

Page 1
Aurora Edit LD
FAST TURN PRODUCTION TOOLS
User Guide
SOFTWARE VERSION 6.3
071-8606-00
SEPTEMBER 2007
Page 2

Copyright
Trademarks
Disclaimer
U.S. Government
Restricted Rights
Legend
Copyright © 2007 Grass Valley, Inc. All rights reserved. Printed in the United States of America.
Portions of software © 2000 – 2007, Microsoft Corporation. All rights reserved.
This document may not be copied in whole or in part, or otherwise reproduced except as
specifically permitted under U.S. copyright law, without the prior written consent of Grass
Valley, Inc., P.O. Box 59900, Nevada City, California 95959-7900
This product may be covered by one or more U.S. and foreign patents.
Grass Valley, K2, Aurora, Turbo, M-Series, Profile, Profile XP, NewsBrowse, NewsEdit,
NewsQ, NewsShare, NewsQ Pro, Aurora, and Media Manager are either registered
trademarks or trademarks of Grass Valley, Inc. in the United States and/or other countries.
Other trademarks used in this document are either registered trademarks or trademarks of the
manufacturers or vendors of the associated products. QuickTime and the QuickTime logo are
trademarks or registered trademarks of Apple Computer, Inc., used under license therefrom.
Grass Valley, Inc. products are covered by U.S. and foreign patents, issued and pending.
Additional information regarding Grass Valley, Inc. trademarks and other proprietary rights may
be found at www.thomsongrassvalley.com.
Product options and specifications subject to change without notice. The information in this
manual is furnished for informational use only, is subject to change without notice, and should
not be construed as a commitment by Grass Valley, Inc. Grass Valley, Inc. assumes no
responsibility or liability for any errors or inaccuracies that may appear in this publication.
Use, duplication, or disclosure by the United States Government is subject to restrictions as set
forth in subparagraph (c)(1)(ii) of the Rights in Technical Data and Computer Software clause
at DFARS 252.277-7013 or in subparagraph c(1) and (2) of the Commercial Computer
Software Restricted Rights clause at FAR 52.227-19, as applicable. Manufacturer is Grass
Valley, Inc., P.O. Box 59900, Nevada City, California 95959-7900 U.S.A.
Revision Status
Rev Date Description
September 14, 2007 Release 071-8606-00 for Software Version 6.3
2
Aurora Edit LD User Guide September 14, 2007
Page 3

Contents
Safety Summaries
Preface
Grass Valley Product Support ................................................................................. 13
.................................................................................................................. 13
.............................................................................................. 7
Chapter 1 Introducing Aurora Edit LD
Logging In ............................................................................................................... 16
Tour of the Aurora Edit LD Window ........................................................................ 16
Find/Bin Tabs ..................................................................................................... 17
Main Toolbar ...................................................................................................... 17
Storyboard ......................................................................................................... 17
Timeline ............................................................................................................. 18
Tools .................................................................................................................. 19
Tour of the Aurora Edit LD Keyboard ..................................................................... 22
Chapter 2 Configuring Aurora Edit LD
Adding Sources ...................................................................................................... 24
Setting Options .......................................................................................................26
Setting General Options ....................................................................................27
Configuring Video Settings ................................................................................ 28
Setting Up Send Locations ................................................................................ 29
Setting Handles .................................................................................................30
Setting Timeline Options .................................................................................... 30
Setting Aurora Playout Options .........................................................................31
Setting ConformManager Properties ......................................................................32
Chapter 3 Managing Media
Organizing Media in Your Bin ................................................................................. 34
Searching for Clips ................................................................................................. 34
Using Search Filters ............................................................................................... 35
Saving Filters .....................................................................................................36
Modifying Active Filters ...................................................................................... 37
Loading a Filter ..................................................................................................37
Deleting Filters ................................................................................................... 38
Using Metadata ......................................................................................................39
Adding General Information ............................................................................... 39
Adding Keywords ............................................................................................... 40
Using Custom Fields .......................................................................................... 41
Viewing Related Information .............................................................................. 41
Modifying Groups ............................................................................................... 42
Chapter 4 Editing in the Timeline
Overview ................................................................................................................. 44
Changing the Timeline View ................................................................................... 45
Creating a New Sequence ...................................................................................... 46
Changing Sequence Properties .............................................................................. 47
Selecting and Deselecting Tracks .......................................................................... 47
Marking In and Out Points ......................................................................................48
Setting Up a Split Edit ............................................................................................. 48
Routing Audio Tracks ............................................................................................. 49
Creating Clips .........................................................................................................49
Playing Your Sequence ..........................................................................................50
September 14, 2007 Aurora Edit LD User Guide
3
Page 4

Contents
Chapter 5 Trimming Clips
Using the Trim Tool ................................................................................................ 52
Changing the End Points Between Clips ................................................................ 52
Using Handles ........................................................................................................ 53
Locking the Duration of a Clip ................................................................................ 53
Playing Past Out ..................................................................................................... 53
Extending Your Edits .............................................................................................. 54
Chapter 6 Fine Tuning
Moving Clips in the Timeline .................................................................................. 56
Moving Audio Clips ............................................................................................ 56
Copying and Pasting Clips ..................................................................................... 57
Selected Items in the Timeline .......................................................................... 57
Selected Area of the Timeline ........................................................................... 57
Changing the Editing Mode .................................................................................... 58
Converting Clip Aspect Ratios................................................................................. 59
Manually Converting a Clip Aspect Ratio ........................................................... 59
Conversion Types .............................................................................................. 60
Using Presets .................................................................................................... 61
Splitting Clips .......................................................................................................... 62
Lifting Clips ............................................................................................................. 63
From the Timeline .............................................................................................. 63
Lifting an Area of the Sequence ........................................................................ 64
Deleting Clips ......................................................................................................... 65
Deleting a Clip from Your Sequence ................................................................. 65
Deleting an Area of the Sequence ..................................................................... 65
Inserting Filler Between Clips ................................................................................. 66
Using Control Track ................................................................................................ 67
Using Match Frame to Bin ...................................................................................... 67
Linking to a News Story .......................................................................................... 68
Chapter 7 Adding Transitions
Using the Transition Tool ....................................................................................... 72
Transition Types ..................................................................................................... 72
Adding Transitions to Your Sequences .................................................................. 73
Creating a Transition ......................................................................................... 73
Changing Transitions ......................................................................................... 74
Deleting Transitions ........................................................................................... 74
Adding Audio Crossfades ....................................................................................... 75
Applying Crossfades to the Audio Tracks Only ................................................. 75
Applying Crossfades Automatically with Transitions ......................................... 75
4
Aurora Edit LD User Guide September 14, 2007
Page 5

Chapter 8 Audio
Using the Audio Mixer Tool ....................................................................................78
Adjusting Audio Levels on the Timeline .................................................................. 78
Viewing Audio Levels on the Timeline ...............................................................78
Changing Audio Levels in a Clip ........................................................................ 79
Removing Fade Control Points .......................................................................... 79
Setting the Pan Control ...................................................................................... 80
Muting Tracks .................................................................................................... 80
Setting Audio Output Levels .............................................................................. 81
Adjusting Audio Gain ..............................................................................................82
Using Audio Automation .........................................................................................83
Showing Audio Automation ................................................................................ 83
Removing Audio Automation ............................................................................. 83
Adding Voiceovers to Your Sequence .................................................................... 84
Required Equipment ..........................................................................................84
Configuring Your System ................................................................................... 84
Recording a Voiceover ......................................................................................85
Chapter 9 Saving and Sending Clips
Saving Clips ............................................................................................................ 88
Sending a Clip to a Destination .............................................................................. 88
Associating a Sequence with a Aurora Playout Placeholder .................................. 89
Using the ConformManager ...................................................................................90
Viewing the Job List ........................................................................................... 90
Viewing EDL History ..........................................................................................90
Archiving Clips ........................................................................................................ 91
Archiving an Asset .............................................................................................91
Archiving Multiple Assets ................................................................................... 92
Restoring an Archived Asset .............................................................................93
Restoring Multiple Archived Assets ................................................................... 95
Deleting Archived Assets ................................................................................... 95
...................................................................................................................... 97
Index
September 14, 2007 Aurora Edit LD User Guide
5
Page 6

Contents
6
Aurora Edit LD User Guide September 14, 2007
Page 7

Safety Summaries
General Safety Summary
Review the following safety precautions to avoid injury and prevent damage
to this product or any products connected to it.
Only qualified personnel should perform service procedures.
While using this product, you may need to access other parts of the system.
Read the General Safety summary in other system manuals for warnings and
cautions related to operating the system.
Injury Precautions
Use Proper Power Cord
To avoid fire hazard, use only the power cord specified for this product.
Ground the Product
This product is grounded through the grounding conductor of the power
cord. To avoid electric shock, the grounding conductor must be connected
to earth ground. Before making connections to the input or output terminals
of the product, ensure that the product is properly grounded.
Do Not Operate Without Covers
To avoid electric shock or fire hazard, do not operate this product with
covers or panels removed.
Do Not operate in Wet/Damp Conditions
To avoid electric shock, do not operate this product in wet or damp
conditions.
Do Not Operate in an Explosive Atmosphere
To avoid injury or fire hazard, do not operate this product in an explosive
atmosphere.
Avoid Exposed Circuitry
To avoid injury, remove jewelry such as rings, watches, and other metallic
objects. Do not touch exposed connections and components when power is
present.
Product Damage Precautions
Use Proper Power Source
Do not operate this product from a power source that applies more than the
voltage specified.
Provide Proper Ventilation
To prevent product overheating, provide proper ventilation.
September 14, 2007 Aurora Edit LD User Guide
7
Page 8
Safety Summaries
Do Not Operate With Suspected Failures
If you suspect there is damage to this product, have it inspected by qualified
service personnel.
Battery Replacement
To avoid damage, replace only with the same or equivalent type
recommended by the circuit board manufacturer. Dispose of used battery
according to the circuit board manufacturer’s instructions.
Safety Terms and Symbols
Terms in This Manual
These terms may appear in this manual:
!
!
Terms on the Product
Symbols on the Product
WARNING: Warning statements identify conditions or practices that can
result in personal injury or loss of life.
CAUTION: Caution statements identify conditions or practices that may
result in damage to equipment or other property, or which may cause
equipment crucial to your business environment to become temporarily
non-operational.
These terms may appear on the product:
DANGER indicates a personal injury hazard immediately accessible as one
reads the marking.
WARNING indicates a personal injury hazard not immediately accessible
as you read the marking.
CAUTION indicates a hazard to property including the product.
The following symbols may appear on the product:
DANGER high voltage
Protective ground (earth) terminal
!
8
Aurora Edit LD User Guide September 14, 2007
ATTENTION – refer to manual
Page 9

Service Safety Summary
!
Do Not Service Alone
Disconnect Power
Use Care When Servicing With Power On
WARNING: The service instructions in this manual are intended for
use by qualified service personnel only. To avoid personal injury, do
not perform any servicing unless you are qualified to do so. Refer to all
safety summaries before performing service.
Do not perform internal service or adjustment of this product unless another
person capable of rendering first aid and resuscitation is present.
To avoid electric shock, disconnect the main power by means of the power
cord or, if provided, the power switch.
Dangerous voltages or currents may exist in this product. Disconnect power
and remove battery (if applicable) before removing protective panels,
soldering, or replacing components.
To avoid electric shock, do not touch exposed connections
Certifications and Compliances
Canadian Certified Power Cords
Canadian approval includes the products and power cords appropriate for
use in the North America power network. All other power cords supplied are
approved for the country of use.
FCC Emission Control
This equipment has been tested and found to comply with the limits for a
Class A digital device, pursuant to Part 15 of the FCC Rules. These limits
are designed to provide reasonable protection against harmful interference
when the equipment is operated in a commercial environment. This
equipment generates, uses, and can radiate radio frequency energy and, if
not installed and used in accordance with the instruction manual, may cause
harmful interference to radio communications. Operation of this equipment
in a residential area is likely to cause harmful interference in which case the
user will be required to correct the interference at his own expense. Changes
or modifications not expressly approved by Grass Valley can affect
emission compliance and could void the user’s authority to operate this
equipment.
Canadian EMC Notice of Compliance
This digital apparatus does not exceed the Class A limits for radio noise
emissions from digital apparatus set out in the Radio Interference
Regulations of the Canadian Department of Communications.
September 14, 2007 Aurora Edit LD User Guide
9
Page 10

Safety Summaries
EN55103 1/2
Class A Warning
FCC Emission Limits
Le présent appareil numérique n’émet pas de bruits radioélectriques
dépassant les limites applicables aux appareils numériques de la classe A
préscrites dans le Règlement sur le brouillage radioélectrique édicté par le
ministère des Communications du Canada.
This product has been evaluated for Electromagnetic Compatibility under
the EN 55103-1/2 standards for Emissions and Immunity and meets the
requirements for E4 environment.
This product complies with Class A (E4 environment). In a domestic
environment this product may cause radio interference in which case the
user may be required to take adequate measures.
This device complies with Part 15 of the FCC Rules. Operation is subject to
the following two conditions: (1) This device may not cause harmful
interference, and (2) this device must accept any interference received,
including interference that may cause undesirable operation.
Laser Compliance
Laser Safety Requirements
The device used in this product is a Class 1 certified laser product. Operating
this product outside specifications or altering its original design may result
in hazardous radiation exposure, and may be considered an act of modifying
or new manufacturing of a laser product under U.S. regulations contained in
21CFR Chapter 1, subchapter J or CENELEC regulations in HD 482 S1.
People performing such an act are required by law to recertify and reidentify
this product in accordance with provisions of 21CFR subchapter J for
distribution within the U.S.A., and in accordance with CENELEC HD 482
S1 for distribution within countries using the IEC 825 standard.
Laser Safety
Laser safety in the United States is regulated by the Center for Devices and
Radiological Health (CDRH). The laser safety regulations are published in
the “Laser Product Performance Standard,” Code of Federal Regulation
(CFR), Title 21, Subchapter J.
The International Electrotechnical Commission (IEC) Standard 825,
“Radiation of Laser Products, Equipment Classification, Requirements and
User’s Guide,” governs laser products outside the United States. Europe and
member nations of the European Free Trade Association fall under the
jurisdiction of the Comité Européen de Normalization Electrotechnique
(CENELEC).
10
Aurora Edit LD User Guide September 14, 2007
Page 11

Safety Certification
This product has been evaluated and meets the following Safety
Certification Standards:
Standard Designed/tested for compliance with:
UL1950 Safety of Information Technology Equipment,
IEC 950 Safety of Information Technology Equipment,
including Electrical Business Equipment (Third
edition).
including Electrical Business Equipment
(Second edition, 1991).
CAN/CSA C22.2,
No. 950-95
EN60950 Safety of Information Technology Equipment,
Safety of Information Technology Equipment,
including Electrical Business Equipment.
including Electrical Business Equipment 1992.
September 14, 2007 Aurora Edit LD User Guide
11
Page 12

Safety Summaries
12
Aurora Edit LD User Guide September 14, 2007
Page 13

Preface
Grass Valley Product Support
To get technical assistance, check on the status of a question, or to report new issue, contact
Grass Valley Product Support via e-mail, the Web, or by phone or fax. Contact Grass Valley
first regarding problems with third party software on Grass Valley products, such as the
Microsoft
®
Windows
internet browser, and SQL Server™.
Web Technical Support
To access support information on the Web, visit the product support Web page on the
Grass Valley Web site. You can download software or find solutions to problems by
searching our Frequently Asked Questions (FAQ) database.
®
operating system, Windows Media
®
player, Internet Explorer
®
World Wide Web:
Technical Support E-mail Address:
Phone Support
Use the following information to contact product support by phone during business
hours. Afterhours phone support is available for warranty and contract customers.
International
(France)
International
(United States,
Canada)
Hong Kong,
Taiwan, Korea,
Macau
Australia, New
Zealand
Central, South
America
China +861 066 0159 450 Netherlands +31 (0) 35 62 38 421
http://www.thomsongrassvalley.com/support/
gvgtechsupport@thomson.net.
+800 80 80 20 20
+33 1 48 25 20 20
+1 800 547 8949
+1 530 478 4148
+852 2531 3058 Indian
+61 1300 721 495 Germany, Austria,
+55 11 5509 3440 Near East, Africa +33 1 48 25 20 20
Italy +39 02 24 13 16 01
+39 06 87 20 35 42
Belarus, Russia,
Tadzikistan,
Ukraine,
Uzbekistan
Subcontinent
Eastern Europe
+7 095 258 09 20
+33 (0) 2 334 90 30
+91 11 515 282 502
+91 11 515 282 504
+49 6150 104 444
Belgium +32 (0) 2 334 90 30 Northern Europe +45 45 96 88 70
Japan +81 3 5484 6868 Singapore +65 6379 1313
Malaysia +603 7805 3884 Spain +41 487 80 02
Middle East +971 4 299 64 40 UK, Ireland, Israel +44 118 923 0499
Authorized Support Representative
A local authorized support representative may be available in your country. To locate
the support representative for your country, visit the product support Web page on the
Grass Valley Web site.
September 14, 2007 Aurora Edit LD User Guide
13
Page 14
Preface
14
Aurora Edit LD User Guide September 14, 2007
Page 15

Chapter
1
Introducing Aurora Edit LD
Aurora Edit LD combines the editing features of Aurora Edit with the flexibility of
Aurora Browse. You use Aurora Edit LD to browse and edit low-resolution versions
of high-resolution video, assemble shots and clips, and create sequences and
storyboards for editorial review.
As video is ingested, a high-resolution (broadcast quality) version is stored on a
Media Server. At the same time, Aurora Browse processes the high-resolution feed
and creates a low-resolution version that it stores locally on a Network Attached
Storage (NAS) unit. Aurora Browse then creates video thumbnails to index the video
by scene.
After using Aurora Edit LD to create a sequence from the low-resolution media, you
can send completed sequences to a Media Server for playout or for additional editing
using Aurora Edit. You can also archive and restore high-resolution media.
This manual shows you how to use Aurora Edit LD effectively and efficiently to
produce quality on-air news and sports stories.
This chapter discusses the following topics:
• Logging In
• Tour of the Aurora Edit LD Window
• Tour of the Aurora Edit LD Keyboard
September 14, 2007 Aurora Edit LD User Guide
15
Page 16

Chapter 1 Introducing Aurora Edit LD
Logging In
Unless your system administrator has configured an automatic login, you must
manually log in to Aurora Edit LD.
To log in to Aurora Edit LD:
1. Double-click the Aurora Edit LD application icon on your desktop or go to
Start | Programs | Aurora Edit LD
.
2. If a login screen appears, enter your login information, and click
Tour of the Aurora Edit LD Window
The Aurora Edit LD window consists of a mail toolbar, Find/Bin tabs to hold and
organize files, a record/playback monitor, an audio mixer, an editing Timeline, and a
dynamic window that changes depending on the tool used.
Main
Toolbar
Record/Playback
Viewing Monitor
Dynamic
Window
OK
.
Audio
Mixer
16
Find/Bin tabs
Editing
Timeline
Storyboard
If you are using Aurora Playout with Aurora Edit LD, you see the Category pull-down
list and the number of missing stories for Aurora Playout in your Aurora Edit LD
window.
Aurora Edit LD User Guide September 14, 2007
Page 17
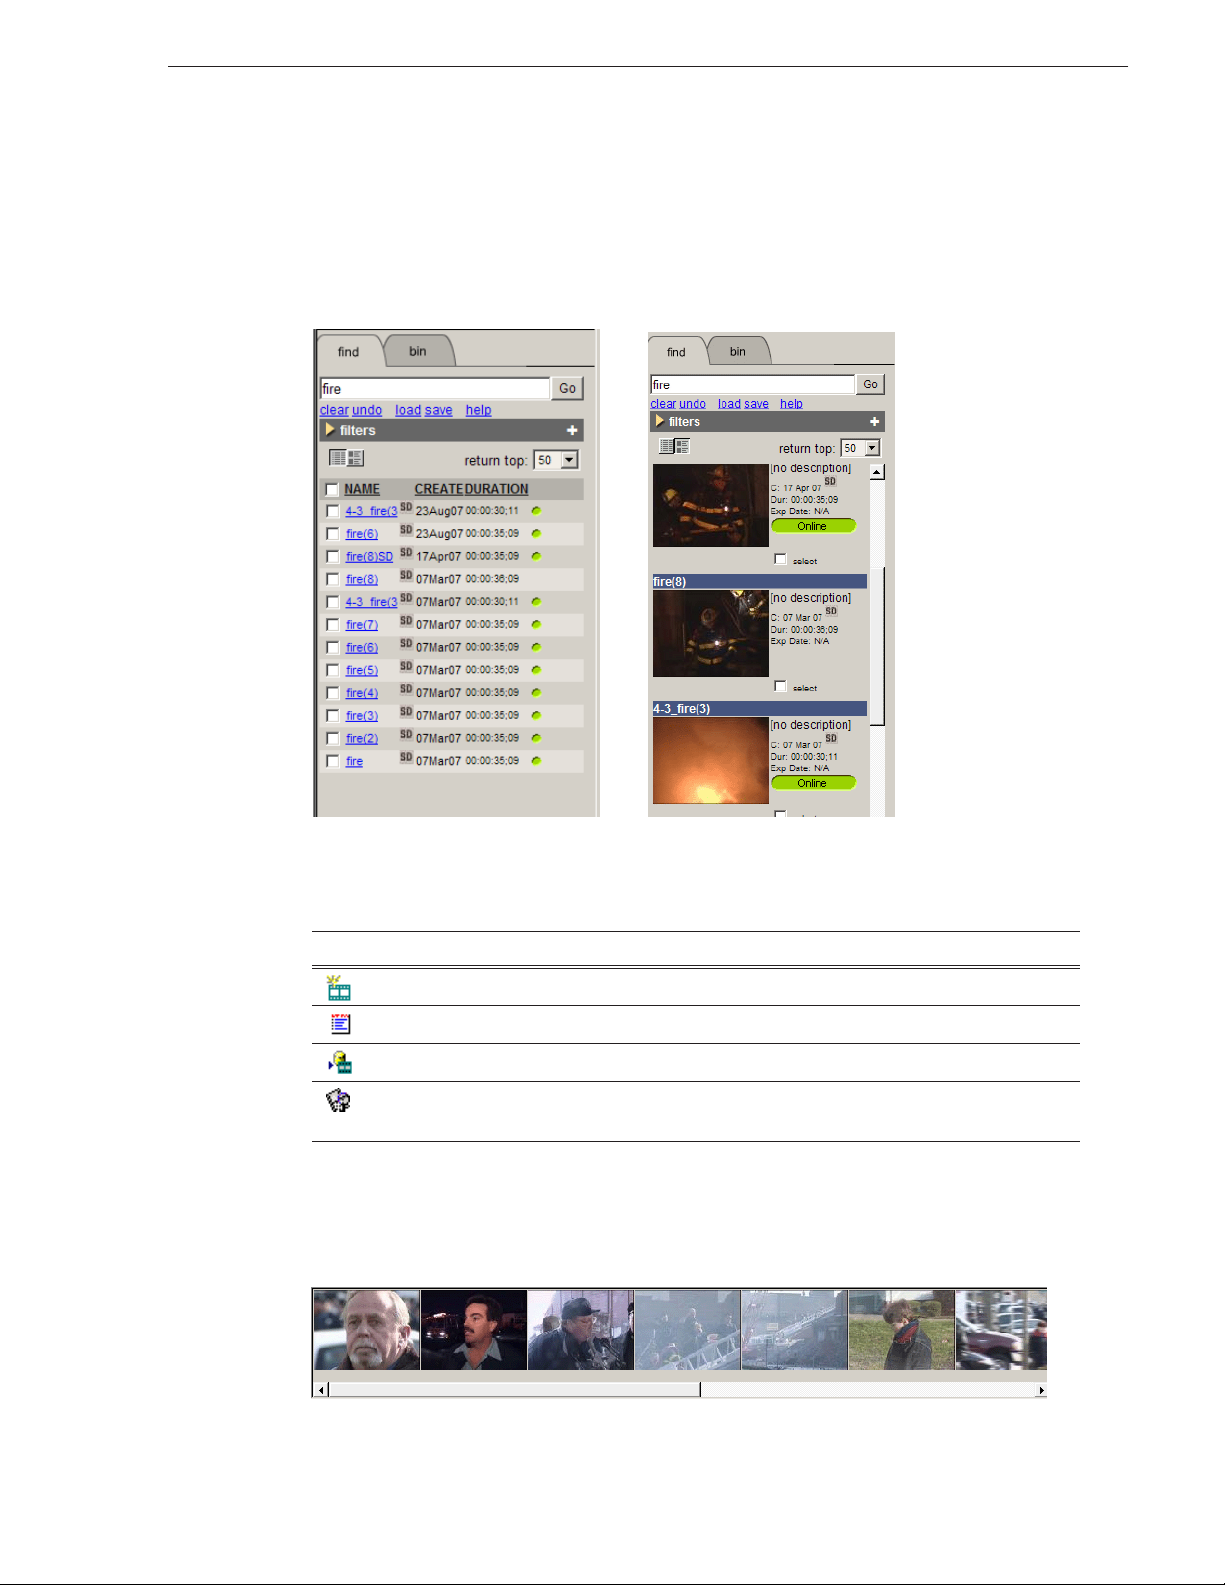
Find/Bin Tabs
The find tab contains all of the assets in the database. You can use searches and filters
to display the assets you need. The bin tab allows you to display only those assets you
select.
You can view the assets in List view or Thumbnail view.
Find/Bin Tabs
Main Toolbar
The Main Toolbar lets you access common Aurora Edit LD functions:
Icon Name Function
Storyboard
A storyboard displays video thumbnails of scene changes in the footage, providing an
easy visual way to see what the footage includes. To view the footage at a specific
spot, click the storyboard image.
New Sequence Creates a new, empty sequence on the Timeline.
Story View Displays the script for the selected sequence, if there is one.
Send to File Sends a sequence to another destination.
Launch ConformManager Opens an application where you can view the status of exported
EDLs.
September 14, 2007 Aurora Edit LD User Guide
17
Page 18
Chapter 1 Introducing Aurora Edit LD
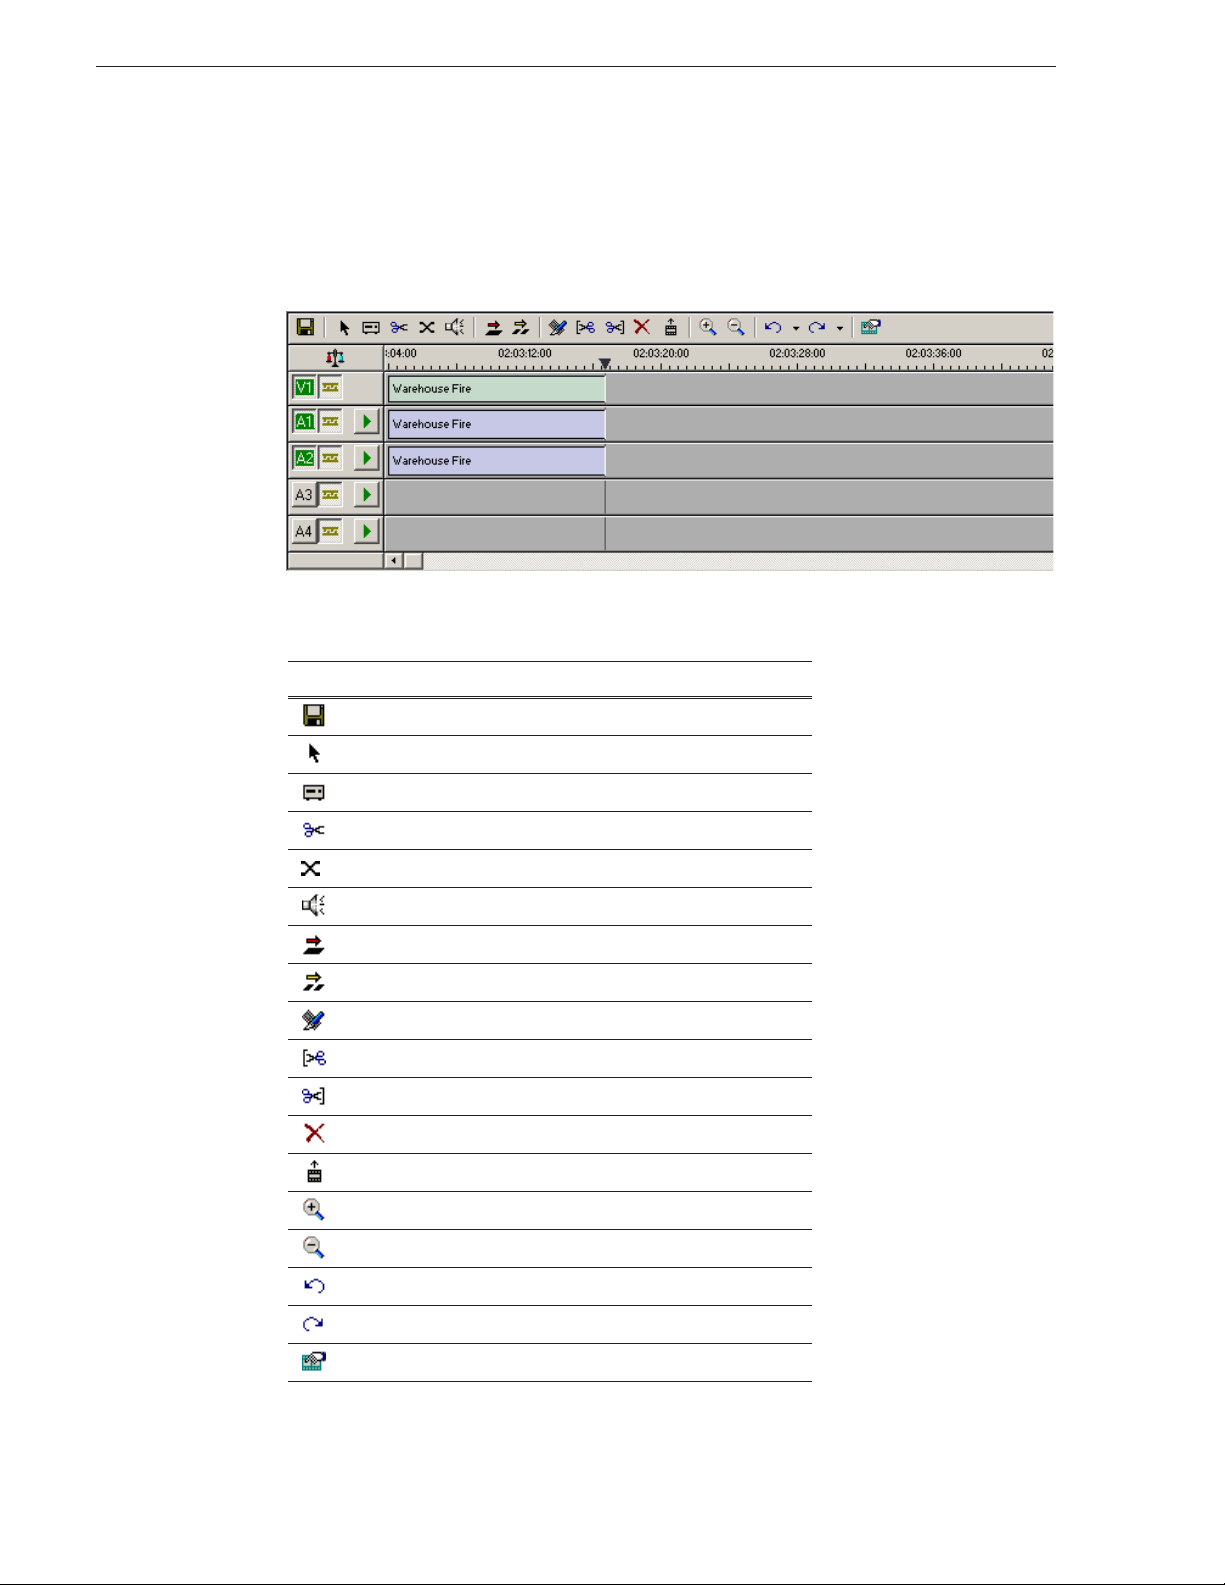
Timeline
The Timeline is an all-purpose editing window that replaces a record deck in the
editing process. The Timeline provides a graphic representation of your sequence in
a single window, displaying its tracks, the name of each clip, and the current frame’s
location.
The Timeline Toolbar provides access to each of the Aurora Edit LD tools and lets
you select your editing mode:
Icon Function
Saves your sequence in the Bin.
Selects the Timeline Tool.
Selects the Source Tool.
Selects the Trim Tool.
Selects the Transition Tool.
Selects the Audio Mixer Tool.
Selects Overwrite Edit Mode.
Selects Splice Edit Mode.
Splits a clip at the cursor point.
Trims the top of the selected clip on the Timeline.
Trims the tail of the selected clip on the Timeline.
Deletes selected clips.
Lifts selected clips off the Timeline.
18
Zooms in the view in the Timeline.
Zooms out the view in the Timeline.
Undo.
Redo.
Opens the Sequence Properties window.
Aurora Edit LD User Guide September 14, 2007
Page 19
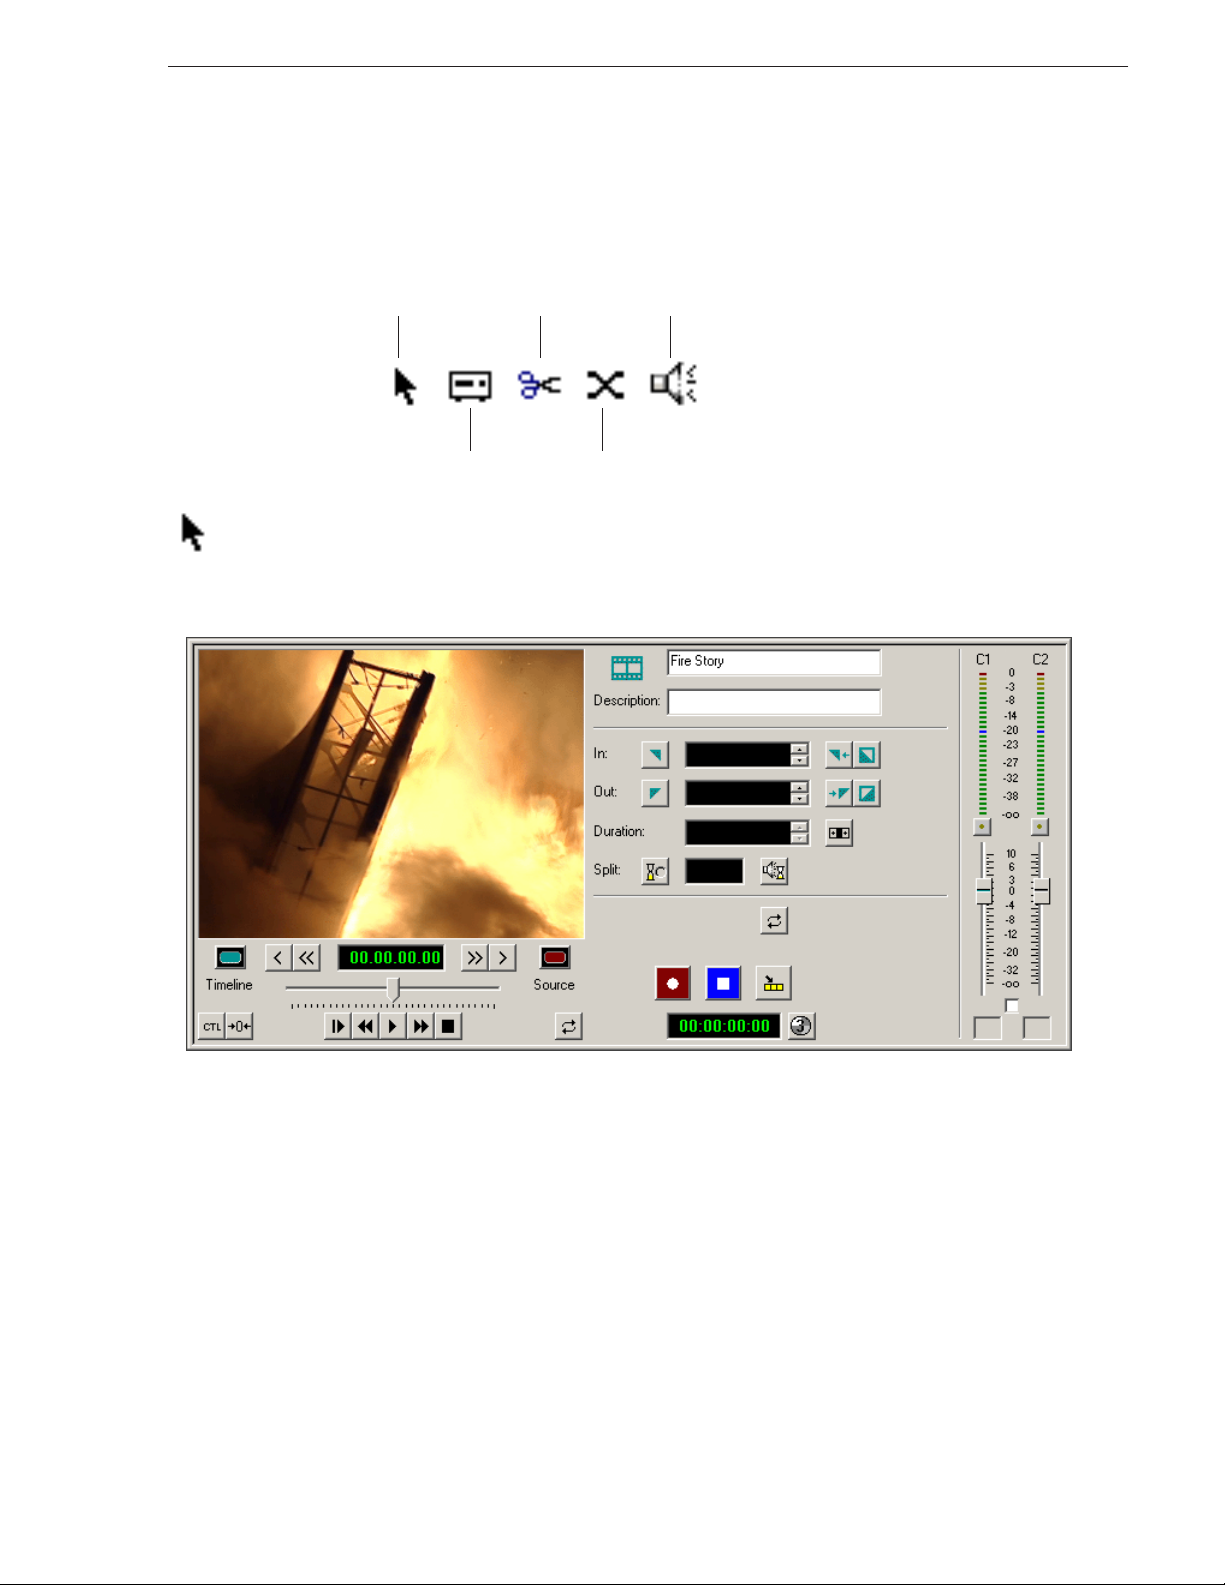
Tools
Tools
Each of the five Aurora Edit LD tools displays in the dynamic window, leaving the
Timeline unchanged. You select the tools from the Timeline toolbar.
Timeline Tool
Source Tool
Trim Tool
Audio Mixer Tool
Transition Tool
The Timeline Tool
The Timeline Tool opens by default when you first create a new timeline. You can
select and move clips or audio tracks, play sequences, mark in and out points, and
adjust master output audio sliders.
September 14, 2007 Aurora Edit LD User Guide 19
Page 20
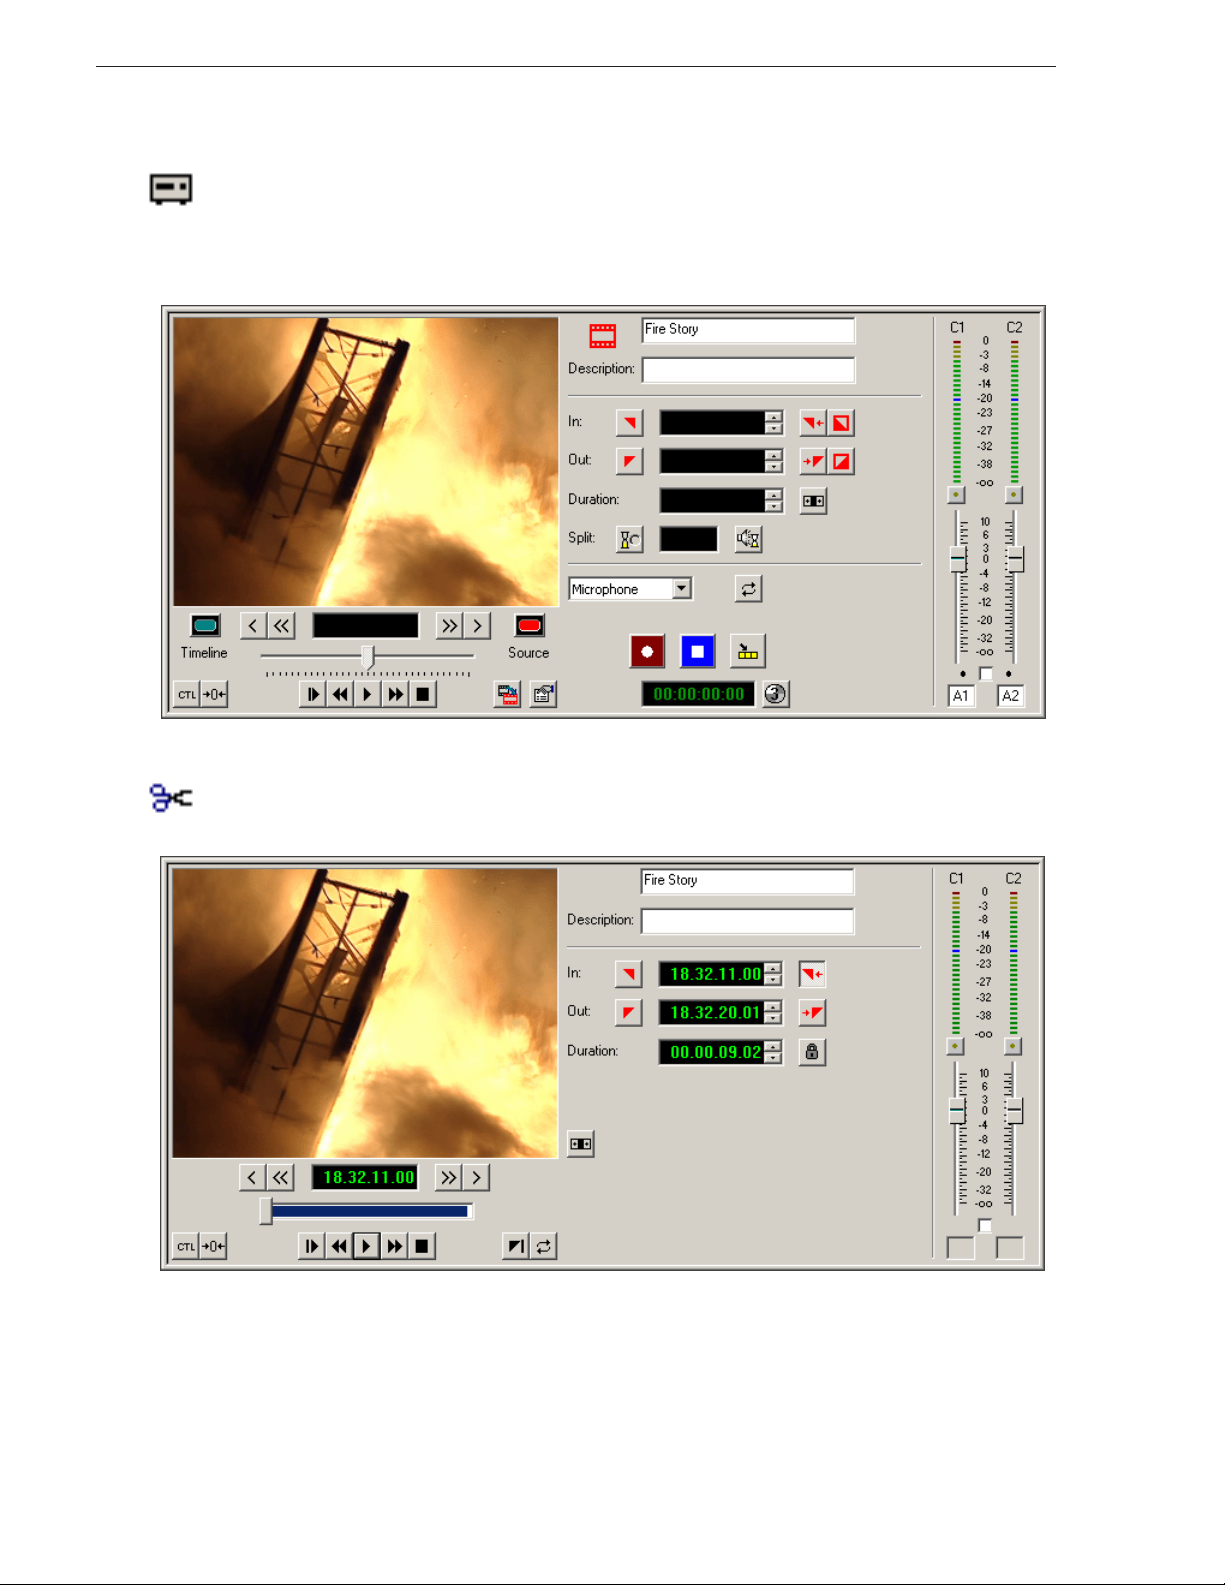
Chapter 1 Introducing Aurora Edit LD
The Source Tool
The Source Tool switches transport control to the source clip to allow you to navigate
through the clip and mark In and Out points. You can also add metadata information
to make searching for specific media easier, and adjust the aspect ratio of your clip, if
needed.
The Trim Tool
The Trim Tool changes the head or tail of a clip to change its duration.
20 Aurora Edit LD User Guide September 14, 2007
Page 21
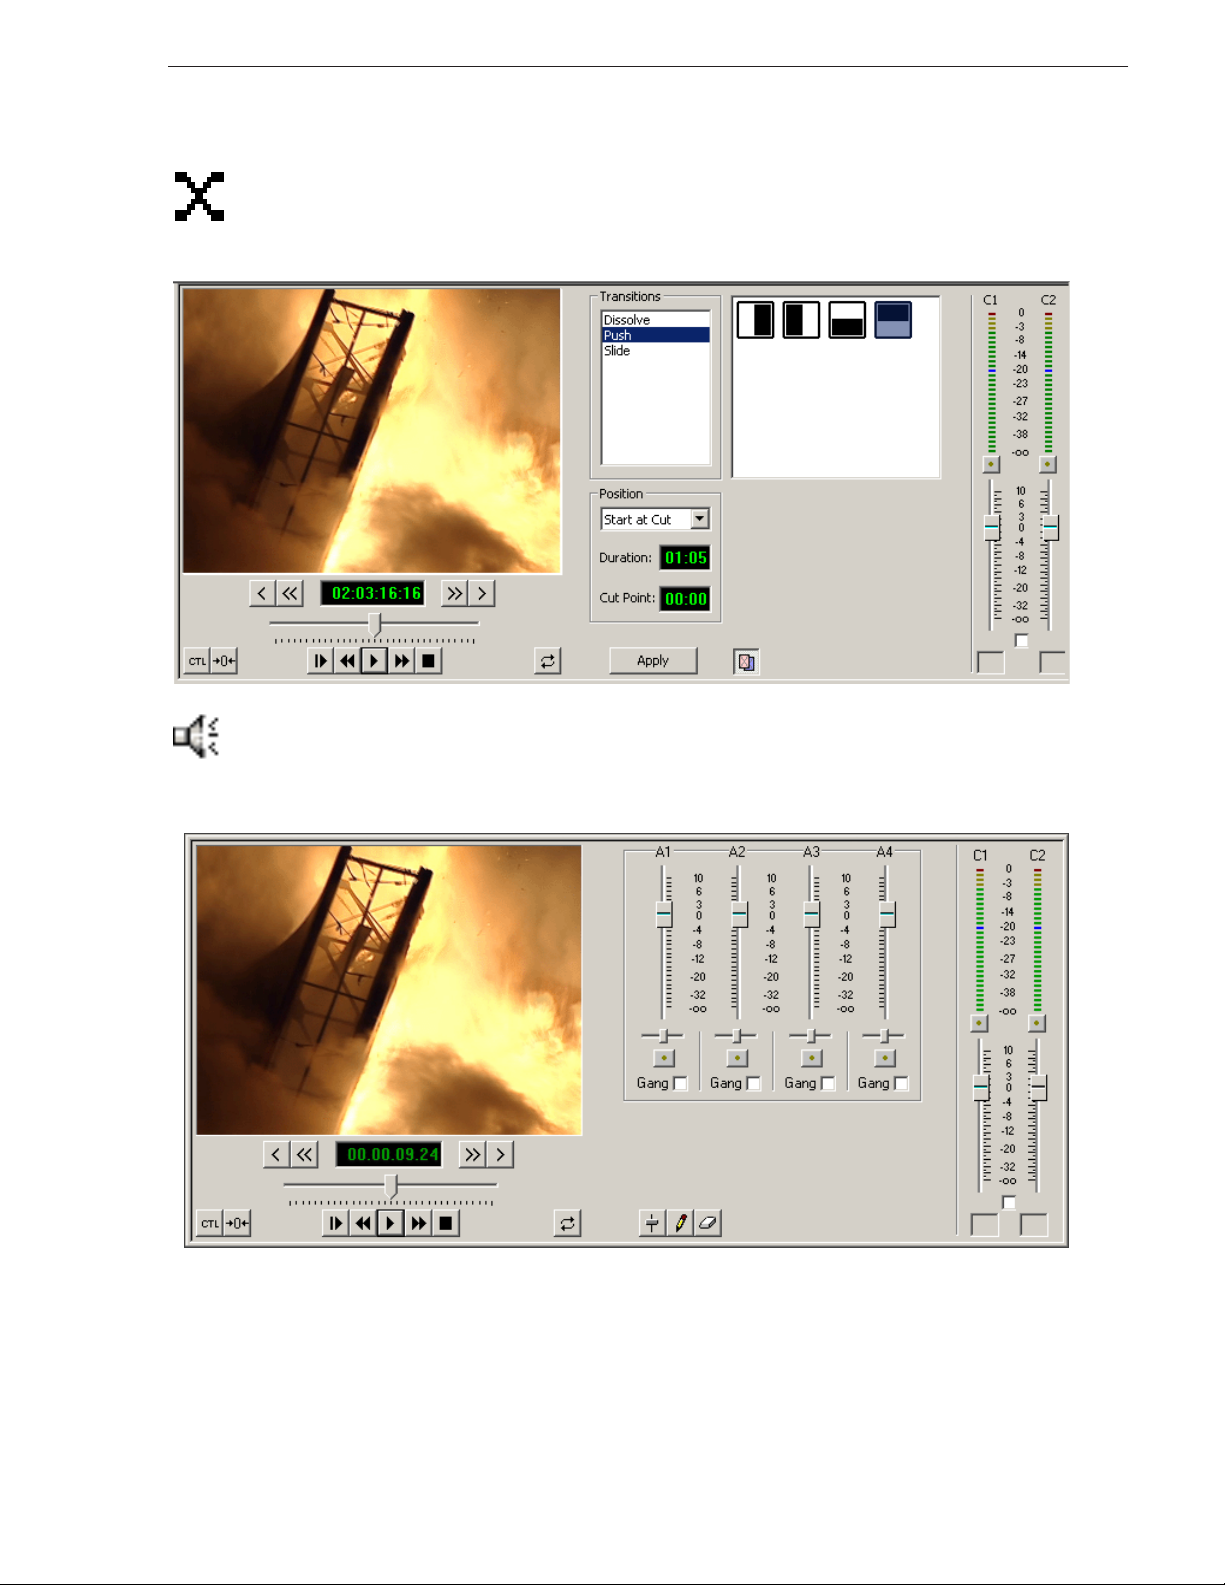
The Transition Tool
The Transition Tool creates transition effects between clips in a sequence. You can
create dissolves, pushes, or slides between any two edits by selecting the transition
you want and clicking at the point you want the effect to appear.
Tools
The Audio Mixer Tool
The Audio Mixer Tool adjusts the audio settings in a sequence, including the level,
the pan, and output channel routing; you can raise or lower the audio on each audio
track.
September 14, 2007 Aurora Edit LD User Guide 21
Page 22
Chapter 1 Introducing Aurora Edit LD
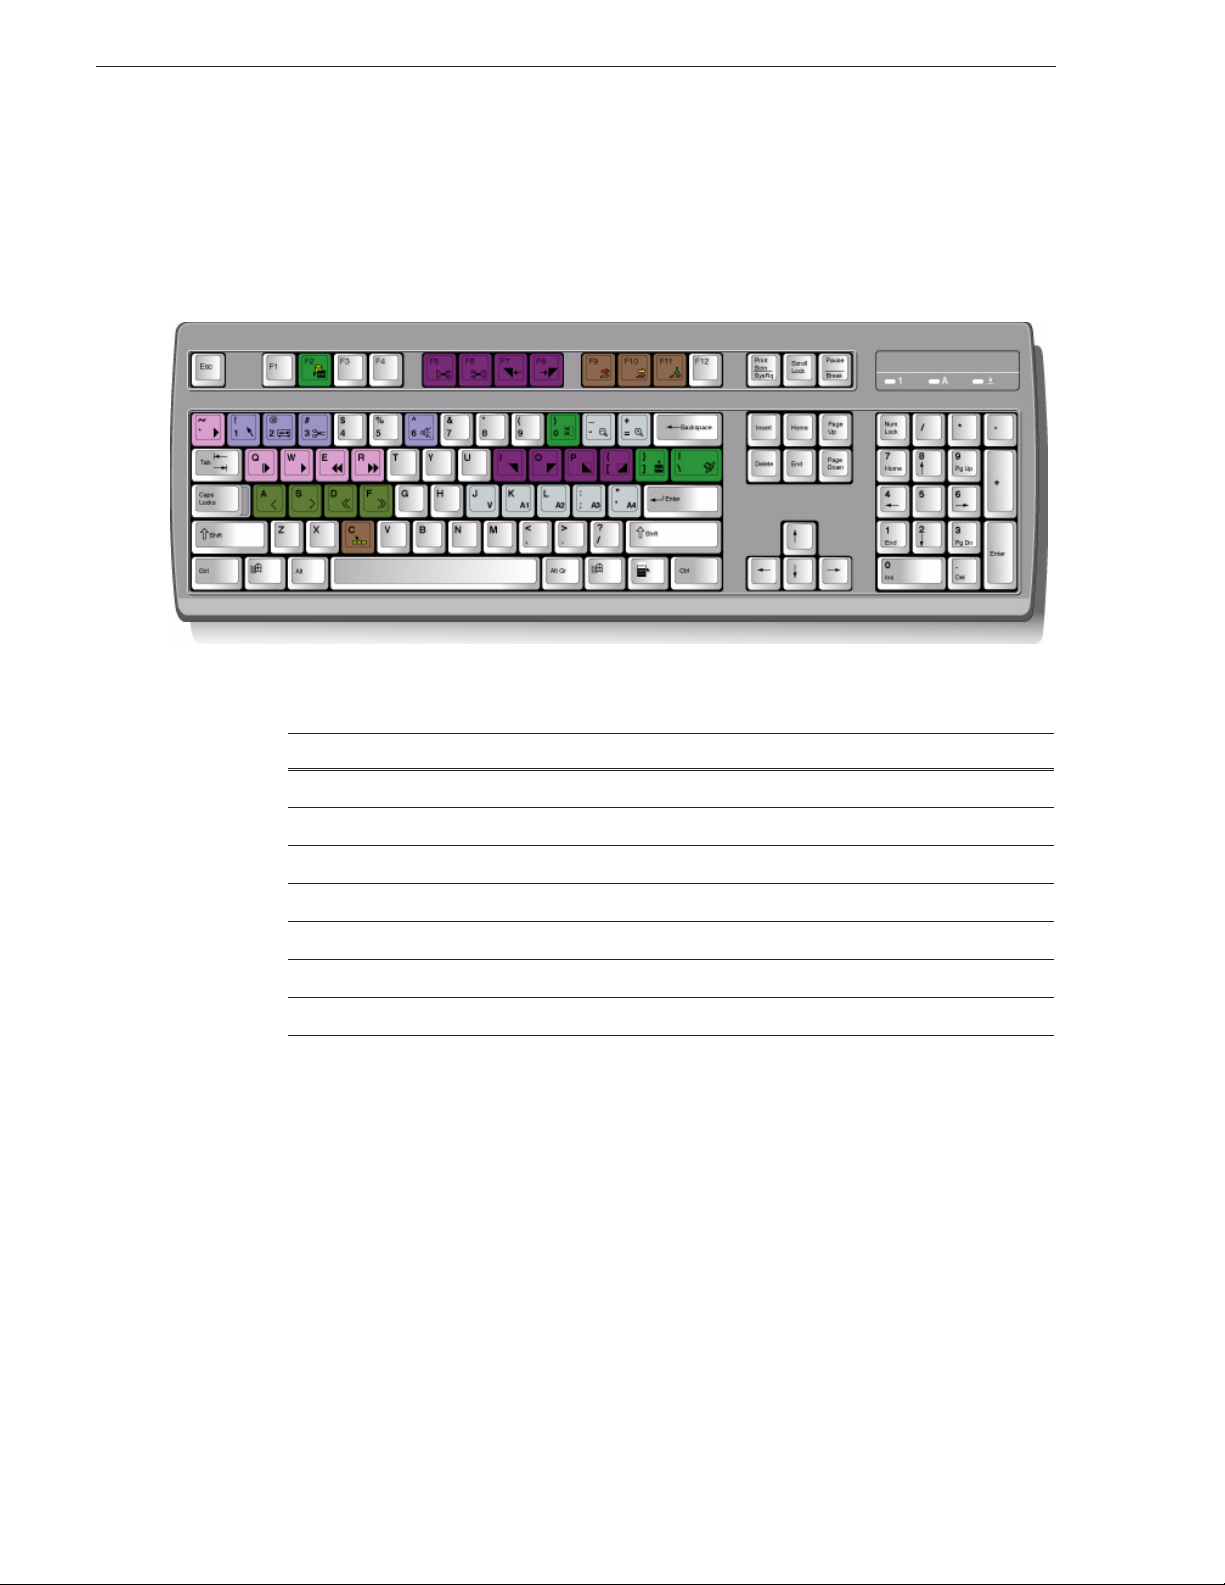
Tour of the Aurora Edit LD Keyboard
With Aurora Edit LD, you use a regular keyboard that you use with your PC. Another
Grass Valley product, Aurora Edit, uses a color-coded keyboard to allow faster
editing than using a mouse allows. Some of these color-coded key functions are
available in Aurora Edit LD.
While you can access Aurora Edit LD functions with the mouse, you may want to use
the keyboard for faster editing. The keyboard is divided into these areas:
Group of Colored Keys Description
Dark purple Set and control Mark In and Out Points.
Light purple Act as deck controls for playing sequences.
Blue Activate corresponding Aurora Edit LD tools.
Light Blue Zoom the view in the Timeline and select clip tracks.
Brown Select different edit modes and copy marked footage to the Timeline.
Avocado Green Control movement within a clip.
Bright green Send open sequence to a destination, perform fine tuning editing functions.
22 Aurora Edit LD User Guide September 14, 2007
Page 23

Chapter 2
Configuring Aurora Edit LD
Aurora Edit LD has many options that let you define how your system is set up. While
your Aurora Edit LD system was pre-configured at the factory, you may want to
adjust some options based on how you use Aurora Edit LD.
This chapter discusses the following topics:
• Adding Sources
• Setting Options
• Setting ConformManager Properties
September 14, 2007 Aurora Edit LD User Guide 23
Page 24
Chapter 2 Configuring Aurora Edit LD
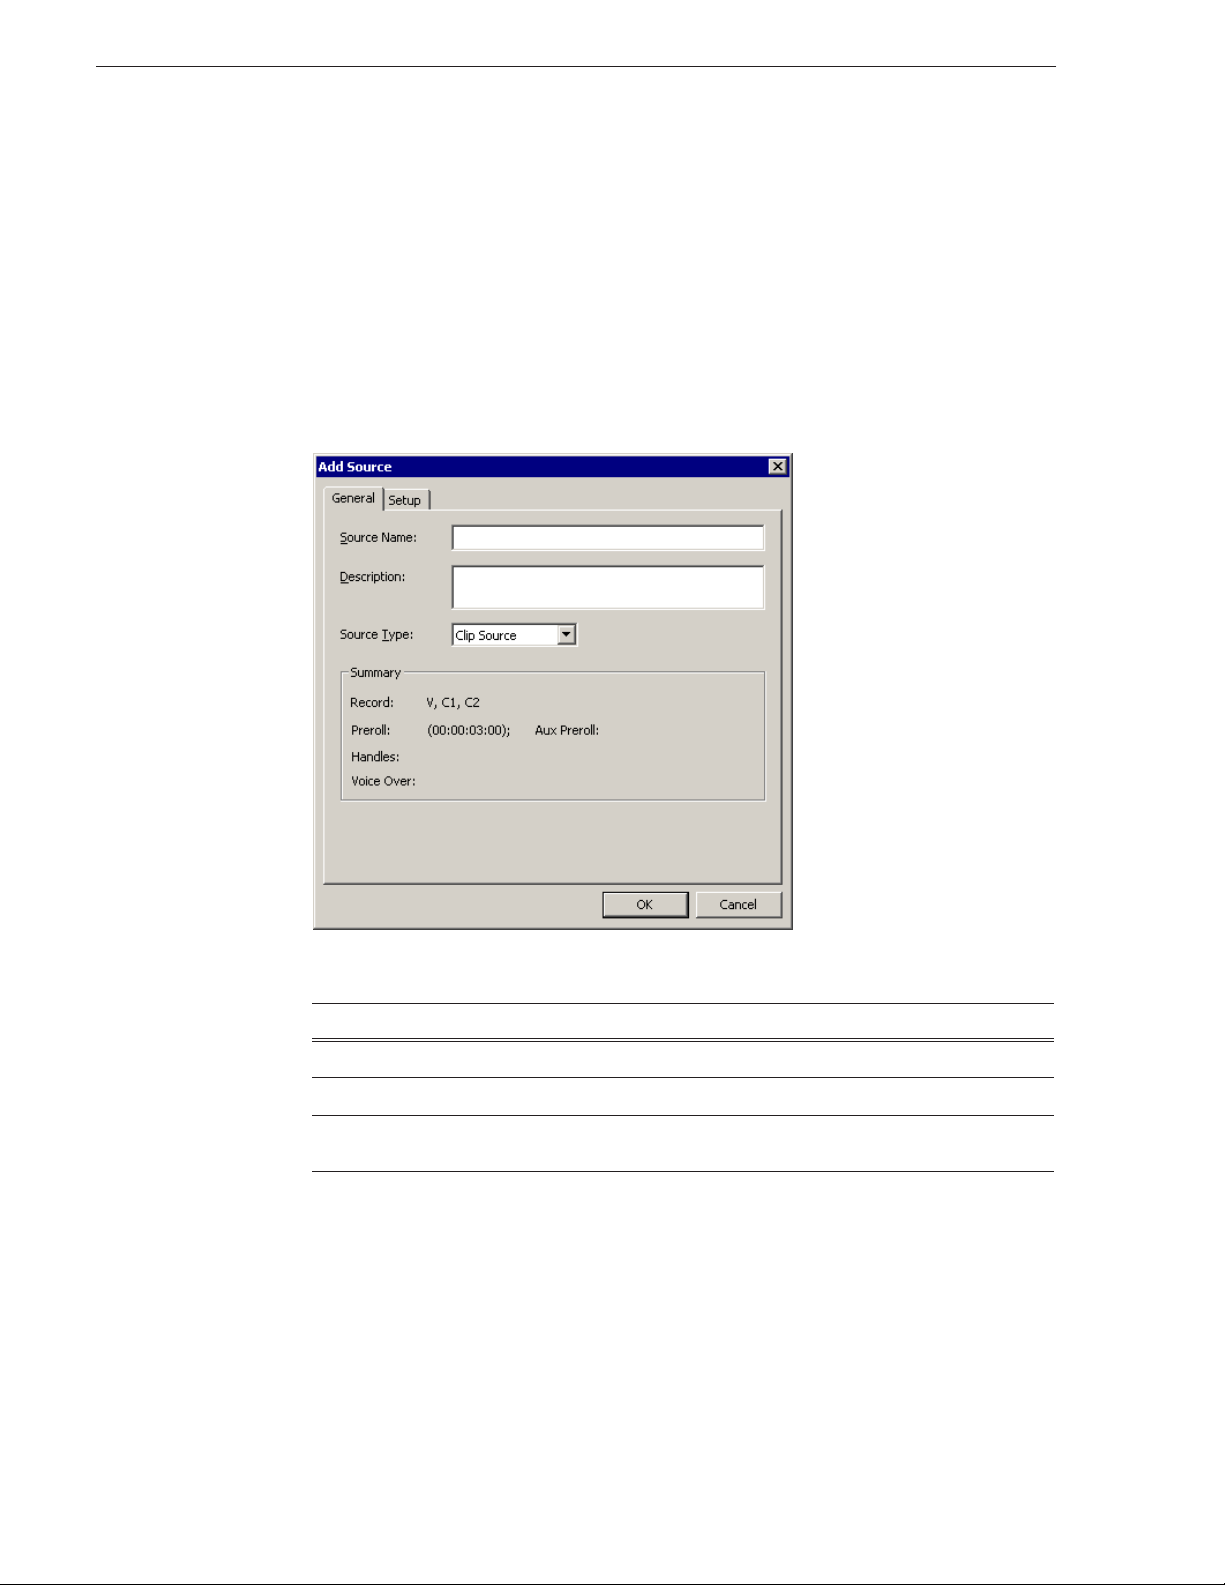
Adding Sources
Before using footage from a particular source, you need to add the source to the
Aurora Edit LD source list. Aurora Edit LD comes with one pre-configured clip
source, which allows you to edit a clip as a Timeline source directly in the Bin.
To add another source:
1. From the main menu bar, choose
View | Sources.
The Sources window appears, listing the currently configured sources.
2. Click
Add; the Add Source window appears.
3. On the General tab, provide the following information:
Setting Option Description
Source Name Enter a name for the source, such as Microphone.
Description Enter a description of the source, if desired.
Source Type Clip Source
Microphone
24 Aurora Edit LD User Guide September 14, 2007
Select which type of source you are configuring.
Page 25
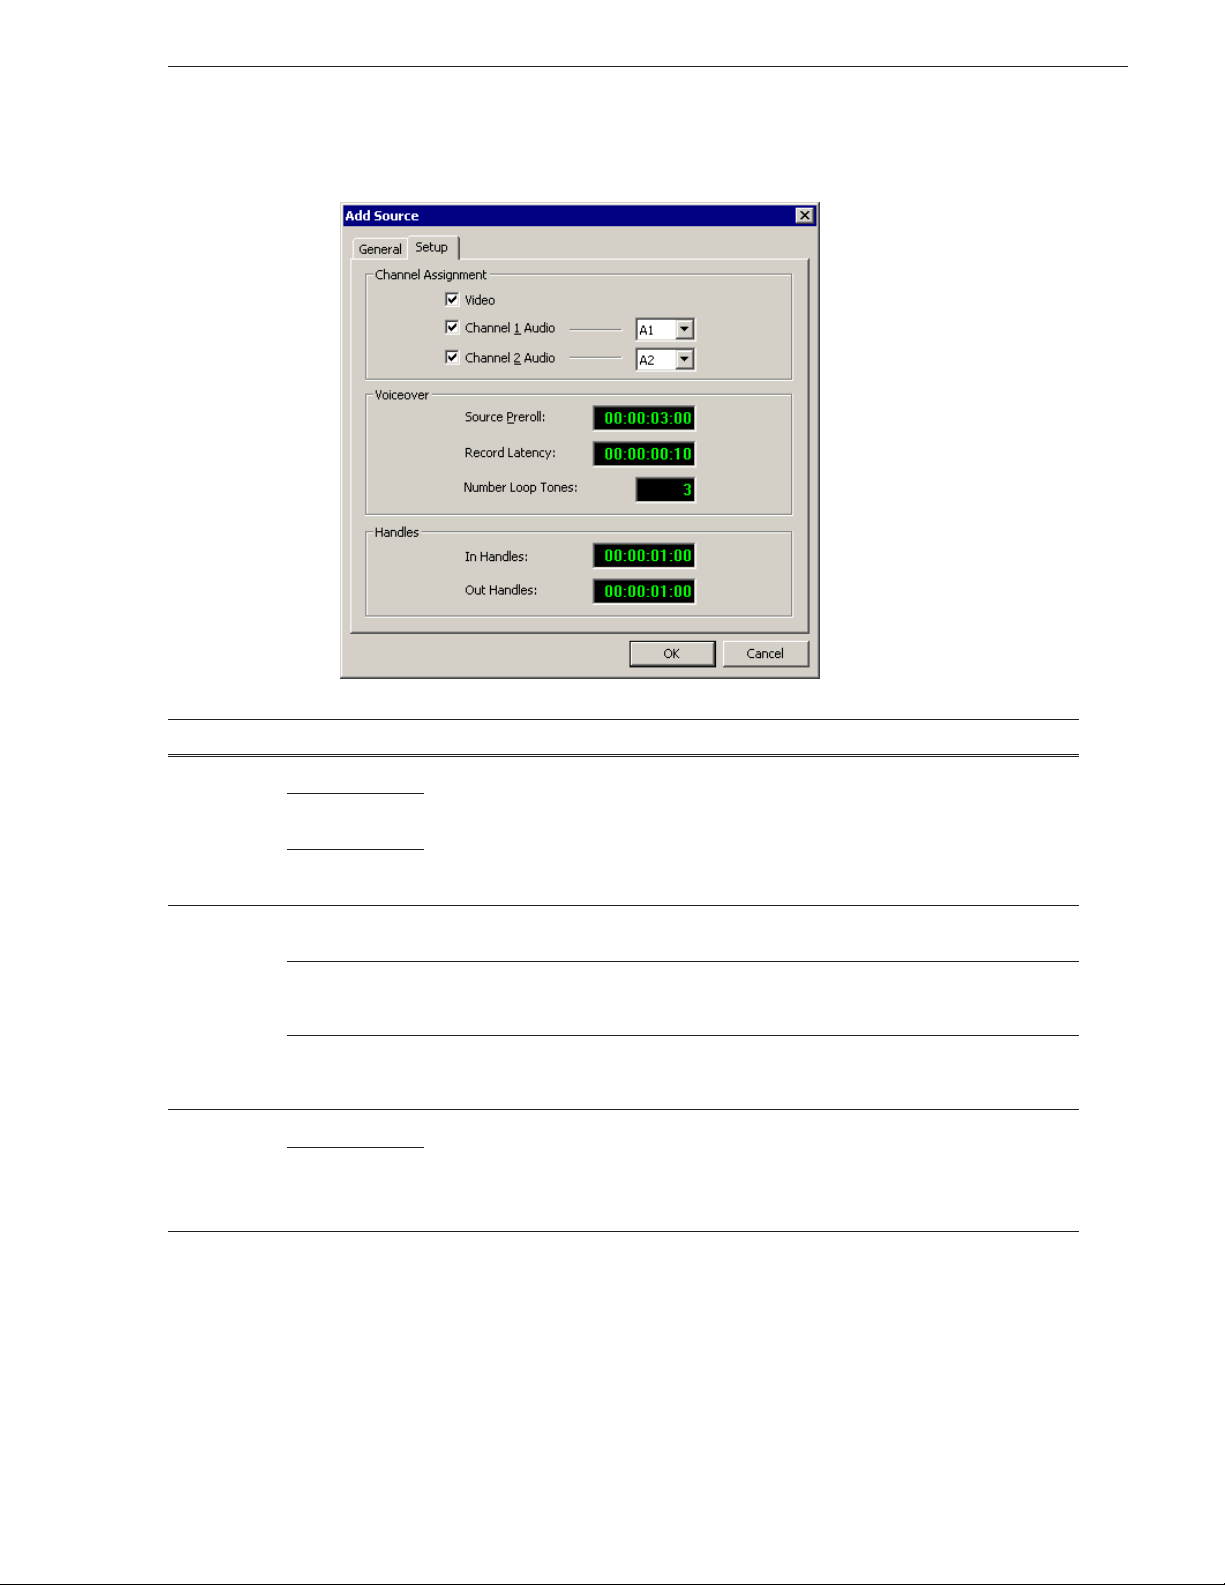
4. Click the Setup tab and provide the following information:
Adding Sources
Setting Options Description
Channel
Assignment
Voiceover Source Preroll Enter the number of seconds of preroll to use when recording from this source.
Handles In Handles Enter the number of seconds for the In and Out Handle length.
Video Check to select which tracks to include for this source. For audio channels, use the
Channel 1
Audio
Channel 2
Audio
Record Latency Enter the amount of time you want the system to wait before starting recording. This
Number Loop
Tones
Out Handles
drop-down list to assign a track. When configuring a microphone source, the video
channel is not available.
Three seconds is the default value.
latency accounts for the difference in pre-amplifiers and can make sure you don’t lose
any audio at the beginning of your record. Ten frames is the default value.
Enter the number of tones to sound to indicate how much time before a retake
automatically starts again at the mark in point. Each tone is 1 second in length. Three
tones is the default value.
Handles provide the extra frames necessary to trim or add transition effects at the head
or tail of a clip. When you Mark In and Mark Out, Aurora Edit LD starts recording the
specified number of seconds before you Mark In and after your Mark Out point. Only
the material between your marks is copied to the Timeline.
September 14, 2007 Aurora Edit LD User Guide 25
Page 26
Chapter 2 Configuring Aurora Edit LD
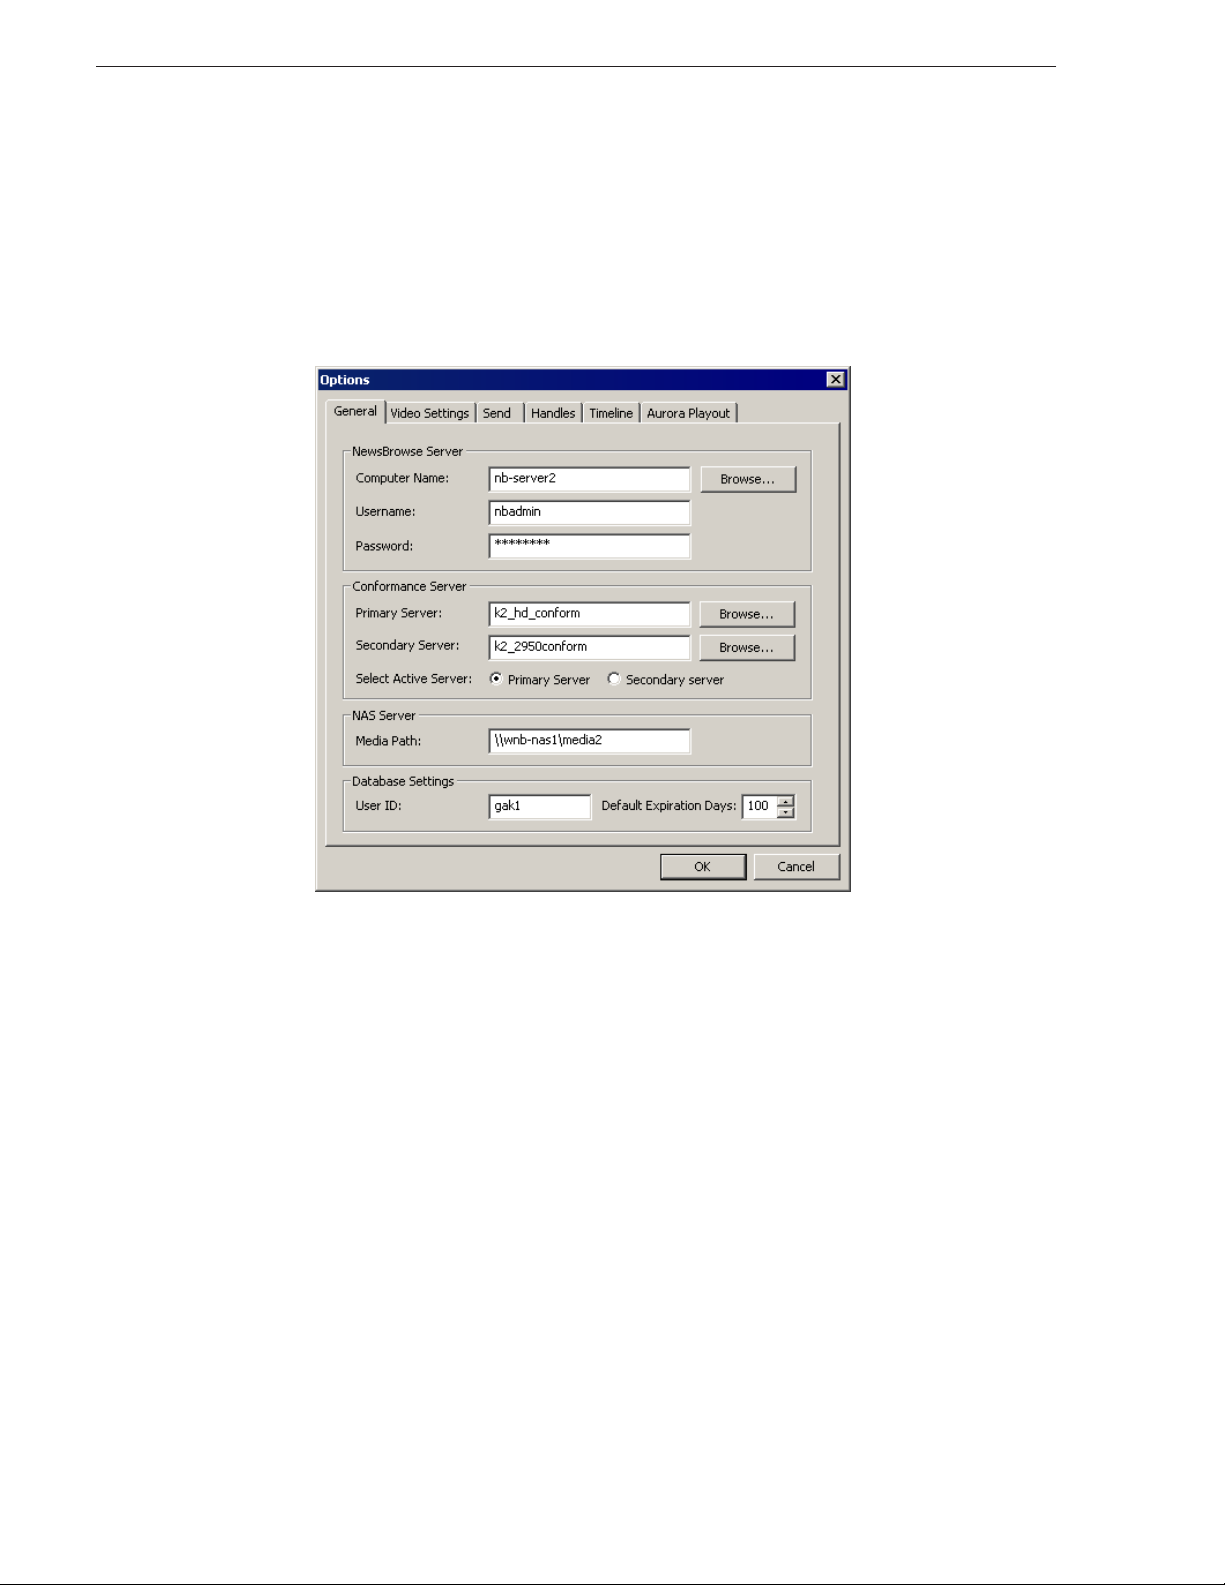
Setting Options
You can configure Aurora Edit LD options for your equipment and workflow.
To adjust Aurora Edit LD options:
1. Select
Tools | Options from the Aurora Edit LD menu bar.
The Options window appears:
2. Go through each tab to set options.
The following sections describe each tab in the Options window.
3. Click
OK when you are done adjusting options.
26 Aurora Edit LD User Guide September 14, 2007
Page 27

Setting General Options
Setting Description
Setting General Options
NewsBrowse
Server
Conformance
Server
NAS Server Media Path Enter the location where the low-resolution media is stored.
Database
Settings
Computer
Name
Username Username and Password required to log in to the MediaFrame server; usually an
Password
Primary
Server
Secondary
Server
Select Active
Server
User ID Appends this ID to the beginning of each new timeline. Provides a unique
Default
Expiration
Days
Name of the NewsBrowse server.
administrator account.
Name of the XRE server used with Aurora Edit LD.
Name of the backup XRE server.
Choose to use the Primary or Secondary Server as the active server for Aurora Edit
LD.
identification for sequences created on each Aurora Edit LD client.
Enter the number of days before clips are removed from the database.
September 14, 2007 Aurora Edit LD User Guide 27
Page 28

Chapter 2 Configuring Aurora Edit LD
Configuring Video Settings
Setting Description
Reference
Standard
Video Format
Compression
Type
Bit Rate
Chroma
Format
Video Aspect
NTSC
(59.94 Hz)
PAL
(50.00 Hz)
480i (SD)
576i (SD)
720p
(1280x720)
1080i
(1920x1080)
MPEG2
IMX30
IMX40
IMX50
DV25
DV50
4-100 Mbits
4:1:1
4:2:0
4:2:2
4:3
16:9
Select the Reference Standard you are using.
NTSC (default setting) has a frame rate of 29.97 frames/second and is used
primarily in the Americas and Japan. PAL has a frame rate of 25 frames/second
and is used in Europe, most of Asia, and Australia.
Select 480i Video Format for an interlaced (i) standard definition(SD) television
format (default setting) for NTSC; select 576i for PAL.
Select 720p for a progressive (p), high definition (HD) television format.
Select 1080i for an interlaced, high definition television format.
Select a compression type.
MPEG2 is the default compression type. The DV50 and IMX formats are optional
and may not be available on all systems.
Enter the Bit Rate specified by your system administrator.
The 4:1:1 Chroma Format is selected if you use DV25 compression.
Select the 4:2:0 or 4:2:2 Chroma Format if you use MPEG2 compression.
Select the 4:2:2 Chroma Format if you use DV50 or MPEG2 compression—4:2:2
offers more color resolution than 4:2:0 with MPEG2; this is the default setting.
Select 4:3 Video Aspect for a standard definition (SD) television format; default
setting.
Select 16:9 Video Aspect for a high definition(HD) television format.
Video
Resolution
720 x 512
720 x 480
720 x 576
720 x 608
1280 x 720
1920 x 1080
Select for NTSC systems using MPEG2 compression.
Select for NTSC systems using DV25, DV50, or MPEG2 compression; default
setting.
Select for PAL systems using DV25, DV50, or MPEG2 compression.
Select for PAL systems using MPEG2 compression.
Automatically selected when you select the 720p Video Format.
Automatically selected when you select the 1080i Video Format.
28 Aurora Edit LD User Guide September 14, 2007
Page 29

Setting Up Send Locations
After completing a sequence you can send it to a Profile Server for subsequent
high-resolution editing and playout. To send completed sequences, you first need to
configure Aurora Edit LD with each of your send locations.
To set up a send location:
Setting Up Send Locations
1. On the Send tab, click
Add.
The Add Named Destination to Send List window appears.
2. Enter the name of the send location.
3. Select the type of location from the drop-down list:
Send Type Description
Profile
NewsShare
NewsFTP
Select Profile when the send location is a Profile Media Server, a K2 Server, or
an M-Series Server.
Select NewsShare when the send location is a Network Attached Server (NAS).
Select NewsFTP when to send the completed sequence as a GXF stream which
can be used for a generic FTP site.
4. Configure the send location based on the location type:
Send Type Option Description
Profile Use Video ID
Send to
Check Use Video ID if you will be linking to stories on
a Newsroom Computer System (NRCS) that contain
Video IDs. When you send an Aurora Edit sequence to
this location, the system uses the Video ID for the name
of the file that gets sent.
Type in drive letter and destination folder; e.g., V: \
default.
Host Name
User Name
Password
Aurora Playout
Destination
NewsShare Use Video ID
Send to
Type in the host name of the destination server; e.g.,
Profile 1.
Automatically fills in as movie; leave as is.
Leave this field blank.
Check Aurora Playout Destination if this send location
is an Aurora Playout server.
Check Use Video ID if you will be linking to stories on
a Newsroom Computer System (NRCS) that contain
Video IDs. When you send an Aurora Edit sequence to
this location, the system uses the Video ID for the name
of the file that gets sent.
Type in drive letter and destination folder; e.g., V: \
default.
September 14, 2007 Aurora Edit LD User Guide 29
Page 30

Chapter 2 Configuring Aurora Edit LD
Send Type Option Description
NewsFTP Use Video ID
5. Click OK.
Setting Handles
The Trimmer handle type sets a handle duration that will be used when you are
trimming a clip with the Trim Tool and trim the set duration from either side of your
clip; 10 seconds is the default duration.
Send to
Host Name
User Name
Password
Aurora Playout
Destination
Check Use Video ID if you will be linking to stories on
a Newsroom Computer System (NRCS) that contain
Video IDs. When you send an Aurora Edit sequence to
this location, the system uses the Video ID for the name
of the file that gets sent.
Type in drive letter and destination folder; e.g., V: \
default.
Type in the host name of the destination server; e.g.,
Profile 1.
Automatically fills in as vmfmovie; leave as is.
Leave this field blank.
Check Aurora Playout Destination if this send location
is an Aurora Playout server.
To change handle durations, select the handle type from the drop-down menu and
enter the new duration in the In or Out fields.
Setting Timeline Options
Setting Options Description
Review Edit
Duration
Start Time Enter a default start time for each new sequence you create. You can override
Undo/
Redo
Limit
1 - 1024 Enter the number of undo levels you want Aurora Edit LD to track. 32 is the
Enter the amount of preroll to play on a clip prior to playing the edit you’re
reviewing.
The default Edit Duration is 3 seconds.
this setting when you create a new sequence, if desired.
default number of undo levels.
NOTE: Increasing the number of undo levels increases system memory
usage.
30 Aurora Edit LD User Guide September 14, 2007
Page 31

Setting Aurora Playout Options
Setting Description
Setting Aurora Playout Options
Primary
Database
Backup
Database
Thumbnails Server Enter the server name where Aurora Playout stores video clip thumbnails.
Categories Lists the currently configured Aurora Playout categories.
Background Row Colors Displays the Background and Text Rows in different colors to alert other editors that this
Text Row Colors
Server Enter the server name where the primary Aurora Playout database resides.
Ports Enter the port numbers used to access the primary Aurora Playout database.
Server Enter the server name where the secondary Aurora Playout database resides.
Ports Enter the port numbers used to access the secondary Aurora Playout database.
Path Enter the path to the thumbnail directory.
If you are using Aurora Playout version 1.5 or later, you don’t need to add categories
here. Categories are set in the SDB Server options and propagated to Aurora Edit LD.
To add a category:
Click
Add, enter a category name, and click OK.
sequence is being edited.
September 14, 2007 Aurora Edit LD User Guide 31
Page 32

Chapter 2 Configuring Aurora Edit LD
Setting ConformManager Properties
The Aurora Edit LD ConformManager tracks the EDLs sent from a specific XRE
Conformance Server. You can configure the ConformManager to determine how
much information to display in the History window.
To set properties:
1. From the Aurora Edit LD main menu bar, click
2. Click the
3. Enter the name of the XRE Conformance Server.
Properties button on the toolbar.
ConformManager.
4. Enter the number of Hours and/or Minutes to establish the length of time Aurora
Browse searches for EDL History.
5. Enter your User Name; if you leave this field blank, Aurora Browse displays
history for all Aurora Edit LD client machines on the network.
6. Click
32 Aurora Edit LD User Guide September 14, 2007
Apply.
Page 33

Chapter 3
Managing Media
Aurora Edit LD uses Bins to hold media clips, sequences, and raw footage. You can
organize clips by placing them into your Bin, or searching through the list of assets
using various search criteria. You can further categorize clips by adding metadata to
each clip, making it easier to find.
This chapter discusses the following topics:
• Organizing Media in Your Bin
• Searching for Clips
• Using Search Filters
• Using Metadata
September 14, 2007 Aurora Edit LD User Guide 33
Page 34

Chapter 3 Managing Media
Organizing Media in Your Bin
The find tab displays all of the assets on the MediaFrame server. You can put assets
you are working with into a bin. You can view the bin in Thumbnail or List View.
To put assets in your bin:
1. In the list of assets, check the box for each of the assets you want in your bin.
2. Click the bin tab to see your selected assets.
Searching for Clips
The search function compares your search criteria with asset metadata (text fields)
and returns the results.
To perform a simple search, enter the search criteria in the text field and click
Example:
For example, searching for "fire" would return matches for:
• Fire on Elm Street
• firefighter
• fireman
• A number of fires...
You may also use three types of logical operators in a search string:
" " Words in quotes to invoke exact match
- To exclude a specific word
OR To provide an alternate match in the search
Go.
The AND operator is implied when no explicit operator is used between words.
So, the following search would return all assets that contain "fire" along with "elm"
or "downtown", but nothing that contains "uptown".
NOTE: Searching for short strings can be system- and time-intensive. Whenever
possible, use longer strings, multiple strings, or filters.
34 Aurora Edit LD User Guide September 14, 2007
Page 35

Using Search Filters
Filters allow you to focus a search on particular metadata fields, which returns more
appropriate results in much less time.
To add a filter to an existing search:
Using Search Filters
1. Click the (+) symbol on the filters box to open the
2. Select a metadata field from the
3. Select an operator from the
Field to Filter list.
Comparison list, which presents options appropriate to
the selected metadata type.
Add a Filter dialog.
4. Enter the Value to search upon as appropriate for your filter.
5. Click
September 14, 2007 Aurora Edit LD User Guide 35
Add Filter to add this filter to the active filter list.
Page 36

Chapter 3 Managing Media
Some filter fields offer an additional selection to reverse the search parameters. For
example, in the following screen, the filter will search for Asset Names that contain
the word “fire”. By checking the
assets that DO NOT contain the word “fire”.
Tips for using filters to search for clips
Here are a few tips for using the search filter with Aurora Edit LD:
• To find assets that have been archived and restored on an Open SAN, use these 2
filters:
Invert this Logic checkbox, the filter searches for
"Device Name" contains "archive"
"Offline Status" "is not set"
• To find assets that haven't been archived, use this filter:
NOT (inverted) "Device Name" contains "archive"
• To find assets that have been archived (but not restored), use this filter:
"Offline status" "is set"
• Additional date range and/or asset name filters will help narrow the search down
to the needed group.
Saving Filters
If you create a search that you wish to use again, you can save it and reload it when
needed. All filters and search criteria currently active in the filter box are saved.
To save a filtered search:
1. Select a filter from the list and click the
Save link.
2. Name the filter and then click
36 Aurora Edit LD User Guide September 14, 2007
Save Search Macro.
Page 37

Modifying Active Filters
Once a filter is created, you can modify its search parameters if needed.
To modify a filter:
1. Select a filter from the list of active filters.
Modifying Active Filters
2. From the Update a filter dialog, update the search parameters and click
Filter
.
You can also delete a filter by clicking
Loading a Filter
Once a filter is saved, you need to load it in order to run the filtered search.
To load a filter:
1. Click the
Update
Remove This Filter.
Load link above the Filters list.
September 14, 2007 Aurora Edit LD User Guide 37
Page 38

Chapter 3 Managing Media
2. Select a filter and click Load.
3. The filter loads; click Go to apply the filter to the assets in the database.
Deleting Filters
There are several ways to delete a filter:
• To delete a saved filter:
a. Click the
b. Select a filter and then click
• In Add/Update Search Filter window, click
Load link above the Filters list.
Delete.
Remove This Filter.
• To delete all filters in the active filter box, click
clear.
38 Aurora Edit LD User Guide September 14, 2007
Page 39

Using Metadata
Adding metadata to a sequence allows you and other editors to find media faster using
searches and filters.
Adding General Information
You can add information about an asset to make it easier to find:
NOTE: You cannot change the asset duration.
Using Metadata
1. To view metadata, click the
2. Change the
name of the asset if you wish:
Source Tool and then click Source Properties.
a. Click in the name field; the field turns pink.
b. Edit the text to change the name of the asset.
c. Tab to the next field (or click in another field with the mouse).
3. Change the
4. Enter an expiration date or check the
a. Click in the
b. Select the expiration date in the window and click
source ID if you wish.
hold box if you don’t want the asset to expire:
exp date field; the Pick Date window opens.
OK; the new expiration date
appears with a pink background.
5. Enter a
6. Click
description for the asset if you wish.
Accept Changes; the pink fields disappear.
NOTE: Two users can modify the same metadata field at the same time, though only
the last-accepted changes are saved.
September 14, 2007 Aurora Edit LD User Guide 39
Page 40

Chapter 3 Managing Media
Adding Keywords
Keywords provide a powerful way for you and others in your newsroom to find
specific footage needed for a news story. Each keyword references a specific
timecode location in the media file.
To add keywords:
1. Type the keyword.
2. Create an In point by playing the footage and clicking
point for the keyword.
3. Create an Out point by clicking
4. Click
Add.
Mark Out at the end point for the keyword.
The keyword is added to the list.
To delete a keyword, click
del for the specific keyword you wish to delete.
Mark In at the starting
40 Aurora Edit LD User Guide September 14, 2007
Page 41

Using Custom Fields
Custom fields let you further search for assets. These fields are set up by your
Administrator and let you select which are appropriate for a particular asset.
Examples of custom fields include reporter names, air dates, and source locations.
To add values to the custom fields:
1. Select a choice from a pull-down list or type the data into the field.
If the custom field is a date field, click in the date area, and then pick the correct
date on the calendar.
Using Custom Fields
2. Click
The field data is associated with the clip.
Accept Changes.
Changed fields have a pink background until you click Accept Changes or Reset
Values.
Viewing Related Information
Each Aurora Edit LD asset has additional information you can view; this information
is primarily used for diagnostic purposes.
Click on an underlined component to view it; the asset opens in another window.
September 14, 2007 Aurora Edit LD User Guide 41
Page 42

Chapter 3 Managing Media
Modifying Groups
You use Groups to allow members of a particular group access to specific media.
Groups are set up by your Administrator.
To modify membership in Aurora Edit LD groups:
1. Click
Modify Group Membership on the mgmt tab.
A list of available groups appears, with checks next to the currently assigned
groups.
2. Check or uncheck boxes to add or remove an asset from a particular group.
3. Click
4. Click
Update.
Done to close the window.
42 Aurora Edit LD User Guide September 14, 2007
Page 43

Chapter 4
Editing in the Timeline
To edit a story with Aurora Edit LD, you need to move the video and audio media
from tapes or feeds to a digital format on your computer. The most efficient way to
create stories is to edit directly to the Timeline.
This chapter discusses the following topics:
• Overview
• Changing the Timeline View
• Creating a New Sequence
• Changing Sequence Properties
• Selecting and Deselecting Tracks
• Marking In and Out Points
• Setting Up a Split Edit
• Routing Audio Tracks
• Creating Clips
• Playing Your Sequence
September 14, 2007 Aurora Edit LD User Guide 43
Page 44

Chapter 4 Editing in the Timeline
Overview
Editing in Aurora Edit LD is a fast and efficient way to produce low-resolution
sequences. Editing in the Timeline involves these basic steps:
1. Create a new Sequence.
2. Select the tracks you want to record in the Timeline.
3. From the Timeline Tool, you may optionally:
• Mark In and Out points
• Set up a split edit
• Route the audio output
4. Press 2 to select the Source Tool and optionally:
• Mark In and Out points
• Route the audio output
• Set up a split edit
5. Play the source to find footage you want to use in your Aurora Edit LD sequence.
6. Mark an In and Out Point for the footage to include in your sequence.
7. Click
8. Play your sequence if you want to.
9. Repeat steps 5-8 for each clip.
10. Save your sequence.
This chapter discusses each of these steps in detail.
Copy to Timeline.
44 Aurora Edit LD User Guide September 14, 2007
Page 45

Changing the Timeline View
You can zoom in and out of the Timeline to see a specific area of the Timeline or to
get an overall perspective of your sequence. There are two ways to change the
Timeline view—you can change it manually or use Auto Scale to have the view adjust
automatically when your sequence extends beyond the Timeline view.
To manually change the Timeline view:
Changing the Timeline View
1. Right-click the
You can also press
Toolbar to zoom in the Timeline view. Press - or click
Turn Auto-Scale On/Off button and select an increment to display.
+ on your keyboard or click the Zoom In button in the Timeline
Zoom Out to zoom out the
Timeline view.
To have the Timeline view adjust automatically:
2. Click the
Turn Auto-Scale On/Off button in the Timeline.
The Timeline view compresses and displays the entire sequence in the Timeline
each time the sequence extends beyond the Timeline window. To turn off Auto
Scale, click
Turn Auto-Scale On/Off again.
NOTE: Auto Scale turns off automatically once you click
Zoom In or Zoom Out on the
Timeline Toolbar.
September 14, 2007 Aurora Edit LD User Guide 45
Page 46
Chapter 4 Editing in the Timeline
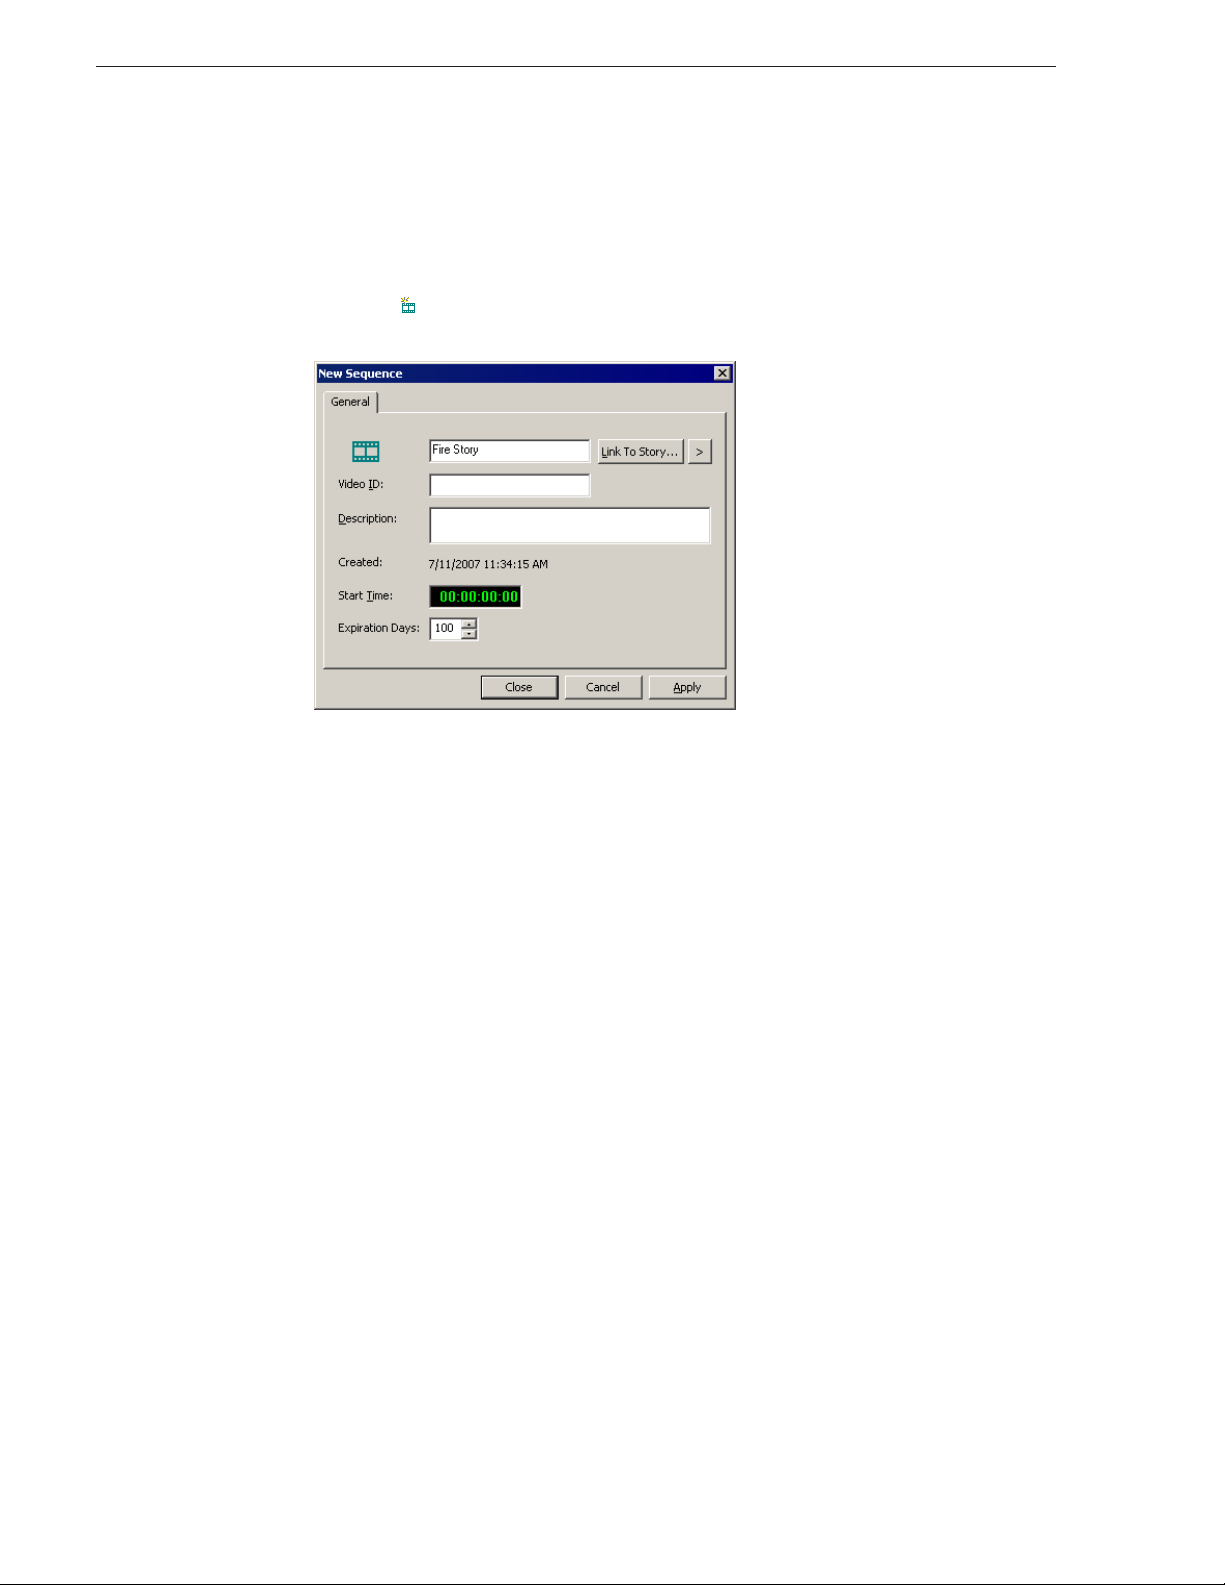
Creating a New Sequence
The first thing you need to do is to create a new sequence.
To create a new sequence:
1. Click the
The New Sequence window appears:
2. Enter a name for the sequence.
You can also link to a story to view the story script (See “Linking to a News Story”
on page 68).
3. To use a Start Time other than 00:00:00:00, double-click on the timecode field and
enter a new Timecode.
New Sequence button on the Main toolbar.
This Start Time field overrides the Start Time set in Tools | Options | Timeline for
this sequence only.
4. Adjust the number of days until the sequence expires, if you wish.
5. Click
You are now ready to add footage to the Timeline.
OK.
46 Aurora Edit LD User Guide September 14, 2007
Page 47

Changing Sequence Properties
After creating a sequence, you can change any of the sequence properties as
necessary.
To edit sequence properties:
Changing Sequence Properties
1. If the sequence is open in the Timeline, click the
the Timeline toolbar.
The Sequence Properties window appears:
2. Make any necessary changes.
3. Click
OK to save your changes.
Selecting and Deselecting Tracks
Sequence Properties button in
You can select which tracks you want to copy to in the Timeline. Aurora Edit LD lets
you work with one video track and up to four audio tracks. You can edit from any
source audio track onto any track in the Timeline.
To select or deselect tracks:
• Click once in the track indicator on the Timeline for each track you want to select
or deselect.
Selected track buttons are green in the Timeline.
September 14, 2007 Aurora Edit LD User Guide 47
Page 48

Chapter 4 Editing in the Timeline
Marking In and Out Points
You can set the Mark Points using the Mark In and Mark Out buttons in either the
Timeline Tool or the Source Tool. The steps to create a mark point are the same
regardless of which tool you are using, but you will be setting different mark points
in the two tools. In the Timeline Tool, you are setting mark points for your sequence;
in the Source Tool, you are setting mark points for the input source.
When you make the first edit in a sequence, you can mark In and Out points if you
want to. If you don’t set a Mark In point, recording starts at the current position of the
cursor. If you don’t set a Mark Out, Aurora Edit LD creates an Out when you stop
recording and the clip is edited into the Timeline. The Timeline automatically moves
the cursor to the end of each edit in preparation for the next edit.
To Mark In and Out Points:
1. Move to the Mark In or Mark Out point in one of the following ways:
2. Click the point on the Timeline where you want to place the points.
3. Press the
10-frame increments.
4. Press
You can also enter an In or Out time and click or to go to that point in the clip.
A, S, D, or F keys on the keyboard to jog through clips in 1-frame or
I on the keyboard to Mark In and press O to Mark Out.
Setting Up a Split Edit
Aurora Edit LD lets you set In and Out points to create a pre-defined split edit from
the Timeline Tool. To delay one of the tracks at the beginning of a clip, set different
In points for the video and audio, with one starting after the other. You can also extend
one track after the other at the end of a clip.
To create a split edit:
1. Press
2. Press
3. Click the
1 (or click the Timeline Tool button) to select the Timeline Tool.
I on the keyboard to mark an In point for the video track.
Show Audio Marks button.
Blue icons indicate audio mark in and out points.
4. Select a Mark In Point for the audio track.
5. The duration of the split appears in the Duration field.
6. Set an Out point and copy to timeline.
48 Aurora Edit LD User Guide September 14, 2007
Page 49

Routing Audio Tracks
You can edit audio from any source track onto any track in the Timeline. You can
work with up to four audio tracks in the Timeline.
To route an audio track:
Routing Audio Tracks
1. Press
2. Click the
3. From the drop-down list, select the new audio track location.
2 (or click the Source Tool button) to select the Source Tool.
Timeline Track box for the Audio Input channel you need to reassign.
Creating Clips
To create a clip in your sequence, follow these steps. Repeat the steps for each
additional clip in your sequence.
1. Play the footage by clicking the play button.
2. At the appropriate beginning point, click
3. Click
4. Click Copy to Timeline to copy the marked footage to the timeline.
5. Continue marking points and copying footage to create a sequence.
September 14, 2007 Aurora Edit LD User Guide 49
Mark Out to create a mark point.
Mark In to create a mark point.
Page 50

Chapter 4 Editing in the Timeline
Playing Your Sequence
As you create a sequence, you may want to review the progress. With Aurora Edit LD,
you can play the sequence as part of the editing process in the Timeline.
To play a sequence:
1. Press
1 on the keyboard (or click the Timeline Tool button) to select the Timeline
tool.
2. Select one of these commands to play or work through the sequence:
Icon Keyboard Key Description
A
S
D
F
Q
E
W or Spacebar Starts playing from the position of the cursor.
R
Spacebar
N/A Plays the sequence in a continuous loop.
Left Arrow Shuttles left in increments of -50%, -75%, -1x, -2x, -3x.
Right Arrow Shuttles right in increments of +50%, +75%, +1x, +2x, +3x.
Moves the position indicator one frame to the left.
Moves the position indicator one frame to the right.
Moves the position indicator ten frames to the left.
Moves the position indicator ten frames to the right.
Starts playing from the beginning of the sequence.
Rewinds the sequence.
Fast Forwards the sequence.
Stops playing the sequence.
Up Arrow Resets shuttle speed to default, which is 200%.
Down Arrow Selects previous shuttle speed.
You can also drag the shuttle slider with your mouse to scrub through the Timeline.
50 Aurora Edit LD User Guide September 14, 2007
Page 51

Chapter 5
Trimming Clips
After creating clips in the Bin or directly in the Timeline, you may need to trim a clip
to fit or edit out extra frames. Aurora Edit LD provides several methods for trimming
clips to create quality sequences.
This chapter discusses the following topics:
• Using the Trim Tool
• Changing the End Points Between Clips
• Using Handles
• Locking the Duration of a Clip
• Playing Past Out
• Extending Your Edits
September 14, 2007 Aurora Edit LD User Guide 51
Page 52

Chapter 5 Trimming Clips
Using the Trim Tool
After you create clips in the Bin or directly in the Timeline, you may need to trim a
clip to fit or edit out extra frames. You will often need to shorten your clips or change
the starting or ending frame. In Aurora Edit LD you trim clips by changing the Mark
In and Mark Out points using the Trim Tool.
To select the Trim Tool, press
3 on your keyboard or click the Trim Tool button in
the Timeline Toolbar.
You can also double-click on the video track for the clip you want to trim.
Changing the End Points Between Clips
You trim your clips by marking new In and Out points for each clip:
1. Click once on the clip you want to trim to select it.
2. Press
3 on the keyboard or click the Trim Tool button in the Timeline toolbar.
The Trim window appears.
3. To trim the beginning of a shot, press the spacebar to play the clip and press the
spacebar again to stop at the frame where you want the clip to start.
You can also use the slider to find the approximate In point and then use the
D, and F keys on the keyboard to find the exact spot.
4. Press
I on the keyboard to mark a new In point.
A, S,
5. To trim the end of the same clip, play the clip again and stop at the frame where
you want the clip to end.
6. Press
O on the keyboard to mark a new Out point.
7. Continue trimming other clips in your sequence.
NOTE: You can also trim an individual track in a clip by turning off the tracks you
don’t want, clicking on the desired track, and trimming the clip.
52 Aurora Edit LD User Guide September 14, 2007
Page 53

Using Handles
If you have recorded handles with your clips, you have additional frames to choose
from when trimming your clips. To set handles, see “Setting Handles” on page 30.
To use handles:
Using Handles
1. Click the
The handles appear as additional frames on the slider in the Viewing Monitor.
2. Mark new In and Out points for your clip using the additional material.
Add Handles button in the Trim Tool.
Locking the Duration of a Clip
Sometimes you need trim a clip while maintaining its duration. The Lock Duration
feature allows you to keep the clip duration constant while trimming by using the
extra frames in the handles and adjusting the clip. For instance, if you move the Mark
In point 5 frames from the beginning of the clip, the Mark Out point moves
automatically 5 frames to maintain the duration.
To lock the duration of a clip:
• Click the
Lock Duration button in the Trim tool.
Playing Past Out
Playing Past Out lets you create an Out point on the fly while viewing media after the
Mark Out point, which is useful when verifying the Out point.
To play past the Out point:
1. Click the
2. Play the clip.
The clip continues playing past the Mark Out point, letting you see the rest of the
footage in the clip.
Play Past Out button in the Trim Tool.
September 14, 2007 Aurora Edit LD User Guide 53
Page 54

Chapter 5 Trimming Clips
Extending Your Edits
Aurora Edit LD provides a quick way to extend an edit without having to re-record
any footage. Use this feature to extend an individual track (video or audio) over the
track in the next clip.
To extend an edit:
1. Deselect any tracks you don’t want to extend.
To deselect a track, click once in the track indicator on the Timeline for each track
you want to deselect.
2. Highlight the clip you want to extend.
3. Move the cursor to the position you want to extend the clip to.
4. Press
You can also shorten a clip using this method by marking an In point on a clip and
pressing V on your keyboard.
V on your keyboard.
The clip extends into the next clip. If the clip doesn’t have enough handle material
to extend as far as you select, Aurora Edit LD extends it as far as it can.
54 Aurora Edit LD User Guide September 14, 2007
Page 55

Chapter 6
Fine Tuning
Once you have clips in the Timeline, Aurora Edit LD has several features to help
fine-tune a sequence.
This chapter discusses the following topics:
• Moving Clips in the Timeline
• Copying and Pasting Clips
• Changing the Editing Mode
• Converting Clip Aspect Ratios
• Splitting Clips
• Lifting Clips
• Deleting Clips
• Inserting Filler Between Clips
• Using Control Track
• Using Match Frame to Bin
• Linking to a News Story
September 14, 2007 Aurora Edit LD User Guide 55
Page 56

Chapter 6 Fine Tuning
Moving Clips in the Timeline
When you move clips in the Timeline, the result differs slightly based on the current
edit mode. If you are in Overwrite Edit Mode, a moved clip covers other clips. If you
are in Splice Edit Mode, a moved clip pushes other clips out.
To move a clip:
1. Press
1 on your keyboard (or click the Timeline Tool button) to choose the
Timeline Tool.
2. Click once on the clip in the Timeline you want to move.
An outline appears around the clip you selected.
3. Drag the clip to its new location.
You can also use the following keyboard keys to move clips:
This keyboard key... Moves the selected clip...
Numberpad 4 one frame to the left on the Timeline.
Numberpad
Ctrl + Numberpad
Ctrl + Numberpad
Z
X
6 one frame to the right on the Timeline.
4 10 frames to the left on the Timeline.
6 10 frames to the left on the Timeline.
to the previous cut point.
to the next cut point.
Moving Audio Clips
You can move an audio clip to any of the four Aurora Edit LD audio tracks.
To move an audio clip to a different track:
• Drag the audio clip to the desired track.
56 Aurora Edit LD User Guide September 14, 2007
Page 57

Copying and Pasting Clips
In the Timeline, you can copy and paste items, such as video clips, audio clips, and
transitions.
Using the right-click menu in the Timeline, you can delete, lift, copy, cut and paste
selected items, a selected area of the sequence, or paste a selected track.
Selected Items in the Timeline
1. Click once on the clip (or Lasso the area) in the Timeline you want to cut or copy.
An outline appears around the clip you selected.
Copying and Pasting Clips
2. Right-click in the Timeline and select what you want to do.
3. If you are pasting a clip, move the cursor to the new location, right-click and select
Paste Selected or Paste Track.
You can also use keyboard shortcuts for cutting and pasting:
Ctrl + X
Ctrl + C
Ctrl + Y
Cuts a selected item.
Copies a selected item.
Pastes a selected item.
You can also paste items into other sequences.
Selected Area of the Timeline
1. Mark an In Point at the start of the material to move.
2. Mark an Out Point at the end of the material.
3. Turn off any tracks you don’t want to cut or copy.
4. Right-click in a track and select one of these functions:
Area
, or Lift Area.
5. If desired, paste the material into another part of this sequence or another sequence.
Cut Area, Copy Area, Delete
Make sure you remove any mark points from your sequence before pasting material;
Aurora Edit LD pastes material at the Mark Out Point.
September 14, 2007 Aurora Edit LD User Guide 57
Page 58

Chapter 6 Fine Tuning
Changing the Editing Mode
The Timeline has two editing modes, Overwrite mode (the default) and Splice mode.
For the first edit and for adding one clip after another, you can use either Overwrite
or Splice mode. The difference between these modes is important when you revise
and fine tune your sequence, as described in the table below.
Once you use these modes to edit clips to the sequence in your Timeline, you can
move clips forward or backward within the sequence or use the Trim tool to trim
transitions or to produce split edits.
The Aurora Edit LD editing modes are:
Tool Icon Keyboard
Key
Over
write
Splice F10 Splices a clip between two existing clips in the Timeline by moving the
F9 Replaces existing sections of a sequence with new material, leaving the
Description
sequence duration unchanged. Similar to an insert edit in a tape-based
system.
two clips apart and inserting the new clip in between them. All clips
after the edit point move downstream and lengthen the sequence.
58 Aurora Edit LD User Guide September 14, 2007
Page 59

Converting Clip Aspect Ratios
When Aurora Edit LD is initially configured, a default aspect ratio, 4:3 or 16:9, is set
in the Options menu (see “Configuring Video Settings” on page 28). As clips are
brought into the Source Tool, Aurora Edit LD automatically converts those that have
a different aspect ratio than the default setting. Aurora Edit LD uses a default
conversion type—letterbox when down converting from 16:9 to 4:3, and pillarbox
when up converting from 4:3 to 16:9. You can manually convert the clip if you wish
to use another conversion method to produce a different video image.
Converting Clip Aspect Ratios
Aspect Ratio Conversion
Manually Converting a Clip Aspect Ratio
If the video doesn’t look acceptable after Aurora Edit converted the aspect ratio using
the default settings, you can change the conversion method to produce better results.
To convert the aspect ratio of a clip:
1. Load the clip into the Source Tool.
2. Click
3. Select the Conversion Type from the drop-down list or select a Preset (see
“Creating a Preset” on page 61).
4. Play the clip to view how the aspect ratio converted the clip.
5. Modify the conversion settings if necessary.
These settings become the default and all subsequent clips will be converted using
these settings.
6. Copy the clip to the Timeline.
Aspect Ratio Conversion.
September 14, 2007 Aurora Edit LD User Guide 59
Page 60

Chapter 6 Fine Tuning
Conversion Types
Aurora Edit LD has 8 different conversion types, 4 for up converting to a 16:9 aspect
ratio, and 4 for down converting to a 4:3 aspect ratio:
Source Clip Conversion Type Offset Choices
4:3 up converting to 16:9 Pillarbox
(default)
Half Pillarbox -100 to +100
Zoom None
None
Stretch -100 to +100
16:9 down converting to 4:3 Letterbox
(default)
Half Letterbox -100 to +100
Crop -100 to +100
Compress None
None
60 Aurora Edit LD User Guide September 14, 2007
Page 61

Using Presets
Aurora Edit LD lets you create presets for common conversions you’ll use.
Creating a Preset
To create a preset:
Using Presets
1. In the Source Tool, click
2. Select the Conversion Type from the drop-down list.
3. Modify the Offset, if desired.
4. Click
5. Accept the name provided or enter a new name, and click
Deleting a Preset
If you don’t need a preset anymore, you can delete it:
1. Select the preset to delete in the drop-down list.
2. Click
The preset is removed from the list and deleted from the system.
Aspect Ratio Conversion.
Save.
OK.
Delete.
September 14, 2007 Aurora Edit LD User Guide 61
Page 62

Chapter 6 Fine Tuning
Splitting Clips
You can split an existing clip into two clips. For example, you can insert new material
between two split sections or split a clip and remove a piece of it to tighten the
sequence.
Before split... After split...
To split a clip:
1. Press
1 on the keyboard (or click the Timeline Tool button) to choose the
Timeline Tool.
2. Drag the cursor to the spot where you want to split the clip.
You can also use the A, S, D, and F keys to find the split point.
3. Press \ on the keyboard or click the
Split Clip button on the Timeline toolbar.
The clip splits in two.
To split only one of the tracks (for example, split the Video track and leave A1 and
A2 intact), deselect the track button at the left of the Timeline for tracks you want to
be unaffected by the split.
62 Aurora Edit LD User Guide September 14, 2007
Page 63

Lifting Clips
You can lift a clip out of a sequence to replace it, or remove a piece of a clip from a
sequence after splitting it. Black or silence replaces the lifted portion. You can also
lift an area of the sequence that includes parts of adjoining clips.
From the Timeline
Before lift... After lift...
Lifting Clips
To lift a clip:
1. Press
1 on your keyboard (or click the Timeline Tool button) to choose the
Timeline Tool.
2. Click once on the clip you want to lift.
3. Press ] on the keyboard or click the
Lift Clip button on the Timeline toolbar.
The clip disappears from the sequence.
To fill in the gap created by lifting a clip:
• Select the first clip after the gap and press
Sequence
from the Command menu.
0 on the keyboard or select Collapse
The hole to the left of the selected clip closes. You can also use the Delete key to
completely remove the clip and close the gap in a single step.
September 14, 2007 Aurora Edit LD User Guide 63
Page 64

Chapter 6 Fine Tuning
Lifting an Area of the Sequence
Before lifting area... After lifting area...
To lift an area:
1. Press
1 if you are not already in the Timeline Tool.
2. Select the area to lift by marking and In and an Out point.
3. Press
Ctrl + ] on the keyboard or hold down the Ctrl key while clicking the Lift Clip
button.
You can also right-mouse click in the Timeline and select Lift Area.
64 Aurora Edit LD User Guide September 14, 2007
Page 65

Deleting Clips
Instead of lifting a clip from the Timeline, which leaves black and silence, you can
delete a clip and close the gap between the remaining clips in the sequence.
Deleting a Clip from Your Sequence
Before deleting... After deleting...
To delete a clip:
Deleting Clips
1. Press
2. Deselect any tracks you don’t want to delete by clicking their track indicator on the
3. Select the clip in the Timeline that you want to delete. Press the Ctrl key to select
4. Press
1 on your keyboard, or click , to choose the Timeline Tool.
Timeline.
multiple clips.
Delete on your keyboard.
The clip disappears from the Timeline.
Deleting an Area of the Sequence
You can delete an area of the sequence, which can include parts of adjoining clips.
Before deleting an area... After deleting an area...
To delete an area:
1. Press
September 14, 2007 Aurora Edit LD User Guide 65
1 on your keyboard to choose the Timeline Tool.
Page 66

Chapter 6 Fine Tuning
2. Select the area to delete by marking an In and an Out point.
3. Press
Ctrl + Delete on the keyboard or hold down the Ctrl key while clicking the
button.
Delete
You can also right-click in the Timeline and choose Delete Area.
Inserting Filler Between Clips
With Aurora Edit LD, you use filler to place a gap between two shots or to create a
dip to silence in the sequence. You can also use filler to serve as a placeholder for
late-arriving material. Inserting filler is both track and edit mode specific.
Before filler... After filler...
To insert filler:
1. Press
1 on your keyboard to choose the Timeline Tool.
2. Click once on the clip, at the point before you want to insert filler.
3. Right-click and select
Insert Filler.
The Filler Properties window appears.
4. Enter a Duration for the filler and click
OK.
The Timeline updates with the filler inserted into the sequence.
NOTE: You can also insert filler between Mark In and Mark Out points on all tracks
that are active.
66 Aurora Edit LD User Guide September 14, 2007
Page 67

Using Control Track
Control track lets you see the actual count of a clip or piece of tape instead of using
timecode. Control track is available in the Timeline and Source Tools.
To use control track:
Using Control Track
• Click the
The timecode field changes and the text becomes yellow. To switch back to
viewing the timecode, click the Control Track button again.
To reset the control track to zero:
• Click the
Control Track button.
Reset Control Track button while in Control Track mode.
Using Match Frame to Bin
Match Frame to Bin finds a frame you select from the Timeline and loads it in as a
clip source.
To match frame to the Bin:
1. Select a clip on the Timeline.
2. Select the frame you want to match.
3. Press
F3 on the keyboard.
Aurora Edit LD finds the frame on the clip and loads it as a clip source.
September 14, 2007 Aurora Edit LD User Guide 67
Page 68

Chapter 6 Fine Tuning
Linking to a News Story
Aurora Edit LD can link to scripts on iNews, NewStar, and AP/ENPS Newsroom
computer systems, which you can use as an aid for creating your sequence. You can
link to a news story when you create a new sequence, as described below, or to an
existing sequence by opening Sequence Properties and clicking Link to Story.
To link to a news story:
1. Click the
The New Sequence window appears:
2. Click the arrow next to Link To Story and select your newsroom system.
New Sequence button in the Main toolbar.
3. Click
68 Aurora Edit LD User Guide September 14, 2007
Link to Story.
Page 69

A Browse window appears, displaying the available stories:
Linking to a News Story
If you select Aurora Playout as your newsroom system, the Aurora Playout Items
window appears:
NOTE: Once a Aurora Playout story is linked, the row color for the selected story
changes to reflect that the story is being edited. You can change this color in
Tools | Options | Aurora Playout.
4. Select the file you need and click
Open.
The Sequence Properties window appears with the file title and Video ID filled in
(if you are set up to use Video IDs with your NRCS).
September 14, 2007 Aurora Edit LD User Guide 69
Page 70

Chapter 6 Fine Tuning
5. Click OK; the Timeline opens.
6. Click the
The script opens:
Story View button in the Main Toolbar.
You can leave the script open and create a sequence to match the story.
70 Aurora Edit LD User Guide September 14, 2007
Page 71

Chapter 7
Adding Transitions
Aurora Edit LD lets you create a variety of transitions between clips in your sequence.
Adding transitions to your sequences can add visual interest, avoid a bad edit between
two shots, or slow a change between two shots for a pacing effect.
Video transition effects include dissolves, pushes, and slides. You can also create
crossfades on the audio tracks in your sequence.
This chapter discusses the following topics:
• Using the Transition Tool
• Transition Types
• Adding Transitions to Your Sequences
• Adding Audio Crossfades
September 14, 2007 Aurora Edit LD User Guide 71
Page 72

Chapter 7 Adding Transitions
Using the Transition Tool
Aurora Edit LD lets you create a variety of transitions between clips in your sequence.
Adding transitions to your sequences can add visual interest, avoid a bad edit between
shots, or slow a change between two shots for a pacing effect.
To create transitions or audio crossfades, you use the Transition Tool.
To select the Transition Tool, press
button in the Timeline toolbar.
Transition Types
Aurora Edit LD has 3 types of transitions:
• Dissolve—Fades the existing image as the new image becomes visible in its place.
You cannot specify the direction or kind of dissolve.
5 on your keyboard or click the Transition Tool
You can create fades using the Dissolve transition. A fade is the gradual
appearance of a new picture from black (fade-in) or the gradual disappearance of a
picture to black (fade-out). To gradually fade the video in, place a dissolve
transition at the beginning of a sequence. To fade the video off the screen, place a
dissolve transition at the end of the sequence.
• Push—Moves the second image in the direction chosen onto the screen, looking
like the first image is "pushed" out of the way.
• Slide—Moves either the old image or the new image. The old image moves to
reveal the new image or the new image moves to conceal the old image. A black
arrow indicates the direction and path the second image takes moving into the
frame. A white arrow indicates a reverse slide, where the first image slides to reveal
the second image.
To read a description of each transition, double-click its effect icon in the Transition
Tool.
72 Aurora Edit LD User Guide September 14, 2007
Page 73

Adding Transitions to Your Sequences
Adding Transitions to Your Sequences
You add transitions between clips in your sequence. You need to have handles on
your clips in order to apply a transition.
Creating a Transition
You add transitions between clips in your sequence. You need to have handles on
your clips in order to apply a transition.
You create each of the 3 transitions in the same way.
To create a transition:
1. Press
5 on your keyboard, or click , to select the Transition Tool.
2. Click on the transition type and then on the icon for the effect you want.
3. In the Settings area, choose the
Centered—Centers the transition across the cut point (default)
•
End at Cut—Ends the transition at the cut point between clips
•
Start at Cut—Starts the transition at the cut point between clips
•
Custom—Lets you set the position by typing it in the Cut Point field. If you
•
Position of the transition from these choices:
don’t have enough handle material to complete the custom position you set,
Aurora Edit LD completes as much of the positioning as it can.
4. Enter the duration of the transition (the default is 15 frames).
5. Move the mouse over the cut point between the two clips. The cursor becomes a
red X.
6. Click the mouse once to place the effect.
The transition appears on the Timeline as a pink box with diagonal lines in it,
indicating the transition is unrendered. When you export a sequence as an EDL,
Aurora Edit LD automatically renders the transition.
When you play the sequence in the Timeline, you see the transitions in the Video
window.
September 14, 2007 Aurora Edit LD User Guide 73
Page 74

Chapter 7 Adding Transitions
Changing Transitions
You can change a transition from one type to another or change the properties of the
transition.
To change a transition:
1. Click once to select the transition on the Timeline.
A red and green dotted border appears around the transition and its properties are
displayed in the Transition Tool.
You can select multiple transitions (by pressing
and apply changes to all of the transitions at once. If you have more than one
transition selected, the red and green dotted border appears only around the
transition for which the properties are displayed.
2. Make any changes—type of transition, type of effect, transition position, duration,
or border.
Ctrl + clicking on each transition)
3. Click
Apply.
The new transition replaces the old one on the Timeline.
NOTE: Double-clicking on a transition in the Timeline from any tool selects the
Transition Tool and shows the transition’s properties.
Deleting Transitions
1. Click on the transition to select it.
To delete several transitions at once, hold down the Ctrl key on the keyboard, then
click on each transition you need to delete.
2. Press
Delete on the keyboard.
The transition disappears from the Timeline.
74 Aurora Edit LD User Guide September 14, 2007
Page 75

Adding Audio Crossfades
Adding Audio Crossfades
If you want to soften the transition between two audio clips, you can add an audio
crossfade. Aurora Edit LD lets you create audio crossfades between any two edit
points in your sequence. Apply crossfades to only the audio tracks in a clip or with
each video transition you create.
Applying Crossfades to the Audio Tracks Only
1. Press 5 on your keyboard to select the Transition Tool.
2. Move the mouse over the cut point between the two audio clips where you want to
place the transition.
The cursor turns into a red X.
3. Click the mouse once on the audio track to place the effect.
The audio crossfade appears on the Timeline as a blue box with a X in it.
Applying Crossfades Automatically with Transitions
1. Press 5 on your keyboard to select the Transition Tool.
2. Click the
Each time you apply a video transition, an audio crossfade occurs on the audio
tracks at the same point. The audio crossfade uses the same settings you are using
for the video transitions; position, duration, and cut point.
You can also adjust the settings for the audio crossfade separately from the video
transition if desired. Click to highlight the transitions for crossfading, whether all
or some of the audio tracks.
Auto-Apply Crossfade button.
September 14, 2007 Aurora Edit LD User Guide 75
Page 76

Chapter 7 Adding Transitions
76 Aurora Edit LD User Guide September 14, 2007
Page 77

Chapter 8
Audio
Aurora Edit LD allows you to adjust many aspects of the audio tracks in your
sequence and add additional audio tracks to your sequence.
While Aurora Edit LD can only record four audio tracks, you can edit up to eight
tracks. The Audio Mixer Tool adjusts levels and pan controls for individual tracks in
a sequence or for entire clips.
This chapter discusses the following topics:
• Using the Audio Mixer Tool
• Adjusting Audio Levels on the Timeline
• Adjusting Audio Gain
• Using Audio Automation
• Adding Voiceovers to Your Sequence
September 14, 2007 Aurora Edit LD User Guide 77
Page 78

Chapter 8 Audio
Using the Audio Mixer Tool
Aurora Edit LD allows you to adjust many aspects of the audio tracks in your
sequence. The Audio Mixer Tool adjusts levels and pan for individual edits in a
sequence, for entire clips, or for entire audio tracks.
To select the Audio Mixer Tool, press 6 on your keyboard or click the Audio Mixer
button in the Timeline Toolbar.
Adjusting Audio Levels on the Timeline
You can adjust the audio levels within a clip by adding and manipulating fade control
points in the Timeline, which is known as rubber banding. You can also view the
audio waveform for a sequence, providing a visual indication of audio levels.
Viewing Audio Levels on the Timeline
You can view audio levels in Aurora Edit LD in different ways:
• In the Audio Mixer Tool, the fade control line is always visible, whether the audio
track is expanded or not.
• In all of the Aurora Edit LD tools:
• You can view audio levels at any time by clicking the
next to the audio track you want to view.
• Click
track is expanded.
• Click
expanded track.
• Click the up arrow on the
height or click the down arrow to expand the height of the track.
Show Audio Fade Control Points to show the points anytime the audio
Show Audio Waveform to show the waveform for the sequence in the
Change Track Height button to shrink the track
Expand Track button
• Click the
amplitude as shown on the audio track or click the
Vertically
78 Aurora Edit LD User Guide September 14, 2007
Zoom In Waveform Vertically button to increase the waveform
Zoom Out Waveform
button to decrease the waveform amplitude.
Page 79

Changing Audio Levels in a Clip
You can adjust the audio levels within a clip by adding and manipulating fade control
points in the Timeline, which is known as rubber banding.
To change the audio level in a clip:
1. Expand the audio track to reveal the fade control line.
2. To adjust the audio level in a clip, do one of the following:
• To adjust a specific point in a clip, click on the red line to create a fade control
point. Using the fade control point as a pivot, click on another point in the audio
track and drag the red line to raise or lower the level.
• To raise the audio level for the entire track in a clip, click the fade control line
and drag it up in the track. If fade control points exist, you need to click on a
point before raising the level.
• To lower the audio level, click the fade control line and drag it down.
• To raise or lower the sound level for the entire track in a clip while preserving
the positions of the existing fade control points, press the
the fade control points, and while holding down the left mouse button, drag the
fade control point up or down. Release the mouse button while still holding the
ALT key.
Changing Audio Levels in a Clip
ALT key, click one of
If your audio levels are still too low or too high after adjusting the fade control line to
its maximum or minimum value, you can make further adjustments by changing the
audio gain (see “Adjusting Audio Gain” on page 82).
Removing Fade Control Points
To remove a fade control point, press Ctrl + click on the fade control point. Notice that
the cursor changes to a red hand, allowing you to click and remove the control point.
To remove all of the fade control points for a selected audio clip, right-click within
the clip and select
You can also remove an area of fade control points:
1. Set a Mark In and Mark Out point to indicate the section of fade control points to
remove.
2. Right-click on the audio track and select
All fade control points between the Mark Points, on active tracks, are deleted.
To clear all of the fade control points in a sequence, click the
button.
Clear Fade Control Points.
Clear Fade Control Points Area.
Clear Audio Automation
September 14, 2007 Aurora Edit LD User Guide 79
Page 80

Chapter 8 Audio
Setting the Pan Control
Pan direction
set to left
The pan control adjusts sound location. By default, odd-numbered channels pan to the
left and even-numbered channels pan to the right.
Click the Channel Mute
button to mute a track
Changing the pan direction affects the entire track in a sequence.
To change the pan direction:
• Drag the pan slider for an audio channel to the right or left position.
To set the pan direction to center, press
Muting Tracks
By default, Aurora Edit LD monitors all audio tracks in a sequence. However, you can
mute one or more tracks; you hear only the unmuted tracks until you deactivate
Muting. Muting is useful when recording voice-overs to the Timeline (see “Adding
Voiceovers to Your Sequence” on page 84).
To Mute one or more tracks:
• In the Audio Mixer Tool, click the
mute.
To turn off Muting, click each Channel Mute button again.
Alt + click on the pan slider.
Channel Mute button for each track you want to
80 Aurora Edit LD User Guide September 14, 2007
Page 81

Setting Audio Output Levels
You can use the Master Audio Sliders to adjust the output level for your final
sequence. When you output audio, the four audio tracks are mixed down to two tracks.
The pan direction determines how tracks are mixed.
By default, odd-numbered tracks mix to channel one and even-numbered tracks mix
to channel two of your output sequence.
Setting Audio Output Levels
To use the Master Audio Sliders:
• Drag the level slider up or down for each channel to set the output volume.
Check the Master Gang box to adjust both channels simultaneously.
September 14, 2007 Aurora Edit LD User Guide 81
Page 82

Chapter 8 Audio
Adjusting Audio Gain
Aurora Edit LD lets you adjust the audio levels within a clip in your sequence if a
clip’s level is too low or too high. The Audio Gain feature lets you compensate by
adjusting the clip’s audio between -41 dB and +10 dB.
To adjust an audio clip, you can use the Timeline Tool, the Trim Tool, or the Audio
Mixer Tool.
To adjust the audio gain in a clip:
1. Select the clip you need to adjust.
2. Right-click in the appropriate audio track.
3. Choose
The Adjust Audio Gain dialog box appears.
4. Enter a new value for the audio gain:
5. To lower the gain, enter a value preceded by a minus sign, such as -5.
6. To raise the gain, enter a value, such as 5.
7. Click
The new value appears for the audio clip.
Adjust Audio Gain.
OK.
82 Aurora Edit LD User Guide September 14, 2007
Page 83

Using Audio Automation
You can use Audio Automation to adjust volume on the fly while a sequence is
playing. You can then go back to adjust the fade control points for each level.
To use Audio Automation:
Using Audio Automation
1. Press
2. Click the
6 on the keyboard to select the Audio Mixer Tool.
Write Audio Automation button.
3. Click in the Timeline where you want the audio automation to start.
4. Press
F10 or click Play to play the sequence.
5. As the sequence is playing, click on the audio slider in the appropriate channel and
raise or lower it.
6. When you reach the end of the sequence, press the
The automation appears as fade control points in the audio tracks.
Showing Audio Automation
When you play a sequence with Audio Automation, you may want to see the audio
sliders moving along with the video, which show you the audio changes you made
while recording.
To show Audio Automation:
• Verify that the
Tool.
When you play the sequence, the sliders move along with it. If you need to do any
fine-tuning, you can move any of the fade control points once the sequence has
stopped playing.
Show Audio Automation button is activated in the Audio Mixer
spacebar to stop.
If you play a sequence without Show Audio Automation on, you see the fade control
points from the automation, but the sliders don’t move during playback.
Removing Audio Automation
You can remove an individual fade control point or all points in a sequence.
To remove a single fade control point:
• Press
To remove all fade control points:
• Click
September 14, 2007 Aurora Edit LD User Guide 83
Ctrl + click on a fade control point to remove it.
The cursor changes to a red hand, allowing you to click and remove the control
point.
Clear Audio Automation.
All of the fade control points disappear.
Page 84

Chapter 8 Audio
Adding Voiceovers to Your Sequence
Required Equipment
Configuring Your System
Adding a voiceover to a sequence replaces the current audio with audio you record.
This is used mainly for adding voice to video footage.
In order to record voiceovers with Aurora Edit LD, you need to have the following
equipment installed on your computer:
• Microphone
• USB pre amplifier; Thomson Grass Valley recommends one of the following
products:
• Tascam US-122—USB Audio/MIDI Interface; www.tascam.com
• M-Audio Mobil EPRE USB—USB Bus-Powered Preamp & Audio Interface;
www.m-audio.com
To record voiceovers, you need to install and configure the microphone pre-amplifier.
The mic pre-amplifier mixes the audio, avoiding a latency problem. Follow the
instructions that came with the pre-amplifier to configure as follows:
1. Plug your computer speakers into the mic pre-amplifier.
2. Plug the microphone into the mic pre-amplifier.
3. Connect the pre-amplifier to your PC.
You also need to disable your PC’s sound card and configure your PC to use the
pre-amplifier:
1. Go to
2. Click on the Audio tab.
3. Choose the pre-amplifier for Sound Playback and Sound Recording.
4. Click
Start | Settings | Control Panel | Sounds & Audio Devices.
OK.
84 Aurora Edit LD User Guide September 14, 2007
Page 85

Recording a Voiceover
There are two ways to record a voiceover—by positioning the cursor where you want
the record to begin, or by marking an in and out point. Marking In and Out points
allows you to use the Record Countdown feature, which displays the duration
remaining for the voiceover, allowing you to see how much time you have left to
record.
To record a voiceover:
1. In the Source Tool, select your microphone from the source drop-down list.
2. Mark an In and Out point in your sequence where you want the voiceover to record.
3. If you want the system to display the remaining duration of the record, press the
Record Countdown button.
Recording a Voiceover
4. Press the
Start Recording button.
5. Using the microphone plugged into the mic pre-amp, record your voiceover.
6. Press the
Stop Recording button.
When on, loop tones will sound at the end of each microphone recording. When the
loop tones are done playing, the record starts again automatically. You can use loop
tones for voiceovers directly to the timeline in case you make a mistake and need to
re-record.
September 14, 2007 Aurora Edit LD User Guide 85
Page 86

Chapter 8 Audio
86 Aurora Edit LD User Guide September 14, 2007
Page 87

Chapter 9
Saving and Sending Clips
Once your sequence is complete, you have several output options. The most efficient
method is sending the sequence to a network video server.
This chapter discusses the following topics:
• Saving Clips
• Sending a Clip to a Destination
• Associating a Sequence with a Aurora Playout Placeholder
• Using the ConformManager
• Archiving Clips
September 14, 2007 Aurora Edit LD User Guide 87
Page 88

Chapter 9 Saving and Sending Clips
Saving Clips
To save a sequence:
• Click
Aurora Edit LD saves the sequence to your media server.
Save in the Timeline toolbar or press Ctrl + S on the keyboard.
Sending a Clip to a Destination
Once you complete a sequence, you can send them to a Media Server.
To send a completed sequence:
1. Press
F2 on the keyboard (or click the Send to File button on the toolbar).
The Select Destination window appears, showing all available locations:
NOTE: If you need to add another destination, go to
2. Click on the box where you want to send the sequence.
3. If you want to change the name of the sequence, enter it in the Send As: field.
You cannot change the Send Type or Send To fields.
You can use the Video ID of a sequence instead of the sequence name by selecting
the Use Video ID box in the Select Destination window. If no Video ID appears
with the sequence, that box is grayed out.
4. Click
5. To check if your sequence was sent, click
88 Aurora Edit LD User Guide September 14, 2007
Send or press Enter on the keyboard to send your sequence.
Job List.
If you don’t see your sequence in the current Job List, click the
which shows all sequences that have been sent and their status. See “Viewing EDL
History” on page 90 for more information.
Tools | Options | Send.
ConformManager and view the
History button,
Page 89

Associating a Sequence with a Aurora Playout Placeholder
Associating a Sequence with a Aurora Playout
Placeholder
If you create a clip or sequence on Aurora Edit LD for a specific placeholder in Aurora
Playout, you need to send it back to a playout Media Server so it can be played to air.
To send a sequence and associate it with a Aurora Playout placeholder:
1. Select the completed sequence in the bin.
If you have the sequence open in Aurora Edit LD, it is already selected.
2. Press
3. Select the placeholder to assign to your completed sequence.
F2 on the keyboard or click the Send to File button on the toolbar.
NOTE: If the story was already linked to a MOS ID, the Send to Selected Destinations
window selects the Aurora Playout placeholder automatically.
4. Enter an Editorial Duration for the sequence, if desired.
When sending a linked story to a Aurora Playout destination, you have the
opportunity to change the Editorial Duration. The duration is sent back to the
Newsroom Computer System as the actual on-air duration of the sequence for more
accurate rundown timing.
If left unchanged, the total duration of the story is sent by default.
5. Click
September 14, 2007 Aurora Edit LD User Guide 89
Send.
The clip is automatically sent to the Media Server. Once the clip is sent, the
placeholder no longer appears in your Assignment List and the number of missing
items at the top of the screen decreases by one.
Page 90

Chapter 9 Saving and Sending Clips
Using the ConformManager
The Aurora Edit LD ConformManager tracks the EDLs sent from a specified XRE
Conformance Server. To configure the ConformManager, see “Setting
ConformManager Properties” on page 32.
Viewing the Job List
The ConformManager Job List displays each active and scheduled job or export.
Once a job is complete, the listing moves to the History window.
To view the Job List:
• From the Aurora Edit LD main menu bar, click
The Aurora Browse Conform Server opens displaying the Job List.
Viewing EDL History
The History window displays each of the EDLs that have been sent and their status,
whether the transfer was successful or not.
To view EDL export history:
1. From the Aurora Edit LD main menu bar, click
2. Click the
History button on the toolbar.
ConformManager.
ConformManager.
Transfers that complete successfully display with a blue background. If a send could
not be completed for some reason, the job displays with a red background.
90 Aurora Edit LD User Guide September 14, 2007
Page 91

Archiving Clips
Aurora Edit LD lets you archive system assets to a permanent repository, allowing
you to recover disk space by removing high-resolution material that you don’t need
for immediate playout.
Archiving an Asset
You can archive assets individually or archive multiple clips in a single operation.
This procedure describes archiving a single clip; see “Archiving Multiple Assets” on
page 92 to archive several clips at once.
To archive a clip:
1. Select an asset from the Find tab.
Archiving Clips
2. Press
2 to select the Source Tool and click the Source Properties button.
3. Click the
4. Click
Archive Selected Asset to set the archive parameters.
mgmt (Management) tab.
5. Select an
Archive Device and Archive Group. Your administrator can explain the
choices and site policies.
6. If you wish to rename the archive, edit the
Archive Asset As field.
7. To automatically remove high-resolution material from the Open SAN or
NewsShare NAS after the asset has been archived, check the
following archive
checkbox.
8. To automatically rename the clip if there is a naming conflict, check the
duplicate name handling
checkbox. If you leave the box unchecked, you will be
delete online media
enable
prompted to rename the clip if there is a conflict.
September 14, 2007 Aurora Edit LD User Guide 91
Page 92

Chapter 9 Saving and Sending Clips
9. Click Submit.
10. Click
Yes to confirm the archive operation.
After archiving is complete, the clips status appears as follows:
• If you chose not to delete the online media, the online entry appears on the Related
tab. Hold the mouse pointer over the clip name to view the location.
• If you chose to delete the online media, the General tab displays Archived status
and the Find tab displays an orange dot next to the Thumbnail view and
clip name. The online media entry is removed from the
Related tab, which shows the location of the archived clip.
Archiving Multiple Assets
Aurora Edit LD lets you archive multiple assets at one time.
To archive multiple clips:
1. From the Find tab, search for the clips you wish to archive.
2. Check the box for each clip to be archived.
3. Open the Bin tab; all checked clips are displayed.
4. Click
Archive.
5. Select an
Archive Device and Archive Group. Your administrator can explain the
choices and site policies.
6. To automatically remove high-resolution material from the Open SAN or
NewsShare NAS after the asset has been archived, check the
following archive
7. Click
Yes to submit the assets for batch archive.
checkbox.
delete online media
After archiving is complete, the clips status appears as follows:
• If you chose not to delete the online media, the online entry appears on the Related
tab. Hold the mouse pointer over the clip name to view the location.
• If you chose to delete the online media, the General tab displays Archived status
and the Find tab displays an orange dot next to the Thumbnail view and
clip name. The online media entry is removed from the
Related tab, which shows the location of the archived clip.
92 Aurora Edit LD User Guide September 14, 2007
Page 93

Restoring an Archived Asset
After you archive an asset, you can restore the high-resolution material, if needed, to
the Open SAN or NewsShare NAS.
These procedures describe restoring a single complete or partial clip.
Restoring Complete Clips
To restore a complete clip:
1. From the Find tab, search for the clip you wish to restore.
Restoring an Archived Asset
2. Click the
mgmt (Management) tab.
3. Click Restore Selected Asset to set the restore parameters.
4. Select a
5. If required, modify the clip name in the
6. To automatically rename the clip if there is a naming conflict, check the
duplicate name handling
Restore To Location destination for the high-resolution material.
Restore Asset As field.
enable
checkbox. If you leave the box unchecked, you will be
prompted to rename the clip if there is a conflict.
7. Click
8. Click
September 14, 2007 Aurora Edit LD User Guide 93
Submit.
Yes to confirm the archive operation.
Page 94

Chapter 9 Saving and Sending Clips
Restoring Partial Clips
To restore a partial clip:
1. From the Find tab, search for the clip you wish to restore.
2. Click the
3. Click
4. Select the
5. Select a
mgmt (Management)tab.
Partial Restore From Archive to set the restore parameters.
Region to Restore by playing the clip and creating mark points.
Restore To Location destination for the high-resolution material on your
Open SAN or NewsShare NAS. If you restore a partial clip, you should save it to
a location that is monitored for scavenge operations so that a complete set of proxy
assets is generated for the partial restore file.
6. If required, edit the clip name in the Restore Asset As field. The system appends
"_PR" to the restore clip name to identify it as a partial clip.
7. To automatically rename the clip if there is a naming conflict, check the
duplicate name handling
checkbox. If you leave the box unchecked, you will be
enable
prompted to rename the clip if there is a conflict.
8. Click
9. Click
10. Click
Submit.
Yes to confirm the archive operation.
OK to close the Restore Assets box or click View Log to view which assets
were submitted.
Once restored, the Online Media entry on the Related tab shows the name and location
of the clip on the Open SAN or NewsShare NAS. The Archived Media entry displays
the location of the archived clip; clips remain archived until you choose Delete From
Archive from the
mgmt (Management) tab.
94 Aurora Edit LD User Guide September 14, 2007
Page 95

Restoring Multiple Archived Assets
After you archive an asset, you can restore the high-resolution material, if needed, to
the Open SAN or NewsShare NAS.
To restore clips:
1. From the Find tab, search for the clips you wish to restore.
2. Check the box for each clip that you wish to restore from the archive.
3. Open the Bin tab; all checked clips are displayed.
Restoring Multiple Archived Assets
4. Click
5. Select a
Restore.
Restore To Location destination for the high-resolution material on your
Open SAN or NewsShare NAS.
6. Click
Yes to start the restore operation.
Once restored, the Online Media entry on the Related tab shows the name and location
of the clip on the Open SAN or NewsShare NAS. The Archived Media entry displays
the location of the archived clip; clips remain archived until you choose Delete From
Archive from the Management (mgmt) tab.
Deleting Archived Assets
If you wish to delete an archived asset—if you no longer need it, or if you wish to
store a modified version instead, for example—you can selectively delete assets from
the archive without affecting the online high-resolution material.
You may delete only one clip at a time; you cannot use batch operations.
To delete an asset:
1. From the Find tab, search for the clip you wish to delete.
2. Open the clip in the View window.
NOTE: Archive assets without corresponding high-resolution media are identified
with an orange dot next to the clip entry , and with an
Archived status indicator in the Thumbnail view. Deleting these clips from
the archive removes that last high-resolution copy of the clip.
3. Click the
4. Click
5. At the Delete Asset message, click
mgmt (Management) tab.
Delete From Archive to remove the high-resolution material from the archive.
Continue to delete the asset.
Once the clip is deleted, the Related tab displays the clip location of the
high-resolution material if it exists; the Archived entry is removed.
September 14, 2007 Aurora Edit LD User Guide 95
Page 96

Chapter 9 Saving and Sending Clips
96 Aurora Edit LD User Guide September 14, 2007
Page 97

Index
A
adding general information 39
adding keywords
adding sources
adjusting audio gain
archiving
asset
91
clips
91
deleting assets
multiple assets
restoring asset
restoring complete clips
restoring multiple assets
restoring partial clips
aspect ratio conversion
types
60
using presets
asset
archiving
deleting archived
associating sequence with Aurora Playout
audio
adding crossfades
adjusting gain
adjusting levels on the Timeline
changing clip levels
moving clips
muting tracks
pan control
removing fade control points
routing tracks
setting output levels
viewing levels on the Timeline
voiceovers
audio automation
removing
showing
Audio Mixer tool
Aurora Edit LD
Audio Mixer tool
find/bin tabs
keyboard
logging in
main toolbar
options
Source tool
40
24
82
95
92
93
93
95
94
61
91
95
75
82
78
79
56
80
80
79
49
81
78
84
83
83
83
21, 78
21, 78
17
22
16
17
26
20
89
storyboard
Timeline
Timeline tool
tools
Transition tool
Trim tool
window
Aurora Playout
associating sequence with
options
17
18
19
19
21, 72
20, 52
16
89
31
B
battery replacement 8
Bin
organizing media
using match frame
34
67
C
Canadian Certified Power Cords 9
Canadian EMC Notice of Compliance
certifications and compliances
changing
audio levels
editing mode
end points between clips
sequence properties
Timeline view
transitions
clips
archiving
changing audio levels
changing end points
copy and paste
creating
deleting
area of sequence
deleting archived
extending edit
inserting filler
lifting
area of sequence
from Timeline
marking points
moving audio
moving in Timeline
restoring
79
58
45
74
91
57
49
65
95
54
66
63
63
48
56
93
9
52
47
79
52
65
64
56
9
September 14, 2007 Aurora Edit LD User Guide 97
Page 98

Index
restoring multiple assets 95
restoring partial
saving
88
searching for
sending
splitting
trimming
configuration
adding sources
Aurora Playout
ConformManager properties
general options
handles
send locations
setting options
Timeline
video settings
voiceovers
ConformManager
EDL History
Job List
properties
control track
copying and pasting clips
selected area
selected items
creating
clips
new sequence
transitions
crossfades, audio
audio tracks only
with transitions
custom fields
88
62
30
30
90
67
49
94
34
52
24
31
27
29
26
28
84
90
90
32
57
57
46
73
75
75
75
41
57
32
overview
tools
editing mode, changing
EDL history
electric shock
EN55022 Class A Warning
end points, changing
extending edit
44
19
58
90
7
52
54
F
fade control points 79
adding
78
removing
FCC
10
Emission Control and Limits
filler, inserting
filters
deleting
loading
modifying
saving
search
find/bin tabs
fire hazard
79, 83
66
38
37
37
36
35
17
7
G
gain, audio 82
general options, setting
grounding, safety
groups, modifying
27
7
42
H
handles, setting 30
10
9
D
deleting
archived assets
area of sequence
clips
65
filters
38
transitions
95
65
74
E
edit
extending
split
editing
98 Aurora Edit LD User Guide September 14, 2007
54
48
I
injury precautions 7
inserting filler
66
J
Job List, ConformManager 90
K
keyboard, Aurora Edit LD 22
keywords
40
Page 99

L
Laser 10
Laser Compliance
launching Aurora Edit LD
lifting clips
area of sequence
from Timeline
linking to a news story
loading filter
locking duration of clip
logging in
16
10
16
63
64
63
68
37
53
M
main toolbar 17
marking in and out points
match frame
media, organizing
metadata
custom fields
general information
keywords
modifying groups
related information
modifying
active filters
groups
moving
audio clips
clips
multiple asset archiving
muting audio tracks
67
34
39
41
40
37
42
56
56
48
39
42
41
92
80
N
new sequence 46
news story, linking to
newsroom computer system, linking to
68
O
options
Aurora Edit LD
Aurora Playout
organizing media in Bin
output audio levels
overview of editing
26
31
34
81
44
P
pan control 80
68
playing past out
playing sequence
points, marking
presets, for aspect ratio conversion
product damage precautions
properties
changing
ConformManager
53
50
48
7
47
32
R
recording voiceover 85
related information
removing audio automation
required equipment for voiceover
restoring
archived asset
multiple assets
partial clips
routing audio tracks
41
83
93
95
94
49
S
safety
certification
summary
terms and symbols
saving
clips
88
filters
search filters
searching
for clips
tips
36
using filters
using metadata
selecting and deselecting tracks
send locations, setting up
sending clips
with Aurora Playout placeholder
sequence
adding transitions
adding voiceovers
changing properties
creating clips
creating new
deleting area
deleting clips from
lifting area of
marking points
11
7
8
36
35
34
35
39
47
29
88
73
84
47
49
46
65
65
64
48
61
84
89
September 14, 2007 Aurora Edit LD User Guide 99
Page 100

Index
playing 50
saving
88
sending
service safety summary
setting audio output levels
setting up Aurora Edit LD
adding sources
Aurora Playout
ConformManager
general options
handles
options
send locations
Timeline
video settings
setting up split edit
settings, video
showing audio automation
Source tool
sources, adding
split edit
splitting clips
storyboard
88
9
24
31
32
27
30
26
29
30
28
48
28
20
24
48
62
17
T
Timeline 18
adjusting audio levels
changing view
copying selected area
copying selected items
creating new sequence
moving clips
options, setting
selecting/deselecting tracks
viewing audio levels
Timeline tool
tips for searching
tools
Audio Mixer
Source
Timeline
Transition
Trim
tracks
muting
routing audio
selecting
Transition tool
20
20, 52
80
45
56
30
78
19
36
21, 78
19
21, 72
49
47
21, 72
81
83
78
57
57
46
47
adding to sequences
transitions
audio crossfades with
changing
creating
deleting
types
Trim tool
trimming clips
handles
locking duration
playing past out
types of aspect ratio conversion
74
73
74
72
20, 52
52
53
73
75
53
53
U
using
control track
handles with Trim tool
match frame to Bin
67
53
67
V
ventilation 7
video settings
viewing related information
voiceovers
configuring
recording
required equipment
28
41
84
84
85
84
60
100 Aurora Edit LD User Guide September 14, 2007
 Loading...