

Page 1
Aurora Edit
FAST-TURN PRODUCTION TOOLS
User Guide
Software Version 7.0
071-8500-05
April 2010
Page 2

Affiliate with the N.V. KEMA in The Netherlands
CERTIFICATE
Certificate Number: 510040.001
The Quality System of:
Thomson Inc, and its worLdwide Grass Valley division affiliates DBA
GRASS VALLEY
Headquarters
400 Providence Mine Rd
Nevada City, CA 95959
United States
15655 SW Greystone Ct.
Beaverton, OR 97006
United States
10 Presidential Way
Suite 300
Woburn, MA 01801
United States
Kapittelweg 10
4827 HG Breda
The Nederlands
7140 Baymeadows Way
Ste 101
Jacksonville, FL 32256
United States
2300 So. Decker Lake Blvd.
Salt Lake City, UT 84119
United States
Rue du Clos Courtel
CS 31719
35517 Cesson-Sevigné Cedex
France
1 rue de l’Hautil
Z.I. des Boutries BP 150
78702 Conflans-Sainte
Honorine Cedex
France
Technopole Brest-Iroise
Site de la Pointe du Diable
CS 73808
29238 Brest Cedex 3
France
40 Rue de Bray
2 Rue des Landelles
35510 Cesson Sevigné
France
Spinnereistrasse 5
CH-5300 Turgi
Switzerland
Brunnenweg 9
D-64331 Weiterstadt
Germany
Carl-Benz-Strasse 6-8
67105 Schifferstadt
Germany
Including its implementation, meets the requirements of the standard:
ISO 9001:2008
Scope:
The design, manufacture and support of video and audio hardware and software products and
related systems
.
This Certificate is valid until: June 14, 2012
This Certificate is valid as of: June 14, 2009
Certified for the first time: June 14, 2000
H. Pierre Sallé
President
KEMA-Registered Quality
The method of operation for quality certification is defined in the KEMA General Terms
And Conditions For Quality And Environmental Management Systems Certifications.
Integral publication of this certificate is allowed.
KEMA-Registered Quality, Inc.
4377 County Line Road
Chalfont, PA 18914
Ph: (215)997-4519
Fax: (215)997-3809
CRT 001 073004
Accredited By:
ANAB
Page 3

Aurora Edit
FAST-TURN PRODUCTION TOOLS
User Guide
Software Version 7.0
071-8500-05
April 2010
Page 4

Copyright Copyright © Grass Valley, Inc. All rights reserved. Printed in the United States of America.
Portions of software © 2000 – 2010, Microsoft Corporation. All rights re
may not be copied in wh
under U.S. copyright law, without the prior written consent of Grass Valley, Inc., P.O. Box
59900, Nevada City, California 95959-7900. This product may be covered by one or more U.S.
and foreign patents.
SkinCrafter Component Copyright 2002-2005 DMSoft Technologies
ole or in part, or otherwise reproduced except as specifically permitted
Disclaimer Product options and specifications subject to change without notice. The information in this
manual is furnished for informational use only, is subject to change without notice, and should
not be construed as a commitment by Grass Valley, Inc. Grass Valley, Inc. assumes no
responsibility or liability for any errors or inaccuracies that may appear in this publication.
served. This document
U.S. Government
Restricted Rights
Legend
Trademarks and
Logos
Revision Status
Use, duplication, or disclosure by the United States Government is subject to restrictions as set
forth in subparagraph (c)(1)(ii) of the Rights in Technical Data and Computer Software clause
at DFARS 252.277-7013 or in subparagraph c(1) and (2) of the Commercial Computer
Software Restricted Rights clause at FAR 52.227-19, as applicable. Manufacturer is Grass
Valley, Inc., P.O. Box 59900, Nevada City, California 95959-7900 U.S.A.
Grass Valley, K2, Aurora, Summit, Dyno, Solo, Infinity, Turbo, Profile, Profile XP, NetCentral,
NewsBrowse, NewsEdit, NewsQ, NewsShare, NewsQ Pro, and Media Manager are either
registered trademarks or trademarks of Grass Valley, Inc. in the United States and/or other
countries. Grass Valley, Inc. products are covered by U.S. and foreign patents, issued and
pending. Additional information regarding Grass Valley, Inc. trademarks and other proprietary
rights may be found at www.grassvalley.com. Other trademarks and logos used in this
document are either registered trademarks or trademarks of the manufacturers or vendors of
the associated products, such as Microsoft® Windows® operating system, Windows Media®
player, Internet Explorer® internet browser, and SQL Server™. QuickTime and the QuickTime
logo are trademarks or registered trademarks of Apple Computer, Inc., used under license
therefrom.
Rev Date Description
June 30, 2006 Release 071-8500-00 for Software Version 6.0
October 26, 2006 Release 071-8500-01 for Software Version 6.0a
May 3, 2007 Release 071-8500-02 for Software Version 6.1
September 7, 2007 Release 071-8500-03 for Software Version 6.3
November 21, 2008 Release 071-8500-04 for Software Version 6.5A
April 21, 2010 Release 071-8500-05 for Software Version 7.0
4
Page 5

Contents
Grass Valley Product Support................................................................................................13
Chapter 1: Introducing Aurora Edit..........................................................................15
What is Aurora Edit?..............................................................................................................16
Quick overview of editing with Aurora Edit............................................................................16
Supported formats.................................................................................................................16
Tour of the Aurora Edit window..............................................................................................18
Main toolbar.......................................................................................................................18
Bin......................................................................................................................................19
Timeline.............................................................................................................................21
Dynamic tool window.........................................................................................................23
Viewing monitor.................................................................................................................24
Storyboard.........................................................................................................................24
Audio mixer........................................................................................................................25
The Assignment List Manager...........................................................................................25
Aurora Edit tools....................................................................................................................26
Timeline Tool .....................................................................................................................26
Source Tool .......................................................................................................................27
Trim Tool ............................................................................................................................28
Cut Point Edit Tool .............................................................................................................29
Transition Tool ...................................................................................................................30
Audio Mixer Tool ................................................................................................................30
Audio Effects Tool .............................................................................................................31
Video Effects Tool .............................................................................................................32
Title Tool ............................................................................................................................33
Graphic Tools.....................................................................................................................34
The Aurora Edit keyboard......................................................................................................35
Tool selection keys.............................................................................................................35
Transport command keys...................................................................................................36
Editing and clip/track selection keys..................................................................................37
Mark point keys..................................................................................................................38
Track selection keys...........................................................................................................40
Other Aurora Edit keys.......................................................................................................41
Command pulldown menu.....................................................................................................42
Keyboard shortcuts...............................................................................................................42
Aurora Edit keyboard shortcuts..........................................................................................43
Edit setup keyboard shortcuts...........................................................................................43
Selecting and moving keyboard shortcuts.........................................................................44
Play speed keyboard shortcuts..........................................................................................45
Tracks keyboard shortcuts.................................................................................................45
Transports keyboard shortcuts...........................................................................................46
Video effects keyboard shortcuts.......................................................................................46
MediaFrame keyboard shortcuts.......................................................................................47
Contents
Chapter 2: Working in the Bin..................................................................................49
08 April 2010 Aurora Edit User Guide 5
Page 6

Contents
About the Bin window............................................................................................................50
Creating a new bin................................................................................................................50
How to organize your Bins.....................................................................................................51
Saving the Bin position..........................................................................................................52
Working in shared or local mode...........................................................................................52
Viewing clips in your Bin........................................................................................................53
Details view........................................................................................................................53
Thumbnail view..................................................................................................................55
Working with clips in the Bin..................................................................................................55
Searching for a clip or sequence.......................................................................................55
Copying a clip or sequence................................................................................................56
Moving a clip or sequence.................................................................................................57
Renaming bins and media files..........................................................................................57
Deleting clips and sequences............................................................................................57
Changing master clip properties .......................................................................................57
SmartBins..............................................................................................................................58
Understanding SmartBins .................................................................................................58
Creating a Transfer SmartBin.............................................................................................58
Creating a Shared SmartBin .............................................................................................59
Chapter 3: Using MediaFrame to manage media...................................................61
Understanding MediaFrame..................................................................................................62
Searching for media..............................................................................................................62
Setting search criteria........................................................................................................62
Tips for using search criteria..............................................................................................63
Saving a search.................................................................................................................66
Working with searches.......................................................................................................66
Using filters to refine a search...........................................................................................67
Using Explore to bookmark locations....................................................................................69
Using Collections to categorize clips.....................................................................................70
About Collections...............................................................................................................70
Creating a collection..........................................................................................................70
Modifying Collections.........................................................................................................71
Viewing Collection contents...............................................................................................71
Adding assets to a collection.............................................................................................71
Using metadata to define clips..............................................................................................72
About metadata.................................................................................................................72
Adding general information................................................................................................72
Using keywords to define clips...........................................................................................73
Managing custom metadata fields.....................................................................................75
Using custom metadata fields............................................................................................76
Printing metadata...............................................................................................................76
Chapter 4: Acquiring media.....................................................................................79
Using clips stored in the Bin..................................................................................................80
Using a clip source................................................................................................................80
Recording to the Bin..............................................................................................................80
Using files from removable media ........................................................................................81
Importing files........................................................................................................................82
Importing clips...................................................................................................................82
6 Aurora Edit User Guide 08 April 2010
Page 7

Contents
Importing EDL files............................................................................................................82
Importing effects................................................................................................................83
Importing graphic files........................................................................................................83
Importing media ................................................................................................................84
Importing a TGA animation sequence ..............................................................................86
Importing a MOV Animation File .......................................................................................87
Batch recording.....................................................................................................................88
About batch recording........................................................................................................88
Creating a Batch Capture list.............................................................................................89
Rearranging the Batch Capture list....................................................................................90
Changing row colors in the Batch Capture list...................................................................90
Saving a Batch Capture list...............................................................................................91
Loading a Batch Capture list..............................................................................................91
Recording clips to the Bin..................................................................................................91
Chapter 5: Preparing to edit.....................................................................................93
Creating a new sequence......................................................................................................94
Changing sequence properties..........................................................................................95
Preserving ANC Data............................................................................................................96
Selecting and deselecting tracks...........................................................................................97
About editing modes..............................................................................................................97
Naming source tapes............................................................................................................98
Routing audio tracks..............................................................................................................98
Using variable speed record..................................................................................................99
Selecting your source..........................................................................................................100
Using a clip source..........................................................................................................100
Changing sources............................................................................................................100
Using auxiliary input.........................................................................................................100
Linking to an existing news or sports story..........................................................................101
Story View functions........................................................................................................103
Adjusting the read count in Story View............................................................................105
Using the Assignment List Manager....................................................................................105
Editing and Aurora Playout..............................................................................................107
Creating placeholders in the Assignment List..................................................................107
Viewing by category in the Assignment List....................................................................109
Changing the clip category in the Assignment List..........................................................109
Identifying missing clips...................................................................................................109
Deleting placeholders in the Assignment List..................................................................110
Chapter 6: Working in the Timeline........................................................................111
Understanding Aurora Edit's Agile Timeline........................................................................112
Mark Points..........................................................................................................................112
About Mark Points............................................................................................................112
Marking In and Out Points...............................................................................................113
Setting up a split edit...........................................................................................................113
Controlling a deck from Aurora Edit.....................................................................................114
Zooming in on a clip source................................................................................................115
Tips for using the zoom controls......................................................................................116
Changing the Timeline view manually.................................................................................117
Using Auto-Scale to adjust the Timeline view automatically................................................117
08 April 2010 Aurora Edit User Guide 7
Page 8

Contents
Toggling tracks on the fly.....................................................................................................118
Moving clips.........................................................................................................................118
Moving clips in the Timeline.............................................................................................118
Moving audio clips...........................................................................................................119
Copying clips to the Timeline...........................................................................................119
Copying and pasting clips................................................................................................119
Copying a selected area of a sequence...........................................................................120
Using Quick Edit mode........................................................................................................120
Creating your clips...............................................................................................................120
Playing a sequence.............................................................................................................121
Saving a sequence..............................................................................................................122
Splitting clips.......................................................................................................................122
Lifting clips...........................................................................................................................123
Lifting clips from the Timeline..........................................................................................123
Lifting an area of a sequence..........................................................................................123
Deleting clips.......................................................................................................................124
Deleting a clip from your sequence.................................................................................124
Deleting an area from a sequence...................................................................................125
Saving the Timeline track configuration ..............................................................................125
Chapter 7: Trimming clips......................................................................................127
Trimming your clips..............................................................................................................128
Using handles to add frames to your clips...........................................................................128
Locking the duration of a clip...............................................................................................128
Playing Past Out..................................................................................................................129
Changing cut points between adjacent clips.......................................................................129
About adjusting cut points ...............................................................................................129
Changing cut points.........................................................................................................129
Navigating to cut points...................................................................................................130
Using audio scrubbing.....................................................................................................131
Extending an individual track...........................................................................................131
Extending your edits............................................................................................................131
Trimming your media clips in the Bin...................................................................................132
Creating SubClips............................................................................................................133
Copying a clip to the Timeline..........................................................................................133
A quick way to edit...........................................................................................................133
Chapter 8: Transitions.............................................................................................135
Transitions in Aurora Edit.....................................................................................................136
Understanding transition types............................................................................................136
Dissolves..........................................................................................................................137
Wipes...............................................................................................................................137
Pushes.............................................................................................................................137
Slides...............................................................................................................................138
Creating a transition............................................................................................................138
Changing transitions............................................................................................................139
Creating wipes.....................................................................................................................140
Adding a border to a wipe................................................................................................140
Changing the border color of a Wipe...............................................................................141
Reversing a Wipe.............................................................................................................141
8 Aurora Edit User Guide 08 April 2010
Page 9

Contents
Rendering transitions..........................................................................................................141
Creating transitions for an area of the sequence ................................................................142
Deleting transitions..............................................................................................................142
Audio crossfades.................................................................................................................143
About audio crossfades...................................................................................................143
Applying crossfades to the audio tracks only...................................................................143
Applying crossfades automatically with transitions..........................................................143
Chapter 9: Audio......................................................................................................145
Adjusting audio levels..........................................................................................................146
About adjusting audio levels in Aurora Edit......................................................................146
Viewing audio levels on the Timeline...............................................................................146
Changing audio levels in a clip........................................................................................148
Removing fade control points..........................................................................................148
Ganging and adjusting multiple audio tracks...................................................................149
Monitoring audio tracks.......................................................................................................149
Soloing an audio track.....................................................................................................149
Muting an audio track.......................................................................................................149
Using the Master Audio Sliders to set output level...........................................................150
Setting Timeline audio settings............................................................................................151
Adjusting audio gain............................................................................................................152
Using Audio Automation......................................................................................................153
Showing Audio Automation..............................................................................................153
Removing Audio Automation...........................................................................................153
Adding audio narration .......................................................................................................154
Audio effects........................................................................................................................154
About audio effects..........................................................................................................154
Equalizing audio in a recorded sequence........................................................................155
Using a previously applied Audio EQ effect.....................................................................157
Disguising a voice in a clip...............................................................................................157
Enhancing audio using OMF files .......................................................................................159
Exporting an Aurora Edit sequence as an OMF file ........................................................159
Enhancing audio with Digidesign Pro Tools ....................................................................160
Enhancing audio with Steinberg Nuendo ........................................................................161
Enhancing audio with Fairlight and AVTransfer ...............................................................163
Importing enhanced OMF files back into Aurora Edit .....................................................164
Chapter 10: Advanced editing................................................................................165
Converting clip aspect ratios...............................................................................................166
About aspect ratio conversion..........................................................................................166
Aspect ratio conversion types..........................................................................................167
Manually converting a clip aspect ratio............................................................................167
Creating an aspect ratio preset........................................................................................168
Inserting filler between clips................................................................................................168
Creating a Fit To Fill.............................................................................................................169
Adding a freeze frame to your sequence.............................................................................170
Varying the speed of a clip..................................................................................................171
Creating split edits...............................................................................................................171
Using control track...............................................................................................................172
Using Match Frame.............................................................................................................172
08 April 2010 Aurora Edit User Guide 9
Page 10

Contents
Match Frame to Bin..........................................................................................................172
Match Frame to source....................................................................................................173
Editing using offline proxy media.........................................................................................173
Seaching for Offline Assets..............................................................................................174
Moving offline assets to the Timeline...............................................................................175
Restore and synchronize offline assets...........................................................................176
Unlinking restored assets................................................................................................179
Linking video MOS objects to the Timeline.........................................................................180
About Aurora Edit and Final Cut Pro...................................................................................183
Exporting an Aurora Edit sequence as a Final Cut Pro EDL ..........................................183
Importing an Aurora Edit sequence on Final Cut Pro .....................................................184
Exporting a Final Cut Pro file ..........................................................................................184
Converting existing Aurora Edit files to .mov format .......................................................185
Opening an Aurora Edit clip on Final Cut Pro .................................................................185
Chapter 11: Video effects.......................................................................................187
Creating video effects - overview........................................................................................188
Understanding video effects................................................................................................189
Moving the foreground image within the viewer window.....................................................190
Moving foreground image—dragging image....................................................................190
Moving foreground image—using the joystick.................................................................190
Moving foreground image—moving the resize slider.......................................................190
Moving foreground image—adjusting the dials................................................................190
Moving foreground image—using the keyboard..............................................................191
Adding a video effect to the Timeline...................................................................................191
Other ways to add a video effect to the Timeline.............................................................192
Changing the duration of a video effect...........................................................................192
Using saved effects in your sequence.............................................................................192
Importing video effects.....................................................................................................193
Choosing a video effect.......................................................................................................194
Using video effect options................................................................................................194
Adding effect properties...................................................................................................195
Working with keyframes......................................................................................................196
Understanding keyframes................................................................................................196
Inserting keyframes.........................................................................................................197
Modifying keyframes........................................................................................................197
Setting a path for your video effect......................................................................................198
Video effect paths............................................................................................................199
Viewing video effects within your sequence........................................................................200
Saving video effects............................................................................................................200
Rendering video effects.......................................................................................................200
Layering video effects..........................................................................................................201
Exporting video effects........................................................................................................201
Effects & what they do.........................................................................................................202
How video effects work together......................................................................................202
Understanding video effects and keyframes....................................................................202
Resize video effect...........................................................................................................204
Key Shape video effect....................................................................................................204
Blur & mosaic video effects..............................................................................................205
Color Effect......................................................................................................................207
10 Aurora Edit User Guide 08 April 2010
Page 11

Contents
Proc Amp video effect......................................................................................................208
Color correction video effect............................................................................................208
Mirror Vertical video effect...............................................................................................210
Mirror Horizontal video effect...........................................................................................210
Luma Key video effect......................................................................................................211
Options for resize or key shape effects...............................................................................211
Blend options for Resize and Key Shape effects.............................................................211
Border options for Resize and Key Shape effects............................................................212
Cropping options for Resize effects.................................................................................212
Drop shadows for Resize and Key Shape effects............................................................213
Path Control for keyframes..............................................................................................214
Chapter 12: Titling and Graphics...........................................................................217
Titling and Graphics Overview.............................................................................................218
Using the Title Tool..............................................................................................................218
Using title templates........................................................................................................219
Modifying a template for your sequence..........................................................................220
Advanced titling...............................................................................................................222
Adding fonts.....................................................................................................................223
The Orad Graphics Tool .....................................................................................................223
Configuring Orad in Aurora Edit.......................................................................................224
Moving Orad MOS objects into Aurora Edit.....................................................................225
Creating Graphics In Orad...............................................................................................226
Preview and Edit Orad Graphics......................................................................................227
The VizRT Graphics Tool ....................................................................................................228
Configuring VizRT in Aurora Edit.....................................................................................229
Moving VizRT MOS objects into Aurora Edit....................................................................231
Create VizRT Graphic within Aurora Edit.........................................................................232
Preview VizRT Graphics..................................................................................................234
Chapter 13: Sending and exporting output..........................................................237
Sending sequences.............................................................................................................238
Associating a sequence with an Aurora Playout placeholder..............................................238
Recording completed sequences to tape............................................................................239
Storing sequences on Aurora Edit.......................................................................................241
Creating a playback list.......................................................................................................241
Playing and organizing sequences in the playback list....................................................242
Playing all sequences in the playback list........................................................................242
Viewing footage while playing a sequence......................................................................243
Trimming sequences in the playlist..................................................................................243
Loading a playlist.............................................................................................................243
Changing playback colors................................................................................................244
Modifying playback settings.............................................................................................244
Exporting files......................................................................................................................244
Exporting EDLs................................................................................................................245
Exporting a Final Cut Pro EDL........................................................................................246
Exporting effects..............................................................................................................247
Exporting graphic files.....................................................................................................247
Exporting media...............................................................................................................248
Exporting to a removable media device...........................................................................249
08 April 2010 Aurora Edit User Guide 11
Page 12

Contents
Using the Conform Manager...............................................................................................250
Appendix A: Software Licenses.............................................................................253
cmemdc...............................................................................................................................254
cping....................................................................................................................................254
CSizingToolBar....................................................................................................................255
CTextProgressCtrl...............................................................................................................256
MIT......................................................................................................................................256
mozilla.................................................................................................................................257
Paintlib.................................................................................................................................264
resizeable lib........................................................................................................................265
tconvert................................................................................................................................267
zlib.......................................................................................................................................267
Glossary.................................................................................................................................269
12 Aurora Edit User Guide 08 April 2010
Page 13

Grass Valley Product Support
To get technical assistance, check on the status of a question, or to report a new issues,
contact Grass Valley Product Support via e-mail, the Web, or by phone or fax.
Web Technical Support
To access support information on the Web, visit the product support Web page on the
Grass Valley Web site. You can download software or find solutions to problems.
World Wide Web: http://www.grassvalley.com/support/
Technical Support E-mail Address: gvgtechsupport@grassvalley.com
Telephone Support
Use the following information to contact Product Support by phone.
International Support Centers
Our international support centers are available 24 hours a day, 7 days a week.
Authorized Local Support Representative
A local support representative may be available in your country. To locate a support
center during normal local business hours, refer to the following list. This list is
regularly updated on the website for Grass Valley Product Support
(http://www.grassvalley.com/support/contact/phone/)
After–hours local phone support is also available for warranty and contract customers.
Macau
In countryToll freeSupport Center
+33 1 48 25 20 20+800 80 80 20 20France
+1 530 478 4148+1 800 547 8949United States
TelephoneCountyRegion
+86 10 5883 7575ChinaAsia
+852 2531 3058Hong Kong, Taiwan, Korea,
+81 3 6848 5561Japan
+603 7492 3303Southeast Asia - Malaysia
+65 6379 1313Southeast Asia - Singapore
08 April 2010 Aurora Edit User Guide 13
Page 14

Grass Valley Product Support
South America
TelephoneCountyRegion
+91 22 676 10300India
1 300 721 495AustraliaPacific
0800 846 676New Zealand
+61 3 8540 3650For callers outside Australia
or New Zealand
+55 11 5509 3440AllCentral America,
North America
North America, Mexico,
Caribbean
France
Eastern Europe
Belarus, Russia,
Tadzhikistan, Ukraine,
Uzbekistan
Nordics (Norway, Sweden,
Finland, Denmark, Iceland)
Southern Europe – Italy
+1 800 547 8949;
+1 530 478 4148
+44 118 923 0499UK, Ireland, IsraelEurope
+31 (0) 35 62 38 421Benelux – Netherlands
+32 (0) 2 334 90 30Benelux – Belgium
+800 80 80 20 20;
+33 1 48 25 20 20
+49 6150 104 444Germany, Austria,
+7 095 258 09 20;
+33 (0) 2 334 90 30
+45 40 47 22 37; +32 2 333
00 02
Rome: +39 06 87 20 35 28 ;
+39 06 8720 35 42. Milan:
+39 02 48 41 46 58
+34 91 512 03 50Southern Europe – Spain
+41 56 299 36 32Switzerland
+971 4 299 64 40Middle EastMiddle East, Near East,
Africa
14 Aurora Edit User Guide 08 April 2010
Near East and Africa
+800 80 80 20 20;
+33 1 48 25 20 20
Page 15

Chapter 1
Introducing Aurora Edit
This section contains the following topics:
• What is Aurora Edit?
• Quick overview of editing with Aurora Edit
• Supported formats
• Tour of the Aurora Edit window
• Aurora Edit tools
• The Aurora Edit keyboard
• Command pulldown menu
• Keyboard shortcuts
08 April 2010 Aurora Edit User Guide 15
Page 16

Introducing Aurora Edit
What is Aurora Edit?
Aurora Edit is a digital nonlinear editing solution designed specifically for editing
news stories. It replaces record decks and effects switchers by displaying edits in real
time.
Nonlinear editing systems provide greater efficiency, accuracy, and flexibility than
analog tape-based systems. For instance, you do not need to edit chronologically--you
can edit shots in any order without re-recording all of your edits after a change.
Breaking stories can be edited quickly, saved, and then different versions can be cut.
Re-editing stories, fixing mistakes, and adding shots in a tape-to-tape environment
can require valuable time in a business where time isn't always available. With
nonlinear editing, however, changes can be made at anytime during the editing process.
Aurora Edit's unique dynamic display updates automatically to provide you, the editor,
with the tools necessary for every edit. Because the audio and video are stored digitally,
you can repeatedly use media without duplication or degradation.
Quick overview of editing with Aurora Edit
You create a news or sports story with Aurora Edit in three stages: record footage,
edit and fine-tune the story, send the story for playout to air.
1. Record your raw footage or feed directly to the Aurora Edit Timeline or Bin.
You can also import clips and sequences from other third-party sources or other
Aurora Edit workstations.
2. Edit the story and fine tune it.
Use basic editing procedures to create simple cuts. Add dissolve, wipe, or slide
transitions. Add video effects such as blurs, color effects, or Picture-in-Picture.
Adjust the audio or add new audio. Add graphics or titles.
3. Save your final story to a network server, record it to tape for airing, play it directly
to air with an Aurora Edit playlist or a playback system like Aurora Playout.
Supported formats
Aurora Edit supports a large variety of audio, video and media formats you can use
to create sequences.
Aurora Edit supports these media formats for both NTSC and PAL video standards:
• DV
• DVCAM
• DVCPRO (25/50/100)
16 Aurora Edit User Guide 08 April 2010
Page 17

• MPEG
• IMX
• AVC-Intra
• JPEG 2000
Aurora Edit supports these video formats:
Introducing Aurora Edit
Format
Aurora Edit supports these audio formats:
Format
Aurora Edit
LD
Aurora Edit
LD
Aurora Edit
HD
Aurora Edit
HD
Aurora Edit
HDR
XComponentInput
XComposite
XXFireWire, AVC and RMI
XSDI
XS-Video
XComponentOutput
XComposite
XXXDual VGA
XXFireWire (IEEE 1394)
XSDI
XS-Video
Aurora Edit
HDR
2/1AES-BNCInput
2/1AES-XLR
XXXANALOG-RCA
2ANALOG-XLR
8SDI Embedded
2/1AES-BNCOutput
2/1AES-XLR
2XXANALOG-RCA
2ANALOG-XLR
8SDI Embedded
08 April 2010 Aurora Edit User Guide 17
Page 18
Introducing Aurora Edit
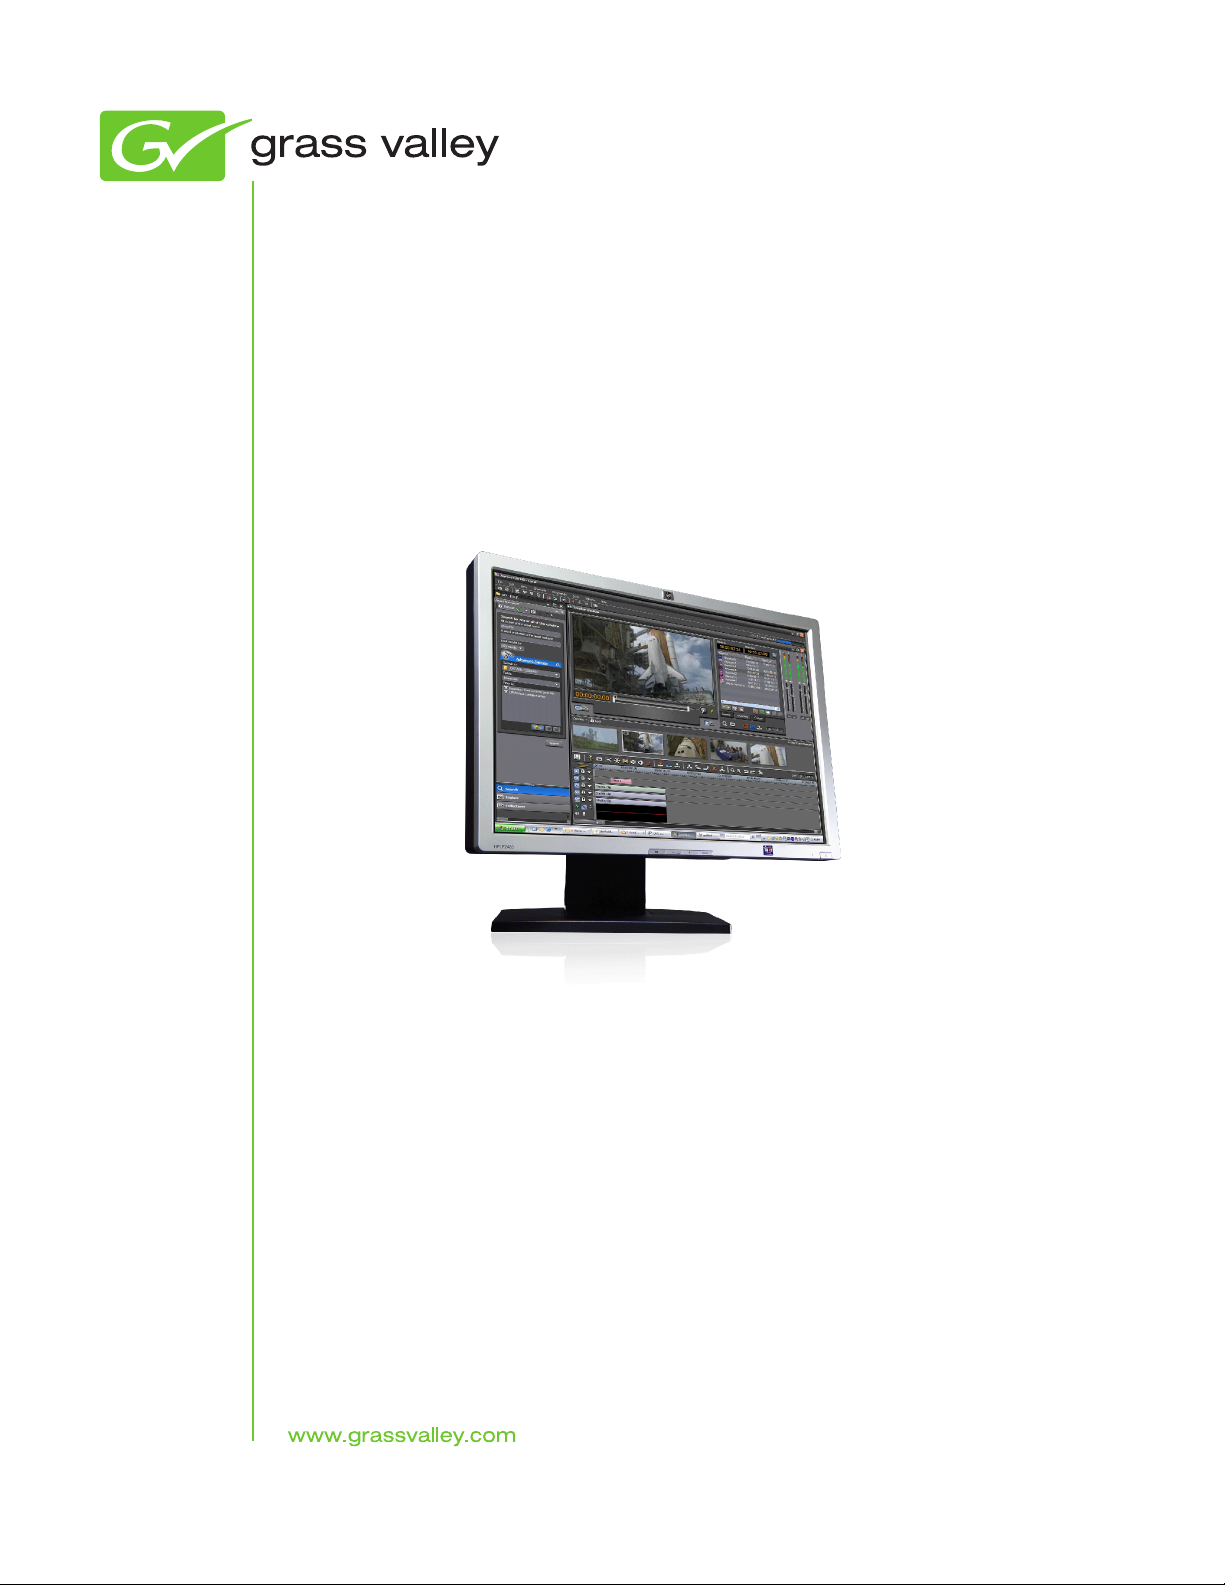
Tour of the Aurora Edit window
The Aurora Edit window consists of a main toolbar, a Bin to hold files, a
record/playback monitor, an audio mixer, an editing Timeline, and a dynamic window
that changes depending on the tool selected.
If you are using MediaFrame, you also have a storyboard that display scene detection
thumbnails.
Main toolbar
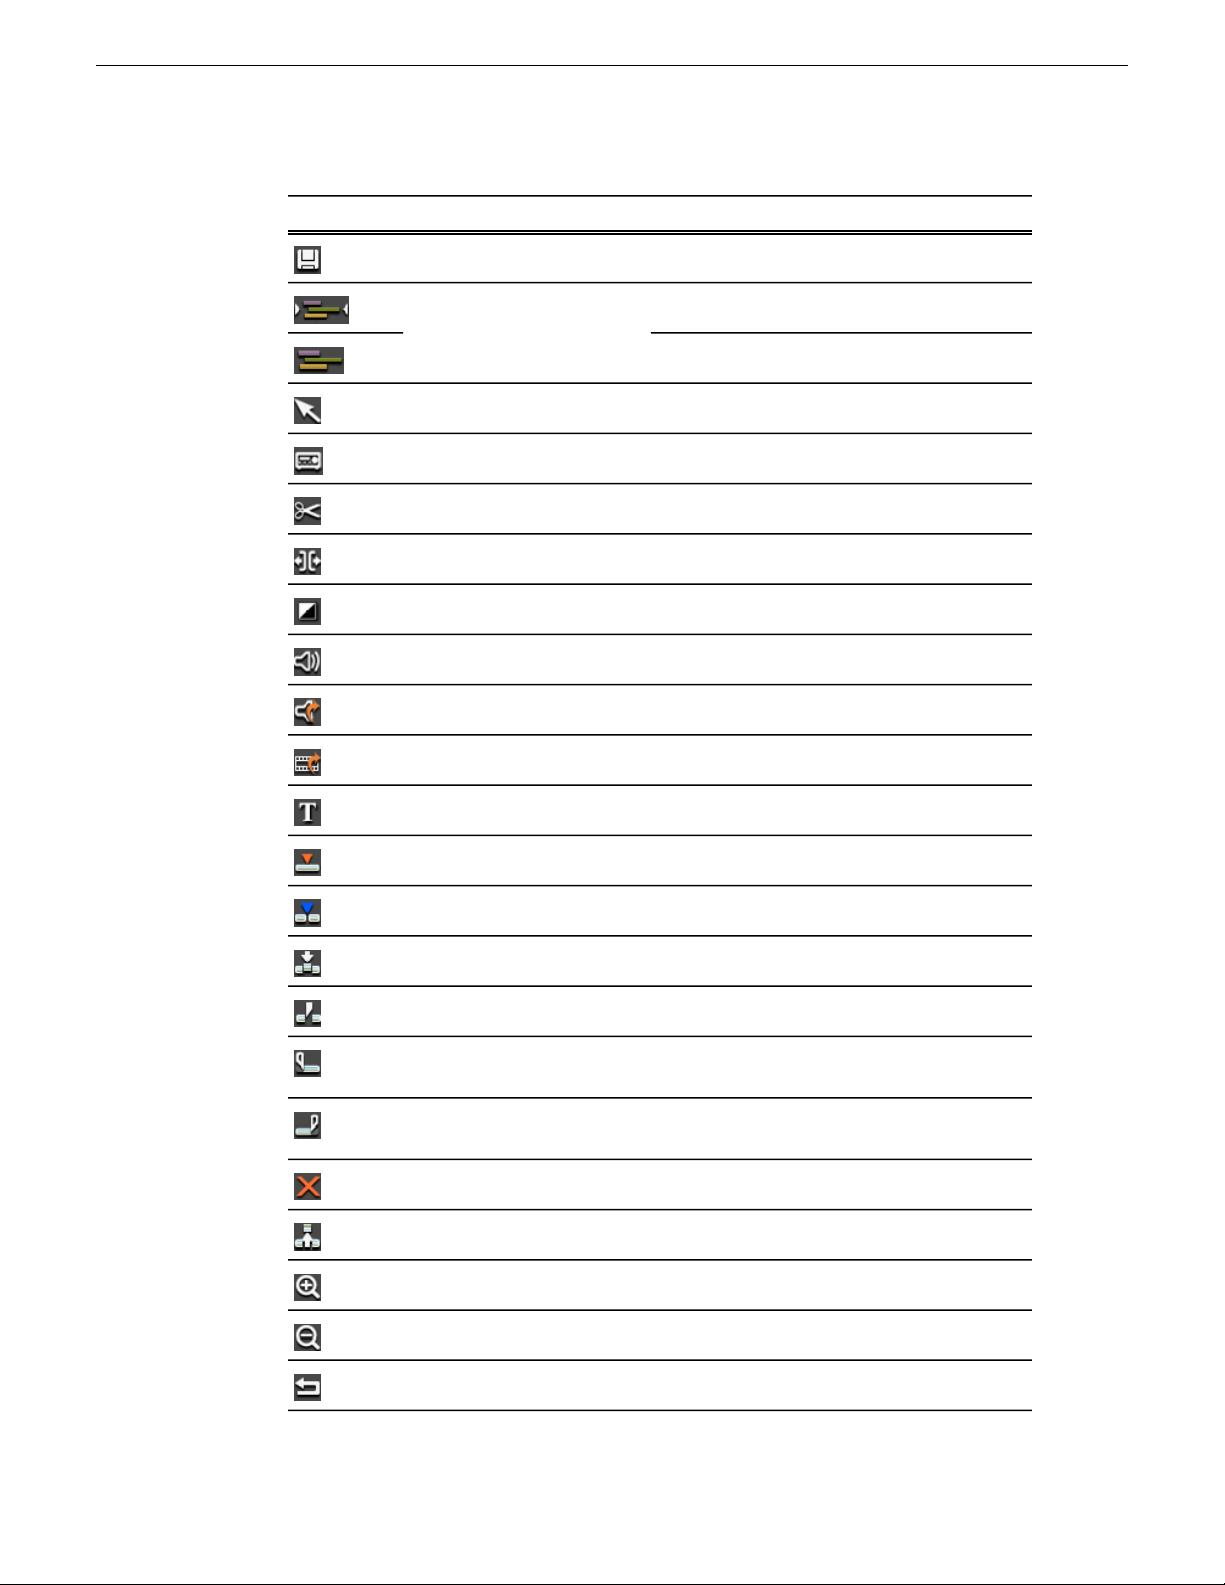
The main toolbar provides access to common Aurora Edit functions.
Conform Manager
Transfer Manager
Story View
Render Effects
FunctionNameButton
Sends a clip or sequence to another destinationSend To File
Opens the Conform Manager where you can
monitor sends using a Conformance Server
Opens the Transfer Manager window to show
status of restored media being transferred between
an archive location and the current timeline
Displays the script for the selected sequence, if
there is one
Records clips directly into your BinRecord to Bin
Records the selected clip or sequence to tapePlay to Tape
Renders the currently selected transitions or other
selected effects
18 Aurora Edit User Guide 08 April 2010
Page 19
Introducing Aurora Edit
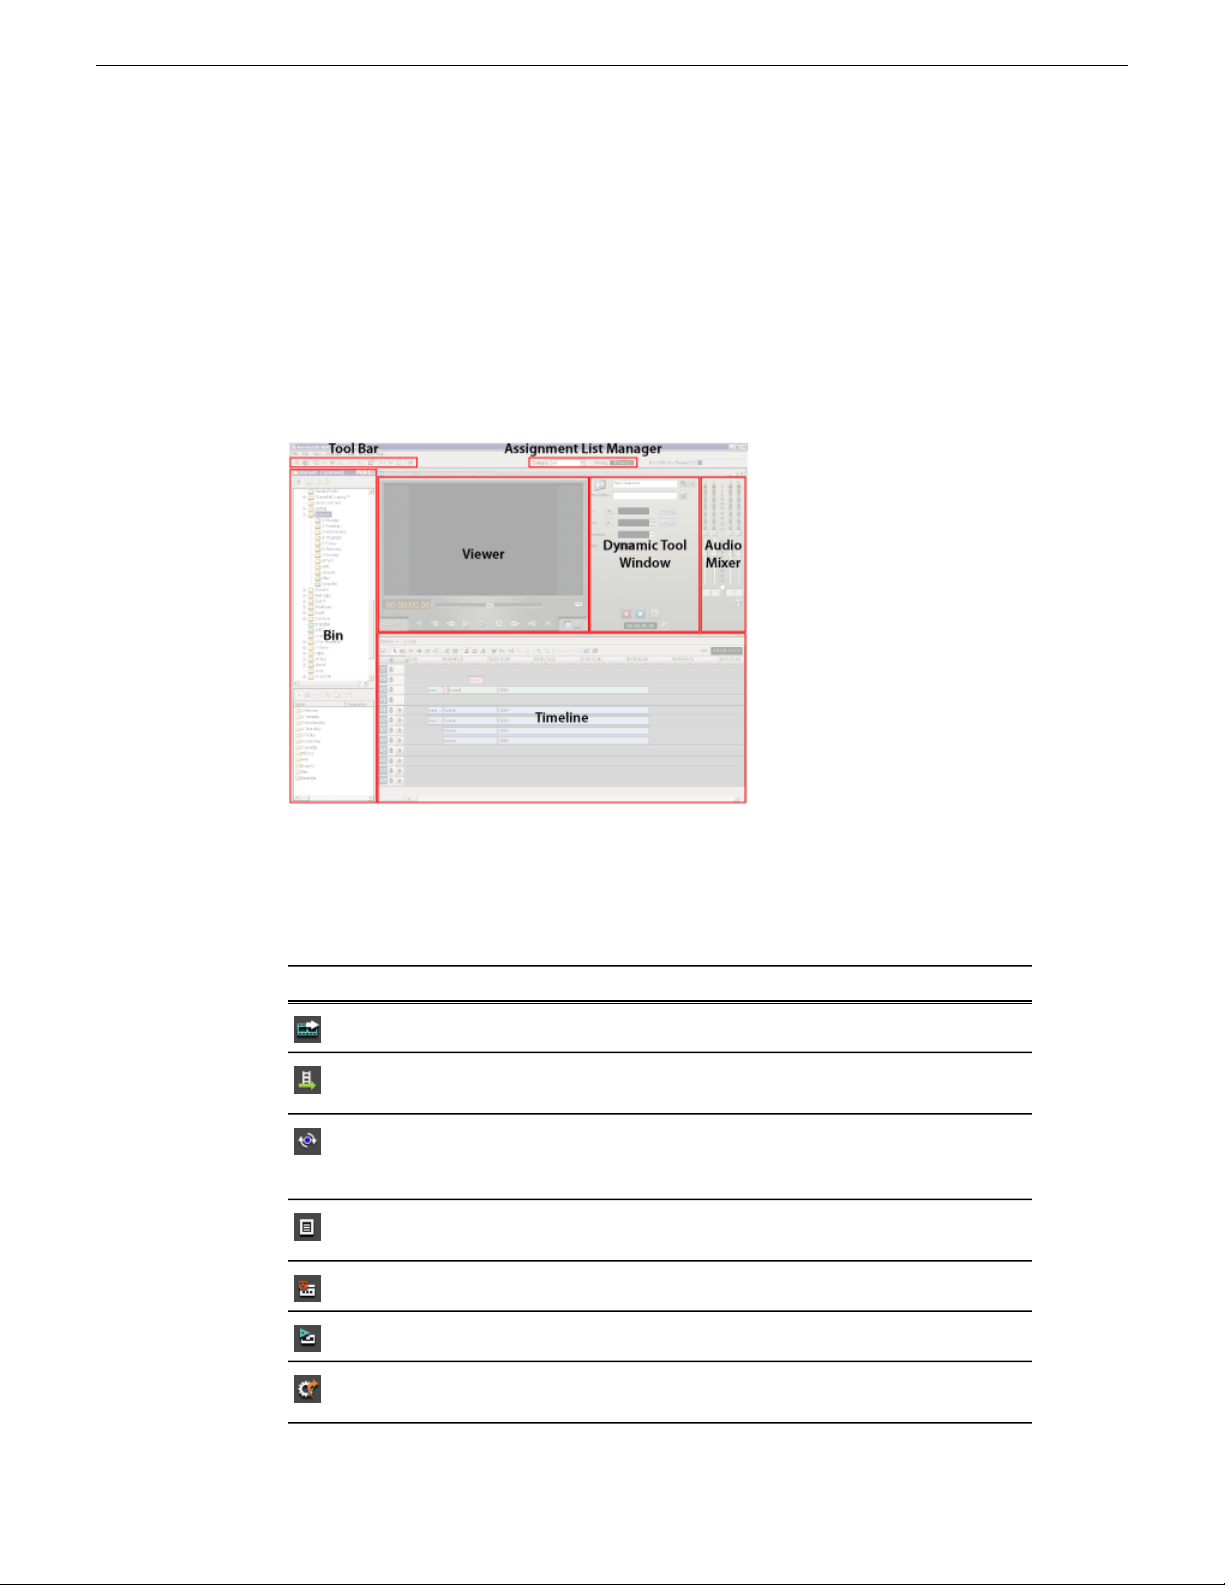
FunctionNameButton
Bin
Render All
Mix Down
Restore Sequence
Assets
Synchronize
Restored Assets
Unlink Restored
Assets
Second Monitor
Renders all unrendered transitions and effects in
the current sequence
Collapses a video effect into the video track below
it, allowing you to apply another effect to the same
clip
Invokes a hi-res restore in a sequence where offline
lo-res media from archived assets has been added
to the active timeline and edited
A syncronization button that allows the user to
manually replace the lo-res media with the hi-res
version making the story ready to render or be sent
to playout
Unlinks restored assets on the timeline back to
proxy references while preserving the timeline for
preview, future restore
Allows you to view the video window on a second
computer monitor
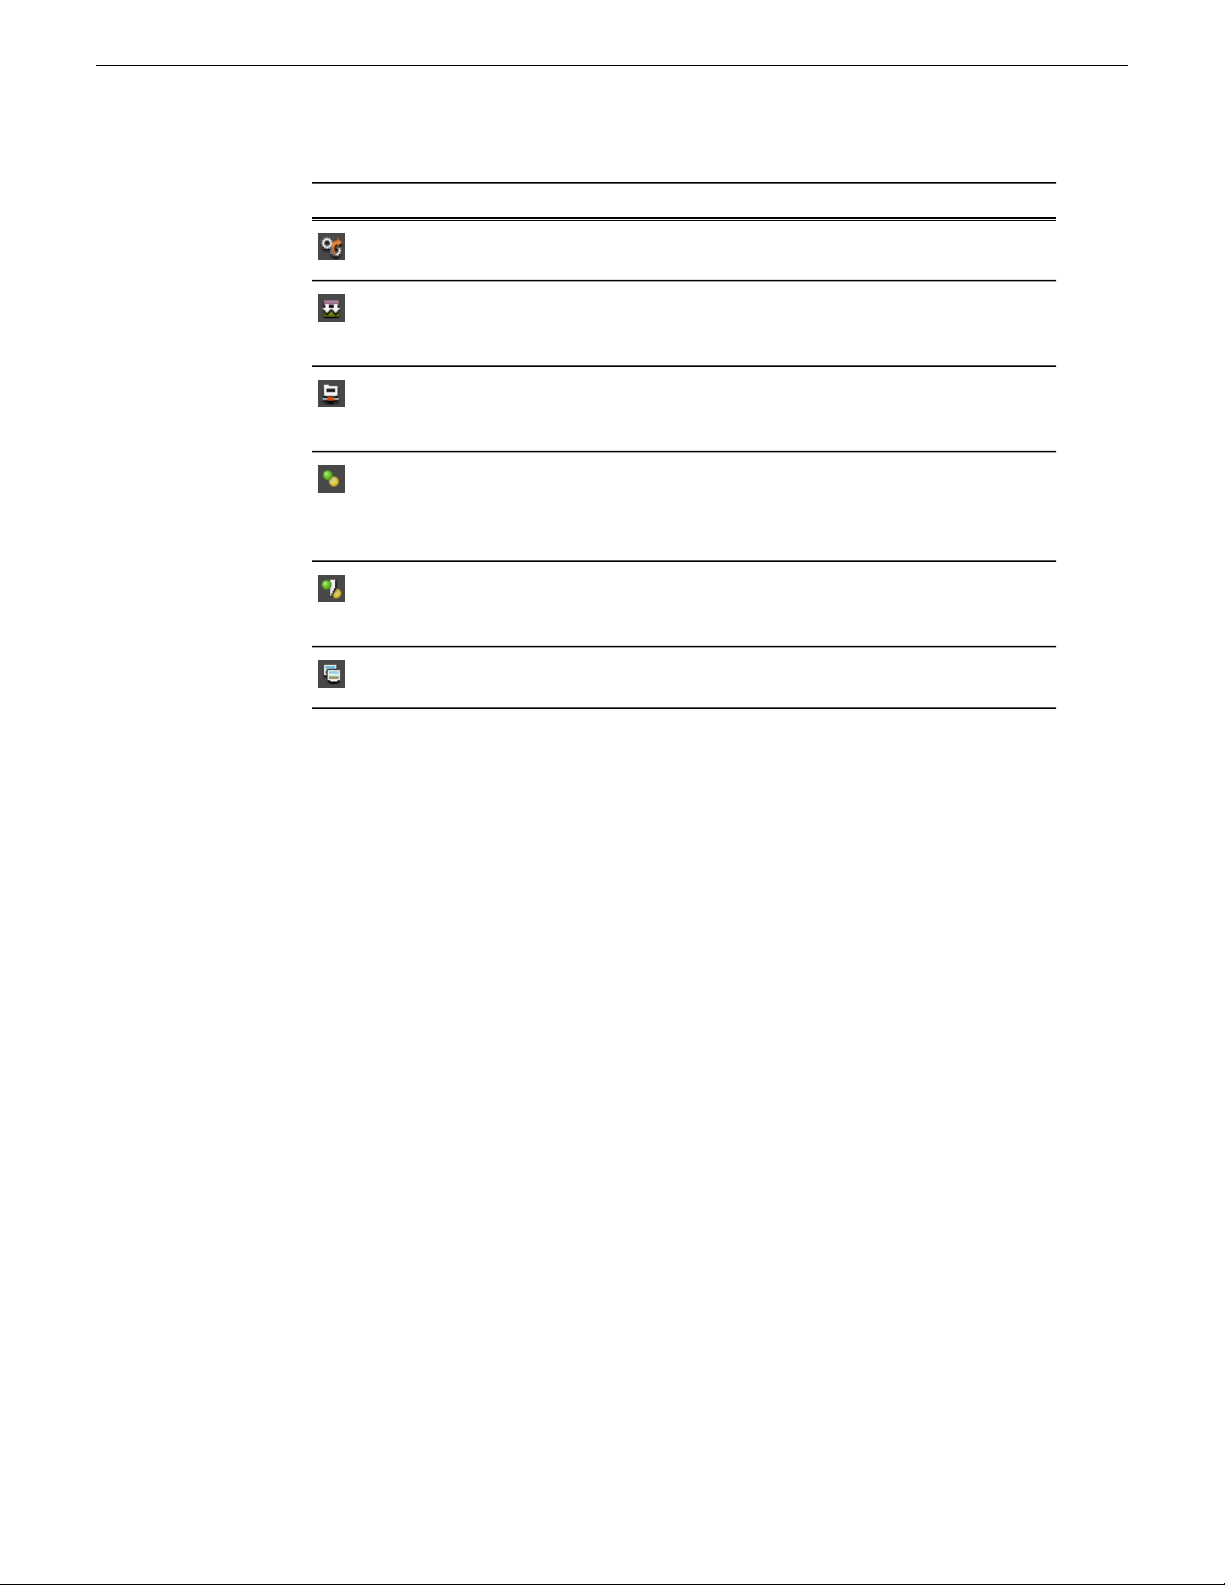
The Bin is a database where clips and sequences are stored and organized.
The top-level Bin appears by default when you start Aurora Edit. You create additional
bins to organize your media. You can also customize the information about each clip
and then search specific fields in the database.
If you are using MediaFrame, you have more searching and organizing capabilities.
08 April 2010 Aurora Edit User Guide 19
Page 20
Introducing Aurora Edit
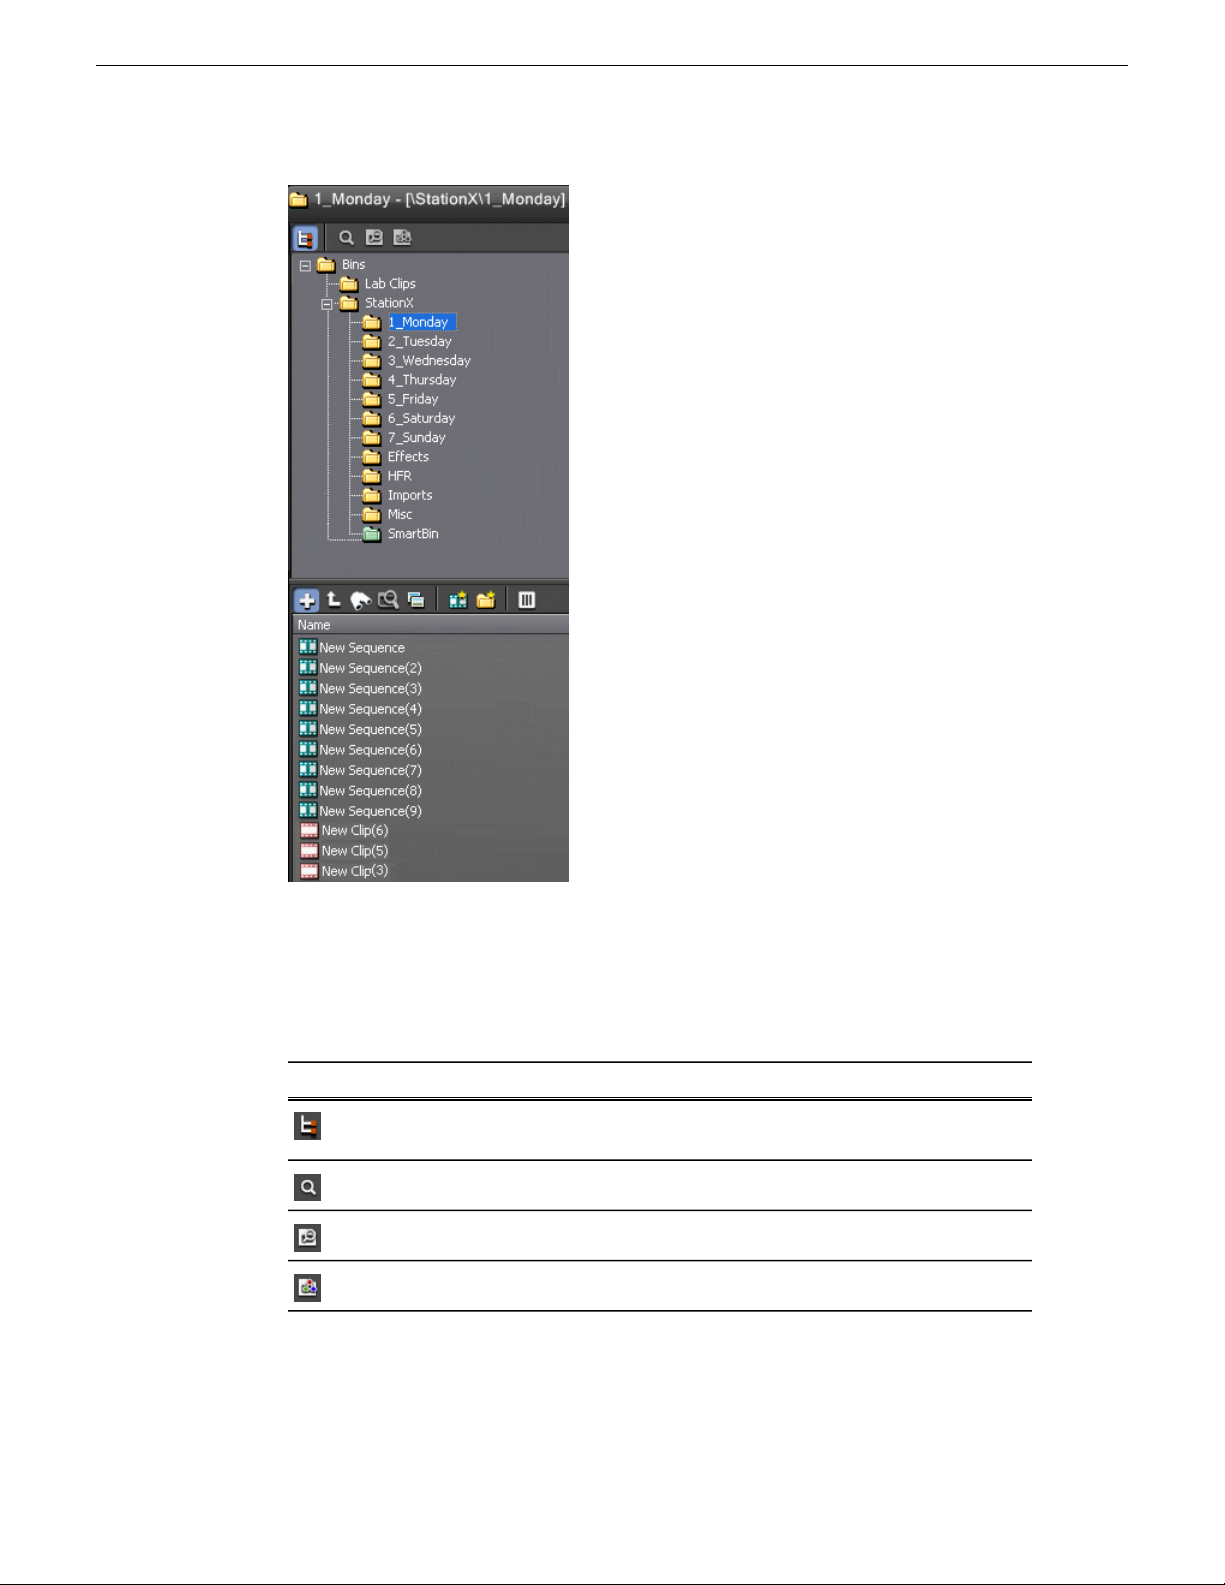
Bin toolbar
The Bin toolbar lets you view and organize the folders in your database, as well as
search for clips.
DescriptionNameButton
Tree
View
Bin contents toolbar
Lets you toggle between seeing the entire Bin structure and
seeing contents of a selected Bin
Allows you to search your database for clips and metadata assetsSearch
Allows you to browse your network and save network locationsExplore
Lets you organize and sort clips in the Bin for easy accessCollections
The Bin contents toolbar lets you access common Bin functions.
20 Aurora Edit User Guide 08 April 2010
Page 21

Introducing Aurora Edit
DescriptionNameIcon
Timeline
Bins
Search Results
View Thumbnails
Column Manager
View the content of the selected Bin, not all Bins in
tree view
View the bins at the next highest levelUp One Level
Opens the bin Find in View search functionFind in View
Shows bin search results in bin contents as list or
thumbnail view
Toggle between displaying your clips and sequences
as text or as thumbnails
Create a new sequence in your binNew Sequence
Create a new binNew Bin
Select the columns to view in your bin; only
available when viewing bin contents as text, not as
thumbnails
The Aurora Edit Timeline is an all-purpose editing window that replaces a record deck
in the editing process.
The Timeline provides a graphic representation of your sequence in a single window,
displaying its tracks, the name of each clip, and the current frame's location.
Timeline toolbar
The Timeline has its own toolbar, which provides access to each of the Aurora Edit
tools, lets you select your editing mode, and other common Timeline functions.
08 April 2010 Aurora Edit User Guide 21
Page 22
Introducing Aurora Edit
DescriptionNameButton
Saves your sequence in the BinSave
Timeline Auto-Scale is on
Auto-Scale On/Off
Timeline Auto-Scale is off
Selects the Timeline ToolTimeline Tool
Selects the Source ToolSource Tool
Selects the Trim ToolTrim Tool
Selects the Cut Point Edit ToolCut Point Edit Tool
Selects the Transition ToolTransition Tool
Selects the Audio Mixer ToolAudio Mixer Tool
Cut Mark In
Cut Mark Out
Selects the Audio Effects ToolAudio Effects Tool
Selects the Video Effects ToolVideo Effects Tool
Selects the Title Tool (option)Title Tool
Selects Overwrite Edit ModeOverwrite Mode
Selects Splice ModeSplice Mode
Activates Fit To FillFit To Fill
Splits a clip at the cursor pointSplit Clip
Trims the top of the selected clip on the
Timeline
Trims the tail of the selected clip on the
Timeline
Deletes selected clipsDelete Selected
Lifts selected clips off the TimelineLift
Zooms in on the view in the TimelineZoom In
Zooms out on the view in the TimelineZoom Out
Undoes the latest actionUndo
22 Aurora Edit User Guide 08 April 2010
Page 23
Dynamic tool window
The dynamic tool window changes functionality based on the Aurora Edit tool you
select.
Each Aurora Edit tool lets you create, edit, refine, and enhance your sequences as you
create stories for playing to air.
Introducing Aurora Edit
DescriptionNameButton
Redoes the latest actionRedo
Opens the Sequence Properties windowSequence Properties
Toggles the display of the StoryboardShow/Hide Storyboard
08 April 2010 Aurora Edit User Guide 23
Page 24
Introducing Aurora Edit
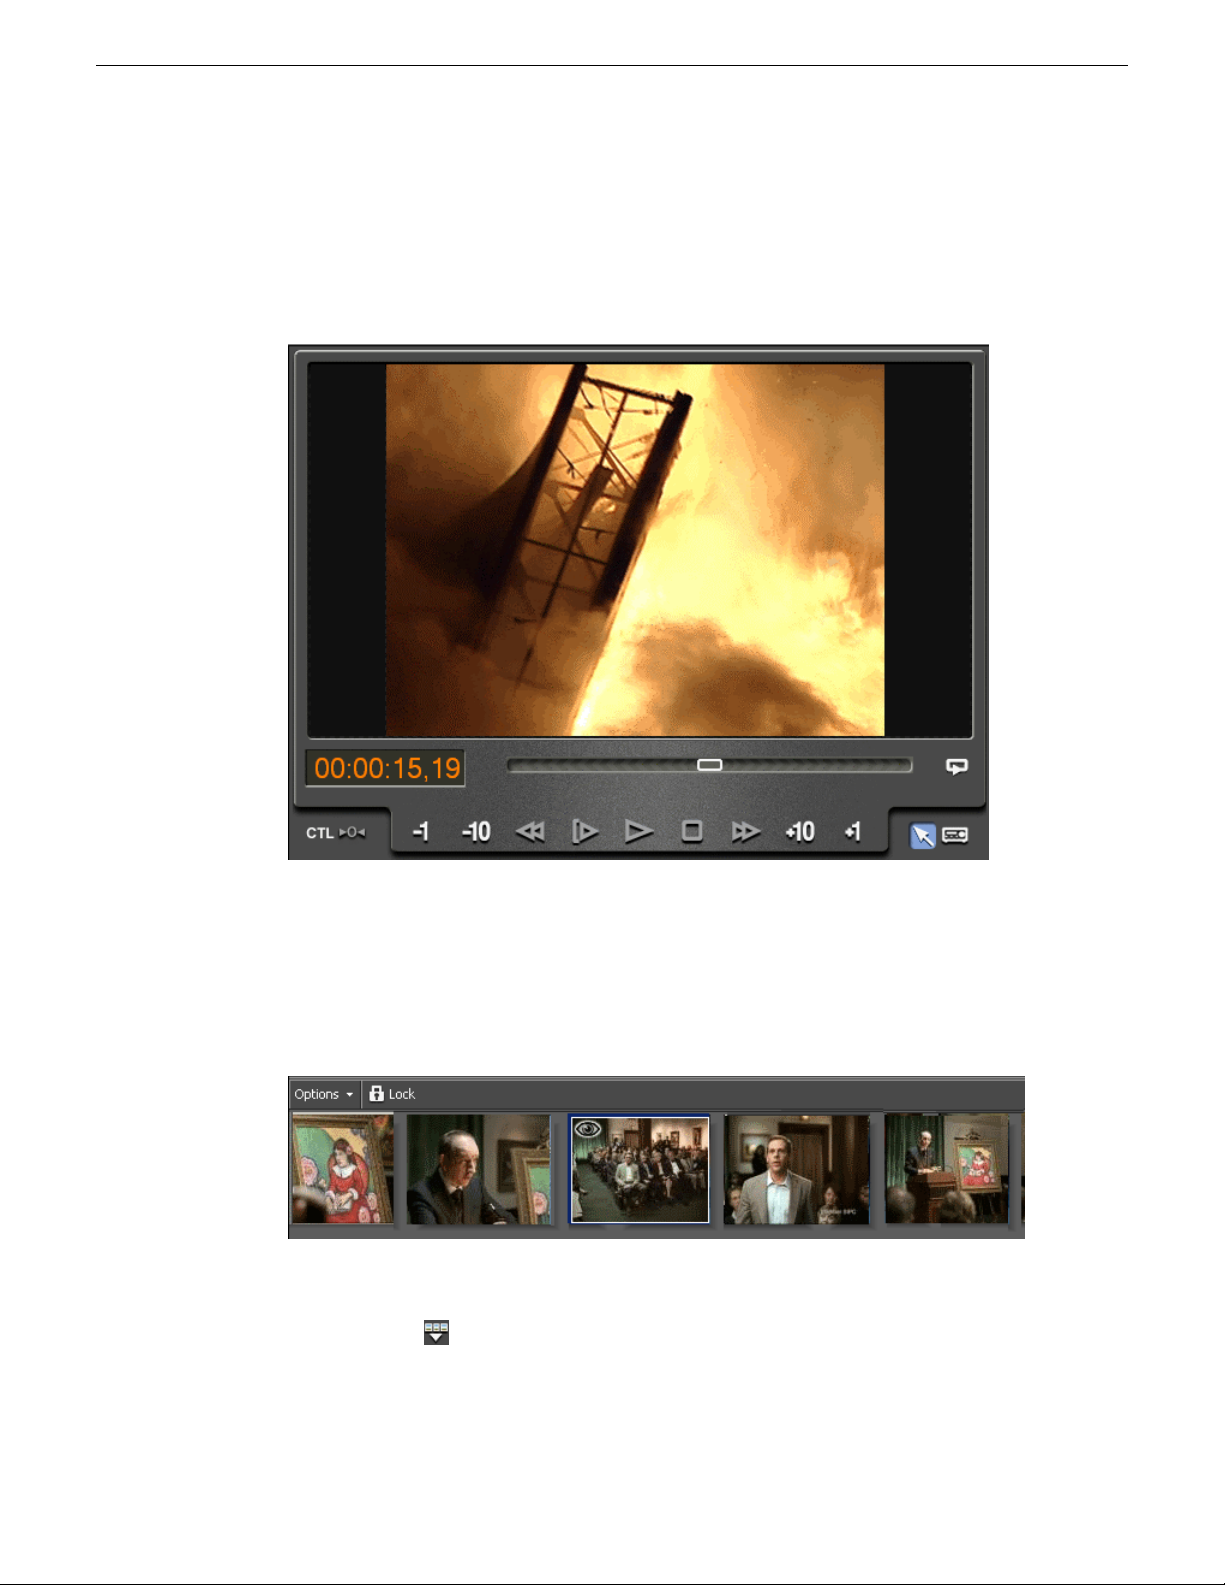
Viewing monitor
The viewing monitor is where you view your media, play through a clip to find footage,
and play your sequence.
Storyboard
The storyboard displays video thumbnails of scene changes in your media, providing
an easy way to see what the clip includes.
You can have the storyboard display in your Aurora Edit timeline or you can hide it
by clicking the Show/Hide Storyboard button in the Timeline toolbar.
24 Aurora Edit User Guide 08 April 2010
Page 25
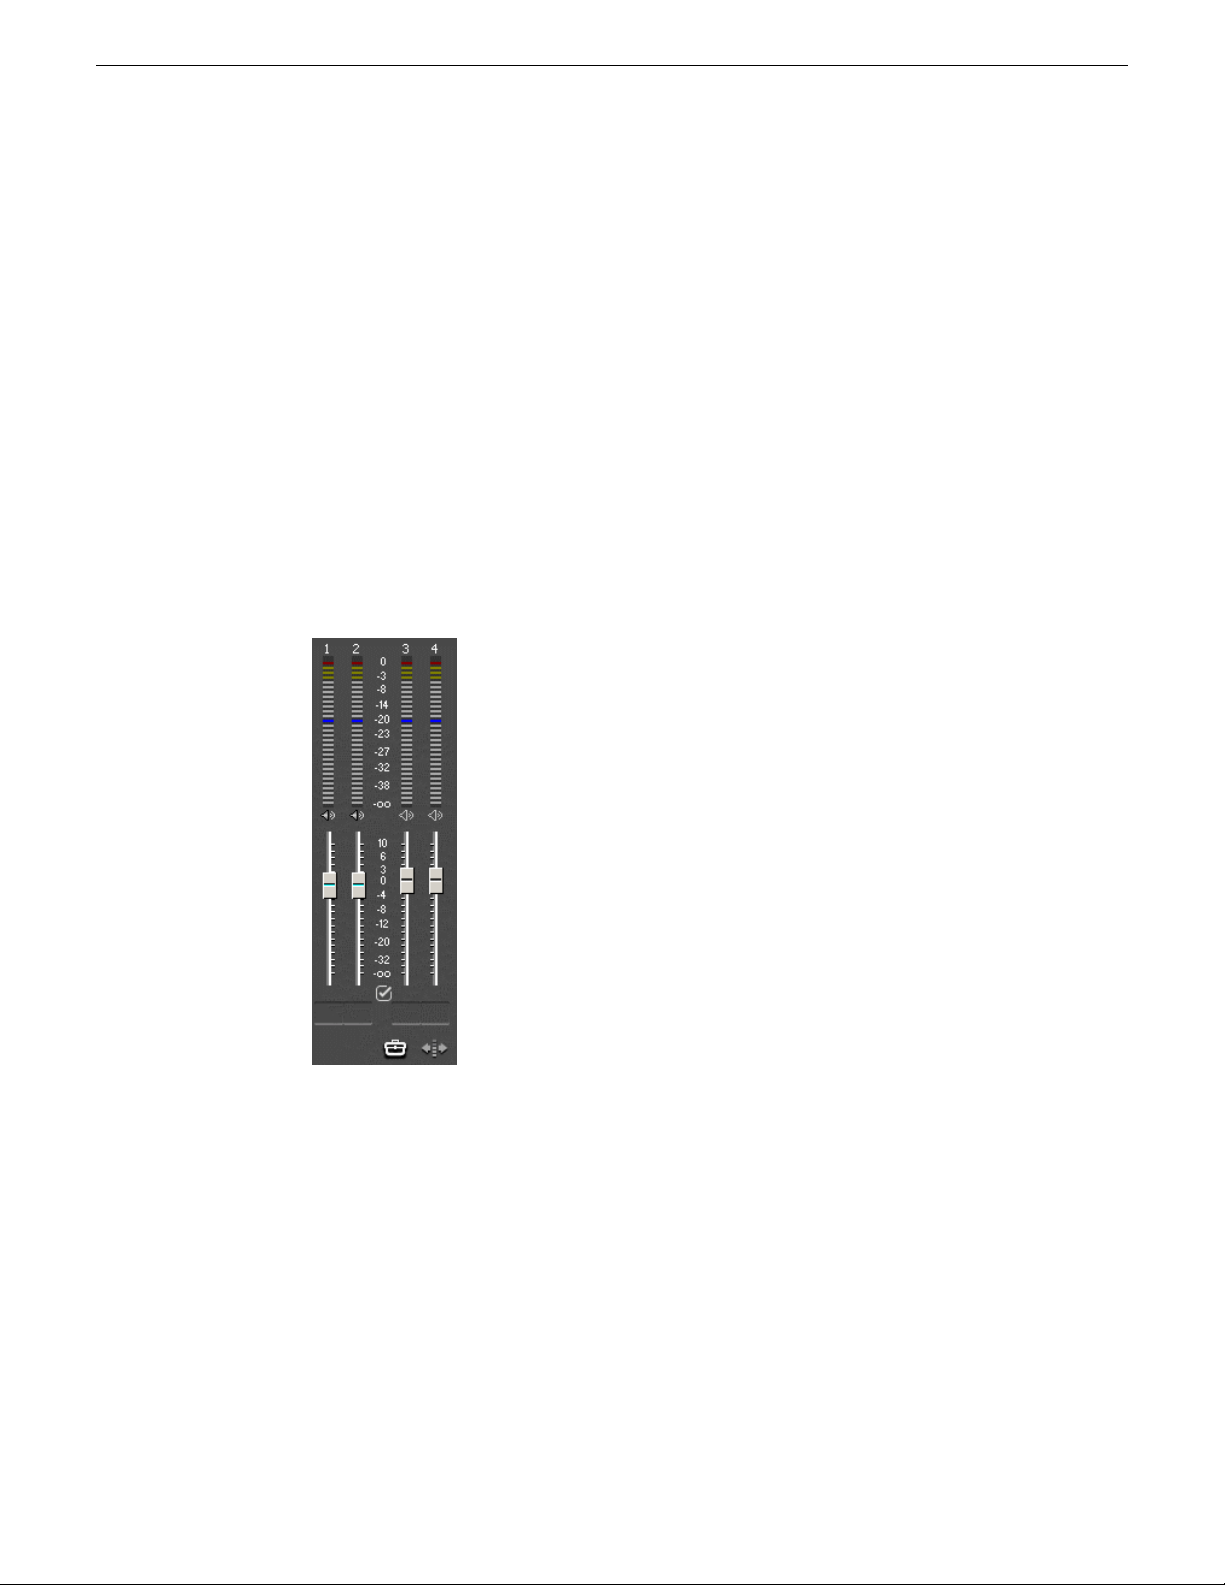
Audio mixer
The audio mixer lets you adjust audio output levels, gang audio tracks, and mute
channels.
Six of Aurora Edit's tools contain the audio mixer:
• Timeline Tool
• Source Tool
• Trim Tool
• Transition Tool
• Audio Mixer Tool
• Audio Effects Tool
For further audio editing capabilities, use the Audio Mixer Tool or the Audio Effects
Tool.
Introducing Aurora Edit
The Assignment List Manager
The Assignment List Manager is for editors to receive assignments from the producer,
to create additional placeholders for clips, and to reassign placeholders to other editors.
The Assignment List Manager runs on the Aurora Edit workstation and integrates
with Aurora Edit. The Aurora Edit toolbar displays part of the Assignment List so
editors can see at a glance how many stories need video.
08 April 2010 Aurora Edit User Guide 25
Page 26

Introducing Aurora Edit
Aurora Edit tools
Each of the nine Aurora Edit tools displays in the dynamic window, leaving the
Timeline unchanged. You select the tools from the Timeline toolbar.
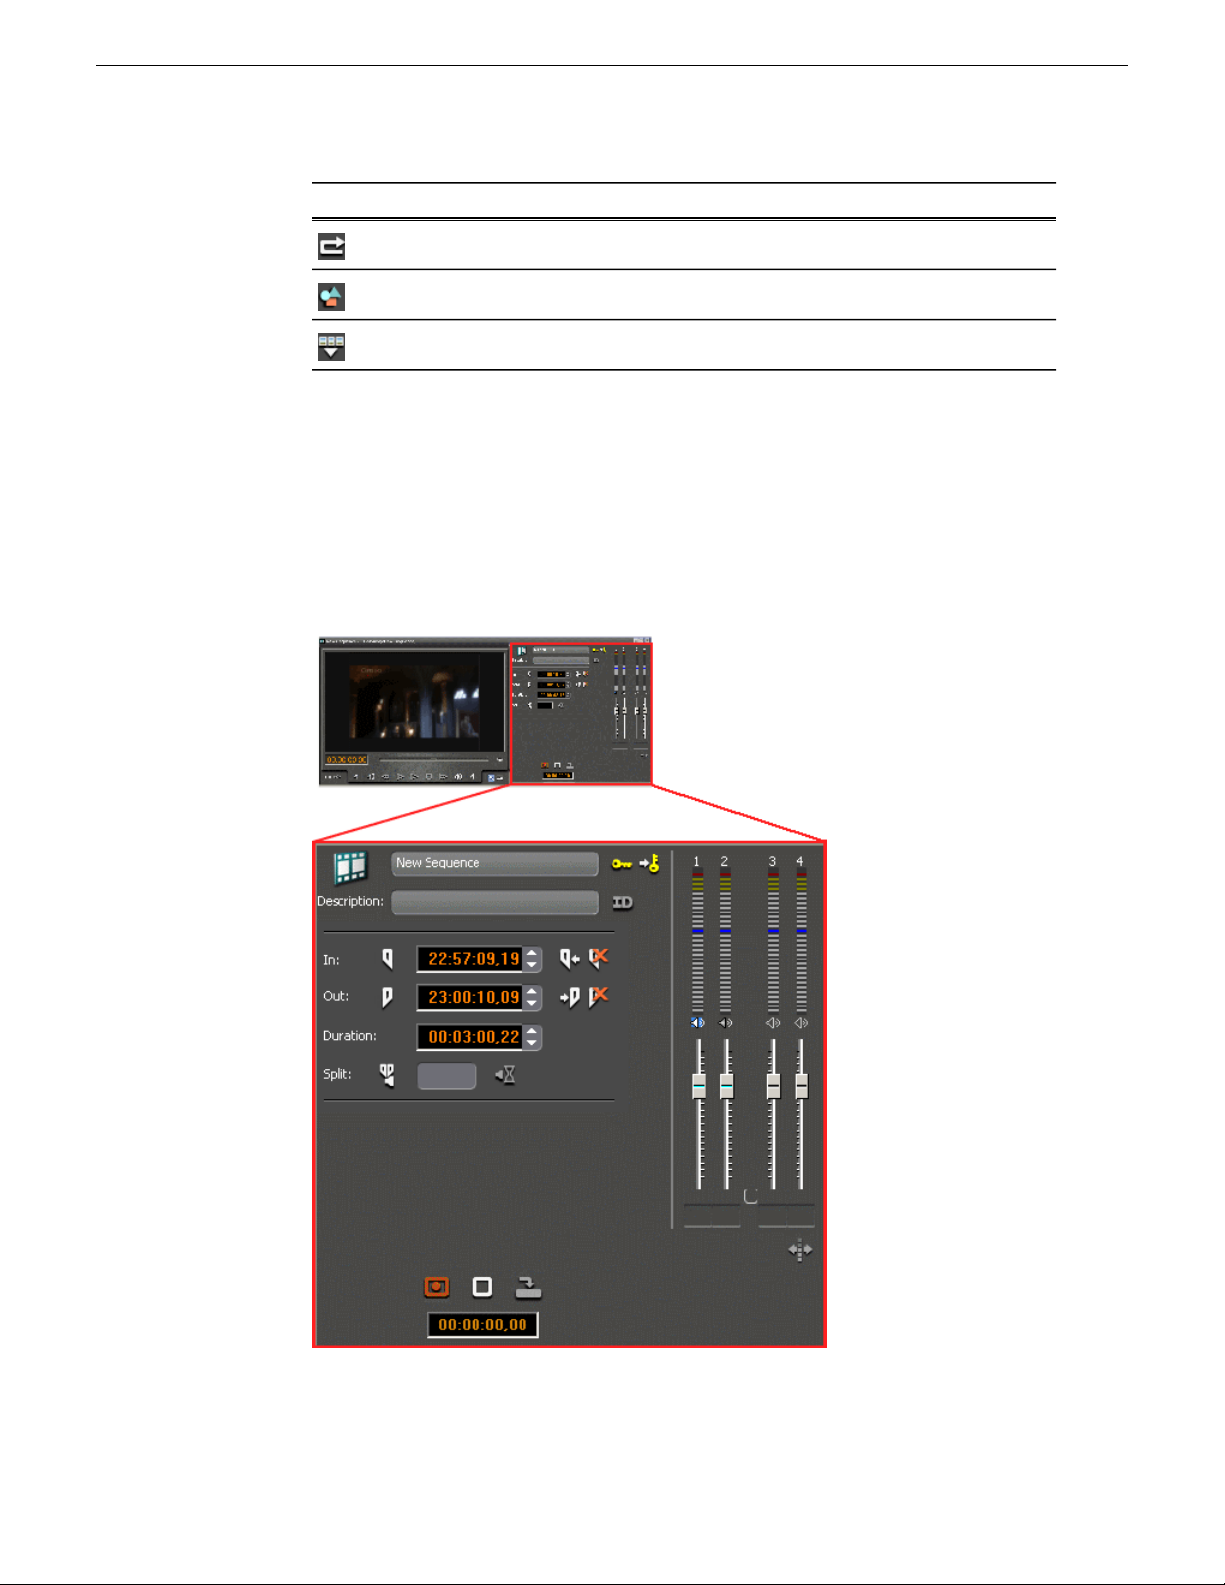
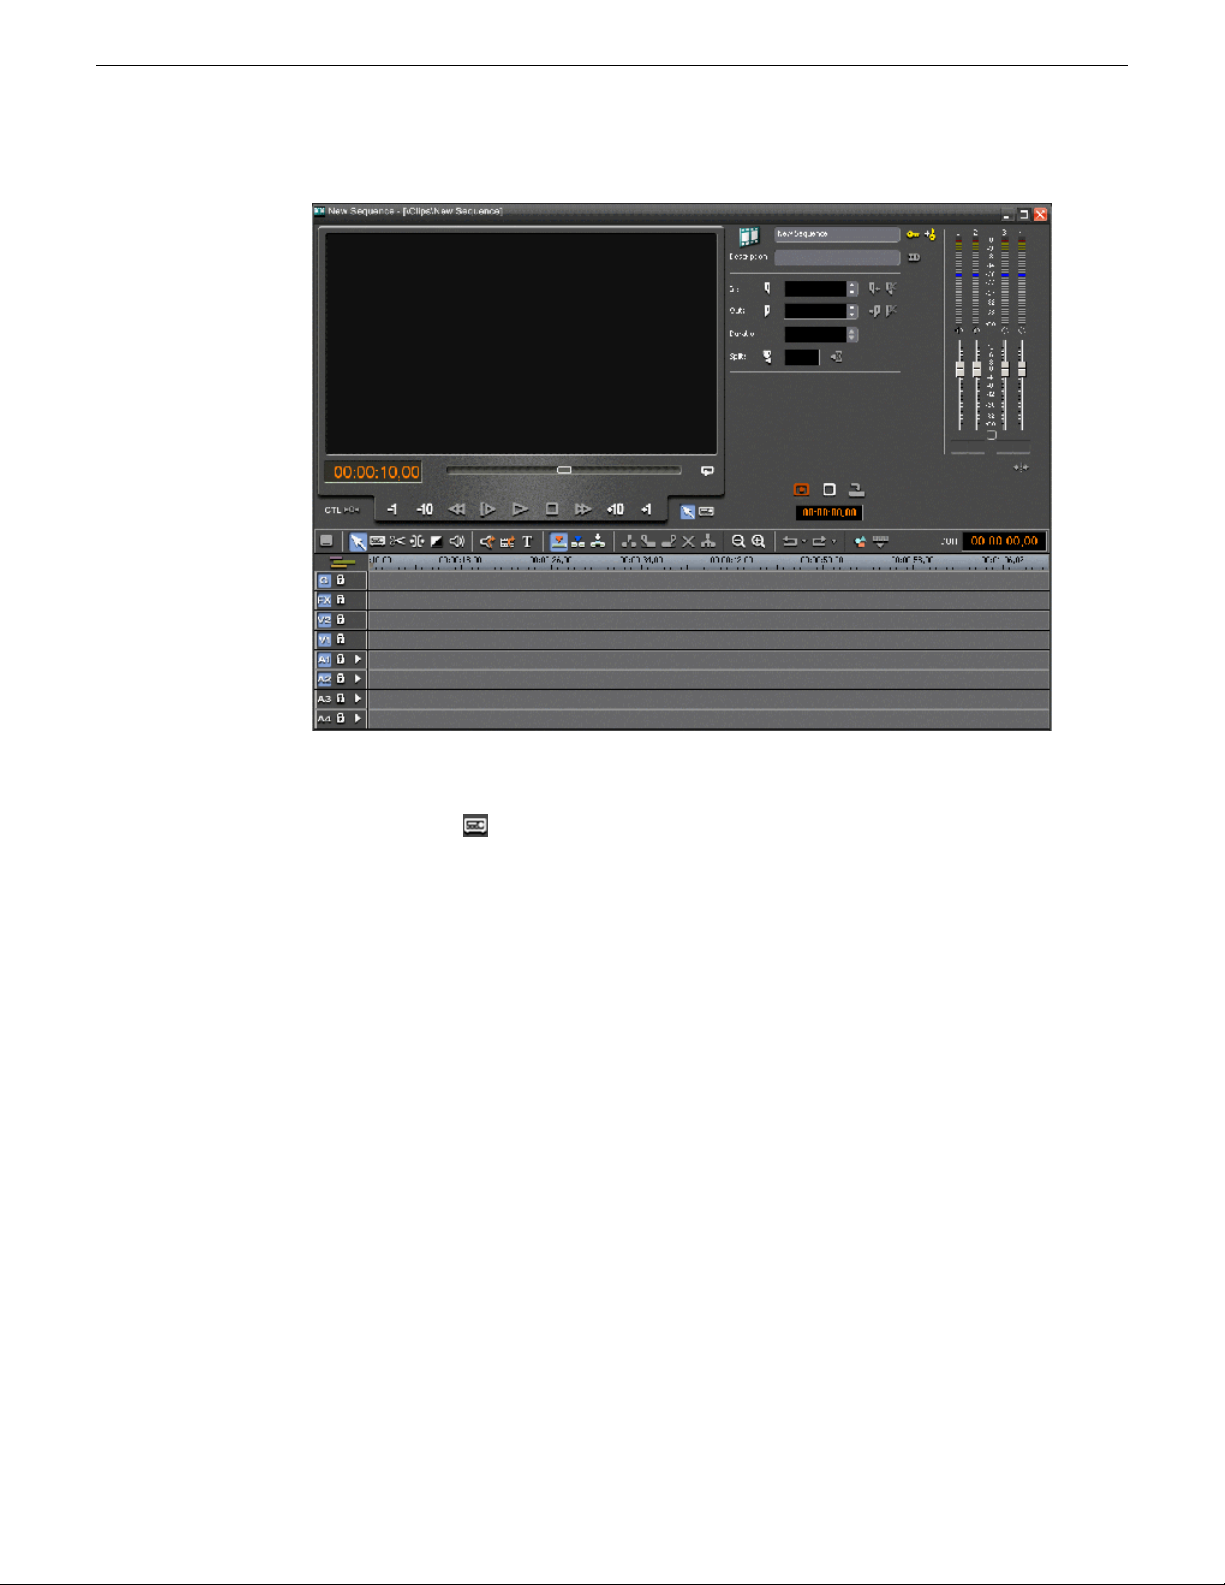
Timeline Tool
The Timeline Tool opens by default when you first create a sequence. You can
select and move clips or audio tracks, play sequences, mark in and out points, and
adjust master output audio sliders.
26 Aurora Edit User Guide 08 April 2010
Page 27
Introducing Aurora Edit
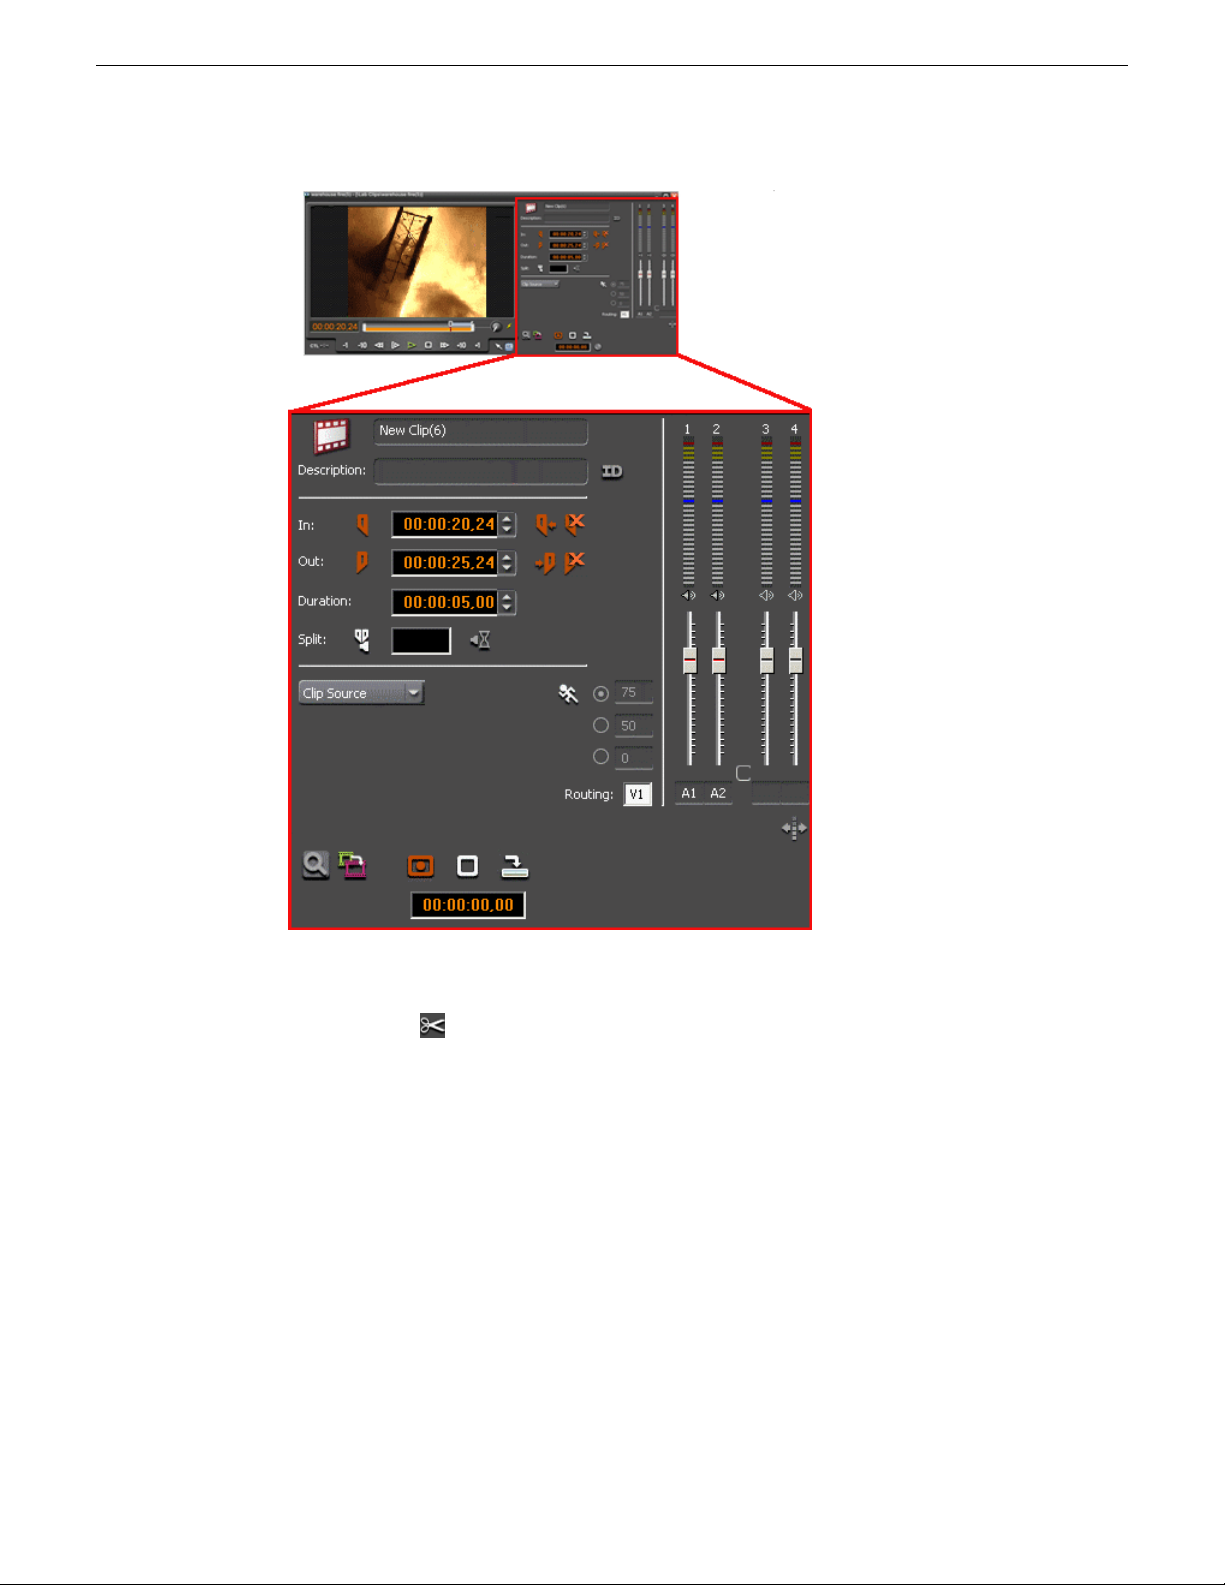
Source Tool
The Source Tool digitizes raw material directly to the Timeline.
This is the fastest and most efficient way to generate clips from a source tape. You
can also use other sources for your footage, such as video feeds or microphones.
08 April 2010 Aurora Edit User Guide 27
Page 28
Introducing Aurora Edit
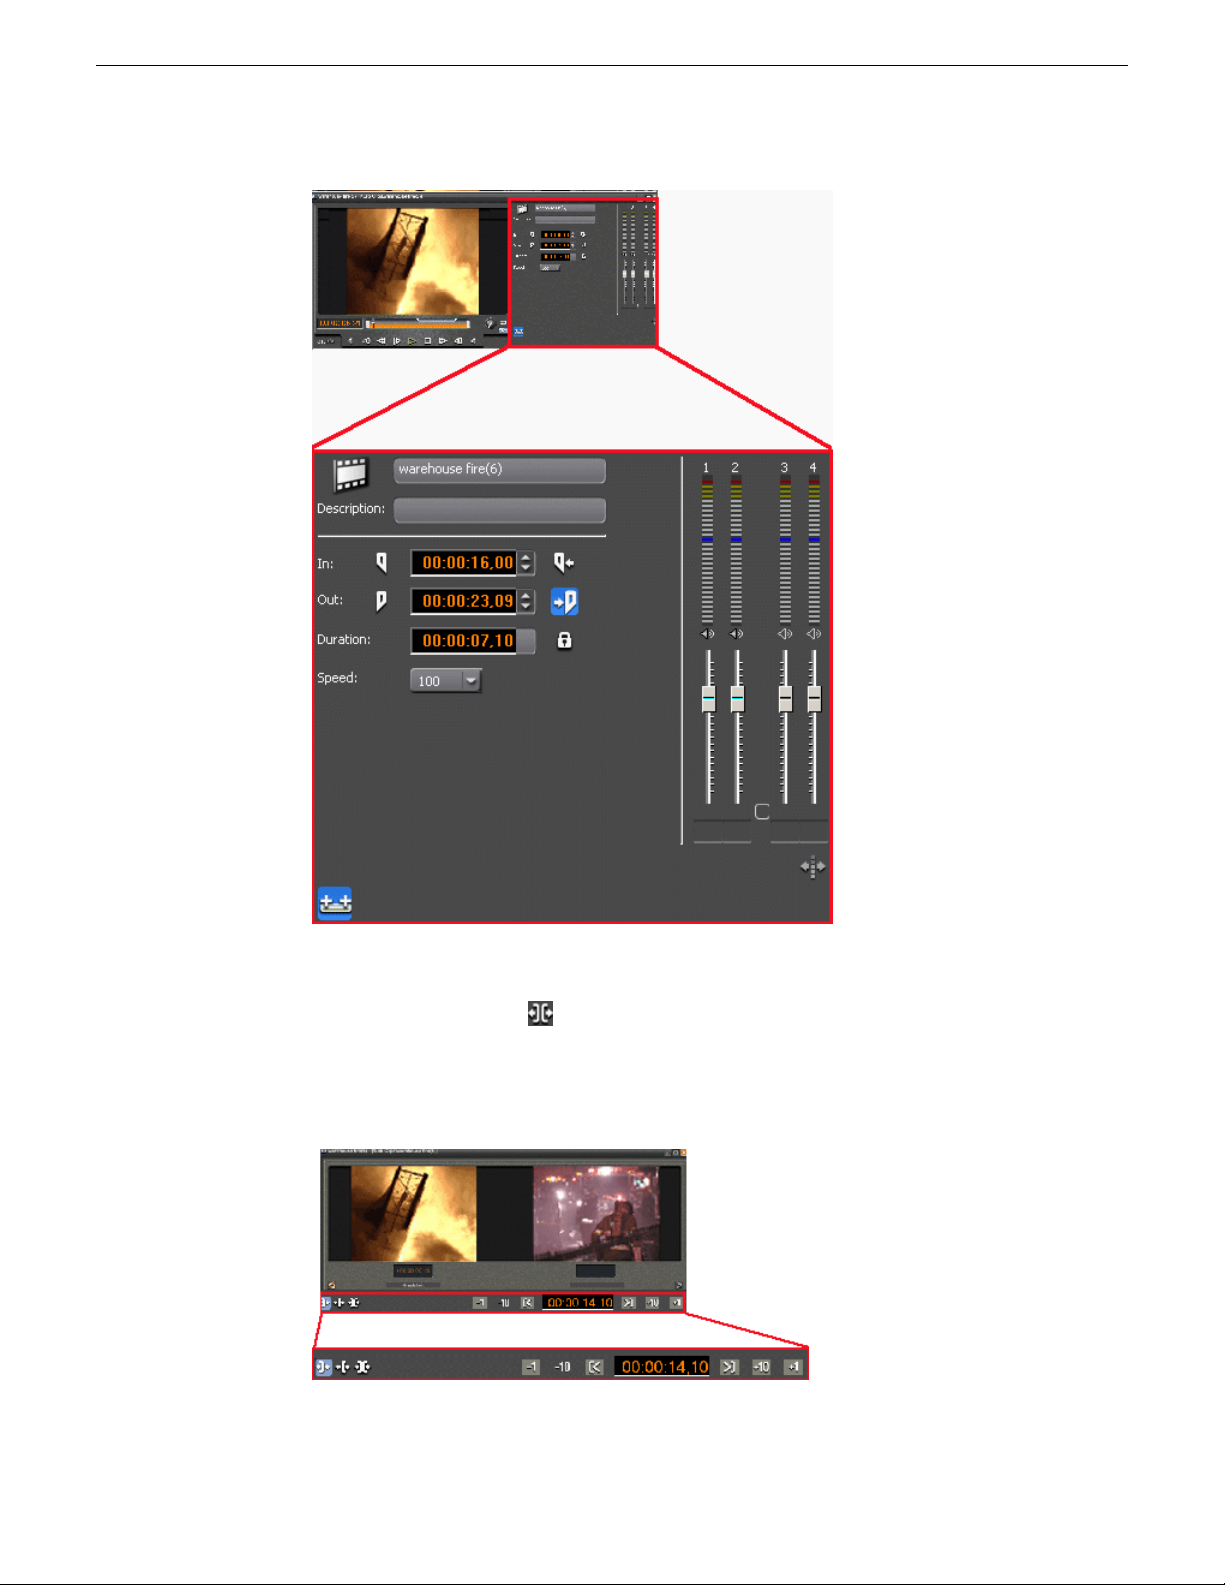
Trim Tool
The Trim Tool changes the head or tail of a clip to change its duration.
28 Aurora Edit User Guide 08 April 2010
Page 29
Introducing Aurora Edit
Cut Point Edit Tool
The Cut Point Edit Tool changes the edit points between clips in the Timeline.
You can easily create split edits by only selecting audio or video. If you have handles
on your clips, you can access unused portions of a clip without returning to the source
tape and redoing the edit.
08 April 2010 Aurora Edit User Guide 29
Page 30
Introducing Aurora Edit
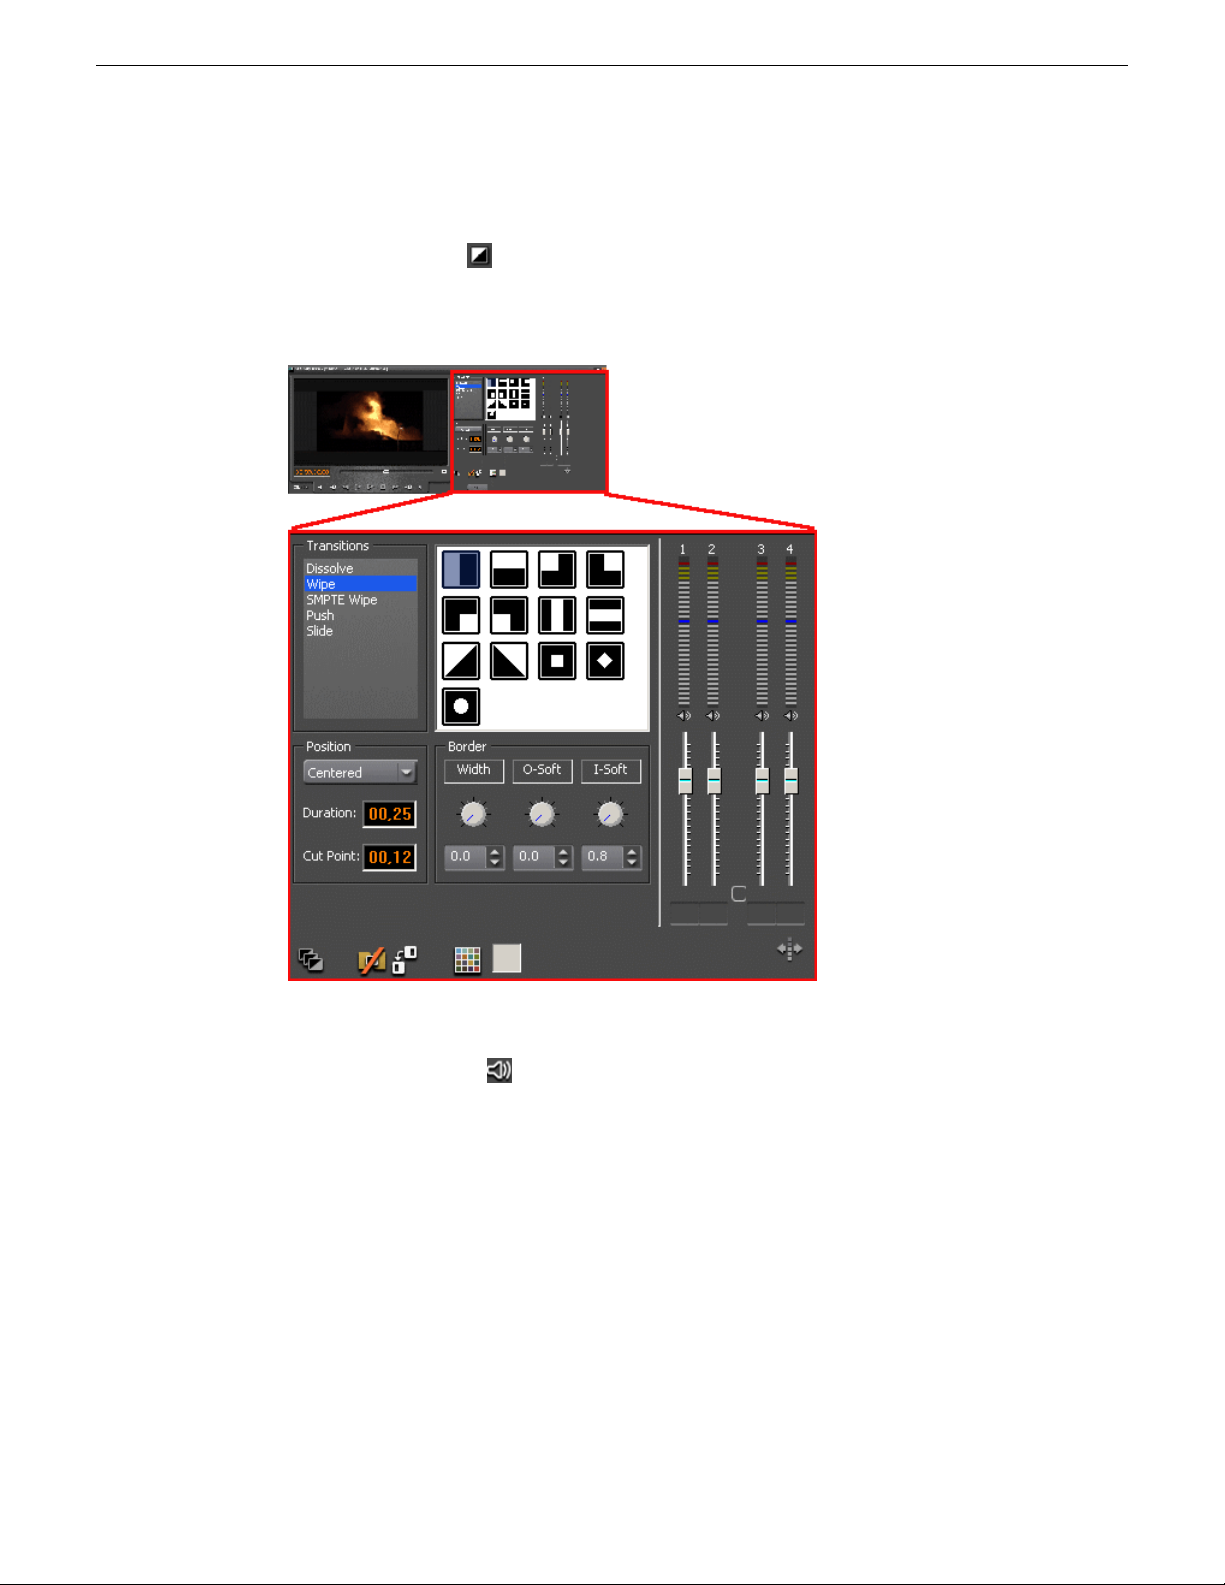
Transition Tool
The Transition Tool creates transition effects between clips in a sequence.
You can create dissolves or wipes between any two edits by selecting the transition
you want and clicking at the point you want the effect to appear.
Audio Mixer Tool
The Audio Mixer Tool adjusts the audio settings in a sequence, including the level,
the pan, and output channel routing.
You can raise or lower the audio on each audio track, or ride the audio on the fly using
the Write Automation option.
30 Aurora Edit User Guide 08 April 2010
Page 31

Introducing Aurora Edit
Audio Effects Tool
The Audio Effects Tool adjusts the frequency and gain within a clip by adjusting
the audio EQ.
For instance, you could disguise a subject's face and voice by modifying the audio
and using a mosiac or blur effect for video.
08 April 2010 Aurora Edit User Guide 31
Page 32

Introducing Aurora Edit
Video Effects Tool
The Video Effects Tool creates effects for one or two video tracks, depending on
the effect.
An effects track on the Timeline lets you create the effect using keyframes and review
the clip with the effect applied to it.
32 Aurora Edit User Guide 08 April 2010
Page 33

Introducing Aurora Edit
Title Tool
The Title Tool is optional and adds text and graphics to your sequences.
A graphics track on the Timeline lets you create the effect, modify its properties, and
review the clip with the title applied to it.
08 April 2010 Aurora Edit User Guide 33
Page 34

Introducing Aurora Edit
Graphic Tools
Both Aurora Edit and Aurora Edit LD can interface with two powerful graphic system
options, Orad or VizRT. Plug-ins available from each graphic system basically allow
the journalist to link graphics to scripts as MOS objects and the editor to link to these
scripts and copy the graphics directly to the Timeline.
The Orad system has an end-to-end workflow with integration from the journalist's
desktop directly to playout on air. From Aurora Edit, editors can link to these scripts
and copy graphics directly to the Timeline. Once the grahpic is on the Timeline, the
editor can preview the graphic and has the same add/modify capabilities as the journalist
within the Orad plug-in.
Aurora Edit will embed timing information for graphics triggering from Aurora Playout.
The Orad graphics engine will then be given a command from Aurora playout to play
the graphics at certain times throughout the story. The video output of the Orad graphics
system will then be routed through the switcher for overlay on the video.
34 Aurora Edit User Guide 08 April 2010
Page 35

Introducing Aurora Edit
The VizRT system allows integration from the journalist's desktop directly to the
Timeline. From the journalist desktop, VizRT has a plug-in that allows operators to
access, add, or modify graphics that can then be linked to scripts as MOS objects.
From Aurora Edit, editors can link to these scripts and copy the graphics directly to
the Timeline. Editors can preview the graphic from within Aurora Edit using the VizRT
plug-in and have the same add/modify capabilities as the journalist.
Once a graphic is ready on the Timeline, the editor can retrieve the graphic. This then
communicates with theVizRT graphics server and pulls the proper graphic file into
Aurora Edit as a video file with Alpha. The editor can then transfer to playout with
the burned-in graphic already on the Timeline.
NOTE: Check the Aurora Edit and Aurora Edit LD Release Notes for the specifc
plug-in versions required for the Orad and VizRT system that are compatible with
this software release.
In addition to the optional graphic tools, Aurora Edit and Aurora Edit LD can import
24- or 32- bit still or sequencial (Aurora Edit only) graphic files for placement on the
Timeline graphics track from the File | Import | Graphic pulldown in the main menu
bar.
The Aurora Edit keyboard
Most Aurora Edit functions can be controlled from a standard keyboard. Color-coded
keypad stickers supplied with each Aurora system can be applied to the keycaps that
correspond to Aurora Edit functions, allowing you to edit more quickly and easily.
A set of color-coded keypad stickers is included with each Aurora Edit software disk.
The keypad sticker set allows any standard keyboard to be updated to an Aurora Edit
keyboard. Also use the stickers to update an existing Aurora Edit keyboard that already
has permanent colored-coded keypads if necessary.
Tool selection keys
The eight light blue keys at the top of the keyboard activate the Aurora Edit tools.
08 April 2010 Aurora Edit User Guide 35
Page 36

Introducing Aurora Edit
FunctionNameKeypad
Selects and moves items on the TimelineTimeline Tool
Views the sourceSource Tool
Trims Mark In and Mark Out points in clipsTrim Tool
Cut Point Edit Tool
Audio Effects Tool
Video Effects Tool
Transport command keys
The light purple keys act as transport controls for playing sequences and remote
sources. The green keys control movement within a clip. The red key F12 starts a
record.
Trims the cut points between adjacent clips (Edit
HD only)
Add transition effects to clipsTransition Tool
Adjust the audio tracks in clipsAudio Mixer Tool
Adjusts the Audio EQ in clips and disguises voices
(Edit HD only)
Creates video effects to use on clips, such as blurs
and Picture-in-Picture
FunctionNameKeypad
Plays the Timeline, source or clipPlay
Plays sequence or clip starting at the beginningPlay From Start
36 Aurora Edit User Guide 08 April 2010
Page 37

Introducing Aurora Edit
FunctionNameKeypad
Plays the Timeline, source or clipPlay
Rewinds the footage for both Timeline and sourceRewind
Fast Forward
Fast forwards the footage for both Timeline and
source
Starts recording from source or source binRecord
Moves cursor one frame back on the TimelineBack 1 Frame
Moves cursor one frame forward on the TimelineForward 1 Frame
Moves cursor 10 frames back on the TimelineBack 10 Frames
Moves cursor 10 frames forward on the TimelineForward 10 Frames
Moves cursor to the previous cut pointPrevious Cut Point
Moves cursor to the next cut pointNext Cut Point
Editing and clip/track selection keys
The tan keys perform trims. The blue keys represent edit modes for overwrite, splice,
and fit-to-fill. The dark gray key performs copy to Timeline. The purple keys control
clips. The gray keys are used with Aurora Edit local seaches (not MediaFrame).
08 April 2010 Aurora Edit User Guide 37
Page 38

Introducing Aurora Edit
FunctionNameKeypad
Trim Mark Out
Trim Mark In
Trim Both
Copy To Timeline
Match Frame to Bin
Trims the Out point in the Cut Point Edit Tool;
changes the duration of the sequence (Edit HD
only)
Trims the In point in the Cut Point Edit Tool;
changes the duration of the sequence (Edit HD
only)
Trims both the In and Out points in the Cut Point
Edit Tool; doesn't change the duration of the
sequence (Edit HD only)
Allows you to overwrite clips to the TimelineOverwrite Mode
Allows you to splice clips to the TimelineSplice Mode
Lets you create fit to fill clipsFit To Fill
Copies selected clips from Bin as well as Timeline
clip sources to the Timeline. In the Record to Bin
window, adds a clip to the Batch Capture list.
Copies selected clips from Bin as well as Timeline
clip sources to the Timeline. In the Record to Bin
window, add a clip to the Batch Capture list.
Mark point keys
The dark purple keys set and control the mark In and Out points. The gray keys are
used with keywords in MediaFrame.
Mark Area
View Search Results
Find
Marks an in and out around the selected areas of
the Timeline
Displays the results bin for local Aurora Edit
searches (not MediaFrame searches)
Searches for assets within the local Aurora Edit
database (not the MediaFrame Asset Management
database)
38 Aurora Edit User Guide 08 April 2010
Page 39

Introducing Aurora Edit
FunctionNameKeypad
Add Keyword (in
MediaFrame)
Automark Keyword
(in MediaFrame)
Cut Mark In
Refresh
Cut Mark Out
Adds a keyword into the MediaFrame metadata
view for quick recall throughout the system
Automatically marks a keyword from the current
position of the cursor along with a configurable
duration. The duration is set though the settings
option with the MediaFrame metadata view.
Cuts the beginning of the clip (the top) off the
selected clips on the Timeline; in the Bin, refreshes
bin folders and displays any newly imported files
Cuts the end of the clip (the tail) off the selected
clips on the Timeline
Moves to the Mark In pointGo to Mark In
Moves to the Mark Out pointGo to Mark Out
Marks an In pointMark In
Marks an Out pointMark Out
Clears the In pointClear Mark In
Clears the Out pointClear Mark Out
Extend Edit
Timecode/Control
Track
08 April 2010 Aurora Edit User Guide 39
Extends an edit past the end of the clip using
handles
Toggles between Timecode and Control Track
modes
Page 40

Introducing Aurora Edit
Track selection keys
The light gray keys zoom the Timeline in and out. The bright blue keys toggle audio
and video tracks on and off.
FunctionNameKeypad
Resets the Control Track to 00:00:00:00Reset Control Track
Move the seleced clip to the previous cut pointMove Clip Previous
Cut Point
Move the selected clip to the next cut pointMove Clip Next Cut
Point
FunctionNameKeypad
Zooms the view in the Timeline outZoom out
Zooms the view in the Timeline inZoom in
Toggles video track V1 on and offVideo 1
Toggles audio track A1 on and offAudio 1
Toggles audio track A2 on and offAudio 2
Toggles audio track A3 on and offAudio 3
Toggles audio track A4 on and offAudio 4
40 Aurora Edit User Guide 08 April 2010
Page 41

Other Aurora Edit keys
The keys described below perform miscellaneous editing functions.
Introducing Aurora Edit
FunctionNameKeypad
Control +
Send
View Metadata
Collapse Sequence
Lift Selection
Insert Keyframe
Go to Start
Lets you send a clip or sequence to another
destination
Display and access MediaFrame metadata for the
loaded clip
Collapses a clip in a sequence to close a gap
between media
Lifts the selected clip out of the sequence, leaving
black and silence
Splits the selected clip at the cursor pointSplit Clip
Enables variable speed controls in the Source ToolEnable Vary Speed
In the Video Effects Tool, adds a keyframe to the
currently selected effect
Moves the position to the beginning of a clip or
sequence
Previous Vary Speed
08 April 2010 Aurora Edit User Guide 41
In the Source Tool or Trimmer, selects the
previously set variable speed
Deletes the selected clip from the Bin or TimelineDelete Selection
Page 42

Introducing Aurora Edit
FunctionNameKeypad
Moves the position to the end of a clip of sequenceGo to End
Next Vary Speed
Shuttle Rewind
Shuttle Fast Forward
Command pulldown menu
Most Aurora Edit functions can be controlled directly by the Commands listed in the
Commands menu pulldown in the top menu bar.
In the Source Tool or Trimmer, selects the next
variable speed
Shuttles left in increments of -50%, -75%, -1x,
-2x, -3x
Shuttles left in increments o +50%, +75%, +1x,
+2x, +3x
Resets the shuttle speed to its default speedShuttle Default Speed
Selects previous shuttle speedShuttle Prevous Speed
The Commands pulldown lists the functions available and the keyboard shortcuts that
correspond to each function.The pulldown will appear in the top menu bar when any
editing function view such as Timeline, Record to Bin, Trimmer, Playback Channel
and other editing windows are open.
Most Commands have a corresponding keyboard shortcut to perform the same function.
Related Links
Keyboard shortcuts on page 42
Keyboard shortcuts
Keyboard shortcuts let you perform tasks more quickly and efficiently by using the
keyboard instead of pointing and clicking with the mouse.
42 Aurora Edit User Guide 08 April 2010
Page 43

Aurora Edit keyboard shortcuts
Introducing Aurora Edit
Use this key...To do this...
0Collapse a sequence
F5Cut a mark in point
F6Cut a mark out point
Ctrl + DelDelete an area
DelDelete a selection
Shift + DDeselect all
VExtend an edit
Ctrl + Shift + FInsert filler
Ctrl + ]Lift an area
Edit setup keyboard shortcuts
]Lift a selection
MMatch frame to Bin
Shift + F4Match frame to source
Shift + MMixdown selected
Ctrl + MMove a selection
Shift + VRender all
Ctrl + Shift + RRender selected
Shift + SSelect all
\Split a clip
Use this key...To do this...
Shift + ~Add handles
Ctrl + AAuxiliary input
Alt + PClear all mark points
Shift + PClear audio in
{Clear audio out
PClear mark in
[Clear mark out
08 April 2010 Aurora Edit User Guide 43
Page 44

Introducing Aurora Edit
Use this key...To do this...
F11Fit to fill
Ctrl + IGo to mark in
Ctrl + OGo to mark out
Ctrl + F4Mark area
Shift + IMark audio in
Shift + OMark audio out
IMark in
OMark out
F9Overwrite mode
Ctrl + 2Quick edit
F12Record
NReset control track
Selecting and moving keyboard shortcuts
Shift + AShow audio marks
F10Splice mode
spaceStop record
BTimecode/control track
Use this key...To do this...
Numpad 4Move clip left 1 frame
Ctrl + numpad 4Move clip left 10 frames
XMove clip to the next cut point
ZMove clip to the previous cut point
Numpad 6Move clip right 1 frame
Ctrl + numpad 6Move clip right 10 frames
Alt + ,Select next
Alt + /Select the next track
Alt + MSelect previous
Alt + .Select the previous track
44 Aurora Edit User Guide 08 April 2010
Page 45

Play speed keyboard shortcuts
Tracks keyboard shortcuts
Introducing Aurora Edit
Use this key...To do this...
PauseEnable vary speed
Page downNext vary speed
Page upPrevious vary speed
Use this key...To do this...
KAudio 1
LAudio 2
;Audio 3
'Audio 4
Ctrl + KAudio 5
Ctrl + LAudio 6
Ctrl + ;Audio 7
Ctrl + 'Audio 8
Ctrl + 8Effects track (FX)
Ctrl + GGraphics track
Shift + KSync lock A1
Shift + LSync lock A2
:Sync lock A3
"Sync lock A4
Ctrl + Shift + KSync lock A5
Ctrl + Shift + LSync lock A6
Ctrl + Shift + ;Sync lock A7
Ctrl + Shift + 'Sync lock A8
Shift + JSync lock V1
JV1
Ctrl + JV2
08 April 2010 Aurora Edit User Guide 45
Page 46

Introducing Aurora Edit
Transports keyboard shortcuts
Use this key...To do this...
ABack 1 frame
Ctrl + DBack 1 second
DBack 10 frames
Ctrl + QEject
RFast forward
SForward 1 frame
Ctrl + FForward 1 second
FForward 10 frames
EndGo to end
HomeGo to start
Video effects keyboard shortcuts
HNext cut point
WPlay
QPlay from start
GPrevious cut point
Shift + WReverse play
ERewind
Up arrowShuttle default speed
Right arrowShuttle fast forward
Down arrowShuttle previous speed
Left arrowShuttle rewind
spaceStop
Use this key...To do this...
Shift + 8Add an effect
Shift + DelDelete all keyframes
Ctrl + InsertInsert a keyframe
Shift + insertModify all keyframes
Alt + insertModify a keyframe
46 Aurora Edit User Guide 08 April 2010
Page 47

MediaFrame keyboard shortcuts
Introducing Aurora Edit
Use this key...To do this...
Page downNext keyframe
Page upPrevious keyframe
Ctrl + WRun the effect
Use this key...To do this...
F3Add Keyword
InsertAdd Keyframe
F4Automark Keyword
08 April 2010 Aurora Edit User Guide 47
Page 48

Page 49

Chapter 2
Working in the Bin
This section contains the following topics:
• About the Bin window
• Creating a new bin
• How to organize your Bins
• Saving the Bin position
• Working in shared or local mode
• Viewing clips in your Bin
• Working with clips in the Bin
• SmartBins
08 April 2010 Aurora Edit User Guide 49
Page 50

Working in the Bin
About the Bin window
The Bin window consists of two main components — a toolbar and the area that holds
your files. The toolbar lets you create new bins and sequences, search for specific
files, and change the way you view bins.
Creating a new bin
The Bin window is empty when you open Aurora Edit for the first time. Before you
can begin using Aurora Edit, you need to create bins to store your work.
You can create and organize your bins to suit your work style. For instance, you could
create a bin for each day of the week and within those set up a bin for each individual
story or for each editor.
1. Click the New Bin button on the Bin contents toolbar.
50 Aurora Edit User Guide 08 April 2010
Page 51

The Bin Properties window appears.
2. Enter the bin Name.
3. Enter a bin Description and Keywords (optional).
You can use the keywords to search for a specific bin.
4. Click Browse and select a location for the Bin, if different than the default.
5. Click OK.
Related Links
Understanding SmartBins on page 58
How to organize your Bins
There are several ways to organize your bins, and the organization you choose depends
mostly on your job function as well as your organizational style.
A typical setup might be:
Working in the Bin
DescriptionName of Bin
Used for everyday stories1-Monday to 7-Sunday
Holds saved video effectsEffects
HFR (Hold For Release)
Imports
Misc.
08 April 2010 Aurora Edit User Guide 51
Used when you are editing a story on one day but airing it
on another
Set up as a single location where other Aurora Edit
workstations can send clips over the network to you
Holds any clips to be saved, such as Whiteflash, Black,
Color Bars and Tone, Reporter Outcues, repeated effects,
etc.
Page 52

Working in the Bin
Saving the Bin position
It is also important that, within each day of the week, you create another bin with the
title of the specific project you are working on. This helps to keep the bins organized,
especially with more than one editor working on the same Aurora Edit system.
Aurora Edit automatically monitors your bins and refreshes the display if anyone
places a file in one of your bins. For instance, as a breaking story develops, station
staff can place the latest footage in a given directory. It then appears in your Bin where
you can use it in your sequence.
NOTE: In order to create directories, an Aurora Edit LD client must be able to
connect to the storage volume. This may be on the hi-res storage or proxy storage.
If access is denied, an asterisk will appear next to the bin.
In Aurora Edit, you can create a workspace that remains each time you open and close
the application.
• Choose Window | Save Bin Postions.
Your Bin position is saved. Each time you open Aurora Edit, the Bin opens in this position.
Working in shared or local mode
Aurora Edit lets you use a shared media database or your computer's storage and a
local database.
You can use Aurora Edit either in shared or local mode.
Shared mode
Local mode
Aurora Edit indicates your current mode at the top of the window.
Uses a shared media database. All Aurora Edit workstations access
the same bins; the bins are locked so two editors can’t make
changes to the same file at the same time.
Uses your computer’s local disk storage and a local media
database. Each Aurora Edit workstation has its own Bin on the
Aurora Edit machine, and cannot share the Bin. In order to use
someone else’s files, you need to import them into your Bin.
52 Aurora Edit User Guide 08 April 2010
Page 53

You create sequences in Aurora Edit the same way regardless of what mode you are
working in. The main difference is that in shared mode all editors using an Aurora
Edit workstation have access to the same media files you do, according to security
settings.
Viewing clips in your Bin
Viewing Bins in details view
In this view, each clip or sequence is represented by an icon, the name of the file, and
other information about the file, such as timecode, description, and keywords.
The information acts as a database that you can customize by entering information
about your clips. You can also search the information for clips that match certain
criteria.
Working in the Bin
Related Links
Viewing Bins in thumbnail view on page 55
Displaying columns
You can hide or display multiple text columns in the Bin.
1. Click the View Thumbnails button in the Bin Toolbar, if you need to change to
thumbnail mode.
2. Click to select a Bin; the contents display in the window below.
If you are in the highest-level bin, you will not see all of the column choices.
3. Click the Column Manager button in the Bin Toolbar.
4. Select the columns you want to display or click the Reset button to display all of
the columns.
• Name — Displays the name of the clip or sequence.
08 April 2010 Aurora Edit User Guide 53
Page 54

Working in the Bin
• Description — Displays the description of the clip or sequence.
• Keywords — Displays any keywords entered; keywords help to identify and
search for specific clips.
• Created — Displays the date the clip or sequence was created.
• Folder — Displays the directory where the clip files are stored.
• Duration — Displays the length of the clip or sequence.
• Mark In — Displays the Mark In timecode.
• Mark Out — Displays the Mark Out timecode.
• Video Format — Displays the video format used for the media.
• Video Aspect — Displays the video aspect for the media, 4:3 or 16:9.
• Video Resolution — Displays the video resolution for the media.
• Compression — Displays the video compression type for the clip or sequence;
e.g., DV25, DV50, MPEG2, IMX30, IMX40, IMX50.
• Chroma Format — Displays the chroma ratio for the media, 4:1:1, 4:2:0 or
4:2:2.
• Tracks — Displays the tracks present in the clip.
• Tape ID — Displays the name of the source VTR tape where the media in this
clip came from.
• Modified — Displays the date of the last time the clip was modified.
• Status — Displays the clip status: All, Good, Bad, or Marked.
• Audio Format — Displays the audio bit depth: 16-bit PCM or 24-bit PCM.
A checkmark appears next to the selected options.
5. Click OK.
The Bin displays your new column choices.
Sorting your media files
You can arrange clips in numeric or alphabetical order according to the columns you
select.
For example, you can sort the Bin by the Mark In column to display all of the clips in
timecode order.
1. Click the heading of the column by which you want to sort the Bin.
The clips and sequences display in alphabetical or numerical order depending
on the column you selected.
2. Click the column again to reverse the order of the sort.
3. Right-click in the Bin and select Restore Default Sort to return to the original sort
order.
54 Aurora Edit User Guide 08 April 2010
Page 55

Viewing Bins in thumbnail view
The Thumbnail view provides a visual representation of the type of media file in each
bin. Each clip or sequence is represented by a single frame, allowing you to see the
content of the material.
Related Links
Viewing Bins in details view on page 53
Changing thumbnail size
Aurora Edit offers two thumbnail sizes in this view: 4:3 (SD) and 16:9 (HD).
Working in the Bin
1. Click the View Thumbnails button on the Bin Toolbar.
2. Choose the thumbnail size you want from the View menu.
Selecting the head frame
Aurora Edit allows you to change the head frame for your media.
Each clip or sequence in Thumbnail view is represented by a single frame, called the
head frame. By default, Aurora Edit uses the first frame from the clip or sequence.
However, you can choose any frame within the clip or sequence to represent the file
in the view.
1. Double-click the clip or sequence to open it.
Clips open in the Trimmer window; sequences open in the Timeline Tool.
2. Play through the clip until you find the frame you want to use.
3. Click Set Head Frame From Current Frame.
4. Click OK.
Working with clips in the Bin
Searching for a clip or sequence
You can search for clips and sequences in the Bin. You can search for all clips that
meet specific criteria or for a specific clip.
08 April 2010 Aurora Edit User Guide 55
Page 56

Working in the Bin
1. Select Tools | Find.
The Find In View window appears.
2. Choose the appropriate options:
• Fields — Check the boxes for the field(s) on which you want to search (Name,
Description, and Keywords).
• Query — Enter the text you want to search for.
• Match case — Check this checkbox to do a case-sensitive search.
• Match whole query only — Check this checkbox to search only for clips with
text matching the query text exactly.
• All bins — Select this option to search all Aurora Edit bins.
• Viewed bin and sub-bins — Select to search all of the bins within the bin you
selected.
• Viewed bin only — Select to search the bin you are currently viewing.
3. Click OK.
Clips and sequences matching your search result appear in the Bin window.
When you are done with your search, click the Search Results button off to restore
the normal bin view and allow you to continue working in the Bin. To see your search
results again, click the Search Results button to its ON position (blue).
Copying a clip or sequence
You can copy clips and sequences between bins.
56 Aurora Edit User Guide 08 April 2010
Page 57

If you copy a master clip, Aurora Edit pastes it as a subclip.
1. In the Bin, select the item you want to copy.
2. Right-click on the item and choose Copy.
3. Open the bin where you want to paste the item.
4. Right-click and choose Paste.
Moving a clip or sequence
You can move clips or sequences from one bin to another.
1. Choose View | Bins to open a second Bin window.
2. In the second Bin window, navigate to the destination bin.
3. Drag the sequence or clip from the first Bin window to the second.
Renaming bins and media files
Working in the Bin
You can change the name of any bin, clip or sequence.
1. Select the item you want to rename.
2. Choose Edit | Rename.
You can also press Shift + R on the keyboard or right-click on the item and choose
Rename.
3. Enter the new name of the item and press Enter.
Deleting clips and sequences
You can delete unused clips or sequences you no longer need. However, you cannot
delete files if they are being used in any existing sequences or subclips.
1. Select the clip or sequence you want to remove. Hold down the Ctrl key to select
multiple items.
2. Press Delete on the keyboard.
A dialog box prompts you to confirm the deletion.
3. Click Yes to delete the file.
Changing master clip properties
You can change the video aspect of a master clip, add a description and keywords,
and view file information.
08 April 2010 Aurora Edit User Guide 57
Page 58

Working in the Bin
SmartBins
Understanding SmartBins
1. Highlight the clip in the Bin, right-click and select Properties.
The Master Clip Properties window appears.
2. Add a description for the clip, or add keywords that can be used to search for this
file.
3. Select the video aspect for the clip: 4:3 or 16:9.
4. Click OK.
SmartBins provide a way to automatically synchronize media access between Aurora
Edit and media server bins. A SmartBin monitors a folder on a media server and
automatically updates the SmartBin contents when new or updated media appears.
SmartBins require a license from Grass Valley.
Using Aurora Edit in shared mode, you can automatically update clips, map folders,
or automatically import files from a Media Server to one of your bins, known as
SmartBins.
Aurora Edit monitors the server folder specified and automatically updates the SmartBin
when new clips or updated feeds appear. You don’t need to go into the server directory
and copy the media into your Aurora Edit bin in order to use it for editing.
Related Links
Creating a new bin on page 50
Creating a Shared SmartBin on page 59
Creating a Transfer SmartBin on page 58
Creating a Transfer SmartBin
The Transfer SmartBin sets up automatic clip transferring from a Media Server to an
Aurora Edit Bin.
1. Click the New Bin icon on the Bin toolbar.
2. In the SmartBin Type drop-down list, select Transfer SmartBin.
3. Click Browse to the right of the Server Path field.
The Select Server Bin window appears.
4. If you are using a Network Attached Storage (NAS) server, enter the name of the
server and click Connect.
58 Aurora Edit User Guide 08 April 2010
Page 59

You only need to enter the name of the server the first time you connect; the
server connects automatically once you’ve set it up.
5. Select the bin to monitor and click OK.
The Server Path fills in with the selected Bin and the Enable SmartBin checkbox
gets checked.
6. Click OK to create the SmartBin.
Aurora Edit now monitors the Media Server folder and automatically adds new media
to this bin.
Related Links
Understanding SmartBins on page 58
Creating a Shared SmartBin
Shared SmartBins set up a link for an Aurora Edit bin to monitor a folder on the media
server.
Working in the Bin
Media is not moved between the server and bin; instead, media is mapped into the
two directory structures — a process known as "mirroring".
1. Click the New Bin icon on the Bin toolbar.
2. In the SmartBin Type drop-down list, select Shared SmartBin.
3. Click Browse to the right of the Server Path field.
4. Select the bin to map with and click OK.
5. Click OK to create the SmartBin.
Once the mapping association is made, the SmartBin Service automatically keeps the
bins synchronized.
Related Links
Understanding SmartBins on page 58
The Select Server Bin window appears.
08 April 2010 Aurora Edit User Guide 59
Page 60

Page 61

Chapter 3
Using MediaFrame to manage media
This section contains the following topics:
• Understanding MediaFrame
• Searching for media
• Using Explore to bookmark locations
• Using Collections to categorize clips
• Using metadata to define clips
08 April 2010 Aurora Edit User Guide 61
Page 62

Using MediaFrame to manage media
Understanding MediaFrame
MediaFrame is an Aurora Edit plug-in that provides a variety of tools for organizing,
managing, and searching media clips.
The MediaFrame plug-in allows Aurora Edit to incorporate some key Aurora Browse
asset management functionality within the editor itself. This includes enhanced search
capabilities within the bin, scene detection for sources, links to lo-res assets, offline
assets, and metadata entry even in environments that do not have lo-res media.
MediaFrame is configured from Tools | Options | General. It includes a field for the
MediaFrame server name or IP, and a checkbox to enable or disable MediaFrame
functionality without clearing the field.
Aurora Edit consumes a Browse license when MediaFrame is enabled, so the number
of available licenses must be considered when configuring the system.
Once configured, the application presents a number of different touch points in the
MediaFrame plug-in architecture:
• Bin—MediaFrame adds the Search, Explore, and Collections tools to the bin.
• Clip Source—MediaFrame provides access to the general, custom, and
keyword/keyframe metadata fields from the clip source as well as the Record to
Bin and Trim Tools.
Metadata entry is permissioned through MediaFrame/Aurora Browse roles and
responsibilities.
• Timeline Storyboard—MediaFrame can display a storyboard in the Timeline area
to show either scene detection thumbnails or keyword/keyframe thumbnails.
• Sequence Metadata—Sequences are not added to the MediaFrame database until
they are linked to placeholders during "Published" sends. Once sent to a publish
location, the sequence appears as a searchable asset in the MediaFrame database.
In addition, the sequence properties of the published story has a metadata tab for
entering additional information.
Note that effects, graphics, Bins, and audio-only files cannot be seen in the MediaFrame
database.
Searching for media
Setting search criteria
With Aurora Edit and MediaFrame, you can specify various criteria on which to search
for media.
1. In the Bin toolbar, click the Search icon.
62 Aurora Edit User Guide 08 April 2010
Page 63

2. Enter search criteria in one of these two fields:
• All or part of the asset name
• A word or phrase in the asset metadata
3. Select how many results to view by clicking the Limit results to drop-down box
and choosing 50, 100 or 500 assets.
4. Click Search.
Search results display in the lower pane of the Bin.
Tips for using search criteria
You can use a variety of methods to define your media search.
Using MediaFrame to manage media
Follow these steps...To search...
For logical assets
For physical assets
Using specific criteria, such as
searching for files created before
a certain date Settings. The Advanced Settings dialog box displays.
In the Asset Navigator view, under Advanced settings,
select the Search in drop-down field. Specify the
MediaFrame database and press the Search button.
MediaFrame database searches return logical assets that
contain metadata and links to any physical assets
including high-resolution media and proxy video.
In the Asset Navigator view, under Advanced settings,
select the Search in drop-down field. Specify the MDI
device and press the Search button. MDI device
searches return physical assets. If a red X is displayed
against the MDI, the system is communicating with the
MDI but the MDI is experiencing a problem. A red dot
indicates there is no communication with the MDI, and
a green dot indicates the server is communicating with
the MDI.
Create a filter and use it to search: In the Asset
Navigator view, click the down arrow next to Advanced
Click the Add Filter icon and select the Property and
Comparison criteria from the drop-down lists. Click
OK to add the newly created filter to the active filter
list. Press the Search button.
Notes: You can create an unlimited number of
filters and save them as part of a search. You can
use filters as independent search criteria or use
them together with a text search. If more than one
filter is defined, an AND operator is implied
between them.
Using only specific metadata
fields
08 April 2010 Aurora Edit User Guide 63
Under Advanced Settings, select the MediaFrame
database or an MDI device. In the Fields drop-down
Page 64

Using MediaFrame to manage media
Follow these steps...To search...
list, check the field or fields to search on and press the
Search button.
Using text or numbers in the
name of the asset
Using text or numbers in the asset
metadata fields of the asset
By asset name
Enter the search criteria in the Asset Name text field
and press the Search button.
Notes: Do not use wildcards or quotation marks
in the Asset Name text field. Do not enter more
than one word unless you are searching for an
exact match of the multiple words and spaces.
Enter the search criteria in the Asset Metadata text field
and press the Search button.
Notes: You can use wildcards or quotation marks
in the Asset Metadata text field. If you enter more
than one word or phrase, the OR operator is
implied unless you specify otherwise. If you are
searched for numbers in a number field, create a
filter.
Do not enter more than one word in the Asset Name
text field unless you want to find both words exactly
as typed with spaces.
NOTE: The Asset Name field does not recognize
quotation marks.
To search for an asset by name, enter text or
numbers in the Asset Name text field and click the
Search button.
For an exact phrase
Results are returned from assets that contain the
search term in the name of the asset, even if it is
a fragment of the name.
How you search for an exact phrase depends on whether
you're entering the search term in the Asset Name or
the Asset Metadata text field.
NOTE: The Asset Name field does not recognize
quotation marks.
If you search within the Asset Metadata text field,
enter the phrase in quotation marks.
If you search within the Asset Name text field,
enter the exact phrase.
64 Aurora Edit User Guide 08 April 2010
Page 65

Using MediaFrame to manage media
Follow these steps...To search...
With wildcards
Metadata fields
Wildcard searches can be performed in the Asset
Metadata field. You can only use an asterisk at the end
of a term, not in the beginning or middle.
If you want to search using a beginning fragment
of a term, use the wildcard asterisk symbol (*) in
the Asset Metadata text field.
Using an asterisk after a term returns any asset that
contains the term, followed by a space or by more
text, in any of the text fields.
NOTE: To search using a fragment that is found in
the middle or the end of a word in the asset metadata,
add a filter under Advanced Settings instead of using
the Asset Name or Asset Metadata text field.
You can limit your search to specific metadata fields
or keywords, such as the asset name, the source ID or
a keyword, by using the asset metadata text field and
specifying the fields to search.
Assets are returned if they have the word or phrase
in any of the specified metadata fields.
To search foreign metadata or keywords, you need
to select these fields in the Filters drop-down list.
For more information, refer to the Aurora Browse
Installation and Configuration Guide.
With Boolean operators
You can search with the following Boolean operators:
AND, OR, and AND NOT. If you enter more than one
term without a specific Boolean operator, the OR
operator is implied.
To search with Boolean operators, use the Asset
Metadata text field.
You can search for numbers in three ways:For numbers
• To find a number in the asset's name, use the
Asset Name text field.
• To find a number inthe asset's text field
metadata. such as the description, use the Asset
Metadata text field.
• To find a number only in a specific category,
such as a number metadata field or a specific
Creation Date , Modification Date, etc., create
a filter and select the property to search on.
NOTE: You cannot search for single numbers in the
Asset Metadata text field. Any single character, letter
08 April 2010 Aurora Edit User Guide 65
Page 66

Using MediaFrame to manage media
Follow these steps...To search...
or number, is treated like a "noise" word and is
ignored. To search for a single number in the
metadata, create a filter.
With noise words
Saving a search
Certain "noise" words or characters are automatically
ignored in a search in the Asset Metadata text field.
Examples include:
• Prepositions or articles (such as "after",
"before", "the", "an", etc.)
• Single characters or numbers ("a", "z", "0",
"9"," $", "_", etc.)
• Pronouns ("who", "him", "mine", etc.)
Common verbs (such as "will", "said", "want",
etc.)
To search for noise words, create a filter containing
the word or words you want to search for.
If you have administrator privileges, you can
modify the SQL file containing the noise words.
Modifying this list might affect expected execution
times.
You can create a customized search that searches specifically for particular text or
properties.
Searches can be saved globally for universal access, or locally for your access only.
Global changes are saved to the server when you close the Aurora Edit application.
Other users need to reopen Aurora Edit before they can see the changes.
1. In the Bin, click the Search icon.
2. Enter your search criteria.
3. Click the Add Saved Search icon.
4. Name the search, and if desired make the search accessible globally.
You cannot give a search the same name as one of the default searches (indicated
by a lock icon).
Working with searches
With Aurora Edit and MediaFrame, you can specify how searches are organized and
saved.
66 Aurora Edit User Guide 08 April 2010
Page 67

Using MediaFrame to manage media
DescriptionIcon
Displays the name of the current search, if any.
Saves search criteria, either globally or locally.
Deletes the current search.
Sets the current search to be the default search.
Resets the default search.
Undoes the default search reset.
Indicates a search saved on the MediaFrame server by a
particular user. Can be accessed by the user from any Browse
Client where they're logged in.
Indicates a search saved globally.
Using filters to refine a search
About searching with filters
Using a filter, you can search assets by name, description, or other specific criteria.
You can also use a filter if you are searching for a fragment of metadata.
You can also use a filter in conjunction with text in the asset name or asset metadata
text fields. If you search using a text field and a filter, only assets that have the search
term and meet the specified criteria are returned.
You can create an unlimited number of filters and save them as part of a search. Filters
can be used as independent search criteria or together with a text search that uses
Boolean operators, fragments of asset names, or other asset metadata. Creating a
keyword-based filter or an association-based filter lets you find logical assets that are
associated with specific criteria.
If more than one filter is defined, an AND operator is implied between them.
Indicates a default search (installed with the application,
cannot be modified).
When you create a filter, you can add it to your list of favorite filters. This allows you
to quickly access the filters.
08 April 2010 Aurora Edit User Guide 67
Page 68

Using MediaFrame to manage media
The favorite filters are only accessible on the PC where they were created, but they
are available regardless of which search you are using. You can access the list by
clicking on the Favorite Filters icon.
Related Links
Seaching for Offline Assets on page 174
Creating a filter
Filters let you customize your searches so that you can quickly locate specific assets.
1. In the Search window of the Bin, click the double arrow or the plus sign next to
Advanced Settings.
(Which button is displayed is determined by the length of the Search pane.)
The Advanced Settings dialog box displays.
2. Click the Add Filter icon .
The Add Filter dialog box displays.
3. Select the Property and Comparison criteria from the drop-down lists.
4. If you want to use this filter frequently, check the Add to Favorites box.
If you want to delete the filter from the Favorites list later, you can select Modify
Favorites.
5. Click OK to add the newly created filter to the active filter list.
The new filter is displayed in the Filters field.
When you want to use this filter to search for media, click the Search button.
Working with filters
If you need to, you can modify the characteristics of a filter or delete one you no longer
use.
• To modify a filter:
a) Select the filter and click Modify Filter
The Edit Filter window opens.
b) Make any changes to the filter characteristics.
c) Click OK.
You can also double-click on a listed filter to open the Edit Filter window.
• To remove a filter, select it and click Delete.
68 Aurora Edit User Guide 08 April 2010
Page 69

Using Explore to bookmark locations
The Explore tool allows you to browse your network and save network locations
(servers and folders) as Favorites just as you would in the Windows Explorer. Favorites
serve as one-click shortcuts to the locations you use most, and also as destinations
onto which you can drag assets to transfer them across the network.
Follow these steps...To do this task...
Using MediaFrame to manage media
Browse the network
Add a favorite location
Go to a favorite location
Copy an asset
Transfer (move) an asset
1. Navigate the network from the All Locations pane.
2. Select a location from the All Locations pane to view its
contents in the Explore pane.
1. Browse the network in the All Locations pane.
2. Right-click on a server or folder and select
• Add to Favorites -- Adds the location to Favorite
Locations | Personal Favorites
• Add to Global Favorites -- Adds the location to
Favorite Locations | Global Favorites
You can drag Favorites to reorder them, or right-click a
Favorite and select Move Up or Move Down.
Click on a Personal or Global Favorite in the Favorite
Locations pane.
1. Right-click on an asset in the Explore pane and select
Copy.
2. Right-click on a Favorite and select Paste.
1. Drag an asset (clip or folder) from the Explore pane onto
a Favorite.
The Transfer Options window appears.
2. Select Automatically rename destination "K2 Movie"
... to rename the asset if an asset with that name exists at
the destination.
3. Select Save settings for similar transfers to have
subsequent clips being transferred keep these settings.
08 April 2010 Aurora Edit User Guide 69
Page 70

Using MediaFrame to manage media
Using Collections to categorize clips
About Collections
Collections provide a way to sort and organize assets within a bin for easy access.
You can create collections for yourself or for all users to share, and save them for
future use or only until you close the Aurora application.
DescriptionName
Saves a collection that only you can accessPrivate
Saves a collection that all users may accessShared
Creates a temporary collection that is deleted when you exit the applicationTemporary
Logical
Creating a collection
You can create collections to sort and organize clips within the Bin for easy access
1. Click the New Collection button.
The New Collection window appears.
2. Enter a Collection Name.
3. Select a Collection Type:
• Private - Saves a collection that only you can access
• Shared - Saves a collection that all users may access
• Temporary - Creates a collection until you close the Aurora Edit application,
then it is deleted
4. Select the Content type:
• Logical - The collection references clip content (raw video, audio, sound,
images), metadata, and proxy assets (low-res footage)
• Physical - The collection references clip content (raw video, audio, sound,
images) only
Links to asset content (raw video, sound, images), metadata, and proxy
assets (low-res footage)
Links to asset content (raw video, sound, images) onlyPhysical
5. Click OK.
70 Aurora Edit User Guide 08 April 2010
Page 71

Modifying Collections
Once a collection is created, you can modify the name of the collection, as well as
change the Content type, or delete a collection.
Using MediaFrame to manage media
Follow these steps...To do this task...
Select the collection and click Delete CollectionDelete a collection
Rename a collection
Toggle a collection between private
and shared
Save a collection
Perform a batch operation on all the
assets in a collection (e.g. copy all
the assets)
Viewing Collection contents
1. Select a collection from the top part of the bin.
Its contents are displayed in the bottom part of the bin.
2. Click Refresh Collection to refresh the collection content display.
Adding assets to a collection
Select the collection, click on the name, and type a
new name
Right-click on the collection and [de]select Shared
With Others
Right-click on the collection and select Saved for
Future Sessions
Right-click on the collection, select Act on
Contents, and choose the desired action.
You can only add assets of the same content type as the collection group.
1. Select the asset(s) you want to add to a collection.
2. Choose one of these methods to add assets:
• Right-click on the asset and select Add to Collection | collection_name.
• If you need to create a new collection, right-click on the asset and select Add
to Collection | New Collection, and add the collection properties in the New
Collection window.
To remove an asset from a collection, select the asset from the collection contents and
press Delete.
08 April 2010 Aurora Edit User Guide 71
Page 72

Using MediaFrame to manage media
Using metadata to define clips
About metadata
Metadata is data about data; it can include keywords, timecode information, and other
terms that help you find a particular asset.
Metadata adds descriptive information about media assets. An administrator can create
customized, predefined metadata fields to speed selection and avoid errors. You can
enter information in custom metadata fields before, during, or after assets are ingested.
You can also print metadata.
Once metadata has been entered into the Aurora system, it is searchable and you can
use it to locate the specific assets recorded at that time.
The types of metadata featured in Aurora Browse are described in the following table.
DescriptionType of
metadata
Core
Custom
Logical
asset
Physical
asset
Related Links
Certain metadata brought in through Aurora Ingest, such as Name, Creation
Date, Description Field and Keywords appear in Browse with high-resolution
associations. Likewise certain metadata added in Aurora Edit as part of Master
Clips and Sequences also get added to Browse environment for a common
metadata view. An administrator can customize and expand mapping depending
on your workflow requirements.
Metadata in fields that have been created by an administrator. Custom metadata
can include text fields, as well as date, number, or Boolean fields.
Metadata about a logical asset, that is, metadata about the MediaFrame database
information, physical asset or assets on the server, and proxy assets.
Metadata about a physical asset, or essence, is metadata about raw program
material, such as video or audio.
Adding general information
1. Select the Source Tool by pressing 2 on the keyboard or clicking the Source
Tool button.
2. Click the View Metadata button.
The metadata tabs open in the dynamic tool area.
3. Enter information about the clip:
72 Aurora Edit User Guide 08 April 2010
Page 73

Using MediaFrame to manage media
DescriptionField or Button
Thumbnail
Name
Source
Expires Hold Duration
Description
The still image of the frame that the general metadata
describes. To change the thumbnail, right click on
the image.
The asset name. If the asset has been located using
Search, the name is highlighted.
The name of the advanced encoder that encoded the
proxy.
Enter an expiration date If the date field is not
defined, click the drop-down arrow to bring up a
calendar and select a date. If a date has already been
entered, you can modify it by typing a new date in
the Expires field. Check the hold box if you don't
want the asset to expire. The asset cannot be deleted
until the hold box is unchecked. The duration
indicates the length of the asset.
Click in the Description text field to enter text, if
desired. If you press Enter after adding a description,
you will see [] symbols immediately after the word
in the Description column of the Asset list.
Additional search information.Search Terms
Refresh the metadata.
Using keywords to define clips
Adding keywords
Keywords reference a specific timecode location in the media file; they provide a
powerful way to find specific assets. You can create subclips based on keywords.
Print the general metadata.
Undo the metadata change.
Redo the metadata change.
08 April 2010 Aurora Edit User Guide 73
Page 74

Using MediaFrame to manage media
1. Create an In point by playing the footage and clicking Mark In at the starting
point for the keyword.
2. Create an Out point by clicking Mark Out at the end point for the keyword.
3. If you are not in the Source Tool, press 2 on the keyboard or click Source Tool.
4. Click the View Metadata button.
5. To Add Keyword, select F3 or the Keywords tab.
6. Click the Keyword drop-down list and select Add Keyword.
The new keyword displays.
7. To change the name of the keyword, double-click on the default keyword name,
enter the new name, and click off of the keyword.
The keyword is added to the list.
Adding auto-mark keywords
You can define how newly created keywords or keyframes are named using the
Keyword Options dialog box.
1. Select the Source Tool by pressing 2 on the keyboard or clicking the Source
Tool button.
2. Click the View Metadata button.
The metadata tabs open in the dynamic tool area.
3. Click the Keyword Options icon, next to the Mark In and Mark Out fields.
The Keyword Options dialog box displays.
4. To automatically generate keyword names, check the Auto-Generate keyword
names box and fill in the text field.
Once the option is checked, keywords are created using the defined naming rule.
(Optionally, you can use "%" to specify where the numbering will be placed.)
If the option is not checked, the default keyword name, keyword , is used with
an incremental suffix.
5. Click OK.
Deleting keywords
You can delete keywords you no longer wish to use.
Deleting the material between the Mark In and Mark Out points does not delete the
keyword. Instead, it moves the keyword's Mark points to the asset's original timecodes.
Adding keyframes
A keyframe is a zero-length keyword.
74 Aurora Edit User Guide 08 April 2010
Page 75

Rather than being created from the currently selected mark-in and mark-out points, a
keyframe is created at the clip player’s current play position. Selecting a keyframe
moves the clip player’s current position to that location, but it doesn’t modify the
mark-in or mark-out points.
• Use one of these methods to create a keyframe:
• Press the Insert key on the keyboard.
• On the Keywords tab, click on the arrow next to the Add Keyword button and
select Add Keyframe.
The keyframe displays as a notch, similar to a storyboard marker.
Working with keywords
In the Keyword tab of the metadata area, you can add keywords or keyframes and
manage your keywords.
Using MediaFrame to manage media
DescriptionField or Button
Add a keyword
Add a keyframe
Auto-mark keywords
Reassign keyword marks
Create a subclip for the selected keyword footage
Delete selected keyword(s)
Refresh the keywords in the list
Print the clip metadata
Undo the last metadata change
Redo the last metadata change
Managing custom metadata fields
If you have MediaManager privileges, you can add, edit, or delete custom metadata
fields.
08 April 2010 Aurora Edit User Guide 75
Page 76

Using MediaFrame to manage media
1. Select the Source Tool by pressing 2 on the keyboard or clicking the Source
Tool button.
2. Click the View Metadata button.
3. In the Custom tab, click the Manage Fields icon.
The Edit Custom Metadata Fields dialog box displays.
4. Click Add in the Fields list.
The Add Custom Metadata field displays.
5. Enter the Name of the new field.
The name displays in the Custom tab of the metadata section of the Source Tool.
6. Select the Type of field you want to add.
Field types can be text that a user fills in or a list of options.
7. Click OK.
The new field is added to the Field list.
8. Click Close to exit out of the window.
Using custom metadata fields
Custom fields allow you to enter additional asset metadata such as names, air dates,
or source locations.
An administrator can create custom metadata fields.
1. Select the Source Tool by pressing 2 on the keyboard or clicking the Source
Tool button.
2. Click the View Metadata button.
3. Click the Custom tab.
4. Add values to the custom fields by one of the following methods:
• Select a choice from a drop-down list
• Type the data into the field
• If the custom field is a date field, click in the date area and then pick the correct
date on the calendar
The field data is associated with the asset.
Printing metadata
You can print the metadata for a clip from all three metadata tabs: General, Keywords,
or Custom.
76 Aurora Edit User Guide 08 April 2010
Page 77

• Click Print from any of the metadata tabs.
Using MediaFrame to manage media
08 April 2010 Aurora Edit User Guide 77
Page 78

Page 79

Chapter 4
Acquiring media
This section contains the following topics:
• Using clips stored in the Bin
• Using a clip source
• Recording to the Bin
• Using files from removable media
• Importing files
• Batch recording
08 April 2010 Aurora Edit User Guide 79
Page 80

Acquiring media
Using clips stored in the Bin
Using a clip source
If you have clips in the Bin before starting a sequence, you can bring them onto the
Timeline and use them in a new sequence.
You can be in any of the Aurora Edit tools to load clips from the Bin onto the Timeline.
1. Navigate through the Bin until you find the clip you want.
2. Double-click the clip to load it into the Timeline.
The clip loads into the clip source of the Timeline.
You can load any clip from your Bin into the Source Tool, which effectively treats
the clip like a live source such as a tape deck.
1. Drag the clip into the viewer or press Shift + C to load the clip.
2. Edit the footage to the Timeline as you would a tape deck.
Related Links
Editing in the Timeline
Recording to the Bin
You can record media directly to the Bin to use later.
Once you open a bin, you can record from your tape deck or any other source directly
into that bin. You later edit that material in the Bin or bring it into the Timeline.
1. Open the bin where you want the media to reside.
2. Click the Record to Bin button in the menu bar.
The Record to Bin window appears.
3. Enter the name of the clip and add a description (optional).
You can also use Tape ID as a way to identify where your source video
originated.
4. Choose the record source using the drop-down menu.
5. Play or cue the tape to the place where you want to start recording.
6. Mark an In point by pressing I on the keyboard.
If you don’t set a Mark In, Aurora Edit uses the current position. Optionally,
scrub the video and mark an Out point here.
7. Press F12 to start recording; the recording appears in the Record Window.
80 Aurora Edit User Guide 08 April 2010
Page 81

8. When you are done recording, press the space bar to stop, or press O on the keyboard
to stop recording after adding Out handles.
If you marked an Out point, recording stops at that point. Aurora Edit
automatically saves the clip into the selected bin.
9. Close this window by clicking the X in the upper right corner.
Related Links
Naming source tapes on page 98
Using files from removable media
Aurora Edit can import and use files from three types of removable media—Panasonic
P2 cards, Sony XDCam Professional Disks (SD,HD, and EX), and REV® Pro USB
drive disks.
When previewing media, HD XDCam files always use the low-resolution proxy. With
SD files, you have the option of using proxies or high-resolution media.
Acquiring media
Aurora Edit supports shot status for P2 and XDCam. In addition, if a unique title was
given to a clip in P2 or XDCam, Aurora Edit will recognize that title and display the
modified name.
JVC also has the ability to encode in the XDCAM EX format. These files import
correctly with both Aurora Edit and RMI.
1. Make sure you have the appropriate removable media driver(s) installed on your
Aurora Edit machine.
The drivers are located on the Aurora Suite CD-ROM.
2. Insert the removable media into the drive.
3. In Aurora Edit, select View | Removable Media Bin.
The Bin opens and operates the same as the Aurora Edit Bin.
4. If you want to pre-cache proxies for quicker preview, click Cache All Proxies.
Otherwise, proxy files are cached when the file is opened. Once cached, status
is updated, represented by a yellow triangle in Thumbnail View or listed in the
status column in Details View.
NOTE: While proxies are being cached, you cannot playback video. You can,
however, continue to edit high-resolution media that is already stored on your
system.
5. Import the files into Aurora Edit using one of the following methods:
• Double-click on a file to open it in the Trimmer, mark In and Out points to
select the footage you want, and either create a subclip or copy to the Timeline.
08 April 2010 Aurora Edit User Guide 81
Page 82

Acquiring media
Importing files
• Drag the clip into the viewing window of the Timeline or Source Tools; footage
becomes a clip source and can be used to mark clips.
• Drag a clip (or a selection of clips) into the Aurora Edit Bin.
• To view all clips on the removable media as one long file, click View as
Tape in the Removable Bin toolbar, scrub the file as needed, then import.
NOTE: View as Tape is not available for REV Pro media.
The contents of the Bin won’t refresh automatically if you change a card or disk; press
F5 to refresh the Removable Media bin.
Proxies are stored in the same location as the default VibrintAVFiles folder and are
not removed automatically; you should delete these files periodically.
Importing clips
You can import media clips from your computer network or other Aurora Edit
workstations. Imported clips appear in your Bin so you can use it in sequences.
1. Click in the Bin window. then choose File | Import | Clip.
The Import Clips window appears.
2. Use the Look in list or Browse button to find the clip you want to import.
3. Highlight the clip and click Import. Press the Ctrl key to select multiple clips.
A progress bar indicates the import status.
The imported file appears in the Bin; you can use it just like any other clip.
Importing EDL files
You can import common EDL formats (.OMF or .XML) from low-resolution editing
systems or .AAF files created from Aurora Edit high-resolution media. These files
contain sequenced clips that you can use to create your own sequences.
1. Click in the Bin window, then choose File | Import EDL.
2. Navigate to the EDL file you want to import and select it.
3. Click Open.
A progress bar indicates the import status.
Aurora Edit creates a new bin with the name of the imported EDL for the sequence
and its clips.
Related Links
82 Aurora Edit User Guide 08 April 2010
Page 83

Exporting EDLs on page 245
Enhancing audio using OMF files on page 159
Importing effects
You can import video effects from other workstations as well as saved effects you
created for other sequences.
1. Click in the Bin window, then choose File | Import | Effect.
The Import Effect window appears.
2. Navigate to the effect you want to import, select it and click Open.
A progress bar indicates the import status.
The effect appears in the Bin; you can bring it into the FX track on the Timeline.
Related Links
Using saved effects in your sequence on page 192
Acquiring media
Importing graphic files
You can import 24- or 32-bit graphic files in Aurora Edit and Aurora Edit LD, which
you can use in the graphics track of your sequence.
You can also superimpose a bitmap (with an alpha key) over the video in your clip.
Imported graphics appear in your Bin.
1. Choose File | Import | Graphic.
The Import Graphics window appears.
2. Navigate to the graphic you want to import and select it.
3. Resize the image, if necessary, by checking the Size to Fit or Center boxes.
It is recommended that the Auto Detect Sequential Files checkbox be left
unchecked unless you are working with sequential TGA files. Leaving the
checkbox checked prevents the importation of more than one graphic at a time.
4. Click Open.
A progress bar indicates the import status.
The imported graphic appears in the Bin; you can bring it onto the Timeline on the
Graphics (G) track.
You can also import a graphic directly to the Timeline by choosing File | Import |
Graphic while the Timeline window is currently selected.
NOTE: For Aurora LD, this is the same functionality as the high-resolution Aurora Edit,
but Aurora Edit LD must import the file into a directory that is has access to. If it is not
attached to the hi-res volume (V), then it must import to a directory that it has access to.
08 April 2010 Aurora Edit User Guide 83
Page 84

Acquiring media
Graphic file formats
Animated sequential .tga files are not supported for Aurora Edit LD; only still graphics
may be imported via this application.
Aurora Edit supports these graphic file types:
File ExtensionType of File
.bmpWindows Bitmap
.tgaTruevision Targa
.jpg, .jpegJPEG - JFIF Compliant
.tif, .tiffTagged Image File Format
.pngPortable Network Graphic (PNG)
.psdPhotoshop
.pctMacintosh PICT
.pcxZsoft Paintbrush
Related Links
Importing a TGA animation sequence on page 86
Importing media
You can import media in a variety of formats into your sequence.
1. Click in the Bin window, then choose File | Import | Media.
The Import Media window appears.
2. Navigate to the media you want to import and select it.
3. Select the Format and Compression Type, if needed.
4. If you are importing AVI, MPG, or WM9 Files, click Options and adjust these
settings, if desired:
Bit Rate (Mbps)
Chroma Format
.gifGraphics Interchange Format
OptionsSetting
Description
Automatically set according to the
Compression type.
Video Resolution
Aspect Ratio
4:3
16:9
Select the correct aspect ratio for your
media:
4:3 for Standard Definition (SD)
84 Aurora Edit User Guide 08 April 2010
Page 85

Acquiring media
OptionsSetting
Description
16:9 for High Definition (HD).
Aspect Ratio
Option
Half Pillar Box
Select which ratio option is appropriate.Pillar Box
Zoom
Stretch
Tracks
Video and Audio
Audio Only
Select which tracks you want to import
into your sequence.
Video Only
Field Order
Top First
Bottom First
Select the Field Order for the selected
files.
5. Click Open.
A progress bar indicates the import status.
The imported media appears in the Bin as a Master Clip; you can bring it onto the
Timeline to use in your sequence.
You can also export graphics to enhance or tweak it and then import the enhanced file
back into your sequence.
Related Links
Creating a playback list on page 241
Imported media formats
Aurora Edit supports these media types for importing:
File ExtensionType of File
.aviAVI Files
.mpg, .mpeg, .mpe, .m1r, .m2vMPG Files
.asf, .wmvWM9 Files
.movMOV Files
.aviMPEG-AVI Files
.cdaCD Audio Files
.mp3, .mp2MP3 Files
.wavWAV Audio Files
08 April 2010 Aurora Edit User Guide 85
Page 86

Acquiring media
Importing a TGA animation sequence
File ExtensionType of File
.aiff, .aifc, .aifAIF Audio Files
.wmaWM Audio Files
.auAU Audio Files
.gxfGXF Files
.mxfMXF Files
You can import .TGA animation sequences to use in your Aurora Edit sequences.
Aurora Edit imports a TGA bitmap file for each frame of sequentially numbered video,
and combines them into a single video clip.
In order to use a .TGA sequence in Aurora Edit, the Aurora Edit sequence needs to
have a Graphics track available.
The imported animation sequence, when placed on the Aurora Edit Timeline, is a
video clip plus a resize video effect using the alpha channel for transparency.
If, for some reason, you don’t want the animation sequence to be transparent over the
video on the other video track, you can turn it off by highlighting the clip, right-clicking
and selecting Properties, and unchecking Enable Video Alpha.
1. Click in the Bin window, then choose File | Import | Graphic.
The Import Graphics window appears.
2. Navigate to the animated sequence you want to import.
3. Leave the Resize Image checkboxes unchecked; these fields don’t apply when
importing an animated sequence.
86 Aurora Edit User Guide 08 April 2010
Page 87

4. Check Auto Detect Sequential Files to import all sequentially numbered .tga files
5. Select one file that is part of the .TGA sequence.
6. Click Open.
7. To add the animation clip to the Graphics track in your Aurora Edit sequence, make
8. Drag (or copy) the animation clip onto the Timeline Graphics track.
Related Links
Graphic file formats on page 84
Understanding keyframes on page 196
Acquiring media
with the same filename.
A progress bar indicates the import status. The imported file(s) appear in the
Bin as a single video clip.
sure your sequence has an active Graphics track.
The clip appears on the Graphics track.
NOTE: TGA animations that were imported prior to version 7.X will need to
be imported again as they were previously imported to the V2 and Effects
tracks.
Importing a MOV Animation File
You can import animation .MOV files to use in your Aurora Edit sequences. If the
.MOV file is an animation with alpha, it is recognized as such and imported as an
animated graphic into a selected bin.
1. To import an animation MOV file, click in the Bin window, then choose File |
Import | Media.
This will bring up the Import Media window.
08 April 2010 Aurora Edit User Guide 87
Page 88

Acquiring media
2. Navigate to the animation file you want to import and highlight it.
3. Click Open to import the movie file to the bin specified.
Batch recording
About batch recording
You can record multiple clips at a time using Batch Capture, which you access from
the Record to Bin window.
Batch Capture lets you mark clips from a Source tape and add them to a Batch Capture
list. You can also use footage from multiple Source tapes in the same Batch Capture
list. Once you create your list, you can record the clips to the Bin.
88 Aurora Edit User Guide 08 April 2010
Page 89

Creating a Batch Capture list
Acquiring media
You need to create a Batch Capture list before you can record clips to the Bin.
1. Insert a tape into the VTR.
2. Open the bin where you want the media to reside.
3. Click the Record to Bin button in the menu bar.
The Record to Bin window appears.
4. Click the Batch Capture button; the Batch Capture window expands as part of
the Record to Bin window:
5. Type a name for the first tape you are getting footage from in the Tape ID box.
6. Click Play in the Record to Bin window to begin playing the tape.
7. Use the transport controls to locate the material you want to record.
8. Create a Mark In and Mark Out point for the clip.
9. Click Add from deck presets or press C to add the clip to the Batch Capture list.
08 April 2010 Aurora Edit User Guide 89
Page 90

Acquiring media
Rearranging the Batch Capture list
10. Repeat steps 7-9 to create additional clips.
11. To use additional tapes, insert a new tape into the VTR and repeat the steps above.
Aurora Edit asks you for the new tape name when you add the first clip to the
Batch Capture list.
When you are done creating your Batch Capture list, you can save it or record the
clips to the Bin.
Once you have clips in the Batch Capture list, you can rearrange them if you need to.
• Use the following buttons to rearrange your list:
Button
Function
Clears the Batch Capture list.
Moves the selected clip down in the list.
Moves the selected clip up in the list.
Deletes the selected clip.
Adds the selected clip to the batch capture list.
Replaces the selected clip with the new Settings. Click Replace
with current deck presets instead of Add from deck presets after
marking a new clip.
Changing row colors in the Batch Capture list
You can change the way Aurora Edit displays rows in the Batch Capture List.
1. In the Batch Capture list, click the Settings button.
90 Aurora Edit User Guide 08 April 2010
Page 91

2. In the Settings window, click the Change button next to the row color you want to
change.
3. Pick a new color and click OK.
To return all colors to their Aurora Edit default color, click Use Defaults.
4. Change other row colors as necessary.
5. Click OK.
Saving a Batch Capture list
Once you’ve created a list, you can save it and record it later.
1. Click the Save button in the Batch Capture window.
The Save As window appears.
2. Navigate to the directory where you want to save the list.
To easily organize and keep track of files, you can create a separate folder to
store all of the batch capture files.
Acquiring media
3. Name the file and click Save.
The batch record list gets saved as a DNP Batch Log File with a .vlg extension.
Loading a Batch Capture list
You can load a previously saved Batch Capture list or a batch list created on another
system.
Aurora Edit supports these types of batch lists:
• DNP Batch Log Files (.vlg)
• Avid Log Exchange (.ale)
• CMX EDL Files (.edl)
• CSV—Comman delimited files (.csv)
1. Click the Load button in the Batch Capture window.
2. Locate the file containing the list and click Open.
The file loads into the Batch Capture and is ready to record.
Recording clips to the Bin
You record your batch capture list to the Bin.
In case of a failure during recording, a Batch Capture Log can be found in C:\Program
Files\Grass Valley\Aurora Edit\Logs. This log files contains error events which describe
the problem during capture.
08 April 2010 Aurora Edit User Guide 91
Page 92

Acquiring media
1. Load the Batch Capture list into the window, if it isn’t already open, or create a
new one.
2. Press F12 or click Record.
Aurora Edit records the clips from the current tape in the VTR first or asks you
to insert a specific tape.
Each of the clips records to the Bin. Row color changes to reflect the current status
of each clip.
Once the clips are recorded, you can bring the clips into the Timeline to use in a
sequence.
NOTE: When marking clips from a tape with discontinuous timecode, you can switch to
CTL Track and add the clip to the list. Aurora Edit dynamically switches from Timecode to
CTL Track depending on how the clips were originally marked.
92 Aurora Edit User Guide 08 April 2010
Page 93

Chapter 5
Preparing to edit
This section contains the following topics:
• Creating a new sequence
• Preserving ANC Data
• Selecting and deselecting tracks
• About editing modes
• Naming source tapes
• Routing audio tracks
• Using variable speed record
• Selecting your source
• Linking to an existing news or sports story
• Using the Assignment List Manager
08 April 2010 Aurora Edit User Guide 93
Page 94

Preparing to edit
Creating a new sequence
Aurora Edit uses sequences to create your news story; video clips, audio, and effects
are all part of your sequence.
The new sequence must be inside a bin in order for you to use it.
1. Click the New Sequence button on the Bin contents toolbar.
The Sequence Properties window appears:
2. Enter a name for the sequence (or use the one Aurora Edit assigns).
Continue to the Info section of the window.
3. In the Video ID section,
4. Enter a Description and Keywords for the sequence (optional).
You can use keywords to search for a specific sequence in your bin.
5. To use a Start Time other than 00:00:00:00, enter another time.
The date of the sequence creation will be shown below the Start Time.
94 Aurora Edit User Guide 08 April 2010
Page 95

Preparing to edit
Continue to the Timeline Settings section.
6. Select the number of Video Tracks to use for this sequence from the pulldown (1
or 2 tracks).
7. Select the number of Audio Tracks to use for this sequence from the pulldown (2-16
tracks).
Audio Tracks refers to the number of tracks in the Timeline for mixing, not the
number of output tracks.
8. Check the Graphics Track checkbox if you will be adding graphics to this sequence
and the Video Effects Track checkbox if you will be adding video effects.
9. Check Allow Mixed Formats if you want to mix and match video formats in real
time within the same Timeline.
This checkbox is active only when Allow Mixed Format Timeline is enabled in
Tools | Options | Timeline. In addition, all clips that differ from the video format
of the Timeline need to be transcoded when the completed sequence is sent to
a destination.
10. ANC data is preserved on all feeds sent via a Smartbin (the option to preserve ANC
data from a K2 or Summit storage device must be selected in the Audio/Video
Configuration under Data Track Setup). Checking the Preserve ANC Data checkbox
allows the edited sequence to preserve ANC data on send. The video can be
previewed on external monitors to view captioning data via the SDI output of an
AJA Breakout Box (BOB) . Note that this feature is not available with the older
SD AJA Breakout Box only with the LHi version.
More detailed information on preserving ANC data is provided in this manual
and the Aurora Edit and Aurora Edit LD Installation Manual.
11. Click OK to save the sequence.
The new sequence appears in your Bin and the Timeline opens.
You are now ready to add footage to the Timeline.
Related Links
Preserving ANC Data on page 96
Preserving ANC Data on page 96
Changing sequence properties
After creating a sequence, you can change any of the sequence properties as needed.
1. If the sequence is open in the Timeline, click the Properties button in the
Timeline toolbar. If you are in the Bin, right-click on a sequence and choose
Properties.
2. Make any necessary changes.
3. Click OK to save your changes.
08 April 2010 Aurora Edit User Guide 95
Page 96

Preparing to edit
Preserving ANC Data
Sequences created in Aurora Edit have a Preserve ANC Data checkbox that when
selected will allow ancillary data in clips sent to a Smartbin from a K2 or Summit
storage device to be preserved on the Timeline. The closed captioning present in the
ancillary data of a clip can be displayed on the SDI output of an optional AJA Breakout
Box (BOB) (LHi version only).
When incoming feeds with closed captioned data are recorded to a K2 or Summit
storage device, the K2 or Summit will put this data into an ancillary data track when
the generate ancillary data option is turned on on the K2 or Summit device. This is
done in Audio/Video configuration under Data Track Setup on the K2 or Summit.
When clips with this data are fed to an Aurora Edit Smartbin, the ancillary data can
be expected to be preserved in the clip (Preserve ANC Data checkbox must be selected
for the sequence) and allow any closed captioning in the data track to be monitored
on the SDI output of an AJA Breakout Box (BOB) option.
The general conditions for preserving and viewing closed captioning in Aurora Edit
are listed below.
• Closed captioning data is only displayed on ancillary data tracks. Closed captioning
in the VBI will not be displayed. If a clip with closed captioning data in the VBI
is rendered (to convert to another compression type, etc.) the VBI is not preserved.
• The currently supported types of closed captioning are OP-42, OP-47, EIA-608,
and EIA-708. Data must be VANC (vertical ancillary) data; closed captioning in
the HANC (horizontal ancillary data) is not supported.
• Preservation of ancillary data is available for both SD and HD SDI video (ANC
and Line 21)
The general rules for what to expect when editing clips containing ancillary data are
listed below.
• When editing with clips with an ancillary data track on the Timeline, the data can
be expected to be preserved when the Preserve ANC Data checkbox is selected
(when creating a new sequence).
• When edits are made on the Timeline, closed captioning in that frame can be
expected to be read and displayed without interruption.
• When effects and graphics are placed over the clips, ancillary data can be expected
to be preserved.
• When an effect involves two video tracks, such as a Resize effect with V2 over
V1, the clip that is on top (V2) ancillary data will be displayed. If the top clip does
not have an ancillary data track or valid closed captioning in the ancillary data
track, closed captioning will not be displayed regardless of the status of the clip
underneath.
• Ancillary data is not preserved over transitions (wipes, dissolves, etc.)
• Interlaced to progressive ancillary data conversions (and vice versa) are not
supported. If you have a progressive clip with closed captions on an interlaced
Timeline, the captions will not be displayed at the correct rate (they will most likely
96 Aurora Edit User Guide 08 April 2010
Page 97

play twice as fast, but they could also appear corrupt). The reverse is also true.
When the progressive clip on the interlaced timeline gets transcoded the captions
will not be preserved.
• The conform process will preserve ANC data on sends from Aurora Edit LD.
NOTE: Due to the nature of closed captioning, editing a clip with closed captions
can result in error prone closed captioning data due to crucial commands/characters
being removed.
Related Links
Creating a new sequence on page 94
Selecting and deselecting tracks
You can select which tracks you want to record to in the Timeline.
Aurora Edit lets you work with two video tracks and up to eight audio tracks. You
can edit from any source audio track onto any record track in the Timeline.
Preparing to edit
• Click once in the track indicator on the Timeline for each track you want to select
or deselect.
Selected track buttons are blue; deselected tracks are light gray.
About editing modes
The Timeline has three editing modes — Overwrite mode (the default), Splice mode,
and Fit to Fill, a special mode for creating motion effect clips.
For the first edit and for adding one clip after another, you can use either Overwrite
or Splice mode. The difference between these modes is important when you revise
and fine tune your sequence, as described in the table below.
08 April 2010 Aurora Edit User Guide 97
Page 98

Preparing to edit
Once you use these modes to edit clips to the sequence in your Timeline, you can
move clips forward or backward within the sequence or use the Trim tool to trim
transitions or to produce split edits.
The Aurora Edit editing modes are:
DescriptionKeypadIconTool
Naming source tapes
You can identify which Source tape source video material comes from using Tape ID.
Tape ID lets you add a name for the Source tape before recording; you can view the
tape name in the Properties tab for the clip.
1. Enable Tape ID by choosing Tools | Options | General and clicking Use Tape ID for
Capture.
2. Press 2 on your keyboard or click the Source Tool button.
3. Click the Tape ID button; the Tape ID window appears.
4. Enter a name for the tape and click OK.
F9Overwrite
F10Splice
Replaces existing sections of a sequence with new
material, leaving the sequence duration unchanged.
Similar to an insert edit in a tape-based system.
Splices a clip between two existing clips in the
Timeline by moving the two clips apart and inserting
the new clip between. All clips after the edit point move
downstream and lengthen the sequence.
Fits a clip into a duration you specify in the Timeline.F11Fit To Fill
You can view the Tape ID by highlighting the clip in the Bin, right-clicking and
selecting Properties.
Related Links
Recording to the Bin on page 80
Routing audio tracks
You can edit audio from any source track onto any record track in the Timeline.
You can work with up to eight audio tracks in the Timeline, though you can record
only four tracks per clip. If you have two audio inputs, you may need to assign a
different track to your audio source.
1. Press 2 on the keyboard or click Source Tool to select the Source Tool.
2. Click the Timeline Track box for the Audio Input channel you need to reassign.
98 Aurora Edit User Guide 08 April 2010
Page 99

Preparing to edit
3. Select the new audio track location from the drop-down list.
Using variable speed record
Aurora Edit lets you take advantage of the Dynamic Motion Control on most tape
decks and create a slow-motion or fast-motion record on the fly.
In the Source Tool, you set the speed in percentages and click them when you want a
change in speed. The default speeds are 75%, 50%, and 0, which you use to create a
freeze frame. Variable speed record also works with clip sources.
1. Press 2 on the keyboard or click Source Tool to select the Source Tool.
2. Click Enable variable speed controls.
The percentage windows become active.
3. Choose one of the three default speeds or enter a new percentage.
You can enter positive or negative numbers, as your deck allows.
4. Press F12 to record your clip.
The clip records to the Timeline with the speed you chose.
NOTE: If you are using a deck source, you can change the speed while recording the clip
by clicking one of the other percentage fields.
08 April 2010 Aurora Edit User Guide 99
Page 100

Preparing to edit
Selecting your source
Using a clip source
Related Links
You can select your input source from the equipment that has been set up in your
working environment. Sources can include tape decks, feeds, or routers.
1. Press 2 to select the Source Tool.
2. Select a source from the drop-down menu.
The image in the viewing monitor changes to reflect the new source.
You can load any clip from your Bin into the Source Tool, which effectively treats
the clip like a live source such as a tape deck.
1. Drag the clip into the viewer or press Shift + C to load the clip.
2. Edit the footage to the Timeline as you would a tape deck.
Editing in the Timeline
Changing sources
You can connect and configure a variety of video and audio sources as input devices
to Aurora Edit.
You can also configure a non-remote source, such as a microphone or a router, as an
input source and specify the tracks to select when using that input source.
1. Press 2 to select the Source Tool.
2. Select a source from the drop-down menu.
The image in the viewing monitor changes to reflect the new source.
Using auxiliary input
You can connect an auxiliary source as an input for creating sequences, which is
helpful if you are using an A-B switch for controlling your sources.
When you enable auxiliary input, Aurora Edit disables deck control from the Timeline
and your keyboard so you can use the device’s external controls.
1. Press 2 to select the Source Tool.
2. Click the Use Aux Input button.
The deck controls on Aurora Edit gray out; you can use the external controls of the
auxiliary device.
100 Aurora Edit User Guide 08 April 2010
 Loading...