

Page 1

Instruction Manual
071-0719-00
FIRST PRINTING: APRIL 2000
8981FS
DIGITAL FRAME SYNCHRONIZER MODULE
Page 2

Contacting Grass Valley Group
Region Voice Fax Address Web Site
North America (800) 547-8949
530-478-4148
Pacific Operations +852-2585-6688
Support: 852-2585-6579
U.K., Europe, Asia, Middle East +44 1753 218 777 +44 1753 218 757
France +33 1 45 29 73 00
Germany +49 221 1791 234 +49 221 1791 235
Copyright © Grass Valley Group. All rights reserved.
This document may not be copied, in whole or in part, or otherwise reproduced, except as specifically
permitted under U.S. copyright law, without the prior written consent of Grass Valley Group, P.O. Box
599000, Nevada City, CA 95959-7900 USA. GRASS VALLEY GROUP is a registered trademark and
Grass Valley is a trademark of Grass Valley Group. All registered trademarks and trademarks are property of their respective holders. Grass Valley Group products are covered by U.S. and foreign patents,
issued and pending. Product options and specifications subject to change without notice. The information in this manual is furnished for informational use only, is subject to change without notice, and
should not be construed as a commitment by Grass Valley Group. Grass Valley Group assumes no responsibility or liability for any errors or inaccuracies that may appear in this publication.
(530) 478-3347 Grass Valley Group
+852-2802-2996
P.O. Box 599000
Nevada City, CA 95959-7900
USA
www.grassvalleygroup.com
Page 3

Contents
About This Manual . . . . . . . . . . . . . . . . . . . . . . . . . . . . . . . . . . . . . . . . . . . . . . . . . . . . . v
Introduction . . . . . . . . . . . . . . . . . . . . . . . . . . . . . . . . . . . . . . . . . . . . . . . . . . . . . . . . . . . 1
Installation . . . . . . . . . . . . . . . . . . . . . . . . . . . . . . . . . . . . . . . . . . . . . . . . . . . . . . . . . . . . 3
Frame Capacity . . . . . . . . . . . . . . . . . . . . . . . . . . . . . . . . . . . . . . . . . . . . . . . . . . . . . . 3
Module Placement in the 8900 Frame. . . . . . . . . . . . . . . . . . . . . . . . . . . . . . . . . . . . 4
Cabling . . . . . . . . . . . . . . . . . . . . . . . . . . . . . . . . . . . . . . . . . . . . . . . . . . . . . . . . . . . . . 6
Input. . . . . . . . . . . . . . . . . . . . . . . . . . . . . . . . . . . . . . . . . . . . . . . . . . . . . . . . . . . . . . 6
Outputs . . . . . . . . . . . . . . . . . . . . . . . . . . . . . . . . . . . . . . . . . . . . . . . . . . . . . . . . . . . 6
Reference Input . . . . . . . . . . . . . . . . . . . . . . . . . . . . . . . . . . . . . . . . . . . . . . . . . . . . 6
Delay Control Output . . . . . . . . . . . . . . . . . . . . . . . . . . . . . . . . . . . . . . . . . . . . . . . 6
Power Up . . . . . . . . . . . . . . . . . . . . . . . . . . . . . . . . . . . . . . . . . . . . . . . . . . . . . . . . . . . . . 7
Operation Indicator LEDs . . . . . . . . . . . . . . . . . . . . . . . . . . . . . . . . . . . . . . . . . . . . . 7
Configuration. . . . . . . . . . . . . . . . . . . . . . . . . . . . . . . . . . . . . . . . . . . . . . . . . . . . . . . . . . 9
Configuration Switches and LEDs . . . . . . . . . . . . . . . . . . . . . . . . . . . . . . . . . . . . . . 9
Module Operation Modes . . . . . . . . . . . . . . . . . . . . . . . . . . . . . . . . . . . . . . . . . . . . 10
Frame Sync Mode. . . . . . . . . . . . . . . . . . . . . . . . . . . . . . . . . . . . . . . . . . . . . . . . . . 10
Fixed Delay Mode . . . . . . . . . . . . . . . . . . . . . . . . . . . . . . . . . . . . . . . . . . . . . . . . . 11
Input Signal Loss . . . . . . . . . . . . . . . . . . . . . . . . . . . . . . . . . . . . . . . . . . . . . . . . . . 11
Input Signal EDH Detection. . . . . . . . . . . . . . . . . . . . . . . . . . . . . . . . . . . . . . . . . 12
Manual Freeze and GPI. . . . . . . . . . . . . . . . . . . . . . . . . . . . . . . . . . . . . . . . . . . . . 12
Signal Processing — Offset and Gain . . . . . . . . . . . . . . . . . . . . . . . . . . . . . . . . . 12
Hot Switch Handling. . . . . . . . . . . . . . . . . . . . . . . . . . . . . . . . . . . . . . . . . . . . . . . 13
Switching Line Handling . . . . . . . . . . . . . . . . . . . . . . . . . . . . . . . . . . . . . . . . . . . 14
Vertical Interval Blanking. . . . . . . . . . . . . . . . . . . . . . . . . . . . . . . . . . . . . . . . . . . 14
Store/Retrieve Configuration Settings . . . . . . . . . . . . . . . . . . . . . . . . . . . . . . . . 14
On-board Module Configuration . . . . . . . . . . . . . . . . . . . . . . . . . . . . . . . . . . . . . . 15
Remote Configuration and Monitoring . . . . . . . . . . . . . . . . . . . . . . . . . . . . . . . . . . . 17
Module Configuration Displays . . . . . . . . . . . . . . . . . . . . . . . . . . . . . . . . . . . . . . . 18
Signal Configuration Displays. . . . . . . . . . . . . . . . . . . . . . . . . . . . . . . . . . . . . . . . . 18
GPI Freeze Trigger Circuits . . . . . . . . . . . . . . . . . . . . . . . . . . . . . . . . . . . . . . . . . . . . . 25
GPI Circuit Design. . . . . . . . . . . . . . . . . . . . . . . . . . . . . . . . . . . . . . . . . . . . . . . . . . . 25
GPI Operation . . . . . . . . . . . . . . . . . . . . . . . . . . . . . . . . . . . . . . . . . . . . . . . . . . . . . . 26
Specifications . . . . . . . . . . . . . . . . . . . . . . . . . . . . . . . . . . . . . . . . . . . . . . . . . . . . . . . . . 27
Service . . . . . . . . . . . . . . . . . . . . . . . . . . . . . . . . . . . . . . . . . . . . . . . . . . . . . . . . . . . . . . . 28
Functional Description . . . . . . . . . . . . . . . . . . . . . . . . . . . . . . . . . . . . . . . . . . . . . . . . . 29
Video Input. . . . . . . . . . . . . . . . . . . . . . . . . . . . . . . . . . . . . . . . . . . . . . . . . . . . . . . . . 29
Genlock and Output Timing . . . . . . . . . . . . . . . . . . . . . . . . . . . . . . . . . . . . . . . . . . 30
Video Output . . . . . . . . . . . . . . . . . . . . . . . . . . . . . . . . . . . . . . . . . . . . . . . . . . . . . . . 30
Micro-Controller . . . . . . . . . . . . . . . . . . . . . . . . . . . . . . . . . . . . . . . . . . . . . . . . . . . . 30
Audio Delay . . . . . . . . . . . . . . . . . . . . . . . . . . . . . . . . . . . . . . . . . . . . . . . . . . . . . . . . 30
8981FS Instruction Manual iii
Page 4

Contents
iv 8981FS Instruction Manual
Page 5

).
Preface
About This Manual
This manual describes the features of a specific module of the 8900 Series
Modular Products family. As part of this module family, it is subject to
Safety and Regulatory Compliance described in the 8900 Series frame and
power supply documentation (see the
Instruction Manual
8900TX/8900TF/8900TFN Frames
8981FS Instruction Manual v
Page 6

Preface
vi 8981FS Instruction Manual
Page 7

8981FS Digital Frame Synchronizer Module
Introduction
The 8981FS is a component digital frame synchronizer module compatible
with the 8900 series frames. The video input and output are 270 Mb serial
digital and reference is analog color black. The module can also be operated
as a fixed delay with adjustable output timing offset relative to the video
input. This mode does not require a reference input.
The 8981FS combines the best features of a frame synchronizer, frame delay
and digital processing amplifier in one module. It is designed to handle
various environments and applications including asynchronous input
video signal timing, manual color correction, and production freeze frame
applications. It operates as a companion to the 8916 AES/EBU Autotracking Delay DA for audio synchronization applications. The 8981FS
offers several control modes including:
■
Local onboard controls,
■
GPI (general purpose interface) for freeze mode trigger, and
■
Ethernet control over a LAN/WAN using the optional 8900NET control
system.
8981FS Instruction Manual 1
Page 8

8981FS Digital Frame Synchronizer Module
8981FS module features include:
■
Provides user-selectable frame synchronization or fixed signal delay.
■
Supports 270 Mb Component serial digital input and output.
■
10-bit signal processing assuring broadcast quality.
■
Adjustable gain and offset of color and luma components.
■
Module is hot swappable (can be removed and replaced while frame
power is on).
■
User settings are stored in non-volatile memory and are maintained
when power is cycled.
■
Output timing/delay and gain/offset settings stored independently for
525 and 625 line operation.
■
Provides automatic 525/625 line selection.
■
Provides delay control signal to drive Grass Valley auto-tracking audio
delay DAs.
■
When operating as a frame synchronizer, output timing is locked to reference input and adjustable in 37 ns steps over a full frame.
■
Cleanly handles input signal hot switches by momentary freezes when
operating as a frame synchronizer.
■
When operating in Fixed Delay mode, can provide up to one full frame
of output delay adjustable in 37 ns steps.
■
Passes Horizontal and Vertical Interval ancillary data.
■
Monitors its input signal for EDH (error detection and handling) errors
and inserts new EDH on its output signal.
■
Provides user selectable blanking of vertical interval active line data (20
or 21 line in 525; or 24 lines field 1, 25 lines field 2 in 625).
■
Operates in 8900TN Series frames with network control to offer a GUIbased configuration and monitoring system (see
and Monitoring on page 17
■
Can provide various freeze options for production applications that are
).
Remote Configuration
triggered by either a GPI (general-purpose interface) using a BNC connector or by remote control via the 8900NET control system.
2 8981FS Instruction Manual
Page 9

Installation
Frame Capacity
Installation
Installation of the 8981FS module consists of:
1.
Placing the module in the proper frame slot, and
2.
Cabling and terminating signal ports.
The 8981FS module can be plugged in and removed from an 8900 Series
frame with power on. When power is applied to the module, LED indicators reflect the initialization process (see
Power Up on page 7 ).
The 8981FS module can be installed in all 8900 Series frames but with
varying maximum quantities determined by frame cooling capacity.
Table 1 provides the power capacity, cooling capacity, and maximum
module count for each frame type.
Table 1. Power, Cooling, and Module Capacity of 8900 Frames
Capacity Calculated
Power (W) 60 60 100 100 100
Recommended Module Cooling (W) 30 60 30 90 90
8981FS Modules 6 10 6 10 10
Note Module capacity figures assume no other modules are in the frame.
8900T2
Frame
8900T2-F
Frame
8900TX
Frame
8900TF
Frame
8900TFN
Frame
8981FS Instruction Manual 3
Page 10
8981FS Digital Frame Synchronizer Module
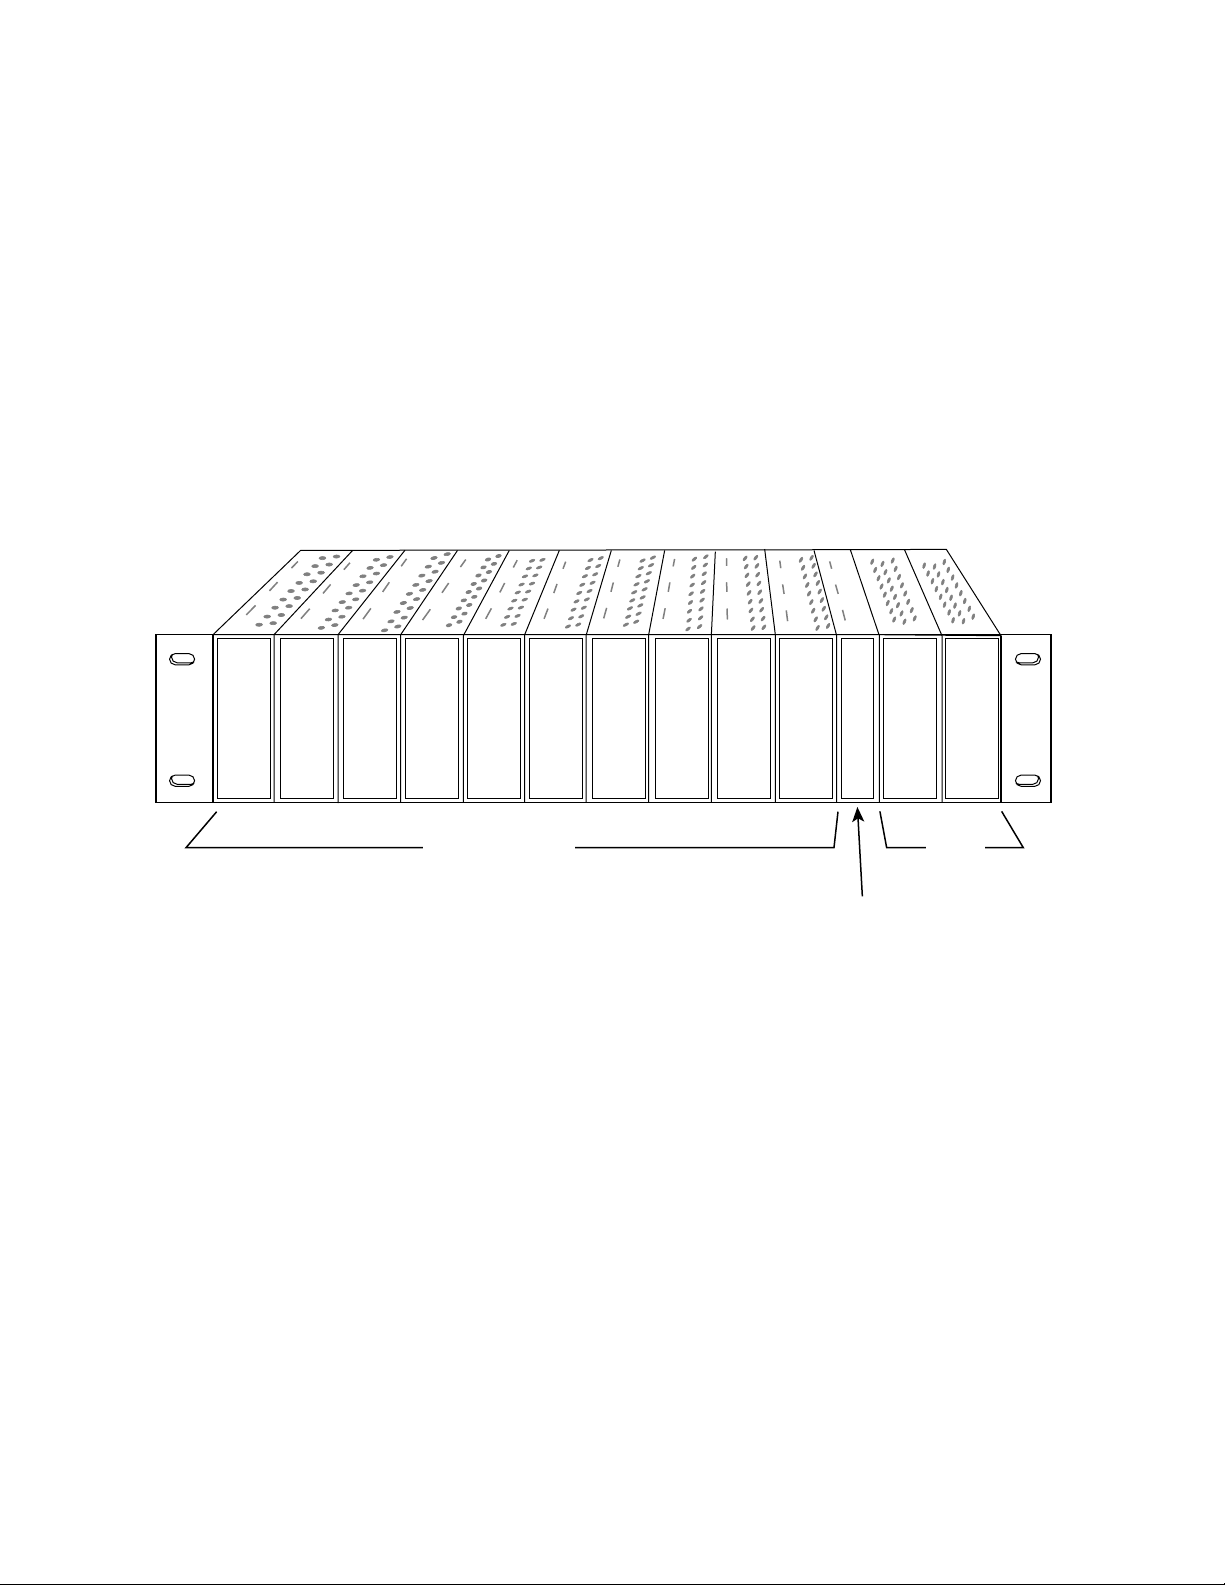
Module Placement in the 8900 Frame
There are ten slot locations in the frame to accommodate either analog or
digital modules. These are the left ten locations. Refer to Figure 1.
The two slots on the right are allocated for the power supplies. For additional information concerning the Power Supply module, refer to the 8900
frame manual.
The third slot from the right is allocated for the controller module—either
a Frame Monitor Module or a Network Interface Module. For additional
information concerning the controller module options, refer to the
8900TF/8900TFN Frames Instruction Manual
Figure 1. 8900 Series Frame
8900TX/
.
Any 8900 Module
Frame Monitor
or Network Interface
Module (only)
Power
Supplies
(only)
8900 modules are interchangeable within the module slots. There are 10
BNC connectors in each slot’s I/O group. The functional assignment of
each connector in a group is determined by the module that is placed in
that slot. The maximum number of modules an 8900 frame can accept is
ten. Figure 2 illustrates the rear connector plate for an 8900 Series frame.
0719-04
4 8981FS Instruction Manual
Page 11
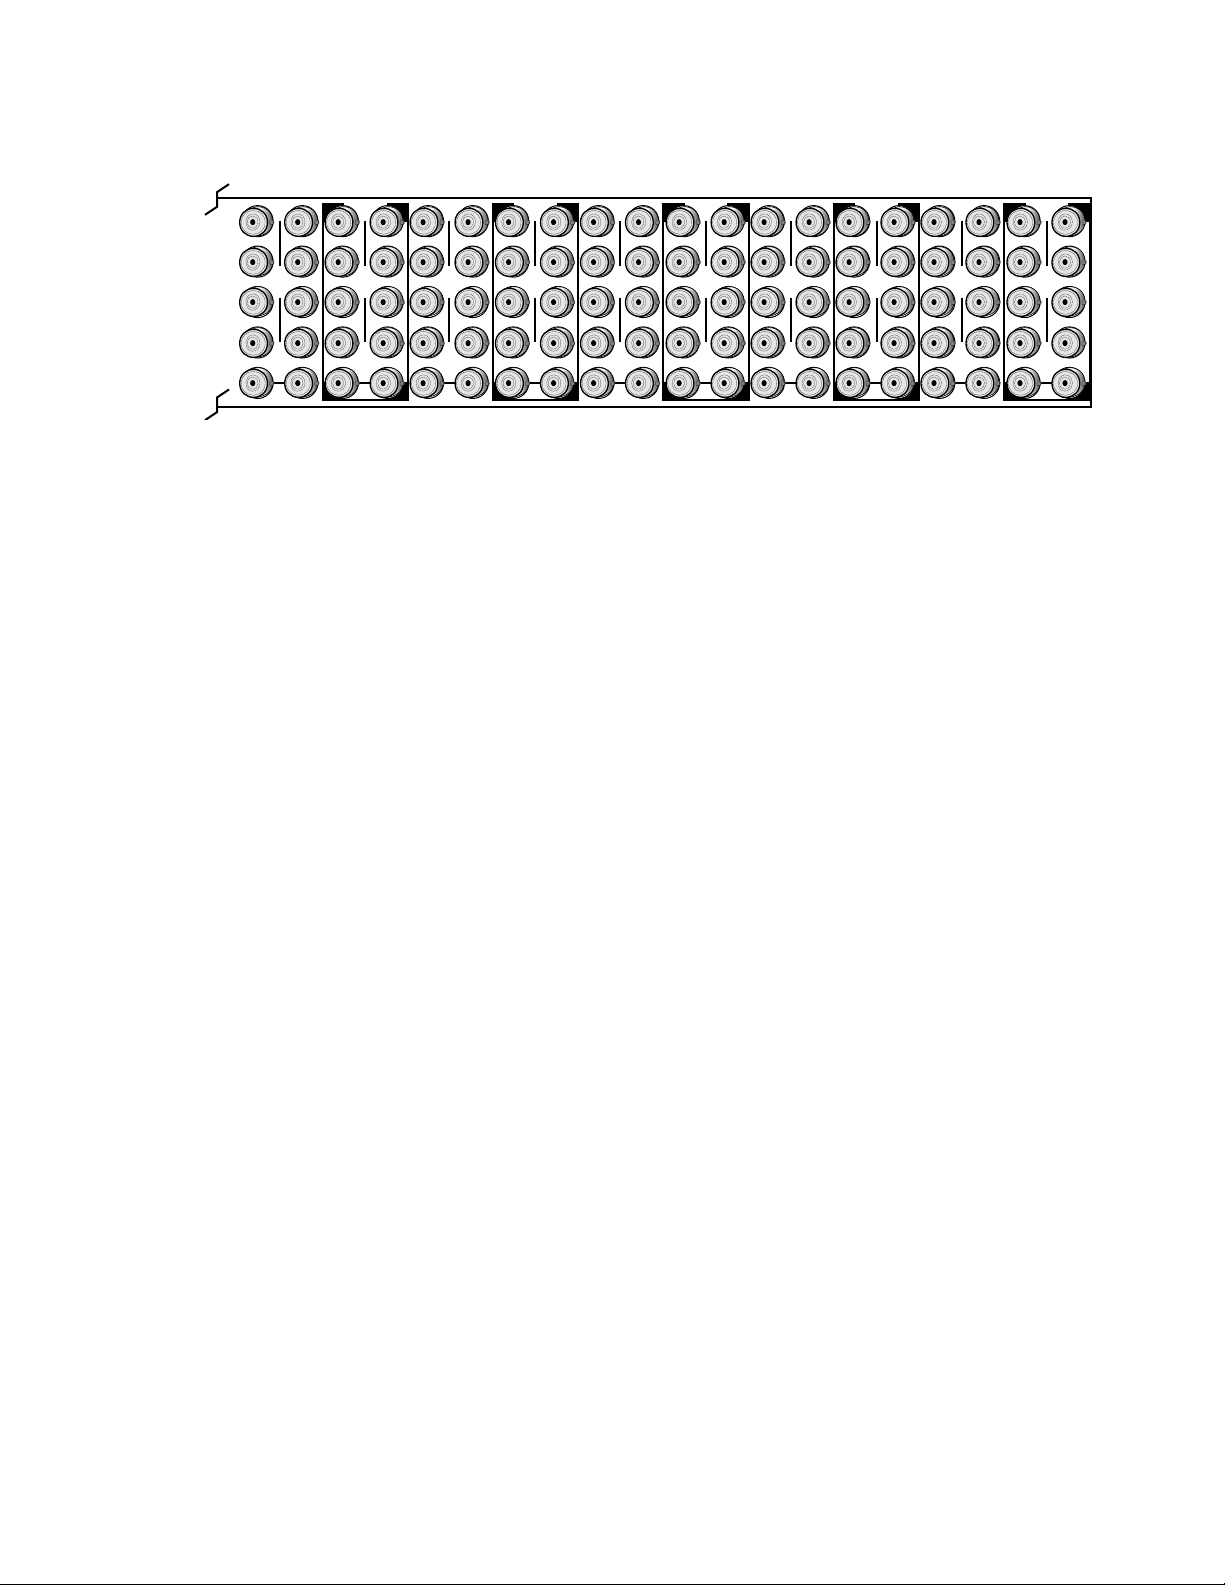
Figure 2. 8900 Series Frame Rear Connector
Installation
10
J1 J2
O
J3 J4
U
T
J5 J6
J7 J8
J9 J10
IN
9
J1 J2
J2
O
J3 J4
J4
U
T
J5 J6
J6
J7 J8
J8
J9 J10
IN
8
J1 J2
O
J3 J4
U
T
J5 J6
J7 J8
J9 J10
IN
7
J1 J2
J2
O
J3 J4
J4
U
T
J5 J6
J6
J7 J8
J8
J9 J10
IN
6
J1 J2
O
J3 J4
U
T
J5 J6
J7 J8
J9 J10
IN
5
J1 J2
J2
O
J3 J4
J4
U
T
J5 J6
J6
J7 J8
J8
J9 J10
IN
4
J1 J2
O
J3 J4
U
T
J5 J6
J7 J8
J9 J10
IN
3
J2
J1 J2
O
J4
J3 J4
U
T
J6
J5 J6
J8
J7 J8
J9 J10
IN
2
J1 J2
O
J3 J4
U
T
J5 J6
J7 J8
J9 J10
IN
J1 J2
J3 J4
J5 J6
J7 J8
To install a module in the frame:
1.
Insert the module, connector end first, with the component side of the
module facing to the right and the ejector tab to the top.
2.
Verify that the module connector seats properly against the backplane.
3.
Press the ejector tab in to seat the module in place.
1
O
U
T
J9 J10
IN
0719-03
8981FS Instruction Manual 5
Page 12
8981FS Digital Frame Synchronizer Module
Ω
Cabling
Note At the back of this manual are overlay cards that can be placed over the rear
connector BNCs to identify the specific 8981FS connector functions.
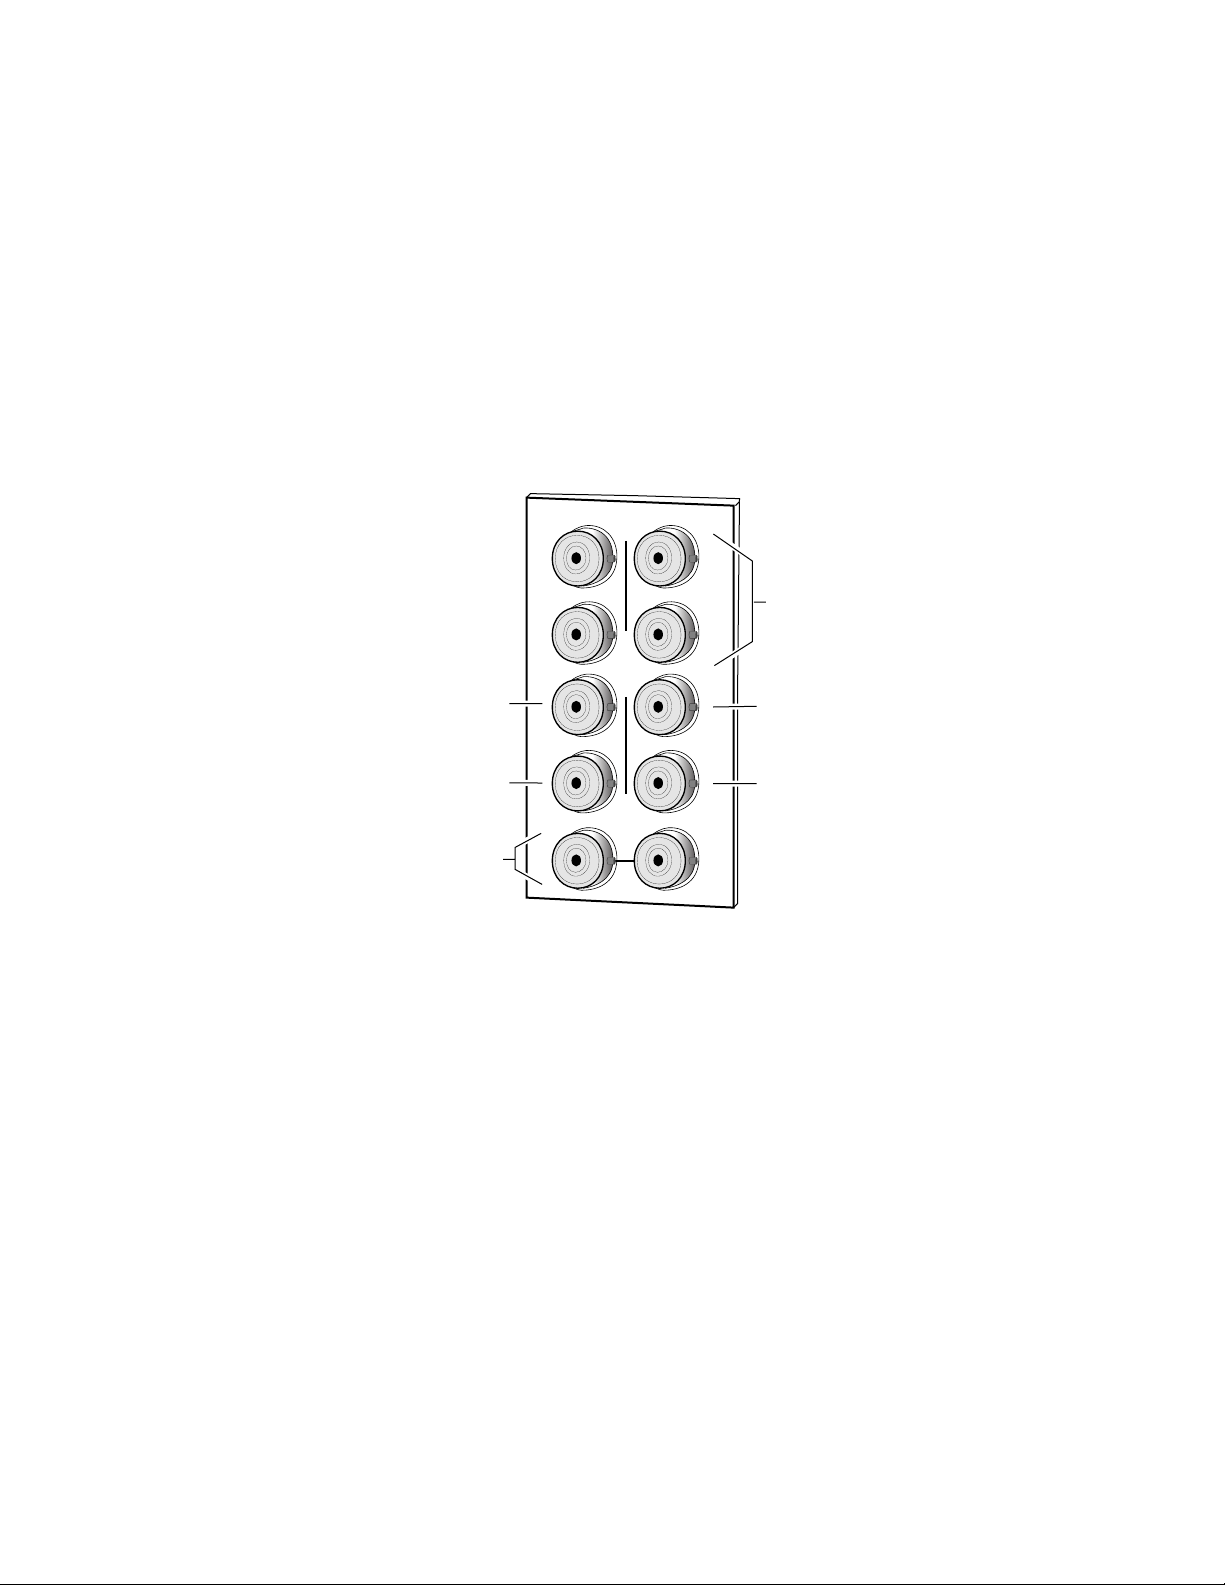
Input
Connect an input source to the input connector, J7 (see Figure 3). The
8981FS input will accept either 8- or 10-bit Serial Digital Component video
per SMPTE 259M-C or EBU technical standard 3267.
Figure 3. 8981FS Input/Output Connectors
Delay Control
Signal Output
J1
J3
J5
X
J2
J2
O
U
T
J4
J6
J4
J6
Four Component
Serial Digital Video
Outputs
Delay Control
Signal Output
Component Serial
Digital Video Input
Loopthrough
Reference Input
Outputs
The 8981FS has four serial digital video outputs—J1 through J4.
Reference Input
For operation as a Frame Synchronizer, a loop-through input is provided
for an analog color black 525- or 625-line signal. Acceptable sync level is 140
to 560 mV peak-to-peak. Terminate the unused connector into 75
signal is not looped to other equipment. No reference input is required if
the module is used as a fixed Delay.
Delay Control Output
Two audio delay control outputs (J5 and J6) are provided for input to Grass
Valley Auto-tracking Delay DAs for audio synchronization. A BNC Tee
connector can be used if more than two audio delay modules are required.
J7
J9 J10
IN
J8
GPI
J8
0719_02
if the
6 8981FS Instruction Manual
Page 13

Power Up
Operation Indicator LEDs
Ejector Tab
Power Up
The various front LED indicators and configuration switches are illustrated
in Figure 4. Upon power-up, the green PWR LED should light and the
yellow CONF LED should illuminate for the duration of module initialization.
With a valid input signal connected, the green PWR LED and one of the
green signal standard LEDs (525 or 625) should illuminate.
Video input presence is indicated by the 525 or 625 LED (indicating a 525line or 625-line input signal has been detected).
Figure 4. LEDs and Configuration Switches
0719_06
5
6
4
7
3
8
2
9
1
0
F
C
E
D
16-position
A
B
Rotary switch
Momentary toggle switch
FAULT – Red LED is off during normal operation
COMM – Yellow LED on indicates communication bus traffic
CONF – Yellow LED on indicates module is initiating, changing operating
mode, or updating firmware
PWR – Green LED on indicates power OK
525 – Green LED on indicates 525-line input present
625 – Green LED on indicates 625-line input present
REF – Green LED on indicates Reference signal present
FRZ – Yellow LED on indicates output is in Freeze mode
Module Configuration Switches and LED
2ND FUNC LED
(yellow)
DELAY – Green LED on indicates module is operating in fixed delay mode
A red FAULT LED indicates an error situation. When in Frame Sync mode,
the 525 or 625 LEDs will blink if the reference signal input line standard
does not match the video input standard.
8981FS Instruction Manual 7
Page 14

8981FS Digital Frame Synchronizer Module
Table 2 describes the output that will be seen under the various possible
input operating modes and conditions.
Table 2. Possible Operating Conditions
Mode Settings
Auto-freeze Forced Black
N.A.
1
N.A.
1
Video Input Condition Reference Input Condition Resulting Output
Video input present Valid reference input present Normal output
Off Off No video input present Valid reference input present Passes any input signal
On Off No Video input present Valid reference input present Freeze of last good field
1
N.A.
Frame Sync
N.A.
N.A.
N.A.
1
1
1
Off Off No video input present N.A.
On Off No video input present N.A.
Delay
1
N.A.
1
N.A. = Not Affected—output signal is not affected by this mode setting or input under these signal conditions.
2
Unusable output signal if video input and reference are not the same line standard.
3
Output will contain EAV/SAV timing reference signals but they will be far from normal line frequency.
4
Output will be Freeze of last good field before input lost but will be far from normal line frequency.
5
Output will be black video but will be far from normal line frequency.
On No Video input present Valid reference input present Black output
1
N.A.
1
N.A.
1
N.A.
On No video input present N.A.
Video input present Reference input not present Forced to fixed delay mode
Video input present Wrong line standard Reference Bad output signal
Video input present N.A.
1
1
1
1
Normal output
Bad output signal
Bad output signal
Bad output signal
2
3
4
5
8 8981FS Instruction Manual
Page 15

Configuration
Configuration Switches and LEDs
Configuration
This section describes:
■
Onboard configuration hardware (switches and LEDs),
■
Module operation modes and appropriate setups,
■
Using the onboard switches to make configuration settings, and
■
Remote configuration and monitoring using the 8900NET interface.
The 8981FS module can be configured locally using the onboard rotary and
toggle switches shown in Figure 5. Two LEDs are used to indicate status of
the configuration process. These four components perform the following:
■
Function (rotary) switch – addresses a desired function for configuration and provides two sets (banks) of 16 functions (0 through 9, A
through F), although not all positions are used.
Note The Function switch should be kept in position 0 or F when not in use to avoid
any inadvertent change in configuration. 0 and F are inactive positions.
■
2nd FUNC (second function) LED – when on, indicates that the rotary
switch is addressing the second bank (Bank 2) of functions (see Table 3
on page 15).
■
SW1 (toggle) switch – actuates or selects the desired setting for the
selected function when the switch is pushed momentarily in either the
Up or Down position.
■
CONF (configuring) LED – when on, indicates the module is initializing or processing configuration information.
Note Function switch position E (Restore) in Bank 2 can be used to return the
module configuration to the factory default (as shown in Table 3 on page 15).
Configuration can also be performed using the 8900NET with GUI. Remote
control can, however, be locked out using the jumper (J5) shown in Table 5
on page 10.
8981FS Instruction Manual 9
Page 16

8981FS Digital Frame Synchronizer Module
Figure 5. Module Configuration Switches and LEDs
Place jumper in
Local
Remote
JP5
CONF – configuration processing LED
FUNCTION – function select rotary switch
2ND FUNC – second function LED
JP5
local position to
lock out remote
access.
SW1 – actuator toggle switch
0719-05
Module Operation Modes
The configuration of the 8981FS establishes:
■ Module Operating Mode—Frame Sync or Fixed Delay mode settings,
■ Output mode when input signal is lost,
■ Input signal Error Detection and Handling (EDH) settings,
■ Manual Freeze and GPI settings
■ Signal processing settings, and
■ Video output timing adjustment.
User settings can be stored in memory and recalled, as can factory default
settings, using the configuration controls. Output timing and video signal
level settings are stored independently for each video line standard. The
module thus can provide different output signal timing and gain values for
each line standard.
Frame Sync Mode
In the Frame Sync Mode, the module will automatically adjust the delay
added to the input video to keep the output signal timing fixed with respect
to a reference analog color black input signal.
The output video timing is adjustable from one field advanced to one field
delayed with respect to the reference video input. The minimum video
delay in this mode is 240 µs (525) or 270 µs (625). If the output signal timing
10 8981FS Instruction Manual
Page 17

setting does not result in at least this much signal delay from video input
to output, the module will delay the signal up to one frame. The output
timing controls can adjust the serial digital output timing:
■ ± 1 field, in 1 H-line steps and
■ Over 1 line in 37 ns steps.
Total timing range is slightly greater than one full frame.
If the Restore Defaults configuration is recalled, the serial digital output
timing will revert to providing a video output exactly in time with the reference input.
If the Reference input signal is lost, the module will revert to the fixed delay
operating mode. The video output signal will continue to be present. The
audio delay control output will continue to function.
Fixed Delay Mode
The Frame Sync function can be turned off to operate the module as a fixed
video signal delay of up to one frame. In this mode no reference input is
required. Delay is adjustable:
Configuration
■ From two lines to one frame in one line steps and
■ In 37 ns steps over one horizontal line.
Input Signal Loss
Upon input signal loss the, the user can select between three output signal
options:
■ Freeze of the last good field (Auto-freeze)
■ Force the output to black, or
■ Pass the input signal as is.
To select a freeze of the last good field the Auto-freeze mode should be
ENABLED and the Output With No Input mode should be set to PASS. (See
Table 3 on page 15, Function Switch positions 7 and 8, Bank 1)
To select a black output signal the Output With No Input mode should be
set to BLACK. This function will override video freezes if the input signal
is lost. For automatic freezes to cover input signal Hot Switches, ENABLE
the Auto-freeze mode.
To pass the input signal as is without a last good field freeze or forced black
Auto-freeze mode should be set to DISABLE and Output With No Input
should be set to PASS. In this mode automatic freezes are disabled and nonsynchronous input signal hot switches will appear in the output signal.
8981FS Instruction Manual 11
Page 18

8981FS Digital Frame Synchronizer Module
Input Signal EDH Detection
The module monitors its video input signal for EDH (Error Detection and
Handling) checkwords. If checkwords are present, active picture only or
full field input signal errors will cause the front of module FAULT indicator
to illuminate briefly each time an error is detected. The EDH Error Mode
control function determines whether ACTIVE PICTURE or FULL FIELD
errors will cause the indicator to illuminate. (See Table 3 on page 15, Func-
tion Switch positions 6, Bank 1) New EDH checkwords per SMPTE RP165
are always inserted into the module output signal. The EDH Error Mode
setting will have no effect on the new EDH checkwords inserted at the
module output.
Manual Freeze and GPI
Freeze mode can be manually initiated when operating either as a frame
sync or fixed delay. It can be used to provide a frame or field grab for production applications. Freeze can be triggered using the GPI input BNC connector or using the 8900 series remote control system. When operating in
delay mode, a stable input signal must continue to be present to produce a
stable freeze output.
The selection of which type of freeze (Frame, Field 1, or Field 2) can be
made via the Frame/Field Select and F1/F2 control functions. (See Table 3
on page 15, Function Switch position A and B, Bank 1).
The GPI connection is a dual function connection. It can be used as both an
output to drive a remote LED to indicate when the module is in the freeze
mode and as an input that can control the freeze mode (see GPI Freeze
Trigger Circuits on page 25 for control wiring required to use the GPI connector).
The GPI control input must be ENABLED using the Freeze GPI mode setting. (See Table 3 on page 15, Function Switch position B, Bank 2).
SEE GPI Freeze Trigger Circuits on page 25 for more information on GPI
circuit design and operation.
Signal Processing — Offset and Gain
If video signal levels need to be adjusted, the video signal level controls
must be activated by setting the Video Signal Levels mode setting to VARIABLE. (See Table 3 on page 15, Function Switch positions E, Bank 1) If this
mode setting is in the UNITY position, the video signal levels will be fixed
at unity gain and with no black level offset. If VARIABLE is selected, offset
and gain adjustments can be made for each component video channel— Y,
B-Y, and R-Y. Offsets are adjustable ±31 least significant bits (10-bit video).
12 8981FS Instruction Manual
Page 19

Gain can be adjusted ±40%. (See Table 3 on page 15, Function Switch posi-
tions 1 though 6, Bank 2) Offset and gain adjustment values set in Variable
mode will be retained if the mode setting is changed to UNITY. If the
setting is later changed back to VARIABLE these offset and gain settings
will return.
Hot Switch Handling
The 8981FS module has a number of mode setting options for handling
switching transients from a routing switcher feed. If the input signal contains non-synchronous switches, the module will briefly provide a field
freeze until it can lock to the new input timing. These automatic freezes can
be inhibited by setting the Auto-freeze mode to DISABLE. (See Table 3 on
page 15, Function Switch position 8, Bank 1).
The automatic freeze circuitry looks for vertical timing jumps and horizontal timing steps in the input signal. Changes in horizontal timing can be
detected on the line immediately following the step.
Vertical timing jumps cannot be reliably detected until the next vertical
interval. This means that a full field may have to be written to memory
before the module can detect that the vertical timing is no longer as it was.
Depending upon the relative video input to output timing, the signal
written to memory may have already been read out before the synchronizer can detect that the vertical timing is incorrect. This can result in a one
field vertical jump in the output picture. If the horizontal timing also contained a step, the module would enter the freeze mode without having to
wait for the next vertical interval. The output would then have a momentary freeze and no vertical picture jump would occur.
Configuration
The magnitude of the horizontal timing step required to trigger the automatic freeze mode can be set to one of two values using the Auto-freeze
Sensitivity mode setting. When the sensitivity is set HIGH, a timing step of
a single 27 MHz clock cycle will trigger a momentary freeze. With the sensitivity is set LOW, a horizontal timing step of greater than 20 ms is
required to trigger a freeze. This mode is intended for use in applications
where the synchronizer is downstream of switching equipment which has
its inputs timed within 20 µs of each other. As long as the switching equipment has its inputs timed vertically and horizontally within this window,
the synchronizer will not produce momentary freezes at signal switches.
This provides clean active picture switches at the module output. The
module can recover from vertical interval timing steps of this magnitude if
they occur on or before line 12/275 (525) or line 9/322 (625). Horizontal
blanking interval ancillary data (HANC) may be disturbed for up to a
frame following the switch point. This will also apply to any embedded
active line time vertical blanking interval ancillary data (VANC) from the
switch point up to line 14/277 (525) or line 11/324 (625).
8981FS Instruction Manual 13
Page 20

8981FS Digital Frame Synchronizer Module
Any time the module enters the freeze mode horizontal (HANC) or vertical
(VANC) blanking interval embedded data will be removed and replaced by
black level data. This applies to both momentary freezes due to input
timing steps and manually initiated frame or field freezes. This does not
apply to EDH check words that are always recalculated and inserted in the
output signal.
Switching Line Handling
The industry standard video signal line where routing switchers should
switch (10/273 (525), 6/319 (625) can be replaced by black to remove
switching transients. Transients will occur when serial digital signals are
switched even if the signals are perfectly timed (see Table 3 on page 15,
Function Switch position 5, Bank 1).
If BLANKED is selected, the nominal switching line, the H blanking
interval after it, and the first half of the following line will be replaced by
black. This will not affect any embedded audio because the H blanking
interval after the switching line should not contain any audio data.
Vertical Interval Blanking
Vertical interval active line time data can be replaced by black if desired.
This function blanks the active line time but does not interfere with any
horizontal blanking interval embedded data. The number of lines blanked
can be set to 20 or 21 in 525 to remove closed captioning. If the Vert
Blanking Data mode setting is set to PASS, all vertical blanking interval
data will pass through the module (see Table 3 on page 15, Function Switch
position 4, Bank 1 and position C, Bank 2).
Store/Retrieve Configuration Settings
All user configuration settings are automatically stored in non-volatile
memory a few seconds after any change. If power is lost these settings will
be recalled at power up to return the unit to its previous configuration. The
user can also store configuration settings at a different memory location for
later recall. There are also factory default settings that can be recalled to
return all parameters to known settings. Table 3 on page 15, Function
Switch positions D and E, Bank 2) The function settings after a recall of
factory defaults is also indicated in Table 3. The output signal will be timed
to match the reference signal in Frame Synchronizer mode after a recall of
factory defaults.
14 8981FS Instruction Manual
Page 21

On-board Module Configuration
To make configuration settings on the module:
1. Rotate the Function Switch to the Bank 1 (2ND FUNC LED off) or Bank
2 (2ND FUNC LED on) and to the desired function within that bank.
2. Move the Toggle Switch to the up or down position to set the desired
function.
Table 3. 8981FS Configuration Functions
Configuration
Function
Switch
Toggle
Switch Up
Toggle
Switch Down
0 Inactive position
1 Delay Advance
2 Delay Advance
3 Frame Sync
4 Pass
5 Pass Blanked
6 Active picture
7 Pass
8 Enable
9 High
Bank 1 - 2nd Func Off
A Frame
B Field 1
C Freeze Normal
D Toggle
E Unity
1
1
1
1
1
1
1
1
1
1
Delay Choose either Frame Sync or Fixed Delay Operating Mode.
Blanked Pass or blank the vertical interval data.
1
Full-field Set input error detection mode to either examine the entire field or just active picture data.
Black Select Pass mode or output a Black signal when no input is present
Disable Enable or disable Auto-freeze when input disturbances occur.
Low Set Auto-freeze sensitivity to timing disturbances.
Field Select Frame or Field mode for user-initiated manual freeze.
Field 2 Select the field for user-initiated manual freeze.
1
Hold
Variable Select Unity gain or adjustable video signal level.
F Inactive position
Function Description
Vertical Timing Adjust – In Frame Sync mode, line steps from one field advanced to one field
delayed. In Delay Mode, line steps from 2 lines to one frame.
Horizontal Timing Adjust – Vertical Timing increments or decrements as appropriate at line
boundaries.
Pass or blank the switching line data to suppress input signal switching transients.
Activate or deactivate a manual Freeze.
Set GPI mode to alternate (toggle) between freeze modes on momentary closure or on a held
closure.
8981FS Instruction Manual 15
Page 22

8981FS Digital Frame Synchronizer Module
Table 3. 8981FS Configuration Functions - (continued)
Function
Switch
Toggle
Switch Up
Toggle
Switch Down
0 Inactive position
1 Increase Decrease Adjust Y channel offset ±31 least significant bits.
2 Increase Decrease Adjust B-Y channel offset ±31 least significant bits.
3 Increase Decrease Adjust R-Y channel offset ±31 least significant bits.
4 Increase Decrease Adjust Y channel gain ±49%.
5 Increase Decrease Adjust B-Y channel gain ±49%.
6 Increase Decrease Adjust R-Y channel gain ±49%.
7 thru 9 Not used.
A Not used.
Bank 2 - 2nd Func On
B Disable
C 20 lines
1
1
Enable Enable/disable Freeze GPI. Disable to guard against errant GPI input.
21 lines Select 525 format vertical data blanking width (see Bank 1, position 4).
D Store Save current settings to EE prom.
E Restore defaults Restore User Recall factory defaults or stored user settings.
F Inactive position
1
Restored default setting.
Function Description
16 8981FS Instruction Manual
Page 23

Remote Configuration and Monitoring
8981FS configuration and monitoring can be performed using the 8900NET
interface in 8900TF or TFN frames (see Figure 6). This section describes the
GUI access to the module configuration functions. Refer to the 8900NET
Network Interface Module Instruction Manual for information on setting
up and operating the 8900 frame network.
Figure 6. 8900NET GUI
The links section lists the frame and its current modules. The selected link's Status
page is first displayed and the sub-list of links for the selection is opened. The sub-list
allows you to select a particular information page for the selected device.
Content display section displays information for the selected
frame or module (frame slot icons are also active links).
Remote Configuration and Monitoring
The 8900 modules can be addressed by clicking on a specific module icon
in the frame status display or on a module name or slot number in the link
list on the left.
8981FS Instruction Manual 17
Page 24

8981FS Digital Frame Synchronizer Module
Module Configuration Displays
The 8900 GUI provides the following links and displays for the 8981FS. The
module name shown in Figure 7 is “SDI Frame Synchronizer/Delay.” The
name is user determined and is assigned using the module’s Configuration
display. The four module configuration displays provide:
■ Module operational status information,
■ Module properties (part and version numbers),
■ Module configuration information (location and user assigned names),
and
■ Software update (file transfer).
These displays are the same for all remote controllable 8900 modules. Refer
to the 8900NET manual for more information on these displays. Some functions listed may not be supported by a particular module. These will be
indicated as not supported.
Figure 7. 8981FS Display Links
Module Configuration
Displays
Signal Configuration
Displays
Signal Configuration Displays
This section discusses the last four displays which are used to perform configuration of module functions. These are the same functions described for
On-board Module Configuration in Table 3 on page 15.
18 8981FS Instruction Manual
Page 25

Using GUI Controls
Variable settings can be made using one of two control modes— Slider or
Numeric. Figure 8 illustrates both types.
Note Numeric displays are for approximate values only. Calculation of displayed
values are subject to decimal place truncation. Variation from the absolute
value increases at higher adjustment levels.
Figure 8. Control Mode Options
Mode Select
Use the Apply button
to activate the selection
Remote Configuration and Monitoring
SLIDER:
Coarse adjust (10X)
Fine adjust (1X)
NUMERIC:
Enter a numeric value
or use increment buttons
Functions that are shown dimmed (or ghosted) are not available (N/A) in
the display’s current mode of operation (see Figure 9).
Figure 9. Dimmed Unavailable Functions
Dimmed function
is not available (N/A)
8981FS Instruction Manual 19
Page 26

8981FS Digital Frame Synchronizer Module
Module Operation Mode Selection
Access the Mode display shown in Figure 10 to perform the following
(refer to Module Operation Modes on page 10).
■ Choose between Frame Synchronizer or Delay mode.
Note If a sync reference signal input is not detected by the 8981FS, the module will
automatically function as a fixed video signal delay. In this case, the Operating
Mode indication in the display may read “Frame Synchronizer” when the
module is actually functioning in delay mode.
■ If in Frame Synchronizer mode, choose the output that will be active if
the input signal is lost—pass the input channel or force the output to
black.
Use
This
Link
■ Pass or blank switching line and vertical interval data (see Switching
Line Handling and Vertical Interval Blanking on page 14).
■ Select EDH error detection mode (see Input Signal EDH Detection on
page 12).
Not available
in Delay Mode
Not available with
625 input signal
Figure 10. Frame Sync/Delay Mode Selection Display
20 8981FS Instruction Manual
Page 27

Timing/Delay Settings
t
Access the Timing/Delay display shown in Figure 11 to perform the fol-
lowing (refer to Module Operation Modes on page 10).
Remote Configuration and Monitoring
Use
This
Link
■ Adjust Horizontal and Vertical timing or delay.
■ Activate or terminate a manual output Freeze.
■ Disable or enable and setup Auto-freeze operation.
■ Disable or enable and setup Remote Auto-freeze GPI.
Figure 11. Timing/Delay Setup Display
Current setting is indicated by the poin
of color change. Timing values range
from -49% to +49%. Delay values
range from 0.0 to maximum.
Activates or terminates
a Manual Freeze.
Not available when Manual Freeze
Mode is set for Frame.
8981FS Instruction Manual 21
Page 28

8981FS Digital Frame Synchronizer Module
Figure 12 illustrates timing adjustment using the Numeric control mode.
Figure 12. Numeric Timing Controls
Enter a numeric value or use
increment/decrement buttons.
Timing values range from
-49% to +49%. Delay values
range from 0.0 to maximum.
22 8981FS Instruction Manual
Page 29

Video Processor Controls
Access the Processor Controls display shown in Figure 13 to perform the
following (refer to Signal Processing — Offset and Gain on page 12).
Remote Configuration and Monitoring
Use
This
Link
■ Select Variable or calibrated Unity settings.
■ Adjust variable video Gain and Offset settings. Offsets are adjustable in
approximately 3.5% increments (10-bit video). Gain can be adjusted
±49%.
In Unity mode the slider or numeric controls are dimmed and are not available (N/A).
Figure 13. Processor Controls Display
8981FS Instruction Manual 23
Page 30

8981FS Digital Frame Synchronizer Module
Recall or Save Settings
Access the Recall or Save Settings display shown in Figure 14 to perform
the following (refer to Store/Retrieve Configuration Settings on page 14).
■ Restore factory default settings.
Use
This
Link
■ Store the current user settings for future recall.
■ Recall previously stored user settings.
Figure 14. Recall or Save Settings Display
24 8981FS Instruction Manual
Page 31

GPI Freeze Trigger Circuits
Figure 15 provides two sample circuits, with and without remote indicator
LED, that can be used to manually trigger the Freeze output when the GPI
Remote Freeze function is enabled (see Table 3 on page 15). Refer to the
Configuration table to select whether the 8981FS alternates between
freeze/no freeze or stays in freeze mode only while the remote freeze
switch is closed.
If a Remote Freeze indicator is not required, no diodes are needed. Simply
connect the freeze control switch to ground the center pin.
Figure 15. Typical User-supplied Circuits for GPI Freeze Triggering
With Indicator LED
Freeze
Control
Switch
Any Standard
Signal Diodes
GPI Connector
BNC Center Pin
GPI Freeze Trigger Circuits
Without Indicator LED
GPI Connector
BNC Center Pin
Freeze
Control
Switch
Shield/Ground
Freeze
Indicator
LED
GPI Circuit Design
The GPI BNC connector is both a manual freeze mode control input and an
output to drive a remote freeze indicator. To provide both functions independently, two diodes are required at the remote control panel as well as a
switch and indicator LED. This line pulls up for approximately 15 ms to
light the indicator if freeze mode is active, then down below ground for 1
ms to test for the presence of a catch diode. The catch diode will function to
limit how far negative the line can go only when a switch closure connects
the diode to ground. The module detects this change in how far below
ground this control input goes and uses it to control the freeze mode. When
in freeze mode, this cycle continuously repeats so the indicator is driven
with a 94% duty cycle. When not in freeze mode, the line does not pull high
(the indicator is not illuminated) but the line still pulls negative to test for
the catch diode. The module supplies limited current both when pulling up
and down on this line. No damage will be done if the line is tied to ground.
If no remote freeze indicator is needed the diodes can be eliminated and
only a contact closure to ground is required to initiate freeze mode.
Shield/Ground
Note:
Coaxial cable is not required
for this connection.
0719-07
8981FS Instruction Manual 25
Page 32

8981FS Digital Frame Synchronizer Module
GPI Operation
The GPI freeze control input can also be configured to operate in two ways
by the “GPI MODE” control function (see Table 3 on page 15, Function
Switch position D, Bank 1). When the toggle mode is selected the module
will alternately switch between normal operation and freeze mode each
time the remote input is pulled to ground. When in the hold position, the
synchronizer will stay in the freeze mode only as long as the freeze control
switch is closed.
When the toggle mode is selected the freeze mode can easily be controlled
by a momentary action switch. The hold mode is intended to control freeze
mode with other equipment. In this mode positive freeze/no freeze control
can be obtained with a contact closure without regard to the present state
of the synchronizer.
26 8981FS Instruction Manual
Page 33

Specifications
Specifications
Table 4. 8981FS Specifications
Parameter Value
Inputs
Number of inputs 1 Serial Digital Input (SDI)
Input signal formats 8 or 10 bits Serial Digital Component video per SMPTE 259M-C or
EBU tech 3267
Impedance 75 Ω, terminating
Return loss >15 dB, 5 to 270 MHz
Connector 75 Ω BNC
Maximum Input Cable Length 300 m (984 ft) of 8281 or equivalent cable
Outputs
Number of outputs 4
Signal Type Serial digital video conforming to SMPTE259M-C or EBU 3267
Output Impedance 75 Ω
Connector type 75 Ω BNC on 8900 frame
Output Return Loss > 15 dB, 5 to 270 MHz
Reference Input
Signal Type Analog color black, 525 or 625 lines, per SMPTE 170M or CCIR 624
Signal Level Sync: 140 mV to 560 mV p-p
Input Impedance High impedance
Connector type 75 Ω BNC on 8900 frame, loop through
Return Loss > 40 dB to 5 MHz
Delay Track Output
Number of outputs 2
Connector type BNC
Output impedance High impedance-do not terminate
Format Compatible with Grass Valley automatic tracking audio delay products
Signal Processing
Signal path 10 bits
Environmental
Frame temperature range 0 to 45 degrees C
Operating Humidity Range 0 to 90% non-condensing
Non-operating Temperature -10 to 70 degrees C
Mechanical
Frame type 8900 Series
Power Requirements
Supply voltage +12V, -12V
Power Consumption 5.0 Watts
8981FS Instruction Manual 27
Page 34

8981FS Digital Frame Synchronizer Module
Service
The 8981FS modules make extensive use of surface-mount technology and
programmed parts to achieve compact size and adherence to demanding
technical specifications. For other than fuse replacement, circuit modules
should not be serviced in the field. The 8981FS module has one fuse on the
+12 V input. This fuse is installed in a socket so it can be easily replaced.
If your module is not operating correctly, proceed as follows:
■ Check frame and module power and signal present LEDs.
■ Check for presence and quality of input signals.
■ Verify that source equipment is operating correctly.
■ Check cable connections.
Refer to Figure 4 for the location of PWR LED.
If the module is still not operating correctly, replace it with a known good
spare and return the faulty module to a designated Grass Valley repair
depot. Call your Grass Valley representative for depot location.
Refer to the Contacting Grass Valley Group at the front of this document for
the Grass Valley Customer Service Information number.
28 8981FS Instruction Manual
Page 35

Functional Description
Refer to the block diagram in Figure 16 while reading the following functional description.
Figure 16. 8981FS Block Diagram
Functional Description
Reference
Video Input
Input
Present
LEDs
Video
Input
525
625
Deserializer
Reference
Present LED
Genlock and Output
Timing Control
Write Control
Logic
Memory
Fault
Communication
LED
Control
Microprocessor
Read Control
and Timing Logic
LED
Output Signal
Processor and
EDH Inserter
Configure LED
Freeze LED
Delay Mode LED
2nd Function LED
Audio Delay
Control Outputs
Audio Delay
Control Signal
Generator
Serializer and
Output Driver
EDH Error Detector
EDH Error Sense
Output to Microprocessor
Video
Outputs
Video Input
The serial digital video input signal is deserialized to produce a 10-bit
digital signal at a 27 MHz word rate. This data feeds an EDH error detector,
the write inputs of the frame memory, and the write control timing logic.
The write control logic extracts timing information from the input data
stream and uses it to control the memory addressing so that any particular
point in the input video frame is always written to the same fixed address
in the frame memory. Data is read from the frame memory under control of
pixel and line counters in the read control and timing logic. The read
control timing and resulting frame memory output video timing is set by a
8981FS Instruction Manual 29
Page 36

8981FS Digital Frame Synchronizer Module
27 MHz clock and the timing of a half-frame rate pulse feeding the read
control logic. This clock and pulse is produced by the genlock and output
timing control logic.
Genlock and Output Timing
The genlock and output timing control block can either lock its outputs to
an analog color black reference input or to timing pulses from the write
control logic. The analog video reference is used in the frame synchronizer
operating mode. The signals from the write logic are used in the fixed delay
operating mode.
Video Output
Video data from the frame memory output feeds the output signal processor circuits. This circuit can vary the signal levels, insert video black,
insert new digital timing sequences (EAV/SAV), and insert new EDH
checkwords. The video from the output signal processor feeds a serializer
and line driver that drives the module’s four output connectors.
Micro-Controller
A micro-controller is used to control all functional blocks and to store and
retrieve user-stored or factory preset operating parameters.
Audio Delay
The time that elapses between writing video into memory and reading it
back out is measured by logic which produces a serial data stream that
carries this time delay information. This signal feeds two output BNC connectors for use by other Grass Valley Group modules that can delay audio
to match the video delay produced by this module.
30 8981FS Instruction Manual
Page 37

Index
A
apply button 19
audio delay control 6
auto-freeze 11, 13, 21
auto-freeze sensitivity 13
B
backplane 5
black output 11
block diagram 29
C
checkwords 12
color black 6
configuration 9, 15
connector 4
delay control 6
functions 6
input 6
control modes 19
controller module 4
D
F
factory default 24
fault 7
features 2
fixed delay mode 11
format setup 15
frame 4, 27
frame status display 17
frame sync 10
freeze mode 12
freeze trigger 25
G
gain 23
gain adjustment 12
GPI 12, 25
GUI 2, 17
GUI controls 19
H
HANC 13
horizontal timing 21
default settings 14
delay 10
delay adjustment 11, 21
delay track output 27
dimmed functions 19
I
increment/decrement buttons 19
indicators 7
input signal loss 11
input specifications 27
input, loopthrough 6
E
EDH (error detection) 12, 20
enabled GPI 12
environmental 27
8981FS Instruction Manual Index-1
L
LEDs 7
links 18
Page 38

M
R
manual freeze 12, 25
missing reference signal 20
mode display 20
module
controller
installation 4
power supply 4
slots 4
module functions 18
module location 18
module name 18
momentary freeze 13
4
N
N/A 19
network 17
networking 2
non-synchronous switches 13
non-volatile memory 14
NTSC reference 6
numeric displays 19
numeric entries 19
O
recall 14
recall settings 24
reference input 6
reference specifications 27
remote auto-freeze GPI 21
repair depot 28
reset 19
S
save settings 24
signal configuration 18
signal processing 23
slider 19
software update 18
store configuration 14
switches 9
switching line 14, 20
switching transients 13, 14
T
termination 6
trigger circuit 25
troubleshooting 28
offset 23
offset adjustment 12
operating modes 8
operational modes 7
output
conditions
signal timing 10
specifications 27
overlay 6
8
V
VANC 13
vertical interval 14, 20
vertical timing 21
VI blanking 14
voltage 27
P
PAL reference 6
power 27
power supply 4
Index-2 8981FS Instruction Manual
 Loading...