

Page 1

Overseas Sales and Marketing Dep.
DC Strain Module
GL7-DCB
DATA PLATFORM GL7000
Contents
1. Outline and Basic Connection for the GL7-DCB module P. 1
3. Setting the GL7-DCB, Using Strain Gauges
P. 5
4. Setting the GL7-DCB, Sensor Usages
P. 14
5. Setting the GL7-DCB, Measuring Voltage
P. 25
Channel Isolation and
Accurate Measurement
DC Strain Module [GL7-DCB]
Study Guide for GL7000
Signal conditioner for the GL7000 corresponding with the
sensors using strain gauges.
- Technical guide for measuring [GL7-DCB] Amplifier.
2. Setting the GL7-DCB, Set measurement types
6. Setting the GL7-DCB, Measuring Resistance
P. 30
P. 4
Page 2

Overseas Sales and Marketing Dep.
DC Strain module GL7-DCB, Method to take advantage
GL7000 Product Information (GL7-DCB, vol. 2, rev. 1.0) - Page 1-
Strain gauge
Load-cell
Acceleration sensor
Control board
Sensors
(Voltage output type)
Thermistor
Potentiometer
Measuring micro distortion (strain)
Measuring output of sensor
Measuring voltage
Measuring resistance
Types of sensors
Types of measurements
1. Outline and Basic Connection for the GL7-DCB module (1/3)
The DC strain module GL7-DCB amplifier is the signal conditioner for the GL7000 data platform. It offers isolated 4 channel input, corresponding
bridge amp for the strain gauge sensor, and supports voltage and resistance measurement. Input signal type can be set individually for each
channels.
• Incorporates elements (120/350 ohms) for bridge circuit, simple to measure micro distortion levels using strain gauges.
• Incorporates the excitation power source for the sensor.
• Supports TED corresponding sensors.
• Supports precision measurement using noise reduction techniques including low-pass and anti-aliasing filter.
• Supports remote-sensing and the shunt calibration to measure high accurate readings.
DC Strain Module
GL7-DCB (4ch / unit)
Other sensors
(Based on strain gauge)
Input signal type
can be configured
individually for each
channels.
Study Guide
Page 3

Overseas Sales and Marketing Dep.
DC Strain module GL7-DCB, Method to take advantage
GL7000 Product Information (GL7-DCB, vol. 2, rev. 1.0) - Page 2 -
1. Outline and Basic Connection for the GL7-DCB module (2/3)
The input terminal of the DC strain module GL7-DCB is a rectangle connector (D-Sub serial 9-pin). An adapter for the circular connector (NDIS
type) and screw terminals are available for quick plug-and-play connection. Configuration of wiring will vary by the type of signals and sensors.
Screw terminal adapter
(Option B-650)
NDIS connector adapter
(Option B-651)
Rectangular connector (D-Sub 9-pin)
(Standard accessory)
Signal assignment of input connector
Input connector
pin number
Signal
symbol
Description
Screw terminal
(B-650)
NDIS connector
(B-651)
1 B- Excitation voltage (-) 1 C
2 IN- Input signal (-) 2 B
3 S+ Sense (+) 3 N/A
4 T- TEDS (-) 4 G
5 R+ Shunt resistance 5 N/A
6 S- Sense (-) 6 N/A
7 IN+ Input signal (+) 7 D
8 B+ Excitation voltage (+) 8 A
9 T+ TEDS (+) 9 F
Shell N/A Shield FG E
Input terminals
(for Strain, Voltage, Resistance)
Type: Rectangle connector (D-Sub
Serial 9-pin)
Switches to configure the input
channel by signal types and number
of gauges, etc.
Accessory for input terminal
Wires from the sensor needs to be soldered to
the connector. (Connection diagram varies by
the type of sensor.)
When sensor has cable with the circular
connector (NDIS type), you can use the B-651
option.
Wires from the sensor are fixed to terminal
screw when this adapter is used.
Rectangular (D-Sub type)
connector (Plug, Male)
NDIS connector
(pin assignment)
Study Guide
Page 4

Overseas Sales and Marketing Dep.
DC Strain module GL7-DCB, Method to take advantage
GL7000 Product Information (GL7-DCB, vol. 2, rev. 1.0) - Page 3 -
1. Outline and Basic Connection for the GL7-DCB module (3/3)
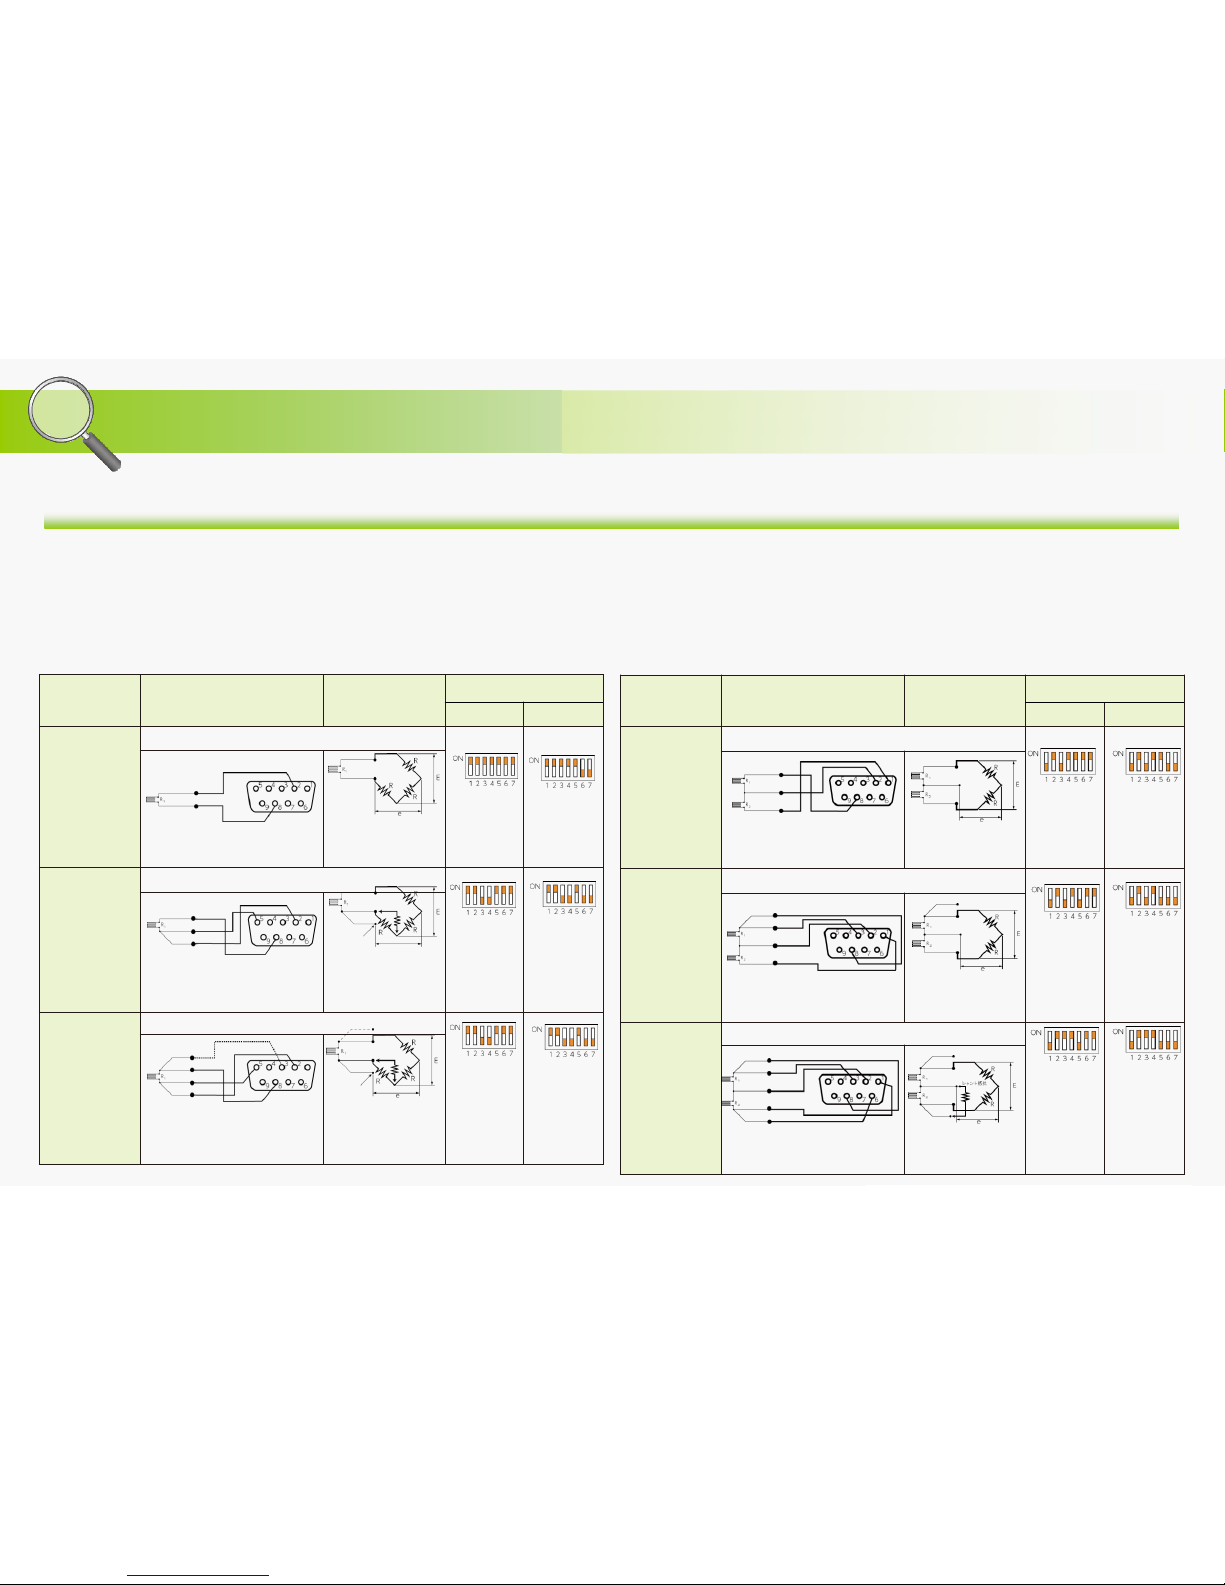
Setting of switch to set the input channel configuration
Type of measurement Configuration
Used the 120 ohms strain gauge Used the 350 ohms strain gauge
1 2 3 4 5 6 7 1 2 3 4 5 6 7
Measuring micro distortion using
strain gauge
Single gauge, 2 wires 1 1 1 1 1 1 1 1 1 1 1 1 0 0
Single gauge, 3 wires 1 1 0 0 1 1 1 1 1 0 0 1 0 0
Single gauge, 4 wires 1 1 0 0 1 1 1 1 1 0 0 1 0 0
Dual gauge, 3 wires 0 1 0 1 1 1 1 0 1 0 1 1 0 0
Dual gauge, 4 wires 0 1 0 1 0 1 1 0 1 0 1 0 0 0
Dual gauge, 5 wires 0 1 1 1 0 1 1 0 1 1 1 0 0 0
4 gauges, 4 wires 0 0 0 1 1 1 1
The 350 ohms strain gauge cannot be
used.
4 gauges, 6 wires 0 0 1 1 0 1 1
Measuring the output of a strain
gauge-based sensor
(ex. load cell)
4 wires 0 0 0 1 1 1 1
Use setting shown in left side.
6 wires 0 0 1 1 0 1 1
Measuring direct voltage or resistance 0 0 0 1 1 1 1
Use setting shown in left side.
The input of each channels can be configured by the settings using the switch. This switch needs to be set according to the type of measurement
and configuration of the sensors connected to the GL7-DCB module.
Measuring direct voltage or direct resistance
Measuring an output of a sensor based on the strain gauge
(Load-cell, Accelerometers, or other sensors)
Measuring micro distortion using strain gauge
When voltage or resistance is measured, switches needs to be set as shown
below.
When the output of the sensor is measured, switches are set according to the
configuration of sensor you see below.
When strain gauges are used, the switches are set according to the type of their
sensor. The bridge circuit required to use the strain gauge is configured by the
changing the settings on the switch mechanism.
Switch for configuring input channel.
(Located on front panel)
ON: 1
OFF: 0
Sensor, 4 wires type Sensor, 6 wires type
Study Guide
Page 5

Overseas Sales and Marketing Dep.
DC Strain module GL7-DCB, Method to take advantage
GL7000 Product Information (GL7-DCB, vol. 2, rev. 1.0) - Page 4 -
Type Description
Strain gauge Micro distortion (strain) measurement using the strain gauge
Strain sensor
Sensor output measurement (using strain gauges inside sensors)
(ie) Load Cell, accelerometer.
DC Voltage measurement (DC coupling)
Resistor Resistance measurement
The GL7-DCB module can measure micro distortion levels using strain gauges, strain gauge-based sensors, voltage, and resistance. The input
signal type is set on the input settings menu in each channels.
Input setting menu for GL7-DCB
Select the "Input" for setting the input
signal types.
Select the "Input" for setting the type
of input signal.
Note:
The description of the setting is the following.
2. Setting the GL7-DCB module, Set measurement types
Select the type of input signal. Showcase the input type after
selecting the sensor on the previous
menu.
Note:
When the input type is set to "Strain gauge", "Strain sensor", and "Resistor", the
excitation voltage for the sensor or resistor will be outputted from the input
connector. If wire connection of the sensor or equipment is not correct, the
equipment or the GL7-DCB module might get damaged.
Setting of signal type (selects to the strain gauge)
Study Guide
Page 6
Overseas Sales and Marketing Dep.
DC Strain module GL7-DCB, Method to take advantage
GL7000 Product Information (GL7-DCB, vol. 2, rev. 1.0) - Page 5 -
Configuration
Connection Bridge circuit
Strain Gauge Type
120 ohms 350 ohms
2 wires
Remote-sensing: Non (It is affected by temperature, etc.)
E: Excitation voltage,
e: Output signal,
R: Elements of bridge
circuit
3 wires
Remote-sensing: Yes (It is not affected by temperature, etc.)
E: Excitation voltage,
e: Output signal,
R: Elements of bridge
circuit
4 wires
Remote-sensing: Yes (It is not affected by temperature, etc.)
E: Excitation voltage,
e: Output signal
R: Elements of bridge
circuit
Remotesensing wire
Shunt
resister
Single gauge configuration (Quarter bridge)
Remotesensing wire
Shunt
resister
Configuration
Connection Bridge circuit
Strain Gauge Type
120 ohms 350 ohms
3 wires
Remote-sensing: Non (It is affected by temperature, etc.)
E: Excitation voltage,
e: Output signal,
R: Elements of bridge
circuit
4 wires
Remote-sensing: Yes (It is not affected by temperature, etc.)
E: Excitation voltage,
e: Output signal,
R: Elements of bridge
circuit
5 wires
Remote-sensing: Yes (It is not affected by temperature, etc.)
E: Excitation voltage,
e: Output signal
R: Elements of bridge
circuit
Dual gauge configuration (Half bridge)
Remote-sensing circuit
Shunt
resister
Remote-sensing circuit
3-1. Setting the GL7-DCB module, Using Direct Strain Gauge Connection (1/2)
Bridge circuit is normally required when signal is measured using strain gauges. The element of this bridge circuit is incorporated inside the GL7DCB module. The GL7-DCB strain gauge module supports strain gauges configured in Single gauge (Quarter bridge), Dual gauge (Half bridge),
and Four gauge (Full bridge) configuration with multiple typesof wiring format. The bridge circuit for each channels can be configured using the
switch setting for each channels.
Study Guide
Page 7

Overseas Sales and Marketing Dep.
DC Strain module GL7-DCB, Method to take advantage
GL7000 Product Information (GL7-DCB, vol. 2, rev. 1.0) - Page 6 -
Configuration
Connection Bridge circuit
Strain Gauge Type
120 ohms 350 ohms
4 wires
Remote-sensing: Non (It is affected by temperature, etc.)
N/A
E: Excitation voltage
e: Output signal
6 wires
Remote-sensing: Yes (It is not affected by temperature, etc.)
N/A
E: Excitation voltage
e: Output signal
Four (4) gauge configuration (Full bridge)
Remote-sensing
circuit
Shunt
resister
3-1. Setting the GL7-DCB module, Using Direct Strain Gauge Connection (2/2)
Study Guide
Page 8

Overseas Sales and Marketing Dep.
DC Strain module GL7-DCB, Method to take advantage
GL7000 Product Information (GL7-DCB, vol. 2, rev. 1.0) - Page 7 -
When micro distortion levels are measured using strain gauges, bridge circuit needs to be configured to its gauge types. The elements for the
bridge circuit is incorporated in the GL7-DCB module, and will need to be configured based on your chosen strain gauges.
3-2. Setting the GL7-DCB module, Using the Strain Gauge, Menu Setting (1/7)
Select the "Input" for setting the type
of input signal.
Set the "Input" to "Strain gauge". Select the "Bridge type" for setting the
used number of strain gauges.
Select the type of bridge.
Select the "Number of wires" for
setting the type of the gauge.
Select the number of wires from the
gauge.
Select the "Gauge resistor" for setting
the type of strain gauge.
Selected input signal is displayed.
Note: Type of bridge - Number of gauges
Quarter bridge: using single (1) gauge
Half bridge: using dual (2) gauges
Full bridge: using four (4) gauges
Note: Displayed number of wires are
varied by the setting of the type of
bridges.
Select the resistance of the used
gauge.
Setting the strain gauge configuration
Input setting menu for GL7-DCB
In this example, the micro distortion (strain) is
measured using the strain gauge.
Study Guide
Page 9

Overseas Sales and Marketing Dep.
DC Strain module GL7-DCB, Method to take advantage
GL7000 Product Information (GL7-DCB, vol. 2, rev. 1.0) - Page 8 -
The elements for the bridge circuit is incorporated in the GL7-DCB module, and they are configured by the setting on the switches for each
channels. The setting pattern will be displayed on the screen after setting parameters are entered. The excitation power for the bridge circuit
needs to be applied. The range of measurement will vary by the setting of the excitation source.
3-2. Setting the GL7-DCB module, Using the Strain Gauge, Menu Setting (2/7)
Select the "Polarity inverse" for
setting polarity of the signal.
Select the ON or OFF. Settings of strain gauge are displayed. Select the "Misc" for setting the
condition of the bridge circuit.
Select the "Sensor setting" for setting
the condition of excitation for bridge
circuit.
Select the “Bridge power” for setting
the type of excitation for bridge circuit.
Select "Voltage" or "Constant current"
for type of excitation.
Note: If polarity of the phenomena and
measured signal is not the same, this
setting needs to be changed.
Select the "Bridge voltage" for setting
value of excitation.
Setting the excitation for bridge circuit
Note: Setting pattern of switch for
configuring channel will be shown below.
You will need set the switches to the ones
shown here.
Note: Voltage would be normally selected
here. When lead wire of the gauge is long,
constant current is used to avoid the noise
factor from the lead wire.
Study Guide
Page 10

Overseas Sales and Marketing Dep.
DC Strain module GL7-DCB, Method to take advantage
GL7000 Product Information (GL7-DCB, vol. 2, rev. 1.0) - Page 9 -
Measurement ranges can be set after all parameters of strain gauge are complete. The range of signal to be displayed can be set here. Captured
signal is limited up to the selected measuring range. The displayed signal range can be set separately from the measuring range.
3-2. Setting the GL7-DCB module, Using the Strain Gauge, Menu Setting (3/7)
Select the voltage for excitation.
Note: 5V and 10V can be selected when
the gauge with 300 ohms or higher is
applied.
Setting the unit for strain measurement
Select the range. Select the "Upper" and "Lower" span
for setting display signal range.
Set the value for displayed signal
range.
Note: The span setting affects the range of signal to be displayed on the screen. The range of captured signal is set by the "Range".
The captured signal will be saved to specified memory media.
Select the "Strain unit" for setting the
measurement unit.
Select the "με" (micro-epsilon) or
"mV/V" for the unit of measurement.
Select the "Range" for setting
measuring range.
Note: When micro distortion is measured,
usually the "με" is used. When sensors
are used, "mV/V" would normally be
applied.
Note: Displayed value of ranges are
varied by setting the excitation condition.
Setting the span (range of signal to be displayed)
Setting of measuring range
Select the "Span" for setting the
displayed signal range.
Study Guide
Page 11
Overseas Sales and Marketing Dep.
DC Strain module GL7-DCB, Method to take advantage
GL7000 Product Information (GL7-DCB, vol. 2, rev. 1.0) - Page 10 -
Measured signal can be converted to other physical units, and you can save and display in real time. The scaling function is used for this feature.
3-2. Setting the GL7-DCB module, Using the Strain Gauge, Menu Setting (4/7)
Span Setting is displayed
Setting of scaling conditions
Select "Scaling" for setting the scaling
condition.
Select "On" to enable the scaling
function.
Select the “Upper” and “Lower”
values for the “Meas. Value”.
(Measured Value)
Enter the value. If set value is out of
the limit, measuring range will need to
be changed.
Sets the measurement condition for
display.
The micro distortion
(strain) can be measured
with these settings.
If the measured signal
needs to be converted to
other unit, then you will
need to set the Scaling
function to view data in
different units.
Select the "Scaling" for setting the
scaling condition.
Note: Signal is converted using four (4) reference points which focuses on two (2) points in
measurement value and two (2) points in scaled value. The measuring value is calculated by
proportional calculation based on the specified four reference points.
Study Guide
Page 12

Overseas Sales and Marketing Dep.
DC Strain module GL7-DCB, Method to take advantage
GL7000 Product Information (GL7-DCB, vol. 2, rev. 1.0) - Page 11 -
3-2. Setting the GL7-DCB module, Using the Strain Gauge, Menu Setting (5/7)
Select the "Decimal point" for setting
the digits of the scaled value.
Set the scaled condition. Press "Select" for complete setting the
type of scaled signal.
Select the type of signal for displaying
the unit that has been pre-set.
Select the "Setting" for setting the
type of the unit.
Note: The unit of scaled value can be selected from the preset or you can enter them directly.
Select the number of digits above the
decimal point. This will showcase the
digits in the scaled value.
Select the "Upper" and "Lower" values
for the "Scal. Value". This is the
scaled value corresponding to the
measurement value’s "Upper" and
"Lower" values.
Enter the scaled values.
Setting of scaling unit (select from pre-set)
Study Guide
Page 13

Overseas Sales and Marketing Dep.
DC Strain module GL7-DCB, Method to take advantage
GL7000 Product Information (GL7-DCB, vol. 2, rev. 1.0) - Page 12 -
3-2. Setting the GL7-DCB module, Using the Strain Gauge, Menu Setting (6/7)
Select the unit from preset.
Setting of scaling unit (direct enter)
Settings for measurement condition
are displayed.
Set the units to be displayed. Select the "Unit" for setting the unit of
scaled value.
Enter the unit using displayed
keyboard.
Note: If there is no unit available the preset list, unit can be entered directly using the
keyboard.
Select the "Upper" and "Lower" values
for setting display signal range.
Set the value for display signal range.Select the "Span" for setting displayed
signal range.
Setting the span (range of signal to be displayed in scaled value/unit)
or
Note: The span setting affects the range of signal to be displayed. The range of capturing signal is set by the "Range". The captured
signal will be saved to specified memory media.
Study Guide
Page 14

Overseas Sales and Marketing Dep.
DC Strain module GL7-DCB, Method to take advantage
GL7000 Product Information (GL7-DCB, vol. 2, rev. 1.0) - Page 13 -
3-2. Setting the GL7-DCB module, Using the Strain Gauge, Menu Setting (7/7)
Displays the Span setting All settings for the measurement
conditions are now final.
Study Guide
Page 15

Overseas Sales and Marketing Dep.
DC Strain module GL7-DCB, Method to take advantage
GL7000 Product Information (GL7-DCB, vol. 2, rev. 1.0) - Page 14 -
3-3. Setting of GL7-DCB module, Using the Strain Gauge, Shunt calibration (1/1)
Type of input Configuration Number of wires Remote sensing Shunt calibration
Strain gauge
1 gauge
(Quarter bridge)
2 wires N/A N/A
3 wires Available Available
4 wires Available Available
2 gauges
(Half bridge)
3 wires N/A N/A
4 wires Available N/A
5 wires Available Available
4 gauges
(Full bridge)
4 wires N/A N/A
6 wires Available N/A
Strain gauge based sensor
4 wires N/A N/A
6 wires Available N/A
The GL7-DCB module has the shunt calibration and remote sensing functionality. Shunt calibration is available when the input type is selected to
the “Strain gauge”. This can be executed from the settings menu. The remote sensing function is automatically applied when the input type is
selected to the “Strain gauge” or “Strain sensor”. Those functions are available in the specific condition listed below.
Select the "Misc" for executing the
shunt calibration.
Press the "Execute" for the "Shunt
calibration" for executing the shunt
calibration.
Setting of shunt calibration
Input setting menu for GL7-DCB
Note: The shunt calibration and the remote sensing functions are available in the following
configuration of the strain gauge or the strain gauge based sensor setup.
Note: Shunt Calibration
The shunt calibration is executed using the shunt resistor that is incorporated within the GL7DCB module. The shunt resistor is appended to the bridge circuit for simulating the bridge
circuit. The compensation value is found by the shunt calibration. GL7-DCB module will provide
accurate measurement using this compensation value.
Note: Remote Sensing
When longer lead wires of the strain gauge or strain gauge based sensor is used (ie. load cell,
accelerometers), lead wire length will affect the accuracy of the measurement. The remote
sensing function finds the resistance of the lead wire, and then compensates the value for the
lead wire resistance levels. A further accurate measurement can be achieved using the
compensation value.
The excitation voltage is required when the signal is measured using the strain gauge or strain
gauge based sensor. If the lead wire is very long, the actual applied excitation voltage will be
smaller then the resistance of the lead wire. This can cause an error in measurement accuracy.
Study Guide
Page 16

Overseas Sales and Marketing Dep.
DC Strain module GL7-DCB, Method to take advantage
GL7000 Product Information (GL7-DCB, vol. 2, rev. 1.0) - Page 15 -
4-1. Setting of GL7-DCB module, Using Proprietary Sensors, Configuration (1/1)
Variety of signals can be measured using the strain gauge based sensor such as load cells and accelerometers. These products typically carry
several strain gauges inside the sensor requiring excitation power to draw power from the DAQ system to measure the resistance within the
strain gauges. The GL7-DCB can supply this direct excitation power to the sensors.
Configuration
Connection Bridge circuit Switch setting
4 wires
Remote-sensing: Non ( it is affected by temperature.)
N/A
6 wires
Remote-sensing: Yes (It is not affected by
temperature.)
N/A
For Signal measurement using Sensors (strain gauge based)
IN(+)
B(+)
IN(-)
B(-)
Sensor
IN(+)
IN(-)
B(-)
Sensor
B(+)
S(+)
S(-)
Study Guide
Page 17

Overseas Sales and Marketing Dep.
DC Strain module GL7-DCB, Method to take advantage
GL7000 Product Information (GL7-DCB, vol. 2, rev. 1.0) - Page 16 -
When various signals are measured using the strain gauge based sensors, the input circuit needs to be configured for particular sensors for each
channel of your measurement. GL7-DCB offers in-depth set up to properly match and measure your sensors.
4-2. Setting the GL7-DCB module, Using Proprietary Sensors, Menu Setting (1/8)
Set the Input to the "Strain sensor". Select the "Number of wires" for
setting the configuration of the sensor.
Review the displayed settings of the
strain gauges.
Select the number of wires from the
sensor.
Select the "Bridge resistor" for setting
the configuration of the sensor.
Note: The resistance of the sensor is
written on the specification sheet of the
sensor.
Set the resistance of the sensor.
Setting of sensor configuration
Input setting menu for GL7-DCB
In this example, we look at a pressure
measurement that uses strain gauge
based sensor with the following
characteristics.
Rated Output: 1.25mV/V
Rated Capacity: 50kPa
Excitation Voltage: 1 to 3V
Output Resistance: 350 ohms
Note;
The rated output value varies by the excitation
voltage value. (When excitation voltage is 2V, the
rated output is 2.5mV.)
The rated output value is outputted when the rated
capacity is applied to the sensor.
In this case, when the excitation voltage is 1V and
the sensor receives the 50kPa pressure, the sensor
outputs 1.25mV.
(sensitivity: 50kPa/1.25mV = 40kPa/mV)
Select the "Input" for setting the type
of input signal.
Note: Setting pattern of switch for
configuring channel is shown below. The
switches will need to be set in this
particular pattern based on your gauge
setup.
Study Guide
Page 18

Overseas Sales and Marketing Dep.
DC Strain module GL7-DCB, Method to take advantage
GL7000 Product Information (GL7-DCB, vol. 2, rev. 1.0) - Page 17 -
4-2. Setting the GL7-DCB module, Using Proprietary Sensors, Menu Setting(2/8)
Select the "Misc." for setting the
sensor characteristics.
Select the "Sensor setting" for setting
the sensor characteristics.
Select the "Bridge voltage" for setting
the excitation condition.
Select the voltage for excitation levels.
Select the "Rated output" for setting
the sensor characteristics.
Set the number of rated output value.
Selected input signal is displayed.
Note: The rated output is written in the
specification of the sensor data sheet.
The value entered in this menu is in μV.
For example, when the rated output in the
specification sheet is 1.25mV/V, then the
number entered in this menu would be the
“1250μV/V” .
Rated output;
1.25mV/V = 1250μV/V
Rated output setting is displayed.
Set the excitation voltage for sensor
Set the sensor characteristic
Study Guide
Page 19

Overseas Sales and Marketing Dep.
DC Strain module GL7-DCB, Method to take advantage
GL7000 Product Information (GL7-DCB, vol. 2, rev. 1.0) - Page 18 -
4-2. Setting the GL7-DCB module, Using Proprietary Sensors, Menu Setting(3/8)
Select the "Calibration coefficient" for
setting the sensor characteristics.
Set the value. Settings of calibration coefficient
(sensitivity of sensor) is displayed.
Set the sensor characteristics (in the measuring unit of the sensor)
When measurement needs to be
displayed in other unit, scaling would be
required. Go to section 6/8 (page 21).
Note: The entered value is the sensitivity
from the sensor. This sensitivity is
calculated with the rated output and the
rated capacity of the sensor. The unit of
sensitivity in this menu is “μV”.
In this sensor, the sensor outputs the
1.25mV/V (rated output) when the sensor
receives the 50kPa (rated capacity). So,
sensitivity is 50kPa per 1.25mV/V.
Sensitivity: 50kPa/1.25(mV/V)
= 40kPa/(mV/V)
= 0.04kPa/(μV/V)
The number (0.04) would be entered in this
menu. The unit (kPa) is entered in the Unit
section.
Note: Measurement is displayed and saved in the measuring units of the
sensor. Measured voltage is converted to the measurement units in this
setting.
Press the "Select" for setting the type
of measurement signal.
Select the type of signal for displaying
the unit that has been pre-set.
Note: The unit of scaled value can be selected from the preset or you can enter them directly.
Press the “Select” for setting the type
of the unit.
Select the unit from preset.
Set the measurement unit (select from pre-set)
Study Guide
Page 20

Overseas Sales and Marketing Dep.
DC Strain module GL7-DCB, Method to take advantage
GL7000 Product Information (GL7-DCB, vol. 2, rev. 1.0) - Page 19 -
4-2. Setting the GL7-DCB module, Using Proprietary Sensors, Menu Setting(4/8)
Settings of unit are displayed.
Setting of measurement unit (direct enter)
Select the "Unit" for setting the unit of
measurement value.
Enter the unit using displayed
keyboard.
Note: If there is no unit in the preset list, unit can be entered directly using the
keyboard.
Settings for the units are displayed. Settings of the unit is displayed.
Select the "Strain unit" for setting the
measurement unit for measuring
range.
Select the "mV/V". Display the measurement condition
after pressing Close.
or
Note: When the sensor is used, usually
the "mV/V" is used.
When micro distortion is measured, the
"με" unit is normally is used.
Study Guide
Page 21

Overseas Sales and Marketing Dep.
DC Strain module GL7-DCB, Method to take advantage
GL7000 Product Information (GL7-DCB, vol. 2, rev. 1.0) - Page 20 -
4-2. Setting the GL7-DCB module, Using Proprietary Sensors, Menu Setting(5/8)
Select the "Range" for setting the
measuring range.
Set measurement range is displayed.
Span setting gets displayed. Measurement Conditions are
displayed after you press Apply.
Select the range.
Select the "Upper" and "Lower" levels
for setting display signal range.
Set the value for display signal range.
Note: Displayed value of ranges are
varied by settings for the excitation
condition.
Setting of span (range of signal to be displayed)
Set the measuring range
Select the "Span" for setting display
signal range.
Note: The span setting affects the range of signal to be displayed. The range of capturing signal is set by the "Range". The captured
signal will be saved to a specified memory media.
Study Guide
Page 22

Overseas Sales and Marketing Dep.
DC Strain module GL7-DCB, Method to take advantage
GL7000 Product Information (GL7-DCB, vol. 2, rev. 1.0) - Page 21 -
When the measured value needs to be displayed and saved in a measurement unit other than that offered by the sensor, the number entered on
the "Calibration coefficient" need to be converted to the physical units used for that measurement.
4-2. Setting the GL7-DCB module, Using Proprietary Sensors, Menu Setting (6/8)
Settings of calibration coefficient is
displayed.
Select the "Unit" for setting the unit of
measurement value.
Enter the unit using the displayed
keyboard.
Measurement units are displayed.. Measurement conditions are
displayed after pressing “Close”.
Select the "Calibration coefficient" for
setting the sensor characteristics.
Set the value of the sensitivity.
Note: The sensitivity of the sensor is
calculated by the rated output and the rated
capacity. It needs to be converted to the
required unit.
In this particular sensor, the sensitivity of the
sensor is as follow:
Sensitivity: 50kPa/1.25(mV/V)
= 40kPa/(mV/V)
= 0.04kPa/(μV/V)
The conversion rate between the "kPa" and
"kgf/cm2" is as follows:
1kPa = 0.0101972kgf/cm2= 10.1972gf/cm
2
So, the sensitivity in the "kgf/cm2" is as follows
0.04kPa/(μV/V) = 0.407888(gf/cm2)/(μV/V)
This number (0.4079) is entered in this menu.
The unit (gf/cm2) is entered in the Unit section.
In this example, the pressure is measured using the sensor that is
calibrated with the SI unit (kPa). The measured value is displayed in
the unit as “gf/cm2” which would be the Physical unit commonly used.
Set the sensor characteristics (in the unit different from the sensor)
Set the scaling unit (in text)
Note: “Scaling" factor on the input setting menu is not available when "Strain sensor" is selected. The scaling function needs to be set in the "Calibration coefficient" parameter.
Study Guide
Page 23

Overseas Sales and Marketing Dep.
DC Strain module GL7-DCB, Method to take advantage
GL7000 Product Information (GL7-DCB, vol. 2, rev. 1.0) - Page 22 -
4-2. Setting the GL7-DCB module, Using Proprietary Sensors, Menu Setting (7/8)
Strain unit settings are displayed.Select the "Strain unit" for setting the
measurement unit.
Select the "mV/V". Select the "Range" for setting the
measuring range.
Select the range.
Note: Displayed value of ranges are
varied by setting of the excitation
condition.
Range setting conditions are
displayed.
Select the "Span" for setting display
signal range.
Setting of span (range of signal to be displayed)
Setting of measuring range
Select the "Upper" and "Lower" levels
for setting display signal range.
Note: The span setting affects the range of signal to be displayed. The range of capturing
signal is set by the “Range”. The captured signal will be saved to a specified memory
media.
Note: When the sensor is used, usually
the "mV/V" is used.
When micro distortion is measured, "με"
units are normally used.
Study Guide
Page 24

Overseas Sales and Marketing Dep.
DC Strain module GL7-DCB, Method to take advantage
GL7000 Product Information (GL7-DCB, vol. 2, rev. 1.0) - Page 23 -
4-2. Setting the GL7-DCB module, Using Proprietary Sensors, Menu Setting (8/8)
Span setting will be displayed Measurement Conditions is displayed
after you press “Apply”.
Set the values for displayed signal
range.
Study Guide
Page 25

Overseas Sales and Marketing Dep.
DC Strain module GL7-DCB, Method to take advantage
GL7000 Product Information (GL7-DCB, vol. 2, rev. 1.0) - Page 24 -
4-3. Setting the GL7-DCB module, Using Proprietary Sensors, TEDS Compatible sensor
When TEDS (Transducer Electronic Data Sheet) compatible sensors are used, GL7-DCB module can read settings information automatically
from the sensor. The information of the rated capacity, rated output and etc. are included in the TEDS, and sensor sensitivity and other
informations will be set automatically. The "Range", "Filter", "Scaling" or other setting needs to be set as required after the TEDS measurements
are read.
Input setting menu for GL7-DCB
Select the "Input" for setting the type
of input signal.
Select the "TEDS setting" for reading
TEDS compatible sensors after the
"Input" is set to "Strain sensor".
Select the "Read TEDS information" for
executing the reading of the information
from the sensor.
Set TEDS Compatible Sensors
Note: TEDS compliant sensors need to be compatible to the IEEEE1451.4 Template ID33 (Strain gauge based sensor) standard.
If the sensor does not support this standard, then the TEDS feature cannot be used. In such cases, the setting condition of the sensor needs to be set
manually.
Note: TEDS is supported when the
strain gauge based sensor is selected.
If the Strain gauge is selected, then the
TEDS setting menu will not be available.
Study Guide
Page 26

Overseas Sales and Marketing Dep.
DC Strain module GL7-DCB, Method to take advantage
GL7000 Product Information (GL7-DCB, vol. 2, rev. 1.0) - Page 25 -
5-1. Setting the GL7-DCB module, Measuring the Voltage, Input Configuration (1/1)
Standard voltage input can be measured using this module. The input section of the channels needs to be configured for standard voltage
measurement, and it is done by changing the switch setting.
Configuration
Connection Bridge circuit Switch setting
2 Wires
N/A
For Voltage measurement
IN(+)
IN(-)
Study Guide
Page 27

Overseas Sales and Marketing Dep.
DC Strain module GL7-DCB, Method to take advantage
GL7000 Product Information (GL7-DCB, vol. 2, rev. 1.0) - Page 26 -
5-2. Setting the GL7-DCB module, Measuring Voltage Input, Menu Setting (1/4)
Mixed signals can be measured using a strain gauge-based sensor. When these types of sensors are used, excitation power is required and
GL7-DCB module can supply the excitation power to the sensor.
Set the Input to "DC" for measuring
voltage.
Select the "Range" for setting the
measuring range.
Set the value for displayed signal
range.
Select the range.
Setting of Range is displayed. Select the "Span" for setting display
signal range.
Setting of input configuration
Input setting menu for GL7-DCB
Select the "Input" for setting the type
of input signal.
Note: Setting pattern for DIP switch is
shown below. The switch needs to be set
to this pattern.
Setting of measuring range
Select the "Upper" and "Lower" levels
for setting displayed signal range.
Note: The span setting affects the range of signal to be displayed. The range of capturing signal is set by the "Range". The captured
signal will be saved to a specified memory media.
Setting of span (range of signal to be displayed)
Study Guide
Page 28

Overseas Sales and Marketing Dep.
DC Strain module GL7-DCB, Method to take advantage
GL7000 Product Information (GL7-DCB, vol. 2, rev. 1.0) - Page 27 -
Span settings are displayed. Measurement conditions are
displayed after pressing “Apply”.
Setting of span (range of signal to be displayed)
Standard voltage levels
can be measured in this
settings.
If the measured signal
needs to be converted to
other unit, Scaling function
will need to be used.
Setting of scaling condition
Select the "Scaling" for setting the
scaling condition.
5-2. Setting the GL7-DCB module, Measuring Voltage Input, Menu Setting (2/4)
When the output voltage of the sensor is measured, the measurement value needs to be displayed and saved in its physical units. Scaling
function would be used to offer this conversion.
In this example, the flow rate is measured using voltage
output sensor. The sensitivity of the sensor is as follows:
5mV output at 0.5m3/min
Select the "Scaling" for setting the
scaled condition.
Select to "On" to enable the scaling
function.
Select the "Upper" and "Lower" levels
of the "Meas. Value".
Enter the value. If set value is out of
limit, the setting of the measuring
range needs to be changed.
Note: The signal is converted using four (4) reference points that includes two (2) points in
measurement value and two (2) points in scaled value. The measuring value is calculated by
proportional calculation based on the specified four reference points.
Study Guide
Page 29

Overseas Sales and Marketing Dep.
DC Strain module GL7-DCB, Method to take advantage
GL7000 Product Information (GL7-DCB, vol. 2, rev. 1.0) - Page 28 -
Set the reference points for scaled
values.
Select the "Decimal point" for setting
the digits for the scaled value.
Select the number of digits below the
decimal point. This will be how the
scaled values will be displayed.
Select the “Upper” and
“Lower“values for the ”Scal. Value”.
This is the scaled value corresponding
to the measurement value to the
"Upper" and "Lower" levels for the
"Meas. Value".
Enter the value for scaling. Set the scaled conditions.. Press "Select" for setting the type of
scaled signal.
Select the pre-set type of signal for
displayed unit..
Note: The unit of scaled value can be selected from the preset or can be entered manually..
Setting of scaling unit (select from pre-set)
5-2. Setting the GL7-DCB module, Measuring Voltage Input, Menu Setting (3/4)
or
Study Guide
Page 30

Overseas Sales and Marketing Dep.
DC Strain module GL7-DCB, Method to take advantage
GL7000 Product Information (GL7-DCB, vol. 2, rev. 1.0) - Page 29 -
Display the set values.
Select the "Setting" for setting the
type of units.
Select the unit from preset.
Setting of scaling unit (direct enter)
Select the "Unit" for setting the unit of
the scaled value.
Enter the unit using displayed
keyboard.
Note: If there is no unit available in the preset list, unit can be entered manually
using the keyboard.
Display the measurement conditions
after pressing “Apply”.
5-2. Setting the GL7-DCB module, Measuring Voltage Input, Menu Setting (4/4)
Study Guide
Page 31

Overseas Sales and Marketing Dep.
DC Strain module GL7-DCB, Method to take advantage
GL7000 Product Information (GL7-DCB, vol. 2, rev. 1.0) - Page 30 -
6-1. Setting the GL7-DCB module, Measuring Resistance, Input Configuration (1/1)
Resistance can also be measured using this module. The input section of the channel needs to be configured for measuring resistance, and this
is done by setting the proper conditions on the DIP switch.
Configuration
Connection Bridge circuit Switch setting
2 Wires
N/A
4 Wires
N/A
For Resistance measurement
Note: When resistance is measured using two (2) wires, it is required to connect
between the pin #1 and #2, and pin #7 and #8. It is shown in above figure.
In(-)
In(+)
In(-)
B(+)
B(-)
In(+)
Study Guide
Page 32

Overseas Sales and Marketing Dep.
DC Strain module GL7-DCB, Method to take advantage
GL7000 Product Information (GL7-DCB, vol. 2, rev. 1.0) - Page 31 -
6-2. Setting the GL7-DCB module, Measuring Resistance, Menu Setting (1/4)
Various signals can be measured using the strain gauge-based sensors. Internal strain gauges require excitation power and GL7-DCB module
can supply the excitation power to these sensors.
Set the Input to "Resistor" for
measuring resistance.
Select the "Range" for setting the
measuring range.
Set the value for display signal range.
Select the range.
Setting is displayed. Select the "Span" for setting display
signal range.
Setting of input configuration
Input setting menu for GL7-DCB
Select the "Input" for setting the type
of input signal.
Note: Setting pattern for DIP switch will be
shown below. The switch needs to be set
to this particular pattern.
Setting of measuring range
Select the "Upper" and "Lower" levels
for setting display signal range.
Note: The span setting affects the range of signal to be displayed. The range of capturing signal is set by the “Range”. The captured
signal will be saved to a specified memory media.
Setting of span (range of signal to be displayed)
Study Guide
Page 33

Overseas Sales and Marketing Dep.
DC Strain module GL7-DCB, Method to take advantage
GL7000 Product Information (GL7-DCB, vol. 2, rev. 1.0) - Page 32 -
Span setting is displayed. Press
“Apply” after confirming the
measurement range.
Measurement condition setting is
displayed.
Setting of span (range of signal to be displayed)
Resistance can be
measured in this particular
settings.
If the measured signal
needs to be converted to
other unit, then use the
scaling feature to convert
original signal
measurement scale
Setting of scaling condition
Select the "Scaling" for setting the
scaling condition.
When the output resistance of the sensor is measured, the measured value needs to be displayed and saved in its physical units. The scaling
function can help support this conversion.
In this example, displacement is measured using a
potentiometer. The sensitivity of the sensor is as follows:
200ohms at 10mm, 100ohms at 0mm, 0ohm at -10mm
Select the "Scaling" for setting the
scaling condition.
Select to "On" to enable the scaling
function.
Select the "Upper" and "Lower" levels
of the "Meas. Value".
Enter the value. If set value is out of
limit, the setting of the measuring
range needs to be changed.
Note: The signal is converted using four (4) reference points which includes two (2) points in
measurement value and two (2) points in scaled value. The measuring value is calculated by
proportionaly calculating the specified four reference points.
6-2. Setting the GL7-DCB module, Measuring Resistance, Menu Setting (2/4)
Study Guide
Page 34

Overseas Sales and Marketing Dep.
DC Strain module GL7-DCB, Method to take advantage
GL7000 Product Information (GL7-DCB, vol. 2, rev. 1.0) - Page 33 -
Set the reference point in measured
units.
Select the "Decimal point" for setting
the digits to the scaled value.
Select the number of digits above the
decimal point. This will be the decimal
digits that will be displayed on the
scaled values.
Select the “Upper” and “Lower”
levels for the “Scal. Value”. This is
the scaled value corresponding to the
measurement value to against the
"Upper" and "Lower" values for the
"Meas. Value".
Enter the value for scaling. Scaled measurement values will be
displayed..
Press the "Select" for setting the type
of scaled signal.
Select the type of signal for displaying
the unit that has been pre-set.
Note: The unit of scaled value can be selected from the preset menu or you can manually
enter the scaled unit.
Setting of scaling unit (select from pre-set)
or
6-2. Setting the GL7-DCB module, Measuring Resistance, Menu Setting (3/4)
Study Guide
Page 35

Overseas Sales and Marketing Dep.
DC Strain module GL7-DCB, Method to take advantage
GL7000 Product Information (GL7-DCB, vol. 2, rev. 1.0) - Page 34 -
Display the scaled setting. Press
“Apply”.
Select the "Setting" for setting the
type of the unit.
Select the unit from preset.
Setting of scaling unit (direct enter)
Select the "Unit" for setting the unit of
scaled value.
Enter the unit using displayed
keyboard.
Note: If there is no unit available in the preset list, you can enter the scaled unit
manually using the keyboard.
Final measurement conditions are
displayed. You are set to go.
6-2. Setting the GL7-DCB module, Measuring Resistance, Menu Setting (4/4)
Study Guide
You are set to go!
Page 36

Overseas Sales and Marketing Dep.
DC Strain module GL7-DCB, Method to take advantage
GL7-DCB Measurement Specification
GL7000 Product Information (GL7-DCB, vol. 2, rev. 1.0) - Page 35 -
Voltage
GL7-V
DC Strain
GL7-DCB
Charge
GL7-CHA
Voltage
Output
GL7-DCO
Voltage/
Temperature
GL7-M
High Speed
Voltage
GL7-HSV
Logic
Pulse
GL7-L/P
High
Voltage
GL7-HV
Modular Type Data Acquisition Unit
DATA PLATFORM GL7000
• Input modules can be expanded to accommodate wide variety of
measurements (expand up to 10 modules)
• Attaching the high-definition display module with a touch panel capability
allows both stand-alone operation and a system-embedded solution
• 2 interfaces to connect the GL7000 to PC (USB and Ethernet)
• 4 destinations to save the captured data (Built-in RAM, Built-in Flash
memory, SD memory card, and SSD module)
• Software for high performance and easy operation (GL-Connection)
* Display and modules are optional.
High
Speed
High
Voltage
Large
Memory
Capacity
Multi-
channels
DC Strain
GL7-DCB
Page 37

Overseas Sales and Marketing Dep.
Experience the Power of the
Standalone Data Platform
GL7000
Modular Data Acquisition Platform
 Loading...