

Page 1
GRANDVIEW REPRODUCING GENUINE COLORS
Model EL-Pxx
GRANDVIEW REPRODUCING GENUINE COLORSGRANDVIEW REPRODUCING GENUINE COLORS
Thank you for purchasing a Grandview projection screen.
Before use, please read instructions carefully. After installation, store instructions for future reference.
Instruction Manual for
Elegant Series Manual Pull-Down Screen
ISO9001:2000
International Certification
Grandview Crystal Screen Canada Ltd.
#11- 3751 North Fraser Way,
Marine Way Business Centre,
Burnaby, BC, Canada V5J 5G4
Tel: 1-604-412-9777 Fax: 1-604-412-9796
Website: www.grandviewscreen.ca
Guangzhou Grandview Crystal Screen Co., Ltd.
P.O. 511400 Federal Ind. Zone No. 363, Yushan West Road,
Shiqiao, Panyu District, Guangzhou, Guangdong, China
Tel: +8620-8489-9499 Fax: +8620-8480-3343
Website: www.grandviewscreen.com
Page 2
1
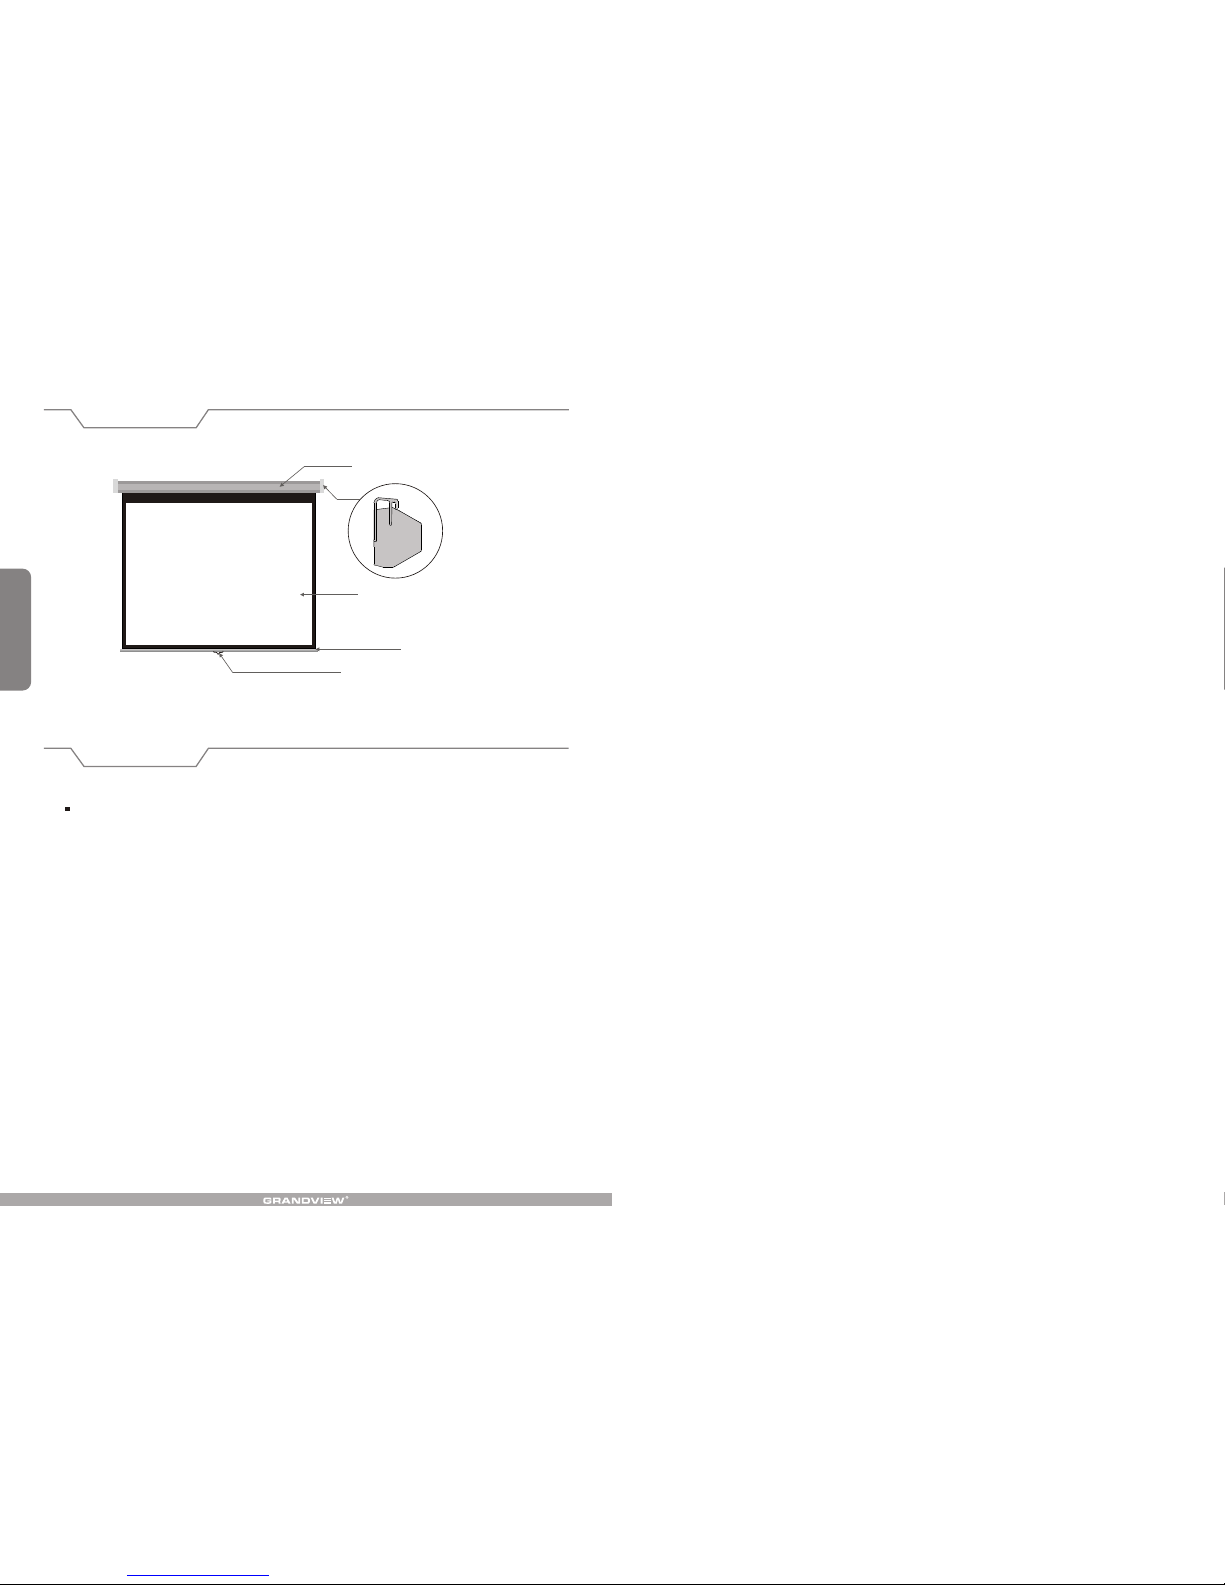
Instruction Manual (1pc)
Accessories
Metal Casing
End Cap
Screen Fabric
Rod
Pull Down Handle
Description
Page 3
2
5
A
A
1
2
3
4
5
Installation
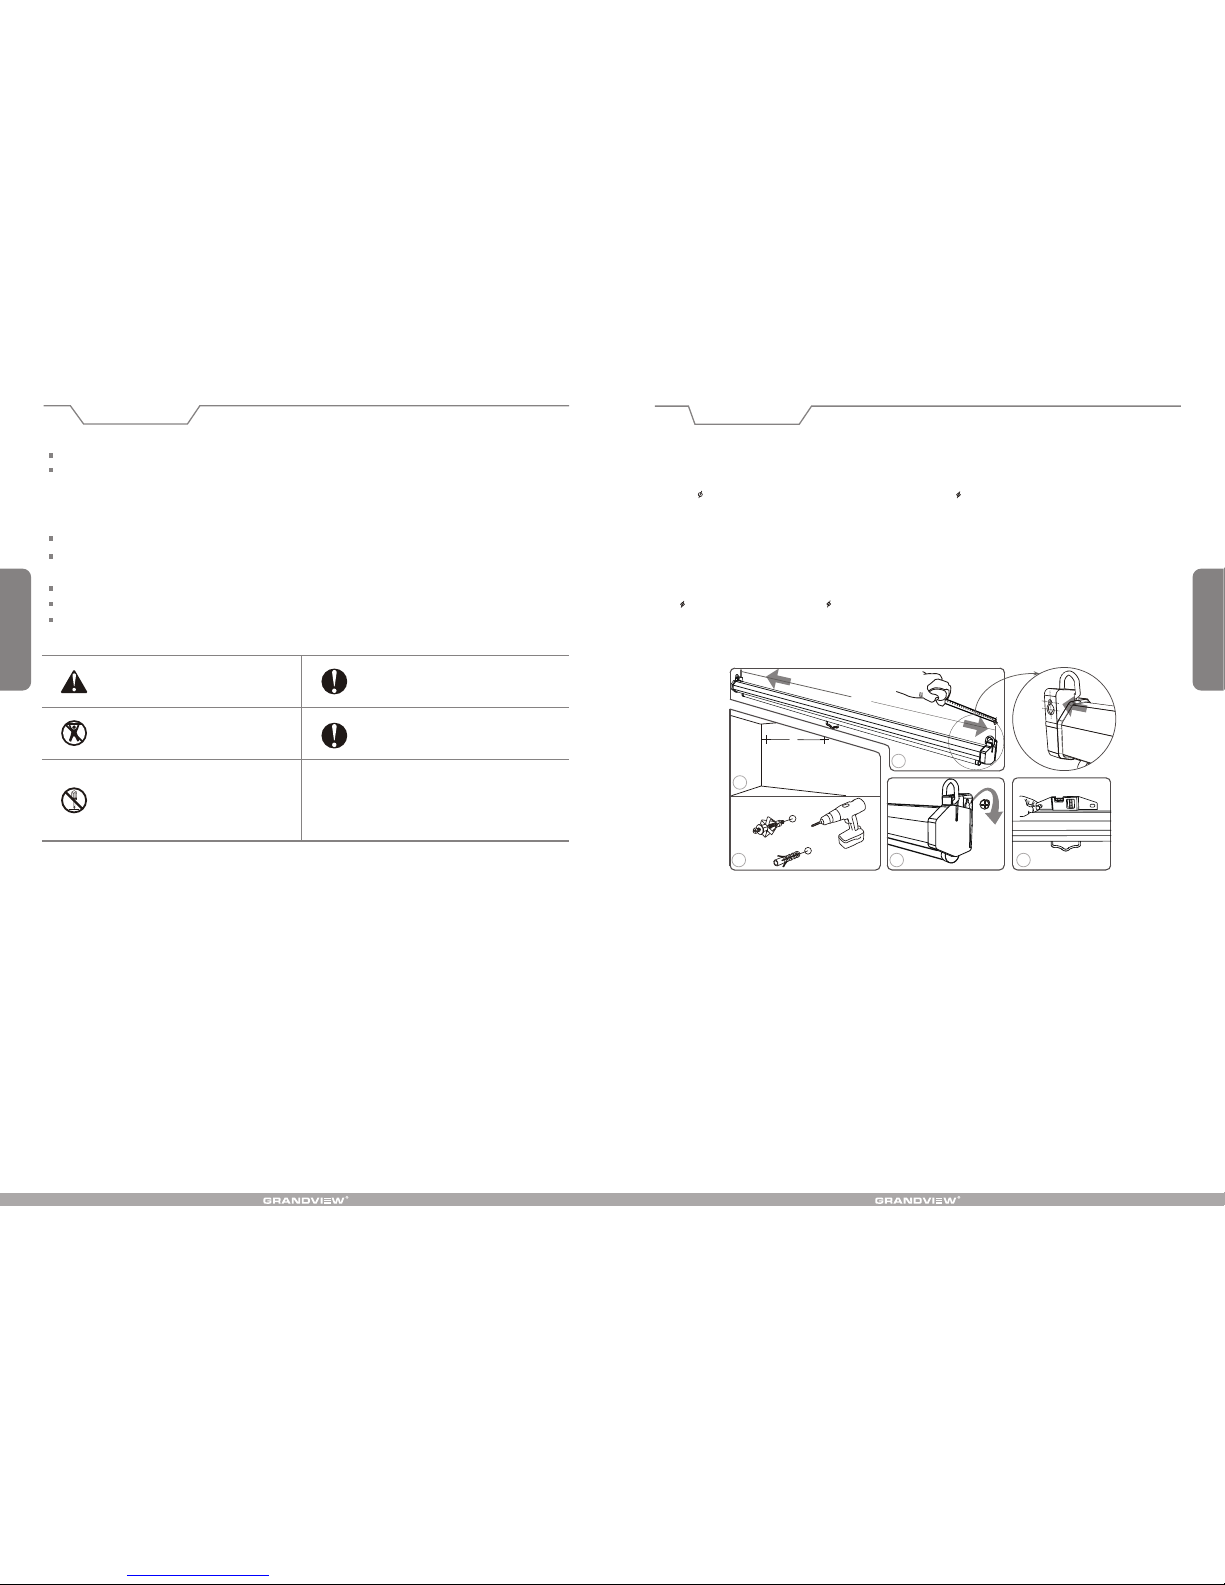
This projection screen should be installed at the best possible viewing position for the audience. Take out
all the parts from the packaging and follow the accessories guideline to ensure you have all parts. The parts
needed will vary depending on which installation you choose to use. For installation on a wood wall or ceiling,
use the 5 x 40 screws. For installation on a drywall, use the 5 x 40 screws with anchors.
Wall Mount
Using a tape measure, measure the distance between the two keyholes on the casing ( Figure 1). According
to the measurement, use the drill to drill identical holes of the appropriate size (use a smaller drill bit than the
actual screws) on the wall and ensure that it is level ( Figure 2 and 3 ). screw in the appropriate screws, either
the 5 x 40 for wood walls or the 5 x 40 plus anchors for drywalls, leaving enough space at the end to
hang the casing (Figure 4). To ensure that the screen is level, use a leveler to check ( Figure 5 ).
The ceiling or wall used for fixture installation must be secure to prevent the screens from falling.
Please read the following as any damage to the screen surface will affect the quality of the picture:
1.Avoid contact or touching the screen surface as it may cause scratches or tears.
2.Do not write or draw on the surface
3.Clean the screen with a soft cloth and lukewarm water. Do not use any detergent or cleaning products.
Roll up the screen after every use.
While the screen is retracting, hold on to the pull loop on the bottom of the screen to prevent it from going
too fast, which may result in damaging both the screen and casing.
It may also cause the screen the fall.
Ensure that the screen is level when installing; do not pull on the sides or fold the screen.
To prevent unnecessary damage, the operation and maintenance of the screen should be done by adults.
Do not take apart and replace with unknown parts. If there are any problems, please contact your local dealer.
Product specifications are subject to change.
Ignoring the safety warnings may
lead to injuries and/or damaging
the product.
Fixtures should be installed in a secure
place to avoid accidents or the screen
falling.
Please contact your local dealer for
repair s or maintenance. Please contact
our company if you have any further
questions. Avoid taking apart the
fixtures yourself. Loose parts may
cause the screen to fall.
Warnings
Roll up the screen after every use.
Leaving it hanging for a long period
of time may cause the fabric to loosen.
Refrain from hanging anything on the
screen as it may cause the screen to
fall.
Page 4
3
4
A
A
1
2
3
4
5
Installation
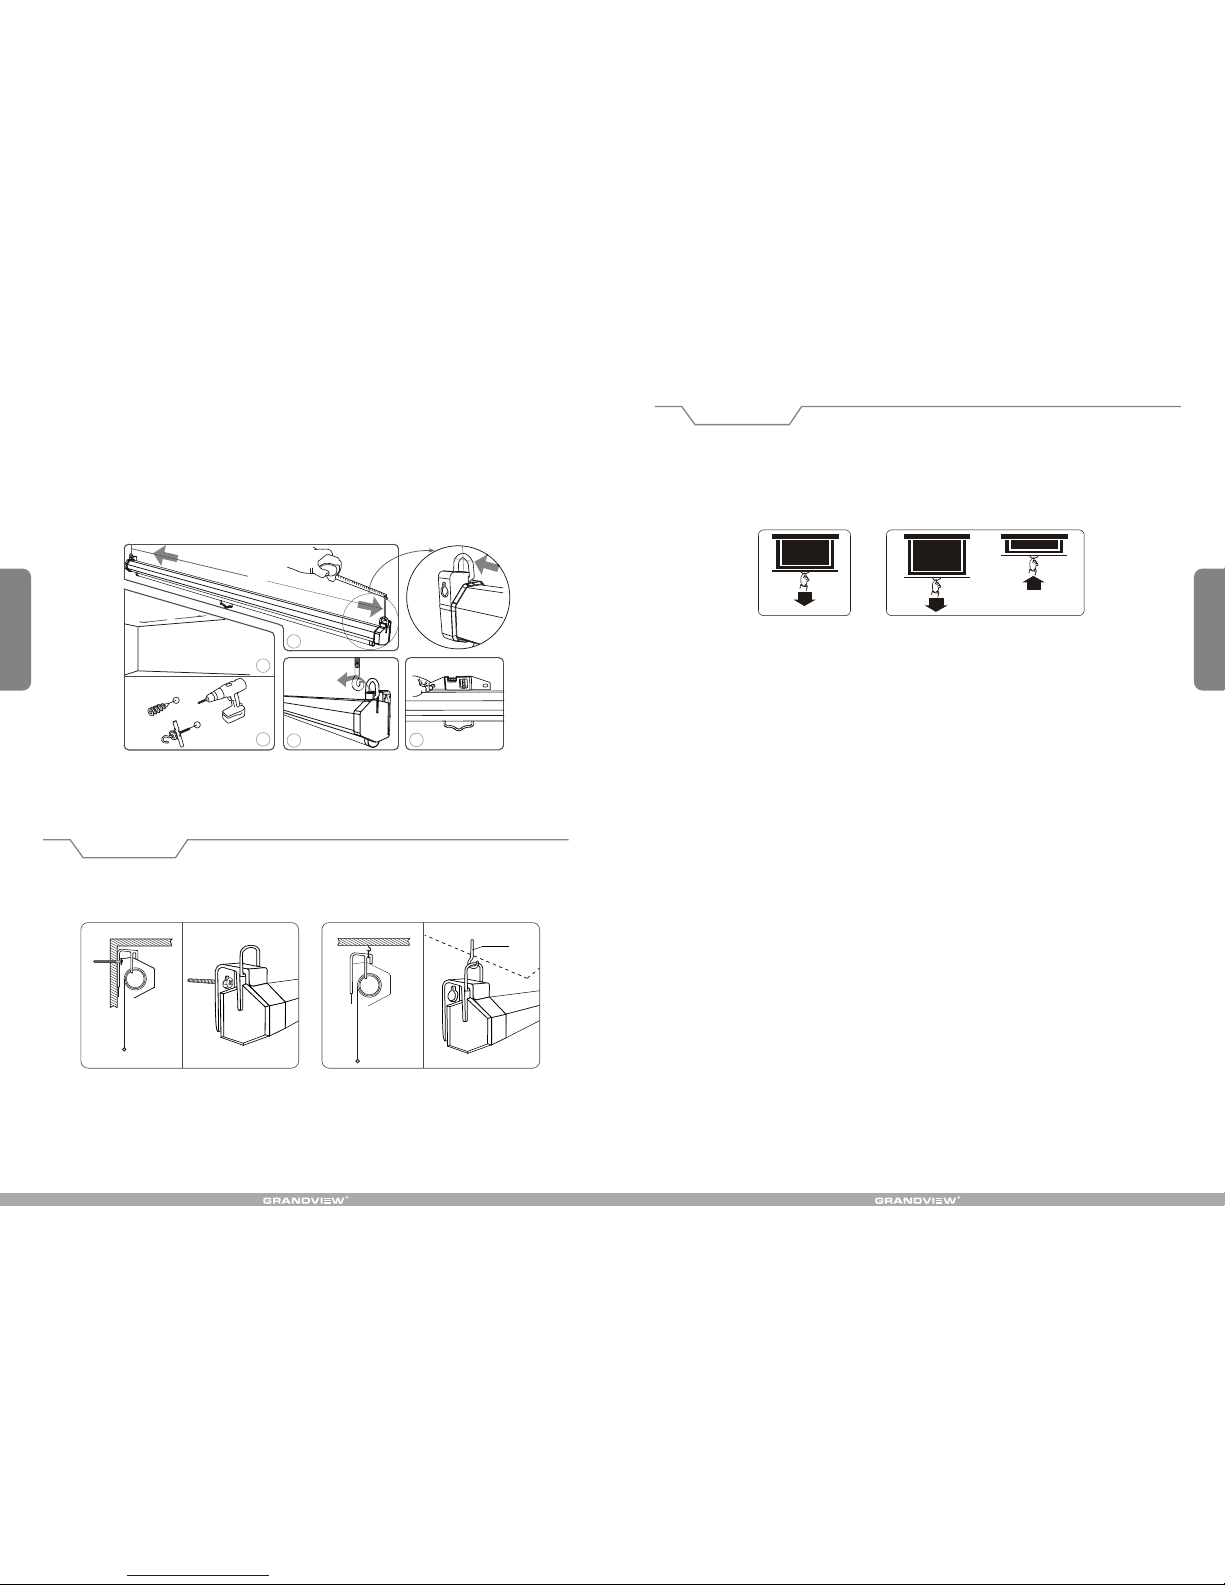
Hanger
Wall mount Ceiling mount
Using a tape measure, measure the distance between the two keyholes on the casing ( Figure 1 ). According
to the measurement, use the drill to drill identical holes of the appropriate size on the ceiling ( use a smaller
drill bit than the actual screws) and ensure that it is level ( Figure 2 & 3 ). screw in the hook screws (not
provided ), and lift the screen into the hook screws to hang ( Figure 4 ). To ensure that the screen is level,
use a leveler to check ( Figure 5 ).
Ceiling Mount
Instructions
Picture 1 Picture 2
1. .
2. When retracting the screen, simply pull down screen slightly to release
. Guide the screen up with the handle, and release when the screen is fully retracted.
Pull the screen handle down and ensure it locks in position
pull down the screen handle
slightly to release
 Loading...