

Page 1
GRANDVIEW REPRODUCING GENUINE COLORS
GRANDVIEW REPRODUCING GENUINE COLORS
Installation Guide for
Cyber Series Motorized Portable Screen
Grandview Crystal Screen Canada Ltd.
#11- 3751 North Fraser Way,
Marine Way Business Centre,
Burnaby, BC, Canada V5J 5G4
Tel: 1-604-412-9777 Fax: 1-604-412-9796
Website: www.grandviewscreen.ca
Guangzhou Grandview Crystal Screen Co., Ltd.
P.O. 511400 Federal Ind. Zone No. 363, Yushan West Road,
Shiqiao, Panyu District, Guangzhou, Guangdong, China
Tel: +8620-8489-9499 Fax: +8620-8480-3343
Website: www.grandviewscreen.com
www.grandviewscreen.com.cn
ISO9001:2000
International Certification
Model: CB-UMxx
Thank you for purchasing a Grandview projection screen.
Before use, please read instructions carefully. After installation, keep instructions for future reference.
Page 2
Description
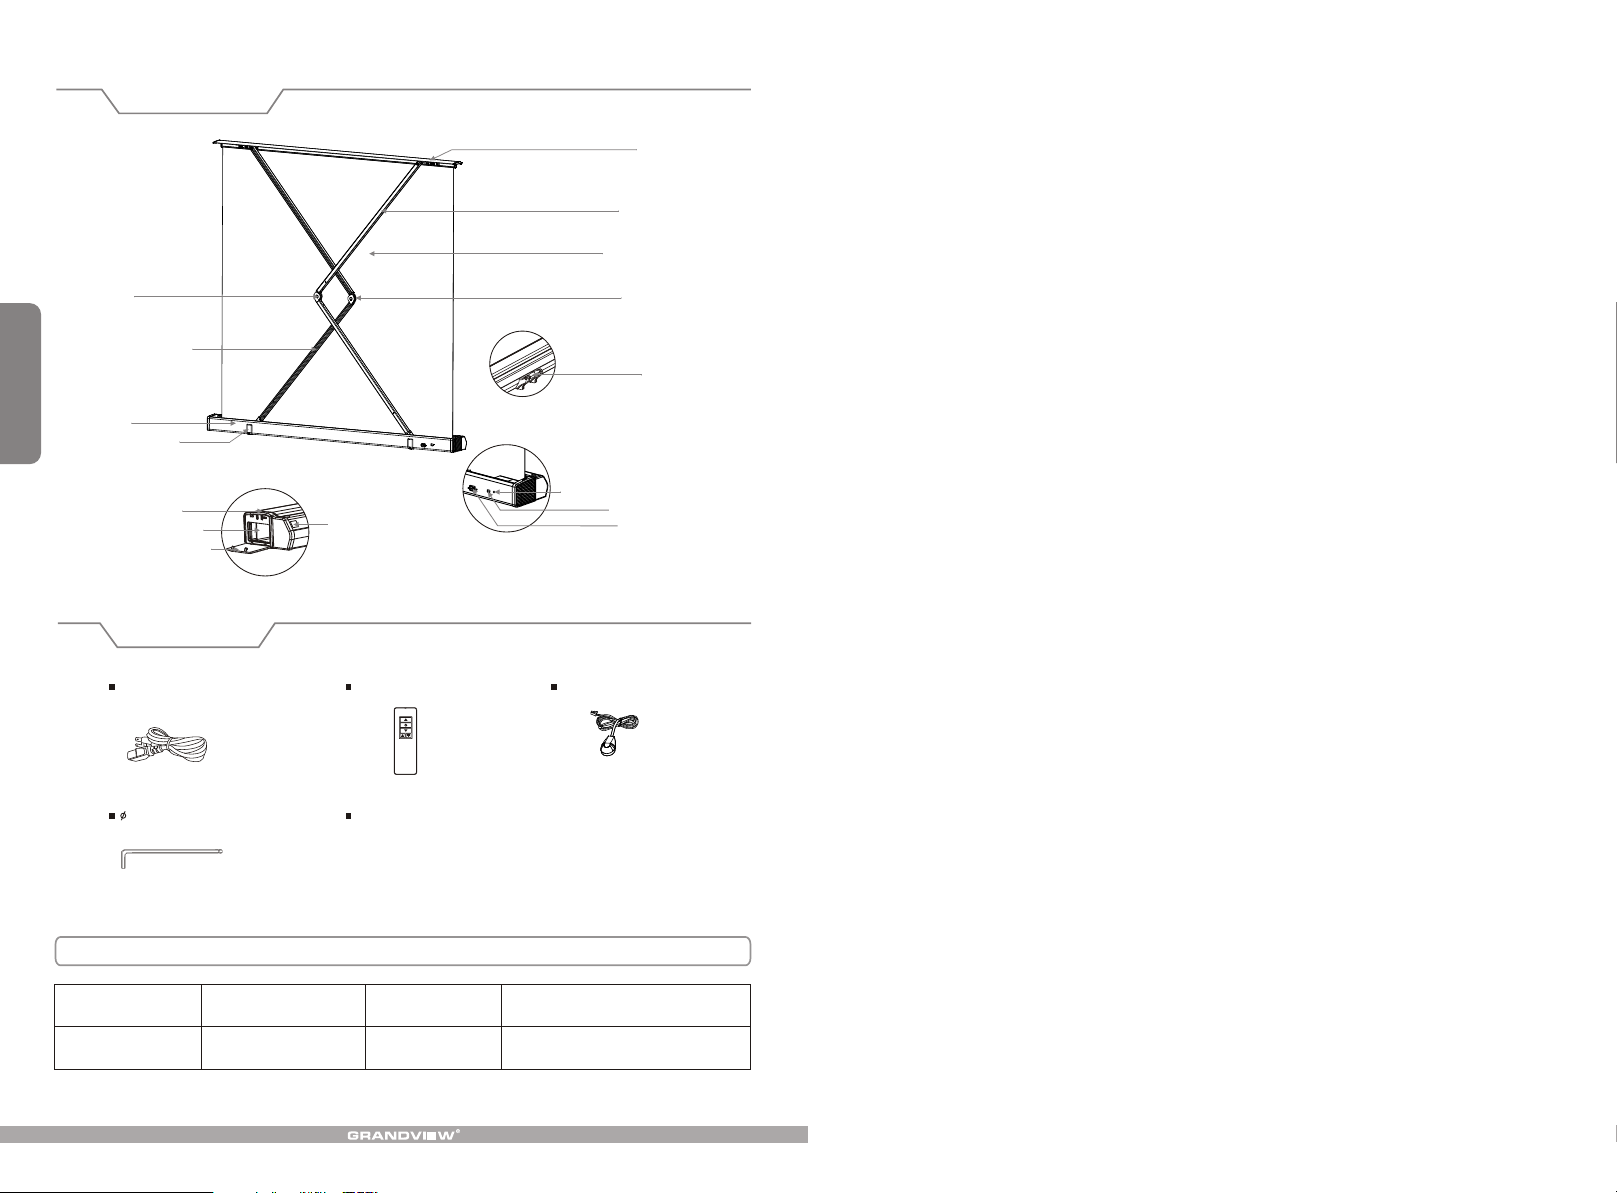
Top cap
Uphold bar
Screen fabric
1
Joint
Down hold bar
Base
Holding foot
Push button
Multifunctional box
Multifunctional box cap
Accessories
5mm Allen Key (1 )pc
Infrared receiving window
Installation Manual (1 )pc
Steel wire
Handle
Switch control button
Infrared jack
Power plug
Externnal IR Receicier (1 )pcInfrared controller (1pc)Power cable (1pc )
Cyber Motorized Portable Screen Power Specifications
Voltage
230V/120V/100V
Frequency
50Hz/60Hz
Watts
85W/85W
Applies to all Cyber portable
motorized screens
Application
Page 3
Notice
Instruction
1. To ensure safety, don't approach or touch the multifunction box on the right side of screen outer case
after you connect the screen with the power.
2. Don't put your finger inside of the case when you retract the screen fabric back to the case.
3. Don't hang anything or put any goods on the top of the screen case when your screen is ready to work.
4. Dusty or scratch on the screen will damage the image of projection, Please pay much attention for the
following points:
a. do not touch the screen surface by hand.
b. do not drawing on the screen surface.
c. do not scrape or scratch the screen, doing so with hard materials can cause damage.
d. Never use chemicals to wash the screen surface.
5. Make sure there isn't any gnat or things before you retract the screen back to the case.
6. The motor will stop working after 4 minutes using according to the self-protect purpose, When it happen,
5
you had to wait for 2 minute after the temperature of the motor come down.
7. There is no need for you to add the lube to the motor. And the motor is already in the right position in the
production. Do not adjust the motor by yourself. Please call the specialty to help you on this.
Motor adjusting slot
First, open the package and take out all the parts from the box, make sure all the parts are
available in the box and operate it according the manual.to
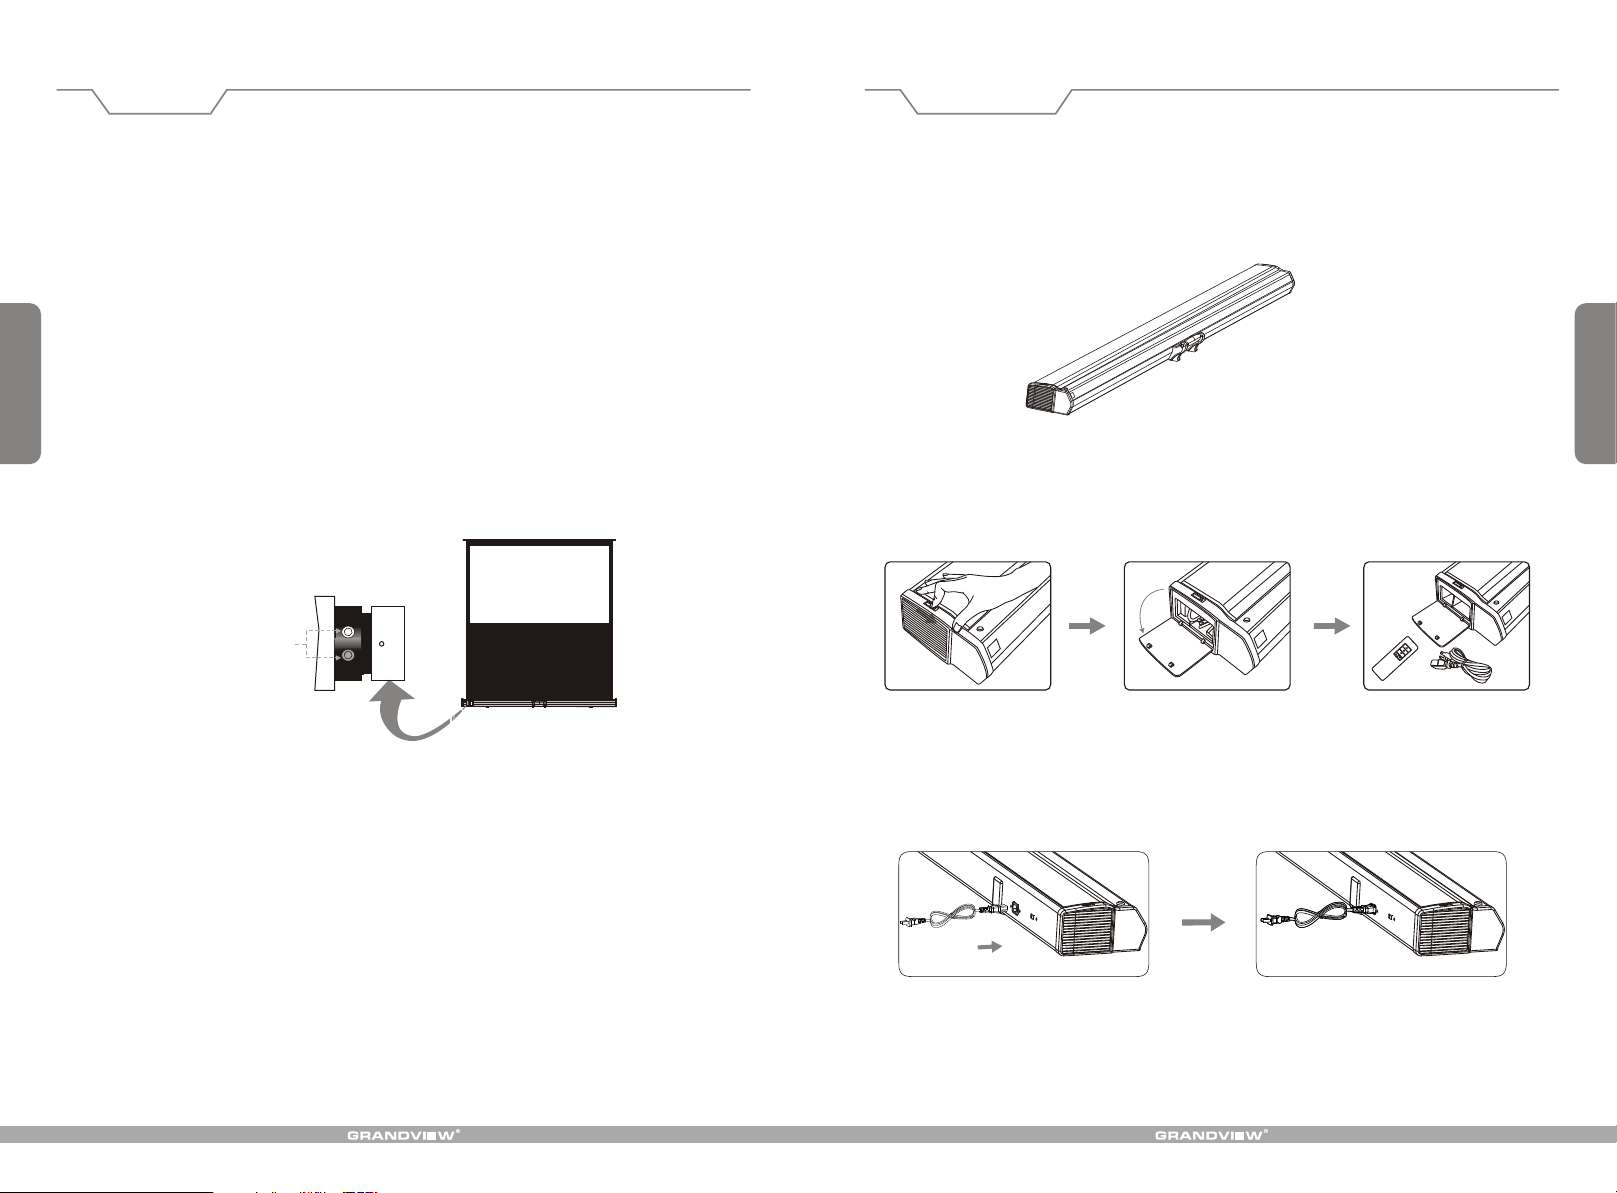
1. Put the screen on the flat ground or on the flat table. ( Figure 1)
Figure 1
2. Push forward the button which lies on left side of the case slightly to open the multifunction box,take
out the power line and push the remote control slightly and let it come out of the case automatic.
( Figure 2-4)
Figure 2 Figure 3 Figure 4
2
3. Connect the power line together with the screen out case by the plug of back side. (Figure 5-6)
(Please take notice the voltage and make sure it will be safety)
Figure 5 Figure 6
Page 4
Control method
Instructions
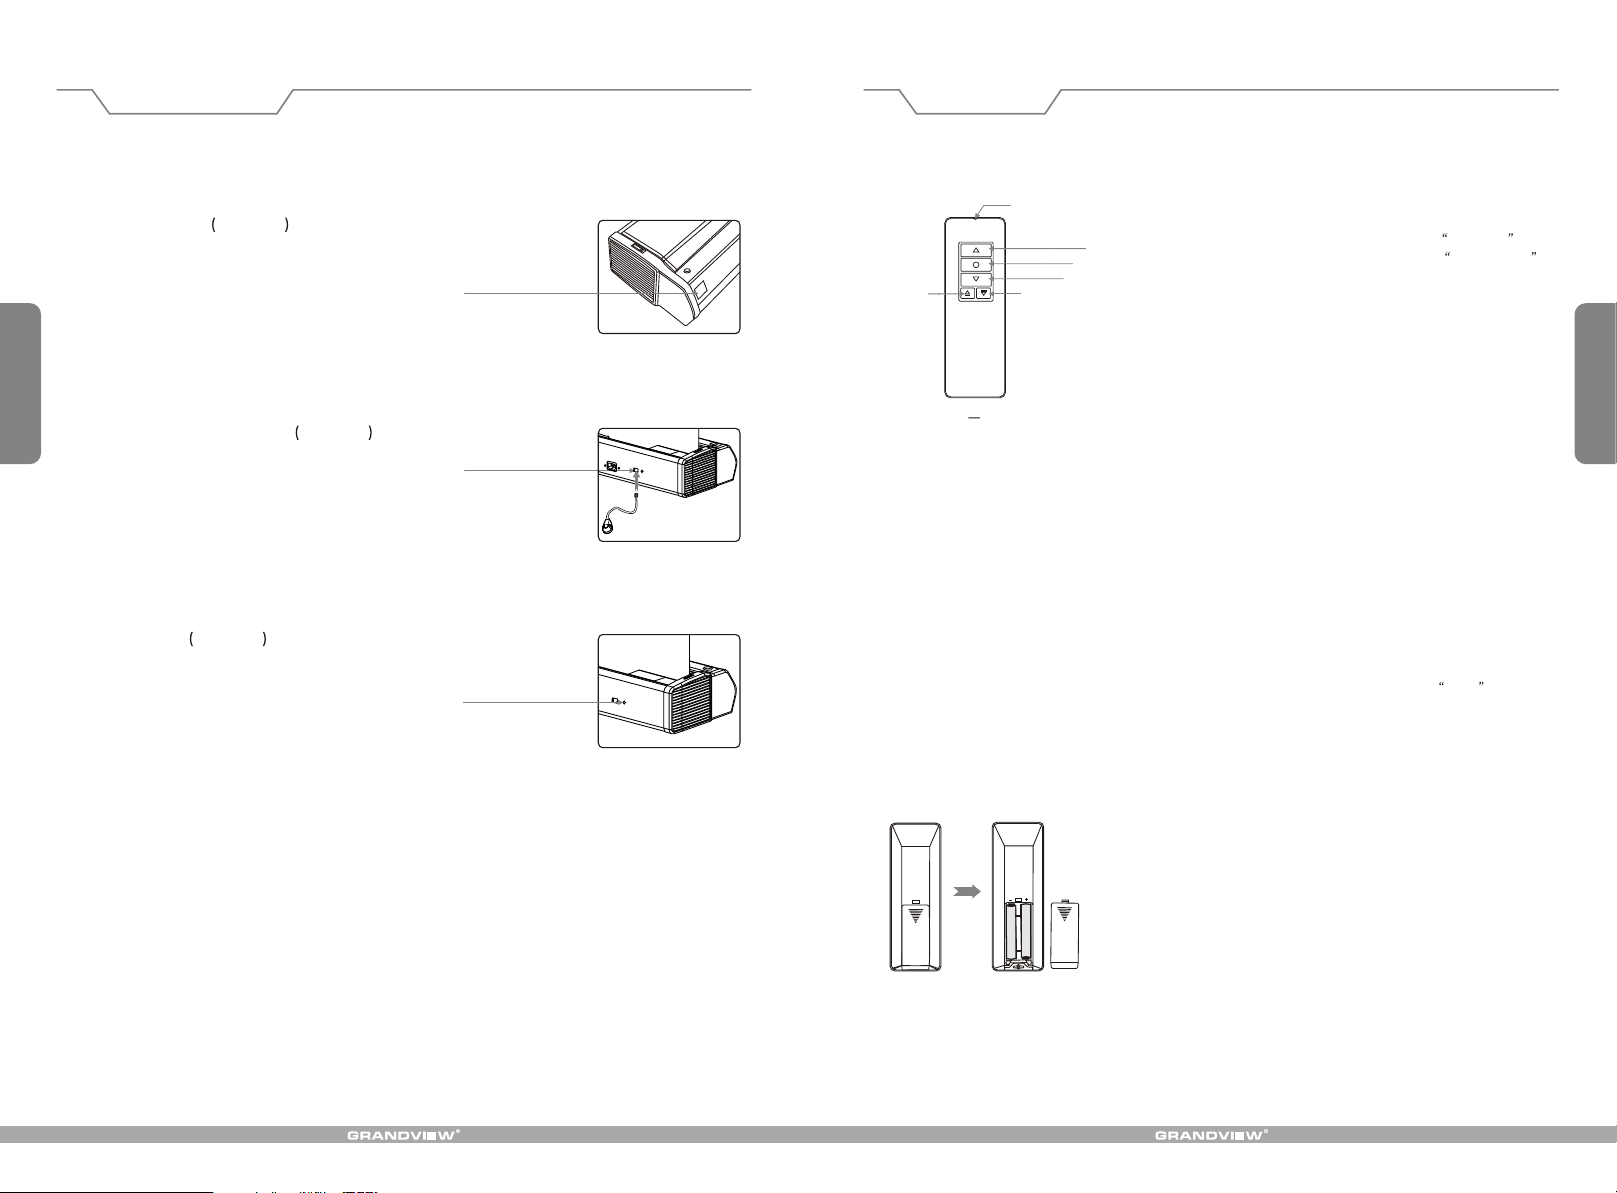
The motorized screen can be controlled by built-in IR, IR receiver with cable & switch control.
1. Built-in IR control Figure 7
When the built-in IR receiver works without anything
blocking, you can control the screen up, down, or stop.
Infrared receiving window
3
2. IR receiver with cable control Figure 8
You can also connect the IR receiver with cable and
extend the receiver once for special condition.
3. Switch control Figure 9
If you cannot control the screen by IR or for any external
reasons, you can press the switch control button to
control the screen instead.
Infrared jack
Switch control button
Figure 7
Figure 8
MICRO-UP
1GD IRAn
LED remote controller
UP
STOP
DOWN
MICRO-DOWN
Controller button instruction
1.To raise screen press "UP .
2.To hold screen at desired position press STOP .
3.To lower screen press DOWN .
4. To raise the screen little at your desired position press MICRO-UP
5. To lower the screen little at your desired position press MICRO-DOWN
Manual Control Instructions
If you don't use the Infrared controller , the screen canbe controlled directly
through the button on the receiver.
Motor Direction-Conversion Switch (SW1) Instruction
When using controller or manual control to control the screen , if the screen
can't work properly (i .e. Press UP but screen goes down. While press DOWN
screen goes up.), you need to press SW1(figure 2) to make it work normally .
Caution:
The shortest distance between receiver and controller is 0.5 meter.
1.
.Controller work within 30 degree away horizontally from the center of r eceiver
2 will
point within 8 meters from the screen .
.The controller not work the signal was coveredby something.
3 will if
.Keep the controller far away from high temperature and humid situation.
4
.Please change the battery when the signal is weak.
5
.Please take the battery out if the controller was not being used for long time.
6
.Please choose the same type battery as original supplied.
7
Electricity will be cut off from the receiever 3 minutes after use , but it will
8.
remain on stand-by.
off the electricity or take off the plug.
When pressing the button to control , you will hear da-da from the
9.
receiver, which means it isworking normally.
"
""
""
"" " "
If the receiver won't be used in a long time, please cut
4
Figure 9
How to install the battery:
1.Turn the controller around, push to open the cover as
guide arrow.
2.Put the battery in according the guide of cathode and
anode.
3.Close the cover.
 Loading...