

Page 1
GRANDVIEW REPRODUCING GENUINE COLORS
GRANDVIEW REPRODUCING GENUINE COLORS
Instruction Manual for
Cyber Portable Series Pull-Up Screen
Grandview Crystal Screen Canada Ltd.
#11- 3751 No rth Fraser Way,
Marin e Way Busin ess Cent re,
Burna by, BC, Cana da V5J 5G4
Tel: 1-604- 412-97 77 Fax: 1-604- 412-9796
Websit e: www.grandvi ewscreen.c a
Guangzhou Grandview Crystal Screen Co., Ltd.
P.O. 511400 Feder al Ind. Zone No. 3 63, Yushan West Roa d,
Shiqi ao, Pany u District, Gu angzhou, Gua ngdong, Chin a
Tel: +8620- 8489-9 499 Fax: +8620 -8480-3343
Websit e: www.grandvi ewscreen.c om
www.grandv iewscr een.com.cn
Model:CB-Uxx
Thank you for purchasing a Grandview projection screen.
Before use, please read instructions carefully. After installation, store instructions for future reference.
Page 2
1
The model is a portable pull-up screen,the design is compact and lightweight.It is suited for
various venues such as business presentation boardromm home theathes and other
、 、 、
ententainment sites.
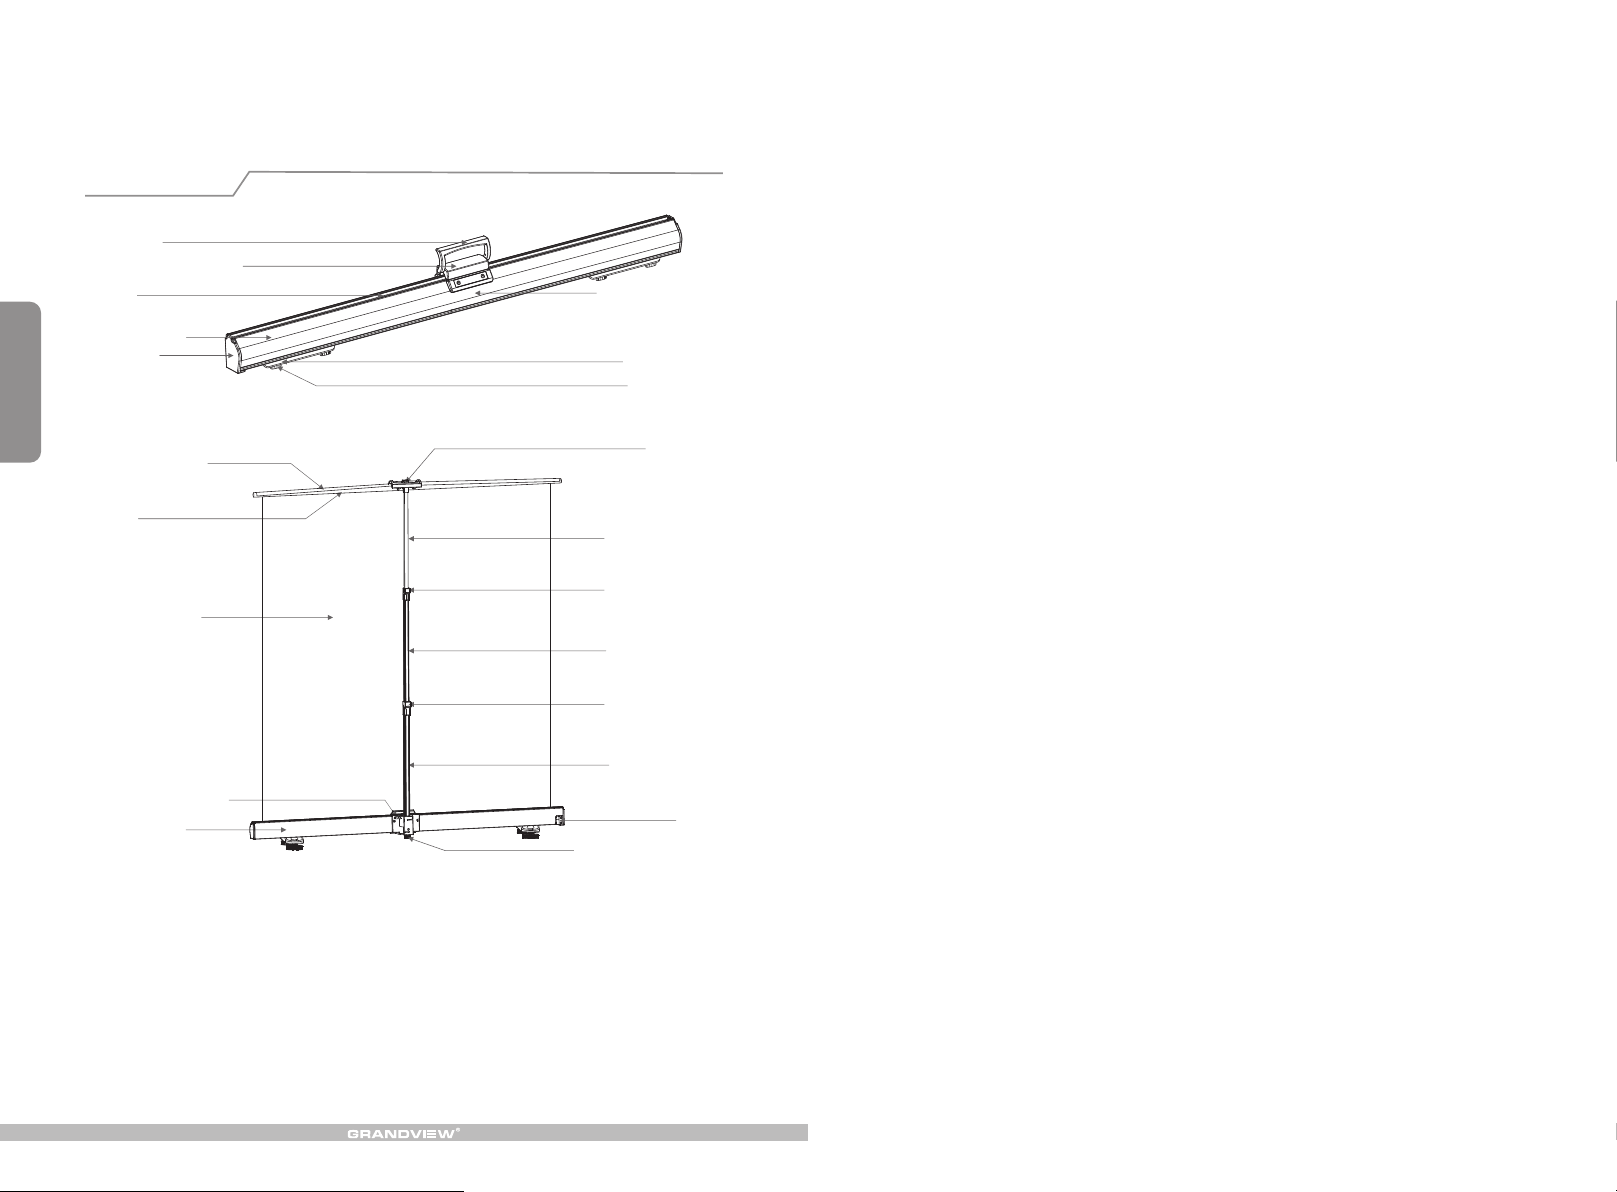
Description
12 Handle
13 plastic han dl e ba se
2 Tube
1 Front casing
4 End cap
14 Tube lock base
(front & back)
5 Support foot
6 Foot wheel
3 Semicircle t ub e
2 Tube
16 Screen fabr ic
15 Tube lock acti vi st
1 Back casing
Casing Assembly
1. Ca si ng ( front & b ac k)
2 .Tu be
3 .Se mi ci rcle tu be
4 .En d ca p
5 .Su pp or t foot
6 .Fo ot w he el
7 .Cl ip
①
②
Upload Bar Assembly
8. Up ho ld b ar ① ② ③
9. Top lo ck
10. Uph ol d locke r
11. He ig ht adju st me nt wh ee l
Hook & Lock Assembly
12. Han dl e
13. Pla st ic hand le b as e
14. Tube l oc k ba se
(fr on t & ba ck)
15. Tube l oc k activ is t
9 Top loc k
8 Uphold bar ①
10 Uphold lock er
8 Uphold bar ②
10 Up locker hold
8 uphold bar ③
7 Clip
11 Hei gh t ad justment
wheel
Screen
16. Scr ee n fabri c
Page 3
Warnings
Installation
5
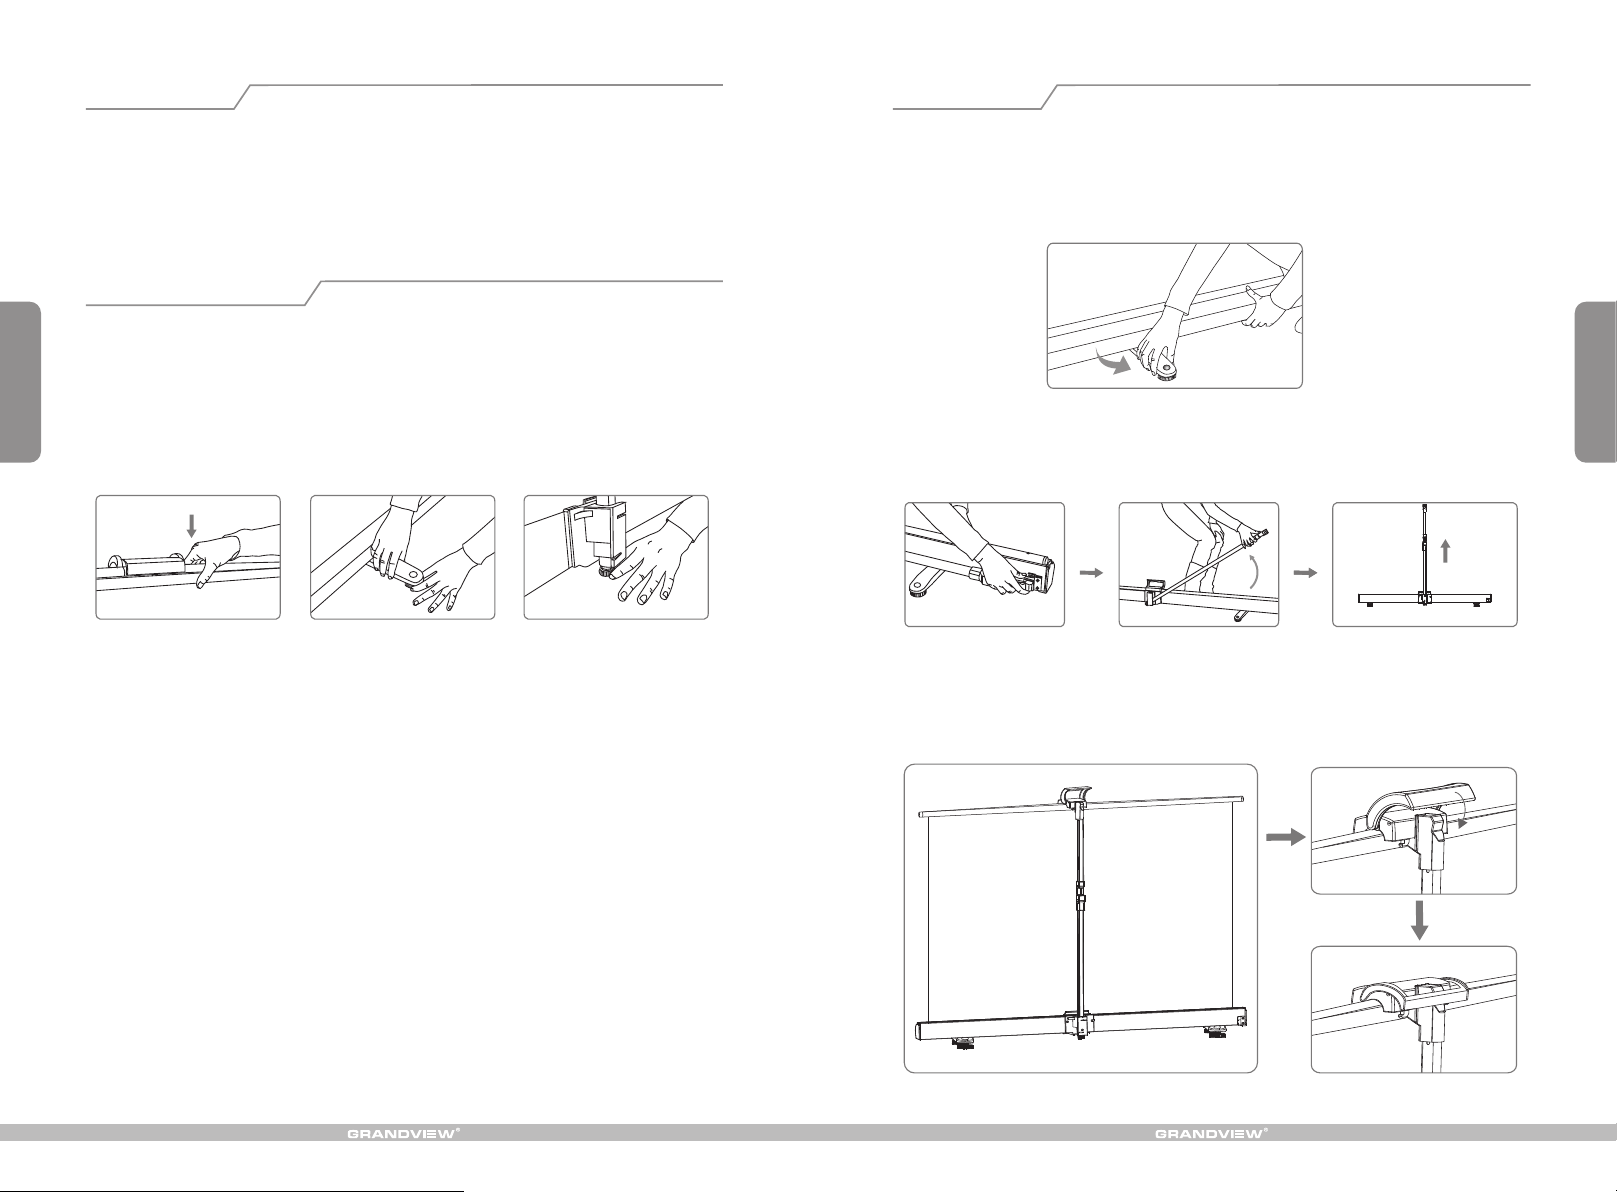
1.Control t he u ph ol d bar simultaneou sl y pu sh in g the uphold lo ck er w hi le p ul l up or down th e
screen. Ot he rw is e th e screen will b e da ma ge d by fast down out of c on tr ol .
2.Be sure t he h an dl e ba se were locke d in to t he f as tener at the to p of u ph ol d bar stable, and
the han dl e we re f as tened on the ho ld er a t th e to p of uphold bar.
Malfunction solutions
1.
Screen Fabr ic is not smo oth when sc reen is unf olded.
a. Hold and push s li gh tl y fi xe d tu be i n th e mi dd le o f po si ti on o f tu be u nt il l loose from the
semicirde tube . (F ig ur e 14 )
b. Adjust the foo t wh ee l of s up po rt a nd h ei gh t ad ju st wheel.(Fig ur e 15 -1 6) ment
Figure 14 Figure 15 Figu re 1 6
The fixe d holding b ar can not be r aised whe n it is in use.
2.
a.Check whet he r th e up ho ld b ar i s ve rt ic al t o th e ou te r ca se o r re fe r to I ns ta llation Step3.
Open Scr een
1.Put the screen o n th e gr ou nd , in a p ro pe r po si ti on , fa ci ng t he p ro je ct or. Turn the support foot
(5) out untill the y ar e pe rp en di cu la r to t he s cr ee n ca si ng ( 1) . (F ig ur e 1)
Figure 1
2
2.Lift the uphold bar ③ ② ( 8 ) 90 degrees vertic ally until it clicks. Raise the uphold bar (8 ) while
simultaneously pushing the uphold locker(10) .(Figure 2-4)
Figure 2 Figure 3 Figure 4
3.Pull up the sc re en b y gr as pi ng t he h an dl e( 12 ) an d lo ck t he h an dl e ba se o n the fastener at the
top of uphold ba r( 8) . (F ig ur e 5- 7)
Figure 5
Figure 6
Figure 7
Page 4
Retract screen
3
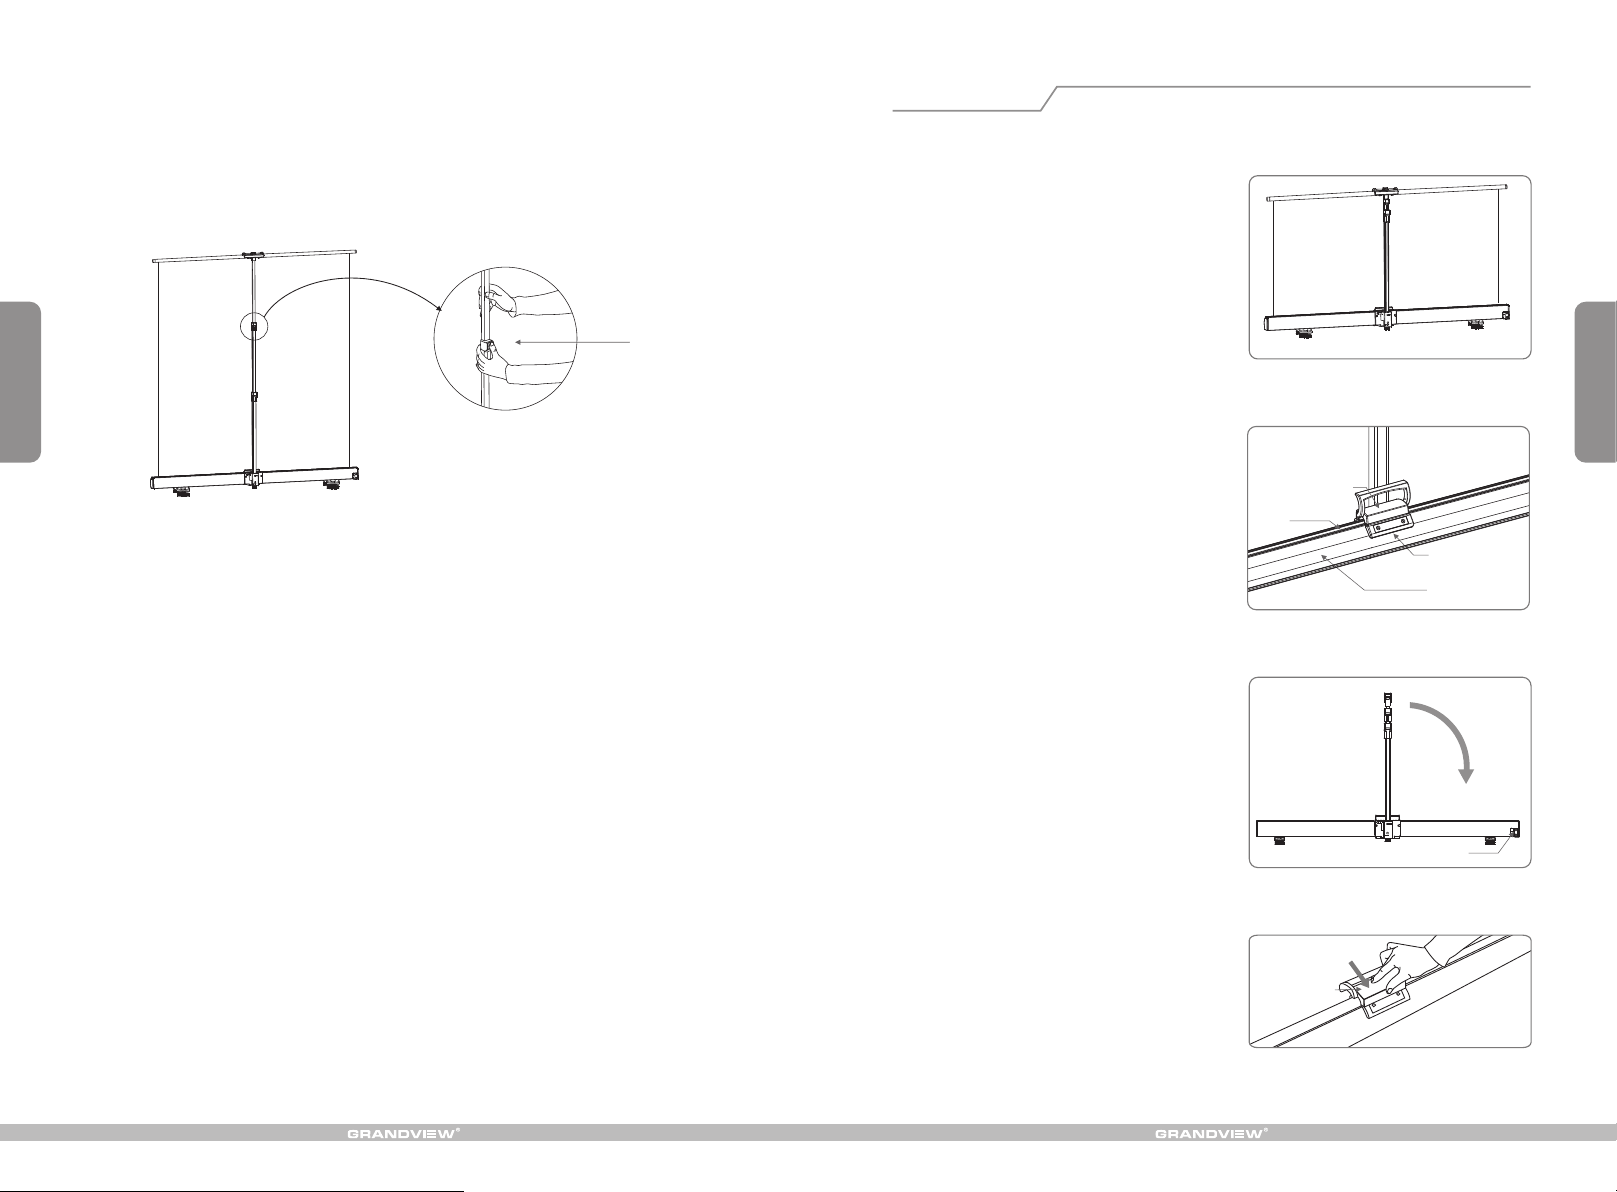
4.Pull up and l oc k th e up ho ld bar(8) to the de si re d he ig ht . The sc re en i s fu ll y released . Th e
screen he ig ht c ou ld b e ad justed to 6 diffe re nt levels by adjust in g lo ck in g po sition of uphold
bar. (Fi gu re 8 )
8 ①
Button
8 ②
8 ③
Figure 8
5.To get the flat scre en b y ad ju st in g fo ot w he el .w he n it w er e de cl in ed .
please retract the screen for store.
1.Push the uphold locker using one hand
simultaneously pull down the uphold bar ( 8① )
with another hand . Repeat the same action to
low down the uphold bar (8②). (Figure 9)
2.Remove the handle fromthe fastener at the
top of uphold bar .Grasp the handle, lower the
screen to allow it retract into the case. Be sure
the handle base connected with tube lock base.
(Figure 10)
3. F ol d d o wn an d l o ck up h old b a r ( 8 ) to it s
. Ret urn th e s upp o rt fo o t to ori g in a l
cl i p( 7 )
pos iti o n.( Fig u re 11)
③
13 plastic hook base
2 Tube
8 ③
14 Tub e lock ba se
(fr ont & bac k)
1 Fro nt casi ng
Figure 9
4
Figure 10
Figure 11
4.Be sure the screen is completely stowed and
locked before carrying the product by handle ,
even if the screen could be locked automatically
while the uphold bar were locked in the clip.
(Figure 12)
Press g en tly
13 Plast ic handl e
base
7 Uphol d ba r fi xer
Figure 12
 Loading...