

Page 1
GRANDVIEW REPRODUCING GENUINE COLORS
GRANDVIEW REPRODUCING GENUINE COLORS
ISO9001:2000
International Certification
Grand view Cr ystal Screen Canada Ltd.
#11- 3751 Nor th Fraser Way,
Marine Way B usiness Cent re,
Burnaby, BC , Canada V5J 5G4
Tel: 1-604-41 2-9777 Fax: 1- 604-412-97 96
Website : www.grandvie wscreen.ca
Guang zhou Gr andvi ew Crystal Screen Co., Ltd.
P.O. 511400 Federa l Ind. Zone No. 36 3, Yushan West Road ,
Shiqiao , Panyu Distri ct, Guangzho u, Guangdong , China
Tel: +8620-84 89-9499 Fax: + 8620-8480- 3343
Website : www.grandvie wscreen.co m
GRANDVIEW REPRODUCING GENUINE COLORS
Thank you for purchasing a Grandview projection screen.
Before use, please read this manual carefully. After installation, keep this manual for future reference.
Model CB: -Sxx
,
Cyber Speed Control Pull Down User s M anual
Page 2

1
6
Do not take apart and replace with unknown parts. If there are any problems, please contact your local dealer.
Product specifications are subject to change.
The warranty will only be valid if you follow the instructions below carefully! Improper use and care may cause
serious injury and/or damage!.
Make sure the Fixing screw be fastened when using the wall bracket, to avoid any damage.
Make sure the surface you have chosen for installing the screen is flat and secure.
Please read the following as any damage to the screen surface will impact the image's quality:
1. Do not touch the screen surface by hand.
2. Do not write or draw on the screen surface.
3. Do not poke the screen surface by finger or edge tools, as it may cause scratches or tears.
4. Do not use any detergent or cleaning products to clean the screen surface, please clean it with a soft cloth
and lukewarm water.
Retract the screen after every use.
Ensure the screen is level when it is wall-mounted installation, when the screen is spread, it should be
balanceable with the wall.
Do not pull two sides of the screen fabric by hands, do not fold the screen fabric.
To prevent unnecessary damage, the operation and maintenance of the screen should be done by adult.
Ignoring the safety warnings may lead
to injuries or damaging the product.
The screen should be installed at secure
place to avoid any accidents or the screen
falling down.
Avoid hanging anything on the screen
as it may cause the screen to fall down.
Retract the screen after every use.
Leave it hanging for a long period may
cause screen fabric loose
Please contact your local dealer for repair
or maintenance, and contact us if you have
any further questions. Avoid taking apart the
fixtures by yourself. Loose parts may cause
the screen fall down.
Warnings
Locki ng screw
Screen fabric
Handle
Aluminium casing
Description
Accessaries
Floati ng wall bracke t
Float ing wall b racket(2 pcs )
5×40mm Tapping screw & cap (8sets)
M5x10 S crew (6 pcs)
Instruction manual (1pc)
Hanging bracket (2pcs)
Top panel
Upper h ook
Baffle
Lower h ook
Page 3
2
5
Take out all the parts from the packaging to ensure you have all necessary components.
There are three installation measures for this product, namely wall mount, ceiling mount and ceiling hang. The
installed distance can be changeable up to your needs via adjusting the slipper block, while the ideal position is the
mounting bracket is at its nearest point to the end cap, which can reduce unnecessary vibration or noise.
Installation
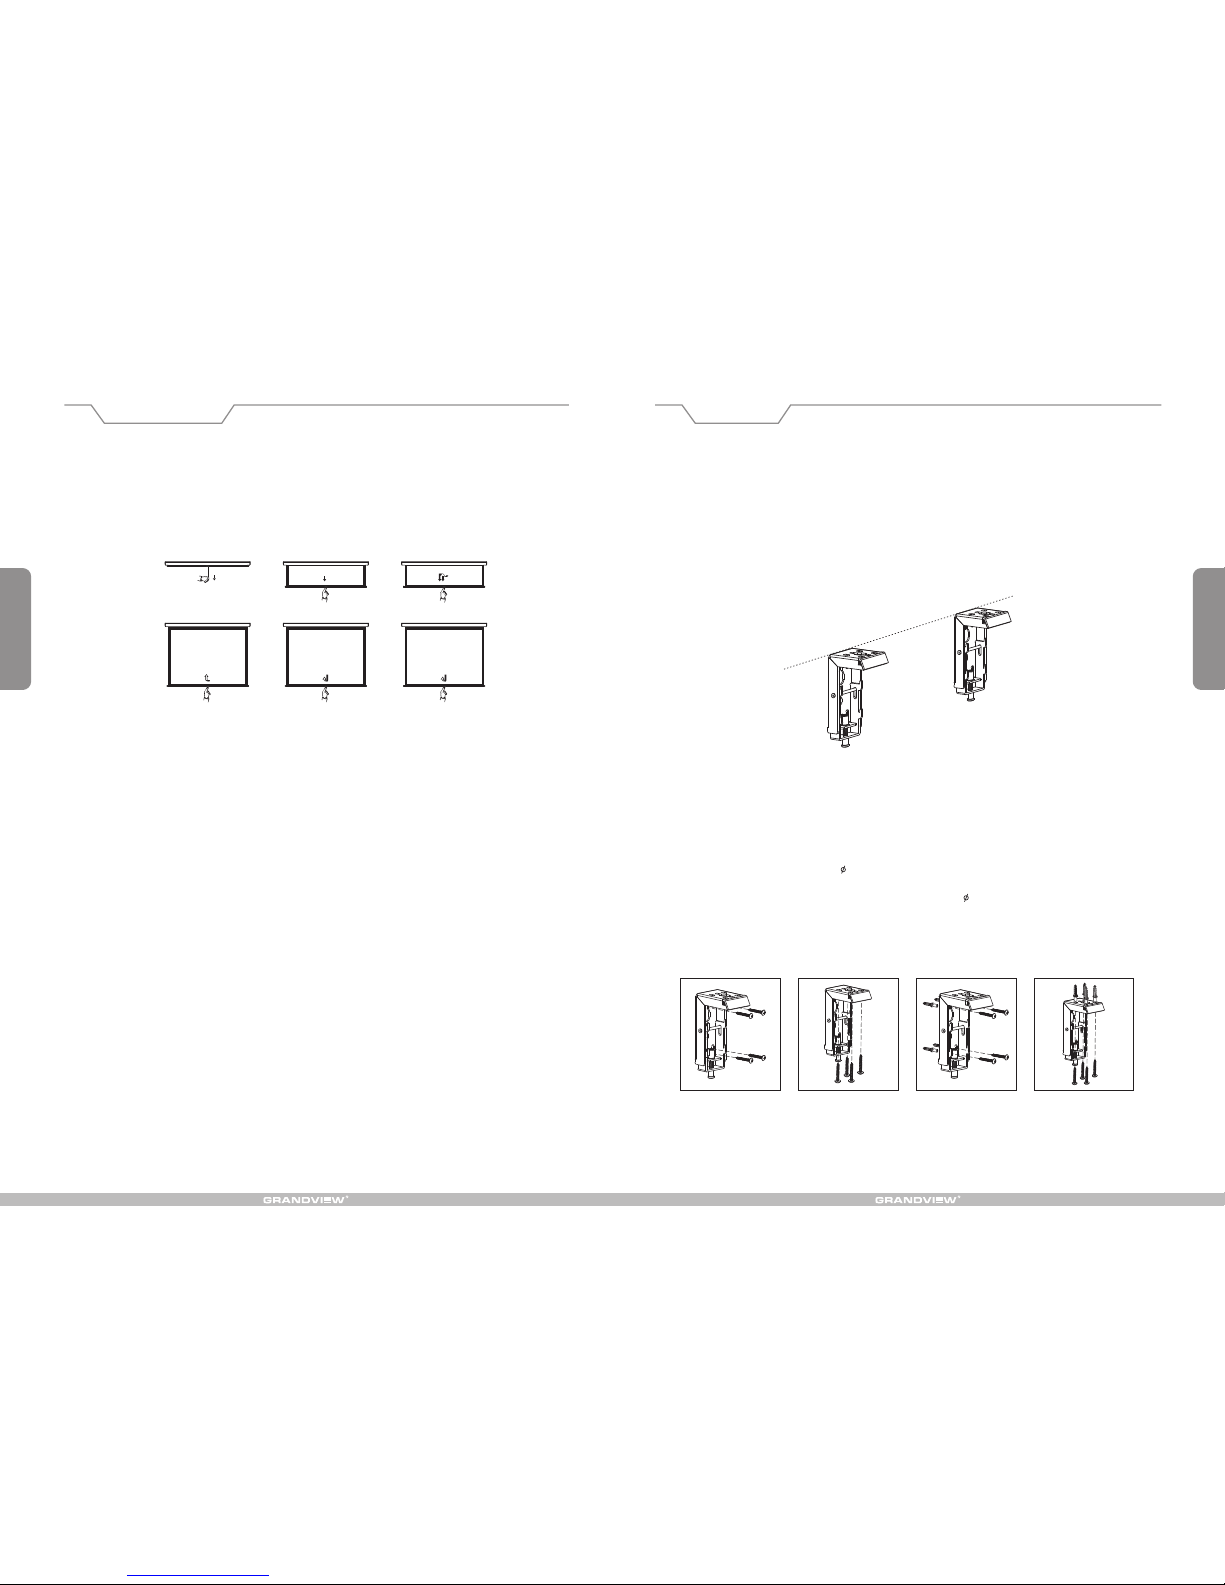
1. Mount the wall/ceiling brackets using the appropriate screws for your supporting material.
2. Ensure the brackets are horizontal and near the ends of the casing. Fasten to the wall or ceiling, not both.
( Figure 1) .
Figure 1
Wood wall installation
Wood ceiling installation
Concrete wall installation
Concrete ceiling installation
Figure 2 Figure 3
Figure 4 Figure 5
Wall and c eili ng installa tion :
Insta llatio n Steps
a) Wood sup porting mate rials: Drill i n the 5 x 40 screws through the appropri ate holes in the bracket
( Figure 2 -3 ).
b) Concr ete supporti ng materials : Install the anc hors and drill in t he 5 x 40
( Figure 4 -5).
screw s into the ap propriate
brack et holes .
Operat ion
1. Use rope to pul l down bottom rod un til within hand reach distan ce.
2. Lower the scr een by pulling dow n the handle. Once in position , hold for 3 seconds; the self loc king mechanism
will lock the sc reen into positi on
3. Retract the s creen by pulling d own the handle and then let go of it . The screen will retract at the c ontrolled
speed into the c asing.
Page 4
3
4
A
1
2
Ceiling hang installation
Up groo ve
Down gr oove
Fi gure 8 Fi gure 9
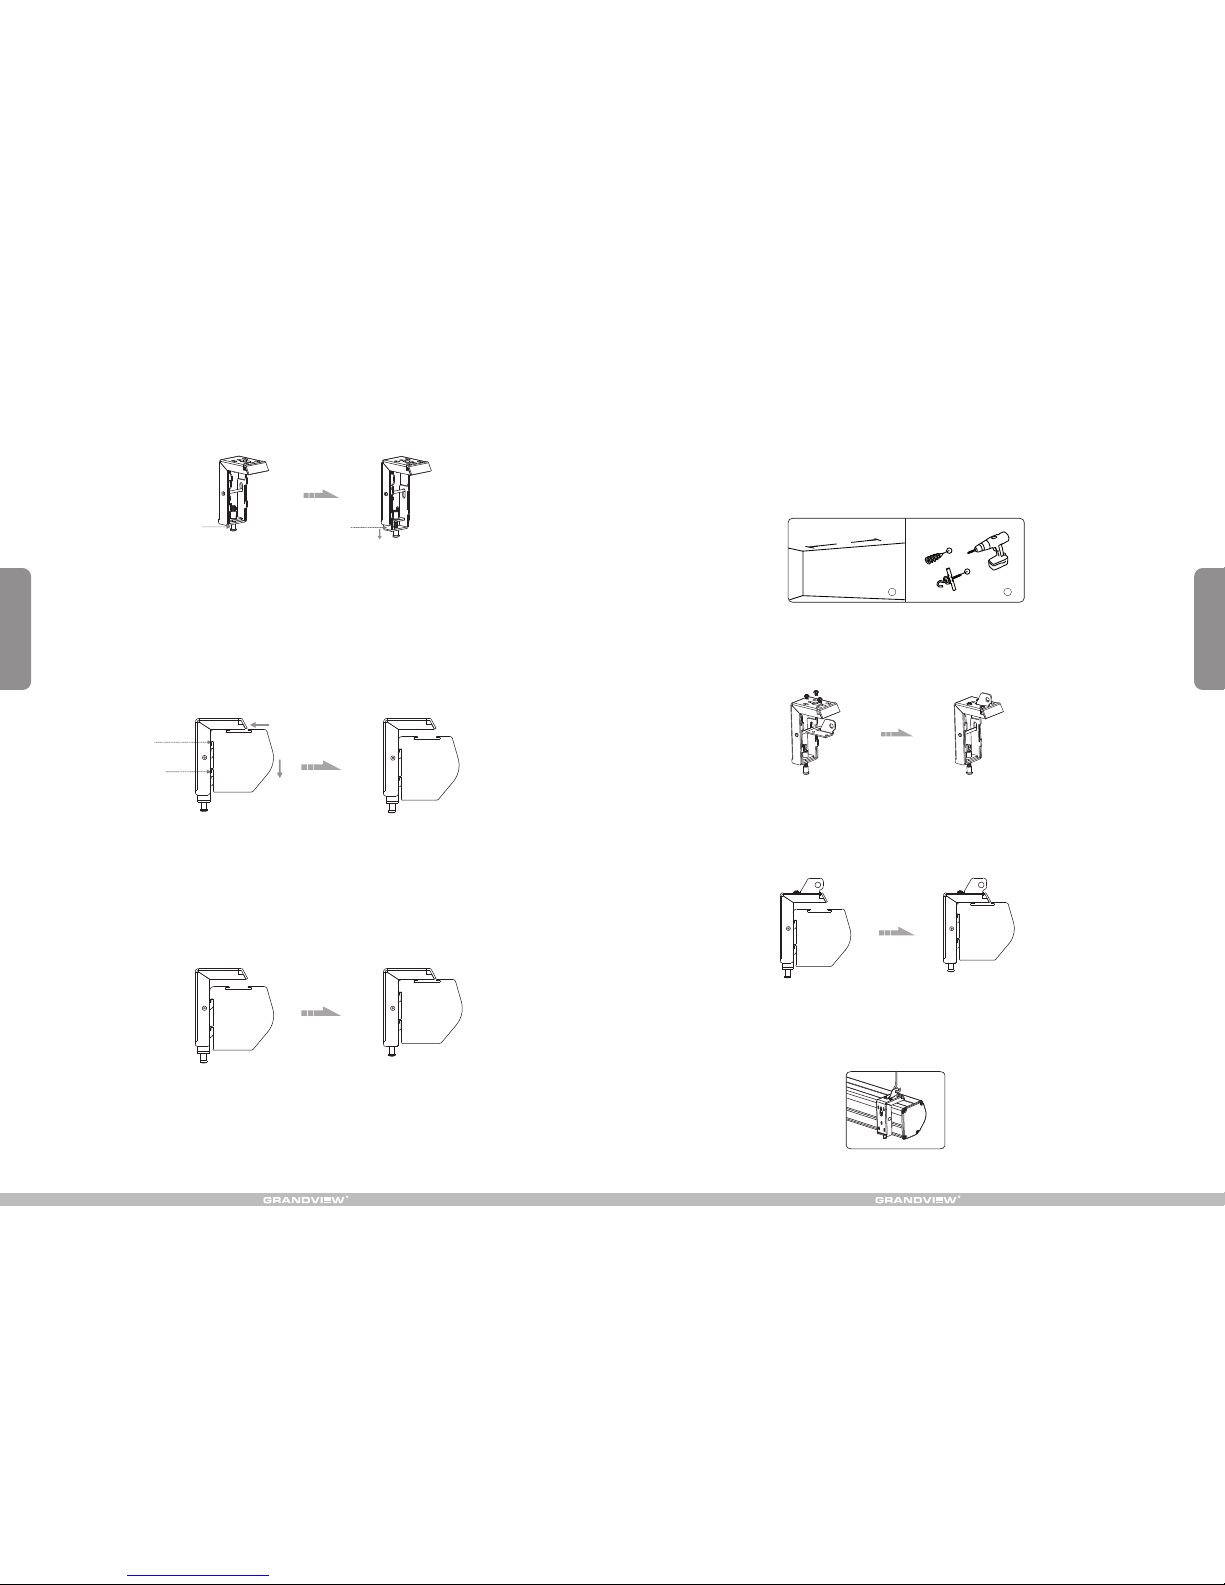
4. Mount the pro jection screen b y sliding the casing grooves o ver the bracket hooks. ( Figur e 8-9 )
5. Tighte n the lock ing screw to cla mp the screen se curely in plac e. ( Figure 10-11 )
Figur e 10 Figur e 11
3 ( Fi gur e 6-7 ). Lo ose n the lo ckin g scre w to low er the b racke t clam p all th e way do wn.
Figur e 6 Figur e 7
Baf fle
Fixing s crew
Each end of the screen casing needs to be supported by a hook (not provided). Ensure that the suspension system
(cable and/or hook) can support the weight of the screen.
1. To drill two same holes with an electric drill horizontally with wall, then fasten hangers (unprovided) onto the
ceiling. ( Figure 12 )
Figure 12
2. Use three M5x10mm screws to fasten the hanging brackets, to the wall and ceiling brackets as shown.
( Figure 13-14)
3. Attach the wall and ceiling brackets to the casing as shown in figures 15 and 16.
4. Place hooks through the hanging brackets to suspend the projection screen as shown. See figure 17.
Figure 13 Figure 14
Figure 15 Figure 16
Figure 17
 Loading...