

Grandtech 60648 Users Manual

DCM
Manual
Content
Introduction . . . . . . . . . . . . . . . . . . . . . . . . . . . . . ........ . . . . . . . . . . . . . . . . . . . . . . . . . . . . . . . . . . . 2
Inserting the battery . . . . . .. . . . . . . . . . . . . . . . . . . . . . . . . . . . . . . . . . . . . . . . . . . . . . . . . . . . . . . . .2
Charging the battery . . . . . . .. . . . . . . . . . . . . . . . . . . . . . . . . . . . . . . . . . . . . . . . . . . . . . . . . .. . . . . . 2
Switching the camera on . . . . . . . . . . . . . . . . . . . . . . . . . . . . . . . . . . . . . . . . . . . . . . . . . . . . . . . . . . 3
Taking your first picture .. . . . . . . . . . . . . . . . . . . . . . . . . . . . . . . . . . . . . . . . . . . . . . . . . . . . . . . . . . 3
Taking videos . . . . . . . . .. . . . . . . . . . . . . . . . . . . . . . . . . . . . . . . . . . . . . . . . . . . . . . . . . . . . . . . . . . 3
Playback mode . . . . . . . . . . . . . . . .. . . . . . . . . . . . . . . . . . . . . . . . . . . . . . . . . . . . . . . . . . . . . . . . . . 4
Image quality . . .. . . . . . . . . . .. . . . . . . . . . . . . . . . . . . . . . . . . . . . . . . . . . . . . . . . . . . . . . . . . . . . . . 4
Increase the camera memory with an SD card .. . . . .. . . . . . . . . . . . . . . . . . . . . . . . . . . . . . . . . . . . . 5
Inserting an SD card . . . . . . . .. . . . . . . ................. . . . . . . . . . . . . . . . . . . . . . . . . . . . . . . . . . . . . . . 5
Deleting unwanted images . . . . . . . . . . . . . . . . . . .... .. . . . . . . . . . . . . . . . . . . . . . . . . . . . . . . . . . . . 5
Downloading your images to your computer . . . . . ..... . . . . . . . . . . . . . . . . . . . . . . . . . . . . . . . . . . . 5
Using the Self Timer . . . . . . . . . . . . . . . . . . . . . . . . . . ... . . . . . . . . . . . . . . . . . . . . . . . . . . . . . . . . . . 6
Adjusting the white balance (WB) . . . . . . . . . . . . . . . . . ... . . . . . . . . . . . . . . . . . . . . . . . . . . . . . . . . 6
Adjusting the Exposure Values (EV) . . . . .. . . . . . . . . . . . .. . . . . . . . . . . . . . . . . . . . . . . . . . . . . . . . 6
Adjusting your camera settings . . . . . .. . . . . . . . . . . . . . . . . . . . . . . . . . . . . . . . . . . . . . . . . . . . . . . . 7
Camera maintenance . . .. . . . . . . . . . . . . . . . . . . . . . . . . . . . . . . . . . . . . . . . . . . . . . . . . . . . . . . . . . . 8
Technical Data . . . . . . . . . . . . . . . . . . . . . . . . . . . . . . . . . . . . . . . . . . . . . . . . . . . . . . . . . . . . . . . . . . 8
Conditions of warranty . . . . . . . . .. . . . . . . . . . . . . . . . . . . ... . . . . . . . . . . . . . . . . . . . . . . . . . . . . . 9
1

Introduction
Congratulations on the purchase of your new MINOX DCM. Like all other MINOX products this
digital Camera Module boasts the traditional values fostered by MINOX. It combines functionality
in the smallest possible space with excellent optical quality.
Fast and easy operation make the MINOX DCM an excellent tool for digital observation and digital
photography in combination with a spotting scope.
The MINOX DCM is ready to become your permanent companion and capture wonderful
memories in the modern way.
These instructions are to help you benefit from the full performance spectrum of your MINOX
DCM.
Enjoy photography with your digital Camera Module!
Introducing your DCM
Please take a few moments to read these Instructions and the Safety and Maintenance notes in the
last section of this manual.
Inserting the battery
Your camera uses a lithium-ion rechargeable battery.
You can recharge the battery using the provided accessory equipment.
We do not warranty for battery or camera damage caused by using any other method to charge the
battery.
To insert the battery hold the Camera Module with your right hand, with the monitor shield flipped
open and the back facing upward. Now open the battery compartment cover by opening the latch
with the thumb of your left hand and moving it to the side.
Slide the battery into the battery compartment with the metal contacts head first and close the
battery latch. Close the battery compartment.
Your photos will remain safely stored in the camera memory or on the SD card even if the batteries
are removed or replaced.
Charging the battery
Connect the switched off Camera Module using the provided USB cable to the USB connection of
your computer. This starts the charging process automatically. While the battery is being charged
a green lamp lights up in the proximity of the USB connection.
Charging is completed when the lamp extinguishes.
2
Switching your Camera Module On / Off
To switch the camera on press and hold the Mode button ON/MODE.
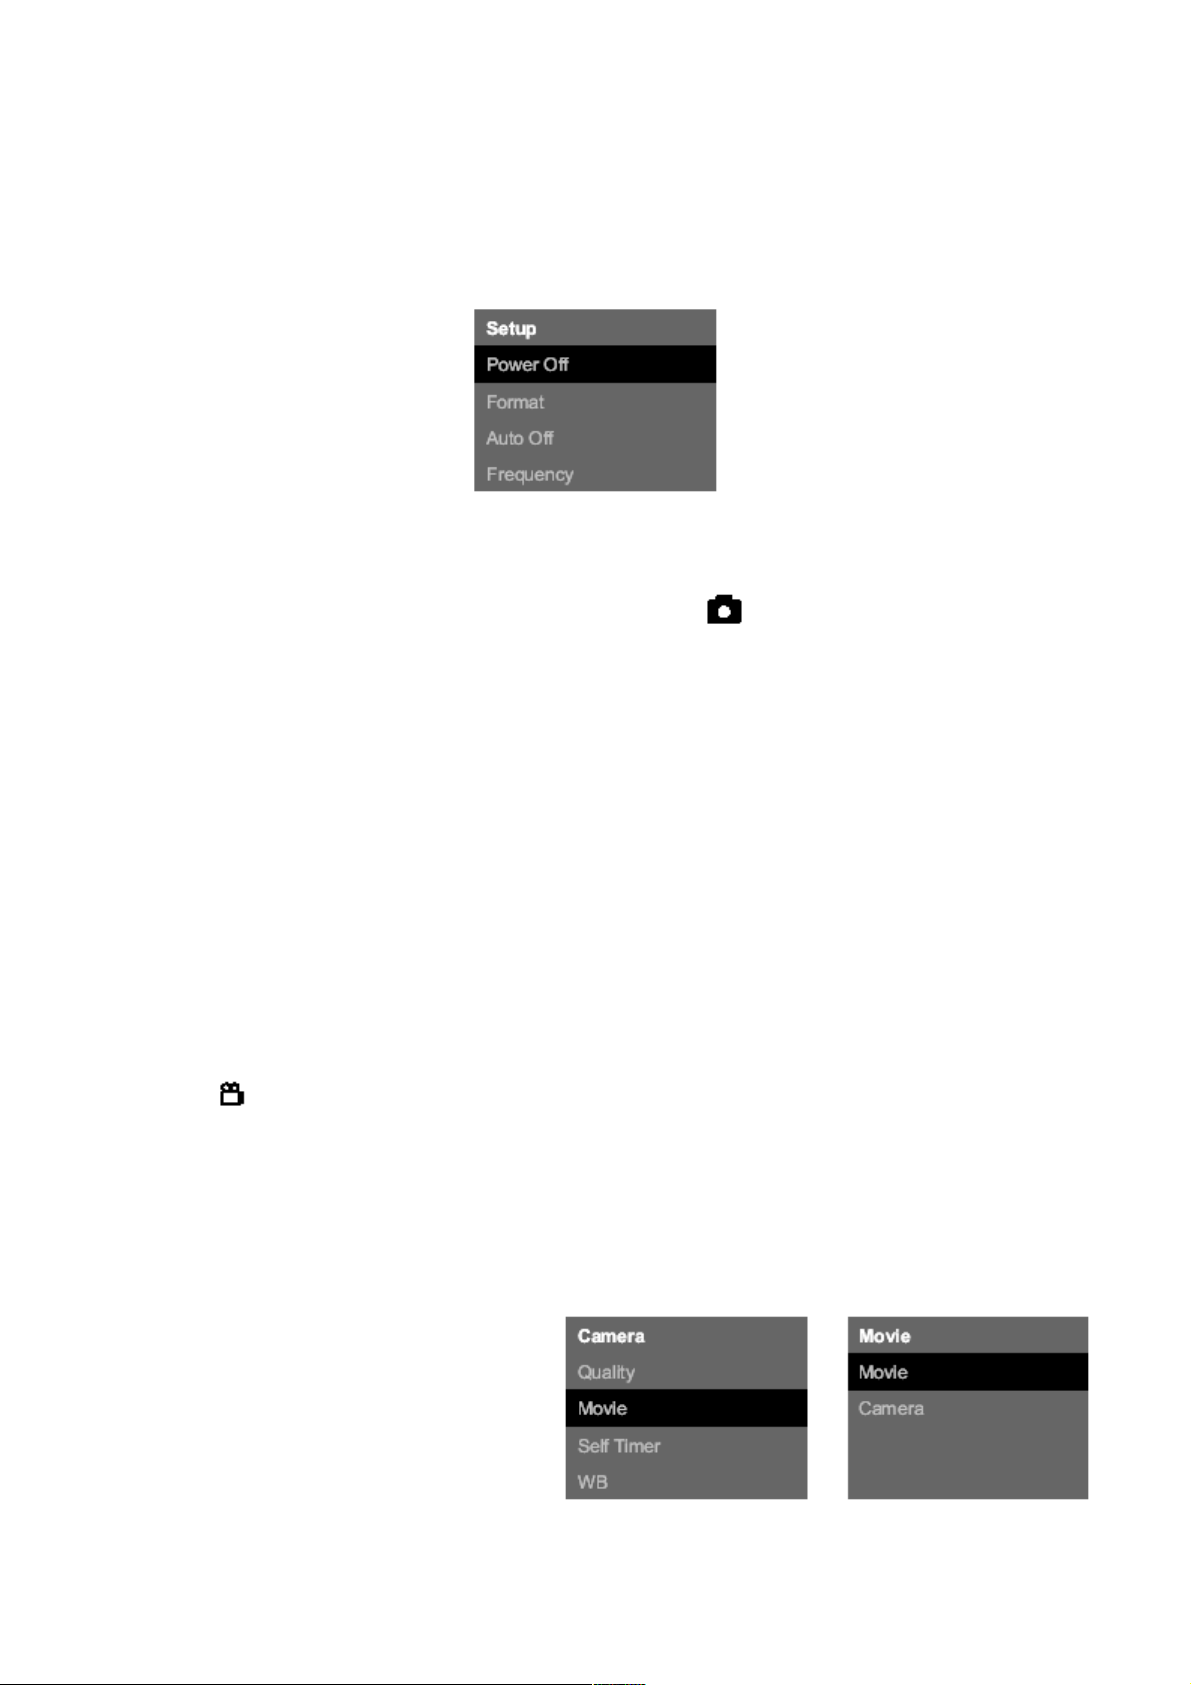
To switch your camera off, press the Mode button until the Setup menu appears. Press the Down
button until Power Off is selected and then press the shutter button to switch the camera off. Your
camera will automatically switch itself off if it is not used within 60 seconds, thus saving battery
power.
Taking your first picture
Frame your subject
When the DCM is switched on it is in Camera Mode and the symbol appears on the display. If
this symbol does not show, press the Mode button until it appears.
Digital zoom function
Frame your subject in the display on the back of the Camera Module.
To change the size of the desired image detail (zoom function) press the Up button (to zoom in) or
Down button (to zoom out).
Shoot the picture
Press the shutter button (RELEASE) to shoot the picture.
Taking videos
Select Video Mode
In the Photo mode, press the Select button (SEL/OK); the Camera Menu appears. Use the Down
button to select the option Video and then press the Select button (SEL/OK) again to get into the
Video Setup Menu. The Camera option is selected. Use the Down button to select the option Video
and then press the Select button (SEL/OK) to confirm the setting. The camera is now in Video
Mode, the symbol will show on the display.
Frame the scene
Frame the scene you want to take using the display on the back of the camera. To change the size of
the desired image detail (zoom function) press the Up button (to zoom in) or the Down button (to
zoom out).
Shoot the video
Press the shutter button (RELEASE) to start
the recording. Press it again to stop the video.
During the shooting you will see a red dot in
the display.
3
 Loading...