

Page 1

DSC Manual
Content
Operating controls and components P 2
How to use your MINOX DSC P 2
Charging the batteries P 3
Increasing the camera memory capacity with a Micro-SD card P 3
Switching on the MINOX DSC P 3
Shooting photos P 4
Taking videos P 4
Playback mode P 5
Deleting images P 6
Transferring images to your computer P 7
Fastening the safety chain P 7
Adjusting your camera settings P 8-9
Camera maintenance P 10
Technical data P 11
P 1
Page 2

Operating controls and components
On the DSC (camera)
- On/Off button
- Mode dial
- Up/Down buttons
- Shutter release
- Multicolor LED display
The multicolor LED display indicates the following:
Blue: you are in Photo or Video mode
Green: you are in Playback mode
Off: during the photo shoot
Red: during the video shoot
Red flashing: memory is full
Blue flashing: battery is low
Violet(red and blue): integrated flash activated
- Red LED display inside the viewfinder
The Red LED display indicates the following:
Flashing: memory is full or battery is low
On: during the photo shoot
- Safety eye (for attaching the safety chain)
How to use your MINOX DSC
Before using the DSC for the first time you have to remove the insulation tape and fully
charge the integrated batteries. To remove the insulation tape, open the battery
compartment cover of the DSC and the flash module. Pull the insulation tape out
completely. Close the battery compartment cover. Note: there is no power if the insulation
tape is not removed.
Note: When charging for the first time the batteries must be fully charged to ensure
maximum performance. Do not interrupt the charging process before the green light goes
out, indicating that the charging process has finished.
P 2
Page 3
Charging the batteries
Charging the battery in the camera (DSC)
Use the provided power supply cable (mini USB to USB) to connect the DSC to the USB
port of your switched-on computer. Charging starts automatically. To charge the battery of
the DSC without the computer you can use an optionally available AC Adapter. A green
LED lights up while the battery is charging. Charging is complete when the green light
goes out.
Increasing the camera memory capacity with a Micro-SD card
The MINOX DSC is equipped ex-works with a 128 MB internal memory, capable of storing
approx. 111 images. An additional Micro-SD card substantially increases the memory
capacity of your DSC. The MINOX DSC supports Micro-SD cards with a
capacity of up to 16 GB. Micro-SD cards are available from photo dealers and electronics
stores.
Inserting a Micro-SD card
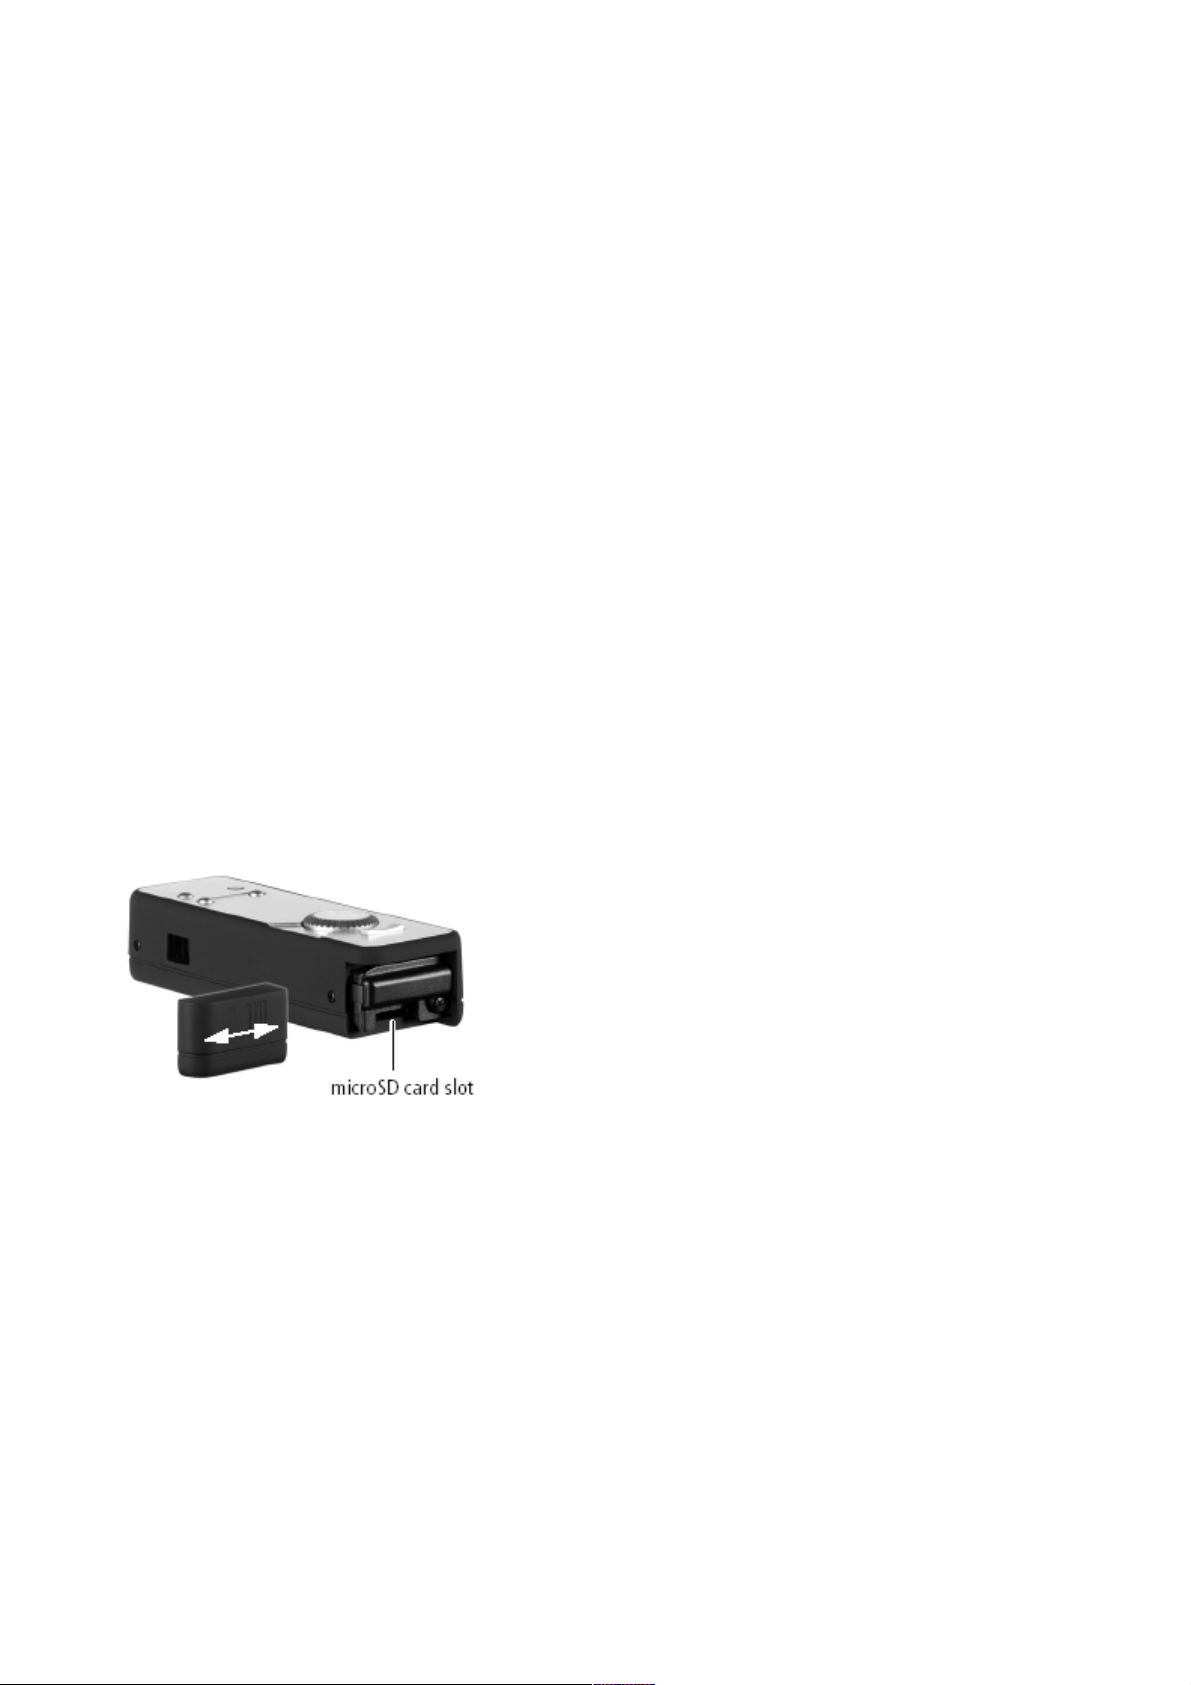
Open the battery compartment cover of the DSC and insert the Micro-SD card the right
way up (with the gold contacts facing upward) into the Micro-SD card slot. The SD symbol
appears on the monitor.
Important: Inserting the Micro-SD card blocks the internal memory. All new photo and
video shootings will now be stored on the Micro-SD card. The internal memory is only
available until you remove the Micro-SD card. You should do formatting after inserting a
new Micro-SD card. Please refer to “Format the internal camera memory or Micro-SD
card”
Switching on the MINOX DSC
To switch the DSC on press the On/Off button and hold it down until the LED lights up blue
(in the Photo/Video mode) or green (in the Playback mode).
The switching on of the DSC takes effect with a delay of a few seconds to avoid any
unintentional switching on of the MINOX DSC.
To switch the DSC off press the On/Off button and hold it down until the LED goes off.
P 3
Page 4

Shooting photos
Framing the subject and shooting the picture
Set the mode dial to the desired Photo mode. With connected and switched on flash
module the -symbol appears on the monitor. Frame the subject you want to shoot
through the viewfinder or in the monitor of the connected flash module. Adjust the
distance ring to a suitable range of your object accordingly. Press the shutter release to
capture and save the picture. The LED display extinguishes during the shot and
the respective saving process. The LED display then lights up blue again to signal that the
DSC is ready to take the next shot.
Using the flash(Up button)
Press the Up button to activate the flash function in Photo mode only. The LED display
now lights up violet (red and blue) to indicate the flash is enabled.
When switched on the flash is controlled automatically and only operates when there is
insufficient light.
If the flash module is not connected the LED flash in the camera is used. It is immediately
ready for use.
When the flash module is connected, this flash is used instead of the internal LED flash.
After enabling the flash, the green lamp(LED) on the flash module lights on to indicate the
flash is ready for operation. The time it takes to signal that the flash is ready can vary,
depending on the charge status of the battery.
Press the Up button again to deactivate the flash function, the LED display lights up blue
again.
Adjusting the EV(Down button)
This operation can be done only if the DSC is connected to a switched-on flash module.
Press the Down button to adjust the EV from “-1.8 to +1.8” (default 0 EV) with a step of
0.3, in Photo mode only. The EV value (except 0 EV) will show on the monitor in Photo
and Video mode, and the value also apply to Video.
Note: The value will be reset to “0 EV” if the switched-on DSC is disconnected from the
flash module.
Taking videos
Framing the subject and shooting the video
Set the mode dial to the desired Video mode. With connected and switched-on flash
module the -signal appears on the monitor. Frame the scene you want to shoot through
the viewfinder of the DSC or in the monitor of the connected and switched-on flash
module. Adjust the distance ring to a suitable range of your object accordingly. Press the
shutter release to start shooting the video. The LED display lights up red during the
shooting. To stop shooting press the shutter release again.
Note: Shooting video is prohibited when the battery is low of the DSC. Please fully recharge the DSC before use.
P 4
Page 5
Playback mode
Viewing images or videos on the monitor
The images or video clips stored on your camera can be viewed on the monitor integrated
in the flash module. To do this, connect the flash module to your DSC as described in
“Connecting the flash module (DSC Flash) to the camera (DSC)” and switch the monitor
on. Activate the Playback mode by turning the mode dial to the corresponding position.
The monitor of the connected flash module now displays the -symbol. Press the Up or
Down button to page through your saved images or video clips.
Playing video clips(only videos)
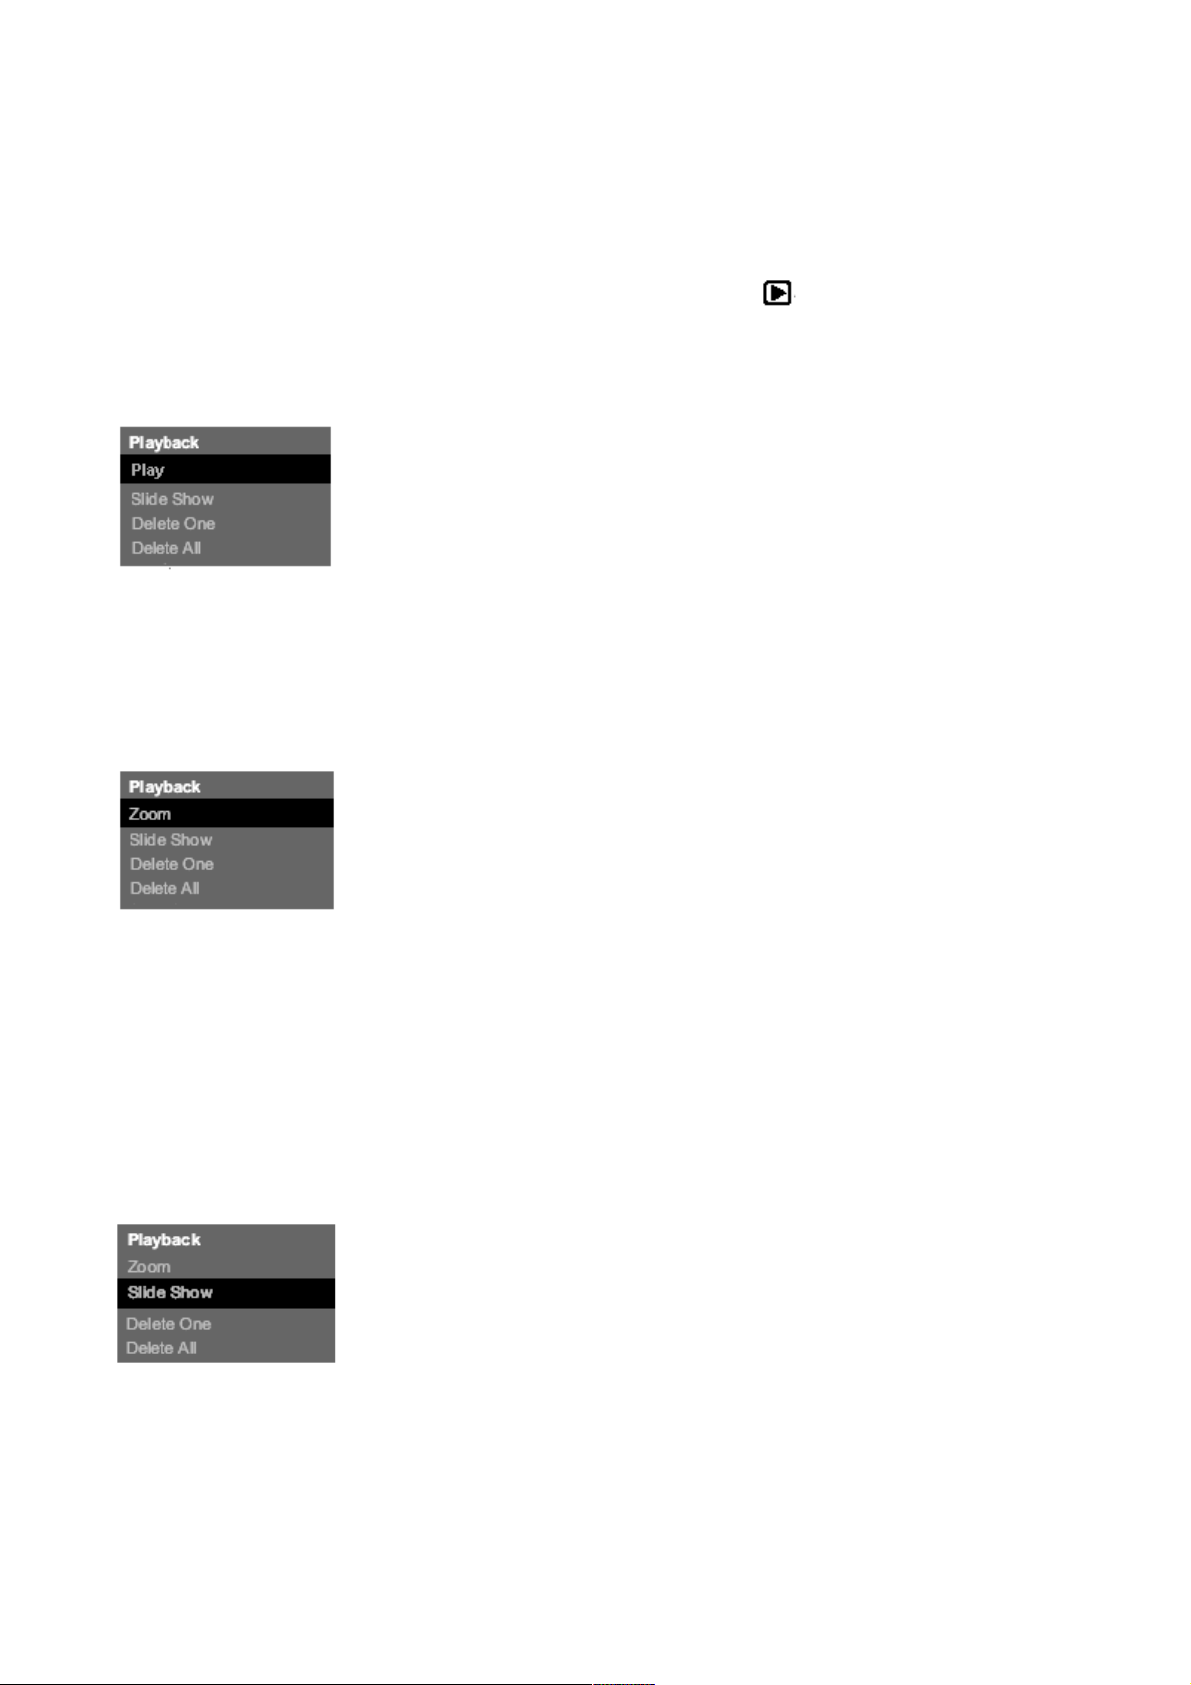
Press the shutter release to enter the Playback menu. Select Play and press the shutter
release to start playing the video. Press the shutter release again to stop the playback.
Viewing details (only photos)
The zoom function allows you to view details of your images.
When you are viewing an image press the shutter release to enter the Playback menu.
Select Zoom and press the shutter release to confirm this selection. Pressing the Up or
Down button enables you to zoom in or zoom out. Press the shutter release again to view
the individual image details in square sections. With the Up or Down button you can select
and view the individual details of the image. Press the shutter release a third time to exit
the Zoom mode.
Viewing images in a slide show
The DSC can display your saved images on the monitor in a slide show.
Press the shutter release in Playback mode to enter the Playback menu, select Slide
Show and confirm this selection by pressing the shutter release. The slide show
commences. Press the shutter release again to stop the slide show.
P 5
Page 6

Deleting images
Important note!
Deleted images and video clips cannot be restored. In case of doubt make a copy of your
data before deleting images.
Deleting a single image
In Playback mode select the image you want to delete using the Up or Down button.
Press the shutter release to enter the Playback menu, select Delete One and confirm this
selection by pressing the shutter release. Confirm the safety question that appears with
Yes and press the shutter release again. The selected image is now irrevocably deleted
from the memory of the camera.
Deleting all images
In the Playback mode press the shutter release to enter the Playback menu. Select Delete
all and confirm this selection by pressing the shutter release. Confirm the safety question
that appears with Yes and press the shutter release again. All images are now irrevocably
deleted from the memory of the camera.
P 6
Page 7

Transferring images to your computer
The DSC supports the following operating systems:
• Windows 2000/ME/XP/Vista
• Mac OS 9.x or OS X
Driver installation is not required. Older operating systems are not supported.
Note: When connected to your switched-on computer via the USB cable the MINOX DSC
is supplied with power and the battery is charged. Refer also to section Charging the
batteries.
Connecting your camera to the computer
Always switch the DSC on and set the mode dial to Playback mode before connecting it to
the computer. Then connect the camera to the computer using the provided USB cable
(connect the smaller connector to the camera and the larger one to the computer.)
When connecting the MINOX DSC to your computer for the first time the computer will
recognize it as new hardware. You computer automatically installs the drivers. Wait until
your computer informs you that installation has been completed before trying to access the
images or video clips stored in the camera or on the Micro-SD card.
Note: If there is a Micro-SD card installed in the camera you can only access the data on
this card. To access any data in the internal memory of the camera you must first remove
the Micro-SD card.
Transferring images to a Windows PC
Click on the symbol My Computer on your computer. You will see a symbol with the
designation Removable media. Double click on the symbol and open the folder DCIM and
then folder 100_ICAM in which all your images are stored.
Transferring images to an Apple Mac
After connecting and switching on the camera a new hard drive system appears on your
desktop with the designation MINOX. On this hard drive you will find a folder DCIM, and in
this folder another folder 100_ICAM with all your images and video clips. You can rename
the hard drive MINOX to any name you choose.
Note: You can also use your camera to store or download other files. To do this, open the
above mentioned folder and copy the respective file into this folder to save it in the camera
memory.
Fastening the safety chain
Attach the safety chain to the provided safety chain eye on the DSC. It is not possible to
connect the safety chain when the DSC is connected to the external flash module.
Note: You must remove the safety chain before connecting the external flash to the DSC.
P 7
Page 8
Adjusting your camera settings
Adjusting the camera settings can only be carried out with the flash module (DSC flash)
connected. The settings can only be carried out using the monitor.
See section Connecting the flash module (DSC Flash) to the camera (DSC).
Opening the Setup menu
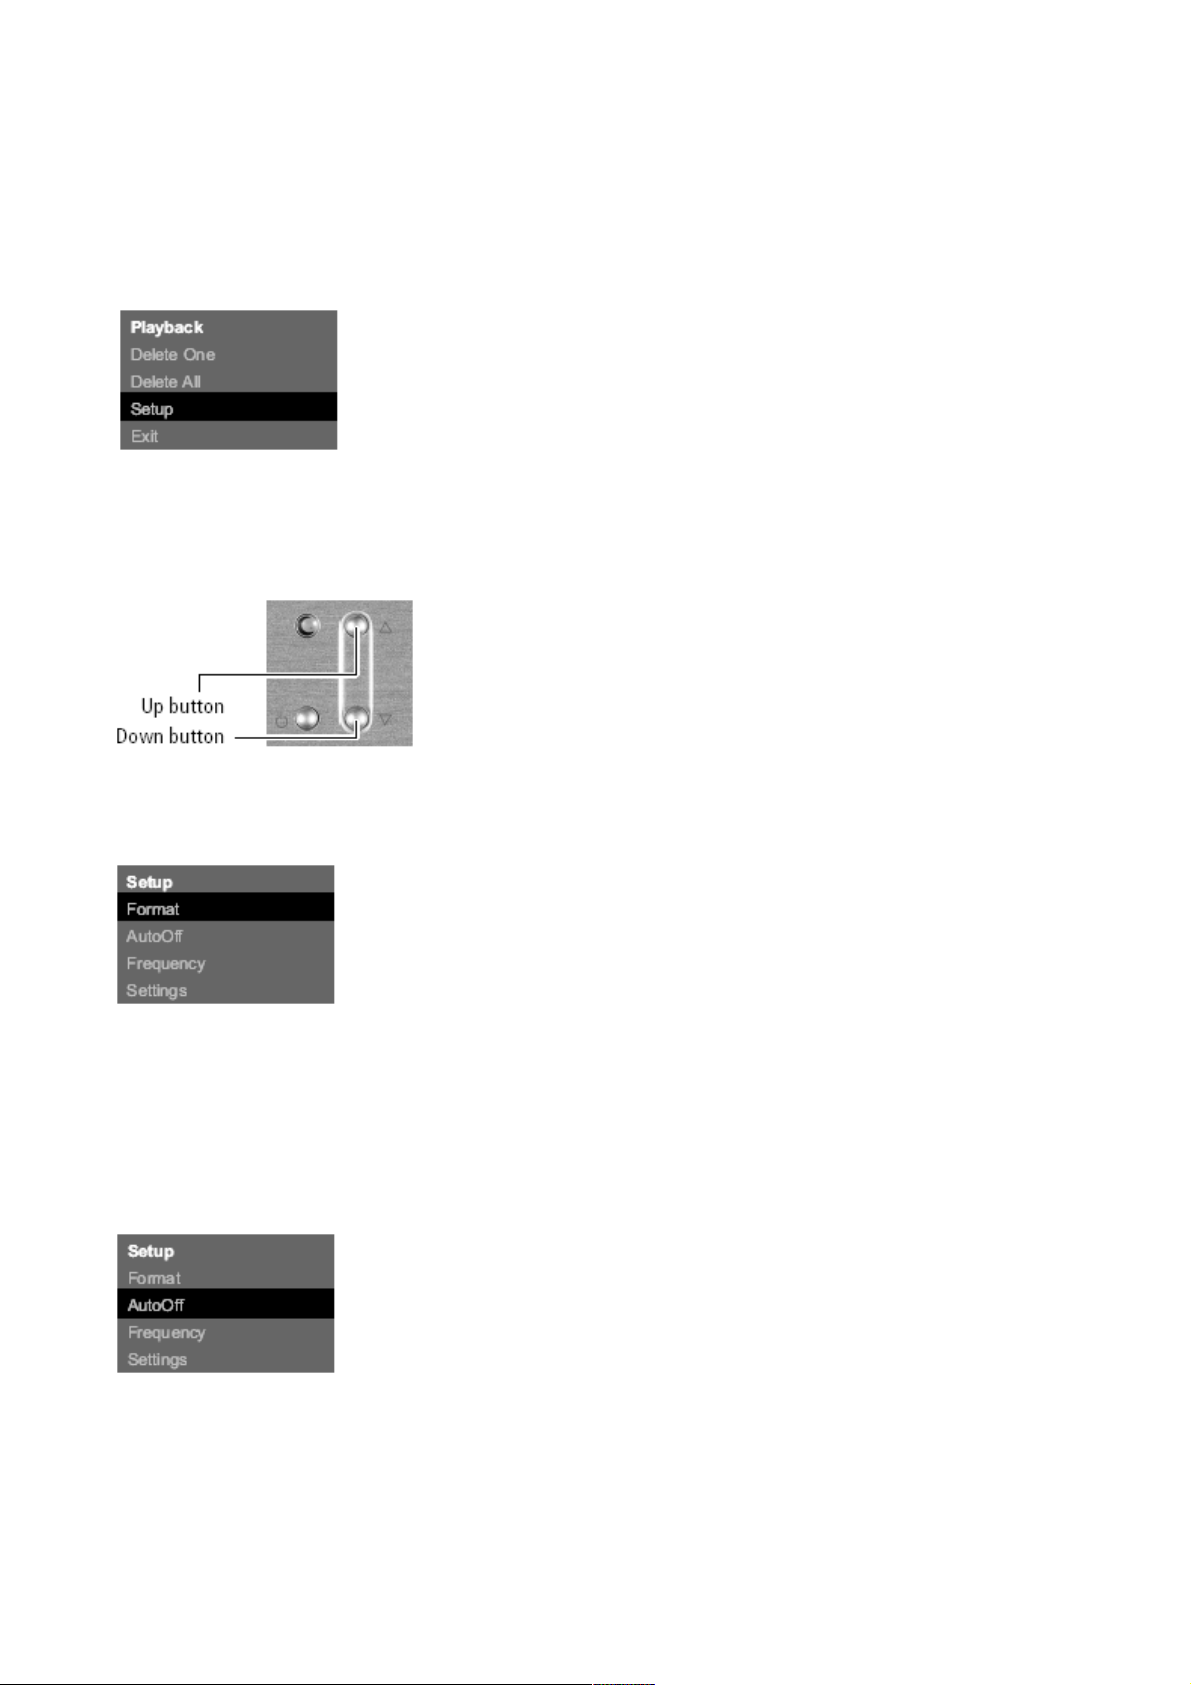
In Playback mode press the shutter release, the Playback menu appears on the monitor.
Use the Up or Down button to select the menu item Setup and confirm this selection by
pressing the shutter release again. Then the Setup menu appear on the monitor.
Use the Up or Down button to select one of the following options:
Format the internal camera memory or Micro-SD card
You can format the internal memory of the DSC and Micro-SD card. In the Setup menu
select Format and confirm by pressing the shutter release. In the Format menu select Yes
and again press the shutter release to confirm this selection. All images, video clips and
data in the memory are irrevocably deleted.
Setting the Auto Off time
Select Auto Off and press the shutter release. Use the Up or Down button to determine the
time after which you wish the camera to turn itself off. Confirm your selection by pressing
the shutter release.
P 8
Page 9
Adjusting the mains frequency
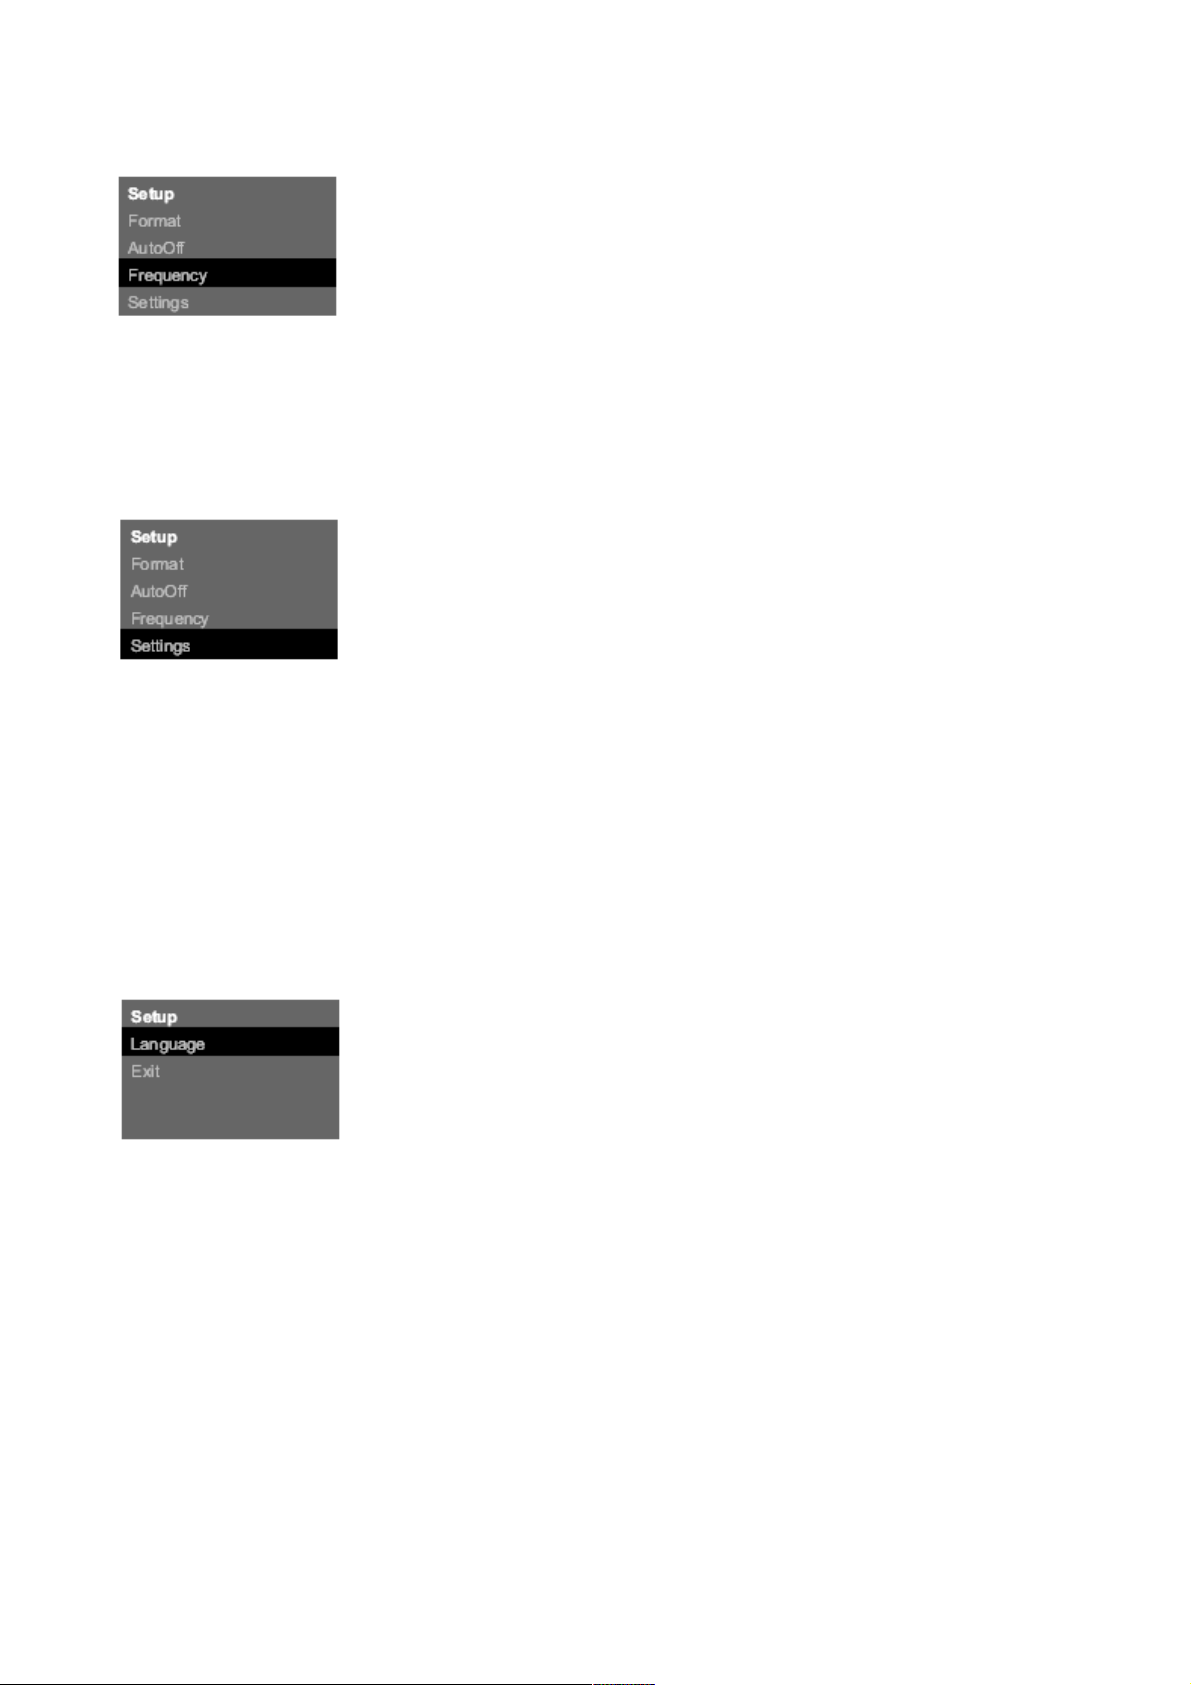
To reduce flicker in video mode when shooting in artificial light (fluorescent lamps) you can
manually adjust the frequency. To do this select the frequency 50 Hz or 60 Hz and confirm
your selection by pressing the shutter release.
Revert to default settings
If you want to reset your camera to the ex-works settings, select Settings press the shutter
release to reset the settings.
Upgrade the firmware
The firmware of the DSC can be upgraded through a Micro-SD card. Select Settings press
the shutter release to enter Settings menu. Select Fw Upgrade and press the shutter
release to upgrade the firmware. Note: The camera will power off if upgrade is succeed.
Otherwise, it will return to Playback mode.
Language selection
You can set the language used in the menus. Select Language and press the shutter
release. Choose the language you wish and confirm your selection by pressing the shutter
release.
P 9
Page 10

Camera maintenance
Read the following information carefully to ensure correct use of your MINOX DSC.
Places to avoid
Do not store or use the camera in the following environments:
• in very damp, soiled or dusty places.
• in places exposed to direct sun radiation or extreme temperatures, such as inside a
locked car in the summertime.
• in extremely cold places.
• in places exposed to severe vibrations.
• in places exposed to smoke or steam.
• in places exposed to strong magnetic fields
(e.g. in the proximity of electrically operated motors, transformers or magnets).
• in places where aggressive chemicals such as pesticides, rubber or vinyl products are
stored on a long-term basis.
Note: Keep the MINOX DSC away from sand and dust. As with all digital cameras the
MINOX DSC is also particularly susceptible to sand and dust. When in sandy places
always make sure that the camera is not unprotected, especially on beaches or in the
desert where find sand is blown about by wind.
How to keep the DSC and the external DSC flash
If you are not using your MINOX DSC for a longer period of time, it is best to store it and
the flash module in a dry place.
Cleaning your DCC
Always use the optionally available MINOX Cleaning Set. Use the small brush to carefully
remove dust from the lens and the LCD surface of the display. Wipe the surface gently
with the special micro-fiber cloth. If there are any marks on the lens, put a drop of the liquid
lens cleaner onto the micro-fiber cloth and gently wipe the lens surface.
Never scratch any part of the camera or flash module with hard objects. Never use volatile
substances such as solvents, benzene or insecticides, as these may react with the camera
body and cause deformation or damage to the coating.
When flying
We do not recommend storing the camera in your suitcase or baggage. Keep your MINOX
DSC safely in your hand luggage.
P 10
Page 11

Technical data
Image sensor 5 Mega Pixels CMOS Sensor
Image resolution Still: 2,608 x 1,956 pixels
Video clip: 640 x 480 pixels
File format Still: JPEG / Video clips: AVI
Memory Internal: 128 MB NAND Flash memory
External: optional Micro-SD card up to 16 GB
Viewfinder Optical (Galileian-Style)
Display 1.5’’ TFT LCD display (integrated in DSC Flash module)
Flash DSC with LED flash
DSC Flash: electronic flash
Lens 9 mm Minoctar Lens/ 5 elements glass lens with IR filter glass
Focal length 9 mm (corresponds to approx. 43 mm with 35 mm format)
Lens aperture F 2.0
Focus range 0.6m, 1.1m, infinity
White balance Automatic
Shutter speed Automatic
Power supply Rechargeable Lithium-Polymer-Battery/USB-cable
Support Windows ME/2000/XP/Vista / Mac OS compatible
System requirements min. 450 MHz, min. 128 MB RAM,
min. 800 MB free volume space, USB 2.0
Data transfer mini USB cable (USB 2.0 high speed)
Dimensions(W x L x H) DSC: 3.38 x 1.18 x 0.82 inch / 86 x 30 x 21 mm
Weight DSC: 2.36 oz / 70 g
P 11
Page 12

This device complies with Part 15 of the FCC Rules. Operation is subject to the following
two conditions: (1) this device may not cause harmful interference, and (2) this device
must accept any interference received, including interference that may cause undesired
operation.
Caution:
Changes or modifications not expressly approved by the party responsible for compliance
could void the user's authority to operate the equipment.
Note: This equipment has been tested and found to comply with the limits for a Class B
digital device, pursuant to Part 15 of the FCC Rules. These limits are designed to provide
reasonable protection against harmful interference in a residential installation. This
equipment generates, uses and can radiate radio frequency energy and, if not installed
and used in accordance with the instructions, may cause harmful interference to radio
communications. However, there is no guarantee that interference will not occur in a
particular installation. If this equipment does cause harmful interference to radio or
television reception, which can be determined by turning the equipment off and on, the
user is encouraged to try to correct the interference by one or more of the following
measures:
-- Reorient or relocate the receiving antenna.
-- Increase the separation between the equipment and receiver.
-- Connect the equipment into an outlet on a circuit different from that to which the
receiver is connected.
-- Consult the dealer or an experienced radio/TV technician for help.
P 12
 Loading...