

Page 1
Grandstream Networks, Inc.
IPVT10
Video Conferencing Server
User Guide
Page 2

P a g e | 1
IPVT10 User Guide
Version 1.0.2.8
COPYRIGHT
©2018 Grandstream Networks, Inc. http://www.grandstream.com
All rights reserved. Information in this document is subject to change without notice. Reproduction or
transmittal of the entire or any part, in any form or by any means, electronic or print, for any purpose without
the express written permission of Grandstream Networks, Inc. is not permitted.
The latest electronic version of this guide is available for download here:
http://www.grandstream.com/support
Grandstream is a registered trademark and Grandstream logo is trademark of Grandstream Networks, Inc.
in the United States, Europe and other countries.
Page 3

P a g e | 2
IPVT10 User Guide
Version 1.0.2.8
CAUTIONS
In order to use the equipment correctly and safely, please read the safety cautions carefully before using it
and strictly follow it when using it. "Equipment" refers to the equipment itself and its accessories by default
in this document.
Basic Requirements
• Please keep the equipment dry and avoid violent collisions between the equipment and other objects
during storage, transportation, and usage.
• Please do not disassemble the equipment. Please contact with Grandstream support or designated
distributor when users encounter problems.
• Any individual or enterprise may not change the structure, safety or performance design of the
equipment without Grandstream authorization.
• When using this equipment, users should follow the relevant laws and regulations, and respect the
legal rights of others.
Environmental Requirements
• Before plugging or unplugging the cables of the equipment, users should stop using the equipment and
disconnect the power supply.
• Please keep the equipment away from the heat source or fire such as electric heater, candle and etc.
• Please keep the equipment away from the strong magnetic or strong electric appliances, such as
microwave oven, refrigerator, mobile phone and etc.
• Please place the equipment on the stable worktable.
• Please place the equipment in a ventilated, direct light-free environment. The recommended operating
environment temperature of this equipment is 0℃ to 45℃
• Do not block the openings of the device with any object and leave more than 10cm of heat dissipation
space around the equipment.
Page 4

P a g e | 3
IPVT10 User Guide
Version 1.0.2.8
• Do not place any objects (such as candles or water containers) on the equipment. If foreign objects or
liquids are in the equipment, stop using the equipment and disconnect the power supply immediately,
unplug all the cables connected to the equipment, and contact with Grandstream designated service
center.
• Do not place the equipment near water or a humid area.
• Please keep the equipment clean and away from the dust.
• Do not place the equipment near the objects which are easily combustible, such as foam materials and
etc.
Note: If the device keeps running for a long time, the shell of the device will be heat with a certain
degree. Please do not worry about it, and the equipment can still be working normally.
Terms and Conditions
• Please keep the equipment away from children, in order to avoid dangers such as swallowing.
• Please use the accessories which are coming with the equipment or recommended by the manufacturer.
• Do not place the equipment near water or a humid area. If the liquid flows into the equipment
accidentally, please disconnect the power supply immediately, and unplug all cables connected to the
equipment, such as power cable. Then, please contact with Grandstream designated service center.
• The supplied voltage of the equipment has to meet the input voltage requirement of the equipment.
Please use the lightning protection socket which matches the requirements.
• Before plugging or unplugging the cables from the equipment, please stop using the equipment and
disconnect the power supply from the equipment.
• Please keep the hands dry when plugging and unplugging the cables from the equipment.
• Do not step on, pull, or bend the cables excessively of the equipment to avoid equipment failure.
• Do not use the damaged or aged cables with the equipment.
• Please keep the power plug clean and dry to avoid electric shock or other hazards.
• Please disconnect the power supply from the equipment in a thunderstorm, and remove all the cables
connect to the equipment, such as power supply cable, in order to avoid lightning damage to the
equipment.
Page 5

P a g e | 4
IPVT10 User Guide
Version 1.0.2.8
• If users do not plan to use the equipment for a long time, please disconnect the power supply and
remove all cables connect to the equipment.
• Do not look at the fiber interface on the equipment to avoid to impaired vision.
• If any abnormal issue occurs, such as equipment smoking, abnormal sound, abnormal odor, please
stop using the equipment and disconnect the power supply from the equipment immediately. Please
unplug all the cables connected to the equipment and contact with Grandstream designated support
center.
• Please avoid the foreign objects (such as metal) enter the equipment from the heat dissipation hold.
• Before connecting other cables to the equipment, connect the ground cable to the host first; When
users try to disconnect the cables from the equipment, please remove the ground cable at the end.
• Please ensure the protection ground cable of the three-phase socket is grounded effectively. The
neutral wire and the live wire are not connected reversely.
• Do not scratch the shell of the equipment. Otherwise, the peeled paint may cause allergy, or equipment
failure (falling into the equipment and causing failure).
• To ensure the safety, when the fuse in the equipment is blown, please replace the fuse with the same
model and size.
Cleaning Instructions
• Before cleaning, please stop using the equipment and disconnect the power supply, and unplug all
cables connected to the equipment.
• Do not clean the equipment shell with cleaning liquids or spray cleaner. Users could use a soft cloth to
wipe the equipment shell.
Page 6

P a g e | 5
IPVT10 User Guide
Version 1.0.2.8
Table of Content
DOCUMENT PURPOSE ............................................................................................... 16
CHANGELOG ............................................................................................................... 17
Version 1.0.2.8 ..................................................................................................................................... 17
Version 1.0.1.5 ..................................................................................................................................... 17
Version 1.0.0.15 ................................................................................................................................... 17
WELCOME ................................................................................................................... 18
PRODUCT OVERVIEW ................................................................................................ 19
Feature Highlights ................................................................................................................................ 19
IPVT10 Technical Specifications .......................................................................................................... 20
GETTING STARTED ..................................................................................................... 23
IPVideoTalk ID ..................................................................................................................................... 23
Conference Management Platform ...................................................................................................... 24
Main Features ............................................................................................................................... 24
Login to Conference Management Platform ................................................................................. 24
CREATE MEETINGS .................................................................................................... 25
JOIN MEETING ............................................................................................................ 26
GVC32XX CLIENT ........................................................................................................ 28
About GVC32XX .................................................................................................................................. 28
Configure IPVT10 Server Address ....................................................................................................... 28
Activate/De-Activate IPVideoTalk ID .................................................................................................... 29
Start a Meeting ..................................................................................................................................... 31
Instant Meeting ............................................................................................................................. 31
Schedule a Meeting ...................................................................................................................... 31
Start a Webinar .................................................................................................................................... 32
Conference Control .............................................................................................................................. 32
Page 7

P a g e | 6
IPVT10 User Guide
Version 1.0.2.8
Request to Share Webcam .................................................................................................................. 35
Recording ............................................................................................................................................. 36
Local Recording ............................................................................................................................ 36
Cloud Recording ........................................................................................................................... 36
Check Meeting Information .................................................................................................................. 37
Join Meeting ......................................................................................................................................... 38
Schedule Meeting ................................................................................................................................ 39
Check Scheduled Meetings .......................................................................................................... 39
Start Scheduled Meeting Automatically ........................................................................................ 39
Start Scheduled Meeting Manually ............................................................................................... 40
Cancel Scheduled Meeting ........................................................................................................... 40
IPVideoTalk Application ........................................................................................................................ 41
Contacts ........................................................................................................................................ 42
Notices .......................................................................................................................................... 43
Unread Messages ......................................................................................................................... 44
Settings ......................................................................................................................................... 45
Messages on GVC32XX Main Page .................................................................................................... 47
WEBRTC CLIENT......................................................................................................... 48
About WebRTC .................................................................................................................................... 48
Browser and Operating System ........................................................................................................... 48
Features Supported on Different Browsers ......................................................................................... 49
Join a Meeting ...................................................................................................................................... 50
Join a Meeting with Meeting ID .................................................................................................... 50
Join a Meeting via Notification Email ............................................................................................ 51
Participants Register ............................................................................................................................ 53
Install Plug-in for IE .............................................................................................................................. 55
Meeting Interface ................................................................................................................................. 56
Webinar Practice Session .................................................................................................................... 59
Audio .................................................................................................................................................... 61
Current Speaker ................................................................................................................................... 62
Page 8

P a g e | 7
IPVT10 User Guide
Version 1.0.2.8
Video .................................................................................................................................................... 62
Sharing ................................................................................................................................................. 64
Install Add-ons .............................................................................................................................. 64
Start to Share ................................................................................................................................ 64
Pause Sharing .............................................................................................................................. 65
Stop Sharing ................................................................................................................................. 65
Switch Sharing Resource ............................................................................................................. 66
Participants list ..................................................................................................................................... 66
All Group Chat ..................................................................................................................................... 68
Panelists Group Chat ........................................................................................................................... 69
Private Chat ......................................................................................................................................... 70
Raise Hand .......................................................................................................................................... 71
Q&A...................................................................................................................................................... 72
Browser Notification ............................................................................................................................. 75
Uploading Logcat ................................................................................................................................. 75
Quit a Meeting ...................................................................................................................................... 76
Host ...................................................................................................................................................... 76
Become Meeting Host .................................................................................................................. 76
Multiple Meeting Hosts ................................................................................................................. 77
Meeting Control .................................................................................................................................... 78
Panelists ....................................................................................................................................... 78
Mute/Unmute ................................................................................................................................ 78
Cloud Recording ........................................................................................................................... 79
Facebook/YouTube Live ............................................................................................................... 79
Live on the 3rd Party Platform ...................................................................................................... 80
Video Layouts Control .................................................................................................................. 80
Stop Sharing the Webcam ............................................................................................................ 84
Require Webcam Sharing............................................................................................................. 84
Preview Participant’s Video .......................................................................................................... 84
Disable/Enable Chat Function ...................................................................................................... 86
Mute Attendees on Entry .............................................................................................................. 86
Allow All View Attendee List .......................................................................................................... 86
Page 9

P a g e | 8
IPVT10 User Guide
Version 1.0.2.8
Add Participants during a Meeting ................................................................................................ 86
Remove Participant ...................................................................................................................... 87
End/Exit Meeting ........................................................................................................................... 87
MOBILE CLIENT .......................................................................................................... 88
Operating System ................................................................................................................................ 88
Join a Meeting ...................................................................................................................................... 88
Download IPVideoTalk Mobile app ............................................................................................... 88
Configure IPVT10 Server Address ....................................................................................................... 88
Join a Meeting via Mobile app ............................................................................................................. 89
Host a Meeting via Mobile App ............................................................................................................ 91
Meeting Interface ................................................................................................................................. 93
Webinar Practice Session .................................................................................................................... 95
Audio Control ....................................................................................................................................... 97
Connect Audio .............................................................................................................................. 97
Mute/Unmute ................................................................................................................................ 97
Media Channel .............................................................................................................................. 97
Invite Participants ......................................................................................................................... 99
Video .................................................................................................................................................. 100
Group Chat ........................................................................................................................................ 101
Panelist Group Chat ........................................................................................................................... 102
Private Chat ....................................................................................................................................... 103
Q&A.................................................................................................................................................... 104
Exit Meeting ....................................................................................................................................... 107
Host .................................................................................................................................................... 107
Become Meeting Host ................................................................................................................ 107
Meeting Control .................................................................................................................................. 107
Panelists ..................................................................................................................................... 107
Mute/Unmute .............................................................................................................................. 108
Cloud Recording ......................................................................................................................... 108
Stop Sharing the Webcam .......................................................................................................... 109
Require Webcam Sharing........................................................................................................... 109
Page 10

P a g e | 9
IPVT10 User Guide
Version 1.0.2.8
Disable/Enable Chat Function .................................................................................................... 109
Mute Attendees on Entry ............................................................................................................ 110
Allow All View Attendee List ........................................................................................................ 110
Add Participants during a Meeting .............................................................................................. 110
Remove Participant .................................................................................................................... 110
End/Leave Meeting ......................................................................................................................111
About ...................................................................................................................................................111
CONFERENCE MANAGEMENT PLATFORM............................................................ 112
Sign In ................................................................................................................................................ 112
Definitions .......................................................................................................................................... 113
Tool Bar .............................................................................................................................................. 113
Access IPVT10 Web UI ..................................................................................................................... 114
Enterprise Brand Customization ........................................................................................................ 115
Devices .............................................................................................................................................. 116
Add Device Automatically ........................................................................................................... 116
Create Accounts for 3
rd
Party Device ......................................................................................... 116
Assign Devices ........................................................................................................................... 117
Device Authority Management .................................................................................................... 119
View/Search Devices .................................................................................................................. 120
Authenticated Devices Management – Remote Control ............................................................ 121
Authenticated Devices Management – Delete Device ............................................................... 121
Meetings ............................................................................................................................................ 122
Personal Room ........................................................................................................................... 122
Meet Now .................................................................................................................................... 123
Schedule a new Meeting ............................................................................................................ 125
Schedule a new Webinar ............................................................................................................ 128
Schedule a Recurring Meeting ................................................................................................... 134
View Meeting .............................................................................................................................. 135
Start Meeting or Webinar ............................................................................................................ 141
Upcoming Meeting – Edit ........................................................................................................... 141
Upcoming Meeting – Cancel ...................................................................................................... 142
Reschedule Meeting ................................................................................................................... 142
Page 11

P a g e | 10
IPVT10 User Guide
Version 1.0.2.8
Restart Meeting .......................................................................................................................... 143
After-Meeting Report Email ........................................................................................................ 143
Notification Email ........................................................................................................................ 143
Recordings ......................................................................................................................................... 144
Check Recording Files................................................................................................................ 144
Check Storage Space ................................................................................................................. 144
Contacts ............................................................................................................................................. 145
My Contacts ................................................................................................................................ 146
Business Contacts ...................................................................................................................... 146
Contacts/Public Devices ............................................................................................................. 146
Add Contact ................................................................................................................................ 147
Add Public Device ....................................................................................................................... 147
Edit Contact/Public Device ......................................................................................................... 148
Delete Contact/Public Device ..................................................................................................... 148
Departments ............................................................................................................................... 148
Department - Add Department .................................................................................................... 149
Department - Edit Department .................................................................................................... 149
Department - Delete Department ............................................................................................... 149
Import Contacts .......................................................................................................................... 149
Export Contacts .......................................................................................................................... 151
Admin Center ..................................................................................................................................... 151
Business Profile .......................................................................................................................... 151
User Management ...................................................................................................................... 151
Add Users ................................................................................................................................... 152
Edit Users ................................................................................................................................... 153
Delete Users ............................................................................................................................... 154
Settings .............................................................................................................................................. 154
Multiple Languages ............................................................................................................................ 155
EXPERIENCING IPVT10 VIDEO CONFERENCING SERVER................................... 156
Page 12

P a g e | 11
IPVT10 User Guide
Version 1.0.2.8
Table of Tables
Table 1: IPVT10 Features in a Glance ........................................................................................................ 19
Table 2: IPVT10 Technical Specifications ................................................................................................... 20
Table 3: IPVT10 Server Meetings Performance ......................................................................................... 22
Table 4: Session Features........................................................................................................................... 26
Table 5: Notices and Solutions .................................................................................................................... 43
Table 6: Browser and Operating System .................................................................................................... 48
Table 7: Supported Features with Different Browsers................................................................................. 49
Table 8: Conference capabilities parameters ............................................................................................ 119
Table 9: Recurring Range Specifications .................................................................................................. 135
Table 10: Meeting Status List .................................................................................................................... 135
Table 11: Conference Capabilities Parameters ......................................................................................... 152
Page 13

P a g e | 12
IPVT10 User Guide
Version 1.0.2.8
Table of Figures
Figure 1: IPVT10 Video Conferencing System Architecture ....................................................................... 23
Figure 2: IPVideoTalk ID in GVC32xx Client ............................................................................................... 23
Figure 3: IPVideoTalk Application................................................................................................................ 28
Figure 4: IPVideoTalk Application Configuration Page ............................................................................... 29
Figure 5: IPVideoTalk Application................................................................................................................ 30
Figure 6: IPVideoTalk AppSettings .............................................................................................................. 30
Figure 7: GVC32XX Meeting Screen .......................................................................................................... 32
Figure 8: Layouts Options ........................................................................................................................... 34
Figure 9: End Conference prompt ............................................................................................................... 35
Figure 10: Request to Share Webcam ........................................................................................................ 36
Figure 11: Cloud Recording ........................................................................................................................ 37
Figure 12: Meeting Information ................................................................................................................... 38
Figure 13: Input Meeting PIN Code ............................................................................................................ 38
Figure 14: Schedule List ............................................................................................................................. 39
Figure 15: IPVideoTalk Application Options ................................................................................................ 41
Figure 16: IPVideoTalk Application→Contacts ............................................................................................ 42
Figure 17: IPVideoTalk Application Interface .............................................................................................. 44
Figure 18: Notice Message - Authentication Request to Link Device via MAC Address ............................ 45
Figure 19: IPVideoTalk Application Settings ............................................................................................. 45
Figure 20: GVC32XX Home Page .............................................................................................................. 47
Figure 21: WebRTC “Join a Meeting” Interface .......................................................................................... 51
Figure 22: Notification Email ....................................................................................................................... 52
Figure 23: Input Meeting Password ............................................................................................................ 53
Figure 24: Sign-up Page ............................................................................................................................. 54
Figure 25: Add to Calendar ......................................................................................................................... 55
Figure 26: Download IPVideoTalk Plug-in ................................................................................................... 55
Figure 27: Setup IPVideoTalk Plug-in ......................................................................................................... 56
Figure 28: Meeting Interface on Firefox ...................................................................................................... 57
Figure 29: Prepare Webinar Option ............................................................................................................ 59
Figure 30: Set Panelist ................................................................................................................................ 60
Figure 31: Webinar Practice Session .......................................................................................................... 60
Figure 32: Select Microphone and Speaker ................................................................................................ 61
Figure 33: Share Your Own Webcam.......................................................................................................... 63
Figure 34: Share Desktop/Application ........................................................................................................ 64
Figure 35: Install Add-ons Interface ............................................................................................................ 64
Figure 36: Select Share Content ................................................................................................................. 65
Figure 37: Stop Sharing .............................................................................................................................. 66
Figure 38: Participants List.......................................................................................................................... 67
Figure 39: Clients Type Icons ...................................................................................................................... 68
Page 14

P a g e | 13
IPVT10 User Guide
Version 1.0.2.8
Figure 40: Group Chat Interface on WebRTC Client .................................................................................. 69
Figure 41: Panelists Group Chat ................................................................................................................. 70
Figure 42: Private Chat Interface on WebRTC Client- Select Person ........................................................ 71
Figure 43: Raise Hand ................................................................................................................................ 71
Figure 44: Send Questions ......................................................................................................................... 72
Figure 45: Answer the Questions ................................................................................................................ 73
Figure 46: Answer Live in Public Mode ....................................................................................................... 73
Figure 47: End Live Answer ........................................................................................................................ 74
Figure 48: Finish the Question .................................................................................................................... 74
Figure 49: Answer by Text ........................................................................................................................... 74
Figure 50: Report a problem ....................................................................................................................... 76
Figure 51: WebRTC Interface - Meeting Info .............................................................................................. 77
Figure 52: Input Host Code ......................................................................................................................... 77
Figure 53: Tile Layout .................................................................................................................................. 81
Figure 54: Focus 1+N Layout ...................................................................................................................... 82
Figure 55: Speaker Layout .......................................................................................................................... 82
Figure 56: Select Fixed Position ................................................................................................................. 83
Figure 57: Stop Sharing Webcam ............................................................................................................... 84
Figure 58: Preview Video ............................................................................................................................ 85
Figure 59: Show Participant's Video ........................................................................................................... 85
Figure 60: Confirm to Remove Participant .................................................................................................. 87
Figure 61: End/Exit Meeting ........................................................................................................................ 87
Figure 62: Configure Server Address .......................................................................................................... 89
Figure 63: IPVideoTalk Application Join Meeting Interface ......................................................................... 90
Figure 64: IPVideoTalk Application Join Meeting Interface - Enter Password ............................................ 91
Figure 65: Host Meeting via Mobile App ..................................................................................................... 92
Figure 66: IPVideoTalk Meeting Interface on Mobile Client ........................................................................ 93
Figure 67: IPVideoTalk Landscape Mode ................................................................................................... 93
Figure 68: Clients Type Icons ...................................................................................................................... 94
Figure 69: Webinar Practice Session .......................................................................................................... 96
Figure 70: Media Channel Configuration Interface ..................................................................................... 98
Figure 71: Sound Channel Settings ............................................................................................................ 99
Figure 72: Invite Participants by Share Icon ............................................................................................. 100
Figure 73: Share Webcam ........................................................................................................................ 101
Figure 74: Group Chat Interface on Mobile Client .................................................................................... 102
Figure 75: Panelist Chat on Mobile ........................................................................................................... 103
Figure 76: Chat List ................................................................................................................................... 104
Figure 77: Private Chat with Other Participants ........................................................................................ 104
Figure 78: Q&A Interface ........................................................................................................................... 105
Figure 79: Answer Methods ...................................................................................................................... 106
Figure 80: Stop Sharing the Webcam ....................................................................................................... 109
Page 15

P a g e | 14
IPVT10 User Guide
Version 1.0.2.8
Figure 81: Choose How to End Meeting ....................................................................................................111
Figure 82: Configure to Access Conference Management Platform......................................................... 112
Figure 83: IPVideoTalk Sign in Screen ..................................................................................................... 113
Figure 84: Account Info Screen ................................................................................................................. 114
Figure 85: Access IPVT10 Web UI............................................................................................................ 114
Figure 86: Enterprise Brand Customization .............................................................................................. 115
Figure 87: IPVideoTalk Devices Screen .................................................................................................... 116
Figure 88: Create Device Account ............................................................................................................ 117
Figure 89: Device Details .......................................................................................................................... 118
Figure 90: Assign Devices ......................................................................................................................... 118
Figure 91: Conference Capabilities Configuration .................................................................................... 119
Figure 92: set meeting ability .................................................................................................................... 120
Figure 93: Devices Menu .......................................................................................................................... 120
Figure 94: Remote Control Screen ........................................................................................................... 121
Figure 95: Meetings Screen ...................................................................................................................... 122
Figure 96: Personal Room Template......................................................................................................... 123
Figure 97: Meeting Now Options .............................................................................................................. 124
Figure 98: Meet Now Template ................................................................................................................. 125
Figure 99: Email Settings .......................................................................................................................... 127
Figure 100: Schedule Meeting Screen ...................................................................................................... 127
Figure 101: Schedule Webinar - I ............................................................................................................. 130
Figure 102: Schedule Webinar – II............................................................................................................ 131
Figure 103: Customize Registration Page ................................................................................................ 132
Figure 104: Customize Options - I ............................................................................................................ 132
Figure 105: Customize Options II ............................................................................................................. 133
Figure 106: Email Settings ........................................................................................................................ 134
Figure 107: Set Recurring Meeting ........................................................................................................... 134
Figure 108: Check the Registered Participants ........................................................................................ 136
Figure 109: Copy Meeting Invitation ......................................................................................................... 136
Figure 110: Meeting Details – Meeting Info .............................................................................................. 137
Figure 111: Meeting Details - Registered Participants .............................................................................. 137
Figure 112: Meeting Details ...................................................................................................................... 138
Figure 113: Meeting TimeLine ................................................................................................................... 139
Figure 114: Pie Statistics Graph................................................................................................................ 140
Figure 115: Exporting Reports .................................................................................................................. 141
Figure 116: Report Email .......................................................................................................................... 143
Figure 117: Check Recording Files ........................................................................................................... 144
Figure 118: Business Storage Space ........................................................................................................ 145
Figure 119: Contacts ................................................................................................................................. 145
Figure 120: Contacts Screen .................................................................................................................... 146
Figure 121: Add Contact Screen ............................................................................................................... 147
Page 16

P a g e | 15
IPVT10 User Guide
Version 1.0.2.8
Figure 122: Add Public Device Screen ..................................................................................................... 148
Figure 123: Directory Organization – Groups ........................................................................................... 148
Figure 124: Add New Department Screen ................................................................................................ 149
Figure 125: Batch Import Devices Screen ................................................................................................ 150
Figure 126: Company Profile Screen ........................................................................................................ 151
Figure 127: Add New User Screen ........................................................................................................... 152
Figure 128: Edit user Screen .................................................................................................................... 153
Figure 129: Settings .................................................................................................................................. 154
Figure 130: Change IPVideoTalk Language ............................................................................................. 155
Page 17

P a g e | 16
IPVT10 User Guide
Version 1.0.2.8
DOCUMENT PURPOSE
This document describes the basic concepts and tasks necessary to work with the IPVT10 Video
Conferencing Server to use IPVideoTalk Cloud Services. This document covers the topics of device
installation, configuration and technical specifications, as well as IPVideoTalk Cloud service items, users’
clients, service management and advanced features. To learn more information about IPVT10, please visit
link http://www.ipvideotalk.com to get more information.
This guide covers following topics:
• Product Overview
• Getting Started
• Create Meetings
• Join Meeting
• GVC32xx Client
• WebRTC Client
• Mobile Client
• IPVideoTalk Portal
• Experiencing IPVT10 Video Conferencing Server
Page 18

P a g e | 17
IPVT10 User Guide
Version 1.0.2.8
CHANGELOG
Users could log in to the product page to get more firmware update logs:
http://www.ipvideotalk.com/version.html
Version 1.0.2.8
• Added assigning device usage privilege to sub account, and allow sub account to manage
independently the related meeting functions, and email sub accounts the related status change.
[Assign Devices]
• Added each device now can independently set the maximum conference duration, the maximum
number of participants, and the maximum number of videos. [Device Authority Management]
• Reduced the volume lever of comfort noise. [Conference Control]
Version 1.0.1.5
• Added “Pave” Layout during conference. [Layout]
• Added Support to adjust Video Layouts control when using WebRTC client. [Video Layouts Control]
• Added ability to preview participant’s video by the host server. [Preview Participant’s Video]
• Added support for Enterprise Brand Customization. [Enterprise Brand Customization]
• Added support for being directed to the device’s Web UI when clicking on its IP address under
“Devices”. [Devices]
Version 1.0.0.15
• This is the initial version.
Page 19

P a g e | 18
IPVT10 User Guide
Version 1.0.2.8
WELCOME
Thanks for purchasing Grandstream Network IPVT10 full-HD Video conferencing server.
This document introduces the functions for each conference client (GVC32xx Client/WebRTC
Client/IPVideoTalk Mobile Client) such as starting conferences, joining conferences, conference control
features and other related features. This document also introduces the functions for conference
management platform such as scheduling conferences, conference histories management, enterprise
contacts management, devices management and etc.
For more information about IPVT10 and IPVideoTalk service, please visit the product page at:
http://www.ipvideotalk.com
This manual is applicable to IPVT10 equipment users.
Note: Any change that is not authorized by Grandstream Network Inc., or any operation that is not
following this IPVT10 user guide will void the manufacturer’s warranty of IPVT10.
Page 20

P a g e | 19
IPVT10 User Guide
Version 1.0.2.8
PRODUCT OVERVIEW
IPVT10 is an on-premise video conferencing server designed for enterprises seeking a powerful and secure
video conferencing solution. It offers one easy-to-use platform that combines all aspects of an enterprise
video conferencing platform, including room and web-based options and conferencing management.
IPVT10 provides a centralized solution to manage an entire businesses' conferencing needs through one
single server and interface. This on-premise video conferencing server is ideal for internal conferencing
between small and medium-sized enterprises, especially those with multiple locations, for example,
communication between headquarters and multiple branch offices. It is also ideal for organizations who
need to communicate with remote employees and those who perform remote training and/or education
through video conferencing.
Feature Highlights
The following tables contain the major features of the IPVT10:
Table 1: IPVT10 Features in a Glance
IPVT10
• Supports up to 200 participants and 10 simultaneous conference
sessions
• Audio and video recording capabilities with 500GB local storage
• 1080P 30 fps H.264/VP8 for video stream, dual stream for presentation
• Supports up to 120 video feeds and 200 participants per single
conference session
• Live broadcast using Facebook/YouTube Live features
• Easy-to-use one-touch start meeting functionality
• Smooth video display and clear voice under packet loss of up to 30%
• Integrates with access devices including GVC/GXV series, PC/Mac with
WebRTC, Android/iOS, and SIP phones
• Uses encryption protocols like HTTPS, TLS/SRTP in SIP networking,
and WebRTC WSS/DTLS-SRTP encryption
Page 21
P a g e | 20
IPVT10 User Guide
Version 1.0.2.8
IPVT10 Technical Specifications
The following table resumes all the technical specifications including the protocols/standards supported,
server module, audio/video features, MCU functional features, meeting and device management for IPVT10.
Table 2: IPVT10 Technical Specifications
Server Modules
MCU Unit, Registrar Server, Traversal Server, IPVideoTalk Meeting Server,
Device Server, Contacts Server, Storage Server, SIP Trunk Server, WebRTC
Server.
MCU Performance
Up to 120 participants 1080p 30fps H.264 real-time audio and dual-stream video
access
Up to 200 participants’ real-time dual audio access and 1080p 30fps H.264/VP8
video receiving
Up to 10 meetings room at the same time.
Video Features
H.264, H.265, VP8, 1080P 30fps, Dual Stream
Supports all devices with different codec/bitrate/resolution/framerate to access
meetings
Audio Features
G.722, G.711a/u, Opus, Up to 48KHZ wide-band audio mixing
Network Suitability
Smooth video display under packet loss of up to 30%
Clear voice function under packet loss of up to 30%
Bandwidth dynamic adaptive adjustment between 64Kbps and 6Mbps
Safety Features
HTTPS ensures security when WebRTC browser accesses MCU
Supports TLS/SRTP encryption in SIP networking
Supports WebRTC WSS/DTLS-SRTP encryption
Video Display Layout
Supports 4/9/16/25/36/49 Tile Layout mode, 1+N (N=3, 5, 7) Layout mode
Support speaker mode with voice active speaker
Meeting Management
Meeting Now, Schedule Meeting/Webinar, Webinar provides customized
registration page
Meeting info synchronization to devices
Emails Notifications
Meeting invitation emails, reminders before meeting starts, statistics email after
meeting
Live Function
Live feature on Facebook & YouTube platforms
RTMP pushes to external live platform
Access Meeting Devi
ces
Supports GVC series video conferencing system, and third-party SIP video
conferencing system
Supports GXV series video phones, and third-party SIP phones
Supports PC/Mac using WebRTC browsers, mobile devices using IPVT Mobile
app.
Supports PSTN/PBX access Meeting via IVR service.
Page 22

P a g e | 21
IPVT10 User Guide
Version 1.0.2.8
Meeting Control
Supports multiple hosts and designated speakers, open/close video,
enable/disable audio
Supports sharing desktop or applications, chat/participants list access
permission control
Q&A feature, poll voting system (pending) and video layout setting
Meeting Records
Store meeting audio/video recording files, meeting report files, meeting chat
files, etc.
500GB for local storage.
Statistics Features
Summary report of all history meetings.
Single meeting statistics includes: attendees information, meeting duration,
timeline of attendees joining meeting.
NAT Traversal
ICE, Turn, Stun, various NAT firewall traversing technology
Server Scalability
Multiple units expansion, Load-balanced working mode for Multiple Server
(pending)
Multi-language
English, German, French, Spanish, Simplified Chinese, Japanese and etc.
Protocols / Standards
H.264, H.265, VP8, BFCP, IETF SIP, G.722, G.711a/u, Opus, IPv4, UDP,
TCP/TLS, RTP, RTCP, SMTP, HTTP(s)/WSS, SSH, DNS, DTMF, NTP, SRTP,
DTLS-SRTP, SSL, H.323 and H.239 (pending)
Power Supply
550W (Redundancy PSU)
Suitable Cabinet
2U rack design, support 19-inch cabinet and guide rail
Physical size
Dimension: 430mm (W) x 650mm (L) x 88mm (H)
USB Interfaces
3x USB 3.0 (2 rear, 1 via header); 3x USB 2.0 (2 rear, 1 via header)
Network Interfaces
2x RJ45 Gigabit Ethernet LAN ports; 1x RJ45 Dedicated IPMI LAN port
Display Ports
1 x VGA port
Temperature and
Humidity
Operation 0°C to 45°C, Humidity: 10 % to 90% Non-condensing
Page 23

P a g e | 22
IPVT10 User Guide
Version 1.0.2.8
Table 3: IPVT10 Server Meetings Performance
Current
Meeting
Number
Max
Video
Feeds
Max Participants
Descriptions
1
120
300 (Dual NICs)
200 (Single NIC)
• If the participant only uses single NIC to join into the
conference, it only supports 200 participants in the
conference which is limited by the bandwidth.
• If the participants use dual NICs at the same time,
the participants could use different IP addresses to
join into the meeting, and the participants amount is
up to 300.
• Supported H.264/VP8
2
120
200
• Supported H.264/VP8
4
120
160
• With more conferences at the same time for the
server loading, the maximum number of participants
in the conference will be less.
• Supported H.264/VP8
6
120
140
• With more conferences at the same time for the
server loading, the maximum number of participants
in the conference will be less.
• Supported H.264/VP8
8
120
130
• With more conferences at the same time for the
server loading, the maximum number of participants
in the conference will be less.
• Supported H.264
10
120
120
• With more conferences at the same time for the
server loading, the maximum number of participants
in the conference will be less.
• Supported H.264
Note:
Under poor network condition, packets loss will cause the performance degradation.
Page 24
P a g e | 23
IPVT10 User Guide
Version 1.0.2.8
GETTING STARTED
Figure 1: IPVT10 Video Conferencing System Architecture
IPVideoTalk ID
GVC32xx client is a full-HD conferencing client. When users first attempt to connect the GVC32xx client to
the IPVT10 conferencing system, it gets registered with an auto-assigned IPVideoTalk ID, starting from the
IPVideoTalk ID “100”. This IPVideoTalk ID is a SIP account and when the GVC32xx connects with IPVT10
server, users could initialize conferences, make calls, join conferences with this IPVideoTalk ID on GVC32xx
client.
The following figure shows that the IPVideoTalk ID in the GVC32xx client is registered (The IPVideoTalk ID
is highlighted green):
Figure 2: IPVideoTalk ID in GVC32xx Client
For more operating instructions on the GVC32xx client, please visit our website
www.grandstream.com/support and download the latest version of GVC32xx User Guide for more details.
Page 25

P a g e | 24
IPVT10 User Guide
Version 1.0.2.8
Conference Management Platform
Main Features
• Instant Meeting: Create a temporary meeting for a certain conference client
• Schedule Meeting: Create a remote scheduled meeting for a certain conference client
• Join Meeting: Join a meeting through a WebRTC client
• Manage Meeting: Start/Cancel scheduled meeting, check meeting history, participants list after
the meeting, information statistics and etc.
• Manage Recording Files: Check/Download cloud recording files
• Manage Client: Manage all conference clients which are connected to this conferencing system,
such as GVC32xx
• Administrator could create the user accounts for the conference management platform so that
multiple users could login the platform.
Login to Conference Management Platform
1. Login URL: The IP address or domain name which is configured by the administrator on the IPVT10
server’s Web Deployment Platform
2. Login Account: The default account user name is “admin”, and the default password is “admin”. The
user name and password could be modified on IPVT10 server’s Web Deployment Platform.
3. Login Web Deployment Platform: Users could input the login URL in the browser on the PC and use
the login user name/password to log in the platform.
Note: For more details, please see the IPVIDEOTALK PORTAL section.
Page 26

P a g e | 25
IPVT10 User Guide
Version 1.0.2.8
CREATE MEETINGS
Users can create meetings on the GVC32xx client or Conference Management Platform.
Features
GVC32XX
Conference Management
Platform
Instant Meeting (Personal
Meeting Room)
√
√
Schedule Meeting (Video
Conference)
○
(Only support to invite
IPVideoTalk ID)
√
Schedule Meeting (Webinar)
×
√
Start Scheduled Meeting
√
√
Join Meeting √ √
Page 27

P a g e | 26
IPVT10 User Guide
Version 1.0.2.8
JOIN MEETING
Users could join a meeting via WebRTC Client, IE or Safari, IPVideoTalk Mobile App, GVC32XX, and using
a phone to call in the meeting.
Table 4: Session Features
Session Features
GVC32XX
Firefox/
Chrome
Internet
Explorer/Safari/
Edge
Opera
Mobile App
Join a meeting
√
√ √ √
√
Host a meeting
√
√ √ √
√
Audio
Connect via mic and
speakers (VoIP)
√
√ √ √
√
Mute √ √ √ √
√
Screen Sharing and
Content Sharing
View Presenter's
screen
√
√ √ √
√
Share screen
√
√ × √
×
Share an application
√
√ × √
×
Webcams (HD)
Share own webcam
√
√ × √
√
View shared
webcams
√
√ √ √
√
Host Control
Add participant
√
(Add GVC32XX
participant only)
√ √ √
√
Delete participant
×
√ √ √
√
Mute all × √ √ √
√
End meeting
√
√ √ √
√
Chat
All group
chat/Panelists group
chat
×
√ √ √
√
Page 28

P a g e | 27
IPVT10 User Guide
Version 1.0.2.8
Private chat
×
√ √ √
√
Forbid group chat
×
√ √ √
√
Cooperation
Raise Hand
√
√ √ √
√
Q&A × √ √ √
√
Cloud recording
√
√ √ √
√
Facebook/YouTube
Live
×
√ √ √
×
To join meeting via WebRTC client, the users can use Firefox/Chrome/Opera browsers. If users join a
meeting via IE, please install the plug-in before joining into a meeting (IE does not support WebRTC). Follow
one of the 2 ways below to join meeting via WebRTC Client:
1. Open link https://meetings.ipvideotalk.com on Firefox/Chrome/Opera browser or IE/Safari, fill in
meeting ID, user name, and Email address to join the meeting.
2. Click the meeting URL in the meeting invitation Email to join the meeting.
The following chapters describe more details about using GVC32XX, WebRTC Client and IPVideoTalk
Mobile App to join meeting.
Page 29
P a g e | 28
IPVT10 User Guide
Version 1.0.2.8
GVC32XX CLIENT
About GVC32XX
The GVC32XX is a ground-breaking solution that offers businesses a revolutionary video conferencing
system with unprecedented flexibility and the power of support for multiple popular video conferencing
protocols and platforms right out of the box. The SIP-based GVC32XX supports Grandstream’s robust
IPVideoTalk cloud platform for plug and play video conferencing while also being interoperable with any 3rd
party SIP video conferencing platform - thus offering a great option to expand or implement a 3rd party
platform. The GVC32XX eliminates the traditional barriers to video conferencing and sets a new bar for
business-class video conferencing solutions by offering industry-leading flexibility, interoperability, system
compatibility, application richness and ease of use.
Note:
Before using IPVT10 Service, please make sure your GVC320X/GVC3210 is on firmware version
1.0.3.51/1.0.1.20 or later. For more information about upgrading, kindly refer to GVC32XX release note and
user manual on http://www.grandstream.com/support.
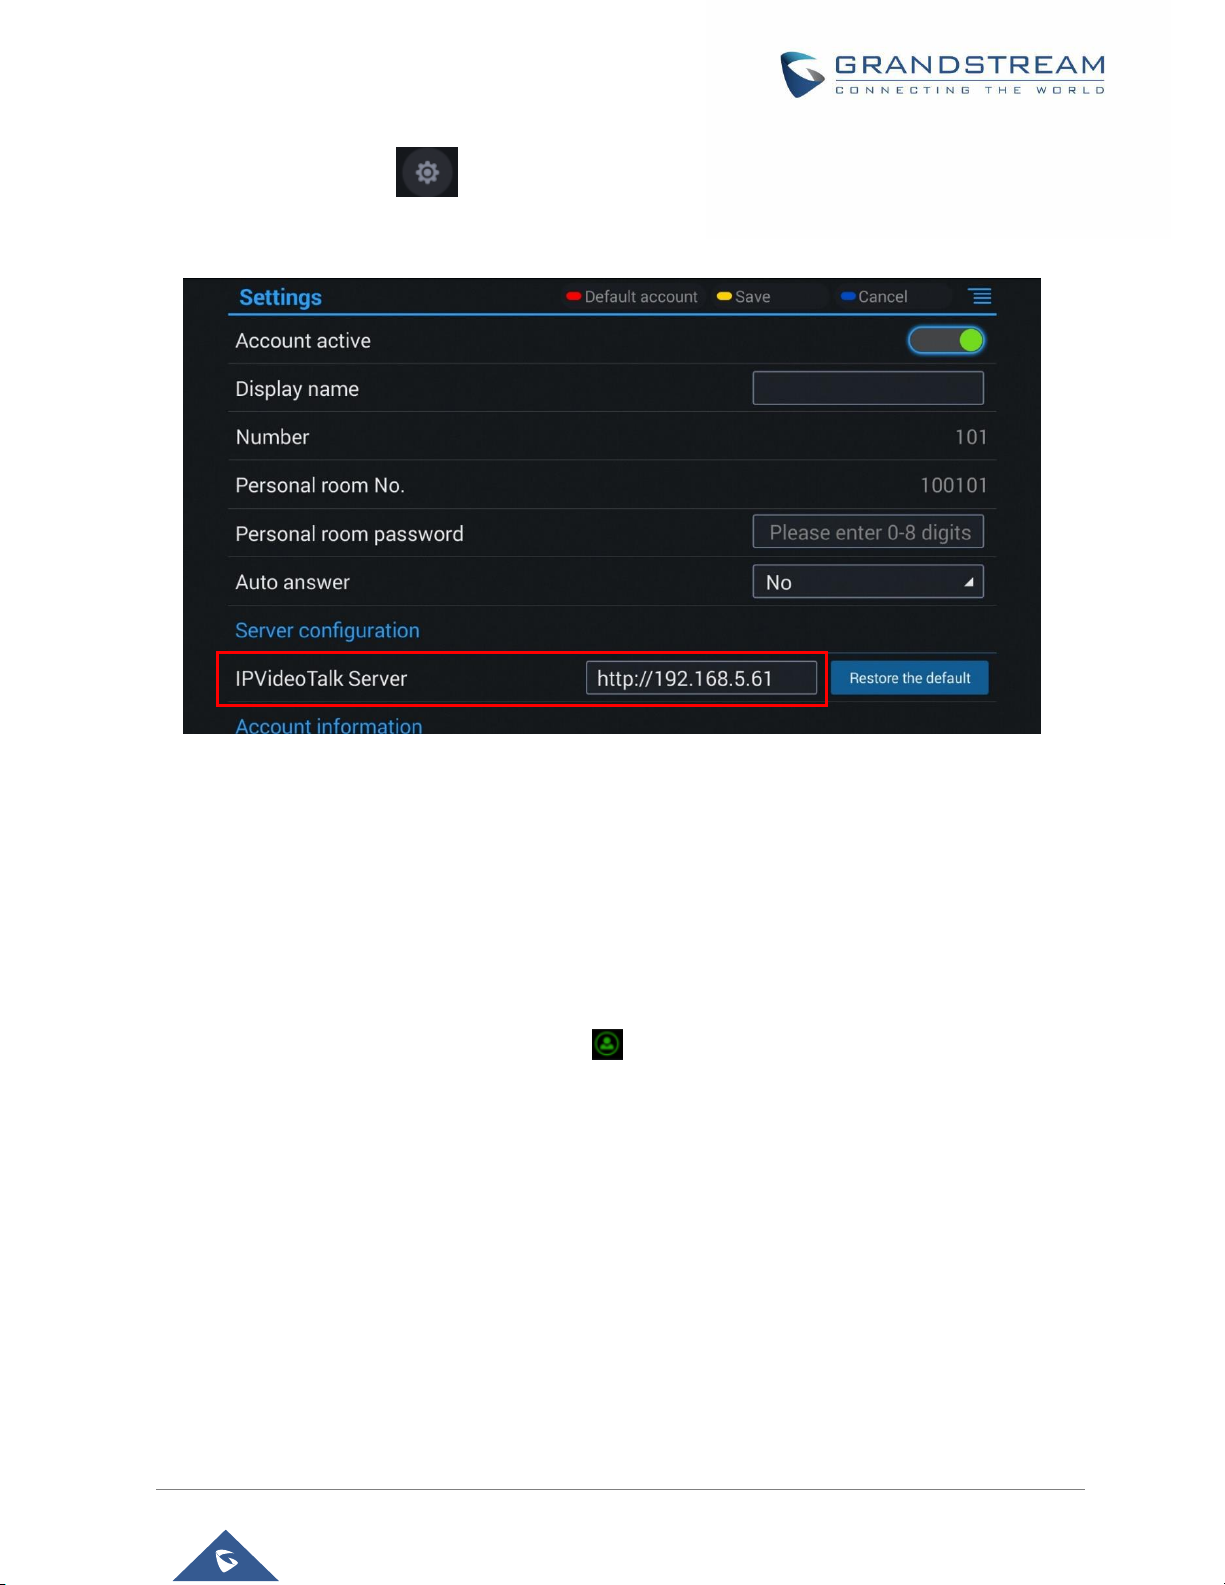
Configure IPVT10 Server Address
If users want to use IPVT10 service on GVC32xx client, users need to configure the IPVT10 server address
on the GVC32xx client.
1. Power on the GVC32xx client, and ensure that the GVC32xx client connects to the network correctly.
2. Start the IPVideoTalk application on the desktop of the GVC32xx client .
Figure 3: IPVideoTalk Application
Page 30
P a g e | 29
IPVT10 User Guide
Version 1.0.2.8
3. Select “Settings” option , and access the configuration page.
4. Enter the IP address/Domain name of the Conference Management Platform in “IPVideoTalk Server”.
Figure 4: IPVideoTalk Application Configuration Page
5. Save and apply the configuration, and the GVC32xx client will connect to the IPVT10 server.
Activate/De-Activate IPVideoTalk ID
When the GVC32xx client connects and registers on IPVT10 server, an IPVideoTalk ID will be autoassigned on the GVC32xx client (The first GVC32xx will have “100” as IPVideoTalk ID), and it will be
activated. If the account status icon turns to green , users could use the IPVideoTalk services normally.
If the account status icon turns to grey, the account is de-activated so that users cannot use the IPVideoTalk
services, please kindly activate the IPVideoTalk ID following the steps below:
1. Go to GVC32XX LCD Menu→Application and click on "IPVideoTalk" application.
Page 31

P a g e | 30
IPVT10 User Guide
Version 1.0.2.8
Figure 5: IPVideoTalk Application
2. Open IPVideoTalk application, click on "Settings", and check "Account Active". If this option is checked,
it means the IPVideoTalk ID has been activated. See figure below:
Figure 6: IPVideoTalk AppSettings
3. Users could edit "Display Name". The Display Name will be displayed on the callee side when the users
make an IPVideoTalk call.
4. When users finish editing, click on the yellow shortcut key on GVC remote control to save the
configuration.
Page 32

P a g e | 31
IPVT10 User Guide
Version 1.0.2.8
5. Users will see the Account displayed with a green icon on the top status bar of GVC32XX display device,
which indicates the IPVideoTalk ID is registered. This account can be used to establish call with other
IPVideoTalk IDs or join IPVideoTalk meetings now.
Start a Meeting
Users could start an instant meeting on GVC32XX, or schedule a meeting via IPVideoTalk Portal.
Instant Meeting
An instant IPVideoTalk meeting can be started on GVC32XX by the following steps:
1. On GVC32XX, select LCD menu→Call icon to access the dialing interface.
2. Or, users could go to IPVideoTalk Application, select “Dial” option to access the dialing interface.
3. Enter another GVC32XX’s IPVideoTalk ID, or select it from contacts/call history.
4. Press the dialing button on the remote control, or click on the "dialing" icon to start a
meeting.
Note:
Users could also search for business contacts on dialing page via contacts name or IPVideoTalk ID number.
Additionally, users could start an instant meeting by only clicking on the "dialing" icon on dialing
interface on GVC32XX without entering any IPVideoTalk ID. The GVC32XX will be the meeting host by
default. IPVideoTalk cloud system will assign a meeting ID to this instant meeting for other users (such as
WebRTC client) to join the meeting.
If the IPVideoTalk ID on the GVC32XX has another session in progress, the user cannot start an instant
meeting on the GVC32XX. For instant, the GVC32XX passes the meeting host to a WebRTC client and
leaves the meeting, the user cannot start an instant meeting on this GVC32XX.
Schedule a Meeting
Users could schedule a meeting on IPVideoTalk Portal. For details, please check chapter Meetings.
Page 33

P a g e | 32
IPVT10 User Guide
Version 1.0.2.8
Start a Webinar
IPVideoTalk offers now the possibility to schedule a Webinar through IPVideoTalk Portal or from a GVC32xx
device.
When schedule a Webinar, the default Webinar will stay at preparation period, the participants cannot join
into the Webinar until the scheduled time arrives.
Users could join into the Webinar as the host via browser. Once the Webinar is ready, users could click to
start the Webinar and the participants could join into the Webinar.
Conference Control
Users could use the conference control features on GVC32XX to manage the participants during the
meeting. If users need to experience more functional control features during the conference, please join
into the conference as the host via WebRTC client.
See the following figure:
Figure 7: GVC32XX Meeting Screen
Redial
If there is a failed call, users could redial this number by clicking on this button. If multiple participants
are in the previous call, “Redial” will call all the participants.
Add Member
Users could click on this button to open the dialing interface, and add participants into the exiting
conference.
Page 34

P a g e | 33
IPVT10 User Guide
Version 1.0.2.8
Conference Control
Figure 8: Conf Control
1. If the user is muted by the meeting host, there will be an icon shown on the label; in this case,
the user cannot unmute himself/herself, only the host can do it. If the user mutes himself/herself, the
user could unmute by himself/herself.
2. If the video from GVC32XX is terminated by the meeting host, the icon will be shown on the label.
Users can click on this icon and enable/disable the video from GVC32XX during the meeting.
Figure 8: Conf Control-Me
Page 35

P a g e | 34
IPVT10 User Guide
Version 1.0.2.8
3. If the participant needs help or wants to be unmuted, the participant could click on Raise Hand button
, and the meeting host will see the Raise Hand icon in Participants List. The meeting host cannot
click to raise hand.
Note:
• If sharing webcam fails, it may be caused by the user’s current role, which does not have the
permission to share the webcam.
• When all the participants are muted, IPVT10 generates a comfort noise to make users aware that
the conference is still in progress.
Layout
Select "Cloud Conference Layout" to control the IPVT conference room Layout. There are four Layout
modes: "Pave", "1+3", "1+5" and "1+7".
Figure 8: Layouts Options
Hold
This is used to hold/resume the conference. If the conference is put on hold, the video will stop and
users cannot see the video from all other participants.
Page 36

P a g e | 35
IPVT10 User Guide
Version 1.0.2.8
Presentation
This is used to open/close sharing presentation. If this feature is enabled, all participants will see the
presentation from the GVC32XX.
If starting presentation fails, it may be caused by the user’s current role, which does not have the
permission to start presentation.
More
Users could click on this option to use the 3rd party application (This option will be found only if the
GVC32XX has already installed the 3rd party application), check the Call Info, Set PIN Code, and Open
DTMF, check Meeting Info and Participants list.
Raise Hand
If the participant needs help or wants to be unmuted, the participant could click on Raise Hand button,
and the meeting host will see the Raise Hand icon in Participants List. The meeting host cannot click
to raise hand.
End Meeting
If selected, an End Conference prompt will be shown on the screen, if user clicks on OK, all participants
will be disconnected from the conference room and the call will be ended.
Figure 9: End Conference prompt
Request to Share Webcam
If the GVC’s camera is not shared during an IPVideoTalk meeting, the WebRTC acting as host can request
GVC clients to share their camera. A prompt will be displayed on the screen to accept or reject the request
as shown in the figure below.
Page 37

P a g e | 36
IPVT10 User Guide
Version 1.0.2.8
Figure 10: Request to Share Webcam
Note: The firmware of GVC320X/GVC3210 should be 1.0.3.51/1.0.1.20 or later version (respectively).
Otherwise, the GVC32XX will not receive the request.
Recording
Local Recording
1. When the GVC32XX is in an IPVideoTalk video call, the user could click on the bottom of the
call interface, or on the remote control to start recording.
2. Once start recording, the audio and video on the GVC32XX will be recorded. Users could see the
recording icon flashing at the upper left corner during recording. If the meeting participant
enables presentation function during recording, it will record the presentation as default. If the meeting
participant disables presentation function during recording, it will switch to record the video and audio.
Click button again to stop recording, and the recording file will be saved in the GVC32XX
automatically.
3. Each recorded file will not be bigger than 1.9G, the system will create a new file automatically to
continue recording if the previous recorded file exceeds 1.9G. There will be a prompt to indicate the
storage space is insufficient if the disk storage is full.
4. Once the recording is completed, users could go to Recording application on the GVC32XX to check
the recording file, or look for the recording file in File Manager application. Users could play, export,
lock/unlock, send, rename or delete the recording file.
Cloud Recording
GVC32XX support cloud recording feature.
Prerequisites: IPVT 10 server has enough storage space.
1. When users join into the IPVideoTalk meeting, users could click on recording button or shortcut
button to see the recording menu which including “Start local recording” and “Start cloud recording”.
Page 38

P a g e | 37
IPVT10 User Guide
Version 1.0.2.8
Figure 11: Cloud Recording
2. Users could start the cloud recording by selecting “Start cloud recording” option. If there is no more
available storage, there will be a prompt to show that the storage space is full.
3. All the meeting participants will see the “Cloud Recording” icon during the meeting,
including GVC participants.
4. When finish recording, users could click on the recording button or shortcut button and select “Stop
cloud recording” option to stop cloud recording.
5. The recording files will be saved in the storage server, and users need to login IPVideoTalk Portal
to check or download the recording files.
Check Meeting Information
Users could check the meeting subject, meeting ID, Host, Password and URL during the meeting. The
meeting host could share the meeting ID or URL for other participants to join the meeting via
WebRTC/IPVideoTalk Mobile App.
1. During meeting, click on “More” icon on GVC32XX, then click on "Meeting Info".
2. GVC32XX will show the information prompt as below:
The meeting Subject, Meeting ID, Host, Password, URL, Host code, PSTN access number (for
IPVideoTalk Pro and Plus) and Server location area will be listed there.
Page 39

P a g e | 38
IPVT10 User Guide
Version 1.0.2.8
Figure 12: Meeting Information
Join Meeting
On GVC32XX, users could join a meeting by dialing the host’s IPVideoTalk ID number or the meeting ID.
The users can find the meeting ID in the meeting invitation Email, or contact the host directly for the
IPVideoTalk ID number or the meeting ID.
Go to dialing interface, input the meeting ID or meeting host’s IPVideoTalk ID number, and press the
dialing button to join the meeting.
If the meeting status is “To be hosted” or “In Process”, users could dial into the meeting successfully.
If the meeting status is “Ended” or “Not Started”, the call will be failed, and users could see the prompt
on GVC32XX output.
If the meeting has set the password, users need to enter the password in the DTMF input box according
to the IVR, and press “#” key to confirm the password.
Figure 13: Input Meeting PIN Code
Page 40

P a g e | 39
IPVT10 User Guide
Version 1.0.2.8
If the user is the participant in the invited list, the user does not need to input the PIN Code.
If the meeting is not started yet, the user cannot join the meeting by dialing the meeting ID.
If the WebRTC host leaves the meeting without ending it, and the meeting is still in process, other
participants can still join into the meeting.
Note: When using virtual devices, the user won’t be able to join meeting using GVC32xx conferencing
systems/endpoints.
Schedule Meeting
To schedule an IPVideoTalk meeting using IPVideoTalk service, the users need to login in IPVideoTalk
Portal first. Please refer to chapter Meetings for more details.
Check Scheduled Meetings
Once the meeting is scheduled on IPVideoTalk Portal, the scheduled meeting will be provisioned to the
GVC32XX host. Users can check the meeting details under Schedule interface in GVC LCD or Web UI.
1. On the GVC32xx client desktop, click to open the IPVideoTalk application, and click on the "Schedule"
icon .
2. Or, on the GVC32XX LCD idle screen, click on the "Schedule" icon .
3. In the scheduled meetings list, the IPVideoTalk meeting scheduled via IPVideoTalk service will be
marked with icon.
Figure 14: Schedule List
4. Select the meeting entry and press "OK" button on GVC remote control to check the detailed
information of the scheduled meeting.
Start Scheduled Meeting Automatically
A meeting notification will be prompted on the host GVC32XX display device 10 minutes and 5 minutes
before meeting starts. Once the scheduled time arrives, the scheduled meeting will be started and
GVC32XX will dial all invited participants automatically.
Page 41

P a g e | 40
IPVT10 User Guide
Version 1.0.2.8
Note:
1. When the scheduled meeting time arrives, if the host GVC32XX is still in a call, the meeting will not start.
The users can start the meeting manually on GVC32XX after the current call is ended.
2. If the user set DND on GVC32XX, the meeting cannot start automatically. The user could disable DND
and start the meeting manually.
3. If the IPVideoTalk ID on the GVC32XX has another session in progress, the user cannot start an instant
meeting on the GVC32XX.
Start Scheduled Meeting Manually
If users want to start the scheduled meeting before the scheduled time, or if users have missed the
scheduled meeting, users could start the meeting manually.
1. Go to GVC32XX schedule list on LCD by clicking on icon and select the meeting entry in the
meeting history.
2. Press the Call button on the GVC remote control, or click on "Start conference" option on
GVC32XX display device.
3. If the IPVideoTalk ID on the GVC32XX has another session in progress, the user cannot start an instant
meeting on the GVC32XX.
Cancel Scheduled Meeting
Users could cancel the scheduled meeting at any time before the meeting starts. IPVideoTalk cloud system
will send Emails to the invited participants notifying them the meeting is canceled.
1. Go to "Schedule" List on GVC32XX by clicking on icon .
2. Select the meeting that the user wants to cancel.
3. Click on "Cancel conf" option on GVC32XX display device.
Note:
If the meeting is canceled, the meeting entry will be removed from the "Schedule" list, but users could find
the meeting history in IPVideoTalk Portal.
Page 42

P a g e | 41
IPVT10 User Guide
Version 1.0.2.8
IPVideoTalk Application
GVC32XX comes with a built-in IPVideoTalk ID as well as a pre-installed IPVideoTalk application. Users
could experience IPVideoTalk service out-of-box without additional efforts to install any other applications.
IPVideoTalk application includes the IPVideoTalk services such as starting instant meetings, call features,
meeting list, enterprise contacts, notices feature and settings. To access IPVideoTalk application, go to
GVC32XX LCD menu→Applications→IPVideoTalk. Users will see the following options in IPVideoTalk
application:
Figure 15: IPVideoTalk Application Options
1. Instant Meeting
When the user clicks on this option, the IPVideoTalk Personal Room will be created immediately, and the
GVC user will join into the meeting afterwards.
2. Schedule Meeting
When the user clicks on this option, it will show the Schedule Meeting interface. The user needs to fill the
meeting title, schedule, invitees and other meeting information to save the scheduled meeting.
3. Meeting List
All IPVideoTalk upcoming meetings will be shown on the list
Note: If the meeting is ended/cancelled, the meeting will not be shown on this list. The user needs to login
IPVideoTalk Portal to check the meeting history
4. Contacts
This is used to show the business contacts. If the device is not linked on IPVideoTalk Portal, this will be
empty.
Page 43

P a g e | 42
IPVT10 User Guide
Version 1.0.2.8
5. Dial
When the user clicks on this option, the user will be directed to dialing interface, input other GVC’s
IPVideoTalk ID to dial out and the meeting will be created immediately.
6. Notices
This is used to receive the notices from IPVideoTalk cloud system. Users can check system messages here.
7. Settings
This is used to configure IPVideoTalk ID related settings. Users may activate the IPVideoTalk ID, edit display
name and check device code.
Contacts
After the users link the IPVideoTalk ID on the IPVideoTalk Portal, the users could check the business
contacts here (if the contact exists in IPVideoTalk Portal). The contacts are centrally managed in the
IPVideoTalk Portal, and GVC32XX can sync up with the IPVideoTalk Portal for the contacts in IPVideoTalk
Portal. Currently, the users cannot directly edit the business contacts on GVC32XX.
Figure 16: IPVideoTalk Application→Contacts
Group
This is used to check the contacts under this group.
Contacts
This is used to check the detailed information of the contacts, such as name, phone number, Email
address and so on. The green dot represents "online, and the grey dot represents "offline".
Page 44

P a g e | 43
IPVT10 User Guide
Version 1.0.2.8
Public Device
This is used to check the detailed information of the device, such as device name, IPVideoTalk ID, and
so on. The green dot represents "online" and the grey dot represents "offline".
Call
Users could select one contact and press this button to dial out. This will join an IPVideoTalk meeting
with the callee immediately. If the callee does not have an IPVideoTalk ID, this call cannot be made.
Refresh
Users could select "Refresh" to refresh online status.
Search
Users could input contact name or IPVideoTalk ID to search the entry.
Batch Call
Users could select multiple contacts, and make batch call to dial all selected contacts into the one
IPVideoTalk meeting.
Notices
"Notices" is used to receive message from IPVideoTalk server. The following table lists possible notices
from IPVideoTalk server and what the user is expected to do after receiving the message.
Table 5: Notices and Solutions
Notices
Solutions
When the user links the device on
IPVideoTalk Portal using MAC
address, the GVC32XX will receive a
message to reply to authentication
request.
Users could open this message and select "Yes" or "No" to
reply. If “Yes” is selected, the device can be linked to
IPVideoTalk Portal.
When the user’s GVC32XX firmware
is too old to be used with the
IPVideoTalk service, the user will
receive a notice.
Click to open the message, the user could select to upgrade
the device. The GVC32XX will be configured with an available
firmware upgrading path to upgrade to the required firmware
version.
Page 45

P a g e | 44
IPVT10 User Guide
Version 1.0.2.8
When there is an upgrade on
IPVideoTalk cloud system, the users
will receive notifications from the
server about upgrading time and
duration.
During cloud system upgrade and maintenance, the users
cannot use the GVC32XX for IPVideoTalk meetings. Please
do not schedule meetings during the upgrade and
maintenance period.
Others
Users may receive other system notification messages,
please pay attention to the notices.
Unread Messages
When there is an unread message in GVC32XX LCD menu → Applications → IPVideoTalk application
→ Notices, GVC32XX will notify users via the following ways:
• Users could find the IPVideoTalk icon on the system status bar on the top of the screen.
• In LCD menu → Applications, users could find the red digit on "IPVideoTalk" application
indicating the number of unread messages.
• In LCD menu → Applications → IPVideoTalk application → Notices, users could find the red digit
showing the number of unread messages. The format of the message is "x/y" where "x" is the number
of unread messages and "y" is the number of total saved messages. Please see figure below:
Figure 17: IPVideoTalk Application Interface
To check and reply (if required) messages in "Notices" section:
1. Select "Notices" and open the notices list.
2. Select the message. There will be a dialog prompted to display message content.
Page 46

P a g e | 45
IPVT10 User Guide
Version 1.0.2.8
3. For some notices, users may be required to reply. Please use GVC remote control to navigate and
make necessary selections to finish the operation. The following figure shows the authentication
request message for users to confirm to link device to IPVideoTalk Portal when the link operation is
done via MAC address.
Figure 18: Notice Message - Authentication Request to Link Device via MAC Address
Settings
Users could configure IPVideoTalk ID related settings and check information in GVC32XX LCD
menu→Applications→IPVideoTalk application→Settings. See figure below:
Figure 19: IPVideoTalk Application Settings
• Account Active
This is used to activate/de-activate IPVideoTalk ID. Green icon indicates active IPVideoTalk ID
while Grey icon indicates inactive IPVideoTalk ID. Users can click on this box to activate and
de-activate IPVideoTalk ID.
Page 47

P a g e | 46
IPVT10 User Guide
Version 1.0.2.8
Display Name
This is used to set the display name for the IPVideoTalk ID on GVC32XX. When the user uses this
device to dial out, the callee will see the display name.
Personal Room Number
Each GVC32xx device has one Personal Room Number, the instant meeting/meeting now will use this
Personal Room Number to start the meeting. The participants could join into the meeting via this
Personal Room Number any time.
Personal Room Password
Each GVC32xx device has one Personal Room Password, the default password is none. If the owner
sets the Personal Room Password, all participants need to input the correct password to join into the
Personal Room. Users could update the Personal Room Password, or login IPVideoTalk Portal to
update the Personal Room Password.
IPVideoTalk Service Address
If the users would like to use the Enterprise internal deployed server, or try our trial service system
(which might not be as stable as the official IPVideoTalk platform), please obtain the trial service
address from Grandstream and enter it here.
Device Code
This is a six-digit code for the device to link to IPVideoTalk Portal quickly. Authentication response is
not required for the GVC32XX user to link the device if device code is entered in IPVideoTalk Portal.
Number
This is the IPVideoTalk ID number assigned by IPVideoTalk cloud system and it cannot be edited.
Other IPVideoTalk ID users could dial this number to join the meeting. If the IPVideoTalk ID on the
GVC32XX fails to obtain association with the IPVideoTalk cloud system, this field will show the MAC
address of GVC32XX instead of IPVideoTalk ID number. In this case, please check your network
connection, network settings, or trial service settings on the GVC32XX to make sure it has properly
connected to the IPVideoTalk platform over the Internet.
Business
This is used to show the enterprise name if the user has linked the device on IPVideoTalk Portal.
Save
After editing, users need to save the configuration by pressing the yellow shortcut key on GVC remote
control, or selecting the "Save" option at the top right corner to have the changes take effect.
Page 48

P a g e | 47
IPVT10 User Guide
Version 1.0.2.8
Note:
The IPVideoTalk ID number is unique for each GVC32XX, and it doesn’t change upon re-activation or reregistration. If the GVC32XX fails to obtain IPVideoTalk ID number from IPVideoTalk cloud system or fails
to register/activate IPVideoTalk ID, this IPVideoTalk ID cannot be used to make or receive calls.
Messages on GVC32XX Main Page
The main page of the GVC32XX displays important notification messages of IPVideoTalk service, such as
low firmware notification, temporarily out of service for maintenance notification, which may cause the users
to be unable to use IPVideoTalk service properly.
1. The GVC32XX supports displaying important notification messages on the bottom of its main page.
Press the yellow key on the remote control to view the message details. The firmware of the
GVC32XX is too low, please update the firmware as soon as possible.
Figure 20: GVC32XX Home Page
2. Display the notification messages in different priority (e.g., the priority from high to low is low firmware
notification, system upgrade maintenance notification), and display the latest message in accordance
with the release time.
• Low firmware notification. When the user upgrades the firmware to the latest version on the
GVC32XX, the notification message displayed on the bottom of the screen will disappear.
• System upgrade maintenance notification. Once the maintenance is done, the notification
message displayed on the bottom of the screen will disappear.
Page 49

P a g e | 48
IPVT10 User Guide
Version 1.0.2.8
WEBRTC CLIENT
About WebRTC
IPVideoTalk WebRTC client allows users to use IPVideoTalk service without downloading any application
or plug-in, and users could join a meeting via web browser directly. WebRTC client offers faster, simpler,
and more convenient user experience than other clients.
Internet Explorer does not support WebRTC, please install the plug-in before join meeting via the browsers.
Please click the meeting URL to join a meeting after installation.
Browser and Operating System
Table 6: Browser and Operating System
Operating System
• Windows
• Mac
• Linux/Ubuntu
• Google Chrome OS
Web Browser
• Mozilla Firefox V52 or later
• Google Chrome V52 or later
• Win Opera V36 or later, MAC Opera V32 or later
• Internet Explorer V11 or later
• Apple Safari V11 or later
Internet Connection
• 3 Mbps or better (broadband recommended)
• 3G connection or better (Wi-Fi recommended for VoIP audio) for Chromebooks
Software/Hardware
• Screen sharing extension for Mozilla Firefox (if Presenter)
• Meeting plug-in for IE
• Microphone and speakers
Note:
Internet Explorer/Safari do not support screen sharing function currently. If there is no prompt to remind
you to install the plug-in, please upgrade your browser to the latest version or use the supported browsers
to join meeting such as Firefox, Chrome or Opera.
Page 50

P a g e | 49
IPVT10 User Guide
Version 1.0.2.8
Features Supported on Different Browsers
Table 7: Supported Features with Different Browsers
Session Features
Firefox
Chrome
IE
Safari (Beta)
Opera
Edge
Requirement
Operating System
Windows
Mac
Linux
Ubuntu
Windows
Mac
Linux
Ubuntu
Windows(IE)
Apple(Safari)
Windows
Mac
Linux
Ubuntu
Windows 10
(version
1703+)
Browser's Version
Firefox
(V52+)
Chrome
(V52+)
IE (V11+)
Safari (V11+)
Opera
(V36+)
EdgeHTML
(V15+)
Requires Plugin Instal
lation
× × √ × ×
×
Join & Host
Join a meeting
√ √ √ √ √
√
Host a meeting
√ √ √ √ √
√
Audio
Connect via MIC and
speakers (VoIP)
√ √ √ √ √
√
Mute √ √ √ √ √ √
Screen sharing and
content sharing
View the Presenter's
screen
√ √ √ √ √
√
Share your screen
√ √ × × √
×
Share an application
√ √ × × √
×
Webcams (HD)
Share your own
webcam
√ √ × × √
√
View shared webcams
√ √ √ √ √
√
Chat
Group chat
√ √ √ √ √
√
Private chat
√ √ √ √ √
√
Host Control
Page 51

P a g e | 50
IPVT10 User Guide
Version 1.0.2.8
Join a Meeting
WebRTC client does not support initiating a meeting as a host via web browser. Users could join a hosted
meeting with WebRTC client. To make sure the users can join the meeting successfully using WebRTC, the
users need to have a working microphone device connected to the PC. Otherwise, users will not be able to
join the meeting properly.
Join a Meeting with Meeting ID
Open the Conference Management Platform on the browser of the PC, and click on the “Join Meeting”
option at the right upper corner to join into the IPVideoTalk meeting.
Users could input the Meeting ID, Name and Email Address to join the meeting. Users could find the meeting
ID from the notification Email, or users could contact the meeting host to obtain the meeting ID.
Mute all/Unmute all
√ √ √ √ √
√
Mute one
participant/Cancel
√ √ √ √ √
√
Forbid group chat
√ √ √ √ √
√
Remove participant
√ √ √ √ √
√
End meeting
√ √ √ √ √
√
QoS Information
Network status
√ √ √ √ √
√
Server location
√ √ √ √ √
√
Audio/Video packet
loss
√ √ √ √ √
√
Cooperation
Raise Hand
√ √ √ √ √
√
Q&A √ √ √ √ √ √
Cloud recording
√ √ √ √ √
√
Facebook/YouTube
Live
√ √ √ √ √
√
Page 52

P a g e | 51
IPVT10 User Guide
Version 1.0.2.8
Figure 21: WebRTC “Join a Meeting” Interface
Join a Meeting via Notification Email
In the IPVideoTalk meeting notification Email, users could join the meeting by clicking on "Click Here to Join
the Meeting". The default browser needs to be configured as Firefox, Opera or Chrome so the meeting link
can be automatically opened with the supported WebRTC browser.
Page 53

P a g e | 52
IPVT10 User Guide
Version 1.0.2.8
Figure 22: Notification Email
If the host has set password authentication for the meeting, users need to input the password to join the
meeting successfully. Please see figure below:
Page 54

P a g e | 53
IPVT10 User Guide
Version 1.0.2.8
Figure 23: Input Meeting Password
Notes:
1. Users need to ensure that the microphone device is available to be used with PC. Once the browser
shows a window to indicate to share microphone device, please choose "Allow" to join the meeting
successfully.
2. If the host has not entered the meeting room yet, users need to wait until the host joins the conference.
Before the host joins the conference, other participants will hear the waiting music.
3. If the participant enters the meeting more than 10 minutes before the meeting’s scheduled start time,
the meeting will be shown as not existed. Please wait until at least 10 minutes before the meeting start
time to join the meeting.
Participants Register
If the current meeting requires the meeting participants to register, the participant will see an URL before
joining in the meeting, and it will lead the user to register by clicking on this URL, and finish registering with
the participant’s information. The meeting scheduler could customize the contents on the registration page
when scheduling an IPVideoTalk meeting.
1. Click on the register URL to enter the register page. (The participant could click on the URL which is
used for joining in the meeting, and if the meeting requires the participant to register, it will direct the
participant to the register page.)
Page 55

P a g e | 54
IPVT10 User Guide
Version 1.0.2.8
Figure 24: Sign-up Page
2. The user needs to input the information: Name, Email, and Country (current country).
3. When finish registering, the user will receive a confirmation Email, the user may click on “Click Here
to Join the Meeting” in the Email to join in the meeting. The meeting system will use the register Name
and Email as default when joining into the meeting. If the Webinar needs to be verified by the organizer,
the participants/invitees will not receive the invitation Emails, and cannot join into the meeting
immediately until the request passes the verification by the scheduler.
4. If the Email had been registered before, the system will indicate the user whether to resend another
Email. When done, the user will receive a confirmation Email. If the user input a new Name to join the
meeting, the system will use the new Name for the user in the meeting.
5. If the meeting is terminated/canceled/expired, the user cannot continue to register.
6. When registration is finished, users could load the meeting into Google Calendar or Outlook.
Page 56

P a g e | 55
IPVT10 User Guide
Version 1.0.2.8
Figure 25: Add to Calendar
Install Plug-in for IE
Internet Explorer does not support WebRTC, please install the plug-in before join meeting via the browsers.
Please follow the steps below to install:
1. If users open the meeting URL with IE browser, then it will remind users to install the plug-in. Please
upgrade the browser to the latest version if there is no reminder because the browser version is too
low, or use the supported browsers to join meeting such as Firefox, Chrome or Opera.
Figure 26: Download IPVideoTalk Plug-in
2. Click “Download” and the browser will direct users to install and operate the plug-in, please follow the
guidance to install.
Page 57

P a g e | 56
IPVT10 User Guide
Version 1.0.2.8
Figure 27: Setup IPVideoTalk Plug-in
3. It is recommended to restart the browser when the installation is done.
4. Users only need to install the plug-in once, and users can join the IPVideoTalk meeting shortly
afterwards.
Meeting Interface
When users join the conference from the web browser, users will see the following interface:
Page 58

P a g e | 57
IPVT10 User Guide
Version 1.0.2.8
Figure 28: Meeting Interface on Firefox
[1] - Video displaying interface
This screen is used to check the video from host or presentation in the conference.
[2] - Meeting Duration
This is used to show the meeting duration.
[3] - Participants list
This is used to show all participants in the conference. The meeting host could set that all participants
can see all meeting members.
[4] - Chat
Chat in meetings, supports group chat and private chat now.
[5] - Mute
This is used to enable/disable mute.
[1] Video displaying interface
[11] Q&A
[5] Mute
[8] Share desktop or application
[4] Chat
[3] Participants list
[12] Settings
[6] Share your own Webcam
[10] Meeting control
[2] Meeting Duration
[13] Network Status
[7] Hand up
[9] Full screen
[14] Speaker Volume
[15] Split Screen
[16] Meeting Info
Page 59

P a g e | 58
IPVT10 User Guide
Version 1.0.2.8
[6] - Share your own Webcam
Share your Webcam to other participants during the meetings on supported WebRTC browsers.
If the user does not have the permission to share the webcam, the user will not see this option on
Meeting Interface.
[7] - Raise Hand
If the participant needs help or wants to be unmuted, the participant could click on Raise Hand button,
and the meeting host will see the Raise Hand icon in Participants List. The meeting host cannot click
to raise hand.
[8] - Share desktop or application
Share your desktop or an application during the meetings.
If the user does not have the permission to share desktop/application, the user will not see this option
on Meeting Interface.
[9] - Full Screen
Users could click Full Screen button to make the video in full screen size and scroll to zoom in/out the
video.
[10] - Meeting control
Users could obtain host access via host code to gain meeting control such as mute all, mute one
participant, Cloud Recording, Facebook/YouTube Live, forbid chat, mute attendees on entry, allow
checking the participant’s authorization etc.
If the current meeting type is “Webinar”, the meeting host could set the meeting participants to
“Panelists” during the meeting.
[11] - Q&A
Only IPVideoTalk Webinar supports this feature, and the meeting host could select to display/hide
this feature when scheduling the meeting.
The meeting participants could ask questions during the meeting, and the meeting host/panelists
could answer the questions.
[12] - Settings
Users could click “Help” or “About” to get IPVideoTalk information or version.
[13] - Network Status
It is used to show Audio/Video Information including Server location, QoS information of the current
network, and Audio/Video packet loss.
Page 60

P a g e | 59
IPVT10 User Guide
Version 1.0.2.8
[14] - Speaker Volume
It is used to adjust the speaker’s volume for the current meeting, or muting the speaker.
[15] - Split Screen
If the user has multiple monitors, the user could split the presentation screen to multiple screens, and
drag to another monitor. The split screen could zoom in to full screen.
Cancel Split Screen Mode: Click the “X” button on the split screen, or click the “Cancel Split Screen”
button on the main screen to cancel the split screen, the presentation screen will go back to the main
screen.
[16] - Meeting information
This is used to show the conference information. Users could get more information about this meeting
by clicking on this option.
Webinar Practice Session
For IPVideoTalk Webinar, the Webinar host and panelists could join into the Webinar 1 hour before the
Webinar time for preparation, such as check the audio/video and presentation performance. During the
preparation period, the participants cannot join into the Webinar, and they can only stay at the waiting room
(cannot receive any audio/video from the Webinar) until the Webinar starting.
1. When the Webinar host joins into the Webinar, there will be a prompt showing that the current period
is preparation period or starting the Webinar immediately.
a) If the Webinar host selects to prepare the Webinar, the Webinar host could start the Webinar any
time.
b) The default behavior is the IPVideoTalk Cloud System will not call the Webinar host or invite the
GVC panelists, there will be a prompt on GVC32xx host to ask whether to call the participants
immediately. If the user rejects to call the participants, the IPVideoTalk system will call the
participants at the Webinar starting time. Or, the device owner could select to call the conference
ID to join into the Webinar for preparation.
Figure 29: Prepare Webinar Option
Page 61

P a g e | 60
IPVT10 User Guide
Version 1.0.2.8
2. The Webinar panelists could join into the Webinar 1 hour before the starting time, the default is
preparation period. The panelists cannot start the Webinar.
3. The participants stay at the waiting room until the Webinar starts. At this time, the Webinar host could
set the participant as a panelist and this new panelist will join into the Webinar. The Webinar host could
also kick out any participant who is waiting out of the Webinar.
Figure 30: Set Panelist
4. During the preparation period, there are some limited features:
a) Recording/Live features are temporarily unavailable.
b) The Chatting feature is only available for panelists group.
c) If the scheduled Webinar is set to record automatically, this recording feature will be started only
if the Webinar starts.
Note:
If the Webinar is about to the scheduled ending time, but the Webinar is not started, this Webinar will be
expired automatically.
Figure 31: Webinar Practice Session
Page 62

P a g e | 61
IPVT10 User Guide
Version 1.0.2.8
Audio
Users need to have a microphone device (built-in with PC or plugged into PC) before joining the meeting.
If there is no available Microphone for the user joining into the meeting, the client has to have an available
Speaker. Otherwise, the user cannot receive any audio from the conference.
When joining into the meeting, the user could select the Microphone and the Speaker which audio
input/output the user prefers to use. Users could also click on “Test” option to test the audio performance.
If the user selects to test or use the audio output device, a drop-box will be prompted to grant the browser
permission to access your device. The user needs to select to allow to use the device, and the WebRTC
will use the Microphone/Speaker as the audio device in the meeting.
Meanwhile, the user could select to mute/unmute himself/herself. The user could click on “Mute myself” to
mute the audio device.
Notes:
1. When the user clicks to open the window, the MIC will be muted automatically.
2. This Speaker selection feature is only available for Chrome and Opera users.
Figure 32: Select Microphone and Speaker
: This icon represents if other participants could hear the voice, user can click to mute the MIC.
Page 63

P a g e | 62
IPVT10 User Guide
Version 1.0.2.8
: This icon represents if the user’s MIC is muted, and other participants cannot hear the voice, user is
able to click to unmute the MIC.
: This icon represents if the MIC is not plugged into the PC.
: This icon represents if you are muted by the host.
If the user is current in an IPVideoTalk webinar, and the user is a general participant, the user cannot
unmute himself/herself, only the meeting host can unmute the participant. To apply to unmute the MIC in
the meeting, the participant could click to raise hand to indicate the meeting host.
If the user is the meeting host or a panelist, the user has the permission to unmute himself/herself.
If the user is current in an IPVideoTalk meeting, the user has the permission to unmute himself/herself.
: If the user wants to select or test the Microphone or the Speaker, the user could click Settings
option at the right bottom corner, and then click on “Audio Settings” to select the audio device. If there is a
Microphone is in use, the Firefox browser will not allow the user to test the audio device.
Current Speaker
Users could see the current speaker during the conference by the indication icon . If there
are multiple speakers at the same time, there will be multiple indication icons displayed during the
conference. Users could move the indication icons to anywhere on the video area.
Video
Note: For IPVideoTalk Meeting type, all participants have the permission of the features in this section; For
IPVideoTalk Webinar type, only the meeting host and panelists have the permission of the features in this
section.
Users can use “Share your own webcam” feature to share their webcams to the conference using Firefox
or Google Chrome browsers.
To share your webcam, click on the icon on the bottom of the meeting page, there will a preview
window and users could click on “Share” to broadcast the local video to the meeting participants.
• If the user has multiple cameras, the user could select the camera from the prompted window.
When done, the browser needs to get the permission to preview the video.
Page 64

P a g e | 63
IPVT10 User Guide
Version 1.0.2.8
• If the amount of shared video webcams reaches the maximum, the user cannot start to share the
video until someone stops sharing his video.
• If the user does not allow the browser to access the webcam on the PC, there will be a prompt to
ask the user to allow accessing the webcam. Otherwise, the browser cannot start sharing the
webcam.
• If the user wants to stop sharing the local webcam, the user could click on the icon on the
bottom of the meeting page.
• If the user connects a video camera during a meeting, the browser may consider the device as an
“unknown” device. It is recommended to connect a video camera before joining the meeting.
• If the user does not apply to play the video in turn, other participants cannot see the user’s video.
The user could see the option , and the user could click on this option to close the shared
camera.
• If there is no video camera connected with the PC, the webcam icon will be shown as .
Figure 33: Share Your Own Webcam
Page 65

P a g e | 64
IPVT10 User Guide
Version 1.0.2.8
Sharing
Currently only Firefox and Chrome support desktop or application sharing.
Note: For IPVideoTalk Meeting type, all participants have the permission of the features in this section; For
IPVideoTalk Webinar type, only the meeting host and panelists have the permission of the features in this
section.
Figure 34: Share Desktop/Application
Note:
Sharing Desktop or Application feature for WebRTC requires 2Mbps+ uplink bandwidth for Chrome and
7Mbps+ for Firefox uplink bandwidth to ensure good video quality.
Install Add-ons
Users need to install add-ons before using Share Screen feature. When users click on "Share Screen"
option on the browser at the first time, there will be a notification asking users to install the add-ons. See
figure below:
Figure 35: Install Add-ons Interface
Please follow the prompts on your PC to install the add-ons. Or the users could also click on icon to
manually install the add-ons.
Start to Share
Users could choose to share the entire screen or one of the applications. Here are the steps:
1. Click on icon at the bottom of the browser.
2. Users could choose to share the desktop or an application.
Page 66

P a g e | 65
IPVT10 User Guide
Version 1.0.2.8
Figure 36: Select Share Content
3. If users would like to share desktop, on the popped-out window, choose "Whole Screen" and click on
"OK" to start sharing.
4. If users would like to share an application, on the popped-out window, choose the application to share.
5. If the application window is minimized, the application cannot be shared.
Pause Sharing
If the presenter wants to pause sharing the screen, the presenter could click on icon and select
“Pause Sharing” icon . The other participants will see the last image before the presenter pauses
sharing the screen until the presenter recovers sharing the screen.
Stop Sharing
When users start to share screen/application, users may stop sharing at any time by clicking the icon
at the bottom of the browser.
Page 67

P a g e | 66
IPVT10 User Guide
Version 1.0.2.8
Figure 37: Stop Sharing
Switch Sharing Resource
If the presenter wants to switch sharing resource (e.g. switch the sharing resource from Word application
to Excel application), the presenter could click on icon and select “Switch” icon . Then, the
presenter needs to select the sharing application/desktop and confirm to share the resource, the other
participants will see the new sharing contents by this operation.
Participants list
This is used to show all participants in the conference. The meeting host could set to allow all participants
to see all meeting members.
Page 68

P a g e | 67
IPVT10 User Guide
Version 1.0.2.8
Figure 38: Participants List
1. In IPVideoTalk Webinar, the Participants List includes “Panelists” and “Participants”, users could
click to expand to show the list. The “Panelists” includes the Webinar host and all panelists, the
members in this group are allowed speaking, sharing the webcams, starting presentation any time.
The participants need to get the permission from the Webinar host/panelist to speak in the
conference, and they are not allowed sharing the webcams or starting presentation.
2. In IPVideoTalk Meeting, the participants will not be divided, all participants are shown in the
Participants List.
3. Client Types: Users could see the participants’ clients type in the Participants List, the icon will be
seen in front of the participants’ name. Here are all clients type icons:
Page 69

P a g e | 68
IPVT10 User Guide
Version 1.0.2.8
Figure 39: Clients Type Icons
4. Panelists Contacts: For IPVideoTalk Webinar, users could check the information of the panelists,
such as photo, name, and basic information (The meeting host/the meeting scheduler will input
this information when scheduling the meeting).
5. Search Participants: Users could search the participants by the names. In IPVideoTalk Webinar,
it only allows searching the general participants.
6. Sorting the Participants: The default sorting rule is Intelligent Sorting, and there are some
optional sorting rules:
a) Intelligent Sorting: The default rule is the participants who raise hands will be sorted at the
beginning of the list, following participants are the people who are speaking, and the rest of
participants will be sorted by names.
b) Sorting by MIC: The participants who are speaking are sorted at the beginning, and the rest
of participants are sorted by names.
c) Sorting by “Hand Raise”: The participants who click on “Hand Raise” button will be sorted
at the beginning, and the rest of participants are sorted by names.
d) Sorting by Cameras: The participants who start sharing the cameras will be sorted at the
beginning, and the rest of participants are sorted by names.
All Group Chat
Group chat is supported on WebRTC. The WebRTC participants can chat in group during the meeting.
1. Select to send to "All" in the dropdown list.
2. Simply enter message in the chat window and send the message.
Page 70

P a g e | 69
IPVT10 User Guide
Version 1.0.2.8
Figure 40: Group Chat Interface on WebRTC Client
To clear chat messages, click on button at the upper right corner. Please note if the host disables
chat, no participant can chat.
Panelists Group Chat
The panelists’ group chat is an internal chat group between the Webinar host and panelists.
Note: This feature is only supported in IPVideoTalk Webinar mode
1. The Webinar host and panelists could send messages to this group, and receive messages from it.
2. The general Webinar participants cannot check the messages in panelists chat group, nor send
messages to it.
Page 71

P a g e | 70
IPVT10 User Guide
Version 1.0.2.8
Figure 41: Panelists Group Chat
Private Chat
Private chat is supported on WebRTC. The WebRTC participant can send a message to the host or other
participants in the group during the meeting.
1. Select the person you want to send the message to in the dropdown list.
2. Once the message is sent, the message will be marked as "Private".
3. You can click the name to reply private message quickly.
Page 72

P a g e | 71
IPVT10 User Guide
Version 1.0.2.8
Figure 42: Private Chat Interface on WebRTC Client- Select Person
If the host prohibits you to check the participants list, you can only send private message to the host.
If the host prohibits chatting, the participants cannot send private messages to all participants.
Raise Hand
If a participant needs help or wants to be unmuted, he could click on button to raise hand, and the
meeting host could see the icon in Participants List, as the figure shows below:
Figure 43: Raise Hand
Page 73

P a g e | 72
IPVT10 User Guide
Version 1.0.2.8
1. The participant could click on Raise Hand button again to cancel the request.
2. The meeting host could click on the Raise Hand icon to
cancel the request, or click on button to cancel all requests.
Q&A
This feature is only supported for IPVideoTalk Webinar.
1. The Webinar participants click on the icon on the right bottom corner, and the participants
could send the questions to the Webinar host/panelists.
Figure 44: Send Questions
Page 74

P a g e | 73
IPVT10 User Guide
Version 1.0.2.8
2. The Webinar host/panelists will receive the notification of the new question, the Q&A icon
will be updated to a new status and check all questions during this Webinar (including the
answered and unanswered questions). There are two ways to answer the question, “Answer live in
public mode” or “Answer by Text”.
Figure 45: Answer the Questions
a. Answer live in public mode:
i. When the user clicks to answer the question, the question will be sent to public by default,
and the user could answer the question via audio during the Webinar.
Figure 46: Answer Live in Public Mode
ii. All participants will see the question, and know that the user is trying to answer the
question.
Page 75

P a g e | 74
IPVT10 User Guide
Version 1.0.2.8
Figure 47: End Live Answer
iii. If the user answers the question and clicks on button to
finish the question, all Webinar participants will see the notification below.
Figure 48: Finish the Question
b. Answer by Text: The Webinar host/panelists will send texts to the user who sends the question.
The Webinar host/panelists could select option “Send to all participants”, and all participants will
see the question and answer.
Figure 49: Answer by Text
Page 76

P a g e | 75
IPVT10 User Guide
Version 1.0.2.8
1. The Webinar host/panelists could add more additional comments for the answered questions.
2. When the new participants join into the Webinar, they will receive all questions and answers which
are in public.
3. The panelists could answer the questions which are sent by themselves, in order to show the typical
Q&As to other participants.
4. The Webinar host is able to select whether if this Webinar allows participants to send out the
questions. This option could be operated at the upper left side . If
this option is disabled, the participants cannot send questions to the panelists.
5. For any question, it does not allow two Webinar hosts/panelists to answer in live mode at the same
time.
Browser Notification
If the browser is minimized or on other tab page, and WebRTC receives the messages below, there will be
a pop-out window to show the prompt:
✓ Lost connection with the server (Disconnection by unknown error).
✓ End Presentation (The prompt is only displayed on presenter’s client).
✓ The conference will be ended in 5 minutes.
✓ Muted/Unmuted.
Uploading Logcat
In the conference, if users encounter any unknown error, users could upload the logcat of WebRTC in the
specified browser to the debug server, in order to help our support team to address the issue.
Click on the button at the right bottom corner, and select “Report a Problem”, it will direct users to
upload the logcat.
Page 77

P a g e | 76
IPVT10 User Guide
Version 1.0.2.8
Note: The logcat only includes the operations logs in the WebRTC client.
Figure 50: Report a problem
Quit a Meeting
Users could quit a meeting at any time by clicking on the icon at the bottom left corner on the browser,
or users may close the browser directly to quit the meeting.
Host
Become Meeting Host
1. Click on button on WebRTC interface to access Meeting info, and then click on "Host Meeting".
Page 78

P a g e | 77
IPVT10 User Guide
Version 1.0.2.8
Figure 51: WebRTC Interface - Meeting Info
2. Enter the correct host code to be the new host. To find host code, the user could go to IPVideoTalk
Portal to find the host code of the meeting; or, if the host has filled up host Email when scheduling the
meeting, the Email notification will list the host code there. Host Code is also found in Meeting Info
during a meeting of the GVC32XX host.
Figure 52: Input Host Code
3. Once host code is submitted successfully, this WebRTC user will become the new host and other
participants will receive the prompt "XXX is now the host".
Multiple Meeting Hosts
IPVideoTalk allows having multiple hosts in the same meeting.
• The GVC32XX which establishes the IPVideoTalk meeting will be the meeting host by default.
• If the WebRTC user becomes an IPVideoTalk meeting host with host code, the user will be the
meeting host until leaving the meeting.
Page 79

P a g e | 78
IPVT10 User Guide
Version 1.0.2.8
• If the WebRTC user joins an IPVideoTalk meeting with host code before the meeting starting time,
the user will be the meeting host until leaving the meeting.
• If the user joins an IPVideoTalk meeting by pressing the URL in host Email, the user will join the
meeting as meeting host as default.
Notes:
▪ Meeting’s hosts have the same privileges including all options in Meeting Control and ability to end
the meeting.
▪ Meeting’s hosts can mute/unmute and remove each other out of the meeting.
Meeting Control
During the meeting, WebRTC user could apply to be the meeting host to control the meeting.
Panelists
1. Select a participant in Participants Lists.
2. Click on the button next to the participant’s name.
3. Select “Set as Panelist” to set the participant to be a panelist.
When the participant is set as a panelist, the user will obtain some new privileges:
• The user could unmute himself even if muted by the Webinar host.
• The user could start presentation at any time during an IPVideoTalk Webinar.
• The user could share the webcam at any time during an IPVideoTalk Webinar.
• The user could check the Participants List. (This will not be affected by Meeting Control option).
• The user could chat with all panelists in the same group, and private chat with all participants. (This
will not be affected by Meeting Control option).
Mute/Unmute
• Mute all
Click on button at the bottom right corner and select “Mute all”. There will be a prompt showing "Mute
all success". All participants on the Participants list will be muted except the host. Please note participants
who join the meeting via GVC32XX device cannot be muted. Users could also click on Settings button
at the upper right corner, and click on “Mute All” option to mute all participants.
Page 80

P a g e | 79
IPVT10 User Guide
Version 1.0.2.8
• Unmute all
Click on button at the bottom right corner and select "Unmute all". There will be a prompt showing
"Unmute all success". All participants on the Participants list will be unmuted except the host. Users could
also click on Settings button at the upper right corner, and click on “Unmute All” option to unmute all
participants.
• Mute/Unmute selected participant
Select one participant on participants list to mute/unmute, the corresponding icon will be changed.
Cloud Recording
The meeting host could start cloud recording during the meeting. When the cloud recording starts, other
participants will see the recording status icon . Webinar participants will not see the recording status
icon.
The meeting host could stop cloud recording at any time. When the cloud recording is stopped, users could
login the web portal to check/download recording files. When the recording files finish uploading to web
portal, the meeting host will receive an email notification.
The recording file format is MP4, including the meeting audio, video/presentation (presentation will be
recorded and has higher priority than video stream).
Prerequisites:
1. The enterprise account should have enough storage space in cloud sever. The sum of all spaces
for all activated plans which belong to the same enterprise account will be counted. The used
storage spaces are counted with all recording files for the enterprise account.
2. GVC32XX needs to be linked with IPVideoTalk account, otherwise, the user cannot use cloud
recording feature.
Facebook/YouTube Live
1. The meeting host could broadcast the meeting on Facebook/YouTube.
2. When Facebook/YouTube account is authenticated, the meeting host could start to broadcast the
meeting.
3. When the user wants to start living on Facebook, the user could select the channel: Personal
Timeline, Page, Group.
Page 81

P a g e | 80
IPVT10 User Guide
Version 1.0.2.8
4. If the meeting is ended, or there is no one in the meeting, the broadcast will be terminated.
5. If the meeting has been broadcasted on Facebook/YouTube, others cannot broadcast the meeting
again. Otherwise, the previous live will be ended.
6. The broadcast includes audio, video/presentation (presentation will be recorded and has higher
priority than video stream).
Note: If users’ Facebook/YouTube accounts are not authenticated with the broadcast feature, please setup
the live feature first on Facebook/YouTube.
Live on the 3rd Party Platform
The meeting host could broadcast the meeting on the 3rd party platform via the RTMP address.
1. Select “Live to third-party platform” on the conference control menu at the right bottom corner
2. Select “Other platform”
3. Enter the live broadcast address (RTMP address) in the popup window. This address needs to be
viewed on the third-party live broadcast platform.
4. Enter the live broadcast code in the popup window (optional). This live broadcast code may be viewed
on the third-party broadcast platform. Some live broadcast platforms do not require a live broadcast
code.
5. When users click to start the live broadcast on the 3rd party platform, the system will broadcast the
audio/video during the conference to the RTMP address. If the RTMP address or live broadcast code
is incorrect, the live broadcast will fail, and the system will ask the user to re-enter the information for
broadcasting.
6. The live broadcasting includes audio, video, and presentation (only display single stream, demo stream
has higher priority).
Note: Users could log in the third-party live broadcasting platform to check the RTMP address and
broadcasting code.
Video Layouts Control
Only the host could control the video layouts for the video conference. When the video layouts are changed,
all the participants will see the updated video layouts.
Page 82

P a g e | 81
IPVT10 User Guide
Version 1.0.2.8
1. The host clicks on the icon at the right bottom corner, and select the video layouts in the
conference.
2. Select the Layout Settings: Tile (Default), Focus 1+N, Speaker (The selected participant is displayed
in full size).
• Tile: Auto (Default), 1*2,2*2, 3*3, 4*4, 5*5, 6*6, 7*7.
o Auto: The video for all attendees will be tiled and adapted automatically based on the
number of video images.
Figure 53: Tile Layout
• Focus 1+N: There are three modes for users: “1+3” layout, “1+5” layout, and “1+7” layout, which
means one large video image with N smaller video images (polling mode).
The current large video image is displaying the video image from current speaker.
Page 83

P a g e | 82
IPVT10 User Guide
Version 1.0.2.8
Figure 54: Focus 1+N Layout
• Speaker: Select one participant in the Participants List as speaker. The selected participant will be
displayed in full size.
Figure 55: Speaker Layout
Page 84

P a g e | 83
IPVT10 User Guide
Version 1.0.2.8
3. Set Video Carousel Interval: If the video images amount exceeds the number of layout grids, the video
images will be played in turn. Users could select the focus’s video playing interval. The default interval is
10 seconds.
4. Select Video Carousel Attendees:
• All Participants: Including the new participants in the meeting.
• Custom Participants: Select the focus’s video participants in the Participants List in the meeting. If
the participant disables the camera, the participant’s video cannot be displayed in the conference
until the participant enables the camera.
5. Set Fixed Position: Click on the icon following the participant name under Layout Settings, and
select the fixed position. Click the fixed position again to cancel the request as the screenshot shows below:
Figure 56: Select Fixed Position
Notes:
• The layout type is depending on the video feeds of the license. For example, if the license includes
up to 8 video feeds, the layouts include Tile Layouts (Default), 1x2, 2x2, 3x3.
• In the 1+N layout, if one of conference participants is fixed in the large panes, the voice-activated
feature is disabled automatically.
Page 85

P a g e | 84
IPVT10 User Guide
Version 1.0.2.8
Stop Sharing the Webcam
The meeting host can stop the sharing webcam for all other participants. To stop sharing webcam for a
participant, click on the webcam icon of the participant, the webcam sharing for that participant will
be stopped, and will receive a prompt.
Figure 57: Stop Sharing Webcam
In Participant’s list, if sharing the webcam is started, the icon will be displayed. If the video sharing is
stopped, the icon will be hidden.
Require Webcam Sharing
If the GVC32XX client in the IPVideoTalk meeting does not share the webcam, the meeting host is able to
request the GVC32XX client to share the webcam.
The meeting host could select the button next to the GVC32XX participant, and select “Require
Webcam Sharing” to send the sharing request. The GVC32XX participant will receive the notification and
show a prompt to accept/reject the request. If accepts, the GVC32XX participant will share the webcam to
the IPVideoTalk meeting immediately.
Notes:
• The client GVC320X/GVC3210 should be running firmware version 1.0.3.47/1.0.1.20 or higher
(respectively).
• If the GVC32XX client is the general participant in an IPVideoTalk Webinar, this feature will not
be available. In this case, the meeting host could set the GVC32XX client to a panelist, and
request the GVC32XX client to share the webcam.
Preview Participant’s Video
The meeting host could preview the participant’s video, and set the participant’s video as the main screen
during the meeting quickly.
1. On the Participants List, click on the menu following the certain participant, and click on “Preview Video”
as the screenshot shows below to preview the participant’s video. It requires the participant to enable the
camera, otherwise, the meeting host cannot preview the participant’s video.
Page 86

P a g e | 85
IPVT10 User Guide
Version 1.0.2.8
Figure 58: Preview Video
2. The participant’s video will be displayed on the meeting host’s screen as the screenshot shows below:
Figure 59: Show Participant's Video
3. If the current layout is 1+N layout or Speaker layout, users could click on icon at the right bottom
corner to fix the preview video on the main screen.
4. If the preview video is not selected to be played in turn, users could click on icon at the right bottom
corner to add it as video carousel attendees.
5. Click on the icon at the right bottom corner to close to preview the video.
Page 87

P a g e | 86
IPVT10 User Guide
Version 1.0.2.8
Disable/Enable Chat Function
• Disable chat
Click on button at the bottom right corner and select "Disable All to Chat", no participant can send
chat anymore. The WebRTC participants will receive prompt "Disable all to chat".
• Enable all to chat
Click on button at the bottom right corner and select "Enable All to Chat", and all participants can chat.
The WebRTC participants will receive prompt "Enable all to chat".
Note: If it is an IPVideoTalk Webinar, the panelist will not be affected by this option.
Mute Attendees on Entry
Click on the icon and check “Mute Attendees On Entry”. Then, the meeting participants who join into
the meeting will be muted as default by the host automatically. This option will not effect on the participants
who are already in the meeting.
Allow All View Attendee List
Click on the icon and check “Allow All View Attendee List”. Then, all the participants in the meeting
will see the meeting participants list. If the user unchecks this option, all the participants will only see the
host and himself/herself on the participants list.
Note: If it is an IPVideoTalk Webinar, the panelist will not be affected by this option.
Add Participants during a Meeting
During an IPVideoTalk meeting, the meeting host could invite GVC32XX participants or WebRTC
participants at any time by IPVideoTalk ID or Email address, respectively.
Click on button , and select “Add Participant”, the user could input the IPVideoTalk ID or Email address
and click on “Add” to invite more participants. When done, IPVideoTalk system will call GVC32XX directly,
or send an invitation to the given Email address.
Page 88

P a g e | 87
IPVT10 User Guide
Version 1.0.2.8
If the GVC32XX rejects the invitation, the meeting host will receive the failed prompt; If the participants
amount reaches the limitation, the meeting host cannot add more participants during the meeting; If the
participant accepts to join the meeting, but the participants amount reaches the limitation at current time,
the participant cannot join the meeting.
Remove Participant
Select one participant in participants list, and click on “Remove” to confirm as shown below:
Figure 60: Confirm to Remove Participant
End/Exit Meeting
When the host clicks on icon at the upper right corner, the host could choose whether to end meeting
or leave meeting alone.
• If choosing "End meeting", the meeting hosted on GVC32XX device will be ended and all
participants will be disconnected from the meeting.
• If choosing “Exit meeting” only the host will leave, please make sure to end the meeting manually
from IPVideoTalk portal after all participants left. Otherwise, it will be ended automatically after 6
hours.
Figure 61: End/Exit Meeting
Page 89

P a g e | 88
IPVT10 User Guide
Version 1.0.2.8
MOBILE CLIENT
Users could join a meeting via IPVideoTalk mobile app on Android device (currently on beta) or IOS
device (currently on beta).
Operating System
• Operating system: Android 4.1 or later, IOS 8.0 or later.
• Internet connection: 3G/4G connection or Wi-Fi.
• Hardware: Android mobile device or IOS mobile device, microphone and speaker.
Join a Meeting
Download IPVideoTalk Mobile app
Please go to website www.ipvideotalk.com to download and install IPVideoTalk mobile application on your
mobile device.
Configure IPVT10 Server Address
If users want to use IPVT10 service in IPVideoTalk mobile client, users need to configure the IPVT10 server
address in the IPVideoTalk mobile client.
1. Start IPVideoTalk mobile client on the mobile device.
2. Click on the icon on left upper corner, open the menu, select “Server address”, and go to the
configuration page as the figure shows below:
Page 90

P a g e | 89
IPVT10 User Guide
Version 1.0.2.8
Figure 62: Configure Server Address
3. Enter the IP address or domain name of the Conference Management Platform.
4. Click “Save” to save the configuration, and the mobile client will connect to the IPVideoTalk server
automatically.
5. If the user wants to recover the configuration to default values, please click on “Recover to Default”,
and the mobile client will recover the connection with IPVideoTalk cloud conferencing platform.
Join a Meeting via Mobile app
1. Start IPVideoTalk mobile application on the mobile device.
2. Input the meeting ID, name and Email address in order to inform other participants. The name and
Email address that the user have entered will be saved on the device and will be automatically used
next time when joining a meeting again.
Page 91

P a g e | 90
IPVT10 User Guide
Version 1.0.2.8
Figure 63: IPVideoTalk Application Join Meeting Interface
3. If the meeting requires the participant to register, it will direct to the register page automatically. If the
Email has been registered or invited, the user could join into the meeting directly.
4. If the meeting host has set password authentication for the meeting, users need to input the password
to join the meeting.
Page 92

P a g e | 91
IPVT10 User Guide
Version 1.0.2.8
Figure 64: IPVideoTalk Application Join Meeting Interface - Enter Password
5. If the meeting host has not joined the meeting, other participants need to wait until the host joins the
meeting. The participants will hear waiting tone before the host joins the meeting.
Host a Meeting via Mobile App
Users could start and host the meeting with host code.
Prerequisites: The meeting should have “To be hosted” status, which is 15 minutes before the meeting
starting time. Otherwise, users cannot host the meeting via Mobile App.
1. Users could input the meeting ID, host code, name, and Email address to host the meeting.
Page 93

P a g e | 92
IPVT10 User Guide
Version 1.0.2.8
2. Users may also click on the URL in the host notification Email to start to host the meeting, and it
will use the name and Email in the web portal to host the meeting. The meeting host does not need
to input the password to host the meeting in this scenario.
Figure 65: Host Meeting via Mobile App
Page 94

P a g e | 93
IPVT10 User Guide
Version 1.0.2.8
Meeting Interface
Figure 66: IPVideoTalk Meeting Interface on Mobile Client
Users could set landscape mode during the meeting under "Setting" option on device for better video
viewing effect.
Figure 67: IPVideoTalk Landscape Mode
Settings
Check meeting info
Mute local
microphone
Video
Exit meeting
Turn ON/OFF
receiving video feed
Participants list
Chat list
Private Chat
Raise Hand
Share Camera
Page 95

P a g e | 94
IPVT10 User Guide
Version 1.0.2.8
Please check the options below on the UI of IPVideoTalk mobile app. See Figure 66: IPVideoTalk Meeting
Interface.
• Video
The received video or presentation will be displayed here. If one of the participants is doing presentation
during the meeting, the mobile app user could switch to the conference video by swiping the screen.
The user could place two fingers on the screen, then pinch them together to zoom out, or spread them
apart to zoom in, to resize the screen to get clearer video.
• Participants list
Display all participants during a meeting. Users may only view the host due to permission restriction.
The meeting host has the authority to allocate permissions.
Users could see the participants’ clients type in Participants List, the icon will be seen in front of the
participants’ name. Here are all clients type icons:
Figure 68: Clients Type Icons
• Chat
Support group chat and private chat. Click "Chat" icon to send messages, and view new messages.
The recently talked participants will be displayed in chat list.
• Mute Local Microphone
Users can mute or unmute the microphone.
• Share Camera (beta)
Users are able to click this option to share the camera to the meeting.
Page 96

P a g e | 95
IPVT10 User Guide
Version 1.0.2.8
• Raise Hand
If the participant needs help or wants to be unmuted, the participant could click on Raise Hand button,
and the meeting host will see the Raise Hand icon in Participants List.
• Turn ON/OFF receiving video feed
If the network condition is not ideal, users can choose not to receive video to ensure the audio quality.
Users can enable or disable it at any time.
• Meeting Duration
This is used to show the meeting duration.
• Check Meeting Info & Become Meeting Host
Users can click on this option and input the host code to become the meeting host, or check the meeting
information.
Click meeting subject to view more meeting info such as meeting ID, meeting host, meeting time and
etc.
• Settings
Users could check the name and Email that users use to join the current meeting, mute himself/herself
when joining the meeting or check the firmware version here.
Users could also configure the media channel manually, and switch the media channel any time.
Currently, the IPVideoTalk mobile app does not support online chatting or desktop sharing feature.
Webinar Practice Session
For IPVideoTalk Webinar, the Webinar host and panelists could join into the Webinar 1 hour before the
Webinar starting time, in order to test the audio/video performance, and sharing/presentation performance.
During the preparation period, the participants cannot join into the Webinar, and they can only stay at the
waiting room (cannot receive any audio/video from the Webinar) until the Webinar starting time.
1. When the Webinar host joins into the Webinar, there will be a prompt showing that the current period
is preparation period or starting the Webinar immediately.
a) If the Webinar host selects to prepare the Webinar, the Webinar host could start the Webinar any
time.
b) The default behavior is the IPVideoTalk Cloud System will not call the Webinar host or invite the
GVC panelists, there will be a prompt on GVC32xx host to ask whether to call the participants
Page 97

P a g e | 96
IPVT10 User Guide
Version 1.0.2.8
immediately. If the user rejects to call the participants, the IPVideoTalk system will call the
participants at the Webinar starting time. Or, the device owner could select to call the conference
ID to join into the Webinar for preparation.
Figure 69: Webinar Practice Session
2. The Webinar panelists could join into the Webinar 1 hour before the starting time, the default is
preparation period. The panelists cannot start the Webinar.
3. The participants stay at the waiting room until the Webinar starts. At this time, the Webinar host could
set the participant as a panelist and this new panelist will join into the Webinar. The Webinar host could
also kick out any participant who is waiting out of the Webinar.
4. During the preparation period, there are some limited features:
a) Recording/Live features are temporarily unavailable.
Page 98

P a g e | 97
IPVT10 User Guide
Version 1.0.2.8
b) The Chatting feature is only available for panelists group.
c) If the scheduled Webinar is set to record automatically, this recording feature will be started only
if the Webinar starts.
Note: If the Webinar is about to the scheduled ending time, but the Webinar is not started, this Webinar will
be expired automatically.
Audio Control
Connect Audio
By default, most of the mobile devices should already have built-in microphone/speaker to support audio in
the meeting, without additional audio devices connected. Users can adjust the volume on the mobile device.
Mute/Unmute
• Click the microphone icon on participants list to mute the user, and the icon will turn to .
• Click again to unmute the microphone, and the icon will change back to . If the participant is
muted by the meeting host, the MIC icon will be . At this time, the participant cannot
unmute himself/herself, only the meeting host can unmute the participant. To apply to unmute the
MIC in the meeting, the participant could click to raise hand to indicate the meeting host.
Media Channel
When users join into the meeting, users could set the media channel manually.
1. Users could click on button to open the configuration interface, and select the media channel as
the figure shows below.
2. If users have the Bluetooth headset connected with the device, the media channel will be selected as
“Bluetooth Headset”. Otherwise, the media channel is “Speaker” as default.
3. If users have a new 3.5mm headset or Bluetooth headset connected with the device, the media
channel will be switched to use the new media device.
4. If users disconnect the 3.5mm headset or Bluetooth headset, the media channel will be switched to
use other 3.5mm headset or Bluetooth headset as default. Otherwise, the media channel will be
switched to “Speaker”.
Page 99

P a g e | 98
IPVT10 User Guide
Version 1.0.2.8
Figure 70: Media Channel Configuration Interface
Page 100

P a g e | 99
IPVT10 User Guide
Version 1.0.2.8
Figure 71: Sound Channel Settings
Invite Participants
Users could share the meeting information to invite more participants, share the meeting via Messaging or
Email function on the device.
Tap on "Participants" icon on the screen below and tap on ; or tap on meeting name and select
“Share”.
 Loading...