

Page 1

Epygi Technologies Configuring Grandstream IP Phones on Quadro LAN
Configuring Grandstream IP Phones
on Quadro LAN
Revision Revised By Date
Split form Configuring Tested IP
Phones on Quadro LAN document
Quadro variants:
Filename:
Version:
Template: NEWsupportTemplate.dot
Last saved: 9/27/2007 6:08:00 PM by Liana Badalyan
Sona Grigoryan 26-09-2007
Revision: 1.0
Abstract: This document describes the steps required for Auto-
configuration of the Grandstream IP phones on Quadro LAN.
Please Note: This document contains confidential and proprietary information owned by Epygi Technologies Ltd. Any copying, use or disclosure of
the document or the information contained herein without the written permission of Epygi Technologies Ltd. is strictly prohibited.
Page 2

Epygi Technologies Configuring Grandstream IP Phones on Quadro LAN
Table of Contents
1 Introduction ........................................................................... 4
2 Requirements and Preparations.............................................. 4
3 Auto-Configuration on Grandstream IP Phones ...................... 5
4 Completing Grandstream IP Phones Configuration ................. 7
4.1 Grandstream BT100/200................................................................. 8
4.2 Grandstream GXP2000 ................................................................... 9
5 Verifying Configuration........................................................... 9
6 Troubleshooting.................................................................... 10
7 SIP Phone Uses a Third-Party DHCP Server .......................... 10
7.1 Configuration Changes to a DHCP Server..........................................11
8 References............................................................................ 12
PAGE 2 27-Sep-07
Page 3

Epygi Technologies Configuring Grandstream IP Phones on Quadro LAN
Document Revision History
Revision Date Revision Valid for SW Valid for models
1.0 27-09-07 Initial version 4.1.x IP PBXs
PAGE 3 27-Sep-07
Page 4
Epygi Technologies Configuring Grandstream IP Phones on Quadro LAN
1 Introduction
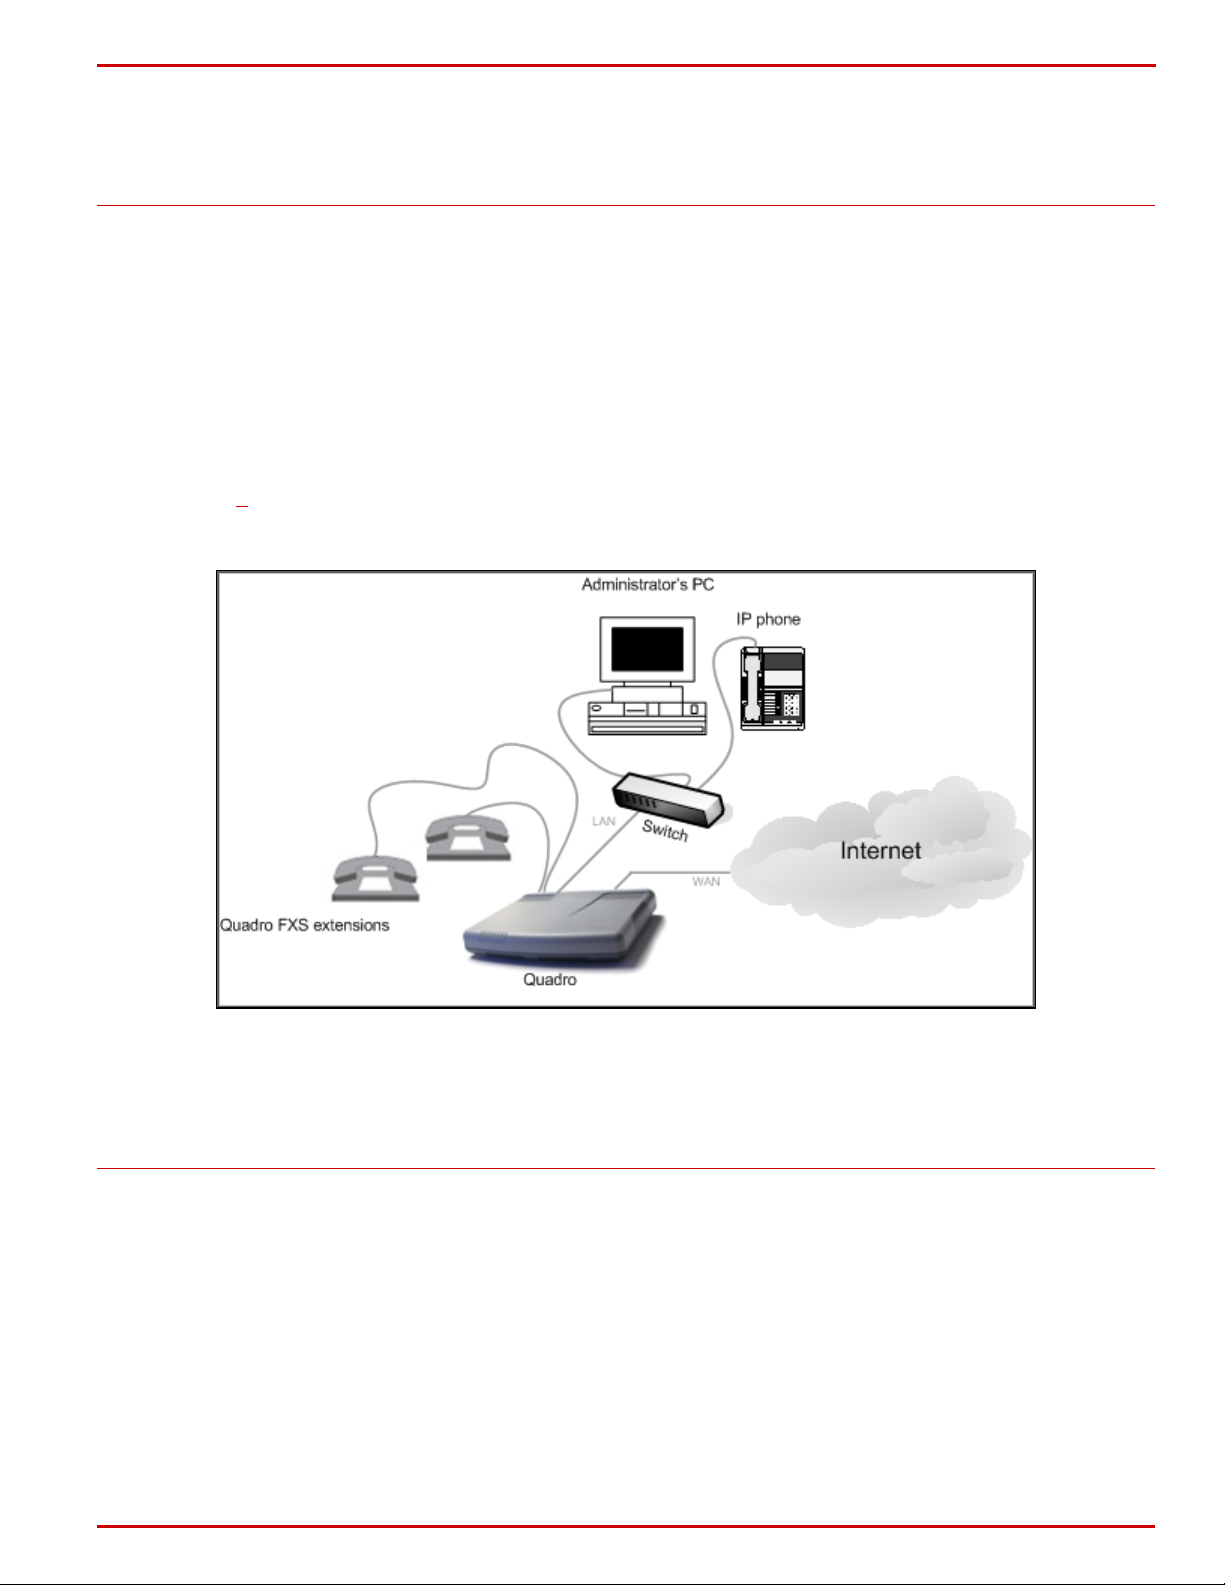
Quadro IP PBXs provide the option of using SIP phones along with standard analogue phones. IP
phones are connected to the Quadro LAN interface via Ethernet and serve as additional extensions
similar to onboard FXS extensions (see
This document describes how to configure the Grandstream SIP phones connected to the Quadro
LAN using Auto-configuration option of the Quadro.
Started with Quadro software 3.1.x, an Auto-configuration option is available for a number of
SIP phones particularly the Grandstream IP Phones. This option simplifies SIP phone configuration
procedure eliminating the necessity of manual configuration of the phones. The user only needs to
configure an IP line attached to a desired extension on the Quadro and then reset the SIP phone
to factory defaults. For more information on the Auto-configuration option, please refer to
Section
3.
Figure 1).
Figure 1-IP phone connected to the Quadro LAN
2 Requirements and Preparations
• Software image 4.1.x running on the Quadro IP PBX.
• Quadro is connected to the network and all network settings are correctly configured.
• SIP phones connected to the Quadro LAN
PAGE 4 27-Sep-07
Page 5

Epygi Technologies Configuring Grandstream IP Phones on Quadro LAN
3 Auto-Configuration on Grandstream IP Phones
The following step-by-step instructions describe how to configure an IP line to allow Grandstream
SIP phones to be auto-configured.
1. Log into the Quadro as an administrator.
2. Open the TelephonyÆLine SettingsÆIP Line Settings page (see
Figure 2).
Figure 2-Line Settings page
3. From the Attached Extension column, choose an extension to be assigned to the SIP
phone and click on the corresponding IP line link. Note that the table lists only the
extensions attached to IP lines. If the extension is not listed on this page, open
UsersÆExtensions Settings page and attach an IP line to the extension by editing the
extension settings (see
Figure 3).
PAGE 5 27-Sep-07
Page 6

Epygi Technologies Configuring Grandstream IP Phones on Quadro LAN
Figure 3- Attaching an IP line to an extension
4. On the IP Line Settings page (see Figure 4), select the SIP phone radio button to
activate the line.
5. Select the model of the SIP phone from the Phone Model drop-down list.
Please Note: If the phone model is not included in the Phone Model drop-down list, select
Other and specify a Username and a Password in the respective fields (the same values should
be used when configuring the phone manually).
6. Enter the MAC address of the phone into the appropriate text fields. MAC addresses of IP
phones are usually printed on the back of the phone base unit.
7. Enter the number for simultaneous calls – the total number of active and held calls, in the
Line Appearances text box. If this field is set to 1, only one active call will be possible to
have on the phone. Making or accepting a second call while the other is on hold will not be
allowed.
Please Note: This number cannot exceed the number of simultaneous calls supported by the
phone. For Grandstream GXP2000 it is 11, for Grandstream BT 100/200 it is 2.
8. The Quadro identifies each SIP phone located on its LAN by a unique username and a
password specified on the IP Line Settings Page (see
configuration, they are specified on the Quadro and are automatically included in the
phone’s configuration file generated by the Quadro. By default the Quadro assigns a unique
username and password to each IP line. The user may either keep these values or specify
new ones.
9. Check the Use Session Timer checkbox to enable SIP Session Timer for this line.
10. Click Save to submit the changes.
Once a corresponding IP line is configured, factory reset the phone to complete Autoconfiguration. For instructions on how to reset a Grandstream SIP phone, please refer to Section
4.
Figure 4). In case of auto-
PAGE 6 27-Sep-07
Page 7

Epygi Technologies Configuring Grandstream IP Phones on Quadro LAN
Figure 4-Configuring an IP line
4 Completing Grandstream IP Phones Configuration
To complete Grandstream IP phone configuration using Auto-configuration option, reset the phone
to factory default settings. Please see the instructions below that describe how to restore the
default configuration on the Grandstream SIP phones.
Please note: If a SIP phone obtains its basic network parameters from a DHCP server other than
the Quadro’s built-in DHCP server, certain configuration changes will be required on the DHCP
server in use. Please refer to Section
7.
PAGE 7 27-Sep-07
Page 8

Epygi Technologies Configuring Grandstream IP Phones on Quadro LAN
4.1 Grandstream BT100/200
To complete the automatic configuration on Grandstream BT100/200, reset the phone to factory
default settings as detailed below:
1. Press the Menu button on the phone for Key Pad Menu options.
2. Press the Up or Down button to see Reset.
3. Just after the rESEt” is seen on the phone LCD, enter the MAC address of the phone using
the key pad (It is a 12 digits HEX number located on the bottom of the unit).
4. Press the Menu button again to confirm the Reset.
5. Wait for phone reboot and the LCD backlight finish flashing.
Please Note: Use the following mapping for Grandstream phones to enter the MAC address:
0-9: 0-9
• A: 22 (press the “2” key twice, ”A” will show on the LCD)
• B: 222
• C: 2222
• D: 33 (press the “3” key twice "D” will show on the LCD)
• E: 333
• F: 3333
If there are digits 22 in the MAC, you need to type 2 then press Æ right arrow key to move the
cursor or wait for 4 seconds to continue to key in another 2.
PAGE 8 27-Sep-07
Page 9

Epygi Technologies Configuring Grandstream IP Phones on Quadro LAN
4.2 Grandstream GXP2000
To complete the automatic configuration on Grandstream GXP2000, reset the phone to factory
default settings as detailed below:
1. Press the OK key to bring up the key pad configuration UI menu, select the Config,
2. Press the OK key to enter the submenu and select Factory Reset.
3. Key in the MAC address printed on the bottom of the sticker (see the
above).
4. Press the OK key again to move the cursor to OK button.
5. Press the OK key again to confirm. If the MAC address is correct the phone will reboot.
Otherwise, it will exit to previous keypad menu interface.
Please Note:
5 Verifying Configuration
This section describes how to verify the Grandstream IP phone successful configuration:
• Go to Quadro StatusÆSIP Registration statusÆRegistered IP Lines to see if the IP
Line registration is successful.
• Dial *74 to get the line information.
• Make outgoing and accept incoming calls.
• line is displayed on the phone
Make sure the default username set for an assigned IP
display (by default it has the ‘locextNumber’ format).
PAGE 9 27-Sep-07
Page 10

Epygi Technologies Configuring Grandstream IP Phones on Quadro LAN
6 Troubleshooting
The IP phone fails to reboot/restart
Some IP phones may fail to reboot when the reboot is initiated from the phone’s LCD-based
interface. The only way to recover the phone from the permanent reboot is to unplug the power
cable from the base unit of the phone and plug it in again.
If there is a problem with auto configuration of Grandstream BT100 phones, after resetting the
phone there is a need to set the configuration server by hand from the GUI of the phone.
Advanced Settings -> Firmware Upgrade and Provisioning:
Firmware Server Path: should be changed from fm.grandstream.com/gs to Quadro LAN IP (e.g. 172.30.0.1)
Config Server Path: should be changed from fm.grandstream.com/gs to Quadro LAN IP (e.g. 172.30.0.1).
7 SIP Phone Uses a Third-Party DHCP Server
To allow a SIP phone to be configured using auto-configuration options, the phone should be able
to download the configuration file from the Quadro’s HTTP/TFTP server. This requires that the boot
server address of the phone be set to the IP address of the Quadro’s LAN interface. In network
configurations where the SIP phone obtains its network parameters from the Quadro’s DHCP
server (recommended, see
Apart from the steps mentioned in Sections
phone configuration.
If the SIP phone uses a third-party DHCP server, the DHCP server should be configured to notify
the phone of the Quadro’s location. An example of such network configuration is shown in
In this example, the LAN of the Quadro, the dedicated DHCP server, and SIP phones are in the
same subnet. For the instructions on how to make appropriate changes to a third-party DHCP
server, please see Section
Figure 5), the boot server address is set automatically by the Quadro.
4 no additional steps are required to complete SIP
Figure 5-Recommended configuration for SIP phone setup
0.
Figure 6.
PAGE 10 27-Sep-07
Page 11

Epygi Technologies Configuring Grandstream IP Phones on Quadro LAN
Figure 6- SIP Phone uses dedicated DHCP server
Please note: If your company’s LAN configuration is similar to the one shown in Figure 6 make
sure the DHCP server is disabled on the Quadro LAN. If it is not, unpredictable network behaviour
may occur.
7.1 Configuration Changes to a DHCP Server
The steps below describe how to correctly configure the DHCP server. These steps also apply to
LANs that consist of several logical subnets with the DHCP server and a SIP phone on one subnet,
and the Quadro on another.
• Set the options listed in Table 1 to the values shown in the right column.
• Create a DHCP record for each SIP phone connected to the Quadro LAN.
• Reset the ph t. one to its default settings and then reboo
l scope options
Table 1 Globa
Option Name Value Example
003 Router
004 Time Server
005 Name Servers
006 DNS Servers
015 DNS-Domain Name com epygi-config.com epygi-config.
066 TFTP Server Name
Quadro LAN IP 172.30.0.1
Quadro LAN IP 172.30.0.1
Quadro LAN IP 172.30.0.1
Quadro LAN IP 172.30.0.1
Quadro LAN IP 172.30.0.1
Once the appropriate changes to the DHCP server configuration are completed, reset the phone to
s
tart the phone configuration. Please see Section 4
PAGE 11 27-Sep-07
.
Page 12

Epygi Technologies Configuring Grandstream IP Phones on Quadro LAN
8 References
• Quadro Manual-II: Administrator’s Guide for the corresponding release.
• Quadro Features on Epygi Tested IP Phones List.
• IP Phones and IP Lines Configuration Guide.
PAGE 12 27-Sep-07
 Loading...