

Grand Hall Bc-161a Owner's Manual

BC-161A Turbo Outdoor Refrigerator
Before Putting Into Use
Important
Placing and Installation
Description of the Appliance
Operation Control
Use
Maintenance and Cleaning
Changing the Direction of opening the Door
Trouble Shooting Guide

1
Thank you for buying a Grand Hall appliance!
We hope it will successfully serve your requirements for many years.
This Refrigerator can be for indoor and outdoor use and is intended for storing beverages and
fresh foods at temperatures higher than 0°C/32°F.
SAVE THESE INSTRUCTIONS
Before Putting Into Use……………… 2 Use………………………………………… 9
Instructions for Use Storing Fresh Foods
We care for the Environment Maintenance and Cleaning…………… 10
Tips for Energy Savings Automatic Defrosting of the Refrigerator
Important………………………………… 3 Cleaning of the Appliance
Disposing of Worn Out Appliances Switch Off the Appliance When Not In Use
Placing and Installation……………….. 4 Changing the Direction of
Choosing the Right Place Opening the Door…………………………11
Placing the Self-standing Appliance Trouble –Shooting Guide………………..12
Connection to Power Supply
Description of the Appliance………….7
Operation Control………………………8

2
Before Usage
Before connecting the appliance to an electrical power supply, let it stand for about 2 hours
to reduce the possibility of malfunctions in the cooling system due to transport handling.
Clean the appliance thoroughly, especially in the interior( See Cleaning and Maintenance)
In case the interior accessories are not correctly placed, rearrange them as described in
“Description of the Appliance”.
Instructions for Use
These instructions for use are intended for the user.
They provide descriptions of the appliance and proper operating procedures for safe use.
SAVE THESE INTRUCTIONS:
We Care for the Environment
Our products are environmentally friendly as individual packaging materials are clearly
marked.
These instructions are printed either on recycled paper or chlorine free bleached paper.
When ready to dispose your appliance, please call your nearest authorized service agent.
(See Disposing of Worn Out Appliance)
Tips for Energy Savings
Try not to open the door too often, especially when the weather is hot and humid. Once
you open the door, close it as soon as possible.
Periodically check if the appliance is sufficiently ventilated (adequate air circulation behind
the appliance).
Set the thermostat from higher to lower settings as soon as possible (depends on how full
the appliance, ambient temperatures etc).
Before loading the appliance with packages of fresh foods, make sure that they are cooled
to normal temperature (excluding soups).
Ice and frost layers increase energy consumption, so clean the appliance as soon as the
frost layer is 3-5mm thick.
If the gasket is damaged or the door seal is poor, energy consumption is substantially
higher. To restore efficiency, replace the gasket.
Always consider instructions stated in sections Positioning and Energy Saving Tips,
otherwise the energy consumption is substantially higher.

3
Important
The appliance must be properly connected to an electrical power supply. (See: Connection
to Power Supply).
If the food has a strange smell or color, throw it away, because it is very likely that it is
spoiled and therefore is dangerous to consume.
Always disconnect the appliance from the power supply before cleaning the appliance,
replacing the light bulb and / or attempting repairs. WARNING: repairs should be
performed by qualified service personnel only.
Do not defrost the appliance with other electric appliances (for example a hair dryer) and
never attempt to scrape /remove ice/frost with sharp objects. Use only enclosed tools or
tools recommended by the manufacturer.
The refrigerating system of the appliance is filled with refrigerant and oil, so when the
appliance is damaged, handle it with care and dispose of it in compliance with
environmental protection safeguards. (See: We Care for the Environment.)
The rating plate containing Model No/Serial No and other technical date specific to this
unit, is located either inside the unit or outside on the rear wall.
If there is any damage to the power supply cord, please contact local service center for
help! WARNING: repairs should be performed by qualified service personnel only.
Dispose of Worn Out Appliances
When your appliance finally wears out, dispose of it in a safe and harmless manner. If the
appliance is equipped with a door lock that can not be opened from the inside (lock, bolt),
make sure the lock is removed, disable or destroyed before being discarded. This will
make it impossible for children to accidentally lock themselves inside the appliance and
suffocate.
The refrigerator system of the appliance is filled with refrigerant and insulating substances
which should be separately treated and processed. Call your nearest authorized service
agent or specialized servicing center. If you are unable to locate one, contact your local
authorities or your distributor.
4
Placing and Installation
CHOOSING THE RIGHT PLACE
Place the appliance in a dry and regularly ventilated place. Never place the appliance near
heat emitting devices
(e.g. cooking appliances, radiators, water heaters or similar devices).
The appliance should be positioned at least 3cm away from electric or gas cooking
appliances and at least 30cm away from oil or coal fired stoves. If this is not possible, use
an appropriate insulation barrier.
Behind the appliance there should be a free space at least 200 c ㎡ wide and above the
appliance kitchen units (cupboards) should be at least 5 cm away from the appliance in
order to assure adequate ventilation.
Since this product has many ventilation holes underneath, please make sure there is a
gap of at least 3cm between the bottom of the product and the ground & there is nothing
stuck underneath.
INSTALLATION
Place the appliance firmly on a solid base. There are two wheeled feet underneath, but two
fixed feet on front side underneath. So if you want to move the appliance, hold the front side,
pull / push the appliance to the required location.
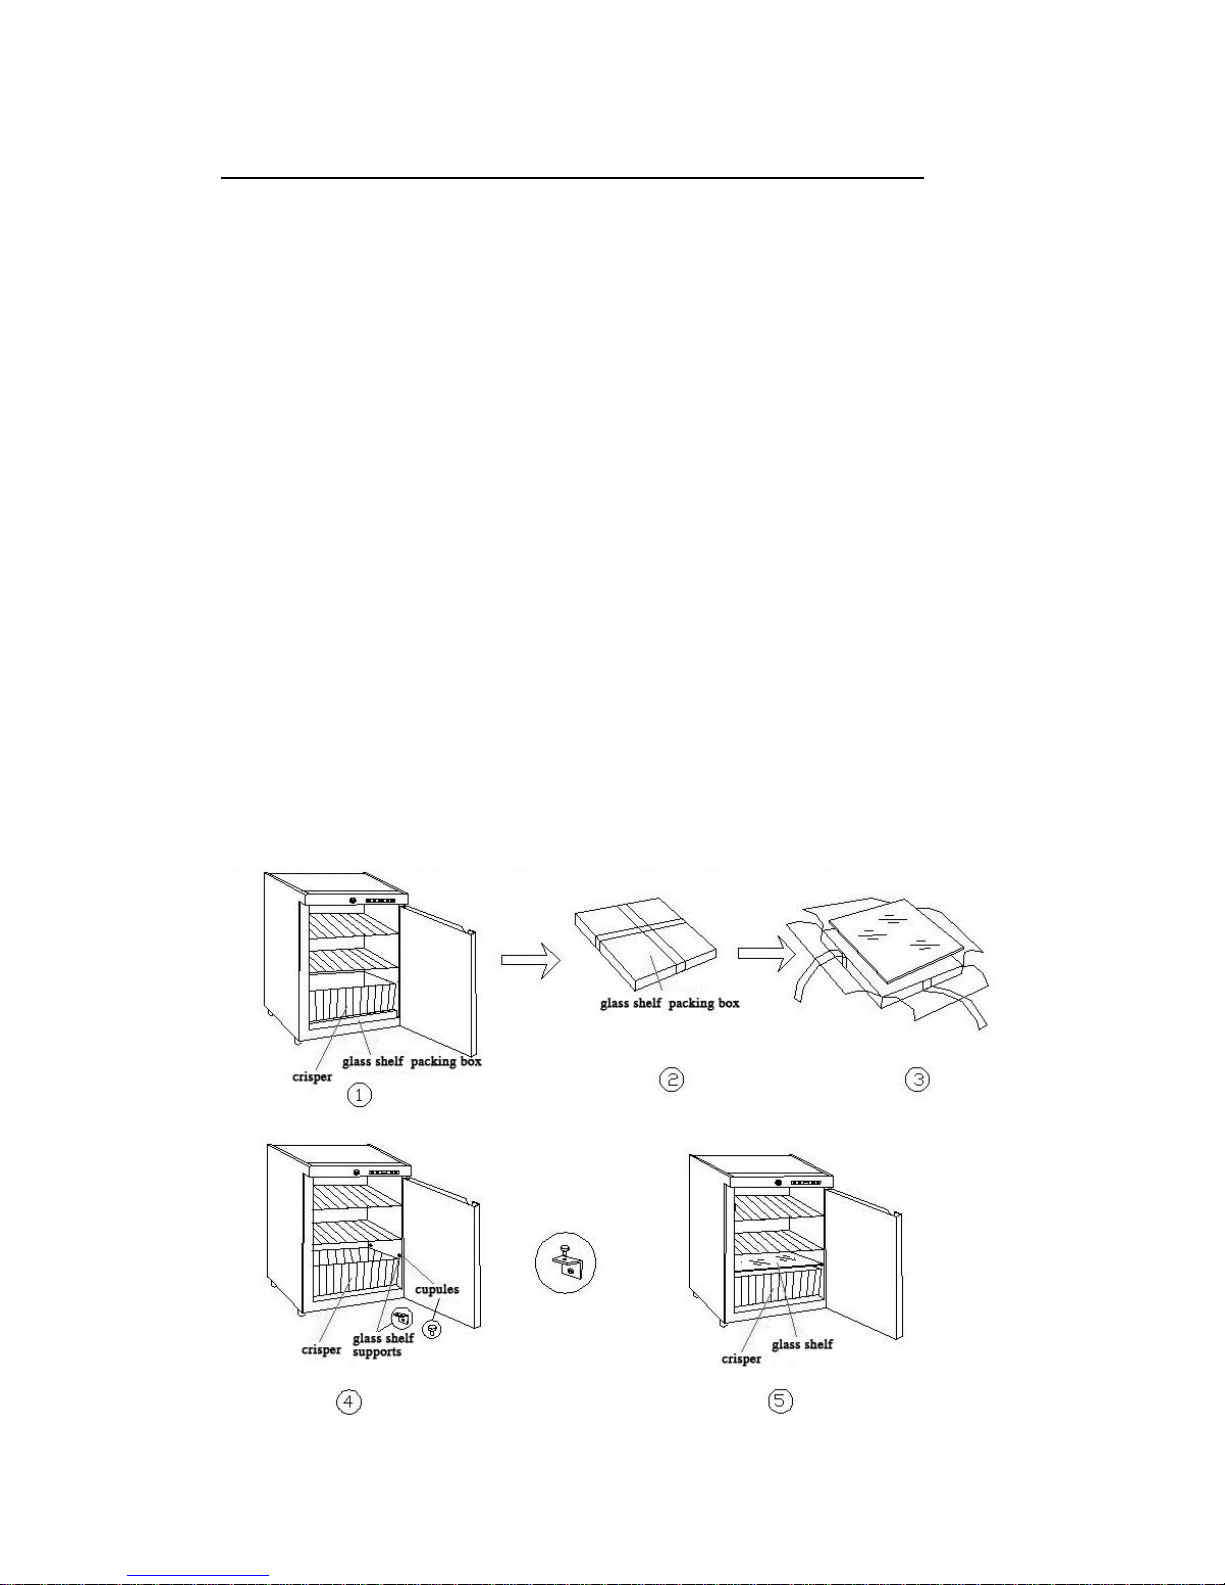
NOTICE CARD
For unpacking and installing the glass shelf:
5
① Open the door; the glass shelf is packed under the crisper;
② Take out the glass shelf packing box;
③ Unpack the box, take out the glass shelf;
④ Fix the four supports and add four cupules on them;
⑤ Put the glass shelf on the four cupules & make sure it is steady.
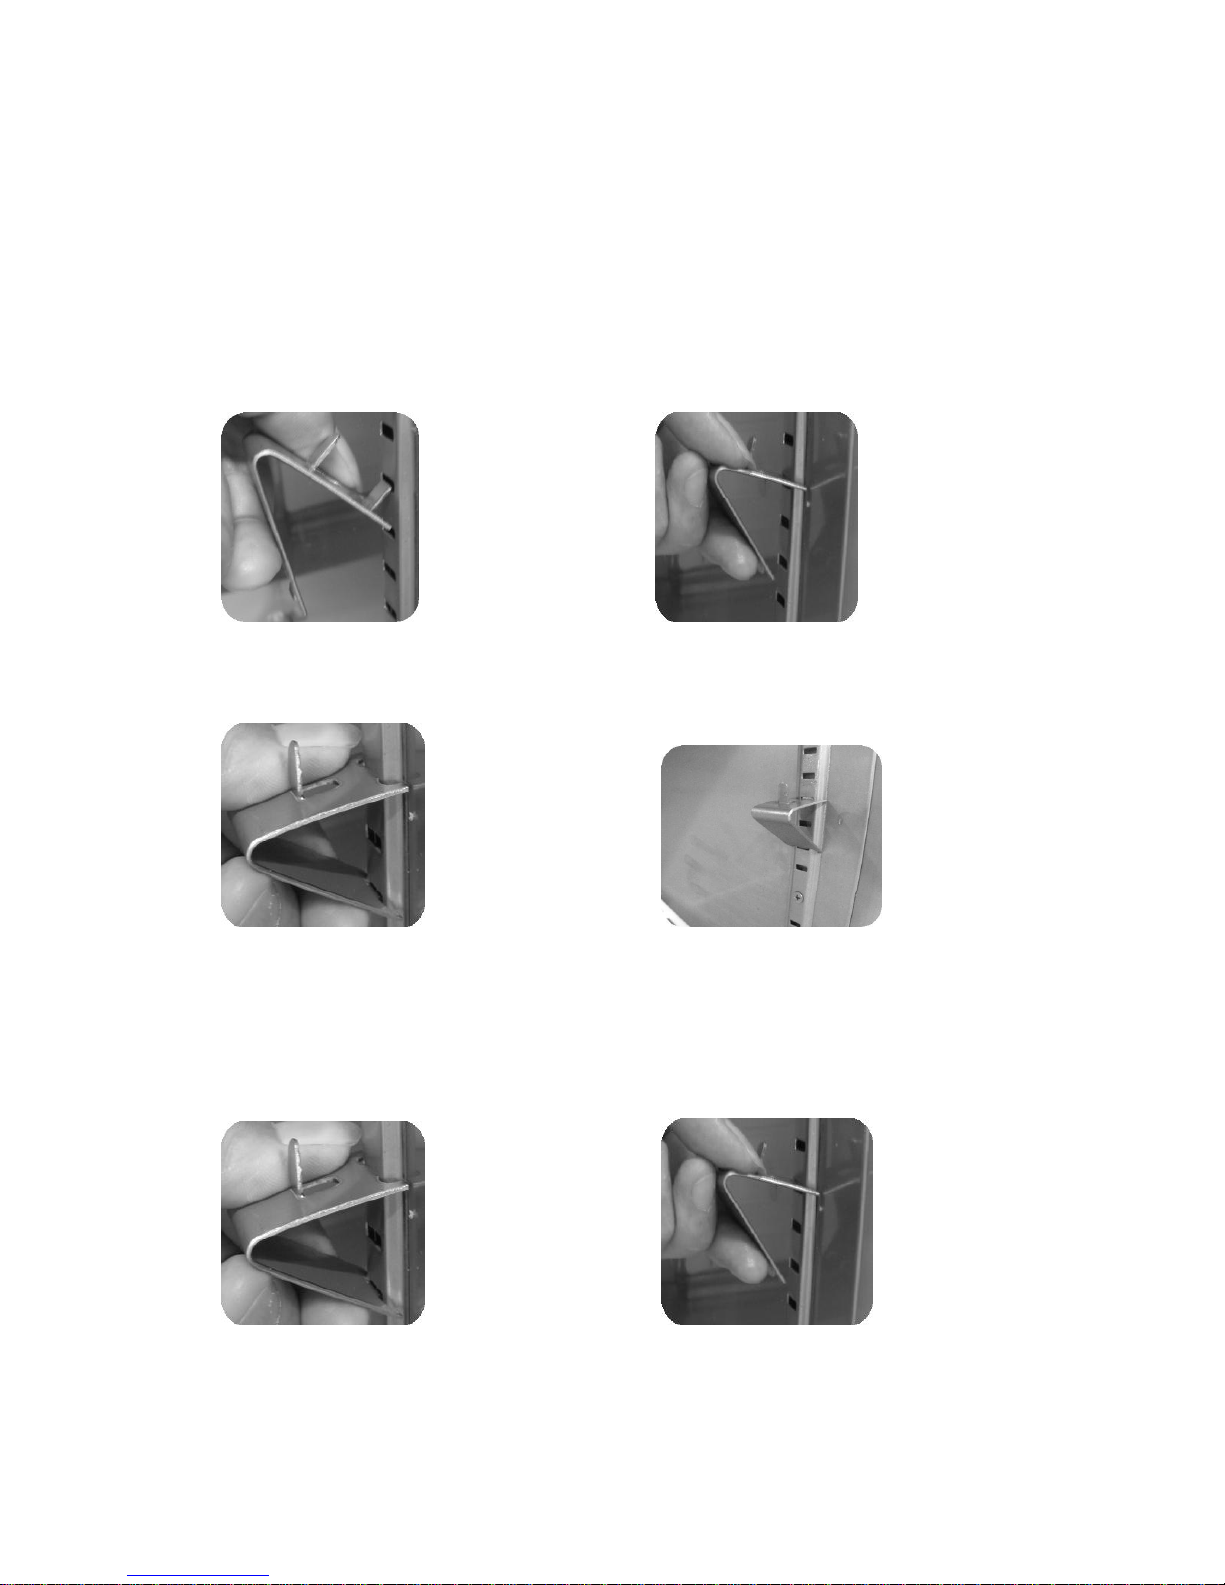
Fixing the “K” clip:
(ⅰ) (ⅱ)
Put the peg into the hole you choose; Press it downwards with your thumb;
(ⅲ) (ⅳ)
With your other fingers pushing on the Done.
slanting side, put the other peg into the third hole.
Removing the “K” clip:
(ⅰ) (ⅱ)
With your fingers pushing on the slanting side; Pull out the peg on the slanting side;
(ⅲ)
 Loading...