

Page 1
IO 9600-90 X
INSTRUCTION MANUAL
BUILT-IN ELECTRIC OVEN
IO-CBI-0577 / 8071455
(01.2019 / v1)
Page 2

DEAR CUSTOMER,
Your oven is exceptionally easy to use and extremely ecient. After reading these Operating
Instructions, operating the appliance will be easy.
Before being packaged and leaving the manufacturer, the appliance was thoroughly checked
with regard to safety and functionality.
Before using the appliance, please carefully read these Operating Instructions
By following these instructions carefully you will be able to avoid any problems in using the
appliance.
It is important to keep these Operating Instructions and store them in a safe place so that
they can be consulted at any time.
Follow these instructions carefully in order to avoid possible accidents.
Important!
Carefully read the instructions below before using the appliance.
This appliance is intended exclusively for domestic use.
The manufacturer reserves the right to introduce changes, which do not aect operation of the appliance.
2
Page 3

TABLE OF CONTENTS
Basic Information.......................................................................................................2
Safety instructions.....................................................................................................4
Description of the appliance.......................................................................................8
Installation...............................................................................................................10
Operation.................................................................................................................12
Cleaning and maintenance.......................................................................................31
Troubleshooting......................................................................................................36
Specication........................................................................................................37
3
Page 4

SAFETY INSTRUCTIONS FOR USE
Note.The appliance and its accessible parts become hot
during use. Care should be taken to avoid touching heating
elements. Children less than 8 years of age shall be kept
away unless continuously supervised.
This appliance can be used by children aged from 8 years
and above and persons with reduced physical, sensory or
mental capabilities or lack of experience and knowledge if
they have been given supervision or instruction concerning
use of the appliance in a safe way and understand the hazards involved. Children shall not play with the appliance.
Cleaning and user maintenance shall not be performed by
children without supervision.
During use the appliance becomes hot. Care should be taken
to avoid touching heating elements inside the oven.
Accessible parts may become hot during use. Young children
should be kept away.
Note. Do not use harsh abrasive cleaners or sharp metal
scrapers to clean the oven door glass since they can scratch
the surface, which may result in shattering of the glass.
Note. Ensure that the appliance is turned o before replacing
the lamp to avoid the possibility of electric shock.
4
Page 5

SAFETY INSTRUCTIONS FOR USE
Do not use steam cleaning equipment to clean the oven.
Danger of burns! Hot steam may escape when you open the
oven door. Be careful when you open the oven door during
or after cooking. Do NOT lean over the door when you open
it. Please note that depending on the temperature the steam
can be invisible.
● Ensure that small items of household equipment, including connection leads, do
not touch the hot oven as the insulation material of this equipment is usually not
resistant to high temperatures.
● Do not leave the oven unattended when frying. Oils and fats may catch re due
to overheating or boiling over.
● Do not put pans weighing over 15 kg on the opened door of the oven.
● Do not use harsh cleaning agents or sharp metal objects to clean the door as
they can scratch the surface, which could then result in the glass cracking.
● Do not use the oven in the event of a technical fault. Any faults must be xed by
an appropriately qualied and authorised person.
● In the event of any incident caused by a technical fault, disconnect the power
and report the fault to the service centre to be repaired.
● The rules and provisions contained in this instruction manual should be strictly
observed. Do not allow anybody who is not familiar with the contents of this
instruction manual to operate the oven.
● The appliance has been designed only for cooking. Any other use (for example
for heating) does not comply with its operating prole and may cause danger.
● The appliance must not be installed behind a decorative door in order to avoid
overheating.
5
Page 6

TIPS ON SAVING ELECTRICITY
Using energy in a responsible way not only saves
money but also helps the
environment. So let’s save
energy! And this is how you
can do it:
• Do not uncover the pan too often (a
watched pot never boils)!
Do not open the oven door too often.
• Only use the oven when cooking
larger dishes.
Meat of up to 1 kg can be prepared more
economically in a pan on the cooker hob.
• Make use of residual heat from the
oven.
If the cooking time is more than 40 minutes
turn o the oven 10 minutes before the end
time.
• Make sure the oven door is properly
closed. Heat can leak through spillages
on the door seals. Clean up any spillages
immediately.
• Do not install the oven in the immediate vicinity of refrigerator / freezer.
Otherwise energy consumption increases unnecessarily.
Important! When using the timer, set
appropriately shorter cooking times
according to the dish being prepared.
6
Page 7

UNPACKING
DISPOSAL OF THE APPLIANCE
The appliance was packed
to protected it from damage
during of transport. After
unpacking, please dispose
of all elements of packaging
in a way that will not cause
damage to the environment.
All materials used for packaging the appliance are environmentally friendly; they are
100% recyclable and are marked with the
appropriate symbol.
Important! Packaging materials (bags, polyethylene, polystyrene, etc.) should be kept
away from children during unpacking.
In accordance with European
Directive 2012/19/EU and Polish legislation regarding used
electrical and electronic goods,
this appliance is marked with
the symbol of the crossed-out
waste container.
This marking indicates that the appliance
must not be disposed of together with other
household waste after it has been used.
The user is obliged to hand it over to waste
collection centre collecting used electrical
and electronic goods. The collectors, including local collection points, shops and local
authority departments provide recycling
schemes.
Proper handling of used electrical and electronic goods helps avoid environmental and
health hazards resulting from the presence of
dangerous components and the inappropriate
storage and processing of such goods.
7
Page 8
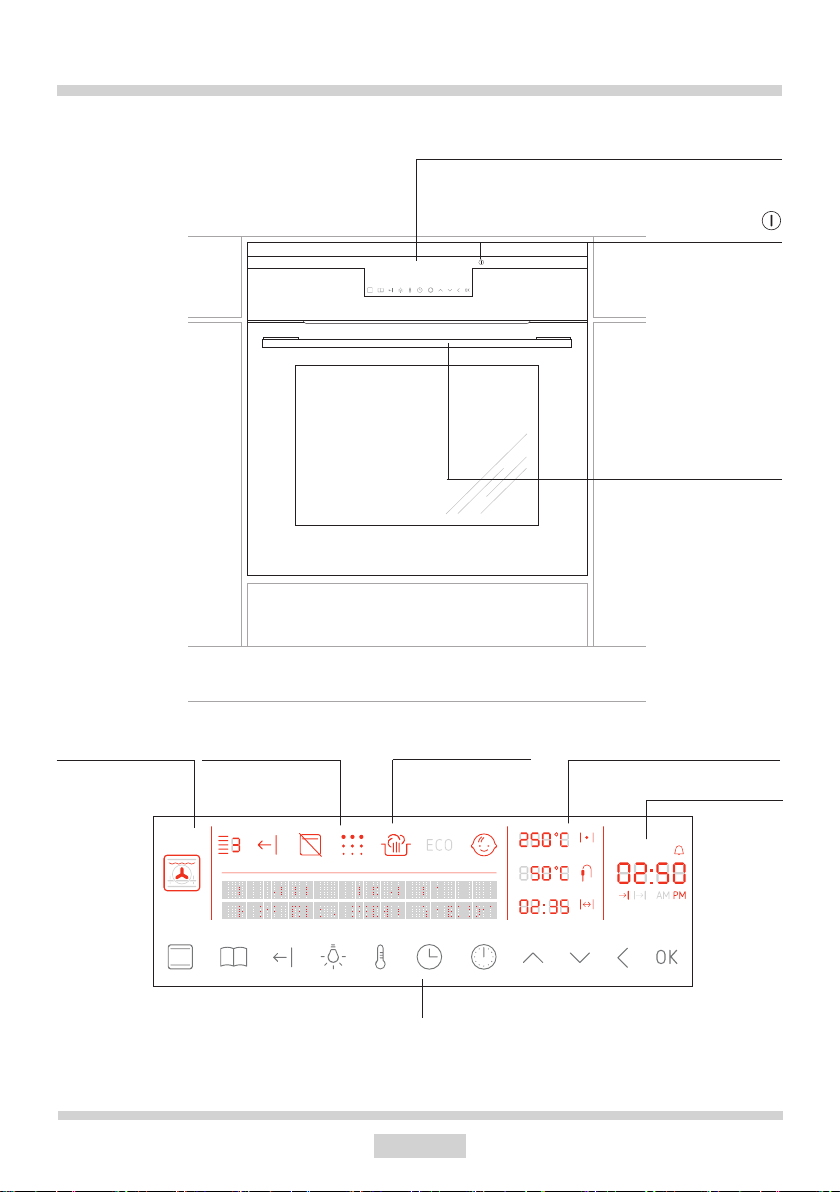
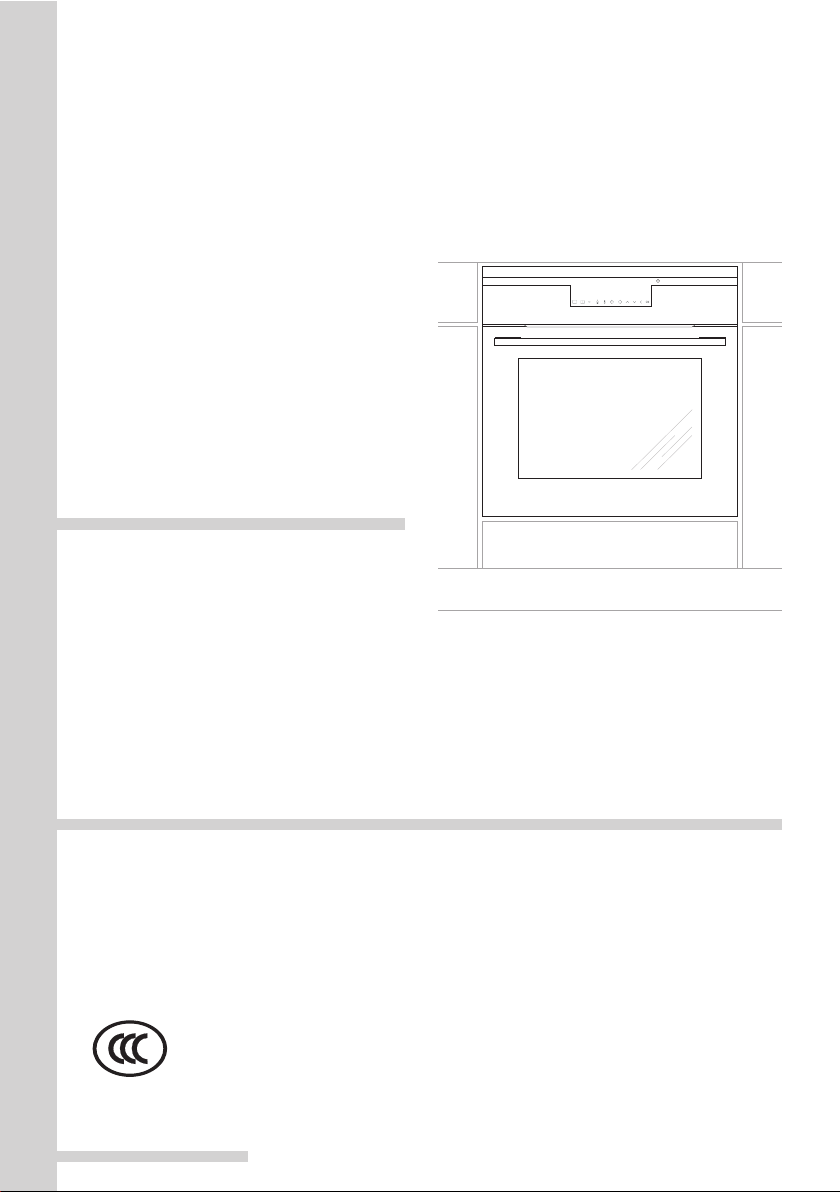
DESCRIPTION OF THE APPLIANCE
Control panel
On/O switch
Door Handle
oven
Oven functions
Active functions
Text messages
Temperature
Time display
Touch controls
8
Page 9
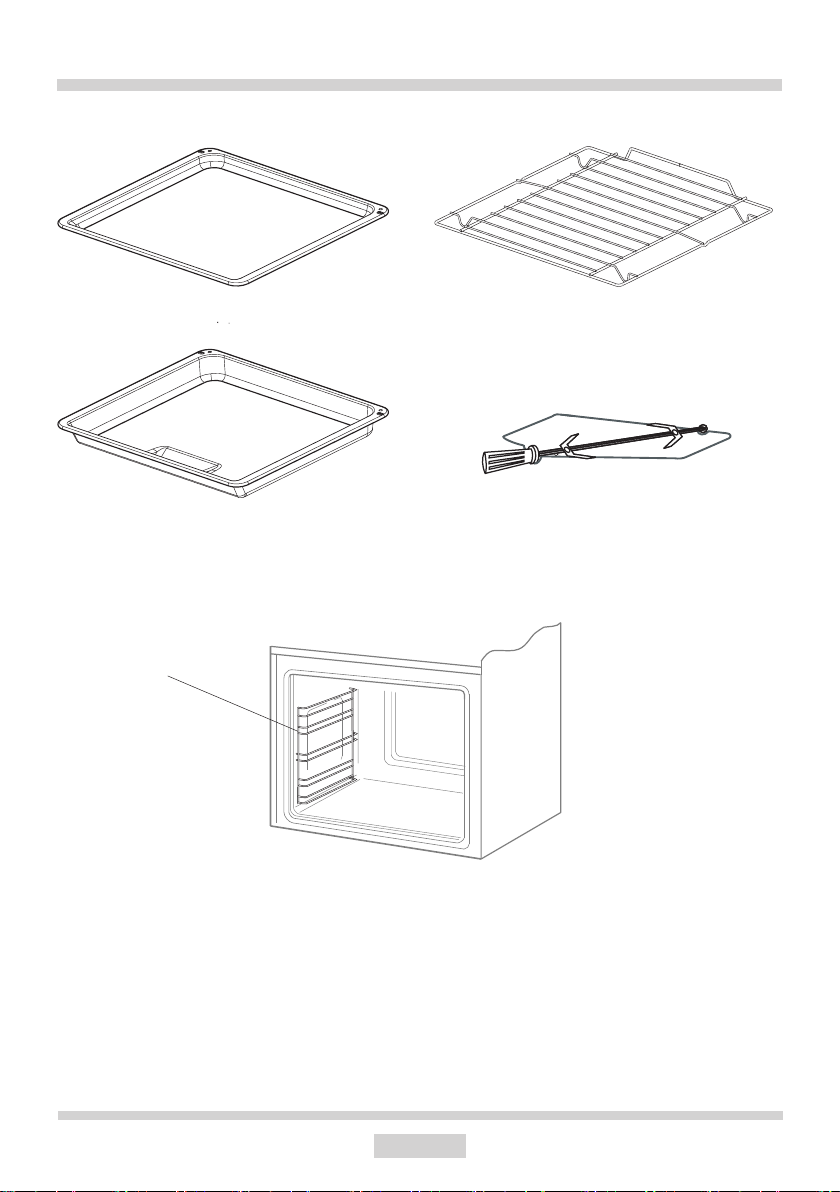
FEATURES AND COMPONENTS
Accessories
Bread baking tray*
Roasting tray*
Wire shelf supports
Grilling rack
(Wire grid)
Fork and rotisserie frame
*optional
9
Page 10

INSTALLATION
Installing the oven
The kitchen area should be dry and
aired and equipped with ecient ventillation. When installing the oven, easy
access to all control elements should
be ensured.
This is a Y–type design built–in oven,
which means that its back wall and one
side wall can be placed next to a high
piece of furniture or a wall. Coating or
veneer used on tted furniture must be
applied with a heat–resistant adhesive
(100°C). This prevents surface deformation or detachment of the coating.
Hoods should be installed according to
the manufacturer’s instructions.
Make an opening with the dimensions
given in the diagram for the oven to be
tted.
Make sure the mains plug is disconnec-
ted and then connect the oven to the
mains supply.
Insert the oven completely into the ope-
ning without allowing the four screws in
the places shown in the diagram to fall
out.
560
25
25
560
600
560
25
600
560
10
Page 11
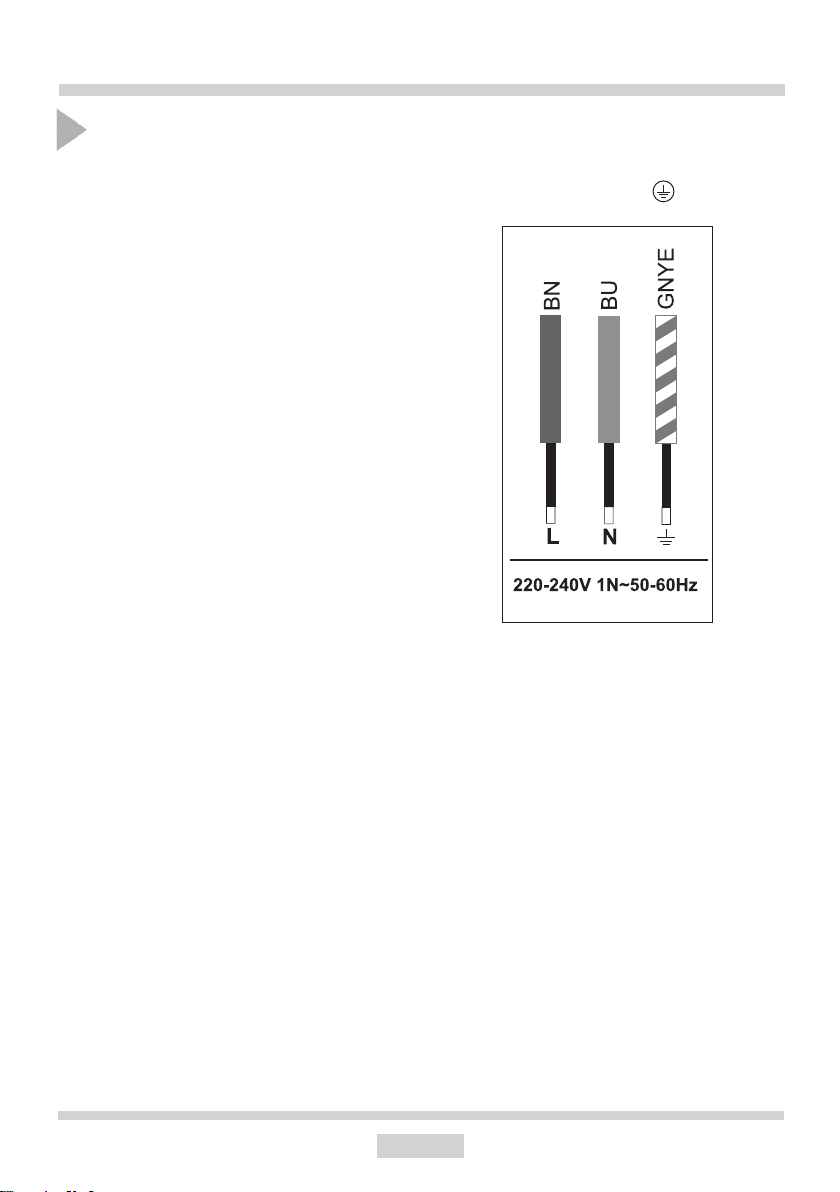
INSTALLATION
Electrical connection
Warning!
All electrical work should be carried out by a
suitably qualied and authorised electrician.
No alterations or wilful changes in the electricity supply should be carried out.
The oven is manufactured to work with a
one-phase alternating current (220-240V
~50-60Hz) and is equipped with a 3 x 1,5
mm2 connection lead.
The electricity supply for the oven must have
a safety switch which enables the power to
be cut o in case of emergency. The distance
between the working contacts of the safety
switch must be at least 3 mm.
Before connecting the oven to the power
supply it is important to read the information
on the data plate and the connection diagram.
Caution! The installer is obliged to provide
the user with “appliance electrical connection
certicate” (enclosed with the warranty card).
Connection diagram
Caution! Voltage of heating elements 220-240V .
Caution! In the event of any connection the safety
wire must be connected to the PE terminal.
Live L: BN - brown
Neutral N: BU - blue
Earth PE: GNYE -green/yellow
Power circuit should be protected with
a 16A fuse.
Recommended type of connection lead:
H05VV-F, 3 x 1,5mm2.
Important!
If the xed power supply cable is damaged,
it should be replaced at the manufacturer
or at an authorized servicing outlet, or by a
qualied person to avoid danger.
11
Page 12

OPERATION
Before using the appliance for
the rst time
• Remove packaging, clean the interior
of the oven,
• Take out and wash the oven accessories
with warm water and a little washing-up
liquid,
• Turn on the ventilation in the room or
open a window,
• Heat up the oven (to a temperature of
250°C for approximately 30 minutes),
remove any stains and wipe the interior
carefully. (see section: Using the control
panel),
Important!
To clean the oven chamber use only
warm water and a small amount of
washing-up liquid.
Important!
The oven features touch control panel
and display. To activate each touch
sensor, touch the glass above the
sensor (indicated by a pictogram). An
acoustic signal will be heard.
On/o switch is on the right side
of the display. To activate each touch
sensor, touch the glass above the
sensor (indicated by a pictogram). An
acoustic signal will be heard, which
was selected in the menu. (See section: Using the control panel),
Touch sensor surfaces must be
kept clean.
12
Page 13

OPERATION
Using the control panel
Touch controls
The control panel features 12 touch sensors (no backlight), marked as shown above. Each time
you touch a sensor a beep is emitted (except as indicated in detailed operating instructions).
On/o switch is on the right side of the display. When touch an activated sensor a beep is
emitted [conrmation]. When you touch an inactive sensor and [error] beep is heard. When
you touch and hold a sensor for 3 seconds a [conrmation 2] beep is emitted.
The appliance generates the following beeps:
[on] beep
[o] beep
[conrmation] — sensor touched
[conrmation 2] — sensor touched and held
[error] beep when you touch an inactive touch sensor
[kitchen timer alarm] — the maximum duration of 5 minutes.
[fast heat-up end alarm] – the maximum duration of 5 minutes.
[end time] – the maximum duration of 5 minutes.
[Open door alert]
- on/o switch
- oven functions
- preset programmes,
- fast heat-up on/o.
- oven cavity lighting on/o
- set temperature
13
Page 14

OPERATION
- clock settings
- kitchen timer, duration, end time settings
- plus / up [+]
- minus / down [-]
- back [<]
- conrm
Oven functions
Oven functions are indicated as follows:
Display backlight brightness. Backlight brightness changes throughout the day. Backlight
brightness is set to high during 05:00—22:00 and low during 22:00—05:00. Backlight brightness is also determined by the oven operating mode:
• Low backlight brightness — you can read current time in standby mode
• High backlight brightness when you use the appliance.
Active functions
Baking level symbol
Fast heat-up
Door lock (oven with pyrolytic cleaning)
Pyrolytic cleaning (oven with pyrolytic cleaning)
Steam Cleaning
ECO mode
Child lock
14
Page 15

OPERATION
Temperature
Oven cavity temperature and heating indicator
Meat probe and activation indicator
Start Time/ End Time and activation indicator
Time display
HH:MM time display and symbols: AM/PM,
kitchen timer, duration, end time
Text messages
Text information area includes 2 lines x 34 characters for displaying text information in the
following languages:
English, German, Polish, Russian, Czech, Serbian, Lithuanian, Estonian, Latvian, French,
Spanish, Turkish, Swedish, Norwegian, Finnish, Danish, Italian, Dutch.
15
Page 16

OPERATION
Turn on the appliance and set the time.
When you plug in the appliance for the rst
time you need to select the language. The
display is o except the text messaging area.
The default language is English. "Select language" is displayed on the left and language
selection option on the right. You can use
, sensors and [OK]. Use and sensor to select language. Touch OK sensor to
select your preferred language (The "Select
language" message will be displayed in your
preferred language). Touch OK again to begin
setting the time. For details on how to select
language please refer to the settings section.
When you plug in the appliance (or after a
power outage) you will need to set current
time. Current time is ashing on the display.
You can use , sensors and [OK].
Touch OK to initiate standby mode.
Important! In the event of a power outage
all automatic programmes, set temperatures
and kitchen timer are cleared. If you interrupt
the pyrolytic cleaning (or the door is locked
for any other reason), the oven will start the
cooling and door opening procedure before
you can set the time.
Standby mode
In this mode, the power consumption of the
appliance is limited to 800mW (except when
cooling down or using the light). Switch the
appliance to standby mode to reset all function settings, times, temperature, kitchen
timer and automatic programmes. All heating
elements are disconnected. The display is
dimmed except for the clock. You can use ,
and child lock combination (touched
together, individually they are inactive). Display backlight brightness is reduced.
If meat probe is plugged in the oven cavity,
is displayed. The symbol goes out when you
unplug the meat probe.
If the temperature in the oven chamber exceeds 50°C, the oven chamber temperature
is displayed (to indicate the residual heat) and
the cooling fan operates. When the temperature drops below 50°C, the cooling fan is
turned o and the oven chamber temperature
display goes out.
If the oven door is opened, the oven light
comes on. Oven light turns o when you close
the door or automatically after 10 minutes if
the door is still open.
The is displayed when Child Lock is on.
Touch and together to deactivate Child
Lock.
When you activate the appliance from the
standby mode you will hear an acoustic
signal [on]. When you turn o the appliance
into standby mode you will hear an acoustic
signal [o].
If you touch inactive sensors in a standby
mode, there will be no conrmation [error].
During 22:00 – 06:00 in standby the display
backlight is reduced as set for night-time
mode.
16
Page 17

OPERATION
Operation.
In this mode you can select the desired
functions, programmes and adjust settings.
You can use , , and sensors that
activate the Child Lock. Other touch sensors are enabled when necessary. When all
programmes complete and you do nothing
for 60 seconds, the appliance turns o (auto-o).
When you use the appliance display backlight brightness is normal. Oven chamber
outline symbol is displayed in oven function
area. The display shows the current oven
temperature or "--- °C" when the temperature is lower than 30°C. If meat probe is
unplugged, no information relating to meat
probe is displayed. Otherwise, the symbol is displayed and meatprobe temperature
is shown of "-- °C" when the temperature is
below 30°C. The text display (left) shows
the message "Select function >" and ">" is
blinking.
Clock
Touch and hold for a few seconds to
change the current time. In turn you can
set time display mode (12h/24h), hours and
minutes.
- touch or to adjust settings;
- touch OK to conrm the setting and begin
to adjust the next setting;
- touch to go back;
- when selecting time display mode
(12h/24h), touch or or do nothing for 10
seconds to abort.
Touch OK to conrm and store the settings.
In 12h mode the "AM" is displayed for 1-12
hours and "PM" for 13-24 hours.
You can only set the time when the appliance is in standby or operating mode an no
automatic programme or timer is enabled.
Otherwise, when you touch and hold the
sensor, you will hear an [error] beep and you
will not be able to change the current time.
17
Page 18

OPERATION
Light
The sensor operates independently and
using it does not aect other functions and
settings. sensor is inactive in a standby
mode.
The light in the oven turns on:
- when you touch — for 30 seconds;
- when you touch and hold for 3s – until
the appliance enters standby mode,
when you use any heating function or a pre-
set programme — for 30s;
when "fast heat-up" completes — for 30s;
when you open the door — until the door is
closed, but no longer than for 10 minutes.
Touch to turn o the light at any time.
Cooling fan.
Cooling fan operates independently of the
set functions and the appliance status.
Cooling fan turns on when the oven cham-
ber temperature exceeds 50°C and turns o
when it is below this temperature.
Thermostat
Thermostat symbol (next to the oven temperature) indicates the operating status of
heaters. If any of the heating elements operates, the symbol lights up. The symbol
goes out, if none of the heating elements
operates (e.g. when the oven reaches the
desired temperature and the heating elements are disconnected until the temperature drops).
Heating functions
Touch to select heating functions. You
can use the following controls:
– open pre-set programmes menu (clear
unconrmed settings);
– open timer menu (clear unconrmed
settings);
– go back. If you are on the main screen
– clear settings and enter operating mode.
, – navigate the menu;
OK – conrm.
[do nothing for 20s] - if you do nothing for 20
seconds, settings are cleared and the appliance enters operating mode.
The text display (left) shows the message
"Select heating function >" and ">" is blinking. Heating functions are displayed sequentially. The default function is Fan cooking. Note: Rotisserie functions only appear
on appliances that feature rotisserie. Out of
the three cleaning function available only
the active function is displayed, depending
on the pyrolysis settings.
In addition to accompanying functions, different oven chamber outline symbols are
displayed reecting the selected heating
function. Touch or to select and then
OK to conrm.
Once your selection is made, it is displayed
on the left side while the right side is blank.
The default oven temperature ashes.
Touch or to adjust temperature and
then OK to conrm.
If meat probe is detected, the appliance will
ask you to select its temperature. Touch
or to adjust default meat probe tempera-
ture of 80°C and then OK to conrm.
This step is omitted if no meat probe is detected.
18
Page 19

OPERATION
Oven light is on switches, and you can use
and sensors. Other functions start af-
ter 5 seconds of conrming.
[Duration ] symbol is displayed and time
display shows time that has elapsed.
You can cancel a heating programme at any
time. Touch:
– you can select pre-set programmes;
– standby mode.
Set the timer to control if the oven is on/o.
The timer does not aect, which heating
function is selected.
Touch to select a new heating function
(already active heating function is not interrupted). By default currently selected function and temperature are displayed. New
function and temperature selection must be
conrmed.
19
Page 20

OPERATION
Overview of oven functions, oven elements, possible temperature and default settings.
Function De-
scription
Conventional bottom heater + top heater 30 250 180 3
Cake
Rotisserie roaster + rotisserie drive 30 250 250 3
Grill roaster 30 250 250 4
Turbo grill roaster + top heater + fan 30 230 200 2
Super grill roaster + top heater 30 250 250 4
Fan assisted
heating
Pizza
Browning top heater 30 230 180 -
Roasting bottom heater 30 240 200 -
Defrosting fan - - - -
Super Rotisserie
Cleaning
Aqualytic
function*
Steam Cleaning*
Pyrolytic
cleaning*
bottom heater + top heater +
fan
fan heater + fan 30 250 170 3
fan heater + bottom heater +
fan
roaster + top heater + rotisserie
drive
bottom heater + top heater 30 250 90 -
bottom heater 30 240 50 -
Roaster + bottom heater - - 480 -
Oven elements
Temperature
[OC]
min. max
30 250 170 3
30 250 220 2
30 250 250 3
Default
tempera-
ture [°C]
Level
from the
bottom
*available cleaning function depends on the model
20
Page 21

OPERATION
Fast oven cavity heat-up.
When you select the heating function and
temperature the fast heating function becomes available. You can use it until the set
temperature is reached.
When you touch fast heat-up sensor the
symbol is shown. When the set temperature
is reached the symbol goes out, and the
oven lights up for 30 seconds and you hear
the [fast heat-up end] alarm. The selected
heating function is resumed and set temperature is maintained.
Fast heat-up and timer.
A) Set Timer before you use fast heat-up:
- if you only set duration, fast heat-up starts
immediately;
- If you set Duration and End Time, fast heatup starts at the beginning of the programme,
however the symbol is shown immediately until the set temperature is reached.
Using fast heat-up does not aect Duration.
B) Set Timer (touching ) when you are us-
ing fast heat-up — fast heat-up is paused
until you set the timer. When you set the
timer the function continues normally as in
item A).
Meat probe*
If you plug in the meat probe before selecting the heating function, you can set the
meat probe immediately after setting the
oven function.
You can connect the meat probe at any
time. The symbol will be shown and 80°C
default value will ash on the temperature
display. Touch or to adjust tempera-
ture and then touch OK to confirm. T h e
oven continues to use the previous settings
until you conrm meat probe setting (if you
unplug the meat probe before conrming the
temperature, the oven resumes the previous
mode). Activating the meat probe does not
change the oven temperature settings.
When you conrm meat probe setting, the
oven will keep the set temperature until the
desired meat probe temperature is reached.
Then the heat is turned o and you will hear
[end] beep.
Unplugging the meat probe during operation
(after you conrm the meat probe temperature) will cause an error (meat probe might
be damaged). You will hear a beep and the
programme will be terminated.
Meat probe and timer:
If you simultaneously use meat probe and
timer, the oven continues to operate until
the rst condition to end the programme is
met, i.e. until the meat probe temperature is
reached or duration has elapsed.
*optional
21
Page 22

OPERATION
Recommended meat probe temperature
settings
Type of meat Temperature
[°C]
Pork 85 - 90
Beef 80 - 85
Veal 75 - 80
Lamb 80 - 85
Venison 80 - 85
Important! Only use the meat probe recommended for this oven.
Adjust temperature during oven operation.
During operation oven cavity temperature
and meat probe temperature (if used) are
displayed. Touch once to display oven
cavity temperature and meat probe temperature. Touch again to set oven temperature
— and again to set meat probe temperature
(if equipped).
Touch and to adjust temperature.
Touch OK to store the set temperature or
touch to abort and leave previously set
temperature.
Timer.
Touch to access timer settings. You oven
features a timer, which is not aected by
other settings. You can set Duration or End
Time and Duration. Touch to set Kitchen
Timer -> Duration -> End Time.
Kitchen Timer.
The Kitchen Timer counts the time down.
When the countdown is completed [timer
alarm] is heard. The Kitchen Timer runs independently of other functions. Using the
Kitchen Timer during a preset programme
does not aect the programme.
Touch to set the Kitchen Timer. The
Kitchen Timer symbol will start ashing.
Instead of current time, 0:00 is shown (or
the previous timer setting). Touch or to
adjust settings. Touch or do nothing for 5s
to abort and keep previous settings or touch
to conrm and store the settings.
When you touch , the Kitchen Timer indicator is shown, but the display again shows
the current time.
You can change the timer settings in a similar manner (the display shows the time remaining to alarm activation). To disable the
timer, set "0:00" and conrm. The timer indicators goes out and the timer is o.
Touch once to view the time remaining to
alarm activation.
Touch any sensor to reset the timer alarm.
You can set the timer for a maximum of 2
hours.
22
Page 23

OPERATION
Timed operation.
Timed operation involves setting the duration after which the appliance automatically
turns o. You can set the duration from 1
minute to 10 hours.
Touch twice to adjust Duration (Kitchen
Timer settings are shown rst and then Duration). The symbol indicator ashes and
"0:00" is shown (or, if the function has been
previously activated, the remaining duration
until the oven turns o). Touch or to
adjust settings. Touch or do nothing for 5s
to abort and keep previous settings or touch
to conrm Duration and start countdown.
The symbol is shown. The symbol
and End Time ash for 5 seconds, then the
symbol goes out and the display shows
current time.
You can independently set the timer and
heating functions. You can also change the
heating functions while timer is counting
down. The Timer continues to count down
regardless of whether any of the heating
function is activated. The fast heat-up func-
tion does not aect the timer either.
You can deactivate the timer by setting the
duration to 0:00.
Once duration has elapsed, you will hear
an [end] beep. All heating elements are disconnected. You can silence the alarm as
follows:
- touch any sensor once to reset all function
settings, temperatures and to turn on light
for 30 seconds;
- touch twice to set the new duration and
continue cooking with currently set temperature and settings.
Automatic operation
You can set the appliance, so that its timed
operation is delayed and cooking ends at a
specic time.
You must rst set the Duration (same as in
timed operation). Touch to conrm the
set Duration. The symbol lights up and
the symbol starts ashing. The display
will show the End Time (calculated as Start
Time + Duration). Touch within 5 seconds
to move the End Time forward (and delay
Start Time). Touch or to adjust. Touch
, or do nothing for 5 seconds to abort or
touch OK to conrm. Once End Time is conrmed the and symbols light up stead-
ily and the Current Time is shown again.
The and indicators are on during the
countdown to Start Time. Once the countdown is complete, the symbol goes o
and the appliance turns on heating for the
set Duration.
Touch to view and modify the set duration.Touch the sensor once to set the Kitchen Timer, touch it again to set Duration and
touch it the third time to set the End Time
Set Duration to 0:00 to erase both Duration
and End Time.
You can adjust End Time from (Current Time
+ Duration + 1 minute) to (Current Time +
Duration + 10 hours). You can modify Duration (when End Time is set) from 0:00 to
(Duration – Current Time – 1 minute).
Duration countdown
The appliance counts down duration. Current Duration is shown on the bottom line
and accompanied by the [duration symbol
]. The duration is cleared when the appliance is in standby.
During timed operation (pre-set programmes or timer) the time remaining to
the next stage is shown (no symbol) i.e.
the time remaining to Start Time and to End
Time. Touch and hold for 3 seconds to
view elapsed time. Touch and hold for 3 seconds again to view remaining time.
23
Page 24

OPERATION
Child Lock
Child lock is designed to prevent children from
changing the oven settings. Once the child
lock is activated the oven stops responding
to any controls except the unlocking combination.
You can activate the Child Lock (lock the
touch sensors) at any time. Touch and to
activate and and to deactivate the Child
Lock. The Child Lock symbol will be shown
on the display.
When Child Lock is active touching any
control will cause an [error] beep, even the
and when touched separately. Active touch
sensors:
- touch and to deactivate Child Lock;
- touch to enter standby.
When the oven is in standby mode and
the child lock is enabled, the sensor
is inactive.
Door
Oven door must be closed during operation.
If the door is opened during appliance operation, the heating elements are disconnected and the light is on. If the door is open
for more than 30 seconds, you will hear
an acoustic signal alerting you to an open
door. Touch any sensor or close the door to
silence the alarm. Opening the door does
not aect any temperature or time settings,
however if the door remains open for more
than 10 minutes, the appliance cancels all
programmes.
Limit the operating time
If the oven operates any heating function for a
long time, heating elements are disconnected
to ensure safety as shown on the example
below. The appliance switches to standby
when programme is completed.
Example: If oven cavity temperature is 200°C
heater are turned o after about 3 hours. At a
temperature of 100°C after about 10 hours.
This prevent overheating.
Pre-set programmes
Pre-set programmes are pre-dened heating functions including temperature and
times to specic cooking applications. You
can adjust pre-set programme temperature
and time. Adjusting Kitchen Timer does not
aect a pre-set programme.
Menu navigation:
, – go to another menu item; menu
items are rotated in a loop;
OK – conrm;
– open pre-set programmes menu (clear
unconrmed settings)
– open heating functions menu (clear un-
conrmed settings)
– open timer menu (clear unconrmed
settings);
– go back. If you are on the main screen
– clear settings and enter operating mode.
[do nothing for 20s] - if you do nothing for 20
seconds, settings are cleared and the appliance enters operating mode.
Select a pre-set programme.
Touch to select a pre-set programme.
The current oven setting will be cleared, the
heaters turned o, and you san select a pre-
set programme.
The text display (left) shows the message
"Select programme group >" and ">" is blinking. On the right side available programme
groups are displayed:
Meat
Poultry
Pizza;
Frozen products
Pastries
Low temperature baking
Additional programmes
When you conrm, the selected group is
displayed on the left side. ">" continues to
ash. Pre-set programmes within the select-
24
Page 25

OPERATION
ed group are displayed on the right.
When you conrm, the selected pre-set programme is displayed on the left side.
Adjust settings.
If meat probe is plugged in but you select a
pre-set programme that does not use a meat
probe, "unplug meat probe" message is displayed in the text area on the right. Then you
have 1 minutes to unplug the meat probe. If
meat probe is still plugged in after this time,
all programme settings are cleared and the
appliance is in operating mode. If you unplug the meat probe within 1 minute, the
message "unplug meat probe" is removed
and you proceed to the next stage.
If meat probe is unplugged in but you select a pre-set programme that uses a meat
probe, "insert meat probe or select weight"
message is displayed in the text area on the
right. The message is removed when you
plug in the meat probe and you proceed to
the next stage. When you touch or
, "select weight and touch OK" will be displayed and you proceed the same as with a
weight-based programme. If you do nothing
for 1 minute or you do not insert the meat
probe the appliance enters operating mode.
If you have select the weight-based programme (e.g. chicken), "select weight and
touch OK" will be displayed and you can select the desired weight. Weight is displayed
in kg in accordance with convention used in
a given language. If no weight is selected
within 1 minute the appliance enters operating mode.
Start programme without fast heat-up
When you enter all necessary settings the
message "Touch OK to start programme"
will be displayed. You have 1 minute to
touch OK, otherwise settings are cleared
and the appliance enters operating mode.
Once you touch OK, the pre-set programme
settings such as temperature, heating function and times are applied and the programme starts. "Programme in progress"
message will be displayed.
Start programme with fast heat-up
When you enter all necessary settings the
message "Touch OK to pre-heat the oven"
will be displayed. You have 1 minute to touch
OK, otherwise settings are cleared and the
appliance enters operating mode.
When you touch OK the heating function and temperature are applied and fast
heat-up starts (the is shown) and "Oven
pre-heating" message is displayed.
When the pre-set programme temperature
is reached the appliance uses heating elements assigned to the pre-set programme
and continues to maintain temperature. The
symbol ashes, pre-heat end beep is
emitted. The message will be shown on the
right: oven hot, place your food inside and
touch OK If you do not touch OK for 1 minute the appliance enters operating mode.
When you touch OK, duration starts and
pre-set programme settings are applied, fast
heat-up indicator goes out and "Programme
in progress" message is displayed.
End programme
When duration elapses, end time beep is
emitted, and text messages are removed.
Touch any control to silence the alarm.
When you touch , you can set duration
and continue cooking with the same heating function and temperature settings. When
you touch any other control, the appliance
enters operating mode.
25
Page 26

OPERATION
Cleaning programme.
Cleaning programme can be found in the
"Heating functions", but it operates much
like pre-set programmes. You can select the
following heating programme:
- Pyrolytic cleaning (depending on the model)
- Cleaning
Cleaning.
Pre-set cleaning programme: temperature
90°C, top heater + bottom heater, duration =
30 minutes with no fast heat-up. The cleaning symbol is shown.
The message "Add 50cl water and touch OK
to start" is displayed.
Aqualytic enamel oven (marked by the letters
Qa).
Pour 50 cl (two glasses) of water on the bottom of the oven chamber.
Standard enamel oven (marked by the letter
Q).
Insert the bread baking tray on the lowest level and pour 25 cl (one glass) of water into it.
"Cleaning" is shown on the display.
You can modify the pre-set cleaning programme settings.
When you conrm door status is checked. If
the door is open the message "Close oven
door and touch OK to start" is displayed. If
the door is closed the message is displayed:
"Touch OK to start pyrolytic cleaning" You
have 10 minutes to close the door and touch
OK to conrm.
Pyrolytic cleaning starts. The door is locked.
The symbols and are shown. Top grill
heater and bottom heater operate with temperature setting of 480°C and cooling fan
operates at speed 2. The temperature is set
to 465°C and bottom heater operate intermittently. The message "Caution! Pyrolytic
cleaning!"
30 minutes ahead of End Time all heaters
are turned o, temperature changes to "---
°C" and the message changes to "Cooling
down."
Based on the cooling rate the appliance calculates and displays the time remaining until
the end of the pyrolytic cleaning.
The door is unlocked when temperature is
less than 150°C.
The cooling fan slows down to speed 1.
No settings can be changed during the pyrolytic cleaning and you cannot continue
cooking with these settings. When you silence the alarm, the appliance always en-
ters operating mode. Touch to terminate
the pyrolytic cleaning.
Pyrolytic cleaning*
The Pyrolytic cleaning programme comes
with special requirements. The message
"Remove all items from the oven and touch
OK”.
You need to conrm the setting within 10
minutes.
When you conrm the message is displayed: "Select pyrolytic cleaning duration"
and the choices are: 90 minutes, 120 minutes and 150 minutes Use controls to make
your choice.
*optional
26
If there is a short power outage during pyrolytic cleaning the appliance starts cooling
down and eventually unlocks the door.
When you touch to abort pyrolytic cleaning the appliance starts cooling down and
eventually unlocks the door. When the door
is unlocked the appliance switches to standby.
When you touch OK to start pyrolytic cleaning and open the door before it is locked
there will be an [open door] beep and pyrolytic cleaning is aborted.
Page 27

OPERATION
Settings
Touch and together to enter setup
menu. The appliance must be in operating
mode to enter setup.
Menu navigation:
, – go to another menu item; menu
items are rotated in a loop;
OK – conrm;
– open pre-set programmes menu (clear
unconrmed settings);
– open heating functions menu (clear un-
conrmed settings);
– open timer menu (clear unconrmed
settings);
– go back. If you are on the main screen
– clear settings and enter operating mode.
[do nothing for 20s] - if you do nothing for 20
seconds, settings are cleared and the appliance enters operating mode.
"Setup" is displayed on the left and available
options on the right.
- 1. Language
- 2. Light
- 3. ECO;
- 4. Display brightness
- 5. Handle backlight brightness (option)
- 6. Service
- 7. Factory settings.
1. Language.
"Select language" is displayed on the left.
Available language selection options are
displayed on the right. Current language is
the default option.
Touch , to change the language. Touch
OK to select your preferred option. The "Select language" message and "Touch OK to
conrm" will be displayed in your preferred
language.
Touch or to go back to language selection. Touch to go back to the current default
language. Touch OK to store the default language and go back to the setup menu
2. Light
"Select light mode" is displayed on the left.
Available options are displayed on the right:
Continuous and ECO. The default is the current setting and the factory setting is: ECO.
Touch OK to store the current setting and go
back to the conguration menu.
Appliance specication assumes ECO set-
ting is used. In continuous setting light is
turned on:
- when the door is open;
- during heating function
3. ECO
"Select oven operation mode" is displayed
on the left. Available options are displayed
on the right: Normal operation and ECO.
The default is the current setting and the
factory setting is: ECO. Touch OK to store
the current setting and go back to the con-
guration menu.
Appliance specication assumes normal
setting is used. ECO mode aects the oper-
ation of pre-set programmes when duration
or meat probe are used.
If Duration exceeds 25 minutes, the heaters
and fan are turned o 5 ve minutes before
End Time and audible alert.
If meat probe is used, heaters are turned o
at 2°C below the set temperature. If the temperature does not rise within 2 minutes, the
target temperature is raised by 1°C (-1°C of
the set temperature). If the target temperature is not reached with the next three minutes, it is raised 1°C and programme ends
(the appliance assume the set temperature
has been reached).
4. Display brightness.
"Select display mode" is displayed on the
left. Available options are displayed on the
right: Operation, Standby, Night. When you
conrm, you will see "Operation display
brightness" or "Standby display brightness"
27
Page 28

OPERATION
or "Night display brightness" depending on
your choice. On the right you will see current display brightness expressed in percent
"100%." Touch , to adjust brightness
and touch OK to conrm. Touch to go back
to the previous menu.
When you adjust brightness, current display
backlight brightness remains unchanged
until you conrm.
Default values for operation/standby/night
mode are 80%, 45%, 30%.
5. Handle backlight brightness
Applies only to appliances with backlit handle. "Set handle backlight brightness" will be
displayed on the left. On the right you will
see current display brightness expressed
in percent "100%." Touch , to adjust
brightness and touch OK to conrm. Touch
to go back to the previous menu.
When you adjust brightness, current handle
backlight brightness remains unchanged
until you conrm.
The default handle backlight brightness is
75%.
6. Service.
The service menu is for information only and
no settings can be adjusted. Touch or
to go through all the items and touch OK or
to go back. Menu items:
User interface rmware version
Power board rmware version
Current error:
Previous error:
tings and go back or to abort and go back.
The and touch sensors are inactive.
When you restore factory settings all settings for programmes, Kitchen Timer, Timer
and Duration are cleared.
Default factory settings:
- Language: English;
- backlight brightness: 80%/45%/30%;
- Backlight: ECO;
- Oven: ECO;
- Clock : 24h (current time is unaected).
List of errors:
- blank – no error;
- E0 - temperature sensor error
- E1 - meat probe sensor error
7. Factory settings.
The message will be shown: Restore factory
settings? Touch OK to restore factory set-
28
Page 29

OPERATION
Using the roaster.
The roasting process occurs as a result of
the infrared rays emitted by incandescent
radiator, which are absorbed by the food.
In order to switch on the roaster you need to:
• Choose one of the heating functions
.
• Heat the oven for approx. 5 minutes (with
the oven door shut).
• Insert a tray with a dish onto the appropri-
ate cooking level; and if you are roasting
on the grate insert a tray for dripping on
the level immediately below (under the
grate).
• Close the oven door.
Important!
When roasting it is recommended that
the oven door is closed.
When the roaster is in use accessible
parts can become hot.
It is best to keep children away from
the oven.
Use of the rotisserie
The rotisserie enables rotating grilling in the
oven. It is intended for grilling poultry, kebabs,
sausages and similar dishes. Switching the
rotisserie motor on and o is done at the
same time as switching the grilling function
with rotisserie .
When using these funtions during grilling
the rotisserie motor can stop momentarily
or the rotating direction can be changed.
This does not aect the functionality and the
grilling quality.
Preparing dishes using the rotisserie:
(see the diagram below)
• put the food on the rotisserie spit and
secure it using the forks;
• insert the rotisserie frame into the oven
on the third level from the bottom;
• insert the spit end into the motor drive
coupling, making sure that the groove
of the metal part of the rotisserie handle
rests on the frame;
• unscrew the handle;
• insert the tray onto the lowest level of the
oven chamber and close the door.
29
Page 30

TIPS FOR COOKING IN THE OVEN
Baking
• we recommend using the baking trays which were provided with your cooker;
• it is also possible to bake in cake tins and trays bought elsewhere, which should
be put on the drying rack; for baking it is better to use black trays which
conduct heat better and shorten the baking time;
• shapes and trays with bright or shiny surfaces are not recommended when
using the conventional heating method (top and bottom heaters), use of such
tins can result in undercooking the base of cakes;
• when using the convection fan function it is not necessary to initially heat up the
oven chamber, for other types of heating you should warm up the oven chamber
before the cake is inserted;
• before the cake is taken out of the oven, check if it is ready using a wooden
stick (if the cake is ready the stick should come out dry and clean after being
inserted into the cake);
• after switching o the oven it is advisable to leave the cake inside for about 5 min.;
• temperatures for baking with the convection function are usually around 20°C
– 30°C lower than in normal baking (using top and bottom heaters);
• settings given in the table are reference only and may be modied depending
on your own experience and preferences.
• if information given in recipe books is signicantly dierent from the values pro-
vided in this instruction manual, please apply the instructions from the manual.
Roasting meat
• cook meat weighing over 1 kg in the oven, but smaller pieces should be cooked
on the heating zones.
• use heatproof ovenware for roasting, with handles that are also resistant to
high temperatures;
• when roasting on the drying rack or the grate we recommend that you place a
baking tray with a small amount of water on the lowest level of the oven;
• it is advisable to turn the meat over at least once during roasting you should
also baste the meat with its juices or with hot salty water – do not pour cold
water over the meat.
30
Page 31

OVEN CLEANING AND MAINTENANCE
Proper routine maintenance and cleaning
of the oven can signicantly extend its trouble-free operation.
Turn o the oven before cleaning.
Do not begin cleaning until the
oven has cooled.
• Clean the oven after each use. When
cleaning the oven turn on lights to improve
visibility of the interior.
• To clean the oven chamber use only warm
water and a small amount of washing-up
liquid.
• Steam Cleaning
Proceed as described in the section Using
the control panel.
• When the steam cleaning process is
completed, wipe out the chamber with a
damp cloth or a sponge soaked in a mild
solution of washing-up liquid.
• After cleaning wipe over chamber dry.
• Use a soft, moisture absorbing cloth to
clean surfaces.
Important!
Do not use any abrasive agents,
harsh detergents or abrasive objects for cleaning.
Only use warm water with a small
amount of dishwashing liquid to
clean the front of the appliance.
Do not use washing powders or
creams.
31
Page 32

OVEN CLEANING AND MAINTENANCE
12
12
• Ovens in cookers marked with the letter
D are equipped with easily removable
wire shelf supports. To remove them for
washing, pull the front catch, then tilt the
support and remove from the rear catch.
Removing wire shelf supports
Installing wire shelf supports
• Ovens in cookers marked with the letters
Dp have stainless steel sliding telescopic
runners attached to the wire shelf supports. The telescopic runners should be
removed and cleaned together with the
wire shelf supports. Before you put the
baking tray on the telescopic runners,
they should be pulled out (if the oven
is hot, pull out the telescopic runners
by hooking the back edge of the baking
tray on the bumpers in the front part of
the telescopic runners) and then insert
them together with the tray.
Important!
Do not wash telescopic runners in a
dishwasher.
Removing telescopic runners
Installing telescopic runners
32
Page 33

OVEN CLEANING AND MAINTENANCE
Replacing the halogen bulb in the oven
Before replacing the halogen bulb, make
sure the appliance is disconnected from
the electric mains to avoid a possible
electric shock.
Oven lighting
1. Unplug the appliance
2. Remove shelves and trays from the oven.
3. Unscrew and wash the lamp cover and
then wipe it dry.
4. Pull the halogen bulb out using a cloth
or paper. If necessary, replace the halogen
bulb with a new one.
- voltage 230V
- power 25W
5. Replace the halogen bulb in its socket.
6. Screw in the lamp cover.
Replacement of the oven light bulb
In order to avoid the possibility of an
electric shock ensure that the appliance
is switched o before replacing the bulb.
● Set all control knobs to the position “●”/“0”
and disconnect the mains plug,
● unscrew and wash the lamp cover and
then wipe it dry.
● unscrew the light bulb from the socket,
replace the bulb with a new one – a high
temperature bulb (300°C) with the following parameters:
- voltage 230 V
- power 25 W
- thread E14.
Oven light bulb
● Screw the bulb in, making sure it is pro-
perly inserted into the ceramic socket.
● Screw in the lamp cover.
33
Page 34

OVEN CLEANING AND MAINTENANCE
A
B
C
Door removal
In order to gain easier access to the oven
chamber for cleaning, the door can be removed. To do this, tilt the safety catch part of
the hinge upwards (Fig. A). Gently close the
door slightly ajar, lift and pull it out towards
you. In order to t the door back on to the
cooker, do the inverse. When tting, ensure
that the notch of the hinge is correctly placed
on the protrusion of the hinge holder. After
the door is tted in the oven, the safety catch
should be carefully lowered down again.
If the safety catch is not set it may cause
damage to the hinge when closing the door.
Removing the inner panels
1. Using a at screwdriver unhook the upper
door strip, prying it gently on the sides (Fig. B).
2. Pull the upper door strip loose. (Figure B, C)
Tilting hinge safety catch
34
Page 35

OVEN CLEANING AND MAINTENANCE
D
1
2
3
1
2
3
1
2
3
3. Pull the inner glass panel from its seat (in
the lower section of the door)
Important! Risk of damage to glass panel
mounting. Do not lift the glass panel up
but pull it out.
Remove the middle glass panel (Fig. D).
4. Wash the glass panel with warm water
and a little detergent.
Carry out the same in reverse order to reassemble the glass panels. The smooth
surface of the glass panel should be placed
at the top, while the trimmed corners at the
bottom.
Important! Do not force the upper strip
in on both sides of the door at the same
time. In order to correctly t the top door
strip, rst put the left end of the strip on the
door and then press the right end in until you
hear a "click". Then press the left end in until
you hear a "click".
Regular inspections
In addition to normal cleaning and maintenance:
• carry out periodic checks of touch controls
and other elements. After the warranty
expires, have authorised service inspect
the appliance every two years,
• repair any operational faults,
• carry out periodic maintenance of the
oven.
Important!
All repairs and adjustments must
be performed by the appropriate
service centre or by an appropriately
authorised tter.
Removing the inner glass panels
35
Page 36

TROUBLESHOOTING
In the event of any fault:
• turn o the appliance,
• disconnect the power supply,
• based on the instructions given in the table below, some minor issues can be corrected
by the user. Please check the consecutive points in the table before you refer the repair
to customer service.
Problem Reason Remedy
1. The appliance does not work no power check the fuse, replace if blown
2. Oven lighting does not work. loose or damaged bulb Replace the blown bulb (see
3. E0 error Oven temperature reading error You cannot use the oven, please
4. E1 error Meat probe temperature reading
error
5. Fan does not work Risk of overheating! Immediately unplug the appliance or switch
o the main circuit breaker. Refer the repair to the nearest service
centre.
Cleaning and Maintenance section)
refer the repair to the nearest
service centre.
The message disappears once
the meat probe is unplugged.
The oven can be used without
the meat probe
If the problem is not solved, disconnect the power supply and report the fault.
Important! All repairs must be performed by qualied service technicians.
36
Page 37

SPECIFICATION
Rated voltage 220-240V 1N~50-60 Hz
Rated power max. 3.1 kW
Oven dimensions (height x width x depth) 59,5 / 59,5 / 57,5 cm
Meets the requirements of the following EU regulations EN 50304 EN 60335-1, EN 60335-2-6
Certicate of compliance CE
The Manufacturer hereby declares that this product complies with the general requirements pursuant to the
following European Directives:
The Low Voltage Directive 2014/35/EC,
Electromagnetic Compatibility Directive 2014/30/EC,
ErP Directive 2009/125/EC,
and therefore the product has been marked with the symbol and the Declaration of Conformity has been
issued to the manufacturer and is available to the competent authorities regulating the market.
37
Page 38

38
Page 39

39
Page 40

 Loading...