

Page 1
SERIES
FH
100 / 200 / 2000 / 6000
OPERATION MANUAL
Page 2

2
INDEX English
Safety information 4
Installation 4
Preparatory before using 5
Storage 5
Unfolding the package 5
Package list 6
Installation of the balance 6
Usage Conditions 6
Install the balance with wind shield 7
Install the balance with round weighing pan 7
Connect the Power Adapter 7
Install the External Facilities 7
Warm-up Time 7
Adjust the Level Gauge Purpose 8
Display and keys description 8
Calibration 10
Procedure 10
Basic weighing 11
Counting mode 11
Percent deviation 12
Weighing units 13
Enabling weighing units 13
User setups 16
Print setups 16
Setting the baud rate 17
Restoring the factory default setup 18
Communication with a computer 18
RS-232 Interface hardware 19
Page 3

3
Pin description 20
Routine maintenance and troubleshooting 20
Troubleshooting 20
Clearance 21
Clearing the stainless steel surface 21
Safety check 22
Troubleshooting 22
Technical conditions 24
Guarantee 25
Page 4

4
ENGLISH
SAFETY INFORMATION
To avoid unnecessary demage to the balance, please pay attention to the
following tips:
• Please do not use this balance in dangerous área.
• Only the trained technicians could operate this balance.
• Please turn off the power of the balance before connect it or disconnect
it with other facilities.
• If the environment requires a higher safety standard, please follow the
relevant installation instructions.
• Excessive electromagnetic interference will make the displayed value
in this balance change. Once the interference is dismissed, the balance
could operate in normal way.
• Please avoid any liquid on the surface of the balance. A piece of lightly
damp cloth is allowed to wipe the balance.
INSTALLATION
• Please make sure the local voltage is in line with the rated voltage on
the name board.
• Please pay special attention when use RS-232 as the pins location
might be incompatible with our facilities. Please check the pins
locations before the connection and turn off the connection of different
configuration.
Page 5

5
• If the facility or the power cord has apparent damage, please turn off
the power, put it or them in a safe place and do not use it or them
before they are fixed.
• This balance could only be connected to our accessories or optional
fittings. We are not responsible for any modification the operator
makes to our balance, including using the facilities and cable which are
not supplied by us. However, we are always ready to offer the operation
norms information.
• Please do not open the balance. If the guarantee lable is damaged, our
quality guarantee will automatically cease being effective.
• If the balance does not work well, please contact your local distributor
or our customer service center.
PREPARATORY BEFORE USING
STORAGE
This balance requires an environment which is free from excessive high or
low temperature, corrosive, vibration, air current and collision.
Unfolding the package
• Unfold the package and check if there is any outer damage of the
balance.
• If there is outer damage, please refer to section routain maintenance
and troubleshooting.
• Please keep all the package for possible transportation in the
Page 6

6
future. When pack the balance, please remove all the cables to avoid
unnecessary damage.
Package list
• The balance.
• Weighing pan.
• Pan support.
• Power adapter.
• User manual.
INSTALLATION OF THE BALANCE
Put it in a proper place, please avoid the following situations:
• Much heat and direct sunlight.
• Air currents and vibrations.
• Excessive moisture.
Usage Conditions
Please do not lay the balance in a quite damp palce for a long time. If the
balance is transferred from a lower temperature environment to a higher
temperature environment, please lay it there with power off foraround 2 hours.
Page 7
7
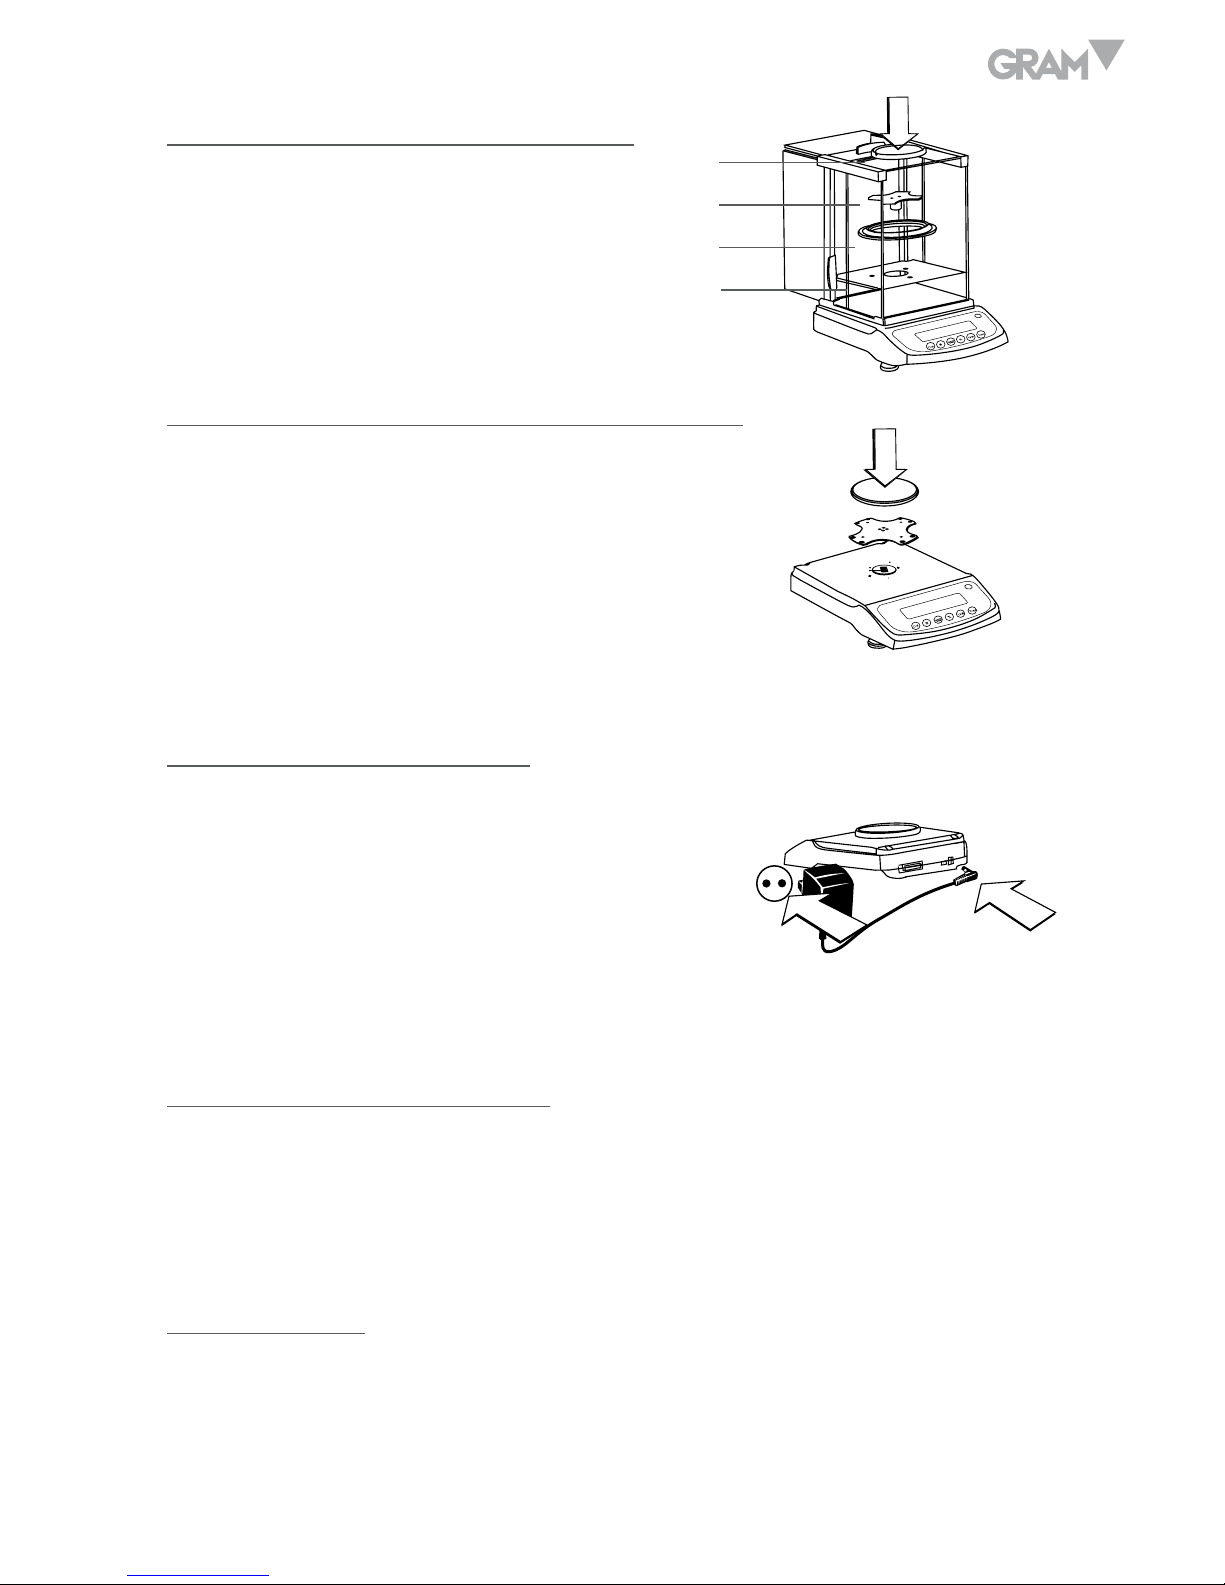
Install the balance with wind shield
• Assemble the parts in the
indicated order.
1
2
4
3
2
1
Install the balance with round weighing pan
• Installation Sequence.
• Pan support.
• Weighing pan.
Connect the Power Adapter
Only the power adapter offered by us is allowed.
• Connect the power adapter to the balance.
• Connect the power adapter to the power socket.
Install the External Facilities
Turn off the balance before connect it or disconnectit with external facilities
such as the printer or the computer).
Warm-up Time
To assure the measure accuracy, the balance must be warmed up for 30
minutes before normal operation.
Page 8
8
Adjust the Level Gauge Purpose
• Adjust the level guage of the balance. The
level guage needs to be adjusted once its
place is changed. The two front bottom bolts
are used to adjust the level guage.
• Spin the two bolts as shown in the figure until
the bubble in the level gauge is in the ceter of
the circle.
• Normally, it needs to be adjusted repeatedly.
L
R
R
R
L
L
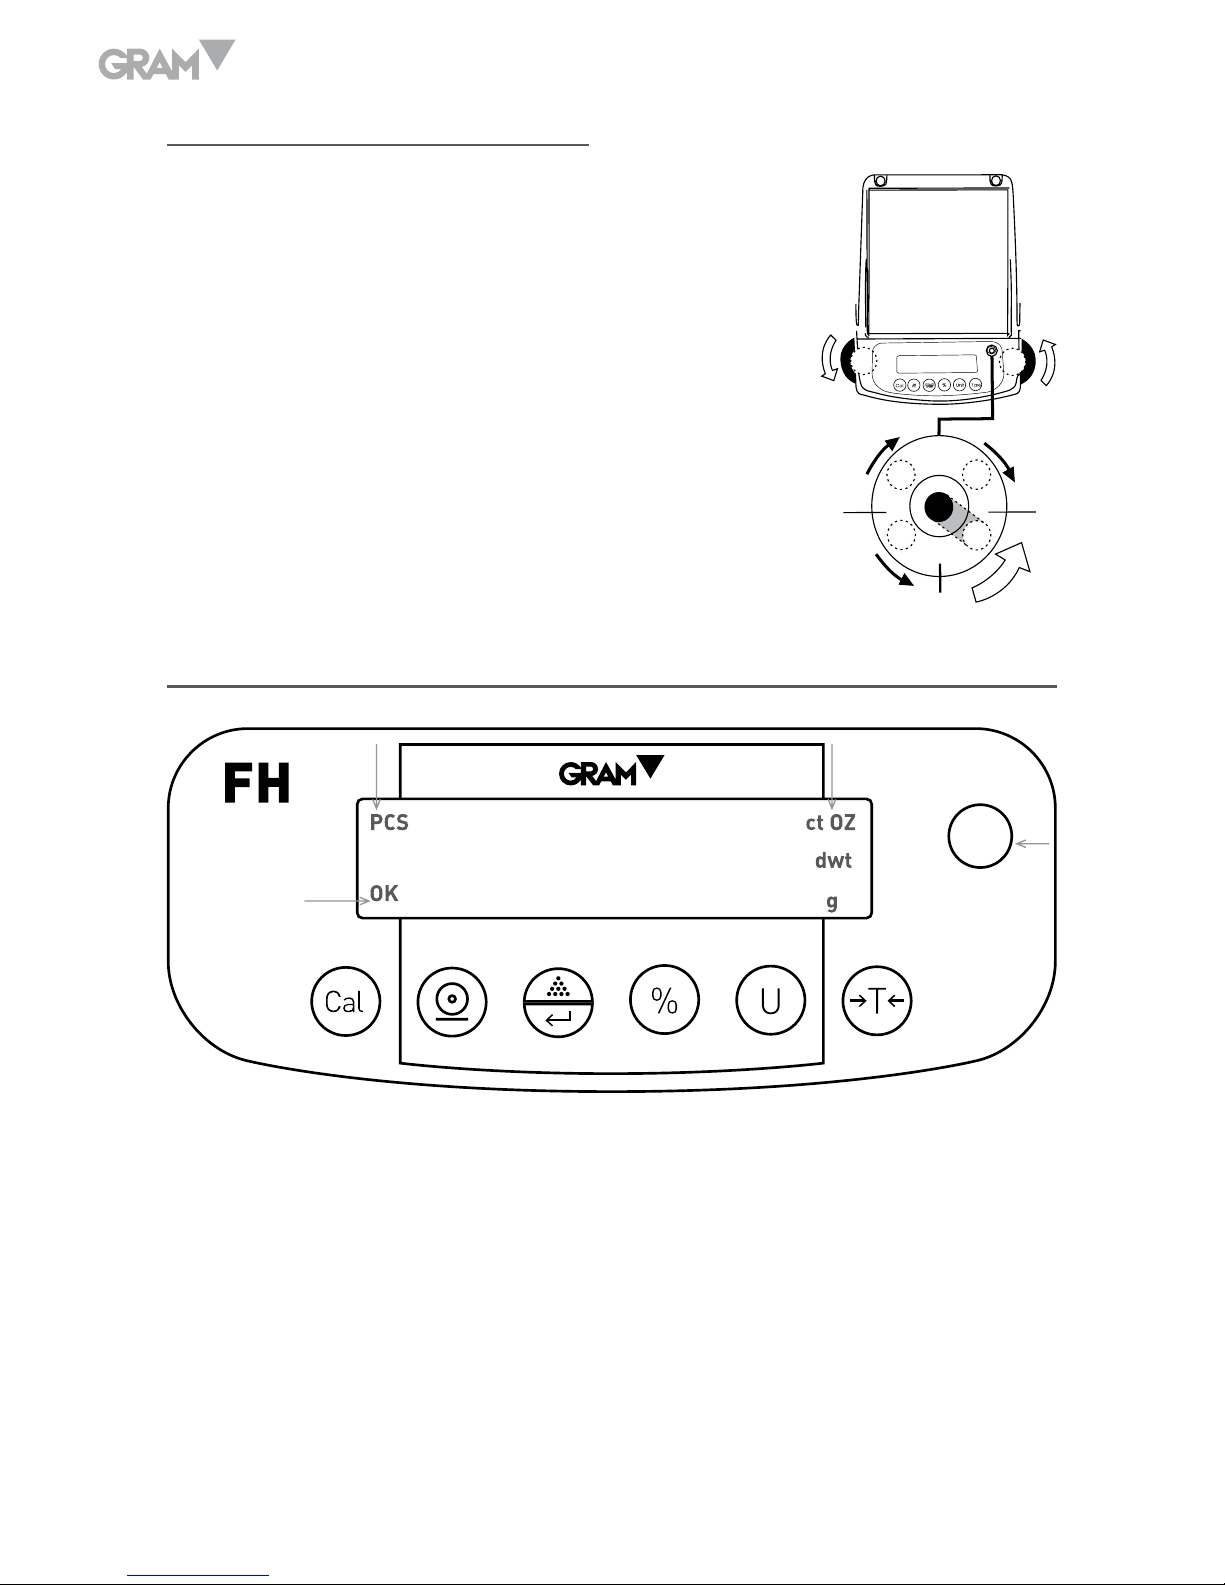
DISPLAY AND KEYS DESCRIPTION
1
3
4
2
1. Count sign.
2. Weighing units.
3. Stability sign.
4. Level gauge.
OK - Reading shown is stable
g - Reading shown is given in grams
Page 9

9
OZ - Reading shown is given in ounces (1g = 0.03527396200 oz)
ct - Reading shown is given in carats (1g = 5.0000000000 ct)
dwt - Reading shown is given in pennyweight (1g = 0.64301493100 dwt)
% - Reading shown is given in percent weight
PCS - Reading shown is given in as a counting
------- The balance is developing a stable reading
UNABLE – Error operation
HHHHH – The weight on the pan excedes the capacity of the balance
LLLLLL – The pan is not properly seated or has been removed
Calibration / Adjustment key
Print / Output key
Count / Function confirmation key
Percentage key
Unit conversion key
Tare key
Page 10

10
CALIBRATION
To decide the accuracy of the balance through test the difference between
thereading and the actual weight of the object on the weighing pan.
Prerequisite of calibration:
1. There is no loading on the weighing pan.
2. Press the key.
3. The interior signals are stable.
Procedure
1. Adjust the level guage and warm it up for 25 minutes.
2. Press the key.
3. Press the key, the display will read its full range, such as 3000.
4. Press the key repeatedly, it reads the calibration point within the
range (such as 2000, 1000…).
5. Choose one calibration point and place the right weight on the pan. Press
the key, the display will show CAL---.
6. When the external calibration is finished, the balance reads the value of
the weight on the pan (such as 3000).
Page 11

11
BASIC WEIGHING
Procedure
1. Plug in the power, the balance will automatically proceed system
initialization and deduct the tare weight.
2. Place the container on the weighing pan.
3. Press the key.
4. Place the simple object in the container.
5. Print the weight value pressing the key.
COUNTING MODE
Displayed sign: PCS
Procedure
1. Place the empty container on the weighing pan.
2. Press the key.
3. Choose the amount of the reference samples. Press the key, the
balance reads “qTy10”, press the key, choose the number of
samples (10, 25, 50, 100). The bigger number, the more accurate for the
counting results.The choosed reference number will be saved until a
new reference number is set or the power is off.
4. Place the right samples on the weighing pan or in the container.
5. Press key, the balance reads the amount number of the samples.
Page 12

12
6. Add the rest of ítems, the balance will show the total pieces.
7. If you want print the result, press the key.
8. To return to normal weighing mode, press the key, the symbol PCS
disappears.
PERCENT DEVIATION
Displayed sign: %
Procedure
1. Press the
key.
2. Put the reference object on the weighing pan. When the reading is stable,
press the key, it reads “100.000” or “100.00”, which relates to the
accuracy 100.00% of the balance. Meanwhile, it displays “%”.
3. Remove the reference object, the balance Reads “0.000” or “0.00”.
4. Place the goal object on the weighing pan.
5. Wait for the OK on the display, read the display, the display indicates
percent deviation from the reference.
6. Press the
key, the balance returns to normal weighing mode.
To test the percentage a weight in a container varies from a reference, please
follow the below steps:
1. Put an empty container on the weighing pan. Press the
key.
2. Place the standard object into the container.
Page 13

13
3. Press the
key. Wait for the stable display, it reads “100.000” or
“100.00”.
4. Remove the container with standard object. Put another same
container on the weighing pan, wait for the stable display, it reads
“0.000” or “0.00”.
5. Add the goal object in the container, wait for tyhe stable display, the
value displayed is the percentage the weight of the goal object varies
from the standard weight.
6. Press the
key to return to normal weighing mode.
7. If necessary, the weight of the goal object could be printed out.
WEIGHING UNITS
1. Press the key
to select the desired unit weight (g, oz, dwt) or
weighing mode (normal weighing, counting or percentage mode).
Enabling weighing units
The units function can be programmed to turn certain weighing units on or off.
To enable or disable certain units of measure, perform the following procedure.
1. Press the
key while pressing
key, the balance reads “PrInT”.
2. Press the
key repeatedly until it reads “unIT”.
3. Press the
key, the display reads “g yes” which means g available for use.
Press the
key to confirm. To disable “g” as the unit, press the
key, then the display reads “g no”, press the
key to confirm.
4. Follow the steps above to enable or disable Oz, Ct or dwt as the unit of measure.
Page 14

14
Page 15

15
Page 16

16
USER SETUPS
The balance could be set up to meet individual requirement.
1. Press the
key while pressing the
key to enter to setup program.
2. Press the
key to choose the ítem to be set up, then press
to confirm.
3. Anytime to exit the setup program, press the
key, it reads “ESC”,
then press the
to confirm.
PRINT SETUPS
There are three print types:
STABLE Print: print a stable reading when it is attained.
INSTANT Print: print immediately after press the key.
INTERVAL Print: print at predeterminated time intervals.
Note: The print function is separate from the line feed setup, i.e set the print
function first then set the number of line feeds.
To set the print type, use the following procedure:
1. Press the
key while pressing the
key, the display will show “PrInt”.
2. Press the
key, the display will show “STAbLE”, which indicates
stable print as the default.
3. Press the
key to choose the print type and confirm pressing the .
4. Press the
key until the display reads “InTEr”, press the
key, the
display will show “SEC”.
Page 17

17
5. Press the
key repeatedly to see the predeterminated time interval and
press the
to confirm. The message “0 SEC” means countinous print.
6. Press the
key to return to weighing mode.
7. After entering print setup, press the
key repeatedly to see
predetermined line foods (1-18) Choose the proper line feeds, press the
to return to normal weighing mode.
SETTING THE BAUD RATE
1. Press the
key while pressing the
key, the display will show “PrInT”.
2. Press the
key, the balance reads “bAud”.
3. Press the
key, the balance reads “300”.
4. Press the
key repeatedly, the balance display the other baud rates.
Choose the proper rate and press
key to confirm. The balance reads
“ParITy” and begins parity check.
5. Press the
key, the balance reads “nOnE” (no check) for the first.
6. Press the
key, it reads the other check types; “Odd” indicates odd
check and “EvEn” indicates even check.
7. Choose the proper check type and press the
key to confirm, the
balance now returns to normal weighing mode.
Page 18

18
RESTORING THE FACTORY DEFAULT SETUP
1. Press the
key while pressing the
key the display will show
“PrInT”.
2. Press the
key repeatedly until it reads “InITIA”.
3. Press the
key to confirm, the display reads “BUSY” and the returns
to weighing mode. Factory default setup is finished.
COMMUNICATION WITH A COMPUTER
The balance keyboard functions can be accessed via the RS-232 interface.
The following commands are available:
U –
: units conversion
T –
: tare function
C –
: calibration with external standard weight
P –
: print function
% -
: percent function
# -
: instant print
M –
: counting function
When a balance is connected to a computer, it is suggested that immediate
print # be used. In response to this command the balance will transmit
whatever number or message appears on the balance display.
The string format output is shown below:
Page 19

19
A B C D E F G H I J K L M
A - +/-: Signs field, usually no display as a space when it is a positive
number, “-” is displayed when it is a negative number.
B – G: Number and decimal field, spaces are used when there are less
than six digits.
H – I: Spaces fields.
J: Unit field, it describes the units of the number being transmitted. Your
balance will transmit G for grams, O for ounces and C for carats.
K: Stable character, it corresponds to the OK indicator on the display. S
means the reading is stable, space means the reading is not stable.
L: Return character.
M: Line feeds character, it indicates the line feeds.
RS-232 INTERFACE HARDWARE
This balance adopts the transmit and receive lines of standard RS-232.
The data format is:
1 start bit.
8 data bits include parity.
1 stop bit.
The instruction to connect the balance to external device is as follows:
Page 20

20
Pin description
2 – TXD - - - scale transmits data
3 – RXD - - - scale receives data
5 – GRD - - - signal ground
Note: “Handshake” signals, such as “clear to send” (CTS) are not used. The
peripheral must have a mínimum buffer (15 characters).
It is suggested that the máximum recommended cable lenght is 15 meters,
the load impedance of the device connected should be between 3000 and
7000 ohms with no more than 2500 pf shunt capacitance.
ROUTINE MAINTENANCE AND TROUBLESHOOTING
Troubleshooting
Only the trained professionals are allowed to do repair work. There is a risk
for the user if non-professionals do the repair.
Page 21

21
Clearance
• Turn off the balance and unplug the data cables.
• Avoid the liquid into the balance.
• Any corrosive cleaner (solvent) is forbidden to use.
• Wipe the balance with a piece of soft cloth.
• Remove the weighing pan before wipe the balance.
• Remove the shield ring and pan support with the weighing pan which
helps avoid damage to the weighing system.
Clearing the stainless steel surface
All the stainless Steel components need to clean regularly. Remove the
weighing pan and thoroughl clean it with a damp cloth or sponge. The
cleaner applicable to stainless Steel are recommended. Wipe the stainless
Steel surface of the balance first and then clear the stainless Steel weighing
pan. Make sure there is no dirt and then wipe the stainless Steel component
again. Dry the balance by air. If necessary, smear the proper oil on the surface
as additional protection.
Note: After remove the weighing pan and the pan support, avoid any liquid or
solid pellet into the installation hole.
Page 22

22
Safety check
If the balance could not work normally:
• Cut off the power immediatelly, keep and do not use it again.
• Keep it in a safe place to make sure it won´t be used for the moment.
• Inform the nearest Service Center or your Distributor. The repairman
must have had profesional training.
TROUBLESHOOTING
DISPLAY REASON SOLUTION
- - - - - -
The balance could not get
a stable reading or the
transducer is damaged.
Contact your local service
center.
HHHHH
The real weight is 5% higher
than its capacity or the
transducer is damaged.
Unload or contact your local
service center.
LLLLLLL
a) The weighing pan is not on.
b) There is wrong connect with
the pan.
c) The transducer is damaged.
a) Install the right weighing
pan and press the
key.
b) Clear the connect.
c) Contact your local service
center.
Page 23

23
NOCAL
Calibration is unresponsive.
Refer to calibration section,
check if it is the right
calibration weight.
UNABLE
Lack of data or wrong data
with which the balance could
not perform the function.
Refer to user manual.
UNSTABLE
READING
Unstable the ambient
environment (excessive
vibration or air current) or
there is wrong connect with
the pan.
Put the balance in another
place.
Clear the wrong connect.
NO DISPLAY
No work voltage no
connection with transformer.
Check the power supply
circuit and the instrument,
connect the transformer.
Apparent wrong
weighing display
No calibration or the tare
weight is deducted.
Calibrate the balance
Deduct the tare weight
before weighing.
If there is any other trouble, please contact your local distributor or service center.
Page 24

24
TECHNICAL CONDITIONS
AC-DC adapter
Input: 220V/110V, output: 7.5V (+15% to -20%) 48-60Hz
Power consumption: Maximam=16W, Average=8W
Page 25

25
GUARANTEE
This scale is guaranteed for one year from the delivery date. The guarantee
covers any fabrication defect of the material.
During this period GRAM PRECISION, SL, covers the manpower and the
spare parts necessary for the reparation of the scale.
This guarantee does not cover the failures caused by an inappropriate use
or overcharge.
The guarantee does not cover the freight cost (transport) necessary to
repair the scale.
Page 26

Gram Precision S.L.
Travesía Industrial, 11 · 08907 Hospitalet de Llobregat · Barcelona (Spain)
Tel. +34 902 208 000 · +34 93 300 33 32
Fax +34 93 300 66 98
comercial
@gram.es
www.gram-group.com
002/14032017
 Loading...