

Page 1
SERIES / SERIE
FD
410
OPERATION MANUAL
MANUAL DE UTILIZACION
Page 2
2
INDEX English
Safety information 6
Installation 6
Preparatory before using 7
Storage 7
Unfolding the package 7
Packing list 8
Installation of the balance 9
Usage Conditions 9
Installation sequence 9
Install the balance with density measurement device 10
Connect the Power Adaptor 10
Install the External Facilities 10
Preheat Time 11
Adjust the Level Gauge 11
Display description 11
Keys description 12
Calibration 13
Basic weighing (Tare function) 13
Solid / liquid density measurement 14
Test solid material density 14
Test liquid material density 16
User setups 17
Print setup 17
Set baud rate and calibration mode 18
Restoring factory setup 19
Backlight setup 19
Temperature setup 20
State of goal object setup 20
Page 3

3
Media parameters setup 21
Additional functions 21
Communication with a computer 22
RS-232 Interface hardware 24
Routine maintenance and troubleshooting 25
Troubleshooting 25
Clearance 25
Clearing the stainless steel surface 25
Safety check 26
Troubleshooting 26
Technical conditions 28
Technical parameters 28
Guarantee 29
Page 4

4
ÍNDICE Español
Información de seguridad 30
Instalación 30
Antes de utilizar la balanza 31
Entorno de la balanza 31
Embalaje 31
Lista de material 32
Instalación de la balanza 33
Condiciones de uso 33
Montaje de balanza con vitrina 33
Instalación del kit de densidad 33
Conectar el adaptor 34
Instalación de equipos externos 34
Tiempo de Precalentamiento 34
Nivelar la balanza 34
Descripción del display 35
Descripción de las teclas 36
Calibración 36
Pesaje básico 37
Medición de la densidad de líquidos y sólidos 37
Densidad de material sólido 37
Densidad de líquido 39
Configuración de parámetros 41
Configuración de la impresión 41
Configuración de la velocidad de transmisión y modo de calibración 43
Restablecer las configuraciones de fábrica 43
Configuración de la iluminación del display 44
Configuración de la temperatura 44
Predeterminar el tipo de muestra (sólido o líquido) 45
Page 5
5
Configuración de los parámetros de la media 45
Funciones opcionales 46
Comunicación a un ordenador 47
Interface RS-232 48
Rutina de mantenimiento y solución de problemas 49
Solución de averías 49
Limpieza 49
Limpieza de la superfiie de acero inoxidable 49
Revisión de seguridad 50
Solución de problemas 50
Condiciones técnicas 51
Parámetros técnicos 52
Garantía 53
Page 6

6
ENGLISH
SAFETY INFORMATION
• To avoid unnecessary damage to the balance, please pay attention to the
following tips.
• Please do not use this balance in dangerous area.
• Only the trained technicians could operate this balance.
• Please turn off the power of the balance before connect it or disconnect
it with other facilities.
• If the environment requires a higher safety standard, please follow the
relevant installation instructions.
• Excessive electromagnetic interference will make the displayed value
in this balance change. Once the interference is dismissed, the balance
could operate in normal way.
• Please avoid any liquid on the surface of the balance. A piece of lightly
damp cloth is allowed to wipe the balance.
INSTALLATION
• Please make sure the local voltage is in line with the rated voltage on the
name board.
• Please pay special attention when use RS-232 as the pins location might
be incompatible with our facilities. Please check the pins locations before
the connection and turn off the connection of different configuration.
• If the facility or the power cord has apparent damage, please turn off
Page 7

7
the power, put it or them in a safe place and do not use it or them before
they are fixed.
• This balance could only be connected to our accessories or optional
fittings. We are not responsible for any modification the operator makes
to our balance, including using the facilities and cable which are not
supplied by us. However, we are always ready to offer the operation
norms information.
• Please do not open the balance. If the guarantee lable is damaged, our
quality guarantee will automatically cease being effective.
• If the balance does not work well, please contact your local distributor or
our customer service center.
PREPARATORY BEFORE USING
Storage
This balance requires an environment which is free from excessive high or
low temperature, corrosive, vibration, air current and collision.
Unfolding the package
• Unfold the package and check if there is any outer damage of the balance.
• If there is outer damage, please refer to section routain maintenance
and troubleshooting.
• Please keep all the package for possible transportation in the future.
When pack the balance, please remove all the cables to avoid unnecessary
damage.
Page 8

8
Packing list
• The balance
• Weighing pan
• Pan support
• Glass windshield
• Density accesories
• Power adapter
• User manual
wind shield
RS232 ports erial no. power port
the balance
Plan view
Back viewTop view
adjustable feet
pan support
display
level gauge
panel
screw hole for
wind shield
weighing
pan
Page 9
9
INSTALLATION OF THE BALANCE
Put it in a proper place, please avoid the following situations:
• Much heat and direct sunlight.
• Air currents and vibrations.
• Excessive moisture.
Usage Conditions
Please do not lay the balance in a quite damp palce for a long time. If the
balance is transferred from a lower temperature environment to a higher
temperature environment, please lay it there with power off foraround 2 hours.
Installation sequence
• Assemble the parts in the
indicated order.
4
3
2
1
Page 10
10
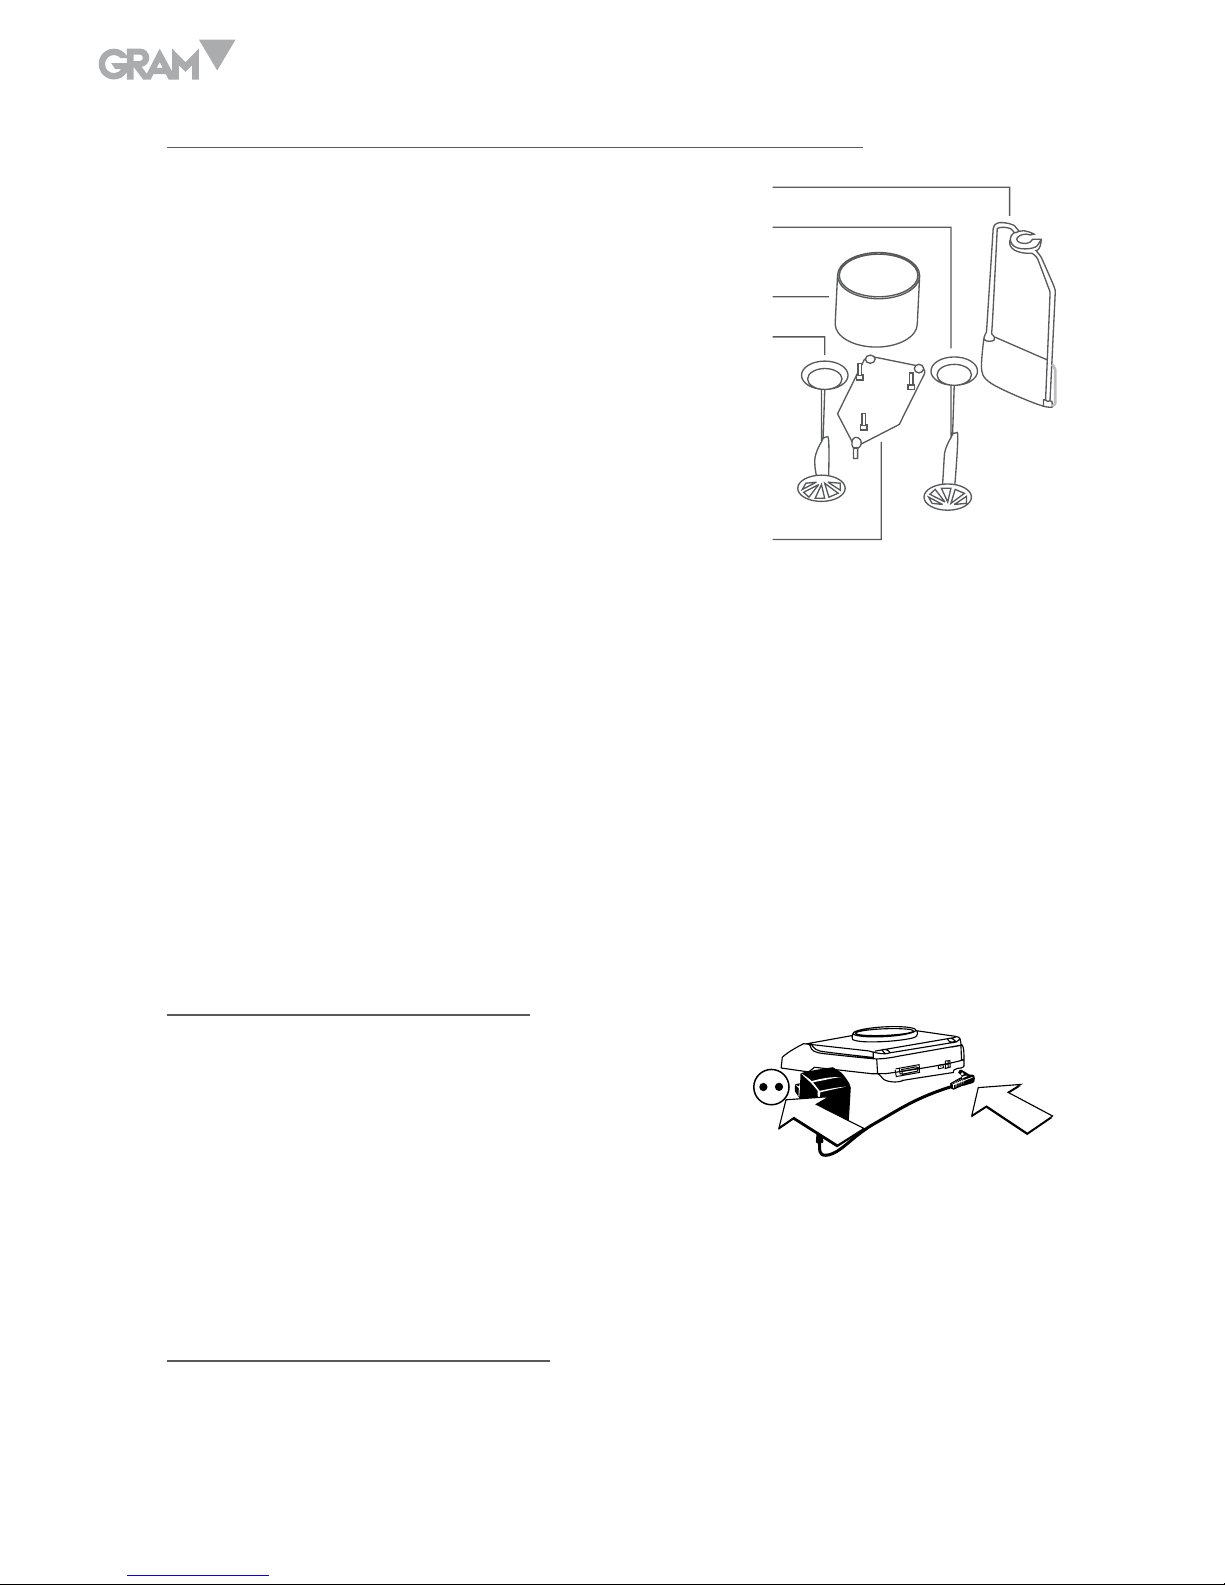
Install the balance with density measurement device
1. Bracket
2. Beaker holder
3. Beaker
4. Convex holder (concave holder)
1. Put the bracket on the balance and adjust it to the right angle.
2. Put the beaker support and beaker onto the bracket in proper sequence.
3. Fill the beaker 5mm from the rim of it.
4. Test the temperature of liquid with thermometer.
5. Choose the right holder and hang it on the holder.
Connect the Power Adaptor
Only the power adaptor offered by us is allowed.
• Connect the power adaptor to the balance
• Connect the power adaptor to the power socket
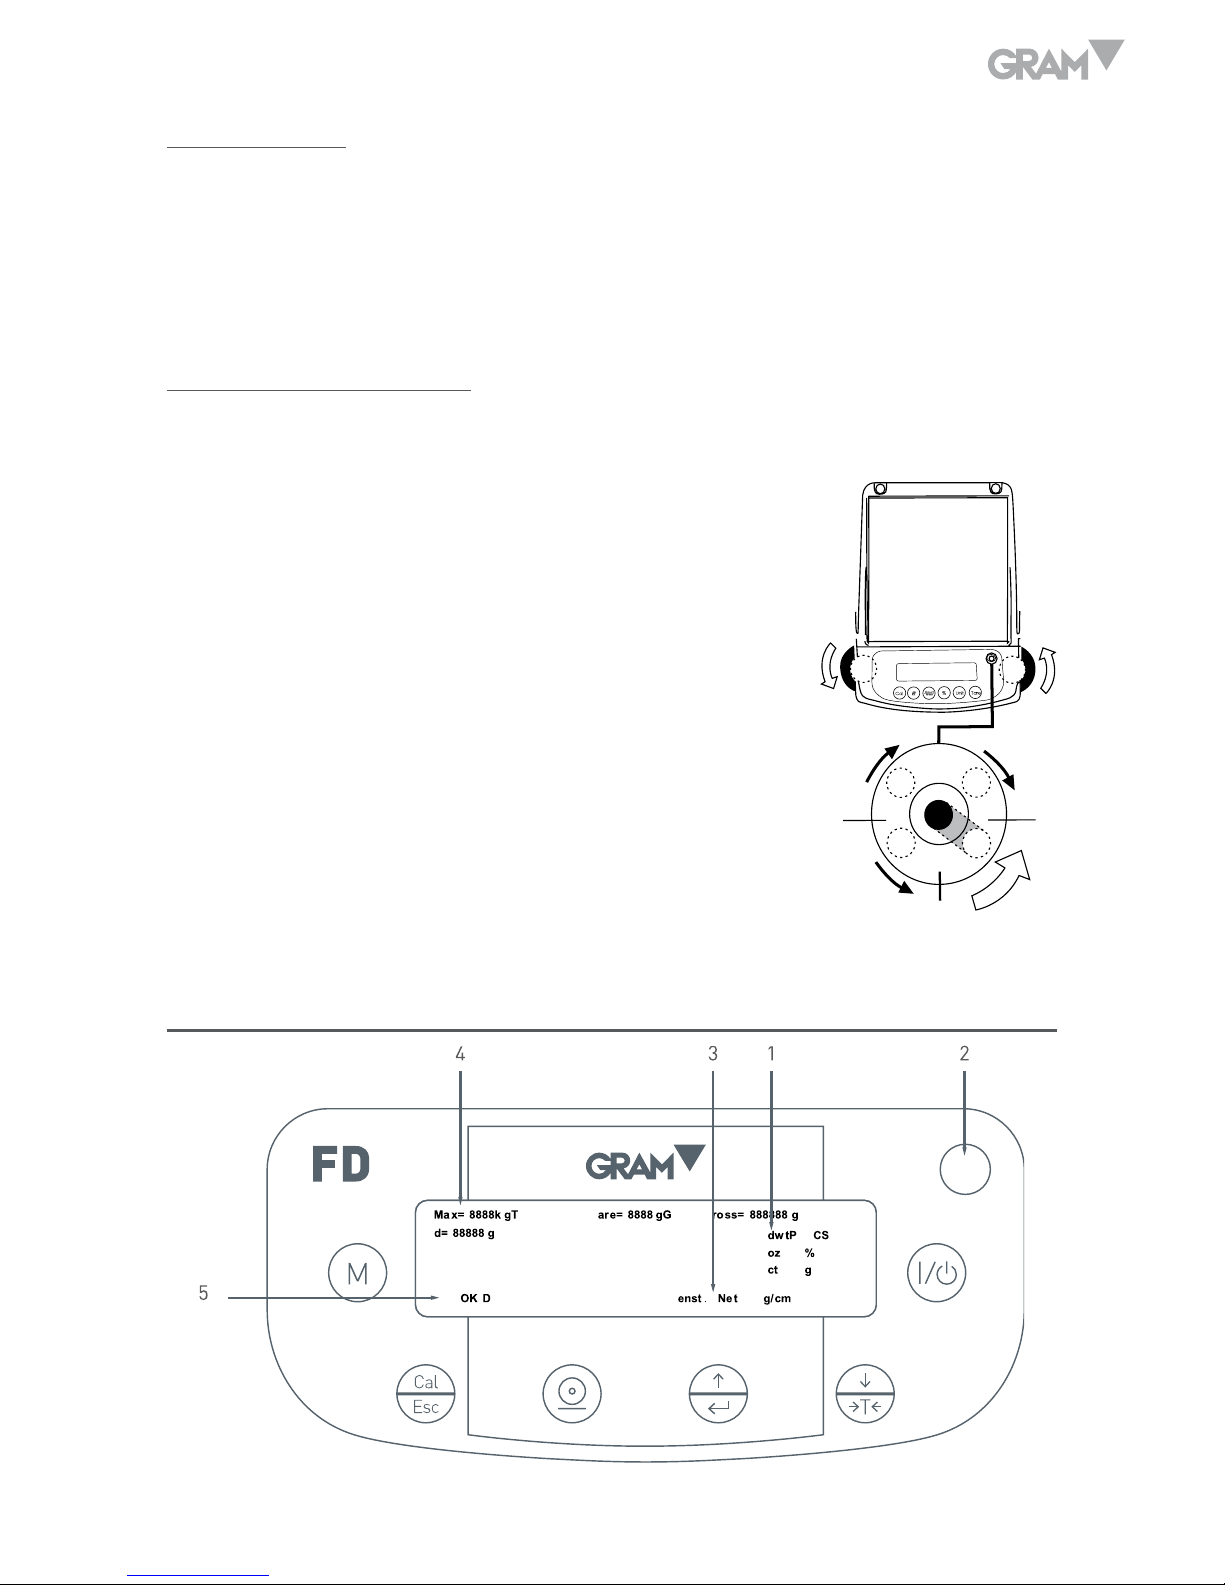
Install the External Facilities
Make sure to turn off the balance before connect it or disconnect it with
external facilities (such as printer or computer)
1
2
3
4
5
1
2
Page 11
11
Preheat Time
To assure the measure accuracy, the balance must be preheated for 30
minutes before normal operation.
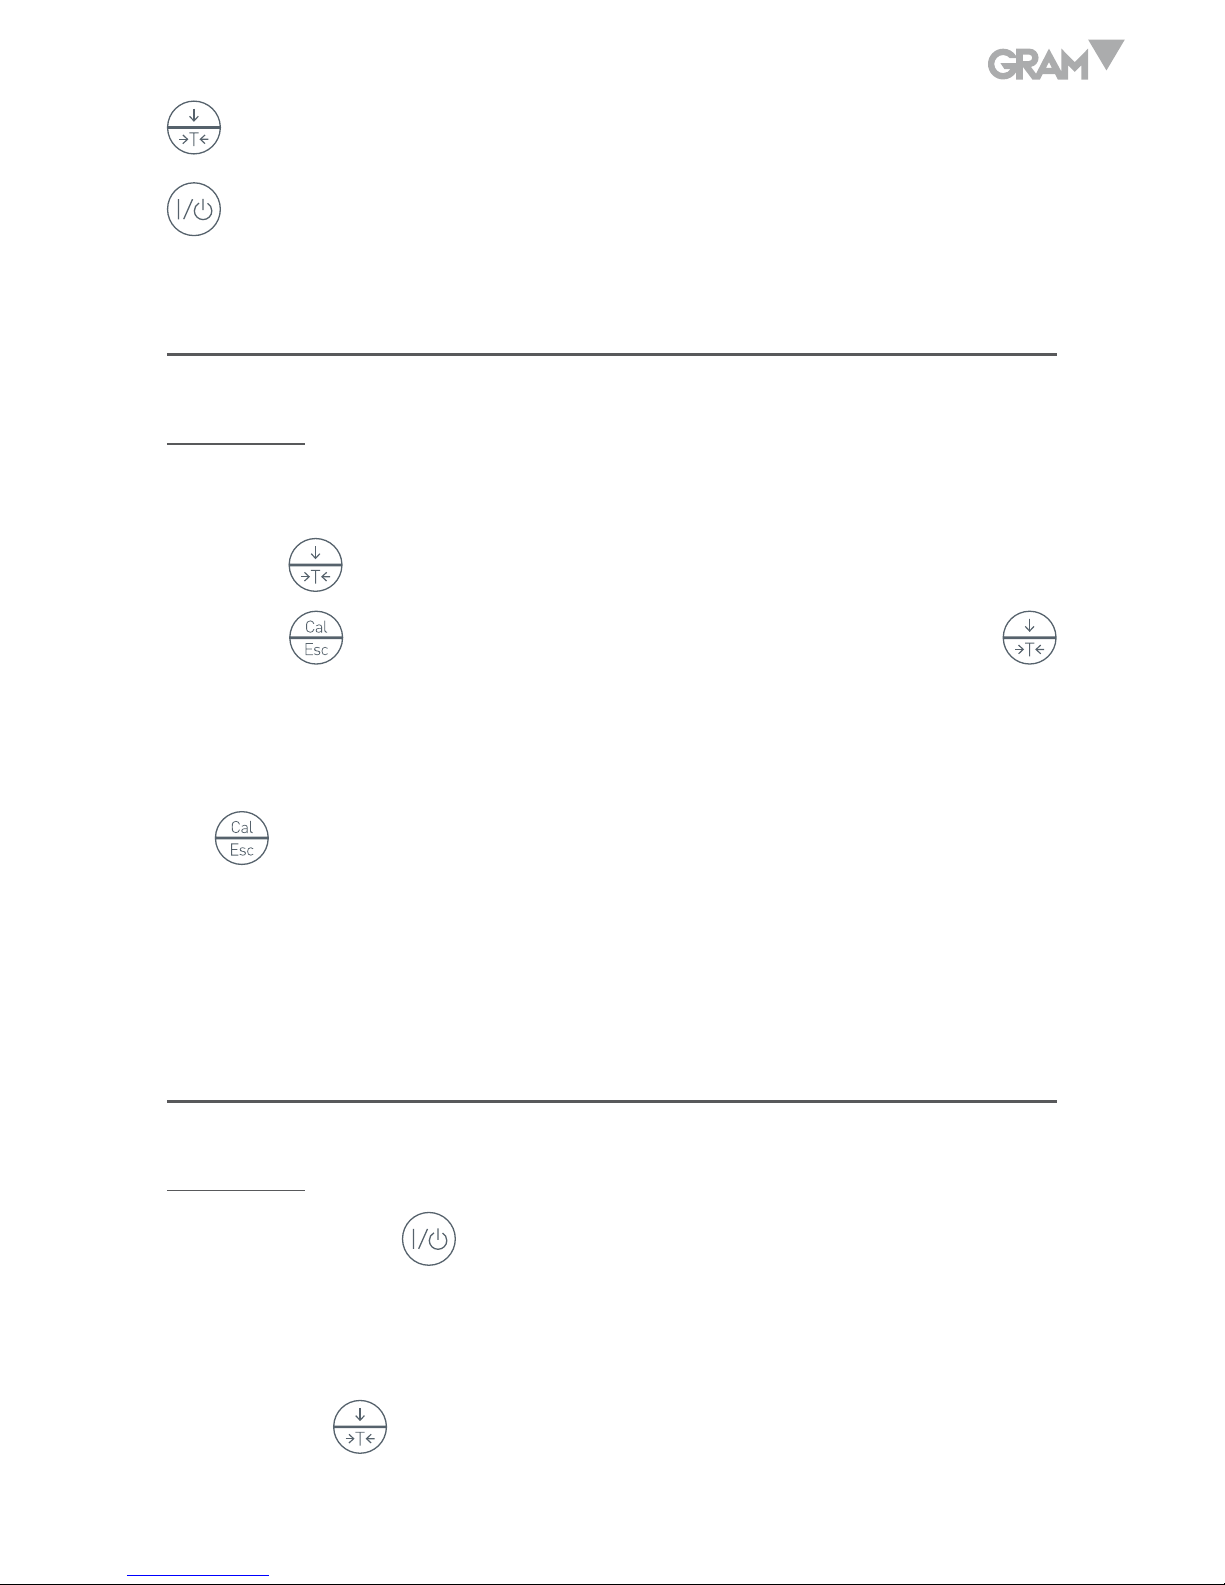
Adjust the Level Gauge
Purpose:
• Adjust the level gauge of the balance, the level
gauge needs to be adjusted once its place is
changed. The two front bottom bolts are used
to adjust the level gauge.
• Spin the two bolts as shown in the figure until
the bubble in the level gauge is in the center
of the circle.
• Normally, it needs to be adjusted repeatedly.
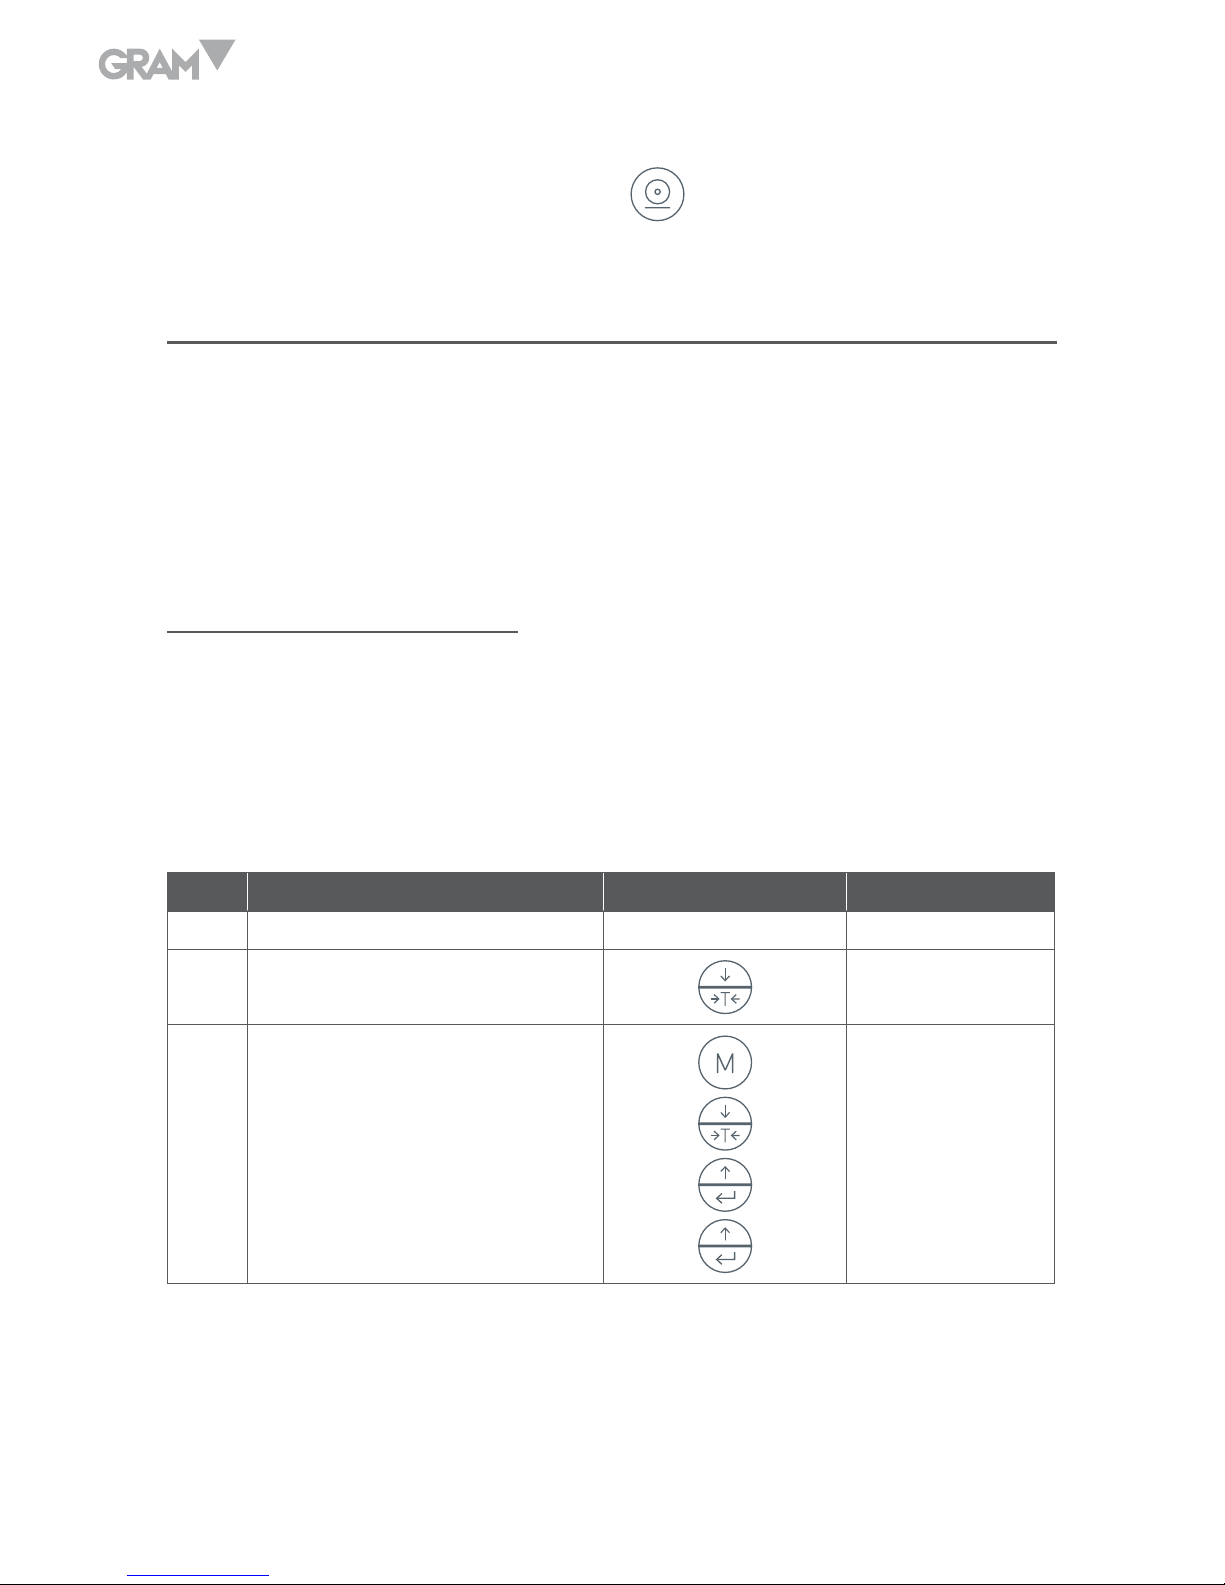
DISPLAY DESCRIPTION
L
R
R
R
L
L
Page 12

12
1. Weighing Units
2. Level Gauge
3. Weighing Mode Signs: Density: Density Measurement Mode
Net: Tare Weight / Gross Weight / Net Weight
4. Capacity / Readability
5. OK indicator: stable display
Display Information:
OK - Reading shown is stable.
g - Reading shown is given in grams.
g/cm
3
- Reading shown is given in density units.
------- The balance is developing a stable reading
UNABLE – Error operation.
HHHHH – The weight on the pan exceeds the max. capacity of the balance.
LLLLLL – The pan is not properly seated or has been removed.
KEYS DESCRIPTION
Menu key
Calibration / Adjustment key
Print / Output key
Function / Confirmation key
Page 13
13
Tare key
Power switch
CALIBRATION
Procedure
1. Adjust the level gauge and preheat it for 30 minutes.
2. Press
key.
3. Press
key, the balance will read its full range (e.g.200), press
key repeateadly, it reads the calibration point within the range (e.g.200,
100, ...).
4. Choose one calibration point and place the right weight on the pan. Press
key, the balance starts calibration, “ACAL” displayed.
5. When the external calibration is 200.000g finished, the balance reads the
value of the weight on the pan (e.g.200).
BASIC WEIGHING (Tare function)
Procedure
1. Press the key , the balance will automatically proceed system
initialization and deduct the tare weight.
2. Place the container on the weighing pan.
3. Press the
key.
Page 14
14
4. Place the simple object in the container.
5. Print the weight value pressing the
key.
SOLID / LIQUID DENSITY MEASUREMENT
Applied formula:
Sample density = Weight in the air / (Weight in the air – Weight in the liquid)
* Liquid density
Test solid material density
Because the buoyancy of the liquid density depends on the temperature,
temperature varies 1ºC, the density of distilled water will change 0.02%.
In order to modify the effect of temperature on density, please set the
temperature refer to function setting section:
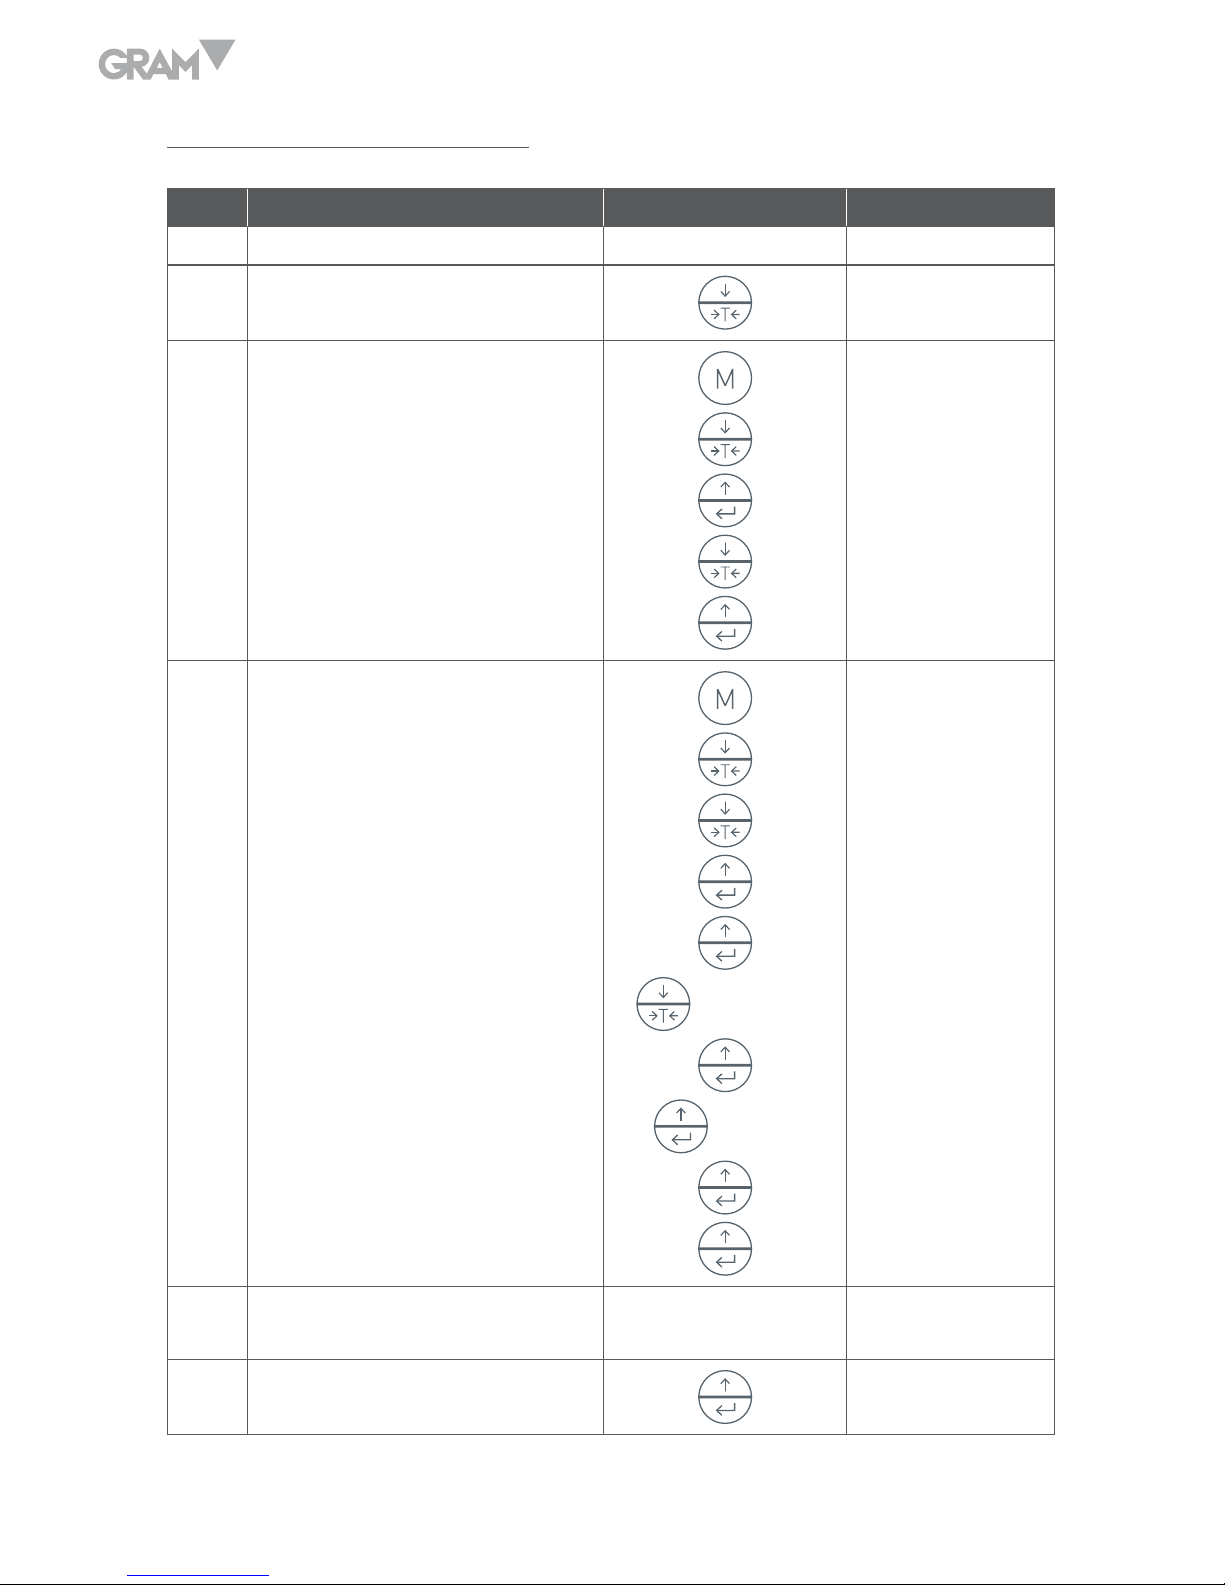
Step Procedure (Example) Key / Instruction Display
1 Preheat the balance for 30 min
2 Tare the balance
0.000g
3 Set sample state (solid)
CEnTIg
ShaPE
SOLID
0.000g
Page 15

15
4 Set liquid’s temperature
(press key to
increase,press
key to reduce)
CEnTIg
20
number flickers
0.000g
5
Set media parameter
(distilled water)
CEnTIg
SHAPE
COEFF
1
0.000g
6
Put the measured sample onto
the upper plate
7.788g
7 Save sample’s weight in the air
7.788g
8 Take off the sample 0.000g
9
Test sample’s weight in the
liquid
6.889g
10
Save sample’s weight in the
liquid and display the counted
value
1.221g/cm³
11 Sign out density measurement
0.000g
If necessary for repeating, please start the procedure from step 5.
Page 16
16
Test liquid material density
Step Procedure (Example) Key / Instruction Display
1 Preheat the balance for 30 min
2 Tare the balance
0.000g
3 Set sample state (liquid)
CEnTIg
ShaPE
SOLID
LIQUID
0.000g
4
Set weight’s density, assume
the weight’s density is 2.24g/
cm³ (if the weight’s density is
unknown, refer to A. to test the
weight’s density)
(two times)
(repeat)
CEnTIg
SHAPE
COEFF
1
SET DP.
SET .DP
1.00
2.24
2.24 flickers
0.000g
5
Put the weight on the upper
plate
7.788g
6
Save the weight’s weight in the
air
7.788g
Page 17
17
7 Take off the weight 0.000g
8
Test the weight’s weight in the
liquid
6.889g
9
Save the weight’s weight in the
liquid and display the counted
value
0.98g/cm³
10
Take off the weight and back to
weighing state
If necessary for repeating, please start the procedure from step 4.
USER SETUPS
The balance could be set up to meet individual requirement.
1. Press the
key to enter setup program.
2. Press the
key to choose the parameter to be set up and then press
the
key to confirm.
3. Anytime to exit the setup program, press the
key, it reads “ESC”,
then press the
to confirm.
PRINT SETUP
There are three types of printing mode for electronic balance:
Stable Output (STABLE): output after reading value is stable.
Instant Output (INSTANT): instant output after press
key.
Interval Output (INTERVAL): interval output with preset time.
Page 18

18
Users can set up Line Feed for label printing.
※ Printing mode and line feed numbers set apart, after setting up printing
mode, line feed numbers can be set.
Please set up printing mode according to below steps:
1. Press the
key, the display will show “PrInT”.
2. Press
key to enter into menu, “STAbLE” displayed, default is to
stabilize the output.
3. Press
key to choose printing mode you would like, press
key
for confirmation.
4. After enter into menu, press
key to choose Line Feed “InTEr”,
press
key for confirmation, balance displays “0 SEC”, press
key repeatedly to check the preset time interval, then press
key for
confirmation. If to choose “0 SEC”, it means Continuous Output.
5. Press
key to back to normal weighing mode.
6. Enter into Print Setup Menu, press
key repeatedly, choose Line
Feed to set up “LinEFd”.
7. Press
key repeatedly to check the preset line feed numbers (1-18).
After choosing proper line feed numbers, press
key for choice, back
to normal weighing mode.
SET BAUD RATE AND CALIBRATION MODE
1. Press
key for entering into Menu Setup Mode.
2. Press
key repeatedly till “bAud” displayed.
Page 19

19
3. Press
key to enter into Baud Rate Setup Menu, “300” displayed.
4. Press
key repeatedly till the baud rate you want displays, then press
key for confirmation, after “PArITy” displays, set up Parity Check.
5. Press
key for choosing Parity Check, balance first displays “nOnE”
(no check).
6. Press
key for checking choice, “Odd” means odd number check,
“EvEn” means even number check.
7. Press
key for confirming proper checking type, then back to normal
weighing mode.
RESTORING FACTORY SETUP
1. Press
key for entering into menu of the balance, “PrInt” displays.
2. Press
key repeatedly till “InITIA” displays.
3. Press
key for confirmation, after the balance displays “BUSY”, back
to normal weighing mode, Restoring Factory Setup is over.
BACKLIGHT SETUP
1. Press
key for entering into menu of the balance, “PrInt” displays.
2. Press
key repeatedly till “bLgHT” displays, press
key for
confirmation, balance displays “1 nIn”.
3. Press
key repeatedly to choose backlight time (1, 2, 3, 5, 10, 15, 30,
60 are options, means backlight turns off time range is 1-60 minutes).
Page 20

20
4. Press
key for confirmation, balance can be back to normal weighting
mode.
TEMPERATURE SETUP
1. Press
key, “CEnTIg” displays.
2. Press
key, default “20” temperature value displays (or the
temperature value set last time displays). If the referential liquid’s
measured temperature is lower than the displayed temperature, press
key to reduce till the reading is same as the referential liquid’s
measured temperature. If the referential liquid’s measured temperature
is higher than the displayed temperature, press
key to increase till
the reading is same as the referential liquid’s measured temperature.
3. After setting up temperature, press
key, value flickers, press
key for confirmation, Temperature Setup is over.
STATE OF GOAL OBJECT SETUP
Before density measurement, please set up the State of Goal Object, steps
are as follows:
1. Press
key, “CEnTIg” displays;
2. Press
key, “SHAPE” displays;
3. Press
key, “SOLID” displays;
Remarks:
If measuring solid’s density, press
key for confirmation after step
(3), State of Goal Object Setup is over; If measuring liquid’s density,
Page 21

21
please continue to step (4).
4. Press
key, “LIQUID” displays, then press
key for confirmation.
MEDIA PARAMETERS SETUP
1. Press
key, “CEnTIg” displays.
2. Press
key repeatedly till “COEFF” displays.
3. Press
key, the parameters set last time displays, for example: 1.
4. Press
key, “SET dP.” displays, press
key to move decimal
point, then press
key for confirmation. Press
key to reduce
density value, or press
key for increasing.
Remarks:
a. Set up liquid media’s parameter as 1 (distilled water) while measuring
solid’s density;
b. When measuring liquid’s density, user can choose weight as the
measuring solid, measure its density first, then input density value,
test the liquid’s density with the solid you chose).
5. After adjusting density value, press
key, the density value flickers,
then press
key for confirmation, Media Parameters Setup is over.
ADDITIONAL FUNCTIONS
Bottom hook weighing
There is a hole at the bottom of the balance for the optional weighing hook (It
is not allowed tyo use the bottom part to balance in Legal Metrology)
Page 22

22
1. Open the bottom cover of the balance (please lay the side of the balance
downwards to open the bottom cover, do not make the upside down)
2. To use the hook in the accessories: screw the hook clockwise in the
bottom tapped hole. Stop at once to proceed if there is any resistance.
3. Put he goal object to the hook with a line a suspension line, for example.
4. If necessary, set a safety guard to avoid air current.
Attached list:
Density measurement at different temperature (ºC).
T/ºC 0.0 0.1 0.2 0.3 0.4 0.5 0.6 0.7 0.8 0.9
10 0,99973 0,99972 0,99971 0,99970 0,99969 0,99968 0,99967 0,99966 0,99965 0,99964
11 0,99963 0,99962 0,99961 0,99960 0,99959 0,99958 0,99957 0,99956 0,99955 0,99954
12 0,99953 0,99951 0,99950 0,99949 0,99948 0,99947 0,99946 0,99944 0,99943 0,99942
13 0,99941 0,99939 0,99938 0,99937 0,99935 0,99934 0,99933 0,99931 0,99930 0,99929
14 0,99927 0,99926 0,99924 0,99923 0,99922 0,99920 0,99919 0,99917 0,99916 0,99914
15 0,99913 0,99911 0,99910 0,99908 0,99907 0,99905 0,99904 0,99902 0,99900 0,99899
16 0,99897 0,99896 0,99894 0,99892 0,99891 0,99889 0,99887 0,99885 0,99881 0,99882
17 0,99880 0,99879 0,99877 0,99875 0,99873 0,99871 0,99870 0,99868 0,99866 0,99864
18 0,99862 0,99860 0,99859 0,99857 0,99855 0,99853 0,99851 0,99849 0,99847 0,99845
19 0,99843 0,99841 0,99839 0,99837 0,99835 0,99833 0,99831 0,99829 0,99827 0,99825
20 0,99823 0,99821 0,99819 0,99817 0,99815 0,99813 0,99811 0,99808 0,99806 0,99804
21 0,99802 0,99800 0,99798 0,99795 0,99793 0,99791 0,99789 0,99786 0,99784 0,99782
22 0,99780 0,99777 0,99775 0,99773 0,99771 0,99768 0,99766 0,99764 0,99761 0,99759
23 0,99756 0,99754 0,99752 0,99749 0,99747 0,99744 0,99742 0,99740 0,99737 0,99735
24 0,99732 0,99730 0,99727 0,99725 0,99722 0,99720 0,99717 0,99715 0,99712 0,99710
25 0,99707 0,99704 0,99702 0,99699 0,99697 0,99694 0,99691 0,99689 0,99686 0,99684
26 0,99681 0,99678 0,99676 0,99673 0,99670 0,99668 0,99665 0,99662 0,99659 0,99657
27 0,99654 0,99651 0,99648 0,99646 0,99643 0,99640 0,99637 0,99634 0,99632 0,99629
28 0,99626 0,99623 0,99620 0,99617 0,99614 0,99612 0,99609 0,99606 0,99603 0,99600
29 0,99597 0,99594 0,99591 0,99588 0,99585 0,99582 0,99579 0,99576 0,99573 0,99570
30 0,99567 0,99564 0,99561 0,99558 0,99555 0,99552 0,99549 0,99546 0,99543 0,99540
COMMUNICATION WITH A COMPUTER
The balance keyboard functions can be accessed via the RS-232 interface.
The following commands are available:
U –
: units conversion
Page 23

23
T –
: deduct the tare weight
C –
: calibration with external standard weight
P –
: print function
# - #
: immediate print
When the balance is connected with a computer, it is suggested that
immediate print (#) be used. In response to this command the balance will
transmit whatever number or message appears on the balance display.
The string format output is shown below:
A B C D E F G H I J K L M
A - +/-: Signs field; usually no display as a space when it is a positive
number, - is displayed when it is a negative number.
B – G: Number and decimal field; spaces are used when there are less
than six digits.
H – I: Spaces fields.
J: Unit field, it describes the units of the number being transmitted. Your
balance will transmit G for grams, O for ounces and C for carats.
K: Stable character, it corresponds to the OK indicator on the display. S
means the reading is stable, space means the reading is not stable.
L: Return character.
M: Line feeds character, it indicates the line feeds.
Page 24

24
RS-232 INTERFACE HARDWARE
This balance adopts the transmit and receive lines of standard RS-232.
The data format is:
1 start bit.
8 data bits include parity.
1 stop bit.
The instruction to connect the balance to external device is as follows:
Pin description
2 – TXD - - - scale transmits data
3 – RXD - - - scale receives data
5 – GRD - - - signal ground
Note: “Handshake” signals, such as “clear to send” (CTS) are not used. The
peripheral must have a mínimum buffer (15 characters).
It is suggested that the máximum recommended cable lenght is 15 meters,
the load impedance of the device connected should be between 3000 and
7000 ohms with no more than 2500 pf shunt capacitance.
Page 25

25
ROUTINE MAINTENANCE AND TROUBLESHOOTING
Troubleshooting
Only the trained professionals are allowed to do repair work. There is a risk
for the user if non-professionals do the repair.
Clearance
• Turn off the balance and unplug the data cables.
• Avoid the liquid into the balance.
• Any corrosive cleaner (solvent) is forbidden to use.
• Wipe the balance with a piece of soft cloth.
• Remove the weighing pan before wipe the balance.
• Remove the shield ring and pan support with the weighing pan which
helps avoid damage to the weighing system.
Clearing the stainless steel surface
All the stainless Steel components need to clean regularly. Remove the
weighing pan and thoroughl clean it with a damp cloth or sponge. The
cleaner applicable to stainless Steel are recommended. Wipe the stainless
Steel surface of the balance first and then clear the stainless Steel weighing
pan. Make sure there is no dirt and then wipe the stainless Steel component
again. Dry the balance by air. If necessary, smear the proper oil on the surface
as additional protection.
Page 26

26
Note:
After remove the weighing pan and the pan support, avoid any liquid or solid
pellet into the installation hole.
Safety check
If the balance could not work normally:
• Cut off the power immediatelly, keep and do not use it again.
• Keep it in a safe place to make sure it won´t be used for the moment.
• Inform the nearest Service Center or your Distributor. The repairman
must have had profesional training.
TROUBLESHOOTING
DISPLAY REASON SOLUTION
- - - - - -
The balance could not get
a stable reading or the
transducer is damaged.
Contact your local service
center.
HHHHH
The real weight is 5% higher
than its capacity or the
transducer is damaged.
Unload or contact your local
service center.
LLLLLLL
a) The weighing pan is not on.
b) There is wrong connect with
the pan.
c) The transducer is damaged.
a) Install the right weighing
pan and press the
key.
b) Clear the connect.
c) Contact your local service
center.
Page 27

27
NOCAL
Calibration is unresponsive.
Refer to calibration section,
check if it is the right
calibration weight.
UNABLE
Lack of data or wrong data
with which the balance could
not perform the function.
Refer to user manual.
UNSTABLE
READING
Unstable the ambient
environment (excessive
vibration or air current) or
there is wrong connect with
the pan.
Put the balance in another
place.
Clear the wrong connect.
NO DISPLAY
No work voltage no
connection with transformer.
Check the power supply
circuit and the instrument,
connect the transformer.
Apparent wrong
weighing display
No calibration or the tare
weight is deducted.
Calibrate the balance
Deduct the tare weight
before weighing.
If there is any other trouble, please contact your local distributor or service
center.
Page 28

28
TECHNICAL CONDITIONS
AC power, voltage, AC frequency output: AC-DC Adapter, input 220V/110V,
7.5V (+15% to -20%) 48-60Hz
Power consumption: Maximam=16W, average=8W
Work temperature range: +10ºC to +30ºC (50º F to 86º F)
Temperature range allowed: +5ºC to +40ºC (41º F to 104º F)
The balance could assure the normal work: +5ºC (41º F) to +40ºC (104º F)
TECHNICAL PARAMETERS
Model FD410
Capacity 410 g
Readability 0.001 g
Tare range 410 g
Repeatibility 0.001 g
Lowest density Reading +/- 0.01 g
Reponse time 2.5 s
External calibration value 200 or 400 g
Minimum accuracy level calibration weight Class F1
Net weight 4.0 kg
Pan size 115 mm diam
Inferior shield height 230 mm
Shape size 230 x 310 x 330 mm
Page 29

29
GUARANTEE
This scale is guaranteed for one year from the delivery date. The guarantee
covers any fabrication defect of the material.
During this period GRAM PRECISION, SL, covers the manpower and the
spare parts necessary for the reparation of the scale.
This guarantee does not cover the failures caused by an inappropriate use
or overcharge.
The guarantee does not cover the freight cost (transport) necessary to
repair the scale.
Page 30

30
ESPAÑOL
INFORMACIÓN DE SEGURIDAD
Para evitar daños innecesarios a la balanza, por favor preste mucha atención
a los siguientes consejos:
• No utilizar la balanza en áreas peligrosas.
• Desconectar la balanza de la red antes de conectarla o desconectarla en
otras instalaciones.
• Si el entorno de la balanza requiere una norma de seguridad más alta,
por favor, siga las instrucciones de instalación pertinentes.
• Si existen interferencias electromagnéticas excesivas, estas pueden
provocar una lectura del display errónea. Una vez disminuidas estas
interferencias electromagnéticas la balanza debe funcionar de manera
normal.
• Evitar cualquier líquido sobre la superficie de la balanza. Utilizar un
paño ligeramente húmedo para su limpieza.
INSTALACIÓN
• Asegurarse de que el voltaje local está en línea con la tensión indicada
en la placa nominal.
• Prestar especial atención al utilizar la salida de datos RS-232 C.
Comprobar que el cable conectado concuerda con el esquema facilitado
para la comunicación RS-232. En caso de no ser así, desconectar de
inmediato el cable.
Page 31

31
• Si la instalación o el cable de corriente tienen daños aparentes, por
favor desconectar la balanza de la red, situarla en un lugar seguro y no
utilizarla hasta que la instalación de la misma sea segura.
• La balanza solo puede ser conectada a nuestros accesorios o piezas
opcionales. No nos haremos responsables de cualquier modificación
que el usuario efectúe a la balanza, incluyendo el uso inadecuado de las
instalaciones o que el cable de corriente, no sea el suministrado junto
con la balanza.
• Si la balanza no funciona correctamente, por favor contacte con su
distribuidor.
ANTES DE UTILIZAR LA BALANZA
Entorno de la balanza
Esta balanza requiere un entorno libre de altas y bajas temperaturas,
corrosión, vibraciones, corrientes de aire y colisiones.
Embalaje
• Desembalar la balanza y comprobar que no haya sufrido ningún daño
durante el transporte.
• Si hay algún daño externo, por favor consultar la sección de mantenimiento
y solución de problemas.
• Guardar el embalaje original de la balanza para su posible transportación
en un futuro. Cuando se deba embalar la balanza, retirar todos los cables
y accesorios para evitar daños innecesarios.
Page 32

32
Lista de material
• Balanza
• Plato de pesada
• Soporte del plato
• Vitrina de cristal
• Accesorios calculo densidad
• Adaptador de red
• Manual de instrucciones
wind shield
RS232 ports erial no. power port
the balance
Plan view
Back viewTop view
adjustable feet
pan support
display
level gauge
panel
screw hole for
wind shield
weighing
pan
Page 33

33
INSTALACIÓN DE LA BALANZA
Instalar la balanza en un lugar apropiado, evitar las siguientes situaciones:
• Altas temperaturas y rayos solares directos.
• Corrientes de aire y vibraciones.
• Excesivo nivel de humedad
Condiciones de uso
• No dejar la balanza en un lugar muy húmedo durante mucho tiempo.
Si la balanza es transportada de un lugar con bajas temperaturas a un lugar
con altas temperaturas, por favor dejar la balanza en el nuevo lugar sin
conectarla a la red durante 2 horas
Montaje de balanza con vitrina
• Montar las piezas según el
orden indicado.
Instalación del kit de densidad
1. Soporte de densidad
2. Plato colgante
3. Vaso
4. Plato colgante concavo
4
3
2
1
1
2
3
4
5
Page 34

34
Conectar el adaptor
• Conectar el adaptador a la balanza.
• Conectar el adaptador a la toma de red.
Instalación de equipos externos
Asegurarse de apagar la balanza antes de conectarla o desconectarla a
equipos externos como una impresora u ordenador.
Tiempo de Precalentamiento
Para asegurar la exactitud en las lecturas, la balanza debe ser precalentada
durante 30 minutos antes de utilizarla.
Nivelar la balanza
• Nivelar la balanza utilizando los dos pies
regulables delanteros hasta que la burbuja del
nivel quede en el centro del círculo.
• Cada vez que la balanza sea instalada en un
lugar distinto se deberá nivelar antes de su
utilización.
1
2
L
R
R
R
L
L
Page 35

35
DESCRIPCIÓN DEL DISPLAY
1. Unidades de pesada
2. Nivel de burbuja
3. Modos de Pesaje: Density: Modo determinación de la densidad.
Net: Tara / Peso bruto / Peso neto.
4. Capacidad / Resolución
5. Indicador OK : lectura estable
OK - Lectura estable.
g - Lectura en gramos.
g/cm
3
- Lectura en densidad.
------- La balanza está desarrollando una lectura estable.
UNABLE - Error de operación.
HHHHH - El objeto situado sobre el plato de pesada excede la capacidad de
la balanza.
LLLLLL – El plato de pesada no está instalado correctamente o se ha movido.
Page 36

36
DESCRIPCIÓN DE LAS TECLAS
Tecla de acceso al Menu de configuración
Tecla de calibración / ajuste
Tecla de impresión / salida
Tecla Modo / confirmación
Tecla de Tara
Tecla de encendido / apagado
CALIBRACIÓN
Procedimiento
1. Nivelar la balanza ajustando el nivel de burbuja y precalentar la balanza
durante 30 minutos.
2. Pulsar la tecla
para poner la lectura del display a cero.
3. Pulsar la tecla
, el display mostrará la capacidad de la balanza, por
ejemplo 400.
4. Pulsar la tecla
repetidamente, el display irá mostrando los valores
de calibración disponibles (100, 200…).
5. Elegir el valor de calibración deseado.
6. Colocar la pesa de calibración que corresponda con el valor seleccionado
sobre el plato de pesada, por ejemplo 200.
Page 37

37
7. Pulsar la tecla de , el display mostrará el mensaje ACAL.
8. Cuando la calibración ha finalizado, el display mostrará el peso de la
pesa de calibración.
PESAJE BÁSICO
Función de tara
1. Colocar el recipiente sobre el plato de pesada.
2. Pulsar la tecla
.
3. Situar el producto dentro del recipiente
4. Imprimir el resultado pulsando la tecla
.
MEDICIÓN DE LA DENSIDAD DE LÍQUIDOS Y SÓLIDOS
Formula:
Peso en el aire / (Peso en el aire – Peso en el líquido) * Densidad del liquido
Densidad de material sólido
Debido a que la flotabilidad de la densidad del líquido depende de la
temperatura, la temperatura varía 1ºC, la densidad del agua destilada
cambiará 0,02%. Con el fin de modificar el efecto de la temperatura sobre
la densidad, por favor ajuste la temperatura (consultar la sección de
configuración de funciones)
Page 38

38
Paso Ejemplo de procedimiento Tecla / Instrucción Display
1
Instalar el kit de densidad
(ver página 31)
2
Precalentar la balanza durante
30 minutos
3
Poner a cero la lectura del
display pulsando la tecla Tara
0.000g
4
Predeterminar el tipo de la
muestra (en este caso, sólido)
CEnTIg
ShaPE
SOLID
0.000g
5
Seleccionar la temperatura del
líquido
(pulsar la tecla
para incrementar el
valor y la tecla
para reducirlo)
CEnTIg
20
número parpadea
0.000g
6
Configurar tipo de líquido
(agua destilada)
CEnTIg
SHAPE
COEFF
1
0.000g
7
Colocar la muestra en el plato
colgante
7.788g
Page 39

39
8 Guardar el peso en el aire 7.788g
9 Retirar la muestra del plato 0.000g
10
Sumerger la muestra en el
líquido
6.889g
11
Guardar el peso en el líquido y
visualizar el valor
1.221g/cm³
12 Salir del modo densidad
0.000g
Densidad de líquido
Paso Ejemplo de procedimiento Tecla / Instrucción Display
1
Instalar el kit de densidad
(ver página 31)
2
Precalentar la balanza durante
30 min
3
Poner a cero la lectura del
display pulsando la tecla Tara
0.000g
4
Configurar la muestra del
líquido
CEnTIg
ShaPE
SOLID
LIQUID
0.000g
Page 40

40
5
Configurar la densidad.
La
densidad es 2.24g/cm³ (si la
densidad es desconocida, ver
apartado A para determinar
la densidad
(dos veces)
(repetir)
CEnTIg
SHAPE
COEFF
1
SET DP.
SET .DP
1.00
2.24
2.24 parpadeará
0.000g
6
Colocar el objeto en el plato
superior
7.788g
7
Guardar el resultado del peso
en el aire
7.788g
8 Retirar el peso del plato 0.000g
9 Sumergir el objeto en el líquido 6.889g
10 Guardar el resultado
0.98g/cm³
11
Retirar el objeto y volver al
modo normal de pesaje
Page 41

41
Medición de densidad en diferentes temperaturas (ºC)
T/ºC 0.0 0.1 0.2 0.3 0.4 0.5 0.6 0.7 0.8 0.9
10 0,99973 0,99972 0,99971 0,99970 0,99969 0,99968 0,99967 0,99966 0,99965 0,99964
11 0,99963 0,99962 0,99961 0,99960 0,99959 0,99958 0,99957 0,99956 0,99955 0,99954
12 0,99953 0,99951 0,99950 0,99949 0,99948 0,99947 0,99946 0,99944 0,99943 0,99942
13 0,99941 0,99939 0,99938 0,99937 0,99935 0,99934 0,99933 0,99931 0,99930 0,99929
14 0,99927 0,99926 0,99924 0,99923 0,99922 0,99920 0,99919 0,99917 0,99916 0,99914
15 0,99913 0,99911 0,99910 0,99908 0,99907 0,99905 0,99904 0,99902 0,99900 0,99899
16 0,99897 0,99896 0,99894 0,99892 0,99891 0,99889 0,99887 0,99885 0,99881 0,99882
17 0,99880 0,99879 0,99877 0,99875 0,99873 0,99871 0,99870 0,99868 0,99866 0,99864
18 0,99862 0,99860 0,99859 0,99857 0,99855 0,99853 0,99851 0,99849 0,99847 0,99845
19 0,99843 0,99841 0,99839 0,99837 0,99835 0,99833 0,99831 0,99829 0,99827 0,99825
20 0,99823 0,99821 0,99819 0,99817 0,99815 0,99813 0,99811 0,99808 0,99806 0,99804
21 0,99802 0,99800 0,99798 0,99795 0,99793 0,99791 0,99789 0,99786 0,99784 0,99782
22 0,99780 0,99777 0,99775 0,99773 0,99771 0,99768 0,99766 0,99764 0,99761 0,99759
23 0,99756 0,99754 0,99752 0,99749 0,99747 0,99744 0,99742 0,99740 0,99737 0,99735
24 0,99732 0,99730 0,99727 0,99725 0,99722 0,99720 0,99717 0,99715 0,99712 0,99710
25 0,99707 0,99704 0,99702 0,99699 0,99697 0,99694 0,99691 0,99689 0,99686 0,99684
26 0,99681 0,99678 0,99676 0,99673 0,99670 0,99668 0,99665 0,99662 0,99659 0,99657
27 0,99654 0,99651 0,99648 0,99646 0,99643 0,99640 0,99637 0,99634 0,99632 0,99629
28 0,99626 0,99623 0,99620 0,99617 0,99614 0,99612 0,99609 0,99606 0,99603 0,99600
29 0,99597 0,99594 0,99591 0,99588 0,99585 0,99582 0,99579 0,99576 0,99573 0,99570
30 0,99567 0,99564 0,99561 0,99558 0,99555 0,99552 0,99549 0,99546 0,99543 0,99540
CONFIGURACIÓN DE PARÁMETROS
Para acceder al modo configuración, pulsar la tecla .
1. Pulsar la tecla
para seleccionar el parámetro deseado y pulsar la
tecla para confirmar.
2. Si desea salir del modo de configuración en cuaquier momento, pulsar
la tecla
el display mostrará “ESC”, pulsar la tecla
para
confirmar.
CONFIGURACIÓN DE LA IMPRESIÓN
Hay tres modos de impresión disponibles:
(STABLE): impresión cuando el peso es estable.
Page 42

42
(INSTANT): impresión pulsando la tecla
(INTERVAL): impresión con tiempo predeterminado.
Procedimiento
1. Pulsar la tecla , el display visualizará “PrInT”.
2. Pulsar la tecla
para acceder al menu de configuración, el display
mostrará el mensaje “STAbLE”.
3. Pulsar la tecla
para seleccionar el modo de impresión deseado.
4. Pulsar la tecla
para confirmar.
5. Pulsar la tecla
para seleccionar el modo “InTEr”, pulsar la tecla
para confirmar, el display mostrará “0 SEC”, pulsar la tecla
repetidamente para visualizar el intervalo de tiempo de impresión
deseado. Pulsar la tecla
para confirmar.
6. Si se ha seleccionado el modo “0 SEC”, significa que la transmisión de
datos a la impresora sera continua.
7. Pulsar la tecla
para volver al modo normal de pesaje.
8. Acceder al menu de configuración pulsando la tecla
, pulsar la tecla
repetidamente hasta visualizar el parámetro “LinEFd”.
9. Pulsar la tecla
repetidamente para visualizar el número de lineas
(1-18). Una vez seleccionada la opción deseada, pulsar la tecla .
Page 43

43
CONFIGURACIÓN DE LA VELOCIDAD DE TRANSMISIÓN Y MODO DE
CALIBRACIÓN
1. Pulsar la tecla
para acceder al modo de configuración.
2. Pulsar la tecla
repetidamente hasta visualizar el parámetro “bAud”.
3. Pulsar la tecla
para acceder al parámetro, el display mostrará “300”.
4. Pulsar la tecla
repetidamente hasta visualizar la velocidad de
transmisión deseada. Pulsar la tecla
para confirmar.
5. Seguidamente el display visualizará “PArITy” (configuración de la
paridad)
6. Pulsar la tecla
para seleccionar el modo deseado, el display
muestra inicialmente el modo “nOnE”.
7. Pulsar la tecla
para seleccionar uno de los otros dos parámetros
“Odd” o “EvEn”.
8. Pulsar la tecla
para confirmar y volver al modo normal de pesaje.
RESTABLECER LAS CONFIGURACIONES DE FÁBRICA
1. Pulsar la tecla , el display mostrará “PrInT”.
2. Pulsar la tecla
repetidamente hasta visualizar el mensaje “InITIA”.
3. Pulsar la tecla
para confirmar, el display mostrará “BUSY” y la
balanza volverá al modo normal de pesaje.
Page 44

44
CONFIGURACIÓN DE LA ILUMINACIÓN DEL DISPLAY
1. Pulsar la tecla , el display mostrará “PrInT”.
2. Pulsar la tecla
repetidamente hasta visualizar “bLgHT”, pulsar la
tecla
para confirmar, el display mostrará “1 nIn” lo cual indica que
la iluminación del display se apagará en 1 minuto.
3. Pulsar la tecla
repetidamente para seleccionar el tiempo deseado: 1,
2, 3, 5, 10, 15, 30, 60 minutos.
4. Pulsar la tecla
para confirmar y volver al modo normal de pesaje.
CONFIGURACIÓN DE LA TEMPERATURA
1. Pulsar la tecla .
2. Pulsar la tecla
hasta visualizar “CEnTIg”.
3. Pulsar la tecla
, el display visualizará el valor de temperatura por
defecto de “20”.
Si la temperatura media del líquido es inferior a la temperatura que
muestra el display, pulsar la tecla
para reducir el valor hasta sea el
mismo que la temperatura del liquido.
Si la temperatura media del líquido es superior a la temperatura que
muestra el display, pulsar la tecla
para incrementar el valor hasta
que sea el mismo que la temperatura del líquido.
4. Una vez ajustada la temperatura, pulsar la tecla
, el valor parpadeará,
pulsar la tecla
para confirmar.
Page 45

45
PREDETERMINAR EL TIPO DE MUESTRA (sólido o líquido)
Antes de realizar una medición de densidad, se deberá configurar el estado
del objeto:
1. Pulsar la tecla
.
2. Pulsar la tecla
hasta visualizar “CEnTIg”.
3. Pulsar la tecla
, el display mostrará “SHAPE”.
4. Pulsar la tecla
, el mensaje “SOLID” aparecerá en el display.
5. Si la medición a realizar es la densidad de un sólido, pulsar la tecla
.
6. Si la medición a realizar es la densidad de un líquido, pulsar la tecla
,
el display mostrará “LIQUID”, pulsar la tecla
para confirmar.
CONFIGURACIÓN DE LOS PARÁMETROS DE LA MEDIA
1. Pulsar la tecla .
2. Pulsar la tecla
repetidamente hasta visualizar “COEFF”.
3. Pulsar la tecla
, el display mostrará los datos de la última
configuración, por ejemplo: 1.
4. Pulsar la tecla
el display visualizará “SET dP.”, pulsar la tecla
para mover el punto decimal. Pulsar la tecla
para confirmar.
5. Pulsar la tecla
para reducir el valor de densidad y la tecla para
aumentarlo.
Notas:
a. Cuando se trata de una medición de densidad de un sólido, establecer
Page 46

46
el parámetro del líquido en “1” (agua destilada).
b. Cuando se trata de una medición de densidad de un líquido, el
usuario puede elegir el peso cómo la medición del sólido, mesurando
inicialmente su densidad y seguidamente introduciendo el valor de la
densidad del mismo. Comprobar la densidad del líquido con el sólido
seleccionado.
6. Una vez configurado el valor de la densidad, pulsar la tecla
, el valor
parpadeará, seguidamete pulsar la tecla
para confirmar.
FUNCIONES OPCIONALES
Gancho para pesada hidrostática
En la parte inferior de la balanza hay un agujero para instalar el gancho de
pesada (opcional) (No está permitido utilizar el gancho de pesada inferior
para balanzas dentro de Metrología Legal)
1. Abrir la tapa inferior de la balanza (por
favor poner de lado la balanza para abrir
la cubierta inferior, no lo hacerlo al revés)
2. Atornillar el gancho hacía la derecha en
el orificio inferior, dejar de atornillar el
gancho si se percibe alguna resistencia.
3. Colgar el objeto del gancho en una línea
de suspensión por ejemplo.
4. Si es necesario, instalar una banqueta
hidrostática para evitar corrientes de aire.
A
C
B
Page 47

47
COMUNICACIÓN A UN ORDENADOR
Las funciones de las teclas de la balanza pueden ser utilizadas via RS-232.
Están disponibles los siguientes comandos:
U –
: Conversión unidades de pesada.
T –
: Función tara.
C –
: Calibración con una pesa de calibración externa.
P –
: Función de impresión.
# -
: Impresión instantánea.
Cuando la balanza se conecta a un ordenador, recomendamos utilizar la
función de impresión inmediatamente. En respuesta a este comando, la
balanza transmitirá cualquier número o mensaje que aparezca en el display.
El formato de salida es el siguiente:
A B C D E F G H I J K L M
A - +/- : Campo de signos, por lo general no aparece cuando se trata de un
número positivo, aparece cuando la lectura es negativa.
B – G: Campo de número y decimal, los espacios se utilizan cuando hay
menos de seis dígitos.
H – I: Campo de espacios.
J: Campo de unidad, describe la unidad de pesada de las pesadas
transmitidas. La balanza transmitirá G para gramos, O para onzas y
C para quilates.
Page 48

48
K: Carácter de estabilidad, corresponde al símbolo OK del display de
la balanza. S significa que la lectura es estable, un espacio significa
que la lectura es inestable.
L: Carácter de retorno.
M: Carácter de avance de líneas, indica el avance de línea.
INTERFACE RS-232
Esta balanza adopta la transmisión y recepción de líneas del RS-232 estándar
El formato de datos es:
1 start bit.
8 data bits include parity.
1 stop bit.
Las instrucciones para conectar la balanza a un equipo externo son las siguientes:
Descripción del pin
2 – TXD - - - la balanza transmite datos.
3 – RXD - - - la balanza recibe datos.
5 – GRD - - - señal de tierra.
Nota: Los modos de señal CTS no son utilizados. El periférico debe tener un
buffer mínimo (15 caracteres).
Page 49

49
Recomendamos que la longitud del cable sea de 15 metros, la impedancia
de carga del equipo conectado sea entre 3000 y 7000 ohms con no más de
2500 pf de capacidad en paralelo.
RUTINA DE MANTENIMIENTO Y SOLUCIÓN DE PROBLEMAS
Solución de averías
Unicamente los profesionales cualificados pueden realizar la reparación de la
balanza. Existe un alto riesgo si la balanza es reparada por personal no cualificado.
Limpieza
• Apagar la balanza y desconectar todos los cables.
• Evitar la filtración de líquidos dentro de la balanza.
• No utilizar en ningún caso limpiadores corrosivos (disolventes).
• Limpiar la balanza con un paño de tacto suave.
• Antes de limpiar la balanza, retirar el plato, el soporte del plato y el aro
para evitar daños en el sistema de pesaje.
Limpieza de la superfiie de acero inoxidable
Todos los componentes de acero inoxidable necesitan ser limpiados
regularmente. Retirar el plato de pesada y limpiarlo con un trapo suave
o esponja. Recomendamos utilizar un limpiador especial para el acero
inoxidable. Limpiar la superficie de acero inoxidable de la balanza y
seguidamente el plato de pesada. Asegurarse de que no haya suciedad antes
Page 50

50
de secar la balanza con aire. Si fuese necesario, untar la superficie de acero
inoxidable con un aceite especial como protección adicional.
Revisión de seguridad
Si la balanza no funciona correctamente:
• Desconectarla de la red inmediamente, y mantenerla fuera de uso.
• Mantenerla en un lugar seguro y no utilizarla por el momento.
• Contacte con el Servicio Técnico o con su Distribuidor para su reparación.
SOLUCIÓN DE PROBLEMAS
DISPLAY MOTIVO SOLUCIÓN
- - - - - -
La balanza no puede obtener
una lectura estable o la célula de
carga está averiada.
Contactar con su
Distribuidor.
HHHHH
El peso real es un 5% superior
a la capacidad máxima de la
balanza o la célula de carga
está averiada.
Retirar el peso de la
balanza o contactar con el
Servicio Técnico.
LLLLLLL
a) El plato de pesada no está
instalado correctamente.
b) La célula de carga está
averiada
a) Instalar correctamente
el plato y pulsar la tecla
.
b) Contactar con el Servicio
Técnico.
Page 51

51
NOCAL
La calibración no responde.
Ver la sección de calibración
y comprobar que la pesa de
calibración es la adecuada.
UNABLE
Falta de datos o datos
erróneos en el momento de
conectar la balanza.
Lea el manual de usuario.
UNSTABLE
READING
El entorno de la balanza es
inestable.
Excesivas vibraciones o
corrientes de aire o el plato no
está instalado correctamente
Situar la balanza en un
lugar más apropiado.
Comprobar e instalar el
plato adecuadamente.
NO DISPLAY
No hay tensión.
Comprobar el
transformador de corriente
de la balanza.
Valor incorrecto
de la pesada
El valor de la pesada difiere
del de la pesada peso colocado
sobre el plato de pesada.
Comprobar que no hay un
valor de tara prefijado
CONDICIONES TÉCNICAS
Alimentación, voltaje, frecuencia de salida: AC-DC Adaptador, entrada
220V/110V, salida 7.5V (+15% to -20%) 48-60Hz
Consumo: Máximo = 16W, Promedio = 8W
Page 52

52
Rango temperatura de trabajo: +10ºC a +30ºC (50º F a 86º F
Rango temperatura permitido: +5ºC a +40ºC (41º F a 104º F)
La balanza puede asegurar un trabajo normal: +5ºC (41º F) a +40ºC (104º F)
PARÁMETROS TÉCNICOS
Modelo FD410
Capacidad 410 g
Resolución 0.001 g
Rango de Tara 410 g
Repetibilidad 0.001 g
Lectura mínima de densidad +/- 0.01 g
Tiempo de respuesta 2.5 s
Valor de la pesa de calibración 200 o 400 g
Clase mínima en la pesa de calibración Class F1
Peso Neto 4.0 kg
Dimensiones del plato 115 mm diam
Altura interior de la vitrina 230 mm
Dimensiones de la balanza 230 x 310 x 330 mm
Page 53

53
GARANTÍA
Esta balanza está garantizada contra todo defecto de fabricación y de
material, por un periodo de 1 año a partir de la fecha de entrega.
Durante este periodo, GRAM PRECISION, SL, se hará cargo de la reparación
de la balanza.
Esta garantía no incluye los daños ocasionados por uso indebido o
sobrecargas.
La garantía no cubre los gastos de envío (portes) necesarios para la
reparación de la balanza.
Page 54

54
NOTES
Page 55

55
NOTES
Page 56

Gram Precision S.L.
Travesía Industrial, 11 · 08907 Hospitalet de Llobregat · Barcelona (Spain)
Tel. +34 902 206 000 · +34 93 300 33 32
Fax +34 93 300 66 98
comercial
@gram.es
www.gram.es
001/08072016
 Loading...