

Page 1

SE Bruksanvisning 2
EN Instruction manual 27
Type
EK 60-03 AF
EK 60-03 AF X
Page 2

2
Lycka till med din nya GRAM-spis SE
• Läs hela bruksanvisningen noga innan du börjar använda spisen.
• Bekanta dig med din nya spis och dess olika användningsfunktioner i den ordningsföljd
de beskrivs i bruksanvisningen.
• Var uppmärksam på alla upplysningar och förklaringar gällande korrekt användning och
behandling. Därmed ser du till att din spis alltid är redo att användas och att den håller
längre.
• Var särskilt uppmärksam på alla upplysningar som rör säkerheten. Därmed förebygger
du olyckor och skador på spisen.
• Kom ihåg att spara bruksanvisningen, den kan komma till användning vid ett senare
tillfälle.
Observera att denna bruksanvisning gäller för era spisar. Det är därför inte säkert att alla
funktioner nns på just din spis.
Observera!
Du ska ha läst och förstått denna bruksanvisning innan du använder hällen första gången.
Hällen är endast tänkt att användas som kokanordning. Utnyttjande av kokplattan för andra
ändamål än matlagning (t ex för uppvärmning av lokalen) är inte tillåtet då det är förenat
med risker.
Tillverkaren förbehåller sig rätten att göra ändringar som inte påverkar hällens funktion.
Page 3

3
INNEHÅLLSFÖRTECKNING
Säkerhetsanvisningar.........................................................................................................4
Produktbeskrivning.............................................................................................................7
In stalla tion............................................................................................................................9
An vänd ning.........................................................................................................................11
Bakning, köttstekning-praktiska råd................................................................................18
Rengöring och un der håll..................................................................................................23
Tekniska data.....................................................................................................................26
Page 4

4
SÄKERHETSANVISNINGAR
• Håll uppsikt över barn när spisen används.
• Grytor, kokzoner, ugn och värmesköld blir mycket heta vid användning och är fortfarande
varma en stund efter att kokzonerna eller ugnen stängts av.
• Låt inte barn röra vid eller leka med knappar eller ugnslucka, och se så gott det går till att
de inte benner sig i närheten av spisen.
• Vid grillstekning i ugnen blir de infraröda värmeelementen glödheta. För att för hin dra
eventuell ambildning får värmeelementet inte komma i kontakt med den mat som grillas.
• Se till att andra elapparaters anslutningssladdar inte kommer i kontakt med varma kokzoner eller kläms fast i ugnsluckan. Var särskilt försiktig om du an vän der stickkontakter
som sitter i närheten av spisen.
• Använd aldrig spisens glaskeramiska kokplattor eller ugnen för rumsuppvärmning.
• Mycket heta oljor och fetter kan antändas. Håll därför alltid ett öga på spisen under fritering
eller grillstekning.
• Lägg aldrig aluminiumfolie på ugnsbotten eftersom den kan skada botten pla tens emalj.
• Av samma orsak får grytor eller andra delar aldrig ställas direkt på ugnens bottenplatta.
• Stäng av spisens huvudströmbrytare vid defekter eller fel. Spisen får inte an vän das igen
innan eventuellt fel avhjälpts av en fackman.
Den glaskeramiska kokplattan är härdad mot värme, kyla och temperatursvängningar.
Undvik slag förorsakade av att t.ex. saltkar, kryddburkar eller andra hårda föremål faller ner
på plattan.
• De glaskeramiska kokplattorna bör inte vara påslagna när det inte star kokkärl på dem,
de får inte heller användas som förvaringsplats.
• Grytor får bara ställas på plattan om deras bottnar är rena och torra.
• Socker eller sockerhaltiga matvaror som spills på den glaskeramiska kokplattan måste
avlägsnas omedelbart, så gott det går, medan de fortfarande är varma så att de inte bränns
fast.
• Matvaror som tillreds på den glaskeramiska kokplattan får inte ligga i alu mi ni um fo lie,
aluminiumbehållare eller plastbehållare.
• Undvik att repa de glaskeramiska kokplattorna med smycken, grytor med vassa kanter
o.s.v.
• Köksföremal av plast (skedar, skalar o.s.v.) får inte placeras på varma gla ske ra mi ska
kokplattor eftersom de kan smälta fast.
• Se till att emaljerade grytor och liknande inte kokas helt tomma.
• Om det uppstår djupa repor eller sprickor i den glaskeramiska kokplattan måste du genast
koppla bort spisen från elnätet genom att stänga av strömbrytaren.
• Den fukt/ånga som uppstår i ugnen släpps ut genom ångventilerna baktill på den glaskeramiska kokplattan. Ventilerna får därför aldrig vara täckta eller förslut na. Håll händerna
borta från ångan.
Page 5

5
HUR MAN SPARAR ENERGI
Den som använder energi på ett ansvarigt
sätt sparar inte bara pengar utan också mil
jön. Där för ska vi spara energi! Man kan göra
det ge nom att:
• Undvik att lyfta på locket i onödan
Man ska inte heller öppna ugnsluckan i
onö dan.
• Använd ugnen endast vid tillagning av
större mängder
Det är mer sparsamt att tillaga kött som vä ger
mindre än 1 kilo på spisen.
• Utnyttja eftervärmen
Då man kokar något under längre tid än 40
minuter rekommenderas det att ugnen stängs
av 10 minuter innan maten är färdigkokt.
• Vid bakning, använd värmecirkulation
och stängd ugnslucka
• Stäng ugnsluckan noggrant
Värme sipprar ut pga smuts på luckans pack
ning. Det är bäst att ta bort smuts ge nast när
de uppstår.
• Placera spisen långt ifrån kyl- och frys-
skåp
Genom att placera spisen långt ifrån kyl och
frysskåp minskar energiförbrukningen.
Page 6
6
Kassering av förbrukade produkter
När produkten är förbrukad får
den inte kasse ras som vanligt
avfall, utan man bör över lämna
den till en organisation som
åter vinner elek triska och elek tro
niska pro duk ter. På pro duk ten,
bruks an vis ningen eller för pack
ningen nns en sym bol som visar att för bru
kad produkt ska läm nas till återvinning.
Material som används för till verk ning av
pro duk ten kan återvinnas enligt lämplig be
teck ning. Genom återvinning av ma te ria let i
den förbrukade produkten bi drar man till ett
stärkt miljöskydd.
Kontakta din kommun för uppgifter om var i
din kommun det nns organisationer som tar
hand om förbrukade produkter.
Miljöskydd
Tänk på att emballage, an
vända el appa ra ter, re serv de
lar o.s.v. är återanvändbara
ma te rial.
Se alltid till att materialen deponeras enligt de fö re skrif ter som
gäller för åter an vänd ning.
Page 7
7
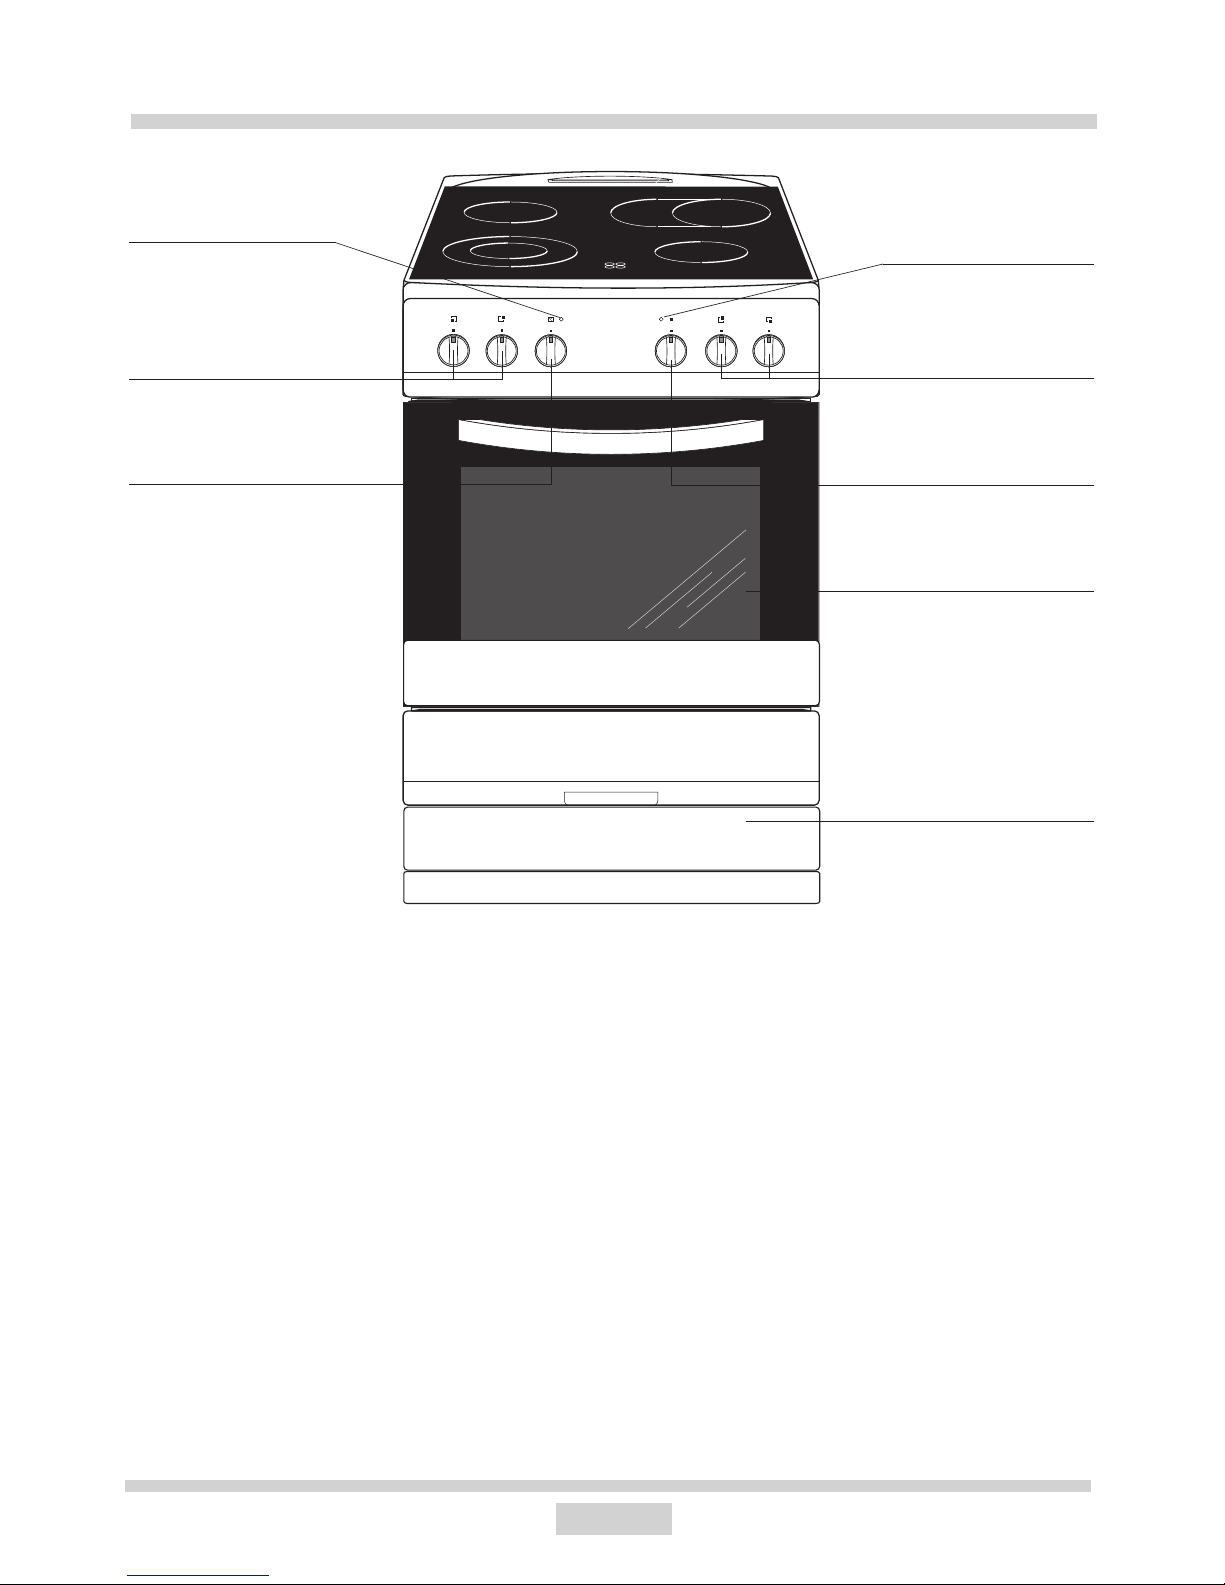
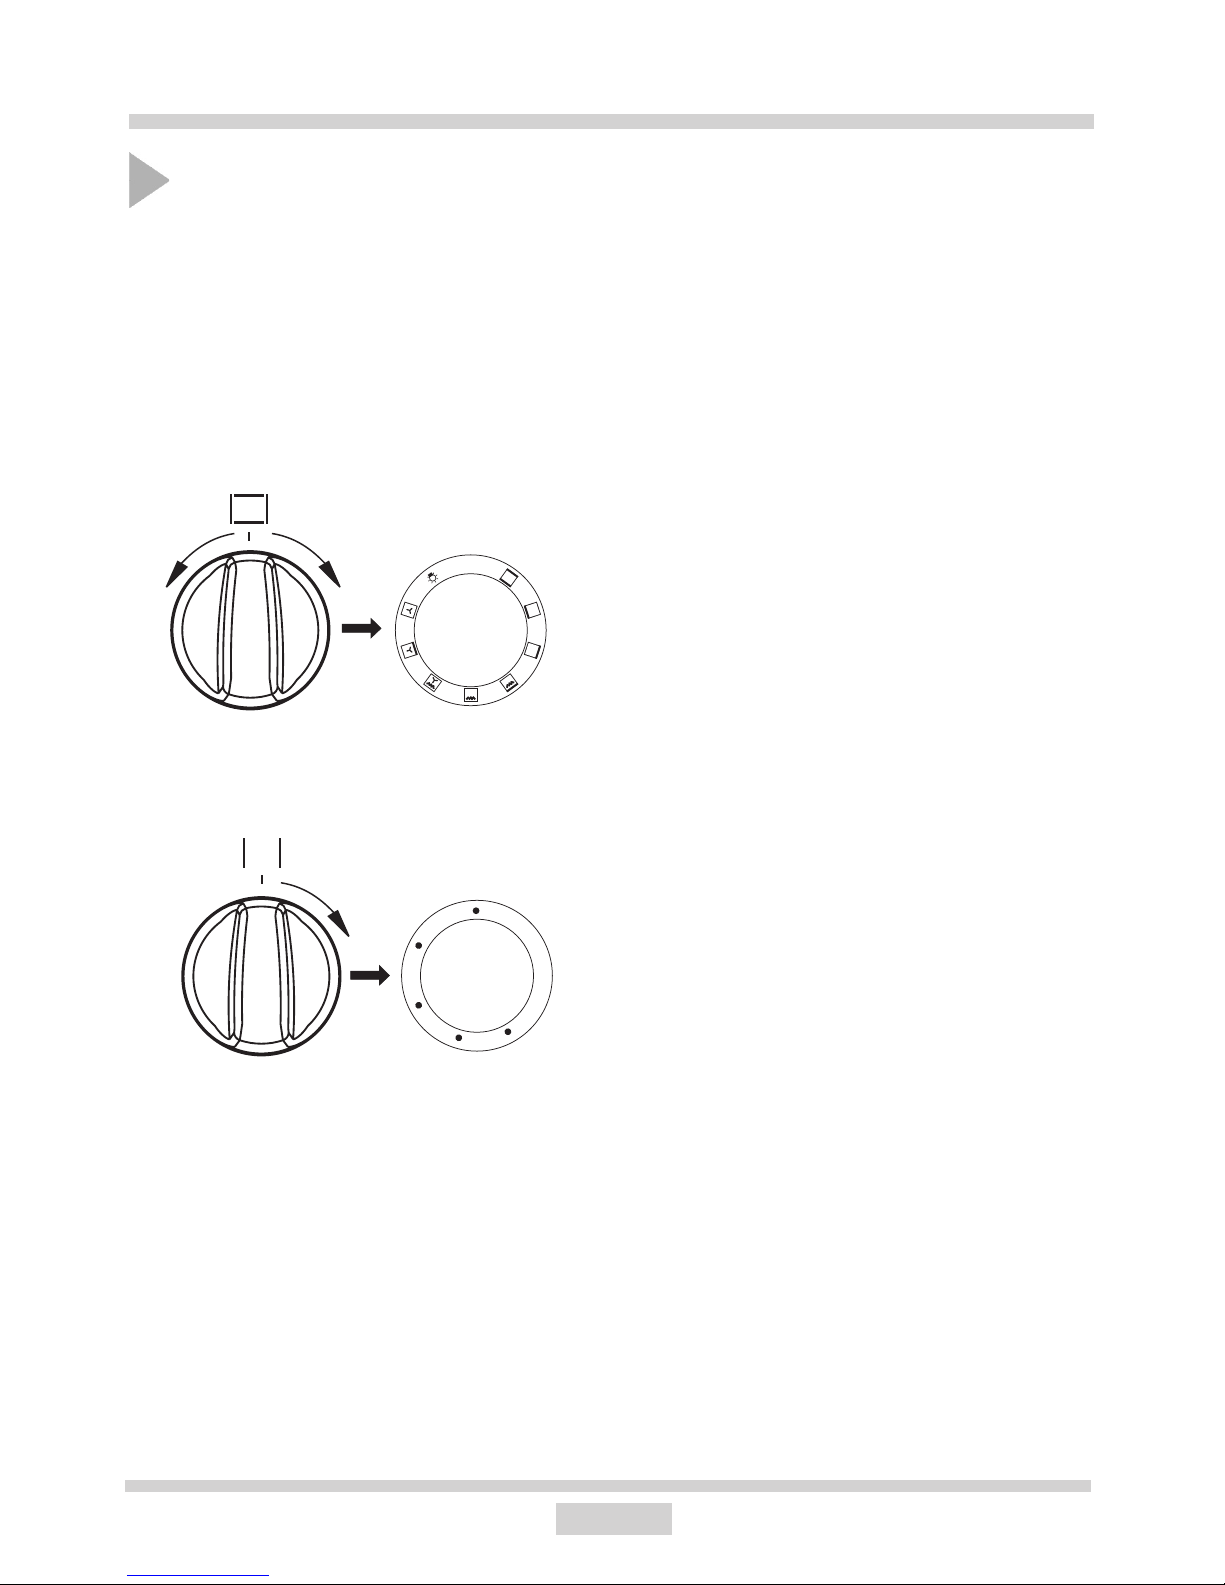
BESKRIVNING AV PRODUKTEN
1 Vred för reglering av ugnstemperatur
2 Vred för ugnsfunktioner
3 Vred för kokplatta, främre vänstra
4 Vred för kokplatta, bakre vänstra
5 Vred för kokplatta, bakre högra
6 Vred för kokplatta, främre högra
7 Värmeindikator för ugn
8 Kontrollampa
9 Ugn
10 Förvaringslåd
7
9
10
5, 6
1
8
2
3, 4
Page 8
8
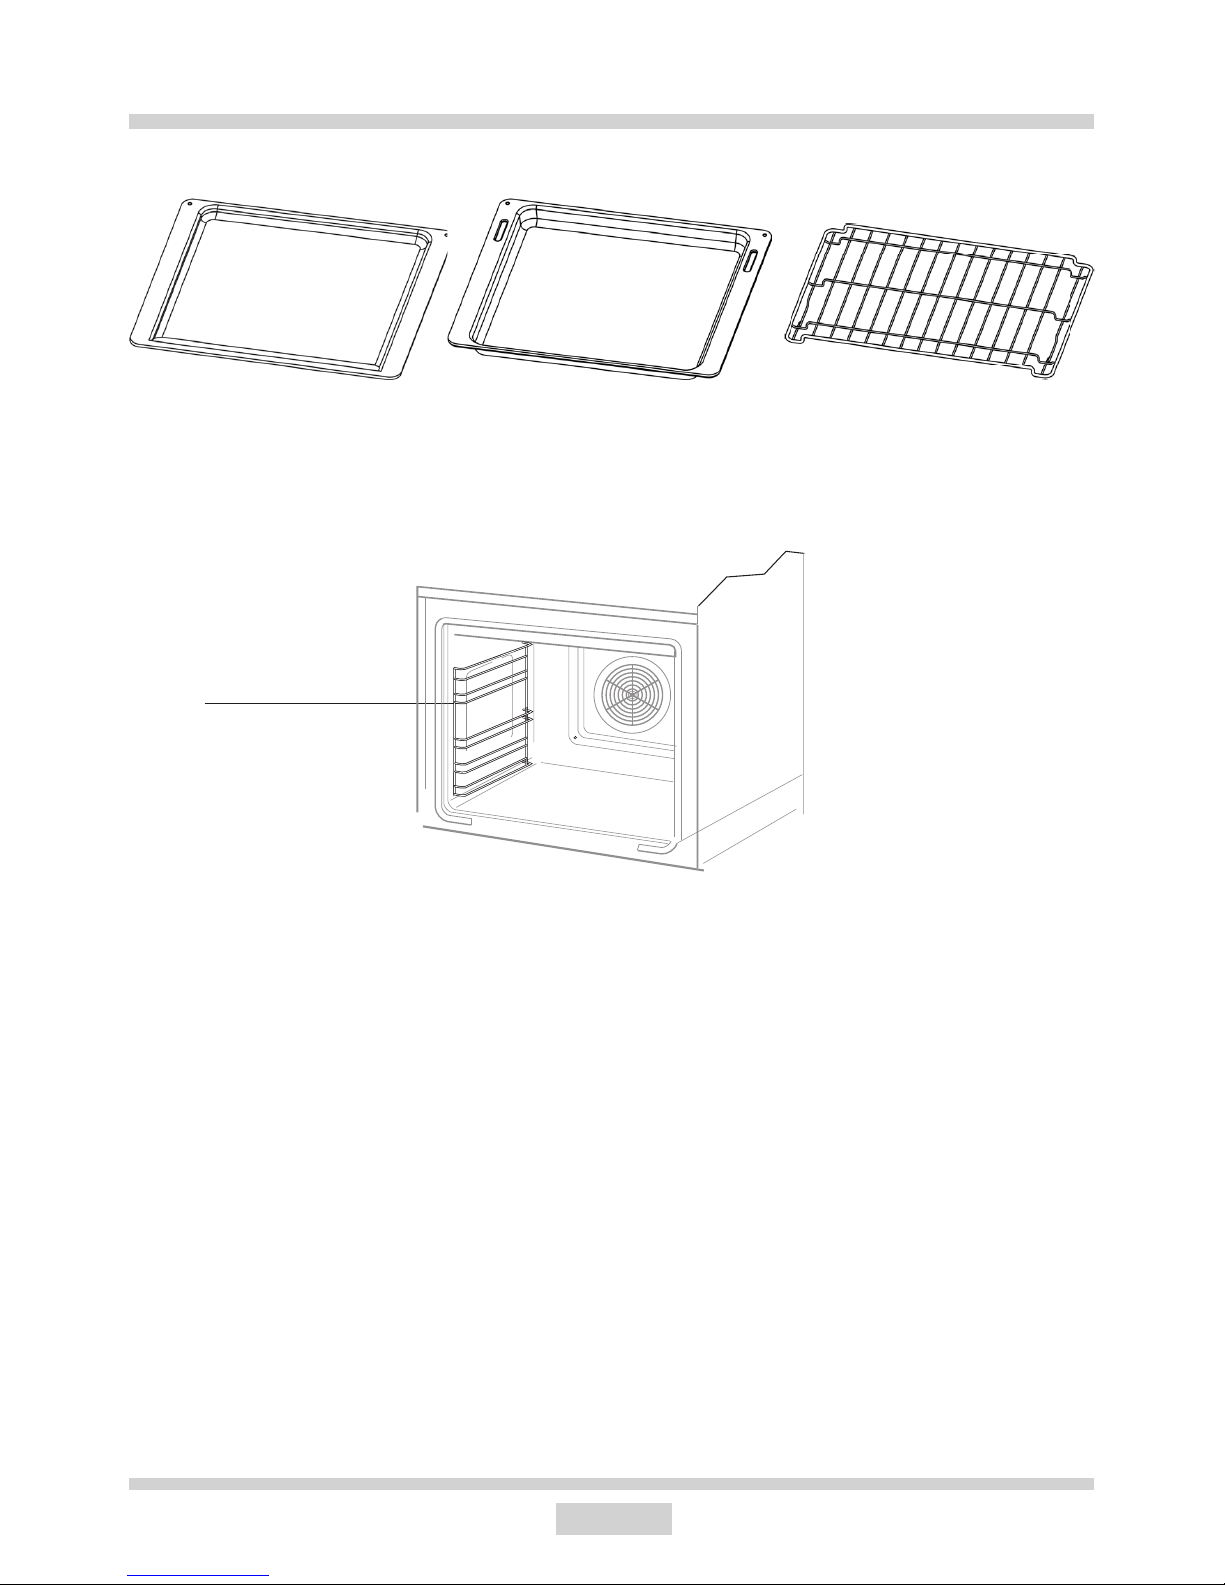
UPPGIFTER ANGÅENDE UTRUSTNING
Spisens utrustning
Bakplåtar
Långpanna
Rostfritt grillgaller
Ugnsfalsar
Page 9
9
INSTALLATION
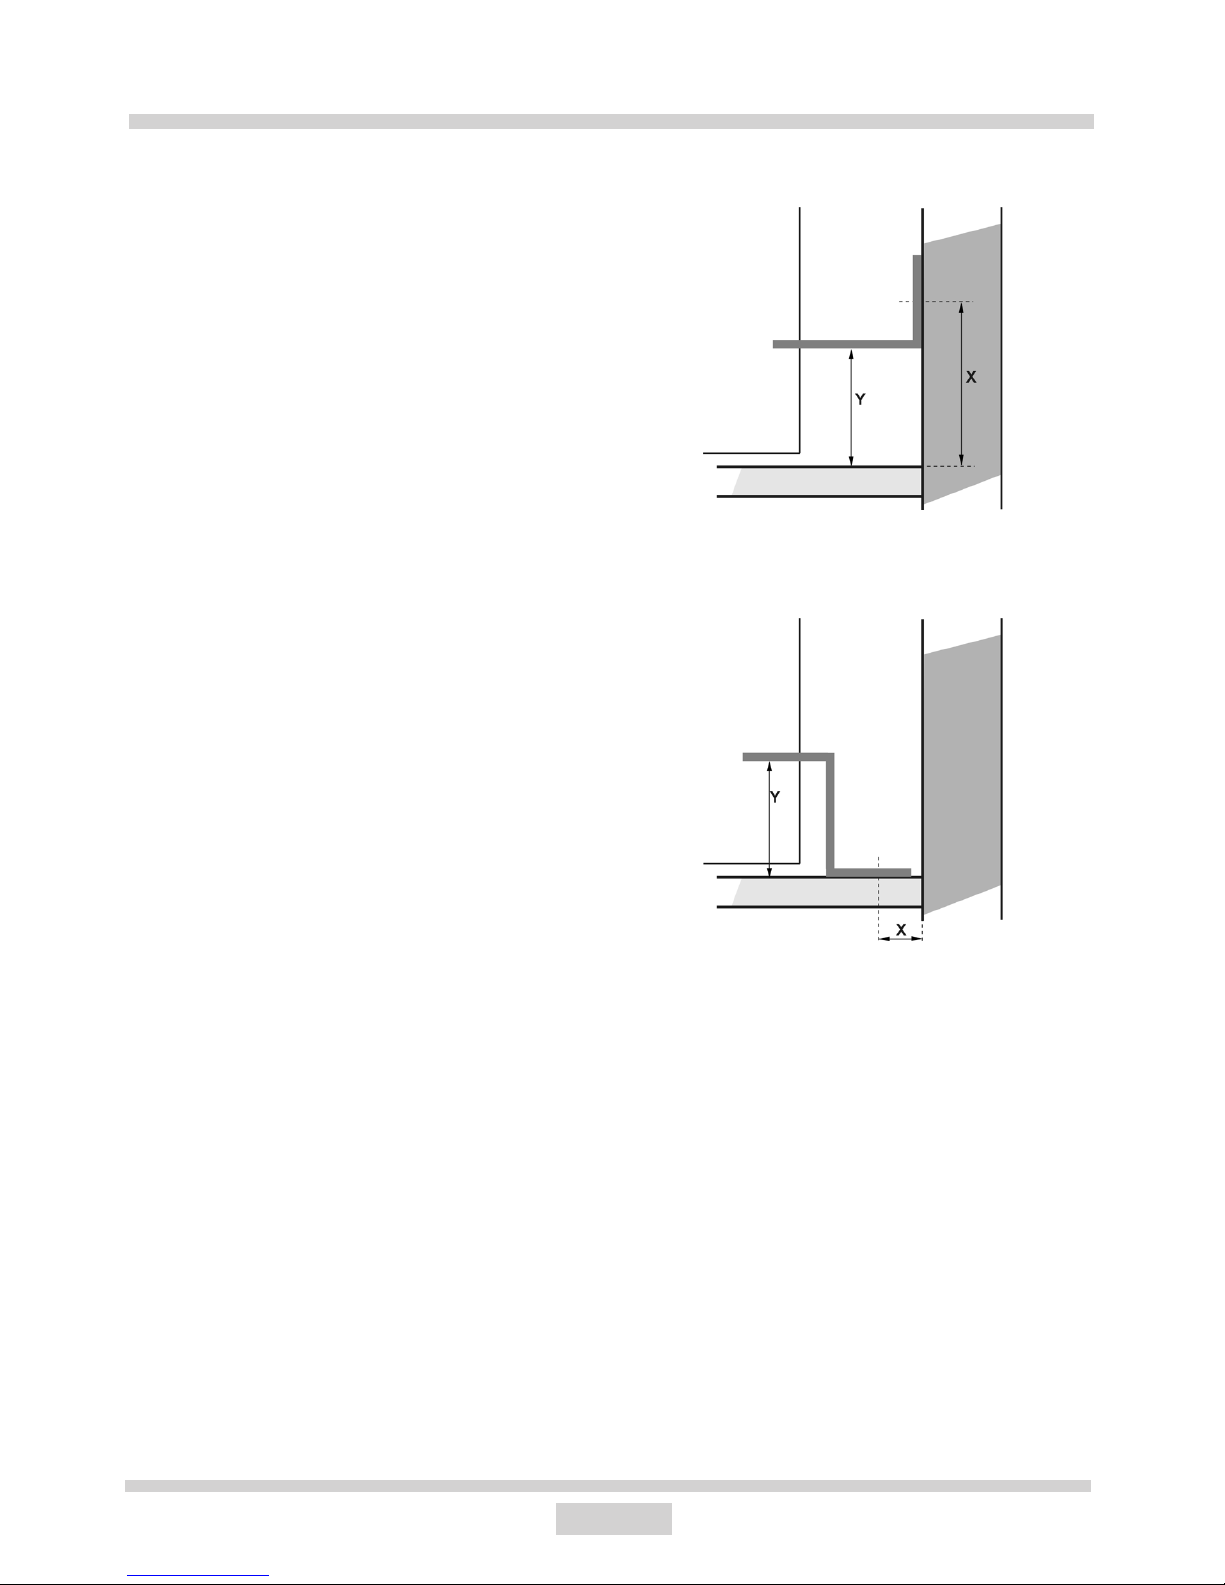
Montering av tippskydd
Spis
Vägg
Golv
Spis 60 cm, höjd 90 cm
X = 110 mm, Y = 80 mm
Spis
Vägg
Golv
Spis 60 cm, höjd 90 cm
X = 3540 mm, Y = 80 mm
Uppställning av spisen
• Rummet som spisen står i ska vara torrt och
luftigt och ha en väl fung erande ven ti la tion
enligt gällande tek niska fö re skrif ter.
• Undvik att lyfta spisen i den glaskeramiska
hällen.
• Tätningsmaterial, lister och klis ter (som be
lägg ning är klist rad med) på möb ler som ska
stå vid spi sen ska tåla minst 100 ºC, annars
ris ke rar möbeln att de for me ras. Om man
inte är säker an gå ende möblers temperaturtålighet ska man ha ett avstånd på ca. 2 cm
mellan möb lerna och spi sen.
• Spisen ska placeras på ett jämnt och hårt
golv (den får inte placeras på ett underlägg).
• Innan man börjar an vända spisen ska man
se till att den står rakt (våg rätt), t ex med
hjälp av ett vatten pass. Detta är sär skilt
vik tigt för att olja i stek pannan ska för de las
jämnt. Du gör nivåjusteringen med hjälp av
de justeringsben som du kommer åt genom
att öppna ugnslådan.
Page 10
10
INSTALLATION
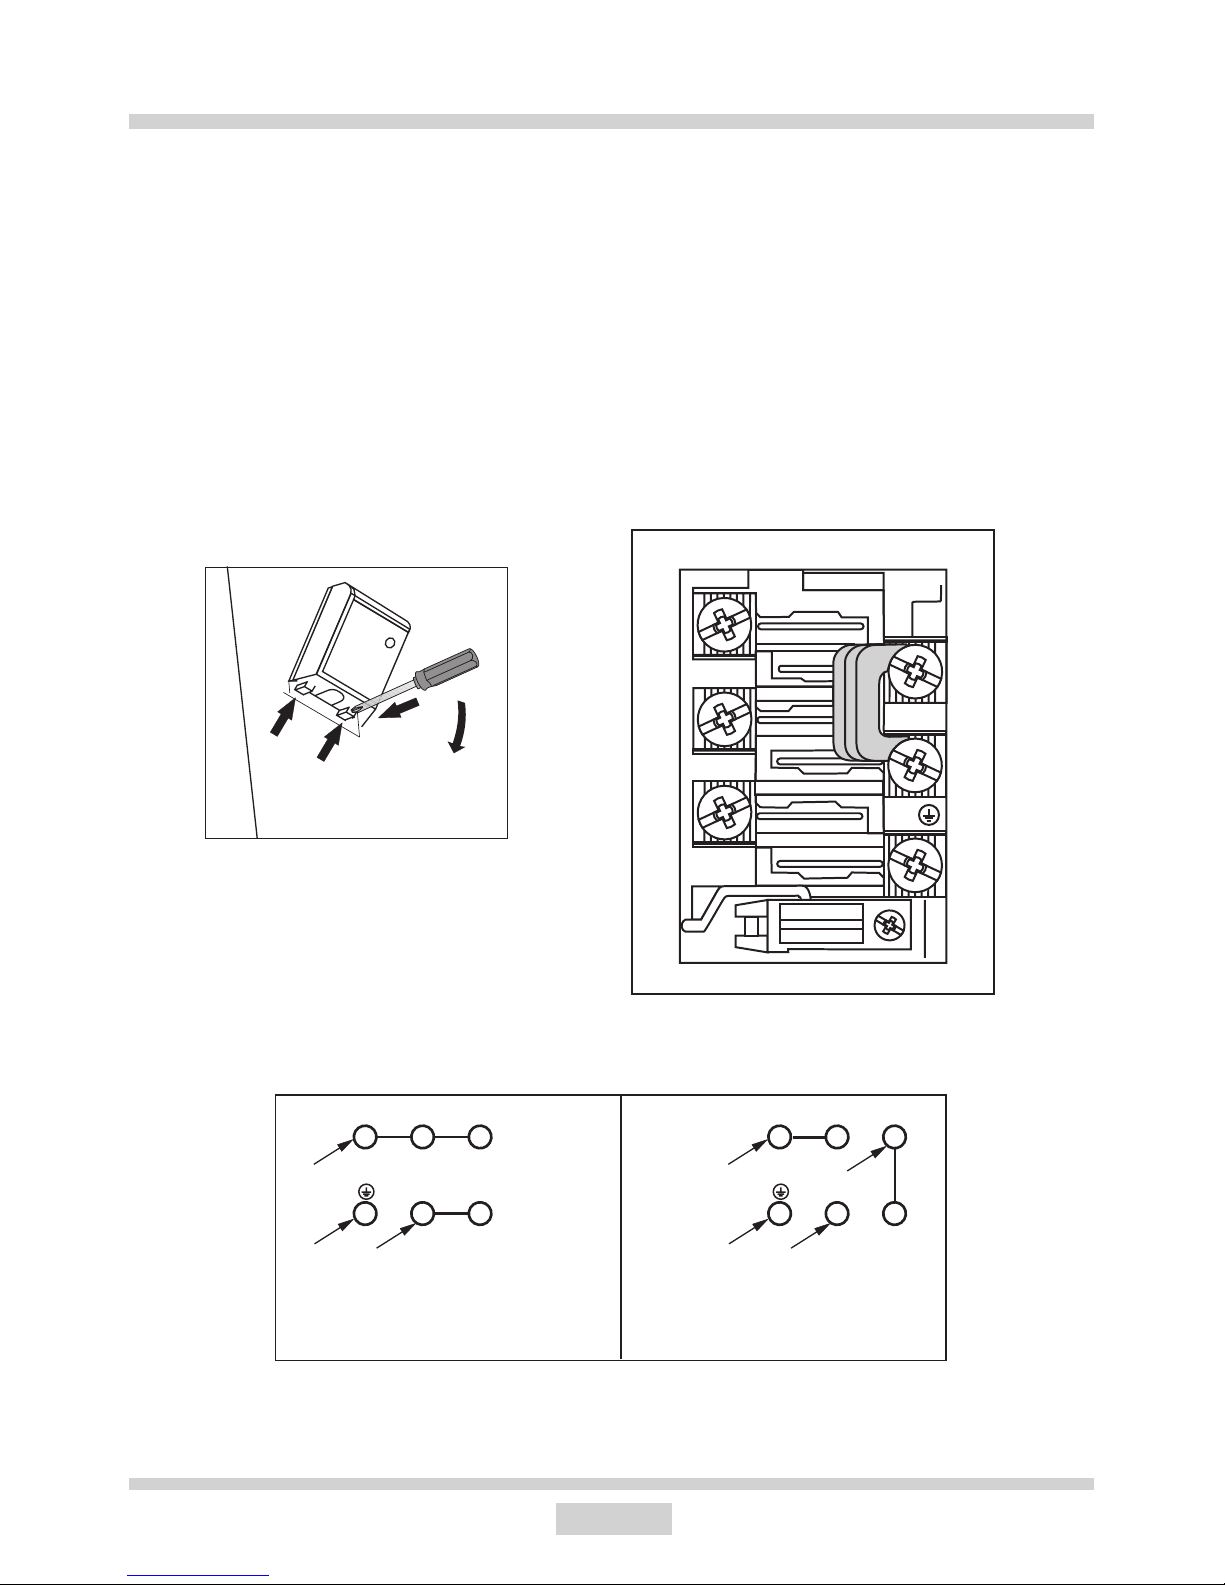
Inkoppling av spis till elsystem
• Installationen får endast genomföras av en auktoriserad elinstallatör. Därmed sä ker ställs
att gällande regler för stark ström följs.
• Installationen måste följa eventuella spe ci ella krav som fastställts av lokala le ve ran tö
rer.
• Anslutningen av spisen kräver en se pa rat strömkrets.
• Anslutningen får endast göras i enlighet med de eldiagram som beskrivs på ut si dan av
skyddet för anslutningsklämmorna på den bakre plåten.
• Vid anslutning eller byte av kopplingssladden måste minst en sladd av typen HO5 VVF
4G2,5 eller motsvarande an vän das.
• OBS!: För att uppfylla sä ker hets fö re skrif terna måste en strömbrytare som bryter alla poler
och som har ett kontaktavstånd på minst 3 mm an vän das. (Kan våra en hu vud ström bry
tare).
2
1
1
2
3
3
4
5
1
2
3
5
4
PE
L1
L2
1
2
3
5
4
L1
L2
PE
L3
400V3~400V2~
Page 11

11
ANVÄNDNING
Innan man börjar använda spisen
• avlägsna delar av förpackningen om så
dana nns kvar, töm ugnslådan och rengör
ugnen,
• ta ut ugnens utrustning och tvätta den i
varmt vatten med lite disk me del i,
• sätt på ventilationen (äkt) i rummet eller
öppna fönster,
• värm upp ugnen (250 ºC i ca. 45 min.), ta
bort smuts och rengör ugnen noggrant,
• följa betjäningsanvisningar och skyddsfö-
reskrifter.
Ugnen får endast tvättas med varm vatten
med diskmedel (inte med några star kare
ren gö rings me del).
Page 12
12
ANVÄNDNING
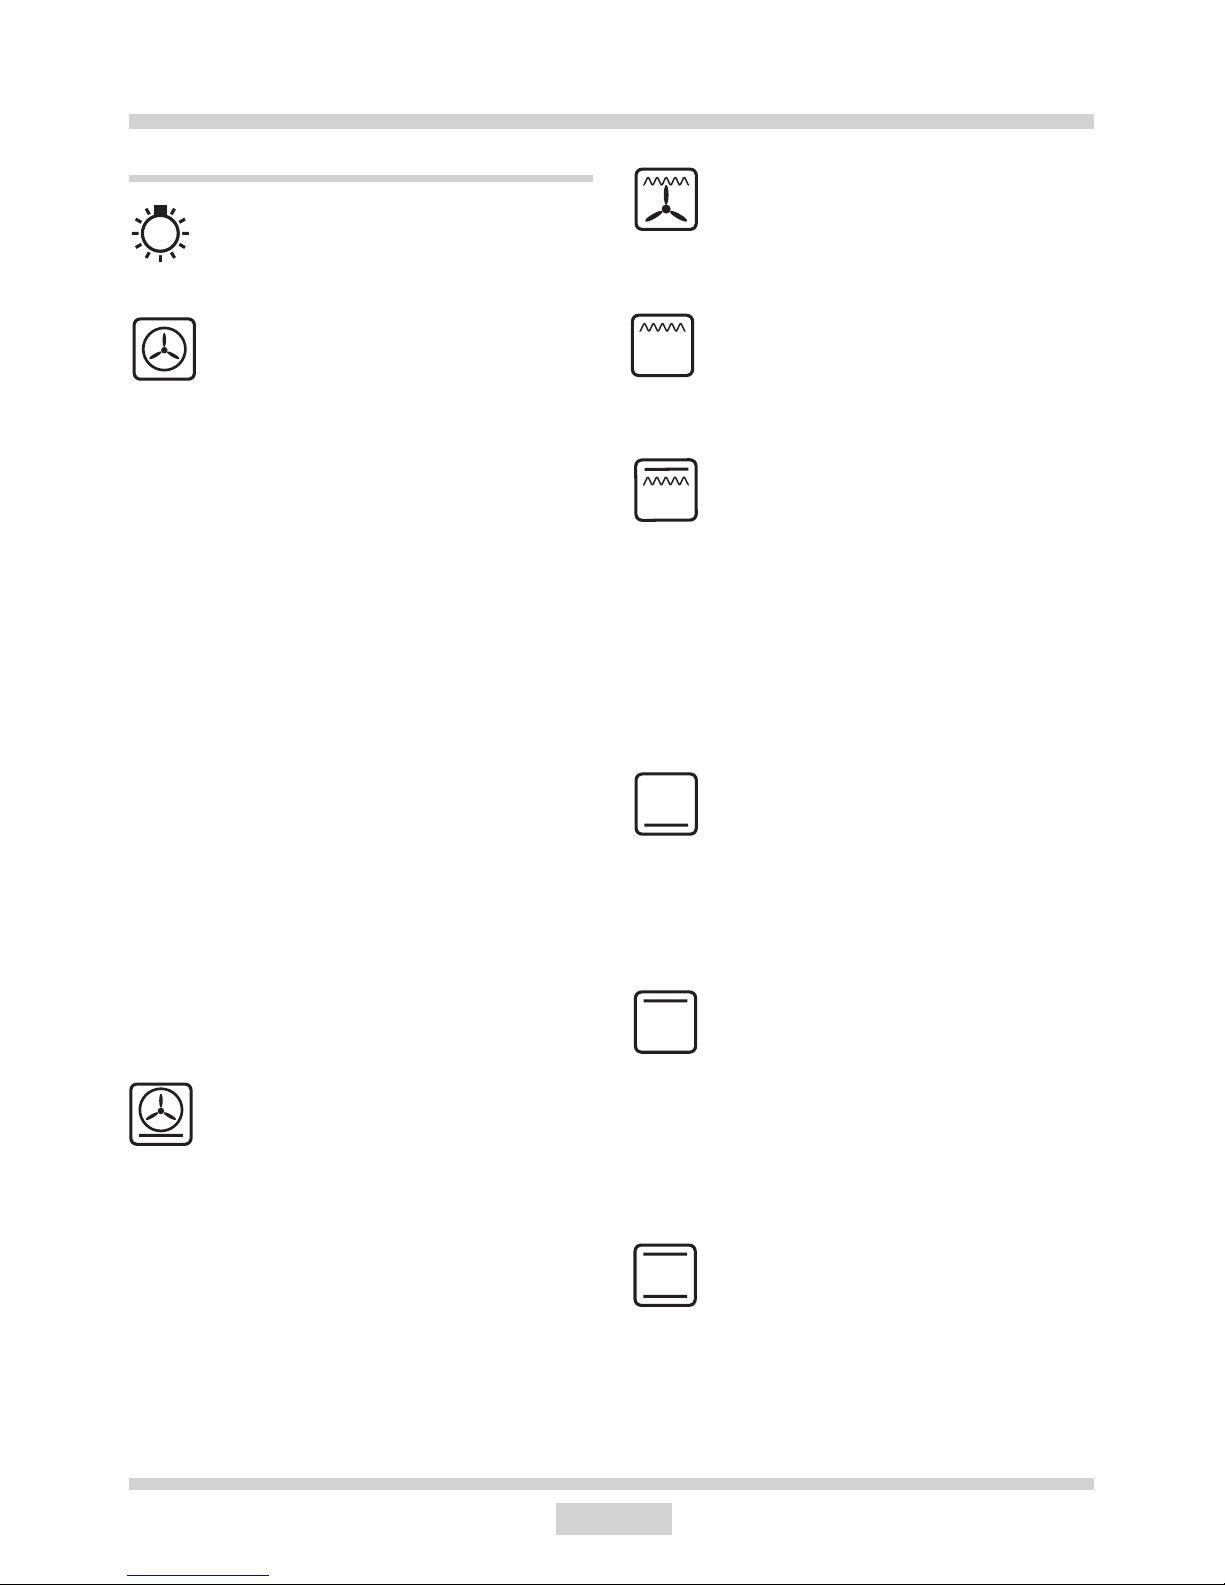
ANVÄNDNING AV KOKZONER
Så fort en glaskeramisk kokzon eller ugnen
slås på lyser driftkontrollampan [8].
De glaskeramiska kokzonerna regleras med
den tillhörande 7stegs kon trol lk nap pen.
Denna har, utöver stegen
0 • 1 • 2 • 3
också tre mellansteg som är mar ke ra de med
prickar.
Dessa mellansteg väljs om tem pe ra tu ren på
de lägre stegen är för låg och tem pe ra tu ren
på det högre stegen är för hög.
Därmed är det möjligt att göra en exakt anpassning av temperaturen efter ma tva rans
typ och mängd.
De olika stegen används lämpligast enligt
beskrivningen nedan.
• Kokzonen avstängd - läge 0
När den glaskeramiska kokplattan är
avstängd kan eftervärmen fort fa ran de
användas för kokning/varm hal l ning.
• Värmhållningssteg
Om rätten bara ska småkoka långsamt
vid mycket svag värme.
• Vidarekokningssteg - läge 1
Vid medelstora rätter och om du önskar
jämn vidarekokning med bra ener giut nyt
tjan de.
• Höjt vidarekokningssteg
För tillagning av större portioner.
0 Kokzonen avstängd
l Varmhållningssteg
1 Vidarekokningssteg
l Höjt vi da re kok nings steg
2 Steksteg
l Höjt steksteg
3 Up p kok nings steg
• Steksteg - läge 2
För rätter som kräver laga tem pe ra tu rer
för fortsatt stekning.
• Höjt steksteg
För tillagning av stekt kött och rätter som
kräver hög temperatur vid fort satt stek
ning.
• Uppkokningssteg - läge 3
I början av tilllagningsprocessen,
för snabbkokning, bryning, up p kok ning
och tillagning av snabbrätter vid full
värme ef fekt.
0
1
2
3
Page 13
13
ANVÄNDNING
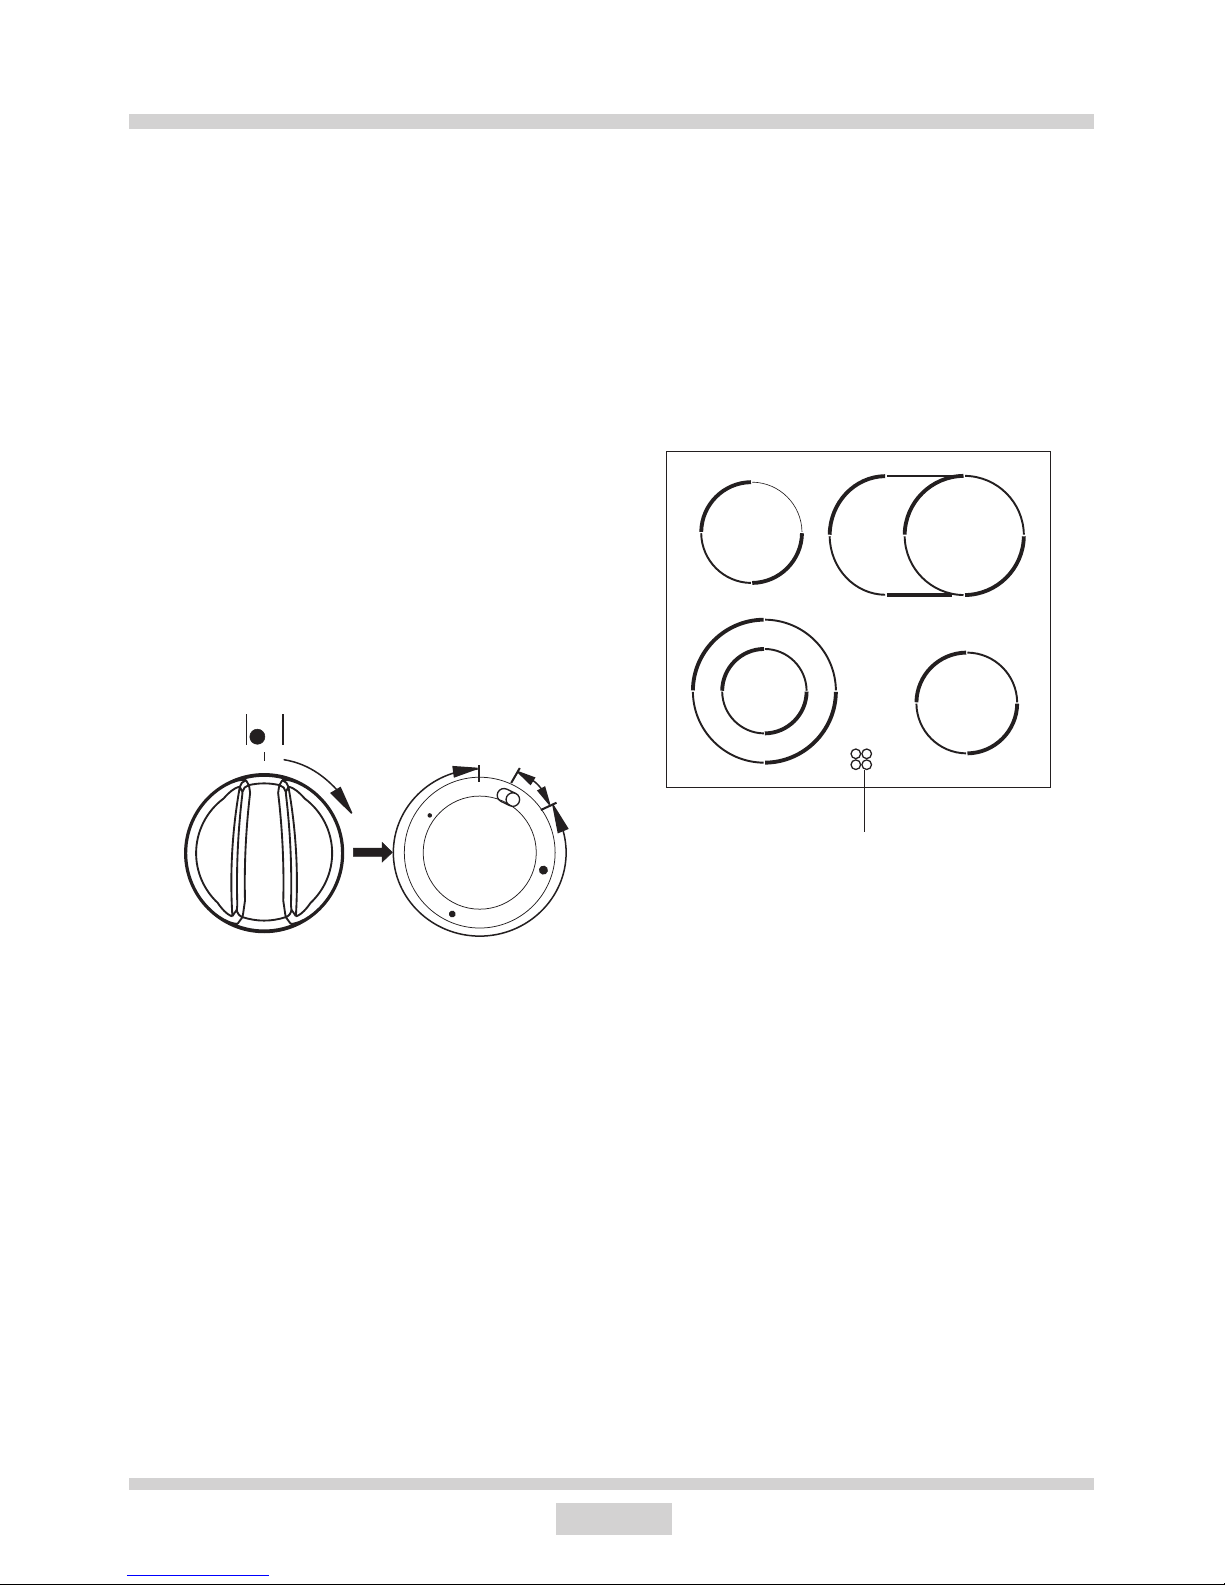
Dubbel kokzon
Den främre, vänstra kokzonen och den bakre
högra kokzonen är tem pe ra tur re gle rad och
har en dubbel kokzon för kokkärl med stor
diameter.
• Om du även vill tända den yttre, större
kokzonen vrider du kon trol lk nap pen [3]
eller [5] över steg 3 till knappens symbol
för dubbel kokzon.
• Efterat kan du välja önskat steg
0 • 1 • 2 • 3
varvid temperaturen ställs in för den större
kokzonen.
• I läget "0" för kontrollknappen [3] el ler
[5] stängs den större, dubbla kok zo nen
av och den lilla, inre, normala kok zo nen
används igen.
Restvärmeindikation
Restvärmeindikationen visar dig vilken av de
fyra kokplattorna som fortfarande har en yttemperatur på mer än 50 °C. Genom att vara
uppmärksam på dettan kan du förebygga
att nagot bränns vid. Du kan ocksa använda
restvärmen för att hålla rätter varma under
en begränsad tid.
Restvärmeindikationen
0
1
2
3
Page 14
14
ANVÄNDNING
VAL AV KOKKÄRL
Det ställs större krav på kokkärl på glaskeramiska kokplattor än på vanliga kok plat tor.
Eventuella extrautgifter för kokkärl lönar sig snabbt pa grund av energibesparingen och längre
livslängd för kokkärl och glaskeramiska kokplattor. Dessutom förkortas tillagningsprocessen
och därmed arbetstiden.
• Använd alltid bara grytor och pannor med lika stor eller större diameter än den glaskeramiska kokplattan på vilken de placeras. Därmed uppnas bästa möjli ga värmeöverföring.
• För små grytor medför energiförlust, men även risk för att maten kokar över och bränner
fast på den glaskeramiska kokplattan.
• Använd aldrig ett kokkärl med tunn eller böjd botten eftersom detta kan medföra överhettning av den glaskeramiska kokplattan. Speciella elgrytor med plan sli pad botten passar
särskilt bra.
• Använd inte grytor med plasthandtag i ugnen.
• Kokkärlets botten måste alltid vara torr så att det inte skapas kalkavlagringar på den
glaskeramiska kokplattan.
• Vid användning av speciella kokkärl måste du alltid följa kokkärlsfabrikantens anvisningar.
Observera:
Kokkärl med botten av aluminium eller koppar kan lämna avlagringar som är svåra att få
bort. Det rekommenderas att vara dubbelt försiktig med emaljerade kärl, vilka kan göra skada vid torrkokning. Följ tillverkarens anvisningar.
Page 15
15
ANVÄNDNING
Användning av ugnen
Välj önskad funktion och tem pe ra tur och
vrid vredet medurs till det. När ugnen startas
tänds en röd och en gul kon trol lam pa. Den
gula visar att ugnen fungerar. Den röda släcks
när ugnen har uppnått önskad tem pe ra tur.
Ställ in önskad ugnsfunktion, med funk tions
vre det
Ställ in temperaturvredet på önskad temperatur.
Du stänger av ugnen genom att vrida båda
vreden till läge „ l” / „0”.
Tillagning med varmluft
En varmluftsfläkt som sitter på ugnens
bakre vägg sörjer för konstant luft cir ku la tion.
Därmed uppnås en bättre vär meö ver fö ring till
matvaran och en mer en het lig temperaturfördelning i hela ug nen.
• Du sparar energi tack vare att du kan välja
väsentligt lägre tem pe ra tur än i tra di tio
nella ugnar.
• Tack vare de lägre temperaturerna kommer ugnen dessutom inte att smutsas ned
särskilt mycket. Fett och liknande bränner
inte fast lika lätt och kan därför avlägsnas
utan svå rig het.
• Om du ska grädda era platta ka kor eller bakplåtar med småkakor samtidigt
rekommenderar vi att du använder den
första och tredje hyllskenan nedifrån.
• Upptining går väsentligt mycket snabbare
och kan eventuellt ske sam ti digt på alla
hyllskenor.
• Det är möjligt att öppna luckan även under
gräddning av känsliga kakor utan att de
rasar ihop.
• Den långa uppvärmningstid som krävs i
traditionella ugnar är inte nöd vän dig; den
inställda tem pe ra tu ren uppnås snabbt.
OBS!:
Stäng av ugnen omedelbart om varmluftäktens motor går sönder. Upp värm ning utan
äkt kan medföra ska dor på ugnen.
0
50
100
150
200
250
C
O
Page 16
16
Grill på
Med denna inställning ak ti ve ras
grillen.
ANVÄNDNING
Intensivgrill (grill plus övervärme)
Maten grillas och värmes up pifrån
sam ti digt.
På detta sätt blir temperaturen
högre i ugnens övre del, så att
den rostade maten blir mörkare till
färgen. En praktiskt inställning när
tjocka bitar ska grillas.
Övervärme
Med vredet inställt i denna position värms ugnen upp endast
med hjälp av den övre värmeanordningen. Denna funktion ska
användas t.ex. vid gräddning
ovanifrån.
Över- och undervärme
Inställning av vredet i den här positionen gör att ugnen värms upp
med en konventionell metod.
Undervärme
Med vredet inställt i denna position värms ugnen upp endast
med hjälp av den nedre värmeanordningen. Denna funktion ska
användas t.ex. vid gräddning underifrån.
Ugnens funktionsvred - In ställ ning:
Inre be ly sning
När vre det vrids till detta läge tänds
be ly snin gen inuti ugnen.
Varmluft på
När denna funktion aktiveras star tas
en äkt på bakre ugnsväggen.
Den sörjer för konstant och jämn
lu ft cir ku la tion inne i ugnen. Denna
uppvärmning me tod har följan de
förde lar:
• ugnen het tas upp snabbare och man
behöver inte förvärma den
• två falspar kan användas samtidigt
• kötträtter förlorar mindre fett och
vätska under uppvärmning, vilket
förbättrar smaken
• ugnen smutsas inte ner lika mycket
Du måste använda temperaturinställningen tillsammans med varmluftsfunktionen.
OBS! Om varm lu fts funk tio nen slås
på sam ti digt som temperaturvredet
är inställt på noll, ak ti ve ras endast
äkten. Den na inställning kan användas för att kyla ner maträtter
el ler själva ungen.
Varmluft och un dervärme
påslagna
Med denna vredinställning ak ti ve ras
både varmluftsäkten och undervärme. Ugnen värms då upp un de rifrån.
Lämpligt för tex pizza och pajer.
OBS! Om tem pe ra tu rvre det ställs
på noll används inställningen för
kylning.
Varmluft och grill på
Grillen och äkten körs sam ti digt.
Detta min skar grilltiden och förbättrar matens smak.
Page 17
17
ANVÄNDNING
Kontrollampor
Aktivering av ugnen signaleras genom att
två kontrollampor börjar lysa – en gul och en
röd. När den gula kontrollampan lyser betyder det att ugnen arbetar. När den röda kontrollampan släcks betyder det att ugnen nått
inställd temperatur. Om det i receptet för en
maträtt rekommenderas att maträtten ska
placeras i en uppvärmd ugn ska man göra
det först efter att den röda kontrollampan
slocknat. Under bakning ska den röda lampan lysa och slockna en stund (bevarande
av temperatur i ugnskammaren). Den gula
kontrollampan kan även lysa när vredet står
i position ”Belysning av ugnkammare”.
GRILLSTEKNING
Användning av grill
Grillprocessen görs genom an vän dande
av infraröda strålar på en maträtt. In fra röda
strålar emitteras av ugnens glö dande värmeanordning.
För att aktivera grillfunktionen ska man:
• placera ugnens ratt i läge betecknat med
symbol grill,
• värma upp ugnen i ca. 5 minuter (med
stängd ugnslucka).
• placera en bakplåt med maträtt i ug nen
på en lämplig arbetsnivå. Om man grillar
på grillgaller ska man placera en plåt under
grillgallret för fett som ska droppa ner.
• stänga ugnsluckan.
För grill och ökad intensiv grill ska tempe ra tu ren ställas in på 250 ºC, och för
funk tion grill med äkt ska tem pe ra tu ren
ställas in på högst 200 ºC.
Observera!
När grillfunktionen används ska ugnsluckan
vara stängd.
När man använder grillfunktionen kan några
delar av ugnen bli heta. Därför re kommen
de ras det att inte låta barnen komma nära
ugnen.
Page 18

18
BAKNING, KÖTTSTEKNING - PRAKTISKA RÅD
Bakning
lVid bakning tabell 1 rekommenderas.
lBakparametrar är givna för 3 olika slags av värme:konventionell uppvärmning (
Övre och Nedre Varmelement ),Varmluft
Köttstekning
lVid köttstekning tabell 2 rekommenderas.
Stekparametrar är givna både för konventionell uppvärmning och för
varmluft.
lRekommenderade parametrar för kött, sk och toast är sammanställda i tabell
3.
lRekommenderade parametrar för stekning med varmluft och grill är samman-
ställda i tabell 4.
Page 19

19
TABELL 1: Bakverk
2
2
23
2
2
2
3
3
2
3
2
3
3
3
170180
160180
170180
170180
160180
210220
170180
160170
180200
220240
190210
170180
180190
90110
2
2
23
23
2
2
2
3
3
3
2
2
150170
150170
160170
160180
140150
150170
180200
160170
160170
150170
150160
170190
6080
6580
2030
3040
6070
6090
4060
5060
3560
3050
3040
1015
1015
3050
1030
1825
8090
Bakverk
Baktid
[min.]
Övre-och Nedre-
Värmeelement
Varmluft
Ugns
läge
Ugns
läge
Tempe
ratur
[°C]
Tempe
ratur
[°C]
Bakning i plåtform
Sockerkaka/spräcklig
Sockerkaka
Rivdegsbotten
Mjuk sockerkaka
Mördegsbotten med. frukter
Ostkaka(på mördegs bot ten)
Jästkaka
Bröd (t.ex. mångkornig)
Bakning på ugnens bakplåtar
Mördegsbotten med. frukter
Fruktkaka(på jästeller ridveg)
Strösselkaka
Rulltårta
Pizza (på tunn botten)
Pizza (på tjock botten)
Små bakelser
Småkakor
Puffdeg
Marräng
BAKNING, KÖTTSTEKNING - PRAKTISKA RÅD
Page 20

20
*Rekommendationer i tabell 2 gäller för 1 kg köttportion.
Stekning av store köttbitar är att föredra men stektid för varje nästa 1kg är 30 – 40 min. extra.
Vänd upp och ner på köttbiten efter halva stektiden.
Viktigt: änvänd endast kärl som är godkända för ugn.
TABELL 2: Köttstekning
Nöttkött
Rostbiff eller le
röd („english“)
förvärmd ugn
rosa („medium“)
förvärmd ugn
genomstekt („well done“)
Stek
Fläsk kött
Stek
Skinka
Filé
Kalvkött
Lammkött
Rådjurskött
Fjäderfä
Kyckling
Gås (omk. 2 kg)
Fisk
2
2
2
2
2
2
2
2
2
3
3
3
2
2
2
3
2
2
2
2
2
2
160180
160180
160180
160170
160180
175180
170180
160180
175180
250
250
210230
200220
200210
200210
210230
200210
200220
200220
220250
190200
210220
ca 1 cm:
1215
1525
2530
120140
90140
6090
2530
90120
100120
100120
5080
150180
4055
Kötträtt
Ugnsläge
nerifrån
Temperatur °C
Stektid*
[min.]
Konventionell
uppvärmning
Varmluft
Varmluft
Konventionell
uppvärmning
BAKNING, KÖTTSTEKNING - PRAKTISKA RÅD
Page 21

21
810
1012
78
810
1215
810
68
810
2530
67
58
23
68
68
67
68
1012
68
56
68
2025
56
57
23
TABELL 3: Grill
Fläskkotlett
Fläskfärs
Köttspett
Korv
Rostbiff (omk. 1kg)
Kalvkotlett
Kalvstek
Lammkotelett
Halv kyckling (je 500g)
Fiskle
Forell (omk. 200 – 250g)
Toast
Maträtt
Ugnsläge
nerifrån
Temperatur
[°C]
Stektid [min.]
4
3
4
4
3
4
4
4
3
4
3
4
250
250
250
250
250
250
250
250
250
250
250
250
Den ene sida Den andra sida
BAKNING, KÖTTSTEKNING - PRAKTISKA RÅD
Page 22

22
Fläskstek
Lammkött
Rostbiff
Kyckling
Anka
Gås
Kalkon
1,0
1,5
2,0
2,0
1,0
1,0
2,0
3,0
2,0
3,0
2
2
2
2
2
2
12
1
2
12
170190
170190
170190
170190
200220
180200
170190
140160
180200
160180
80100
100120
120140
90110
3040
5060
8590
110130
110130
150180
Ugnsläge
nerifrån
Vikt
[kg]
Maträtt
TABELL 4: Varmluft + grill
Temperatur
[°C]
Stektid
[min.]
Under stekning bör även steksky eller varmt salt vatten hällas över köttet ett antal gånger.
BAKNING, KÖTTSTEKNING - PRAKTISKA RÅD
Page 23

23
RENGÖRING OCH UNDERHÅLL
Låga tillagningstemperaturer ger min dre
nedsmutsning av ugnen.
• Du får dock aldrig försöka hålla ug nen
ren genom att lägga alu mi ni um fo lie på
botten.
• Rengör ugnen, vid behov, så snabbt som
möjligt efter an vänd ning (varje gång).
Använd aldrig ugnsspray eller starka,
repande puts- eller skurmedel.
• Låt ugnen stå öppen en stund efter
våtrengöring så att den torkar or dent ligt.
• Ångkokning och konservering för or-
sa kar kraftig fuktbildning i ug nen. Se
till att du låter ugnen torka or dent ligt
– annars kan rostskador uppstå.
• Vid rengöring av äktens fettlter måste
ugnen vara avstängd innan fettltret tas
bort.
Glaskeramisk kokplatta
Rengör den glaskeramiska kokplattan regelbundet och så gott det går medan den
är ljummen eller kall. Se till att smuts inte
bränner fast era gånger.
I samband med detta rekommenderar vi
följande:
• Var försiktig så att inga socker eller
syrehaltiga matvaror bränner fast.
• Även aluminiumfolie och plastkärl kan
skada kokplattan om materialet smälter
pa plattan och inte avlägsnas omedelbart.
• Vid lätt nedsmutsning, som inte bränner fast, kan plattorna torkas av med en
fuktig trasa.
• Kraftig nedsmutsning eller fa stbränd
smuts avlägsnas enkelt med en rak
blads skra pa, som är särskilt avsedd för
kokplattor.
• Kalk, vattenränder, fettstänk och me tal
li ska missfärgningar avlägsnas med ett
rengöringsmedel avsett för glaskeramiska
kokplattor.
Skåpytor
Emaljerade ytor (ugnens botten, ugnsluckan)
och kontrollpanelen torkas av med en fuktig
trasa med såpvatten. Smuts som sitter hårt
fast kan even tu ellt mjukgöras genom att täcka
om rå det en stund med en fuktig trasa.
OBS!: Använd aldrig starka, repande puts
eller skurmedel.
Design i rostfritt stål: Rengör ytor av rostfritt
stål med en fuktig trasa, even tu ellt med nor
malt rengöringsmedel för rostfria stålytor.
Ångrengöring – Steam Clean
Placera en skål med 0,25 liter vatten längst
ned i ugnen och stäng ugnsluckan. Sätt ug
nen på 50 ºC och funk tions v re det på läge ”undervärme”. Värm ugnen i ca. 30 min. Öppna
sedan ugnsluckan, torka ugnen med trasa
eller tvättsvamp och rengör se dan ugnen med
varmt vatten med disk me del i.
Page 24

24
Glödlampan
RENGÖRING OCH UNDERHÅLL
Byte av ugnslampa
Vid byte av glödlampan i ugnen måste spi sen
först stängas av med huvudströmbrytaren.
Det får inte nnas nå gon strömtillförsel till
spi sen när lam pan byts.
• Öppna ugnsluckan och lägg en trasa
(köks handduk/handduk) på ugnsbotten
så att skyddsglaset inte går sönder om
det skulle falla ner.
• Glödlampan sitter framtill i mitten av ugnstaket. Den skyddas av ett runt skydds
glas. Vrid skyddsglaset åt vän ster för att
avlägsna det.
• Byt ut den trasiga glödlampan (typ 25 W
/ E 14, T 300 °C) mot en ny glöd lampa av
samma typ.
• Kom ihåg att sätta fast skyddsglaset igen
genom att vrida det åt hö ger.
Ugnsfalsar med utdragbara bakplåtsskenor
Ugn är utrustad med lätt uttagbara ugnsfalsar
(stege). För att ta ut dem för ren gö ring ska
man dra ett fäste som nns i fronten (Z1) och
därefter dra ut ugnsfalsar och av lägsna det
från bakfäste (Z2). Ef ter att ha rengjort ska
man pla cera dem i ugnens öppningar och
trycka ner fäste (Z1 och Z2).
Z2
Z1
Page 25

25
RENGÖRING OCH UNDERHÅLL
Demontering av ugnslucka
För att bättre komma åt ugnskammaren i
samband med rengöring kan man ta bort
ugnsluckan. För att göra detta ska man öppna
luckan och dra upp en säkerhetsdel som
nns i gångjärnen. Där ef ter ska man trycka
till luckan lite, lyfta och ta ut den framåt. För
att montera luckan i ugnen ska man göra i
omvänd ord ning. Vid återplacering av luckan
ska man se till att en utskärning som nns
på gångjärnen placeras på gångjärnens
greppavsats på rätt sätt. Efter att luckan
återplacerats ska man ovillkorligen dra ner
säkerhetsdelen. Om man inte drar den ner,
kan det orsaka skada på gång är nen vid för
sök att stänga luckan.
Borttagning av inre ruta
Uppdragning av säkerhetsdelar till gångjärn
Demontering av inre ruta
För att ta ut den inre rutan ska man skruva
ur en skruv och ta bort ett plastlås som nns
i hörnet i luckans övre del. Därefter ska man
skjuta ut rutan från den andra låsdelen och
ta ut den. Efter rengöringen ska man sätta
till baka rutan och låsa den genom att skruva
till låsdelen.
A
B
C
Page 26

26
Märkspänning 400V~ 50 Hz
Märkeffekt 10,0 kW
Mått 90 / 60 / 60,5 cm
Ugnens volym 53 liter
Vikt ca. 47 kg
EU – standardi: EN 603351, EN 6033526
TEKNISKA DATA
Page 27

27
DEAR CUSTOMER, EN
The cooker is exceptionally easy to use and extremely efcient. After reading the instruction
manual, operating the cooker will be easy.
Before being packaged and leaving the manufacturer, the cooker was thoroughly checked
with regard to safety and functionality.
Before using the appliance, please read the instruction manual carefully.
By following these instructions carefully you will be able to avoid any problems in using the
appliance.
It is important to keep the instruction manual and store it in a safe place so that it can be
consulted at any time.
It is necessary to follow the instructions in the manual carefully in order to avoid possible
accidents.
Caution!
Do not use the cooker until you have read this instruction manual.
The cooker is intended for household use only.
The manufacturer reserves the right to introduce changes which do not affect the
operation of the appliance.
Page 28

28
TABLE OF CONTENTS
Safety instructions ........................................................................................................... 29
Description of the appliance ........................................................................................... 32
Installation ......................................................................................................................... 34
Operation ........................................................................................................................... 36
Baking in the oven – practical hints ............................................................................... 43
Cleaning and maintenance .............................................................................................. 48
Technical data ................................................................................................................... 52
Page 29

29
SAFETY INSTRUCTIONS
l The appliance becomes hot during operation. Take care not to touch the hot parts inside
the oven.
l Always keep children away from the cooker.
While in operation direct contact with the cooker may cause burns!
l Ensure that small items of household equipment, including connection leads, do not touch
the hot oven or the hob as the insulation material of this equipment is usually not resistant
to high temperatures.
l Do not leave the cooker unattended when frying. Oils and fats may catch re due to
overheating or boiling over.
l Do not allow the hob to get soiled and prevent liquids from boiling over onto the surface
of the hob. This refers in particular to sugar which can react with the ceramic hob and
cause irreversible damage. Any spillages should be cleaned up as they happen.
l Do not place pans with a wet bottom on the warmed up heating zones as this can cause
irreversible changes to the hob (irremovable stains).
l Use pans that are specied by the manufacturer as designed for use with a ceramic
hob.
l If any defects, deep scratches, cracks or chips appear on the ceramic hob, stop using the
cooker immediately and contact the service centre.
l Do not switch on the hob until a pan has been placed on it.
l Do not use pans with sharp edges that may cause damage to the ceramic hob.
l Do not look directly at the halogen heating zones (not covered by a pan) when they are
warming up.
l Do not put pans weighing over 15 kg on the opened door of the oven and pans over 25
kg on the hob.
l Do not use harsh cleaning agents or sharp metal objects to clean the door as they can
scratch the surface, which could then result in the glass cracking.
l Do not use the cooker in the event of a technical fault. Any faults must be xed by an
appropriately qualied and authorised person.
l In the event of any incident caused by a technical fault, disconnect the power and report
the fault to the service centre to be repaired.
l This appliance is not intended for use by persons (including children) with reduced physical,
sensory or mental capabilities, or lack of experience and knowledge, unless they have been
given supervision or instruction concerning use of the appliance by a person responsible
for their safety.
l Children should be supervised to ensure that they do not play with the appliance.
l The cooker should not be cleaned using steam cleaning equipment.
Page 30

30
HOW TO SAVE ENERGY
Using energy in a responsible way not only saves
money but also helps the
environment. So let’s save
energy! And this is how you
can do it:
lUse proper pans for cooking.
Pans with thick, at bases can save up to 1/3
on electric energy. Remember to cover pans
if possible otherwise you will use four times
as much energy!
lMatch the size of the saucepan to the
surface of the heating zone.
A saucepan should never be smaller than a
heating zone.
lEnsure heating zones and pan bases
are clean.
Soils can prevent heat transfer – and repeatedly burnt–on spillages can often only be
removed by products which cause damage
to the environment.
l Do not uncover the pan too often
(a watched pot never boils!).
Do not open the oven door unnecessarily
often.
Switch off the oven in good time and make
use of residual heat.
For long cooking times, switch off heating
zones 5 to 10 minutes before nishing cooking. This saves up to 20% on energy.
Only use the oven when cooking larger
dishes.
Meat of up to 1 kg can be prepared more
economically in a pan on the cooker hob.
l Make use of residual heat from the
oven.
If the cooking time is greater than 40 minutes
switch off the oven 10 minutes before the
end time.
Important! When using the timer,
set appropriately shorter cooking
times according to the dish being
prepared.
lOnly grill with the ultrafan after closing
the oven door.
lMake sure the oven door is properly
closed.
Heat can leak through spillages on the door
seals. Clean up any spillages immediately.
lDo not install the cooker in the direct
vicinity of refrigerators/freezers.
Otherwise energy consumption increases
unnecessarily.
Page 31

31
During transportation, protective packaging was used to
protect the appliance against
any damage. After unpacking, please dispose of all
elements of packaging in a
way that will not cause damage to the environment.
All materials used for packaging the appliance are environmentally friendly; they are
100% recyclable and are marked with the
appropriate symbol.
Caution! During unpacking, the packaging materials (polythene bags, polystyrene
pieces, etc.) should be kept out of reach of
children.
UNPACKING
DISPOSAL OF THE APPLIANCE
Old appliances should not simply be disposed of with normal
household waste, but should
be delivered to a collection and
recycling centre for electric and
electronic equipment. A symbol
shown on the product, the
instruction manual or the packaging shows
that it is suitable for recycling.
Materials used inside the appliance are
recyclable and are labelled with information
concerning this. By recycling materials or
other parts from used devices you are making
a signicant contribution to the protection of
our environment.
Information on appropriate disposal centres
for used devices can be provided by your
local authority.
Page 32

32
DESCRIPTION OF THE APPLIANCE
1 Temperature control knob
2 Oven function selection knob
3, 4, 5, 6 Heating zone control knobs
7 Temperatureregulatorsignal light red
8 Cooker operation signal light yellow
9 Oven
10 Drawer
7
9
10
5, 6
1
8
2
3, 4
Page 33

33
SPECIFICATIONS OF THE APPLIANCE
Cooker ttings
Baking tray*
Grill grate
(drying rack)
Roasting tray
Side racks
Page 34

34
INSTALLATION
Installing the cooker
l The kitchen should be dry and airy and
have effective ventilation according to the
existing technical provisions.
l The room should be equipped with a ven-
tilation system that pipes away exhaust
fumes created during combustion. This
system should consist of a ventilation
grid or hood. Hoods should be installed
according to the manufacturer’s instructions. The cooker should be placed so
as to ensure free access to all control
elements.
l Coating or veneer used on tted furniture
must be applied with a heat resistant
adhesive (100°C). This prevents surface
deformation or detachment of the coating. If you are unsure of your furniture’s
heat resistance, you should leave approximately 2 cm of free space around
the cooker. The wall behind the cooker
should be resistant to high temperatures.
During operation, its back side can warm
up to around 50°C above the ambient
temperature.
l The cooker should stand on a hard, even
oor (do not put it on a base).
l Before you start using the cooker it should
be leveled, which is particularly important
for fat distribution in a frying pan. To this
purpose, adjustable feet are accessible
after removal of the drawer. The adjustment range is +/ 5 mm.
Installing anti-tip bracket
Cooker
Wall
Floor
Cooker 60 cm, height 90 cm
X = 110 mm, Y = 80 mm
Cooker
Wall
Floor
Cooker 60 cm, height 90 cm
X = 3540 mm, Y = 80 mm
Page 35

35
INSTALLATION
Electrical connection
Warning!
All electrical work should be carried out by a suitably qualied and authorised electrician. No
alterations or wilful changes in the electricity supply should be carried out.
Fitting guidelines
The voltage rating of the cooker heating elements is 400V. The connection diagram is also
found on the cover of the connection box. Remember that the connection wire should match
the connection type and the power rating of the cooker.
The connection cable must be secured in a strain–relief clamp.
Warning!
Remember to connect the safety circuit to the connection box terminal marked with . The
electricity supply for the cooker must have a safety switch which enables the power to be cut
off in case of emergency. The distance between the working contacts of the safety switch
must be at least 3 mm.
Before connecting the cooker to the power supply it is important to read the information on
the data plate and the connection diagram.
2
1
1
2
3
3
4
5
1
2
3
5
4
PE
L1
L2
1
2
3
5
4
L1
L2
PE
L3
400V3~400V2~
Page 36

36
l Remove packaging, empty the drawer,
clean the interior of the oven and the
hob.
l Take out and wash the oven ttings with
warm water and a little washing–up
liquid.
l Switch on the ventillation in the room or
open a window.
l Heat the oven (to a temperature of 250 °C,
for approx. 30 min.), remove any stains
and wash carefully; the heating zones of
the hob should be heated for around 4 min.
without a pan.
Before rst use
OPERATION
Important!
The inside of the oven should only be washed
with warm water and a small amount of
washing–up liquid.
Page 37

37
OPERATION
Controlling the heating zones of the ceramic hob.
Heat level selection
The heating zones have different levels of heat. The level of heat can be adjusted gradually
by turning the appropriate knob to the right or left.
0 Switch off
l MIN. Warming up
1 Stewing vegetables, slow cooking
l Cooking soups, larger dishes
2 Slow frying
l Grilling meat, sh
3 MAX. Fast heating up, fast cooking, frying
0
1
2
3
Switching on the wider heating zone
Important!
Only switch on a heating zone by turning
the knob clockwise. Turning the knob in the
opposite direction can cause damage to the
switch.
With the settings 0 l 1 l 2 l 3 the knob
operates the internal heating zone and it is
possible to smoothly control the amount of
heat transferred to a pan. Turning the knob
temporarily to the position marked causes
the external heating zone to be switched on.
From that point, you can smoothly control the
amount of heat trasferred to a pan by both
heating zones (internal and external) as the
internal switch will switch both zones off only
after the knob is set to position 0.
0
1
2
3
Page 38

38
Zone heating indicator
OPERATION
Zone heating indicator
If the temperature of a heating zone exceeds
50°C this is signalled by an indicator which
lights up for that zone.
When the heating indicator lights up it warns
the person using the cooker against touching
a hot heating zone.
For about 5 to 10 minutes after a heating
zone is switched off it will still have residual
heat that can be used, for example to warm
up or keep dishes warm without switching on
another heating zone.
Page 39

39
OPERATION
Choice of cookware
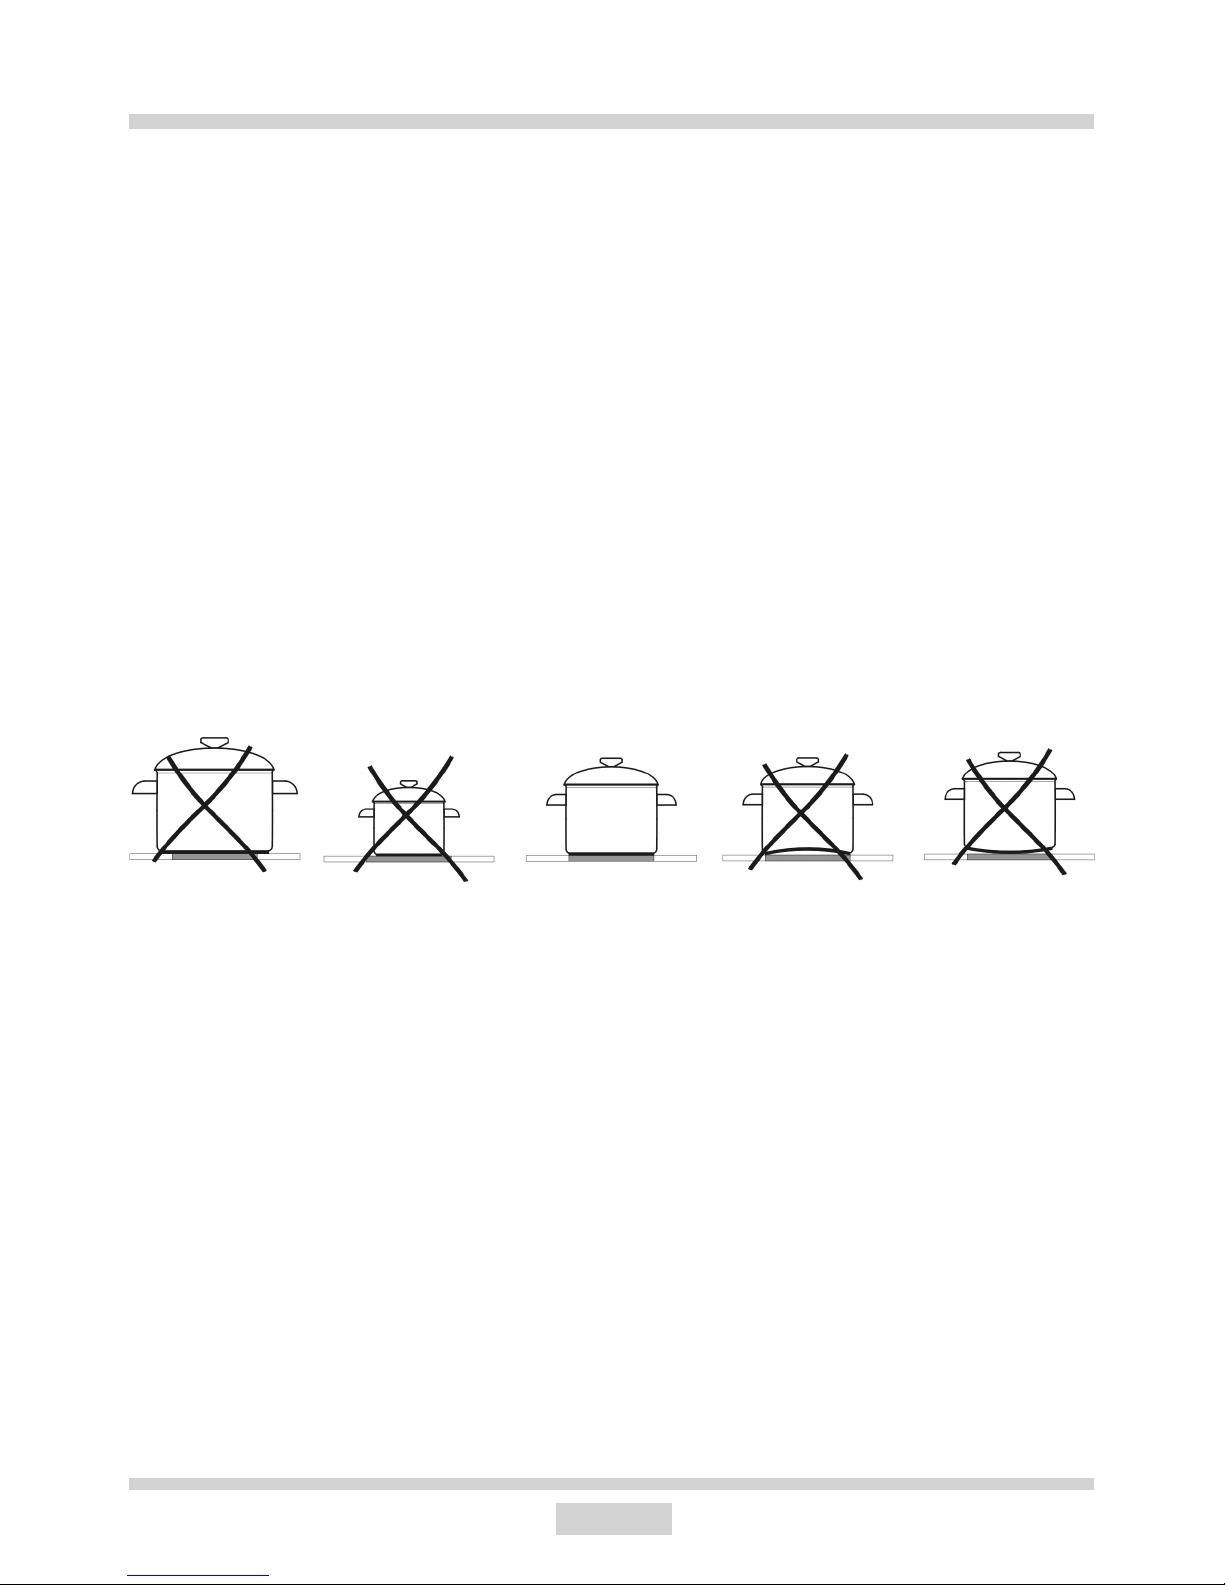
Choose a pan with a diameter that is at least as large as the heating zone. For roasting tins
there is a special widened heating zone of 170x265. Do not use pans with a concave or
convex base. Always remember to put a proper cover on the pan. We recommend the use
of pans with thick, even bases.
If the heating zones and pans are solied it is impossible to make full use of the heat.
Page 40

40
Oven with automatic air circulation
(including a fan and an ultra-fan
heater)
The oven can be heated up using the bottom and top heaters, the grill or the ultrafan
heater. Operation of the oven is controlled
by the oven function knob – to set a required
function you should turn the knob to the selected position,
and the temperature regulator knob – to set
a required function you should turn the knob
to the selected position.
The oven can be switched off by setting both
of these knobs to the position “l”/“0”.
Caution!
When selecting any heating function
(switching a heater on etc.) the oven
will only be switched on after the
temperature is set by the temperature
regulator knob.
OPERATION
Oven functions and operation.
Ultrafan and bottom heater on
With this setting the ultrafan and
bottom heateron functions are
activated, which increases the
temperature from the bottom of
the dish being cooked.
Separate oven lighting
By setting the knob to this position the lighting inside the oven is
switched on.
Ultrafan on
Setting the knob to “ultrafan on”
allows the oven to be heated up in
a forced way with the thermofan,
which is in the central part of the
back wall of the oven chamber.
Heating the oven up in this way
permits even heat circulation
around the dish that is in the
oven.
The advantage of this heating
method is:
l reduction of oven heatingup
time and elimination of the
initial heating stage,
l possibility to bake at two cook-
ing levels simultaneously,
l reduction in the amount of fats
and juices coming out of meat
dishes, which results in an improvement in their taste.
l reduction of spillages in the
oven chamber.
Possible settings of the oven function
knob
0
50
100
150
200
250
C
O
Page 41

41
Fan and grill on
When the knob is turned to this
position, the oven activates the grill
and fan function. In practice, this
function allows the grilling process
to be speeded up and an improvement in the taste of the dish. You
should only use the grill with the
oven door shut.
OPERATION
Grill on
Setting the knob to this postion allows dishes to be grilled only with
the grill heater switched on.
Combined grill
(Grill and the top heater)
When the “combined grill” is active
it enables grilling with the grill and
with the top heater switched on at
the same time. This function allows
a higher temperature at the top of
the cooking area, which causes
more intense browning of the dish
and permits larger portions to be
grilled.
Top heater on
Setting the knob to this postion
allows the oven to be heated
only with the top heater switched
on, e.g. use for nal baking from
above.
Caution!
When the ultrafan functions have been selected but the temperature knob is set to zero
only the fan will be on. With this function you
can cool the dish or the oven chamber.
Switching on the oven is indicated by two
signal lights, yellow and red, turning on. The
yellow light turned on means the oven is working. If the red light goes out, it means the oven
has reached the set temperature. If a recipe
recommends placing dishes in a warmedup
oven, this should be not done before the red
light goes out for the rst time. When baking,
the red light will temporarily come on and go
out (to maintain the temperature inside the
oven). The yellow signal light may also turn
on at the knob position of “oven chamber
lighting”.
Bottom heater on
When the knob is set to this position the oven is heated using only
the bottom heater. Use for e.g. nal
baking from the bottom.
Bottom and top heaters on
Setting the knob to this position
allows the oven to be heated conventionally.
Page 42

42
OPERATION
In order to switch on the grill you need to:
l set the oven knob to the position marked
with ,
l heat the oven for approximately 5 minutes
(with the oven door shut).
l insert a tray with a dish onto the appropri-
ate cooking level, and if you are grilling
on the grate insert a tray for dripping on
the level immediately below (under the
grate).
l the oven door shut.
Use of the grill
The grilling process operates through infrared
rays emitted onto the dish by the incandescent grill heater.
Caution!
The grill should be used with the oven
door shut.
When the grill is in use, accessible
parts can become hot.
It is recommended to keep children
away from the oven.
For grilling and combined grill the temperature must be set to 250 °C, but for the
grill function with fan it must be set to a
maximum of 200 °C.
Page 43

43
Roasting meat
l cook meat weighing over 1 kg in the oven, but smaller pieces should be cooked on
the hob.
l use heatproof ovenware for roasting, with handles that are also resistant to high
temperatures;
l when roasting on the drying rack or the grate we recommend that you place a baking
tray with a small amount of water on the lowest level of the oven;
l it is advisable to turn the meat over at least once during the roasting time and during
roasting you should also baste the meat with its juices or with hot salty water – do
not pour cold water over the meat.
BAKING IN THE OVEN – PRACTICAL HINTS
Baking
l we recommend using the baking trays which were provided with your cooker;
l it is also possible to bake in cake tins and trays bought elsewhere which should be
put on the drying rack; for baking it is better to use black trays which conduct
heat better and shorten the baking time;
l shapes and trays with bright or shiny surfaces are not recommended when using the
conventional heating method (top and bottom heaters), use of such tins can result in
undercooking the base of cakes;
l when using the ultrafan function it is not necessary to initially heat up the oven cham-
ber, for other types of heating you should warm up the oven chamber before the cake
is inserted;
l before the cake is taken out of the oven, check if it is ready using a wooden stick (if
the cake is ready the stick should come out dry and clean after being inserted into
the cake);
l after switching off the oven it is advisable to leave the cake inside for about 5 min.;
l temperatures for baking with the ultrafan function are usually around 20 – 30 degrees
lower than in normal baking (using top and bottom heaters);
l the baking parameters given in Table 1 and 1A are approximate and can be corrected
based on your own experience and cooking preferences;
l if information given in recipe books is signicantly different from the values included
in this instruction manual, please apply the instructions from the manual.
Page 44

44
Oven functions: bottom + top heaters
ultra-fan
BAKING IN THE OVEN – PRACTICAL HINTS
TABLE 1: Cakes
Baking in cake tins
Sponge cake/marble cake
Victoria sponge
Base for a layer cake
Sponge layer cake
Fruit cake (crispy base)
Cheesecake (shortcrust base)
Teacake
Bread (e.g. wholegrain bread)
Baking on the trays provided with the cooker
Fruit cake (crispy base)
Fruit cake (with yeast)
Crumble cake
Sponge roll
Pizza (thin base)
Pizza (thick base)
Baking smaller items
Buns
Puff pastry
Meringues
Choux buns
2
2
23
2
2
2
3
3
2
3
2
3
3
3
170180
160180
170180
170180
160180
210220
170180
160170
180200
220240
190210
160170
180190
90110
2
2
23
23
2
2
2
2
2
2
2
2
2
150170
150170
160170
160180
140150
150170
180200
160170
160170
150170
150160
170190
170190
6080
6580
2030
3040
6070
6090
4060
5060
3560
3050
3040
1015
1015
3050
1030
1825
8090
3545
CAKE TYPE
BAKING
TIME
[min]
TEMPE
RATURE
[°C]
LEVEL
LEVEL
TEMPE
RATURE
[°C]
ULTRA-FAN
BOTTOM +
TOP HEATERS
Page 45

45
BAKING IN THE OVEN – PRACTICAL HINTS
TABLE 2: Roasting meat
* the gures presented in the table refer to a portion of 1 kg, if the portion is larger than
that an additional 30 – 40 minutes should be added for each additional kilogram.
Oven functions: bottom and top heaters
ultra-fan
Caution!
In the middle of the roasting time the meat must be turned over.
It is advisable to roast meat in heatproof ovenware.
BEEF
Roast beef or llet
rare
oven warmed up
juicy (“medium”)
oven warmed up
“well done”
oven warmed up
Roast joint
PORK
Roast joint
Ham
Fillet
VEAL
LAMB
VENISON
POULTRY
Chicken
Goose (approx. 2 kg)
FISH
2
2
2
2
2
2
2
2
2
3
3
3
2
2
2
3
2
2
2
2
2
2
160180
160180
160180
160170
160180
175180
170180
160180
175180
250
250
210230
200220
200210
200210
210230
200210
200220
200220
220250
190200
210220
per 1 cm
1215
1525
2530
120140
90140
6090
2530
90120
100120
100120
5080
150180
4055
TYPE OF MEAT
LEVEL
FROM THE BOTTOM
TEMPERATURE [°C]
TIME*
IN MINUTES
ULTRA-FAN
BOTTOM +
TOP HEATERS
BOTTOM +
TOP HEATERS
ULTRA-FAN
Page 46

46
BAKING IN THE OVEN – PRACTICAL HINTS
TABLE 3: Grill
Oven functions: grill heater
Pork chop
Pork schnitzel
Shish kebab
Sausages
Roastbeef, (steak approx. 1kg)
Veal cutlet
Veal steak
Mutton chop
Lamb chop
Chicken half (per 500 g)
Fish llet
Trout (per approx. 200 – 250g)
Bread (toast)
LEVEL
FROM THE
BOTTOM
TEMPERATURE
[°C]
GRILLING TIME [MINUTES]
4
3
4
4
3
4
4
4
4
3
4
3
4
250
250
250
250
250
250
250
250
250
250
250
250
250
810
1012
78
810
1215
810
68
810
1012
2530
67
58
23
68
68
67
810
1012
68
56
68
810
2025
56
57
23
SIDE 1
SIDE 2
TYPE OF DISH
Page 47

47
BAKING IN THE OVEN – PRACTICAL HINTS
During baking you should turn the meat over periodically as well as basting it with its juices
or with hot salty water.
TABLE 4: Fan with grill
Roast pork
Leg of lamb
Roast beef
Chicken
Duck
Goose
Turkey
1,0
1,5
2,0
2,0
1,0
1,0
2,0
3,0
2,0
3,0
2
2
2
2
2
2
12
2
2
12
170190
170190
170190
170190
180200
180200
170190
140160
180200
160180
80100
100120
120140
90110
3040
5060
8590
110130
110130
150180
LEVEL
FROM THE BOTTOM
TEMPERATURE
[°C]
BAKING
[MINUTES]
WEIGHT
[kg]
TYPE OF MEAT
Oven functions: grill + fan
Caution!
The gures given in Tables are approximate and can be adapted based on your
own experience and cooking preferences.
Page 48

48
CLEANING AND MAINTENANCE
By ensuring proper cleaning and maintenance of your cooker you can have a signicant inuence on the continuing faultfree
operation of your appliance.
Before you start cleaning, the cooker must
be switched off and you should ensure
that all knobs are set to the “l”/“0” position. Do not start cleaning until the cooker
has completely cooled.
Ceramic hob
l The hob should be cleaned regularly after
each use. If possible, it is recommended
that the hob is washed while still warm
(after the heating zone indicator goes
off). Do not allow the hob to get heavily
stained; particualrly from burnt–on spillages from boiled over liquids.
l When cleaning do not use cleaning agents
with a strong abbrasive effect, such as
e.g. scouring powders containing an
abrasive, abrasive compounds, abrasive
stones, pumice stones, wire brushes and
so on. They may scratch the hob surface,
causing irreversible damage.
Do not use the cleaning uid “Cillit” for
cleaning the oven.
l Large spillages that are rmly stuck to the
hob can be removed by a special scraper;
but be careful not to damage the ceramic
hob frame when doing this.
l Appropriate light cleaning or washing
products are recommended, such as e.g.
any kind of liquids or emulsions for fat
removal.
Oven
l The oven should be cleaned after every
use. When cleaning the oven the lighting
should be switched on to enable you to
see the surfaces better.
l The oven chamber should only be washed
with warm water and a small amount of
washingup liquid.
l After cleaning the oven chamber wipe it
dry.
Caution!
Do not use c l eaning product s
containing abrasive materials for
the cleaning and maintenance of the
glass front panel.
l Steam cleaning:
pour 250 ml of water (1 glass) into a bowl
placed in the oven on the rst level from
the bottom,
close the oven door,
set the temperature knob to 50°C, and
the function knob to the bottom heater
position,
heat the oven chamber for approximately
30 minutes,
open the oven door, wipe the chamber
inside with a cloth or sponge and wash us-
ing warm water with washingup liquid.
Caution! Possible moisture or water
residues under the cooker can result from
steam cleaning.
l After cleaning the oven chamber wipe it
dry.
Page 49

49
CLEANING AND MAINTENANCE
Replacement of the oven light bulb
In order to avoid the possibility of an
electric shock ensure that the appliance is
switched off before replacing the bulb.
l Set all control knobs to the position “l”/“0”
and disconnect the mains plug,
l unscrew and wash the lamp cover and
then wipe it dry.
l unscrew the light bulb from the socket,
replace the bulb with a new one – a high
temperature bulb (300°C) with the follow-
ing parameters:
voltage 230 V
power 25 W
thread E14.
l Screw the bulb in, making sure it is prop-
erly inserted into the ceramic socket.
l Screw in the lamp cover.
Oven light bulb
Page 50

50
CLEANING AND MAINTENANCE
Door removal
In order to obtain easier access to the oven
chamber for cleaning, it is possible to remove
the door. To do this, tilt the safety catch part of
the hinge upwards. Close the door lightly, lift
and pull it out towards you. In order to t the
door back on to the cooker, do the inverse.
When tting, ensure that the notch of the
hinge is correctly placed on the protrusion
of the hinge holder. After the door is tted to
the oven, the safety catch should be carefully
lowered down again. If the safety catch is not
set it may cause damage to the hinge when
closing the door.
Removal of the internal glass panel
Removing the inner panel
1. Use a crosshead screwdriver to turn the
side clamp bolts loose (g. A).
2. Push the clamps off with a at screw-
driver. Pull the upper door slat loose.
(g. A, B).
3. Pull the inner glass panel from its seat
(in the lower section of the door) (g.
C).
3a. Remove the inner panel.
4. Clean the panel with warm water with
some cleaning agent added.
Carry out the same in reverse order to
reassemble the inner glass panel. Its
smooth surface shall be pointed upwards.
A
B
Tilting the hinge safety catches
C
Page 51

51
CLEANING AND MAINTENANCE
Dismounting the side racks
Z2
Z1
Dismounting the side racks
Oven is equipped with easily removable wire
guides (side racks) of oven inserts. To remove
them for washing purposes, pull the front
catch (Z1), then tilt the guide and remove it
from the rear catch (Z2). After washing the
guides, put them in the mounting holes of the
oven and press the catches (Z1 and Z2).
Page 52

52
* according to EN 50304
the capacity depends on the oven ttings – indicated on the energy label.
TECHNICAL DATA
Electrical supply 400V ~50Hz
Maximum load 10,0 kW
Cooker dimensions H/W/D 90 / 60 / 60,5 cm
Usable capacity of the oven* 53 litres
Weight approx. 47 kg
Complies with EU regulations EN 603351, EN 6033526 standards
Page 53

53
Page 54

54
Page 55

55
Page 56

IOAK1370 / 8045870
(03.2010./2)
Gram A/S
Aage Grams Vej 1
DK-6500 Vojens
www.gram.dk
Gram Norge A/S Gram Sverige AB Gram Finland OY
Vestvollveien 8 Box 9101 PL 4640
NO-2019 Skedsmokorset SE-200 39 Malmö FI-00002 Helsinki
www.gram.no www.gram.se www.gram.
 Loading...