

Page 1

1
USER MANUAL
MANUAL DE UTILIZACION
MANUEL D´UTILISATION
BEDIENERHANDBUCH
SERIES/SERIE/SÉRIE/SERIE CM
Models / Modelos / Modèles / Modelle:
CM-3
CM-6
CM-15
CM-30
REV. 1A11M06
Page 2

Page 3

3
INDEX
Power source, power consumption and rechargeable battery
4
Scale’s version number display
4
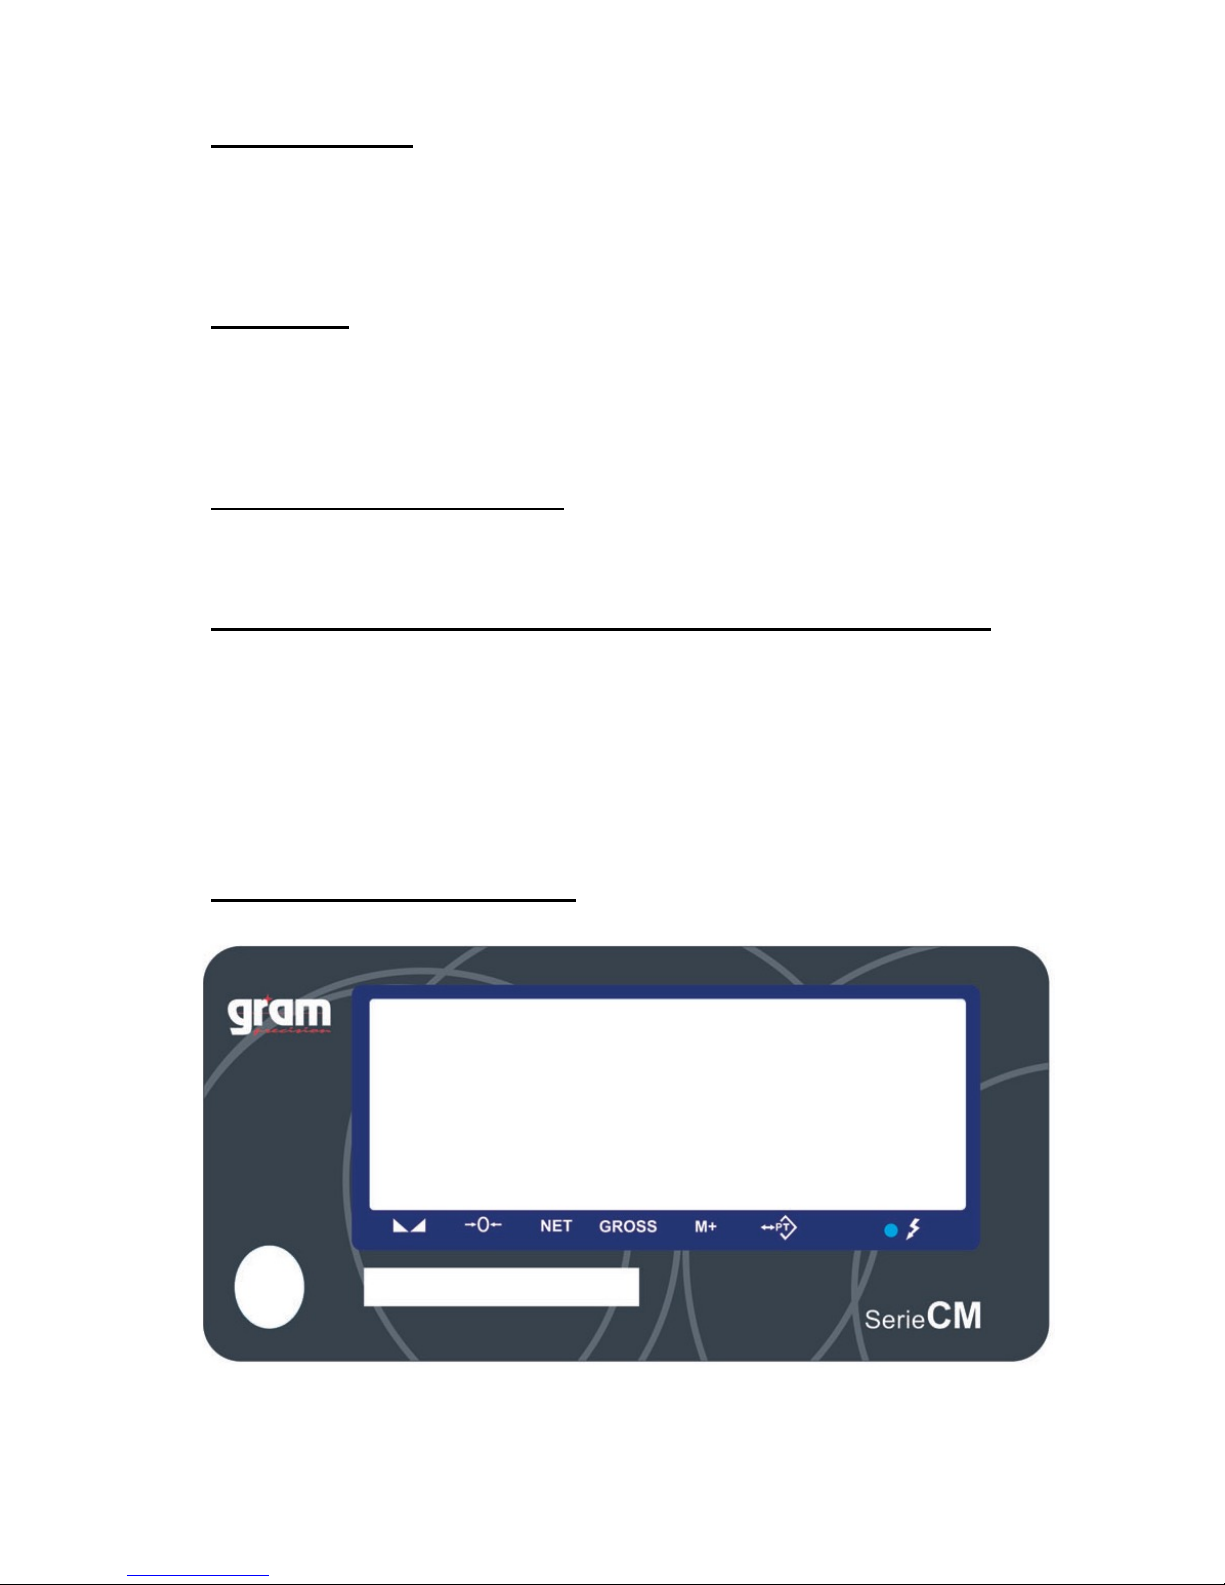
Display description
4
Keyboard description
5
Keys functions description
5
Preset Tara Value
7
Preset the high weight value
7
Preset the low weight value
7
Check-weighing Function configuration
8
Weights accumulation
8
How to enter the sample for piece counting
9
Piece counting function
9
Standard calibrations
9
Functions setup
10
- Internal value
10
- Check weighing
11
- Auto Power off
11
- Backlight
11
- HOLD Function
12
- RS-232 Output
12
- Zero weight Display Condition
15
Standard Gravitational Pre-Calibration
16
Guarantee
17
ENGLISH INDEX…………………………….Page 3
INDICE CASTELLANO……….................…Página 18
SOMMAIRE FRANÇAIS………...................Page 33
DEUTSCHES INHALTSVERZEICHNIS......Seite 48
Page 4
4
POWER SOURCE
Input: 100~240V 50/60hz
Output: 12V/1A DC 12W
Lead-acid rechargeable battery: 6V/4AH
POWER CONSUMPTION
Approx. 12mA
Approx. 36mA with backlight
Approx. 48mA with backlight
and RS232 interface (optional)
BATTERY HOURS PER CHARGE
Approx. 320 hours (backlight off )
SCALE’S VERSION NUMBER DISPLAY
1. Turn on the scale.
2. Press and hold the ZERO key until the countdown sequence has completed.
3. The LCD display will show “1001”. The shown number is the main-board
version of the scale.
4. Release the ZERO key and the scale will start the functions setup.
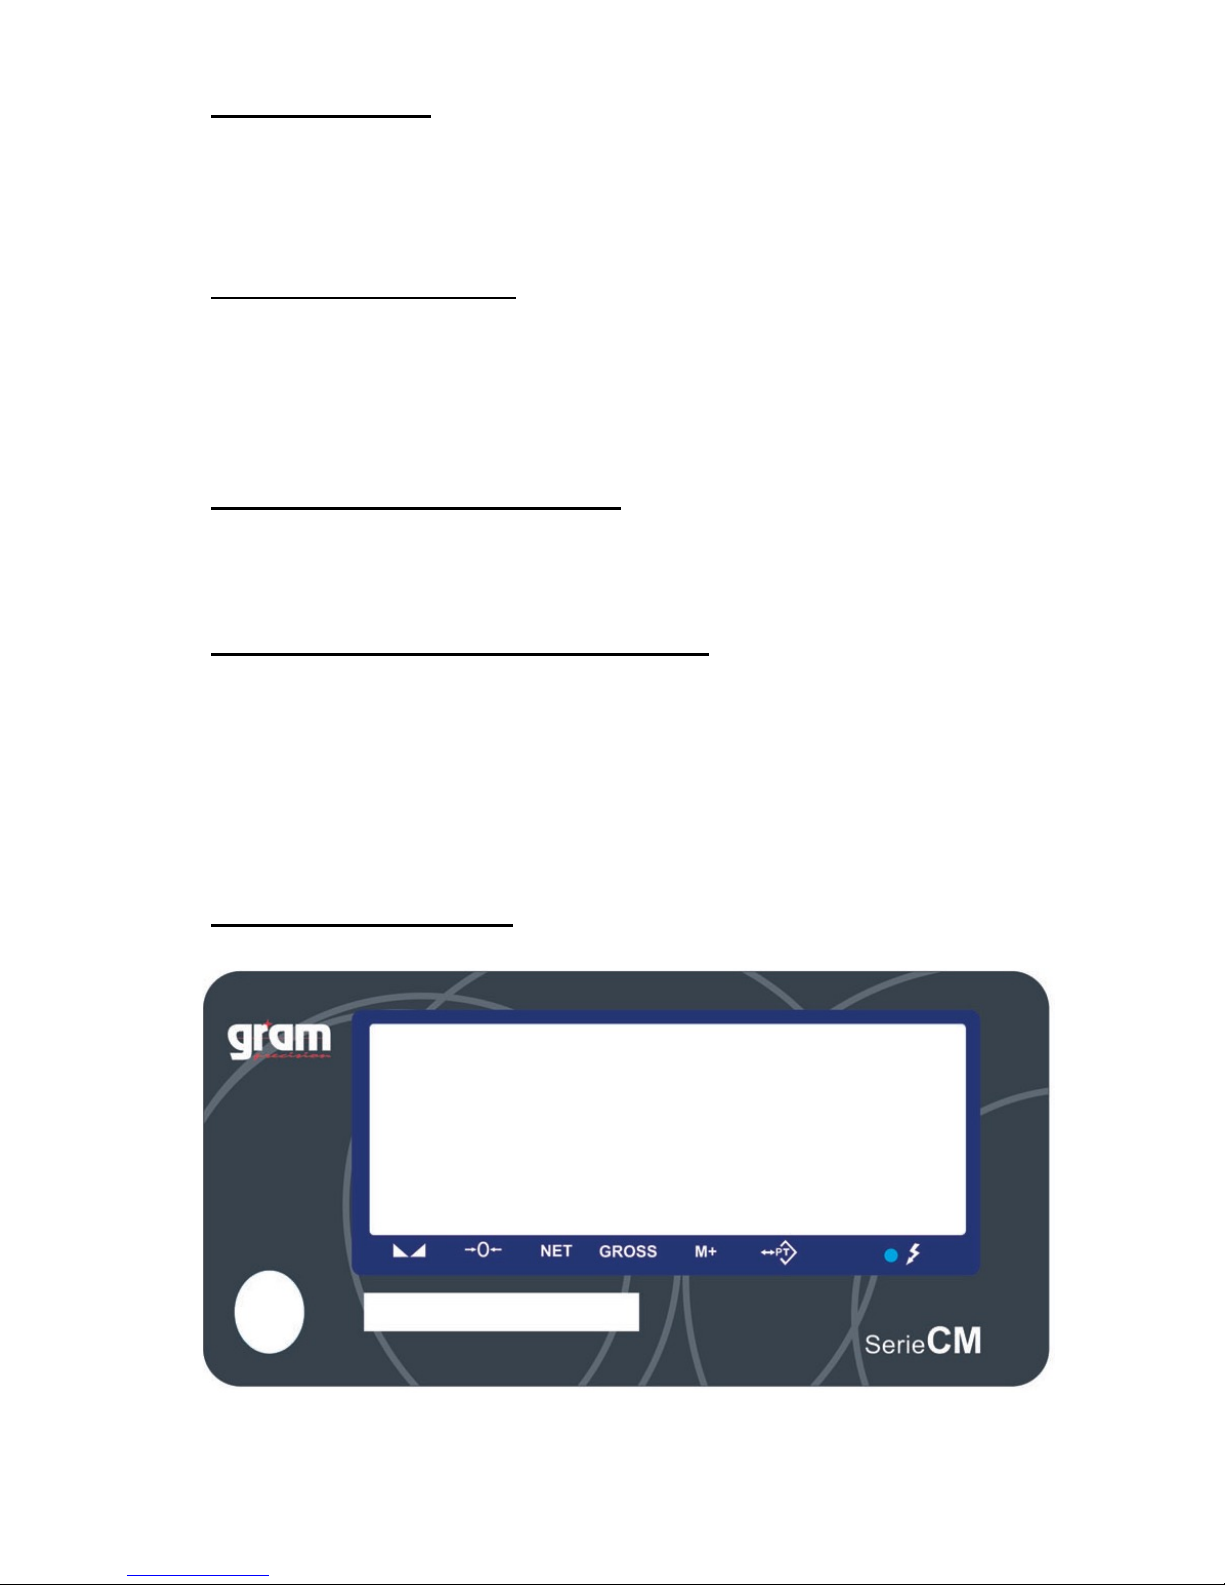
DISPLAY DESCRIPTION
Page 5
5
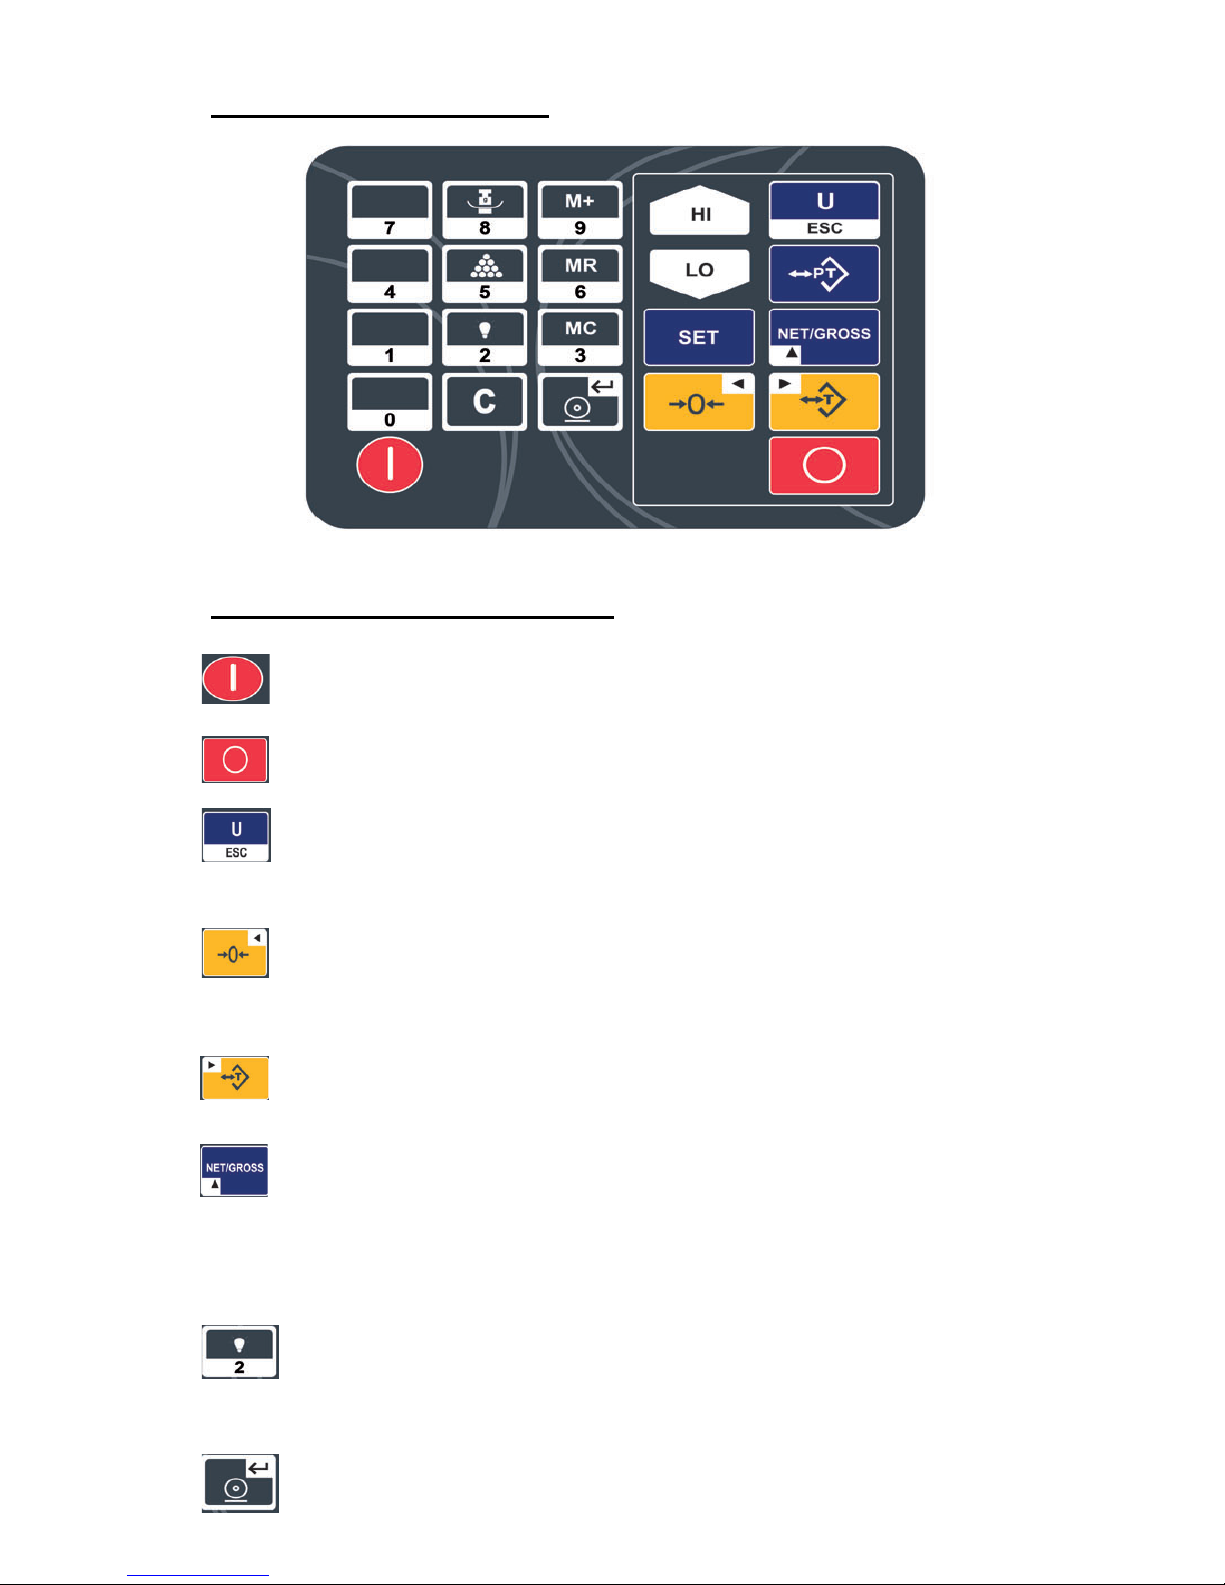
KEYBOARD DESCRIPTION
KEY FUNCTIONS DESCRIPTION
To turn off the scale, press and hold the OFF key and the display will show
“Off” for 2 seconds.
Press the key to turn on the scale.
Function 1. To select desired weighing unit.
Function 2. To escape (exit) setting in setup mode.
Function 1. To reset the weight to 0, but the displayed weight value has
to be less than ± 2% of maximum capacity.
Function 2. To move one space to the left or downward in setup mode
Function 1. To subtract the container weight.
Function 2. To move one space to the right or upward in setup mode.
Function 1. To see gross and net weight when the scale is on tare status.
All other keys will be disabled when gross weight is activated
Function 2. To increase values upward in setup mode.
Function 1. To select internal backlight mode of the display.
Function 2. Works as numeric number 2 in setup mode.
Function 1. Manual transmitting data through RS-232 to computer or
Page 6

6
printer at normal weighing mode (RS-232 must be set up keyboard
transmission 232 3 or 232 6).
Function 2. Works as enter key in setup mode.
To preset Tare value
To preset High Weight value
To preset Low Weight value
To program check weighing parameters
Function 1. To accumulate weights
Function 2. Works as numeric number 9 in setup mode
Function 1. To display total accumulation count and total accumulated
weight.
Function 2. Works as numeric number 6 in setup mode.
Function 1. To clear all accumulated weight data.
Function 3. Works as numeric number 3 in setup mode.
Function 1. To enter the samplefor piece counting
Function 2. Works as numeric number 8 in setup mode.
Function 1. To actívate counting mode
Function 2. Works as numeric number 5 in setup mode
To clear an entry.
Page 7
7
PRESET TARA VALUE
1. Press the key.
2. Use numeric keys from 0 to 9 to enter the required Tara value.
3. Press the key to confirm, the indicators Net and PT will appear.
4. The scale will return to normal weighing mode automatically.
Clear a preset Tare value.
1. Press the key.
2. Press the key to clear the previously entered value.
3. Press the key to continue.
4. The scale will return to normal weighing mode automatically.
PRESET THE HIGH WEIGHT VALUE
1. Press the key.
2. Use the numeric keys from 0 to 9 to set the required HI weight value.
3. Press the key to confirm.
4. The scale will return to normal weighing mode automatically.
PRESET THE LOW WEIGHT VALUE
1. Press the key.
2. Use the numeric keys from 0 to 9 to set the required LO weight value
3. Press the key to confirm.
4. The scale will return to normal weighing mode automatically.
Page 8
8
CHECK-WEIGHING FUNCTION CONFIGURATION
o 0 0 0
A B C
A: Acoustic signal.
Option 0=stability is not required
Option 1= stability is required
B: LCD indicator and Relay activated
Option 0=stability is not required
Option 1= stability is required
C: Acoustic signal conditions
Option 0=acoustic signal deactivated
Option 1=OK
Option 2= LO and HI
1. Press the key.
2. Use the numeric keys 0, 1 and 2 to select the required function (A, B, C)
3. Press the key to confirm.
4. The scale will return to normal weighing mode automatically.
WEIGHTS ACCUMULATION
1. Place the product onto the scale and press the key.
2. During 2 seconds the screen will display the number of weights carried out (1).
3. During 2 seconds the screen will display the total accumulated weight and the M+
symbol.
4. Place another product onto the scale and press the key.
5. During 2 seconds the screen will display the number of weights carried out (2).
6. During 2 seconds the screen will display the total accumulated weight and the M+
symbol.
7. Repeat the process as many times as it is necessary.
HOW TO DISPLAY TOTAL ACCUMULATED WEIGHT
1. Press the key.
2. During 2 seconds the screen will display the number of total weights carried out.
3. During 2 seconds the screen will display the total accumulated weight.
Page 9
9
HOW TO CLEAR WEIGHT ACCUMULATIONS
1. Press the key and all the weight accumulations which were carried out will
be erased.
HOW TO ENTER THE SAMPLE FOR PIECE COUNTING
1. Press the key.
2. Use the numeric keys from 0 to 9 to enter desired sample quantity.
3. Place the same amount of pieces as sample pieces entered.
4. Press the key.
5. The scale will be ready to count.
6. To exit counting mode, press the key.
• The screen will display the message U.--
when the sample unit weight is less
than 0.2 d
• The screen will display the message S. -- when the sample weight is less than
20 d.
• The screen will display the message U.--S.--
if the unit weight and sample
weigh are less than 0.2 and 20 d
PIECE COUNTING FUNCTION
1. Press the key to activate counting mode.
2. If the scale has no previous sample count saved, it will display U.—
for 2 seconds
and will activate counting functions. In this moment, please proceed to enter the
sample as it is described in the previous chapter.
STANDARD CALIBRATIONS
Press the and the key in weighing mode to start Standard
Calibrations.
ECF-1 Weight Calibration (Zero and Span)
ECF-2 Zero Calibration
ECF-3 Span Calibration
Page 10
10
Weight Calibration ECF-1
1. Press the key to start ECF-1 mode or the ESC key to exit menu and back
to weighing mode.
2. The display will show CALZ, press the key.
3. Use ◄, ►, ▲, 0 ~ 9 keys to enter the calibration weight value and then confirm with
the key.
4. Place the required weight mass onto the scale as indicated on display and press
the to calibrate the scale.
5. The scale will complete the calibration automatically and will return back to
weighing mode.
Zero Calibration ECF-2
1. Press the key to start Zero Calibration ECF-2 or the key to exit the
menu and return back to weighing mode.
2. The display will show CALZ, press the key.
3. The scale will complete the zero calibration automatically and will return back to
weighing mode.
Span Calibration ECF-3
1. Press the key to start Span Calibration ECF-3 or the key to exit the
menu and return back to weighing mode.
2. Use ◄, ►, ▲, 0 ~ 9 keys to enter the calibration weight value and then confirm with
the key.
4. Place the required weight mass onto the scale as indicated on display and press
the to calibrate the scale.
5. The scale will complete the calibration automatically and will return back to
weighing mode.
FUNCTIONS SETUP
In order to access functions setup, keep pressed the and without release it,
press the key.
UF-1 Internal value
1. Press the key to see the internal value.
2. To continue with other setups use the ► key.
3. To exit menu and return back to weighing mode, press the key.
Page 11
11
UF-2 Check weighing
1. Press the key to start check weighing setup.
2. The display will show the message “0000.0L”
3. Use ◄, ►, ▲, 0 ~ 9 keys to set LO weight value.
4. Press the key to confirm.
5. The display will show the message “0000.0H”
6. Use the ◄, ►, ▲, 0 ~ 9 keys to set HI weight value.
7. Press the key to confirm.
8. The display will show the message “O 000”
9. Use the ◄, ►, ▲, 0 ~ 9 keys to set I/O SET value.
10. Press the key to confirm.
11. To continue with other setups use the ► key.
12. To exit menu and return back to weighing mode, press the key.
UF-3 Auto Power-off
Modes:
- AoFF 00 – Auto Power-off disable
- AoFF 01 – The scale turns off automatically in 1 minute when the scale is not in
operation and weight at 0.
Auto power-off timer up to 99 minutes (AoFF01~AoFF99), the factory default is
AoFF10 (10 minutes)
1. Press the key to setup Auto Power-off.
2. Use ◄, ►, ▲, 0 ~ 9 keys to enter Auto Power-off time.
3. Press the key to confirm.
4. To continue with other setups use the ► key.
5. To exit menu and return back to weighing mode, press the key.
UF-4 Backlight
Modes:
- Lit Off: Backlight off
- Lit A: Auto light up
- Lit on: Backlight on
Factory default is: Lit A (automatical)
1. Press the key to access the backlight setup.
2. Use the ▲ key to select the desired mode.
3. Press the key to confirm.
4. To continue with other setups use the ► key.
Page 12
12
5. To exit menu and return back to weighing mode, press the key.
UF-5 Function HOLD (keep displaying the weight on the screen during several
seconds after having removed the weight from the scale)
Modes:
- HOLD 0 : HOLD Function off.
- HOLD 1 : Animal Hold function.
- PCtXXX: To set the range from 001~100 of the animal hold
- timEXX: To set 1 2 4 8 16 32 64 times within the hold range (for HOLD 1 only)
Factory default: HOLD 0
1. Press the to setup the HOLD function.
2. Use the ▲ key to select the desired mode.
3. Press the key to confirm.
4. To continue with other setups use the ► key.
5. To exit menu and return back to weighing mode, press the key.
UF-5 RS-232 Output
232 0 RS-232 disable
232 1 Stable Output – Format 1
232 2 Stream Output – Format 1
232 3 Manual Output – Format 1
232 4 Stable Output – Format 2
232 5 Stream Output – Format 2
232 6 Manual Output – Format 2
RS232 Baud rate:
b 1200 Baud rate 1200
b 2400 Baud rate 2400
b 4800 Baud rate 4800
b 9600 Baud rate 9600
b 19200 Baud rate 19200
b 38400 Baud rate 38400
Communication Protocol:
UART signal of EIA-RS232 C
Format:
1. Serial output: 1200/2400/4800/9600/19200/38400 BPS
2. Data Bits: 8 bits
3. Parity Bits: None
4. Stop Bits: 1 bit
Page 13

13
Start bit
D
ata bits Stop bits
FORMAT 1 (232 1~3)
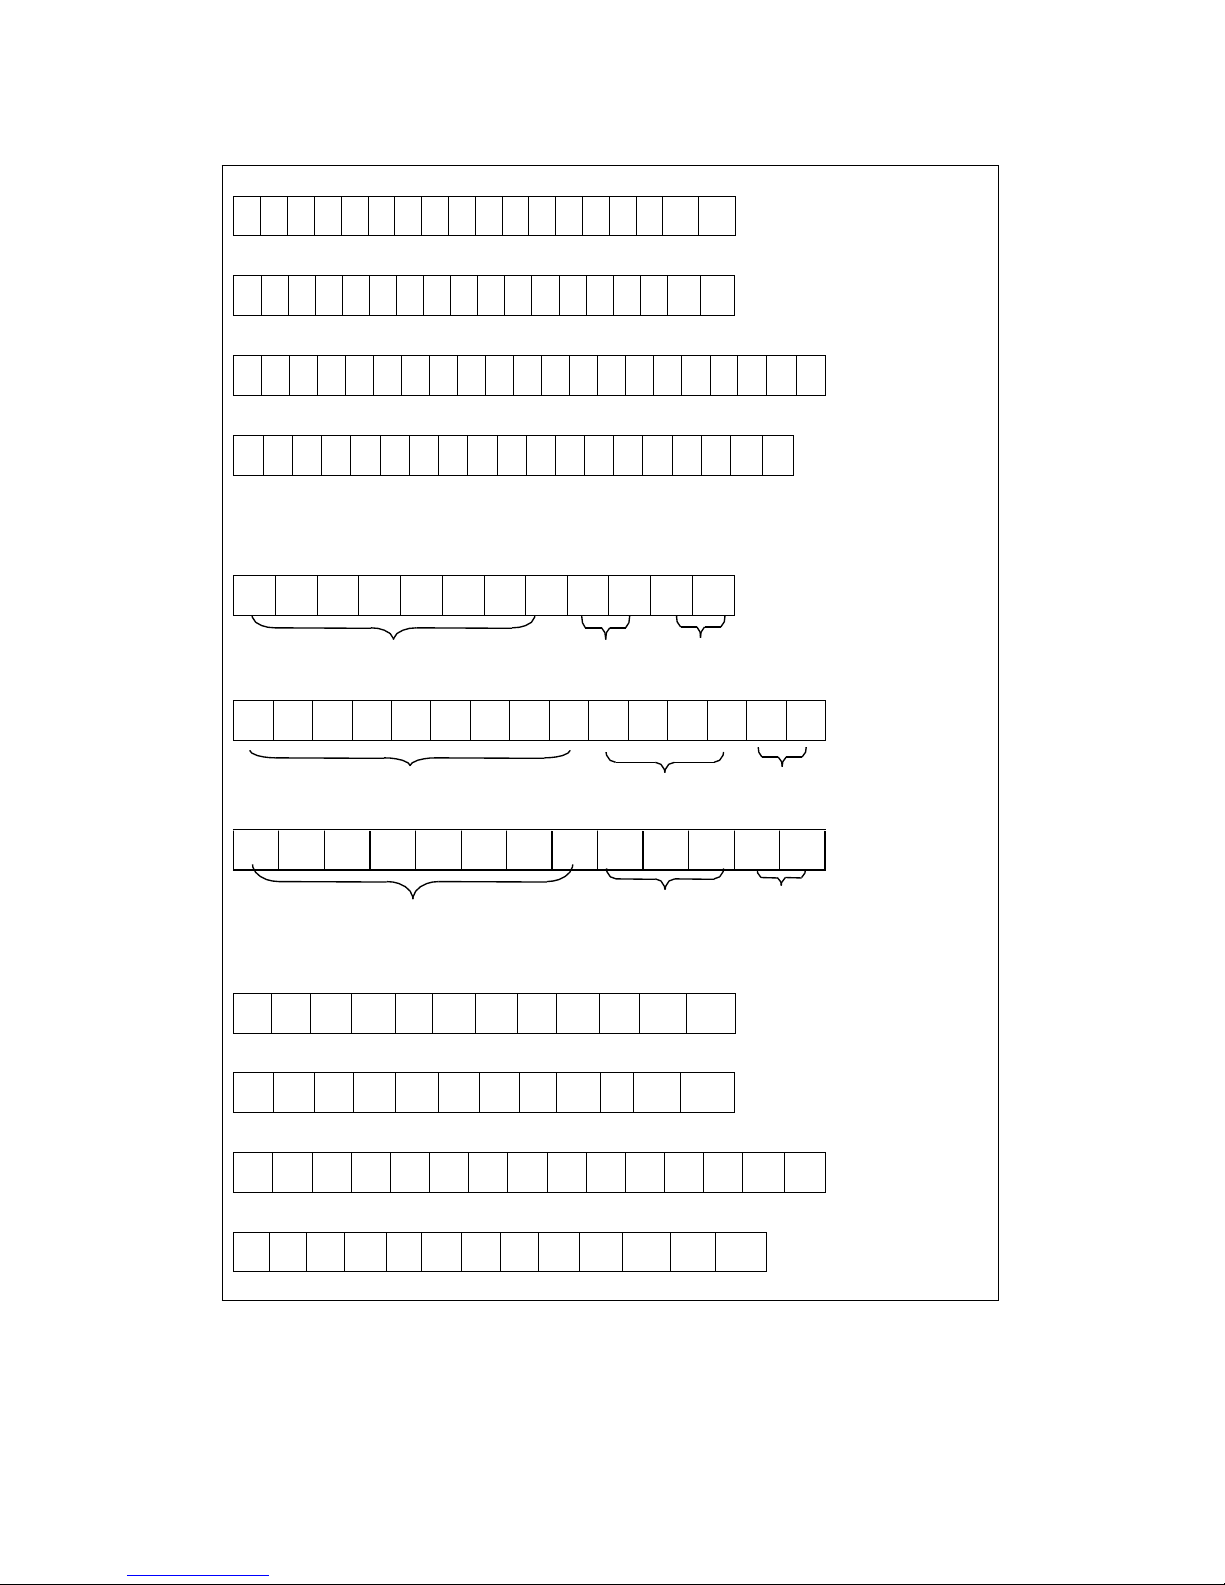
Head 1 (2 bytes)
Head 2 (2 bytes)
OL – Over Load
ST – Stable
NT – Net Weight
US - Unstable
GS – Gross Weight
Fixed 18 BYTES ASCII (kg g t lb)
1 2 1 1 2 1 1 2 3 4 5 6 7 8 1 2 1 2
HEAD1
,
H
E
AD2
,
DA
T
A UNIT CR LF
Fixed 21 BYTES ASCII (tl. T lboz)
1 2 1 1 2 1 1 2 3 4 5 6 7 8 9 1 2 3 4 1 2
HEAD1
,
H
E
AD2
,
DA
T
A UNIT
CR LF
Fixed 19 BYTES ASCII (pcs)
1 2 1 1 2 1 1 2 3 4 5 6 7 8 1 2 3 1
2
HEAD1
,
H
E
AD2
,
DA
T
A UNIT
CR LF
Page 14
Output examples:
Example 1. +
0.876 kg
Stable net weight:
S
T
,
N
T
,
+
0 0 0 .
8 7 6 k
g
0D 0A
Example 2
-
1.568 lb
unstable gross weight:
U
S
,
G
S
,
-
0 0 1 .
5 6 8 l
b
0D 0A
Example 3 -
20. 5.40 lb oz
unstable gross weight:
S
T
,
G
S
,
-
1 0
﹒
0 5
﹒
4 0
l
b
o
z
0 0
Example 4 +1000 pcs stable net weight :
S
T
,
N
T
,
+
0 0 0 1 0 0 0 p
c
s
0D 0A
Format
2 (232 4 ~ 6) :
12 BYTES
ASC
II
(kg g t lb)
1
2 3 4 5 6 7
8
1
2
1
2
Data Unit
CR LF
15 BYTES
ASC
II
(tl.T
lboz)
1 2 3 4 5 6 7 8 9 1 2 3 4 1
2
Datos Unit
CR LF
13 BYTES
ASC
II
(pcs)
1 2 3 4 5 6 7 8 1 2 3 1 2
Datos Unit
CR LF
Output examples:
Example1.
+0.876 kg
stable net weight:
+
0 0 0 .
8 7 6 k
g
0D 0A
Example 2.
-1.568 lb unstable gross weight:
-
0 0 1 .
5 6 8 l
b
0D 0A
Example 3.
-20. 5.40 lb oz
unstable gross weight:
-
1 0
﹒
0 5
﹒
4 0
l
b
o
z
0D 0A
Example 4.
+
1000 pcs :
stable net weight:
+
0 0 0 1 0 0 0 p
c
s
0D 0A
Page 15

15
UF-6 Transmission Format RS-232
1. Press the key.
2. Use the ▲ key to select the desired mode and press the key.
3. Use the ▲ key to select baud rate and the key to confirm.
4. To continue with other setups use the ► key.
5. To exit menu and return back to weighing mode, press the key.
UF-7 ADC Update Rate
SPEEd 1 Standard speed 15 hz
SPEEd 2 High Speed 30 hz
SPPEd 3 Low speed 7.5 hz
• This function is locked when the function HOLD is set as HOLD 1
Factory default: SPEEd 1
1. Press the key to start setting up.
2. Use the ▲ to select the desired ADC speed.
3. To continue with other setups use the ► key.
4. To exit menu and return back to weighing mode, press the key.
UF-8 Zero Weight Display Condition
ZP 0 Function Off
ZP 1 1 division not to display at zero
ZP 2 2 divisions not to display at zero
ZP 3 3 divisions not to display at zero
ZP 4 4 divisions not to display at zero
ZP 5 5 divisions not to display at zero
• This function is locked when the function HOLD is set as HOLD 1
Factory default: ZP 0
Page 16
16
1. Press the key to access the setting up.
2. Use the ▲ key to select the desired mode.
3. Press the key to confirm.
4. To continue with other setups use the ► key.
5. To exit menu and return back to weighing mode, press the key.
UF-9 Standard Gravitational Pre-calibration (G Value)
Even the scale allows doing the Standard Calibration, Gravitational Calibration can
help to provide higher accuracy to the scale. This pre-calibration is allowed when the
switch CAL is at ADJ position. Gravitational value will be saved at -00- and will be
replaced each time a new value has been entered.
Sender G value: set it before Weight Calibration
Recipient G value: set if after Weight Calibration
The G value will be denied when the value is greater than 9.83217 (Polar G value) or
less than 9.78031 (Equator G value)
Factory Default: 9.79423
1. Press the key to setup.
2. Le display will show the last value for 1 second.
3. Use ◄, ► keys to see previous entered values. The display will stay at 00 if no
value has been entered.
4. The display will show the last value for 1 second.
5. Use ◄, ► keys to see previous entered values. The display will stay at 00 if no
value has been entered.
6. Press the key.
7. Use ◄, ►, ▲, 0 ~ 9 keys to enter the desired value.
8. Press the key.
9. Press the ► key to continue with other setups or the key to exit and return
back to normal weighing mode.
Page 17

17
GUARANTEE
This scale is guaranteed for one year from the delivery date. Te guarantee covers any
fabrication defect of the material.
During this period GRAM PRECISION, covers the manpower and the spare parts for
the reparation of the scale.
This guarantee does not cover the failures caused by an inappropriate use or
overcharge.
The guarantee does not cover the freight cost (transport) necessary to repair the
scale.
Page 18

18
INDICE
Alimentación, consumo y batería recargable
19
Visualización de la versión de la balanza
19
Descripción del display
20
Descripción del teclado
20
Función de la teclas
20
Predeterminar el valor de una Tara
22
Predeterminar el valor del límite superior
22
Predeterminar el valor del límite inferior
22
Configuración de la función límites de peso
23
Acumulación de pesadas
23
Introducción de la muestra para función cuentapiezas
24
Función cuentapiezas
24
Calibración
24
Configuración de funciones
25
- Valor interno
25
- Límites de peso
26
- Autodesconexión
26
- Iluminación del display
26
- Función HOLD
27
- Salida RS-232
27
- Configuración del cero
30
Pre-Calibración de la Gravedad
31
Garantía
32
Declaración de Conformidad CE
47
Page 19
19
ALIMENTACION
Entrada: 100~240V 50/60hz
Salida: 12V/1A DC 12W
Batería recargable: 6V/4AH
CONSUMO
Aprox. 12mA
Aprox. 36mA con la iluminación interna del display
Aprox. 48mA con la iluminación interna del display y el interface RS-232 (opcional)
DURACION DE LA BATERIA
Aprox. 320
horas
, con la iluminación del display desactivada
VISUALIZACION DEL NUMERO DE VERSION DE LA BALANZA
5. Conectar la balanza.
6. Pulsar y mantener la tecla ZERO hasta que la cuenta-atrás inicial finalice.
7. El display mostrará el mensaje “1001”. Este número es el número de versión
de la balanza.
8. Liberar la tecla y la balanza inicializará la configuración de funciones.
DESCRIPCION DEL DISPLAY
Page 20

20
DESCRIPCION DEL TECLADO
FUNCION DE LAS TECLAS
Para apagar la balanza, mantener pulsada la tecla OFF hasta que el
display visualice “Off” durante 2 segundos.
Pulsar esta tecla para conectar la balanza.
Función 1. Para seleccionar la unidad de pesada deseada.
Función 2. Para salir del modo programación.
Función 1. Para poner a cero la lectura del display, siempre y cuando el
valor del peso sea menor al ± 2% de la capacidad máxima.
Función 2. Para desplazarse hacía la izquierda ó hacía abajo dentro del
modo de programación.
Función 1. Para sustraer el peso de un recipiente u objeto.
Función 2. Para desplazarse hacía la derecha ó hacía arriba dentro del
modo de programación.
Función 1. Para visualizar el peso bruto ó neto tras efectuar una Tara.
Cuando el display muestra el peso bruto, las demás teclas
quedan inactivas.
Función 2. Para incrementar los valores introducidos en el modo
programación.
Función 1. Para seleccionar el modo de iluminación interna del display.
Función 2. Actúa cómo el número 2 dentro del modo de programación.
Page 21

21
Función 1. Impresión manual de datos a través del RS-232 a un PC ó
impresora, en este caso, el RS-232 debe ser configurado
con transimisión 232 3 ó 232 6.
Función 2. Actúa como tecla de confirmación en el modo programación.
Para predeterminar el valor de una Tara
Para predeterminar el valor del límite superior
Para predeterminar el valor del límite inferior
Para configurar los parámetros de la función de límites de peso
Función 1. Para realizar acumulación de pesadas
Función 2. Actúa cómo el número 9 dentro del modo de programación.
Función 1. Para visualizar la acumulación total de pesadas.
Función 2. Actúa cómo el número 6 dentro del modo de programación.
Función 1. Para borrar todas las acumulaciones de pesadas efectuadas.
Función 3. Actúa cómo el número 3 dentro del modo de programación.
Función 1. Para introducir el valor de la muestra en función cuentapiezas
Función 2. Actúa cómo el número 8 dentro del modo de programación.
Función 1. Para acceder a la función cuentapiezas
Función 2. Actúa cómo el número 2 dentro del modo de programación.
Para borrar un valor introducido.
Page 22

22
PREDETERMINAR UN VALOR DE TARA
1. Pulsar la tecla
2. Utilizar las teclas numéricas del 0 al 9 para introducir el valor de la tara deseado.
3. Pulsar la tecla para confirmar, los indicadores Net y PT se activarán
4. La balanza volverá automáticamente al modo normal de pesaje.
Borrar un valor predeterminado de Tara.
1. Pulsar la tecla
2. Pulsar la tecla para borrar el valor introducido previamente.
3. Pulsar la tecla para confirmar.
4. La balanza volverá automáticamente al modo normal de pesaje.
PREDETERMINAR EL VALOR DEL LIMITE SUPERIOR
1. Pulsar la tecla
2. Utilizar las teclas numéricas del 0 al 9 para introducir el valor de la tara deseado.
3. Pulsar la tecla para confirmar.
4. La balanza volverá automáticamente al modo normal de pesaje.
PREDETERMINAR EL VALOR DEL LIMITE INFERIOR
1. Pulsar la tecla
2. Utilizar las teclas numéricas del 0 al 9 para introducir el valor de la tara deseado.
3. Pulsar la tecla para confirmar.
4. La balanza volverá automáticamente al modo normal de pesaje.
Page 23

23
CONFIGURACION DE LA FUNCION DE LIMITES DE PESO
o 0 0 0
A B C
A: Señal acústica.
Opción 0=estabilidad no requerida
Opción 1=estabilidad requerida
B: Indicador LCD y relés activado
Opción 0=estabilidad no requerida
Opción 1=estabilidad requerida
C: Condiciones de la señal acústica
Opción 0=señal acústica desactivada
Opción 1=OK
Opción 2= LO y HI
1. Pulsar la tecla
2. Utilizar las teclas numéricas 0, 1 y 2 para seleccionar la función deseada (A, B, C)
3. Pulsar la tecla para confirmar
4. La balanza volverá automáticamente al modo normal de pesaje.
ACUMULACION DE PESADAS
1. Colocar el producto sobre el plato y pulsar la tecla
2. El display mostrará durante 2 segundos el número de pesadas efectuadas (1)
3. El display mostrará durante 2 segundos el peso total acumulado y el símbolo M+
4. Colocar otro producto sobre el plato y pulsar la tecla
5. El display mostrará durante 2 segundos el número de pesadas efectuadas (2)
6. El display mostrará durante 2 segundos el peso total acumulado y el símbolo M+
7. Repetir este proceso tantas veces como sea necesario.
COMO VISUALIZAR EL TOTAL ACUMULADO
1. Pulsar la tecla
2. El display mostrará durante 2 segundos el número total de pesadas efectuadas.
3. El display mostrará durante 2 segundos el peso total acumulado.
Page 24

24
COMO BORRAR LAS ACUMULACIONES DE PESADA
1. Pulsar la tecla y todas las acumulaciones de pesada efectuadas se
borrarán.
INTRODUCCION DE LA MUESTRA PARA CUENTAPIEZAS
1. Pulsar la tecla
2. Utilizar las teclas numéricas del 0 al 9 para introducir el valor de la muestra.
3. Colocar sobre el plato el número de piezas que corresponda al valor introducido.
4. Pulsar la tecla
5. La balanza estará lista para efectuar el contaje.
6. Para salir de la función de cuentapiezas, pulsar la tecla
• El display mostrará el mensaje U.--
cuando el peso unitario de la muestra es
inferior a 0.2d
• El display mostrará el mensaje S. -- cuando el peso de la muestra está por
debajo de 20d
• El display mostrará el mensaje U.--S.--
si el peso unitario y el peso de la
muestra es inferior a 0.2 y 20 d
FUNCION CUENTAPIEZAS
1. Pulsar la tecla para acceder a la función cuentapiezas
2. Si no se ha introducido una muestra previamente, el display mostrará U.—
durante 2 segundos y se activará automáticamente la función cuentapiezas. En este
momento, proceder a la introducción de la muestra tal y como se describe en el
apartado anterior.
CALIBRACIÓN STANDARD
Pulsar las teclas y para acceder a la función de calibración standards.
ECF-1 Calibración de peso (Cero y span)
ECF-2 Calibración del cero
ECF-3 Calibración de span
Page 25

25
Calibración de peso ECF-1
1. Pulsar la tecla para acceder al modo ECF-1 ó la tecla ESC para salir del
menú y volver al modo normal de pesaje.
2. El display mostrará CALZ, pulsar la tecla
3. Con las teclas ◄, ►, ▲, 0 ~ 9 introducir el valor de la pesa de calibración y
confirmar con la tecla
4. Colocar la pesa sobre el plato y pulsar la tecla
5. La balanza efectuará la calibración automáticamente y volverá al modo normal de
pesaje.
Calibración del cero ECF-2
1. Pulsar la tecla para acceder al modo ECF-2 ó la tecla para salir del
menú y volver al modo normal de pesaje.
2. El display mostrará CALZ, pulsar la tecla
3. La balanza efectuará la calibración del cero automáticamente y volverá al modo
normal de pesaje.
Calibración del span ECF-3
1. Pulsar la tecla para acceder al modo ECF-3 ó la tecla para salir del
menú y volver al modo normal de pesaje.
2. Con las teclas ◄, ►, ▲, 0 ~ 9 introducir el valor de la pesa de calibración y
confirmar con la tecla
4. Colocar la pesa sobre el plato y pulsar la tecla
5. La balanza efectuará la calibración automáticamente y volverá al modo normal de
pesaje.
CONFIGURACION DE FUNCIONES
Para acceder a la configuración de funciones, pulsar la tecla y sin soltarla
pulsar la tecla
UF-1 Valor interno
1. Pulsar la tecla para visualizar el valor interno.
2. Para pasar al siguiente parámetro pulsar la tecla ►
3. Para salir y volver al modo de pesaje, pulsar la tecla
Page 26

26
UF-2 Límites de peso
1. Pulsar la tecla para acceder a la configuración de límites de peso.
2. El display mostrará el mensaje “0000.0L”
3. Con las teclas ◄, ►, ▲, 0 ~ 9 introducir el valor del límite inferior.
4. Pulsar la tecla para confirmar.
5. El display mostrará el mensaje “0000.0H”
6. Con las teclas ◄, ►, ▲, 0 ~ 9 introducir el valor del límite superior.
7. Pulsar la tecla para confirmar.
8. El display mostrará el mensaje “O 000”
9. Con las teclas ◄, ►, ▲, 0 ~ 9 introducir el valor de las condiciones del programa.
10. Pulsar la tecla para confirmar.
11. Para pasar al siguiente parámetro pulsar la tecla ►
12. Para salir y volver al modo de pesaje, pulsar la tecla
UF-3 Autodesconexión
Modos:
- AoFF 00 – Autodesconexión desactivada
- AoFF 01 – La balanza se autodesconectará transcurrido 1 minuto sin utilizarla
La autodesconexión se puede programar hasta 99 minutos AoFF01~AoFF99, el valor
por defecto es AoFF10 (10 minutos)
1. Pulsar la tecla para acceder a la programación de la autodesconexión.
2. Con las teclas ◄, ►, ▲, 0 ~ 9 introducir el valor deseado.
3. Pulsar la tecla para confirmar.
4. Para pasar al siguiente parámetro pulsar la tecla ►
5. Para salir y volver al modo de pesaje, pulsar la tecla
UF-4 Iluminación del display
Modos:
- Lit Off: Iluminación desactivada
- Lit A: Iluminación automática
- Lit on: Iluminación siempre activada
El valor por defecto es: Lit A (automática)
1. Pulsar la tecla para acceder a la programación de la iluminación del
display.
2. Utilizar la tecla ▲ para seleccionar el modo deseado.
3. Pulsar la tecla para confirmar.
4. Para pasar al siguiente parámetro pulsar la tecla ►
Page 27

27
5. Para salir y volver al modo de pesaje, pulsar la tecla
UF-5 Función HOLD (mantiene el peso visualizado en el display durante unos
segundos tras haber retirado el peso del plato)
Modos:
- HOLD 0 : Función HOLD desactivada.
- HOLD 1 : Modo pesaje de animales.
- PCtXXX: Para configurar el rango de 001~100 dentro del modo HOLD 1
- timEXX: Para configurar el tiempo en 1 2 4 8 16 32 64 dentro del modo HOLD
1
Valor por defecto: HOLD 0
1. Pulsar la tecla para acceder a la programación de la función HOLD
2. Utilizar la tecla ▲ para seleccionar el modo deseado.
3. Pulsar la tecla para confirmar
4. Para pasar al siguiente parámetro pulsar la tecla ►
5. Para salir y volver al modo de pesaje, pulsar la tecla
UF-5 Salida RS-232
232 0 RS-232 desactivado
232 1 Transmisión estable – Formato 1
232 2 Transmisión normal – Formato 1
232 3 Transmisión manual – Formato 1
232 4 Transmisión estable – Formato 2
232 5 Transmisión normal – Formato 2
232 6 Transmisión manual – Formato 2
Velocidad de transmisión seleccionable:
b 1200 Velocidad 1200
b 2400 Velocidad 2400
b 4800 Velocidad 4800
b 9600 Velocidad 9600
b 19200 Velocidad 19200
b 38400 Velocidad 38400
Protocolo de comunicación:
Señal UART de EIA-RS232 C
Formato:
1. Transmisión de serie: 1200/2400/4800/9600/19200/38400 BPS
2. Bits: 8 bits
3. Bits de paridad: Ninguno
4. Bits de parada: 1 bit
Page 28

28
Bit de comienzo
D
a
tos de los bi
ts Parada bits
FORMATO 1 (232 1~3)
Cabezera 1 (2 bytes)
Cabezera 2 (2 bytes)
OL – Sobrecarga
ST – Estable
NT – Peso neto
US - Inestable
GS – Peso bruto
18 BYTES ASCII (kg g t lb)
1 2 1 1 2 1 1 2 3 4 5 6 7 8 1 2 1 2
HEAD1
,
H
E
AD2
,
DA
T
A UNIT CR LF
21 BYTES ASCII (tl. T lboz)
1 2 1 1 2 1 1 2 3 4 5 6 7 8 9 1 2 3 4 1 2
HEAD1
,
H
E
AD2
,
DA
T
A UNIT
CR LF
19 BYTES ASCII (pcs)
1 2 1 1 2 1 1 2 3 4 5 6 7 8 1 2 3 1
2
HEAD1
,
H
E
AD2
,
DA
T
A UNIT
CR LF
Page 29

Ejemplos de transmisiones:
Ejemplo 1. +
0.876 kg
Estable y Peso Neto:
S
T
,
N
T
,
+
0 0 0 .
8 7 6 k
g
0D 0A
Ejemplo 2
-
1.568 lb
instable y Peso Bruto:
U
S
,
G
S
,
-
0 0 1 .
5 6 8 l
b
0D 0A
Ejemplo 3 -
20. 5.40 lb oz
instable y Peso Bruto:
S
T
,
G
S
,
-
1 0
﹒
0 5
﹒
4 0
l
b
o
z
0 0
Ejemplo 4 +1000 pcs estable y Peso Neto :
S
T
,
N
T
,
+
0 0 0 1 0 0 0 p
c
s
0D 0A
Formato
2 (232 4 ~ 6) :
12 BYTES
ASC
II
(kg g t lb)
1
2 3 4 5 6 7
8
1
2
1
2
Datos Unid
CR LF
15 BYTES
ASC
II
(tl.T
lboz)
1 2 3 4 5 6 7 8 9 1 2 3 4 1
2
Datos Unid
CR LF
13 BYTES
ASC
II
(pcs)
1 2 3 4 5 6 7 8 1 2 3 1 2
Datos Unid
CR LF
Ejemplos de transmisiones:
Ejemplo1.
+0.876 kg
peso neto estable:
+
0 0 0 .
8 7 6 k
g
0D 0A
Ejemplo 2.
-1.568 lb peso bruto inestable:
-
0 0 1 .
5 6 8 l
b
0D 0A
Ejemplo 3.
-20. 5.40 lb oz
peso bruto inestable:
-
1 0
﹒
0 5
﹒
4 0
l
b
o
z
0D 0A
Ejemplo 4.
+
1000 pcs peso neto estable :
+
0 0 0 1 0 0 0 p
c
s
0D 0A
Page 30

30
UF-6 Formato de transmisión RS-232
1. Pulsar la tecla
2. Utilizar la tecla ▲ para seleccionar el modo deseado y pulsar la tecla
3. Utilizar la tecla ▲ para seleccionar la velocidad de transmisión y la tecla
para confirmar.
4. Pulsar la tecla ► para pasar al siguiente parámetro.
5. Para salir y volver al modo normal de pesaje pulsar la tecla
UF-7 ADC actualización de la frecuencia
SPEEd 1 Velocidad Standard 15 hz
SPEEd 2 Velocidad alta 30 hz
SPPEd 3 Velocidad baja 7.5 hz
• Esta función está bloqueada si se ha configurado la función HOLD como
HOLD 1
Valor por defecto: SPEEd 1
1. Pulsar la tecla para acceder a la programación.
2. Utilizar la tecla ▲ para seleccionar la velocidad ADC deseada.
3. Pulsar la tecla ► para pasar al siguiente parámetro.
4. Para salir y volver al modo normal de pesaje pulsar la tecla
UF-8 Configuración del cero
ZP 0 Función desactivada
ZP 1 1 división no se muestra
ZP 2 2 divisiones no se muestran
ZP 3 3 divisiones no se muestran
ZP 4 4 divisiones no se muestran
ZP 5 5 divisiones no se muestran
• Esta función está bloqueada si se ha configurado la función HOLD como
HOLD 1
Valor por defecto: ZP 0
Page 31

31
1. Pulsar la tecla para acceder a la programación.
2. Utilizar la tecla ▲ para seleccionar el modo deseado
3. Pulsar la tecla para confirmar
4. Para pasar al siguiente parámetro pulsar la tecla ►
5. Para salir y volver al modo normal de pesaje pulsar la tecla
UF-9 Pre-calibración Gravitacional (Valor G)
Aunque la balanza permite efectuar al Calibración Standard, la Pre-calibración
Gravitacional ayuda a proporcionar mayor exactitud a la balanza. Esta pre-calibración
se efectúa siempre con el interruptor CAL en posición ADJ. El valor se configurará a 00- y será reemplazado cada vez que se introduzca un valor nuevo.
Valor de la gravedad del Distribuidor: configurado antes de la calibración del peso
Valor de la gravedad del Usuario: configurado después de la calibración del peso
El valor de la gravedad será denegado cuando sea mayor a 9.83217 (Gravedad
Polar) ó menor a 9.78031 (Gravedad Ecuador)
Valor por defecto: 9.79423
1. Pulsar la tecla para acceder a la programación.
2. El display visualizará el último valor durante 1 segundo.
3. Con las teclas ◄, ► se podrán visualizar los valores introducidos previamente. El
display quedará a 00 si no se introduce ningún valor.
4. El display visualizará el último valor durante 1 segundo.
5. Con las teclas ◄, ► se podrán visualizar los valores introducidos previamente. El
display quedará a 00 si no se introduce ningún valor.
6. Pulsar la tecla
7. Con las teclas ◄, ►, ▲, 0 ~ 9 introducir el valor deseado.
8. Pulsar la tecla
9. Pulsar la tecla ► para pasar al siguiente parámetro ó la tecla para salir y
volver al modo normal de pesaje.
Page 32

32
GARANTIA
Esta balanza está garantizada contra todo defecto de fabricación y de material, por un
periodo de 1 año a partir de la fecha de entrega.
Durante este periodo, GRAM PRECISION, se hará cargo de la reparación de la
balanza.
Esta garantía no incluye los daños ocasionados por uso indebido o sobrecargas.
La garantía no cubre los gastos de envío (portes) necesarios para la reparación
de la balanza.
Page 33

33
SOMMAIRE
Alimentation, consommation et batterie rechargeable
34
Version de la balance
34
Description du display
34
Description du clavier
35
Fonctions des touches
37
Prédéfinir la valeur d’une Tare
37
Prédéfinir la valeur de la limite supérieure
37
Prédéfinir la valeur de la limite inférieure
38
Configuration de la fonction limites de poids
38
Accumulation de pesées
39
Introduction de l’échantillon pour fonction compte-pièces
39
Fonction compte-pièces
39
Calibration
40
Configuration de fonctions
40
- Valeur interne
41
- Limites de poids
41
- Auto-déconnexion
41
- Éclairage du display
42
- Fonction HOLD
42
- Sortie RS-232
45
- Configuration du zéro
46
Pré-Calibration de la gravité
46
Garantie
46
Déclaration de Conformité CE
47
Page 34

34
ALIMENTATION
Entrée: 100~240V 50/60hz
Sortie: 12V/1A DC 12W
Batterie rechargeable: 6V/4AH
CONSOMMATION
Approx. 12mA
Approx. 36mA avec l’éclairage interne du display
Approx. 48mA avec l’éclairage interne du display et l’interface RS-232 (optionnel)
DURÉE DE LA BATTERIE
Approx. 320
heures
, avec l’éclairage du display désactivé
AFFICHAGE DU NUMÉRO DE VERSION DE LA BALANCE
1. Connecter la balance.
2. Appuyer et mantenir la touche ZÉRO jusqu’à ce que le décomptage initial se
termine.
3. L’écran affichera le message “1001”. Ce numéro est le numéro de version de
la balance.
4. Libérer la touche et la balance commencera la configuration de fonctions.
DESCRIPTION DU DISPLAY
Page 35

35
DESCRIPTION DU CLAVIER
FONCTIONS DES TOUCHES
Pour éteindre la balance, mantenir appuyée la touche OFF jusqu’à ce que
le display affiche “Off” pendant 2 secondes.
Appuyer sur cette touche pour connecter la balance.
Fonction 1. Pour sélectionner l’unité de pesée désirée.
Fonction 2. Pour sortir du mode programmation.
Fonction 1. Pour remettre à zéro la lecture du display, pourvu que la valeur
du poids soit inférieure à ± 2% de la capacité maximale.
Fonction 2. Pour se déplacer vers la gauche ou vers le bas dans le mode
de programmation.
Fonction 1. Pour enlever le poids d’un récipient ou d’un objet.
Fonction 2. Pour se déplacer vers la droite ou vers le haut dans le mode
de programmation.
Fonction 1. Pour visualiser le poids brut ou net après avoir effectué une
Tare. Quand l’écran affiche le poids brut, les autres touches restent
inactives.
Fonction 2. Pour augmenter les valeurs introduites dans le mode de
programmation.
Fonction 1. Pour sélectionner le mode d’éclairage interne de l’écran.
Fonction 2. Fontionne comme le numéro 2 dans le mode de
programmation.
Page 36

36
Fonction 1. Impression manuelle de données grâce à la sortie RS-232, à
ou une imprimante, dans ce cas, le RS-232 doit être configuré avec
transmission 232 3 ou 232 6.
Fonction 2. Fonctionne comme touche de confirmation dans le mode
programmation.
Pour prédéfinir la valeur d‘une Tare
Pour prédéfinir la valeur de la limite supérieure
Pour prédéfinir la valeur de la limite inférieure
Pour configurer les paramètres de la fonction de limites de poids
Fonction 1. Pour réaliser accumulation de pesées
Fonction 2. Fonctionne comme le numéro 9 dans le mode de
programmation.
Fonction 1. Pour visualiser l’accumulation totale de pesées.
Fonction 2. Fonctionne comme le numéro 6 dans le mode de
programmation.
Fonction 1. Pour supprimer toutes les accumulations de pesées
effectuées.
Fonction 3. Fonctionne comme le numéro 3 dans le mode de
programmation.
Fonction 1. Pour introduire la valeur de l’échantillon dans la fonction
compte-pièces
Fonction 2. Fonctionne comme le numéro 8 dans le mode de
programmation.
Fonction 1. Pour accèder à la fonction compte-pièces
Fonction 2. Fonctionne comme le numéro 5 dans le mode de
programmation.
Pour supprimer une valeur introduite.
Page 37

37
PRÉDÉFINIR UNE VALEUR DE TARE
1. Appuyer sur la touche
2. Utiliser les touches numériques de 0 à 9 pour introduire la valeur de la tare
souhaitée.
3. Appuyer sur la touche pour confirmer, les indicateurs Net et PT
s’activeront.
4. La balance reviendra automatiquement au mode normal de pesage.
Supprimer une valeur prédéfinie de Tare.
1. Appuyer sur la touche
2. Appuyer sur la touche pour supprimer la valeur introduite précédemment
3. Appuyer sur la touche pour confirmer.
4. La balance reviendra automatiquement au mode normal de pesage.
PRÉDÉFINIR LA VALEUR DE LA LIMITE SUPÉRIEURE
1. Appuyer sur la touche
2. Utiliser les touches numériques de 0 à 9 pour introduire la valeur de la tare
souhaitée.
3. Appuyer sur la touche pour confirmer.
4. La balance reviendra automatiquement au mode normal de pesage.
PRÉDÉFINIR LA VALEUR DE LA LIMITE INFÉRIEURE
1. Appuyer sur la touche
2. Utiliser les touches numériques de 0 à 9 pour introduire la valeur de la tare
souhaitée.
3. Appuyer sur la touche pour confirmer.
4. La balance reviendra automatiquement au mode normal de pesage.
Page 38

38
CONFIGURATION DE LA FONCTION DE LIMITES DE POIDS
o 0 0 0
A B C
A: Signal accoustique.
Option 0=stabilité non-nécessaire
Option 1=stabilité nécessaire
B: Indicateur LCD et relais activés
Option 0= stabilité non-nécessaire
Option 1= stabilité nécessaire
C: Conditions du signal acustique
Option 0=signal acustique désactivé
Option 1=OK
Option 2= LO et HI
1. Appuyer sur la touche
2. Utiliser les touches numériques 0, 1 et 2 pour sélectionner la fonction souhaitée (A,
B, C)
3. Appuyer sur la touche pour confirmer
4. La balance reviendra automatiquement au mode normal de pesage.
ACCUMULATION DE PESÉES
1. Mettre le produit sur le plateau et appuyer sur la touche
2. L’écran affichera pendant 2 secondes le numéro de pesées effectuées (1)
3. L’écran affichera pendant 2 secondes le poids total accumulé et le symbole M+
4. Mettre un autre produit sur le plateau et appuyer sur la touche
5. L’écran affichera pendant 2 secondes le numéro de pesées effectuées (2)
6. L’écran affichera pendant 2 secondes le poids total accumulé et le symbole M+
7. Répéter ce procès le nombre de fois nécessaire.
Page 39

39
COMMENT VISUALISER LE TOTAL ACCUMULÉ
1. Appuyer sur la touche
2. L’écran affichera pendant 2 secondes le numéro de pesées effectuées.
3. L’écran affichera pendant 2 secondes le poids total accumulé.
COMMENT SUPPRIMER LES ACCUMULATIONS DE PESÉE
1. Appuyer sur la touche et toutes les accumulations de pesées effectuées
seront supprimées.
INTRODUCTION DE L’ÉCHANTILLON POUR COMPTE-PIÈCES
1. Appuyer sur la touche
2. Utiliser les touches numériques de 0 à 9 pour introduire la valeur de l’échantillon.
3. Mettre sur le plateau le nombre de pièces qui correspond à la valeur introduite.
4. Appuyer sur la touche
5. La balance sera prête pour effectuer le comptage.
6. Pour sortir de la fonction de compte-pièces, appuyer sur la touche
• L’écran affichera le message U.--
quand le poids unitaire de l’échantillon est
inférieur à 0.2d
• L’écran affichera le message S. – quand le poids de l’échantillon est inférieur à
20d
• L’écran affichera le message U.--S.--
si le poids unitaiare et le poids de
l’échantillon est inférieur à 0.2 et 20 d
FONCTION COMPTE-PIÈCES
1. Appuyer sur la touche pour accéder à la fonction compte-pièces
2. Si l’échantillon n’était pas introduit précédement, l’écran affichera U.—
pendant 2
secondes et la fonction compte-pièces s’activera automatiquement. En ce moment,
procéder à l’introduction de l’échantillon de la manière telle que décrite ci-dessus.
CALIBRATION STANDARD
Appuyer sur les touches et pour accéder à la fonction de calibration
standard.
ECF-1 Calibration de poids (Zéro et span)
ECF-2 Calibration du zéro
ECF-3 Calibration de span
Page 40

40
Calibration de poids ECF-1
1. Appuyer sur la touche pour accéder au mode ECF-1 ou sur la touche ESC
pour sortir du menu et revenir au mode normal de pesage.
2. L’écran affichera CALZ, appuyer sur la touche
3. Avec les touches ◄, ►, ▲, 0 ~ 9 introduire la valeur du poids de calibration et
confirmer avec la touche
4. Mettre le poids sur le plateau et appuyer sur la touche
5. La balance effectuera la calibration automatiquement et reviendra au mode normal
de pesage.
Calibration du zéro ECF-2
1. Appuyer sur la touche pour accéder au mode ECF-2 ou sur la touche
pour sortir du menu et revenir au mode normal de pesage.
2. L’écran affichera CALZ, appuyer sur la touche
3. La balance effectuera la calibration du zéro automatiquement et reviendra au
mode normal de pesage.
Calibration du span ECF-3
1. Appuyer sur la touche pour accéder au mode ECF-3 ou sur la touche
pour sortir du menu et revenir au mode normal de pesage.
2. Avec les touches ◄, ►, ▲, 0 ~ 9 introduire la valeur du poids de calibration et
confirmer avec la touche
4. Mettre le poids sur le plateau et appuyer sur la touche
5. La balance effectuera la calibration automatiquement et reviendra au mode normal
de pesage.
CONFIGURATION DE FONCTIONS
Pour accéder à la configuration de fonctions, appuyer sur la touche et sans la
liberer, appuyer sur la touche
UF-1 Valeur interne
1. Appuyer sur la touche pour visualiser la valeur interne.
2. Pour passer au paramètre suivant, appuyer sur la touche ►
3. Pour sortir et revenir au mode de pesage, appuyer sur la touche
Page 41

41
UF-2 Limites de poids
1. Appuyer sur la touche pour accéder à la configuration de limites de poids.
2. L’écran affichera le message “0000.0L”
3. Avec les touches ◄, ►, ▲, 0 ~ 9 introduire la valeur de la limite inférieure.
4. Appuyer sur la touche pour confirmer.
5. L’écran affichera le message “0000.0H”
6. Avec les touches ◄, ►, ▲, 0 ~ 9 introduire la valeur de la limite supérieure.
7. Appuyer sur la touche pour confirmer.
8. L’écran affichera le message “O 000”
9. Avec les touches ◄, ►, ▲, 0 ~ 9 introduire la valeur des conditions du programme.
10. Appuyer sur la touche pour confirmer.
11. Pour passer au paramètre suivant, appuyer sur la touche ►
12. Pour sortir et revenir au mode de pesage, appuyer sur la touche
UF-3 Autodéconnexion
Modes:
- AoFF 00 – Autodéconnexion désactivée
- AoFF 01 – La balance se désactivera automatiquement après 1 minute sans
utilisation
L‘autodéconnexion peut être programmée jusqu’à 99 minutes AoFF01~AoFF99, la
valeur par défaut est AoFF10 (10 minutes)
1. Appuyer sur la touche pour accéder à la programmation de
l’autodéconnexion.
2. Avec les touches ◄, ►, ▲, 0 ~ 9 introduire la valeur souhaitée.
3. Appuyer sur la touche pour confirmer.
4. Pour passer au paramètre suivant, appuyer sur la touche ►
5. Pour sortir et revenir au mode de pesage, appuyer sur la touche
UF-4 Éclairage de l’écran
Modes:
- Lit Off: Éclairage désactivé
- Lit A: Éclairage automatique
- Lit on: Éclairage toujours activé
La valeur par défaut est: Lit A (automatique)
1. Appuyer sur la touche pour accéder à la programmation de l’éclairage de
l’écran.
2. Utiliser la touche ▲ pour sélectionner le mode souhaité.
3. Appuyer sur la touche pour confirmer.
Page 42

42
4. Pour passer au paramètre suivant, appuyer sur la touche ►
5. Pour sortir et revenir au mode de pesage, appuyer sur la touche
UF-5 Fonction HOLD (mantient l’affichage du poids sur l’écran pendant quelques
secondes après avoir enlévé le poids du plateau)
Modes:
- HOLD 0 : Fonction HOLD désactivée.
- HOLD 1 : Mode pesage d’animaux.
- PCtXXX: Pour configurer le rang de 001~100 dans le mode HOLD 1
- timEXX: Pour configurer le temps en 1 2 4 8 16 32 64 dans le mode HOLD 1
Valeur par défaut: HOLD 0
1. Appuyer sur la touche pour accéder à la programmation de la fonction
HOLD
2. Utiliser la touche ▲ pour sélectionner le mode souhaité.
3. Appuyer sur la touche pour confirmer.
4. Pour passer au paramètre suivant, appuyer sur la touche ►
5. Pour sortir et revenir au mode de pesage, appuyer sur la touche
UF-5 Sortie RS-232
232 0 RS-232 désactivée
232 1 Transmission stable – Format 1
232 2 Transmission normale – Format 1
232 3 Transmission manuelle – Format 1
232 4 Transmission stable – Format 2
232 5 Transmission normale – Format 2
232 6 Transmission manuelle – Format 2
Vitesse de transmission sélectionnable:
b 1200 Vitesse 1200
b 2400 Vitesse 2400
b 4800 Vitesse 4800
b 9600 Vitesse 9600
b 19200 Vitesse 19200
b 38400 Vitesse 38400
Page 43

43
Protocole de communication:
Signal UART de EIA-RS232 C
Format:
1. Transmission de série: 1200/2400/4800/9600/19200/38400 BPS
2. Bits: 8 bits
3. Bits de parité: Aucun
4. Bits d’arrêt: 1 bit
Bit de début
D
onnées
des bi
ts Arrêt bits
FORMAT 1 (232 1~3)
Tête 1 (2 bytes)
Tête 2 (2 bytes)
OL – Surcharge
ST – Stable
NT – Poids net
US - Instable
GS – Poids brut
18 BYTES ASCII (kg g t lb)
1 2 1 1 2 1 1 2 3 4 5 6 7 8 1 2 1 2
HEAD1
,
H
E
AD2
,
DA
T
A UNIT CR LF
21 BYTES ASCII (tl. T lboz)
1 2 1 1 2 1 1 2 3 4 5 6 7 8 9 1 2 3 4 1 2
HEAD1
,
H
E
AD2
,
DA
T
A UNIT
CR LF
19 BYTES ASCII (pcs)
1 2 1 1 2 1 1 2 3 4 5 6 7 8 1 2 3 1
2
HEAD1
,
H
E
AD2
,
DA
T
A UNIT
CR LF
Page 44

Exemples de transmissions:
Exemple 1. +
0.876 kg
Stable et Poids Net:
S
T
,
N
T
,
+
0 0 0 .
8 7 6 k
g
0D 0A
Exemple 2
-
1.568 lb
instable et Poids Brut:
U
S
,
G
S
,
-
0 0 1 .
5 6 8 l
b
0D 0A
Exemple 3 -
20. 5.40 lb oz
instable
et Poids Brut:
S
T
,
G
S
,
-
1 0
﹒
0 5
﹒
4 0
l
b
o
z
0 0
Exemple 4 +1000 pcs stable et Poids Net:
S
T
,
N
T
,
+
0 0 0 1 0 0 0 p
c
s
0D 0A
Format
2 (232 4 ~ 6) :
12 BYTES
ASC
II
(kg g t lb)
1
2 3 4 5 6 7
8
1
2
1
2
Données Unités
CR LF
15 BYTES
ASC
II
(tl.T
lboz)
1 2 3 4 5 6 7 8 9 1 2 3 4 1
2
Données Unités
CR LF
13 BYTES
ASC
II
(pcs)
1 2 3 4 5 6 7 8 1 2 3 1 2
Données Unités
CR LF
Exemples de transmissions:
Exemple 1.
+0.876 kg
poids net stable:
+
0 0 0 .
8 7 6 k
g
0D 0A
Exemple 2.
-1.568 lb poids brut instable:
-
0 0 1 .
5 6 8 l
b
0D 0A
Exemple 3.
-20. 5.40 lb oz
poids brut instable:
-
1 0
﹒
0 5
﹒
4 0
l
b
o
z
0D 0A
Exemple 4.
+
1000 pcs poids net stable :
+
0 0 0 1 0 0 0 p
c
s
0D 0A
UF-6 Format de transmission RS-232
Page 45

45
1. Appuyer sur la touche
2. Utiliser la touche ▲ pour sélectionner le mode souhaité et appuyer sur la touche
3. Utiliser la touche ▲ pour sélectionner la vitesse de transmission et sur la touche
pour confirmer.
4. Appuyer sur la touche ► pour passer au paramètre suivante.
5. Pour sortir et revenir au mode de pesage, appuyer sur la touche
UF-7 ADC actualisation de la fréquence
SPEEd 1 Vitesse Standard 15 hz
SPEEd 2 Vitesse haute 30 hz
SPPEd 3 Vitesse basse 7.5 hz
• Cette fonction est bloquée si la fonction HOLD était configurée comme HOLD 1
Valeur par défaut: SPEEd 1
1. Appuyer sur la touche pour accéder à la programmation.
2. Utiliser la touche ▲ pour sélectionner la vitesse ADC souhaitée.
3. Appuyer sur la touche ► pour passer au paramètre suivante.
4. Pour sortir et revenir au mode de pesage, appuyer sur la touche
UF-8 Configuration du zéro
ZP 0 Fonction désactivée
ZP 1 1 division ne s’affiche pas
ZP 2 2 divisions ne s’affichent pas
ZP 3 3 divisions ne s’affichent pas
ZP 4 4 divisions ne s’affichent pas
ZP 5 5 divisions ne s’affichent pas
• Cette fonction est bloquée si la fonction HOLD était configurée comme HOLD 1
Valeur par défaut: ZP 0
1. Appuyer sur la touche pour accéder à la programmation.
2. Utiliser la touche ▲ pour sélectionner le mode souhaité.
3. Appuyer sur la touche pour confirmer.
4. Pour passer au paramètre suivante, appuyer sur la touche ►
5. Pour sortir et revenir au mode de pesage, appuyer sur la touche
UF-9 Pré-calibration Gravitacionnelle (Valeur G)
Page 46

46
Bien que la balance permette d’effectuer la Calibration Standard, la Pré-calibration
Gravitacionnelle aide à donner une plus grande exactitude à la balance. Cette précalibration s’effectuera toujours avec l’interrupteur CAL en position ADJ. La valeur
sera configurée à -00- et sera remplacée chaque fois qu’une nouvelle valeur sera
introduite.
Valeur de la gravité du Distribuidor: configurée avant la calibration du poids
Valeur de la gravité de l’utilisateur: configurée après la calibration du poids
La valeur de la gravité sera réfusée lorsqu’elle sera supérieure à 9.83217 (Gravité
Polaire) ou inférieure à 9.78031 (Gravité Équateur)
Valeur par défaut: 9.79423
1. Appuyer sur la touche pour accéder à la programmation.
2. L’écran affichera la dernière valeur pendant 1 seconde.
3. Avec les touches ◄, ► on pourra afficher les valeurs introduites précédement.
L’écran restera à 00 si aucune valeur n’est pas introduite.
4. L’écran affichera la dernière valeur pendant 1 seconde.
5. Avec les touches ◄, ► on pourra afficher les valeurs introduites précédement.
L’écran restera à 00 si aucune valeur n’est pas introduite.
6. Appuyer sur la touche
7. Avec les touches ◄, ►, ▲, 0 ~ 9 introduire la valeur souhaitée.
8. Appuyer sur la touche
9. Appuyer sur la touche ► pour passer au paramètre suivante ou sur la touche
pour sortir et revenir au mode de pesage.
GARANTIE
Cette balance est garantiée contre tout défaut de fabrication et de materiel, pour une
période de 1 an à partir de la date de la livraison.
Pendant cette période, GRAM PRECISION, se chargera de la réparation de la balance.
Cette garantie n’inclut pas les dommages causés par une mauvaise manipulation ou
surcharge.
La garantie ne couvre pas les frais de transport de retour nécessaire pour
réparer la balance.
Page 47

47
INHALTSVERZEICHNIS
Stromversorgung, Stromverbrauch und aufladbarer Akku
49
Anzeige der Versionsnummer der Waage
49
Beschreibung des Displays
49
Beschreibung der Tastatur
50
Beschreibung der Hauptfunktionen
50
Voreinstellung des Tarawerts
52
Voreinstellung des oberen Gewichtsgrenzwerts
52
Voreinstellung des unteren Gewichtsgrenzwerts
52
Konfiguration des Prüf-Wägemodus
53
Summenfunktion
53
So geben Sie die Stichprobe für die Stückzählung ein
54
Stückzählungsfunktion
54
Standardjustierungen
54
Einrichtung der Funktionen
55
- Interner Wert
55
- Prüf-Wägemodus
56
- Automatische Ausschaltung
56
- Hintergrundbeleuchtung
56
- HALTEFUNKTION
57
- RS-232-Ausgang
57
- Nullgewicht-Anzeigebedingung
60
Standardmäßige Gravitationsvorjustierung
61
Gewährleistung
62
Page 48

48
STROMVERSORGUNG
Eingang: 100~240V 50/60Hz
Ausgang: 12V/1A DC 12W
Aufladbarer Blei-Säure-Akku: 6V/4AH
STROMVERBRAUCH
Ca. 12 mA
Ca. 36 mA mit Hintergrundbeleuchtung
Ca. 48 mA mit Hintergrundbeleuchtung und RS232-Schnittstelle (optional)
AKKUSTUNDEN PRO AUFLADUNG
Ca. 320 Stunden (ohne Hintergrundbeleuchtung).
ANZEIGE DER VERSIONSNUMMER DER WAAGE
1. Die Waage einschalten.
2. Die Taste NULL gedrückt halten, bis die Countdown-Zählung abgeschlossen
ist.
3. Auf dem LCD-Display erscheint „1001“. Die angezeigte Nummer ist die
Hauptplatinenversion der Waage.
4. Die Taste NULL loslassen. Die Waage startet jetzt die Einrichtung der
Funktionen.
BESCHREIBUNG DES DISPLAYS
Page 49

49
BESCHREIBUNG DER TASTATUR
BESCHREIBUNG DER HAUPTFUNKTIONEN
Zum Ausschalten der Waage die AUS-Taste gedrückt halten. Das Display
zeigt während 2 Sekunden „AUS“ an.
Die Taste drücken, um die Waage auszuschalten.
Funktion 1. Auswahl der gewünschten Wägeeinheit.
Funktion 2. Verlassen der Einstellung im Einrichtungsmodus.
Funktion 1. Nullsetzung des Displays, wobei der angezeigte Gewichtswert
jedoch weniger als ± 2 % der maximalen Kapazität betragen muss.
Funktion 2. Bewegung um eine Stelle nach links oder nach unten
im Einrichtungsmodus.
Funktion 1. Abziehen des Behältergewichts.
Funktion 2. Bewegung um eine Stelle nach rechts oder nach oben
im Einrichtungsmodus.
Funktion 1. Anzeige des Brutto- und Nettogewichts, wenn die Waage
im Taramodus ist.
Alle anderen Tasten werden deaktiviert, wenn das Bruttogewicht aktiviert
ist.
Funktion 2. Erhöhung der Werte nach oben im Einrichtungsmodus.
Funktion 1. Auswahl des internen Hintergrundbeleuchtungsmodus
des Displays.
Funktion 2. Funktioniert als numerische Zahl 2 im Einrichtungsmodus.
Page 50

50
Funktion 1. Manuelle Übertragung von Daten über die RS232-Schnittstelle
an einen Computer oder Drucker im normalen Wägemodus (RS-232 muss
für die Tastaturübertragung 232 3 oder 232 6 eingestellt sein).
Funktion 2. Funktioniert als Eingabetaste im Einrichtungsmodus.
Voreinstellung des Tarawerts.
Voreinstellung des oberen Gewichtsgrenzwerts.
Voreinstellung des unteren Gewichtsgrenzwerts.
Programmierung der Parameter des Prüf-Wägemodus.
Funktion 1. Summierung von Gewichten.
Funktion 2. Funktioniert als numerische Zahl 9 im Einrichtungsmodus.
Funktion 1. Anzeige der Gesamtzahl der Summierungen
und des summierten Gesamtgewichts.
Funktion 2. Funktioniert als numerische Zahl 6 im Einrichtungsmodus.
Funktion 1. Löschung aller summierten Gewichtsdaten.
Funktion 3. Funktioniert als numerische Zahl 3 im Einrichtungsmodus.
Funktion 1. Eingabe des Stichprobenwerts für die Stückzählung.
Funktion 2. Funktioniert als numerische Zahl 8 im Einrichtungsmodus.
Funktion 1. Aktivierung des Stückzählungsmodus.
Funktion 2. Funktioniert als numerische Zahl 5 im Einrichtungsmodus.
Löschung einer Eingabe.
Page 51

51
VOREINSTELLUNG DES TARAWERTS
1. Die Taste drücken.
2. Numerische Tasten von 0 bis 9 zur Eingabe des erforderlichen Tarawerts
verwenden.
3. Zur Bestätigung die Taste drücken. Die Anzeigen Net und PT erscheinen.
4. Die Waage kehrt automatisch in den normalen Wägemodus zurück.
Löschung eines voreingestellten Tarawerts.
1. Die Taste drücken.
2. Die Taste drücken, um den vorher eingegebenen Wert zu löschen.
3. Die Taste drücken, um fortzufahren.
4. Die Waage kehrt automatisch in den normalen Wägemodus zurück.
VOREINSTELLUNG DES OBEREN GEWICHTSGRENZWERTS
1. Die Taste drücken.
2. Numerische Tasten von 0 bis 9 zur Festlegung des erforderlichen oberen
Gewichtsgrenzwerts (HI) verwenden.
3. Zur Bestätigung die Taste drücken.
4. Die Waage kehrt automatisch in den normalen Wägemodus zurück.
VOREINSTELLUNG DES UNTEREN GEWICHTSGRENZWERTS
1. Die Taste drücken.
2. Numerische Tasten von 0 bis 9 zur Festlegung des erforderlichen unteren
Gewichtsgrenzwerts (LO) verwenden.
3. Zur Bestätigung die Taste drücken.
4. Die Waage kehrt automatisch in den normalen Wägemodus zurück.
Page 52

52
KONFIGURATION DES PRÜF-WÄGEMODUS
o 0 0 0
A B C
A: Akustisches Signal
Option 0=Stabilität ist nicht erforderlich
Option 1= Stabilität ist erforderlich
B: LCD-Anzeige und Relais aktiviert
Option 0=Stabilität ist nicht erforderlich
Option 1= Stabilität ist erforderlich
C: Status akustisches Signal
Option 0=akustisches Signal deaktiviert
Option 1=OK
Option 2= LO und HI
1. Die Taste drücken.
2. Die numerischen Tasten 0, 1 und 2 verwenden, um die erforderliche
Funktion auszuwählen (A, B, C).
3. Zur Bestätigung die Taste drücken.
4. Die Waage kehrt automatisch in den normalen Wägemodus zurück.
SUMMENFUNKTION
1. Das Produkt auf die Waage legen und die Taste drücken.
2. Der Bildschirm zeigt während 2 Sekunden die Anzahl der durchgeführten
Wägevorgänge an (1).
3. Der Bildschirm zeigt während 2 Sekunden das summierte Gesamtgewicht
und das Symbol M+ an.
4. Ein weiteres Produkt auf die Waage legen und die Taste drücken.
5. Der Bildschirm zeigt während 2 Sekunden die Anzahl der durchgeführten
Wägevorgänge an (2).
6. Der Bildschirm zeigt während 2 Sekunden das summierte Gesamtgewicht
und das Symbol M+ an.
7. Den Vorgang so oft wie erforderlich wiederholen.
SO ZEIGEN SIE DAS SUMMIERTE GESAMTGEWICHT AN
1. Die Taste drücken.
2. Der Bildschirm zeigt während 2 Sekunden die Gesamtzahl der durchgeführten
Wägevorgänge an.
Page 53

53
3. Der Bildschirm zeigt während 2 Sekunden das summierte Gesamtgewicht an.
SO LÖSCHEN SIE DIE SUMMIERTEN GEWICHTE
1. Die Taste drücken. Alle durchgeführten Gewichtssummierungen werden
gelöscht.
SO GEBEN SIE DIE STICHPROBE FÜR DIE STÜCKZÄHLUNG EIN
1. Die Taste drücken.
2. Numerische Tasten von 0 bis 9 zur Eingabe der gewünschten Probenstückzahl
verwenden.
3. Dieselbe Stückzahl auf die Waage legen, die als Probenstückzahl eingegeben
wurde.
4. Die Taste drücken.
5. Die Waage ist jetzt für die Stückzahlung bereit.
6. Die Taste drücken, um den Stückzählungsmodus zu verlassen.
• Der Bildschirm zeigt die Nachricht U.-- an, wenn das Stückgewicht
der Probe weniger als 0,2 d beträgt.
• Der Bildschirm zeigt die Nachricht S. -- an, wenn das Gewicht
der Probe weniger als 20 d beträgt.
• Der Bildschirm zeigt die Nachricht U.--S.--
STÜCKZÄHLUNGSFUNKTION
1. Die Taste drücken, um den Stückzählmodus zu aktivieren.
2. Falls die Waage keine vorherige Probenstückzählung gespeichert hat, zeigt
sie während 2 Sekunden U.— an, falls das Stückgewicht und das Probengewicht
weniger als 0,2 und 20 d betragen, und aktiviert die Stückzählungsfunktionen. Bitte
geben Sie in diesem Moment die Probe hinzu, wie im vorherigen Kapitel
beschrieben wurde.
STANDARDJUSTIERUNGEN
Drücken Sie im Wägemodus die Tasten und , um die
Standardjustierungen zu starten.
ECF-1 Gewichtsjustierung (Null und Bereich)
ECF-2 Nulljustierung
ECF-3 Justierung Verhältnisbereich
Page 54

54
Gewichtsjustierung ECF-1
1. Die Taste drücken, um den Modus ECF-1 zu starten, bzw. ESC, um das
Menü zu verlassen und zum Wägemodus zurückzukehren.
2. Auf dem Display erscheint CALZ. Die Taste drücken.
3. Den Wert des Justiergewichts mit den Tasten ◄, ►, ▲, 0 ~ 9 eingeben und die
Eingabe dann mit der Taste bestätigen.
4. Das erforderliche Gewicht wie auf dem Display angezeigt auf die Waage setzen
und die Taste drücken, um die Waage zu justieren.
5. Die Waage schließt die Justierung automatisch ab und kehrt in den Wägemodus
zurück.
Nulljustierung ECF-2
1. Die Taste drücken, um die Nulljustierung ECF-2 zu starten, bzw. die
Taste , um das Menü zu verlassen und zum Wägemodus zurückzukehren.
2. Auf dem Display erscheint CALZ. Die Taste drücken.
3. Die Waage schließt die Nulljustierung automatisch ab und kehrt in den
Wägemodus zurück.
Justierung Verhältnisbereich ECF-3
1. Die Taste drücken, um die Bereichsjustierung ECF-3 zu starten, bzw. die
Taste , um das Menü zu verlassen und zum Wägemodus zurückzukehren.
2. Den Wert des Justiergewichts mit den Tasten ◄, ►, ▲, 0 ~ 9 eingeben und die
Eingabe dann mit der Taste bestätigen.
4. Das erforderliche Gewicht wie auf dem Display angezeigt auf die Waage setzen
und die Taste drücken, um die Waage zu justieren.
5. Die Waage schließt die Justierung automatisch ab und kehrt in den Wägemodus
zurück.
EINRICHTUNG DER FUNKTIONEN
Die Taste gedrückt halten und dann gleichzeitig die Taste drücken,
um die Einrichtung der Funktionen aufzurufen.
UF-1 Interner Wert
1. Die Taste drücken, um den internen Wert anzuzeigen.
2. Um mit anderen Einrichtungen fortzufahren, die Taste ► verwenden.
3. Die Taste drücken, um das Menü zu verlassen und zum Wägemodus
Page 55

55
zurückzukehren.
UF-2 Prüf-Wägemodus
1. Die Taste drücken, um die Einrichtung des Prüf-Wägemodus zu starten.
2. Auf dem Display erscheint die Nachricht „0000.0L“.
3. Mit den Tasten ◄, ►, ▲, 0 ~ 9 den unteren Gewichtsgrenzwert (LO) einstellen.
4. Zur Bestätigung die Taste drücken.
5. Auf dem Display erscheint die Nachricht „0000.0H“.
6. Mit den Tasten ◄, ►, ▲, 0 ~ 9 den oberen Gewichtsgrenzwert (HI) einstellen.
7. Zur Bestätigung die Taste drücken.
8. Auf dem Display erscheint die Nachricht „O 000“
9. Mit den Tasten ◄, ►, ▲, 0 ~ 9 den E/A-SOLLWERT einstellen.
10. Zur Bestätigung die Taste drücken.
11. Um mit anderen Einrichtungen fortzufahren, die Taste ► verwenden.
12. Die Taste drücken, um das Menü zu verlassen und zum Wägemodus
zurückzukehren.
UF-3 Automatische Ausschaltung
Modi:
- AoFF 00 – Automatische Ausschaltung deaktiviert.
- AoFF 01 – Die Waage schaltet sich nach 1 Minute Inaktivität automatisch aus,
wenn das Gewicht bei 0 ist.
Die Zeitschaltuhr zur automatischem Abschaltung kann bis auf 99 Minuten eingestellt
werden (AoFF01~AoFF99), die Werkseinstellung ist AoFF10 (10 Minuten).
1. Die Taste drücken, um die automatische Abschaltung einzurichten.
2. Mit den Tasten ◄, ►, ▲, 0 ~ 9 die automatische Abschaltzeit eingeben.
3. Zur Bestätigung die Taste drücken.
4. Um mit anderen Einrichtungen fortzufahren, die Taste ► verwenden.
5. Die Taste drücken, um das Menü zu verlassen und zum Wägemodus
zurückzukehren.
UF-4 Hintergrundbeleuchtung
Modi:
- Lit Off: Hintergrundbeleuchtung aus.
- Lit A: Automatische Beleuchtung.
- Lit on: Hintergrundbeleuchtung aus.
Die Werkseinstellung ist: Lit A (automatisch).
1. Die Taste drücken, um die Einstellung der Hintergrundbeleuchtung
aufzurufen.
2. Mit der Taste ▲ den gewünschten Modus auswählen.
3. Zur Bestätigung die Taste drücken.
Page 56

56
4. Um mit anderen Einrichtungen fortzufahren, die Taste ► verwenden.
5. Die Taste drücken, um das Menü zu verlassen und zum Wägemodus
zurückzukehren.
UF-5 HALTEFUNKTION (HOLD) (zeigt das Gewicht während mehrerer Sekunden
weiterhin auf dem Display an, nachdem das Gewicht von der Waage genommen
wurde).
Modi:
- HOLD 0 : HALTEFUNKTION aus.
- HOLD 1 : Tier-Haltefunktion.
- PCtXXX: Einstellung des Bereichs der Tier-Haltefunktion von 001~100.
- timEXX: Einstellung von 1 2 4 8 16 32 64 Mal innerhalb des Haltebereichs
(nur für HOLD 1).
Werkseinstellung: HOLD 0
1. Die Taste drücken, um die HALTEFUNKTION einzurichten.
2. Mit der Taste ▲ den gewünschten Modus auswählen.
3. Zur Bestätigung die Taste drücken.
4. Um mit anderen Einrichtungen fortzufahren, die Taste ► verwenden.
5. Die Taste drücken, um das Menü zu verlassen und zum Wägemodus
zurückzukehren.
UF-5 RS-232-Ausgang
232 0 RS-232 deaktiviert
232 1 Stabile Ausgabe – Format 1
232 2 Stream-Ausgabe – Format 1
232 3 Manuelle Ausgabe – Format 1
232 4 Stabile Ausgabe – Format 2
232 5 Stream-Ausgabe – Format 2
232 6 Manuelle Ausgabe – Format 2
RS232-Baudrate:
b 1200 Baudrate 1200
b 2400 Baudrate 2400
b 4800 Baudrate 4800
b 9600 Baudrate 9600
b 19200 Baudrate 19200
b 38400 Baudrate 38400
Kommunikationsprotokoll:
UART-Signal EIA-RS232 C
Format:
1. Serieller Ausgang: 1200/2400/4800/9600/19200/38400 BPS
2. Datenbits: 8 Bit
3. Paritätsbits: Keine
4. Stoppbits: 1 Bit
Page 57

57
Startbit
Datenbits Stoppbits
FORMAT 1 (232 1~3)
Kopf 1 (2 Bytes)
Kopf 2 (2 Bytes)
OL – Überlastung
ST – Stabil
NT – Nettogewicht
US - Instabil
GS – Bruttogewicht
Fest 18 BYTES ASCII (kg g t lb)
1 2 1 1 2 1 1 2 3 4 5 6 7 8 1 2 1 2
HEAD1
,
H
E
AD2
,
DA
T
A UNIT CR LF
Fest 21 BYTES ASCII (tl. T lb oz)
1 2 1 1 2 1 1 2 3 4 5 6 7 8 9 1 2 3 4 1 2
HEAD1
,
H
E
AD2
,
DA
T
A UNIT
CR LF
Fest 19 BYTES ASCII (pcs)
1 2 1 1 2 1 1 2 3 4 5 6 7 8 1 2 3 1
2
HEAD1
,
H
E
AD2
,
DA
T
A UNIT
CR LF
Page 58

58
Ausgabebeispiele:
Beispiel 1. +0,876 kg stabiles Nettogewicht:
S
T
,
N
T
,
+
0 0 0 .
8 7 6 k
g
0D 0A
Beispiel 2 -1,568 lb instabiles Bruttogewicht:
U
S
,
G
S
,
-
0 0 1 .
5 6 8 l
b
0D 0A
Beispiel 3 -20. 5,40 lb oz instabiles Bruttogewicht:
S
T
,
G
S
,
-
1 0
﹒
0 5
﹒
4 0
l
b
o
z
0 0
Beispiel 4 +1000 Stck. stabiles Nettogewicht:
S
T
,
N
T
,
+
0 0 0 1 0 0 0 p
c
s
0D 0A
Format 2 (232 4 ~ 6):
12 BYTES
ASC
II
(kg g t lb)
1
2 3 4 5 6 7
8
1
2
1
2
Data Unit CR LF
15 BYTES
ASC
II
(tl.T
lboz)
1 2 3 4 5 6 7 8 9 1 2 3 4 1
2
Data Unit CR LF
13 BYTES
ASC
II
(
Stck)
1 2 3 4 5 6 7 8 1 2 3 1 2
Data Unit CR LF
Ausgabebeispiele:
Beispiel 1. +0,876 kg stabiles Nettogewicht:
+
0 0 0 .
8 7 6 k
g
0D 0A
Beispiel 2. -1,568 lb instabiles Bruttogewicht:
-
0 0 1 .
5 6 8 l
b
0D 0A
Beispiel 3. -20. 5,40 lb oz instabiles Bruttogewicht:
-
1 0
﹒
0 5
﹒
4 0
l
b
o
z
0D 0A
Beispiel 4. +1000 Stck: stabiles Nettogewicht:
+
0 0 0 1 0 0 0 p
c
s
0D 0A
Page 59

59
UF-6 Übertragungsformat RS-232
1. Die Taste drücken.
2. Mit der Taste ▲ den gewünschten Modus auswählen und die Taste
drücken.
3. Mit der Taste ▲ die Baudrate auswählen und anschließend mit der Taste
bestätigen.
4. Um mit anderen Einrichtungen fortzufahren, die Taste ► verwenden.
5. Die Taste drücken, um das Menü zu verlassen und zum Wägemodus
zurückzukehren.
UF-7 ADC-Aktualisierungsrate
SPEEd 1 Standardgeschwindigkeit 15 Hz
SPEEd 2 Hohe Geschwindigkeit 30 Hz
SPPEd 3 Niedrige Geschwindigkeit 7,5 Hz
• Diese Funktion ist gesperrt, wenn die HALTEFUNKTION auf HOLD 1 gestellt
ist.
Werkseinstellung: SPEEd 1
1. Die Taste drücken, um die Einrichtung zu starten.
2. Mit der Taste ▲ die gewünschte ADC-Geschwindigkeit auswählen.
3. Um mit anderen Einrichtungen fortzufahren, die Taste ► verwenden.
4. Die Taste drücken, um das Menü zu verlassen und zum Wägemodus
zurückzukehren.
UF-8 Nullgewicht-Anzeigebedingung
ZP 0 Funktion aus
ZP 1 1 Teilung ohne Anzeige bei Null
ZP 2 2 Teilungen ohne Anzeige bei Null
ZP 3 3 Teilungen ohne Anzeige bei Null
ZP 4 4 Teilungen ohne Anzeige bei Null
ZP 5 5 Teilungen ohne Anzeige bei Null
• Diese Funktion ist gesperrt, wenn die HALTEFUNKTION auf HOLD 1 gestellt
ist.
Werkseinstellung: ZP 0
Page 60

60
1. Die Taste drücken, um die Einrichtung aufzurufen.
2. Mit der Taste ▲ den gewünschten Modus auswählen.
3. Zur Bestätigung die Taste drücken.
4. Um mit anderen Einrichtungen fortzufahren, die Taste ► verwenden.
5. Die Taste drücken, um das Menü zu verlassen und zum Wägemodus
zurückzukehren.
UF-9 Standardmäßige Gravitationsvorjustierung (G-Wert)
Auch wenn die Waage eine Standardjustierung zulässt, kann die
Gravitationsjustierung zu einer größeren Genauigkeit der Waage beitragen.
Diese Vorjustierung ist möglich, wenn der Schalter CAL in der Position ADJ steht.
Der Gravitationswert wird bei -00- gespeichert und jedes Mal ersetzt, wenn ein
neuer Wert eingegeben wird.
G-Wert Sender: vor der Gewichtsjustierung einstellen.
G-Wert Empfänger: nach der Gewichtsjustierung einstellen.
Der G-Wert wird abgelehnt, wenn der Wert größer als 9,83217 (G-Wert an den
Polen) oder kleiner als 9,78031 (G-Wert am Äquator) ist.
Werkseinstellung: 9.79423
1. Die Taste drücken, um die Einrichtung zu starten.
2. Das Display zeigt den letzten Wert während 1 Sekunde an.
3. Mit den Tasten ◄, ► können die vorher eingegebenen Werte angezeigt werden.
Das Display zeigt weiterhin 00 an, falls kein Wert eingegeben wird.
4. Das Display zeigt den letzten Wert während 1 Sekunde an.
5. Mit den Tasten ◄, ► können die vorher eingegebenen Werte angezeigt werden.
Das Display zeigt weiterhin 00 an, falls kein Wert eingegeben wird.
6. Die Taste drücken.
7. Mit den Tasten ◄, ►, ▲, 0 ~ 9 den gewünschten Wert eingeben.
8. Die Taste drücken.
9. Die Taste ► drücken, um mit den anderen Einrichtungen fortzufahren, bzw. die
Taste , um die Einrichtung zu verlassen und zu normalen Wägemodus
zurückzukehren.
Page 61

61
GEWÄHRLEISTUNG
Für diese Waage besteht eine Garantie von einem Jahr ab Lieferzeitpunkt. Die
Garantie erstreckt sich auf alle Herstellungs- und Materialfehler.
Während dieses Zeitraums deckt GRAM PRECISION die zur Reparatur der Waage
erforderlichen Personal- und Ersatzteilkosten ab.
Diese Garantie erstreckt sich nicht auf Ausfälle aufgrund unsachgemäßer Nutzung
oder Überladung.
Diese Garantie erstreckt sich nicht auf die zur Reparatur der Waage
erforderlichen Versandkosten (Transport).
 Loading...