

Page 1
DE
Bedienungsanleitung
EN
FR
IT
Instruction manual
Mode d'emploi
Istruzioni per l'uso
Fleischwolf FW 700
Page 2

Page 3

Inhaltsverzeichnis
Sicherheitshinweise ................................................................................7
Informationen zu dieser Bedienungsanleitung ........................................9
Bestimmungsgemässe Verwendung .......................................................9
Haftungsbeschränkung ........................................................................10
Auspacken ...........................................................................................10
Anforderungen an den Aufstellort .......................................................10
Vor dem Erstgebrauch ..........................................................................10
Bedienung ..........................................................................................11
Fleischwolf-Aufsatz ..............................................................................11
Wurstfüll-Aufsatz .................................................................................12
Kebbe-Aufsatz .....................................................................................12
Spritzgebäck-Aufsatz ...........................................................................13
Reset-Knopf .........................................................................................13
Aufbewahrung Zubehör .......................................................................14
Reinigung ............................................................................................14
DE
EN
FR
IT
Kundendienst ......................................................................................16
Entsorgung ..........................................................................................16
2 Jahre Gewährleistung .......................................................................16
3
Page 4

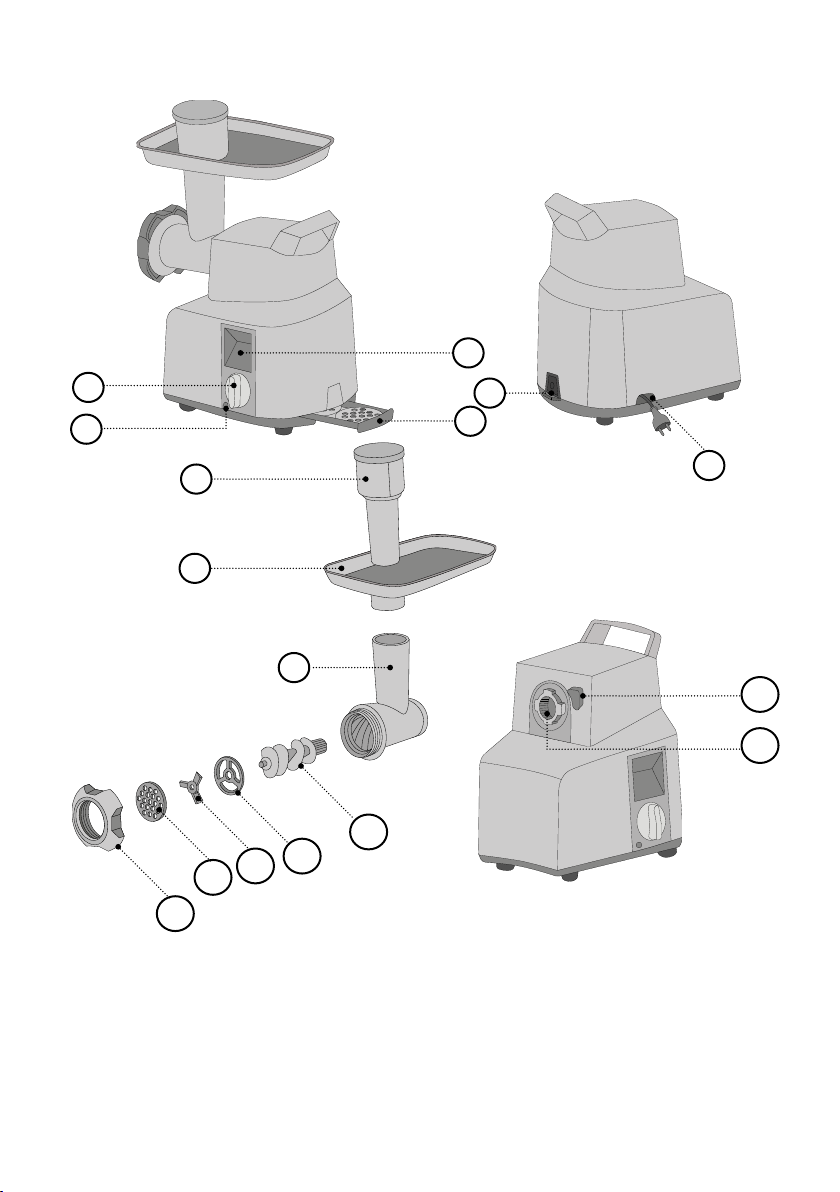
Produktübersicht
3
1
2
7
5
4
6
8
9
15
16
10
11
12
13
14
1. Drehregler
2. Reset-Knopf
3. Display
4. Aufbewahrungsfach
5. Ein-/ Ausschalter
6. Kabel / Kabelfach
7. Stopfer
4
8. Einfüllwanne
9. Schneckengehäuse
10. Schnecke
11. Vorschneider
12. Messer
13. Lochscheibe (fein Ø 3 mm ,
mittel Ø 5 mm, grob Ø 8 mm)
Page 5
14. Schraubring
15. Entriegelungstaster
16. Antrieb
17. Tragring
18. Wurstfüllaufsatz
DE
EN
FR
Wurstfüllaufsatz
IT
18
17
5
Page 6

Kebbeaufsatz
19. Former
20. Kebbeaufsatz
Aufbewahrung
6
19
20
201917
18
7
Page 7

Sicherheitshinweise
DE
Dieses Gerät entspricht den vorgeschriebenen Sicherheitsbestimmungen. Ein unsachgemäßer Gebrauch kann jedoch zu Personenund Sachschäden führen.
Beachten Sie für einen sicheren Umgang mit dem Gerät die folgenden Sicherheitshinweise:
• Kontrollieren Sie das Gerät vor der Verwendung auf äußere sichtbare Schäden an Gehäuse, Anschlussleitung und -stecker. Nehmen
Sie ein mangelhaftes Gerät nicht in Betrieb.
• Eine beschädigte Anschlussleitung darf nur durch den Hersteller,
seinen Kundendienst oder eine ähnlich qualizierte Personen ersetzt werden, um Gefährdungen zu vermeiden.
• Reparaturen sind ausschließlich von einem Fachmann oder vom
Graef-Kundendienst auszuführen. Durch unsachgemäße Reparaturen können erhebliche Gefahren für den Benutzer entstehen. Zudem erlischt der Garantieanspruch.
• Eine Reparatur des Gerätes innerhalb der Garantiezeit darf nur
durch den Graef-Kundendienst vorgenommen werden, andernfalls
erlischt der Garantieanspruch.
• Defekte Bauteile dürfen ausschließlich nur gegen Original-Ersatzteile ausgetauscht werden. Nur bei diesen Komponenten ist gewährleistet, dass sie die Sicherheitsanforderungen erfüllen.
• Dieses Gerät darf nicht von Kindern benutzt werden. Das Gerät
und seine Anschlussleitung sind von Kindern fernzuhalten.
• Das Gerät kann von Personen mit reduzierten physischen, sensorischen oder mentalen Fähigkeiten oder einem Mangel an Erfahrung und/oder Wissen hinsichtlich der Verwendung benutzt werden, wenn sie beaufsichtigt werden oder bezüglich des sicheren
Gebrauchs des Gerätes unterwiesen wurden und Gefahrenquellen
verstanden haben.
• Kinder dürfen nicht mit dem Gerät spielen.
• Das Gerät ist bei nicht vorhandener Aufsicht und vor dem Zusammenbau, dem Auseinandernehmen oder dem Reinigen stets vom
Stromnetz zu trennen.
• Das Gerät ist nicht dazu bestimmt, mit einer externen Zeitschaltuhr
EN
FR
IT
7
Page 8

oder einer separaten Fernsteuerung verwendet zu werden.
• Die Anschlussleitung ist immer am Anschlussstecker aus der Steckdose zuziehen, nicht an der Anschlussleitung.
• Vergleichen Sie vor dem Anschließen des Gerätes die Angaben
zu Spannung und Frequenz auf dem Typenschild mit denen Ihres
Elektronetzes. Diese Daten müssen übereinstimmen, damit keine
Schäden am Gerät auftreten.
• Benutzen Sie das Gerät nicht, wenn die Anschlussleitung oder der
Stecker beschädigt ist.
• Lassen Sie vor der Weiterbenutzung des Gerätes eine neue Anschlussleitung durch den Graef-Kundendienst oder von einer autorisierten Fachkraft installieren.
• Öffnen Sie auf keinen Fall das Gehäuse des Gerätes. Werden spannungsführende Anschlüsse berührt oder der elektrische und mechanische Aufbau verändert, besteht Stromschlaggefahr.
• Niemals unter Spannung stehende Teile berühren. Das kann einen
elektrischen Schlag auslösen oder im schlimmsten Fall zum Tod
führen.
• Tragen Sie das Gerät nicht an der Anschlussleitung.
• Transportieren Sie das Gerät niemals während des Betriebes.
• Fassen Sie den Stecker nicht mit feuchten Händen an.
• Verpackungsmaterialien dürfen nicht zum Spielen verwendet werden. Es besteht Erstickungsgefahr.
• Stellen Sie sicher, dass das Gerät vor der Reinigung und bei Nichtbenutzung ausgeschaltet und nicht an das Stromnetz angeschlossen ist.
• Benutzen Sie keine aggressiven oder scheuernden Reinigungsmittel und keine Lösungsmittel.
• Kratzen Sie hartnäckige Verschmutzungen nicht mit harten Gegenständen ab.
• Spülen Sie das Gerät nicht im Wasser ab und tauchen Sie es nicht
in Wasser.
• Die zu verarbeitenden Lebensmittel müssen frei von harten Bestandteilen sein (z.B. Knochen, Gefrorenes).
8
Page 9

Informationen zu dieser Bedienungsanleitung
Diese Bedienungsanleitung gibt Ihnen wichtige Hinweise für die Inbetriebnahme,
die Sicherheit, den bestimmungsgemäßen Gebrauch und die Pege des Allesschneiders (nachfolgend als Gerät bezeichnet). Sie muss ständig am Gerät verfügbar sein. Sie ist von jeder Person zu lesen und anzuwenden, die mit der
• Inbetriebnahme,
• Bedienung,
• Störungsbehebung und / oder
• Reinigung des Gerätes beauftragt ist.
Bewahren Sie diese Bedienungsanleitung auf und geben Sie sie mit dem Gerät an
den Nachbesitzer weiter. Diese Bedienungsanleitung kann nicht jeden denkbaren
Aspekt berücksichtigen. Für weitere Informationen oder bei Problemen, die in dieser Anleitung nicht oder nicht ausführlich genug behandelt werden, wenden Sie
sich bitte an den Graef-Kundendienst oder an Ihren Fachhandel.
Bestimmungsgemässe Verwendung
Dieses Gerät ist nicht für den gewerblichen Gebrauch bestimmt. Benutzen Sie den
Fleischwolf nur in geschlossenen Räumen. Sie können mit ihm Fleisch, Fisch, Ge-
ügel, Speck und Teig verarbeiten. Zerkleinern Sie keinesfalls harte Gegenstände
wie etwa gefrorene Lebensmittel, Knochen, Holz, Bleche o. Ä. Eine andere oder
darüber hinausgehende Benutzung gilt als nicht bestimmungsgemäß. Dieses Gerät ist für den Gebrauch im Haushalt und ähnlichen Bereichen bestimmt, wie
beispielsweise:
• In Mitarbeiterküchen für Läden und Büros
• In landwirtschaftlichen Anwesen
• In Hotels, Motels und anderen Wohneinrichtungen
• In Frühstückspensionen
WICHTIG!
• Gebrauch nur in haushaltsähnlichen Bereichen!
DE
EN
FR
IT
Eine andere oder darüber hinausgehende Benutzung gilt als nicht bestimmungsgemäß.
VORSICHT!
Von dem Gerät können bei nicht bestimmungsgemäßer Verwendung Gefahren
ausgehen.
• Das Gerät ausschließlich bestimmungsgemäß verwenden.
• Die in dieser Bedienungsanleitung beschriebenen Vorgehensweisen einhalten.
Ansprüche jeglicher Art wegen Schäden aus nicht bestimmungsgemäßer Verwendung sind ausgeschlossen. Das Risiko trägt allein der Betreiber.
9
Page 10

Haftungsbeschränkung
Alle in dieser Bedienungsanleitung enthaltenen technischen Informationen, Daten
und Hinweise für die Installation, den Betrieb und die Pege entsprechen dem
letzten Stand bei Drucklegung und erfolgen unter Berücksichtigung unserer bisherigen Erfahrungen und Erkenntnisse nach bestem Wissen. Aus den Angaben,
Abbildungen und Beschreibungen in dieser Anleitung können keine Ansprüche
hergeleitet werden.
Der Hersteller übernimmt keine Haftung für Schäden aufgrund von:
• Nichtbeachtung der Anleitung
• Nicht bestimmungsgemäßer Verwendung
• Unsachgemäßen Reparaturen
• Technischen Veränderungen
• Verwendung nicht zugelassener Ersatzteile
Übersetzungen werden nach bestem Wissen erstellt. Wir übernehmen keine Haftung für Übersetzungsfehler. Verbindlich bleibt allein der ursprüngliche deutsche
Text.
Auspacken
Zum Auspacken des Gerätes gehen Sie wie folgt vor:
• Nehmen Sie das Gerät aus dem Karton.
• Entfernen Sie alle Verpackungsteile und eventuelle Aufkleber am Gerät (nicht
das Typenschild entfernen).
Anforderungen an den Aufstellort
Für einen sicheren und fehlerfreien Betrieb des Gerätes ist beim Aufstellen folgendes zu beachten:
• Nutzen Sie eine feste, ebene, waagerechte, rutschfeste und wärmebeständige
Oberäche mit einer ausreichenden Tragkraft.
• Wählen Sie den Aufstellort so, dass Kinder nicht an die beweglichen Teile (insbesondere das Messer) des Gerätes kommen.
• Das Gerät ist nicht für den Einbau in eine Wand oder einen Einbauschrank vorgesehen.
• Stellen Sie das Gerät nicht in einer heißen, nassen oder feuchten Umgebung
auf.
• Die Steckdose muss leicht zugänglich sein, sodass die Anschlussleitung notfalls
schnell abgezogen werden kann.
Vor dem Erstgebrauch
Reinigen Sie alle Einzelteile gründlich, um diese von eventuellen Produktionsrückständen zubefreien. Siehe hierzu “Reinigung”.
10
Page 11

Bedienung
DE
HINWEIS
• Die maximale Dauernutzung beträgt ca. 15 Minuten. Anschließend lassen Sie
das Gerät auf Raumtemperatur herunterkühlen (ca. 1 Stunde.)
WICHTIG!
• Gehen Sie vorsichtig mit dem Messer um, dieses ist scharf und kann zu Verletzungen führen.
• Die glatte Seite des Messer muss Richtung Schnecke zeigen.
• Achten Sie darauf, dass die Aussparung auf dem Aufnahme-Bolzen im
Gehäuse sitzt.
• Wenn sich die Lebensmittel in der Schnecke verklemmt haben, drehen Sie den
Drehregler auf “R”. Halten Sie diesen Schalter für 5 Sekunden.
• Greifen Sie niemals mit den Fingern in den Einfüllschacht. Nutzen Sie immer
den Stopfer.
• Entnehmen oder setzen Sie das Schneckengehäuse nur bei Stillstand und gezogendem Anschlusskabel ein.
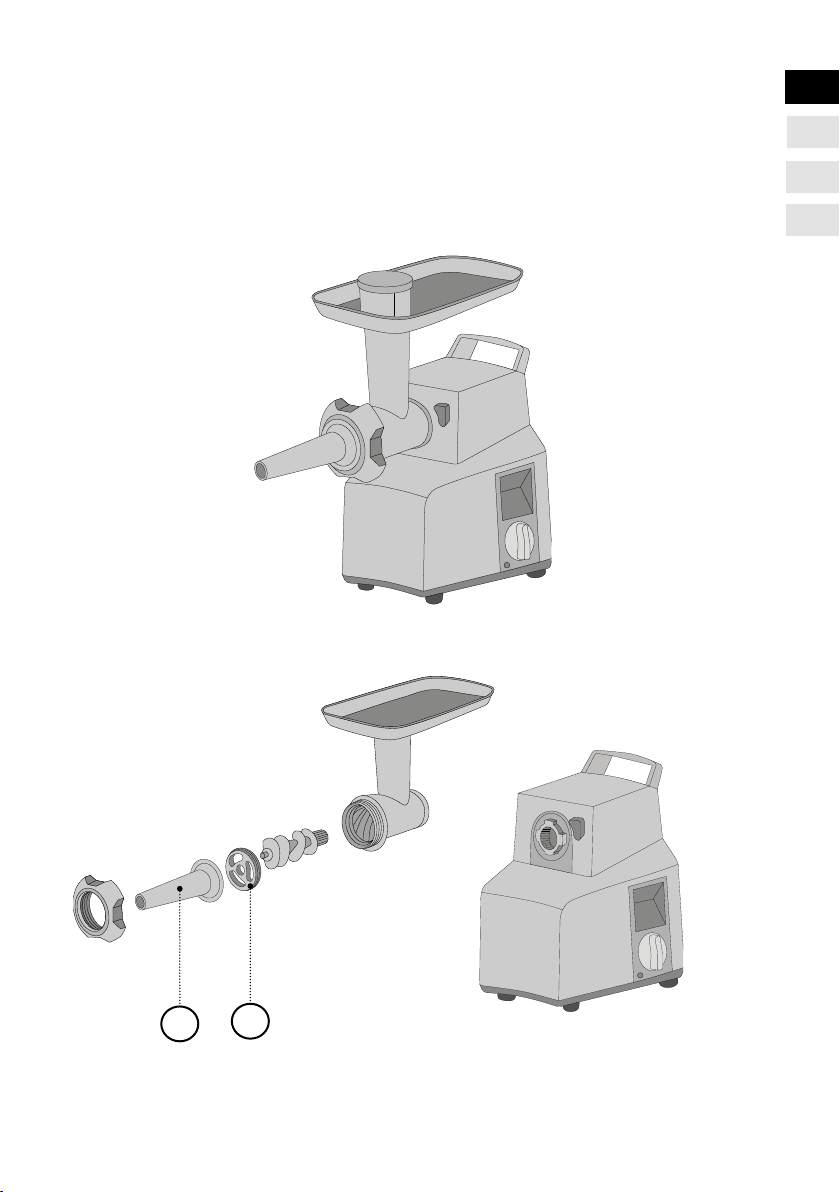
Fleischwolf-Aufsatz
• Nehmen Sie die gewünschte Lochscheibe aus dem Aufbewahrungsfach.
• Setzen Sie die Schnecke in das Schneckengehäuse.
• Setzen Sie anschließend den Vorschneider und das Messer auf.
• Setzen Sie die gewünschte Lochscheibe ein.
• Schrauben Sie nun den Schraubring auf.
• Setzen Sie das Schneckengehäuse leicht nach rechts geneigt auf den Antrieb.
Drehen Sie das Schneckengehäuse gegen den Uhrzeigersinn, bis das der
Vorsatz einrastet.
• Setzen Sie die Einfüllwanne auf.
• Stecken Sie den Stecker in die Steckdose.
• Drücken Sie den Ein-/Ausschalter.
• Stellen Sie einen Teller oder Schüssel unter den Auslauf.
• Legen Sie die zu verarbeitetenden Lebensmittel in die Einfüllwanne. Fleisch in
ca. 2,5 cm breite und ca. 6 cm lange Streifen schneiden.
• Drehen Sie den Drehregler nach rechts. Hier haben Sie die Auswahl zwischen
zwei Geschwindigkeitsstufen (low und high).
• Zum Nachschieben nutzen Sie ausschließlich den mitgelieferten Stopfer.
• Nach Beendigung des Wolfvorgangs, drehen Sie den Drehregler auf “Standby”.
• Anschließend schalten Sie das Gerät aus.
• Um das Gerät zu demontieren, drücken Sie den Entriegelungstaster, drehen Sie
EN
FR
IT
11
Page 12

den Aufsatz im Uhrzeigersinn und nehmen diesen ab und demontieren Sie alle
Einzelteile in umgekehrter Reihenfolge.
Wurstfüll-Aufsatz
• Setzen Sie die Schnecke in das Schneckengehäuse.
• Setzen Sie den Tragring und anschließend den Wurstfüllaufsatz ein.
• Schrauben Sie nun den Schraubring auf.
• Setzen Sie das Schneckengehäuse leicht nach rechts geneigt auf den Antrieb.
Drehen Sie das Schneckengehäuse gegen den Uhrzeigersinn, bis das der
Vorsatz einrastet.
• Setzen Sie die Einfüllwanne auf.
• Stecken Sie den Stecker in die Steckdose.
• Drücken Sie den Ein-/Ausschalter.
• Stellen Sie einen Teller oder Schüssel unter den Auslauf.
• Ziehen Sie den Kunst- oder Naturdarm über die Wurstaufsatznase.
• Legen Sie die zu verarbeitetenden Lebensmittel in die Einfüllwanne.
• Drehen Sie den Drehregler nach rechts. Hier haben Sie die Auswahl zwischen
zwei Geschwindigkeitsstufen (low und high).
• Zum Nachschieben nutzen Sie ausschließlich den mitgelieferten Stopfer.
• Nach Beendigung des Wolfvorgangs, drehen Sie den Drehregler auf “Standby”.
• Anschließend schalten Sie das Gerät aus.
• Um das Gerät zu demontieren, drücken Sie den Entriegelungstaster, nehmen
Sie den Aufsatz ab und demontieren Sie alle Einzelteile in umgekehrter Reihenfolge.
Kebbe-Aufsatz
• Setzen Sie die Schnecke in das Schneckengehäuse.
• Setzen Sie den Former und anschließend den Kebbeaufsatz ein.
• Schrauben Sie nun den Schraubring auf.
• Setzen Sie das Schneckengehäuse leicht nach rechts geneigt auf den Antrieb.
Drehen Sie das Schneckengehäuse gegen den Uhrzeigersinn, bis das der
Vorsatz einrastet.
• Setzen Sie die Einfüllwanne auf.
• Stecken Sie den Stecker in die Steckdose.
• Drücken Sie den Ein-/Ausschalter.
• Stellen Sie einen Teller oder Schüssel unter den Auslauf.
• Legen Sie die zu verarbeitetenden Lebensmittel in die Einfüllwanne.
• Drehen Sie den Drehregler nach rechts. Hier haben Sie die Auswahl zwischen
zwei Geschwindigkeitsstufen (low und high).
• Zum Nachschieben nutzen Sie ausschließlich den mitgelieferten Stopfer.
12
Page 13

• Nach Beendigung des Wolfvorgangs, drehen Sie den Drehregler auf “Standby”.
• Anschließend schalten Sie das Gerät aus.
• Um das Gerät zu demontieren, drücken Sie den Entriegelungstaster, nehmen
Sie den Aufsatz ab und demontieren Sie alle Einzelteile in umgekehrter Reihen-
folge.
DE
EN
FR
Spritzgebäck-Aufsatz
• Nehmen Sie die gewünschte Lochscheibe aus dem Aufbewahrungsfach.
• Setzen Sie die Schnecke in das Schneckengehäuse.
• Setzen Sie anschließend das Messer auf.
• Setzen Sie die gewünschte Lochscheibe ein.
• Platzieren Sie nun den Spritzgebäckaufsatz in dem Schraubring, so das dieser
vorne an der Öffnung liegt.
• Schrauben Sie nun den Schraubring auf. Bevor Sie den Schraubring fest zudrehen, arretieren Sie den Spritzgebäckaufsatz, so das dieser gerade in dem Schraubring sitzt.
• Setzen Sie nun die Schablone für unterschiedliche Spritzgebäck-Variationen ein.
• Setzen Sie das Schneckengehäuse leicht nach rechts geneigt auf den Antrieb.
Drehen Sie das Schneckengehäuse gegen den Uhrzeigersinn, bis das der
Vorsatz einrastet.
• Setzen Sie die Einfüllwanne auf.
• Stecken Sie den Stecker in die Steckdose.
• Drücken Sie den Ein-/Ausschalter.
• Stellen Sie einen Teller oder Schüssel unter den Auslauf.
• Legen Sie den Teig in die Einfüllwanne.
• Drehen Sie den Drehregler nach rechts. Hier haben Sie die Auswahl zwischen zwei Geschwindigkeitsstufen (low und high). Wir empfehlen Ihnen die
“Low”Geschwindigkeitsstufe zu nehmen.
• Zum Nachschieben nutzen Sie ausschließlich den mitgelieferten Stopfer.
• Nach Beendigung des Wolfvorgangs, drehen Sie den Drehregler auf “Standby”.
• Anschließend schalten Sie das Gerät aus.
• Um das Gerät zu demontieren, drücken Sie den Entriegelungstaster, nehmen
Sie den Aufsatz ab und demontieren Sie alle Einzelteile in umgekehrter Reihen-
folge.
IT
Reset-Knopf
Blockiert das Gerät und schaltet sich aus, lassen Sie das Gerät kurz abkühlen und
drücken Sie “Reset-Knopf”. Anschließend stellen Sie den Drehregler für maximal
5 Sekunden auf “R”. Die Schraube rotiert in entgegengesetzter Richtung.
13
Page 14
Aufbewahrung Zubehör
Die nicht benötigten Lochscheiben können Sie in dem Aufbewahrungsfach auf
der Rückseite des Gerätes aufbewahren. Drücken Sie dazu das Fach ein und dann
können Sie das Fach herausnehmen. Die Kunststoffteile (Tragring, Wurstfüllaufsatz, Former und Kebbeaufsatz) können Sie in dem Stopfer aufbewahren.
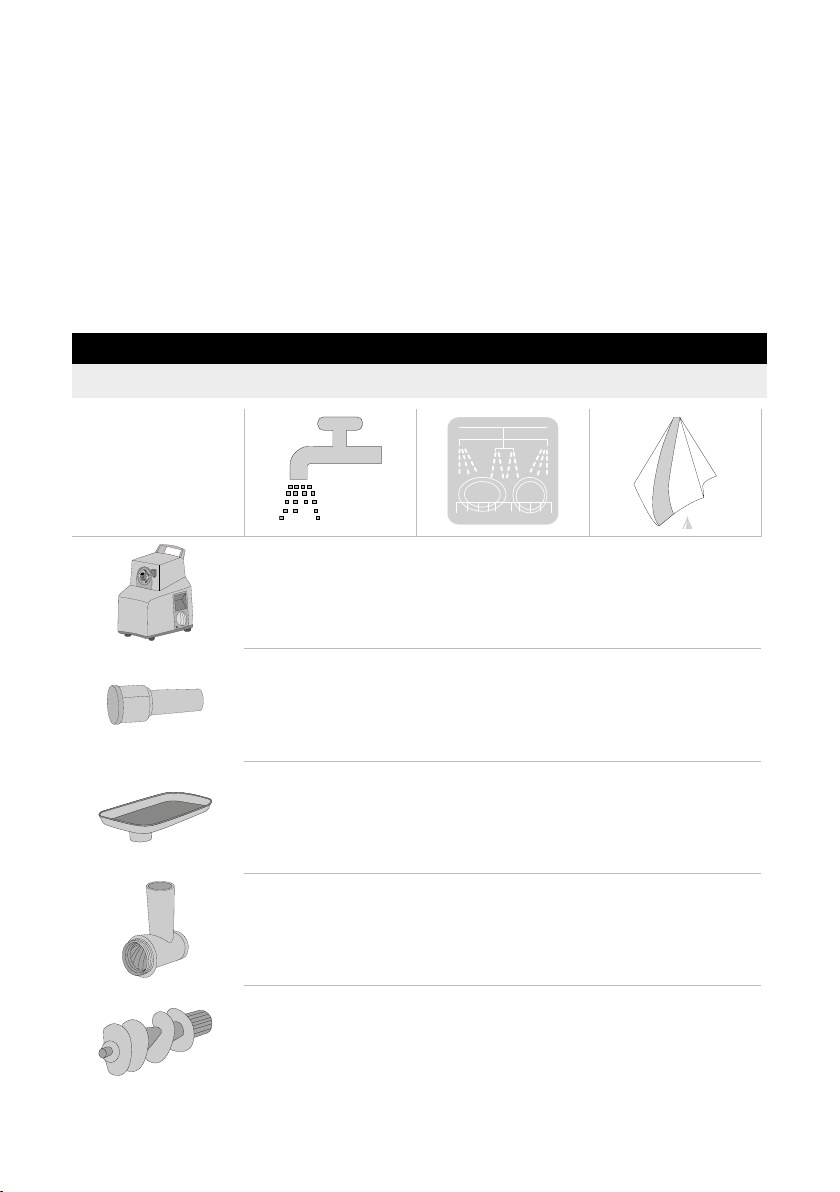
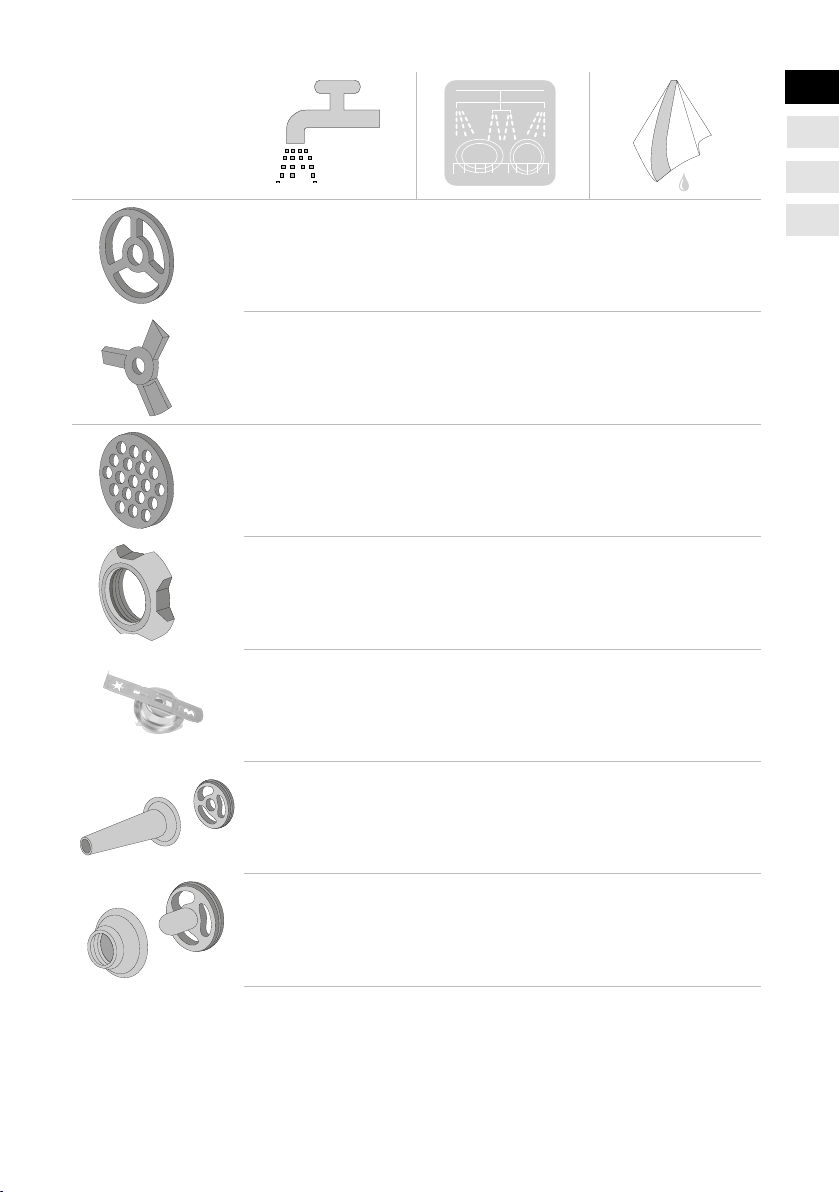
Reinigung
Reinigen Sie das Gerät mit einem weichen, feuchten Tuch und lassen es anschließend trocknen. Spülen Sie das Gerät nicht im Wasser ab und tauchen Sie es
nicht in Wasser.
HINWEIS
• Ziehen Sie vor jeder Reinigung den Stecker aus der Steckdose.
14
Page 15
DE
EN
FR
IT
Lassen Sie alle Teile nach der Reinigung vollständig trocknen. Setzen Sie den
Fleischwolf-Aufsatz wieder zusammen. Die nichtverwendeten Lochscheiben können Sie in dem Aufbewahrungsfach verstauen.
15
Page 16

Kundendienst
Wenn Ihr Graef-Gerät einen Schaden hat, wenden Sie sich bitte an Ihren Fachhändler oder an den Graef-Kundendienst unter 02932-9703677 oder schreiben Sie eine
Email an service@graef.de
Entsorgung
Dieses Produkt darf nicht über den normalen Hausmüll entsorgt werden, sondern
muss an einem Sammelpunkt für das Recycling von elektronischem Haushaltsabfall abgegeben werden. Das Symbol auf dem Produkt und in der Gebrauchsanleitung weist darauf hin. Die Werkstoffe sind gemäß Ihrer Kennzeichnung recycelbar.
Mit der Wiederverwendung, der stofichen oder anderweitigen Verwertung von
Altgeräten leisten Sie einen wichtigen Beitrag zum Schutz unserer Umwelt. Bitte
fragen Sie bei Ihrer Gemeindeverwaltung nach der zuständigen Entsorgungsstelle.
2 Jahre Gewährleistung
Für dieses Produkt übernehmen wir beginnend mit dem Verkaufsdatum 24 Monate Herstellergewährleistung für Mängel, die auf Fertigungs- und Werkstofffehler
zurückzuführen sind. Ihre gesetzlichen Gewährleistungsansprüche nach § 439 ff.
BGB-E bleiben von dieser Regelung unberührt. In der Gewährleistung nicht enthalten sind Schäden, die durch unsachgemäße Behandlung oder Einsatz entstanden
sind sowie Mängel, welche die Funktion oder den Wert des Gerätes nur gering-
fügig beeinussen. Darüber hinaus übernehmen wir für Schäden durch fehlende oder unzureichende Pege keine Haftung. In diesem Fall erlischt die Garantie
ebenfalls. Weitergehend sind Transportschäden, soweit wir dies nicht zu verantworten haben, vom Gewährleistungsanspruch ausgeschlossen. Für Schäden, die
durch eine nicht von uns oder eine unserer Vertretungen durchgeführte Reparatur
entstehen, ist ein Gewährleistungsanspruch ausgeschlossen. Bei berechtigten Reklamationen werden wir das mangelhafte Produkt nach unserer Wahl reparieren
oder gegen ein mängelfreies Produkt austauschen.
16
Page 17

Table of content
Safety instructions ................................................................................21
Information on these operating instructions .........................................22
Intended use ........................................................................................23
Limitation of liability ............................................................................23
Unpacking ...........................................................................................24
Requirements on the installation location .............................................24
Prior to rst use ...................................................................................24
Operation ...........................................................................................24
Mincing machine attachment ...............................................................24
Sausage stufng attachment ................................................................25
Kebbe attachment ...............................................................................26
Spritz biscuit attachment ......................................................................26
Reset button ........................................................................................27
Storage accessories ..............................................................................27
DE
EN
FR
IT
Cleaning ..............................................................................................27
After-sales service ................................................................................29
Disposal ...............................................................................................29
Two-year warranty ...............................................................................29
17
Page 18
Product overview
3
1
2
7
8
13
14
1. Control knob
2. Reset button
3. Display
4. Storage compartment
5. On / off switch
6. Cable / cable compartment
7. Stuffer
18
12
5
4
6
9
15
16
10
11
8. Filling tray
9. Worm housing
10. Worm
11. Pre-cutting knife
12. Blade
13. Perforated disc (ne diam. 3 mm,
medium diam. 5 mm, course diam. 8
mm)
Page 19

14. Ring nut
15. Releasing button
16. Drive
17. Support ring
18. Sausage stufng attachment
DE
EN
FR
Sausage stufng attachment
IT
18
17
19
Page 20

Kebbe attachment
19. Former
20. Kebbe attachment
20
Storage
19
20
201917
18
7
Page 21

Safety instructions
DE
This unit is in conformity with the safety instructions mentioned
hereinbefore. However, incorrect handling may lead to injury and
damage.
For safe handling of this unit, please observe the following safety
instructions:
• Before using this device for the rst time, check it for visible outer
damages on the housing, connection cable and plug. Do not operate a damaged unit.
• If the connection cable is damaged, it must be replaced by the
manufacturer, the after-sales service or a similarly qualied person
in order to prevent danger.
• Repairs may be carried out only by an expert or by Graef after-sales
service. Incorrect repairs may cause considerable hazards for the
user. In addition, any claim under guarantee is forfeited.
• Within the guarantee period the unit may be repaired only by Graef
after-sales service, otherwise the warranty claim expires.
• Defective parts must be replaced by original spare parts only. It is
only with these parts that the safety requirements are met.
• This unit must not be used by children. Keep the unit and its connection cable away from children.
• This unit may be used by persons with reduced physical, sensory or
mental abilities or deciencies in experience and knowledge, if they
are supervised or have been instructed in the safe use of the unit,
and in addition understand the resulting dangers.
• Children must not play with this unit.
• In the absence of supervision and prior to assembly, during cleaning disconnect the unit from the mains.
• The unit is not intended to be used with an external timer or a separate remove control.
• Always disconnect the connection cable by using plug; do not pull
the connecting cable.
• Prior to connecting the unit, compare the details regarding voltage
and frequency on the name plate with those of your electrical network. These details must correspond so that no damage occurs to
EN
FR
IT
21
Page 22

the unit.
• Do not use the unit if the mains cable or plug are damaged.
• Prior to using the appliance any further, have a new connection
cable installed by the Graef customer service or by an authorised
skilled person.
• Do not open the housing under any circumstances. If live connections are touched or the electrical and mechanical construction are
modied, there is the danger of electric shock.
• Never touch live parts. This might cause an electric shock or, in the
worst case, lead to death.
• Never carry the unit by its power cable.
• Never transport the appliance while it is in operation.
• Never touch the plug with moist hands.
• Packaging materials must not be used for playing. There is a danger of suffocation.
• Before cleaning, make sure that the unit is switched off and is not
connected to the power supply.
• Do not use any aggressive or abrasive detergents and no solvents.
• Do not scratch off stubborn soiling with hard objects.
• Do not ush the unit in water and do not immerse it in water.
• The food processes must be free of hard components (such as
bones, frozen pieces).
Information on these operating instructions
These operating instructions provide important information on putting into operation, safety, intended use and the care of the universal cutter (hereinafter referred to as unit). The operating instructions shall have to be available at the unit
at all times. The instructions have to be read and applied by every person who
deals with
• initial operation,
• operation,
• troubleshooting and/or
• or is instructed to clean the unit.
Keep these operating instructions and pass them on to the next owner along with
the unit. These operating instructions cannot take into consideration every conceivable use. For further information or in case of problems which are not dealt
22
Page 23

with or not dealt with sufciently in these instructions, please get in touch with
Graef customer service or your specialist dealers.
Intended use
This unit is not intended for commercial use. Use the mincing machine in closedup rooms only. You can process meat, sh, poultry, bacon and dough. By no
means cut hard matter, such as frozen foodl, bones, wood, sheet metal, or the
like. Another or any exceeding use shall not be considered intended. This appliance is intended for domestic and similar use, such as:
• Staff kitchens in shops and ofce
• In agricultural estates
• In hotels, motels and other residential areas
• In bed and breakfast boarding houses
IMPORTANT!
• Use only for applications akin to households!
Another or any exceeding use shall not be considered intended.
CAUTION!
The appliance can cause dangers, if is not used as intended.
• Use the unit exclusively as intended.
• Observe the procedures described in these operating instructions.
DE
EN
FR
IT
Claims of any kind caused by damage by unintended use shall be excluded. The
risk shall be borne sole by the operator.
Limitation of liability
All technical information, data and notes on the installation, the operation and
the care contained in these operating instructions correspond to the last status
before printing, and are rendered under consideration of our previous experience
and to the best of knowledge. No claims may be derived from the particulars,
illustrations and descriptions in these instructions.
The manufacturer shall not assume any liability for damage caused by:
• non-observation of the instructions
• unintended use
• incorrect repairs
• technical modications
• use of unapproved spare parts
Translations shall be carried out to the best of knowledge. We shall not assume
any liability for translation mistakes. The original German text only shall be bind-
ing.
23
Page 24

Unpacking
Proceed as follows to unpack the unit:
• Pull the unit out of the cardboard box.
• Remove all packaging and possible stickers on the unit (do not remove the
name plate).
Requirements on the installation location
For safe and fault-free operation of the unit, the following has to observed during
installation:
• Use a rm, even, horizontal, non-slip and heat resistant surface with a sufcient
load capacity.
• Choose the location in such a way that children cannot reach moving parts (in
particular the blade) of the unit.
• The unit is not designed for installation in a wall or a built-in cupboard.
• Do not set up the unit in a hot, wet or moist environment.
• The power outlet must be easily accessible so that the power cable can be
quickly removed in case of emergency.
Prior to rst use
Clean all individual parts thoroughly in order to remove potential production leftovers. See “Cleaning”.
Operation
NOTE
• The maximum duration of use is abt. 15 minutes. Subsequently let the unit
cool down at room temperature (approx. 1 hour).
IMPORTANT!
• Handle the blade with care as it may be sharp and may lead to injuries.
• The smooth side of the knife must point in direction of worm.
• Check to see that the opening is on the locating bolt in the housing.
• Turn on the control knob to “R” when food has got stuck in the worm. Hold
this button for approx. 5 seconds.
• Never put your ngers into the feed chute. Always use the stuffer.
• Remove or place the worm housing only at standstill and the connecting cable
removed.
Mincing machine attachment
• Take the requested perforated disc from the storage compartment.
24
Page 25

• Place the worm in the worm housing.
• Subsequently place the pre-cutting blade and the blade.
• Place the requested perforated disc.
• Now screw on the ring nut.
• Incline the worm housing slightly to the right towards the drive. Turn the
worm housing counter-clockwise until the attachment locks into place.
• Insert the lling tray.
• Insert the plug into the socket.
• Press the on / off button.
• Put a plate or bowl below the outlet.
• Place the food to be processed into the lling tray. Cut meat into strips of abt.
2.5 cm in width and abt. 6 cm in length.
• Turn on the control knob to the right. Here you have the choice between two
speed levels (low and high).
• Subsequently use the provided stuffer to push only.
• After nishing the mincing process, turn the control knob to “Standby”.
• Subsequently switch the unit off.
• In order to mount the unit, press the release button, turn the attachment clockwise and remove; and disassemble all individual parts in reverse sequence.
Sausage stufng attachment
• Place the worm in the worm housing.
• Place the support ring and subsequently the sausage stufng attachment.
• Now screw on the ring nut.
• Incline the worm housing slightly to the right towards the drive. Turn the
worm housing counter-clockwise until the attachment locks into place.
• Insert the lling tray.
• Insert the plug into the socket.
• Press the on / off button.
• Put a plate or bowl below the outlet.
• Pull the articial or natural sausage skin over the sausage stufng attachment
nose.
• Place the food to be processed into the lling tray.
• Turn on the control knob to the right. Here you have the choice between two
speed levels (low and high).
• Subsequently use the provided stuffer to push only.
• After nishing the mincing process, turn the control knob to “Standby”.
• Subsequently switch the unit off.
• In order to disassemble the unit, press the release button, remove the attachment; and disassemble all individual parts in reverse sequence.
DE
EN
FR
IT
25
Page 26

Kebbe attachment
• Place the worm in the worm housing.
• Place the former and subsequently the Kebbe attachment.
• Now screw on the ring nut.
• Incline the worm housing slightly to the right towards the drive. Turn the
worm housing counter-clockwise until the attachment locks into place.
• Insert the lling tray.
• Insert the plug into the socket.
• Press the on / off button.
• Put a plate or bowl below the outlet.
• Place the food to be processed into the lling tray.
• Turn on the control knob to the right. Here you have the choice between two
speed levels (low and high).
• Subsequently use the provided stuffer to push only.
• After nishing the mincing process, turn the control knob to “Standby”.
• Subsequently switch the unit off.
• In order to disassemble the unit, press the release button, remove the attachment; and disassemble all individual parts in reverse sequence.
Spritz biscuit attachment
• Take the requested perforated disc from the storage compartment.
• Place the worm in the worm housing.
• Subsequently place the blade.
• Place the requested perforated disc.
• Place the spritz biscuit attachment in the ring nut so that it rests front at the
opening.
• Now screw on the ring nut. Before screwing the ring nut tight, lock the spritz
biscuit attachment to short so that it is straight on the ring nut.
• Now t the mould for the different spritz biscuit variations.
• Incline the worm housing slightly to the right towards the drive. Turn the
worm housing counter-clockwise until the attachment locks into place.
• Insert the lling tray.
• Insert the plug into the socket.
• Press the on / off button.
• Put a plate or bowl below the outlet.
• Place the dough to be processed into the lling tray.
• Turn on the control knob to the right. Here you have the choice between two
speed levels (low and high). We recommend the low speed level.
• Subsequently use the provided stuffer to push only.
26
Page 27

• After nishing the mincing process, turn the control knob to “Standby”.
• Subsequently switch the unit off.
• In order to disassemble the unit, press the release button, remove the attachment; and disassemble all individual parts in reverse sequence.
DE
EN
FR
Reset button
If the unit blocks and switches itself off, let the unit cool down, and press the “Reset button”. Subsequently set the rotary control to “R” for 5 seconds maximum.
The screw rotates into the opposite direction.
Storage accessories
The no longer needed perforated disc can be stored on the rear side of the unit
in the storage compartment. Press on to the compartment, and then you can
remove the compartment. The plastic parts (support ring, sausage stufng attachment, former and Kebbe attachment) can be stored in the stuffer.
Cleaning
Clean the unit with a soft moist cloth, and let to dry subsequently. Do not ush
the unit in water and do not immerse it in water.
NOTE
• Pull the mains plug before each cleaning process.
IT
27
Page 28

28
Page 29

DE
EN
FR
Let all parts dry completely after cleaning. Reassembly the mincing machine attachment again. The no longer needed perforated disc can be stored in the storage compartment.
After-sales service
If your unit is defective, please contact your specialist dealer or the Graef customer
service on +49 2932-9703677 or write an e-mail to service@graef.de
Disposal
At the end of its service life, this product cannot be disposed of in normal domestic waste, but has to be taken a collection point ensuring the recycling of
electronic household waste. The symbol on the product and in the operating
instructions point out to this fact. Reuse the materials according to their marking.
With the reuse, recycling or other forms of recycling of old equipment, you make
an important contribution to the protection of our environment. Please ask your
municipal administration for the disposal point.
Two-year warranty
For this product, we assume 24 months manufacturer warranty for defects, which
are due to production or material defects. Your legal warranty claim in conformity
with Section 439 et seq. of the German Civil Code (BGB) shall remain unaffected
by this regulation. The guarantee does not cover any damage which is caused by
incorrect handling or use as well as defects which only slightly inuence the function or the value of the unit. We do not assume any liability for damage caused
by lack of or insufcient maintenance. In this case, the warranty will become null
and void as well. Moreover, transport damage provided we are not responsible
shall be excluded from the claims under guarantee. Guarantee shall be ruled out
for damage, the repair of which has not been carried out by us or one of our rep-
resentations. In case of justied complaints, we shall repair the defective product
or replace it by a product without defects at our discretion.
IT
29
Page 30

Sommaire
Indications sur la sécurité .....................................................................34
Informations relatives à ce mode d'emploi ...........................................35
Utilisation appropriée de la machine ....................................................36
Restriction de responsabilité ................................................................36
Déballage ............................................................................................37
Exigences á l’emplacement de la machine ............................................37
Avant la première utilisation .................................................................37
Utilisation ...........................................................................................38
Embout pour hachoir à viande .............................................................38
Embout de remplissage pour saucisses .................................................39
Embout pour boulettes de viande ........................................................39
Embout pour pâtisseries .......................................................................40
Bouton de réinitialisation .....................................................................40
Stockage accessoires ............................................................................41
Nettoyage ............................................................................................41
Service clientèle ...................................................................................43
Élimination ...........................................................................................43
2 ans de garantie .................................................................................43
30
Page 31

Aperçu du produit
DE
EN
FR
IT
3
1
2
7
8
9
11
12
13
14
1. Bouton rotatif
2. Bouton de réinitialisation
3. Afchage
4. Compartiment de rangement
5. Interrupteur marche/arrêt
6. Câble/compartiment pour câble
7. Bourroir
5
4
6
15
16
10
8. Cuve de versement
9. Carter de vis
10. Vis sans n
11. Précoupeur
12. Lame
13. Disque perforé (n Ø 3 mm ,
moyen Ø 5 mm, gros Ø 8 mm)
31
Page 32

14. Bague letée
15. Touche de déverrouillage
16. Entraînement
17. Bague de support
18. Embout de remplissage pour saucisses
Embout de remplissage pour saucisses
32
18
17
Page 33

Embout pour boulettes de viande
DE
19. Mouleur
20. Embout pour boulettes de viande
EN
FR
IT
Stockage
19
20
201917
18
7
33
Page 34

Indications sur la sécurité
Cet appareil est conforme aux dispositions de sécurité prescrites. Une
utilisation non-conforme peut néanmoins entraîner des dommages
pour les personnes et les objets.
Pour une manipulation sûre de cet appareil, veuillez respecter les
consignes de sécurité suivantes:
• Avant utilisation, veuillez contrôler l'absence de dommages exté-
rieurs visibles sur le boîtier, le câble et la che d'alimentation. Ne
mettez pas en service un appareil défectueux.
• Un câble de raccordement défectueux ne doit être remplacé que
par le fabricant, son service après-vente ou des personnes de qua-
lication similaire an d'éviter des dangers.
• Les réparations ne doivent être effectuées que par un personnel
spécialisé ou par le service après-vente de Graef. Les réparations
non-conformes peuvent entraîner des dangers considérables pour
l'utilisateur. En outre, elles annulent tous droits de garantie.
• La réparation de l'appareil durant le délai de garantie ne doit être
effectué que par le service après-vente de Graef, autrement le droit
de garantie sera annulé.
• Les pièces défectueuses ne doivent être remplacées que par des
pièces de rechange originales. Seules ces pièces permettent de garantir que les exigences en matière de sécurité sont remplies.
• Cet appareil ne doit pas être utilisé par des enfants. L'appareil et
son câble de raccordement doivent être tenus hors de la portée des
enfants.
• L'appareil peut être utilisé par des personnes avec des capacités
physiques, sensorielles ou mentales réduites ou avec un manque
d'expérience et/ou de connaissances, dans la mesure où celles-ci
sont surveillées ou instruites et ont compris les dangers potentiels
et que l'appareil est utilisé conformément an d'assurer l'utilisation
sûre de l'appareil.
• Ne pas laisser jouer des enfants avec cet appareil.
• En cas d'absence de surveillance et avant le montage, le démontage ou le nettoyage, l'appareil doit toujours être débranché du
réseau électrique.
34
Page 35

• L'appareil n'est pas conçu pour être utilisé avec une minuterie externe ou une télécommande séparée.
• Le câble de raccordement doit toujours être retiré de la prise au niveau du connecteur, non pas au niveau du câble de raccordement.
• Avant de brancher cet appareil, comparez les données de tension
et de fréquence sur le panneau de type et celles de votre réseau
électrique. Ces données doivent correspondre, an qu'aucun dommage ne survienne sur l'appareil.
• N'utilisez pas l'appareil si le câble de raccordement ou le connecteur
sont endommagés.
• Faites installer un nouveau câble d'alimentation par le service client
Graef ou un technicien autorisé, avant réutilisation de l'appareil.
• N'ouvrez jamais le boîtier de l'appareil. Si des raccords conducteurs
sont manipulés ou que la structure mécanique et électrique est
modiée, il y a un risque d'électrocution.
• Ne jamais manipuler de pièces sous tension. Elles peuvent provoquer un choc électrique et, dans le pire des cas, la mort.
• Ne transportez pas l'appareil par le câble d'alimentation.
• Ne jamais transporter l'appareil pendant le fonctionnement.
• Ne saisissez pas la che avec les mains mouillées.
• Les matériaux d'emballage ne doivent pas être utilisés pour jouer.
Risque d'étouffement.
• Assurez-vous que l'appareil est éteint et pas raccordé au réseau
électrique avant le nettoyage et lorsqu'il n'est pas utilisé.
• N'utilisez pas de produit de nettoyage agressif ou abrasifs et de
solvants.
• Gratter les salissures incrustées avec un objet souple.
• Ne rincez pas l'appareil à l'eau et ne le plongez pas dans l'eau.
• Les aliments à traiter doivent être exempts de composants durs
(par ex. os, aliments congelés).
DE
EN
FR
IT
Informations relatives à ce mode d'emploi
Ce mode d'emploi vous fournit des informations importantes pour la mise en
service, la sécurité, l'utilisation conforme et l'entretien de la trancheuse universelle
(appelée ci-dessous appareil). Il doit toujours être accessible près de l'appareil. Il
35
Page 36

doit être lu et être utilisé par chaque personne qui est chargée de
• la mise en service,
• l'utilisation,
• la résolution de panne et/ou
• du nettoyage de l'appareil.
Conservez ce mode d'emploi et remettez-le avec l'appareil au propriétaire suivant.
Ce mode d'emploi ne peut pas prendre en considération chaque utilisation ima-
ginable. Pour de plus amples informations ou en cas de problème, qui ne gurent
pas dans ce mode d'emploi ou qui ne sont pas traités de manière sufsamment
approfondie, veuillez vous adresser au service client de Graef ou à votre revendeur
spécialisé.
Utilisation appropriée de la machine
Cet appareil n'est pas conçu pour une utilisation industrielle. N'utilisez le hachoir
à viande que dans des espaces clos. Il vous permet de transformer la viande, le
poisson, la volaille, du lard et de la pâte. En aucun cas, vous pouvez couper des
objets durs tels que des aliments congelésl, des os, du bois, des tôles etc. Toute
utilisation autre ou au-delà est considérée comme non conforme. Cet appareil est
conçu pour l'utilisation domestique et similaire, tels que, par exemple:
• Dans les cuisines des employés dans des magasins et des bureaux;
• Dans les exploitations agricoles;
• Dans les hôtels, motels et autres structures de logement
• Dans les pensions petit-déjeuner.
IMPORTANT!
• Utilisation uniquement à usage domestique!
Toute autre utilisation ou utilisation divergente est considérée comme nonconforme.
ATTENTION!
Des dangers peuvent émaner de l'appareil en cas d'utilisation non-conforme.
• Utiliser l'appareil exclusivement de manière conforme.
• Respecter les procédures décrites dans le présent mode d'emploi.
Tout type de responsabilité due à des dommages provoqués par une utilisation
non-conforme est exclu. L'utilisateur porte l'entière responsabilité de ces risques.
Restriction de responsabilité
Toutes les informations contenues dans le présent mode d'emploi, les dates et les
recommandations d'installation, d'exploitation et d'entretien correspondent au
36
Page 37

niveau le plus avancé de la technique au moment de l'impression et sont effectuées en prenant en compte notre expérience et nos connaissances les meilleures
jusqu'à présent. Aucune responsabilité ne peut être dérivée des données, des
illustrations et descriptions qui sont contenues dans ce manuel.
Le fabricant décline toute responsabilité pour les dommages en raison :
• du non-respect du mode d'emploi
• d'une utilisation non-conforme
• des réparations non-conformes
• des modications techniques
• l'emploi de pièces de rechange non-autorisées
Les traductions sont effectuées selon les meilleures connaissances. Nous déclinons
toute responsabilité en cas d'erreur de traduction. Seul le texte d'origine en alle-
mand est contraignant.
Déballage
Pour déballer l'appareil, procédez comme suit:
• Retirer l'appareil du carton.
• Enlever toutes les pièces d'emballage et les bouts de bandes adhésives éventuelles sur l'appareil (ne pas retirer le panneau de type).
Exigences à l’emplacement de la machine
Pour une utilisation sûre et sans défaut de l'appareil, la mise en place doit ré-
pondre aux exigences suivantes:
• Utilisez une surface dure, plane, horizontale, antidérapante et résistante à la
chaleur avec une force portante sufsante.
• Choisir le lieu d'installation de manière à ce que les enfants ne puissent pas
toucher les pièces en mouvement (notamment la lame) de l'appareil.
• L'appareil n'est pas conçu pour être encastré dans un mur ou dans un meuble.
• Ne mettez pas l'appareil dans un environnement chaud, humide ou mouillé.
• La prise doit être facilement accessible, de telle façon que le câble électrique
puisse être facilement retiré en cas d'urgence.
DE
EN
FR
IT
Avant la première utilisation
Nettoyez soigneusement tous les composants an de les libérer d'éventuels résidus de production. Voir à cet effet « nettoyage ».
37
Page 38

Utilisation
REMARQUE
• La durée d'utilisation permanente maximale est d'environ 15 minutes. Ensuite, laisser refroidir l'appareil à température ambiante (env. 1 heure).
IMPORTANT!
• Manier la lame avec précaution, celle-ci est tranchante et peut causer des
blessures.
• La face lisse de la lame doit être orientée côté vis sans n.
• Veillez à ce que l'orice sur le boulon récepteur se trouve sur le boîtier.
• Si les aliments se sont coincés sur la vis sans n, placez l'interrupteur rotatif sur
« R ». Maintenez appuyé ce bouton pendant 5 secondes.
• Ne mettez jamais vos doigts dans le compartiment de remplissage. Toujours
utiliser le bourreur.
• Retirez ou placez le carter de vis uniquement à l'arrêt et si le câble de raccordement est tiré.
Embout pour hachoir à viande
• Prenez le disque perforé souhaité du compartiment de rangement.
• Placez la vis sans dans le carter de vis.
• Placez ensuite le précoupeur et la lame.
• Placez le disque perforé souhaité.
• Vissez maintenant la bague letée.
• Placez le carter de vis de manière inclinée légèrement décalée vers la droite sur
l'entraînement. Tournez le carter de vis dans le sens contraire aux aiguilles de
la montre jusqu'à ce que l'embout soit encliqueté.
• Placez la cuve de versement.
• Insérez la che dans la prise électrique.
• Appuyez sur l'interrupteur marche/arrêt.
• Placez une assiette ou un bol sous la sortie.
• Placez les aliments à transformer dans la cuve de versement. Couper la viande
en morceaux d'une largeur d'environ 2,5 cm et d'une longueur d'environ 6 cm.
• Tournez le bouton rotatif vers la droite. Ici, vous avez le choix entre deux niveaux
de vitesses (low et high).
• Pour pousser les aliments, utilisez exclusivement le bourreur fourni.
• Une fois le procédé de hachement terminé, placez le bouton rotatif sur
« Standby ».
• Eteignez ensuite l'appareil.
• Pour démonter l'appareil, appuyez sur la touche de déverrouillage, tournez l'em-
38
Page 39

bout dans le sens des aiguilles d'une montre et retirez-le et démontez toutes les
pièces dans l'ordre inverse.
Embout de remplissage pour saucisses
• Placez la vis sans dans le carter de vis.
• Placez la bague letée et ensuite l'embout de remplissage pour saucisses.
• Vissez maintenant la bague letée.
• Placez le carter de vis de manière inclinée légèrement décalée vers la droite sur
l'entraînement. Tournez le carter de vis dans le sens contraire aux aiguilles de
la montre jusqu'à ce que l'embout soit encliqueté.
• Placez la cuve de versement.
• Insérez la che dans la prise électrique.
• Appuyez sur l'interrupteur marche/arrêt.
• Placez une assiette ou un bol sous la sortie.
• Tirez le boyau articiel ou naturel sur le nez de l'embout de remplissage de
saucisses.
• Placez les aliments à transformer dans la cuve de versement.
• Tournez le bouton rotatif vers la droite. Ici, vous avez le choix entre deux niveaux
de vitesses (low et high).
• Pour pousser les aliments, utilisez exclusivement le bourreur fourni.
• Une fois le procédé de hachement terminé, placez le bouton rotatif sur
« Standby ».
• Eteignez ensuite l'appareil.
• Pour démonter l'appareil, appuyez sur la touche de déverrouillage, retirez l'embout et démontez toutes les pièces dans l'ordre inverse.
DE
EN
FR
IT
Embout pour boulettes de viande
• Placez la vis sans dans le carter de vis.
• Placez le mouleur et ensuite l'embout pour boulettes de viande.
• Vissez maintenant la bague letée.
• Placez le carter de vis de manière inclinée légèrement décalée vers la droite sur
l'entraînement. Tournez le carter de vis dans le sens contraire aux aiguilles de
la montre jusqu'à ce que l'embout soit encliqueté.
• Placez la cuve de versement.
• Insérez la che dans la prise électrique.
• Appuyez sur l'interrupteur marche/arrêt.
• Placez une assiette ou un bol sous la sortie.
• Placez les aliments à transformer dans la cuve de versement.
• Tournez le bouton rotatif vers la droite. Ici, vous avez le choix entre deux niveaux
de vitesses (low et high).
39
Page 40

• Pour pousser les aliments, utilisez exclusivement le bourreur fourni.
• Une fois le procédé de hachement terminé, placez le bouton rotatif sur
« Standby ».
• Eteignez ensuite l'appareil.
• Pour démonter l'appareil, appuyez sur la touche de déverrouillage, retirez l'embout et démontez toutes les pièces dans l'ordre inverse.
Embout pour pâtisseries
• Prenez le disque perforé souhaité du compartiment de rangement.
• Placez la vis sans dans le carter de vis.
• Placez ensuite la lame.
• Placez le disque perforé souhaité.
• Placez maintenant l'embout pour pâtisseries dans la bague letée de manière à
ce que celui-ci se trouve devant sur l'ouverture.
• Vissez maintenant la bague letée. Avant de serrer la bague letée, bloquer
l'embout de remplissage de manière à ce que celui-ci se trouve droit dans la
bague letée.
• Insérez maintenant le gabarit pour les différentes variantes de pâtisseries.
• Placez le carter de vis de manière inclinée légèrement décalée vers la droite sur
l'entraînement. Tournez le carter de vis dans le sens contraire aux aiguilles de
la montre jusqu'à ce que l'embout soit encliqueté.
• Placez la cuve de versement.
• Insérez la che dans la prise électrique.
• Appuyez sur l'interrupteur marche/arrêt.
• Placez une assiette ou un bol sous la sortie.
• Posez la pâte dans la cuve de versement.
• Tournez le bouton rotatif vers la droite. Ici, vous avez le choix entre deux niveaux
de vitesses (low et high).
• Pour pousser les aliments, utilisez exclusivement le bourreur fourni.
• Une fois le procédé de hachement terminé, placez le bouton rotatif sur
« Standby ».
• Eteignez ensuite l'appareil.
• Pour démonter l'appareil, appuyez sur la touche de déverrouillage, retirez l'embout et démontez toutes les pièces dans l'ordre inverse.
Bouton de réinitialisation
Bloquez l'appareil et éteignez-le, laisser refroidir l'appareil et appuyez sur le
« bouton de réinitialisation ». Placez ensuite le bouton rotatif sur « R » pendant 5
secondes maximum. La vis se tourne dans le sens inverse.
40
Page 41

Stockage accessoires
Les disques perforés non utilisés peuvent être rangés dans le compartiment de
rangement au dos de l'appareil. Pour ce faire, appuyez sur le compartiment pour
retirer celui-ci. Les pièces en plastique (bague de support, embout de remplissage
pour saucisses, mouleur et embout pour boulettes de viande) peuvent être rangées dans le bourreur.
Nettoyage
Nettoyez l'appareil à l'aide d'un chiffon doux et humide et laisser le sécher. Ne
rincez pas l'appareil à l'eau et ne le plongez pas dans l'eau.
REMARQUE
• Débranchez la che du réseau avant chaque nettoyage.
DE
EN
FR
IT
41
Page 42

Laissez sécher entièrement toutes les pièces après le nettoyage. Réassemblez l'embout du hachoir à viande. Les disques perforés non utilisés peuvent être rangés
dans le compartiment de rangement.
42
Page 43

Service clientèle
Si votre appareil Graef présente un dommage, veuillez-vous adresser à votre marchand spécialisé ou au service clientèle de Graef +49 (0) 29 32- 97 03 677, ou
envoyez-nous un courriel à l'adresse service@graef.de
DE
EN
FR
Élimination
Ce produit ne doit pas être éliminé avec les ordures ménagères normales, mais
doit être déposé à un point de collecte pour le recyclage d'ordures ménagères
électriques. Le symbole sur le produit et dans le mode d'emploi en atteste. Les
matériaux sont recyclables selon leur marquage. Avec la réutilisation, le recyclage
matériel ou autre de déchets électroniques, vous apportez une contribution importante à la protection de notre environnement. Veuillez-vous adresser à votre
municipalité pour connaître les points de collecte appropriés.
2 ans de garantie
Nous fournissons une garantie fabricant pour ce produit, valable 24 mois à partir
de la date d'achat, pour les défauts imputables à la fabrication et aux matériaux.
Vos droits de garantie selon § 439 ff. BGB-E (code civil allemand) n'en sont pas affectés. Les dommages entraînés par une utilisation ou un emploi non conforme ne
sont pas couverts par la garantie, ainsi que les défauts qui inuencent le fonctionnement et la valeur de l'appareil de manière minime. Par ailleurs, nous déclinons
toute responsabilité pour des dommages dus à un entretien insufsant ou inexistant. Dans ce cas, le droit de garantie est annulé. En outre, les dommages dus au
transport sont exclus de la responsabilité de garantie, dans la mesure où ils ne
nous sont pas imputables. Nous déclinons toute responsabilité de garantie pour
les dommages entraînés par une réparation effectuée par un tiers ou par une de
nos liales. En cas de réclamation de droit, nous décidons soit de réparer, soit de
remplacer le produit défectueux par un produit en bon état de fonctionnement.
IT
43
Page 44

Indice
Avvertenze per la sicurezza ..................................................................48
Informazioni relative a queste istruzioni per l'uso .................................50
Uso conforme ......................................................................................50
Limitazione della responsabilità ............................................................51
Disimballare .........................................................................................51
Requisiti del punto di installazione .......................................................51
Prima del primo utilizzo ........................................................................51
Gestione .............................................................................................52
Gruppo mobile del tritacarne ...............................................................52
Accessorio per insaccati .......................................................................53
Accessorio per kibbeh ..........................................................................53
Accessorio per Spritzgebäck (tipici biscotti tedeschi) .............................54
Tasto Reset ...........................................................................................54
Custodia accessori ...............................................................................55
Pulizia ..................................................................................................55
Assistenza clienti ..................................................................................57
Smaltimento ........................................................................................57
Garanzia di 2 anni ................................................................................57
44
Page 45

Panoramica del prodotto
DE
EN
FR
IT
3
1
2
7
8
9
11
12
13
14
1. Manopola di regolazione
2. Tasto Reset
3. Display
4. Vano portaoggetti
5. Tasto On / Off
6. Cavo / Vano cavi
7. Pressino
5
4
6
15
16
10
8. Tramoggia
9. Convogliatore
10. Coclea
11. Sgrossatrice
12. Lama
13. Piastra forata (ne Ø 3 mm,
media Ø 5 mm, grossa Ø 8 mm)
45
Page 46

14. Ghiera
15. Pulsante di sblocco
16. Unità di azionamento
Accessorio per insaccati
17. Anello di supporto
18. Accessorio per insaccati
46
18
17
Page 47

Accessorio per kibbeh
DE
19. Formatore
20. Accessorio per kibbeh
EN
FR
IT
19
Conservazione
20
201917
18
7
47
Page 48

Avvertenze per la sicurezza
Questo dispositivo è conforme alle norme di sicurezza vigenti. Tuttavia, l'uso improprio può provocare lesioni personali o danni materiali.
Per un uso sicuro del dispositivo, osservare le seguenti avvertenze per
la sicurezza:
• Prima dell’uso, controllare attentamente se il contenitore del dispositivo, il cavo di collegamento o la spina di rete presentassero eventuali danni esterni visibili. Non mettere in funzione il dispositivo se
lo stesso dovesse risultare difettoso.
• Per prevenire rischi e pericoli, un cavo di alimentazione danneggiato può essere sostituito unicamente dal produttore, dal suo servizio
di assistenza clienti o da una persona debitamente qualicata.
• Le riparazioni devono essere eseguite solo da un esperto o dal servizio assistenza clienti Graef. Le riparazioni improprie possono causare notevoli rischi per l'utente. Inoltre estinguono la garanzia.
• La riparazione del dispositivo in garanzia può essere effettuata unicamente tramite il servizio di assistenza clienti Graef, altrimenti il
diritto alla garanzia decade.
• I componenti difettosi devono essere sostituiti solo con parti di ricambio originali. Solo utilizzando queste componenti si garantisce
il rispetto dei requisiti di sicurezza.
• Questo dispositivo non può essere utilizzato da bambini. Il dispositivo e il suo cavo di collegamento devono essere tenuti fuori dalla
portata di bambini.
• Il dispositivo può essere utilizzato da persone con ridotte capacità
siche, sensoriali o mentali, con mancanza di esperienza e/o conoscenza sul funzionamento dello stesso solamente se controllati o
istruiti circa l'uso sicuro del macchinario e solo una volta che abbiano compreso i rischi che derivano dallo stesso.
• Ai bambini non è permesso giocare con il dispositivo.
• L'apparecchio in assenza di supervisione e prima del montaggio,
smontaggio o della pulizia deve essere sempre scollegato dalla rete.
• L'apparecchio non è destinato ad essere utilizzato mediante timer
esterno o sistema di funzionamento remoto separato.
• Scollegare sempre il cavo di alimentazione dalla presa di corrente
48
Page 49

afferrando la spina di rete e non il cavo di cavo di collegamento
stesso.
• Prima di attaccare l’apparecchio alla corrente, assicurarsi che la
tensione e la frequenza di alimentazione indicati sulla targhetta dei
dati corrispondano a quelli della vostra rete elettrica. Questi dati
devono coincidere afnché non si verichino danni al dispositivo.
• Non usare l'apparecchio se il cavo di allacciamento o la spina sono
danneggiati.
• Prima di continuare ad utilizzare l’apparecchio, fare installare un
nuovo cavo di alimentazione dal servizio clienti Graef oppure da
un esperto in materia autorizzato.
• Non aprire in nessun caso il corpo dell'apparecchio. Se vengono
toccati degli attacchi sotto tensione oppure componenti elettriche
o meccaniche, sussiste il pericolo di scossa elettrica.
• Non toccare mai le parti sotto tensione. Sussiste il rischio di prendere la scossa che, nelle peggiore delle ipotesi, potrebbe portare
alla morte.
• Non trasportare l'apparecchio tenendolo per il cavo di allacciamento.
• Non trasportare mai l’apparecchio mentre questo è in funzione.
• Non afferrare la spina con le mani umide.
• I materiali d'imballo non devono essere usati per giocare. Sussiste
pericolo di soffocamento.
• Assicurarsi che il dispositivo sia spento e non sia collegato alla rete
elettrica prima di effettuare interventi di pulizia e quando non viene utilizzato.
• Non utilizzare detergenti aggressivi o abrasivi e solventi.
• Non grattare con oggetti duri per rimuovere lo sporco ostinato.
• Non sciacquare il dispositivo con acqua corrente né immergerlo
nell’acqua.
• Il prodotti alimentari da tritare devono essere liberi da elementi
duri (per es. ossi, surgelati).
DE
EN
FR
IT
49
Page 50

Informazioni relative a queste istruzioni per l'uso
Queste istruzioni d’uso vi forniranno importanti informazioni sulla messa in funzione, la sicurezza, l’uso conforme e la cura dell’affettatrice (di seguito denominata dispositivo). Le istruzioni d'uso devono essere sempre disponibili presso il
dispositivo. Devono essere letti e rispettati da chiunque sia incaricato con la:
• Messa in servizio,
• Gestione,
• Risoluzioni di disfunzioni e/o la
• Pulizia del dispositivo.
Conservare queste istruzioni per l'uso e consegnatele al successivo proprietario
assieme al dispositivo stesso. Queste istruzioni d’uso non possono coprire tutti gli
aspetti possibili ed immaginabili. Per qualsiasi ulteriore informazione o in caso di
problemi che non venissero approfondite abbastanza in queste istruzioni per l’u-
so, vi preghiamo di rivolgervi al servizio clienti Graef oppure al vostro rivenditore.
Uso conforme
Questo dispositivo non è progettato per un uso commerciale. Utilizzare il tritacarne esclusivamente in ambienti chiusi. Con questo dispositivo potete lavorare
carne, pesce, pollame, speck e impasti. Non tentare mai di tritare prodotti duri
come ad esempio cibi surgelati, ossi, legno, lamiere o simili. Qualunque altro o
diverso utilizzo da questo, è considerato non conforme. Questo dispositivo è stato
progettato per un uso domestico o ambienti simili quali:
• Le cucine per il personale di ufci o negozi
• Le proprietà agricole
• Hotel, motel o altre strutture alberghiere
• I bed & breakfast
IMPORTANTE!
• Dispositivo progettato solamente per uso domestico!
Qualunque altro o diverso utilizzo da questo, è considerato non conforme.
ATTENZIONE!
In caso di un utilizzo non conforme, il dispositivo potrebbe presentare alcuni
pericoli.
• Usare il dispositivo solo come previsto.
• Seguire attentamente tutti i processi descritti in queste istruzioni per l'uso.
Sono escluse qualsiasi rivendicazioni per danni riconducibili ad un uso non conforme. L’utente si assume ogni rischio.
50
Page 51

Limitazione della responsabilità
Tutte le informazioni tecniche, i dati e le note per l’installazione, l’utilizzo e la
manutenzione contenuti in queste istruzioni per l'uso, corrispondono all’aggiornamento dell’ultima edizione di stampa e vengono riportati nel rispetto della no-
stra migliore conoscenza ed esperienza acquisita no ad oggi. Le informazioni,
le illustrazioni e le descrizioni contenute in queste istruzioni d’uso non possono
quindi dare luogo ad alcun reclamo.
Il produttore non si assume alcuna responsabilità per danni riconducibili a:
• L’inosservanza di queste istruzioni d’uso
• L’uso non conforme
• Le riparazioni non idonee
• Le alterazioni tecniche
• L’utilizzo di pezzi di ricambio non autorizzati
Le traduzioni vengono effettuare al meglio delle capacità. Non ci assumiamo alcuna responsabilità per gli errori di traduzione. È legalmente vincolante esclusiva-
mente il testo originale tedesco.
Disimballare
Per disimballare il dispositivo procedere come segue:
• Togliere l’apparecchio dalla sua scatola di cartone.
• Rimuovere tutte le parti facenti parte dell’imballaggio e togliere eventuali adesivi dall’apparecchio (non rimuovere la targhetta dei dati).
DE
EN
FR
IT
Requisiti del punto di installazione
Per un funzionamento sicuro e senza errori, durante l’installazione dell’apparecchio è necessario osservare quanto segue:
• Utilizzare sempre una supercie dura, pianeggiante, orizzontale, antiscivolo e
resistente al calore con un’adeguata portata minima.
• Scegliere un punto di installazione tale che i bambini non possano raggiungere
i componenti mobili (in particolare la lama) del dispositivo.
• Questo apparecchio non è previsto per essere incassato in una parete o in un
armadio a muro.
• Non mettere il dispositivo in un ambiente caldo, bagnato o umido.
• È importante che la presa di corrente sia facilmente accessibile così che, in caso
di emergenza, si possa rapidamente staccare il cavo di alimentazione.
Prima del primo utilizzo
Pulire con cura i singoli componenti per eliminare eventuali residui di produzione.
Vedi “Pulizia”.
51
Page 52

Gestione
AVVERTENZA:
• Il tempo massimo di utilizzo ininterrotto è pari a ca. 15 minuti. Dopo questo
tempo lasciare raffreddare il dispositivo no a che non raggiunga la temperatura ambiente (ca. 1 ora).
IMPORTANTE!
• Maneggiare con cura la lama poiché la stessa è aflata e potrebbe causare
lesioni.
• Il lato liscio della lama deve essere rivolto verso la coclea.
• Accertarsi che la cavità predisposta corrisponda esattamente al perno
di centraggio dell’alloggiamento.
• Se i prodotti alimentare si dovessero bloccare nella coclea, posizionare la manopola di regolazione su “R”. Mantenere il tasto in posizione per 5 secondi.
• Non inserire mai le mani nel vano di riempimento. Utilizzare sempre il pressino.
• Estrarre e inserire il convogliatore solamente quando il dispositivo è fermo e il
cavo di collegamento non è inserito.
Gruppo mobile del tritacarne
• Prendere il disco forato desiderato dal vano portaoggetti.
• Inserire la coclea nel convogliatore.
• Montare la sgrossatrice e la lama.
• Montare il disco forato desiderato.
• Avvitare dunque la ghiera.
• Montare il convogliatore sull’unità di azionamento inclinandolo leggermente a
destra. Girare il convogliatore in senso antiorario nché il gruppo mobile non
scatta in posizione.
• Collocare la tramoggia.
• Inserire la spina nella presa di corrente.
• Premere il pulsante di accensione e spegnimento.
• Collocare un piatto o una ciotola sotto l'erogatore.
• Porre il prodotto alimentare da tritare sulla tramoggia. Tagliare la carne in strisce
larghe ca. 2,5 cm e lunghe ca. 6 cm.
• Girare la manopola di regolazione a destra. Qui si ha la possibilità di scegliere tra
due velocità (low e high).
• Utilizzare esclusivamente il pressino in dotazione per aggiungere il prodotto.
• Una volta conclusa l’operazione, posizionare la manopola di regolazione su
“Standby”.
• Spegnere inne il dispositivo.
• Per smontare il dispositivo, premere il pulsante di sblocco, ruotare il gruppo
52
Page 53

mobile in senso orario, rimuoverlo dall’unità di azionamento e smontare tutti i
singoli pezzi procedendo in ordine inverso.
Accessorio per insaccati
• Inserire la coclea nel convogliatore.
• Inserire l’anello di supporto e poi l’accessorio per insaccati.
• Avvitare dunque la ghiera.
• Montare il convogliatore sull’unità di azionamento inclinandolo leggermente a
destra. Girare il convogliatore in senso antiorario nché il gruppo mobile non
scatta in posizione.
• Collocare la tramoggia.
• Inserire la spina nella presa di corrente.
• Premere il pulsante di accensione e spegnimento.
• Collocare un piatto o una ciotola sotto l'erogatore.
• Inlare il budello naturale o sintetico sull’apposita sporgenza per insaccati.
• Porre il prodotto alimentare da tritare sulla tramoggia.
• Girare la manopola di regolazione a destra. Qui si ha la possibilità di scegliere tra
due velocità (low e high).
• Utilizzare esclusivamente il pressino in dotazione per aggiungere il prodotto.
• Una volta conclusa l’operazione, posizionare la manopola di regolazione su
“Standby”.
• Spegnere inne il dispositivo.
• Per smontare il dispositivo, premere il pulsante di sblocco, rimuoverlo dall’unità
di azionamento e smontare tutti i singoli pezzi procedendo in ordine inverso.
DE
EN
FR
IT
Accessorio per kibbeh
• Inserire la coclea nel convogliatore.
• Inserire il formatore e poi l’accessorio per kibbeh.
• Avvitare dunque la ghiera.
• Montare il convogliatore sull’unità di azionamento inclinandolo leggermente a
destra. Girare il convogliatore in senso antiorario nché il gruppo mobile non
scatta in posizione.
• Collocare la tramoggia.
• Inserire la spina nella presa di corrente.
• Premere il pulsante di accensione e spegnimento.
• Collocare un piatto o una ciotola sotto l'erogatore.
• Porre il prodotto alimentare da tritare sulla tramoggia.
• Girare la manopola di regolazione a destra. Qui si ha la possibilità di scegliere tra
due velocità (low e high).
• Utilizzare esclusivamente il pressino in dotazione per aggiungere il prodotto.
53
Page 54

• Una volta conclusa l’operazione, posizionare la manopola di regolazione su
“Standby”.
• Spegnere inne il dispositivo.
• Per smontare il dispositivo, premere il pulsante di sblocco, rimuoverlo dall’unità
di azionamento e smontare tutti i singoli pezzi procedendo in ordine inverso.
Accessorio per Spritzgebäck (tipici biscotti tedeschi)
• Prendere il disco forato desiderato dal vano portaoggetti.
• Inserire la coclea nel convogliatore.
• Montare la lama.
• Montare il disco forato desiderato.
• Montare poi l’accessorio per il Spritzgebäck sulla ghiera in modo che si trovi
davanti, sull’apertura.
• Avvitare dunque la ghiera. Prima di stringere la ghiera, bloccare l’accessorio per
il Spritzgebäck in modo che risulti dritto rispetto alla stessa.
• Utilizzare dunque i vari inseriti per ottenere varie forme per i vostri biscotti.
• Montare il convogliatore sull’unità di azionamento inclinandolo leggermente a
destra. Girare il convogliatore in senso antiorario nché il gruppo mobile non
scatta in posizione.
• Collocare la tramoggia.
• Inserire la spina nella presa di corrente.
• Premere il pulsante di accensione e spegnimento.
• Collocare un piatto o una ciotola sotto l'erogatore.
• Porre l’impasto da lavorare sulla tramoggia.
• Girare la manopola di regolazione a destra. Qui si ha la possibilità di scegliere tra
due velocità (low e high).
• Utilizzare esclusivamente il pressino in dotazione per aggiungere il prodotto.
• Una volta conclusa l’operazione, posizionare la manopola di regolazione su
“Standby”.
• Spegnere inne il dispositivo.
• Per smontare il dispositivo, premere il pulsante di sblocco, rimuoverlo dall’unità
di azionamento e smontare tutti i singoli pezzi procedendo in ordine inverso.
Tasto Reset
Nel caso il dispositivo si blocchi e si spenga da solo, lasciarlo raffreddare un attimo e quindi premere il “Tasto Reset”. Impostare poi la manopola di regolazione
su “R” mantenendola in posizione per massimo 5 secondi. La vite gira nel senso
opposto.
54
Page 55

Custodia accessori
I dischi forati non utilizzati, si possono riporre e custodire nel vano portaoggetti situato sul retro del dispositivo. Premere sul vano per poterlo estrarre. I pezzi in PVC
(anello di supporto, accessorio per insaccati, formatore e accessorio per kibbeh) si
possono custodire all’interno del pressino.
Pulizia
Pulire il dispositivo con un panno morbido e umido e, successivamente, lasciarlo
asciugare. Non sciacquare il dispositivo con acqua corrente né immergerlo nell’acqua.
AVVERTENZA:
• Prima di ogni pulizia scollegare la spina di rete.
DE
EN
FR
IT
55
Page 56

Lasciare asciugare tutti i pezzi dopo averli puliti. Rimontare l’intera gruppo mobile
del tritacarne. I dischi forati non utilizzati, si possono riporre e custodire nel vano
portaoggetti.
56
Page 57

Assistenza clienti
Nel caso il vostro apparecchio Graef si fosse danneggiato, si prega di contattare il
vostro rivenditore oppure il servizio di assistenza clienti Graef al numero +49 29329703677 oppure tramite e-mail all'indirizzo service@graef.de
DE
EN
FR
Smaltimento
Questo prodotto non deve essere smaltito con i normali riuti domestici, ma deve
essere portato in un punto di raccolta per il riciclaggio di apparecchiature elettroniche. Il simbolo applicato al prodotto e riportato sulle istruzioni per l'uso fa riferimento a questo. I materiali sono riciclabili in base al contrassegno che riportano. Il
riutilizzo, il riciclaggio o altre forme di valorizzazione di apparecchiature obsolete,
rappresentano un importante contributo alla tutela dell'ambiente. Informatevi
presso il vostro comune per conoscere i centri di raccolta di competenza.
Garanzia di 2 anni
A partire dalla data di cessione, per questo prodotto offriamo 24 mesi di garanzia
per difetti riconducibili a errori di processo di realizzazione oppure a difetti materiali. Il diritto legale alla garanzia resta invariata da questa regolazione in base al §
439 seg. del BGB-E (progetto di legge del codice civile tedesco). La prestazione di
garanzia non contempla i danni derivanti da uso o trattamento improprio, come
anche i difetti che inuiscono sul funzionamento o il valore del dispositivo solo in
misura esigua. Oltre a ciò, non ci assumiamo alcuna responsabilità per danni riconducibili ad una mancata o una insufciente cura del dispositivo. Anche in questo caso, la garanzia decade. Sono inoltre esclusi dal diritto di garanzia i danni da
trasporto, n tanto che noi non ne siamo responsabili. Per danni derivanti da una
riparazione non eseguita da noi o dai nostri rappresentanti, il diritto di garanzia è
escluso. In caso di reclamo legittimo effettueremo a nostra scelta la riparazione del
prodotto difettoso o la sua sostituzione con un prodotto esente da difetti.
IT
57
Page 58

58
Page 59

Page 60

Seit 1920
Gebr. Graef GmbH & Co. KG
Donnerfeld 6
59757 Arnsberg
Tel. 02932 9703-0
Fax. 02932 9703-90
www.graef.de
Stand: November 2017. Technische Änderungen, Irrtümer und Druckfehler vorbehalten.
 Loading...