

Graco TrueCoat 360 16Y391, TrueCoat 360 DSP 16Y392, TrueCoat 360 VSP 17F329 Owner's Manual
For portable spray applications of water-based architectural paints and coatings only.
For Household Use Only.
Not approved for use in explosive atmospheres or ha zardous locations.
334179B
EN
Important Safety Instructions
Read all warnings and instructions in this manual and on the
unit, including the power cord. Be familiar with the controls and
the proper usage of the equipment. Save these instructions.
ti24623a
Scan QR code or click on link
for operational video.
http://graco.com/tc360opvid
Owners Manual
Project Series Paint Sprayers
WARNING
Use only water-based materials. Do not
use materials which state “FLAMMABLE”
on the packaging. For more information
about your material, request SDS from
distributor or retailer.
ti26063a

Contents
2 334179B
Contents
Important User Information . . . . . . . . . . . . . . . . . . . . . . . . . . . . . . . . . . . . . . . . . . . . . . 3
General Power Tool Safety Information . . . . . . . . . . . . . . . . . . . . . . . . . . . . . . . . . . . . 4
Sprayer Safety Information . . . . . . . . . . . . . . . . . . . . . . . . . . . . . . . . . . . . . . . . . . . . . . 6
Component Identification . . . . . . . . . . . . . . . . . . . . . . . . . . . . . . . . . . . . . . . . . . . . . . . . 9
Start Up . . . . . . . . . . . . . . . . . . . . . . . . . . . . . . . . . . . . . . . . . . . . . . . . . . . . . . . . . . . . .10
Starting a New Job . . . . . . . . . . . . . . . . . . . . . . . . . . . . . . . . . . . . . . . . . . . . . . . . . . 10
Refilling FlexLiner . . . . . . . . . . . . . . . . . . . . . . . . . . . . . . . . . . . . . . . . . . . . . . . . . . .12
How to Spray . . . . . . . . . . . . . . . . . . . . . . . . . . . . . . . . . . . . . . . . . . . . . . . . . . . . . . . . . 13
Dual Speed Control . . . . . . . . . . . . . . . . . . . . . . . . . . . . . . . . . . . . . . . . . . . . . . . . . 13
Variable Speed Control . . . . . . . . . . . . . . . . . . . . . . . . . . . . . . . . . . . . . . . . . . . . . . 13
Spray Techniques . . . . . . . . . . . . . . . . . . . . . . . . . . . . . . . . . . . . . . . . . . . . . . . . . . 13
Triggering Sprayer . . . . . . . . . . . . . . . . . . . . . . . . . . . . . . . . . . . . . . . . . . . . . . . . . . 14
Aiming Sprayer . . . . . . . . . . . . . . . . . . . . . . . . . . . . . . . . . . . . . . . . . . . . . . . . . . . . .14
Spray Pattern Quality . . . . . . . . . . . . . . . . . . . . . . . . . . . . . . . . . . . . . . . . . . . . . . . . 15
Cleanup . . . . . . . . . . . . . . . . . . . . . . . . . . . . . . . . . . . . . . . . . . . . . . . . . . . . . . . . . . . . . 16
Pressure Relief Procedure . . . . . . . . . . . . . . . . . . . . . . . . . . . . . . . . . . . . . . . . . . . .16
Cleaning Sprayer . . . . . . . . . . . . . . . . . . . . . . . . . . . . . . . . . . . . . . . . . . . . . . . . . . . 16
Cleaning VacuValve . . . . . . . . . . . . . . . . . . . . . . . . . . . . . . . . . . . . . . . . . . . . . . . . . 18
Storage . . . . . . . . . . . . . . . . . . . . . . . . . . . . . . . . . . . . . . . . . . . . . . . . . . . . . . . . . . . . . . 19
Common Procedures . . . . . . . . . . . . . . . . . . . . . . . . . . . . . . . . . . . . . . . . . . . . . . . . . . 20
Installing Spray Tips . . . . . . . . . . . . . . . . . . . . . . . . . . . . . . . . . . . . . . . . . . . . . . . . . 20
Unclogging Spray Tip . . . . . . . . . . . . . . . . . . . . . . . . . . . . . . . . . . . . . . . . . . . . . . . . 21
Flushing a New Sprayer . . . . . . . . . . . . . . . . . . . . . . . . . . . . . . . . . . . . . . . . . . . . . . 22
Replacement Parts . . . . . . . . . . . . . . . . . . . . . . . . . . . . . . . . . . . . . . . . . . . . . . . . . . . . 24
Models 16Y391, 16Y392 . . . . . . . . . . . . . . . . . . . . . . . . . . . . . . . . . . . . . . . . . . . . . 24
Parts List- Models 16Y391, 16Y392 . . . . . . . . . . . . . . . . . . . . . . . . . . . . . . . . . . . . .25
Replacement Parts . . . . . . . . . . . . . . . . . . . . . . . . . . . . . . . . . . . . . . . . . . . . . . . . . . . . 26
Model 17F329 . . . . . . . . . . . . . . . . . . . . . . . . . . . . . . . . . . . . . . . . . . . . . . . . . . . . . 26
Parts List- Model 17F329 . . . . . . . . . . . . . . . . . . . . . . . . . . . . . . . . . . . . . . . . . . . . . 27
Troubleshooting . . . . . . . . . . . . . . . . . . . . . . . . . . . . . . . . . . . . . . . . . . . . . . . . . . . . . .28
Technical Data . . . . . . . . . . . . . . . . . . . . . . . . . . . . . . . . . . . . . . . . . . . . . . . . . . . . . . . . 32
Graco Limited Warranty . . . . . . . . . . . . . . . . . . . . . . . . . . . . . . . . . . . . . . . . . . . . . . . .33
Model Name Voltage
Tip
Size
Description
Maximum Working
Pressure
16Y391
TrueCoat 360
230V 0.015 Single Speed 1200 psi (8.3 MPa, 83 bar)
16Y392
TrueCoat 360 DSP
230V 0.015 Dual Speed
Premium
900-1300 psi
(6.2 MPa, 62 bar - 8.9 MPa,
89 bar)
17F329
TrueCoat 360 VSP
230V 0.015 Variable
Speed
Premium
500-1300 psi
(3.5 MPa, 34.5 bar - 8.9
MPa,
89 bar)

Important User Information
334179B 3
Important User Information
Thank You for Your Purchase!
Before using your sprayer read this Owners Manual for complete instructions on proper use and
safety warnings.
Congratulations! You have purchased a high-quality paint sprayer made by Graco Inc.
This sprayer is designed to provide superior spray performance with water-based
architectural paints and coatings. This user information is intended to help you understand
the types of materials that can be used with your sprayer.
Please read the information on the material container label to determine if it can be used
with your sprayer. Ask for a Safety Data Sheet (SDS) from your supplier. The container
label and SDS will explain the contents of the material and the specific precautions
related to it.
Paints, coatings and clean-up materials generally fit
into one of the following 2 basic categories:
WATER-BASED: The container label should indicate that the material can be
cleaned up with soap and water. Your sprayer is compatible with this type of
material. Your sprayer is NOT compatible with harsh cleaners such as
chlorine bleach.
FLAMMABLE: This type of material contains flammable solvents such as
xylene, toluene, naphtha, MEK, lacquer thinner, acetone, denatured alcohol,
and turpentine. The container label should indicate that this material is
FLAMMABLE. This type of material is NOT compatible with your sprayer
and CANNOT be used.

General Power Tool Safety Information
4 334179B
General Power Tool Safety Information
WARNING
Read all safety warnings and all
instructions.
Failure to follow the warnings and instructions
may result in electric shock, fire and/or serious
injury.
Save all warnings and instructions for
future reference.
The term “power tool” in the warnings refers to
your mains-operated (corded) power tool.
Work Area Safety
• Keep work area clean and well lit.
Cluttered or dark areas invite accidents.
• Do not operate power tools in explosive
atmospheres, such as in the presence
of flammable liquids, gases or dust.
Power tools create sparks which may
ignite the dust or fumes.
• Keep children and bystanders away
while operating a power tool.
Distractions can cause you to lose control.
Electrical Safety
• Power tool plugs must matc h the outlet.
Never modify the plug in any way. Do
not use any adapter plugs with earthed
(grounded) power tools. Unmodified
plugs and matching outlets will reduce risk
of electric shock.
• Avoid body contact with earthed or
grounded surfaces, such as pipes,
radiators, ranges and refrigerators.
There is an increased risk of electric shock
if your body is earthed or grounded.
• Do not expose power tools to rain or wet
conditions. Water entering a power tool
will increase the risk of electric shock.
• Do not abuse the cord. Never use the
cord for carrying, pulling or unplugging
the power tool. Keep cord away from
heat, oil, sharp edges or moving parts.
Damaged or entangled cords increase the
risk of electric shock.
• When operating a power tool outdoors,
use an extension cord suitable for
outdoor use. Use of a cord suitable for
outdoor use reduces the risk of electric
shock.
• If operating a power tool in a damp
location is unavoidable, use a residual
current device (RCD) protected supply.
Use of an RCD reduces the risk of electric
shock.
Personal Safety
•
Stay alert, watch what you are doing
and use common sense when operating
a power tool. Do not use a power tool
while you are tired or under the
influence of drugs, alcohol or
medication. A moment of inattention while
operating power tools may result in serious
personal injury.
• Use personal protective equipment.
Always wear eye protection. Protective
equipment such as dust mask, non-skid
safety shoes, hard hat, or hearing
protection used for appropriate conditions
will reduce personal injuries.
• Prevent unintentional starting. Ensure
the switch is in the off-position before
connecting to power source and/or
battery pack, picking up or carrying the
tool. Carrying power tools with your finger
on the switch or energizing power tools that
have the switch on invites accidents.
• Remove any adjusting key or wrench
before turning the power tool on. A
wrench or a key left attached to a rotating
part of the power tool may result in
personal injury.
• Do not overreach. Keep proper footing
and balance at all times. This enables
better control of the power tool in
unexpected situations.
• Dress properly. Do not wear loose
clothing or jewelry. Keep your hair,
clothing and gloves away from moving
parts. Loose clothes, jewelry or long hair
can be caught in moving parts.
• If devices are provided for the
connection of dust extraction and
collection facilities, ensure these are
connected and properly used. Use of
dust collection can reduce dust-related
hazards.
WARNING

General Power Tool Safety Information
334179B 5
Power Tool Use and Care
• Do not force the power tool. Use the
correct power tool for your application.
The correct power tool will do the job better
and safer at the rate for which it was
designed.
• Do not use the power tool if the switch
does not turn it on and off. Any power
tool that cannot be controlled with the
switch is dangerous and must be repaired.
• Disconnect the plug from the power
source before making any adjustments,
changing accessories, or storing power
tools. Such preventive safety measures
reduce the risk of starting the power toll
accidentally.
• Store idle power tools out of the reach
of children and do not allow persons
unfamiliar with the power tool or these
instructions to operate the power tool.
Power tools are dangerous in the hands of
untrained users.
• Maintain power tools. Check for
misalignment or binding of moving
parts, breakage of parts and any other
condition that may affect the power
tool's operation. If damaged, have the
power tool repaired before use. Many
accidents are caused by poorly maintained
power tools.
• Use the power tool, accessories etc. in
accordance with these instructions,
taking into account the working
conditions and the work to be
performed. Use of the power tool for
operations different from those intended
could result in a hazardous situation.
Service
• Have your power tool serviced by a
qualified repair person using only
identical replacement parts. This will
ensure that the safety of the power tool is
maintained.
WARNING

Sprayer Safety Information
6 334179B
Sprayer Safety Information
The following warnings are for the setup, use, maintenance, and repair of this equipment. The
exclamation point symbol alerts you to a general warning and the hazard symbols refer to
procedure-specific risks. When these symbols appear in the body of this manual or on warning
labels, refer back to these Warnings. Product-specific hazard symbols and warnings not
covered in this section may appear throughout th e body of this manual where applicable.
WARNING
GROUNDING INSTRUCTIONS
This product must be grounded. In
the event of an electrical short circuit,
grounding reduces the risk of electric
shock by providing an escape wire for
the electric current. This product is
equipped with a cord having a
grounding wire with an appropriate
grounding plug. The plug must be
plugged into an outlet that is properly
installed and grounded in accordance
with all local codes and ordinances.
• Improper installation of the grounding plug
is able to result in a risk of electric shock.
• When repair or replacement of the cord or
plug is required, do not connect the
grounding wire to either flat blade terminal.
• The wire with insulation having an outer
surface that is green with or without yellow
stripes is the grounding wire.
• Check with a qualified electrician or
serviceman when the grounding
instructions are not completely
understood, or when in doubt as to
whether the product is properly grounded.
• Do not modify the plug provided; if it does
not fit the outlet, have the proper outlet
installed by a qualified electrician.
• This product is for use on a nominal 230V
circuit and has a grounding plug similar to
the plug illustrated in the figures.
• Only connect the product to an outlet
having the same configuration as the plug.
• Do not use an adapter with this product.
WARNING
Extension Cords:
• Use only a 3-wire extension
cord that has a grounding plug
and a grounding receptacle
that accepts the plug on the
product.
• An undersized cord results in a
drop in line voltage and loss of
power and overheating.When
in doubt use the next heavier
gauge. The smaller the gauge
number the heavier the cord.
• When using the sprayer outdoors, use an
extension cord suitable for outdoor use.
• Make sure your extension cord is not
damaged. When using an extension cord,
be sure to use a cord heavy enough to carry
the current that your sprayer draws. See
chart for appropriate sizes and lengths:
Extension Cord
Conductor Size Length
AWG (American
Wire Gauge)
Metric Maximum
18
1.0 mm
2
15 m (50 ft)
16
1.5 mm
2
30 m (100 ft)
14
2.5 mm
2
61 m (200 ft)
Sprayer Safety Information
334179B 7
WARNING
FIRE AND EXPLOSION
HAZARD
Flammable fumes, such as
solvent and paint fumes, in work
area can ignite or explode. To
help prevent fire and explosion:
• Sprayer generates sparks. Do
not spray or flush with flammable
liquids.
• Use only water-based materials.
• Keep spray area well-ventilated.
Keep a good supply of fresh air
moving through the area.
• Do not spray or clean with
flammable liquids.
• Paint or solvent flowing through the
equipment is able to result in static
electricity. Static electricity creates a risk of
fire or explosion in the presence of paint or
solvent fumes.
• Keep sprayer at least 10 in. (25 cm) away
from objects while spraying or flushing.
• Verify all containers and collection
systems are grounded to prevent static
discharge.
• Connect to a grounded outlet and use
grounded extension cords. Do not use a 3
to 2 adapter.
• Do not use paints or solvents containing
halogenated hydrocarbons.
• Do not smoke in the spray area.
• Do not operate light switches, engines, or
similar spark producing products in the
spray area.
• Keep area clean and free of paint or
solvent containers, rags, and other
flammable materials.
• Know the contents of the paints and
solvents being sprayed. Read all Material
Safety Data Sheets (SDS) and container
labels provided with the paints and
solvents. Follow the paint and solvents
manufacturer’s safety instructions.
• Fire extinguisher equipment shall be
present and working.
WARNING
SKIN INJECTION HAZ ARD
High-pressure spray is able to
inject toxins into the body and
cause serious bodily injury. In
the event that injection occurs,
get immediate surgical
treatment.
• Do not aim the sprayer at, or spray any
person or animal.
• Keep hands and other body parts away
from the discharge. For example, do not try
to stop leaks with any part of the body.
• Disconnect power when not spraying.
• Always use the spray tip guard. Do not
spray without spray tip guard in place.
• Use caution when cleaning and changing
spray tips. In the case where the spray tip
clogs while spraying, follow the Pressure
Relief Procedure, page 16 for relieving
the pressure before removing the spray tip
to clean.
• Do not leave the unit energized or under
pressure while unattended. When the unit
is not in use, unplug the sprayer and follow
the Pressure Relief Procedure, page 16.
• Check parts for signs of damage. Replace
any damaged parts.
• This system is capable of producing 2000
psi. Use replacement parts or accessories
that are rated a minimum of 2000 psi.
• Do not carry the unit with a finger on the
trigger.
• Verify that all connections are secure
before operating the unit.
• Know how to stop the unit and bleed
pressure quickly. Be thoroughly familiar
with the controls.
Sprayer Safety Information
8 334179B
WARNING
ELECTRIC SHOCK HAZARD
This equipment must be grounded.
Improper grounding, setup, or usage
of the system can cause electric
shock.
• Turn off and disconnect power cord before
servicing equipment.
• Connect only to grounded electrical
outlets.
• Use only 3-wire extension cords.
• Ensure ground prongs are intact on power
and extension cords.
• Do not expose to rain or wet conditions.
Store indoors.
EQUIPMENT MISUSE HAZARD
Misuse can cause death or serious
injury.
• Always wear appropriate gloves, eye
protection, and a respirator or mask when
painting.
• Do not operate or spray near children.
Keep children away from equipment at all
times.
• Do not overreach or stand on an unstable
support. Keep effective footing and
balance at all times.
• Stay alert and watch what you are doing.
• Do not operate the unit when fatigued or
under the influence of drugs or alcohol.
• Use only in dry locations. Do not expose to
water or rain.
• Use in well-lit areas.
• Do not spray outdoors on windy days.
TOXIC FLUID OR FUMES
HAZARD
Toxic fluids or fumes can cause
serious injury or death if splashed in
the eyes or on skin, inhaled, or
swallowed.
• Read SDS’s to know the specific hazards
of the fluids you are using.
• Store hazardous fluid in approved
containers, and dispose of it according to
applicable guidelines.
WARNING
PRESSURIZED ALUMINUM
PARTS HAZARD
Use of fluids that are incompatible
with aluminum in pressurized
equipment can cause serious
chemical reaction and equipment
rupture. Failure to follow this warning
can result in death, serious injury, or
property damage.
• Do not use 1,1,1-trichloroethane,
methylene chloride, other halogenated
hydrocarbon solvents or fluids containing
such solvents.
• Do not use chlorine bleach.
• Many other fluids may contain chemicals
that can react with aluminum. Contact your
material supplier for compatibility.
PERSONAL PROTECTIVE
EQUIPMENT
Wear appropriate protective equipment when
in the work area to help prevent serious
injury, including eye injury, hearing loss,
inhalation of toxic fumes, and burns. This
protective equipment includes but is not
limited to:
• Protective eye wear, and hearing
protection.
• Respirators, protective clothing, and
gloves as recommended by the fluid and
solvent manufacturer.
Component Identification
334179B 9
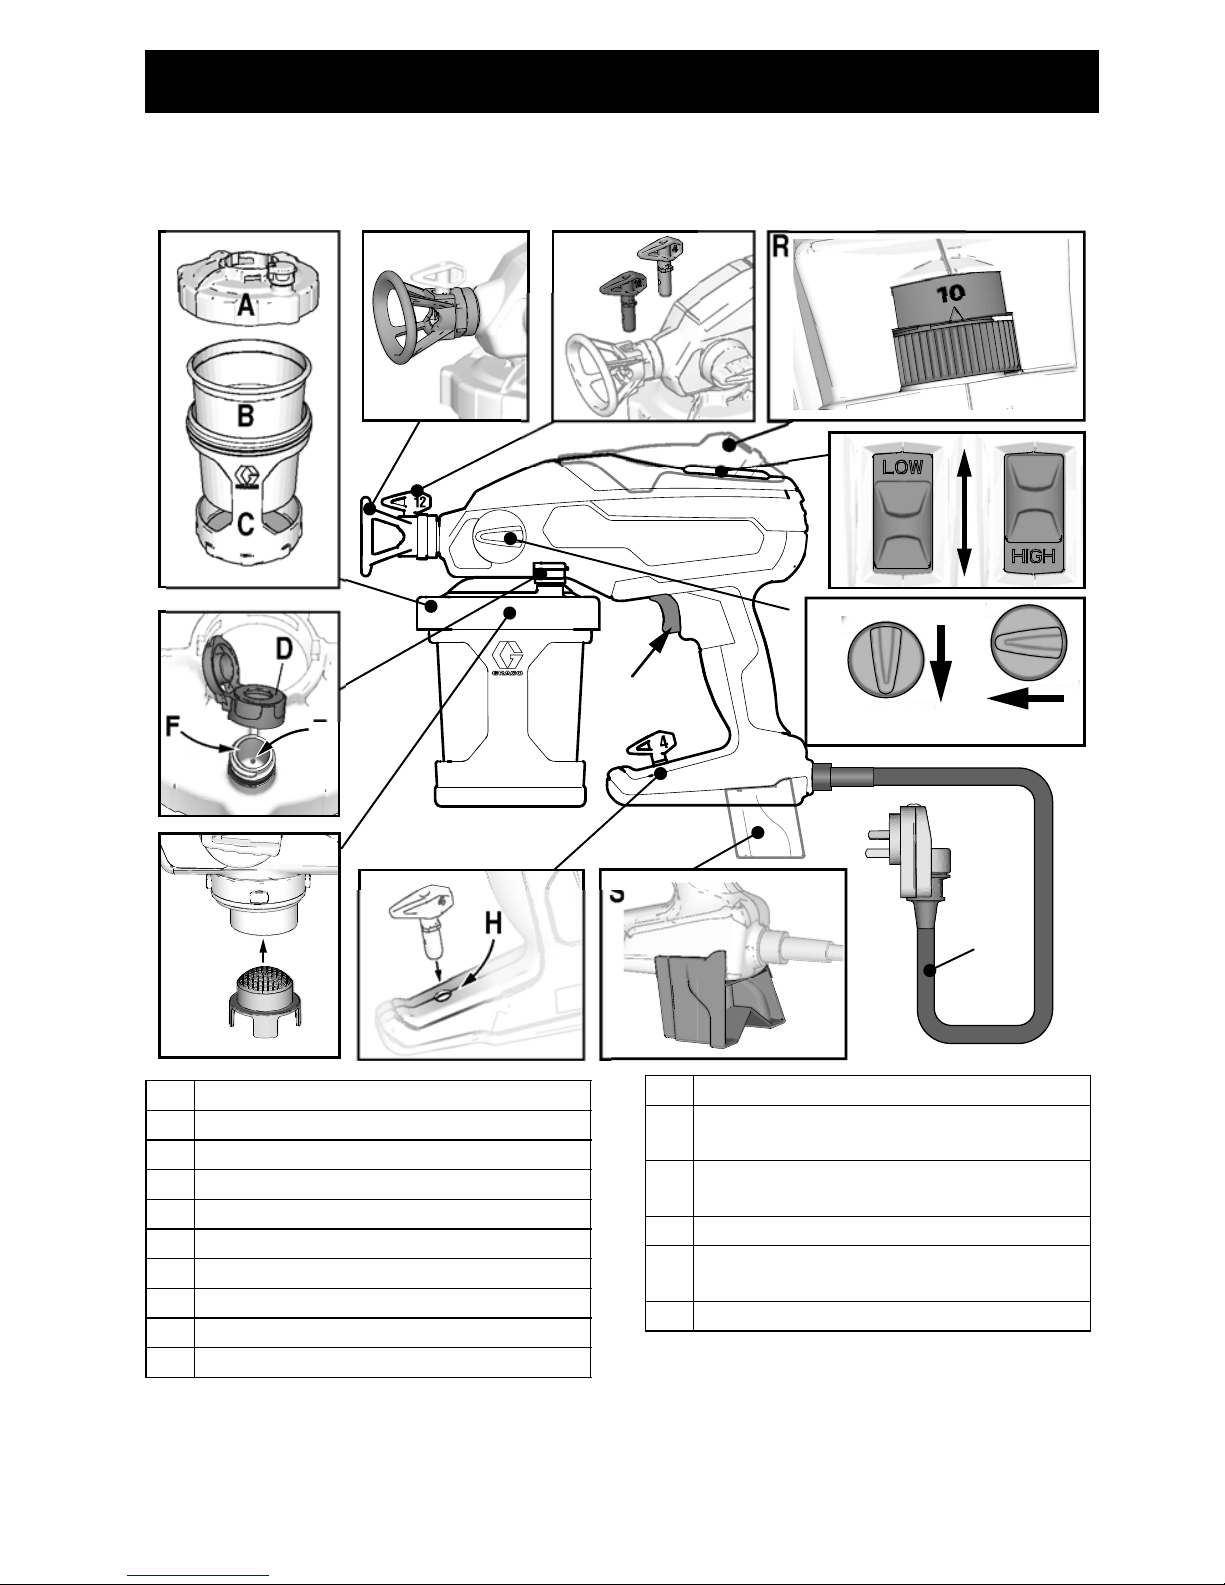
Component Identification
A
B
C
D
E
F
G
H
N
L
K
S
R
Spray
J
M
ti26060a
P
Prime Pump
A Cup Cover
B FlexLiner
C Cup Support
D VacuValve Cap
E VacuValve Air Hole
F VacuValve Reservoir
GStrainer
H Spray Tip Holder
J Prime Pump/Spray Knob
K Power Cord
L Sprayer Trigger
M Dual Speed Control, HIGH/LOW
Switch (DS and DSP models only)
N Spray Tip, Black (12-inch pattern)
Spray Tip, Gray (4-inch pattern)
P Spray Tip Guard
R Variable Speed Control (VSP models
only)
S Kickstand

Start Up
10 334179B
Start Up
Starting a New Job
If you are using the sprayer for the very first
time, see Flushing a New Sprayer, page 22.
Stir material according to manufactures
recommendations. If material was previously
opened, it is recommended to strain material
to avoid spray tip clogs.
1. Install FlexLiner in the cup support.
2. Fill FlexLiner with material. Securely
tighten cup cover onto cup support.
Tighten so the arrow on the cup cover is
within range of the indicator on the cup
support.
3. Align VacuValve on cup cover with
Prime Pump/Spray knob. Push cup
assembly onto sprayer and twist
clockwise to lock.
Use only water-based materials. Do not
use materials which state “FLAMMABLE”
on the packaging. For more information
about your material, request SDS from
distributor or retailer.
Keep spray area well-ventilated. Keep
a good supply of fresh air moving through
the area.
NOTICE
Your sprayer is
NOT
compatible with harsh
cleaners such as chlorine bleach. Using
these cleaners will cause damage to the
sprayer.
ti23361a
ti24279a
ti23258b
Start Up
334179B 11
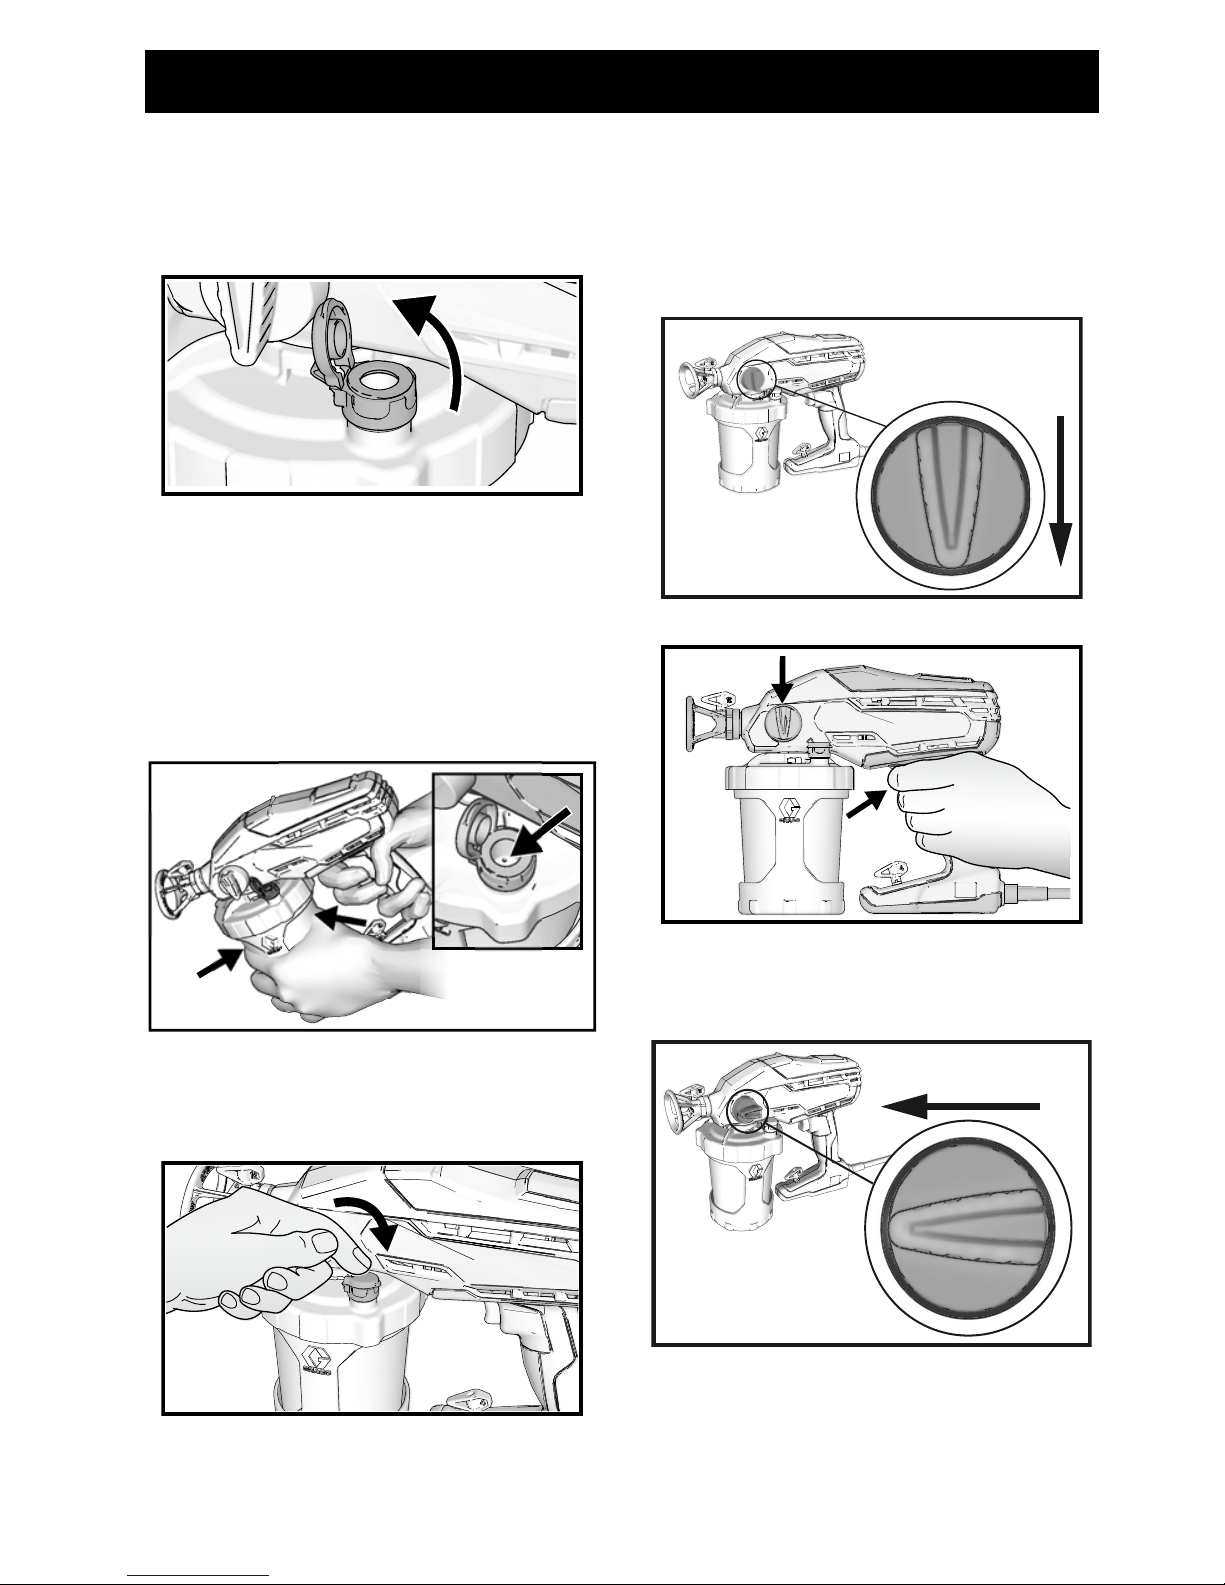
4. The VacuValve is an important part of
your new sprayer. It is used to evacuate
the air out of the FlexLiner. Open
VacuValve cap.
5. Tilt the sprayer so the VacuValve is the
highest point, causing an y ai r in the
FlexLiner to rise to the VacuValve.
Gently squeeze the FlexLiner to
evacuate all air through the VacuValve
air hole. Once you see material enter the
VacuValve reservoir, all air should be
evacuated from the FlexLiner.
6. Stop squeezing the FlexLiner and snap
the VacuValve cap closed. You will hear
the cap click when it is closed properly.
7. Plug sprayer into power source.
8. Turn Prime Pump/Spray knob down to
Prime Pump position. To fill sprayer with
fluid, point sprayer into a waste area and
hold the trigger in for 5–10 seconds.
9. Turn Prime Pump/Spray knob forward to
spray position.
ti23343a
ti23345a
ti23355a
ti23285a
Prime Pump
ti23354a
ti23288a
Spray
 Loading...