

Page 1

Instructions – Parts List
PRO-WASHt Gun Washer
With Huskyt 307 Pump
100 psi (0.7 MPa, 7 bar) Maximum Working Pressure
Read warnings and instructions.
See page 2 for List of Models and page 5 for
Gun Washer Descriptions.
308393J
Model 112634 Model 112635
GRACO INC.ąP.O. BOX 1441ąMINNEAPOLIS, MNą55440-1441
Copyright 1999, Graco Inc. is registered to I.S. EN ISO 9001
03297
03298
Model 117438
Page 2

Table of Contents
Symbols 2. . . . . . . . . . . . . . . . . . . . . . . . . . . . . . . . . . . . . .
Warnings 3. . . . . . . . . . . . . . . . . . . . . . . . . . . . . . . . . . . .
Gun Washer Descriptions 5. . . . . . . . . . . . . . . . . . . . .
Kit Descriptions 6. . . . . . . . . . . . . . . . . . . . . . . . . . . . . .
Technical Data 7. . . . . . . . . . . . . . . . . . . . . . . . . . . . . . . .
Dimensional Drawing 8. . . . . . . . . . . . . . . . . . . . . . . . . .
Installation 10. . . . . . . . . . . . . . . . . . . . . . . . . . . . . . . . . .
Symbols
Warning Symbol
WARNING
This symbol alerts you to the possibility of serious
injury or death if you do not follow the instructions.
Operation 12. . . . . . . . . . . . . . . . . . . . . . . . . . . . . . . . . . . .
Shutdown and Care 17. . . . . . . . . . . . . . . . . . . . . . . . . .
Parts
Model 112634 20. . . . . . . . . . . . . . . . . . . . . . . . . . . . .
Model 112635 22. . . . . . . . . . . . . . . . . . . . . . . . . . . . .
Model 117438 24. . . . . . . . . . . . . . . . . . . . . . . . . . . . .
Warranty 26. . . . . . . . . . . . . . . . . . . . . . . . . . . . . . . . . . . .
Graco Information 26. . . . . . . . . . . . . . . . . . . . . . . . . . . .
Caution Symbol
CAUTION
This symbol alerts you to the possibility of damage to
or destruction of equipment if you do not follow the
instructions.
2 308393
Page 3
WARNING
EQUIPMENT MISUSE HAZARD
INSTRUCTIONS
Equipment misuse can cause the equipment to rupture, malfunction, or start unexpectedly and result
in serious injury.
This equipment is for professional use only.
Read all instruction manuals, tags, and labels before operating the equipment.
Use the equipment only for its intended purpose.
Do not alter or modify this equipment. Use only genuine Graco parts and accessories.
Check the equipment daily. Repair or replace worn or damaged parts immediately.
Do not exceed the maximum working pressure of the lowest rated system component. This equip-
ment has a 100 psi (0.7 MPa, 7 bar) maximum fluid working pressure at 100 psi (0.7 MPa, 7
bar) maximum incoming air pressure.
Do not operate the gun washer at a pressure above the maximum working pressure rating of the
gun(s) being cleaned.
Route the hoses away from the traffic areas, sharp edges, moving parts, and hot surfaces. Do not
expose Graco hoses to temperatures above 180F (82C) or below –40F (–40C).
Do not use the hoses to pull the equipment.
Do not move pressurized equipment.
Use fluids or solvents that are compatible with the equipment wetted parts. See the Technical
Data section of all the equipment manuals. Read the fluid and solvent manufacturer’s warnings.
Comply with all applicable local, state and national fire, electrical and other safety regulations.
TOXIC FLUID HAZARD
Hazardous fluids or toxic fumes can cause serious injury or death if splashed in the eyes or on the
skin, swallowed, or inhaled.
Know the specific hazards of the fluid you are using. Read the fluid manufacturer’s warnings.
Store hazardous fluid in an approved container. Dispose of hazardous fluid according to all local,
state and national guidelines.
Wear the appropriate protective clothing, gloves, eyewear and respirator.
Pipe and dispose of the exhaust air safely. If the diaphragm fails, the fluid may be exhausted along
with the air. See your separate pump instruction manual for further information.
308393 3
Page 4
WARNING
FIRE AND EXPLOSION HAZARD
Improper grounding, poor air ventilation, open flames, or sparks can cause a hazardous condition and
result in fire or explosion and serious injury.
Ground the equipment. See Grounding on page 10.
Provide fresh air ventilation to avoid the buildup of flammable fumes from the solvent.
Extinguish all the open flames or pilot lights in the gun washer area.
Electrically disconnect all the equipment in the gun washer area.
Keep the gun washer area free of debris, including solvent, rags, and gasoline.
Do not turn on or off any light switch in the gun washer area while operating or if fumes are
present.
Do not smoke in the gun washer area.
Do not operate a gasoline engine in the gun washer area.
Follow the gun manufacturers solvent and other cleaning recommendations.
Use solvent with the highest possible flash point.
Use non-conductive solvent when cleaning electrostatic guns.
Do not allow solvent to enter the air passage of an electrostatic gun.
Do not flush an electrostatic gun with the electrostatics ON-OFF lever in the ON position.
If there is any static sparking while using the equipment, stop operation immediately. Identify
and correct the problem.
Drain the solvent into a proper storage container when the gun washer(s) is not in use.
PRESSURIZED EQUIPMENT HAZARD
Spray from hose leaks, ruptured components, or from operating the gun washer with an open lid can
splash fluid in the eyes or on the skin and cause serious injury.
A safety device has been installed to shut off the pump when the gun washer lid is opened. Do not
tamper with or alter this device.
Open the gun washer lid slowly.
Do not prop the gun washer lid open with an object or by any other means.
Do not stop or deflect fluid leaks with your hand, body, glove, or rag.
Follow the Pressure Relief Procedure on page 12 whenever you: are instructed to relieve the
pressure; stop operating the gun washer; and clean, check, or service the equipment.
Tighten all the fluid connections before operating the equipment.
Check the hoses, tubes, and couplings daily. Replace worn, damaged, or loose parts immediately.
Permanently coupled hoses cannot be repaired; replace the entire hose.
4 308393
Page 5

Gun Washer Descriptions
)
less guns
(
Materials of Construction
Gun Washer Model No. Tank Fluid Manifold Lid
112634
112635
117438
*Standard Cleaning Station Configuration Includes:
plastic carbon steel aluminum
plastic stainless steel aluminum
stainless steel stainless steel stainless steel
Gun Washer
Model No.
112634
112635
117438
Description Part No. Quantity Used to Clean Other Features
Long gun support 512800 1 Pressure feed, air
spray, & HVLP
guns
Short gun support 112847 1 Siphon air spray,
air-assisted, & airless guns
Spray nozzle 512799 2 Siphon & pressure
cups
Long gun support 512800 2 Pressure feed, air
spray, & HVLP
guns
Short gun support 112847 1 Siphon air spray,
air-assisted, & air-
Spray nozzle 512799 1
Long gun support 512800 2 Pressure feed, air
Short gun support 112847 1 Siphon air spray,
Spray nozzle 512799 1 Siphon & pressure
Siphon & pressure
cups
spray, & HVLP
guns
air-assisted, & airless guns
cups
Hose wash, (Pot
wash capability;
order kit 236906)
Hose wash, Foot
pedal lid opener
(Pot wash
capability; order kit
236906)
* The standard gun supports can be replaced with cleaning kits to fit the type of guns or containers being washed.
See descriptions on page 6.
308393 5
Page 6

Kit Descriptions
g
py g
py
g
Gun, Pressure Cup and Paint Container Cleaning Kits**
To customize the gun washer, order one kit for each cleaning station.
Kit Includes
Kit Part No. Typically Used to Clean Part No. Description
236659
236681
236905
Graco PRO AA4500 air-assisted electrostatic guns
Graco PRO 3500 and PRO 4500 air spray electrostatic guns
HVLP, air-assisted, air spray, and airless conventional guns
195903 Air cap blank
188406 Tip housing
183459 Washer (2)
236689 PRO AA4500 support
512835 Fluid inlet adapter
512827 Plug
512802 Wire trigger lock
189573 Air cap blank
187423 Air cap nut
176930 Retaining ring
512884 Short gun support
(thick stem)
512835 Fluid inlet adapter
512827 Plug
512802 Wire trigger lock
512800 Long gun support
236906
245270
245271
Pressure pots and other paint containers; see page 14 for
maximum container size (for use with gun washer models
112635 & 117438 only)
Graco PRO Xs2, PRO Xs3, and PRO Xs4 air spray electrostatic guns
Graco PRO Xs4 AA air-assisted electrostatic guns
112847 Short gun support
(thin stem)
512835 Fluid inlet adapter
512802 Wire trigger lock
112695 Male coupler assy.
112696 Female coupler assy.
198741 Air cap blank
245300 Gun support
512835 Fluid inlet adapter
512827 Plug
512802 Wire trigger lock
112851 Snap clip
198786 Air cap blank
188406 Housing tip
183459 Washer (2)
245300 Gun support
512835 Fluid inlet adapter
512827 Plug
512802 Wire trigger lock
112851 Snap clip
**To install the accessory kits, see the instruction manuals included with the kits.
6 308393
Page 7

Technical Data
Category Data
Air Pressure Operating Range
Model 112634 25–100 psi
(0.2–0.7 MPa, 1.7–7 bar)
Model 112635 25–100 psi
(0.2–0.7 MPa, 1.7–7 bar)
Model 117438 25–100 psi
(0.2–0.7 MPa, 1.7–7 bar)
Maximum Tank Capacity 5 gallons (19 liters)
Air Inlet 1/4 npt(f)
Fluid Drain Valve 1 in. npt(m)
Approximate Dry Weight
Model 112634 63 lbs. (28.6 kg)
Model 112635 65 lbs. (29.5 kg)
Model 117438 86 lbs. (39 kg)
Wetted Parts
Model 112634 Carbon Steel, Polyethylene (tank), Stainless Steel,
Aluminum, Brass, PTFE, Acetal
Model 112635 Stainless Steel, Aluminum, Polyethylene (tank), Brass,
Acetal, PTFE
Model 117438 Stainless Steel, Brass, Acetal, PTFE
308393 7
Page 8
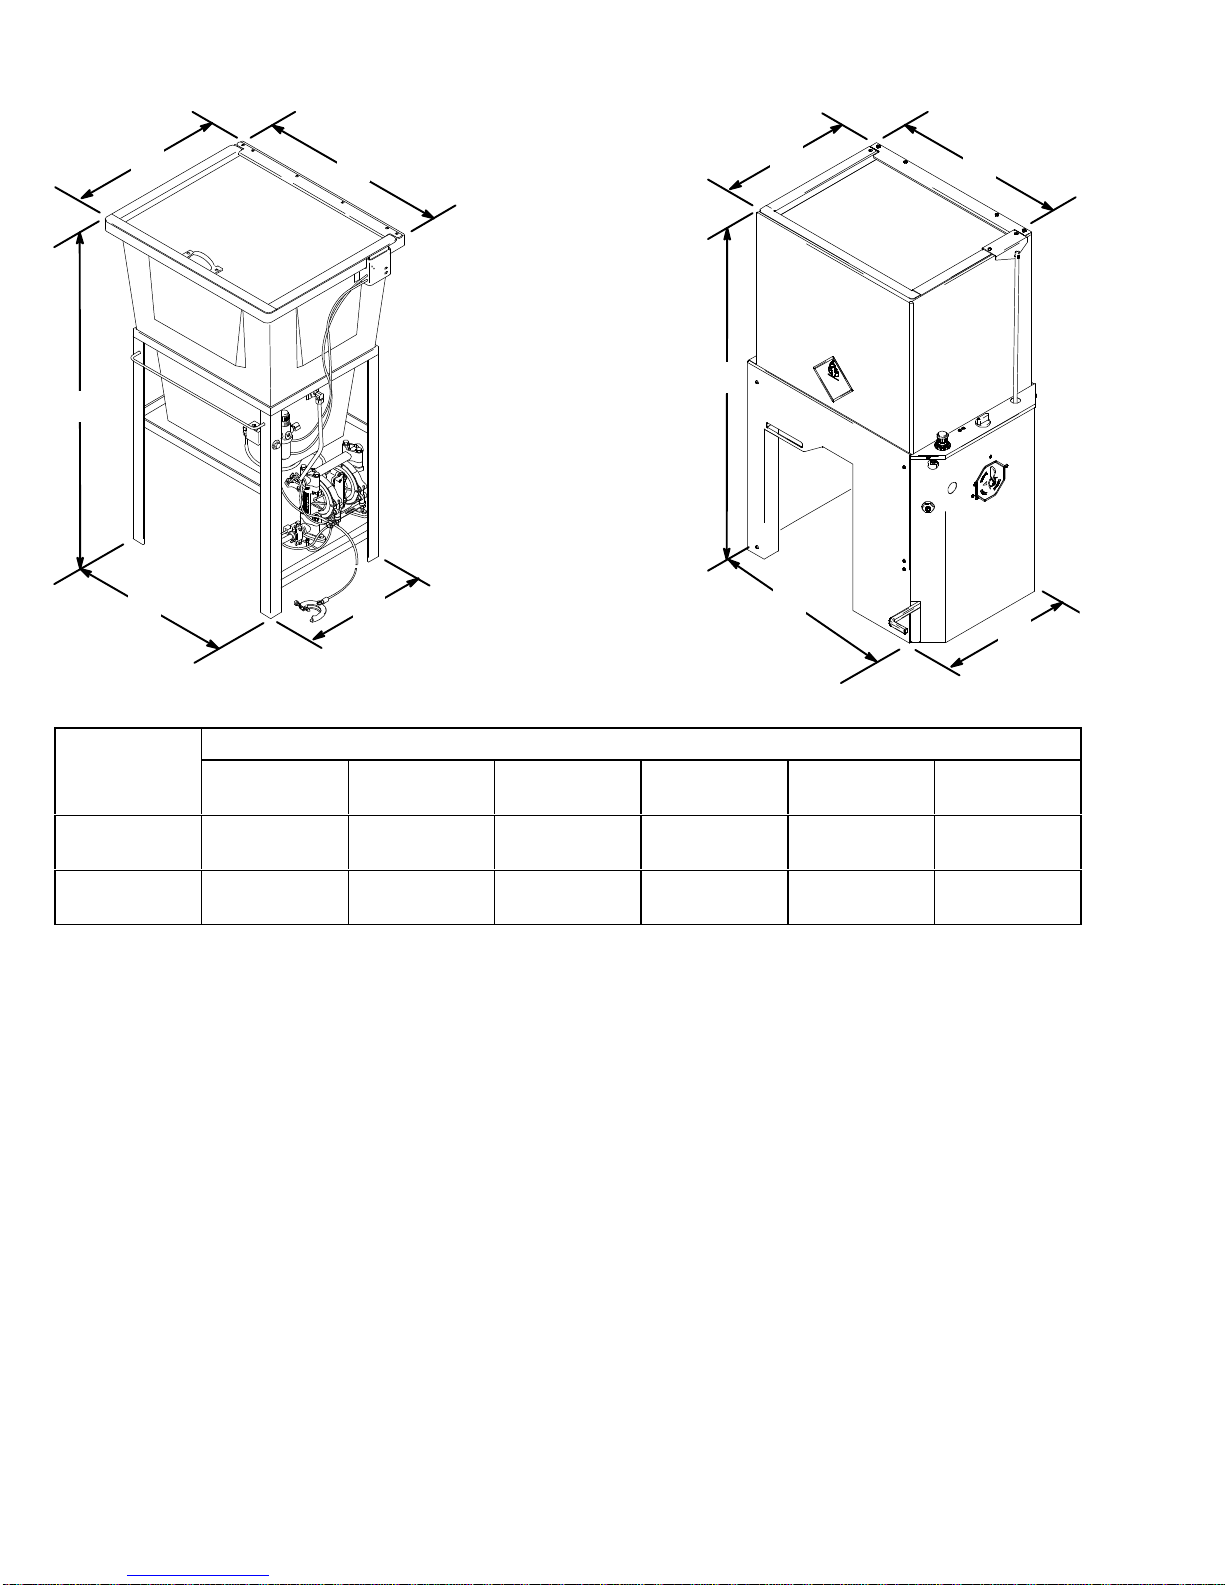
Dimensions
A
B
C
Model 112634 and 112635
E
D
03297
A
B
C
Model 117438
E
D
Model Measurements, inches (mm)
A B–with lid
112634 and
112635
117438 19.25
20.75
(527)
(489)
closed
42.25
(1073)
42.00
(1067)
B–with lid
opened
61.00
(1549)
56.50
(1435)
C D E
20.50
(521)
25.50
(648)
16.25
(413)
18.00
(457)
25.12
(638)
24.5
(622)
8 308393
Page 9

Notes
308393 9
Page 10

Installation
Install the Gun Washer
WARNING
FIRE HAZARD
To prevent hazardous concentrations of
flammable and/or toxic vapors, the gun
washer must be installed in a properly
ventilated paint mixing room or spray booth. Never
operate the gun washer unless ventilation fans are
operating.
Check and follow all the National, State and Local
codes regarding ventilation requirements.
Make sure the gun washer is standing on a level, solid
surface.
Grounding
WARNING
FIRE AND EXPLOSION HAZARD
Improper grounding can cause a
hazardous condition and result in fire or
explosion and serious injury. Ground the
gun washer and all other equipment
used or located in the gun washer area.
Check your local electrical code for
detailed grounding instructions for your area and
type of equipment. Also read the section FIRE
AND EXPLOSION HAZARD, on page 4.
Connect the Air Line
1. Install an air pressure regulator (D) on the gun
washer air supply line to control air pressure to the
gun washer. See Fig. 2.
2. Install a bleed-type master air valve (E) upstream
and within easy reach of the gun washer to relieve
air trapped between this valve and the pump after
the air is shut off.
WARNING
PRESSURIZED EQUIPMENT HAZARD
The bleed-type master air valve (E) is required in
your system to relieve air trapped between this
valve and the pump after the air is shut off.
Trapped air can cause the pump to cycle unexpectedly, which could result in serious injury, including
splashing in the eyes or on the skin.
3. Install a 1/4 in. npt male coupler (F), that is compatible with the quick disconnect of your air supply
line, into the air inlet adapter (G). See Fig. 1.
4. Connect the air line (H) to the coupler (F).
1. Ground the gun washer and its pump by connecting the clamp end (A) of the gun washer’s 15 ft.
(4.6 m) ground wire (B) to a true earth ground (C).
See Fig. 2.
2. Use only grounded air and fluid hoses with a maximum of 500 ft. (150 m) combined hose length to
ensure grounding continuity.
3. Ground the air compressor according to manufacturer’s recommendations.
4. Ground all solvent pails used when flushing and
draining according to local code. Use only metal
pails, which are conductive. Do not place the pail
on a non-conductive surface, such as paper or
cardboard, which interrupts the grounding continuity.
Fig. 1
G
F
03302
10 308393
Page 11

Installation
Typical Installation and Grounding
D
E
H
Fig. 2
AB
F
C
03301
308393 11
Page 12

WARNING
Operation
Pressure Relief Procedure
TOXIC FLUID HAZARD
Hazardous fluids or toxic fumes can
cause serious injury or death if splashed
in the eyes or on the skin, swallowed, or
inhaled.
Know the specific hazards of the fluid you are
using. Read the fluid manufacturer’s warnings.
Wear the appropriate protective clothing,
gloves, eyewear and respirator.
WARNING
FIRE AND EXPLOSION HAZARD
To avoid igniting flammable liquid solvent
vapors and reduce the risk of serious
injury, fire, or explosion:
Keep all ignition sources, such as
static electricity, sparks, arcs, open
flames, and hot objects, away from
the gun washer.
Cleanup solvent leaks or spills immediately. Re-
pair leaking components before operating the
gun washer again.
Use solvent with the highest possible flashpoint.
Follow the FIRE AND EXPLOSION HAZARD
warnings on page 4.
CAUTION
WARNING
PRESSURIZED EQUIPMENT HAZARD
The system pressure must be manually relieved to
prevent the system from starting accidentally. To
reduce the risk of an injury from accidental spray,
splashing fluid, or moving parts, follow the Pres-
sure Relief Procedure whenever you:
are instructed to relieve the pressure,
shut down the gun washer,
check, clean, or service any of the system
equipment.
1. Disconnect the air supply.
2. Drain the solvent into a proper solvent container.
Place the container under the fluid drain valve on
the bottom of the tank and open the fluid drain
valve.
Filling the Gun Washer Fluid Tank
1. Make sure the fluid drain valve is in the closed
position. Fill the gun washer fluid tank with solvent
as instructed for your gun washer model, below.
2. Models 112634 and 112635: Carefully pour sol-
vent into the fluid tank until the fluid level is at least
1/2 inch (12.7 mm) above the filter in the lower
portion of the cabinet.
Use only non-conductive solvents when cleaning
electrostatic guns. Conductive solvents can cause
the gun to malfunction.
Follow the gun manufacturers solvent and other
cleaning recommendations.
12 308393
Model 117438: Carefully pour solvent into the fluid
tank until the fluid level is just below the bottom of
the manifold assembly.
NOTE: Do not pour more than 5 gallons (18.9 liters) of
a compatible solvent into the fluid tank.
Page 13

Operation
Preparing Guns/Cups for the Gun Washer
1. Remove the pressure cup or fluid line and the air
line from the spray gun.
2. Drain any excess fluid in the gun or cup into a fluid
container. The solvent in the gun washer will last
longer if pressure cups are thoroughly emptied
before placing them in the gun washer.
CAUTION
All pressure gauges must be removed before placing
the equipment in the gun washer to avoid damaging
the gauges.
3. To lock the gun trigger in the open position, install
the wire trigger lock around the gun handle and
trigger as shown in Fig. 3.
If the wire trigger lock does not fit on your electrostatic gun, wrap the chain around the trigger and
handle to hold the trigger in an open position.
Placing Guns in the Gun Washer
(See Fig. 3, page 14)
The following are guns typically cleaned with the gun
washer and how to position them in the gun washer for
cleaning. To clean guns not mentioned here, use the
fluid inlet adapter and long or short gun supports as
needed. Refer also to the chart on page 5 for typical
cleaning station usage. Follow the procedure on page
16 to operate the gun washer.
Siphon Feed Guns
Set the gun siphon stem over the short gun support.
Pressure Feed Guns with Cup Lid
(2 Qt. Capacity Cups)
Set the cup cover stem over the short gun support as
shown in Fig. 3.
Pressure Feed Guns
Set the gun fluid inlet over the long gun support as
shown in Fig. 3.
Electrostatic Guns
The PRO-Wash gun washer is approved to clean the
Graco PRO 3500, PRO 4500, PRO AA4500, PRO
Xs2, PRO Xs3, PRO Xs4, and PRO Xs4 AA electrostatic guns. Consult the manufacturer of any other
electrostatic gun before using the PRO-Wash.
A kit, part no. 236659, 236681, 245270, or 245271 is
required to clean Graco electrostatic PRO guns.
See page 6 for kit descriptions.
WARNING
FIRE AND EXPLOSION HAZARD
To reduce the risk of electrostatic shock,
fire, or explosion; which could result in
serious injury and property damage, be
sure to follow these precautions.
Only use non-conductive solvents when clean-
ing electrostatic guns.
Make sure the ES ON-OFF valve lever (electro-
statics) is turned to OFF before cleaning the
gun.
Never allow solvent to enter the air passage of
any electrostatic gun.
Never place the gun air inlet over a gun support.
Only use the fluid inlet adapter provided with the
gun washer. Install it on the gun fluid inlet as
instructed below.
The following is a general procedure for cleaning electrostatic guns. See the manual supplied with kits
236659 and 245271 (Manual 308411) or kits 236681
and 245270 (Manual 308412) for specific cleaning
instructions.
1. Install the electrostatic gun cleaning parts as
instructed in the manual supplied with the kit.
2. Make sure the ES ON-OFF lever (electrostatics)
is turned to OFF. Refer to your gun manual.
3. Screw the fluid inlet adapter onto the PRO-gun
fluid inlet as shown in Fig. 3.
Gravity Feed Guns
Set the gun fluid inlet over the long gun support as
shown in Fig. 3.
4. Place the gun in the gun washer, setting the fluid
inlet adapter over the gun support provided in the
electrostatic gun cleaning kit.
308393 13
Page 14

Operation
Placing Cups and Pots in the Gun Washer
2 Quart Pressure Cups
Set the pressure cup over the spray nozzle. Refer to
Fig. 3.
Pressure Pots and Other Paint Containers
A kit, part no. 236906, is available for use with gun
washer models 112635 and 117438 to clean pressure
pots and other paint containers. The maximum height
and width of the container the pressure washers can
clean are shown below. See the manual supplied with
Typical Cleaning Station Use
the kit (Manual 308414) to install and use this option.
See page 5 for kit description.
Container:
Gun Washer
Model No.
112635 14 in. (356 mm) 11 in. (279 mm)
117438 14.5 in. (368 mm) 11 in. (279 mm)
Maximum
Height
Maximum
Diameter
NOTE: See page 6 for descriptions of Gun, Pressure
Cup, and Paint Container Cleaning Kits.
Wire Trigger Lock
Long Gun Support
Fluid Inlet Adapter
Spray Nozzle
Fig. 3
14 308393
Cup Cover Stem
Short Gun Support
03304
Page 15

Operation
Model 112635 – Using the Hose Wash
1. Place the hose entirely inside the gun washer.
2. Connect one end of the hose to the Hose Wash
Bulkhead fitting. See Fig. 4.
Hose Wash Bulkhead
Model 117438 – Using the Hose Wash
1. Remove the brass plugs from the Hose Wash
Bulkhead. See Fig. 5.
Hose Wash Bulkhead
Hose Wash
Bulkhead
Fig. 5
2. Install a female fluid quick coupler with 1/4 in. npt
male threads (suitable for lacquer thinner) into the
Hose Wash Bulkheads.
Fig. 4
3. Turn the hose/gun wash selector to HOSE WASH.
NOTE: When the selector is set for Hose Wash,
the solvent is routed through the hose wash bulkhead fitting instead of the gun supports and spray
nozzles.
3. Connect the paint line to the couplers.
4. Set the pointer on the shield to hose clean and
operate the gun washer.
NOTE: When the selector is set for Hose Wash,
the solvent is routed through the Hose Wash Bulkhead fitting instead of the gun supports and spray
nozzles.
308393 15
Page 16

Operation
Operating the Gun Washer
WARNING
PRESSURIZED EQUIPMENT HAZARD
Do not operate the gun washer with the
lid open. Serious injury, including blindness, could result.
A safety device has been installed to shut off
the pump when the gun washer lid is opened.
Do not tamper with or alter this device.
Open the gun washer lid slowly.
The gun washer lid has been designed to close
automatically unless supported by hand (Models
112634 and 112635) or by foot (Model 117438).
Do not bypass this safety feature by propping
the cover open with an object or by any other
means.
WARNING
EQUIPMENT MISUSE HAZARD
To avoid component rupture, which could result in
serious injury or property damage, never use an air
supply pressure above the gun washer’s maximum
working pressure of 100 psi (0.7 MPa, 7 bar).
Never operate the gun washer at a pressure above
the maximum working pressure rating of the gun(s)
being cleaned.
2. Make sure all adapter chains and cables are inside
the gun washer tank.
3. If one or more of the gun mounts is not being
used, place a stream blocking device, such as a
pint-size can, over the stem supports and the cup
spray nozzle not being used to prevent those jets
of solvent from hitting the underside of the gun
washer lid.
4. Close the gun washer lid.
5. Press the start button on the reset valve block to
start the gun washer. Guns, cups, or other paint
containers will be cleaned in about 30 to 60
seconds.
NOTE: The cleaning operation should not exceed
60 seconds. Longer operation will not improve the
cleaning process and will cause unnecessary wear
on the pump.
If the lid is opened while the gun washer is operating, the air supply will automatically shut off and
spraying will stop. To restart the pump, close the
lid and press the start button.
6. Remove the gun from the gun washer and blow or
wipe any solvent remaining on the gun exterior.
7. Hang up the gun until it is used again.
1. Set the air pressure to the gun washer between
40–75 psi (0.3–0.5 MPa, 2.8–5.2 bar), using an air
regulator on the gun washer air supply line.
NOTE: All gun washer models include a pump air filter/
regulator that has been preset at the factory; do not
readjust it. See Fig. 4, page 15.
CAUTION
Do not change the setting on the Husky pump’s air
filter/regulator as this will damage the regulator.
CAUTION
Always hang the gun with its nozzle pointing down to
avoid having solvent run into the gun air passages.
Solvent in the gun air passages can cause poor atomization and can damage the gun.
Pump Operation and Maintenance
See the pump instruction manual provided with the gun
washer for operation and maintenance of the pump.
16 308393
Page 17

Shutdown and Care
Gun Washer Shutdown and Care
WARNING
PRESSURIZED EQUIPMENT HAZARD
To reduce the risk of an injury from accidental
spray, splashing fluid, or moving parts, follow the
Pressure Relief Procedure, covered in steps 1
and 2 below, when you shut down the gun washer
and before you check, clean, or service any of the
system equipment.
1. Disconnect the air supply.
2. Drain the solvent from the gun washer tank daily,
when you shut down the system. Place a proper
solvent container under the fluid drain valve on the
bottom of the tank and open the fluid drain valve.
WARNING
FIRE AND EXPLOSION HAZARD
The PRO-Wash gun washer is classified
as a temporary storage container. To reduce the risk of fire or explosion, be sure
to drain the solvent into a proper storage
container and store it according to the
local code for flammable liquids when
shutting down your system.
Air Cut-off Switch and Reset Block
WARNING
EQUIPMENT MISUSE HAZARD
A safety device has been installed to shut off the
pump when the gun washer lid is opened. Do not
tamper with or alter this device. Serious injury, including blindness, could result.
The air connections between the air cut-off switch and
reset block are color coded. They must always be connected as shown in Fig. 6.
Air Cut-off Switch and Reset Block
Air Supply
Black Color
3. Wipe the inside of the tank with a cloth or use a
brush to remove any built-up paint residue.
4. Thoroughly clean the gun washer filter (item 12 in
the Parts Drawings) with a brush.
5. Change the solvent completely when it is no longer
thoroughly cleaning the painting equipment. If the
gun washer is being filled with old solvent, be sure
to filter the solvent before filling the gun washer
tank.
NOTE: If the solvent is thoroughly filtered daily to
remove paint residue, it can usually be reused for 2 to
8 weeks (depending on gun washer usage).
WARNING
FIRE AND EXPLOSION HAZARD
To reduce the risk of fire or explosion,
always clean-up any solvent leaks or
spills immediately. Repair any leaking
components before operating the gun
washer again.
Lid Closed Signal
Blue Color
Start
Switch
Fig. 6
Limit
Switch
Pump
Coupler
Air Filter/
Regulator
Main
Air
03306
308393 17
Page 18

Shutdown and Care
Check the Gun Washer Electrical Continuity
WARNING
FIRE AND EXPLOSION HAZARD
There must be electrical continuity between the gun washer’s fluid tank, divider plate, frame, and main ground wire.
To reduce the risk of static sparking, fire,
or explosion, check the electrical conti-
nuity between all gun washer metallic
parts and true earth ground after servicing the gun
washer. Make sure the gun washer is properly
grounded before operating it again.
Grounding Circuits
Jumper Wire from Lid
to Fluid Manifold
Check your local electrical code for detailed grounding
instructions for your area and type of equipment.
If electrical continuity is lost, check the grounding connections and reconnect them as needed. See Fig. 7 for
the gun washers grounding circuits.
Jumper Wire from Fluid Drain
Valve to Pump Grounding Bar
Jumper Wire from Pump In-
let to Pump Grounding Bar
Fig. 7
18 308393
Jumper Wire from Pump Outlet to
Pump Grounding Bar
Ground Wire to
True Earth Ground
Model 112635 shown
03307
Page 19

Notes
308393 19
Page 20

Reference
Fluid
Manifold
Detail
Parts for Model 112634
27
E
2
E
Pump Ground Bar
Detail
13
26
NOTE: The circled letters indicate
the continuation points of illustrations of tubes or wires.
Ref. A
D
C
1
B
A
D
E
C
5
B
12
4
28
A
6
E
E
E
E
8
20 308393
28
15
16
03309
Page 21

Parts for Model 112634
Model 112634 Gun Washer
Ref.
No. Part No. Description Qty.
1 112871 OUTLET TUBE, pump 1
2 512803 SWITCH, air cut-off 1
4 112870 INTAKE TUBE, pump 1
5 512804 BLOCK, reset valve 1
6 D31211 PUMP, Husky 307; See manual
308553 to order parts 1
8 512838 REGULATOR, air filter 1
12 512829 FILTER, fluid 1
13 112873 VALVE, fluid drain; brass 1
15 512871 WIRE, grounding 1
16 103538 CLAMP, grounding 1
17 512799 NOZZLE, spray; plastic 14
18* ––– GUN SUPPORT, long; brass 1
Fluid Manifold Detail
21
Ref.
No. Part No. Description Qty.
19* ––– GUN SUPPORT, short; brass 1
20* ––– TRIGGER LOCK, wire;
stainless steel 2
21* ––– ADAPTER, gun fluid inlet; brass 2
26 112703 FRAME, gun washer 1
27 186527 LABEL, warning, gun washer 1
28 513049 JUMPER, ground 4
* These parts are included in Gun Washer Kit
236905, which may be purchased separately. See
page 6 for other kits that are available.
Replacement Danger and Warning labels, tags and
cards are available at no cost.
18*
*17
*20
19*
Ref. A
03312
308393 21
Page 22

Parts for Model 112635
27
Reference
Fluid
Manifold
Detail
E
E
Pump Ground Bar
Detail
2
NOTE: The circled letters indicate
the continuation points of illustrations of tubes or wires.
Ref. A
D
C
14
1
B
A
28
A
D
13
C
5
B
26
8
22 308393
E
E
E
6
12
E
4
E
15
28
16
03310
Page 23

Parts for Model 112635
Model 112635 Gun Washer
Ref.
No. Part No. Description Qty.
1 112871 OUTLET TUBE, pump 1
2 512803 SWITCH, air cut-off 1
4 112870 INTAKE TUBE, pump 1
5 512804 BLOCK, reset valve 1
6 D31211 PUMP, Husky 307; See manual
308553 to order parts 1
8 512838 REGULATOR, air filter 1
12 512829 FILTER, fluid 1
13 112873 VALVE, fluid drain; brass 1
14 112875 VALVE, 3-way 1
15 512871 WIRE, grounding 1
16 103538 CLAMP, grounding 1
17 512799 NOZZLE, spray; plastic 13
18* ––– GUN SUPPORT, long; brass 2
Fluid Manifold Detail
*20
21
*17
Ref.
No. Part No. Description Qty.
19* ––– GUN SUPPORT, short; brass 1
20* ––– TRIGGER LOCK, wire;
stainless steel 3
21* ––– ADAPTER, gun fluid inlet; brass 3
26 112703 FRAME, gun washer 1
27 186527 LABEL, warning, gun washer 1
28 513049 JUMPER, ground 4
* These parts are included in Gun Washer Kit
236905, which may be purchased separately. See
page 6 for other kits that are available.
Replacement Danger and Warning labels, tags and
cards are available at no cost.
19*
18*
*18
Ref. A
03313
308393 23
Page 24

Parts for Model 117438
36
14
23
39
37
12
35
E
E
Pump Ground Bar
Detail
29
E
28
6
24 308393
38
E
32
15
16
Page 25

Parts for Model 117438
Model 117438 Gun Washer
Ref.
No. Part No. Description Qty.
6 D31211 PUMP, Husky 307; See manual
308553 to order parts 1
12 112875 VALVE, 3-way 1
14 112873 VALVE, ball 1
15 512871 WIRE, grounding 1
16 103538 CLAMP, grounding (not shown) 1
17 512799 NOZZLE, spray; plastic 13
18* ––– GUN SUPPORT, long; brass 2
19* ––– GUN SUPPORT, short; brass 1
20* 512802 TRIGGER LOCK, wire;
stainless steel 3
21* 512835 ADAPTER, gun fluid inlet; brass 3
23 513284 GASKET, lid 1
Fluid Manifold Detail
Ref.
No. Part No. Description Qty.
28 513049 JUMPER, ground 4
29 117415 KNOB, timer 1
35 117422 FILTER, fluid 1
36 117428 BRUSH, gun wash, manual 1
37 117432 VALVE, OR 1
38 117433 VALVE, limit 1
39 117434 TIMER 1
* These parts are included in Gun Washer Kit
236905, which may be purchased separately. See
page 6 for other kits that are available.
Replacement Danger and Warning labels, tags and
cards are available at no cost.
*18
17
*21
*20
19*
18*
03313
308393 25
Page 26

Graco Standard Warranty
Graco warrants all equipment manufactured by Graco and bearing its name to be free from defects in material and workmanship on the
date of sale to the original purchaser for use. With the exception of any special, extended, or limited warranty published by Graco,
Graco will, for a period of twelve months from the date of sale, repair or replace any part of the equipment determined by Graco to be
defective. This warranty applies only when the equipment is installed, operated and maintained in accordance with Graco’s written
recommendations.
This warranty does not cover, and Graco shall not be liable for general wear and tear, or any malfunction, damage or wear caused by
faulty installation, misapplication, abrasion, corrosion, inadequate or improper maintenance, negligence, accident, tampering, or substitution of non–Graco component parts. Nor shall Graco be liable for malfunction, damage or wear caused by the incompatibility of
Graco equipment with structures, accessories, equipment or materials not supplied by Graco, or the improper design, manufacture,
installation, operation or maintenance of structures, accessories, equipment or materials not supplied by Graco.
This warranty is conditioned upon the prepaid return of the equipment claimed to be defective to an authorized Graco distributor for
verification of the claimed defect. If the claimed defect is verified, Graco will repair or replace free of charge any defective parts. The
equipment will be returned to the original purchaser transportation prepaid. If inspection of the equipment does not disclose any defect
in material or workmanship, repairs will be made at a reasonable charge, which charges may include the costs of parts, labor, and
transportation.
THIS W ARRANTY IS EXCLUSIVE, AND IS IN LIEU OF ANY OTHER WARRANTIES, EXPRESS OR IMPLIED, INCLUDING BUT
NOT LIMITED TO WARRANTY OF MERCHANTABILITY OR WARRANTY OF FITNESS FOR A PARTICULAR PURPOSE.
Graco’s sole obligation and buyer’s sole remedy for any breach of warranty shall be as set forth above. The buyer agrees that no other
remedy (including, but not limited to, incidental or consequential damages for lost profits, lost sales, injury to person or property , o r a ny
other incidental or consequential loss) shall be available. Any action for breach of warranty must be brought within two (2) years of the
date of sale.
Graco makes no warranty , and disclaims all implied warranties of merchantability and fitness for a particular purpose in connection
with accessories, equipment, materials or components sold but not manufactured by Graco. These items sold, but not manufactured
by Graco (such as electric motors, switches, hose, etc.), are subject to the warranty, if any, of their manufacturer. Graco will provide
purchaser with reasonable assistance in making any claim for breach of these warranties.
In no event will Graco be liable for indirect, incidental, special or consequential damages resulting from Graco supplying equipment
hereunder, or the furnishing, performance, or use of any products or other goods sold hereto, whether due to a breach of contract,
breach of warranty, the negligence of Graco, or otherwise.
FOR GRACO CANADA CUSTOMERS
The parties acknowledge that they have required that the present document, as well as all documents, notices and legal proceedings
entered into, given or instituted pursuant hereto or relating directly or indirectly hereto, be drawn up in English. Les parties reconnaissent avoir convenu que la rédaction du présente document sera en Anglais, ainsi que tous documents, avis et procédures judiciaires
exécutés, donnés ou intentés à la suite de ou en rapport, directement ou indirectement, avec les procedures concernées.
Graco Information
TO PLACE AN ORDER, contact your Graco distributor, or call one of the following numbers
to identify the distributor closest to you:
1–800–328–0211 Toll Free
612–623–6921
612–378–3505 Fax
All written and visual data contained in this document reflects the latest product information available at the time of publication.
Graco reserves the right to make changes at any time without notice.
Original instructions. This manual contains English. MM 308393
International Offices: Belgium, China, Japan, Korea
GRACO INC. P.O. BOX 1441 MINNEAPOLIS, MN 55440–1441
Copyright 1991, Graco Inc. is registered to ISO 9001
26 308393
Graco Headquarters: Minneapolis
www.graco.com
Revision J, June 2017
 Loading...