

Page 1
Operation and Maintenance
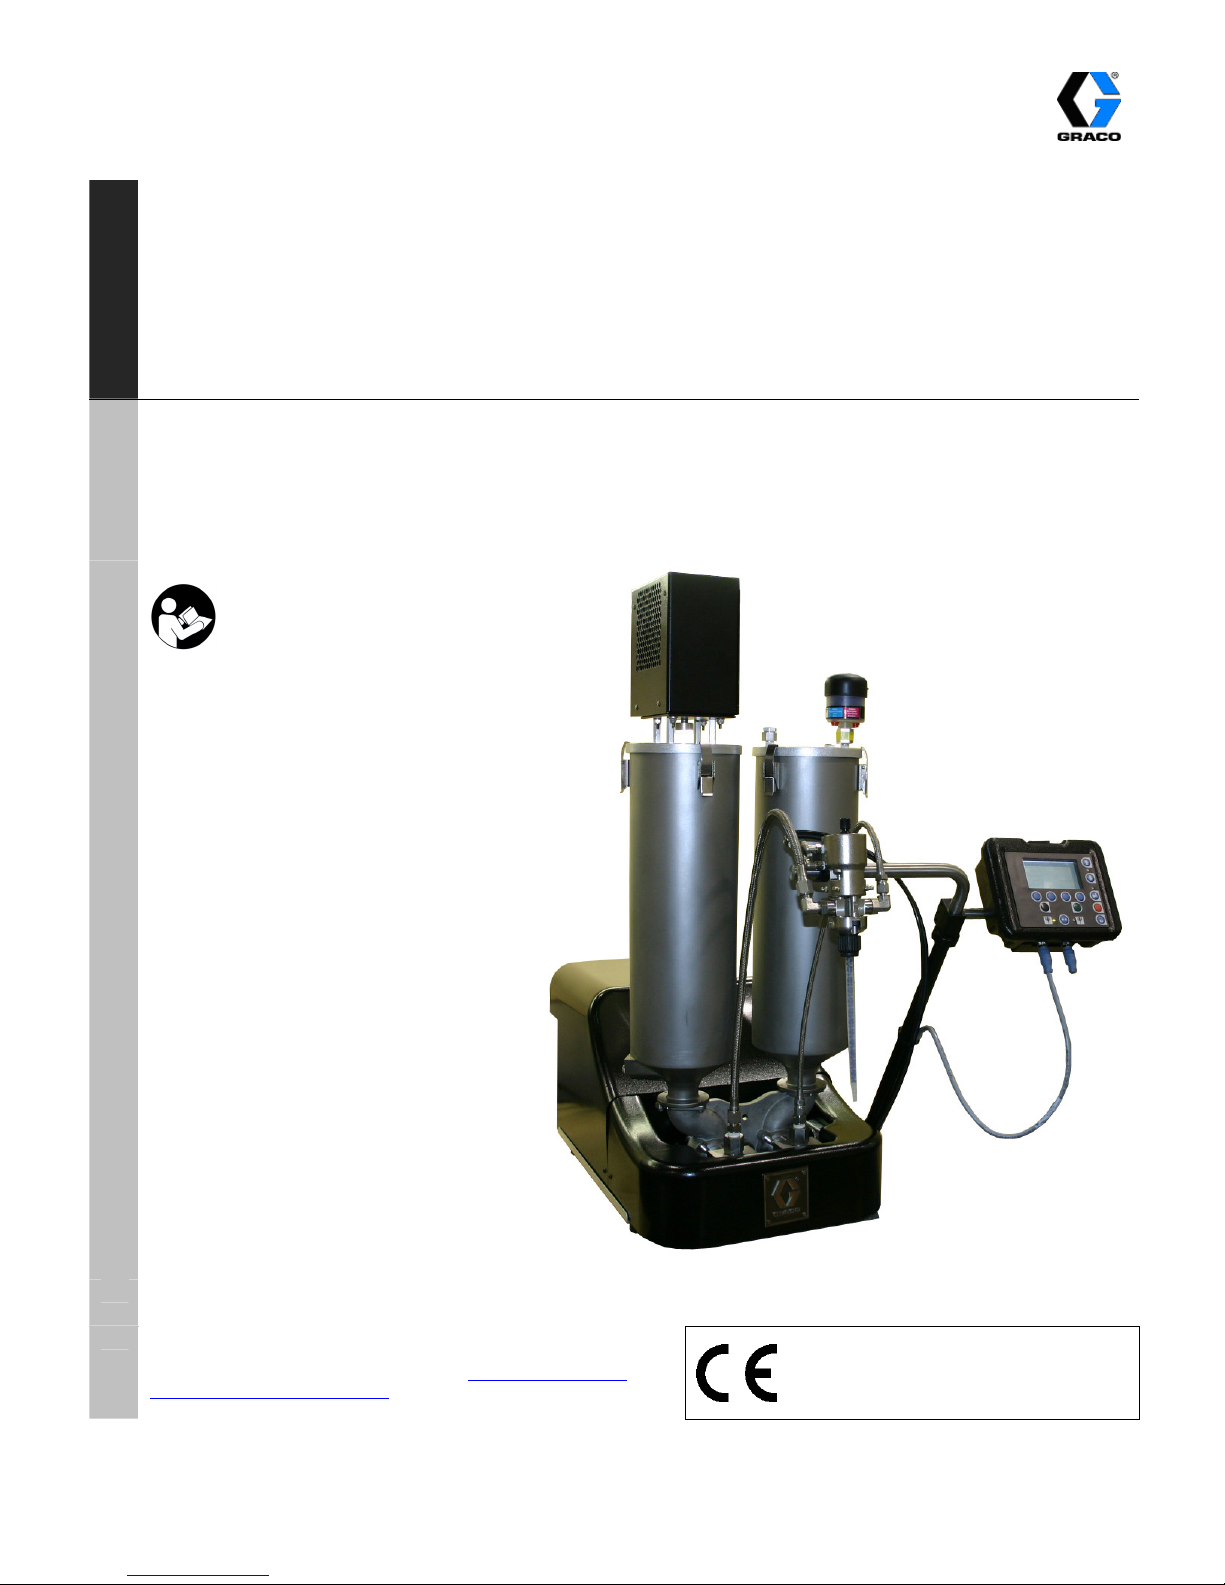
PR70
2 Component
TM
Liquid Dispensing Systems
PR70 All Models
100 PSI (0.7 Mpa, 7 bar) Maximum Air Inlet Pressure
For Dispensing Multi-part Sealants and Adhesives
Not Designed for Use in Explosive Atmospheres
Important Safety
Instructions
Read all warnings and
instructions in this
manual.
312393C
PROVEN QUALITY, LEADING TECHNOLOGY.
GRACO OHIO INC.
8400 PORT JACKSON AVE. NW, NORTH CANTON, OH 44720-5464
Phone: 330.966.3000 Fax: 330.966.3006
LiquidControlService@graco.com LiquidControlParts@graco.com
Copyright 2007, Graco Inc is a registered to I.S. EN ISO 9001
www.liquidcontrol.com
Page 2

Contents
Contents .................................................... 2
Models ....................................................... 3
PR70 Accessories..................................................6
Supplied Manuals ..................................... 7
Related Manuals .......................................7
Warnings ................................................... 8
Installation............................................... 10
General Information .............................................10
Unpacking ............................................................10
Locate and Install the PR70.................................10
Machine Setup .....................................................10
Component Identification ...................... 11
HMI Control and Indicators.................... 12
HMI Main Run Screen..........................................13
Run Screen Operation............................ 13
Tank Level Sensing and Velocity Change (“ ”)
Options (C6)
.........................................................22
Password Setup / Clearing (C5).............23
Setting/Clearing an Administrative Password:..........23
Setting/Clearing a Maintenance ONLY Password:24
Resetting Passwords ...........................................24
Miscellaneous Machine Features .......... 25
HMI Hibernate Mode............................................25
HMI Startup Animation Sequence........................25
HMI Demo Mode Operation .................................25
Pressure Relief Procedure .....................26
Standby/Shutdown Procedure...............26
Error Codes ............................................. 26
Error Code Table.....................................27
ICON Descriptions .................................. 29
Machine Mode Selection......................................13
Machine Operation: Shot Mode ..........................13
Machine Operation: Operator Mode ...................13
Shot Number Selection ........................................13
Machine Disable Mode (“ ”red) .......... 14
Setup Screens......................................... 14
Entering the Setup Screens.................................14
Setup Screens with Passwords Enabled.............14
Machine Priming..................................... 16
Machine Calibration................................ 16
Piston Position Calibration (C1)...........................16
Phasing (C2) ........................................................17
Open Dispense Valve (ODV) Setting (C3)...........17
Machine Calibration Shots (C4)...........................18
Shot Size Definition (M2)........................ 19
Ratio Checks........................................... 19
Maintenance ............................................ 31
Software Upgrades, Run Token.............31
Run Token............................................................31
Troubleshooting...................................... 32
Repair....................................................... 33
Major Mechanical Assemblies, and Attachments 33
Base Frame Assembly.........................................34
Air Cylinder Assemblies, and Rebuild Kits...........35
Drive Block Assembly ..........................................38
Pump Assemblies and Rebuild Kits .....................38
Piston Cylinders or Metering Tubes.....................41
Hose Assemblies .................................................44
Miscellaneous Mechanical Assemblies................45
Wiring Diagrams .....................................48
Technical Data.........................................50
Dimensions..............................................51
Miscellaneous Machine Setups............. 20
Manual Control Options (M1)...............................20
Purge Timer / Alarm Settings (M2) ......................20
Cycle Counter and Silent Mode Control (M3).........21
Date and Time Settings (M4)...............................22
312393C 2 of 52
Graco Ohio Standard Warranty .............52
Page 3

Models
Models
A PR70 system can be ordered with many different options from the configurator below. The example PR70
system part number illustrated below contains the highlighted choices from the charts on pages 3 - 6.
PR70 - 2 - BT - BF - A - A7 - A4 - 2 - 3 - 1 - 1 - N - 2 - N - N - N - 2 - N - N - N
Code : A B-C D-E F G-H I-J K L M N O P Q R S T U V W
The following configuration P/N was assigned to the machine shipped with this manual:
PR70- - - - - - - - - - - - - - - - - - -
Code : A B-C D-E F G-H I-J K L M N O P Q R S T U V W
The following part number fields apply for PR70 part numbering Configurator process. Items highlighted in italics,
refer to “Super Standard” items with are typically stocked, and provide the best delivery dates.
2007 Product Configurator - PR70
Code A
1 3.0" (4,560mm2) Air Motor
2 4.5" (10,260mm2) Air Motor
3 3.0" Air Motor with hydracheck
4 4.5" Air Motor with hydracheck
5 Electric Drive
Code B High Volume Piston Material
A Nylon A Nylon
B UHMWPE B UHMWPE
Code C High Volume Piston Size
1
2 100, Nylon Only 2 100, Nylon Only
3
4 140, Nylon Only 4 140, Nylon Only
5
6 180 6 180
7 200 7 200
8 220 8 220
9
A 260 A 260
B 280 B 280
C 300 C 300
F
G 360 G 360
H 400 H 400
J 440 J 440
L
M 520 M 520
R 560 R 560
S 600 S 600
T
U 720 U 720
W 800 W 800
X 880 X 880
Y
Z Custom Low Volume Side, consult factory (SST Only)
Motor
High Volume Piston
Low Volume Piston
Check Valve
High Volume Hose
Air Motor Information
80, Nylon Only, Super Standard
120, Nylon Only, Super Standard
160, Super Standard
240, Super Standard
320, Super Standard
480, Super Standard
640, Super Standard
960, Super Standard
Low Volume Hose
Dispense Valve
Mixer
Applicator Mounting
Power Cord
Pressure Transducers
High Volume Tank
High Volume Lib
Low Volume Tank
Low Volume Lib
Low Level Sensors
Heat Controller
Wet Test
Code D
Code E Low Volume Piston Size
1
3
5
9
L
T
Y
80, Nylon Only, Super Standard
120, Nylon Only, Super Standard
160, Super Standard
240, Super Standard
320, Super Standard
F
480, Super Standard
640, Super Standard
960, Super Standard
Low Volume Piston Material
Off-board Tank Stand
312393C 3 of 52
Page 4

Models
2007 Product Configurator - PR70 (Continued)
Code F
Check Valve
A Standard Check Valve
G-H High Volume Hose
A1 3/16" (4.8mm) - 2.5' (0.6m)
A2 3/16" (4.8mm) - 10' (3.0m)
A3 3/16" (4.8mm) - 15' (4.6m)
A4 1/4" (6.5mm) - 2.5' (0.6m)
A5 1/4" (6.5mm) - 10' (3.0m)
A6 1/4" (6.5mm) - 15' (4.6m)
A7 3/8" (9.5mm) - 2.5' (0.6m)
A8 3/8" (9.5mm) - 10' (3.0m)
A9 3/8" (9.5mm) - 15' (4.6m)
AA 1/2" (13mm) - 2.5' (0.6m)
AB 1/2" (13mm) - 10' (3.0m)
AC 1/2" (13mm) - 15' (4.6m)
AG 3/4" (19mm) - 10' (3.0m)
AH 3/4" (19mm) - 15' (4.6m)
B4 Heated, 1/4" (6.5mm) - 2.5' (0.6m)
B5 Heated, 1/4" (6.5mm) - 10' (3.0m)
B6 Heated, 1/4" (6.5mm) - 15' (4.6m)
B7 Heated, 3/8" (9.5mm) - 2.5' (0.6m)
B8 Heated, 3/8" (9.5mm) - 10' (3.0m)
B9 Heated, 3/8" (9.5mm) - 15' (4.6m)
BA Heated, 1/2" (13mm) - 2.5' (0.6m)
BB Heated, 1/2" (13mm) - 10' (3.0m)
BC Heated, 1/2" (13mm) - 15' (4.6m)
BG Heated, 3/4" (19mm) - 10' (3.0m)
BH Heated, 3/4" (19mm) - 15' (4.6m)
Code K Dispense Valve
1 None
2 MD2, Valve Only 1:1
3 MD2, Valve Only with 10:1 Nose
4 MD2, Handheld 1:1
5 MD2, Handheld with 10:1 Nose
6 MD2, Lever 1:1
7 MD2, Lever with 10:1 Nose
Code L Mixer Type
N None
1 3/16” (4.8mm) x 32
2 1/4" (6.5mm) x 24
3 3/8” (9.8mm) x 24
4 3/8” (9.8mm) x 36
5 3/8” (9.8mm) Combo
6 1/4" (6.5mm) x 24 Luer Lock
7 3/16” (4.8mm) x 32 Luer Lock
Code M Applicator Mounting
N None, Customer Mount Controls and Applicator
1 Mast Mount, Controls & MD2 Applicator machine mounted
2 Mast Mount, Controls Only
I-J Low Volume Hose
A1 3/16" (4.8mm) - 2.5' (0.6m)
A2 3/16" (4.8mm) - 10' (3.0m)
A3 3/16" (4.8mm) - 15' (4.6m)
A4 1/4" (6.5mm) - 2.5' (0.6m)
A5 1/4" (6.5mm) - 10' (3.0m)
A6 1/4" (6.5mm) - 15' (4.6m)
A7 3/8" (9.5mm) - 2.5' (0.6m)
A8 3/8" (9.5mm) - 10' (3.0m)
A9 3/8" (9.5mm) - 15' (4.6m)
AA 1/2" (13mm) - 2.5' (0.6m)
AB 1/2" (13mm) - 10' (3.0m)
AC 1/2" (13mm) - 15' (4.6m)
AG 3/4" (19mm) - 10' (3.0m)
AH 3/4" (19mm) - 15' (4.6m)
B4 Heated, 1/4" (6.5mm) - 2.5' (0.6m)
B5 Heated, 1/4" (6.5mm) - 10' (3.0m)
B6 Heated, 1/4" (6.5mm) - 15' (4.6m)
B7 Heated, 3/8" (9.5mm) - 2.5' (0.6m)
B8 Heated, 3/8" (9.5mm) - 10' (3.0m)
B9 Heated, 3/8" (9.5mm) - 15' (4.6m)
BA Heated, 1/2" (13mm) - 2.5' (0.6m)
BB Heated, 1/2" (13mm) - 10' (3.0m)
BC Heated, 1/2" (13mm) - 15' (4.6m)
BG Heated, 3/4" (19mm) - 10' (3.0m)
BH Heated, 3/4" (19mm) - 15' (4.6m)
Code N
1
2
3
4
5
6
7
8
9
A
Code O
N No
Y Installed
120VAC North American Cord Set
10A, 250V US Cord Set
10A, 250V Continental Europe
10A, 250V U.K./Ireland
10A, 250V Israel
10A, 250V Australia
10A, 250V Italy
10A, 250V Switzerland
10A, 250V,Denmark
10A, 250V India
Power Cord Option
Pressure Transducer
312393C 4 of 52
Page 5

Models
Code P
High Volume Tank
N None
1 1-1/2" (38mm)NPT FLANGE, No Tanks
2 8L, Twin PE Tanks (High and Low Volumes) and Lid
3 8L one 120 VAC 50/60 Hz agitator
4 8L two 120 VAC 50/60 Hz agitators
5 8L w Shut-off
6 8L one 120 VAC 50/60 Hz agitator w/ Shut-off
7 8L two 110/120 VAC agitators w/Shut-off
S 8L one 240 50/60 Hz VAC agitator
T 8L two 240 50/60 Hz VAC agitators
U 8L one 240 50/60 Hz VAC agitator w/Shut-off
W 8L two 240 50/60 Hz VAC agitators w/Shut-off
D 8L one pneumatic agitator
E 8L two pneumatic agitators
K 8L one pneumatic agitator w/Shut-off
P 8L two pneumatic agitators w/Shut-off
A 3L SST
B 7.5L SST
C 3L SSTw/ Shut-Off
F 7.5L SST w/ Shut-Off
G 7.5L SST w/ Heat 240 VAC
H 7.5L SST w/ Shut-off & Heat 240 VAC
J 30L SST
L 30L SST Heat 240/1
M 60L SST
R 60L SST Heat 240/1
X Accumulator, Viton
Y Accumulator, EP
Code Q High Volume Tank Cover
1 On-board Dust Cover
2 On-board Clamp Down
3 On-board Vacuum Degas
4 On-board Agitate 120VAC 50/60 Hz
5 On-board Agitate 240VAC 50/60 Hz
6 On-board Agitate 120VAC 50/60 Hz & DEGAS
7 On-board Agitate 240VAC 50/60 Hz & DEGAS
8 On-board Agitate 120VAC 50/60 Hz, DEGAS & Fill Port
9 On-board Agitate 240VAC 50/60 Hz, DEGAS & Fill Port
S On-board Agitate Pneumatic
T On-board Agitate Pneumatic & DEGAS
U On-board Agitate Pneumatic, DEGAS & Fill Port
A Off-board Clamp Down-30L
B Off-board Clamp Down-60L
C Off-board Vacuum Degas -30L
F Off-board Vacuum Degas - 60L
G Off-board Agitate SST - 30L
H Off-board Agitate SST - 60L
J Off-board Vacuum Degas & Agitate SST - 30L
L Off-board Vacuum Degas & Agitate SST - 60L
M Off-board Vacuum Degas/Agitate/Fill Port/Slinger SST -30L
R Off-board Vacuum Degas/Agitate/Fill Port/Slinger SST - 60L
V Off-board Pneumatic Agitate SST - 30L
Code Q
W Off-board Pneumatic Agitate SST - 60L
X Off-board Pneumatic Vacuum Degas & Agitate SST - 30L
Y Off-board Pneumatic Vacuum Degas & Agitate SST - 60L
Z Off-board Vacuum Degas/Pneumatic Agitate/FP SST -30L
K Off-board Vacuum Degas/Pneumatic Agitate/FP/SST - 60L
N None
Code R
N None
1 1-1/2" (38mm)NPT FLANGE, No Tanks
A 3L SST
B 7.5L SST
C 3L SST w/ Shut-off
F 7.5L SST w/ Shut-off
G 7.5L SST Heat 240 V
H 7.5L SST w/ Shut-off & Heat 240V
J 30L SST
L 30L SST Heat 240/1
M 60L SST
R 60L SST Heat 240/1
Code S Low Volume Tank Covers
Accumulator, Viton
X
Y Accumulator, EP
1 On-board Dust Cover
2 On-board Clamp Down
3 On-board Vacuum Degas
4 On-board Agitate 120VAC 50/60 Hz
5 On-board Agitate 240VAC 50/60 Hz
6 On-board Agitate 120VAC 50/60 Hz & DEGAS
7 On-board Agitate 240VAC 50/60 Hz & DEGAS
8 On-board Agitate 120VAC 50/60 Hz, DEGAS & Fill Port
9 On-board Agitate 240VAC 50/60 Hz, DEGAS & Fill Port
S On-board Agitate Pneumatic
T On-board Agitate Pneumatic & DEGAS
U On-board Agitate Pneumatic, DEGAS & Fill Port
A Off-board Clamp Down-30L
B Off-board Clamp Down-60L
C Off-board Vacuum Degas -30L
F Off-board Vacuum Degas - 60L
G Off-board Agitate SS - 30L
H Off-board Agitate SS - 60L
J Off-board Vacuum Degas & Agitate SS - 30L
L Off-board Vacuum Degas & Agitate SS - 60L
M Off-board Vacuum Degas/Agitate/Fill Port/Slinger SST -30L
R Off-board Vacuum Degas/Agitate/Fill Port/Slinger SST - 60L
V Off-board Pneumatic Agitate SST - 30L
W Off-board Pneumatic Agitate SST - 60L
X Off-board Pneumatic Vacuum Degas & Agitate SST - 30L
Y Off-board Pneumatic Vacuum Degas & Agitate SST - 60L
Z Off-board Vacuum Degas/Pneumatic Agitate/FP SST -30L
K Off-board Vacuum Degas/Pneumatic Agitate/FP/SST - 60L
N None
High Volume Tank Cover (cont’d)
Low Volume Tank Options
312393C 5 of 52
Page 6

Models
2007 Product Configurator – PR70 (Continued)
Code T Low Level Sensor Options
1 None
2 PE Tanks
3 Steel Tanks On-Board
4 Steel Tanks Off-Board
5 Steel Tanks 1 On / 1 Off-board
6 2 Accumulator
7 1 Accumulator & 1 Off-board Tank
8 1 Accumulator & 1 On-board Tank
Code U Heat Zone Controller
N None
1 1 Off Board Tank (1 zone)
2 1 On Board Tank (1 Zone)
3 2 Off Board Tanks
4 2 On Board Tanks
5 1 Off Board Tank / 1 On Board Tank OR 1 Hose
6 2 Off Board Tanks / 1 Hose
7 1 Off Board Tank / 1 On Board Tank & 1 Hose OR 2 Hoses
8 2 On Board Tanks / 1 Hose OR 1 On Board Tank / 2 Hoses
9 2 Off Board Tanks / 2 Hoses
A 1 Off Board Tank / 1 On Board Tank / 2 Hoses
B 2 On Board Tanks / 2 Hoses
Code V Wet Test
Code W
Wet Test (Note: Material must be supplied; No
Y
Dealer/Distributor discounts apply)
N No Wet Test
Off-Board Tank Stands
N None, or NA
2 Tank Stand (1 or 2 tanks)
PR70 Accessories
Mixer and Shroud Options
LC0063 Mixer, 3/16 (6.5 mm) x 32, 10 Mixers with shroud LC0081 Mixer, 3/8 (9.8 mm) combo, 50 Mixers
LC0057 Mixer, ¼ (6.5 mm) x 24, 10 Mixers with shroud LC0083 Mixer, 1/4 (6.5 mm) x 24 Luer Lock, 50 Mixers
LC0058 Mixer, 3/8 (9.8 mm) x 24, 10 Mixers with shroud LC0082 Mixer, 3/16 (4.8 mm) x 32 Luer Lock, 50 Mixers
LC0059 Mixer, 3/8 (9.8 mm) x 36, 10 Mixers with shroud LC0084 Mixer, 3/16 (4.8 mm) x 32, 250 Mixers
LC0060 Mixer, 3/8 (9.8 mm) Combo, 10 Mixers with shroud LC0085 Mixer, 1/4 (6.5 mm) x 24, 250 Mixers
LC0061 Mixer, 3/16 (4.8 mm) x 32 Luer Lock, 10 Mixers with shroud LC0086 Mixer, 3/8 (9.8 mm) x 24, 250 Mixers
LC0062 Mixer, ¼ (6.5 mm) x 24 Luer Lock, 10 Mixers with shroud LC0087 Mixer, 3/8 (9.8 mm) x 36, 250 Mixers
LC0077 Mixer, 3/16 (4.8 mm) x 32, 50 Mixers LC0088 Mixer, 3/8 (9.8 mm) combo, 250 Mixers
LC0078 Mixer, ¼ (6.5 mm) x 24, 50 Mixers LC0089 Mixer, 3/16 (4.8 mm) x 32 Luer Lock, 250 Mixers
LC0079 Mixer, 3/8 (9.8 mm) x 24, 50 Mixers LC0090 Mixer, ¼ (6.5 mm) x 24 Luer Lock, 250 Mixers
LC0080 Mixer, 3/8 (9.8 mm) x 36, 50 Mixers
MD2 Valve Kits
255217 MDS2, kit rebuild, air cylinder 255219 MD2, Soft Seat rebuild, needle and nose
255218 MD2, kit rebuild, back-end of wet section (no needle or seat) 255220
Other Accessories
LC0097 Desiccant Dryer, 3/8” NPT with adapter and cartridge LC0100 Vacuum Transfer Pump, 240V, down to 25 Torr
LC0098 Desiccant Dryer refill cartridge LC0091 3.0” Air Cylinder rebuild kit
LC0095 Nitrogen Kit for 30L and 60L tank, 1 tank LC0092 4.5” Air Cylinder rebuild kit
LC0096 Nitrogen Kit for 30L and 60L tank, 2 tanks LC0093 Check Valve rebuild kit
LC0008 Cord, I/O interface and footswitch part LC0094 Rear Pump Seal rebuild kit
LC0099 Vacuum Transfer Pump, 120V, down to 25 Torr
MD2, convert Soft Seat nose to Hard Seat (Hard
Seat rebuild), needle and nose
312393C 6 of 52
Page 7
Manuals
Supplied Manuals
The following manuals will be supplied with the
PR70 Operation
PR70.
Refer to these documents for detailed machine
Part Description
information.
312393 Manual, Operation & Maintenance
PR70
PR70 Feed System
Part Description
312394 Manual, Tank/Feed System, PR70
Dispense Valve, MD2
Part Description
312185 Manual, Dispense Valve, MD2
* Heat Control Module(s)
Part Description
312413 Manual, Heat Control, Tank/Hoses
Related Manuals
The following manuals are for accessories to be used
with the PR70 machine.
PR70 Feed System
Part
312394 Manual, Tank/Feed System, PR70
312185 Manual, Dispense Valve, MD2
312413 Manual, Heat Control, Tank/Hoses
* The Heat Control Module manual is not provided for machines that do not have a Heated Tank and/or Hose
component.
PR70 Operation
Part
312393 Manual, Operation & Maintenance PR70
Dispense Valve, MD2
Part Description
Heat Control Module(s)
Part Description
Description
Description
312393C 7 of 52
Page 8
Warnings
Warnings
The following warnings are for the setup, use, grounding, maintenance, and repair of this equipment. The exclamation point symbol alerts you to a general warning and the hazard symbol refers to procedure-specific risk. Refer
back to these warnings. Additional, product-specific warnings may be found throughout the body of this manual
where applicable.
WARNING
ELECTRIC SHOCK HAZARD
Improper grounding, setup, or usage of the system can cause electric shock.
• Turn off and disconnect power cord before servicing equipment.
• Use only grounded electrical outlets.
• Use only 3-wire extension cords.
• Ensure ground prongs are intact on sprayer and extension cords.
• Do not expose to rain. Store indoors.
SKIN INJECTION HAZARD
High-pressure fluid from dispense valve, hose leaks, or ruptured components will pierce skin. This may
look like just a cut, but it is a serious injury that can result in amputation.
Get immediate surgical
treatment.
• Do not point dispense valve at anyone or at any part of the body.
• Do not put your hand over the end of the dispense nozzle.
• Do not stop or deflect leaks with your hand, body, glove, or rag.
• Follow Pressure Relief Procedure in this manual, when you stop spraying and before cleaning,
checking, or servicing equipment.
TOXIC FLUID OR FUMES HAZARD
Toxic fluids or fumes can cause serious injury or death if splashed in the eyes or on skin, inhaled, or
swallowed.
• Read MSDS’s to know the specific hazards of the fluids you are using.
• Store hazardous fluid in approved containers, and dispose of it according to applicable guidelines.
• Always wear impervious gloves when spraying or cleaning equipment.
FIRE AND EXPLOSION HAZARD
Flammable fumes, such as solvent and paint fumes, in work area can ignite or explode. To help prevent
fire and explosion:
• Use and clean equipment only in well ventilated area.
• Eliminate all ignition sources; such as pilot lights, cigarettes, portable electric lamps, and plastic drop
cloths (potential static arc).
• Keep work area free of debris, including solvent, rags and gasoline.
• Do not plug or unplug power cords or turn lights on or off when flammable fumes are present.
• Ground equipment, personnel, object being sprayed, and conductive objects in work area. See
Grounding instructions.
• Use only Graco grounded hoses.
• Check gun resistance daily.
• If there is static sparking or you feel a shock, stop operation immediately. Do not use equipment
until you identify and correct the problem.
• Do not flush with gun electrostatics on. Do not turn on electrostatics until all solvent is removed from
system.
• Keep a working fire extinguisher in the work area.
312393C 8 of 52
Page 9
Warnings
WARNING
EQUIPMENT MISUSE HAZARD
Misuse can cause death or serious injury.
• Do not operate the unit when fatigued or under the influence of drugs or alcohol.
• Do not exceed the maximum working pressure or temperature rating of the lowest rated system
component. See Technical Data in all equipment manuals.
• Use fluids and solvents that are compatible with equipment wetted parts. See Technical Data in all
equipment manuals. Read fluid and solvent manufacturer’s warnings. For complete information about
your material, request MSDS forms from distributor or retailer.
• Check equipment daily. Repair or replace worn or damaged parts immediately with genuine manufacturer’s replacement parts only.
• Do not alter or modify equipment.
• Use equipment only for its intended purpose. Call your distributor for information.
• Route hoses and cables away from traffic areas, sharp edges, moving parts, and hot surfaces.
• Do not kink or over bend hoses or use hoses to pull equipment.
• Keep children and animals away from work area.
• Comply with all applicable safety regulations.
MOVING PARTS HAZARD
Moving parts can pinch or amputate fingers and other body parts.
• Keep clear of moving parts.
• Do not operate equipment with protective guards or covers removed.
• Pressurized equipment can start without warning. Before checking, moving, or servicing equipment,
follow the Pressure Relief Procedure in this manual. Disconnect power or air supply.
PERSONAL PROTECTIVE EQUIPMENT
You must wear appropriate protective equipment when operating, servicing, or when in the operating area
of the equipment to help protect you from serious injury, including eye injury, inhalation of toxic fumes,
burns, and hearing loss. This equipment includes but is not limited to:
• Protective eyewear
• Clothing and respirator as recommended by the fluid and solvent manufacturer
• Gloves
• Hearing protection
312393C 9 of 52
Page 10
Installation
Installation
General Information
Accessories are available from Graco. Make certain all
accessories are adequately sized and pressure-rated to
meet your system needs.
Figures 2 thru 4 are only a guide for identifying system
components and for assisting in installation. Contact
your Graco distributor or Graco Ohio Customer Service
for assistance in designing a system to suit your
particular needs.
Unpacking
1. Inspect the shipping container carefully for damage.
Contact the carrier promptly if there is damage.
2. Open the box and inspect the contents carefully.
There should not be any loose or damaged parts in
the container.
3. Compare the packing slip against all the items in
the box. Report any shortage or other inspection
problems immediately.
4. Remove the PR70 system components from the
container. Do not lift the machine by the tanks.
Locate and Install the PR70
1. Locate a bench top or equivalent location to
mechanically mount the PR70 dispensing machine.
Verify the location has access to compressed air,
AC power and is well ventilated.
2. Place the PR70 onto the designated location. Allow
to the machine to rest on the rubber feet provided.
3. Turn the Shield Locking Screws clockwise on both
sides to remove the PR70 protective shield.
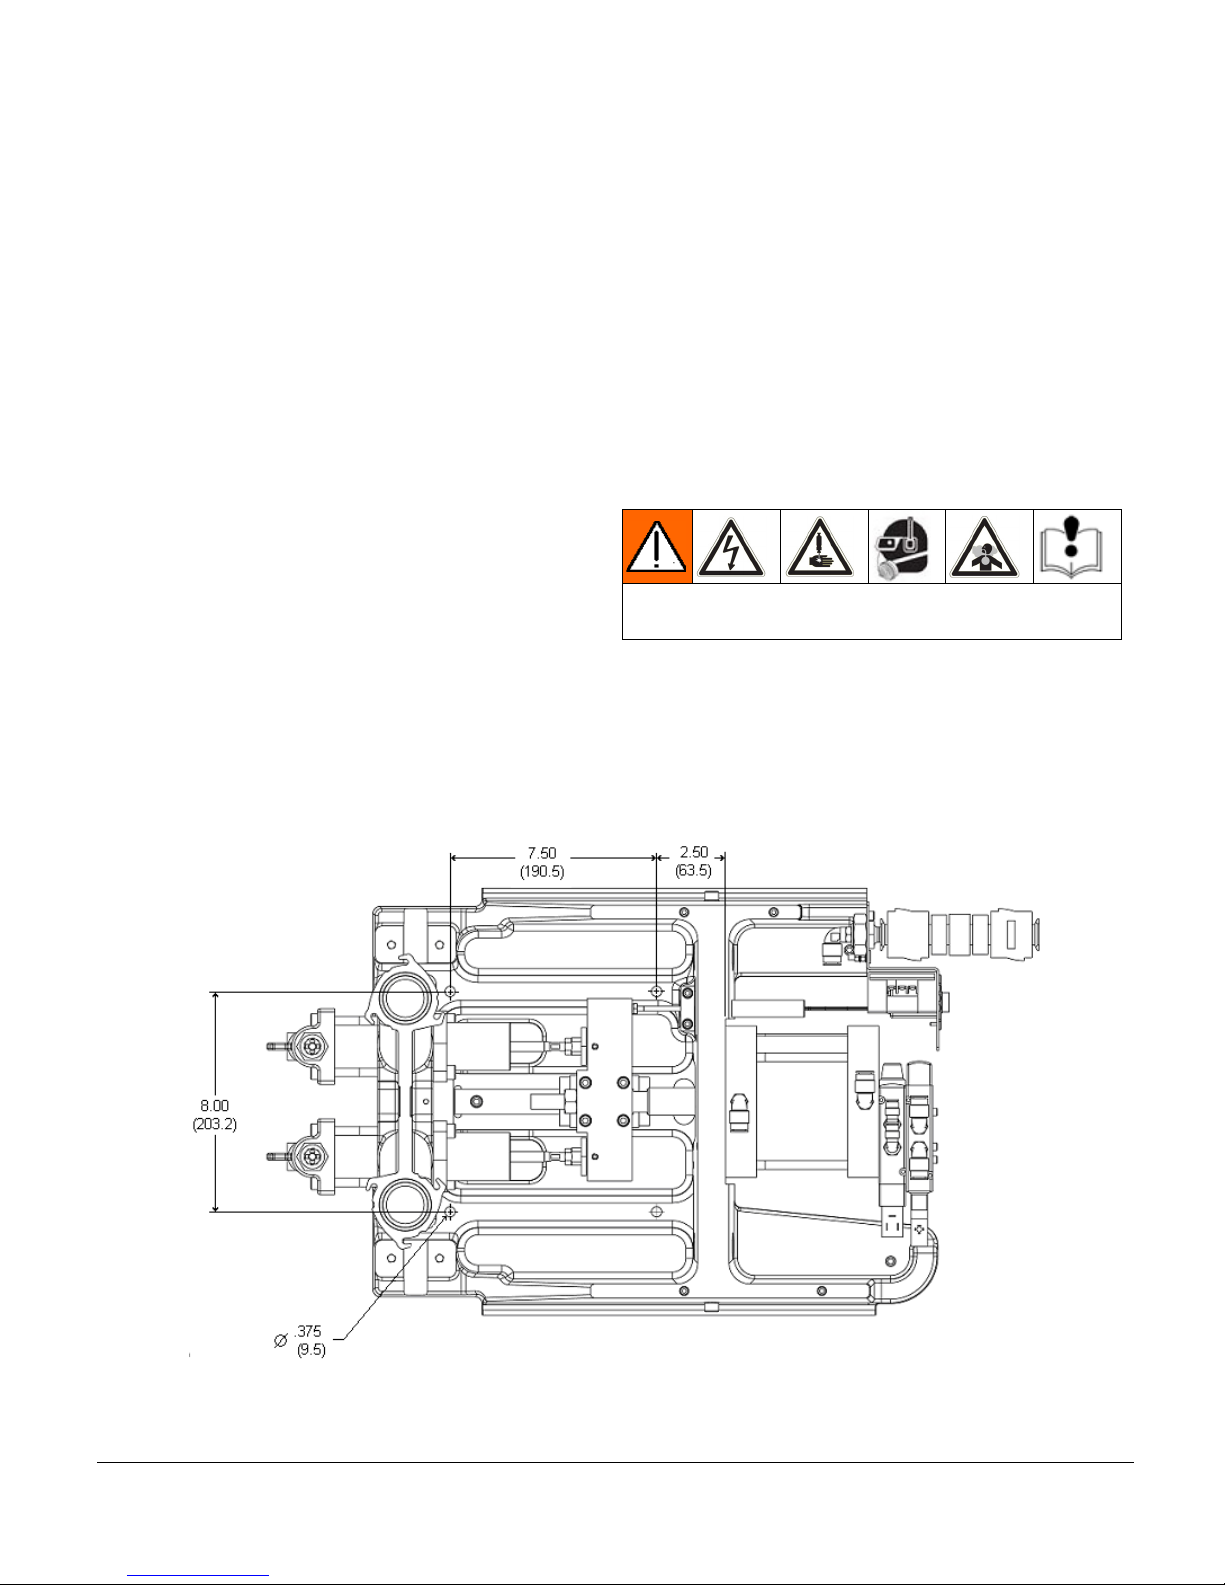
4. Attach the PR70 frame to the selected location by
installing fasteners (not provided with unit) thru the
4 mounting holes. Refer to Figure 1 for mounting
hole dimensions.
Machine Setup
Avoid contact with electrical inter-connects, when connecting electric
power to the machine. Read all manufacturer’s warning and material
MSDS to know the specific hazards of the material used.
1. Connect a compressed airline to the input air in the
back of the machine.
2. Load material into the on-board or off-board tanks
feeding the machine.
3. Using the power cord provided, connect AC power
(100-240V, 50/60 Hz, single-phase) to the machine.
Figure 1: Mounting Hole Dimensions for Installing the PR70 Machine (dimensions in inches/mm)
312393C 10 of 52
Page 11
Component Identification
Component Identification
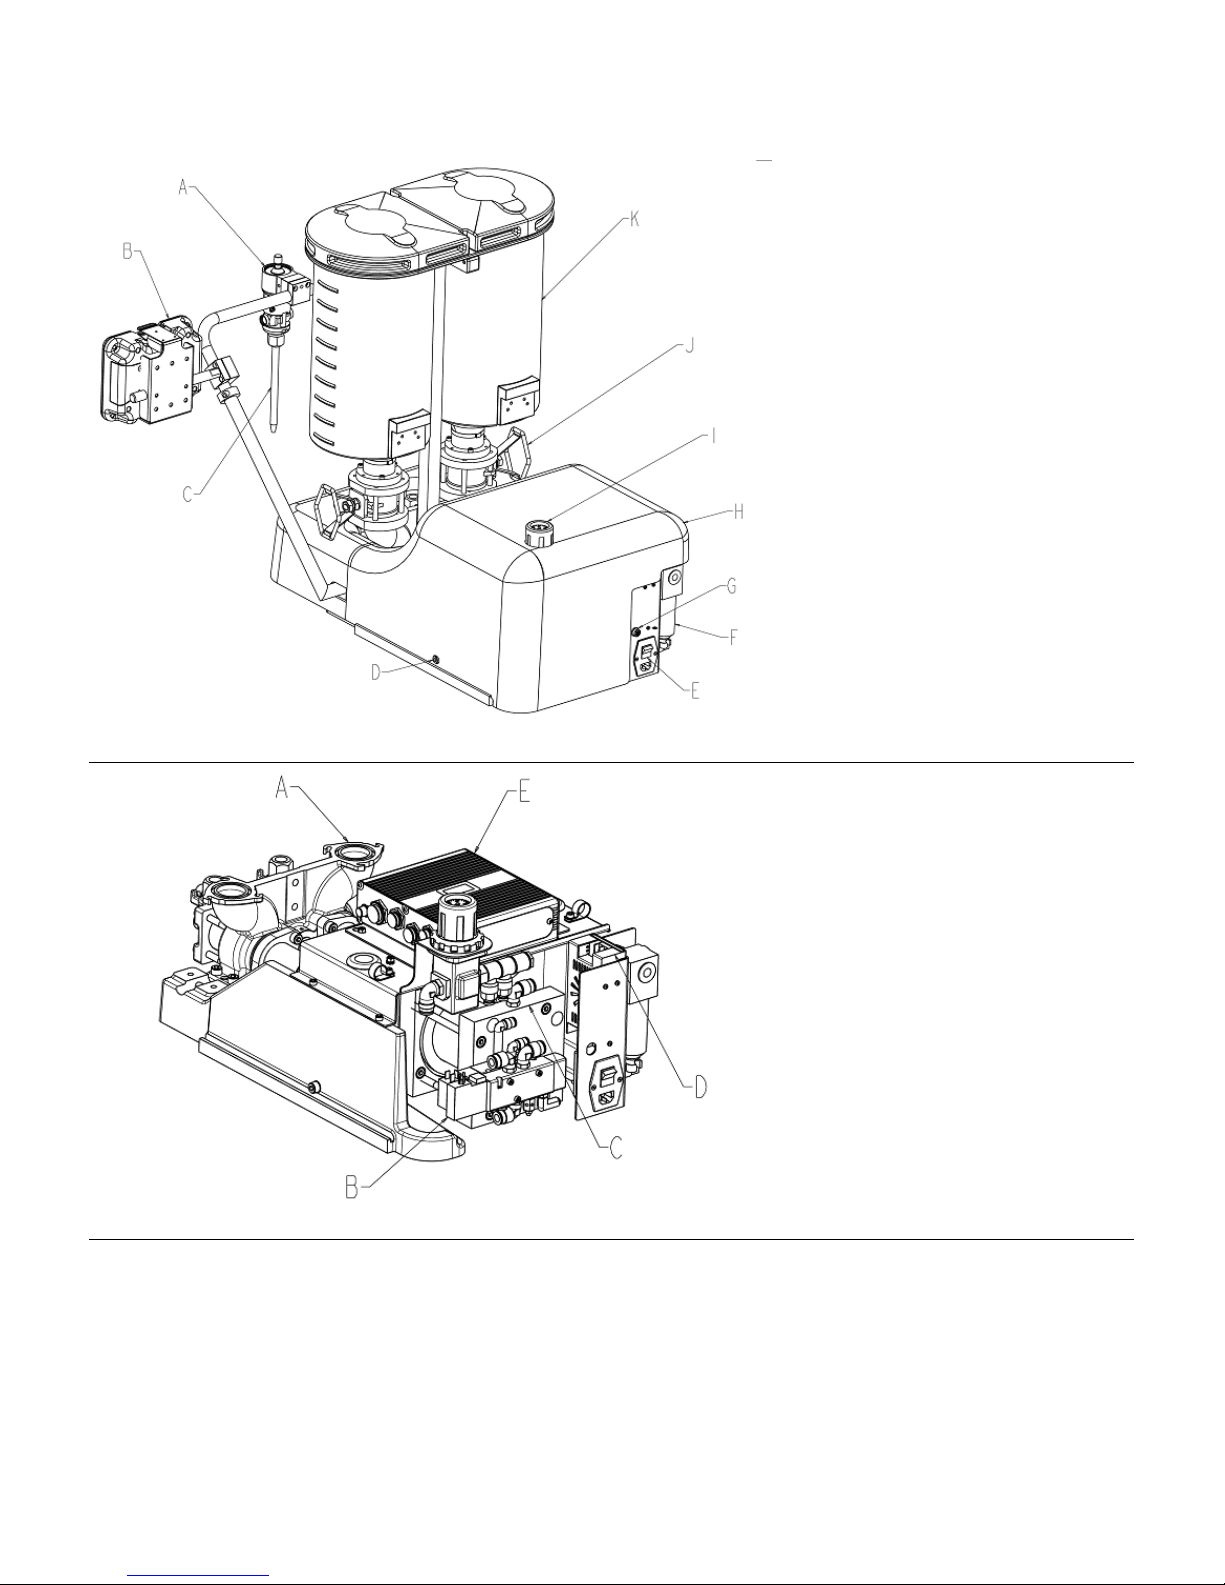
Key:
A Dispense Valve (DV)
B HMI (Human Machine Interface)
C Static Mixer
D Shield Locking Screw
E Power Switch
F Air Filter
G Customer Input Receptacle
H Protective Shield
I Air Pressure Regulator
J Ball Valve (Optional)
K A and B Tanks (Onboard,
Polyethylene versions illustrated).
Figure 2: Typical PR70 (Back View, without Hoses)
Figure 3: PR70 Back View with Shield, Tanks, DV and HMI Removed.
Key:
A Pump Assembly
B Solenoid Valves
C Air Cylinder Assembly
D DC Power Supply
E Fluid Control Module (FCM)
312393C 11 of 52
Page 12
Component Identification
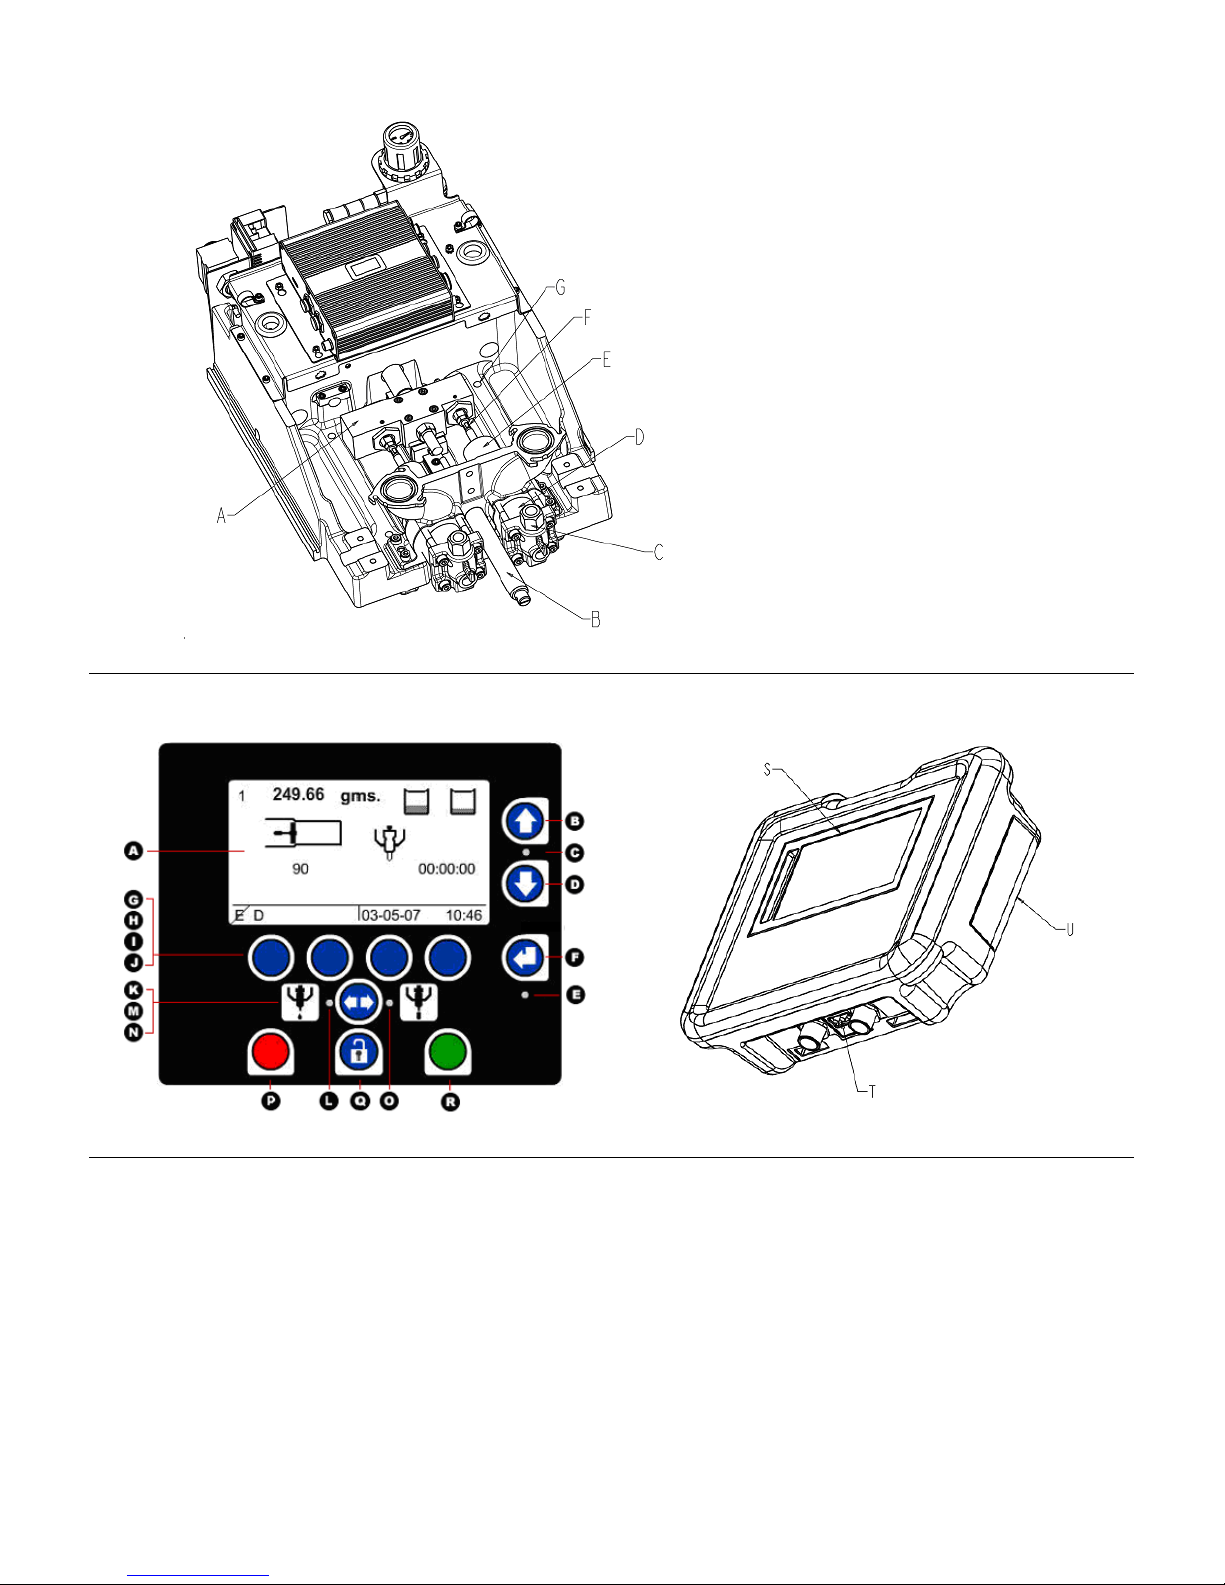
Key:
A Drive Block
B Hydracheck (optional)
C Check Valve
D Cylinder (Metering Tube)
E Rear Bearing
F Phase Adjustment Screw/Locking
Nut
G Mounting Hole in Base Frame
Figure 4: PR70 Top View with Shield, Tanks, DV and HMI Removed.
HMI Control and Indicators
Figure 5: PR70 HMI Controls
Key:
A Screen, Display Area
B, D Up and Down Keys
C Up and Down Key LED
E Enter Key LED
F Enter Key
G-J Soft Keys 1 thru 4 (Left to Right).
K Shot Mode ICON
L Shot Mode LED
M Mode Select Key
N Operator Mode ICON
O Operator Mode LED
P Red Stop or Cancel Key (used to stop machine
operation)
Q Lock Key (used to enter and exit setup screens)
R Green Go Key (used to request a shot)
S Display area
T Diagnostic LED’s
U HMI Rear Access Panel (used to access clock
battery and for reprogramming the HMI).
312393C 12 of 52
Page 13
Run Screens
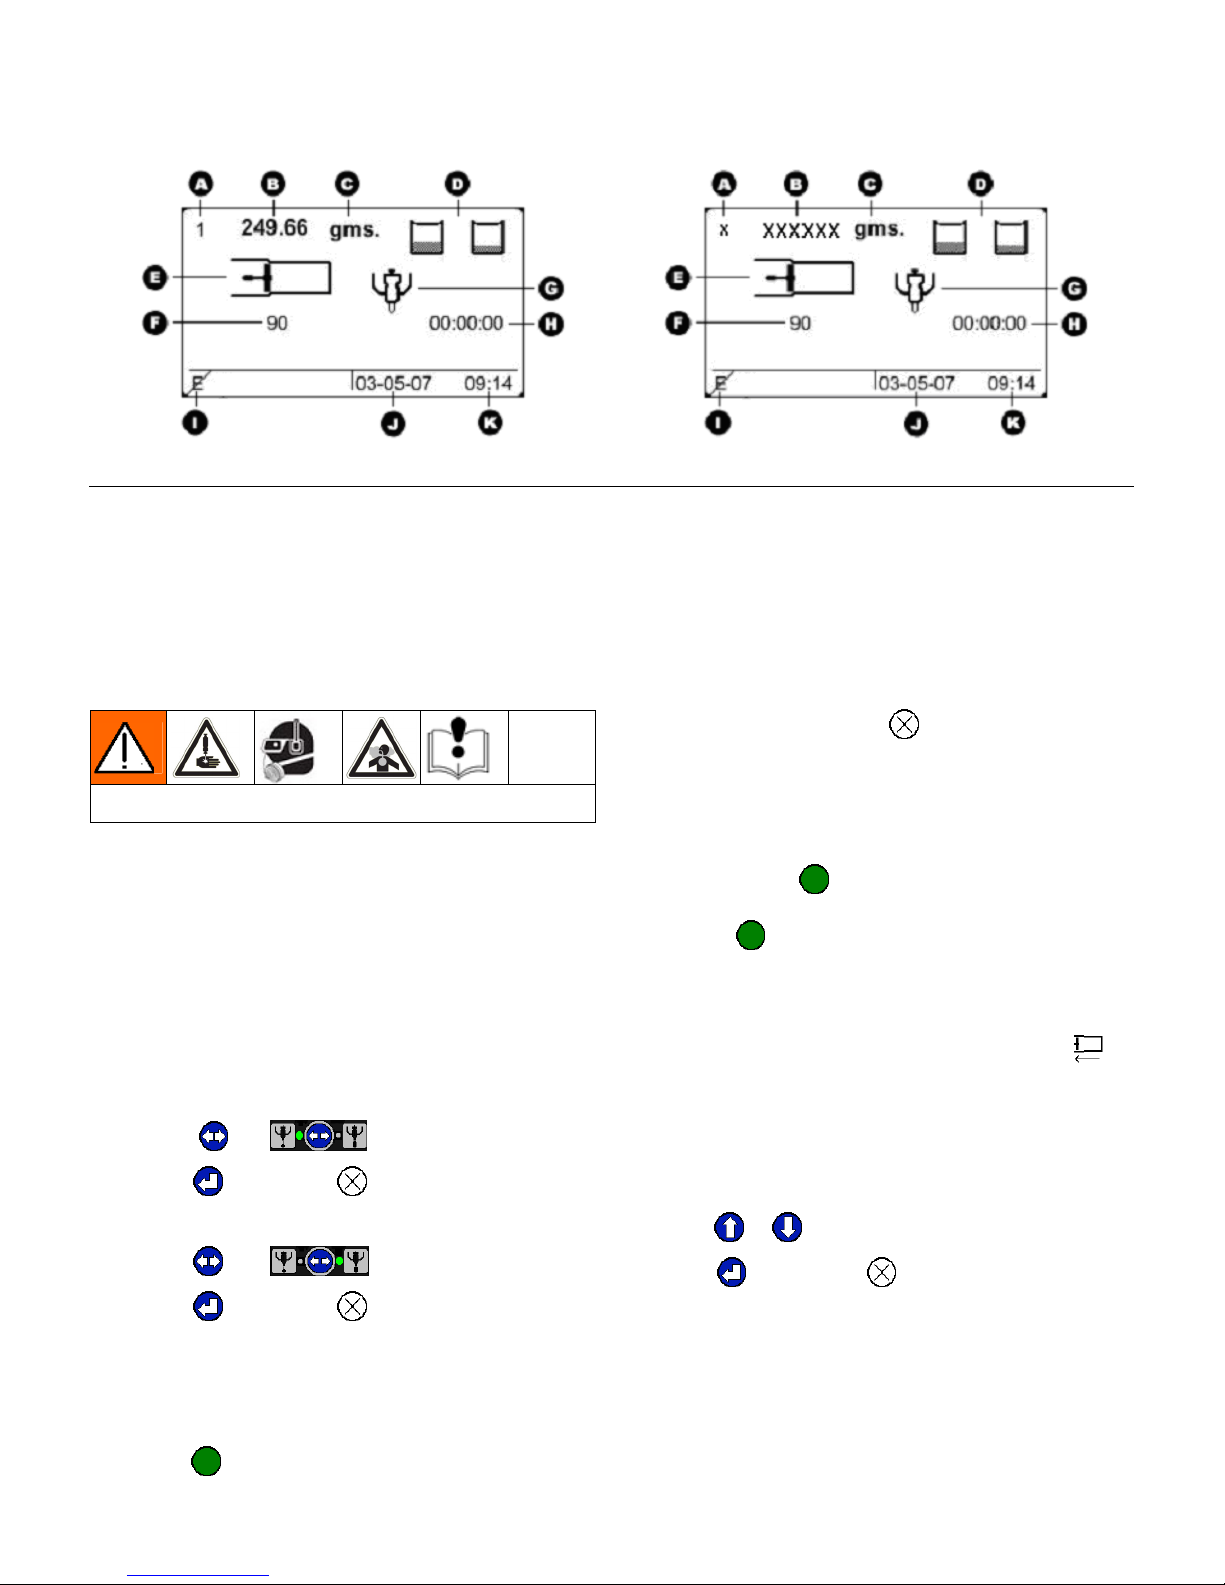
HMI Main Run Screen
Figure 6: Typical PR70 Main Run Screen (Shot and Operator Modes) Respectively)
Key:
A Shot Number Field (“x” in Operator Mode)
B Shot Size Field (“XXXXXX” in Operator Mode)
C Shot weight/mass unit of measure (Grams).
D Tank Fill Status Indicators
E Pistons Status Field
F Cycle Counter
G DV status Field
H Purge Timer status Field
I Error code status Field
J Current Date Field (DD-MM-YY)
K Current Time Field (24 Hr. Format)
Run Screen Operation
Read all manufacturer’s warning and material MSDS to know the
specific hazards of the material used.
Machine Mode Selection
To dispense material, one of the following 2 modes
must be selected;
• Shot mode dispenses a predetermined amount
of material when the machine receives a “Go”
command.
• Operator mode dispenses material as long as
the machine is receiving a “Go” command.
3. To cancel the shot, press
Machine Operation: Operator Mode
1. Place the item or part to be filled below the
dispense valve static mixer.
2. Press and hold
the shot. The machine will continue to dispense
until the
The pistons will not retract unless they are almost fully
extended. They will automatically retract after 4
minutes. The machine will beep to signal that it is about
to retract. To manually retract the machine, press
(green) or the footswitch is released.
(green) or the footswitch to start
.
.
To select Shot mode:
1. Press
2. Press to accept or to cancel.
To select Operator mode:
3. Press
4. Press
until .
until .
to accept or to cancel.
Machine Operation: Shot Mode
1. Place the item or part to be filled below the
dispense valve static mixer
2. Press
312393C 13 of 52
(green) or the footswitch to start the shot.
Shot Number Selection
In Shot mode, up to 5 predefined shot sizes may be
selected. To select a shot:
1. When the machine is idle (not dispensing a shot)
press
2. Press
or to select the new shot size.
to accept, or to cancel.
Page 14
Disable Mode, Entering Set-up Screens
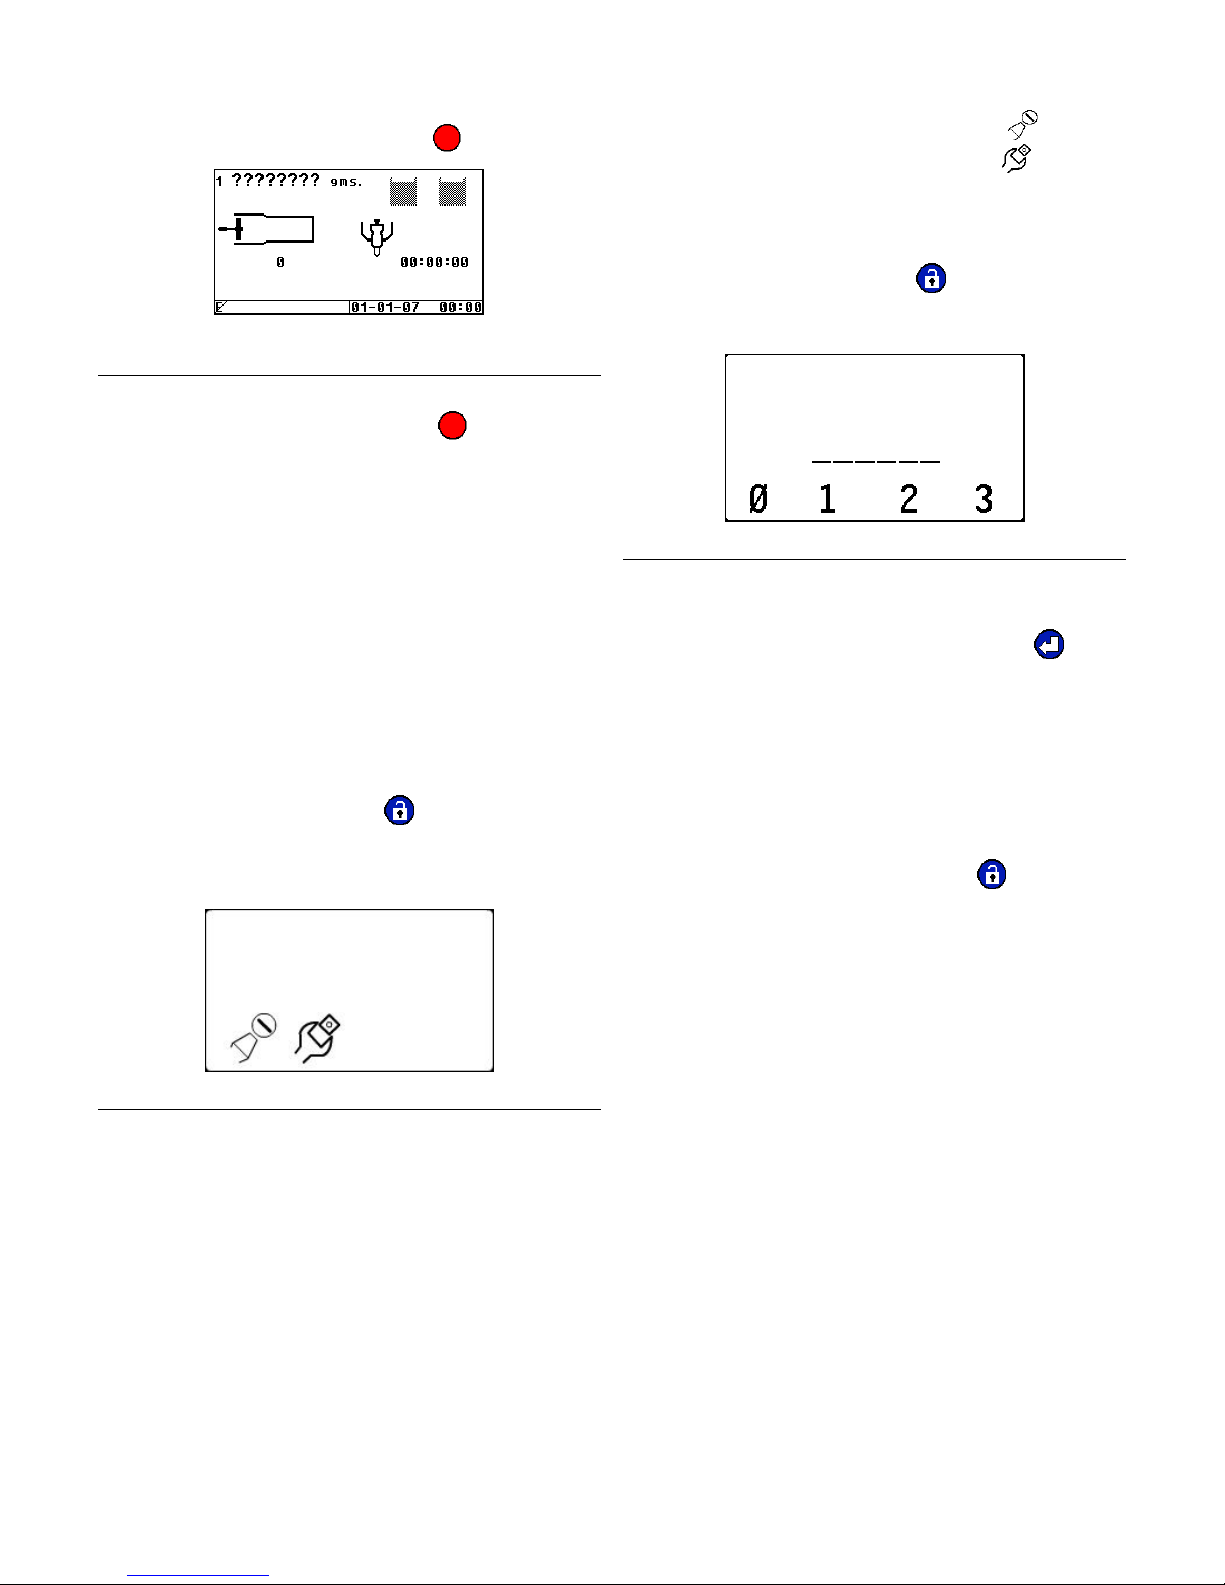
Machine Disable Mode (“ ”red)
2. To enter the calibration screens, press . To
enter the maintenance screens, press
to Figure 9 for a screen navigation diagram.
. Refer
Setup Screens with Passwords Enabled
1. From the Run screen press . If a password has
Figure 6: Typical Run Screen when Machine in
“Disable” Mode
1. At any time and from any screen, to immediately
disable all machine motion, press (red).
been programmed, the Password Entry Screen
(Figure 8) will be displayed.
2. If activated, the purge timer will be disabled
3. To resume operation, the machine must be put
back into an operating mode as described in the
Machine Mode Selection section.
4. If activated, the purge timer will not restart until a
shot is taken.
Setup Screens
Before the machine will operate properly, it must be
calibrated and shot size information must be entered.
Entering the Setup Screens
1. From the Run screen press . If no password
has been programmed into the HMI, the
Programming Mode Selection Screen (Figure 7)
will be displayed.
Figure 8: Password Entry Screen
2. Enter the 6 digit password by pressing the
corresponding soft keys, G-J in Figure 5.
th
3. After the 6
4. If the correct password has been entered, the
Programming Mode Selection Screen will be
displayed. Refer to Figure 9 for a screen navigation
diagram.
5. If the incorrect password has been entered, the
password entry will need to be repeated until the
correct 6-digit sequence is entered.
6. To abort the password entry, press
digit has been entered, press .
.
Figure 7: Programming Mode Selection Screen
312393C 14 of 52
Page 15
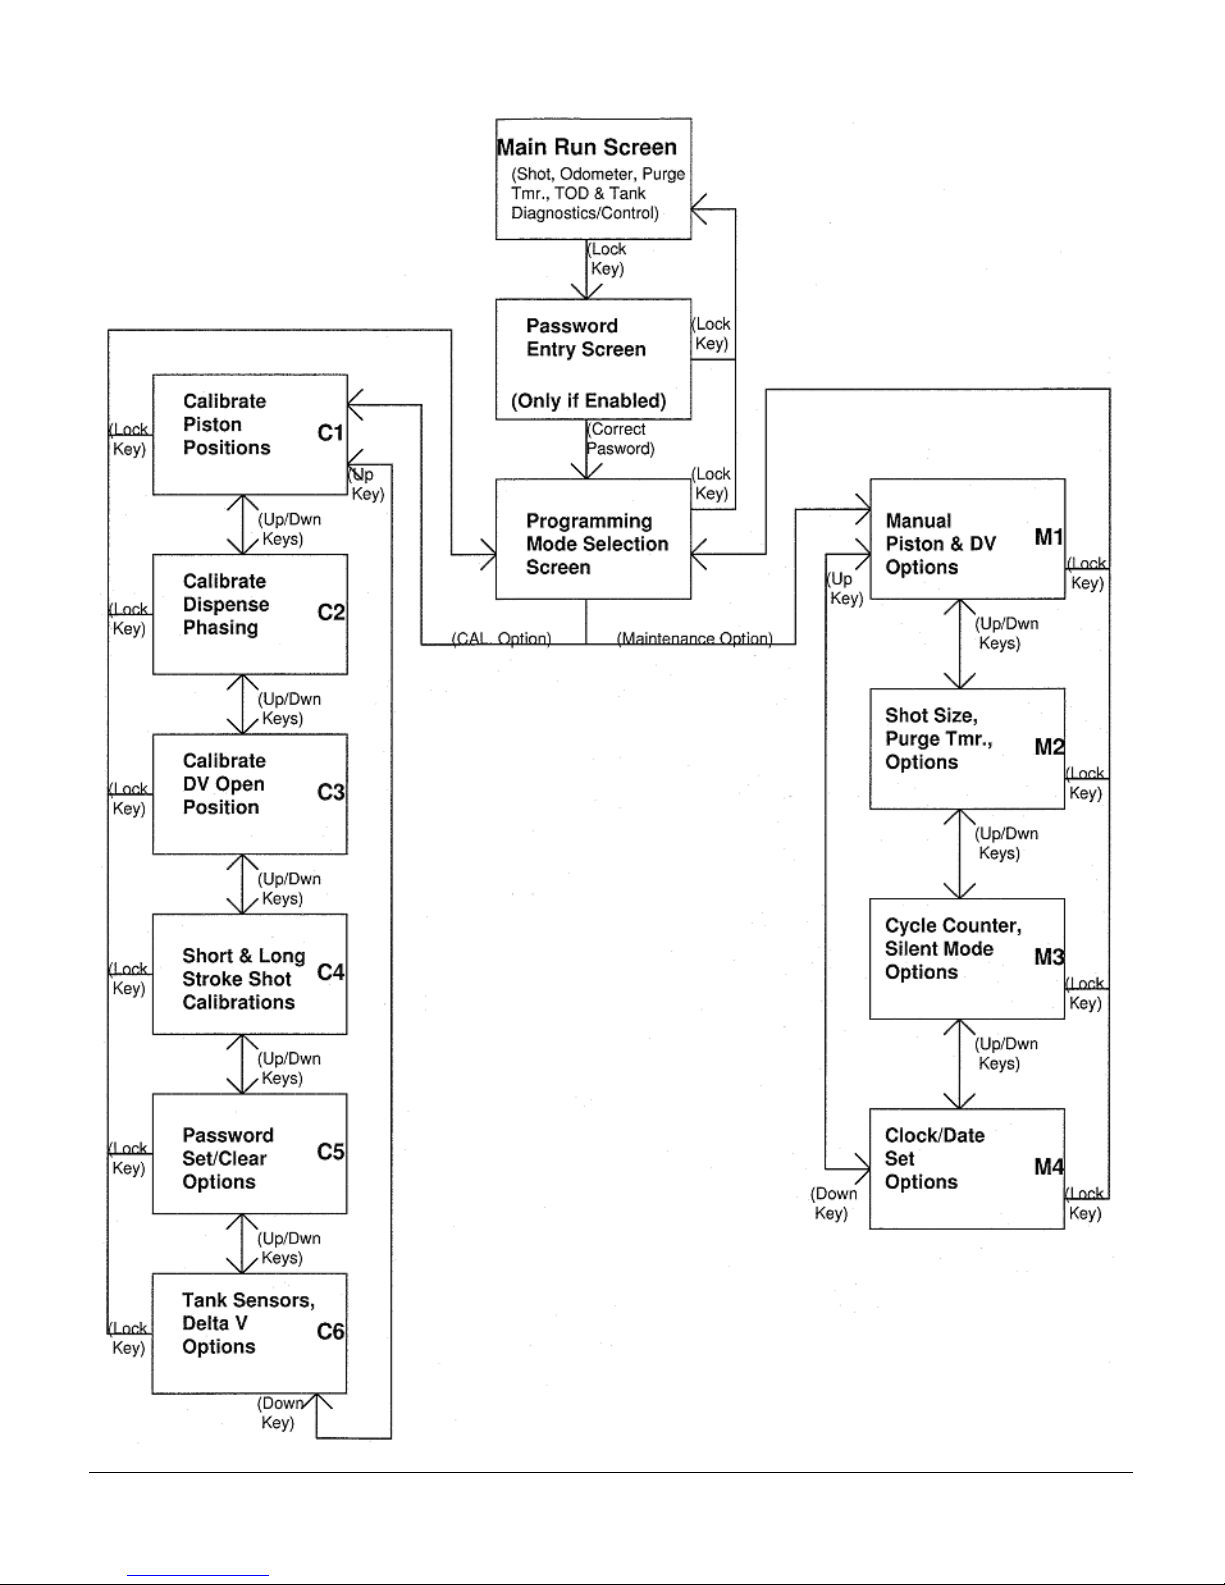
Screen Layout
Figure 9: PR70 Screen Navigation Diagram
312393C 15 of 52
Page 16

Priming and Calibration
Machine Priming
Before the machine can be properly calibrated with
material, it will need to be primed.
Read all manufacturer’s warning and material MSDS to know the
specific hazards of the material used.
From the Run Screen press then press . The
following screen will be displayed.
Figure 10: Maintenance Screen for Priming (M1)
Key:
A Full Retract ICON
B Full Extend ICON
C Change Dispense Valve Mode
= Always Open
= Always Closed
= Opens at Cylinder Entrance (Automatic)
D Current Piston Position
E Current Dispense Valve Mode
F Screen Number (C1)
G
& keys will navigate to adjacent screens.
1. Place a waste container under the dispense valve
to capture any dispensed material.
2. Press
3. Press
until the upper ICON is .
to extend the piston fully.
Be careful not to pinch fingers when manually moving the machine
drive block.
Piston Position Calibration (C1)
This step should be executed the 1st time the machine
is setup, and may not need to be re-executed unless
the position sensor, an electronic component or a piston
has been replaced.
From the Run Screen press
following screen will be displayed.
Figure 11: Piston Position Calibration Screen (C1)
Key:
A Full Extend position number from last calibration
B Full Extend Command ICON
C Full Retract position number from last calibration
D Full Retract Command ICON
E Cylinder Entrance position from last calibration
F Cylinder Entrance Command ICON
H Current Piston Position Field
I Screen Number (C1)
J
& keys will navigate to adjacent screens.
1. Place a waste container under the dispense valve
to capture any dispensed material.
2. With air pressure applied to the machine, press
3. The piston should fully extend and a number
between 3600 to 3900 should appear for ‘H’
4. Press
to accept the number or to keep the
current number.
then press . The
.
4. Press to retract the piston fully.
5. Repeat steps 3 and 4 until both materials dispense
from the valve without air.
6. Press
twice to return to the Run screen.
Machine Calibration
Before the machine will accurately dispense, it must
be calibrated.
312393C 16 of 52
5. Press
.
6. The piston should fully retract and a number
between 200 to 400 should appear for ‘H’
7. Press
to accept the number or to keep the
current number.
8. Decrease the air pressure by adjusting the machine
air pressure regulator to a minimal value (i.e. ~ 10 20 psi).
9. Press
.
Page 17

Priming and Calibration
10. The machine pistons should extend slowly until they
encounter the cylinder entrance and a number
between 1600 to 1900 should appear for ‘H’.
11. If the pistons do not move, manually move the
piston by pulling on the machine drive block, until
mechanical resistance is encountered at the
cylinder entrance.
12. Press
to accept the number or to keep the
current number.
13. Adjust the Air Pressure Regulator back to a
reasonable value for proper machine operation.
14. Press
twice to return to the Run screen.
Phasing (C2)
To enable the machine to dispense the correct ratio of
material from the A and B tanks and to mix properly,
both materials will need to enter the static mixer at the
same time. Phasing shots will need to be executed to
visually verify that the 2 materials are exiting the
dispense valve at the same time.
Remove any static mixer attached to the dispense
valve, and replace it with a ratio check nozzle. Place a
waste container under the valve to capture any
dispensed material.
From the Run screen, press
press
once. The following will screen will be displayed.
, then press , and then
1. Select the location where the piston will reverse
(from the extend to retract motion) by pressing
keys. Pressing will decrease the phasing
shot. Pressing
will increase the phasing shot. A
“+” value indicates that the piston will reverse beyond
the cylinder entrance. A “-“ value indicates the piston
will reverse prior to reaching the cylinder entrance.
2. Press
(green) or the footswitch.
3. During the shot execution, visually monitor the 2
materials exiting the ratio check nozzle. If the
timing of the 2 materials exiting the nozzle cannot
be properly observed, press
or accordingly,
then repeat step 2.
4. If the A side material exits the ratio nozzle before
the B side material (“ ”), turn the B piston
Phase Adjustment Screw/ Locking nut and shaft
counterclockwise to move the B piston forward, as
indicated on the
ICON. Slight adjustments in
the piston shaft will be significant. Adjustments of a
quarter turn are typical.
5. If the B side material exits the ratio nozzle before
the A side material (“
”), turn the A piston
Phase Adjustment Screw/ Locking nut and shaft
counterclockwise to move the A piston forward, as
indicated on the
ICON.
or
Figure 12: Phasing Calibration Screen (C2)
Key:
A A material leads B ICON
B Adjust B side Forward ICON
C B material leads A ICON
D Adjust A side Forward ICON
E A and B Exit the Same Time ICON
F Do NO Mechanical Adjustment ICON
G Phase Shot Request ICON
I Screen Number (C2)
J
& keys will navigate to adjacent screens.
K Decrease Phase Shot Percentage Amount ICON
L Current Phase Shot Percentage Amount
M Increase Phase Shot Percentage Amount ICON
6. Repeat step 2 until both materials exit the ratio
check nozzle at the same time (“
7. Press
twice to return to the Run screen.
”).
Open Dispense Valve (ODV) Setting (C3)
The next step in the calibration process is to determine
the proper position to open the Dispense Valve (DV)
during the shot.
Advancing or increasing the opening position (in millimeters) will build more pressure in the material hoses
prior to the dispense valve opening. If the Dispense
Valve opens too late in the shot, a surge of material
can occur or the piston could stall. If the Dispense
Valve opens to early in the shot, material “drooling” at
the beginning of the dispense cycle could occur.
From the Run screen, press
press
2 times. The following screen will be displayed.
, then press , and then
312393C 17 of 52
Page 18

Priming and Calibration
Figure 13: Open Dispense Valve (ODV) Screen (C3)
Key:
A Current ODV Adjustment (in mm from the cylinder
entrance).
B Adjust ODV value Option ICON.
C Relative ODV Position ICON with respect to
cylinder entrance (This ICON will move right or
left at +/- mm transition).
D Cylinder Entrance ICON (stationary).
I Screen Number (C3)
J
& keys will navigate to adjacent screens.
1. To adjust the ODV position with respect to the
cylinder entrance, press
.
From the Run screen, press
, then press , then press
3 times. The following screen will be displayed.
Figure 14: Stroke Calibration (CAL) Screen (C4)
Key:
A Short Shot Column ICON
B Last/Current Short Shot weight (mass) entry.
C Long Shot Column ICON
D
Last/Current Long Shot weight (mass) entry.
E Grams (Weight or Mass unit used)
F Short Shot ICON
G Long Shot ICON
I Screen Number (C4)
J
& keys will navigate to adjacent screens.
2. Press
to increase the value or to decrease
the value. Values of – 5.0 mm to + 5.0 mm are
allowed.
3. Press
to accept the value or to retain the
previous value. The default value from the factory
is – 1.0 mm.
4. Press
twice to return to the Run screen.
Machine Calibration Shots (C4)
Read all manufacturer’s warning and material MSDS to know the
specific hazards of the material used.
Calibration shots are necessary to program the
machine to properly dispense the correct amount of
material. Several short CAL shots (“
long CAL shots (“
”) are required.
”) and several
Remove the ratio check nozzle, install the static mixer
intended to be used, and adjust the air pressure to the
level intended for use during normal operation.
The air pressure must be set to operating
conditions for this step. Significant changes
in air pressure could adversely affect shot
accuracy.
1. Press to arm the machine to take a short CAL
shots. The icon will be highlighted (“
”). Press
to de-arm the machine.
2. Place the empty container below the static mixer,
and press
(green) or the footswitch.
3. Press and discard the contents of the material
dispensed
4. Repeat the previous 2 steps until the static mixer is
filled with material. Verify the material dispensed
from the mixer is mixed properly.
5. Place a container on a scale and tare (zero) it.
6. Place the tared container below the static mixer,
and press
7. Press
(green) or the footswitch.
to erase existing average weight data.
8. Place the container with the dispensed material on
the tared scale.
9. Enter the mass in grams into the HMI, by pressing
or accordingly.
10. Press to accept the number. The number
entered will be transferred to the right of the
average icon (“
”).
11. Repeat steps 5 through 10, skipping step 7, several
times. Each additional shot weight will be averaged
in the
row with the previous shots.
312393C 18 of 52
Page 19

Priming and Calibration
12. Press to arm the machine to take a long CAL
shots. The icon will be highlighted (“
to de-arm the machine.
13. Place a container on a scale and tare (zero) it.
14. Place the tared container below the static mixer,
and press
15. Press
16. Place the container with the dispensed material on
the tared scale.
17. Enter the mass in grams into the HMI, by pressing
or accordingly.
18. Press
entered will be transferred to the right of the
average icon (“
19. Repeat steps 13 through 18, skipping step 15,
several times. Each additional shot weight will be
averaged in the row with the previous shots.
20. Press
21. Press
(green) or the footswitch.
to erase existing average weight data.
to accept the number. The number
”).
to de-arm the cal shot.
twice to return to the Run screen.
”). Press
I Screen Number (M2).
J
& keys will navigate to adjacent screens.
1. Press . The following screen will be displayed:
Figure 16: M2 Shot Definition Screen
2. Press or to select a shot number to define.
3. Press or to enter the shot size.
The shot size (in grams) must be greater
than the Short CAL Shot size from the
previous C4 calibration screen.
4. Press
previous value.
5. Repeat the previous 2 steps for other shot sizes as
required.
to accept the value or to retain the
Shot Size Definition (M2)
To dispense in Shot Mode, one or more, up to 5, shot
sizes need to be entered. This step is not required for
Operator mode.
From the Run screen, press
press
Figure 15: Shot Size and Purge Timer Screen (M2)
Key:
A Shot Number
B Shot Size (in grams).
C Purge Timer Setting (Turned OFF in Figure 15).
D
Purge Timer Alarm Setting.
E Define Shot ICON
F Set Purge Timer ICON
G Purge Timer Warning ICON.
once. The following screen will be displayed.
, then press , and then
6. Press
7. Press twice to return to the Run screen.
to exit the Shot Definition screen.
Ratio Checks
Read all manufacturer’s warning and material MSDS to know the
specific hazards of the material used.
This is a procedure to verify the weight ratio between
the 2 materials. This is easiest to do with two scales.
1. From the Run screen, put the machine in Shot
mode (“
2. Verify that the machine is properly calibrated and
phased as outlined in the calibration section.
3. Remove any static mixer attached to the dispense
valve and replace it with a ratio check nozzle.
Place a waste container under the valve to capture
any dispensed material.
4. Select a shot size between the Short and Long CAL
shot sizes previously done, by pressing
and
5. Place the empty container below the Ratio Check
Nozzle and the footswitch. Discard this shot.
to accept.
”). See page 13.
or
312393C 19 of 52
Page 20

Priming and Calibration
6. Place an empty container on a scale, and tare
(zero) the scale. Repeat the process with a 2
container on a 2
nd
scale.
nd
7. Place both containers under the ratio check nozzle,
positioned so one container captures material A,
and the 2
nd
container captures material B.
8. Press the footswitch.
Miscellaneous Machine Setups
The following sections outline how to configure various
optional settings.
Manual Control Options (M1)
The user can control the machine’s piston position and
displacement valve operation manually the M1 screen.
From the Run Screen press
following screen will be displayed.
then press . The
9. After the material is dispensed, place each
container on the same scale, and measure the net
mass of each of the materials. Record the mass of
both the A and B materials.
10. Divide the A material mass by the B material mass
to obtain the material ratio being dispensed.
Manual DV Control:
1. To change the DV operation press the third blue
key from the left.
2. When the Current Dispense Valve Mode (E in
Figure 17) is
, the valve will open and stay open
regardless of the piston position.
3. When the Current Dispense Valve Mode is
, the
valve will close and stay closed regardless of the
piston position.
Figure 17: Maintenance Screen (M1)
Key:
A Full Retract ICON
B Full Extend ICON
C Change Dispense Valve Mode
= Always Open
= Always Closed
= Opens at Cylinder Entrance (Automatic)
D Current Piston Position
E Current Dispense Valve Mode
F Screen Number (C1)
G
& keys will navigate to adjacent screens.
Manual Piston Control:
4. When the Current Dispense Valve Mode is , the
valve will be in automatic mode, opening when the
pump gets to the cylinder entrance and closing
when it gets to the end of the cylinder.
5. Press
twice to return to the Run screen.
Purge Timer / Alarm Settings (M2)
When activate, the Purge Timer will automatically
dispense a shot if the machine is idle (not dispensing
material) for a programmed duration of time. This
prevents the mixed material from hardening in the
static mixer. To set the Purge Timer;
From the Run screen, press
press
once. The following screen will be displayed.
Figure 18: M2 after Purge Timer Selection
, then press , and then
1. Press to extend the piston.
2. Press to retract the piston.
312393C 20 of 52
1. Press .
2. Press
or to enter the purge timer value.
This idle time allowed before the machine will
automatically dispense a shot to clear the mixer.
Page 21

Miscellaneous Machine Setups
3. Press to accept the value or to retain the
previous value.
Figure 19: M2 after Purge Shot Size Prompt
4. Press or to enter the purge shot size (in
grams). Enter a number with at least as much
volume as the mixer.
5. Press
previous value.
6. Press
Activating the purge timer automatically activates the
purge alarm
the purge timer reaches zero that the machine will
sound a warning beep to signaling that it is about to
take a purge shot. To change the Purge Alarm value;
From the Run screen, press
press
to accept the value or to retain the
twice to return to the Run screen.
. This is the amount of time before
, then press , and then
once. The following screen will be displayed.
From the Run screen, press
press
Figure 21: M3 Cycle Counter and Silent Mode Control
Key:
A Total Pump Cycle Counter Value (Not Resetable)
B Resetable Cycle Counter Value
C Current Silent Mode State ICON
D Reset Cycle Counter ICON
E Toggle Silent Mode ICON.
I Screen Number (M3)
J
1. Press .
2. Press
2 times. The following screen will be displayed.
Silent Mode Off
Silent Mode On
& keys will navigate to adjacent screens.
to accept the value or to retain the
previous value.
, then press , and then
Figure 20: M2 after Purge Alarm Selection
1. Press .
2. Press
(in seconds). The minimum value is 2 seconds,
and a maximum of 59 seconds or the value of the
purge timer if the timer is more than 59 seconds.
3. Press
previous value.
4. Press
or to enter the purge alarm duration
to accept the value or to retain the
twice to return to the Run screen.
Cycle Counter and Silent Mode Control (M3)
Resetting the Cycle Counter:
The cycle counter shown on the Run screen, see Figure
6, shows the number of pump cycles since the last time
the cycle counter was reset. To reset the cycle counter:
3. Press
twice to return to the Run screen.
Silent Mode Operation:
The default setting is , Silent Mode Off, where audio
feedback is provided when a valid key (1 short tone), or
an invalid key (3 short tones) is pressed.
In
, Silent Mode On, audio feedback is not provided.
Silent Mode On has no effect on the audio sounds
provided for the purge timer alarm, an error code, or
when power is initially applied to the machine.
To toggle or change the silent mode:
From the Run screen, press
then press
be displayed.
1. Press
2. Press
previous setting.
3. Press
2 times. Screen M3, see Figure 21, will
or .
to accept the change or to retain the
twice to return to the Run screen.
, then press , and
312393C 21 of 52
Page 22

Miscellaneous Machine Setups
Date and Time Settings (M4)
At the bottom right corner of the Run screen the date is
shown in DD-MM-YY format and the time is shown in
HH:MM, 24 hour format. The formats cannot be changed.
To set the current date:
From the Run screen, press
press
Figure 23: M4 Screen for Setting the Date and Time
Key:
A Current Date (DD-MM-YY)
B Current Time (HH:MM, 24 Hour Format)
C Current Software Revision
D Date Set ICON
E Time Set ICON.
I Screen Number (M4)
J
1. Press . The M4 screen will appear as follows.
Figure 24: M4 Screen after Date Set Selection
3. Press and to enter the year.
4. Press
5. Press
6. Press
7. Press
8. Press to accept the change or to retain the
9. Press
3 times. The following screen will be displayed.
Dsp = Display Module
FCM = Fluid Control Module
& keys will navigate to adjacent screens.
to accept the change or to retain the
previous setting.
and to enter the month.
to accept the change or to retain the
previous setting.
and to enter the day.
previous setting.
twice to return to the Run screen.
, then press , and then
1. Press
. The M4 screen will appear as follows.
Figure 25: M4 after Time Set Selection
2. Press and to enter the hour (0 - 23).
3. Press
previous setting.
4. Press
5. Press
previous setting.
6. Press
to accept the change or to retain the
and to enter the minutes (0 - 59).
to accept the change or to retain the
twice to return to the Run screen.
Tank Level Sensing and Velocity Change
(“
”) Options (C6)
If tank level sensors are installed into the system, an
alarm is generated when a tank is almost empty. If the
feature is turned ON, a Tank A low (“
low (“
generated if the condition exists.
The machine also measures the piston velocity and
will generate an alarm if the piston velocity has
changed significantly since the machine was last
calibrated. A significant change is piston velocity,
usually caused by a change in air pressure, can
degrade shot size accuracy.
The user has the capability to turn the
by selecting a level of 0%, or ON by selecting
of 20%, 40% or 60%. For instance, if 40% is selected,
and the piston velocity changes by + or – 40%, an error
code will be generated after the corresponding shot to
inform the operator of the situation. If the velocity
increases above the selected level, a error will be
generated, and if the velocity decreases below the
selected level a
The
machine is in Operator mode, or when the machine is
executing a purge shot.
From the Run screen, press
”), or a both tanks are low (“ ”) error will be
error will be generated.
feature is automatically disabled when the
, then press , then press
5 times. The following screen will be displayed.
”), a Tank B
feature OFF
levels
To set the current time:
312393C 22 of 52
Page 23

Miscellaneous Machine Setups
Figure 26: Tank Level and
Key:
A Current Tank Level Mode
= OFF, = ON
B Current
D Turn ON / OFF Tank Level Sensing ICON
level
= OFF
= 20% change before warning
= 40% change before warning
= 60% change before warning
(C6)
E Change
I Screen Number (C6)
J
To turn the Tank Level Sensors On/Off:
1. Press or .
2. Press
3. Press
To turn the Velocity Change On/Off:
1. Press
2. Press
3. Press
& keys will navigate to adjacent screens.
previous setting.
previous setting.
Level ICON
to accept the change or to retain the
twice to return to the Run screen.
.
to accept the change or to retain the
twice to return to the Run screen.
Password Setup / Clearing (C5)
The machine has the capability to limit access to the
Maintenance and Calibration screens. The password
option can be configured into 1 of the following 3
possibilities:
a. No Password (default configuration, when machine
shipped): All users can access all setup screens to
configure the system.
b. One password (“
maintenance and calibration screens (
c. Two passwords:. One password allows access to
both the calibration and maintenance screen (
+ ). The second password only allows
access to the maintenance screens (
To alter the password configuration:
From the Run screen, press
press
4 times. The following screen will be displayed.
”): Allows access to both the
+ ).
=
= ).
, then press , and then
Figure 29: C5 Screen with at least 1 Password
Configured
Key:
A Administrative Password ICON
B Access Indicator for Administrative Password
D Entry Status (Only filled after password change).
E Maintenance ONLY Password ICON
F Access Indicator for Maintenance ONLY Password
G Administrative Password Set/Clear ICON
H Maintenance ONLY Password Set/Clear ICON
I Screen Number (C5)
J
& keys will navigate to adjacent screens.
Setting/Clearing an Administrative Password:
1. Press . The following screen will appear.
312393C 23 of 52
Page 24

Password Setting/Clearing
Figure 30: Administrative Password Entry with NO
Previous Password Stored
If a previous Administrative password has
been entered, the number at the top of the
screen is the existing password. A zero
indicates no Administrative password.
To clear the password, enter “000000”.
2. Enter a 6-digit sequence, by pressing the
corresponding soft keys, G-J in Figure 5. After the
6th key entry, the enter LED will blink.
3. Press
4. Re-enter the same 6-digit number.
5. Press
to accept.
to accept.
3. Press
4. Re-enter the same 6-digit number.
5. Press
6. If both 6-digit passwords match, the C5 screen will
be displayed, and an “OK” after the second row of
symbols. If the 2 numbers do not match, the
process will need to be repeated.
7. Press
With a Maintenance ONLY password, after the user
enters the password from the Password Entry screen,
the following screen will be displayed.
to accept.
to accept.
twice to return to the Run screen.
Figure 32: Mode Selection Screen after
Maintenance ONLY Password Entry
6. If both 6-digit passwords match, the C5 screen will
be displayed, and an “OK” after the first row of
symbols. If the 2 numbers do not match, the
process will need to be repeated.
7. Press
twice to return to the Run screen.
Setting/Clearing a Maintenance ONLY
Password:
1. Press . The following screen will appear.
Figure 31: Maintenance ONLY Password Entry with
NO Previous Password Stored
If a previous Maintenance Only password
has been entered, the number at the top of
the screen is the existing password. A zero
indicates no Administrative password.
To clear
the password, enter “000000”.
Resetting Passwords
If for whatever reason, the passwords for the machine
are not known, the passwords can be reset.
To reset all the passwords to 000000:
1. Temporarily remove power to the HMI.
2. Re-apply power to the HMI.
3. Immediately after the completion of the startup
sequence (
the second soft key for at least 6 seconds.
If the press and hold does not start
immediately after the animation sequence, or
the press and hold is interrupted, the
procedure will need to be restarted at step 1.
4. After 6 seconds, the HMI will generate a single tone
indicating that the passwords have been cleared.
5. New passwords may be entered by following the
steps in Password Setup / Clearing.
, , , , , ….), press and hold
2. Enter a 6-digit sequence, by pressing the
corresponding soft keys, G-J in Figure 5. After the
6th key entry, the enter LED will blink.
312393C 24 of 52
Page 25

Hibernate and Demo Modes
Miscellaneous Machine Features
HMI Hibernate Mode
To help preserve the life of the HMI backlight, the
HMI will enter a Hibernate mode after the machine
has remained idle for an extended period of time.
To exit Hibernate mode, the user simply needs to
activate a HMI key or the machine footswitch.
When in Hibernate mode, the HMI LCD backlight
will be turned OFF, and the enter LED will blink at a
slow duty cycle (1 part ON, 8 parts OFF).
If the machine performs a purge shot when the HMI
is hibernating, the HMI will remain in Hibernate mode.
HMI Startup Animation Sequence
When power is applied to the machine, the
electronics need time to initialize communication.
An “Hour Glass” animation sequence is generated
, , , , , ….). Attempts to use the
(
machine during the startup period will be rejected.
HMI Demo Mode Operation
The machine HMI is equipped with a demonstration
mode. When in “Demo Mode”, the HMI will not send
any requests to the Fluid Control Module and the
machine will not operate. The HMI will simulate
normal operation and provide audio feedback to the
user. All Demo Mode Maintenance and Calibration
screens are identical to screens provided in normal
mode operation.
Demo Mode can be used as a training tool for the
user. The user simply has to connect the HMI unit to
a separate power supply module, and the HMI will
operate normally without the machine attached.
Any calibration, passwords, shot sizes, purge timer
settings, or other miscellaneous settings entered
while operating in Demo mode
normal mode settings. Also, the first time Demo
mode is entered, all the calibration & maintenance
screen setups previously described will need to be
repeated.
WILL NOT alter any
If the press and hold does not start
immediately after the animation sequence,
or the press and hold is interrupted, the
previous and this step may need to be
repeated.
4. After 6 seconds, the HMI will generate a single
tone and the Demo Mode ON or OFF state will
be changed.
5. When in Demo Mode, a “D” will remain on the
bottom left-hand corner of the Run screen, as
indicated in the following figure.
Figure 33: Typical Run Screen in Demo Mode
6. To switch the HMI out of Demo Mode, repeat the
previous steps.
Limitations of Demo Mode Simulation
Even though Demo Mode provides a good training
simulation for the user, it does have limitations when
compared to the HMI operating in normal mode.
• On the Run screen, all the shot mode shots are
simulated as single piston stroke shots
regardless of the shot size and calibration
numbers entered.
• The run screen animation sequence of the piston
movement is not as gradual as in real operation.
• On the Run screen, during Operator mode
operation, a stalled piston condition is not
simulated.
• The piston cycle counter is not stored for use
after power interruption, so if power is cycled to
the HMI, the cycle count will be reset.
• The piston position numbers provided on the C1
screen are simulated.
To configure the HMI into and out of Demo Mode:
1. Temporarily remove power to the HMI.
2. Re-apply power to the HMI.
3. Immediately after the completion of the startup
sequence (
hold the first soft key for at least 6 seconds.
312393C 25 of 52
, , , , , ….), press and
• All error codes will be NOT be generated, except
a stuck key error (E11) if the condition exists.
Page 26

Pressure Relief and Shutdown Procedures, Error Codes
Pressure Relief Procedure
With the machine in an idle state:
1. If the machine pistons are not fully retracted,
retract the pistons by pressing
screen. See Figure 17.
in the M1
2. Manually open the dispense valve by pressing
the third M1 soft key until the “
shown in the Current DV field. See Figure 17.
3. Remove the incoming air pressure by closing the
air inlet valve (item 13 in Figure 54).
” ICON is
Standby/Shutdown Procedure
If the machine is to remain idle for an extended
period of time, implement the following:
1. Remove any static mixer installed at the end of
the dispense valve.
2. Place a container below the valve, and activate a
small shot to flush material away from the end of
the valve.
3. To prevent accidental pump movement, press
(red).
4. With a clean rag, clean the end of the dispense
valve to remove excess material.
5. Install a nightcap at the end of the valve.
Error Codes
When the machine is operating and a fault is
detected, it will report the condition by generating an
error code. Error codes are typically generated
when the machine is idle after dispensing a shot.
When error codes are generated, a screen will be
displayed which contains an animation sequence, the
error code number and an ICON symbol representing
the condition detected. The HMI will also output an
error code tone sequence. The tone sequence
cannot be disabled.
When errors are generated, the machine will
automatically be disabled and remain in an idle state
until the user acknowledges the condition. Any active
purge timer present prior to error code generation will
be suspended, and will need re-started by requesting
a shot after the error is acknowledged.
Figure 34: Typical Error Code Screen
Key:
A Error Code Animation Field
B Error Code Number Field
D Error Code ICON
E Error Code Acknowledgement ICON
When an error code is generated, the user will need
to acknowledge the condition by pressing the soft key
under the
After the user activates the
generated in the Figure 34 example, will be displayed
on the bottom left hand corner of the Run screen,
while the condition is still present.
Figure 35: Typical Run Screen with an Active
The example E12 number on the main run screen will
remain on the run screen as long as the error
condition exists. If the problem is corrected the
example E12 number will be removed.
If more than 1 error code condition exists for the
machine, the corresponding “EXX” numbers will be
listed on the bottom left corner, separated by
commas.
ICON.
key, the error number
Error Code Condition
The following typical screen is generated when an
error code is generated:
312393C 26 of 52
Page 27

Error Code Table
A
Error Code Table
Title # Cause, Details ICON
Stuck Key Error
E11
key on membrane has been active (pressed) for > 30 seconds continuously.
Replace the HMI. This error code does not require user acknowledgment and
will clear itself automatically if the condition is removed.
Communication
Error
No or Invalid Run
Token Error
Piston Stroke
Time-out Error
Less than
Minimum Shot
Requested Error
Improper
Calibration Error
Delta Velocity
(“V”) Minus Error
E12 The Display module has lost communication with the Fluid Control Module.
Material dispensing will be disabled if this condition exists. Check
communication cables between the 2 electronic components, or check the
HMI and/or the Fluid Control Module.
This error will be regenerated continuously while the condition exists.
E13 The Run Token in the FCM is missing (not installed), or does not have the
correct data.
E21 A piston stroke action has taken > 55 seconds. Typically caused by no/too
little air pressure to the machine or a mechanical interference with the piston
has occurred. Check machine input line pressure.
E23 User has requested a shot < the minimum allowable size entered during
calibration. (< 15% of stoke, N/A in Operator Mode).
E24 The calibration done on the machine is invalid, so the requested shot cannot
be executed. For instance, a Large Stroke Calibration Shot mass which is
less than the Short Stroke Calibration Shot mass (C4 screen) will create this
error code. If the wiring to the linear position transducer is reversed this error
will appear. If invalid piston positions are calibrated into the machine (C1
screen) this error will appear.
E25 The piston velocity is slower than the calibration velocity measured, by the
percentage amount selected by the user (20%, 40% or 60%). If the user
selects 0%, this monitoring or alarm feature is disabled.
Delta Velocity
(“V”) Plus Error
Low Material
Level, Tank A
Alarm or Error
Low Material
Level, Tank B
Alarm or Error
If generated, shot size accuracy may be degraded. Typically the problem is
created when the machine pressure regulator is adjusted to different value
from when the machine was calibrated. Another less likely cause could be a
mechanical failure with dispensing (worn piston, etc.). This error will not be
generated for a purge shot or when the machine is in Operator mode.
E26 The piston velocity is faster than the calibration velocity measured, by the
percentage amount selected by the user (20%, 40% or 60%). If the user
selects 0%, this monitoring or alarm feature is disabled.
If generated, shot size accuracy may be degraded. Typically the problem is
created when the machine pressure regulator is adjusted to different value
from when the machine was calibrated. Another less likely cause could be a
mechanical failure with dispensing (worn piston, etc.). This error will not be
generated for a purge shot, or when the machine is in Operator mode.
E27 Tank A is low (only generated if tank sensing is enabled). Fill tank A with
material.
Tank level errors will be generated after every shot if the condition still exists.
E28 Tank B is low (only generated if tank sensing is enabled). Fill tank B with
material.
Tank level errors will be generated after every shot if the condition still exists.
312393C 27 of 52
Page 28

Error Code Table
Low Material
Level, Both Tanks
Alarm or Error
E29 Both tanks are low (only generated if tank sensing is enabled). Fill both tanks
with material.
Tank level errors will be generated after every shot if the condition still exists.
Bad Linear
Position Sensor
E50
There is a fault with the linear position sensor. Check wiring or replace.
Table 1: Error Code Table
312393C 28 of 52
Page 29

ICON Tables
ICON Descriptions
Key Key Description Screen
Maintenance and Calibration Screens Enter / Exit. All
Shot Mode / Operator Control Mode Selection. Run
Shot Request
(green)
Red Stop or Cancel (Stops Operation Immediately, regardless of Screen). All
Up (Used to Raise Numerical Entry, Screen Navigation or Shot Selection). Many
Down (Used to Lower Numerical Entry, Screen Navigation or Shot Selection). Many
Enter (Used to Accept Entry). Many
Run, C2,
C4
Soft (Changes Function, Depending Upon Screen). All
Table 2: PR70 HMI ICON Table
ICON Description Screen
Calibration Screens.
Maintenance Screens.
Option Abort or Escape. Many
Piston Full Extend. C1, M1
Piston Full Retract. C1, M1
Metering Tube or Cylinder Entrance. C1
Phasing Shot. C2
Decrease Phasing Shot. C2
Increase Phasing Shot. C2
Open Displacement Valve (DV) Position Adjustment. C3
312393C 29 of 52
Tables 3: PR70 Screen ICON Tables
Page 30

ICON Tables
ICON Description Screen
Short Stroke Calibration Shot C4
Long Stroke Calibration Shot C4
Administrative Password Set/Clear C5
Maintenance Only Screens Password Set/Clear C5
Tank Level Sensing ON C6
Tank Level Sensing OFF C6
Delta Velocity Set Level (0 = OFF) C6
Displacement Valve Always Open M1
Displacement Valve Always Closed M1
Displacement Valve Automatic Operation M1
Shot Size Definition M2
Purge Timer Set/Clear M2
Purge Shot Size M2
Purge Alarm Setting M2
Zero Cycle Counter M3
Silent Mode ON M3
Silent Mode OFF M3
Set Date M4
Set Time M4
Tables 4: PR70 Screen ICON Tables (Continued)
312393C 30 of 52
Page 31

Maintenance, Software Upgrades and Run Token
Maintenance
The following items should be checked daily, once
during a shift, or as required for the application:
• Air Filter - Check air filter and release any water
circuit water trapped in the base of the filter.
• Tanks – Check material levels and refill as
necessary. Verify the material reservoirs are
vented properly.
• Air Dryer - Check the condition of the desiccant air
dryer, and replace if necessary.
• Pump Shafts – Clean both pump shafts with
solvent and lubricate with approved lubricant such
as mesamoll or Silicon oil.
• Dispense Head – Dismantle, clean thoroughly and
re-assemble. Lubricate all parts with a thin coat of
approved lubricant, or silicon oil.
• Ratio Check – If material ratio is critical for the
application, implement the ratio check procedure as
required.
4. Insert a black programming token into the slot
provided. Make sure it snaps into place when
inserted.
5. Turn ON the AC power switch.
6. Verify the red LED on the FCM or HMI starts
blinking at a fast steady rate, then the red LED
stops flashing accordingly. Verify the Green LED is
on continuously, and the amber LED blinks every
few seconds.
7. Turn OFF the AC power switch.
8. Remove the programming token from the FCM or
HMI. If the second electronic component needs
updating, insert the token into the other electronic
module. If the FCM was re-programmed, re-insert
the blue run token in the slot provided.
9. If programming a second electronic module, repeat
steps 5 through 8.
10. Re-apply machine power.
11. Go to the M4 screen to verify the new software
revision(s).
Software Upgrades, Run Token
When software in the HMI or Fluid Control Module
(FCM) needs updating, a black Graco update token is
used.
Figure 36: Standard Graco Data Token
To transfer an updated software program from the
token to the PR70 HMI or FCM:
1. Turn OFF the AC power switch in the back of the
machine.
2. If updating the Fluid Control Module (FCM), open
the access door to the FCM by loosening the 2
access screws. Remove the Blue Run token from
the FCM.
Run Token
The PR70 Fluid control module (FCM) contains a blue
run token, installed in the socket provided. It has
identical appearance to the black programming token,
but is blue.
If the token is not installed into the FCM, the machine
will not operate, and an E13 error will be generated on
the display module. Hence, if the FCM software is
updated, it will need to be re-installed at the end of the
re-programming procedure.
3. If updating the Human Machine Interface (HMI),
remove the HMI from the mounting bracket and
remove the back cover by removing the 4 screws on
the back of the enclosure.
312393C 31 of 52
Page 32

Troubleshooting
Troubleshooting
Before starting any troubleshooting procedures:
1. Relieve pressure (refer to Pressure Relief
2. Disconnect AC power to the machine.
HMI Display Completely Dark
No or incorrect amount of
material dispensed from either
side
Piston stalled (E21 Error)
Significant material leaking
from pump rear seal
Material dispensed not correct
weight
Machine dispensing off ratio
Pumps drawing material back
from valve hose
Procedure Section).
PROBLEM CAUSE SOLUTION
No Power Verify rear AC Power switch is ON.
Fuse Blown Replace Machine fuses (Refer to “Miscellaneous
Loose connection Tighten 5 pin cable on HMI.
Bad HMI Replace HMI
Ball Valve Closed Open Tank Ball Valve (if installed).
Tank empty Fill tank with material
Tank Cloged Verify no obstruction in the tank
Air in material Prime the machine until the air is removed.
Check valve malfunction Remove, clean or replace check valve.
Piston worn or broken Remove and replace piston if worn.
Input Air Reduced or
removed
Mixer blocked Replace static mixer. Incorporate or decrease
ODV adjustment too late Re-adjust the ODV setting to occur sooner (C3
Blocked Check valve Remove check valve, clean and replace.
Air Cylinder Failure Remove air cylinder and re-install cylinder kit
Pump Shaft worn Remove pump shaft assembly, and re-install rear
Specific gravity of 1 or more
of the 2 materials has
changed since calibration.
Machine Air pressure has
changed since calibration.
Not enough material in 1 or
more tanks
Mixer has slight obstruction Replace static mixer. Re-prime machine.
Check valve malfunction Remove check valve(s), clean or replace if
Piston worn or broken Remove and replace piston(s) if necessary.
One tank is empty Check tank levels. Add material if necessary.
Tank Ball valve Closed Open tank ball valve. Re-prime machine.
Machine out of phase Re-phase machine (C2 section).
Check valve malfunction Remove check valve(s), clean or replace if
Piston worn or broken Remove and replace piston(s) if necessary.
Check valve stuck open Remove check valve(s), clean or replace if
3. Allow the machine to cool, if the machine has a heat
control option.
Try the recommended solutions in the order given for
the each problem to avoid unnecessary repairs. Also
verify all circuit breakers, switches, and controls are
properly set and wiring is correct before assuming there
is a problem.
Mechanical Assemblies” Section).
Re-connect input air line to machine. Increase
air pressure regulator adjustment.
purge time amount to prevent mixer blockage.
screen section).
items if necessary.
pump re-built kit.
Mix materials in tanks, dispense another shot,
then re-weigh. Re-calibrate if necessary (C4
section).
Re-adjust air pressure regulator to value used
when machine was calibrated, or re-calibrate (C4
section). Turn ON or decrease
% level.
Check tank levels, and fill and prime if
necessary.
necessary.
necessary.
necessary.
312393C 32 of 52
Page 33

Base Frame and Air Cylinder Assemblies
Repair
Major Mechanical Assemblies, and Attachments
Figure 38: PR70 Top View w/o Tanks with Footswitch and HMI Illustrated
Figure 39: PR70 Base Frame to Air Cylinder, Pump and Drive Block Attachments
Key:
Ref P/N Description QTY Ref P/N Description QTY
1 LC0112 Pump Assembly, PR70 1 5 LC0107 Drive Block Assembly, PR70 1
2 120913 Screw, SHC, M8-1.25 x 25 4 6 121166 Screw, SHC, M6-1.0 x 40 4
3 120919 Nut, Hex, M14 7 LC0109 Base Frame Assembly 1
4 LC0110, or
LC0111
312393C 33 of 52
Air Cylinder Assemblies, 3.0” or 4.5” 1 8 121167 Screw, SHC, M8 - 1.25 x 40 4
Page 34

Base Frame and Air Cylinder Assemblies
Figure 40: PR70 Power Entry Bracket and Control Bracket Assembly Attachments
Key:
Ref P/N Description QTY Ref P/N Description QTY
1 120885 Screw, SHC, M5 – 0.8 x 14 4 3 LC0106 Power Entry Assembly, PR70 1
2 LC0108 Control Bracket Assembly, PR70 1 4 120885 Screw, SHC, M5 – 0.8 x 14 2
Base Frame Assembly
Figure 41: PR70 Base Frame Assembly (LC0109)
Key:
Ref P/N Description QTY Ref P/N Description QTY
1 120599 PIN, DOWEL, 3/8DIAX1.50LG, SS 2 5 15K796 CLAMP 1
2 120885 SCREW,SHC, M5-0.8X14,MS,E 2 6 LC0033 TRANSDUCER ASSY, LINEAR, PR70S 1
3 120913 SCREW,SHC, M8X1.25X25,MS, E 2 7 120918 GUIDE, LINEAR 1
4 15K788 FRAME, BASE, PR70S, MACHINED 1 8 120886 SCREW, SHC,M6-1.0X25,MS,E 4
312393C 34 of 52
Page 35

Base Frame and Air Cylinder Assemblies
Air Cylinder Assemblies, and Rebuild Kits
Figure 42: PR70 Air Cylinder System and Schematic
312393C 35 of 52
Page 36

Air Cylinder Assemblies
Figure 43: PR70 Air Cylinder Assemblies, 3.0” & 4.5” Diameters (LC0110 & LC0111)
Key:
(LC0110, 3.0” DIA. Assy., PR70) (LC0111, 4.5” DIA. Assy., PR70)
Ref P/N Description QTY Ref P/N Description QTY
1 107571 ORING, VIT, BAD 1 1 107571 ORING,VIT,BAD 1
2 114100 SCREW, SHC, M4X0.7X55, MS, E 3 2 114100 SCREW, SHC, M4X0. 7X55,MS,E 3
3 120875 ORING, VIT, CCE 1 3 104131 ORING,VIT,CDG 1
4 120880 SCREW, SHC, M8-1.25 X 125, MS, E 4 4 120880 SCREW,SHC,M8-1.25X125,MS,E 4
5 120881 BEARING, 1.00ID X 1.252 OD X 1.00LG, 1 5 120881 BEARING, 1.00IDX1.252ODX 1.00LG 1
6 120884 SCREW, SHC, M12-1.75 X 20, MS 1 6 120884 SCREW, SHC,M12-1.75X20,MS 1
7 120899 VALVE, 4W, 3P, COE, DSSC, ¼ NPT, 24VDC 1 7 120899 VALVE, 4W, 3P,COE, DSSC, 1/4NPT, 24VDC 1
8 120900 VALVE, PWR, 4W, SSSR, 1/4NPT, 24VDC 1 8 120900 VALVE,PWR,4W, SSSR, ¼ NPT, 24VDC 1
9 120922 MUFFLER, AIR, ¼ NPT, FLOW CONTROL 1 9 120922 MUFFLER,AIR, 1/4NPT, FLOW CONTROL 1
10 120923 ELBOW, SWVL, ¼ TUBE X 10-32, FXM, 90
11 120932 ORING, VIT, JDA 2 11 104271 ORING,VIT,JDG 2
12 121018 ELBOW, SWVL, 3/8 TUBE X ¼ NPT, FXM, 90
13 121020 ELBOW, SWVL, EXT'D, ¼ X ¼ NPT, FXM, 90
14 121021 MUFFLER, AIR, ¼ NPT, BRONZE 3 14 121021 MUFFLER,AIR, ¼ NPT, BRONZE 3
15 121022 ELBOW, SWVL, ¼ TUBE X ¼ NPT, FXM, 90
16 15K790 TUBE, AIR CYL, 3.0 I.D., PR70S 1 16 15K789 TUBE, AIR CYL,4.5 I.D.,PR70S 1
17 15K791 BLOCK, AIR CYL, ROD END, PR70S 1 17 15K791 BLOCK, AIR CYL, ROD END, PR70S 1
18 15K792 BLOCK, AIR CYL, BLIND END, PR70S 1 18 15K792 BLOCK, AIR CYL, BLIND END, PR70S 1
19 15K793 PISTON,AIR CYL, 3.0 I.D., PR70S 1 19 15K794 PISTON, AIR CYL,4.5 I.D.,PR70S 1
20 15K795 ROD, PISTON, AIR CYL, PR70S 1 20 15K795 ROD, PISTON, AIR CYL,PR70S 1
o
, 1 10 120923 ELBOW, SWVL, ¼ X 10-32, FXM, 90o, CM/PL 1
o
5 12 121018 ELBOW,SWVL,3/8TUBEX ¼ NPT, FXM, 90DE 5
o
1 13 121020 ELBOW, SWVL, EXT'D, ¼ X ¼ NPT, FXM, 90
o
2 15 121022 ELBOW, SWVL, ¼ TUBE X ¼ NPT, FXM, 90DE 2
o
1
312393C 36 of 52
Page 37

Pump Assembly
To install a new Air Cylinder Kit:
1. Follow the Pressure Relief Procedure and turn off
the machine.
2. Disconnect the airline, remove the PR70 Shroud,
and remove the machine power entry assembly
(item 3 or Figure 40) from the machine by removing
the 2 attachment screws (4 of Figure 40).
3. Remove the 2 air valves (items 7 & 8) from the
cylinder end block (18) by removing the 3
attachment screws (2).
4. Disconnect the air cylinder piston rod (20) from the
machine drive block assembly (item 5 of Figure 39)
by removing all hex nuts (item 3 of Figure 39) from
the piston rod (additional nuts may be installed if the
machine has a hydracheck option). An open-end
wrench will be required to prevent the rod from
turning when the nuts are removed.
5. Disconnect the air cylinder from the machine frame
base assembly (item 7 of Figure 39) by removing
the 4 screws (item 8 of figure 39) which attach the
cylinder rod end block (17) to the frame. Access
the screw through the 4 holes in the blind end block
(18) using a long allen wrench.
6. Remove the air cylinder by pulling on the cylinder
from the back of the machine.
7. With the cylinder partially removed, disconnect the
airlines at the air cylinder elbow fittings (12).
8. On a bench, disassemble the air cylinder by
removing the 4 long screws (4) which connect the 2
cylinder blocks.
9. Inspect the cylinder tube (16) and piston (19) to
verify no scratches exist. Replace if necessary.
10. Using a clean dry cloth, remove any existing grease
from the inside of the tube (16), the outside of the
piston (19) and the cylinder rod (20).
11. Remove the 2 cylinder block orings (item 2 of
Figure 40) from the blocks and replace. Remove
the piston oring and replace (item 1 of Figure 40).
12. Remove the cylinder rod from the rod end block,
then remove the rod oring (item 3 of Figure 40) from
the rod end block and replace.
13. Install Graco high temperature lubricant Grease
(Graco P/N 115982) to the inside of the tube (16),
the outside of the piston (19), all the orings and the
cylinder rod (20).
14. Re-assemble the air cylinder. Attach the 2 drive
blocks by reinstalling the 4 long screws (4). Torque
the screws as specified in note
of Figure 43.
15. Reinsert the air cylinder into the back of the
machine by inserting the cylinder rod through the
hole in the base frame and in the drive block.
16. Before the cylinder is completely in place, reconnect the airlines to the cylinder block elbows
fittings (12). Verify the correct airlines are
connected (see Figure 43).
17. Reattach the cylinder to the base frame by
reinstalling the 4 screws (item 8 of Figure 39).
18. Reattach the cylinder to the drive block by
reinstalling the hex nut (item 3 of Figure 39) to the
cylinder rod. Torque the nut as specified in note
of Figure 39.
19. Reattach the valves to the blind end block by
reattaching the 3 screws (2).
20. Reattach the power entry assembly by reinstalling
the 2 attachment screws (item 4 of Figure 40).
21. Reconnect input air into the machine. Operate the
machine accordingly, and verify no air leaks are
found. Recalibrate the machine.
Figure 44: PR70 Air Cylinder Rebuild Kits, 4.5” and 3.0” Diameter Versions (LC0092 & LC0091).
Key:
(LC0092, 4.5” DIA. Rebuild Kit) (LC0091, 3.0” DIA. Rebuild Kit)
Ref P/N Description QTY Ref P/N Description QTY
1 104131 ORING, VIT, CDG 1 1 120875 ORING, VIT, CCE 1
2 104271 ORING, VIT, JDG 2 2 120932 ORING, VIT, JDA 2
3 107571 ORING, VIT, BAD 1 3 107571 ORING, VIT, BAD 1
312393C 37 of 52
Page 38

Pump Assembly
Drive Block Assembly
Figure 45: PR70 Drive Block Assembly (LC0107)
Key:
Ref P/N Description QTY Ref P/N Description QTY
1 120891 SCREW, SHS, M6-1.0 X 8, MS 2 4 15K805 BLOCK, DRIVE, PR70S 1
2 15K801 ROD, ALIGNMENT 2 5 15K868 WASHER, SPERICAL, ½ DIA. MODIFIED 2
3 15K802 NUT, RETAINER 2 6 84/0130-
27/11
LABEL, HAND CRUSH, 1.3 X 1.1, TRIANGLE,
ISO
1
Pump Assemblies and Rebuild Kits
Figure 46: PR70 Pump Assembly (LC0112)
312393C 38 of 52
Page 39

Pump Assembly
Key:
Ref P/N Description QTY Ref P/N Description QTY
1 106258 ORING, VIT, JCB 2 9 15K803 COLLAR, PUMP 2
2 108712 NUT, HEX, M8 X 1.25, MS 2 10 15K804 HOUSING, BEARING, SEAL, PR70S 2
3 120887 POSIPAK, 0.375ID X 0.625OD, COIL 2 11 15K824 SHAFT, PISTON, 3/8, PR70S, SS 2
4 120890 RING, RET, INT, 1.00, SS 2 12 15K828 WASHER, SEAL, 3/8, PR70S, SS 2
6 120982 SCREW, SHC, M8 X 1.25 X 65, MS, E 8 13 15K895 HOUSING, CHECK VALVE 2
7 15K786 HOUSING, PUMP, PR70S, MACHINED 1 14 LC0093 KIT, REBUILD, VALVE, CHECK, PR70S 2
8 15K787 CAP, END, PUMP, PR70S, MACHINED 2
To install a new Check Valve Rebuild Kit:
1. With the machine in an idle state and a bucket
below the dispense valve to catch material, fully
extend the piston by pressing
in the M1
screen.
2. To prevent machine movement, press
(red).
3. With a bucket below the check valve to be
replaced, disconnect the male hose fitting from
the check valve housing (13), by loosing the hose
from the housing. Catch any material draining
from the hose into the bucket.
4. Remove the check valve housing (13) from the
pump endcap (8) by loosening the housing with a
wrench.
5. Remove the existing check valve (14) from the
housing (13) by inserting a screwdriver or dowel
rod into the female threaded end of the check
valve housing.
6. With the new check valve ball guide (item #3 in
figure 43) on a bench with the open end up,
install the check valve spring (item 2 of figure 47)
into the guide.
8. With the rounded inside surface of the check valve
seat (item 4 of figure 47) facing down, place the seat
on top of the check valve ball.
9. Holding both ends of the assembled check valve
assembly, install the check valve into the un-threaded
end of the check housing (13) with the ball end facing
out. Apply some pressure to the valve to snugly fit the
completed check valve into the housing and the fit the
check valve seat (item 4 of figure 47) into the valve
guide.
10. Verify when the assembled check valve and housing
(13) are turned up-side down, that the contents of the
valve stays in place.
11. Re-insert the new valve and valve housing into the
pump end cap, using a wrench.
12. Re-install the material male hose fitting into the check
valve housing using a wrench.
13. Before re-using the machine for operation, activate a
few shots to purge any air present in the material hose
lines due to the procedure.
14. Re-calibrate the machine if necessary.
7. Install the check valve ball (item 1 of figure 47) on
top of the spring.
Figure 47: PR70 Check Valve Rebuild Kit (LC0093)
Key:
Ref P/N Description QTY Ref P/N Description QTY
1 105445 BALL,CHECK VALVE 1 3 15D312 BUSHING, BALL GUIDE 1
2 121084 SPRING, 0.30OD X 0.44LG, 22#/IN, 20PSI, S 1 4 196832 SEAT, LAPPED, CHECK VALVE 1
312393C 39 of 52
Page 40

Pump Assembly
Figure 48: PR70 Rear Pump Rebuild Kit (LC0094)
Key:
Ref P/N Description QTY Ref P/N Description QTY
1 106258 ORING, VIT, JCB 1 3 120887 POSIPAK, 0.375ID X 0.625OD, COIL 1
2 120890 RING, RET, INT, 1.00, SS 1
To install a new Rear Pump Rebuild Kit:
1. Drain the pump by taking several shots with either
the tank ball valves closed (if installed), or by
activating enough shots to empty the tanks.
2. Disconnect the pump shaft (item 11 of Figure 46)
from the drive block assembly by loosening the
shaft locking nut (item 2 of Figure 46), then turning
the shaft with a wrench while preventing the drive
block alignment rod (item 2 of Figure 45) from
rotating with a wrench. Manually push the pump
shaft forward toward the extend position to separate
the shaft from the drive block.
3. Remove the shaft lock nut from the shaft.
4. Remove the pump collar (item 9 on Figure 46) from
the pump housing (item 7 on Figure 46) by
removing the 2 screws (item 5 on Figure 46).
5. Slide the pump bearing housing (item 10 of Figure
46) away from the pump housing to remove.
6. Remove the existing rear pump build components
(refer to Figure 48 items) from the pump bearing
housing.
7. Using a clean dry cloth, remove any existing grease
from the bearing housing.
8. Apply new high temperature grease lubricant (Graco
P/N 115982) to the inside of the pump bearing
housing, and the new rebuild components.
10. Apply 1 layer of thin masking tape over the male
threads of the pump shaft which mates with the
drive block. This will prevent the threads from
damaging the seal or Posipak (3).
11. Using extreme caution, slide the pump shaft through
the hole in the bearing housing as indicated in
Figure 48. Align the bearing housing in position
next to the pump housing.
12. Re-install the pump collar over the bearing housing
and attach it to the pump housing using the 2
screws (item 5 on Figure 46) previously removed.
Torque the screws as specified in note
of
Figure 46.
13. Remove the masking tape from pump shaft.
14. Re-install the pump shaft lock nut to the pump shaft.
15. Re-install the pump shaft to the drive block
alignment rod.
16. Re-tighten the lock nut.
17. Open the tank ball valves (if installed) and put more
material into the tanks.
18. Instigate several shot to fill the pump with new
material.
19. Re-calibrate and re-phase the machine, due to the
procedure performed.
9. Install the new rebuild kit components into the
bearing housing as indicated in Figure 48.
312393C 40 of 52
Page 41

Pistons & Metering Tubes
Piston Cylinders or Metering Tubes
Figure 49 PR70 Nylon and UHMWPE Piston Replacement Kits
Key:
Ref Description QTY Ref Description QTY
1 Piston 1 3 Oring 2
2 Screw 1
When ordering a piston replacement kit, the following
intelligent part numbering system applies for Nylon
based pistons:
LCF - 120
Code : A
Piston Size (mm
2
)
When ordering a UHMWPE replacement kit, the
following numbering applies:
LCE - 160
Code : A
Piston Size (mm
To install a new Piston or Piston/Cylinder
Replacement Kit:
1. Drain the machine pistons by instigating several
shots with either the tank ball valves closed (if
installed), or by activating enough shots to empty
the tanks.
2. To prevent machine movement, press
3. Remove the pump end caps (item 8 of figure 46)
by removing the 4 end cap screws (item 6 of
figure 46). Allow the cap to hang by the hose.
4. Remove the cylinder and Orings (items 1 and 6 of
figure 50) from the pump housing (item 7 of figure
46) and pump cap.
5. Select an operating mode, then fully extend the
pistons by activating the
option in the M1
screen.
(red).
2
)
The items indicated in Figure 46 above will be
supplied with the kit. Refer to the Models section for
the available standard piston sizes.
312393C 41 of 52
6. To prevent machine movement, press
(red).
7. Remove the existing piston (1) and any front or
rear washers (items 3 & 4 of figure 50) from the
pump shaft (item 11 of figure 46) by removing the
piston screw (2). A wrench will be required near
the drive block to prevent the pump shaft from
rotating while the screw is removed.
8. Install the new piston and any rear or front
washers, by re-installing the piston screw into the
pump shaft. When tightening the piston screw,
Page 42

Pistons & Metering Tubes
tighten the screw until the piston stops rotating,
then turn the screw an additional ¼ turn.
9. Select an operating mode, then retract the
pistons by pressing
in the M1 screen.
10. To prevent machine movement, press
(red).
11. Lubricate the new orings with a high temperature
grease, Graco P/N 115982 or equivalent. Place
the lubricated orings into the inside circle
placements in the pump housing and pump end
caps.
12. Install the cylinder between the pump housing
and end cap, then secure the cylinder and Orings
by re-attaching the 4 end cap screws (item 6 of
figure 46).
13. Open the tank ball valves (if installed) or put more
material into the tanks.
14. Instigate several shot to fill the pump with new
material.
15. Re-calibrate the machine, due to the procedure
performed.
312393C 42 of 52
Page 43

Pistons
Figure 50: Available PR70 Piston and Cylinder (Metering Tubes) Kits
Key:
Ref Description QTY Ref Description QTY
1 Cylinder or Metering Tube 1 4 Back Washer See Fig.
2 Piston 1 5 Screw 1
3 Front Washer See Fig. 6 Oring 2
2. To prevent machine movement, press
3. Remove the existing Piston plug (1) from the pump
end cap (item 8 of figure 46) with a wrench.
Remove the existing Oring (2).
4. Lubricate the new Oring with a high temperature
Figure 51 PR70 Piston Plug Assemby
Key:
Ref P/N Description QTY
1 15K815 Plug 2/Machine
2 111457 Oring 2/Machine
To install a new Piston Plug Assembly:
1. Drain the machine pistons by instigating several
shots with either the tank ball valves closed (if
installed), or by activating enough shots to empty
the tanks.
grease, Graco P/N 115982 or equivalent. Place the
lubricated Oring into the cap location of the end cap.
5. Re-install the piston plug (1) back into the end cap.
6. Open the tank ball valves (if installed) or put more
material into the tanks.
7. Instigate several shot to fill the pump with new
material.
8. Re-calibrate the machine, due to the procedure
performed.
(red).
312393C 43 of 52
Page 44

Hose Assemblies
Hose Assemblies
Figure 52 Piston to DV Hose Assemblies
Figure 53 Heated Piston to DV Hose Assemblies
312393C 44 of 52
Page 45

Miscellaneous Assemblies
Miscellaneous Mechanical Assemblies
Figure 54: PR70 Power Entry Bracket Assembly (LC0106)
Key:
Ref P/N Description QTY Ref P/N Description QTY
1 119912 SCREW, PAN, M3X6, PHILLIPS, SS 3 11 84/0130-26/11 LABEL, PE 1
2 121018 ELBOW, SWVL, 3/8 X ¼ NPT, FXM, 90DE 1 12 LC0034 HARNESS, WIRE, REMOTE SIGNAL 1
3 120876 PWR SUPPLY, 24VDC, 40W, 100-240VAC IN 1 13 121178 VALVE, LOCKOUT, ¼ NPT 1
4 120882 FILTER, 1/4NPT 1 14 121179 QUIKCLAMP, ¼ NPT 2
5 120883 NUT, HEX, 7/8-14, MS 1 15 121180 MULTIPORT, [3] ¼ NPT 1
6 120910 PWR ENTRY, 120/240VAC, DUAL FUSE, EMI 1 16 94/0762/99 VALVE, RELIEF, ¼ NPT, M, 110PSI, SIL 1
7 120916 SCREW,FHSC, M3X0.5 X 10, SS 2 17 94/0430/99 PLUG, SKT HD, ¼ NPT, MS 2
8 120993 NUT, HEX, M5X0.8, WITH STAR WASHER 2 18 81/1054-4/11 FUSE 5X20MM, 4AMP, FAST, TYPE F, 250VAC 2
9 15K798 BRACKET, SWITCH, AIR 1 19 LC0031 CABLE ASSY, POWER IN 1
10 15K800 FITTING, BULKHEAD 1
To Replace the Fuses:
1. Remove the machine fuse holder from the PWR
Entry module (6) by inserting a flat-head
screwdriver between the holder and the back the
PWR Entry module (The fuse holder is above
where AC power is connected to the machine).
312393C 45 of 52
2. Replace the blown fuse(s) (18) into the fuse holder.
3. Re-install the holder into the PWR Entry Module.
Page 46

Miscellaneous Assemblies
Figure 55: PR70 Control Bracket Assembly (LC0108)
Key:
Ref P/N Description QTY Ref P/N Description QTY
1 84/0153-1/89 CLAMP, HARNESS, REUSEABLE, 5/8,NYL 2 6 121019 ELBOW, SWVL, 3/8 X 3/8 NPT, FXM, 90DE 1
2 120885 SCREW, SHC, M5-0.8 X 14, MS, E 2 7 LC0124 CONTROLLER, FCM 1
3 120897 REGULATOR, 100PSI, 3/8NPT, GAGE 1 8 15K797 BRACKET, ELECTRICAL, 1
4 120954 MANIFOLD, PN, 3/8NPTX3/8T X ¼ TX1/4T 1 9 84/0130-25/11 LABEL,.375X.375 1
5 120993 NUT, HEX, M5X0.8, WITH STAR WASHER 5 10 LC0035 HARNESS, WIRE, I/O 1
Figure 56: PR70 Shroud Assembly (LC0113)
312393C 46 of 52
Page 47

Miscellaneous Assemblies
Key:
Ref P/N Description QTY Ref P/N Description QTY
1 15G581 PLATE, NAME, VALVE COVER, P3 1 4 15K628 LABEL, PR70 1
2 120060 CLIP, SPEED TUBULAR 4 5 15M511 LABEL, WARNING, PR70 1
3 15K806 SHIELD, PR70S 1
Figure 57: PR70 Hydracheck Components
Figure 58: PR70 HMI Components
Key:
Ref P/N Description QTY Ref P/N Description QTY
1 288446 Display Module, PR70 1 3 120999 Termination Plug 1
2 255235 Bracket, HMI 1
312393C 47 of 52
Page 48

Wirin
312393C
g Diagrams
48 of 52
Wiring Diagrams
Figure 59: PR70 Wiring Interconnect Illustration
Page 49

g Diagrams
312393C 49 of 52
Figure 60: Wiring Diagram, PR70
Wirin
Page 50

Tech
nical Data
Technical Data
Category Data
Metering Pump Effective Area 80 – 960 mm2 (0.124 – 1.49 in2) per side
Small Air Cylinder Effective Area 4560 mm2 (7.07 in2)
Large Air Cylinder Effective Area 10260 mm2 (15.9 in2)
Maximum Stroke Length 38.1 mm (1.50 in)
Minimum Stroke Length 5.8 mm (0.23 in)
Volume per Cycle 2 – 70 cc (0.12 – 4.3 in3)
Pump Cycles per 1L (0.26 gal) 500 – 14.3
Ratios (fixed) 1:1 to 12:1 (depending upon cylinders selected)
Maximum Fluid Working Pressure 3000 psi (20.7 MPa, 207 bar)
Maximum Air Input Pressure 100 psi (0.7 MPa, 7 bar)
Maximum Cycle Rate 30 cpm
Maximum Operating Temperature 70 C (160 F), nylon pistons 50 C (120 F) UHMWPE pistons or PE Tanks
Air Inlet Size ¼ NPT (f)
Pump Fluid Outlet Size -03, -04, -06, -08 or –12 JIC fittings for 3/16 in (4.8 mm), ¼ in (6.4 mm), 3/8 in
(9.5 mm), ½ in (12.7 mm), ¾ in (19.1 mm) hoses
Wetted Parts 303/304, 17-4 PH, hard chrome, Chromex, carbide, Chemical Resistant
O-rings, PTFE, nylon, UHMWPE
Weight 55 kg (120 Lbs) typical with two 7.5L tanks
150 kg (330 Lbs) typical with two 60 L tanks
Sound Power Level
4 in Air Cylinder
100 psi/30 cpm - 81 dBA
50 psi/15cpm – 77 dBA
Measured Per ISO Standard 9614-2
Compressed Air < 10 scfm typical (varies with cycle times)
Electrical Power 100-240 V 50/60Hz, 1 phase for machine – 80 Watts
208-240V 50/60Hz, 1 phase for heat – 11 kW max.
120 or 240 VAC 50/60Hz 1 phase for on-board agitators, 80 Watts
240 VAC 50/60Hz 1 phase for off-board agitators, 830 Watts
312393C
50 of 52
Page 51

Technical Data
Dimensions
Figure 36: PR70 Dimensions (ON-Board PE Tank version Illustrated)
A typical PR70 Machine, with the standard On-Board twin 8 liter PE Tanks has the following dimensions:
Dimension In. (mm) Dimension In. (mm)
A (width) 18.49 (469.6) C (depth) 30.62 (777.7)
B (height) 26.39 (670.3) D (height in Back) 13.39 (340.1)
Figure 37: PR70 Dimensions (ON-Board 7.5L Stainless Tanks version Illustrated)
A typical PR70 Machine, with the standard On-Board 7.5 liter Stainless Steel Tanks has the following dimensions:
Dimension In. (mm) Dimension In. (mm)
A (width) 15.5 (393.7) C (depth) 30.62 (777.7)
B (height) 27.37 (695.2) D (height in Back) 13.39 (340.1)
312393C 51 of 52
Page 52

Warranty and Graco Contact Information
Graco Ohio Standard Warranty
The warranties contained herein are not made in regard to auxiliary equipment and components (see AUXILIARY
EQUIPMENT AND COMPONENTS NOT MANUFACTURED BY SELLER). Unless otherwise specifically stated in
writing, warranties are limited to the following: All proprietary goods designed, manufactured and sold by Seller are
guaranteed against defective workmanship or material for a period of one (1) year after date of shipment from the
factory, provided the goods are properly maintained and operated under the condition for which they were sold.
This warranty does not cover seals or components that are out of specification due to normal wear and tear or
improper maintenance of the equipment. All claims pursuant to the warranties must be made within such one (1)
year period. If Buyer claims the goods are defective within the one (1) year period, Buyer shall notify Seller
immediately, in writing. Seller may inspect, by authorized agent, the defective claim or issue shipping instructions
for return of the goods to its factory. Seller shall have the option, at its sole discretion, if the goods are found to be
defective, to correct the defect or defects by repair or replacement or refund the purchase price. Seller's obligation,
with respect to such goods, shall be limited to the replacement or repair F.O.B. Seller's North Canton, Ohio facility,
or refund of the purchase price, and in no event shall Seller be liable for consequential or special damages, or for
transportation, installation, adjustment or other expenses which may arise in connection with such goods. The
Seller assumes no liability for warranty claims that are found to be attributable to components or mixers, which are
not supplied by Seller (see AUXILIARY EQUIPMENT AND COMPONENTS NOT MANUFACTURED BY SELLER).
Any services and/or parts provided to correct problems associated with components and mixers not supplied by
Seller shall be provided at the Buyer’s expense. The liability of Seller arising out of supplying such goods and
services, or their use, whether on warranties or otherwise, shall not under any circumstances exceed the cost of
the equipment and parts involved, and upon the expiration of the specified one (1) year warranty claims period, all
such warranties and liabilities shall terminate. Seller assumes no liability for damages or expenses of any
character, including those arising out of the installation, use or resale of such goods. No representation or other
affirmation of fact not set forth herein, including, but not limited to, verbal or written statements regarding capacity,
or suitability for use, or performance of the goods, shall be deemed to be a warranty or representation by Seller for
any purpose, nor would they give rise to any liability or obligation of Seller whatsoever. NO WARRANTY OR
GUARANTEE, EXPRESSED OR IMPLIED, INCLUDING ANY WARRANTY AS TO MERCHANTABILITY OR
FITNESS FOR ANY PURPOSE, IS MADE, EXCEPT AS SPECIFICALLY PROVIDED IN THIS AGREEMENT.
AUXILIARY EQUIPMENT AND COMPONENTS
NOT MANUFACTURED BY SELLER
To the extent that auxiliary equipment and components of other manufacturers (e.g. logic control hardware, valves,
transfer pumps, motors, etc.) are included as part of the machine or system described in the quotation and data
sheet attached hereto, it is understood that Seller acts only as an agent of Buyer in making such quotations and
these products which are not manufactured by Seller are subject to the original manufacturer’s warranty policy.
FURTHER, SELLER MAKES NO WARRANTIES OR GUARANTEES, EXPRESS OR IMPLIED, INCLUDING ANY
WARRANTIES AS TO MERCHANTABILITY OR FITNESS FOR ANY PURPOSE AND ASSUMES NO LIABILITIES
WITH RESPECT TO AUXILIARY EQUIPMENT AND COMPONENTS WHICH ARE MANUFACTURED BY
OTHERS.
Graco Ohio Inc.
8400 Port Jackson Ave NW
N. Canton, OH 44720
Phone (330) 966-3000
Fax (330) 966-3006
Send e-mail for technical support to:
LiquidControlService@Graco.com
Send e-mail for parts orders to: LiquidControlParts@Graco.com
Web Site: www.LiquidControl.com
312393C 52 of 52
 Loading...