

Page 1
Do not install or use
this child restraint until you read
and understand the instructions in
this manual.
FAILURE TO PROPERLY USE THIS
CHILD RESTRAINT INCREASES
THE RISK OF SERIOUS INJURY
OR DEATH IN A SUDDEN STOP OR
CRASH.
TURBOBOOSTER
www.gracobaby.com
PD348952D 4/16
Page 2

2
1-A Quick Guide to Your Manual
1-B Welcome to the Graco Family
1-C Before You Begin
Register This Car Seat
If You Need Help
Certification
Car Seat’s Useful Life
Vehicle Seat Protection
Warm Weather Use
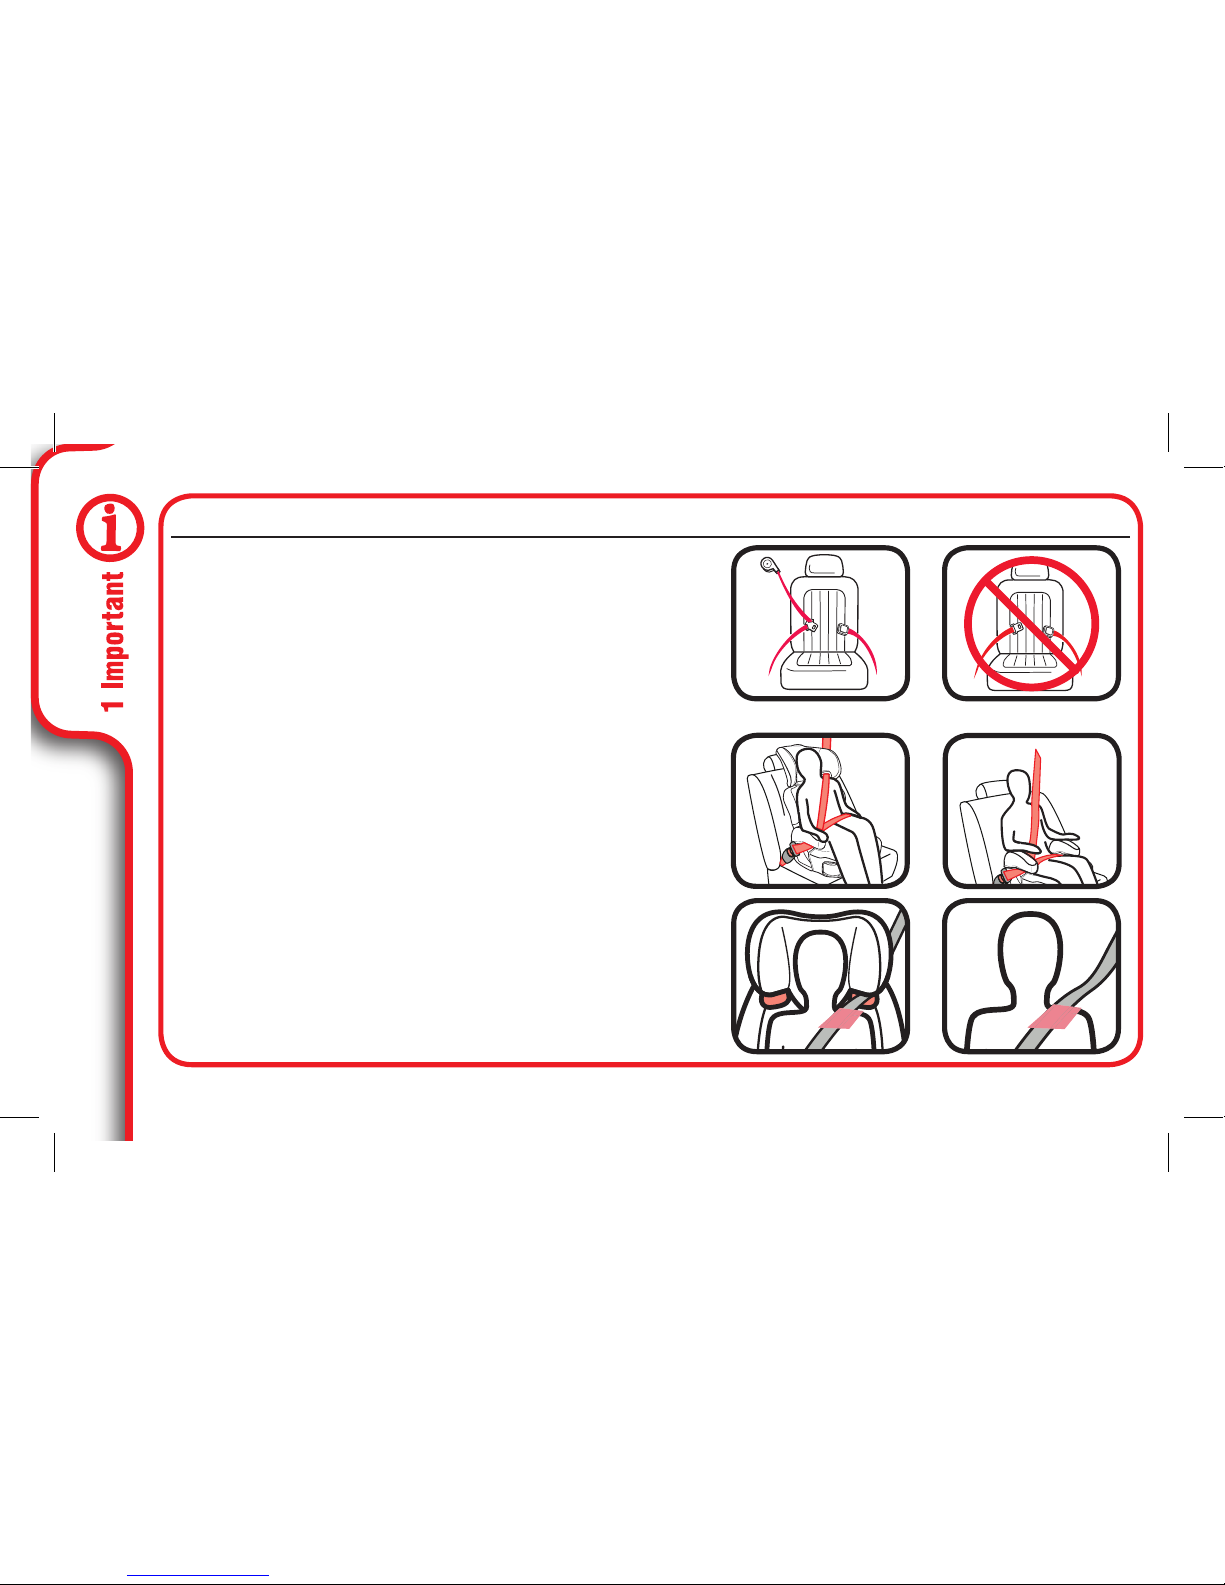
1-D Safety Warnings
1 Important Pages 5-19
2 Features Pages 20-23
2-A Car Seat Features
Page 3

3
3 Booster Pages 24-27
4-A Securing Child Backed Booster
4-B Securing Child Backless Booster
4 Securing Child Pages 28-37
3-A Booster Use
3-B Install Booster
3-C Install Backless Booster
5 Accessories Page 38
Page 4

4
6-A Choosing Vehicle Seat Location
6-B Unsafe Vehicle Seat Location
6-C Vehicle Seat Belts
7-A Cleaning Seat Pad
6 Vehicle Information Pages 39-42
7 Care & Cleaning Pages 43
Adult Assembly Required
1. Armrests
Insert armrest into base as shown until buttons snap into
slots on side of base.
Select the desired armrest height for your child, then insert
the height adjustment screw and tighten. Repeat for other
armrest.
To adjust armrests, remove screw and press in button on
side of base as shown to raise or lower. Reinsert screw and
tighten. CHECK to make sure armrests are securely attached
by pulling up on them.
Page 5
5
1-A Quick Guide to Your Manual
This car seat is for children: Booster: 30-100 lb (14-45 kg) 38-57 in (97-145 cm)
Car Seat Assembly (On Select Models)
Adult Assembly Required
1. Armrests
Insert armrest into base as shown until buttons snap into
slots on side of base.
Select the desired armrest height for your child, then insert
the height adjustment screw and tighten. Repeat for other
armrest.
To adjust armrests, remove screw and press in button on
side of base as shown to raise or lower. Reinsert screw and
tighten. CHECK to make sure armrests are securely attached
by pulling up on them.
Page 6
6
2. Armrest Covers
Slip armrest covers onto armrests as shown.
(on certain models)
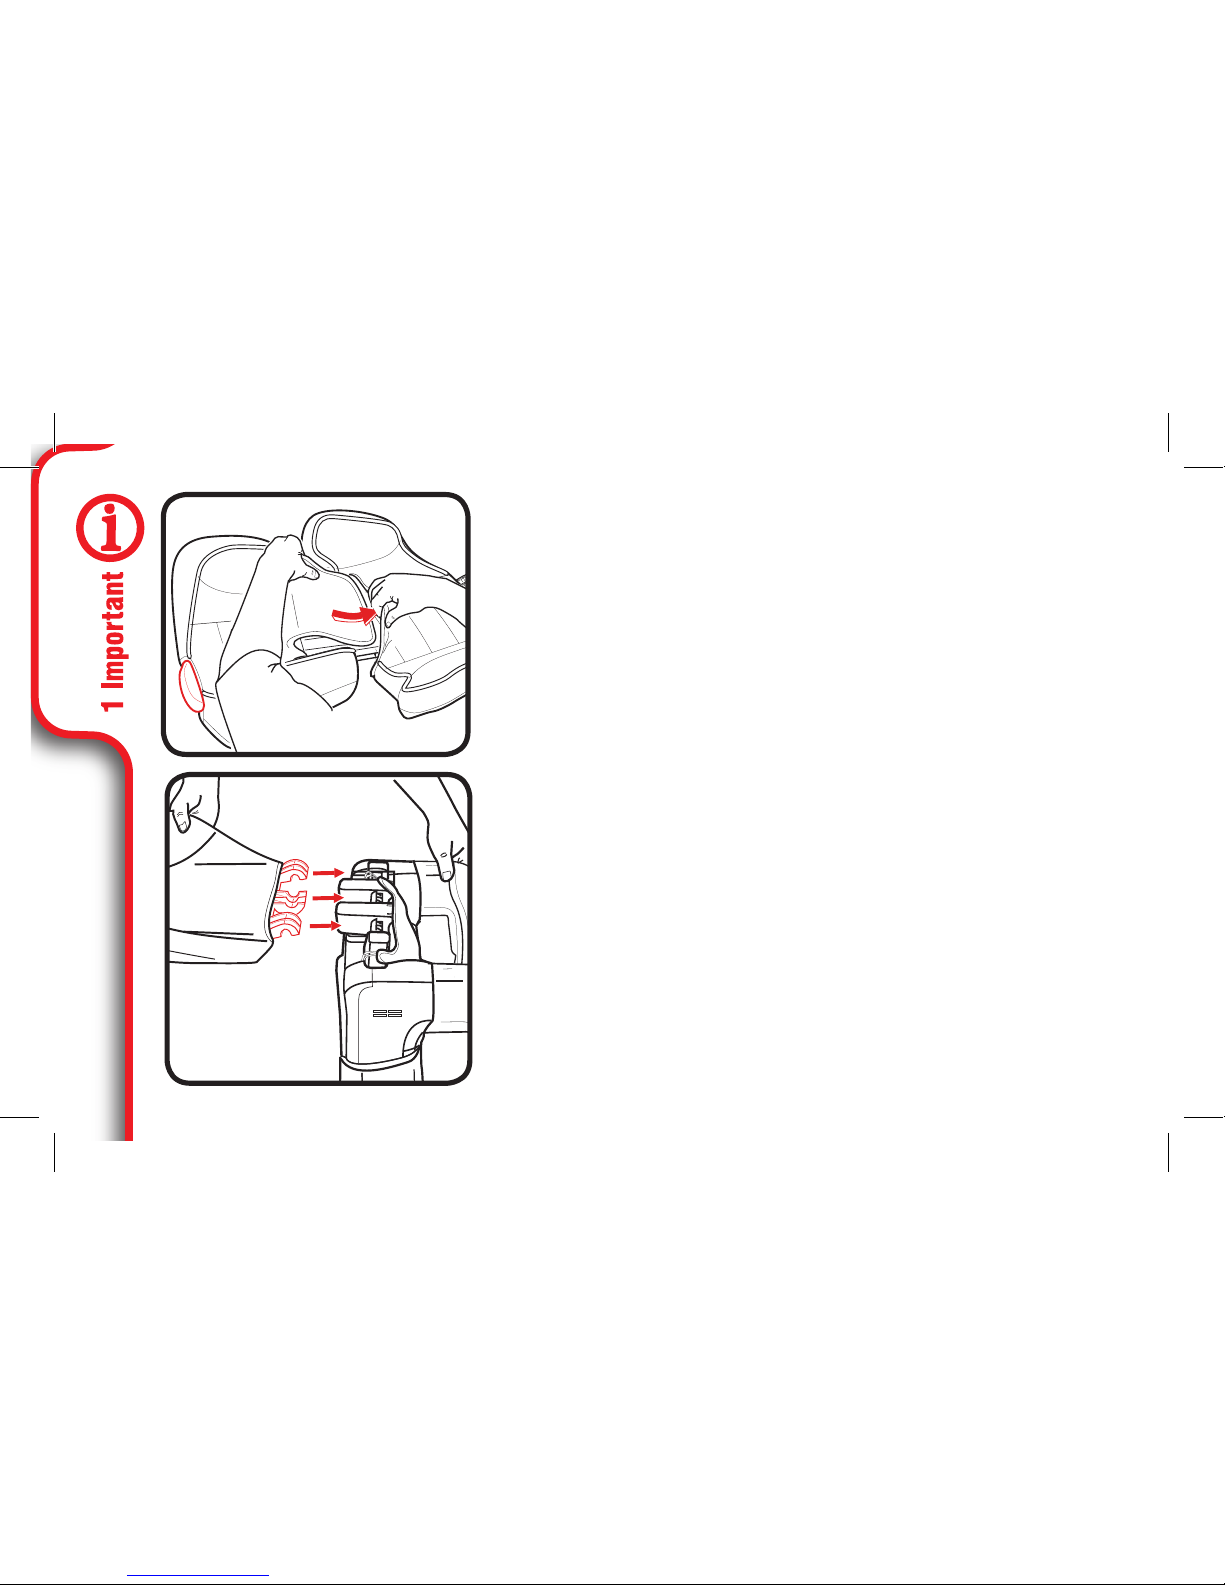
3. Back support pad
On certain models, your lower back support pad
may not be attached to the back support. Place
lower back support pad
around edges of support
as shown. Then fasten
lower elastic strap to the
metal hook on the other
side of the seat pad.
Page 7
7
4. Head support
Flip head support and lower back support over
as shown.
Squeeze red adjustment button and slide two pieces
together until they snap into place.
CHECK to make sure two pieces are securely
snapped together by pulling on them.
Attach elastic strap to metal hook on other side of
seat pad as shown.
Page 8
8
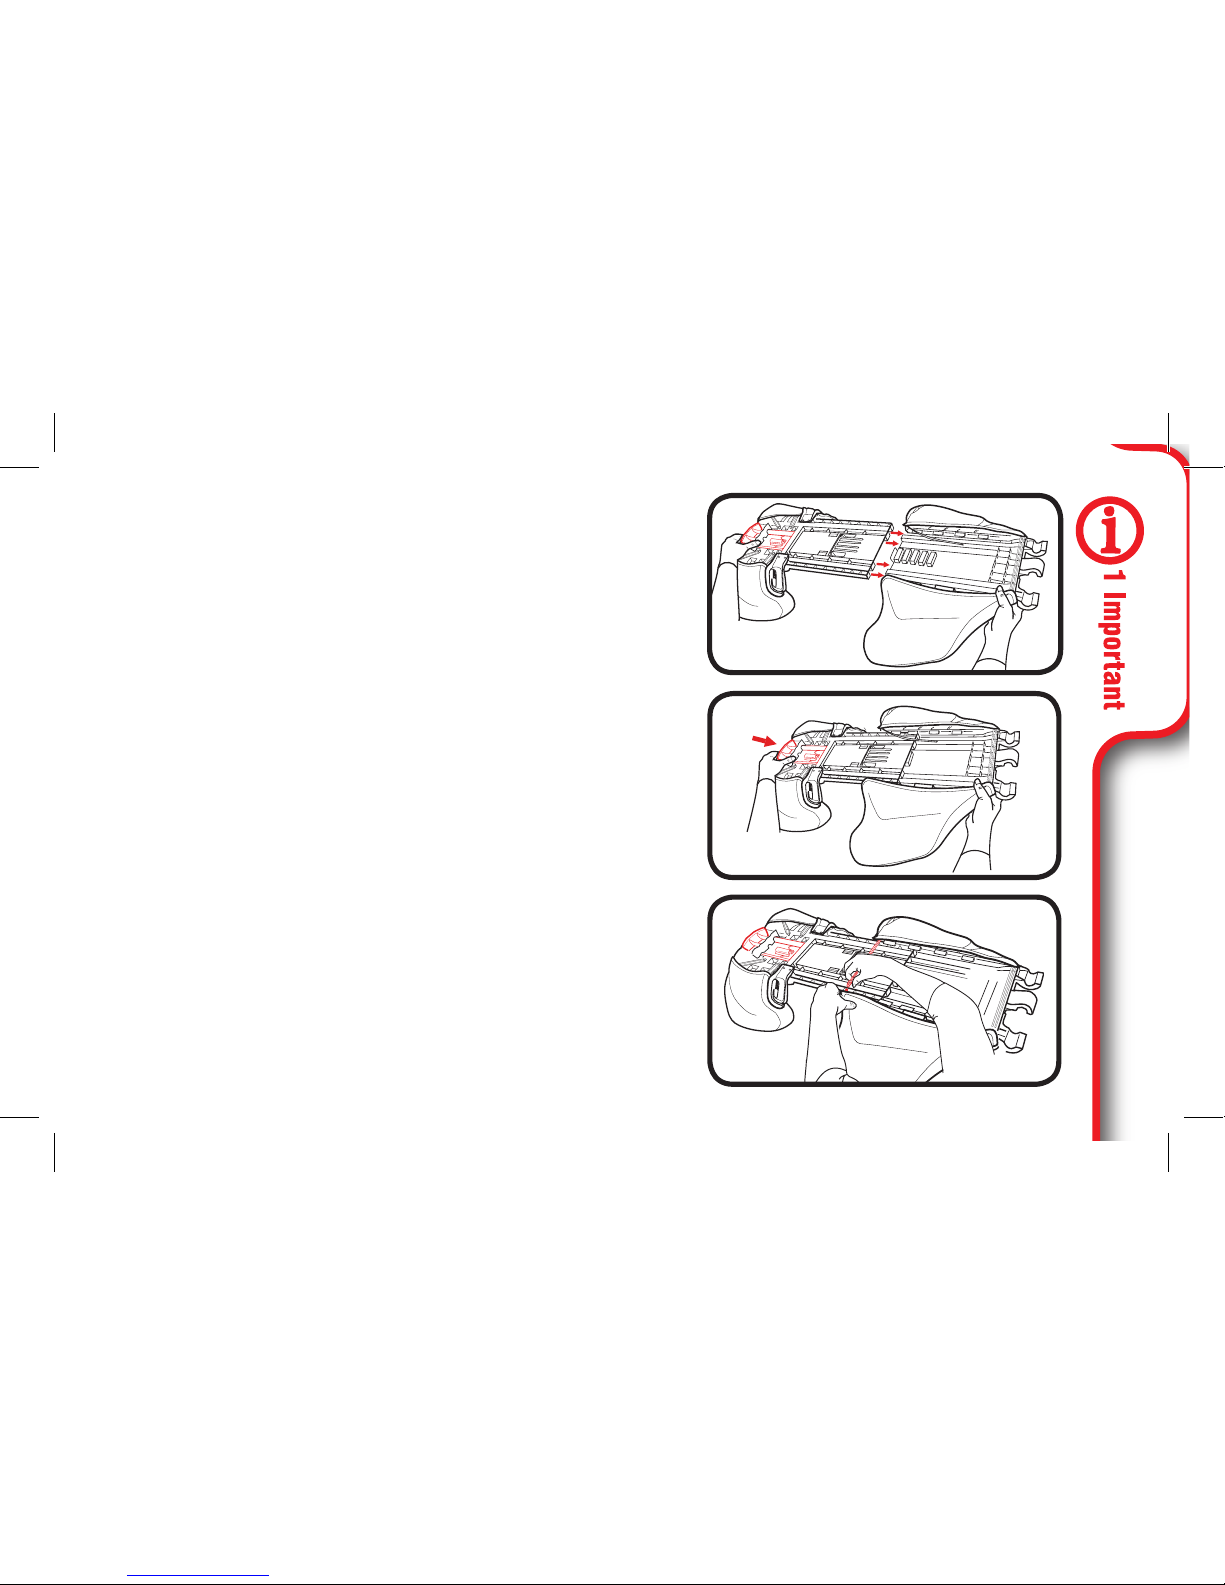
5. Head support pad
Flip seat over and insert the fabric from the head
support underneath the fabric on the lower back support
as shown.
To make insertion of fabric easier, slide the upper and
lower back pieces apart by squeezing the red adjustment
button.
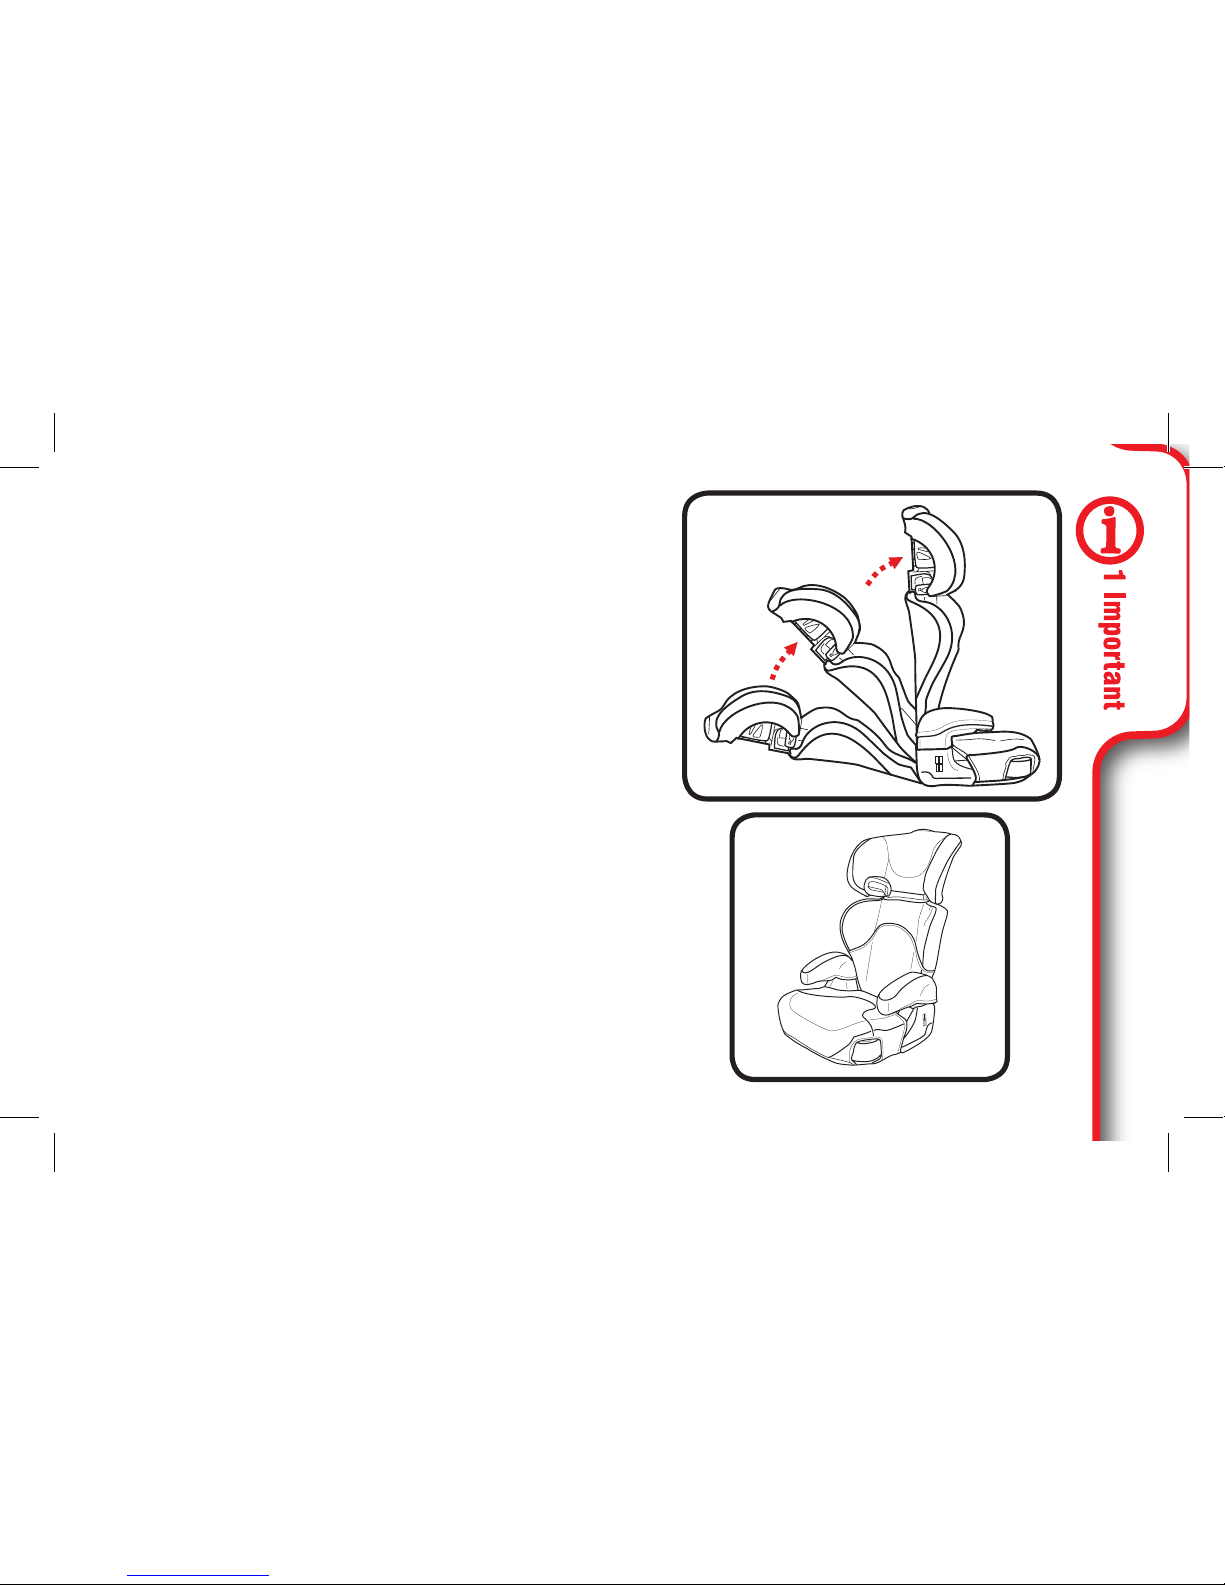
6. Backrest
Attach backrest to base. “U”-shaped hooks on bottom
of backrest will interlock with bars on base.
Make sure that no part of the seat covering interferes
when attaching backrest to the base.
Once backrest is securely attached to the base, push
backrest up as shown.
Your Graco booster seat is now ready to use.
Page 9
9
Once backrest is securely attached to the base, push
backrest up as shown.
Your Graco booster seat is now ready to use.
Page 10
10
Get to Know Your Car Seat
What Seating Location Should I Use?
Review section 2-A to see all of the features of this booster seat.
The best seating location for this booster seat is one that:
• Is recommended by your vehicle owner’s manual, and
• Results in a secure installation of this booster seat.
Some vehicles have specific requirements for where the booster seat can be installed,
so be sure to check your vehicle owner’s manual for available seating positions, if any.
For example, sometimes the center rear seat has a lap belt only vehicle seat belt, which
cannot be used with this booster seat.
Review section 6-B, 6-C, of this manual AND your vehicle owner’s manual.
According to accident statistics, the safest place for
your child in any vehicle is the back seat. The center
of the back seat can be the safest during a possible
side impact.
Page 11
11
When Installing As a Booster
Vehicle Seat Belt
There is one type of vehicle seat belt that can be
used: Lap/Shoulder Seat Belt.
Review section 3 of this manual AND your vehicle
owner’s manual.
Using The Car Seat Correctly
To make sure your child is secured properly, review section 3 and 4 to fit your child.
Page 12
12
Use Lap/Shoulder Belt Only
Review section 3
Position Lap Belt
Lap belt must go under armrest and lie
low across your child’s hips and thighs.
Review section 3
Position Shoulder Belt
Shoulder best lies across shoulder
between neck and edge of shoulder in
the red zone as shown.
Review section 3
Booster Installation
Highback Backless
Page 13
13
1-B Welcome to the Graco Family!
Your child’s safety depends on you. No car seat can guarantee protection from injury in
every situation, but proper use helps reduce the risk of serious injury or death.
Even if this car seat seems easy to figure out on your own, you must follow the detailed
instructions in this instruction manual to ensure the steps below are performed correctly.
Page 14
14
1-C Before You Begin
Please fill out the prepaid registration postcard attached to the seat pad and mail it in today
or register online at www.gracobaby.com/carseatregistration.
Child restraints could be recalled for safety reasons. You must register this restraint to
be reached in a recall. Send your name, address, and the restraint’s model number and
manufacturing date to:
Graco Children’s Products, Inc.
Attn: Customer Service
P.O. Box 169, Elverson, PA 19520-9901
or register online at www.gracobaby.com/carseatregistration
or call 1-800-345-4109
For recall information, call the U.S. Government’s Vehicle Safety Hotline at
1-888-327-4236
(TTY: 1–800–424–9153), or go to http://www.NHTSA.gov.
Register This Child Restraint
Page 15
15
Model Name _________________________
Model Number _______________________
Date of Manufacture __________________
Date of Purchase _____________________
For future reference or if you change addresses, record the model name, model number,
date of manufacture and purchase date of this car seat on the below. You can find this
information either on the registration card if you still have it or on the date label located on
the back of the car seat.
In the U.S.A, please contact our Customer Service Department with any questions you
may have concerning parts, use, or maintenance. When you contact us, please have
your product’s model number and date of manufacture ready so that we may help you
efficiently. These numbers can be found on a sticker on the back side of your car seat.
For additional resources or to get your car seat checked by a child passenger safety
technician, please visit the following web sites:
www.nhtsa.gov • www.seatcheck.org • www.safekids.org
If You Need Help
Page 16
16
This child restraint meets or exceeds all applicable requirements of Federal Motor Vehicle
Safety Standard 213 for use in motor vehicles.
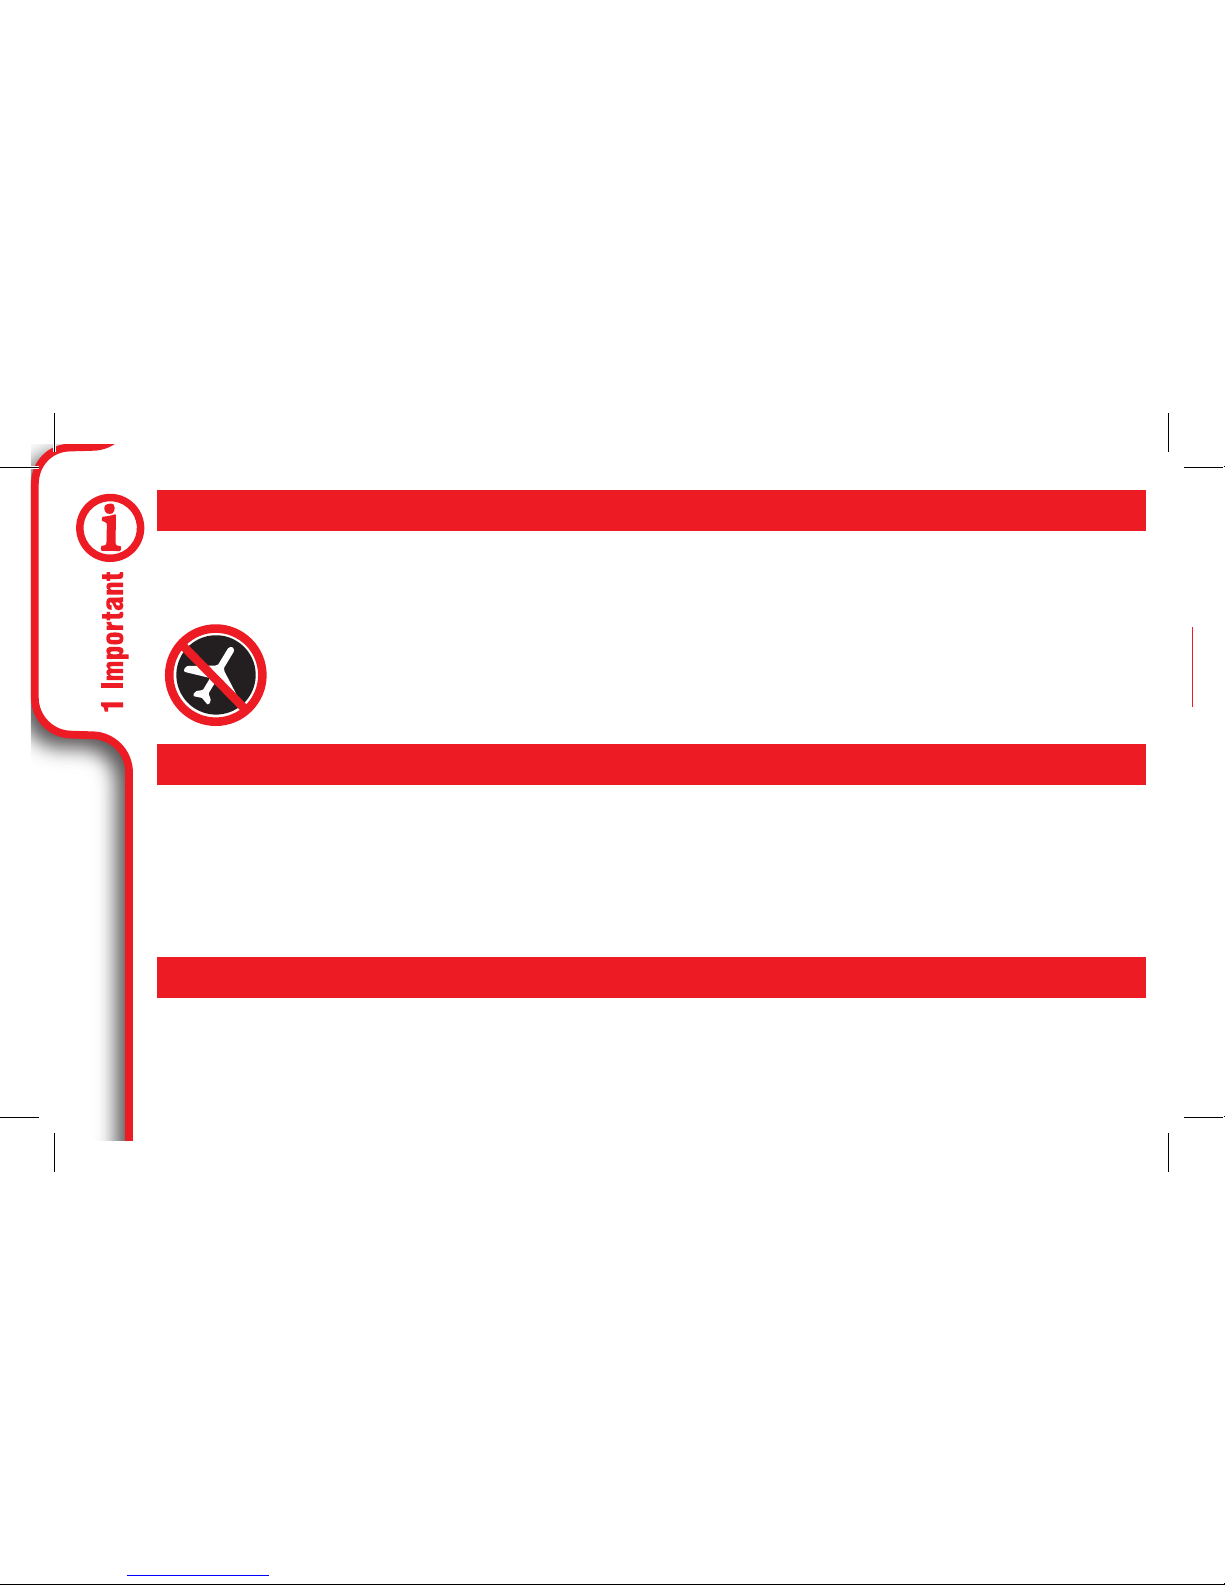
This child restraint is NOT certified for use in aircraft when used as a booster
seat because aircrafts do not have shoulder belts.
STOP using this car seat and throw it away 10 years after the date of manufacture. Look
for date of manufacture label on back of the car seat.
Graco Children’s Products Inc. advises against loaning or passing along a car seat unless
you know the complete history of the product. We also advise against purchasing a car
seat second hand.
Certification
Car Seat’s Useful Life
Protect vehicle seat. Use a car seat mat, towel, or thin blanket under and behind car seat.
Vehicle Seat Protection
No car seat can guarantee protection from injury in every
situation, but proper use helps reduce the risk of serious injury
or death. READ THIS MANUAL CAREFULLY.
Page 17
17
Car seat parts can get very hot in the sun or warm weather. To avoid burns, always
check before putting child in car seat.
Warm Weather Use
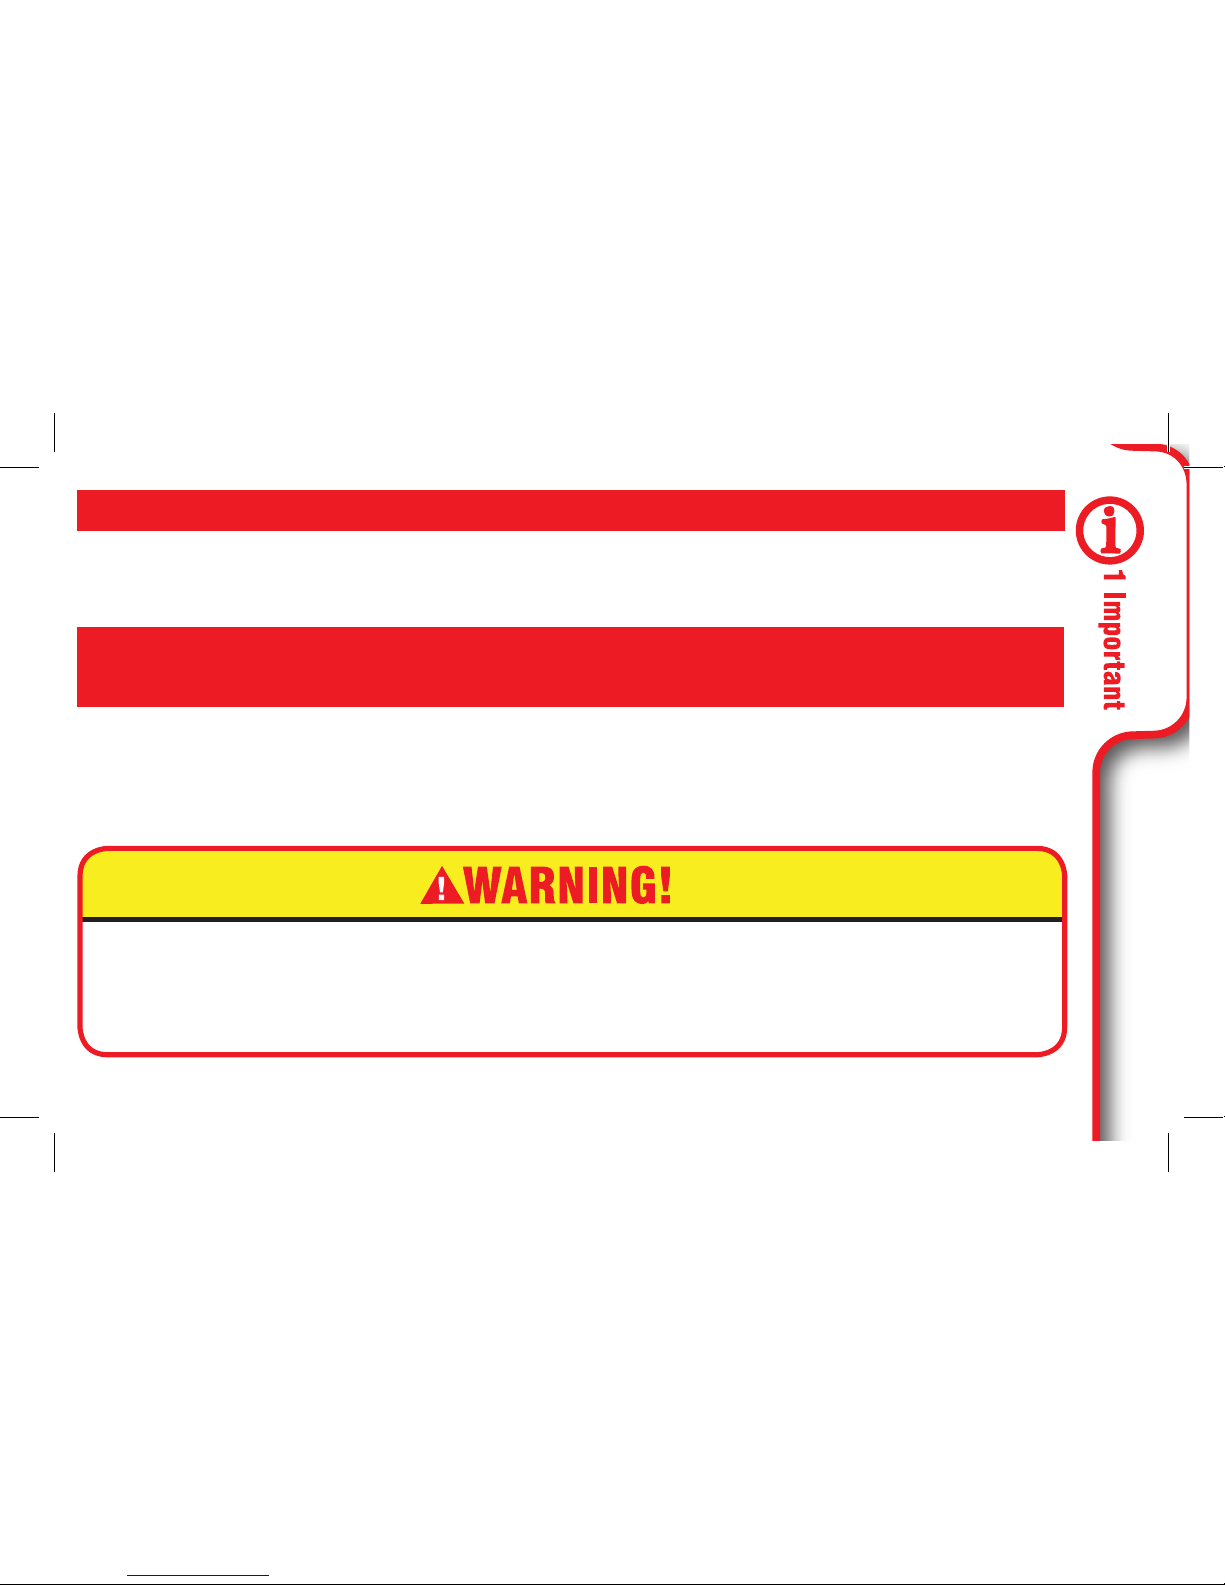
¡ADVERTENCIA!
Failure to follow these instructions and child restraint’s labels can
result in child striking the vehicle’s interior during a sudden stop or
crash.
1-D Safety Warnings
No car seat can guarantee protection from injury in every
situation, but proper use helps reduce the risk of serious injury
or death. READ THIS MANUAL CAREFULLY.
Page 18
18
! Review your vehicle owner’s manual for more information about
air bags and car seat use.
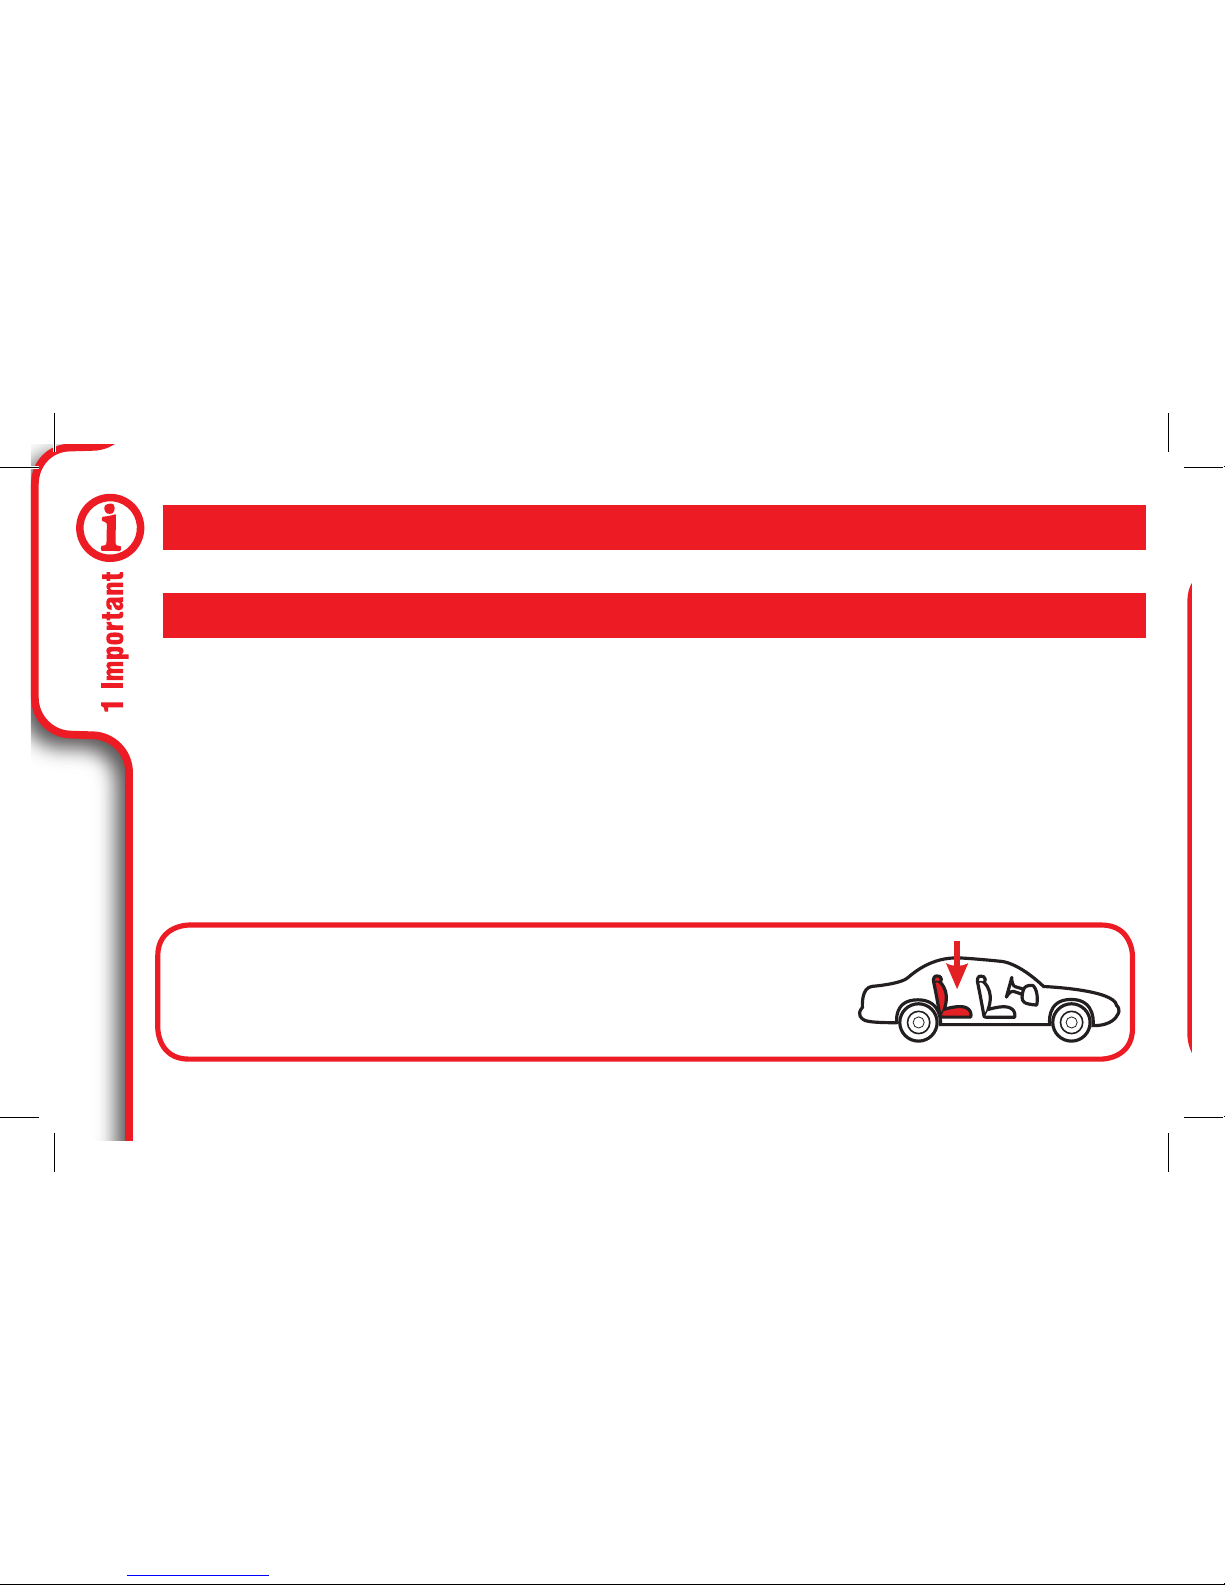
! If your vehicle does not have a back seat, review your vehicle
owner’s manual.
! Select a suitable location for the car seat in your vehicle.
! Always secure car seat with the vehicle seat belt, even when
unoccupied. In a crash, an unsecured car seat can injure
occupants.
! If car seat is in a crash, it must be replaced. DO NOT use it
again! A crash can cause unseen damage and using it again
could result in serious injury or death.
Page 19
19
! DO NOT use car seat if it is damaged or missing parts.
! DO NOT use accessories or parts other than those provided by
Graco. Their use could alter the performance of the car seat.
! Never leave child unattended, even when sleeping.
Page 20
2 Features
20
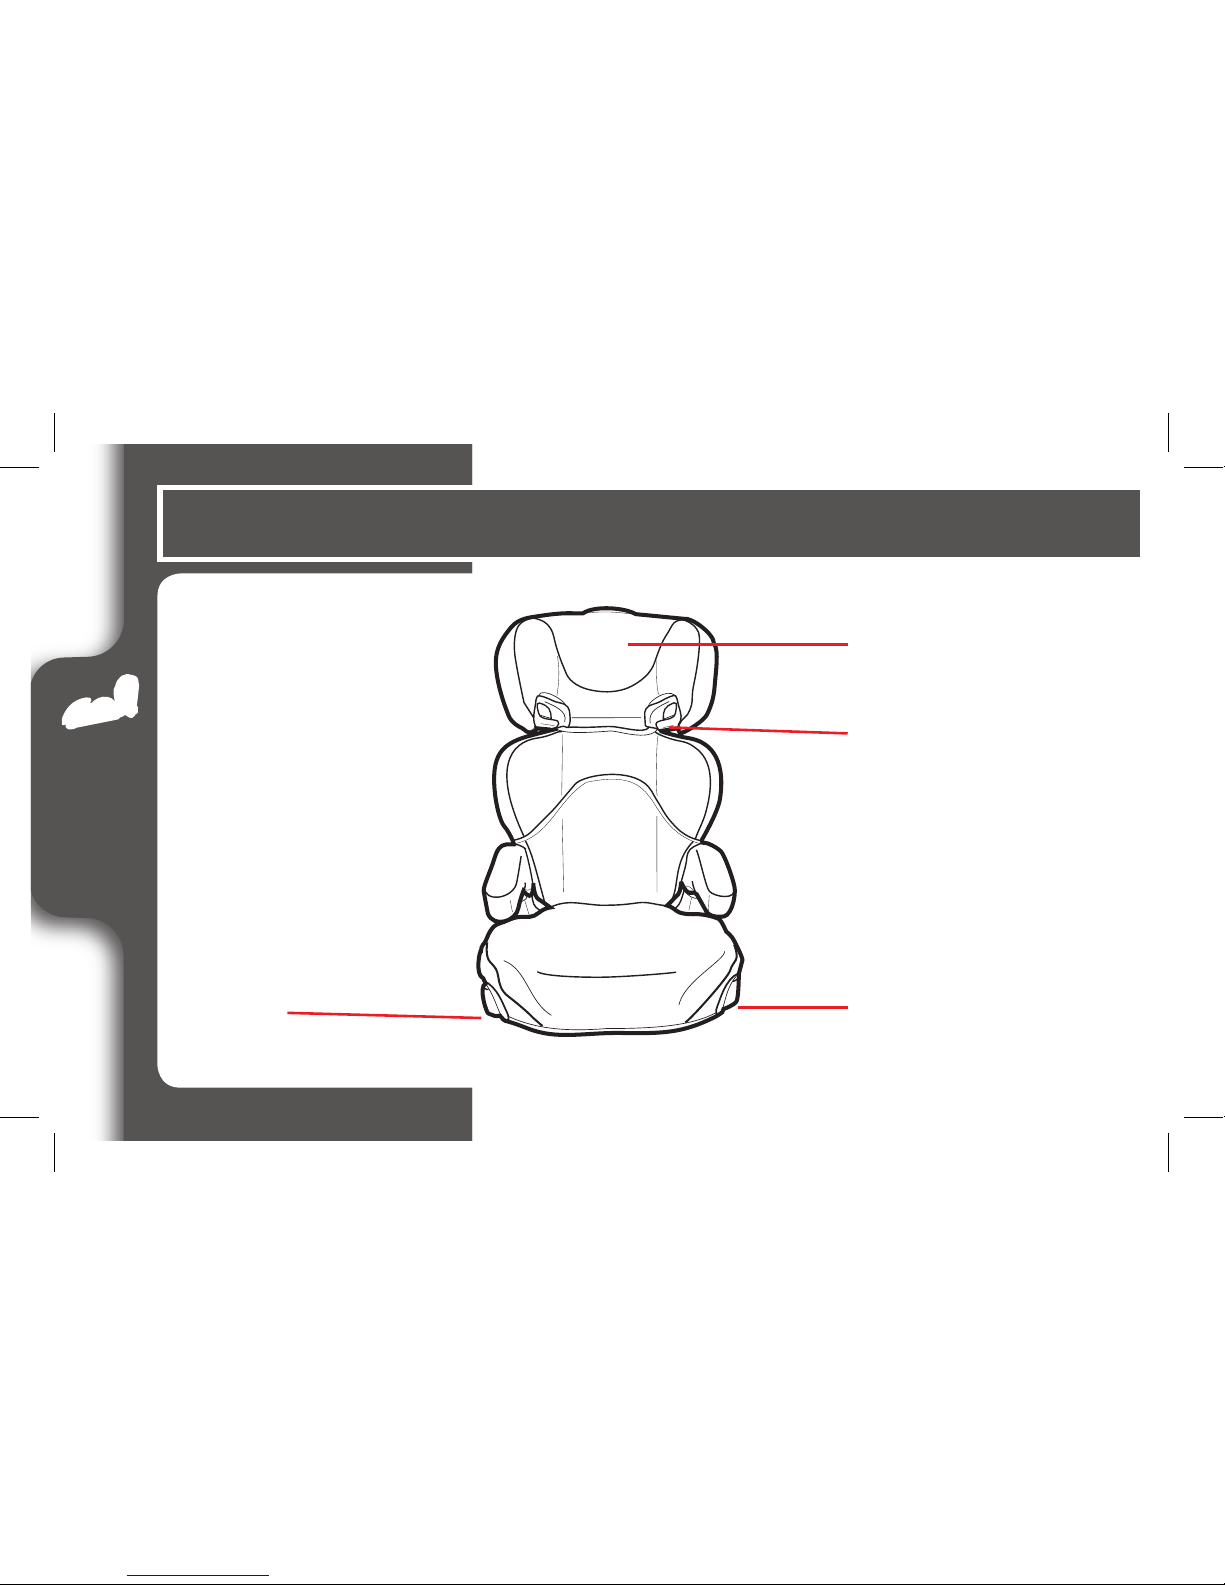
2-A Car Seat Features
C
A
B
C
Page 21

2 Features
21
A Head Support
B Shoulder Belt Guide
C Cup Holder
Page 22
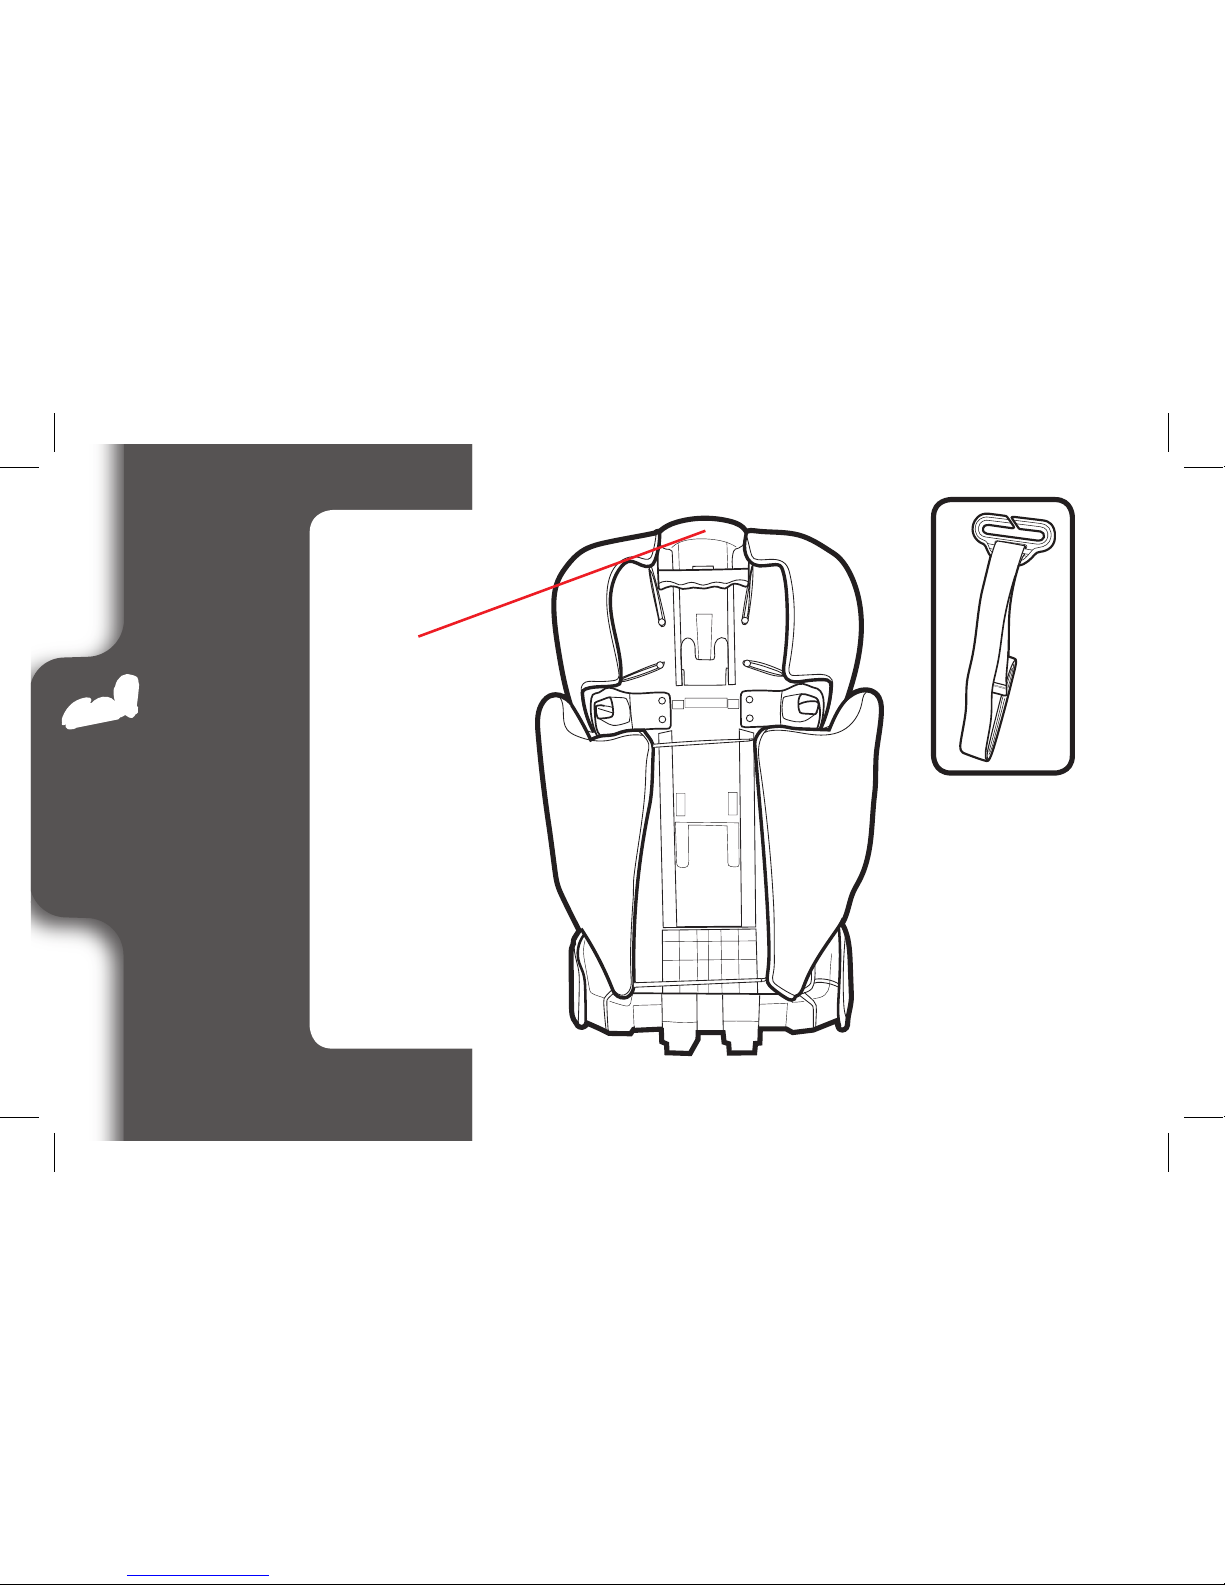
2 Features
22
A
B
Page 23
2 Features
23
A Head Support Adjustment Lever
B Belt Positioning Clip (Inset)
Page 24
3 Booster
24
3-A Booster Use
Booster Use With Back:
30-100 lb (14-45 kg) 38-57 in.
(97-145 cm) at least 4 years old
Booster Use Without Back: 40-100 lb (18.1-45
kg) 43-57 in. (110.1-145 cm) at least 4 years old
• Place car seat forward-facing in the vehicle back seat.
• Make sure vehicle seat’s lap belt is adjusted snugly and
lays low on the child’s hip and is routed under the armrest
in the booster’s belt path.
• Vehicle belts MUST lie flat against child and MUST NOT
be twisted.
• Vehicle seat’s shoulder belt is adjusted snugly and should
lie between child’s neck and edge of shoulder.
Vehicle Lap/Shoulder
Seat Belt
Vehicle Seat Lap/
Shoulder Belt
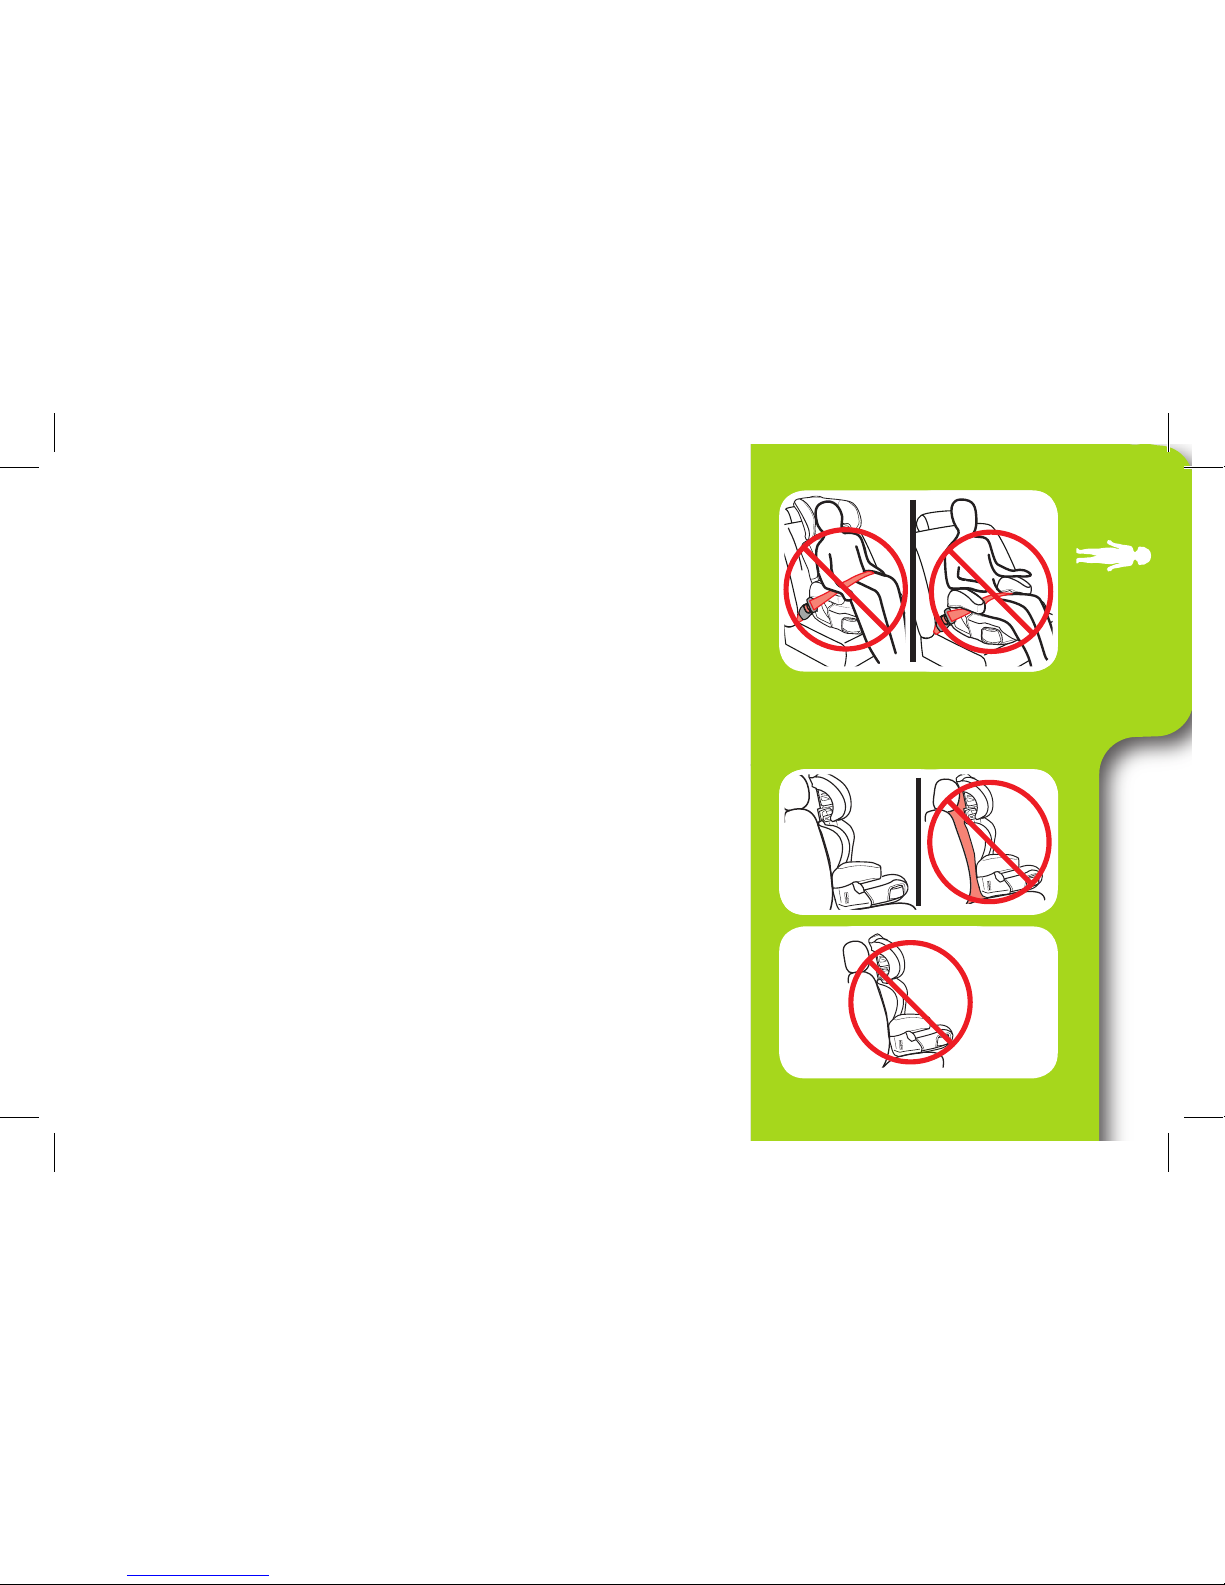
• Never use a vehicle lap-only belt across front of child.
• DO NOT position vehicle shoulder belt under the child’s
arm or back.
• DO NOT allow child to slouch or slide down in the booster
seat.
• DO NOT position vehicle belt over top of armrests.
• Vehicle’s seat headrest SHOULD NOT create a gap
between vehicle seat and booster seat.
• The front of booster seat MUST NOT hang over front of
vehicle seat.
• If child will not keep vehicle belt properly positioned, DO
NOT use this booster seat. Use a different car seat.
Page 25
3 Booster
25
• Never use a vehicle lap-only belt across front of child.
• DO NOT position vehicle shoulder belt under the child’s
arm or back.
• DO NOT allow child to slouch or slide down in the booster
seat.
• DO NOT position vehicle belt over top of armrests.
• Vehicle’s seat headrest SHOULD NOT create a gap
between vehicle seat and booster seat.
• The front of booster seat MUST NOT hang over front of
vehicle seat.
• If child will not keep vehicle belt properly positioned, DO
NOT use this booster seat. Use a different car seat.
Never Use a Vehicle
Lap-Only Belt Across
Front of Child
Page 26
3 Booster
26
3-B Install Booster
1. Place Car Seat Forward-Facing in Back Seat of
the Vehicle
Place forward-facing in vehicle seat. The bottom of the
seat should sit as flat as possible on the vehicle seat.
2. Thread the Vehicle Seat Shoulder Belt Through
Seat Belt Guide on the Headrest
See section 4-A to secure your child.
Page 27
3 Booster
27
3-C Install Backless Booster
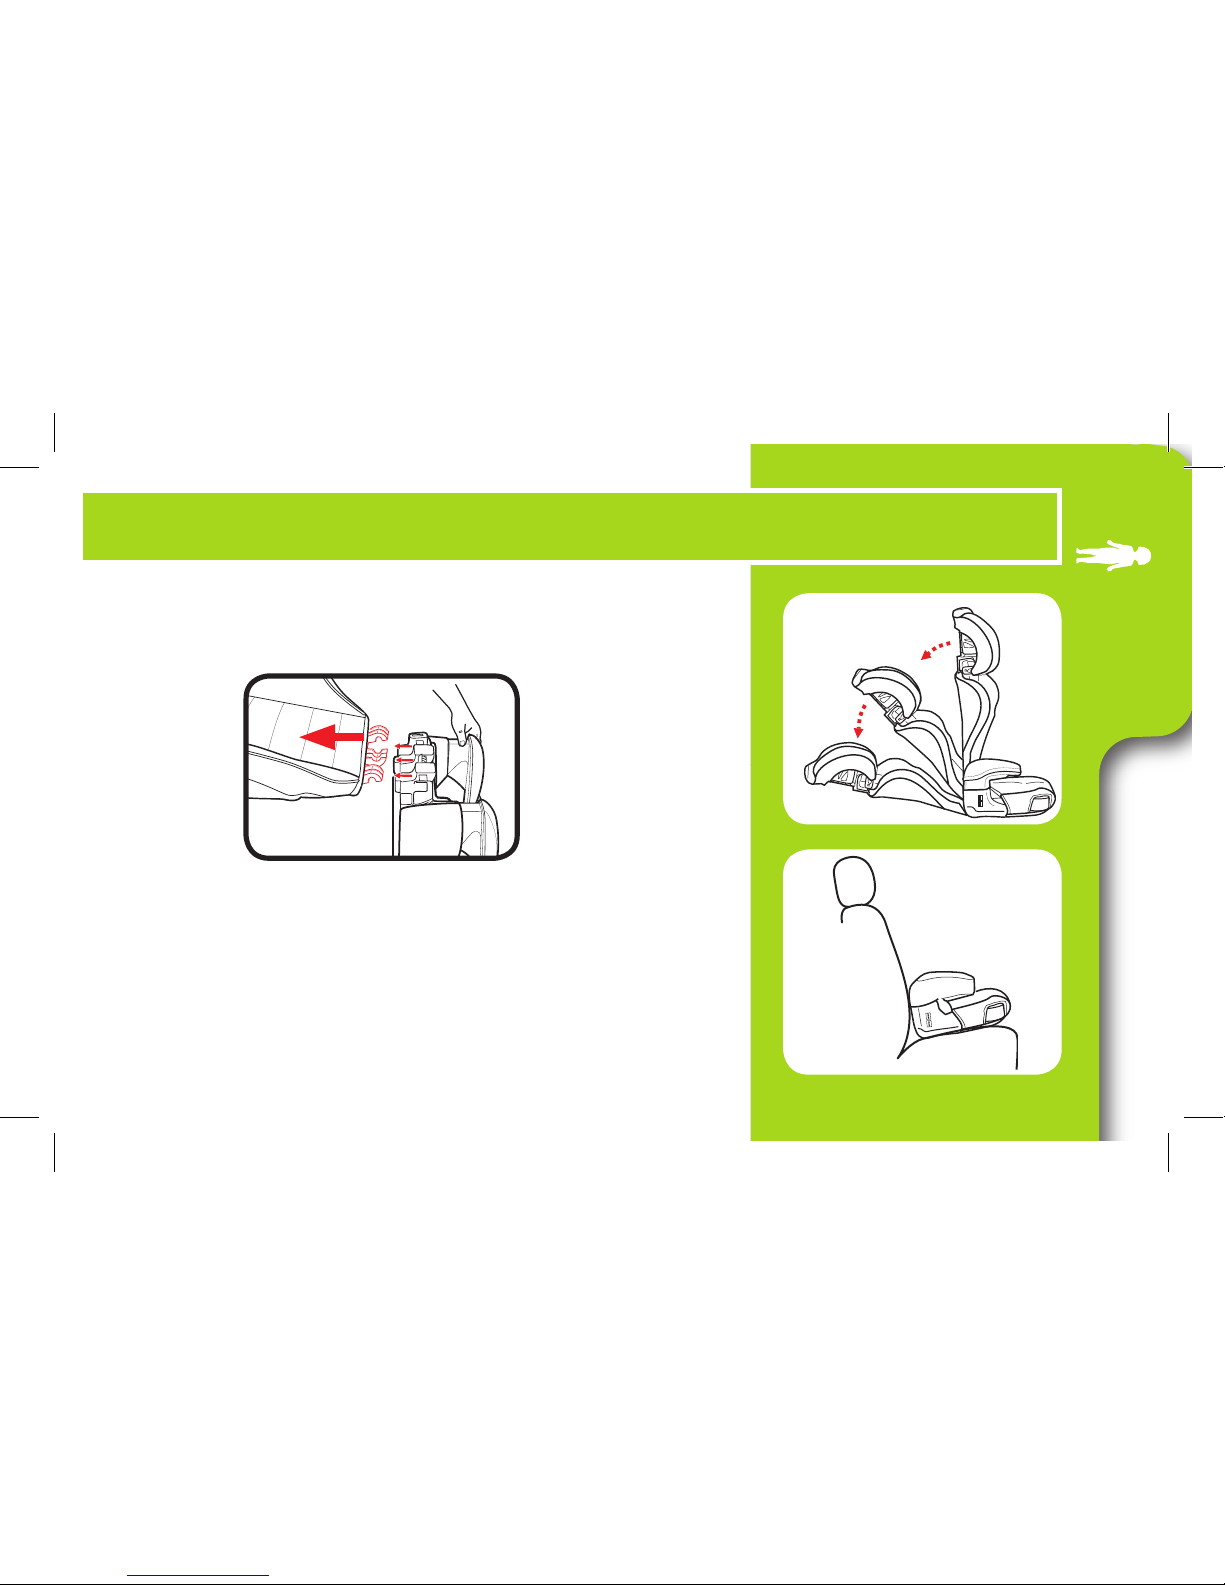
1. Remove the Back Support (on select models)
Recline seat back then remove from base.
2. Place the Booster Seat Forward-Facing in the
Back Seat of Vehicle
Place forward-facing on a vehicle seat that has a lap/
shoulder seat belt. The base should sit as flat as possible
on the vehicle seat.
See section 4-B to secure your child.
Page 28

28
4 Securing Child
1. Place Child In Seat
Have your child sit in the booster seat, with
his/her back flat against the back of the
booster seat.
2. Thread Vehicle’s Shoulder Belt Into
Seat Belt Guide in the Headrest
4-A Securing Child Backed Booster
¡ADVERTENCIA!
Use only the vehicle lap and shoulder belt system
when restraining the child in the booster seat.
Page 29

29
4 Securing Child
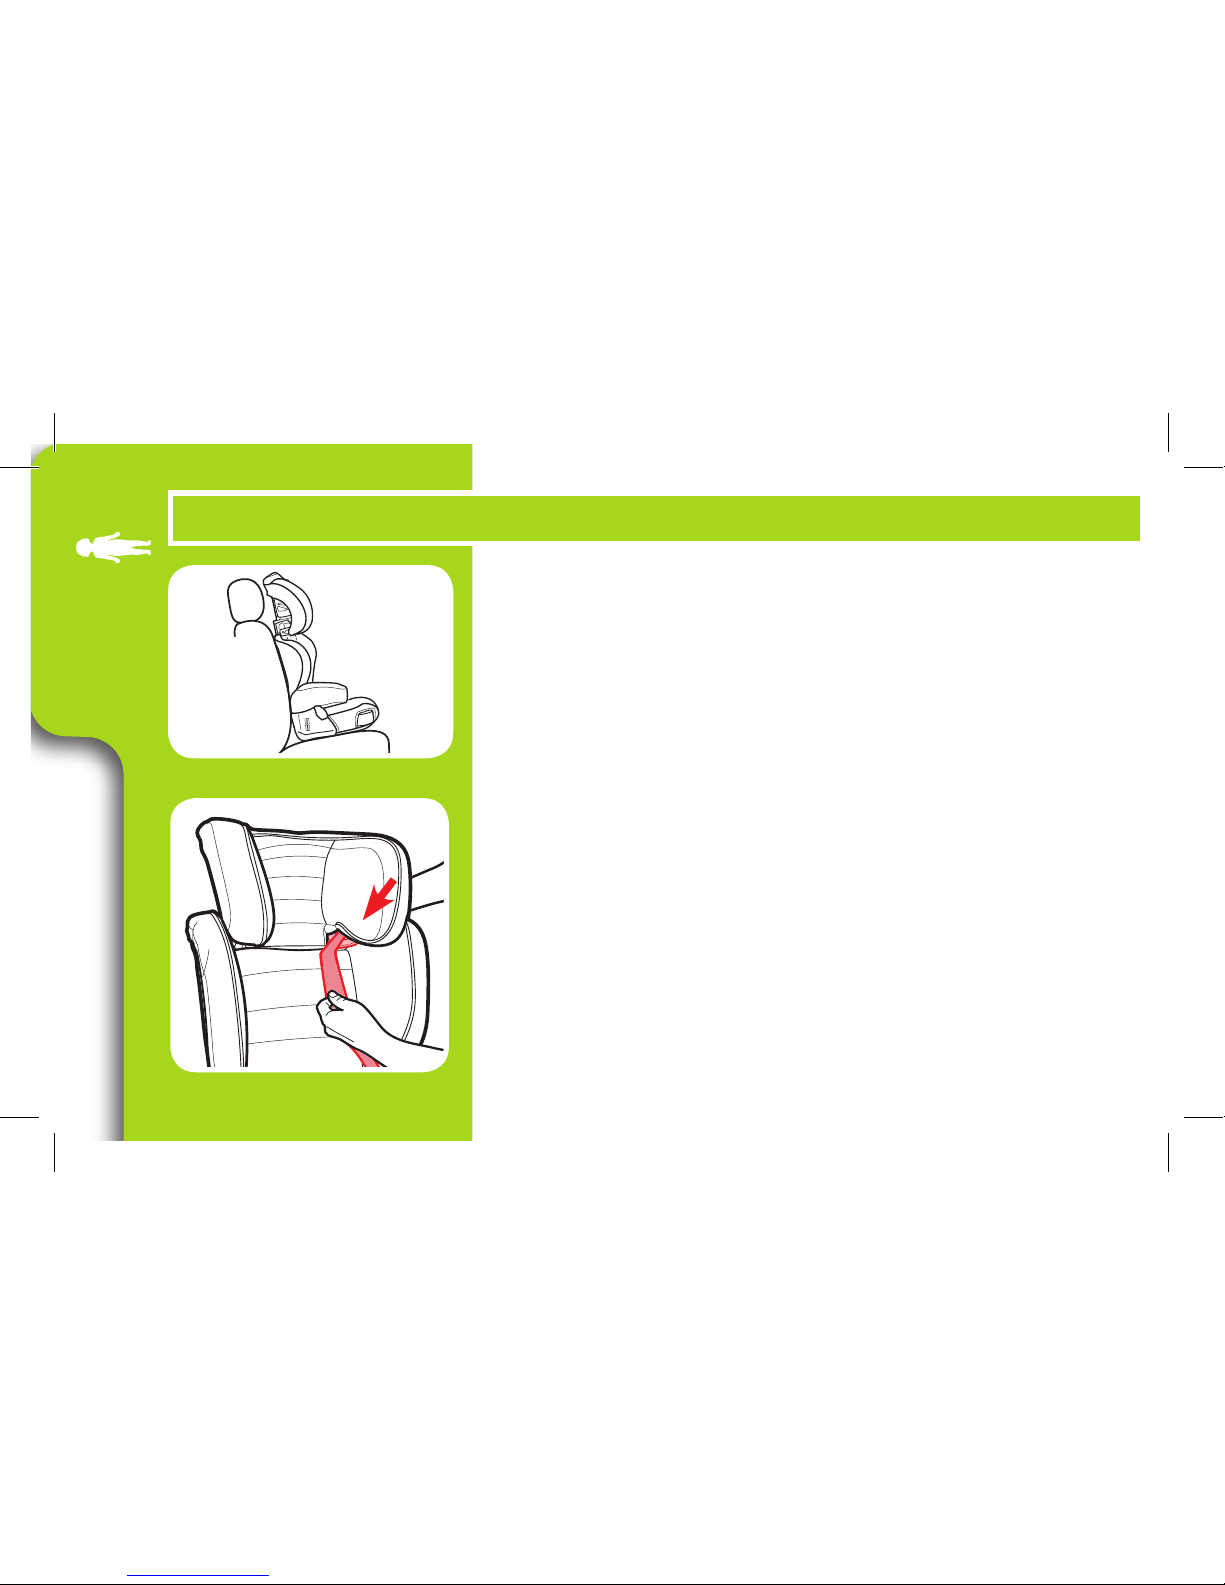
3. To Raise or Lower Headrest Support
Lift adjustment lever and lift or lower headrest.
Page 30

30
4 Securing Child
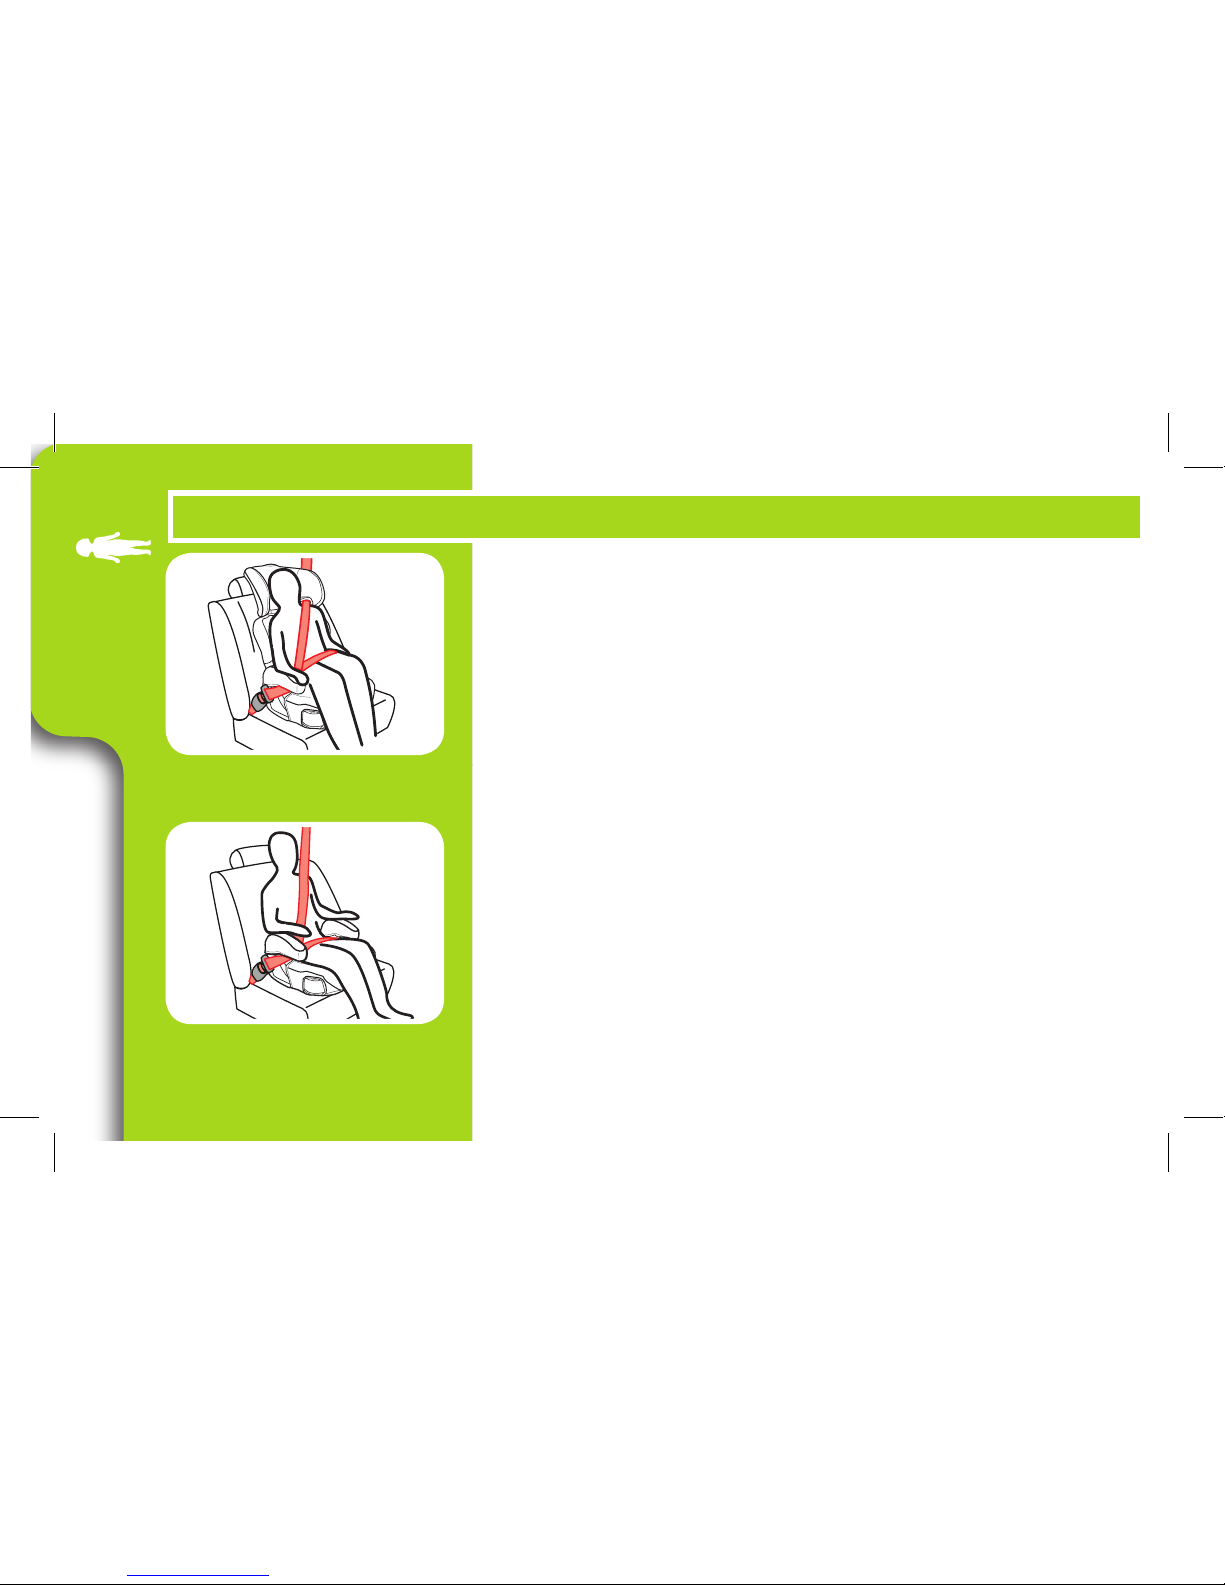
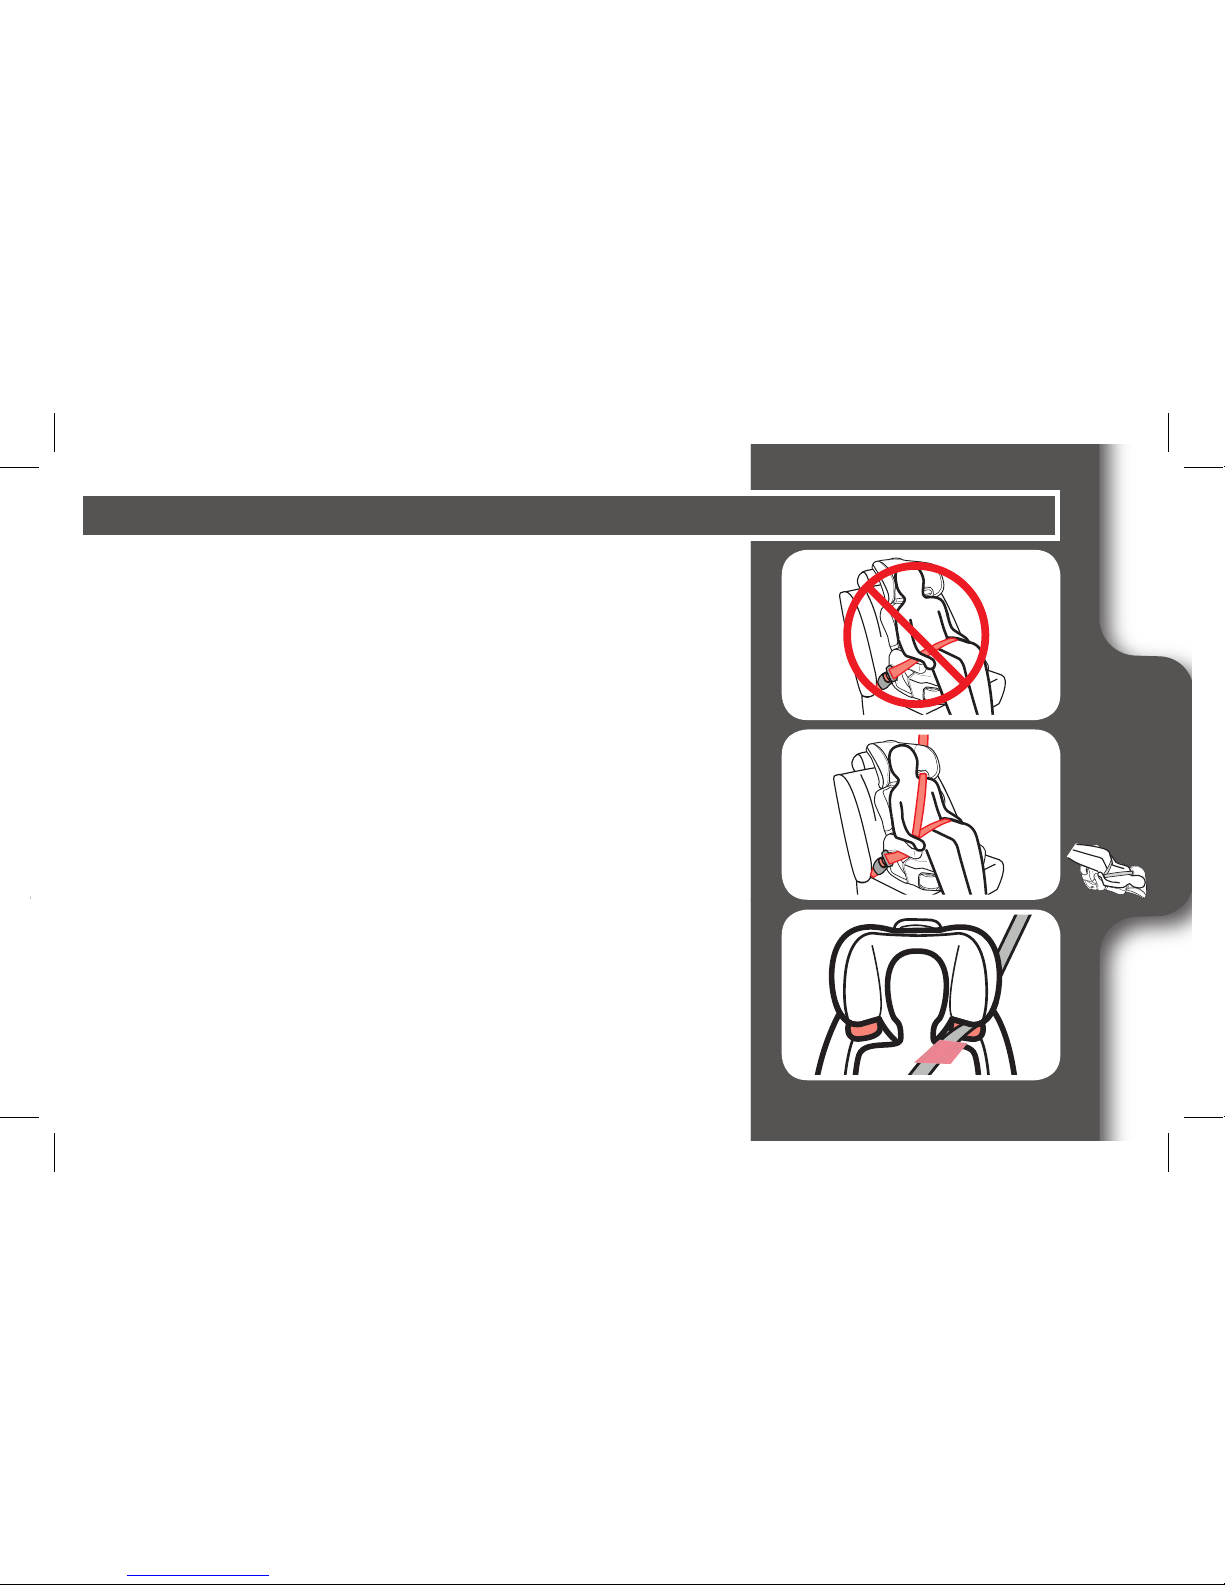
4. Buckle the Vehicle Lap/Shoulder Seat Belt
Be sure the lap portion of the vehicle seat belt goes
under both armrests and the shoulder belt goes under the
armrest on the buckle side.
Be sure the lap portion of the vehicle seat belt lies low
across your child’s hips.
Be sure the shoulder belt lies across your child’s
shoulders, in the red zone between the neck and edge of
shoulder by raising or lowering the head support. The belt
guides should be even with or just above the shoulders.
Page 31

31
4 Securing Child
Is Everything Correct?
Never Use Lap Belt Only
Lap Belt under Armrest and Lies Low Across Hips
and Thighs
Shoulder Belt Lies On the Shoulder in the red
zone, Between the Neck and Edge of Shoulders
Page 32

32
4 Securing Child
1. Place Child In Seat
Have your child sit in the booster seat, with his/her back
flat against the back of the vehicle seat.
2. Ears Must Be Below the Top of the Vehicle
Seat Back or Headrest.
4-B Securing Child Backless Booster
¡ADVERTENCIA!
Use only the vehicle lap and shoulder belt system
when restraining the child in the booster seat.
Page 33

33
4 Securing Child
3. Buckle the Vehicle Lap/Shoulder Seat Belt
Be sure the lap portion of the vehicle seat belt goes
under both armrests and the shoulder belt goes under the
armrest on the buckle side.
Be sure the lap portion of the vehicle seat belt lies low
across your child’s hips.
Be sure the shoulder belt lies across your child’s
shoulders, in the red zone between the neck and edge of
shoulder.
You may need to use the belt positioning clip to help get
a good fit. See “Using Belt Positioning Clip”
Page 34

34
4 Securing Child
Is Everything Correct?
Never Use Lap Belt Only
Lap Belt under Armrest and Lies Low Across Hips
and Thighs
Shoulder Belt Lies On the Shoulder, in the red
zone Between the Neck and Edge of Shoulders
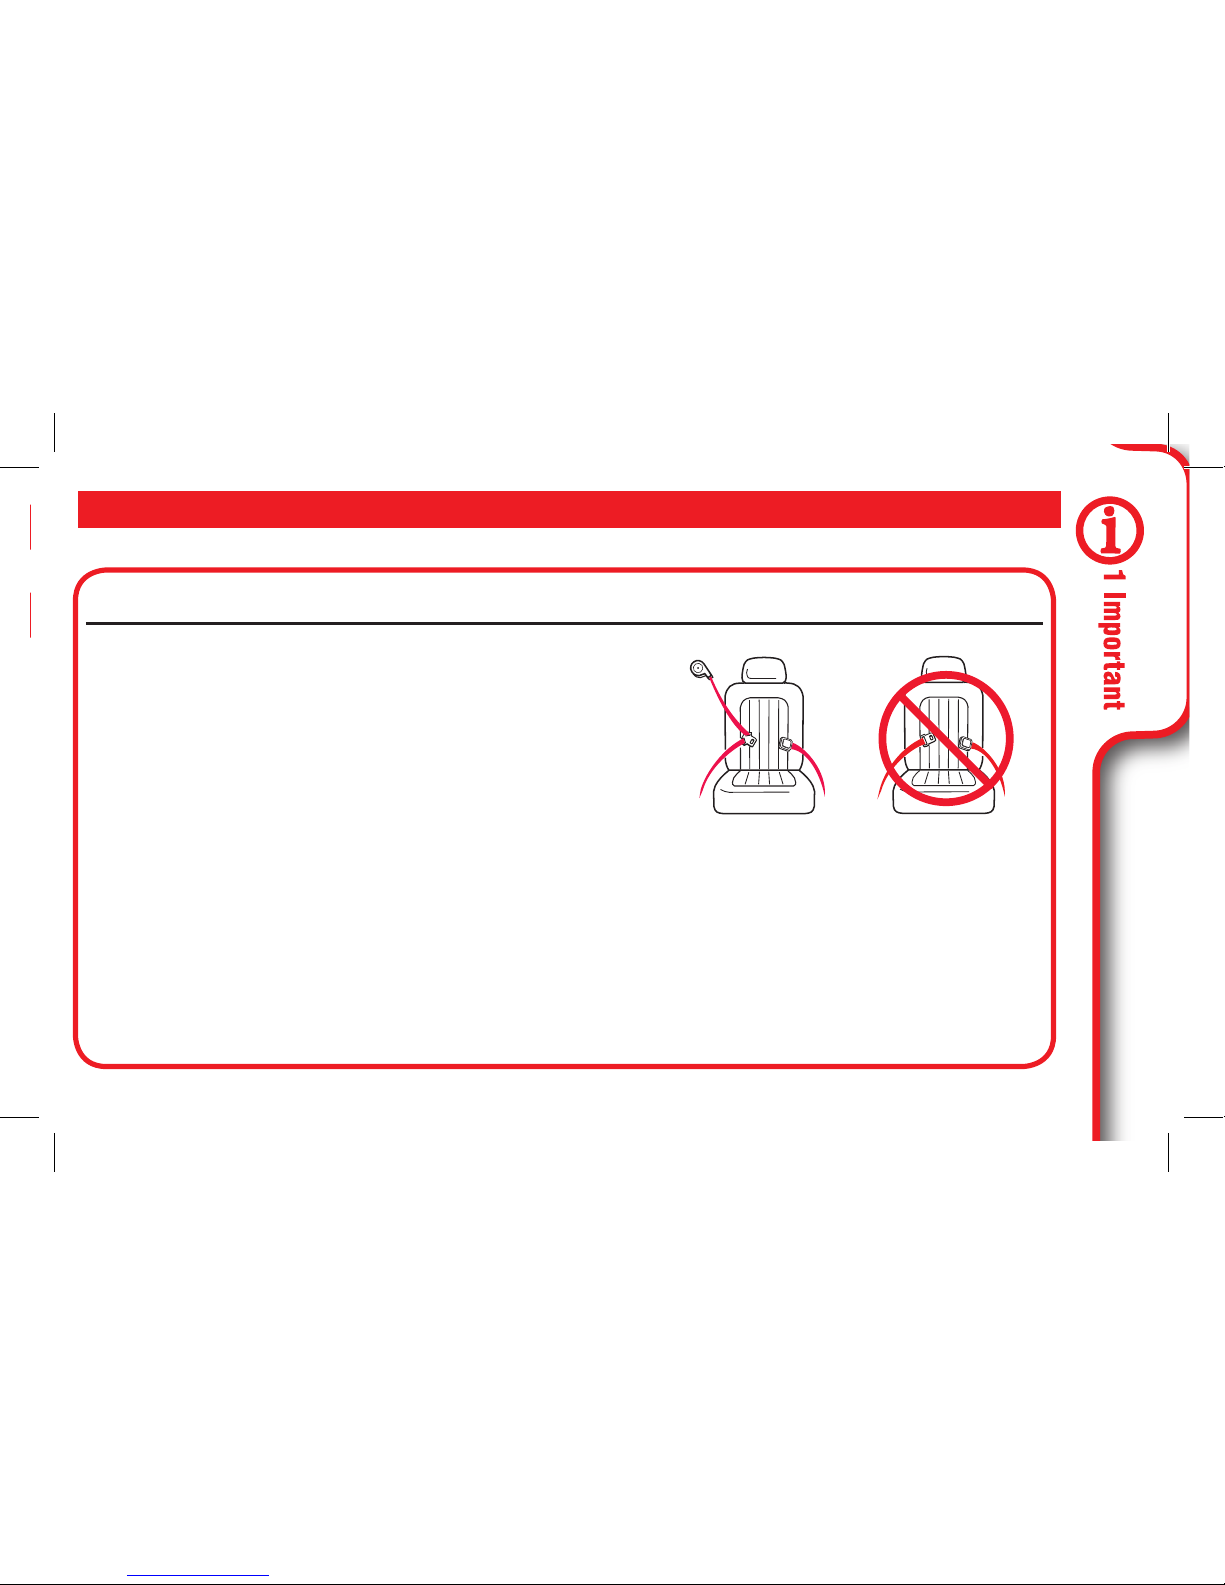
1. Make Sure Vehicle’s Seat Shoulder Belt Lays in
the Red Zone As Shown
If the vehicle’s seat shoulder belt lays outside this zone,
you MUST use the belt positioning clip.
2. Attach Belt Positioning Clip
The shoulder belt positioning
clip MUST be attached to the
slot on the bottom of the base.
Insert the loop end of strap
through the slot on bottom of seat exactly where shown.
3. Push Clip and Strap Through Loop
Pass the clip and the strap through the loop end as shown
and pull strap up.
Page 35

35
4 Securing Child
Using Belt Positioning Clip
1. Make Sure Vehicle’s Seat Shoulder Belt Lays in
the Red Zone As Shown
If the vehicle’s seat shoulder belt lays outside this zone,
you MUST use the belt positioning clip.
2. Attach Belt Positioning Clip
The shoulder belt positioning
clip MUST be attached to the
slot on the bottom of the base.
Insert the loop end of strap
through the slot on bottom of seat exactly where shown.
3. Push Clip and Strap Through Loop
Pass the clip and the strap through the loop end as shown
and pull strap up.
Page 36

36
4 Securing Child
4. Free End of Strap Should Face Front of Seat
5. Place Child in Seat, Buckle
Child In Seat and Attach Belt
Positioning Clip
With child’s back flat against the back
of the vehicle seat, buckle child in.
Then slide the clip onto the vehicle’s
seat shoulder belt as shown.
Rear View
Page 37

37
4 Securing Child
6. Adjust the Belt Positioning Clip to Fit Your Child
Lengthen or shorten the belt length as shown.
Clip should fit right at the top of shoulder as shown.
Be sure the lap portion of the vehicle seat belt lies low
across your child’s hips.
Shorten
Lengthen
Page 38

38
5 Accesorie
s
5 Accessories (on select models)
Cup Holders
Headrest Pillow and Body Pillow
To remove, pull the pillow out.
Reinsert as shown.
The best seating location for this car seat is one that:
• Is recommended by your vehicle owner’s manual, and
• Results in a secure installation of this car seat
In the event there is no available back seat and / or you have no other option, the National
Highway Traffic Safety Administration (NHTSA) recommends that you take the following
steps:
• Ensure the child is properly restrained according to their age and size
• Move the seat as far back as possible
• Make sure the child is not leaning out of position, such as leaning forward into the
deployment path of the air bag
• Set the air bag ON-OFF switch, if available, to the OFF position
Page 39

6 Vehicle
Information
39
Review your vehicle’s owner manual for Seating Locations
6-A Choosing Vehicle Seat Location
The best seating location for this car seat is one that:
• Is recommended by your vehicle owner’s manual, and
• Results in a secure installation of this car seat
In the event there is no available back seat and / or you have no other option, the National
Highway Traffic Safety Administration (NHTSA) recommends that you take the following
steps:
• Ensure the child is properly restrained according to their age and size
• Move the seat as far back as possible
• Make sure the child is not leaning out of position, such as leaning forward into the
deployment path of the air bag
• Set the air bag ON-OFF switch, if available, to the OFF position
Page 40

6 Vehicle
Information
40
6-B Unsafe Vehicle Seat Location
Never install this car seat in any of the following vehicle seating locations:
rear-facing or side-facing
vehicle seats
booster mode with vehicle
lap belt only seat belt
Page 41

6 Vehicle
Information
41
Review your vehicle’s owner manual for vehicle seat belt use
Vehicle Seat Belt Terms
6-C Vehicle Seat Belts
Retractor
A device that winds up the unused vehicle seat belt. It is often
hidden inside the panels on the walls of the vehicle or in the
vehicle seatback.
Latch Plate
The male end of the seat belt with
the silver tongue.
Seat Bight
The crease where the vehicle seat back and seat bottom meet.
Page 42

6 Vehicle
Information
42
There is one type of vehicle seat belt
that can be used with this car seat:
Lap Belt Only 2
connection points.
The following types of vehicle seat belts
CANNOT be used safely with this car seat:
Lap Belt with Motorized
Shoulder Belt
Lap Belt or Shoulder
Belt Mounted on Door
Belts Forward of
the Seat Bight
Lap/Shoulder Belt
3
connections points. Can be
used in all car seats modes
of use.
Identify Your Seat Belt Type
Refer to seat pad care tag for washing instructions.
To Remove Seat Cover
Remove elastic loops and hooks from seat as shown.
Clean with a damp sponge using mild soap and cool water. If needed, head support
cover may be removed for cleaning.
Machine wash cover in cold water on delicate cycle and drip-dry. DO NOT USE BLEACH.
Page 43

43
7 Care &
Cleaning
Refer to seat pad care tag for washing instructions.
To Remove Seat Cover
Remove elastic loops and hooks from seat as shown.
Clean with a damp sponge using mild soap and cool water. If needed, head support
cover may be removed for cleaning.
Machine wash cover in cold water on delicate cycle and drip-dry. DO NOT USE BLEACH.
7-A Cleaning Seat Pad
To reattach the seat pad see
section 1 and reattach elastic
straps as shown.
Page 44

Store instruction manual in
the slot with the instruction
book icon as shown.
To purchase parts or accessories in the United States,
please contact us at the following:
www.gracobaby.com
or
1-800-345-4109
Replacement Parts
Page 45

No instale ni use este sistema de seguridad
para niños hasta que haya leído y entendido
las instrucciones en este manual.
NO USAR DEBIDAMENTE ESTE SISTEMA
DE SEGURIDAD PARA NIÑOS AUMENTA
EL RIESGO DE LESIONES GRAVES O
LA MUERTE EN UN ACCIDENTE O AL
DETENERSE REPENTINAMENTE.
TURBOBOOSTER
www.gracobaby.com
PD348952D 4/16
Page 46

2
1-A Guía rápida a su manual
1-B Bienvenido a la familia Graco
1-C Antes de Empezar
Registre este asiento de automóvil
Si necesita ayuda
Certificación
Vida útil del asiento de automóvil
Protección del asiento del vehículo
Durante el uso en clima cálido
1-D Advertencias de seguridad
1 Importante Páginas 5-19
2 Características Páginas 20-23
2-A Características del asiento de automóvil
Page 47

3
3 Asiento elevado para niños Páginas 24-27
4-A Asegurar al niño en el asiento con respaldo
4-B Asegurar al niño en el asiento sin respaldo
4 Cómo asegurar al niño Páginas 28-37
3-A Uso como asiento elevado para niños
3-B Instalación del asiento con respaldo para niños
3-C Instalación del asiento para niños sin respaldo
5 Accesorios Página 38
Page 48

4
6-A Elegir la ubicación del asiento en el vehículo
6-B Lugares peligrosos para el asiento en el vehículo
6-C Cinturones de seguridad del vehículo
7-A Limpieza de la almohadilla del asiento
6 Información del vehículo Páginas 39-42
7 Cuidado y limpieza Página 43
Requiere que lo arme un adulto
1. Apoyabrazos
Inserte el apoyabrazos en la base como se indica hasta
que los botones encajen en las ranuras del lado de la
base.
Seleccione la altura del apoyabrazos deseado para su
niño, insertar el tornillo de ajuste de altura y apriete .
Repita para el otro apoyabrazo.
Para ajustar los apoyabrazos , quitar el tornillo y pulse en
el botón en el lado de la base como se indica para subir
o bajar . Vuelva a insertar el tornillo y apriete.VERIFIQUE
que los apoyabrazos son bien contactadas, tirando hacia
arriba de ellos.
Page 49

5
1-A Guía rápida a su manual
Este asiento de automóvil es para niños:
Asiento para niños: 30 a 100 libras (14 a 45 kg) 38 a 57 pulgadas (97-145 cm)
Ensamblaje del Asiento de Automóvil (en modelos selectos)
Requiere que lo arme un adulto
1. Apoyabrazos
Inserte el apoyabrazos en la base como se indica hasta
que los botones encajen en las ranuras del lado de la
base.
Seleccione la altura del apoyabrazos deseado para su
niño, insertar el tornillo de ajuste de altura y apriete .
Repita para el otro apoyabrazo.
Para ajustar los apoyabrazos , quitar el tornillo y pulse en
el botón en el lado de la base como se indica para subir
o bajar . Vuelva a insertar el tornillo y apriete.VERIFIQUE
que los apoyabrazos son bien contactadas, tirando hacia
arriba de ellos.
Page 50

6
2. Almohadilla del asiento
Pase la almohadilla del asiento alrededor del
frente de la base y sujétela con las correas
elásticas como se indica.
(en modelos
selectos)
3. Almohadilla inferior del respaldo
En ciertos modelos, es posible que la almohadilla
inferior del respaldo no esté sujeta al respaldo. Coloque
la almohadilla inferior del respaldo alrededor de los
bordes de apoyo, como
indica la figura. Luego ajuste
la correa elástica inferior al
gancho de metal que está
en el lado opuesto de la
almohadilla del asiento.
Page 51

7
4. Apoyacabeza
De la vuelta al apoyacabezas y respaldo como se
indica.
Apriete el botón rojo de ajuste y junte las dos piezas
hasta que encajen en su sitio.
VERIFIQUE que las dos piezas estén bien
conectadas, jalando las mismas.
Sujete la correa de elastica como se indica.
Page 52

8
5. Almohadilla del Apoyacabezas
De la vuelta al asiento e inserte la tela del apoyacabezas
debajo de la tela del respaldo como se indica .
Para facilitar la inserción de la tela, separe las piezas
superior e inferior del respaldo, apretando el botón rojo
de ajuste.
6. Respaldo
Conecte el respaldo a la base. Los ganchos en forma de
“U” en el fondo del respaldo se engancharán en las
barras de la base.
Asegúrese que ninguna pieza de la funda del asiento
interfiera con la conexión del respaldo a la base.
Una vez que el respaldo está bien conectado a la
base, suba el mismo como se indica.
Su asiento para niños de Graco ya está lista para
usar.
Page 53

9
Una vez que el respaldo está bien conectado a la
base, suba el mismo como se indica.
Su asiento para niños de Graco ya está lista para
usar.
Page 54

10
Conozca su asiento de automóvil
¿Qué lugar del asiento debo usar?
Consulte la sección 2-A para ver todas las características de este asiento elevado para niños.
El mejor lugar para colocar este asiento elevado para niños es:
• El que recomienda el manual del dueño de su vehículo, y
• Resulta en una instalación segura de este asiento elevado para niños.
Algunos vehículos tienen requerimientos específicos sobre dónde se puede instalar el asiento de
automóvil, por lo tanto, consulte el manual del dueño de su vehículo para obtener las posiciones
disponibles para el asiento, si las hay. Por ejemplo, algunas veces el centro del asiento trasero
tiene un cinturón de seguridad del vehículo que es solamente un cinturón de seguridad del vehículo
para la falda, que no se puede usar con el asiento elevado.
Consulte la sección 6-B, 6-C, de este manual Y el manual del dueño de su vehículo.
Según las estadísticas de accidentes, el lugar más seguro
para su niño en cualquier vehículo es el asiento trasero.
El centro del asiento trasero puede ser el lugar más
seguro durante un posible impacto lateral.
Page 55

11
Cuando lo instala como asiento para niños
Cinturón de seguridad del vehículo
Hay uno tipo de cinturon de seguridad del
vehículo que se puede usar: El cinturón para la
falda y el hombro.
Consulte la sección 3 de este manual Y el
manual del dueño de su vehículo.
Usar el asiento de automóvil correctamente
Para tener la seguridad de que su niño esté debidamente asegurado, consulte la sección 3 y 4 para
que quepa su niño.
Page 56

12
Use el cinturón para la falda y el
hombro solamente
Consulte la sección 3
Posición del cinturón para
la falda
El cinturón para la falda debe estar
debajo del apoyabrazos y pasar a través
de las caderas y los muslos de su niño.
Consulte la sección 3
Posición del cinturón para
el hombro
El cinturón para el hombro debe cruzar
el hombro entre el cuello y el borde del
hombro en la zona roja como se indica.
Consulte la sección 3
Instalación del asiento para niños
Sin respaldocon respaldo alto
Page 57

13
1-B ¡Bienvenido a la familia Graco!
La seguridad de su niño depende de usted. Ningún asiento de automóvil garantiza la
protección contra lesiones en toda situación, pero su utilización correcta ayuda a reducir el
riesgo de lesiones graves o la muerte.
Aunque parezca fácil determinar cómo usar este asiento de automóvil por su cuenta, debe
seguir las instrucciones detalladas en este manual de instrucciones para asegurar que los
pasos que siguen se cumplen correctamente.
Page 58

14
1-C Antes de empezar
Por favor, llene la tarjeta de registro con franqueo prepagado sujetada al almohadilla del asiento y
envíela hoy mismo por correo o regístrese en línea en www.gracobaby.com/carseatregistration.
Los sistemas de seguridad para niños pueden ser retirados del mercado por problemas de
seguridad. Debe registrar este sistema para que lo podamos contactar en dicho caso. Envíe su
nombre, dirección y el número del modelo del sistema y la fecha de fabricación a:
Graco Children’s Products, Inc.
Attn: Customer Service
P.O. Box 169, Elverson, PA 19520-9901
o llame al 1-800-345-4109
o inscríbase en línea en www.gracobaby.com/carseatregistration
Para obtener información sobre el retiro del mercado, llame a la línea gratuita de información de
seguridad del vehículo automotor del Gobierno de EE.UU. al
1-888-327-4236 (TTY: 1-800-424-9153) o visite http://www.NHTSA.gov.
Registre este sistema de seguridad para niños
Page 59

15
Como referencia futura o si cambia de dirección, registre el nombre del modelo, número del
modelo, fecha de fabricación y fecha de compra de este asiento de automóvil en el lugar que sigue.
Puede encontrar esta información en la tarjeta de registro si todavía la tiene o en la etiqueta con la
fecha que está en el respaldo del asiento de automóvil.
En los EE.UU., por favor, comuníquese con nuestro Departamento de Servicio al Cliente con
cualquier pregunta que pudiera tener sobre piezas, uso o mantenimiento. Cuando se comunica con
nosotros, por favor tenga listo el número de modelo y la fecha de fabricación para que lo podamos
ayudar más eficientemente. Estos números pueden encontrarse en una etiqueta ubicada en el
respaldo de su asiento de automóvil.
Para recursos adicionales o para que un técnico en seguridad de pasajeros infantiles
inspeccione su asiento, por favor visite los siguientes sitios Web:
www.nhtsa.gov • www.seatcheck.org • www.safekids.org
Si necesita ayuda
Nombre del modelo ___________________
Número de modelo ____________________
Fecha de fabricación __________________
Fecha de compra _____________________
Page 60

16
Este sistema de seguridad para niños cumple con o excede todos los requisitos requeridos
por la Norma Federal 213 de Seguridad de Automóviles para uso en automóviles.
Este sistema de seguridad para niños NO está certificado para su uso en
aeronaves cuando se usa como asiento porque las aeronaves no tienen
cinturones para los hombros.
DEJE de usar este asiento de automóvil y tírelo a la basura 10 años después de la fecha de
fabricación. Busque la etiqueta en el respaldo del asiento de automóvil.
Graco Children’s Products Inc. aconseja no prestar ni transferir un asiento de automóvil
a menos que usted conozca la historia completa del producto. Tampoco aconsejamos la
compra de un asiento de automóvil de segunda mano.
Certificación
Vida útil del asiento de automóvil
Proteja el asiento del vehículo. Use una alfombrilla, una toalla o una manta fina debajo y
detrás del asiento de automóvil.
Protección del asiento del vehículo
Ningún asiento de automóvil garantiza la protección contra lesiones
en toda situación, pero su utilización correcta ayuda a reducir
el riesgo de lesiones graves o la muerte. LEA ESTE MANUAL CON
ATENCIÓN.
Page 61

17
Las piezas del asiento de automóvil se pueden calentar mucho cuando están bajo el sol
o cuando hace calor. Para evitar quemaduras, compruebe siempre la temperatura del
asiento antes de sentar al niño.
Uso durante clima cálido
1-D Advertencias de seguridad
Ningún asiento de automóvil garantiza la protección contra lesiones
en toda situación, pero su utilización correcta ayuda a reducir
el riesgo de lesiones graves o la muerte. LEA ESTE MANUAL CON
ATENCIÓN.
¡ADVERTENCIA!
No cumplir estas instrucciones y las de las etiquetas del sistema de seguridad
para niños podría causar el choque del niño contra el interior del vehículo
durante una parada repentina o un accidente.
Page 62

18
! Consulte el manual del dueño de su vehículo para obtener más
información sobre las bolsas de aire y el uso de un asiento de
automóvil.
! Si su vehículo no tiene un asiento trasero, consulte el manual del
dueño de su vehículo.
! Elija el lugar adecuado para el asiento de automóvil en su
vehículo.
! Sujete siempre el asiento de automóvil con el cinturón de
seguridad del vehículo, incluso cuando esté desocupado. En un
accidente, un asiento de automóvil sin sujetar puede lastimar a
los pasajeros.
! Se debe reemplazar el asiento de automóvil tras haber sido
sometido a un accidente. ¡NO lo use de nuevo! Un accidente
podría causar daños ocultos y su utilización repetida podría
causar lesiones graves o la muerte.
Page 63

19
! NO use el asiento de automóvil si ha resultado dañado o si
faltan piezas.
! NO use accesorios o repuestos que no sean los que son provistos
por Graco. Su uso podría alterar el rendimiento del asiento de
automóvil.
! Nunca deje al niño solo, inclusive cuando duerme.
Page 64

2 Características
20
2-A
Características del asiento de automóvil
A
B
C
C
Page 65

2 Características
21
A Soporte de la cabeza
B Guía del cinturón para los hombros
C Apoyavasos
Page 66

2 Características
22
B
A
Page 67

2 Características
23
A Palanca de ajuste del Soporte de la
cabeza
B Presilla de posicionamiento del cinturón
(recuadro)
Page 68

3 Asiento
elevado
24
3-A Uso del asiento para niños
Uso del asiento para niños con respaldo:
30 a 100 lb (14 a 45 kg)
38 a 57 pulgadas (97 a 145 cm)
por lo menos de 4 años de edad
Uso del asiento para niños sin respaldo:
40 a 100 lb (18.1 a 45 kg)
43 a 57 pulgadas (110.1 a 145 cm)
por lo menos 4 años de edad
• Ponga el asiento de automóvil orientado hacia adelante en el
asiento trasero del vehículo.
• Asegúrese de que el cinturón de seguridad del vehículo para la
falda esté apretadamente ajustado y bajo en la cadera del niño
y que pase por debajo del apoyabrazos en la vía del cinturón del
asiento marcado con una etiqueta verde.
• Los cinturones del vehículo DEBEN estar planos contra el niño
y NO DEBEN estar doblados.
• El cinturón de seguridad del vehículo para el hombro se ajusta
apretadamente y deberá estar entre el cuello del niño y el borde
del hombro.
Cinturón de seguridad
del vehículo para la falda
y el hombro
Cinturón de seguridad
del vehículo para la falda
y el hombro
• Nunca use el cinturón de seguridad del vehículo solamente para
la falda a través del frente del niño.
• NO ponga el cinturón de seguridad del vehículo para el hombro
debajo del brazo del niño o su espalda.
• NO deje que su niño se afloje o salga por abajo del asiento.
• NO ponga el cinturón de seguridad del vehículo sobre la parte de
arriba de los apoyabrazos.
• El apoyacabeza del asiento del vehículo NO DEBE crear un espacio
entre el asiento del vehículo y el asiento.
• El frente del asiento NO DEBE quedar suspendido en el frente del
asiento del vehículo.
• Si el niño no puede mantener el cinturón de seguridad del vehículo
debidamente colocado, NO use este asiento. Use un asiento de
automóvil diferente.
Page 69

3 Asiento
elevado
25
• Nunca use el cinturón de seguridad del vehículo solamente para
la falda a través del frente del niño.
• NO ponga el cinturón de seguridad del vehículo para el hombro
debajo del brazo del niño o su espalda.
• NO deje que su niño se afloje o salga por abajo del asiento.
• NO ponga el cinturón de seguridad del vehículo sobre la parte de
arriba de los apoyabrazos.
• El apoyacabeza del asiento del vehículo NO DEBE crear un espacio
entre el asiento del vehículo y el asiento.
• El frente del asiento NO DEBE quedar suspendido en el frente del
asiento del vehículo.
• Si el niño no puede mantener el cinturón de seguridad del vehículo
debidamente colocado, NO use este asiento. Use un asiento de
automóvil diferente.
Nunca use el cinturón de
seguridad del vehículo
solamente para la falda a
través del frente del niño
Page 70

3 Asiento
elevado
26
3-B Instalación del asiento para niños
1. Ponga el Asiento de Automóvil Orientado Hacia
Adelante en el Asiento Trasero del Vehículo
Colóquelo orientado hacia adelante en el asiento del
vehículo. El fondo del asiento debe estar lo más plano
posible sobre el asiento del vehículo.
2. Pase el cinturón de seguridad del vehículo para
el hombro por la guía del cinturón del hombro
en el soporte de la cabeza
Consulte la sección 4-A para asegurar a su niño.
Page 71

3 Asiento
elevado
27
1.
Saque el soporte de la espalda (en modelos selectos)
Recline el respaldo del asiento y luego sáquelo de la base.
2.
Ponga el asiento orientado hacia delante en el
asiento trasero del vehículo
Colóquelo orientado hacia adelante en el asiento del vehículo
que tiene un cinturón para la falda y el hombro. La base
debe estar lo más plana posible sobre el asiento del vehículo.
Consulte la sección 4-B para asegurar a su niño.
3-C Instalación del asiento sin respaldo
Page 72

28
4 Cómo asegurar
al niño
1. Ponga el niño en el asiento
Pídale a su niño que se siente en el asiento para niños,
con la espalda plana contra el respaldo del asiento.
2. Pase el cinturón de seguridad
del vehículo para el hombro por
la guía del cinturón de seguridad
en el soporte de la cabeza
4-A Asegurar al niño en el asiento para
niños con respaldo
¡ADVERTENCIA!
Use solamente el sistema de cinturón del vehículo
para la falda y el hombro cuando sujeta a su niño
en el asiento.
Page 73

29
4 Cómo asegurar
al niño
3. Cómo subir o bajar el soporte de la cabeza
Levante la palanca de ajuste y suba o baje el soporte de
la cabeza.
Orientado Hacia
Adelante
Page 74

30
4 Cómo asegurar
al niño
4. Trabe el cinturón de seguridad del vehículo
para la falda y el hombro
Asegúrese de que la parte de la falda del cinturón
de seguridad del vehículo pase debajo de ambos
apoyabrazos y que el cinturón para el hombro pase
debajo del apoyabrazos en el lado con la traba.
Asegúrese de que la parte de la falda del cinturón de
seguridad del vehículo esté baja a través de las caderas
de su niño.
Asegúrese de que el cinturón para el hombro pase por los
hombros de su niño, en la zona roja entre el cuello y el
borde del hombro, levantando o bajando el soporte para
la cabeza. Las guías del cinturón deben estar parejas o
apenas por encima de los hombros.
Nunca use solamente el cinturón para la falda
Cinturón para la falda debajo del apoyabrazos y
que cruza bajo en las caderas y los muslos
El cinturón para el hombro cruza el hombro en la
zona roja, entre el cuello y el borde del hombro
Page 75
31
4 Cómo asegurar
al niño
¿Está todo correcto?
Nunca use solamente el cinturón para la falda
Cinturón para la falda debajo del apoyabrazos y
que cruza bajo en las caderas y los muslos
El cinturón para el hombro cruza el hombro en la
zona roja, entre el cuello y el borde del hombro
Page 76

32
4 Cómo asegurar
al niño
1. Ponga el niño en el asiento
Pídale a su niño que se siente en el asiento, con
la espalda plana contra el respaldo del asiento del
vehículo.
2. Los oídos deben estar por debajo de la parte
de arriba del respaldo del asiento o del
soporte de la cabeza
¡ADVERTENCIA!
Use solamente el sistema de cinturón del vehículo
para la falda y el hombro cuando sujeta a su niño
en el asiento para niños.
4-B Asegurar al niño en el asiento sin respaldo
Page 77

33
4 Cómo asegurar
al niño
3. Trabe el cinturón de seguridad del vehículo
para la falda y el hombro
Asegúrese de que la parte de la falda del cinturón
de seguridad del vehículo pase enfrente de ambos
apoyabrazos y que el cinturón para el hombro pase
debajo del apoyabrazos en el lado con la traba.
Asegúrese de que la parte de la falda del cinturón de
seguridad del vehículo esté baja a través de las caderas
de su niño.
Tenga la seguridad de que el cinturón de seguridad del
vehículo para el hombro pase por los hombros de su
niño, en la zona roja entre el cuello y el borde del hombro.
Podría necesitar usar la presilla de posicionamiento del
cinturón para obtener un buen calce. Consulte “Usando
la presilla de posicionamiento del cinturón”
Page 78

34
4 Cómo asegurar
al niño
¿Está todo correcto?
Nunca use solamente el cinturón para la falda
Cinturón para la falda debajo del apoyabrazos y
que cruza bajo en las caderas y los muslos
El cinturón para el hombro cruza el hombro,
en la zona roja entre el cuello y el borde del
hombro
1. Asegúrese de que el cinturón de seguridad del
vehículo para el hombro esté en la zona roja como
se indica
Si el cinturón de seguridad del vehículo para el hombro está
fuera de esta zona, DEBE usar la presilla de posicionamiento del
cinturón.
2. Sujete la presilla de
posicionamiento del
cinturón
La presilla de posicionamiento del
cinturón del hombro DEBE estar
sujetada a la ranura en el fondo de la base. Inserte el extremo
con el nudo de la correa a través de la ranura en la parte de
abajo del asiento exactamente como se indica.
3. Pase la presilla y la correa por el nudo
Pase la presilla y la correa a través del extremo del nudo
como se indica y tire la correa hacia arriba.
Page 79

35
4 Cómo asegurar
al niño
Usar la presilla de posicionamiento del cinturón
1. Asegúrese de que el cinturón de seguridad del
vehículo para el hombro esté en la zona roja como
se indica
Si el cinturón de seguridad del vehículo para el hombro está
fuera de esta zona, DEBE usar la presilla de posicionamiento del
cinturón.
2. Sujete la presilla de
posicionamiento del
cinturón
La presilla de posicionamiento del
cinturón del hombro DEBE estar
sujetada a la ranura en el fondo de la base. Inserte el extremo
con el nudo de la correa a través de la ranura en la parte de
abajo del asiento exactamente como se indica.
3. Pase la presilla y la correa por el nudo
Pase la presilla y la correa a través del extremo del nudo
como se indica y tire la correa hacia arriba.
Page 80

36
4 Cómo asegurar
al niño
4. El extremo libre de la correa debe mirar hacia
el frente del asiento
5. Ponga el niño en el asiento,
trabe el niño en el asiento
y sujete la presilla de
posicionamiento del cinturón
Con la espalda del niño plana contra el
respaldo del asiento del vehículo, trabe
al niño. Luego deslice la presilla hacia
el cinturón de seguridad del vehículo
para el hombro como se indica.
Vista trasera
Page 81

37
4 Cómo asegurar
al niño
6. Ajuste la presilla de posicionamiento del
cinturón según su niño
Alargue o acorte la longitud del cinturón como se indica.
La presilla debería caber arriba del hombro como se
indica.
Asegúrese de que la parte de la falda del cinturón de seguridad
del vehículo esté baja a través de las caderas de su niño.
Acortar
Alargar
Page 82

38
5 Accesorio
s
5 Accesorios (en selectos modelos)
Apoyavasos
Almohadillas del apoyacabeza y corporal
Para quitar, saque la almohadillas.
Reinsertar como se indica.
El mejor lugar para colocar este asiento de automóvil es:
• El que recomienda el manual del dueño de su vehículo, y
• Resulta en una instalación segura de este asiento de automóvil
En caso de que no haya un asiento trasero disponible y/o no tiene otra opción que poner al niño
que no sea un bebé en un asiento de automóvil orientado hacia atrás en un asiento delantero, la
Administración Nacional de Seguridad de Tráfico en Carreteras (NHTSA) recomienda que tome las
siguientes medidas:
• Asegurar que el niño esté debidamente sujetado según su edad y tamaño
• Mover el asiento todo lo posible hacia atrás
• Tener la seguridad de que el niño no esté fuera de posición, tal como inclinado hacia adelante en
el lugar de despliegue de la bolsa de aire
• Poner el interruptor de activación de la bolsa de aire, si está disponible, en la posición
DESACTIVADA
Page 83

6 Información
adicional
39
Consulte el manual del dueño del vehículo para identificar los lugares del asiento.
6-A Elegir la ubicación del asiento en el vehículo
El mejor lugar para colocar este asiento de automóvil es:
• El que recomienda el manual del dueño de su vehículo, y
• Resulta en una instalación segura de este asiento de automóvil
En caso de que no haya un asiento trasero disponible y/o no tiene otra opción que poner al niño
que no sea un bebé en un asiento de automóvil orientado hacia atrás en un asiento delantero, la
Administración Nacional de Seguridad de Tráfico en Carreteras (NHTSA) recomienda que tome las
siguientes medidas:
• Asegurar que el niño esté debidamente sujetado según su edad y tamaño
• Mover el asiento todo lo posible hacia atrás
• Tener la seguridad de que el niño no esté fuera de posición, tal como inclinado hacia adelante en
el lugar de despliegue de la bolsa de aire
• Poner el interruptor de activación de la bolsa de aire, si está disponible, en la posición
DESACTIVADA
Page 84

6 Información
adicional
40
6-B Lugares peligrosos para el asiento en
el vehículo
Nunca instale este asiento de automóvil en uno de los siguientes lugares
del vehículo:
asientos del vehículo
orientados hacia atrás o
el costado
modo asiento elevado
con un cinturón de
seguridad del vehículo
solamente para la falda
Page 85

6 Información
adicional
41
Consulte el manual del dueño de su vehículo sobre el uso del cinturón de
seguridad del vehículo
Términos del cinturón de seguridad del vehículo
6-C Cinturones de seguridad del vehículo
Retractor
Un dispositivo que enrolla el cinturón de seguridad del vehículo
que no se usa. A menudo está oculto en el interior de paneles
de las paredes del vehículo o en el respaldo del vehículo.
Placa del Latch
El extremo macho de un cinturón de
seguridad con la lengüeta plateada.
Recodo del asiento
El lugar donde se unen el asiento y el respaldo.
Page 86

6 Información
adicional
42
Hay uno tipo de cinturon de
seguridad del vehículo que se puede
usar con este asiento de automóvil:
Cinturón para la falda
solamente Dos puntos
de conexión.
Los siguientes tipos de cinturones de seguridad
del vehículo NO se pueden usar con seguridad
con este asiento de automóvil:
Cinturón para la falda
con cinturón motorizado
para el hombro
Cinturón para la falda o
cinturón de seguridad del
vehículo para el hombro
montado en la puerta
Cinturones adelante
del recodo del
asiento
Cinturón de seguridad para
la falda y el hombro 3 puntos
de conexión. Se puede usar en
todos los modos de uso del
asiento de automóvil.
Identificación del tipo de su cinturón de seguridad
Consulte la etiqueta de cuidado de la almohadilla del asiento para obtener las instrucciones
de lavado.
Para quitar la funda del asiento
Quite los bucles elásticos y los ganchos del asiento, como se indica.
Límpiela con una esponja húmeda usando un jabón suave y agua fresca. De ser
necesario, se puede sacar la funda del soporte de la cabeza para limpiarla.
Lave la funda a máquina en agua fría en el ciclo delicado y séquela al aire. NO USE
BLANQUEADOR.
Page 87

43
7 Cuidado
y limpieza
Consulte la etiqueta de cuidado de la almohadilla del asiento para obtener las instrucciones
de lavado.
Para quitar la funda del asiento
Quite los bucles elásticos y los ganchos del asiento, como se indica.
Límpiela con una esponja húmeda usando un jabón suave y agua fresca. De ser
necesario, se puede sacar la funda del soporte de la cabeza para limpiarla.
Lave la funda a máquina en agua fría en el ciclo delicado y séquela al aire. NO USE
BLANQUEADOR.
7-A Limpieza de la almohadilla del asiento
Para volver a colocar la almohadilla
del asiento , Consulte la sección
1 y vuelva a colocar las correas
elásticas como se indica.
Page 88

Guarde el manual de
instrucciones en la ranura
con símbolo del libro de
instrucciones como se indica.
Para comprar piezas o accesorios en los Estados Unidos,
por favor comuníquese con nosotros en:
www.gracobaby.com
o
1-800-345-4109
Piezas de repuesto
 Loading...