

Page 1
PD286130G 5/15
Page 2

2-A This product can be used in the following modes:
2-B Parts List
1 WARNING
2 Features
3-A Attach Wheels to Highchair Frame
3-B Attach Toybar to Newborn Seat
3-C Attach Seat Pad
3 Assembly
4-A Frame Legs
4-B Newborn Seat
4-C Highchair Seat
4-D To Secure Child
4-E Booster Seat
4 Use
5-A Care & Maintenance
5 Cleaning
Page 3
Prevent serious injury or death: Failure to follow these warnings
and the assembly instructions could result in serious injury or
death.
• PLEASE SAVE OWNER’S
MANUAL FOR FUTURE USE.
• For your child’s safety, read the
labels and the owner’s manual
before using product.
• PREVENT SERIOUS INJURY
OR DEATH FROM SLIDING
OUT, FALLS, OR TIPPING
OVER. Always use seat belt.
Secure your child at all times
with the restraint system
provided, either in the reclining
or upright position. The tray is
not designed to hold your child
in the product.
• BEFORE EACH USE. Inspect the
highchair for damaged hardware,
loose joints, missing parts, or
sharp edges.
• DO NOT USE highchair if any
parts are missing or broken.
• DO NOT substitute parts.
• FALL HAZARD Never move or
lift high chair or booster seat
with child in it.
• ALWAYS SECURE infant in the
restraint system provided.
• ADULT ASSEMBLY REQUIRED.
• NEVER LEAVE CHILD
UNATTENDED. Always keep
your child in view in product.
• NEVER allow a child to push
away from table.
• DO NOT FORCE TRAY
against child. Use only the three
adjustment positions. Be sure
both tray arms are engaged in
armrest holes.
• STRANGULATION HAZARD:
Do not place product in any
location where there are cords,
such as window blind cords,
drapes, phone cords, etc.
• THIS HIGHCHAIR IS
DESIGNED TO BE USED BY
A CHILD UP TO 3 YEARS
OF AGE. Maximum weight 40
pounds (18 kg).
• FOLLOW ASSEMBLY
INSTRUCTIONS CAREFULLY.
If you experience any difficulties,
please contact the Customer
Service Department.
• DISCONTINUE USING YOUR
HIGHCHAIR should it become
damaged or broken.
• DO NOT ADJUST the recline of
product with your child in it.
• USE ONLY Sous Chef™ Seating
System accessories with this
product.
• It is recommended that the
product be used in the upright
position only by children capable
of sitting upright unassisted.
Page 4

BOOSTER SEAT:
• WARNING: PREVENT SERIOUS
INJURY OR DEATH FROM
SLIDING OUT, FALLS, OR
TIPPING OVER.
• ALWAYS USE booster straps to
attach booster seat to any chair.
Always ensure straps are pulled
tightly.
• IF BOOSTER SEAT CANNOT be
securely and safely attached to
the adult chair, do not use
booster seat with that chair.
• THIS BOOSTER SEAT is
designed to be used by a child
up to 6 years of age and up to
60 lbs (27 kg).
• ALWAYS SECURE CHILD IN
THE RESTRAINT UNTIL CHILD
IS ABLE to get in and out of the
feeding booster without help
(about 2 1/2 years old), the
child should be secured in the
booster seat at all times by the
restraining system. The tray is
not designed to hold the child in
the chair.
• DO NOT USE the booster on a
stool, swivel chair, folding chair
or any other type of chair to
which this booster cannot be
firmly attached. The
recommended type of chair shall
be with four legs, a high
backrest, and a firm seat.
• Use the fully recline position
until infant can hold up head
without help (about 4 months
old).
• PREVENT SERIOUS INJURY
OR DEATH. Do not use in motor
vehicles.
• NEVER LEAVE CHILD
UNATTENDED.
• NEVER allow a child to push
away from table.
NEWBORN SEAT:
• READ ALL INSTRUCTIONS
BEFORE USE OF THE
PRODUCT.
• THIS PRODUCT REQUIRES
ADULT ASSEMBLY. Follow
assembly instructions
carefully. If you experience any
difficulties, please contact the
Customer Service Department.
• NEVER LEAVE INFANT
UNATTENDED in product.
• This product is not intended
for unsupervised or prolonged
periods of sleep.
• NEVER USE for a child able to
sit up unassisted.
• NEVER use this product as a
means to transport an infant in a
motor vehicle.
• TO PREVENT SERIOUS
INJURY OR DEATH FROM
INFANTS FALLING OR BEING
STRANGLED IN STRAPS:
• Always secure infant in the
restraint system provided. After
fastening buckles, adjust belts to
get a snug fit around your infant.
• Discontinue use of seat when
infant attempts to climb out or
reaches 20 pounds (9 kg).
Page 5

• Maximum recommended height
is 30 inches (76 cm).
• Only use a this seat with the
Sous Chef™ Seating System.
• ALWAYS use harness provided.
• NEVER use carrier in a stroller.
• STRANGULATION HAZARD:
• Children have STRANGLED in
loose or partially buckled
harness straps. Fully restrain
the child at all times.
• DO NOT place product in any
location where there are cords,
such as window blind cords,
drapes, phone cords, etc.
• Strings can cause
strangulation. DO NOT place
items with a string around your
child’s neck, such as hood
strings or pacifier cords.
• DO NOT suspend strings over
the product or attach strings to
toys.
• DO NOT USE PRODUCT
without the seat cover.
• DISCONTINUE USING YOUR
PRODUCT should it become
damaged or broken.
• Head support for use only with
this product.
• SUFFOCATION HAZARD:
Product can roll over on soft
surfaces and suffocate child.
Never use on a soft surface
(bed, crib, sofa, cushion), as
seat may tip over and cause
suffocation.
• FALL HAZARD: Child’s
movements can slide product.
Use only on floor. Never use on
any elevated surface.
• The toy bar is not a carry
handle. Never use toy bar to lift
or carry seat.
Page 6
FOR SAFE BATTERY USE:
Keep the batteries out of children’s reach.
Any battery may leak battery acid if mixed with a different battery
type, if inserted incorrectly (put in backwards) or if all batteries are
not replaced or recharged at the same time. Do not mix old and new
batteries. Do not mix alkaline, standard (carbon-zinc) or rechargeable
(nickel-metal hydride, nickel-cadmium) batteries.
Any battery may leak battery acid or explode if disposed of in fire or
an attempt is made to charge a battery not intended to be recharged.
Never recharge a cell of one type in a recharger made for a cell of
another type.
Discard leaky batteries immediately. Leaky batteries can cause skin
burns or other personal injury. When discarding batteries, be sure to
dispose of them in the proper manner, according to your state and
local regulations.
Remove batteries before storing product for a prolonged period of
time. Batteries left in the unit may leak and cause damage.
Recommended type batteries—alkaline disposables, 1-D (LR20-
1.5V). NEVER mix battery types. Change batteries when product
ceases to operate satisfactorily.
Page 7
NOTE: This equipment has been tested and found to comply with the
limits for a Class B digital device,pursuant to Part 15 of the FCC
Rules. These limits are designed to provide reasonable protection
against harmful interference in a residential installation. This
equipment generates, uses and can radiate radio frequency energy
and, if not installed and used in accordance with the instructions, may
cause harmful interference to radio communications.
However, there is no guarantee that interference will not occur in a
particular installation. If this equipment does cause harmful
interference to radio or television reception, which can be determined
by turning the equipment off and on, the user is encouraged to try to
correct the interference by one or more of the
following measures:
• Reorient or relocate the receiving antenna.
• Increase the separation between the equipment and receiver.
• Connect the equipment into an outlet on a circuit different from that
to which the receiver is needed.
• Consult the dealer or an experienced radio/TV technician for help.
This Class B digital apparatus meets all requirements of the Canadian
Interference-Causing Equipment Regulations. CAN ICES-3 (B) /NMB-3
(B).
Page 8
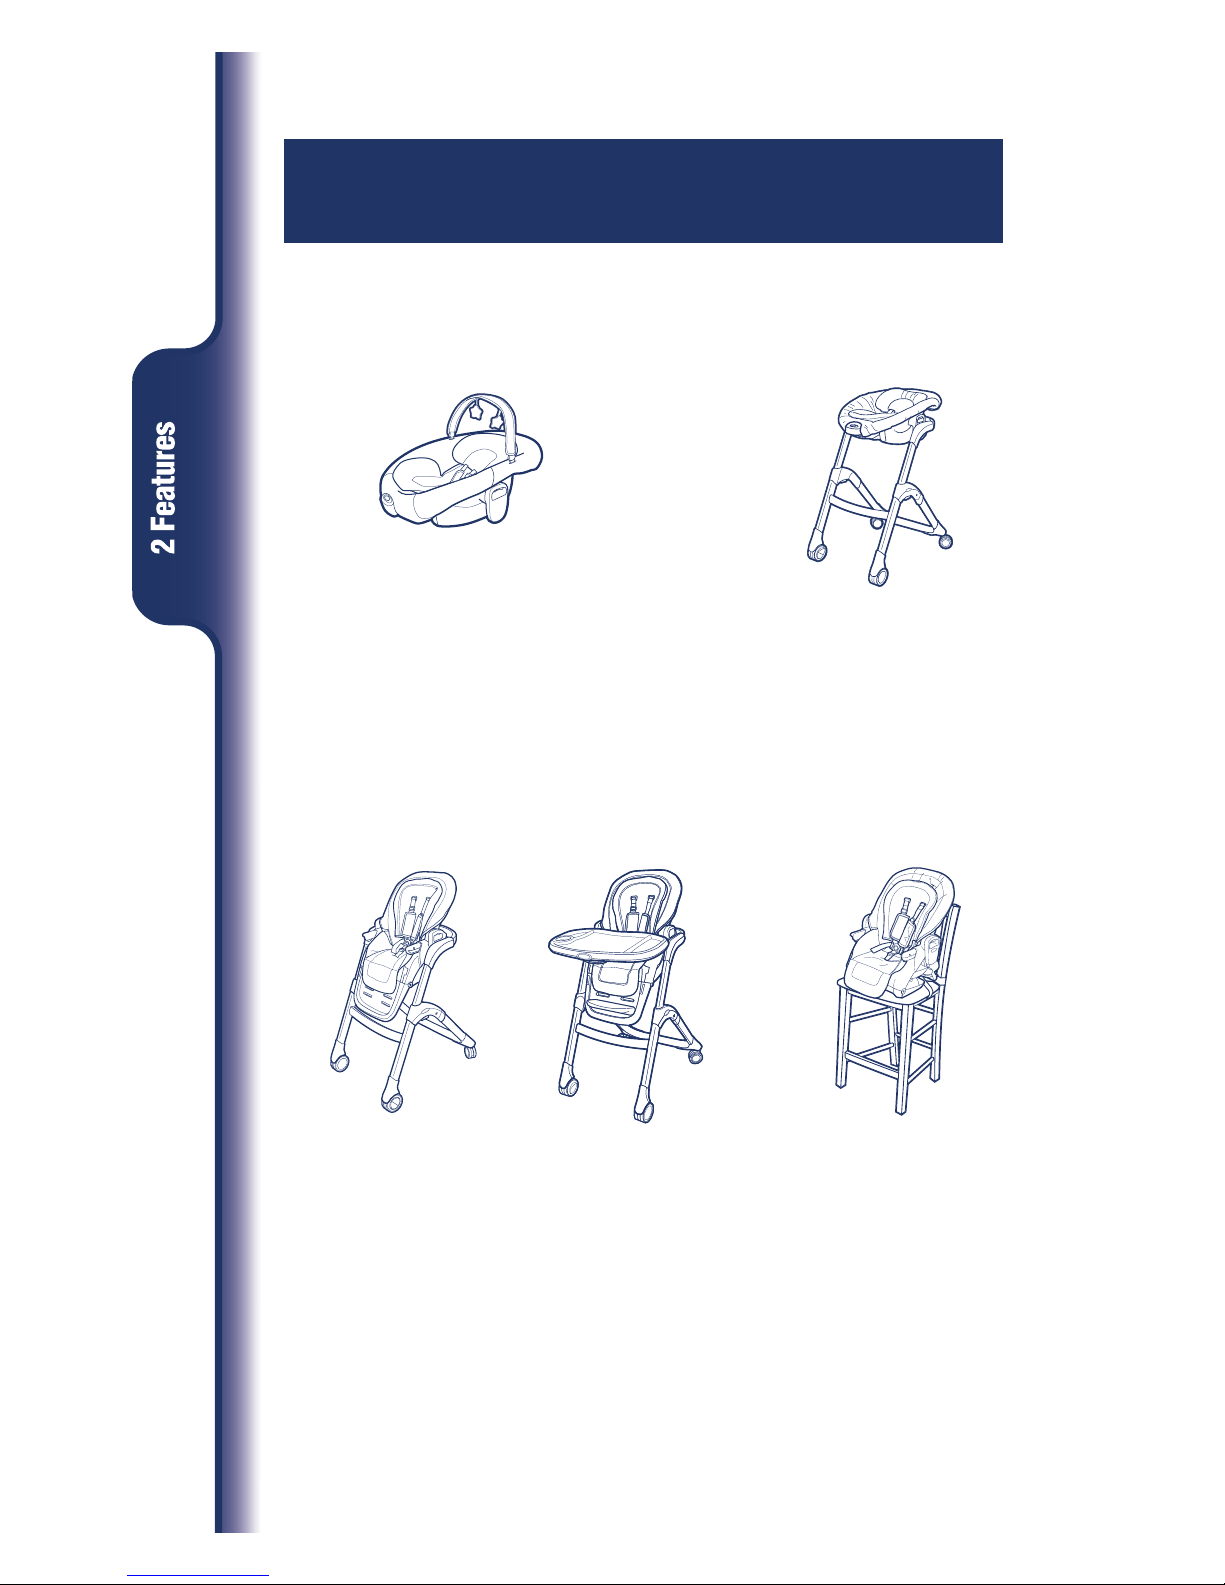
2-A This product can be used in the
following modes:
Toddler
Highchair
Newborn Seat in
Highchair
Booster Seat
(Highchair seat
attached to Chair)
Newborn Seat as
Removable Rocker
Infant Feeding
Recline
Page 9
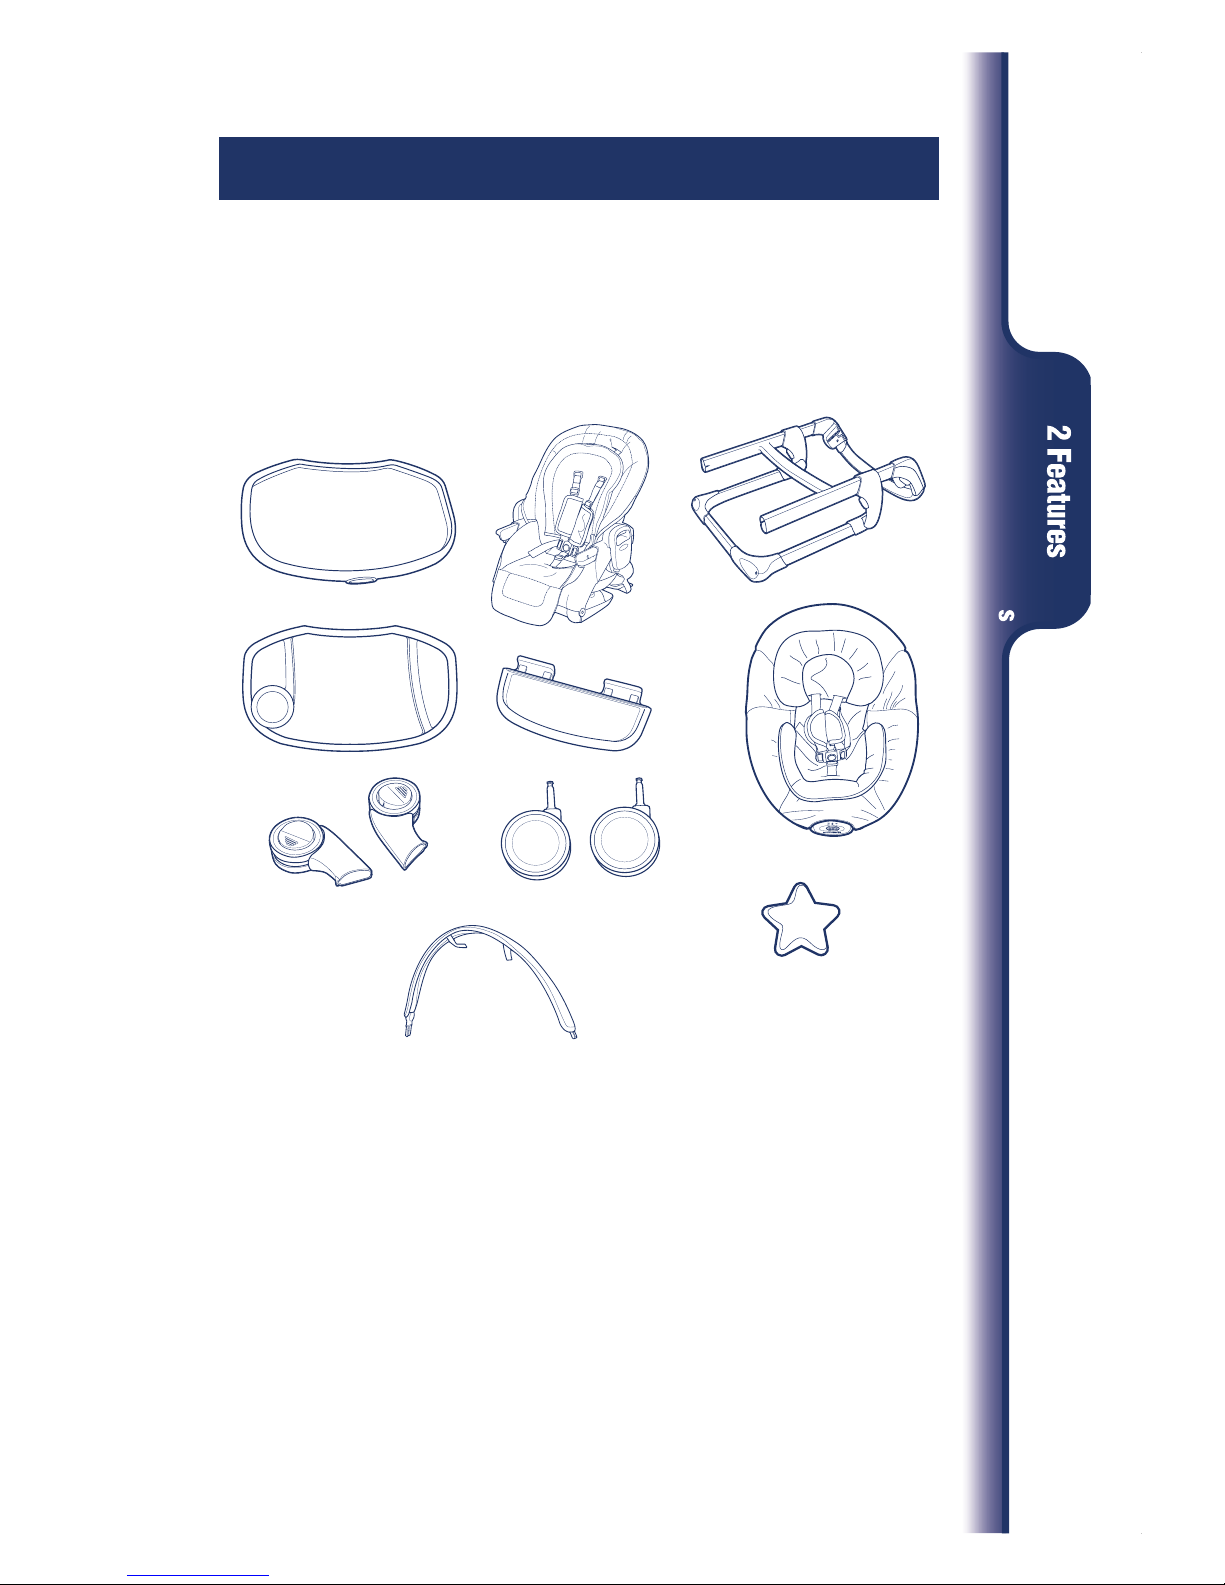
This model may not include some features shown below. Check that you
have all the parts for this model BEFORE assembling your
product. If any
parts are missing, call Customer Service.
No tools required.
ALL MODELS
2-B Parts list
Styles may vary
2X
Page 10
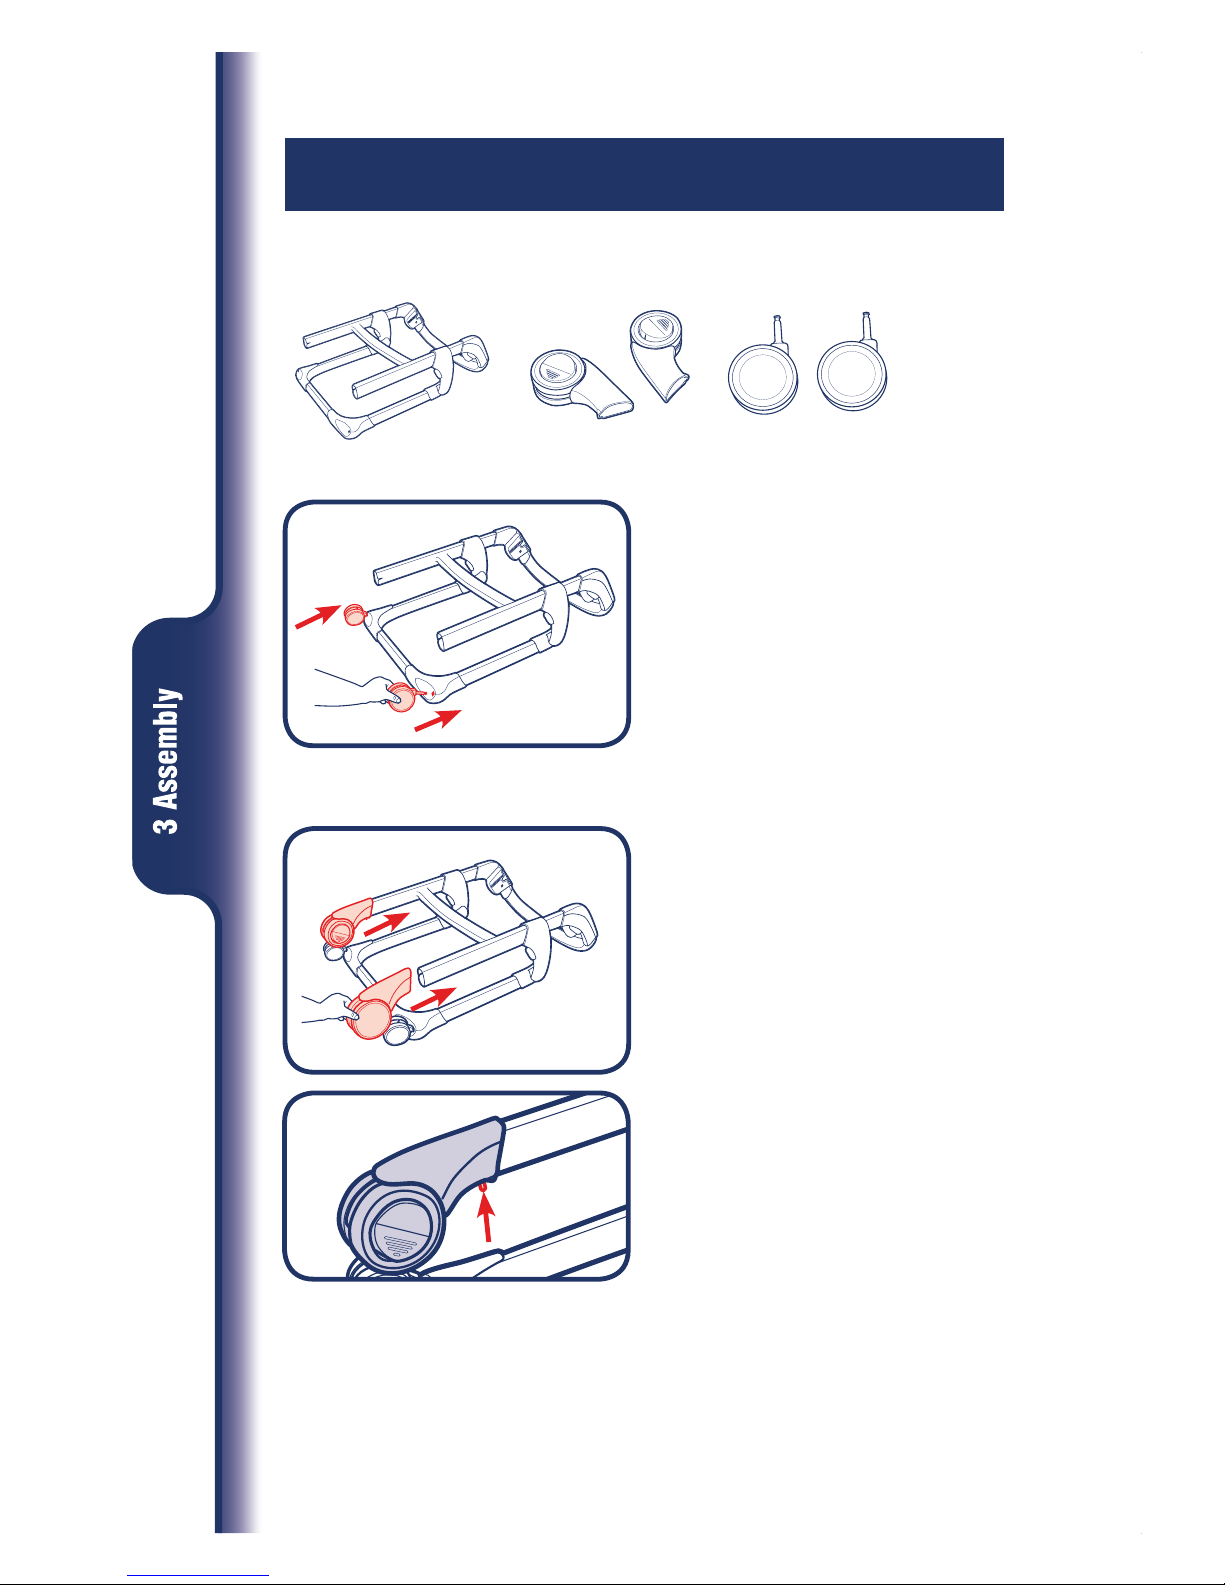
3-A Attach Wheels to Highchair Frame
1. Insert rear wheels into holes in
highchair frame as shown.
2. Attach front wheels to highchair
frame as shown.
CHECK that button is visible.
Page 11

3-B Attach Toybar to Newborn Seat
WARNING
• The toy bar is not a carry handle. Never use toy bar to lift or carry
seat.
2X
1. Attach toybar to Newborn Seat as
shown.
Styles may vary
Page 12
2. Attach toys to toybar as shown.
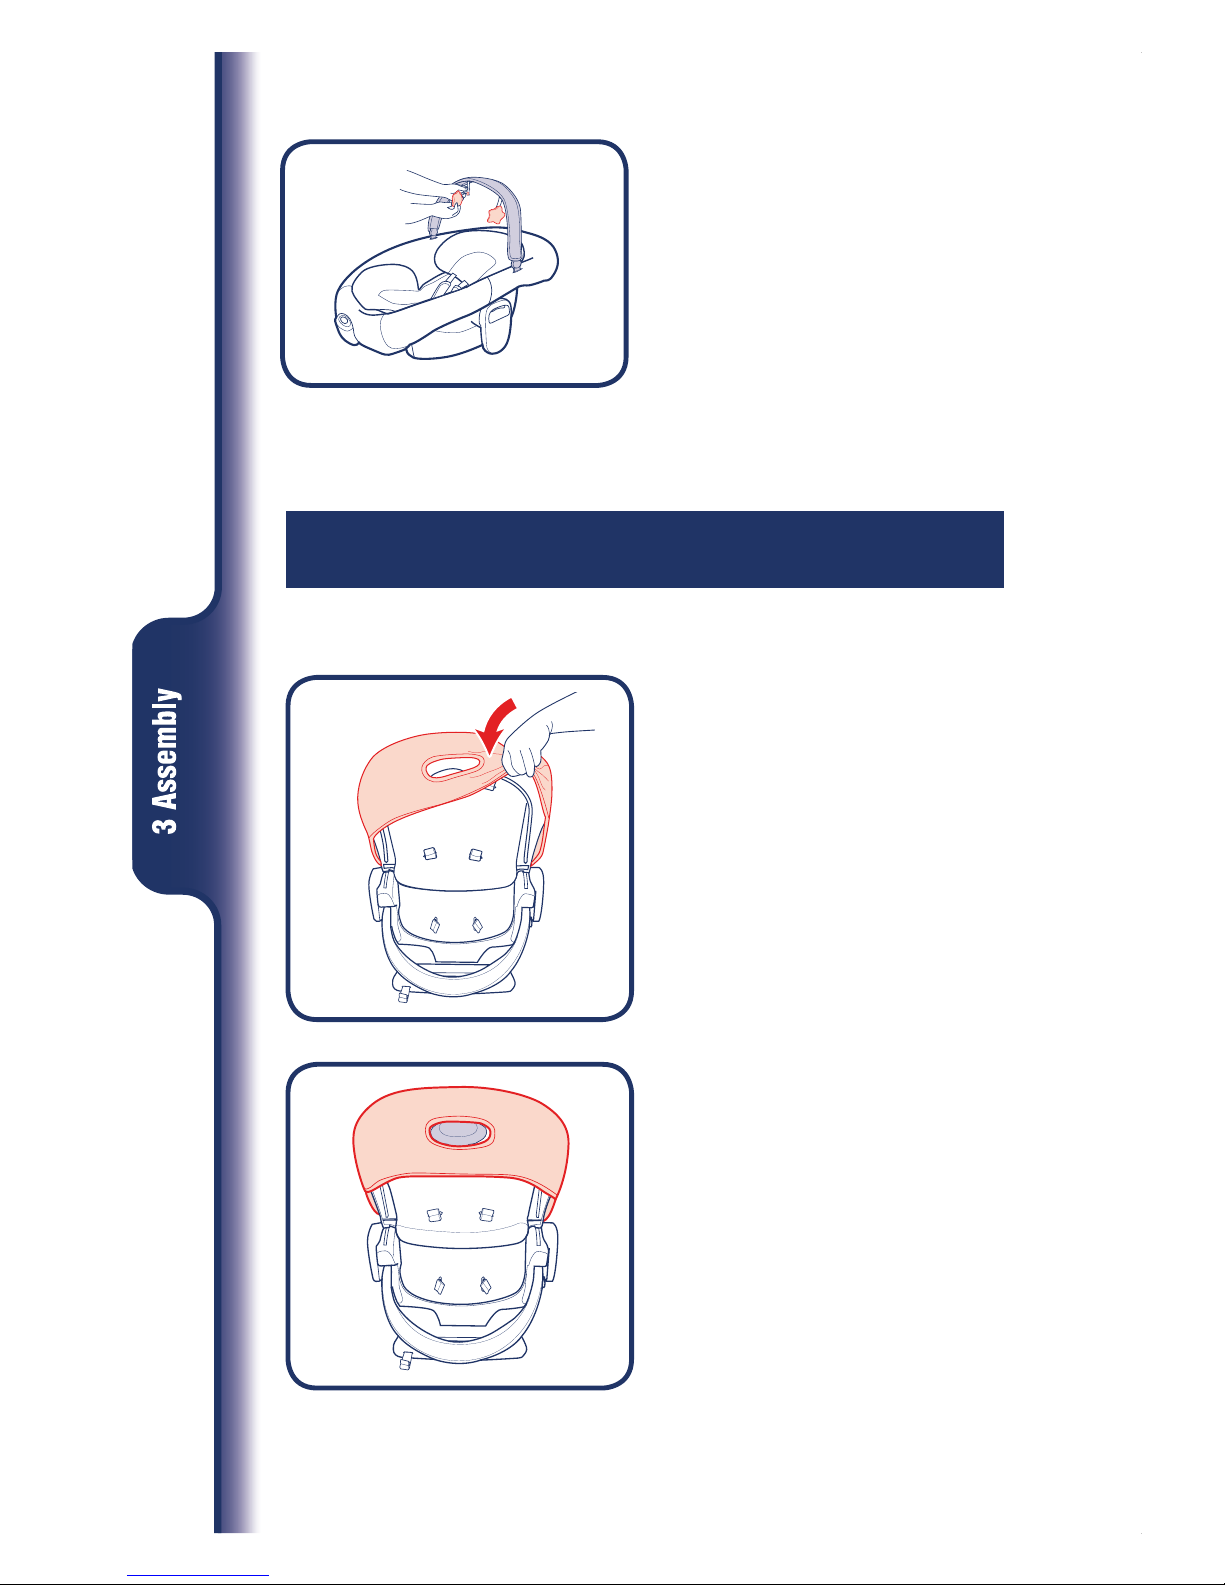
3-C Attach Seat Pad
2. Make sure recline handle is
sticking out the hole in the
seat pad.
1. Wrap seat pad over the top of the
seat.
Page 13

1. Press buttons in on both sides of
frame and open legs.
2. Rotate rear leg away from front
leg.
Adjust Height
1. Squeeze buttons on each side of
frame and lift or lower to desired
height.
To Adjust Frame Legs
4-A Frame Legs
Page 14

1. Press buttons on inside front
wheels of highchair to
LOCK/UNLOCK wheels.
Brakes
Page 15

4-B Newborn Seat
WARNING
DO NOT sit on frame when the seat is not attached.
DO NOT USE frame as a foot stool.
1. Attach Newborn Seat to Frame as
shown.
SNAP!
Attaching Reclined Seat to Frame
Page 16

2. CHECK Newborn Seat is latched
into place by pulling up on it.
1. Remove battery lid on vibration
unit, with a key and insert 1-D
(LR20-1.5V) battery in module.
Replace lid.
3. To remove, squeeze buttons on
side of newborn seat and lift up.
2. Vibration: Turn to one of two
settings.
To Use Vibration
Page 17

4-C Highchair Seat
Opening Highchair Seat
SNAP!
1. Rotate calf support down as
shown.
DO NOT force calf support.
Check that booster strap storage
drawers are closed.
2. CHECK that arm snaps into back
of calf support as shown.
Page 18

2. CHECK seat is latched into place
by pulling up on it.
WARNING
DO NOT sit on frame when the seat is not attached.
DO NOT USE frame as a foot stool.
1. Attach Highchair seat to Frame as
shown.
Attaching Highchair Seat to Frame
SNAP!
Page 19

To Use Tray
1. Squeeze armrest latch button and
slide armrests out to put in tray
use position.
2. To attach, squeeze tray
adjustment handle on front of
tray.
SNAP!
Page 20

3. To adjust tray, squeeze tray
adjustment handle on front of tray
and slide in desired position.
4. To remove, squeeze tray
adjustment handle on front of tray
and lift up from highchair.
Page 21

1. Attach tray cover by pushing it
down on the tray.
2. To remove pull up on the back of
the tray.
Tray Cover
SNAP!
Dishwasher safe.
Page 22

Foot Rest
1. Slide foot rest in the desired slot.
2. Press down on foot rest to lock
into place.
Foot Rest
Page 23

1. Pull handle on back of seat and
push down or pull up to adjust.
There are 3 recline positions.
WARNING
• DO NOT adjust the seat recline with the child in it.
To Recline Highchair
Page 24

4-D To Secure Child
5 Point Harness
WARNING Falling Hazard: Always use the seat belt.
1. To open, press button on buckle
to release the waist straps.
2. To close, slide shoulder strap
connectors to waist straps and
insert into buckle.
Page 25

3. Use slide adjuster at shoulder and
waist for tighter adjustment.
3 Point Buckle
1. To convert to 3-pt harness.
Page 26

2. Use slide adjuster at waist for
further adjustment.
Page 27

1. To adjust harness height, slide
body support up or down.
2. If body support is not attached,
adjust by pulling slide adjusters.
Harness Height Adjustment
Page 28

4-E Booster Seat
1. Remove foot rest by rotating the
foot rest up and pull it away from
the calf support.
2. Check that booster strap storage
drawers are closed.
Page 29

3. Rotate calf support and booster
support leg backwards, to put
highchair seat in booster mode.
DO NOT force booster support
leg.
4. Note: If leg is locked and you can
not pull leg backwards, push it
fully forward into the calf support
and then repeat step 3.
Page 30

1. Slide Booster strap storage open.
3. Pull storage straps out.
Attaching Booster to Chair
2. BE SURE that lip on storage
drawers are inserted in channels
in booster support arm.
Page 31

4. Place booster on a chair with no
armrests and that has a back,
ensuring that the straps are
hanging freely.
Make sure that there are no extra
seat pads or cushions on the
chair that you are using with the
toddler booster.
5. Wrap top straps around back of
seat and secure clip. Tighten by
pulling on the adjustment strap.
SNAP!
Page 32

6. Wrap bottom straps around base
of seat and secure clip under the
seat. Tighten by pulling on the
loose straps.
CHECK to make sure toddler
booster is securely attached by
moving from side to side.
7. Ensure the booster is attached
correctly by pulling up on it.
SNAP!
Page 33

• BEFORE EACH USE. Inspect the product for damaged
hardware, loose joints, missing parts, or sharp edges.
• DO NOT USE product if any parts are missing or broken.
• DO NOT substitute parts.
• TO CLEAN PRODUCT use only household soap and warm
water. NO BLEACH or detergent.
5-A Care and Maintenance
Page 34

1. Open harness and slide harness
covers off of straps.
2. Remove shoulder straps from
head rest to remove.
To Remove Head Support and Body Support from Newborn Seat
3. Slide waist straps through body
support as shown.
Page 35

4. Slide crotch strap through body
support as shown.
5. Reverse steps to re-attach.
Page 36

1. Disconnect elastic loops from
hook on bottom of newborn seat.
2. Slide harness straps through seat
pad.
3. Pull seat pad off of newborn seat.
To Remove Seat Pad from Newborn Se
at
Page 37

2. Unwrap seat pad from seat back.
3. Push bottom set of harness strap
mounts through back of seat.
1. Open harness and slide harness
covers off of straps.
To Remove Body Support from Highchair
Page 38

4. Push top set of harness strap
mounts through back of seat.
5. Pull harness strap out through
seat pad and body support and
remove body support.
 Loading...