

Graco Pack 'N Play with Newborn Napper Elite Owner's Manual

Read all instructions BEFORE assembly and USE of product.
KEEP INSTRUCTIONS FOR FUTURE USE.
Pack 'n Play® Playard
Newborn Napper® Elite

Failure to follow these warnings and the
• THIS PRODUCT REQUIRES
ADULT ASSEMBLY.
• Keep fingers clear of top
corners during setup. Be sure
playard is completely set up
before use. Check that the four
top rails are completely latched,
the center of the floor is pushed
down, the mattress/pad is flat,
the straps are securely fastened
to the bottom of the unit and the
four corners are tucked under
the stiffeners. Always follow the
instructions in the owner’s
manual to set up the playard.
instructions could result in serious injury or death.
Setting Up the Playard Using the playard
• The playard is for playing or
sleeping. When used for playing,
never leave child unattended and
always keep child in view. When
used for sleeping, you must still
provide the supervision
necessary for the continued
safety of your child.
• Always keep the playard away
from hazards in the area that
may injure your child.
• When child is able to pull to
standing position, remove large
toys and other objects that could
serve as steps for climbing out.
• Stop using this product when
your child reaches 35 inches
(89 cm) in height, weighs more
than 30 lb (14 kg), or is able to
climb out.
• Do not modify playard or add
any attachments that are not
listed in the owner’s manual,
including an add-on bassinet.
• Child can become entrapped
and die when improvised netting
or covers are placed on top of a
playard. Never add such items
to confine child in playard.
• NEVER leave child in product
with side lowered. Be sure side
is in raised and locked position
whenever child is in product.

• If refinishing, use a nontoxic
finish specified for children’s
products.
Avoiding Suffocation
Hazards
• Unlike cribs that have rigid
sides, the playard has flexible
sides.
As a result, the playard
mattress/pad is specially
designed to prevent suffocation.
The playard mattress/pad has a
solid base, a certain length and
width, and is less than one inch
thick in order to meet safety
standards. Using a thicker or a
different sized mattress/pad may
allow a child’s head to get
between mattress/pad and the
side of the playard causing
suffocation.
• Infants can suffocate
• In gaps between a mattress
too small or too thick and
products sides
• On soft bedding.
NEVER add a mattress, pillow,
comforter or padding. Use ONLY
mattress pad provided by Graco.
• To reduce the risk of SIDS,
pediatricians recommend healthy
infants be placed on their backs
to sleep, unless otherwise
advised by your physician.
• Never use plastic shipping bags
or other plastic film as mattress
covers not sold and intended for
that purpose. They can cause
suffocation.
• NEVER use a water mattress
with the playard.
Avoiding Strangulation
Hazards
• Strings and cords can cause
strangulation. Keep strings and
cords away from child.
• NEVER place the playard near
a window where cords from
blinds or drapes can strangle
a child.
• NEVER hang strings on or
over the playard.
• NEVER place items with a
string around a child’s neck,
such as hood strings, pacifier
cords, etc.
• NEVER attach strings to toys.
This product is not intended
for commercial use.

FOR SAFE BATTERY USE:
Keep the batteries out of children’s reach.
Any battery may leak battery acid if mixed with a different battery
type, if inserted incorrectly (put in backwards) or if all batteries are
not replaced or recharged at the same time. Do not mix old and new
batteries. Do not mix alkaline, standard (carbon-zinc) or rechargeable
(nickel-metal hydride, nickel-cadmium) batteries.
Any battery may leak battery acid or explode if disposed of in fire or
an attempt is made to charge a battery not intended to be recharged.
Never recharge a cell of one type in a recharger made for a cell of
another type.
Discard leaky batteries immediately. Leaky batteries can cause skin
burns or other personal injury. When discarding batteries, be sure to
dispose of them in the proper manner, according to your state and
local regulations.
Remove batteries before storing product for a prolonged period of
time. Batteries left in the unit may leak and cause damage.
Recommended type batteries—alkaline disposables, 1-D (LR20-
1.5V). NEVER mix battery types. Change batteries when product
ceases to operate satisfactorily.

Changes or modifications not expressly approved by the party
responsible for compliance could void the user’s authority to operate
the equipment.
This device complies with part 15 of the FCC Rules. Operation is
subject to the following two conditions: (1) This device may not
cause harmful interference, and (2) this device must accept any
interference received, including interference that may cause undesired
operation.
NOTE: This equipment has been tested and found to comply with the
limits for a Class B digital device,pursuant to Part 15 of the FCC
Rules. These limits are designed to provide reasonable protection
against harmful interference in a residential installation. This
equipment generates, uses and can radiate radio frequency energy
and, if not installed and used in accordance with the instructions, may
cause harmful interference to radio communications.
However, there is no guarantee that interference will not occur in a
particular installation. If this equipment does cause harmful
interference to radio or television reception, which can be determined
by turning the equipment off and on, the user is encouraged to try to
correct the interference by one or more of the
following measures:
• Reorient or relocate the receiving antenna.
• Increase the separation between the equipment and receiver.
• Connect the equipment into an outlet on a circuit different from that
to which the receiver is needed.
• Consult the dealer or an experienced radio/TV technician for help.
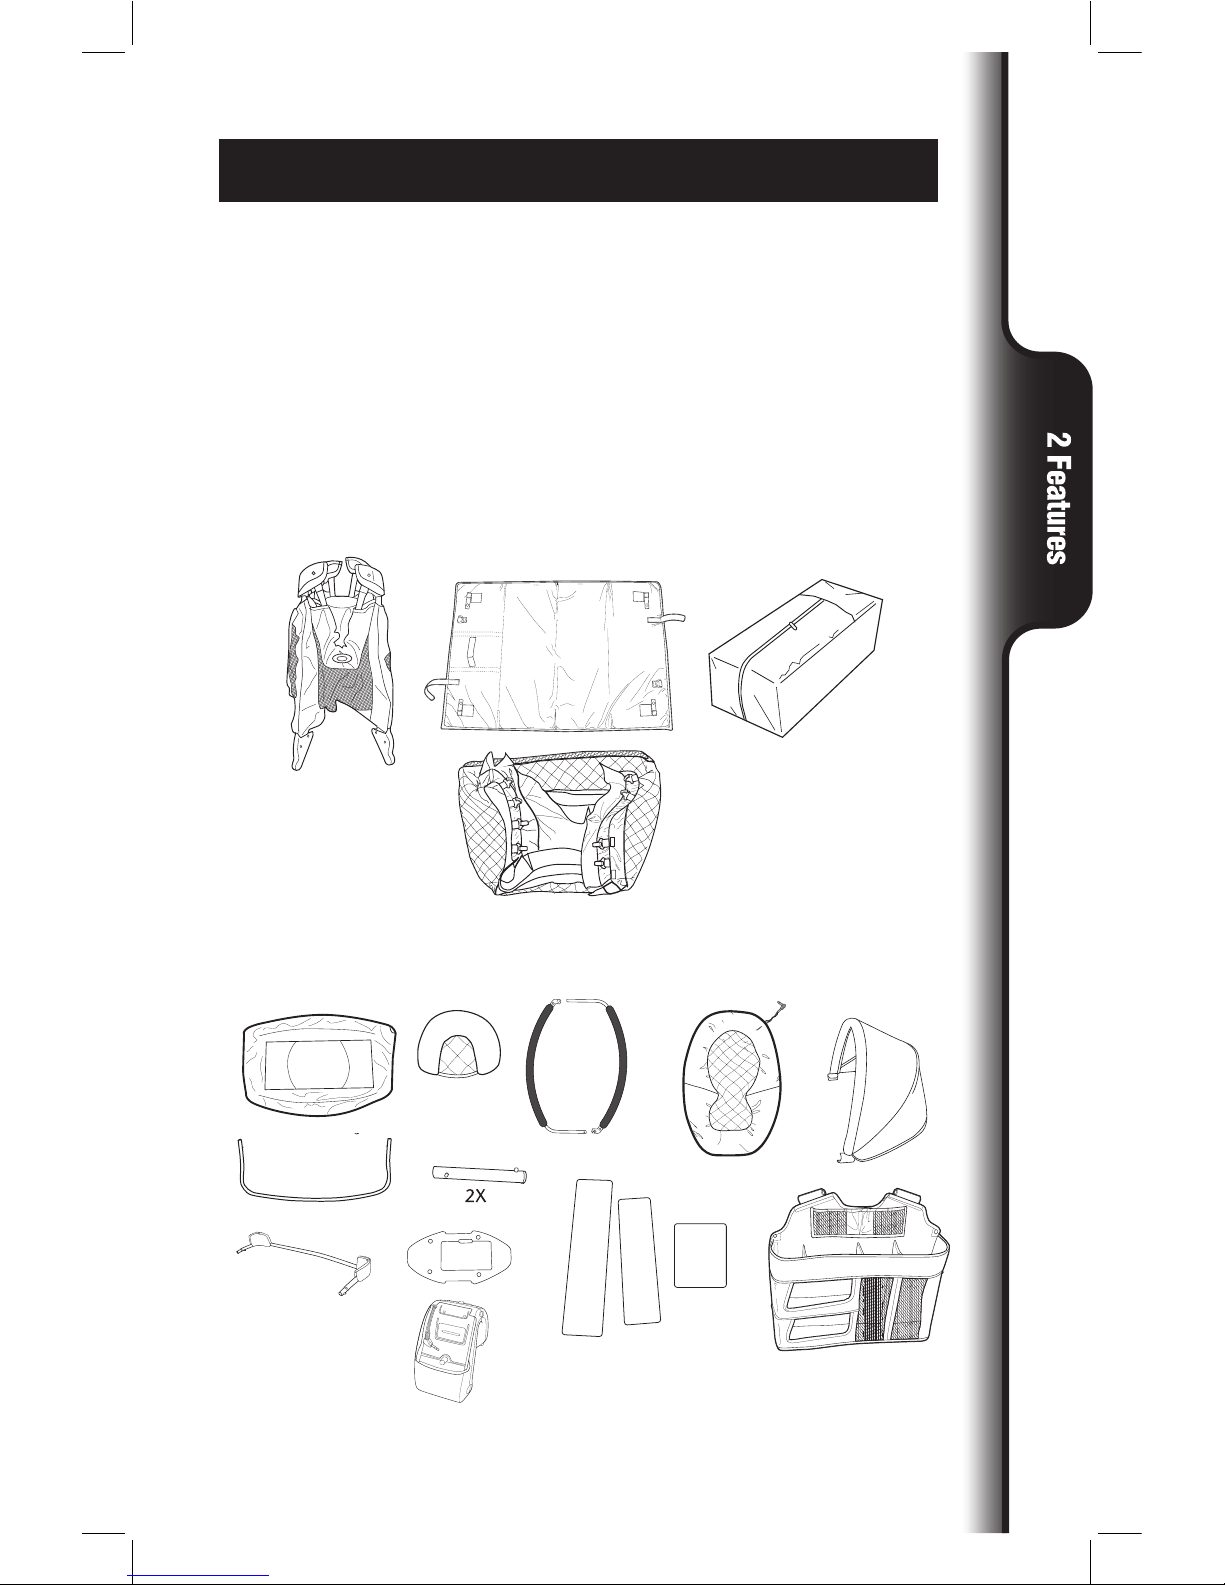
ALL MODELS
2-A Parts list
FEATURES ON CERTAIN MODELS
This model may not include some
features shown below. Check
that you have all the parts for this
model BEFORE assembling your
product. If any parts are missing,
call Customer Service.
Tools required:
Philips Screwdriver
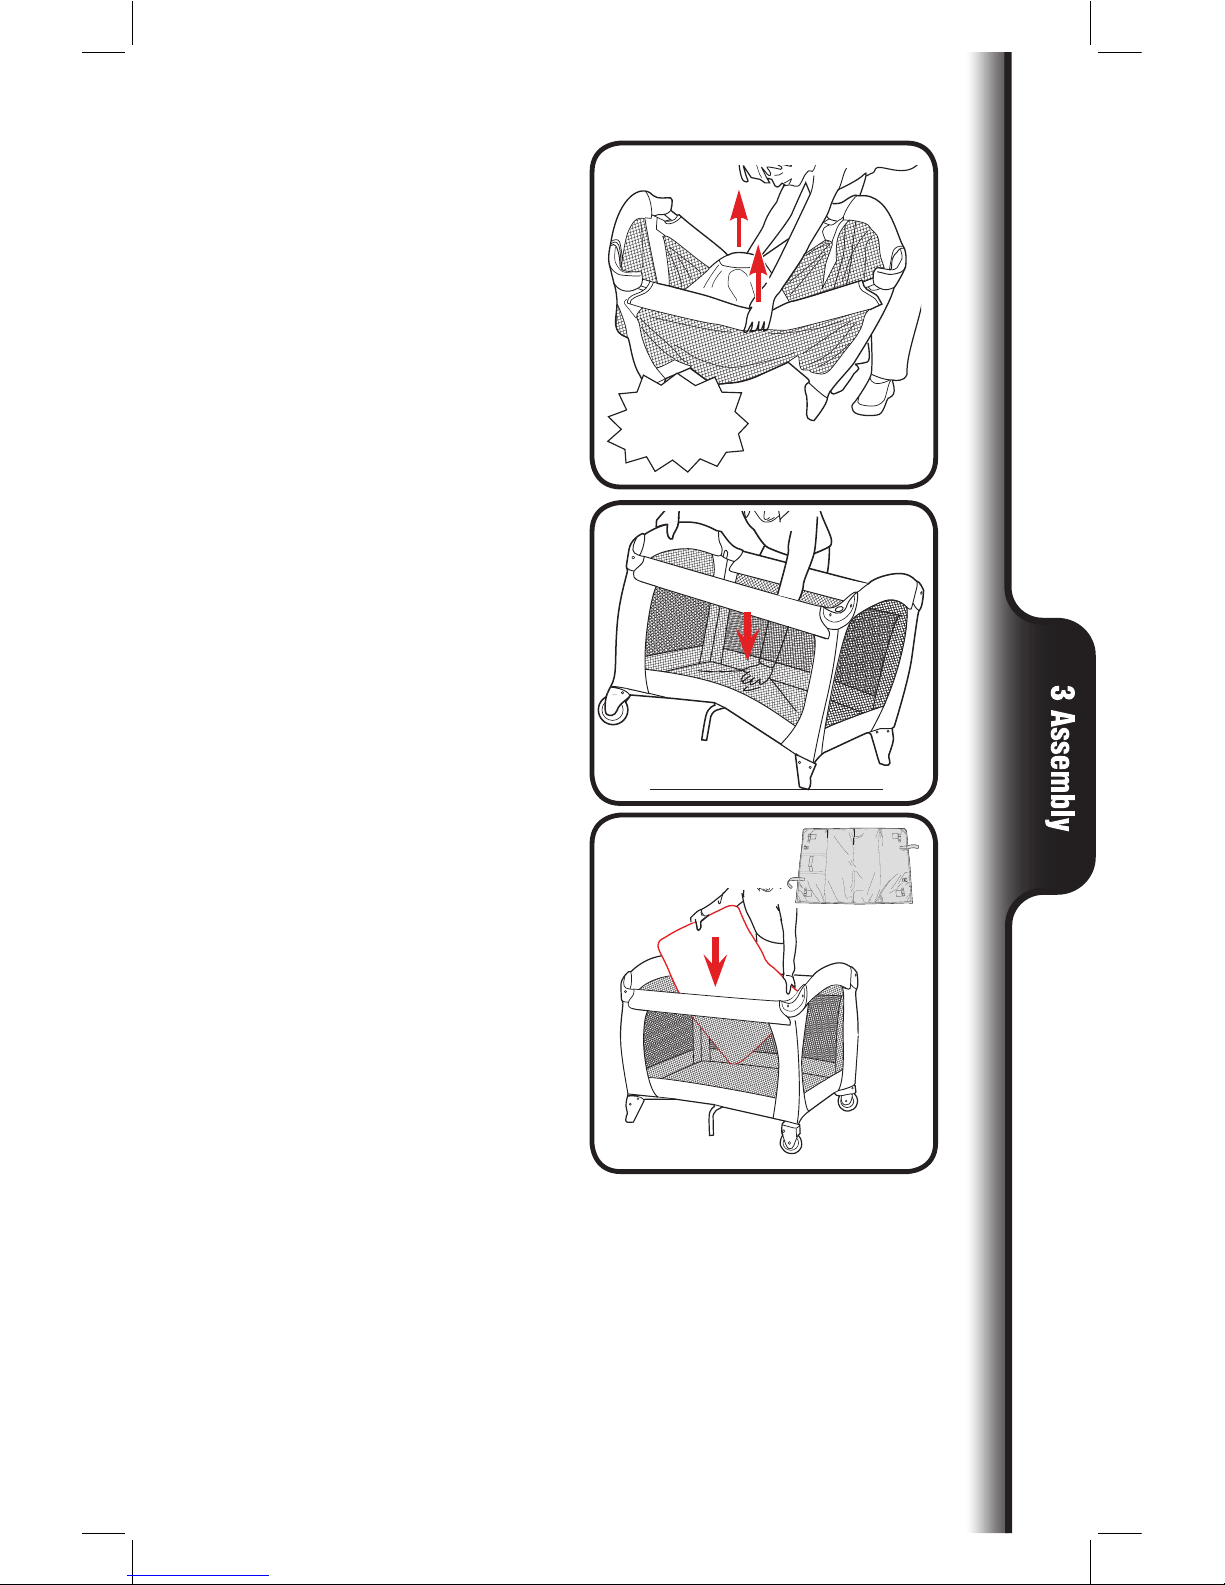
3-A Playard Setup
3. Pull up on side rails in middle
above push button until all four
sides are locked. DO NOT push
center down yet.
1. Disconnect straps holding
mattress around playard.
2. Remove mattress from around
playard.
SNAP!
4. When setting up, lock rails
BEFORE lowering center.
Be sure top rails have become
rigid. If not, pull up again until
they are rigid. If top rails do not
latch, lift the center of the floor
higher.
CHECK that fabric covers
corners.
5. Hold one end of the unit up and
push the center of the floor down
until locked securely into place.
6. Always use mattress/pad soft
side up.
SNAP!

7. Pull the two hook and loop tabs
under mattress/pad through the
slotted holes and attach to hook
and loop patch on bottom of
playard.
8. Pull the four snap straps on
corners of playard mattress
through bottom of playard. Wrap
around the tube and fasten snap
onto the tube. Repeat on all
corners.
SNAP!
9. Tuck four corners of mattress/pad
under corner stiffeners.
3-B Bassinet Set Up
WARNING
SUFFOCATION HAZARD Infants have suffocated:
• In gaps between extra padding and side of the bassinet, and
• On soft bedding.
Use ONLY mattress/pad provided by Graco. NEVER add a pillow,
comforter or another mattress for padding.
• FALL HAZARD: To help prevent falls, do not use this product when
the infant begins to push up on hands and knees or weighs over
15 lb (6.8 kg), whichever comes first.
• Use bassinet with only one child at a time.
• Never place a child under the bassinet.
• The bassinet must be fully assembled and installed, including four
metal tubes, eight clips and mattress/pad, before using. Do not
modify bassinet or add any attachments that are not listed in the
owner’s manual.
• DO NOT store the bassinet in the playard while in use.
• To help prevent heat build-up inside the playard and to avoid
overheating your child, when using the bassinet DO NOT use an
outdoor canopy.
• To reduce the risk of SIDS, pediatricians recommend healthy
infants be placed on their backs to sleep, unless otherwise advised
by your physician.
• If a sheet is used with the pad use only the one provided by Graco
or one specifically designed to fit the dimensions of the bassinet.
• Never place child in bassinet while napper is attached.

1. You will need to remove the
mattress/pad from the bottom
of the playard to use inside
your travel bed. ALWAYS install
mattress in travel bed before
using as bassinet.
2. Fasten 4 clips onto top rail of
playard as shown. The clips
will be hidden underneath the
edge of the bassinet flap.
Holes for changing table.
Wheels
3. Attach 8 hooks on the bassinet
to the ends of the playard as
shown.

5. Insert tapered end of bar into
end of other bar with hole in it.
Repeat with other set of bars.
CHECK: Tubes MUST be
assembled before placing
mattress/pad in bassinet.
4. Fold over the 4 bassinet flaps
to cover all four corners of the
playard as shown.

Vibration Unit
1. Open the battery compartment
lid by inserting a screwdriver the
slot. Insert one D (LR20) cell
battery (not included). Replace
lid.
2. Cord in bottom of bassinet.
3. Vibration must be fastened
tightly and centered on the
webbing strap to work properly.
 Loading...