

Page 1
Quick Start Manual
®
nüvi
760
for Volvo® cars
personal travel assistant
Page 2
WARNING: See the Important Safety and Product Information guide in the product box for product warnings
and other important information.
What’s in the Box?
nüvi GPS device.
USB cable to connect the nüvi to your computer.
Your nüvi connects to your computer as a mass
Headphone/audio
storage device.
AC adapter cable to receive power from a wall
outlet.
Carrying case to protect your nüvi from
scratches and accidental screen taps.
Quick Start Manual.
Ways to Charge Your nüvi
Use the vehicle mount.
•
Use the USB cable.
•
Use the AC adapter cable.
•
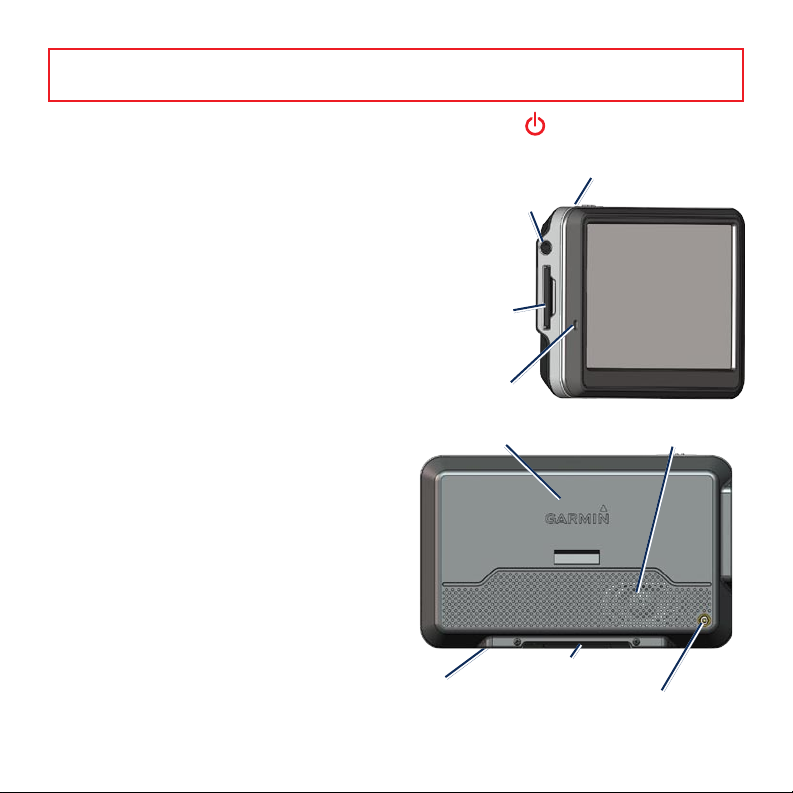
Mini-USB connector
Power key:
slide to the left to turn the unit on/off;
slide to the right to lock the screen
out jack
SD card slot
Microphone
GPS antenna
Serial number
External antenna connector
Speaker
2
Page 3
WARNING: This product contains a non-user-replaceable lithium-ion battery. See the Important Safety and
Product Information guide in the product box for important battery safety information.
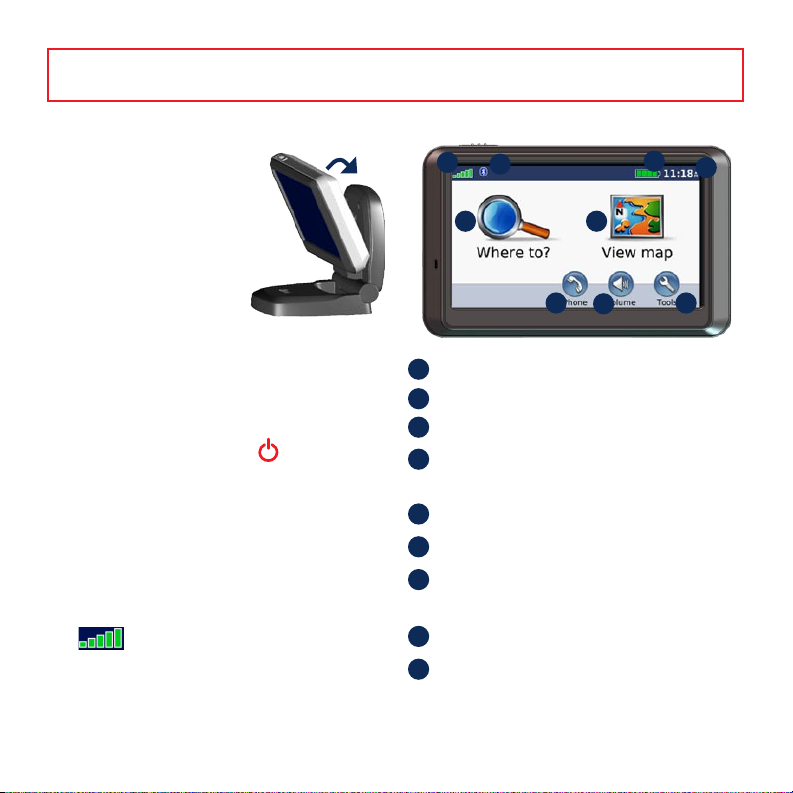
Step 1: Mount the nüvi
1. Flip the cradle open, toward the windshield.
2. Fit the bottom of your nüvi
into the cradle.
3. Tilt the nüvi back until it
snaps into place.
Your unit should turn on
automatically if it is in place
and your vehicle is running.
To remove the unit from the cradle, pull up the
release button on the back of the cradle and tilt
the unit towards you and remove it.
Step 2: Congure the nüvi
To turn on your nüvi, slide the Power key to
the left. Follow the on-screen instructions.
Step 3: Acquire Satellites
Go outdoors to an open area, out of garages, and
away from tall buildings. Stop your vehicle, and
turn on the nüvi. Acquiring satellite signals may
take a few minutes.
The bars indicate GPS satellite
strength. When one bar is green, the nüvi has
acquired satellite signals. Now you can select a
destination and navigate to it.
Step 4: Use the nüvi
A
B
C
D
E
F
G
H
I
A
B
E F
G
GPS satellite strength.
Bluetooth® technology status.
Battery status.
Current time; touch to change time
settings.
Touch to nd a destination.
Touch to view the map.
Touch to make a call when connected to
a compatible mobile phone.
Touch to adjust the volume.
Touch to use the tools such as media
players, settings, and Help.
C
D
H
I
3
Page 4

Finding Points of Interest
1. Touch Where to > Points of Interest.
2. Select a category and a sub-category.
3. Select a destination, and touch
To enter letters contained in the name, touch
Go.
Adding a Via Point
You can add a stop (via point) to your route. The
nüvi gives you directions to the stop and then to
your nal destination.
1. With a route active, touch Menu on the map,
Where to > Points of Interest > Spell Name.
To search for a location in a different area, touch
Where to > Near.
2. Search for the extra stop.
3. Touch
4. Touch
Finding a Volvo® Dealership
1. Touch Where to > Volvo Dealers.
2. Select a dealership, and touch
Go.
Taking a Detour
If a road on your route is closed, you can take a
detour.
1. With a route active, touch Menu.
2. Touch
Detour.
The nüvi attempts to get you back on your
original route as quickly as possible. If the route
you are currently taking is the only reasonable
option, the nüvi might not calculate a detour.
Stopping the Route
1. With a route active, touch Menu.
2. Touch
and touch
before your destination. Touch
Destination to make this your new nal
destination.
Where to.
Go.
Add as Via Point to add this stop
Set as new
TIP: To add more than one stop, edit
the current route. Touch Where to >
Routes.
Stop.
4
Page 5

Viewing the Main Pages
Touch View Map to open the Map page. The vehicle icon shows your current location. Touch
the map and drag to view different parts of the map. Touch anywhere on the map; an arrow appears
pointing at the object.
After you touch Go, the Map page opens. Your route is marked with a magenta line. As you travel,
your nüvi guides you to your destination with voice prompts, arrows on the map, and directions at the
top of the Map page. A checkered ag marks your destination. If you depart from the original route,
your nüvi recalculates the route and provides new directions.
Touch the text bar to open the Turn List.
Touch to zoom out.
Touch to zoom in.
Touch Menu to return
to the Menu page.
Touch Arrival or
Speed to open the Trip
Information.
Map Page while Navigating a Route
Turn List Next TurnTrip Information
Touch to save your
current location.
Touch Turn In to view
the Next Turn.
TIP: A speed limit icon may appear as you travel on major highways. This icon displays
the current speed limit of the highway.
5
Page 6

Using Hands-Free Features
Hands-free phone features are available only if
your nüvi and your compatible mobile phone
have Bluetooth wireless technology. Not all
phones support all the hands-free phone features
the nüvi provides. To use the hands-free features,
you must pair your phone and the nüvi.
Pairing Your Phone
1. Conrm that your phone is supported by the
nüvi. (See
2. On the Menu page, touch
Bluetooth > Add.
3. Enable your phone’s Bluetooth component
and enable Find Me/Discoverable/Visible
mode. These settings might be in a Bluetooth,
Connections, or Hands-free menu.
4. Touch
5. Select your phone, and touch
6. Enter the nüvi’s Bluetooth PIN (
phone.
www.garmin.com/bluetooth.)
Tools > Settings >
OK on the nüvi.
OK.
1234) in your
Using Call Waiting
If you get a call waiting call, the nüvi displays
the Incoming Call window. Touch Answer. The
rst call is placed on hold.
1. During the call, touch > Switch To.
2. Touch
Loading Files on Your nüvi
Connect the USB cable to the mini-USB
connector on the nüvi and to an available USB
port on your computer.
Your nüvi’s internal memory and SD card
appear as removable drives in My Computer on
Windows® computers, and as mounted volumes
on Mac® computers. Copy and paste les from
your computer into the nüvi drives/volumes.
When you are nished transferring les, click the
computers, or drag the volume icon to the
Trash on Mac computers. Unplug your nüvi.
Calling a Number
1. Touch Phone > Dial.
2. Enter the number, and touch
3. To end the call, touch
Dial.
> End Call.
Receiving a Call
When you get a call, the Incoming Call window
opens. Touch Answer.
Listening to MP3 Files
Load MP3 les to the internal memory or SD
card. On the Menu page, touch Tools > Media
Player. Touch Source to open the music player.
Touch Browse. Touch a category. To play the
entire category, touch Play All. To play one
song, touch the title. To create, edit, and listen to
playlists, touch Browse > Playlist.
End Call to hang up; this does not
disconnect the call on hold.
Eject icon in your system tray on Windows
6
Page 7

Locking Your nüvi
1. Touch Tools > Settings > Security.
2. Touch the button below
3. Enter a 4-digit PIN.
4. Drive to a security location (such as your home
or ofce), and touch Set.
Each time you turn on the nüvi, enter the PIN or
drive to the security location.
NOTE: If you forget your PIN and
your security location, you must
send your nüvi to Garmin to get
it unlocked. You must also send a
valid product registration or proof of
purchase.
Garmin Lock.
Resetting the nüvi
If the nüvi screen stops functioning, turn the nüvi
off and on again. If this does not help, slide the
Power key to the left and hold for 8 seconds.
Turn the nüvi back on. The nüvi should operate
normally.
Calibrating the Screen
If the touch screen is not responding properly,
calibrate the touch screen. Turn the nüvi off and
then back on. Slide the Power key to the
right (lock). Hold your nger on the screen for
about 30 seconds until the calibration screen
appears. Follow the on-screen instructions.
nüvi Tips and Shortcuts
•
•
•
Additional Maps
You can purchase additional MapSource map
data from Garmin and load the maps on your
nüvi or on an optional SD card. Check www
.garmin.com/unlock/update.jsp for map updates.
To check the version of the maps loaded on
your nüvi, touch Tools > Settings > Map >
Map Info. To enable additional maps, you need
your unit ID (touch Tools > Settings > System
> About) and serial number (located near the
power connector).
More Information
For more information about your nüvi, touch
Tools > Help. You can download the latest
version of the owner’s manual from
www.garmin.com/volvo. For information about
accessories, go to http://buy.garmin.com or
contact your Garmin dealer.
Volvo® Limited Warranty
See your Volvo® dealer for warranty information.
To quickly return to the Menu page, touch
and hold Back.
Touch and to see more choices.
Touch and hold to scroll faster.
To adjust the volume, touch Volume on the
Menu page.
7
Page 8

For the latest free software updates (excluding map data) throughout the life of
your Garmin products, visit the Garmin Web site at www.garmin.com/volvo.
© 2007–2008 Garmin Ltd. or its subsidiaries
Garmin International, Inc.
1200 East 151st Street, Olathe, Kansas 66062, USA
Garmin (Europe) Ltd.
Liberty House, Hounsdown Business Park, Southampton, Hampshire, SO40 9RB UK
Garmin Corporation
No. 68, Jangshu 2nd Road, Shijr, Taipei County, Taiwan
www.garmin.com
Garmin® and nüvi® are trademarks of Garmin Ltd. or its subsidiaries, registered in the USA and other countries.
These trademarks may not be used without the express permission of Garmin. Volvo® is a registered trademark of
AB Volvo and Volvo Car Corporation. Windows® is a registered trademark of Microsoft Corporation in the United
States and/or other countries. Mac® is a registered trademark of Apple Computer, Inc. The Bluetooth® word mark
and logos are owned by the Bluetooth SIG, Inc. and any use of such marks by Garmin is under license.
May 2008 190-00866-01 Rev. B Printed in Taiwan
 Loading...