

Page 1
nüvifone
quick start manual
™
M10
Page 2
WARNING
See the “Important Safety and Product Information” beginning on page 18 for
product warnings and other important information.
Download the latest owner’s manual at www.garminasus.com\M10.
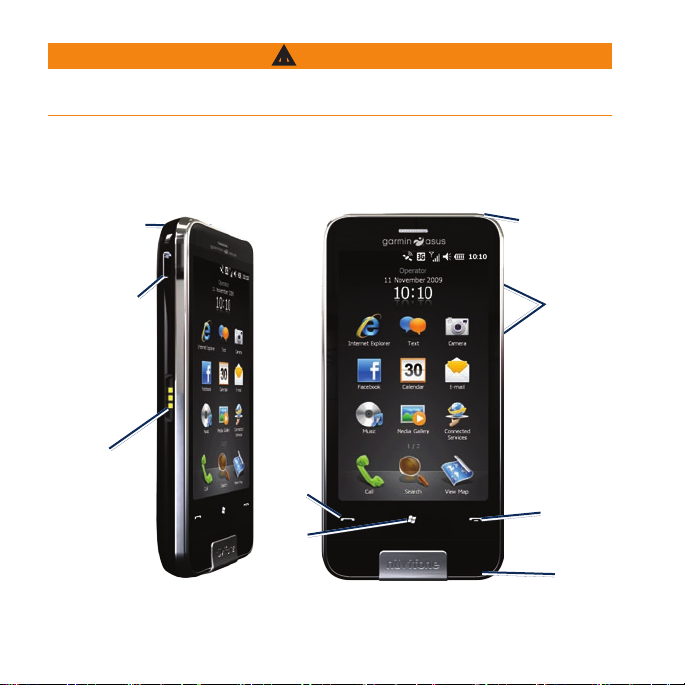
nüvifone™ Device Features
Power key
Headphone
connector
Micro-USB
connector
for power
and
computer
connection
Power
connector
for
navigation
cradle
2 nüvifone M10 Quick Start Manual
Send
key
Start
menu
key
Volume
keys
Camera lens
(on back)
End key
Stylus
Page 3

Setting Up the Device
WARNING
Battery cover
This product contains a lithium-ion
battery. To prevent personal injury or
product damage, remove the device
from the vehicle when exiting or store
it out of direct sunlight.
1. Remove the battery cover.
2. Install the SIM card.
3. Install the microSD
See page 4.
4. Install the battery. See
5. Replace the battery cover. See
page 4.
6. Charge the battery. See
™
card (optional).
page 4.
page 4.
Install the SIM Card
1. Slide the SIM card holder toward
the outside edge of the device and
lift up, as directed on the holder.
2. Place the SIM card in the device
with the gold contacts facing down
and the notched corner near the
center of the device.
Reset button
SIM card holder
Remove the Battery Cover
Slide the battery cover off the back of
the nüvifone.
microSD card holder
3. Close the card holder.
4. Slide the card holder toward the
center of the device to lock it.
nüvifone M10 Quick Start Manual 3
Page 4
Install the microSD Card
You can use an optional microSD card
Battery
to hold more data.
1. Slide the microSD card holder
toward the top edge of the device
and lift up.
2. Place the microSD card in the
device with the gold contacts facing
down.
3. Close the card holder.
4. Slide the card holder toward the
center of the device to lock it.
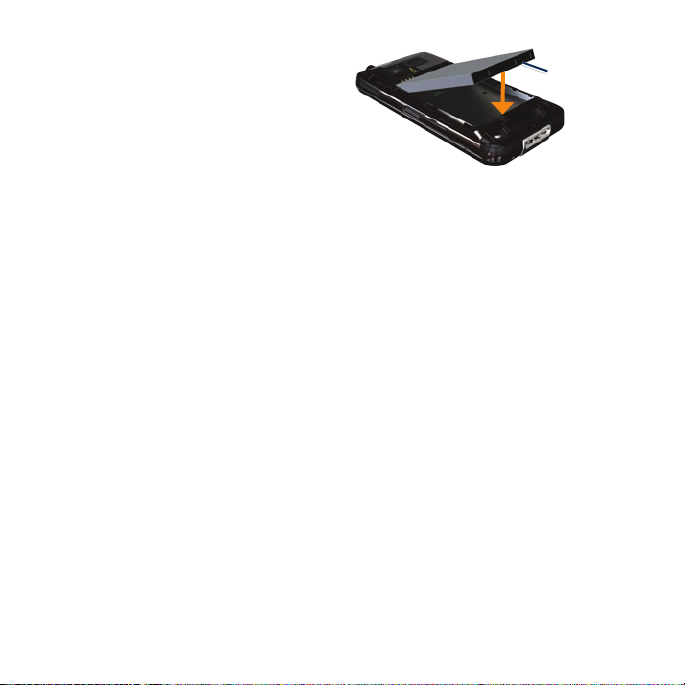
Install the Battery
1. Locate the battery that came in the
product box.
2. Locate the metal contacts on the
end of the battery and in the battery
compartment.
3. Insert the battery with the large
Garmin-Asus logo facing down, and
the metal contacts on the battery
aligned with the contacts in the
battery compartment.
4 nüvifone M10 Quick Start Manual
Replace the Battery Cover
Slide the battery cover onto the back of
the device until it clicks.
Charge the Battery
Charge the battery for at least four
hours before using the nüvifone for the
rst time. If you completely discharge
the battery, recharge it for at least
20 minutes before turning on your
nüvifone.
1. Insert the plug into the AC power
adapter, if necessary.
2. Plug the
adapter.
3. Connect the micro-USB end of the
USB cable to the connector on the
side of the device.
USB cable into the AC
Page 5
4. Plug the AC adapter into a power
outlet.
You can also charge the nüvifone using
the USB cable and a computer, and
using the vehicle power cable and a
vehicle power outlet.
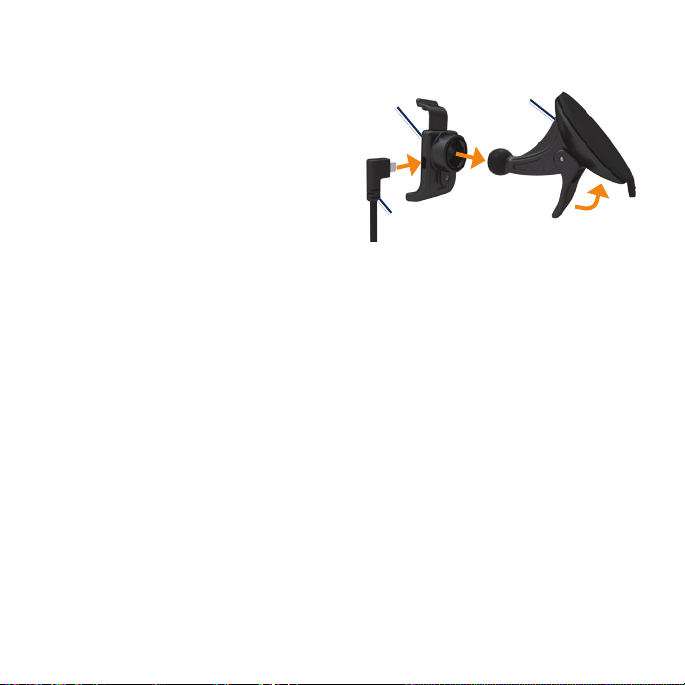
3. Place the suction cup on the
windshield.
Cradle
Suction
cup mount
Turn On Your nüvifone
Press and hold the Power key to turn
on the nüvifone.
Mount the nüvifone in Your Vehicle
The vehicle mount and power cable are
available in some nüvifone packages.
To purchase accessories, go to
www.garminasus.com\M10.
1. Plug the vehicle power cable into
the power connector on the side of
the cradle.
2. Remove the clear plastic from the
suction cup. Clean and dry your
windshield and the suction cup with
a lint-free cloth.
nüvifone M10 Quick Start Manual 5
Vehicle power
cable
4. Flip the lever back, toward the
windshield.
5. Snap the cradle onto the suction
cup arm.
6. Fit the gold contacts on the left side
of your nüvifone into the cradle.
7. Tilt the nüvifone back until it snaps
into the cradle.
8. Plug the other end of the vehicle
power cable into a power outlet in
your vehicle.
TIP: When you take your nüvifone out
of the mounting cradle, your current
location is saved, making it easy to nd
your parking spot.
Page 6
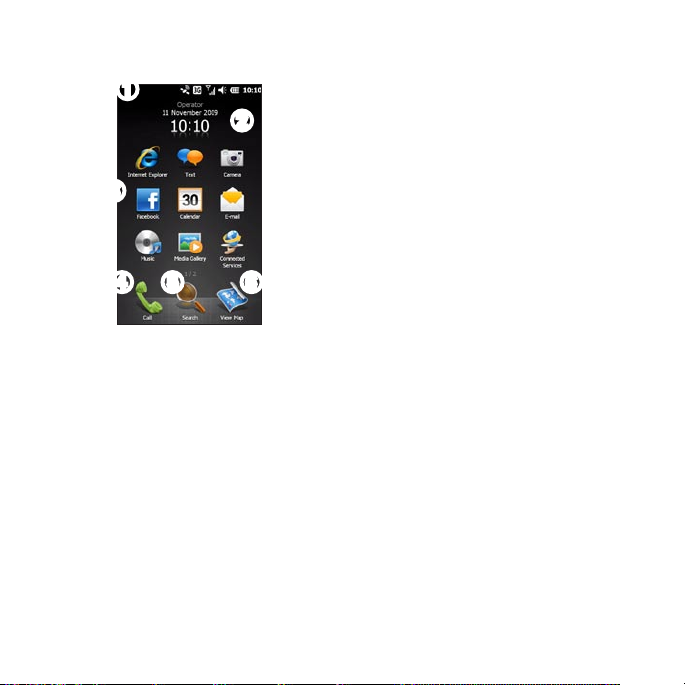
Use the Home Screen
➊
➋
➌
icons. Touch and hold an icon to
edit the applications on the Home
screen.
Tap to place a phone call and
➍
access contacts.
Tap to nd and navigate to a
➎
location.
Tap to view the map.
➏
➍ ➎ ➏
Status bar. Tap to view the device
➊
status and notications, and search
for locations.
Current date and time (based on
➋
your network). Tap to view the
alarms and global clocks and set
the time.
Application shortcut icons. Tap an
➌
icon to open the application. Drag
your nger horizontally across the
Home screen icons to view more
6 nüvifone M10 Quick Start Manual
Scroll the Screen
Touch and drag your nger to
•
slowly scroll the screen.
Touch, drag, and quickly remove
•
your nger to continue scrolling
after removing your nger.
Tap the screen to stop scrolling.
•
You can scroll the screen both
vertically and horizontally.
Page 7
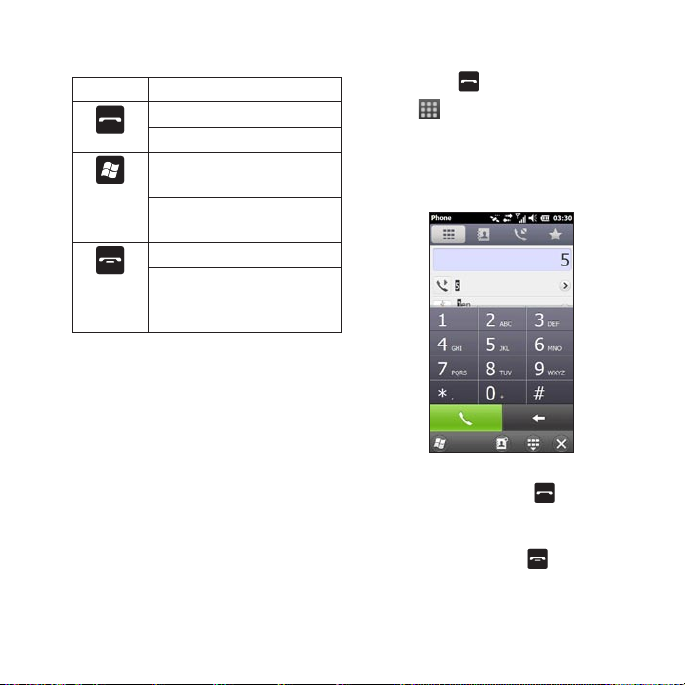
Use the Keys
Key Use
Press to open the phone.
Press to send a call.
Press to open the Start
menu.
Press and hold to close or
switch applications.
Press to end a phone call.
When not on a phone call,
press to open the Home
screen.
Dial a Number
1. Press the key.
2. Tap
3. Dial the number. As you dial, a list
to open the keypad.
appears showing similar numbers
you have dialed and contacts that
have matching numbers or letters.
View the Status
1. Tap the status bar along the top of
the screen.
2. From the slider menu at the top of
the screen, select Status, Search,
or Notication.
3. Tap an item to update it or view
more information about it.
nüvifone M10 Quick Start Manual 7
4. Tap a number in the list to call the
number, or press the key.
End a Call
To end a call, press the key.
Page 8
Add a Contact
1. Press the key.
2. Tap
3. Tap an option.
4. Tap an item to enter the information.
5. Tap
> > New Contact.
Tap Done when nished.
to save the contact.
Call a Contact
1. Press the key.
2. Tap
3. Tap a contact.
4. Tap the number to place a call.
.
View Call History
1. Press the key.
2. Tap
3. Tap a number or a contact in the
.
list to view your call history for that
number or contact.
Set Up Voice Mail
1. Press the key.
2. Tap
Settings > Personal > Phone.
3. From the slider menu at the top of
the screen, select Services.
4. Tap
Voice Mail and Text Messages
> Get Settings.
5. Verify that your voice mail number is
correct, and tap OK.
Call Voice Mail
1. Press the key.
2. Tap
3. Touch and hold
.
1.
Acquire Satellites
1. Turn on your nüvifone.
2. If necessary, go outdoors, away
from tall buildings and trees.
Acquiring satellite signals can take a
few minutes. The satellite icon in
the status bar indicates that the device
has acquired satellite signals.
8 nüvifone M10 Quick Start Manual
Page 9
Find an Address
NOTE: Depending on the version of
the built-in map data on your device,
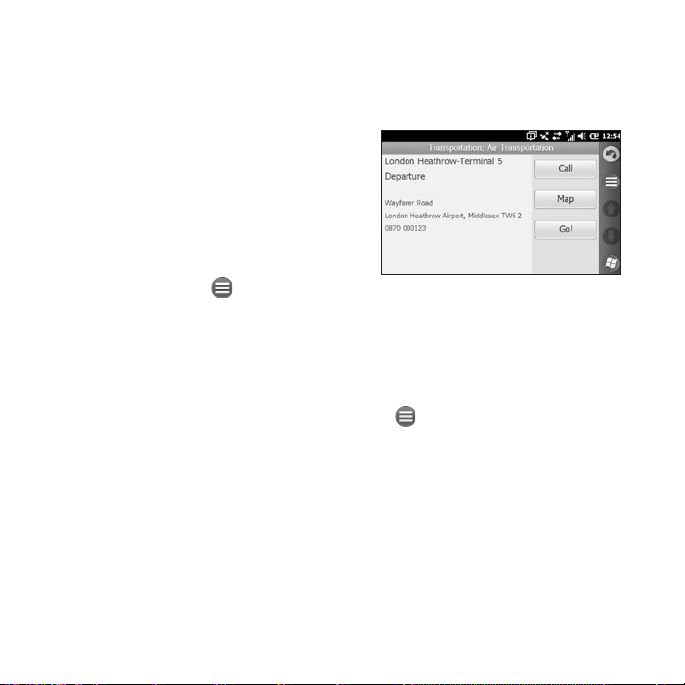
Information Page Options
After you nd a location, information
about the location appears.
the button names and the order of steps
could be different than the steps below.
Before you can navigate, you need to
acquire satellite signals.
1. From the Home screen, tap Search.
2 Tap
Address.
3. If necessary, tap
state, the country, or the province.
4. To search all cities, tap
Cities. You can also tap Spell City,
enter all or part of the name, and
then tap the city in the list.
5. Enter the house number, and then
tap Next.
6. Enter all or part of the street name
or number, and then tap the street
in the list.
7. Tap the correct address in the list.
nüvifone M10 Quick Start Manual 9
to change the
Search All
Call—dial the phone number of the
location, if available.
Map—view the location on the map.
Go!—create a route to the location.
Tap for more options.
Page 10

Find a Point of Interest
The detailed maps loaded in your
nüvifone contain points of interest,
such as restaurants, hotels, and auto
services.
Find by Category
1. From the Home screen, tap Search.
2. Tap
Points of Interest.
3. Tap a category.
4. Tap a subcategory or tap
Categories. A list of items near your
current location appears.
5. Tap the item you want.
Find by Spelling the Name
To nd a destination, enter part or all of
the name.
1. From the Home screen, tap Search.
2. Tap
Points of Interest.
3. Tap
Spell Name, enter your search
term, and tap Done.
4. Tap the item you want.
10 nüvifone M10 Quick Start Manual
All
Find a Location In Another Area
1. From the Home screen, tap Search.
2. Tap
3. Tap the appropriate option, and then
> Near.
tap Done.
Learn About Locations
A data connection is required for this
feature. This service is only available
in some areas.
1. Find a location.
2. On the information page, tap
> Find Nearby > Connected
Services > WiKiKnow.
The browser opens to a Web page
about the selected location.
Page 11

Follow Your Route
After you select a location and tap Go!,
your nüvifone creates a route to the
location. Your route is marked with a
magenta line.
As you travel, your nüvifone guides
you to your destination with voice
prompts, arrows on the map, and
directions at the top of the map. A
checkered ag marks your destination.
If you deviate from the original route,
your nüvifone recalculates the route
and provides new directions.
A speed-limit icon may appear as you
travel on major roadways. This icon
displays the current speed limit of the
roadway.
Use the Map
From the Home screen, tap View Map
to open the map.
nüvifone M10 Quick Start Manual 11
➊
➌
➎
➏
➐
Tap to view the next turn.
➊
Tap to view the route details.
➋
Tap to view the Trafc menu,
➌
when available. Trafc services
may require an additional
subscription and require data plan
charges.
Tap to zoom in and zoom out.
➍
Tap anywhere on the map to
➎
browse the map.
Tap to view the Where Am I?
➏
page.
Tap to view the trip computer.
➐
Tap to return to the Home screen.
➑
➐ ➑
➋
➍
Page 12

Add Points to the Active Route
Via points are additional points or stops
that you add to a route. They can be
addresses, favorites, points of interest,
or any item on the map.
1. While navigating a route, tap the
text bar at the top of the map.
2. Tap
3. Tap
4. Select a method to select a via
5. Tap
You can also add via points to a route
using the Find feature. Find an item,
> Edit.
Add Start Point or Add End
Point.
point.
Done when nished.
Take a Detour
1. While navigating a route, tap .
2. Tap
Detour.
If the route you are currently taking
is the only reasonable option, the
nüvifone might not calculate a detour.
Stop the Route
1. While navigating a route, tap .
2. Tap
Stop.
Save My Current Location
1. From the Home screen, tap View
Map.
2. Tap the vehicle icon.
3. Tap
> Save to Favorites.
and then tap Go!. When prompted
to add the point as a via point to the
current route, tap Yes.
12 nüvifone M10 Quick Start Manual
Page 13

Send a Message
NOTE: Your regular messaging fees
apply when sending and receiving
messages.
1. From the Home screen, tap Text.
2. Tap
3. Tap
4. Enter the text message.
5. Tap
6. Tap
Read, Reply, and Forward Messages
1. From the Home screen, tap Text
2. Tap a message to read it.
3. Perform an action:
nüvifone M10 Quick Start Manual 13
> New > Text Message.
> Add Recipient to select
from your Contacts list.
> Insert to send multimedia
items with the message.
or Send to send the
message.
or E-mail. Unread messages are
displayed in bold.
Tap to send a reply.
•
Tap > Forward to forward to
•
other recipients.
Set up an E-mail Account
Your nüvifone can automatically
congure account information for
some e-mail accounts. If additional
information is required, see your e-mail
account provider.
TIP: If you have a Windows Live ID,
you can set up your e-mail account by
pressing the key, and then tapping
Windows Live.
1. From the Home screen, tap E-mail.
2. Enter your e-mail address and
password.
3. Tap
Next to obtain your e-mail
settings from the Internet.
4. Follow the on-screen instructions to
set up your e-mail account on your
device.
Page 14

Sync with an Exchange E-mail Account
To synchronize with your corporate
Exchange e-mail server, enter your
server and log on information into
ActiveSync. You may need to obtain
server information from your network
administrator.
See page 16 and the ActiveSync help
le for more information.
Make a New Appointment
1. From the Home screen, tap
Calendar.
2. Tap
3. Enter information about the
4. To make this appointment recurring,
5. Tap
TIP: Tap and drag your nger
> New Appointment.
appointment.
tap Occurs, and select an option.
OK.
horizontally across the screen to view a
Send an E-mail Message
1. From the Home screen, tap E-mail.
2. Tap
3. Tap
4. Enter your message in the message
5. Tap
14 nüvifone M10 Quick Start Manual
> New.
> Add Recipient to select
from your Contacts list. Separate
multiple e-mail addresses with a
semicolon (;).
eld.
to send the message.
different day.
Page 15

Check Flight Status
Not all Connected Services are
available in all areas. A data connection
is required for Connected Services.
Your regular data transfer charges
apply.
1. From the Home screen, tap
Connected Services.
2. Tap
Flight Status.
3. To view ight information from an
airport in another city, tap > New
City.
4. Tap an airport in the list.
5. Select an option to nd a ight.
6. If your ight has multiple
connections, tap > Next Leg,
and then tap the next ight.
nüvifone M10 Quick Start Manual 15
Microsoft® Ofce Mobile
Microsoft Ofce Mobile provides
Microsoft Ofce applications, such as
Word and Excel. Use these applications
like you would normally use the Ofce
applications on your computer.
1. Press the key.
2. Tap
Ofce Mobile.
3. Tap an application.
4. Tap a le to open it, or tap
create a new le.
5. Use the application as you would
use it on your computer.
6. Tap
Menu to access more options.
7. Tap
OK to save and close the le.
New to
Page 16

Install and Congure
ActiveSync on Your
Computer
1. Insert the Getting Started CD-ROM
in your computer’s CD-ROM drive.
2. Follow the on-screen instructions.
3. Connect the micro-USB plug to the
micro-USB connector on the side of
the device.
4. Connect the other end of the USB
cable to your computer.
5. Follow the on-screen instructions to
complete the wizard.
6. Disconnect the device after the
synchronization is complete.
During synchronization, ActiveSync
compares the data in your device with
the data in your computer or Exchange
Download Applications
Use the Windows® Marketplace to
download and install applications.
1. Press the key.
2. Tap
Marketplace.
3. Follow the on-screen instructions.
Register Your Product
Go to www.garminasus.com/support to
register your product. Keep the original
sales receipt, or a photocopy, in a safe
place.
Get Support
Go to www.garminasus.com/support
for in-country and regional support
information.
Server, and updates all data with recent
changes.
Update the Software
Go to www.garminasus.com/support to
download the latest software update.
16 nüvifone M10 Quick Start Manual
Page 17

Reset the nüvifone
If the nüvifone stops functioning, turn
off the nüvifone, and then turn on the
nüvifone. If this does not help, reset the
Learn More
1. Press the key.
2. Tap
Getting Started.
3. Tap a topic.
nüvifone.
1. Remove the battery cover.
2. Using the stylus, press the Reset
button. The nüvifone should restart
and operate normally.
nüMaps Guarantee™
To receive one free map update (if
available), register your nüvifone at
www.garminasus.com/support within
60 days of acquiring satellites while
driving with your nüvifone. You are
not eligible for the free map update if
you register by phone or wait longer
than 60 days after the rst time you
acquire satellites while driving with
your nüvifone.
Care for Your Device
Avoid dropping your device and
•
operating it in high-shock and highvibration environments.
Do not expose the device to water.
•
Do not store the device where
•
prolonged exposure to extreme
temperatures can occur.
Never use a sharp object to operate
•
the touchscreen. Never use a stylus
while operating a vehicle.
To help avoid theft, remove the
•
device and mount from sight when
not in use. Remove the residue on
the windshield left by the suction
cup.
nüvifone M10 Quick Start Manual 17
Page 18

Important Safety and Product Information
For updates to the safety and product
information, see the most recent
owner’s manual at
www.garminasus.com\M10.
WARNING
Failure to avoid the following
potentially hazardous situations could
result in an accident or collision
resulting in death or serious injury.
Installation and Operation Warnings
When installing the device in a
•
vehicle, place the device securely
so it does not obstruct the driver’s
view of the road or interfere with
vehicle operating controls, such as
the steering wheel, the foot pedals,
or the transmission levers. Do not
place the device in front of or above
any airbag. (See diagram.)
18 nüvifone M10 Quick Start Manual
Do not place unsecured on the
◦
vehicle dashboard.
Do not mount where the driver’s
◦
eld of vision is blocked.
Do not mount in front of an
◦
airbag eld of deployment.
The windshield mount may not
•
stay attached to the windshield in
all circumstances. Do not place
the mount where it will become
a distraction if the mount should
become detached. Keep your
windshield clean to help ensure that
the mount stays on the windshield.
Always use your best judgement,
•
and operate the vehicle in a safe
manner. Do not become distracted
by the device while driving,
and always be fully aware of all
driving conditions. Minimize the
Page 19

amount of time spent viewing the
device screen while driving, and
use voice prompts when possible.
Do not send text messages, input
•
destinations, change settings, or
access any functions requiring
prolonged use of the device
controls while driving. Pull over
in a safe and legal manner before
attempting such operations.
Navigation Warnings
When navigating, carefully
•
compare information displayed
on the device to all available
navigation sources, including
road signs, road closures, road
conditions, trafc congestion,
weather conditions, and other
factors that may affect safety while
driving. For safety, always resolve
any discrepancies before continuing
navigation, and defer to posted road
signs and road conditions.
The device is designed to provide
•
nüvifone M10 Quick Start Manual 19
route suggestions. It is not a
replacement for driver attentiveness
and good judgement. Do not follow
route suggestions if they suggest
an unsafe or illegal maneuver
or would place the vehicle in an
unsafe situation.
Battery Warnings
If these guidelines are not followed,
the internal lithium-ion battery may
experience a shortened life span or may
present a risk of damage to the GPS
device, re, chemical burn, electrolyte
leak, and/or injury.
Do not leave the device exposed
•
to a heat source or in a high
temperature location, such as in the
sun in an unattended vehicle. To
prevent damage, remove the device
from the vehicle or store it out of
direct sunlight, such as in the glove
box.
Do not puncture or incinerate the
•
device or battery.
Page 20

When storing the device for an
•
extended time, store within the
following temperature range: from
-4°F to 158°F (from -20°C to
70°C).
Do not operate the device outside
•
of the following temperature range:
from 5°F to 104°F (from -15°C to
40°C).
Contact your local waste disposal
•
department to dispose of the
device/battery in accordance
with applicable local laws and
regulations.
Additional User-replaceable Battery
Warnings:
Do not use a sharp object to remove
•
the battery.
Keep the battery away from
•
children.
Do not disassemble, puncture, or
•
external battery charger, only use
the accessory approved for your
product.
Only replace the battery with the
•
correct replacement battery. Using
another battery presents a risk
of re or explosion. To purchase
a replacement battery, see your
Garmin or ASUS dealer or the
Garmin-Asus Web site.
Do not remove or attempt to
•
remove the non-user-replaceable
battery.
Map Data Information
Garmin uses a combination of
governmental and private data sources.
Virtually all data sources contain some
inaccurate or incomplete data. In some
countries, complete and accurate map
information is either not available or is
prohibitively expensive.
damage the battery.
If using an AC charger or an
•
20 nüvifone M10 Quick Start Manual
Page 21

Avoid Hearing Damage
You can permanently damage your
ears and lose hearing if you listen to
the device, earbuds, or headphones at
high volume. The volume is typically
too loud if you cannot hear people
speaking around you. Limit the amount
of time you listen at high volume. If
you experience ringing in your ears or
mufed speech, stop listening and have
your hearing checked.
Avoid Repetitive Motion
You may experience occasional
discomfort in your hands, arms,
shoulders, neck, or other parts of
your body if you perform repetitive
activities, such as typing, on the mobile
device. Take frequent breaks. If you
have discomfort while or after using
the device, stop using it and see a
Avoid Seizures, Blackouts, and Eyestrain
A very small percentage of people
can experience seizures or blackouts
caused by light ashes or patterns, such
as while watching videos or playing
games. If you have experienced, or
have a family history of, seizures or
blackouts, consult a physician before
playing games or watching videos on
your device.
Avoid prolonged use of the device.
Take frequent breaks from using the
device. Hold the device away from
your eyes. Use the device in a well-lit
room. If you experience convulsions,
eye or muscle twitching, loss of
awareness, involuntary movement, or
disorientation, stop using the device
and consult a physician.
physician.
nüvifone M10 Quick Start Manual 21
Page 22

Pacemakers and Other Medical Devices
Studies have shown that there may
be a potential interaction between
mobile devices and normal pacemaker
operation. The pacemaker industry
For other medical devices, consult with
your physician or the manufacturer to
determine if your mobile device may
interfere with the medical device, and
to determine any precautions that you
can take to avoid interference.
recommends that people with
pacemakers follow these guidelines to
minimize any risk of interference with
pacemaker operation:
Radio Frequency Exposure
This device is a mobile transmitter
and receiver that uses its antenna to
send and receive low levels of radio
Always maintain a distance of
•
6 inches (15 cm) between the
pacemaker and any mobile device
that is turned on.
Store the device on the opposite
•
side of the pacemaker. Do not carry
the device in a breast pocket.
Use the ear furthest from the
•
pacemaker in order to minimize any
potential for interference.
If you think that interference may
•
be occurring, turn off the device
immediately.
frequency (RF) energy for voice and
data communications. The antenna(s)
used for this transmitter must not be
co-located or operating in conjunction
with any other antenna or transmitter.
The device emits RF energy below
the published limits when operating in
its maximum output power mode and
when used with Garmin authorized
accessories. To comply with ICNIRP
RF exposure compliance requirements,
the device should be used in its
automobile mount, as a body-worn, or
as a handheld device only. For body
worn operation, this phone has been
22 nüvifone M10 Quick Start Manual
Page 23

tested and meets the FCC RF exposure
guidelines for use with an accessory
that contains no metal and the positions
the handset a minimum of 1.5 cm from
the body. Use of other accessories may
not ensure compliance with FCC RF
exposure guidelines. If you do not use
a body-worn accessory and are not
holding the phone at the ear, position
the handset a minimum of 1.5 cm from
your body when the phone is switched
on. The device should not be used in
other congurations.
This device has been tested and is in
compliance with international Specic
Absorption Rate (SAR) Exposure
limits. The actual measured values are
as follows:
Band Position SAR 10g
GSM 850 Head 0.94
Body (1.5
cm gap)
GSM 900 Head 0.424
nüvifone M10 Quick Start Manual 23
(W/kg)
1.33
Band Position SAR 10g
GSM 1800 Head 0.549
GSM 1900 Head 0.512
Body (1.5
cm gap)
WCDMA
Band I
WCDMA Band
VIII
WLAN Head 0.044
Head 0.796
Head 0.415
Body (1.5
cm gap)
(W/kg)
0.445
0.069
Declaration of Conformity
Hereby, Garmin, declares that this
product is in compliance with the
essential requirements and other
relevant provisions of Directive
1999/5/EC. To view the full
Declaration of Conformity, go to
www.garminasus.com/declaration
-of-conformity.
Page 24

Equipment Use
This device is for use worldwide,
including the following countries:
found to comply with the limits for
a Class B digital device, pursuant to
part 15 of the FCC rules. These limits
are designed to provide reasonable
AT EE IS NO
BE ES IT PL
BG FI LI PT
CH FR LT RO
CY GB LU SE
CZ GR LV SI
DE HU MT SK
DK IE NL TR
protection against harmful interference
in a residential installation. This
equipment generates, uses, and can
radiate radio frequency energy and
may cause harmful interference to
radio communications if not installed
and used in accordance with the
instructions. However, there is no
guarantee that interference will not
occur in a particular installation. If
this equipment does cause harmful
FCC Compliance
This device complies with part 15 of
the FCC Rules. Operation is subject
to the following two conditions: (1)
this device may not cause harmful
interference, and (2) this device must
accept any interference received,
including interference that may cause
undesired operation.
This equipment has been tested and
24 nüvifone M10 Quick Start Manual
interference to radio or television
reception, which can be determined by
turning the equipment off and on, the
user is encouraged to try to correct the
interference by one of the following
measures:
Reorient or relocate the receiving
•
antenna.
Increase the separation between the
•
equipment and the receiver.
Page 25

Connect the equipment into an
0700
•
outlet that is on a different circuit
from the GPS unit.
Consult the dealer or an
•
experienced radio/TV technician
for help.
This product does not contain any
user-serviceable parts. Repairs should
only be made by an authorized service
center. Unauthorized repairs or
modications could result in permanent
damage to the equipment, and void
your warranty and your authority
to operate this device under Part 15
regulations.
nüvifone M10 Quick Start Manual 25
Page 26

Frequently Asked Questions
Question Answer
Press the key, and then tap Settings > Navigation >
GPS > GPS Status > . Make sure GPS is enabled.
Make sure the GPS has enough time to initialize. When the
How can I acquire
satellite signals?
How do I check the
map version?
How do I check the
software version?
How to do I back up
and restore les?
Why can’t I place a
phone call?
26 nüvifone M10 Quick Start Manual
GPS is turned on for the rst time, it may take a few minutes
to initialize.
If you have traveled more than 600 miles with the GPS
receiver turned off, set your location on the map:
Press the key, and then tap Settings > Navigation >
GPS > GPS Status > > Set Location.
Press the key, and tap Tools > Manage My Data > Map
Sets. Tap a map to view the version.
Press the key, and tap Settings > System > System
Information
information and version.
Press the key. Tap Backup > Backup or Restore, select
les, and follow the on-screen instructions.
The call function may have been suspended because of low
battery power. In low battery situations, you might be asked
to turn off the call functions. You can still navigate in these
situations (PND mode).
. Use the slider menu to view the device
Page 27

Why won’t my
device turn on?
Why won’t my
device charge?
How can I avoid
deleting the map
le?
Charge the battery. See page 4.
Replace the battery. See the owner’s manual.
Replace the fuse in the vehicle power cable. See the
owner’s manual.
As a safety precaution in high temperature environments,
the device will suspend charging and use battery power.
If the device is mounted in a vehicle, remove the device
from the mount and place it out of direct sunlight.
In Mass storage mode, do not delete or format the original
directories, such as Garmin and Documents. Do not delete
les for which you do not know the purpose.
Page 28

The combined Garmin-Asus logo is a trademark of Garmin Ltd.
and ASUSTeK Computer, Inc.
Garmin® is a trademark of Garmin Ltd. or its subsidiaries, registered in the USA
and other countries. nüMaps Guarantee™ and nüvifone™ are trademarks of
Garmin Ltd. or its subsidiaries. These trademarks may not be used without the
express permission of Garmin.
ActiveSync, Microsoft, and Windows are either registered trademarks or
trademarks of Microsoft Corporation in the United States and/or other countries.
microSD™ is a trademark of SanDisk or its subsidiaries.
Information on this product’s compliance with the European Union regulation
1907/2006 (Registration, Evaluation, Authorisation, and Restriction of
Chemicals) may be found at http://green.asus.com/english/REACH.htm.
© 2009 Garmin Ltd. or its subsidiaries and ASUSTeK Computer, Inc.
15G06A478001 Version 3
June 2010 Part Number 190-01153-01 Rev. C Printed in China
 Loading...