

Page 1
Instructions
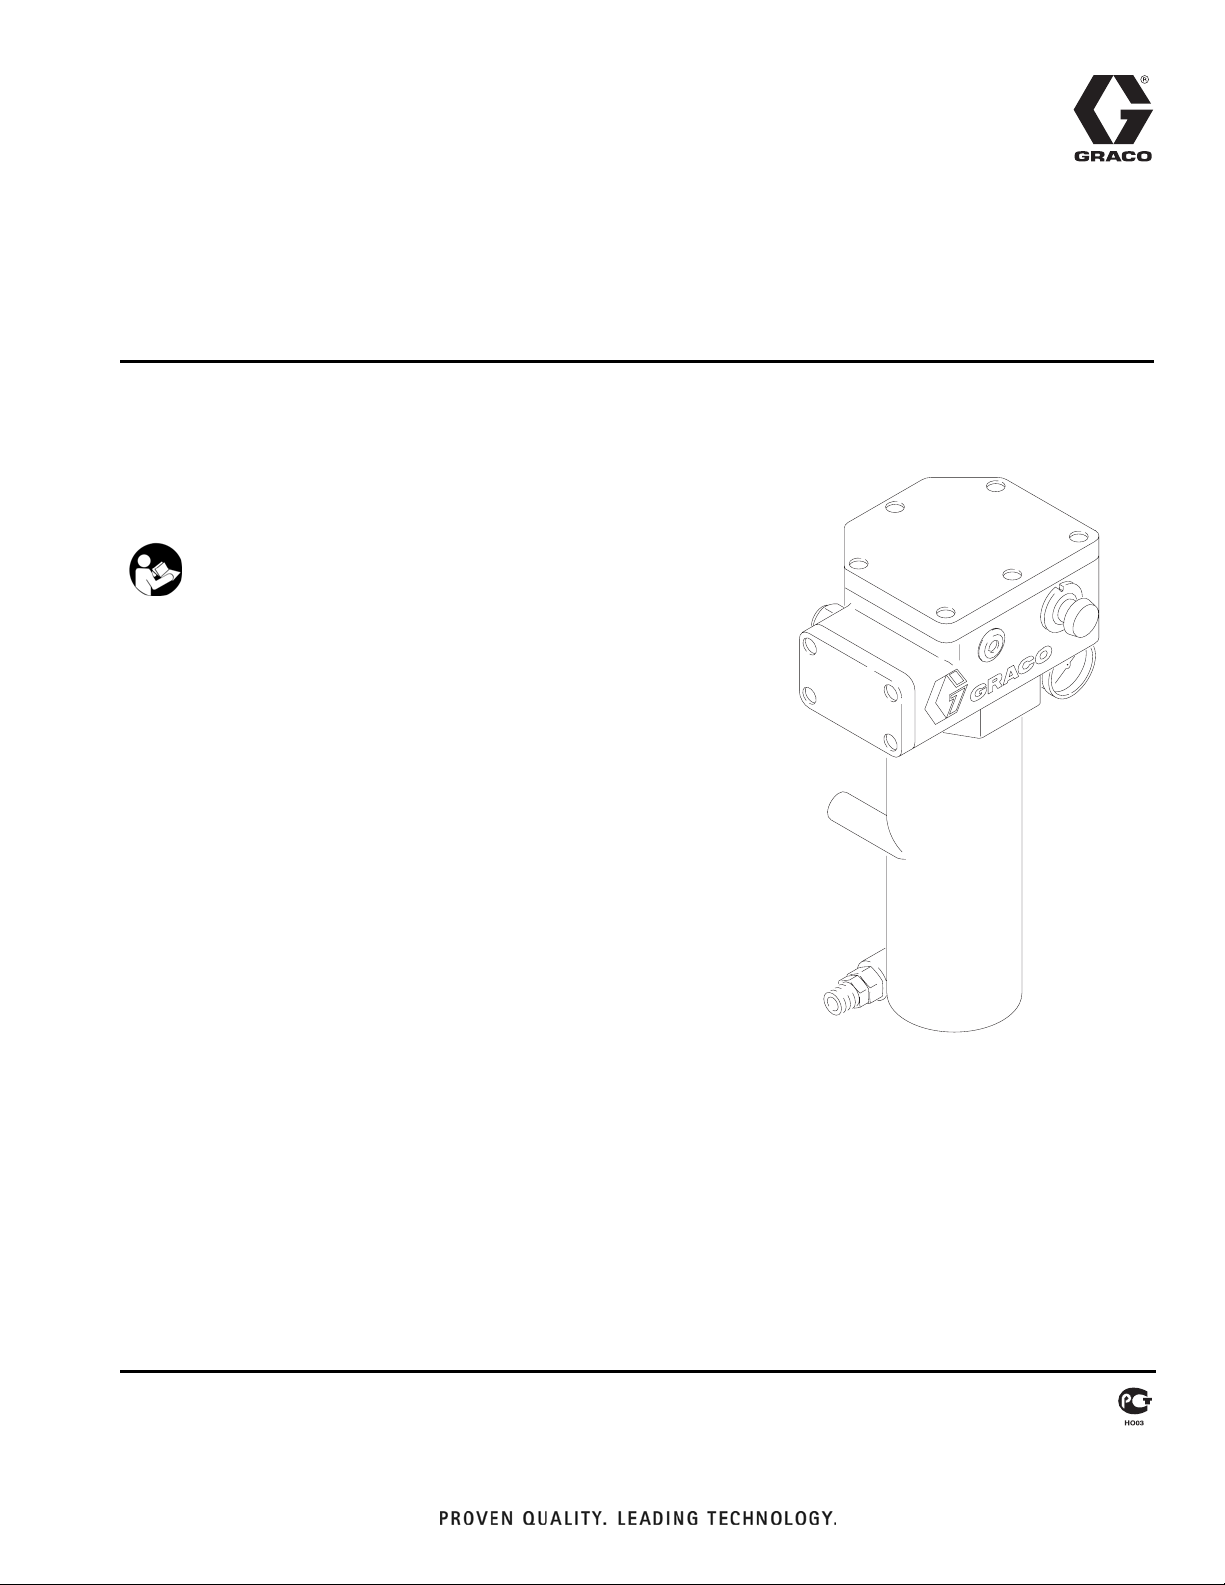
High Pressure Fluid Heater
VISCON HP
Used for variable heating of fluids.
7250 psi (50 MPa, 500 bar) Maximum Working Pressure
Important Safety Instructions
Read all warnings and instructions in this manual.
Save these instructions.
See page 2 for model numbers, descriptions, and
approvals information.
309524L
See page 3 for Table of Contents.
TI12338A
Hazardous Location Heater shown
Page 2
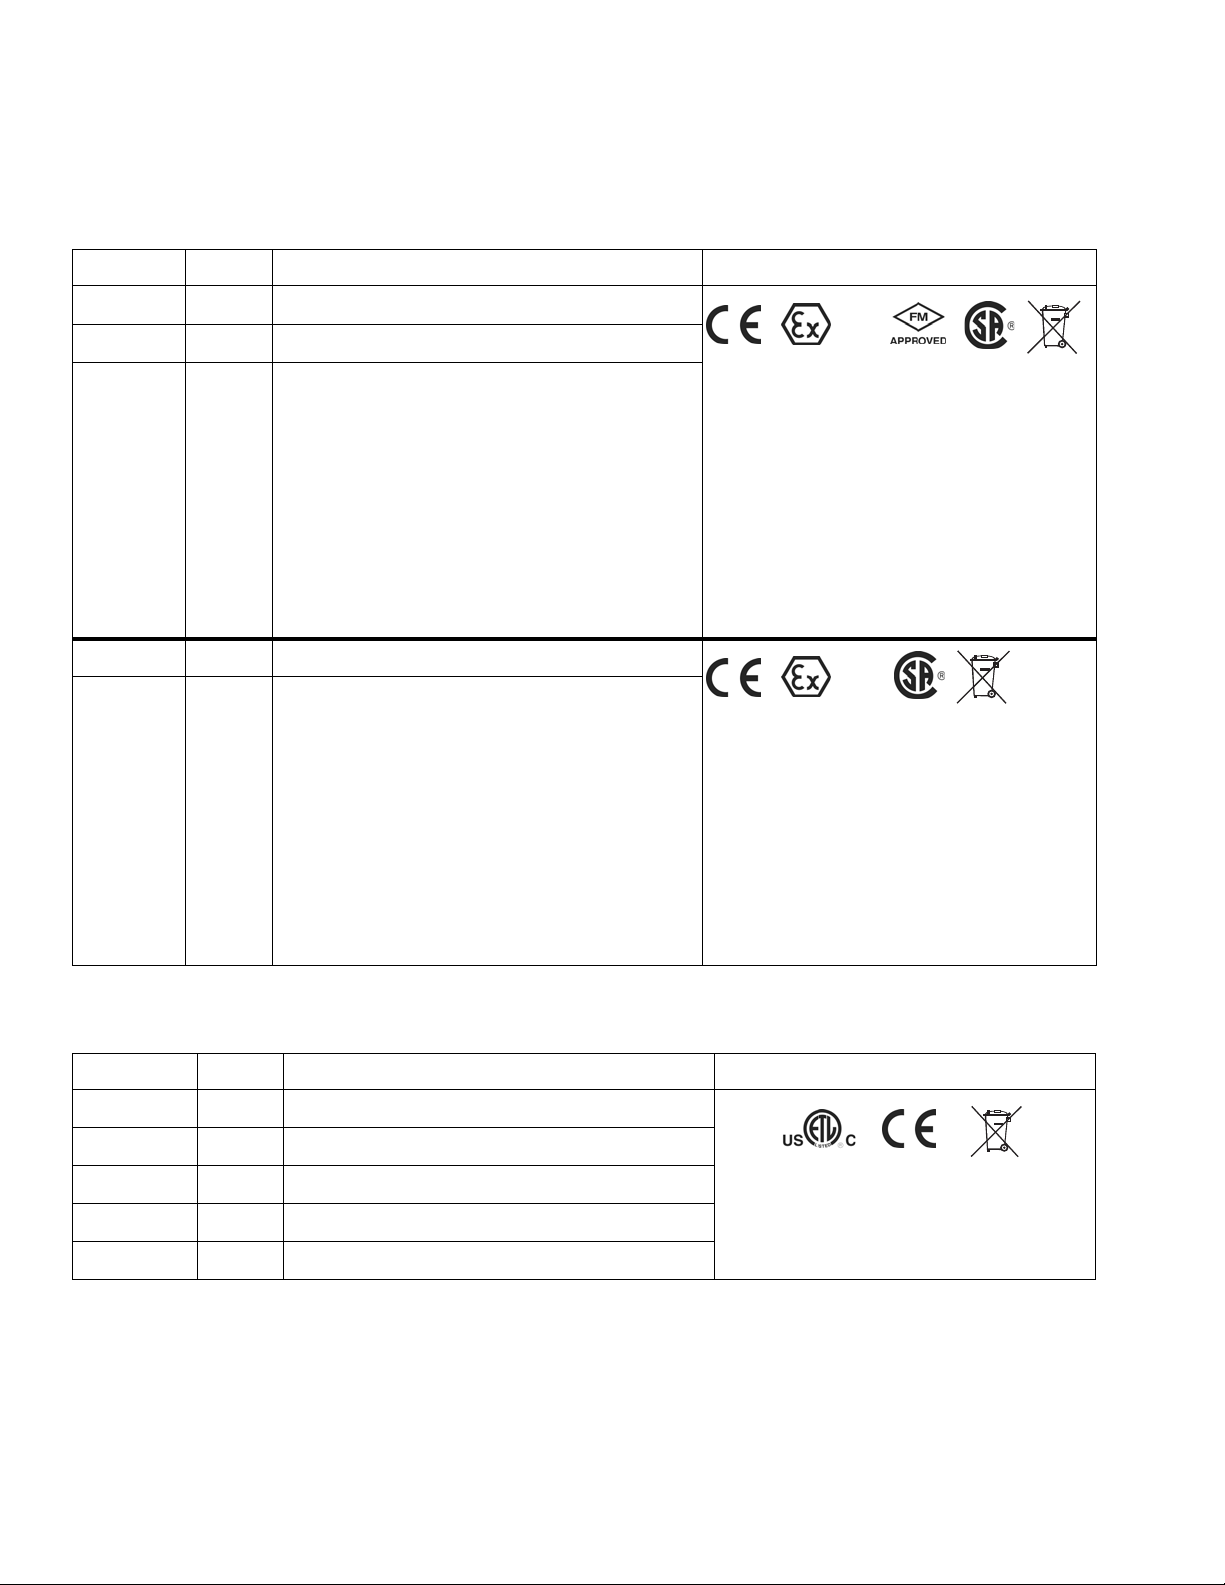
Models
Models
Hazardous Location Heaters
Part No.
245848 A 120 / 2300 / 19.2
245863 A 240 / 4000 / 16.7
245864 A 480 / 4000 / 8.30
245862 A 200 / 4000 / 20.0
246254 A 380 / 4000 / 10.5
Series
VAC (50/60 Hz single phase) / Watts / Amps
Approvals
II 2 G
Approved Exd II T2 482°F (250°C)
Certificate No. ISSeP 07ATEX034X
Approved to EN 60079-0:2006 (IEC 60079-0:2004)
and EN 60079-1:2007 (IEC 60079-1:2007) for
Hazardous Locations, Temp Code T2 482°F
(250°C). See Technical Data, page 28, for
additional information.
CSA Certified and FM Approved as flame proof for
Class I, Division 1, Group D Hazardous Locations,
Temp Code T2 482°F (250°C), -20°C < T amb <
135°F (57°C). See Technical Data, page 28, for
additional information.
II 2 G
Approved Exd II T2 482°F (250°C)
Certificate No. ISSeP 07ATEX034X
Approved to EN 60079-0:2006 (IEC 60079-0:2004)
and EN 60079-1:2007 (IEC 60079-1:2007) for
Hazardous Locations, Temp Code T2 482°F
(250°C). See Technical Data, page 28, for
additional information.
Non-hazardous Location Heaters
Model No.
245867 A 120 / 2300 / 19.2
245868 A 200 / 4000 / 20.0
245869 A 240 / 4000 / 16.7
245870 A 480 / 4000 / 8.30
246276 A 380 / 4000 / 10.5
Series
VAC (50/60 Hz single phase) / Watts / Amps
CSA Certified as flame proof for Class I, Division 1,
Group D Hazardous Locations, Temp Code T2
482°F (250°C), -20°C < T amb < 135°F (57°C). See
Technical Data, page 28, for additional information.
Approvals
Conforms to
UL Std. 61010-1
CSA Std. 22.2 No. 1010-1-92
2 309524L
Page 3

Contents
Contents
Models . . . . . . . . . . . . . . . . . . . . . . . . . . . . . . . . . . . 2
Manual Conventions . . . . . . . . . . . . . . . . . . . . . . . . 3
Warning . . . . . . . . . . . . . . . . . . . . . . . . . . . . . . . . . . . 4
Installation . . . . . . . . . . . . . . . . . . . . . . . . . . . . . . . . 6
Selecting Tubing . . . . . . . . . . . . . . . . . . . . . . . . . 7
Mounting Heater . . . . . . . . . . . . . . . . . . . . . . . . . 8
Fluid Connections & Accessories . . . . . . . . . . . . 9
Electrical Connections . . . . . . . . . . . . . . . . . . . . 10
Determining Proper Fluid Temperature . . . . . . . 12
Operation . . . . . . . . . . . . . . . . . . . . . . . . . . . . . . . . 14
Pressure Relief Procedure . . . . . . . . . . . . . . . . 14
Initial Flushing . . . . . . . . . . . . . . . . . . . . . . . . . . 14
Priming System . . . . . . . . . . . . . . . . . . . . . . . . . 14
Setting Heater Control . . . . . . . . . . . . . . . . . . . . 15
Adjusting for Spraying . . . . . . . . . . . . . . . . . . . . 15
Maintenance . . . . . . . . . . . . . . . . . . . . . . . . . . . . . . 16
Flushing . . . . . . . . . . . . . . . . . . . . . . . . . . . . . . . 16
Draining Heater . . . . . . . . . . . . . . . . . . . . . . . . . 16
Unclogging Fluid Passages . . . . . . . . . . . . . . . . 16
Troubleshooting . . . . . . . . . . . . . . . . . . . . . . . . . . . 17
Repair . . . . . . . . . . . . . . . . . . . . . . . . . . . . . . . . . . . 18
Primary Thermostat & Probe . . . . . . . . . . . . . . . 18
Backup Thermostat . . . . . . . . . . . . . . . . . . . . . . 18
Thermal Limit Sensor . . . . . . . . . . . . . . . . . . . . 20
Control Knob . . . . . . . . . . . . . . . . . . . . . . . . . . . 20
Heater Block . . . . . . . . . . . . . . . . . . . . . . . . . . . 20
Parts . . . . . . . . . . . . . . . . . . . . . . . . . . . . . . . . . . . . 22
Hazardous Location Heaters . . . . . . . . . . . . . . . 22
Non-Hazardous Location Heaters . . . . . . . . . . . 24
Accessories . . . . . . . . . . . . . . . . . . . . . . . . . . . . . . 26
Technical Data . . . . . . . . . . . . . . . . . . . . . . . . . . . . 28
Dimensions . . . . . . . . . . . . . . . . . . . . . . . . . . . . . . . 28
Translations . . . . . . . . . . . . . . . . . . . . . . . . . . . . . . 29
Graco Standard Warranty . . . . . . . . . . . . . . . . . . . 30
Graco Information . . . . . . . . . . . . . . . . . . . . . . . . . 30
Translations
Manual available in following languages:
Manual Language
309524 English
309555 French
309556 Spanish
309557 German
309558 Swedish
309605 Chinese
309606 Korean
309607 Japanese
Manual Conventions
Warning Caution
WARNING
A warning alerts you to possible serious injury or
death if you do not follow instructions.
Symbols, such as fire and explosion (shown), alert you
to a specific hazard and direct you to read the indicated hazard warnings (pages 4-5).
309524L 3
CAUTION
A caution alerts you to possible equipment damage or
destruction if you do not follow instructions.
Note
A note indicates additional helpful information.
Important
An arrow indicates important information.
Page 4
Warning
WARNING
SKIN INJECTION HAZARD
High-pressure fluid from gun, hose leaks, or ruptured components will pierce skin. This may look like just
a cut, but it is a serious injury that can result in amputation. Get immediate surgical treatment.
• Do not point the gun at anyone or at any part of the body.
• Do not put your hand or fingers over the gun fluid nozzle.
• Do not stop or deflect leaks with your hand, body, glove, or rag.
• Do not “blow back” fluid; this is not an air spray system.
• Follow Pressure Relief Procedure, page 14, when you stop spraying and before cleaning, check-
ing, or servicing equipment.
• Use lowest possible pressure when flushing, priming, or troubleshooting.
• Never spray without tip guard and trigger guard installed.
• Engage trigger lock when not spraying.
• Tighten all fluid connections before operating the equipment.
• Check hoses, tubes, and couplings daily. Replace worn or damaged parts immediately. High pressure hose cannot be recoupled; replace the entire hose.
FIRE AND EXPLOSION HAZARD
Solvent and paint fumes in work area can ignite or explode. To help prevent fire and explosion:
• Use equipment only in well ventilated area.
• Eliminate all ignition sources, such as pilot lights, cigarettes and plastic drop cloths (potential static
arc).
• Do not plug or unplug power cords or turn lights on or off when flammable fumes are present.
• Keep the work area free of debris, including solvent, rags, and gasoline.
• Ground equipment and conductive objects. See Grounding, page 11.
• Hold gun firmly to side of grounded pail when triggering into pail.
• Ensure main power is off and heater is cool before flushing or servicing heater. Do not turn on heater
until fluid lines are clear of solvent.
• Use only grounded hoses.
• If there is static sparking or you feel an electric shock, stop operation immediately. Do not use
equipment until you identify and correct the problem.
ELECTRIC SHOCK HAZARD
Improper grounding, wiring, or usage of the system can cause electric shock.
• All electrical wiring must be done by a qualified electrician and comply with all local codes and regulations.
• Connect only to grounded power source.
• Turn off and disconnect power at the main switch before disconnecting any cables and before servicing equipment.
4 309524L
Page 5
Warning
WARNING
EQUIPMENT MISUSE HAZARD
Misuse can cause serious injury or death.
• For professional use only.
• Use equipment only for its intended purpose. Call your Graco distributor for information.
• Read manuals, warnings, tags, and labels before operating equipment. Follow instructions.
• Check equipment daily. Repair or replace worn or damaged parts immediately.
• Do not alter or modify equipment. Use only Graco parts and accessories.
• Do not exceed the maximum working pressure or temperature rating of the lowest rated system
component. See Technical Data in all equipment manuals.
• Use fluids and solvents that are compatible with equipment wetted parts. See Technical Data in all
equipment manuals. Read fluid and solvent manufacturer’s warnings.
• Route hoses and cables away from traffic areas, sharp edges, moving parts, and hot surfaces.
• Do not use hoses to pull equipment.
• Comply with all applicable safety regulations.
BURN HAZARD
This equipment is used with heated fluid, which can cause equipment surfaces to become very hot. To
avoid severe burns:
• Do not touch hot fluid or equipment.
• Allow equipment to cool completely before touching it.
• Wear heat protective gloves and take special care if fluid temperature exceeds 110°F (43°C).
TOXIC FLUID OR FUMES HAZARD
Toxic fluids or fumes can cause serious injury or death if splashed in the eyes or on skin, inhaled, or
swallowed.
• Read Material Safety Data Sheets (MSDS) to know the specific hazards of the fluids you are using.
• Store hazardous fluid in approved containers, and dispose of it according to applicable guidelines.
PERSONAL PROTECTIVE EQUIPMENT
You must wear proper protective equipment when operating, servicing, or when in the operating area of
the equipment to help protect you from serious injury, including eye injury; inhalation of toxic fumes, and
hearing loss. This equipment includes but is not limited to:
• Protective eyewear
• Gloves, clothing, and respirator as recommended by the fluid and solvent manufacturer
• Hearing protection
309524L 5
Page 6
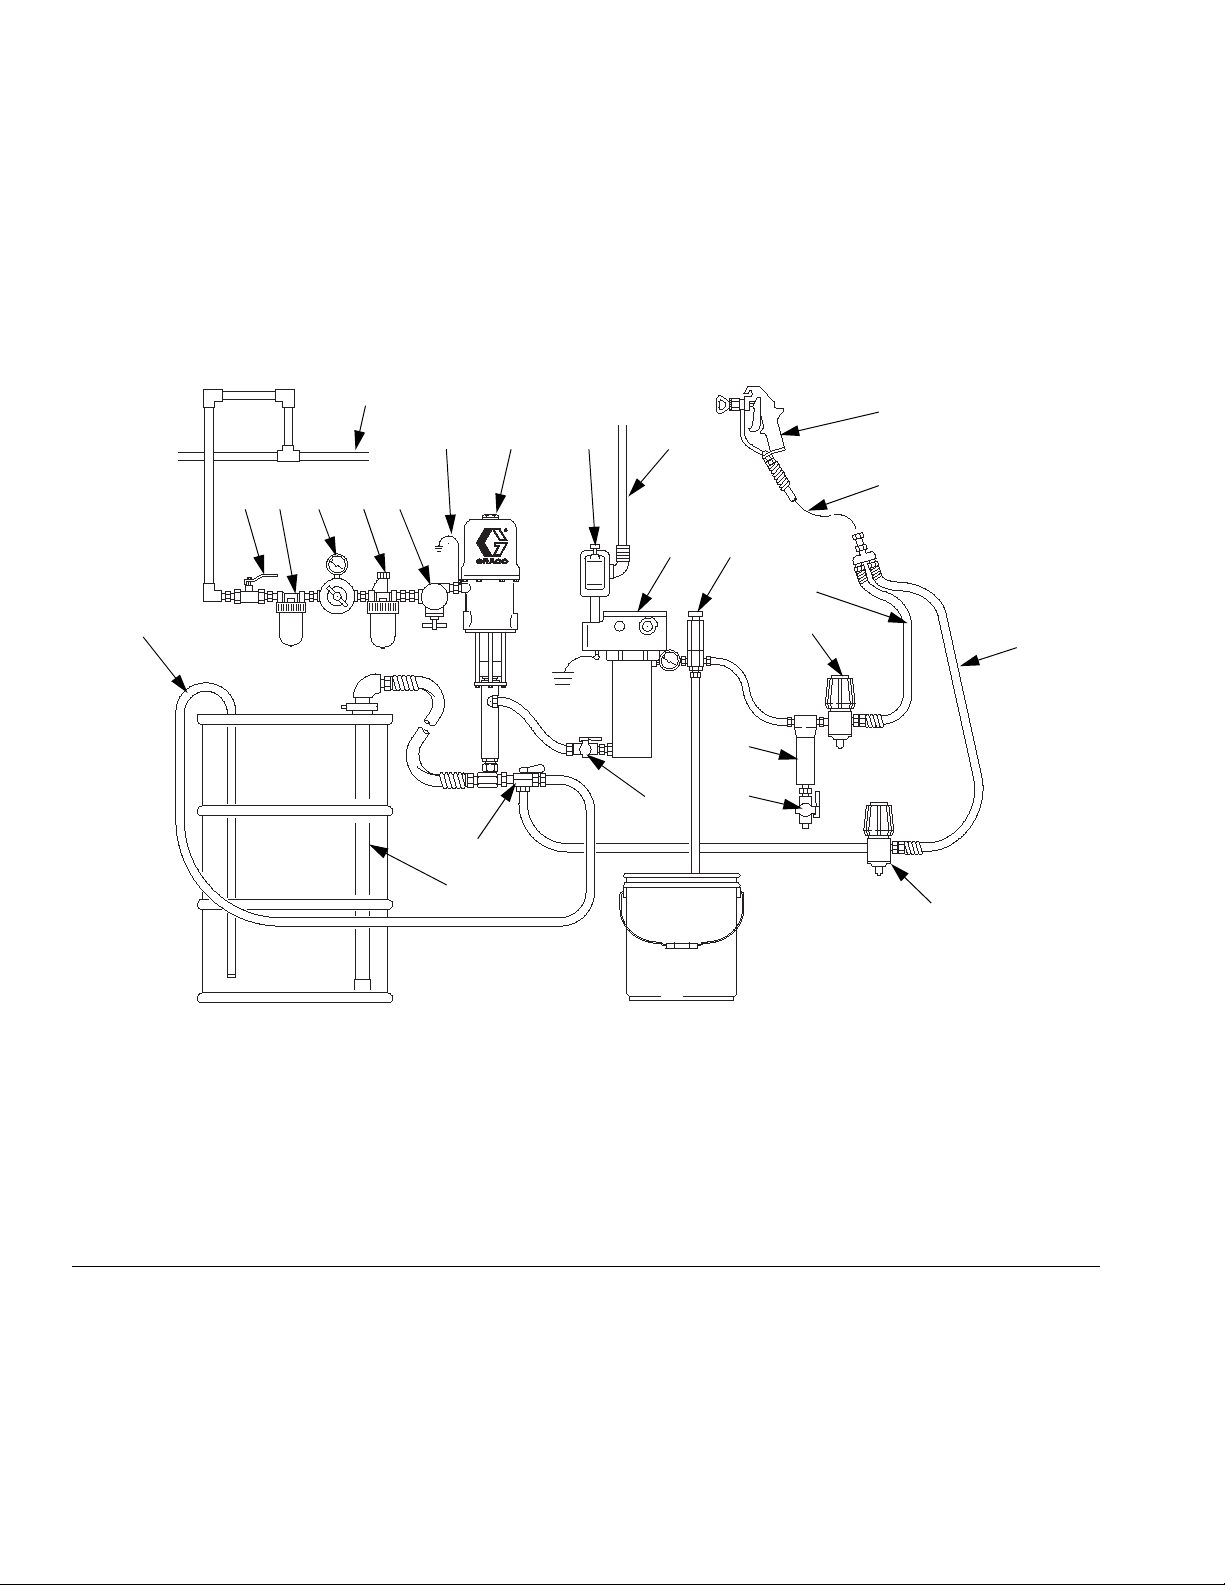
Installation
Installation
Typical Installation Drawing
The typical installation drawing is only a guide. Your Graco distributor can assist in designing your system.
Z
HGF
J
Q
Y
EDCBA
XK
P
V
N
R
L
M
T
U
W
S
05486-524
Key:
A Bleed-type Master Air Valve
B Air Filter
C Air Regulator and Gauge
D Air Line Lubricator
E Pump Runaway Valve
F Ground Wire
GPump
H Explosion Proof Power Switch
IG. 1: Typical Installation – Heated Circulating System
F
6 309524L
JPower Cable
K Heater
L Fluid Filter
M Drain Valve
N Fluid Pressure Regulator
P Fluid Supply Line
QSpray Gun
R Fluid Return Line
S Back Pressure Valve
T Fluid Shutoff Valve
U Director Valve
VDrain Back Tube
W Suction Tube
X Pressure Relief Valve
Y Whip End Hose
Z Air Supply Line
Page 7
Installation
I
WARNING
Read warnings, pages 4-5.
• Select system components that meet temperature and pressure ratings listed in Technical
Data, page 28. The heater’s normal output
range is adjustable from 84-220°F
(29-104°C).
• Locate heater away from all flammable materials and where operators will not come in
contact with hot metal surfaces.
• Insulate and/or label lines and components
exiting heater that may become hot.
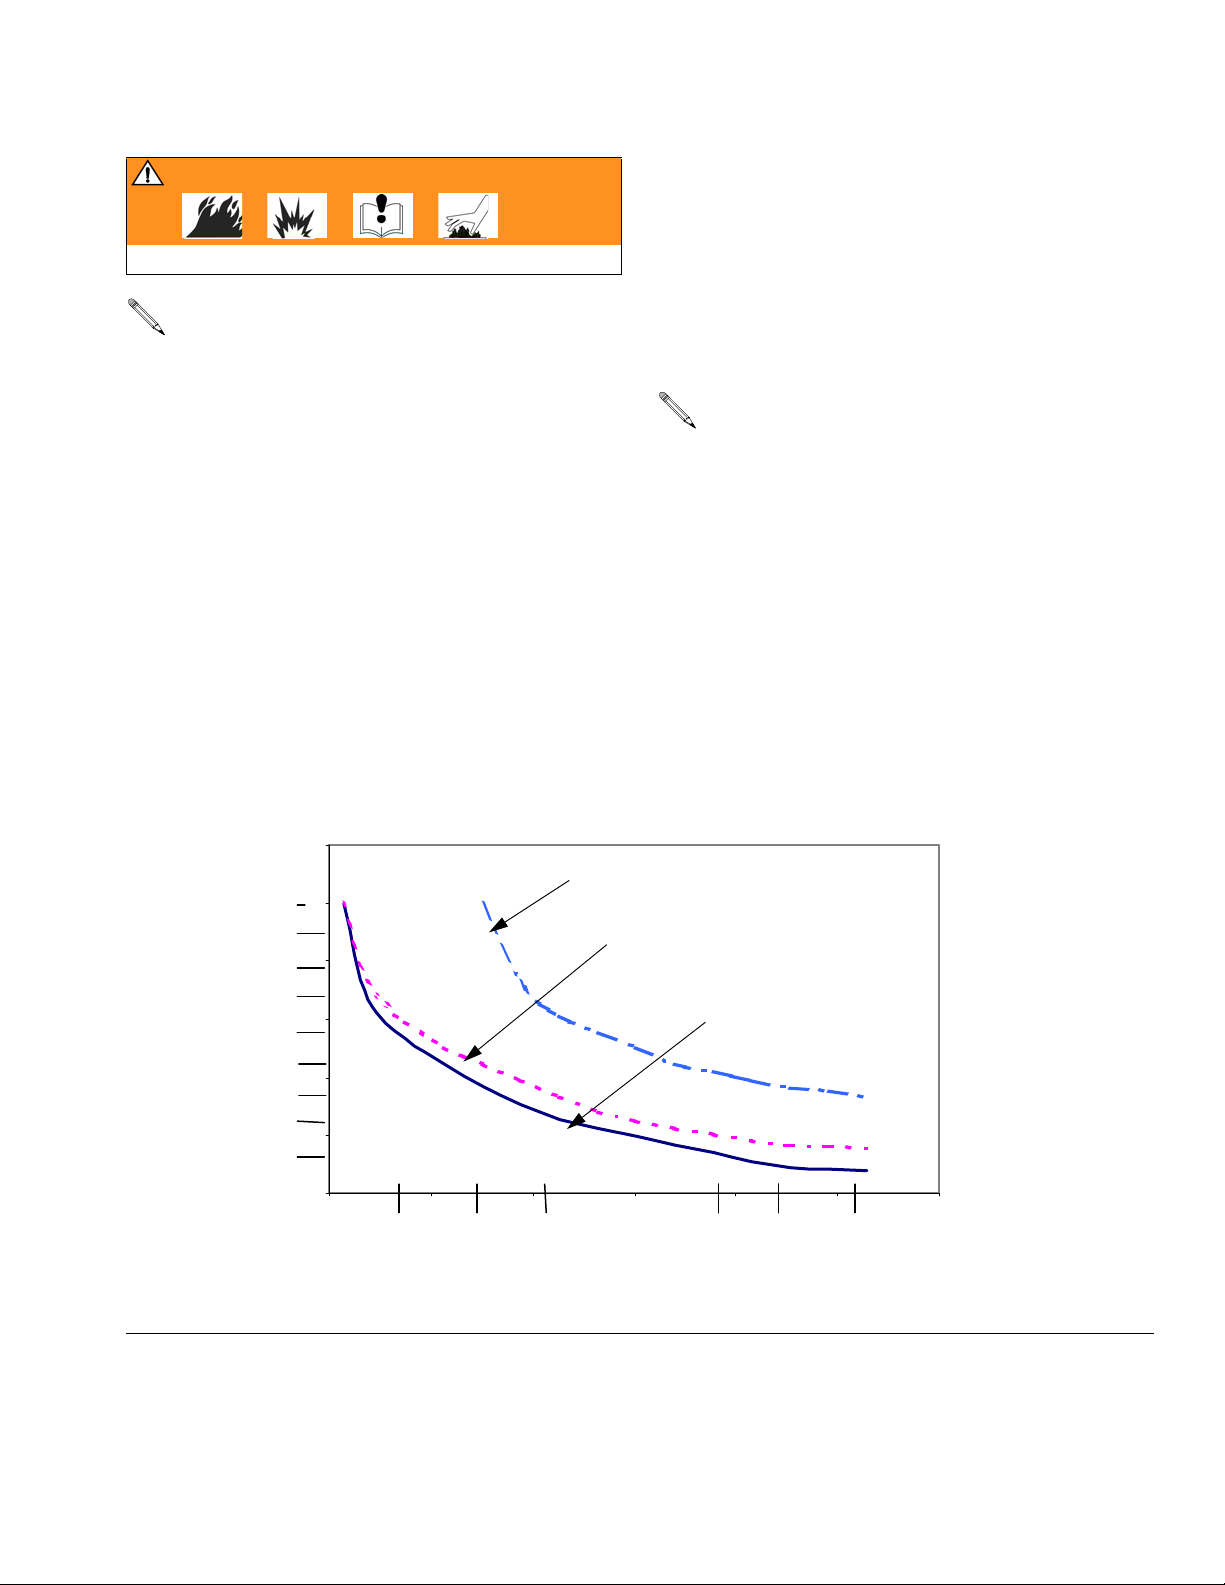
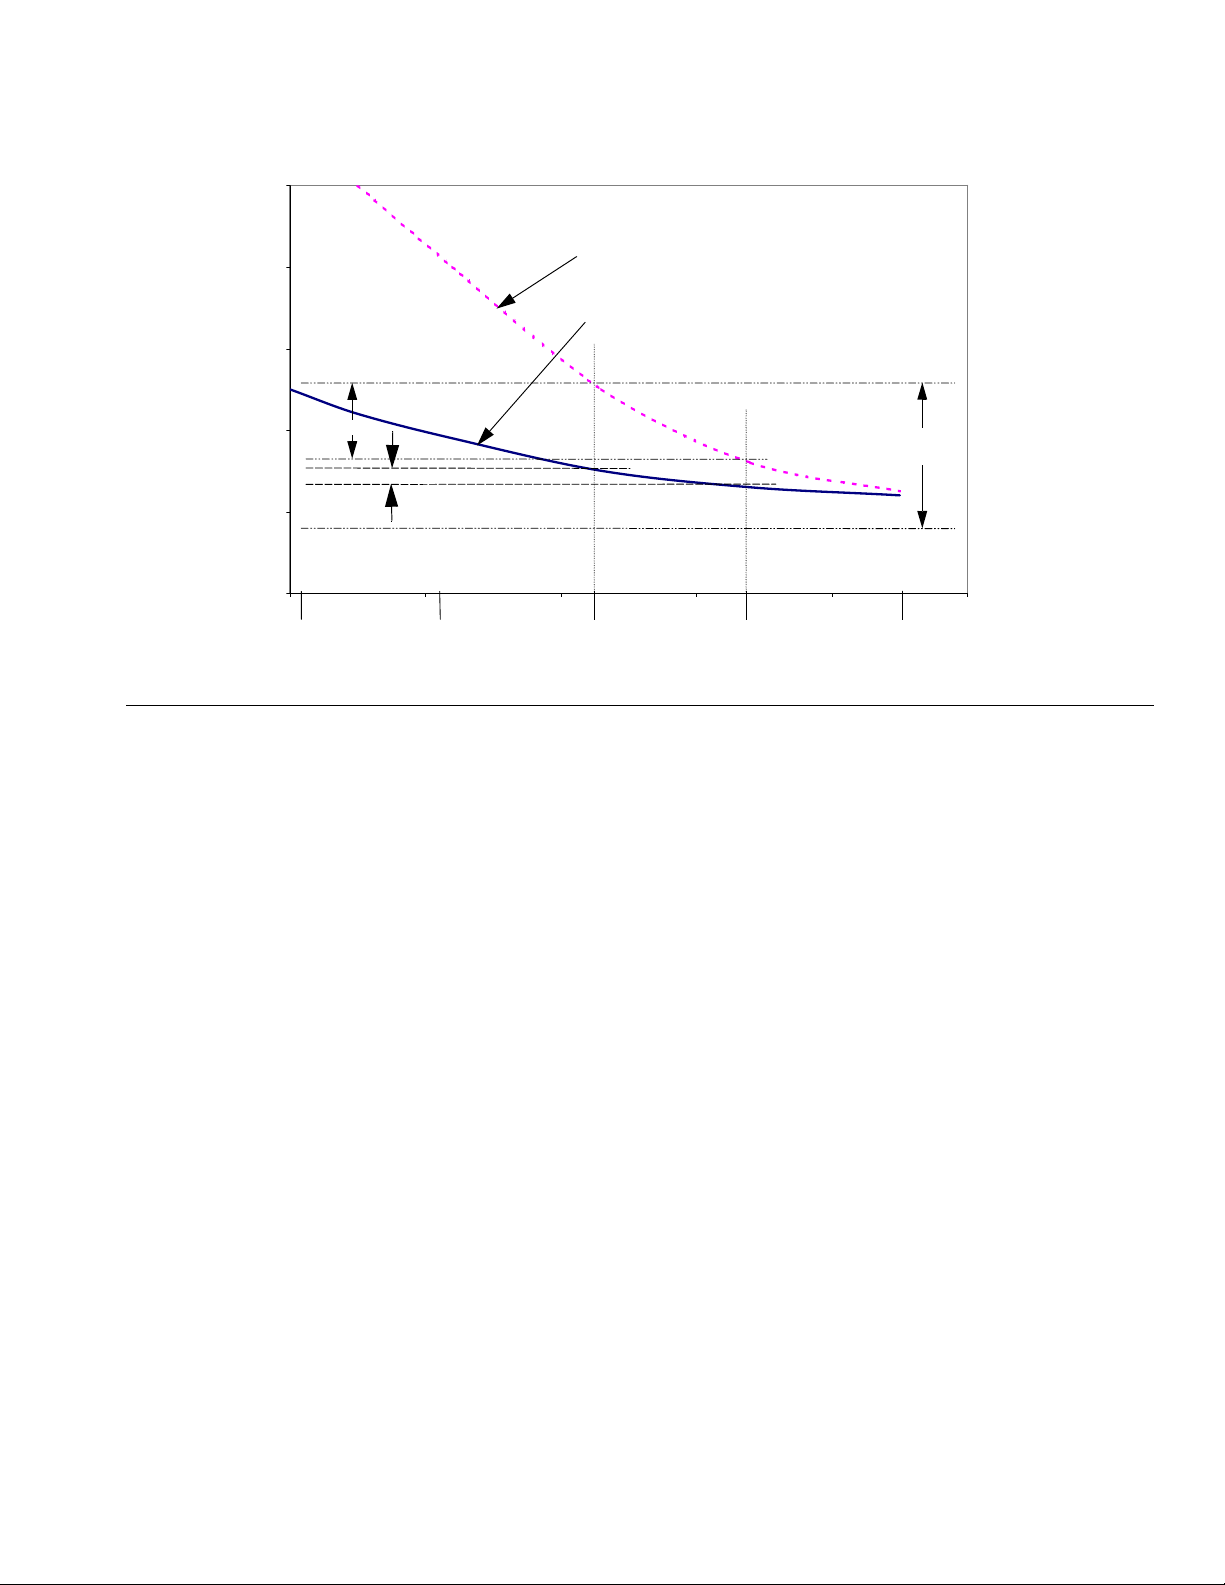
Selecting Tubing
Fluid loses some heat through the tubing or hose
between the heater and spray gun. Locate heater close
to the spray area to minimize heat loss through plumbing.
The chart in F
mon types of tubing.
Chart Notes:
• The greater the flow rate, the less the heat
• Foam-insulated steel tubing and high pres-
• Locate heater close to spray area to minimize
IG. 2 shows a heat loss curve for 3 com-
loss.
sure airless paint hose retain heat best. Insulated tubing and hose are more expensive,
but higher costs are commonly offset by lower
operating costs.
heat loss through plumbing.
oC(o
F)
6
5
(9)
(8)
4
(7)
(6)
3
(5)
(4)
2
(3)
(2)
Typical Fluid Temperature Drop
F
IG. 2: Typical Temperature Drop
1
(1)
0
00.511.522.5 3
(0.1) (0.2) (0.3) (0.4) (0.5) (0.6) (0.7) (0.8)
Heat Loss Curve - 70° F (21° C) ambient
(20 ft.) 6.1 m steel tube
Fluid: (130° F) 54° C
(20 ft.) 6.1 m steel tube
(3/8 in.) 9 mm foam insulation
Fluid: (110° F) 43° C
(20 ft.) 6.1 m airless paint hose
Fluid: (110° F) 43° C
LPM
(GPM )
Flow Rate
309524L 7
Page 8
Installation
Mounting Heater
• The heater has a surface temperature of T2
(482°F, 250°C). Follow temperature code
when locating heater. See Technical Data,
page 28, for more temperature code information.
• Heater controls must be easily accessible.
• The mounting surface must be able to support
the weight of the heater and fluid, and any
stress caused during operation.
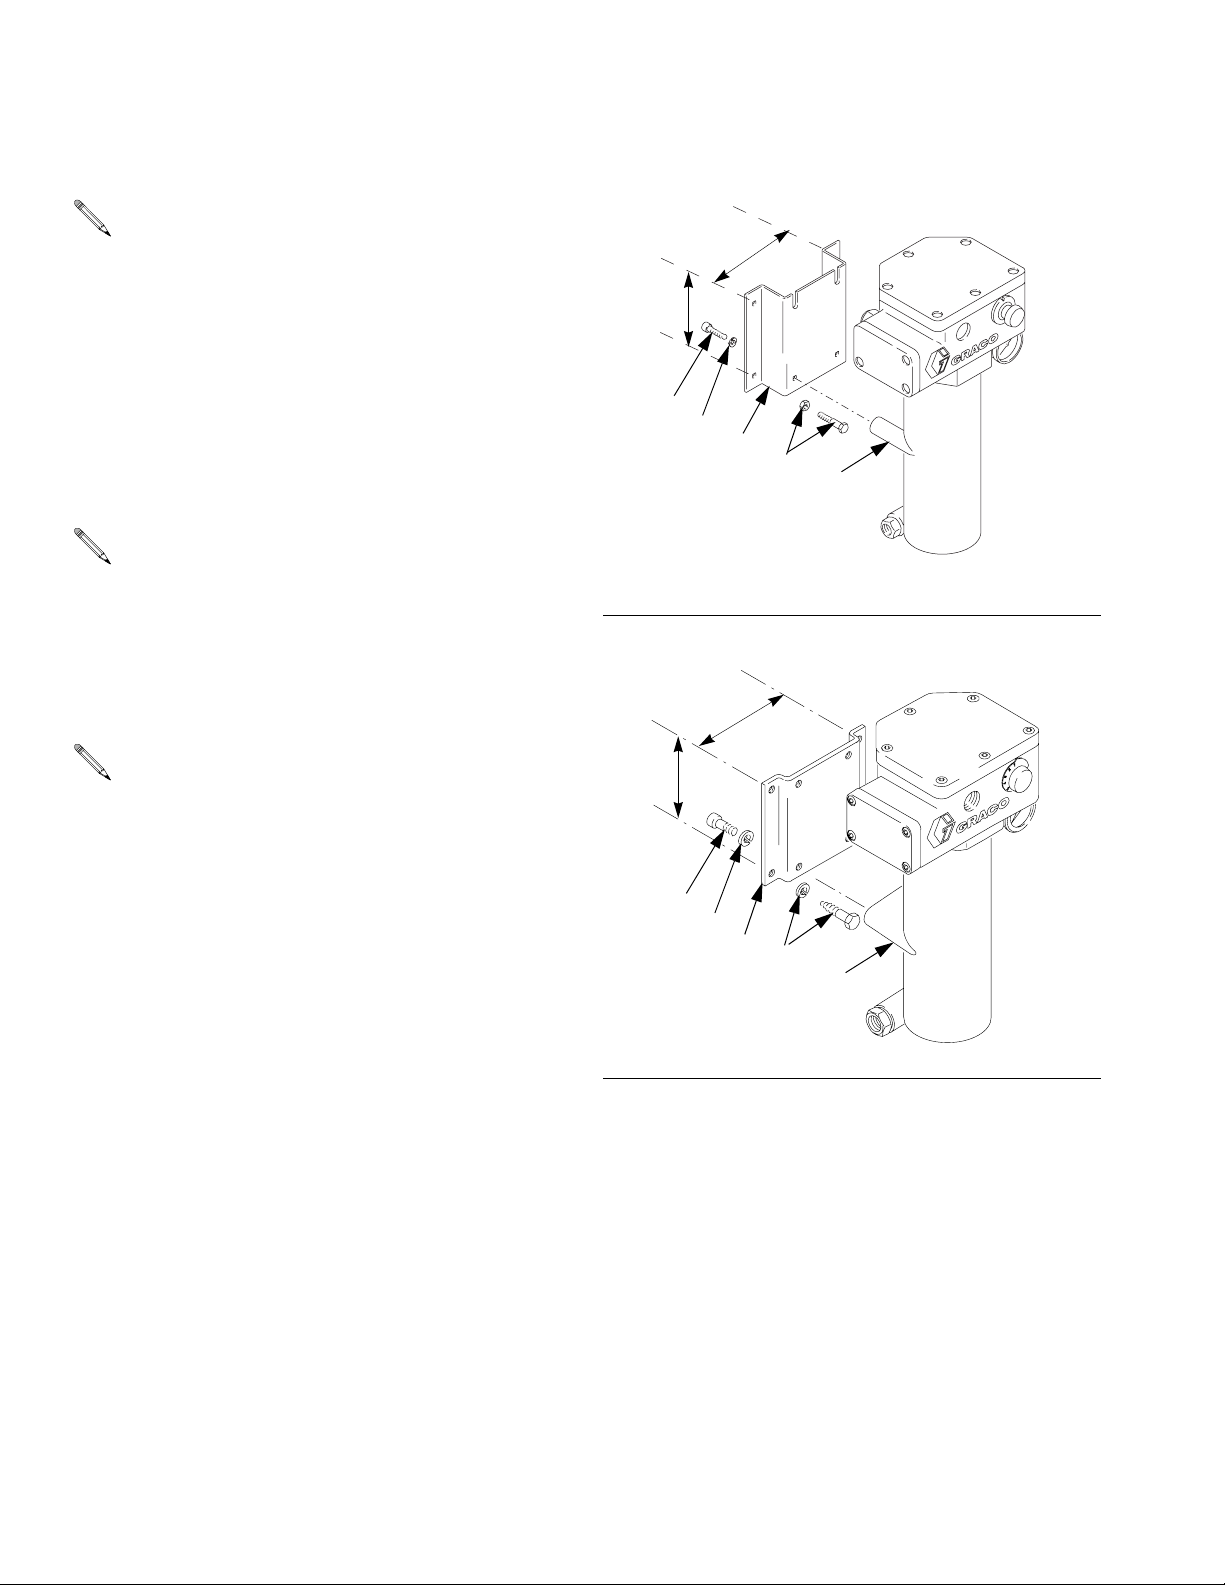
Wall Mounting
Need wall bracket 192585 or 183982. See Accessories, page 26.
Use wall bracket as a template to mark bolt holes.
Bracket 192585
(F
IG. 3)
Bracket depth provides required solid object
clearance to comply with European flame proof
standards.
6 in.
152.4 mm
5 in.
127 mm
6
5
YY
CC
F
IG. 3: Bracket 192585
6 in.
152.4 mm
5 in.
127 mm
BB
05442
1. Use M8 bolts of appropriate length and lockwasher
(CC), not supplied, to mount bracket.
2. Install two screws (6) and washers (5) into top 2
heater mounting posts (BB) until they are about 1/8
in. (3 mm) from fully installed.
3. Lift heater and slide two screw heads into bracket
slots. Install remaining 2 screws and tighten all 4.
Bracket 183982
(F
IG. 4)
1. Mount bracket (MM) to heater with screws (6) and
lockwashers (5) supplied.
2. Use M8 bolts of the appropriate length and lockwasher (NN), not supplied, to secure the bracket to
the wall.
6
5
MM
NN
IG. 4: Bracket 183982
F
PP
8631A
8 309524L
Page 9
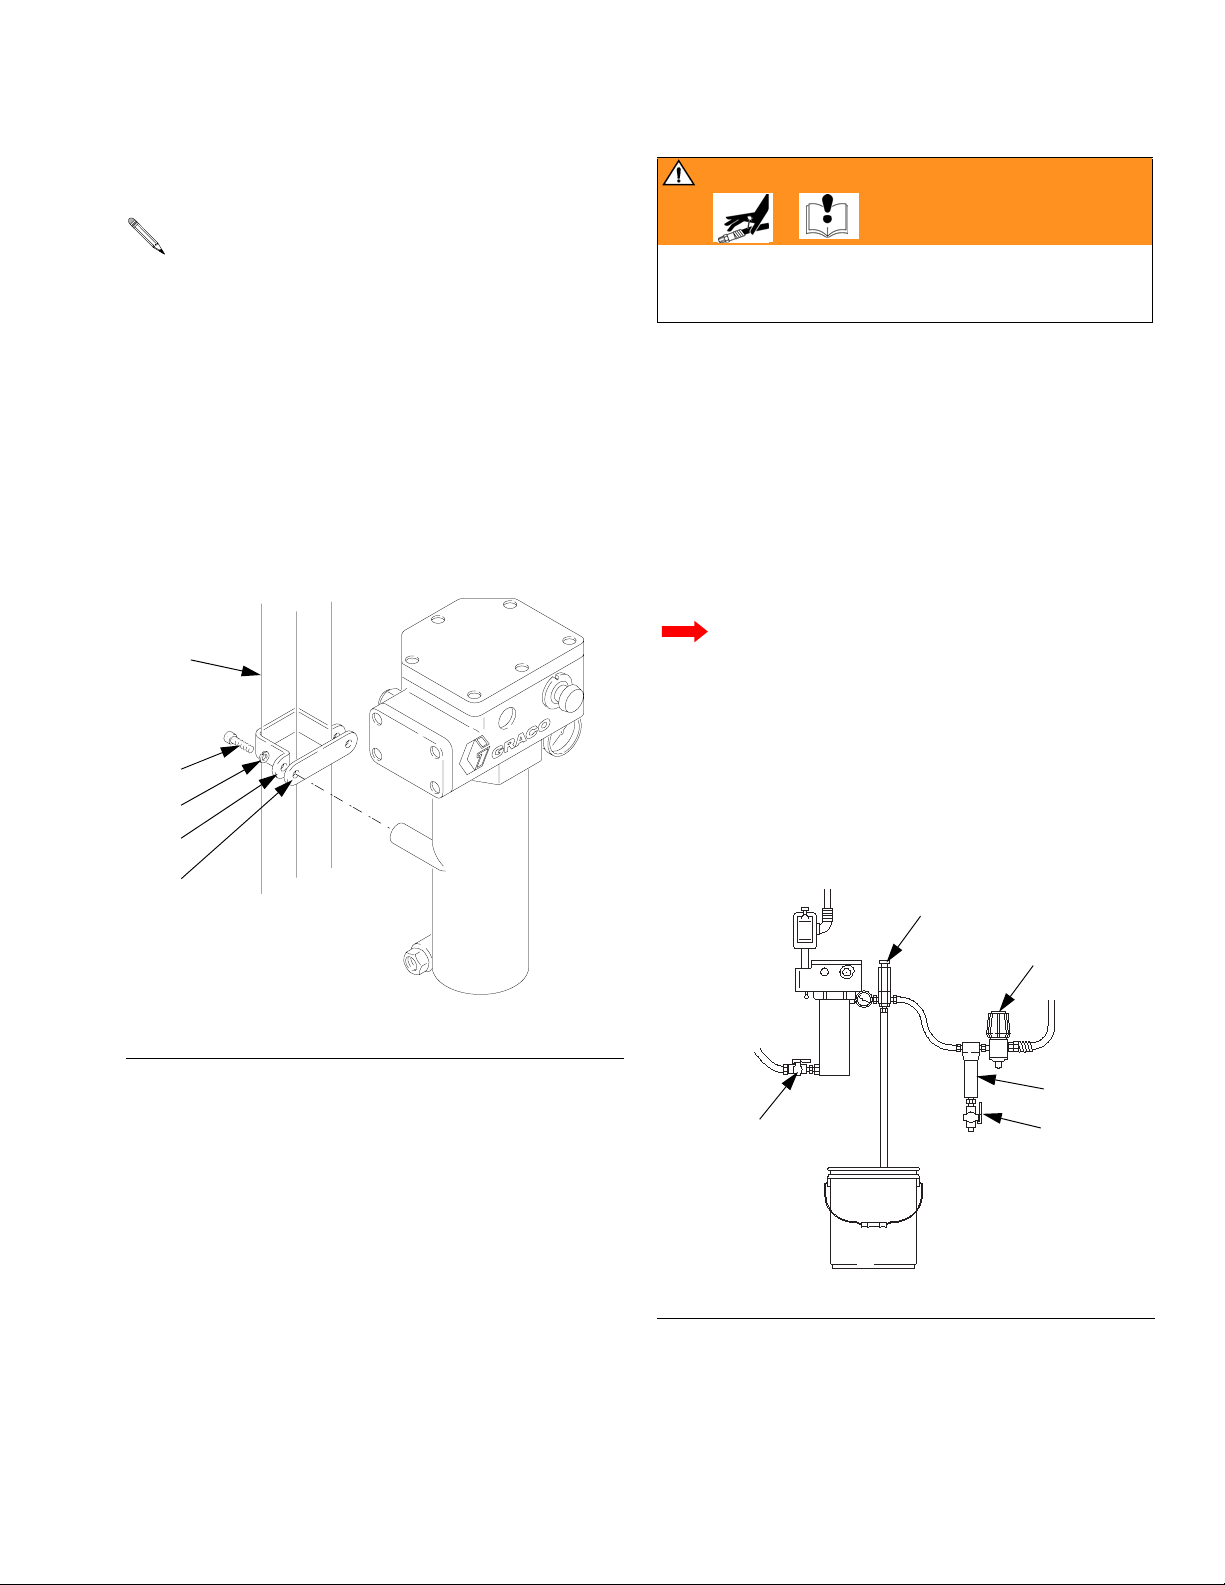
Cart Mounting
(FIG. 5)
Installation
WARNING
You need to have 2 each of cart mounting bar
183485 and clamp 183484. See Accessories,
page 26, to order.
1. Place clamps (AA) around the cart vertical post
(DD) and secure to the heater mounting bars (ZZ)
with M8 x 1.25 x 30 mm bolts (6) and lockwasher
(5).
2. Observe temperature ratings for the power cable to
the terminal junction. Cable H07RN does not meet
the required 221°F (105°C). An intermediate Type
“e” junction may be required. Also see F
DD
6
5
AA
IG. 7.
To avoid rupturing a component, which can cause serious injury, including amputation; read warnings, page
4, and follow the instructions below.
2. Provide a means for adequately handling fluid
expansion caused by heat. Options include:
• Use flexible hoses between heater and gun.
• Install a properly sized accumulator down-
stream from the heater.
• Install a pressure relief valve (X) pre-set to
relieve pressure when it exceeds the system
maximum working pressure.
Never install a shutoff device between the
heater and gun as this will trap the heated fluid
and not allow for expansion. If a fluid regulator
is installed between the heater and gun, never
use it as a shutoff device.
3. Install a fluid filter (L), drain valve (M), and fluid pressure regulator (N) near the heater’s 1/2-14 npt(f)
fluid outlet. Then connect the fluid line.
ZZ
05543-524
F
IG. 5: Cart Mounting
Fluid Connections & Accessories
(FIG. 6)
1. Install a fluid shutoff valve (T) in the heater’s 1/2-14
npt(m) fluid inlet; do not overtighten. Connect the
fluid line to the valve.
X
T
F
IG. 6: Fluid Connections & Accessories
N
L
M
05545-524
309524L 9
Page 10

Installation
Electrical Connections
WARNING
Read warnings, page 4. Install heater in compliance
with all applicable codes and regulations.
CAUTION
To help prevent damage, avoid spilling liquids onto
electrical components.
Requirements For All Installations
1. The voltage supply must agree with the maximum
heater voltage and amperage. See Models, page 2.
2. Conductors used for supply connection must be
suitable for at least 221°F (105°C).
Hazardous Location Installation
Requirements
1. The heater connection must be made using one of
the following options:
a. Cable entries of a certified flameproof model.
b. Threaded metal conduits.
If this option is used, a stopping box with
compound filling of a certified flameproof
model must be placed at the entry of the
heater.
2. Unused threaded holes must be sealed by certified
flameproof plugs, which must be screwed in with a
minimum of 5 full threads engaged and an 8 mm
length of engaged threads.
The above accessories are not provided by
Graco. Make sure that accessories are appropriate for the conditions of use.
10 309524L
Page 11

Installation
Wall Mounted Wiring
Mount a 2-pole, explosion-proof electric switch (H) near
the heater. See F
cal codes for your location. Also use the correct cable
and plug.
1
Power terminal
2
Neutral terminal or 2nd
power terminal
F
IG. 7: Wall Mounted Wiring
IG. 7. The switch must meet the electri-
H
4
9 9
21
4443
8
3
Ground terminal
4
Tighten all terminal nuts to
30 in-lb (3.4 N•m)
05546-524
Cart Mounted Wiring
Connect a plug that meets the electrical codes for your
location. See F
IG. 8.
4
21
4443
8
3
Ground terminal
4
Tighten all terminal nuts to
30 in-lb (3.4 N•m)
05547-524
1
Power terminal
2
Neutral terminal or 2nd
power terminal
9 9
FIG. 8: Cart Mounted Wiring
Grounding
Wire the heater to a properly grounded power supply
through the electrical connections and external grounding lug (8). In a mobile installation, also ground the truck
or trailer to a true earth ground.
309524L 11
Page 12

Installation
Determining Proper Fluid Temperature
CAUTION
Operating the heater at its highest setting, over 180°F
(82°C), for long periods of time decreases the heater
life and can cause fluid to dry out; which can clog the
heater and result in a poor finish.
Use the lowest temperature setting possible for maximum heater life. Use the chart in F
Under-Boil
®
temperature. FIG. 9 also shows the effect of
temperature on reducing viscosity. Note that most of the
viscosity reduction occurs by 130°F (55°C).
Under-Boil is the Graco method of hot, airless spraying
where the fluid is heated to a temperature just under the
boiling point of its most volatile solvent.
IG. 9 to determine the
To find your fluid’s Under-Boil temperature:
1. Pour a small sample into a heat-proof container.
2. Measure and record the fluid temperature and viscosity using a No. 2 Zahn cup.
3. Heat water in a large container to 200°F (93°C).
Place the sample in the water.
4. At every 10° temperature rise, measure and record
the viscosity and temperature. Do this until solvents
start boiling off and the viscosity starts to level off,
usually 160-170°F (71-77°C).
5. To find the temperature to use in your Under-Boil
system:
a. Subtract the lowest viscosity reading from the
highest one.
b. Multiply the result by 0.90.
c. Subtract the result from the highest viscosity
reading. Find this number on your temperature
and viscosity records.
100
90
80
70
60
50
40
30
20
Viscosity: seconds with #2 Zahn cup
10
0
20 30 40 50 60 70 80
(70)
(80) (90) (100) (110) (120) (130) (140) (150) (160) (170) (180)
FIG. 9: Reducing Viscosity: Under-Boil Method
Heavy Lacquer
Medium Lacquer
Temperature
Enamel
o
C
o
(
F)
12 309524L
Page 13
Installation
60
50
Typical high-solid paint
Typical enamel paint
40
nU
30
20
1
nU
2
Apparent viscosity: with #1 Zahn cup
10
15 25 35 45 55 65
(60)
(80) (100) (120) (140)
Temperature
F
IG. 10: Effect of Temperature on Viscosity
The chart in FIG. 10 shows the effect of temperature in
reducing two fluids to a sprayable viscosity, between 20
and 34 seconds using a No. 2 Zahn cup.
Note that temperature has more of an effect on high
solid fluids than on thin enamels. That is, for the same
10° temperature rise, the viscosity of the high solid fluid
is reduced more than the enamel. This means the high
solid fluid is temperature sensitive, and you need to take
this into consideration when planning your system.
Typical spray
viscosities
o
C
o
F)
(
Once the fluid is reduced to about 34 on the chart, viscosity reduction begins to level off and temperature will
not significantly improve sprayability (it only uses more
energy).
309524L 13
Page 14

Operation
Operation
Pressure Relief Procedure
WARNING
Read warnings, page 4.
Follow Pressure Relief Procedure when you stop
spraying, and before cleaning, checking, or servicing
equipment.
1. Engage the gun safety lock.
2. Shut off main power to the heater.
3. Circulate fluid for at least 10 minutes to cool the
heated fluid and heater.
4. Shut off all air and fluid supplies.
5. Disengage the safety lock.
6. Hold a metal part of the gun firmly to a grounded
metal pail, and trigger the gun to relieve pressure.
7. Engage the safety lock.
Initial Flushing
WARNING
Read warnings, page 4.
The heater was tested with lightweight oil, which needs
to be flushed out before using the equipment. Ensure
main power is off and heater is cool before flushing. Use
a compatible solvent, and follow flushing instructions in
your fluid supply and spray gun manual. Do not turn on
heater until fluid lines are clear of solvent.
Priming System
(Refer to FIG. 1, page 6)
1. Do not turn on the heater yet.
2. If using an airless spray gun, do not install a spray
tip yet.
3. Start the pump according to the instructions supplied with it.
8. Have a container ready to catch the fluid, then open
the fluid drain valve.
4. Turn the system director valve (U) to circulate, and
circulate fluid for several minutes.
5. Open the spray gun (Q) at the last outlet to prime
the line. Repeat for all gun stations.
6. Engage the gun safety latch.
7. Shut off the air supply to the pump.
8. Follow Pressure Relief Procedure.
9. Install the gun spray tip.
14 309524L
Page 15

Operation
Setting Heater Control
(Refer to FIG. 11)
1. Set the heater control knob (33) to a trial setpoint of
4 or 5.
2. Start the pump and circulate fluid through the system at very low pressure, about 10-12 oz/min
(0.30-0.35 liter/min).
3. After 10 minutes, read the temperature on the thermometer (2). If it does not match the desired temperature, adjust the setpoint.
33
2
Adjusting for Spraying
CAUTION
Operating the heater at its highest setting, over 180°F
(82°C), for long periods of time decreases the heater
life and can cause fluid to dry out; which can clog the
heater and result in a poor finish.
1. Adjust pump pressure and heater setpoint to the
lowest settings needed for good fluid atomization.
2. Set all system back pressure valves (S - F
maintain even fluid pressure at all gun stations.
IG. 1) to
IG. 11: Setting Heater Control
F
05549-524
309524L 15
Page 16

Maintenance
Maintenance
WARNING
Read warnings, pages 4 and 5. Make sure the main
power is off and heater is cool before doing maintenance.
Flushing
Clogged fluid passages are difficult to clean and reduce
heating efficiency, flow rate, and pressure. Flush frequently, including whenever system is not in use.
1. Follow Pressure Relief Procedure, page 14.
2. Ensure main power is off and heater is cool before
flushing. Use a compatible solvent, and follow flushing instructions in your fluid supply and spray gun
manual. Do not turn on heater until fluid lines are
clear of solvent.
Draining Heater
(FIG. 12)
Unclogging Fluid Passages
(FIG. 13)
1. Drain the heater.
2. Remove the heater block (3) from the heater hous-
ing. See Heater Block, page 20.
3. Pour a high strength, compatible solvent into the
heater tube to soften the clog.
4. Flush out the clog.
5. Clean all passages thoroughly before reassembling.
Pour in solvent
1. Follow Pressure Relief Procedure, page 14.
2. Remove heater inlet and outlet fittings. Have a container ready to catch the fluid.
Outlet
Inlet
05550-524
F
IG. 12: Draining Heater
3
05551-524
FIG. 13: Unclogging Fluid Passages
16 309524L
Page 17

Troubleshooting
Troubleshooting
Problem Cause Solution
Heater will not heat. No current. Check circuit and fuses.
Check continuity of primary thermostat (24), backup thermostat (10),
and thermal limit sensor (15).
Check continuity of thermostat (10)
and heater block (3) terminals - Page
18.
Burned out heater block (3). Replace block - Page 20.
Blown heat limiter (15). Check continuity of primary thermo-
stat (24) and backup thermostat (10).
Replace thermostats if necessary
when replacing thermal limit sensor
(15) - Pages 18-20.
Temperature too low. Fluid requires more warm-up time. Increase warm-up time.
Wrong temperature setting. Adjust setting - Page 15.
Flow rate too high. Reduce flow rate or use 2 heaters.
Clogged fluid passages. Flush regularly - Page 16.
Temperature too high. Wrong temperature setting. Adjust setting - Page 15.
Failed primary thermostat (24). Replace - Page 18.
High fluctuating temperatures, about
220-250°F (104-120°C) at 0.1 GPM.
Too much pressure drop or fluid will
not flow.
Heater fittings leak. Loose or damaged fittings. Tighten fittings or replace heater
Primary thermostat (24) contacts
sticking.
Replace thermostats (24, 10) - Page
18. Note that backup thermostat (10)
keeps heater functioning for only a
short time.
Flow rate too high. Reduce flow rate or use 2 heaters.
Clogged fluid passages. Flush regularly - Page 16.
block - Page 20.
F
300°F
(149°C)
e
2
OFF
230°F
(110°C)
a
1
R
Mp
R
6-55 ohm
SL
e
1
255°F
(124°C)
05556-524
FIG. 14: Electrical Schematic
309524L 17
Page 18

Repair
Repair
WARNING
Read warnings, pages 4-5. Make sure the main power
is off and heater is cool before repairing.
Hazardous Location Heaters: See FIG. 15 & 17
Non-hazardous Location Heaters: See F
IG. 16 & 18
Primary Thermostat & Probe
1. Follow Pressure Relief Procedure, page 14.
2. Remove housing cover (18).
3. Hazardous Location Heater only: Loosen nut (27).
Non-hazardous Location Heater only: Loosen
screws (25).
4. Loosen setscrew (26) in switch shaft (28).
5. Remove screw (16) and bracket (19) holding probe
(EE).
6. Remove wires from the primary thermostat terminals (FF).
7. Pull thermostat probe (EE) out of heater block (3).
Remove thermostat (24) from housing (1).
8. Hazardous Location Heater only: Remove screws
(25).
Non-hazardous Location Heater only: Remove
screw standoff (35) with washer (27).
CAUTION
To avoid damaging capillary tube (GG), which can
cause heater malfunction, do not kink or nick the tube.
To avoid shorting out the heater, do not allow capillary
tube to contact the block terminal (3A). Follow step
10, below.
10. Liberally apply thermal lubricant (part no. 110009) to
probe (EE) of new thermostat (24). Loop capillary
tube (GG) several times and wrap the loops with tie
strap (42-not shown). Insert probe in the heater
block (3).
11. Continue reassembling in reverse order of disassembly. See Reassembly Notes, below.
Backup Thermostat
1. Follow Pressure Relief Procedure, page 14.
2. Remove housing cover (18).
3. Remove screws (HH) on backup thermostat (10)
tabs, and remove the wires – one from heater block
(3A) and one from line in (9B).
4. Remove the two screws (16), then remove the thermostat (10).
5. Liberally apply thermal lubricant (part no. 110009) to
the bottom of the thermostat (10) and reinstall it in
reverse order of disassembly.
Reassembly Notes
• Refer to FIG. 15 or 16 for wiring connections.
9. Remove bracket from thermostat (24) and secure to
new thermostat.
18 309524L
• Non-hazardous Location Heater only: Make
sure gasket (47) is installed and aligned with
electrical housing screw holes.
• Secure cover (18) with lockwashers (5) and
screws (6 or 52); torque screws to 89 in-lb (10
N•m).
Page 19

Repair
REF. 10
HH
3B
REF. 19
L1
9A
9B
3A
15
19
16
63
15
GND
1
2
3
L2
Wiring Diagram
Apply thermal lubricant
Torque to 89 in-lb (10 N•m)
Torque nuts (62) to 10-12 in-lb (1.1-1.3 N•m)
TI12339
HH
1
10
16
1
FIG. 15: Thermostat Repair – Hazardous Location Heaters
EE
3
63
62
62
3A
54
55
FF
GG
51
24
50
27
48
6
5
18
2
52
53
20
25
35
1
26
28
TI12335C
3B
HH
REF. 19
REF. 10
GND
3A
L1
9B
9A
Wiring Diagram
L2
15
HH
1
Apply thermal lubricant
2
Torque to 89 in-lb (10 N•m)
3
Torque nuts (62) to 10-12 in-lb (1.1-1.3 N•m)
FIG. 16: Thermostat Repair – Non-hazardous Heaters
16
19
15
52
2
18
47
FF
63
3
62
GG
24
26
28
27
35
1
25
16
62
63
1
10
1
EE
3A
TI12337B
309524L 19
Page 20

Repair
Thermal Limit Sensor
CAUTION
To avoid damaging the capillary tube (GG), which can
cause heater malfunction, do not kink or nick the tube.
To avoid shorting out the heater, do not allow the capillary tube to contact the block terminal (3A).
1. Follow Pressure Relief Procedure, page 14.
2. Remove housing cover (18).
3. Remove nut (FF) and nut (3B) holding the leads of
the thermal limit sensor (15) and remove the sensor.
See F
IG. 15 or 16, page 19.
4. Apply thin film of thermal lubricant (part no. 110009)
to the thermal limit sensor (15) bulb and install a
new sensor in the reverse order of disassembly. See
Reassembly Notes, below.
Control Knob
1. Follow Pressure Relief Procedure, page 14.
Heater Block
1. Follow Pressure Relief Procedure, page 14.
2. Remove housing cover (18).
3. Hazardous Location Heater only: Remove electrical
junction box cover (4).
4. Hazardous Location Heater only: In the junction box
(1B), disconnect the main power lead from the terminal of the post bushing (9A).
Non-hazardous Location Heater only: Disconnect
the main power lead from the primary thermostat
(24).
5. Hazardous Location Heater only: In the electrical
housing (1A), use a wrench on the flats of the post
bushing (9A) to unscrew it from the housing.
6. See the appropriate sections on pages 18-20 to
remove the primary thermostat and probe (24), the
backup thermostat (10), the thermal limit sensor
(15) and the control knob (33).
7. Remove the 6 screws (6) and lockwashers (5) holding the housing to the heater block (3).
2. Turn knob (33) to setpoint 1.
3. Loosen setscrew (30) in the control knob (33).
4. Remove control knob (33).
5. Remove adjusting knob (12) from the control knob
(33), and press fit it onto the new control knob.
Check the bushing (29) and replace it if worn.
6. Position new knob (33) so setpoint 1 aligns with
mark (JJ) on the housing (12:00 position) and the
knob is about 1/16 in. (1 mm) away from the housing. Tighten setscrew (30).
8. Reassemble heater with the new block (3) in reverse
order of disassembly.
Reassembly Notes
• Refer to FIG. 15 or 16 for wiring connections.
• Non-hazardous Location Heater only: Make
sure gasket (47) is installed and aligned with
electrical housing screw holes.
• Secure cover (18) with lockwashers (5) and
screws (6 or 52); torque screws to 89 in-lb (10
N•m).
20 309524L
Page 21

1
Torque to 89 in-lb (10 N•m)
2
Electrical Housing
3
Junction Box
4
Apply sealant
5
Torque nuts (62) to 10-12 in-lb (1.1-1.3 N•m)
63
Repair
1
6
5
18
5
62
24
10
15
REF. 3A
REF. 3
2
1A
3
1B
4
5
6
1
FIG. 17: Control Repair – Hazardous Location Heaters
1
Torque to 89 in-lb (10 N•m)
2
Electrical Housing
3
Apply sealant
4
Torque nuts (62) to 10-12 in-lb (1.1-1.3 N•m)
REF. 3A
REF. 3
10
63
15
62
63
63
4
62
62
JJ
29
30
33
12
1
6
5
9A
4
4
3A
3B
3
1
52
TI2334E
18
47
24
JJ
29
30
33
12
1
2
47
4
9
1
5
6
1
5
7
3
3B
3A
3
TI2336E
FIG. 18: Control Repair – Non-hazardous Location Heaters
309524L 21
Page 22

Parts
Parts
Hazardous Location Heaters
6
1
47
5
1
14, 43
5
18
16
15
19
4
62
63
24
27
25
35
16
62
10
3
54
55
14, 36
1
6
5
4
63
52
51
53
9
REF. 1
26
28
30
29
33
12
50
1
48
58
20
2
32
2
56
2
2
6
31
8
7
1
6
5
31
22 309524L
3
7
8
1
Torque to 89 in-lb (10 N•m)
2
Apply sealant
3
Apply thermal lubricant
4
Torque nuts (62) to 10-12 in-lb (1.1-1.3 N•m)
ti2334E
Page 23

Hazardous Location Heaters
Parts
Ref. No. 3
Heater Block
Part No. Series
245848 A 246616 120 / 2300
245862 A 246617 200 / 4000
245863 A 246618 240 / 4000
245864 A 246619 480 / 4000
246254 A 246620 380 / 4000
Ref.
No. Part No. Description Qty.
1 183074 CONTROL HOUSING 1
2 102124 THERMOMETER DIAL 1
3 HEATER BLOCK; see table;
includes ref. no. 2, 31, 32, 56
4 183066 COVER 1
5 107542 LOCKWASHER 20
6 109114 SCREW; M8 x 1.25 mm 20
7 104582 WASHER 2
8 104029 GROUNDING CLAMP 2
9 108675 BUSHING; 1000 V max.; 250 A
max.
10 108674 BACKUP THERMOSTAT 1
11 235524 WIRE ASSEMBLY 1
12 177969 KNOB 1
13▲ 177922 WARNING TAG 1
14 100055 SCREW; #6 type U 10
15 223126 THERMAL LIMIT SENSOR, 152° 1
16 105676 SCREW; M4 x 0.7 x 12 mm 4
18 183073 COVER 1
19 183072 BRACKET 2
20 15B828 LIGHT HOUSING 1
21 108664 ALLEN WRENCH; 6 mm 1
Part No. Volts / Watts
Ref.
No. Part No. Description Qty.
22 105747 ALLEN WRENCH; 2 mm 1
23 101369 ALLEN WRENCH; 0.0927 in. 1
24 108676 PRIMARY THERMOSTAT 1
25 100032 SCREW; #6-32 UNC-2A 2
26 105672 SET SCREW; M4 x 0.7 x 6 mm 1
27 183070 NUT; M15 x 1.5 1
28 183068 SWITCH SHAFT 1
29 183071 BUSHING; M15 x 1.5 1
30 101366 SET SCREW; #10-24 x 0.312 in. 1
31 117344 FITTING; 5/8 in. OD tube x 1/2-14
32 15A808 T-FITTING 1
33 177968 KNOB 1
1
35 183067 BRACKET 1
36▲ 15B623 WARNING PLATE, English 1
15B777 WARNING PLATES, multilingual 1
37 235523 WIRE ASSEMBLY 2
42 102478 TIE STRAP 1
43▲ 15B625 WARNING PLATE. English 1
2
47 185065 ADAPTER, 3/4 npt 1
48 15B827 LIGHT LENS 1
50 103338 O-RING; fluoroelastomer 1
51 117483 SOCKET JAM SCREW;
52 117514 SPACER 2
53 246014 LIGHT CIRCUIT BOARD 1
54 114669 SCREW; M5 x 10 mm 2
55 15B243 BRACKET 1
56 15D757 HOUSING, thermometer 1
58 100361 PLUG, pipe; 1/2 npt 1
62 100166 NUT, full hex 4
63 102360 WASHER, flat 4
15B819 WARNING PLATE, multilingual 1
npt(m)
5/8-18 x 5/16
2
1
▲ Replacement Danger and Warning labels, tags and
cards are available at no cost.
309524L 23
Page 24

Parts
Non-Hazardous Location Heaters
14, 43
52
18
47
15
16
3
10
14, 36
16
53
63
54
63
24
26
28
27
35
25
29
30
33
12
19
4
62
62
25
8
51
50
48
20
1
9
1
47
5
4
58
7
2
32
56
2
2
31
6
1
5
3
1
Torque to 89 in-lb (10 N•m)
2
31
24 309524L
Apply sealant
3
Apply thermal lubricant
4
Torque nuts (62) to 10-12 in-lb (1.1-1.3 N•m)
TI2336E
Page 25

Non-Hazardous Location Heaters
Parts
Ref. No. 3
Heater Block
Part No. Series
245867 A 246616 120 / 2300
245868 A 246617 200 / 4000
245869 A 246618 240 / 4000
245870 A 246619 480 / 4000
246276 A 246620 380 / 4000
Ref.
No. Part No. Description Qty.
1 15A809 ENCLOSURE 1
2 102124 THERMOMETER DIAL 1
3 HEATER BLOCK; see table;
includes ref. no. 2, 31, 32, 56
4 15A811 BOTTOM COVER 1
5 107542 LOCKWASHER 1
6 109114 SCREW 6
7 15A990 GASKET 2
8 104029 GROUND CLAMP 2
9 117367 SCREW; M8 x 18 mm 6
10 108674 THERMOSTAT 1
11 235524 WIRE ASSEMBLY 1
12 177969 KNOB 1
13▲ 177922 WARNING TAG 1
14 100055 SCREW; #6 type U 10
15 223126 THERMAL LIMIT SENSOR, 152° 1
16 105676 SCREW; M4 x 0.7 x 12 mm 4
18 15A810 TOP COVER 1
19 183072 BRACKET 2
20 15B828 LIGHT HOUSING 1
21 108664 ALLEN WRENCH; 6 mm 1
22 105747 ALLEN WRENCH; 2 mm 1
Part No. Volts / Watts
Ref.
No. Part No. Description Qty.
23 101369 ALLEN WRENCH; 0.0927 in. 1
24 108676 THERMOSTAT SWITCH 1
25 100032 SCREW; #6-32 UNC-2A 4
26 105672 SET SCREW 1
27 114027 WASHER, #6 2
28 183068 SWITCH SHAFT 1
29 112738 GROMMET 2
30 101366 SET SCREW; #10-24 x 0.312 in. 1
31 117344 FITTING; 5/8 in. OD tube x 1/2-14
npt(m)
32 15A808 T-FITTING 1
33 177968 KNOB 1
35 117526 SPACER 2
1
36▲ 15B623 WARNING PLATE, English 1
15B777 WARNING PLATES, multilingual 1
37 246346 WIRE ASSEMBLY 2
42 102478 TIE STRAP 1
43▲ 15B625 WARNING PLATE, English 1
15B819 WARNING PLATE, multilingual 1
47 15A991 GASKET 1
48 15B827 LIGHT LENS 1
50 103338 O-RING; fluoroelastomer 1
51 117483 SOCKET JAM SCREW;
5/8-18 x 5/16
52 111962 SCREW; 1/4-28 UNRF-3A 10
53 246014 LIGHT CIRCUIT BOARD 1
54 106216 NUT; 3/4-14 npsm 1
55 100633 ALLEN WRENCH; 5/32 1
56 15D757 HOUSING, thermometer 1
58 100361 PLUG, pipe; 1/2 npt 1
62 100166 NUT, full hex 4
63 102360 WASHER, flat 4
2
1
▲ Replacement Danger and Warning labels, tags and
cards are available at no cost.
309524L 25
Page 26

Accessories
Accessories
Heater Conversion Kit
246302: Includes two fittings to make VISCON HP ports
match VISCON
2
Mounting Bracket
192585: European version (see below)
M8
AB
D
C
E
Measurements – inches (mm)
ABCDEF
5
(127)
6.76
(171.7)
0.88
(22.4)
3.37
(85.5)
6.25
(158.8)
F
1.44
(36.6)
Cart Bracket
Order 2 each of the following:
183484: Clamp
183485: Mounting bar
6
5
183484
183485
5 & 6 included with heater
05543
Power Cord Set*
110160: 600 V, 12 Awg, Extra Hard Usage Type St, High
Temperature (221°F, 105°C) rated
Thermal Lubricant
110009: 6.5 gram tube
Cable Clamp Kit*
183982: USA version
246303: Contains a strain relief cable clamp and 5 m,
221°F (105°C) cable. See page 27 for installation
instructions.
GH
6
(152)
26 309524L
5
(127)
H
G
* Hazardous location heaters are no longer rated for
use in a hazardous area when used with these
accessories.
Page 27

Accessories
Cable Clamp Kit 246303 Installation
1. Slide cable clamp (3) onto cable (2).
2. Place washer (F) on fitting (E).
3. Push conical-shaped packing (D) into fitting (E).
4. Place washer (C) on retaining nut (B).
Ref.
No. Part No. Description Qty
2 Cable, 16.4 ft. (5 m), 221° F
1
(105° C)
3 113162 Clamp 1
5. Screw retaining nut (B) into fitting (E). Tighten with
no more than 2 in. (50 mm) stripped black and blue
wires and 4 in. (100 mm) yellow/green ground wire
inside terminal junction box.
6. Place one side of retaining clip onto retaining clip
nut, and insert as shown.
3
2
05544
F
IG. 19: Cable Clamp Kit
Key:
A Retaining clip
B Retaining nut
CWasher
D Packing
EFitting
FWasher
F
IG. 20: Kit Assembly
F
E
D
C
B
A
05554
309524L 27
Page 28

Technical Data
Technical Data
The heater can be used in the following environmental conditions: indoor use, 99% maximum relative humidity, pollution degree 2, installation category II, maximum ambient temperature 135° F (57° C).
Maximum Working Pressure . . . . . . . . . . . . . . . . . . . . . . 7250 psi (50 MPa, 500 bar)
Voltage / Wattage / Current* . . . . . . . . . . . . . . . . . . . . . . . See Models, page 2
Fluid Passage Area . . . . . . . . . . . . . . . . . . . . . . . . . . . . .
Fluid Passage Diameter . . . . . . . . . . . . . . . . . . . . . . . . . . 0.435 in. (11.1 mm)
Fluid Passage Length. . . . . . . . . . . . . . . . . . . . . . . . . . . . 133 in. (3383 mm)
Thermometer Range . . . . . . . . . . . . . . . . . . . . . . . . . . . . 64–250°F (-18–121°C)
Wetted Parts. . . . . . . . . . . . . . . . . . . . . . . . . . . . . . . . . . . Stainless Steel
Temperature Operating Range . . . . . . . . . . . . . . . . . . . . . 84–219°F (-29–104°C)
Surface Temperature Code** . . . . . . . . . . . . . . . . . . . . . . T2 (482°F, 250°C)
Weight . . . . . . . . . . . . . . . . . . . . . . . . . . . . . . . . . . . . . . . 39 lb. (17.6 Kg)
* Main supply fluctuation not to exceed 10%.
** The heater has a surface temperature code of T2 (482°F, 250°C), indicating a maximum external (surface) temperature rating
of 482°F (250°C) in accordance with EN 60079-0:2006 (IEC 60079-0:2004) and EN 60079-1:2007 (IEC 60079-1:2007). This
heater has a surface temperature code (identification code) of T2, indicating a maximum external (surface) temperature rating
of 250°C (482°F) in accordance with Article 500 - Hazardous Locations - of NFPA 70 National Electrical Code and/or Section
18 - Hazardous Locations - of Part 1 of the Canadian Electrical Code. Read and comply with the requirements of these and
similar codes as to proper location of the heater.
182 in.
2
(117,419 mm2)
100
94.16
54.14
00.511.522.533.5
Maximum Temperature Rise
90
80
70
60
50
40
30
20
10
0
4000 watt VISCON HP heater, Test Fluid: 10w Hydraulic Oil
2300 watt VISCON HP heater, Test Fluid: 10w Hydraulic Oil
NOTE: Line shows continuous operation of 1 heater.
Use additional heaters if necessary.
68.39
57.70
50.68
39.32
33.18
29.14
42.23
34.96
24.28
20.10
Flow Rate
30.26
17
.40
26.64
15.32
Maximum Temperature Rise vs. Flow Rate
4000W
2300W
28 309524L
Page 29

Dimensions
G
3/4 npt(f)
Electrical
Conduit Port
L
Dimensions
Measurements – inches (mm)
H
J
GHJ K L
9.375
(238)
8.46
(215)
6.5
(165)
18
(457)
6.375
(162)
K
1/2 npt(m)
Fluid Inlet
1/2 npt(f)
Fluid Outlet
309524L 29
Page 30

Graco Standard Warranty
Graco warrants all equipment referenced in this document which is manufactured by Graco and bearing its name to be free from defects in
material and workmanship on the date of sale to the original purchaser for use. With the exception of any special, extended, or limited warranty
published by Graco, Graco will, for a period of twelve months from the date of sale, repair or replace any part of the equipment determined by
Graco to be defective. This warranty applies only when the equipment is installed, operated and maintained in accordance with Graco’s written
recommendations.
This warranty does not cover, and Graco shall not be liable for general wear and tear, or any malfunction, damage or wear caused by faulty
installation, misapplication, abrasion, corrosion, inadequate or improper maintenance, negligence, accident, tampering, or substitution of
non-Graco component parts. Nor shall Graco be liable for malfunction, damage or wear caused by the incompatibility of Graco equipment with
structures, accessories, equipment or materials not supplied by Graco, or the improper design, manufacture, installation, operation or
maintenance of structures, accessories, equipment or materials not supplied by Graco.
This warranty is conditioned upon the prepaid return of the equipment claimed to be defective to an authorized Graco distributor for verification of
the claimed defect. If the claimed defect is verified, Graco will repair or replace free of charge any defective parts. The equipment will be returned
to the original purchaser transportation prepaid. If inspection of the equipment does not disclose any defect in material or workmanship, repairs will
be made at a reasonable charge, which charges may include the costs of parts, labor, and transportation.
THIS WARRANTY IS EXCLUSIVE, AND IS IN LIEU OF ANY OTHER WARRANTIES, EXPRESS OR IMPLIED, INCLUDING BUT NOT LIMITED
TO WARRANTY OF MERCHANTABILITY OR WARRANTY OF FITNESS FOR A PARTICULAR PURPOSE.
Graco’s sole obligation and buyer’s sole remedy for any breach of warranty shall be as set forth above. The buyer agrees that no other remedy
(including, but not limited to, incidental or consequential damages for lost profits, lost sales, injury to person or property, or any other incidental or
consequential loss) shall be available. Any action for breach of warranty must be brought within two (2) years of the date of sale.
GRACO MAKES NO WARRANTY, AND DISCLAIMS ALL IMPLIED WARRANTIES OF MERCHANTABILITY AND FITNESS FOR A
PARTICULAR PURPOSE, IN CONNECTION WITH ACCESSORIES, EQUIPMENT, MATERIALS OR COMPONENTS SOLD BUT NOT
MANUFACTURED BY GRACO. These items sold, but not manufactured by Graco (such as electric motors, switches, hose, etc.), are subject to
the warranty, if any, of their manufacturer. Graco will provide purchaser with reasonable assistance in making any claim for breach of these
warranties.
In no event will Graco be liable for indirect, incidental, special or consequential damages resulting from Graco supplying equipment hereunder, or
the furnishing, performance, or use of any products or other goods sold hereto, whether due to a breach of contract, breach of warranty, the
negligence of Graco, or otherwise.
FOR GRACO CANADA CUSTOMERS
The Parties acknowledge that they have required that the present document, as well as all documents, notices and legal proceedings entered into,
given or instituted pursuant hereto or relating directly or indirectly hereto, be drawn up in English. Les parties reconnaissent avoir convenu que la
rédaction du présente document sera en Anglais, ainsi que tous documents, avis et procédures judiciaires exécutés, donnés ou intentés, à la suite
de ou en rapport, directement ou indirectement, avec les procédures concernées.
Graco Information
TO PLACE AN ORDER, contact your Graco distributor or call to identify the nearest distributor.
Phone: 612-623-6921 or Toll Free: 1-800-328-0211, Fax: 612-378-3505
All written and visual data contained in this document reflects the latest product information available at the time of publication.
Graco reserves the right to make changes at any time without notice.
This manual contains English. MM 309524
Graco Headquarters: Minneapolis
International Offices: Belgium, China, Japan, Korea
GRACO INC. P.O. BOX 1441 MINNEAPOLIS, MN 55440-1441
Copyright 2002, Graco Inc. is registered to ISO 9001
www.graco.com
Revised 12/2008
 Loading...