

Graco DURON Performance Max 395, DURON Performance Max 495, DURON Performance Max 595 Repair Manual
Page 1
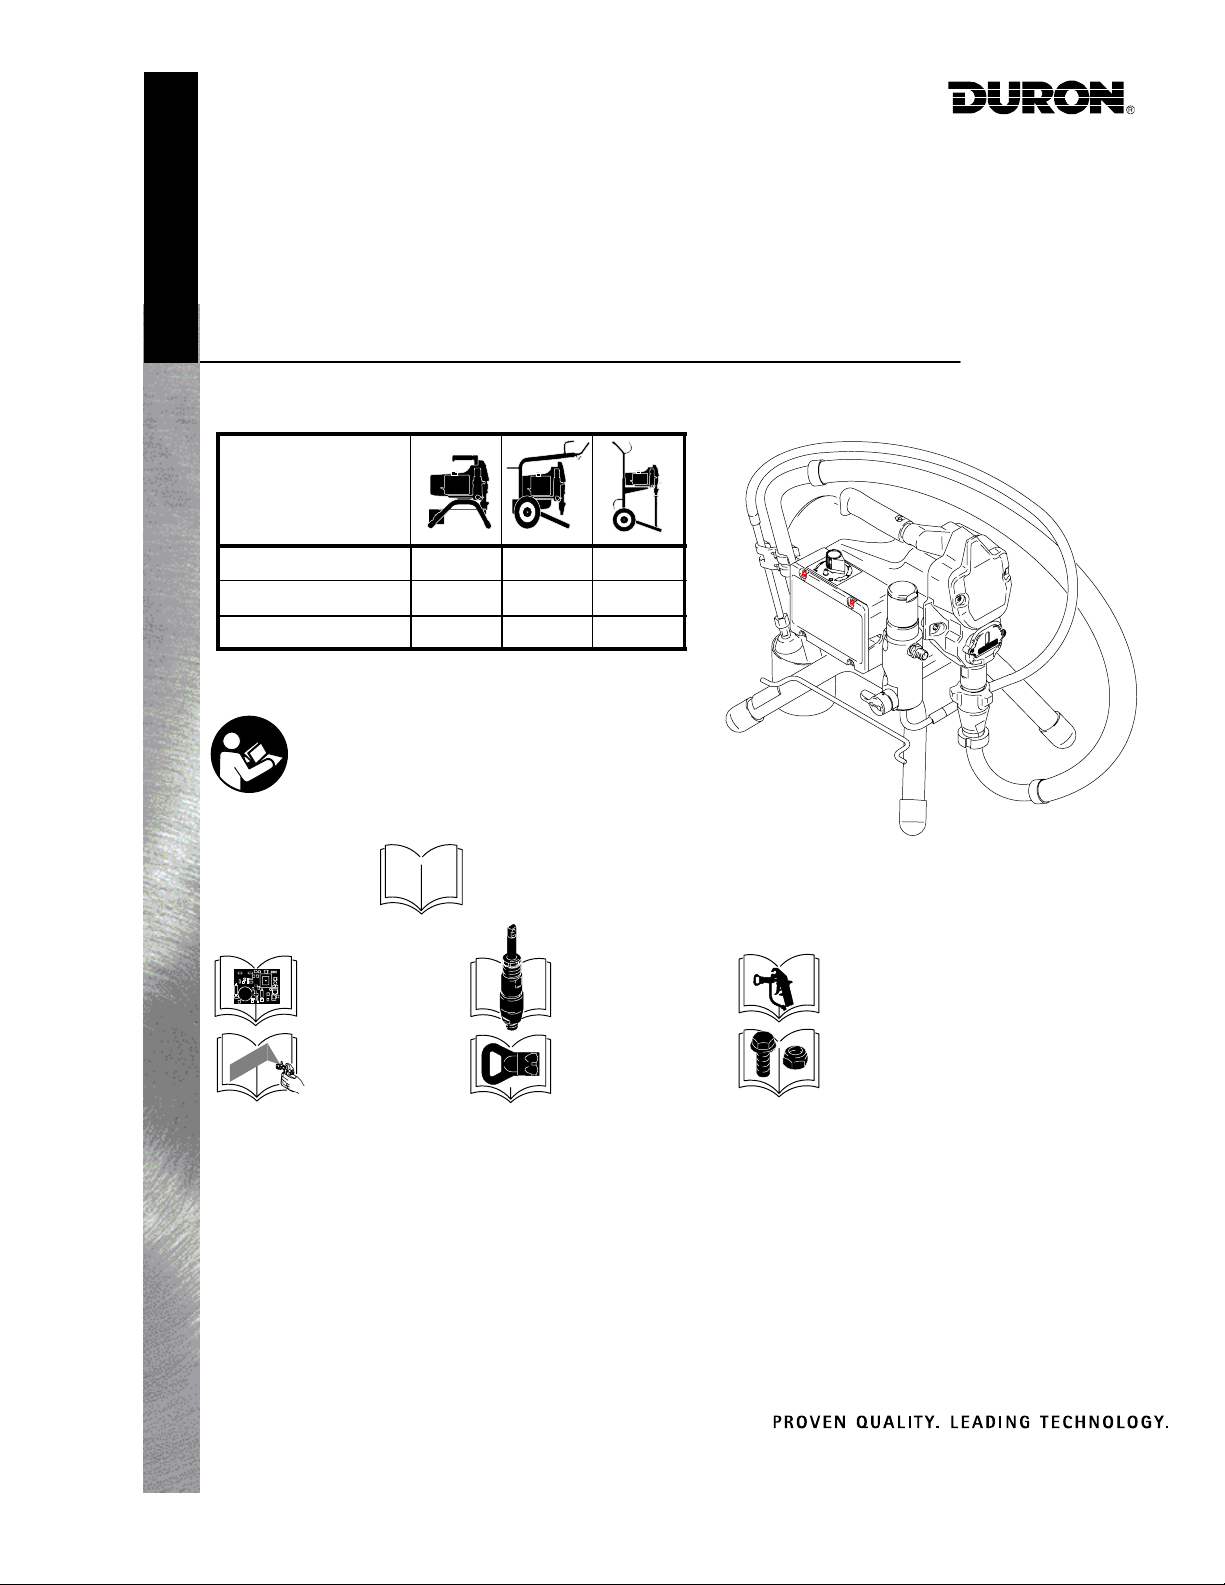
Repair
Performance Max 395/495/595
Airless Sprayers
3300 psi (227 bar, 22.7 MPa) Maximum Working Pressure
Sprayer
395 233980
495 233981 233982
595 234589 234590
All models not available in all countries.
Important Safety Instructions
Read all warnings and instructions in this manual.
Save these instructions.
Related manuals
233980
309714 Rev. C
ti2399
309709. . . . . . .
309665. . . . . . .
Table of Contents
Component Function and Identification 4. . . . .
Grounding 6. . . . . . . . . . . . . . . . . . . . . . . . . . . . . .
Troubleshooting 7. . . . . . . . . . . . . . . . . . . . . . . . .
General Repair Information 5. . . . . . . . . . . . . . .
Spin Test 12. . . . . . . . . . . . . . . . . . . . . . . . . . . . . .
Motor Brush Replacement 13. . . . . . . . . . . . . .
On/Off Switch Replacement 15. . . . . . . . . . . . .
GRACO INC. P.O. BOX 1441 MINNEAPOLIS, MN 55440–1441
COPYRIGHT 2003, GRACO INC.
Graco Inc. is registered to I.S. EN ISO 9001
309250. . . . . . .
309055. . . . . . .
Pressure Control Repair 16. . . . . . . . . . . . . . . .
Drive Housing Replacement 19. . . . . . . . . . . . .
Motor Replacement 20. . . . . . . . . . . . . . . . . . . . .
Displacement Pump Replacement 21. . . . . . . .
Technical Data 22. . . . . . . . . . . . . . . . . . . . . . . . .
Graco Phone Number 22. . . . . . . . . . . . . . . . . . .
309639. . . . . . .
309705. . . . . . .
Page 2
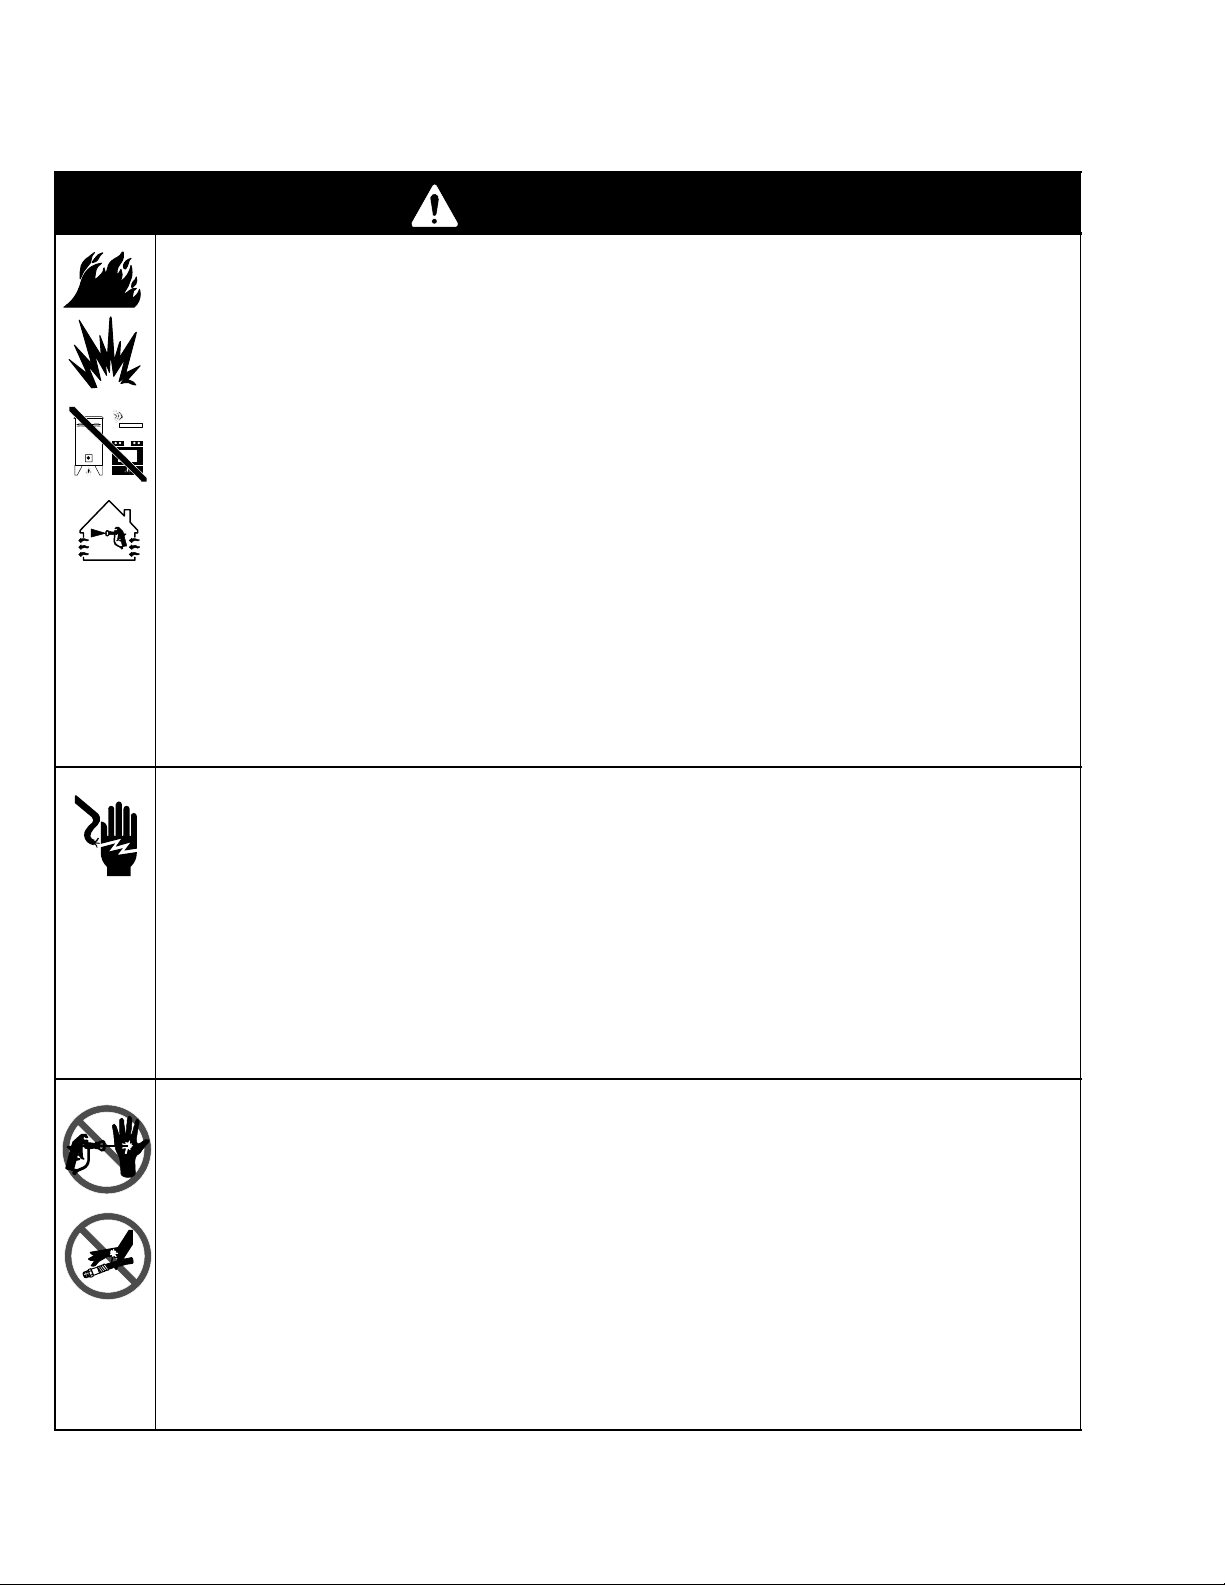
The following Warnings are for the safe setup, use, grounding, maintenance and repair of this equipment. The
exclamation point symbol alerts you to a general warning and the hazard symbols refer to procedure–specific risks.
Refer back to these Warnings. Additional, product–specific warnings may be found throughout the body of this
manual where applicable.
WARNING
FIRE AND EXPLOSION HAZARD
Flammable fumes, such as solvent and paint fumes, in work area can ignite or explode. To help
prevent fire and explosion:
Use equipment only in well ventilated area.
Eliminate all ignition sources; such as pilot lights, cigarettes, portable electric lamps, and plastic
drop clothes (potential static arc).
Keep work area free of debris, including solvent, rags and gasoline.
Sprayer generates sparks. When flammable liquid is used in or near sprayer or for flushing or
cleaning, keep sprayer at least 20 ft (6 m) away from explosive vapors.
Do not clean with materials having flash points lower than 70F (21C). Use water–based materi-
als or mineral spirits type material only. For complete information about your fluid, request the
MSDS from the fluid distributor or retailer.
Do not plug or unplug power cords or turn lights on or off when flammable fumes are present.
Ground equipment and conductive objects in work area. Read Grounding instructions.
If there is static sparking or you feel a shock, stop operating immediately. Do not use equipment
until you identify and correct the problem.
Keep a fire extinguisher in the work area.
ELECTRIC SHOCK HAZARD
Improper grounding, setup, or usage of the system can cause electric shock.
Turn off and disconnect power cord before servicing equipment.
Use only grounded electrical outlets
Use only 3–wire extension cords.
Ensure ground prongs are intact on sprayer and extension cords.
Do not expose to rain. Store indoors.
INJECTION HAZARD
High pressure fluid from gun, hose leaks, or ruptured components will pierce skin. This may look like
just a cut, but it is a serious injury that can result in amputation. Seek immediate surgical treat-
ment.
Do not point gun at anyone or any part of the body.
Do not put your hand over the spray tip.
Do not stop or deflect leaks with your hand, body, glove, or rag.
Do not spray without tip guard and trigger guard installed.
Engage trigger lock when not spraying.
Follow Pressure Relief Procedure in this manual, when you stop spraying and before cleaning,
2 309714
checking or servicing equipment.
Page 3
INSTRUCTIONS
WARNING
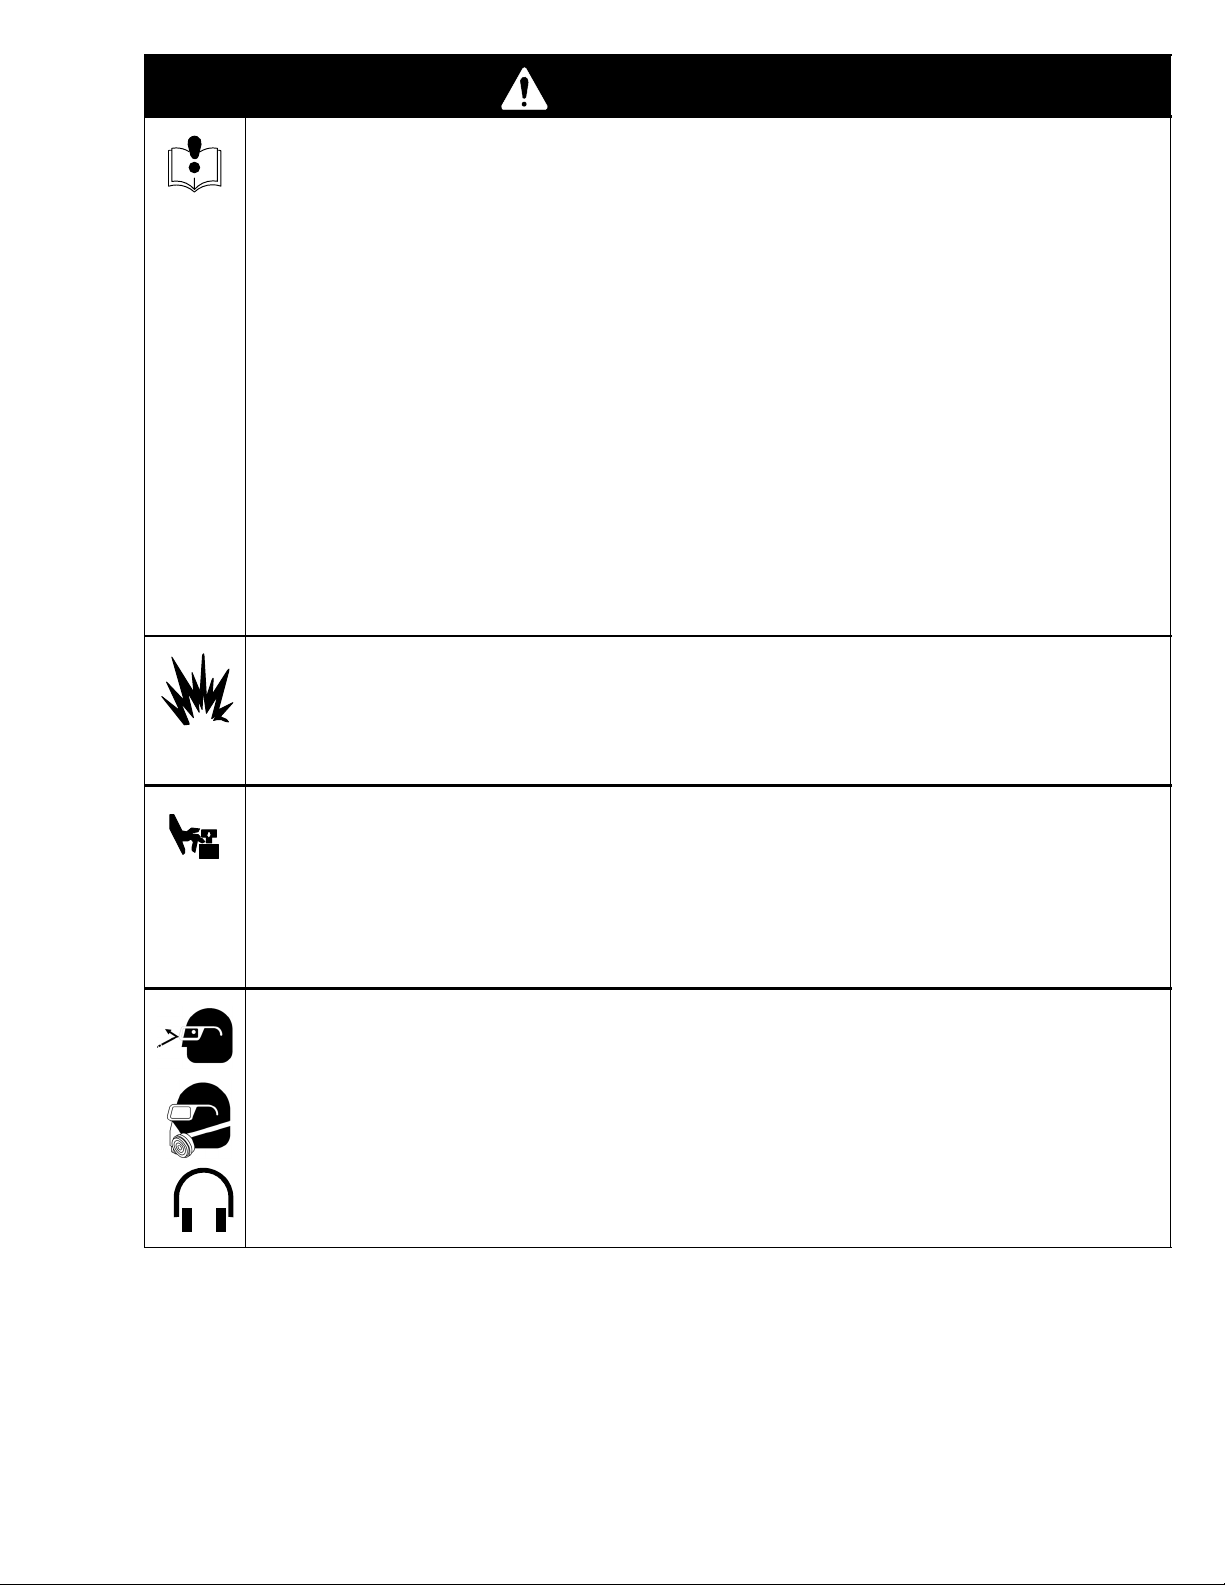
EQUIPMENT MISUSE HAZARD
Misuse can cause death or serious injury.
Do not exceed the maximum working pressure or temperature rating of the lowest rated system
component. See Technical Data in all equipment manuals.
Use fluids and solvents that are compatible with equipment wetted parts. See Technical Data in
all equipment manuals. Read fluid and solvent manufacturer’s warnings. For complete information
about your material, request MSDS from distributor or retailer.
Check equipment daily. Repair or replace worn or damaged parts immediately with genuine Graco
replacement parts only.
Do not alter or modify equipment.
Use equipment only for its intended purpose. Call your Graco distributor for information.
Route hoses and cables away from traffic areas, sharp edges, moving parts and hot surfaces.
Do not kink or overbend hoses or use hoses to pull equipment.
Keep children and animals away from work area.
Comply with all applicable safety regulations.
Do not operate equipment when fatigued or under the influence of drugs or alcohol.
PRESSURIZED ALUMINUM PARTS HAZARD
Do not use 1,1,1-trichloroethane, methylene chloride, other halogenated hydrocarbon solvents or
fluids containing such solvents in this equipment. Such use could result in a serious chemical reaction,
with the possibility of explosion, which could cause death, serious injury and/or substantial property
damage.
MOVING PARTS HAZARD
Moving parts can pinch or amputate fingers and other body parts.
Keep clear of moving parts.
Do not operate equipment with protective guards or covers removed.
Pressurized equipment can start without warning. Before checking, moving, or servicing equip-
ment, follow the Pressure Relief Procedure in this manual. Disconnect power or air supply.
PERSONAL PROTECTIVE EQUIPMENT
You must wear appropriate protective equipment when operating, servicing, or when in the operating
area of the equipment to help protect you from serious injury, including eye injury, inhalation of toxic
fumes, burns, and hearing loss. This equipment includes, but is not limited to:
Protective eye wear.
Clothing and respirator as recommended by the fluid and solvent manufacturer.
Gloves.
Hearing protection.
3309714
Page 4
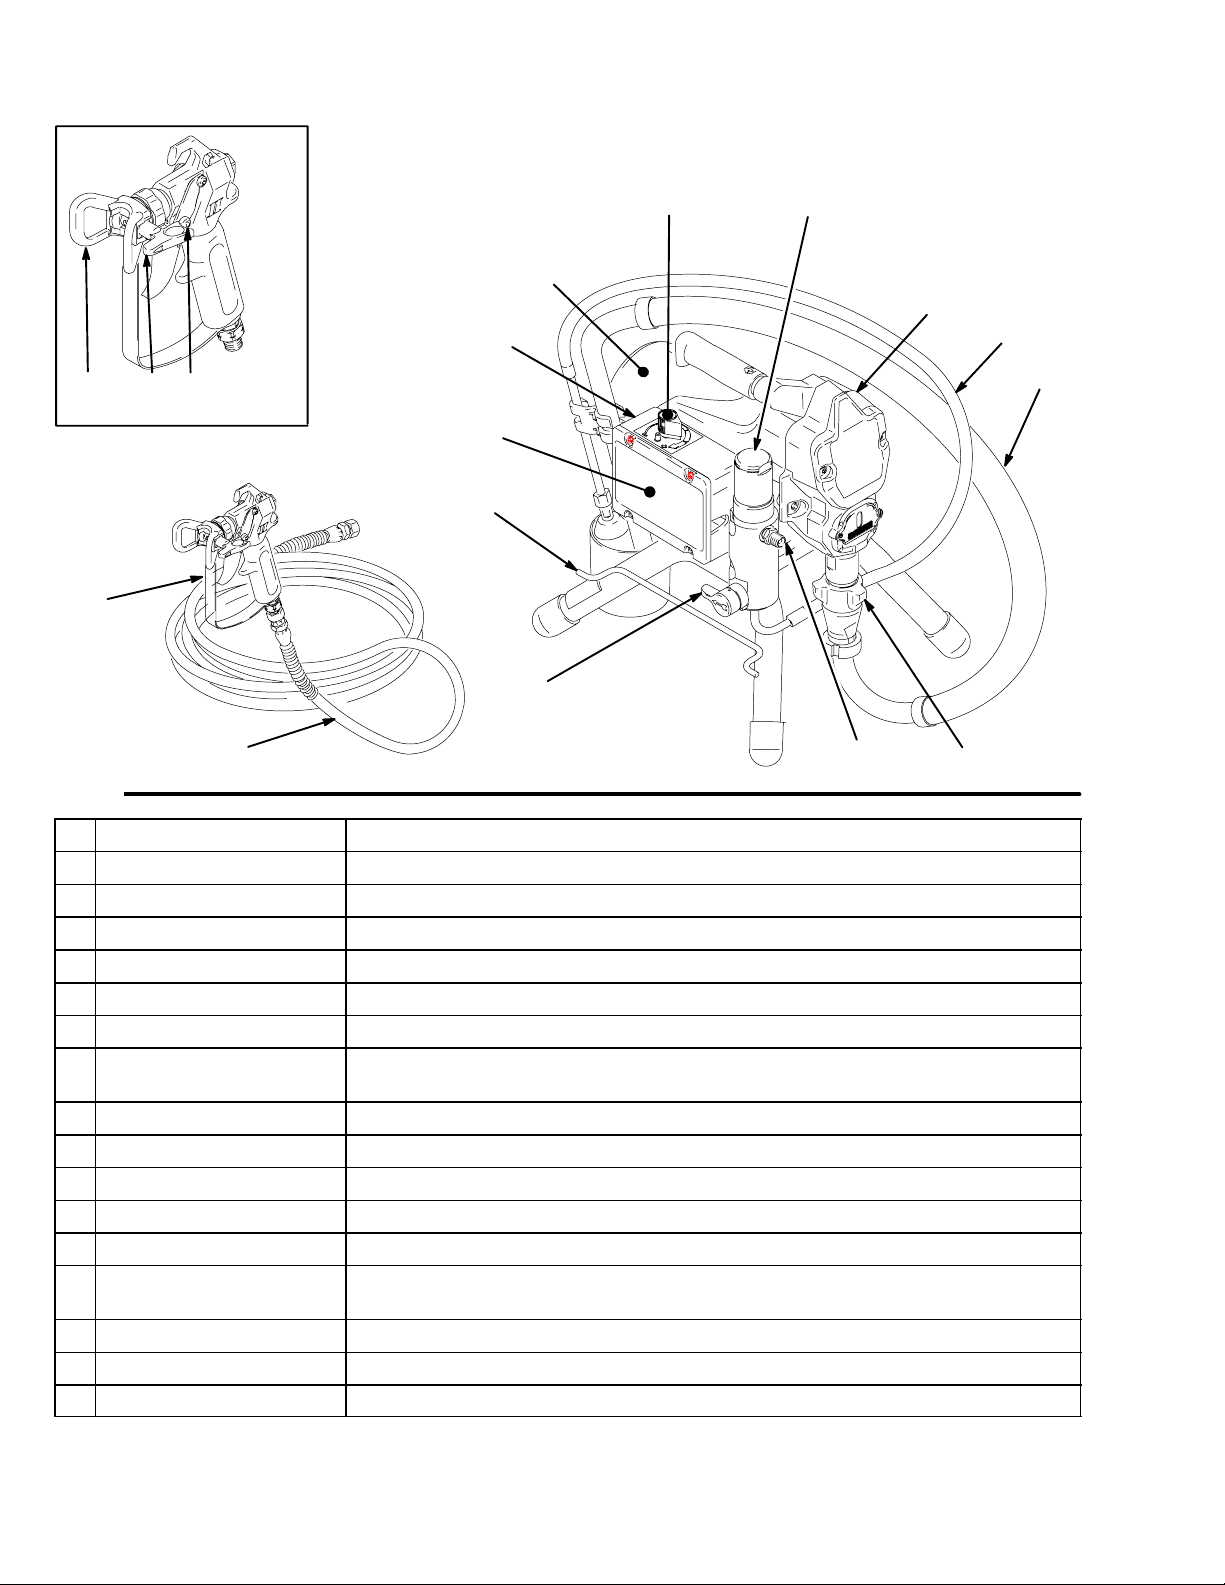
Component Identification and Function
N
Fig. 1
H
A
K
PR
S
ti2377a
J
T
F
M
G
ti2399
B
V
U
E
D
A Motor DC motor, permanent magnet, totally enclosed, fan cooled
B Drive Assembly Transfers power from DC motor to displacement pump
D Displacement Pump Transfers fluid to be sprayed from source through spray gun
E Fluid Outlet Spray gun is connected here
F Prime Valve Used to prime and drain sprayer (also relieves fluid outlet pressure) when open
G Fluid Filter Final filter of fluid to spray gun
H Pressure Adjusting Knob Controls fluid outlet pressure
J Pressure Control Controls motor speed to maintain fluid outlet pressure at displacement pump
outlet. Works with pressure adjusting knob.
K ON/OFF Switch Power switch that controls main power to sprayer
M 50 ft (15 m) Main Hose 1/4 in. ID, grounded, nylon hose with spring guards on both ends
N Spray Gun High pressure spray gun with gun safety latch
P Spray Tip Uses high pressure fluid to clear tip clogs without removing tip from spray gun
R HandTite Tip Guard Tip guard reduces risk of injection injury
S Gun Safety Latch Gun safety latch inhibits accidental triggering of spray gun. Contractor II gun
shown. Refer to your gun manual to properly set your gun safety latch.
T Power Cord Rack Holds wrapped power cord for storage
U Suction Hose Transfers fluid to be sprayed from source to pump
V Drain Tube Fluid outlet used to drain and prime the sprayer
4 309714
Page 5
General Repair Information
Pressure Relief Procedure
WARNING
INJECTION HAZARD
System pressure must be manually
relieved to prevent system from starting
or spraying accidentally. Fluid under high
pressure can be injected through skin and cause
serious injury. To reduce risk of injury from injection, splashing fluid, or moving parts, follow Pres-
sure Relief Procedure whenever you:
are instructed to relieve pressure,
stop spraying,
check or service any system equipment,
or install or clean spray tip.
1. Lock gun safety latch.
2. Turn ON/OFF switch to OFF.
3. Unplug power supply cord.
4. Unlock gun safety latch. Hold metal part of gun
firmly to grounded metal pail. Trigger gun to relieve
pressure.
5. Lock gun safety latch.
6. Open pressure drain valve. Leave pressure drain
valve open until ready to spray again.
If suspected that spray tip or hose is completely
clogged, or that pressure has not been fully relieved
after following steps above, VERY SLOWLY loosen tip
guard retaining nut or hose end coupling to relieve
pressure gradually, then loosen completely. Now clear
tip or hose obstruction.
1. Keep all screws, nuts, washers, gaskets, and
electrical fittings removed during repair procedures. These parts are not normally provided with
replacement assemblies.
WARNING
ELECTRIC SHOCK HAZARD
MOVING PARTS HAZARD
To reduce risk of serious injury, including
electric shock, do not touch moving or
electrical parts with fingers or tools while
testing repair. Shut off and unplug sprayer when inspection is complete. Install all
covers, gaskets, screws, washers and
shroud before operating sprayer.
2. Test repair after problem is corrected.
3. If sprayer does not operate properly, review
repair procedure to verify procedure was done
correctly. If necessary, see Troubleshooting Guide,
pages 7 – 11, for other possible solutions.
WARNING
HOT SURFACES HAZARD
EXPLOSION HAZARD
Motor housing may be very hot during
operation and could burn skin if touched.
Flammable materials spilled on hot, bare
motor could cause fire or explosion.
Have motor shroud in place during
operation to reduce risk of burns, fire or
explosion or cut fingers.
CAUTION
To reduce risk of pressure control malfunction:
Use needle nose pliers to disconnect wire. Never
pull on wire, pull on connector.
Mate wire connectors properly. Center flat blade of
insulated male connector in female connector.
Route wires carefully to avoid interference with
other connections of pressure control. Do not pinch
wires between cover and control box.
CAUTION
Do not run sprayer dry for more than 30 seconds to
avoid damaging pump packings.
4. Install motor shroud before operation of sprayer and replace if damaged. Motor shroud directs
cooling air around motor to prevent overheating. It
can reduce risk of burns, fire or explosion, or cut
fingers; see preceding WARNING.
5309714
Page 6
Grounding
WARNING
Your system must be grounded. Read Warnings,
page 2.
The sprayer requires:
Grounded
Outlets
Grounding Plug
120 VAC
Fig. 2
100–120 VAC, 50/60 Hz, 15A circuit with a ground-
ing receptacle.
Do not alter ground prong or use adapter.
Do not use sprayer if the electrical cord has a
damaged ground prong. Only use an extension
cord with an undamaged, 3–prong plug.
Recommended extension cord lengths:
120 Vac: 300 ft (90 m) 12 AWG (1.0 mm) , 3 wire
with grounding prong
ti3001b
Fluid supply container: follow local codes.
Solvent pails used when flushing: follow local
code. Only use conductive metal pails, placed on
grounded surface such as concrete. Do not place the
pail on a nonconductive surface, such as paper or
cardboard, which interrupts grounding continuity.
Grounding the metal pail: connect a ground wire to
the pail by clamping one end to pail and other end to
ground such as a water pipe.
Maintaining grounding continuity when flushing
or relieving pressure: hold metal part of spray gun
firmly to the side of a grounded metal pail, then trigger
gun.
Long lengths reduce sprayer performance.
Spray gun: ground through connection to a properly
grounded fluid hose and pump.
ti6762a
Fig. 3
6 309714
Page 7
Relieve pressure; page 5.
MOTOR WON’T OPERATE
Troubleshooting
TYPE OF PROBLEM
Basic Fluid Pressure
Problems
Basic Mechanical
Problems
Basic Electrical Problems
WHAT TO CHECK
If check is OK, go to next check
1. Pressure control knob setting. Motor will not run
if at minimum setting (fully counterclockwise).
2. Spray tip or fluid filter may be clogged. 2. Relieve pressure and clear clog or clean fil-
1. Pump (41) for frozen or hardened paint. 1. Thaw sprayer if water or water-based paint
2. Displacement pump connecting rod pin (9a).
Pin must be completely pushed into connecting
rod (9) and retaining spring (9b) must be firmly
in groove of pump pin. See Fig. 11.
3. Motor (54). Remove drive housing assembly
(42). See page 19. Try to rotate fan by hand.
1. Motor control board. Board shuts down and displays error code.
2. Electrical supply:
Meter must read 85–130 Vac.
WHAT TO DO
When check is not OK refer to this column
1. Slowly increase pressure setting to see if motor starts.
ter; refer to separate gun or tip instruction
manual.
has frozen in sprayer. Place sprayer in warm
area to thaw. Do not start sprayer until
thawed completely. If paint hardened (dried)
in sprayer, replace pump packings. See
page 21 (Displacement Pump Replace-
ment).
2. Push pin into place and secure with spring retainer.
3. Replace motor (54) if fan won’t turn. See
page 20.
1. See Motor Control Board Diagnostics,
page 16.
2. Reset building circuit breaker; replace building fuse. Try another outlet.
3. Extension cord. Check extension cord continuity with volt meter.
4. Sprayer power supply cord (56). Inspect for
damage such as broken insulation or wires.
3. Replace extension cord.
4. Replace power supply cord.
7309714
Page 8
Troubleshooting
MOTOR WON’T OPERATE (Continued)
TYPE OF PROBLEM
Basic Electrical Problems
(continued)
WHAT TO CHECK
If check is OK, go to next check
1. That motor leads are securely fastened and
properly mated.
2. For loose motor brush lead connections and terminals. See page 13.
3. Brush length which must be 1/2 in. minimum.
See page 13.
NOTE: Brushes do not wear at the same rate on
both sides of motor. Check both brushes.
4. For broken or misaligned motor brush springs.
Rolled portion of spring must rest squarely on
top of brush. See page 13.
5. Motor brushes may be binding in brush holders.
See page 13.
6. Motor armature commutator for burn spots,
gouges and extreme roughness.
See page 13.
7. Motor armature for shorts using armature tester
(growler) or perform spin test. See page 12.
WHAT TO DO
When check is not OK refer to this column
1. Replace loose terminals; crimp to leads. Be
sure terminals are firmly connected.
Clean circuit board terminals. Securely reconnect leads.
2. Tighten terminal screws. Replace brushes if
leads are damaged. See page 13.
3. Replace brushes. See page 13.
4. Replace spring if broken. Realign spring with
brush. See page 13.
5. Clean brush holders. Remove carbon with
small cleaning brush. Align brush leads with
slot in brush holder to assure free vertical
brush movement.
6. Remove motor and have motor shop resurface commutator if possible. See page 20.
7. Replace motor. See page 20.
Refer to wiring diagram, Fig.
8, to identify test points (TP).
1. Power supply cord (56). Connect volt meter between TP1 (neutral) and L2.
Plug in sprayer. Meter must read 85–130 Vac.
Unplug sprayer.
2. ON/OFF switch (58). Connect volt meter between L1 and L2 terminal on ON/OFF switch.
Plug in sprayer and turn ON.
Meter must read 85–130 Vac
3. All terminals for damage or loose fit. 3. Replace damaged terminals and reconnect
1. Replace power supply cord.
2. Replace ON/OFF switch. See page 15.
securely.
8 309714
Page 9
Troubleshooting
LOW OR FLUCTUATING OUTPUT
TYPE OF PROBLEM
Low Output 1. For worn spray tip. 1. Follow Pressure Relief Procedure Warn-
WHAT TO CHECK
If check is OK, go to next check
2. Verify pump does not continue to stroke when
gun trigger is released.
3. Filter clogged. 3. Relieve pressure. Check and clean filter.
4. Prime valve leaking. 4. Relieve pressure. Repair prime valve.
5. Suction hose connections. 5. Tighten any loose connections.
6. Electrical supply with volt meter.
Meter must read 85–130 Vac.
Low voltages reduce sprayer performance.
7. Extension cord size and length; must be at least
12 gauge wire and no longer than 300 ft. Longer
cord lengths reduce sprayer performance.
8. Leads from motor to pressure control circuit
board (49) for damaged or loose wires or connectors. Inspect wiring insulation and terminals
for signs of overheating.
9. For loose motor brush leads and terminals. See
page 13.
WHAT TO DO
When check is not OK refer to this column
ing, then replace tip. See your separate
gun or tip manual.
2. Service pump. See page 21.
6. Reset building circuit breaker; replace
building fuse. Repair electrical outlet or try
another outlet.
7. Replace with a correct, grounded extension cord.
8. Be sure male terminal blades are centered
and firmly connected to female terminals.
Replace any loose terminal or damaged
wiring. Securely reconnect terminals.
9. Tighten terminal screws. Replace brushes
if leads are damaged. See page 13.
10.For worn motor brushes which must be 1/2 in.
minimum. See page 13.
11. For broken and misaligned motor brush
springs. Rolled portion of spring must rest
squarely on top of brush.
12.Motor brushes for binding in brush holders. See
page 13.
13.Low stall pressure. 13. Do either or both:
14.Motor armature for shorts by using an armature
tester (growler) or perform spin test. See
page 12.
10. Replace brushes. See page 13.
11. Replace spring if broken. Realign spring
with brush. See page 13.
12.Clean brush holders, remove carbon dust
with small cleaning brush. Align brush lead
with slot in brush holder to assure free vertical brush movement.
a. Turn pressure control knob fully
clockwise. Make sure pressure
control knob is properly installed to
allow full clockwise position.
b. Try a new transducer.
14.Replace motor. See page 20.
9309714
Page 10
Troubleshooting
LOW OR FLUCTUATING OUTPUT
TYPE OF PROBLEM
Motor runs and pump strokes 1. Paint supply. 1. Refill and reprime pump.
Motor runs but pump does not
stroke
WHAT TO CHECK
If check is OK, go to next check
2. Intake strainer clogged. 2. Remove and clean, then reinstall.
3. Suction tube or fittings loose. 3. Tighten; use thread sealant or sealing tape
4. To see if intake valve ball and piston ball are
seating properly. See page 21.
5. Leaking around throat packing nut which may
indicate worn or damaged packings. See
page 21.
6. Pump rod damage. 6. Repair pump, page 21.
1. Displacement pump pin (32) (damaged or
missing), page 21.
2. Connecting rod assembly (43) for damage,
page 19.
3. Gears or drive housing, page 19. 3. Inspect drive housing assembly and gears
WHAT TO DO
When check is not OK refer to this column
on threads if necessary.
4. Remove intake valve and clean. Check
balls and seats for nicks; replace if necessary, page 21. Strain paint before using to
remove particles that could clog pump.
5. Replace packings, page 21. Also check
piston valve seat for hardened paint or
nicks and replace if necessary. Tighten
packing nut/wet-cup.
1. Replace pump pin if missing. Be sure retainer spring (31) is fully in groove all
around connecting rod, page 21.
2. Replace connecting rod assembly,
page 19.
for damage and replace if necessary,
page 19.
10 309714
Page 11
Troubleshooting
MOTOR IS HOT AND RUNS INTERMITTENTLY
TYPE OF PROBLEM
Motor is hot and runs intermittently.
ELECTRICAL SHORT
TYPE OF PROBLEM
Building circuit breaker opens
as soon as sprayer switch is
turned on.
CAUTION
Any short in any part of the
motor power circuit will cause
the control circuit to inhibit
sprayer operation. Correctly
diagnose and repair all shorts
before checking and replacing control board.
WHAT TO CHECK
If check is OK, go to next check
1. Determine if sprayer was operated at high
pressure with small tips, which causes low
motor RPM and excessive heat build up.
2. Be sure ambient temperature where sprayer
is located is no more than 90
is not located in direct sun.
WHAT TO CHECK
If check is OK, go to next check
1. All electrical wiring for damaged insulation, and
all terminals for loose fit or damage. Also wires
between pressure control and motor. See page
20.
2. For missing inspection plate gasket (see page
20), bent terminal forks or other metal to metal
contact points which could cause a short.
3. Motor armature for shorts. Use an armature
tester (growler) or perform spin test. See page
12. Inspect windings for burns.
4. Motor control board (49) by performing motor
control board diagnostics on page 16. If diagnostics indicate, substitute with a good board.
F and sprayer
WHAT TO DO
When check is not OK refer to this column
1. Decrease pressure setting or increase tip
size.
2. Move sprayer to shaded, cooler area if possible.
WHAT TO DO
When check is not OK refer to this column
1. Repair or replace any damaged wiring or
terminals. Securely reconnect all wires.
2. Correct faulty conditions.
3. Replace motor. See page 20.
4. Replace with a new pressure control board
(35). See page 16.
Building circuit breaker opens
as soon as sprayer is plugged
into outlet and sprayer is NOT
turned on.
Sprayer quits after sprayer operates for 5 to 10 minutes.
.
CAUTION: Do not perform this check until motor armature is determined to be good. A bad
motor armature can burn out a good board.
1. Basic Electrical Problems on page 7. 1. Perform necessary procedures.
2. ON/OFF switch (58) See page 15. Be sure
sprayer is unplugged! Disconnect wires from
switch. Check switch with ohmmeter. Reading
must be infinity with ON/OFF switch OFF, and
zero with switch ON.
3. For damaged or pinched wires in pressure control. See page 16.
1. Basic Electrical Problems on page 7. 1. Perform necessary procedures.
2. Electrical supply with volt meter.
Meter must read 85–130 Vac.
3. Tightness of pump packing nut. Over tightening
tightens packings on rod, restricts pump action,
and damages packings.
2. Replace ON/OFF switch. See page 15.
3. Replace damaged parts. See page 16.
2. If voltage is too high, do not operate
sprayer until corrected.
3. Loosen packing nut. Check for leaking
around throat. Replace pump packings, if
necessary. See page 21.
11309714
Page 12
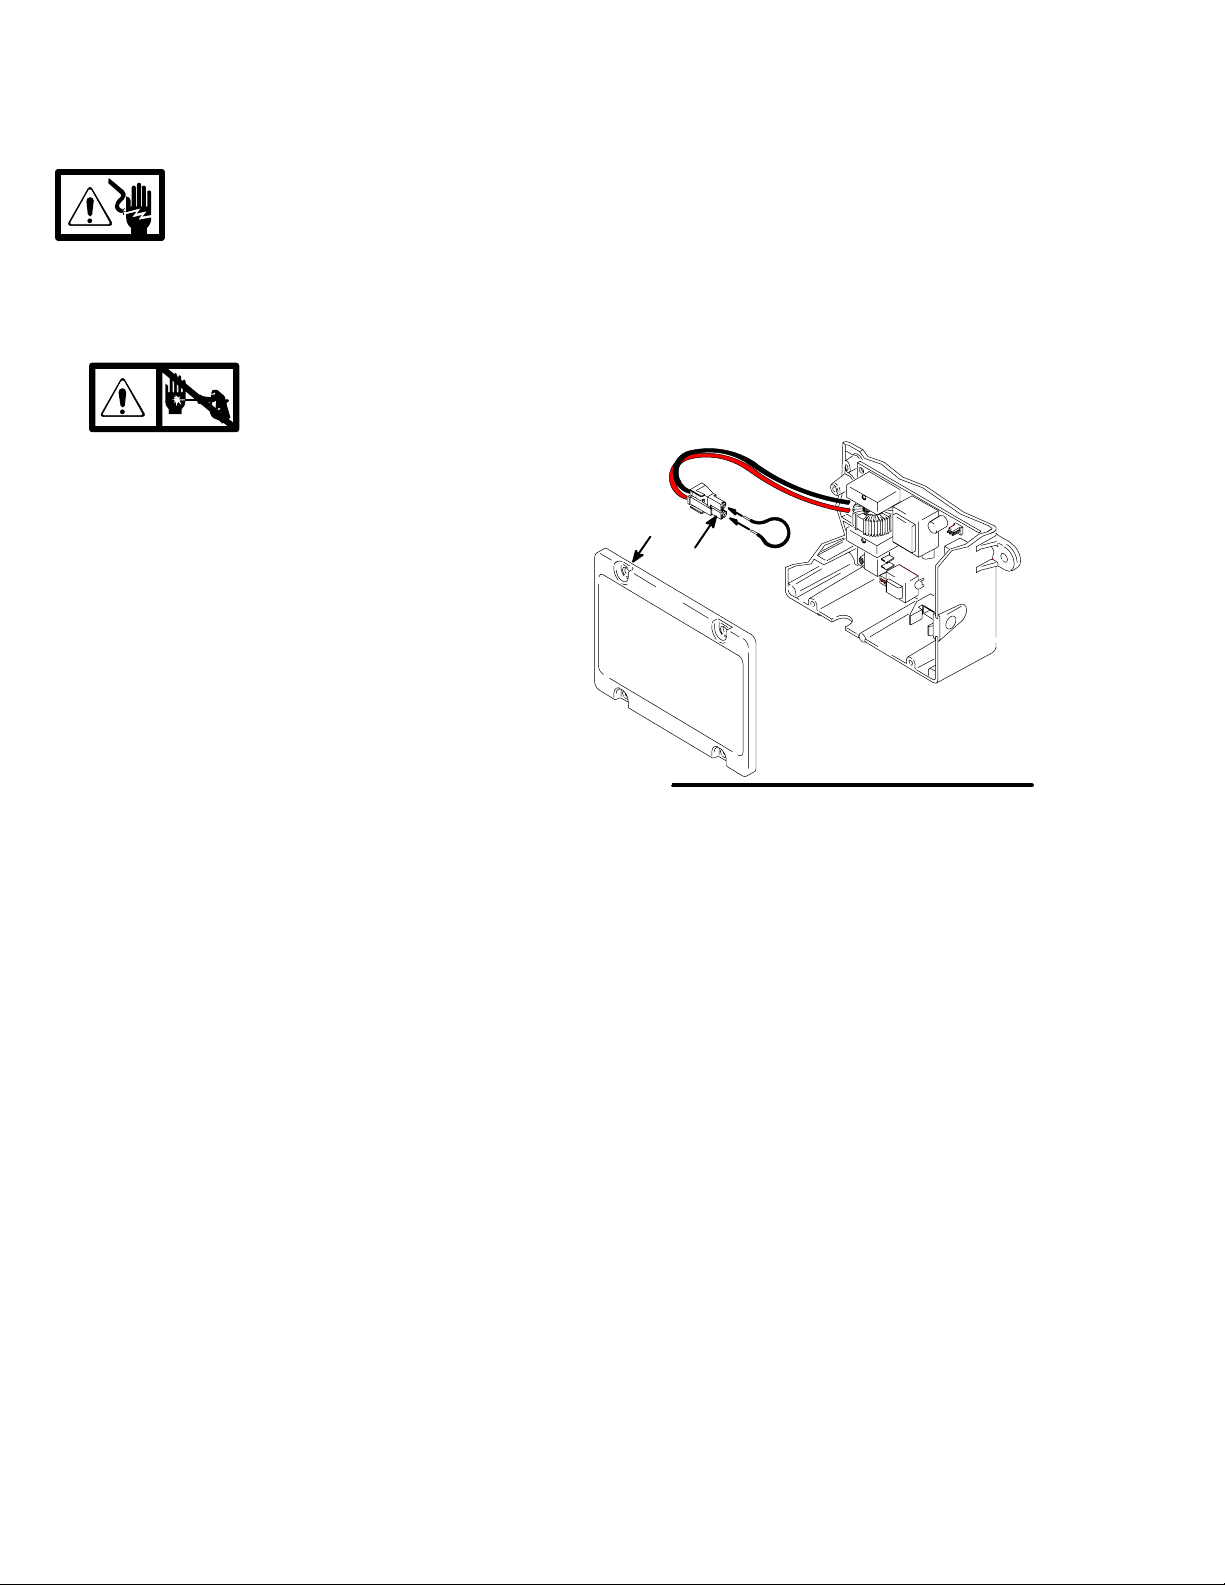
Spin Test
Setup
Electric Shock Hazard; page 5.
To check armature, motor winding and brush electrical
continuity:
1.
2. Remove drive housing; page 19.
3. Fig. 4. Remove pressure control cover (50). Disconnect connector (F).
4. Fig. 5. Remove motor shroud (23) and inspection
covers (A).
Relieve pressure; page 5.
Armature Short Circuit Test
Quickly turn motor fan by hand. If no electrical shorts,
motor coasts two or three revolutions before complete
stop. If motor does not spin freely, armature is
shorted. Replace motor; page 20.
Armature, Brushes, and Motor Wiring Open
Circuit Test (Continuity)
1. Connect red and black motor leads with test lead.
Turn motor fan by hand at about two revolutions
per second.
2. If uneven or no resistance, check for: broken brush
springs, brush leads, motor leads; loose brush
terminal screws, motor lead terminals; worn
brushes. Repair as needed; page 13.
3. If still uneven or no resistance, replace motor;
page 20.
50
F
Fig. 4
ti2572a
12 309714
Page 13
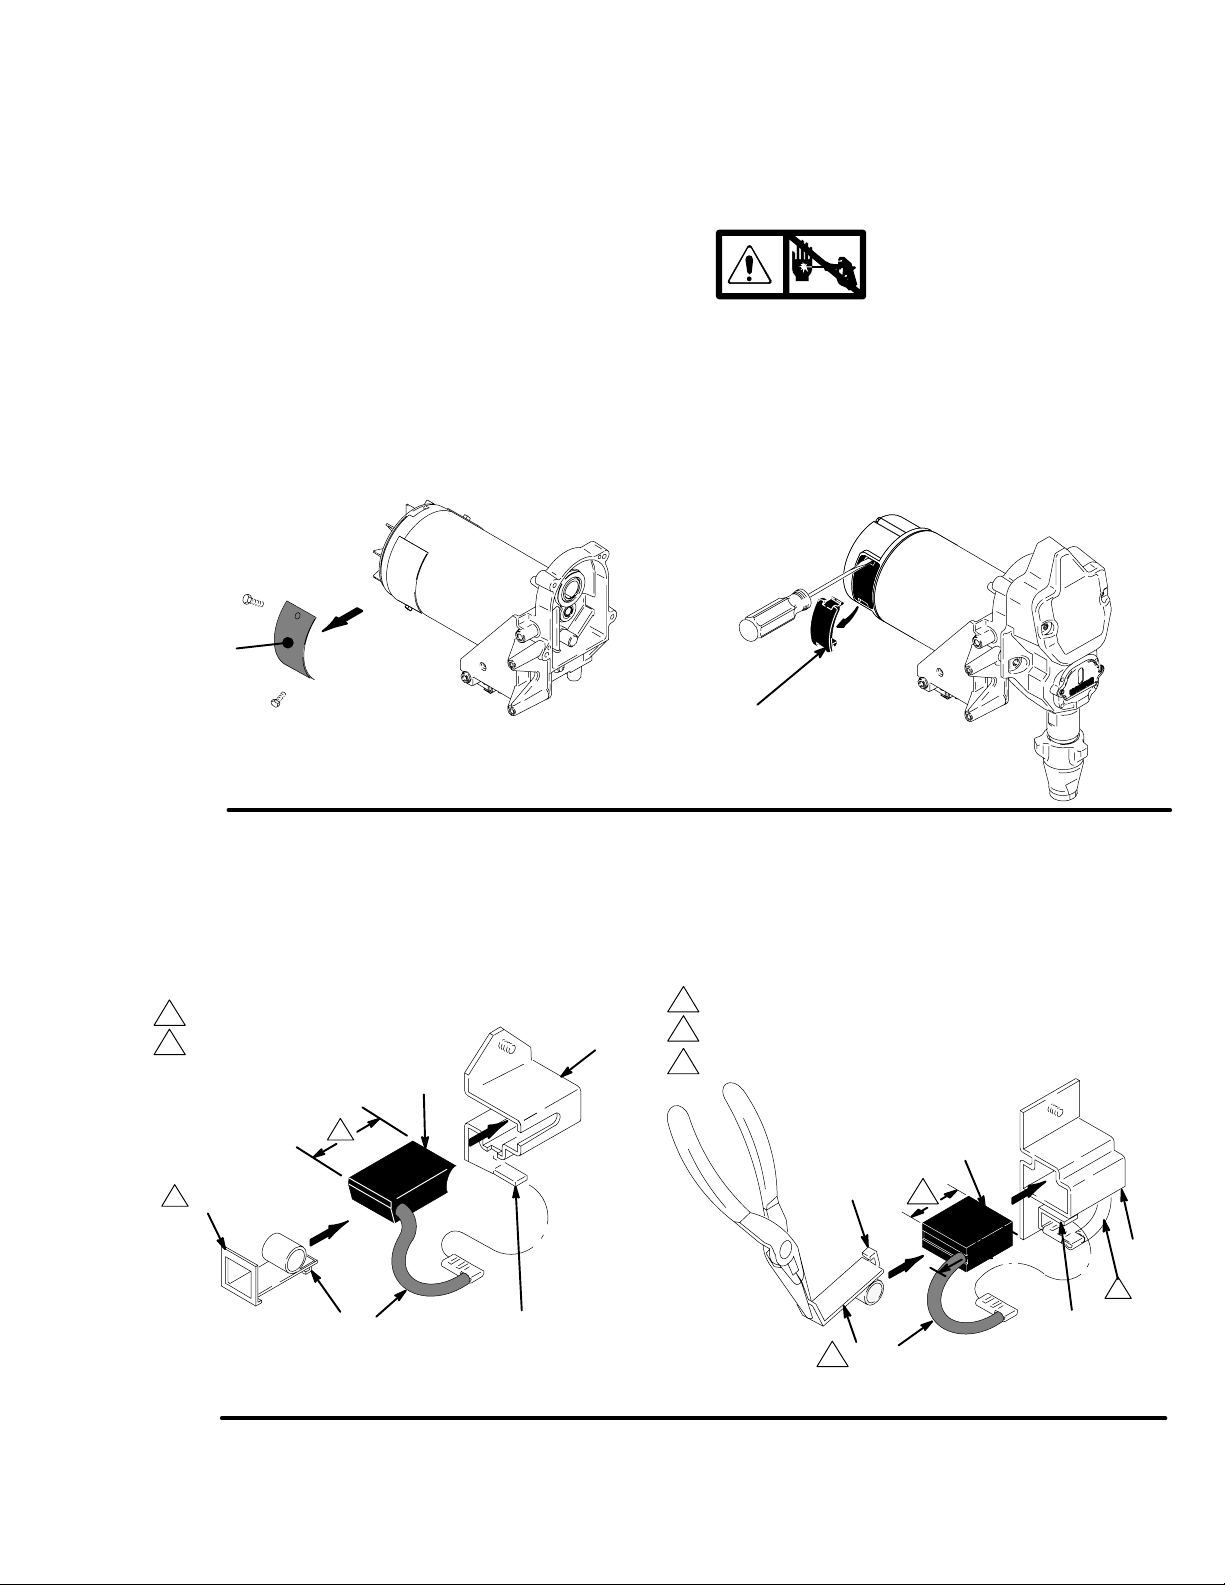
Motor Brush Replacement
The 395/495/595 sprayer’s motors are supplied by two different motor manufacturers. Style A motor has brush
caps held on with screws. Style B has brush caps that snap onto the motor. Determine which style motor you are
servicing and refer to the appropriate illustration in the following instructions.
Motor Brush Removal
Replace brushes worn to less than 1/2 in. Brushes
wear differently on each side of motor, check both
sides. Brush Repair Kit 287735 is available.
1. Read General Repair Information; page 5.
A
Style A
Fig. 5
ti2571a
2.
Relieve pressure; page 5.
3. Fig. 5. Remove motor shroud and two inspection
covers (A).
A
A
Style B
4. Fig. 6 . Push in spring clip (A) to release hook (B)
from brush holder (C). Pull out spring clip (A).
Included in Brush Repair Kit
1
2
Minimum 0.5” (12.5 mm)
C
F
2
1
A
ti4194a
BED
ti2542
Style A
Fig. 6
5. Fig. 6. Pull brush lead (D) off of terminal (E).
Remove brush (F).
Motor lead; do not disconnect
1
2
Minimum 0.5” (12.5 mm)
3
Included in Brush Repair Kit
F
B
2
2
E
3
A
D
Style B
C
1
ti4195a
6. Inspect commutator for excessive pitting, burning
or gouging. A black color on commutator is normal.
Have commutator resurfaced by a motor repair
shop if brushes wear too fast.
13309714
Page 14
Motor Brush Replacement
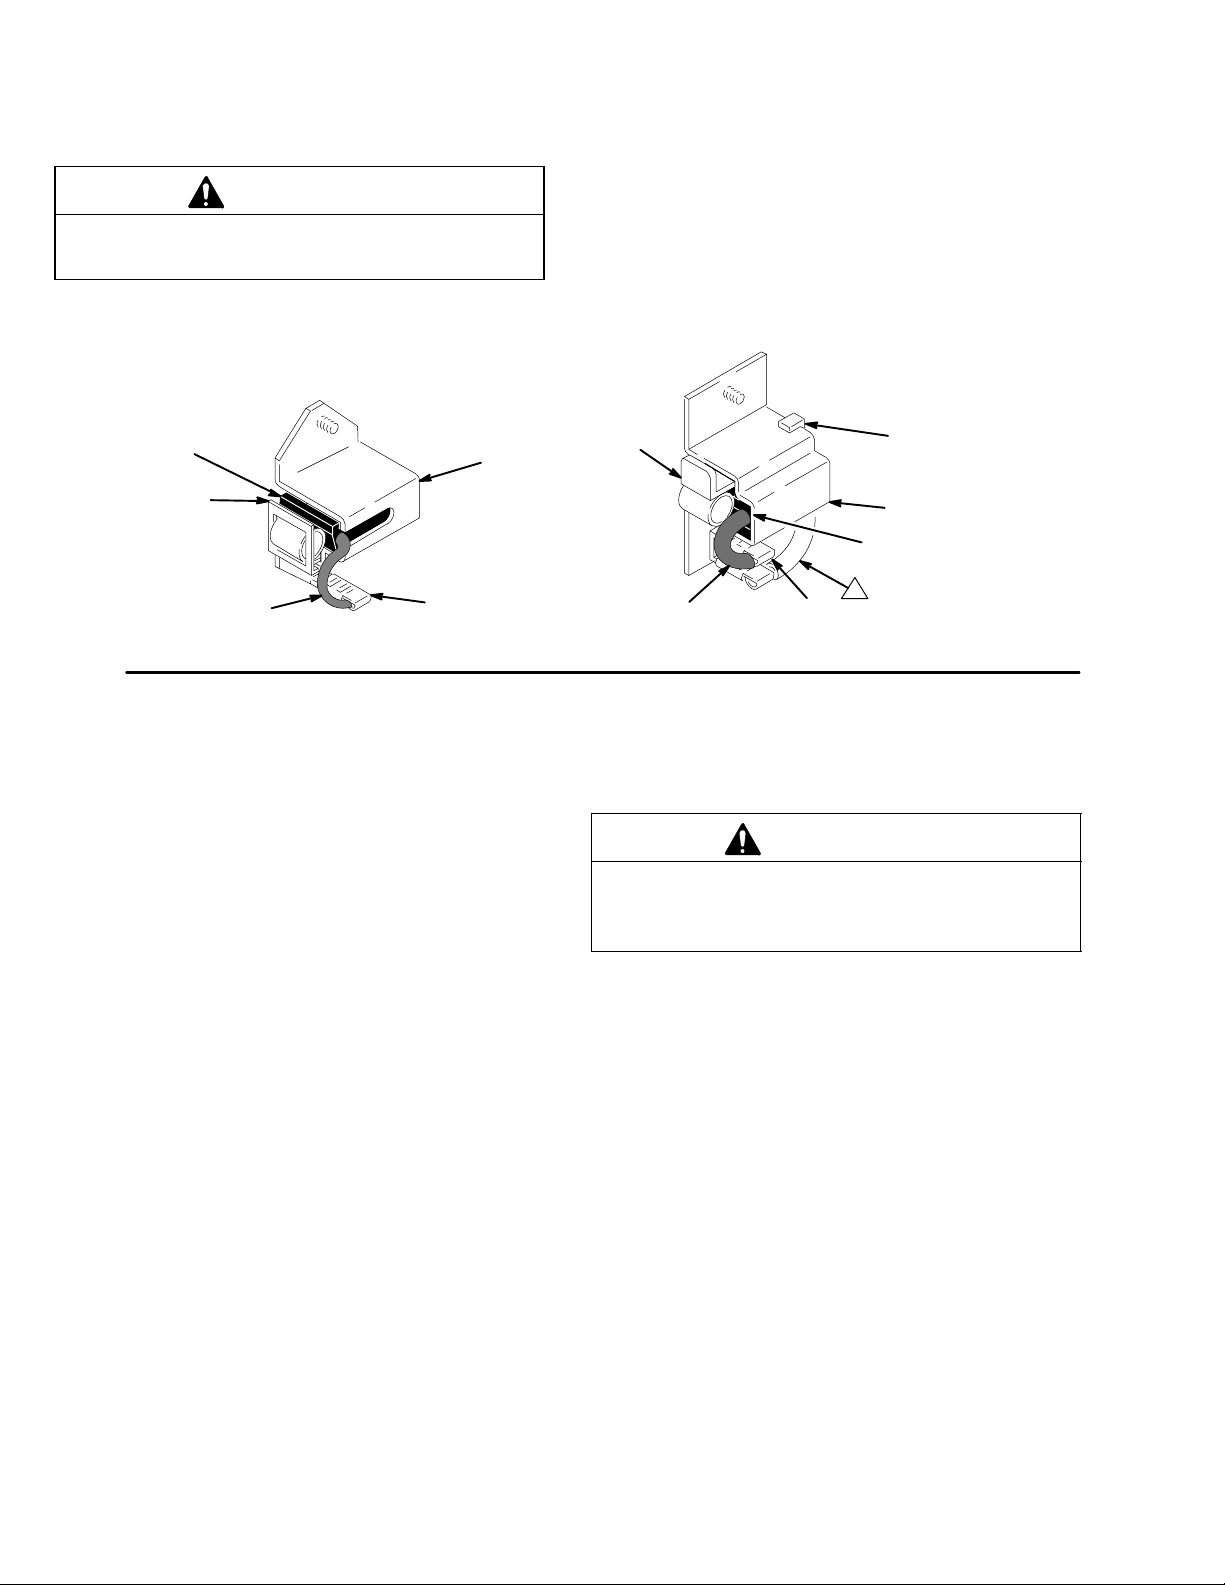
Motor Brush Installation
CAUTION
When installing brushes, follow all steps carefully to
avoid damaging parts.
F
A
D
Style A
Fig. 7
1. Fig. 7. Install new brush (F) with lead into brush
holder (C).
2. Fig. 7. Slide brush lead (D) onto terminal (E).
3. Fig. 7. Install spring clip (A). Push down to set
hook (B) into brush holder (C).
4. Repeat for other side.
5. Test brushes.
a. Remove pump (41); Displacement Pump
Replacement, page 21.
ti4194a
C
E
A
D
c. Turn sprayer ON. Slowly increase pressure
until motor is at full speed.
E
Style B
B
C
F
1
ti4195a
CAUTION
Do not run sprayer dry for more than 30 seconds
while checking brushes to avoid damaging displacement pump packings.
6. Install brush inspection covers and gaskets.
7. Break in brushes.
a. Operate sprayer 1 hour with no load.
b. With sprayer OFF, turn pressure control knob
fully counterclockwise to minimum pressure.
Plug in sprayer.
14 309714
b. Install pump (41); Displacement Pump Re-
placement, page 21.
Page 15
On/Off Switch Replacement
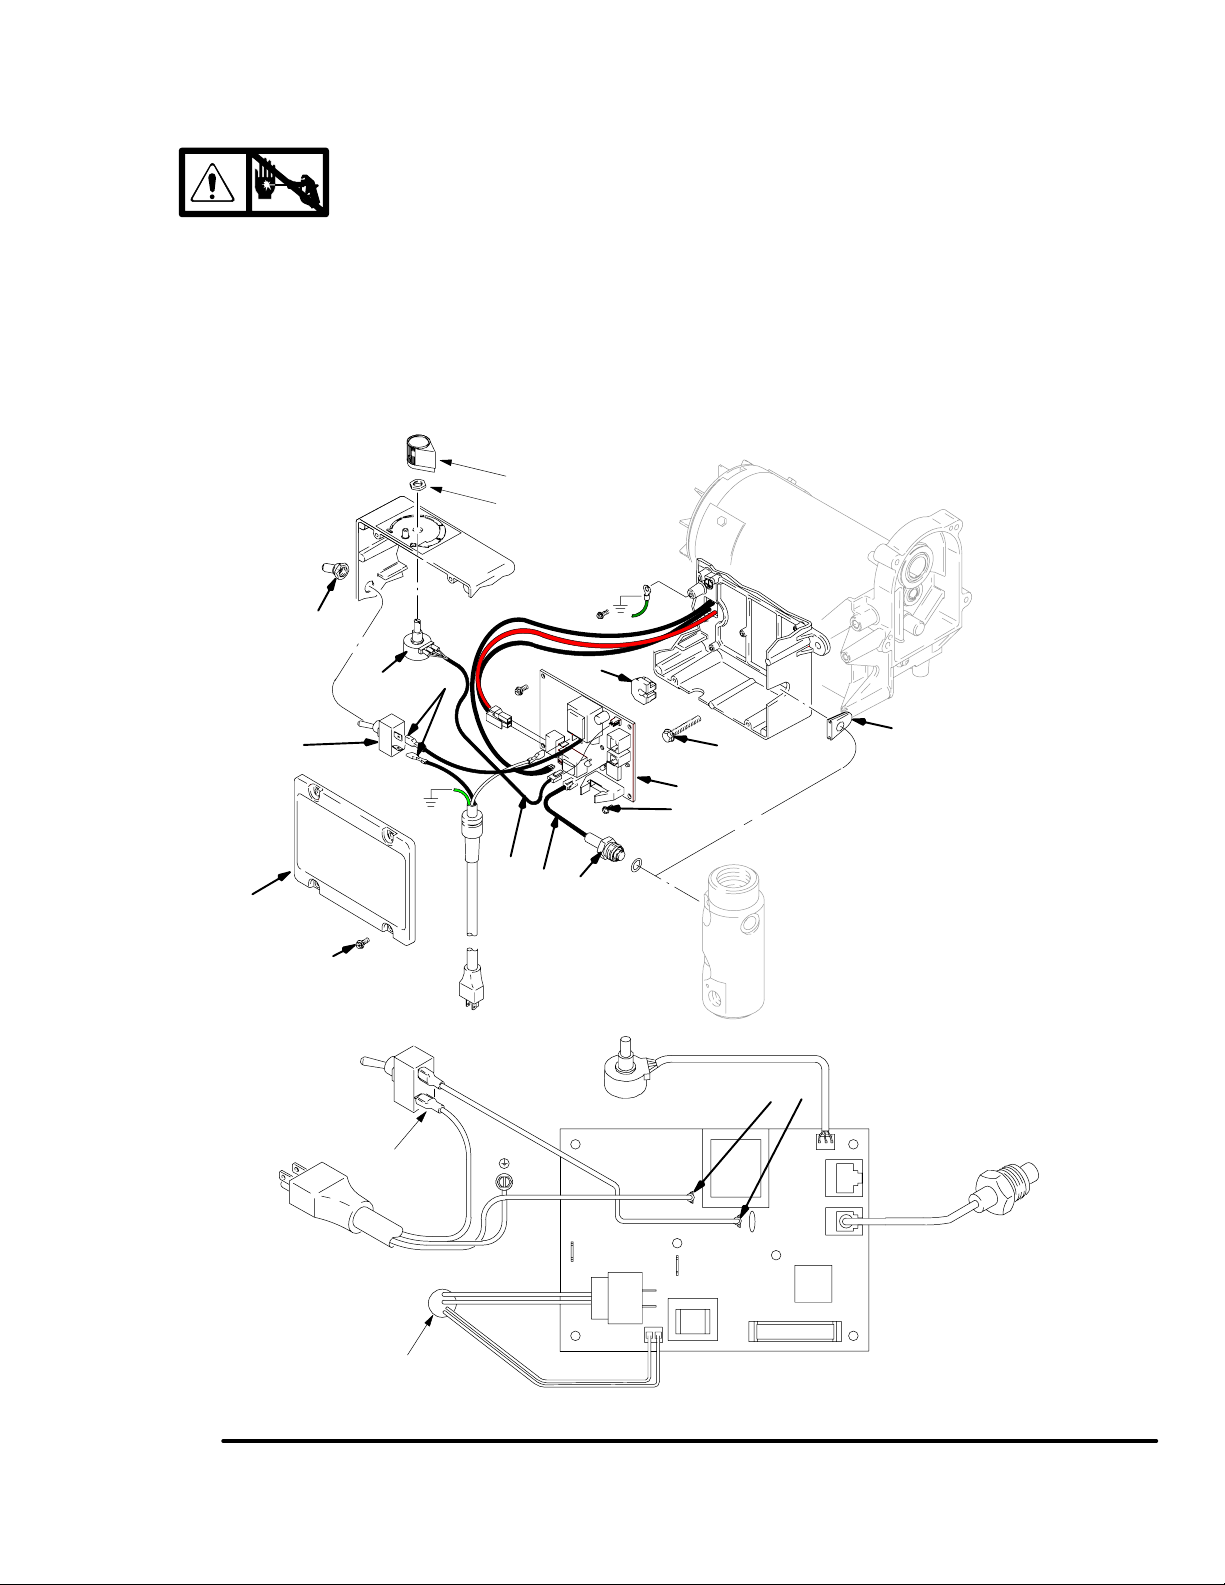
Removal
1.
2. Fig. 8. Remove four screws (12) and pressure
control cover (50).
3. Disconnect two wires (A) from ON/OFF
switch (58).
4. Remove toggle boot (30) and locking ring. Remove
ON/OFF switch (58).
Relieve pressure; page 5.
30
37
A
11
37a
19
Installation
1. Install new ON/OFF switch (58). Install locking ring
and toggle boot (30).
2. Connect two wires (A) to ON/OFF switch.
3. Install pressure control cover (50) with four
screws (12).
50
Power
Plug
Ref 56
58
12
ON/OFF
Switch
Ref 58
TP1
Black
D
Black
Green
Red (+)
49
6
E
38
Potentiometer Ref 37
White
47
Black
ti2509b
L2 L1
20
Black
Pressure
Transducer
Ref 38
Fig. 8
from Motor
Black (–)
2 x White
ti2471a
15309714
Page 16
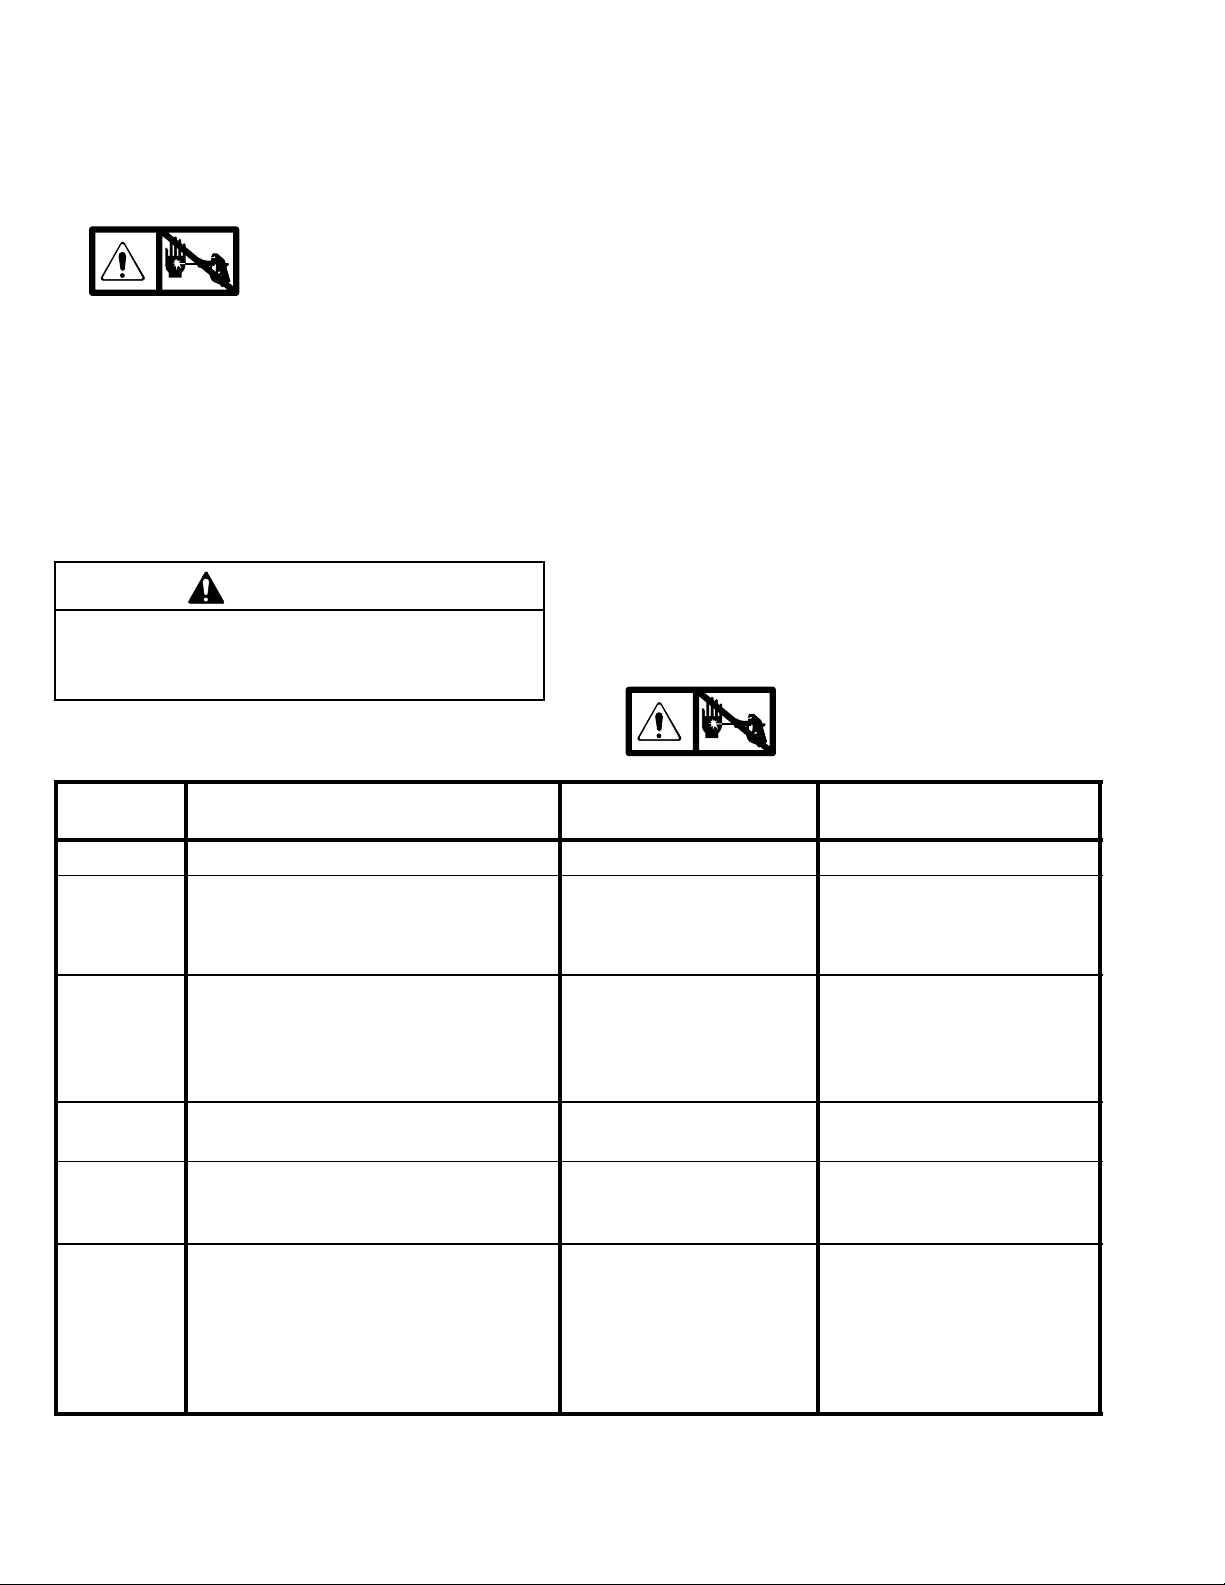
Removal
Refer to Fig. 8.
Pressure Control Repair
Motor Control Board
Installation
1. Clean pad on rear of motor control board. Apply
small amount of thermal compound 073019 to pad.
1.
Relieve pressure; page 5.
2. Remove four screws (12) and cover (50).
3. Disconnect all leads to motor control board (49).
4. Remove six screws (6) and circuit board (49).
Motor Control Board Diagnostics
Note: Keep a new transducer on hand to use for test.
CAUTION
Do not allow sprayer to develop fluid pressure without transducer installed. Leave drain valve open if
test transducer is used.
1. For sprayers with digital display, see Digital Dis-
play Messages, page 17.
LED
BLINKS
SPRAYER OPERATION INDICATES
2. Fig. 8. Install motor control board (49) with six
screws (6).
3. Connect all leads to motor control board (49). See
Fig. 8.
4. Bundle and tie all loose wires so none lay in contact with inductor coil (not 120 Vac sprayers).
5. Install cover (50) with four screws (12).
2. Remove four screws (12) and cover (50).
See Fig. 8.
3. Turn ON/OFF switch ON.
4. Observe LED operation and reference following
table:
Relieve pressure and un-
5.
plug sprayer before servicing control board; page 5.
WHAT TO DO
Once Sprayer runs Normal operation Do nothing
Two times
repeatedly
Three times
repeatedly
Four times
repeatedly
Five times
repeatedly
Six times
repeatedly
Sprayer shuts down and LED continues to
blink two times repeatedly
Sprayer shuts down and LED continues to
blink three times repeatedly
Sprayer shuts down and LED continues to
blink four times repeatedly
Sprayer does not start or shuts down and
LED continues to blink five times repeatedly
Sprayer shuts down and LED blinks six
times repeatedly
Run away pressure. Pressure greater than 4500 psi
(310 bar, 31 MPa) or damaged pressure transducer.
Pressure transducer is
faulty or missing
Line voltage is too high Check for voltage supply prob-
Motor fault Check for locked rotor, shorted
Motor is too hot or there is a
fault in the motor thermal
device
Replace motor control board or
pressure transducer.
Check transducer connection.
Open drain valve. Substitute
new transducer for transducer
in sprayer. If sprayer runs, replace transducer.
lems
wiring or disconnected motor.
Repair or replace failed parts.
Allow sprayer to cool. If sprayer runs correctly when cool,
check motor fan function and
air fow. Keep sprayer in cool
location. If sprayer does not
run when cool and continues to
blink 6 times, replace motor.
16 309714
Page 17
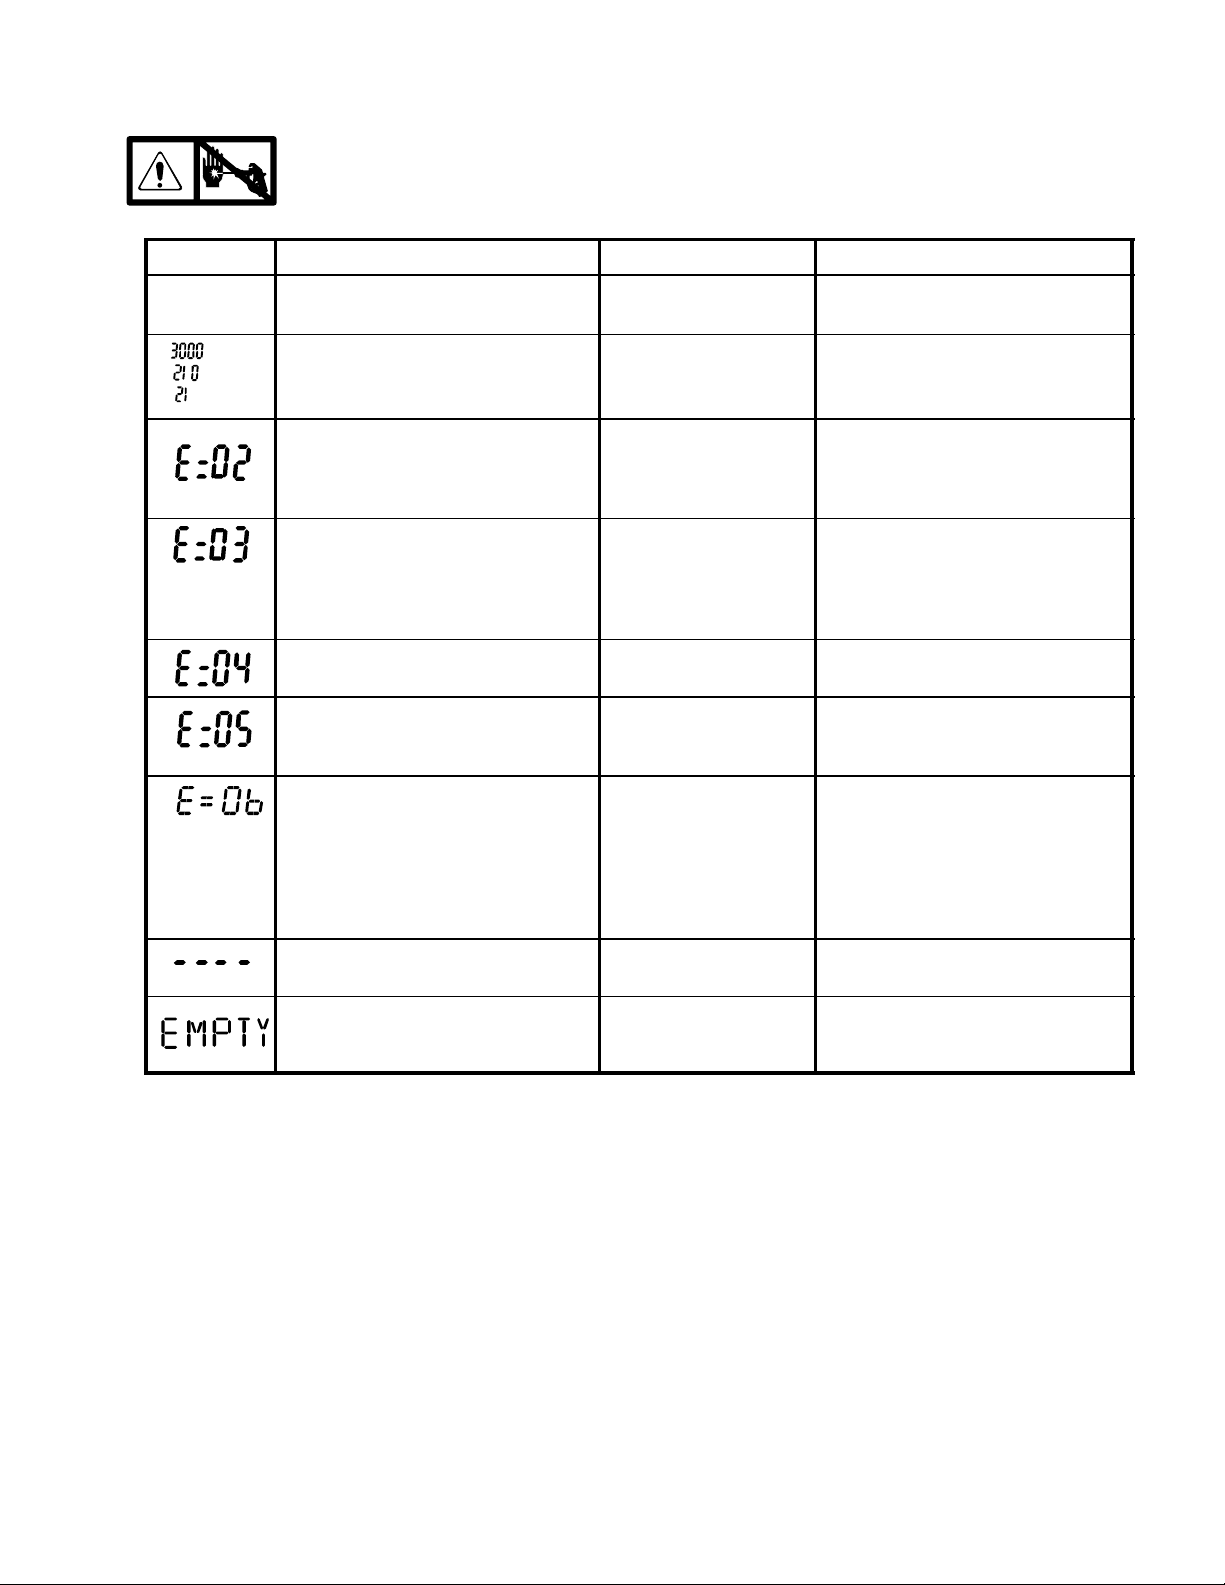
Pressure Control Repair
Digital Display Messages
No display does not mean that sprayer is not pressurized. Relieve pressure before repair; page 5.
DISPLAY
No Display
psi
bar
MPa
SPRAYER OPERATION
Sprayer stops. Power is not applied.
Sprayer may be pressurized.
Sprayer is pressurized. Power is
applied. (Pressure varies with tip
size and pressure control setting.)
Sprayer may continue to run.
Power is applied.
Sprayer stops. Power is applied.
Sprayer stops. Power is applied.
Sprayer does not start or stops.
Power is applied.
Sprayer stops. Power is applied.
INDICATION ACTION
Loss of power Check power source. Relieve pres-
sure before repair or disassembly.
Normal operation Spray
Pressure greater than
4500 psi (310 bar, 31
MPa) or pressure transducer faulty
Pressure transducer
faulty, bad connection
or broken wire.
Line voltage too high Check for voltage supply problem
Motor fault Check for locked rotor, shorted wir-
Motor it too hot. Allow sprayer to cool. If sprayer
Replace pressure control board or
pressure transducer.
Check transducer connection.
Open drain valve. Substitute new
transducer for transducer in sprayer. If sprayer runs, replace transducer.
ing or disconnected motor. Repair
or replace failed parts.
runs correctly when cool, check
motor fan function and air fow.
Keep sprayer in cool location. If
sprayer does not run when cool
and continues to blink 6 times, replace motor.
Power is applied.
Sprayer stops. Power is applied.
Pressure less than 200
psi (14 bar, 1.4 MPa)
Empty paint pail. Loss
of pressure.
Increase pressure if desired. Drain
valve may be open.
Refill paint pail. Check for leaks or
clogged pump inlet. Repeat Start-
up procedure.
17309714
Page 18
Pressure Control Repair
Pressure Control Transducer
Removal
Refer to Fig. 8.
1.
2. Remove four screws (12) and cover (50).
3. Disconnect lead (E) from motor control board (49).
4. Remove two screws (47) and filter housing (15).
5. Thread transducer lead plastic connector down
through transducer grommet (20).
6. Remove pressure control transducer (38) and
packing o-ring (3) from filter housing.
Installation
1. Install packing o-ring (3) and pressure control
transducer (38) in filter housing (15). Torque to
30–35 ft-lb.
2. Thread transducer lead plastic connector up
through transducer grommet (20).
3. Install filter housing (15) with two screws (47).
4. Connect lead (E) to motor control board (49).
5. Install cover (50) with four screws (12).
Relieve pressure; page 5.
Stored Data (Not available on all sprayers)
Pressure Adjust Potentiometer
Removal
Refer to Fig. 8.
1.
2. Remove four screws (12) and cover (50).
3. Disconnect all leads from motor control board (49).
4. Remove six screws (6) and board (49)
5. Remove potentiometer knob (11), nut (37a) and
pressure adjust potentiometer (37).
Installation
1. Install pressure adjust potentiometer (37), nut
(37a) and potentiometer knob (11).
a. Turn potentiometer fully clockwise.
b. Install knob at full clockwise position.
2. Install board (49) with six screws (6).
3. Connect all leads to motor control board (49). See
Fig. 8.
4. Install cover (50) with four screws (12).
Relieve pressure; page 5.
The SmartControl contains stored data to assist with troubleshooting and maintenance. To view this stored data on
the digital display, proceed as follows:
4. Release display button about 1 second after
1.
2. Plug in sprayer.
3. Hold down display button and turn sprayer ON.
Data Point Definition
1 Number of hours power switch has been ON with power applied
2 Number or hours motor has been running
3 Last error code. Press and hold display button to clear error code to E=00
4 Software revision
Relieve pressure; page 5.
turning on sprayer.
Sprayer model number displays (U395, U495) for a
few seconds and then data point 1 is displayed.
5. Push display button and next data point displays.
6. Turn sprayer OFF and then ON to leave stored
data mode.
18 309714
Page 19
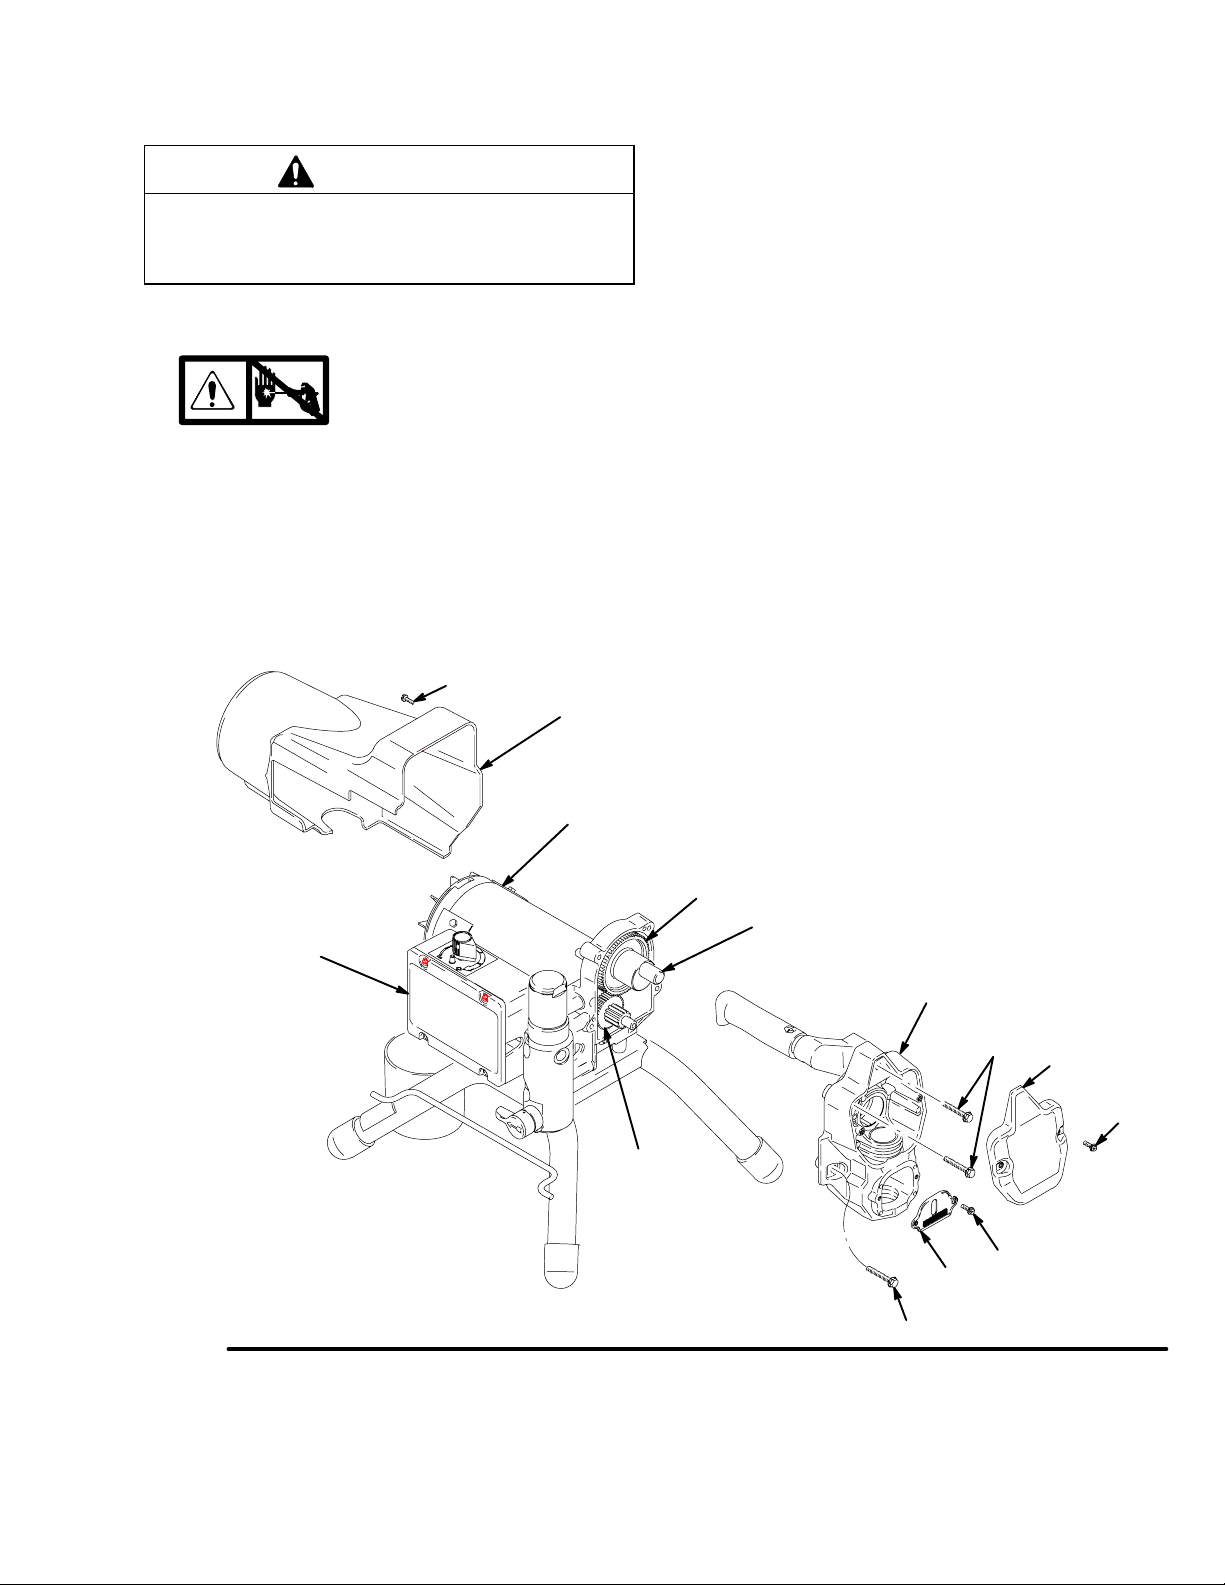
Drive Housing Replacement
CAUTION
Do not drop gear cluster (44) and (40) when removing drive housing (42). Gear cluster may stay engaged in motor front end bell or drive housing.
Disassembly
5. Remove two screws (12) and cover (22).
6. Remove four front screws (47).
7. Pull drive housing (42) off of motor (54).
Assembly
1. Fig. 9. Push drive housing (42) onto motor (54).
1.
2. Remove two screws (12) and pump rod cover (70).
3. Remove pump (41); Displacement Pump Re-
placement, page 21.
4. Fig. 9. Remove two screws (12) and shroud (23).
Relieve pressure; page 5.
12
23
54
A
2. Install four front screws (47).
3. Install cover (22) with two screws (12).
4. Install shroud (23) with two screws (12).
5. Install pump (41); Displacement Pump Replace-
ment, page 21.
6. Install pump rod cover (70) with two screws (12).
7
44
Fig. 9
ti2570b
40
47
42
70
47
12
22
12
19309714
Page 20
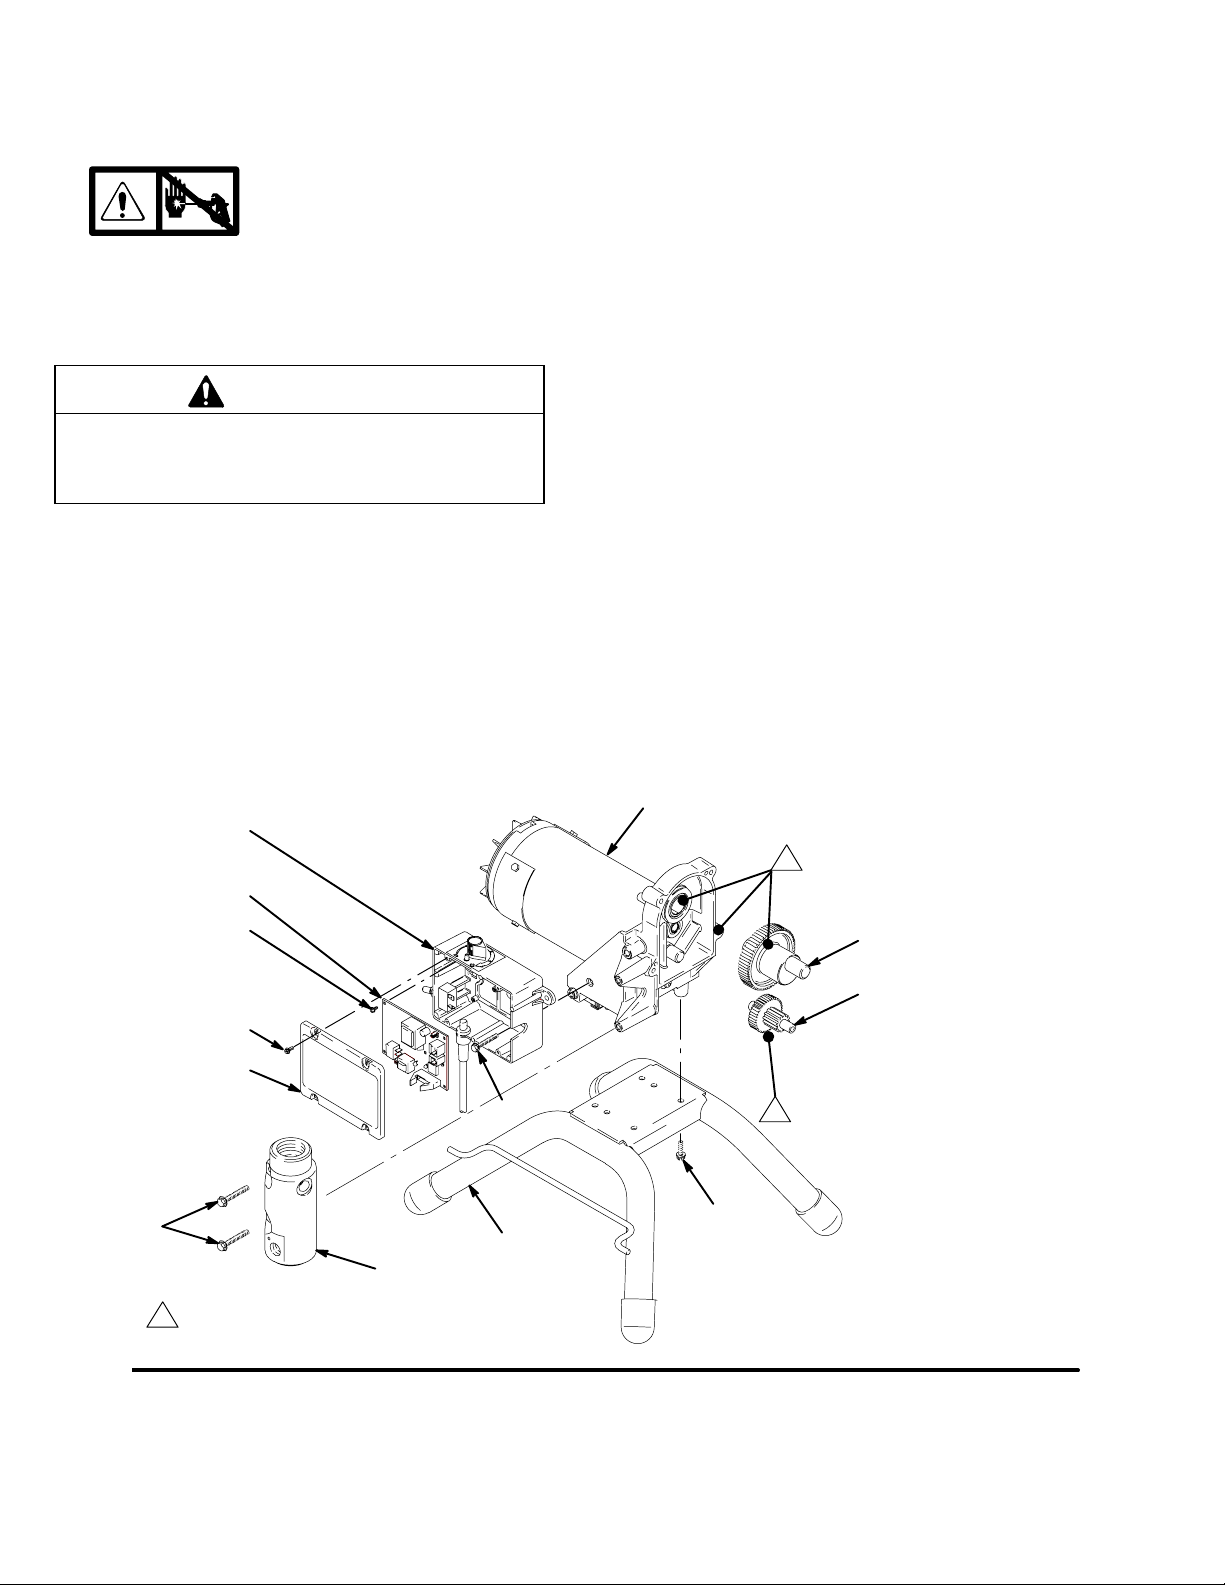
Motor Replacement
Disassembly
1.
2. Remove pump (13); Displacement Pump Re-
placement, page 21.
Relieve pressure; page 5.
CAUTION
Do not drop gear cluster (44) and (40) when removing drive housing (42). Gear cluster may stay engaged in motor front end bell or drive housing.
3. Remove drive housing (42); Drive Housing Re-
placement, page 19.
4. Remove four screws (12) and cover (50).
5. Disconnect all leads from board (49). Remove six
screws (6) and board.
7. Remove two screws (47) and control housing (48).
8. Remove two screws (47) and manifold (15).
9. Remove four screws (47) and motor (54) from
frame (59).
Assembly
1. Install new motor (54) on frame (59) with four
screws (47).
2. Install manifold (15) with two screws (47).
3. Install control housing (48) with two screws (47).
4. Install strain relief (19; Fig. 8).
5. Fig. 8. Install board (49) with six screws (6). Connect all leads to board.
6. Install drive housing (42); Drive Housing Re-
placement, page 19.
7. Install pump (13); Displacement Pump Replace-
6. Remove strain relief (19; Fig. 8).
48
49
6
12
50
47
15
47
59
ment, page 21.
54
1
44
40
1
47
1
Fig. 10
20 309714
Liberally apply grease
ti2569b
Page 21
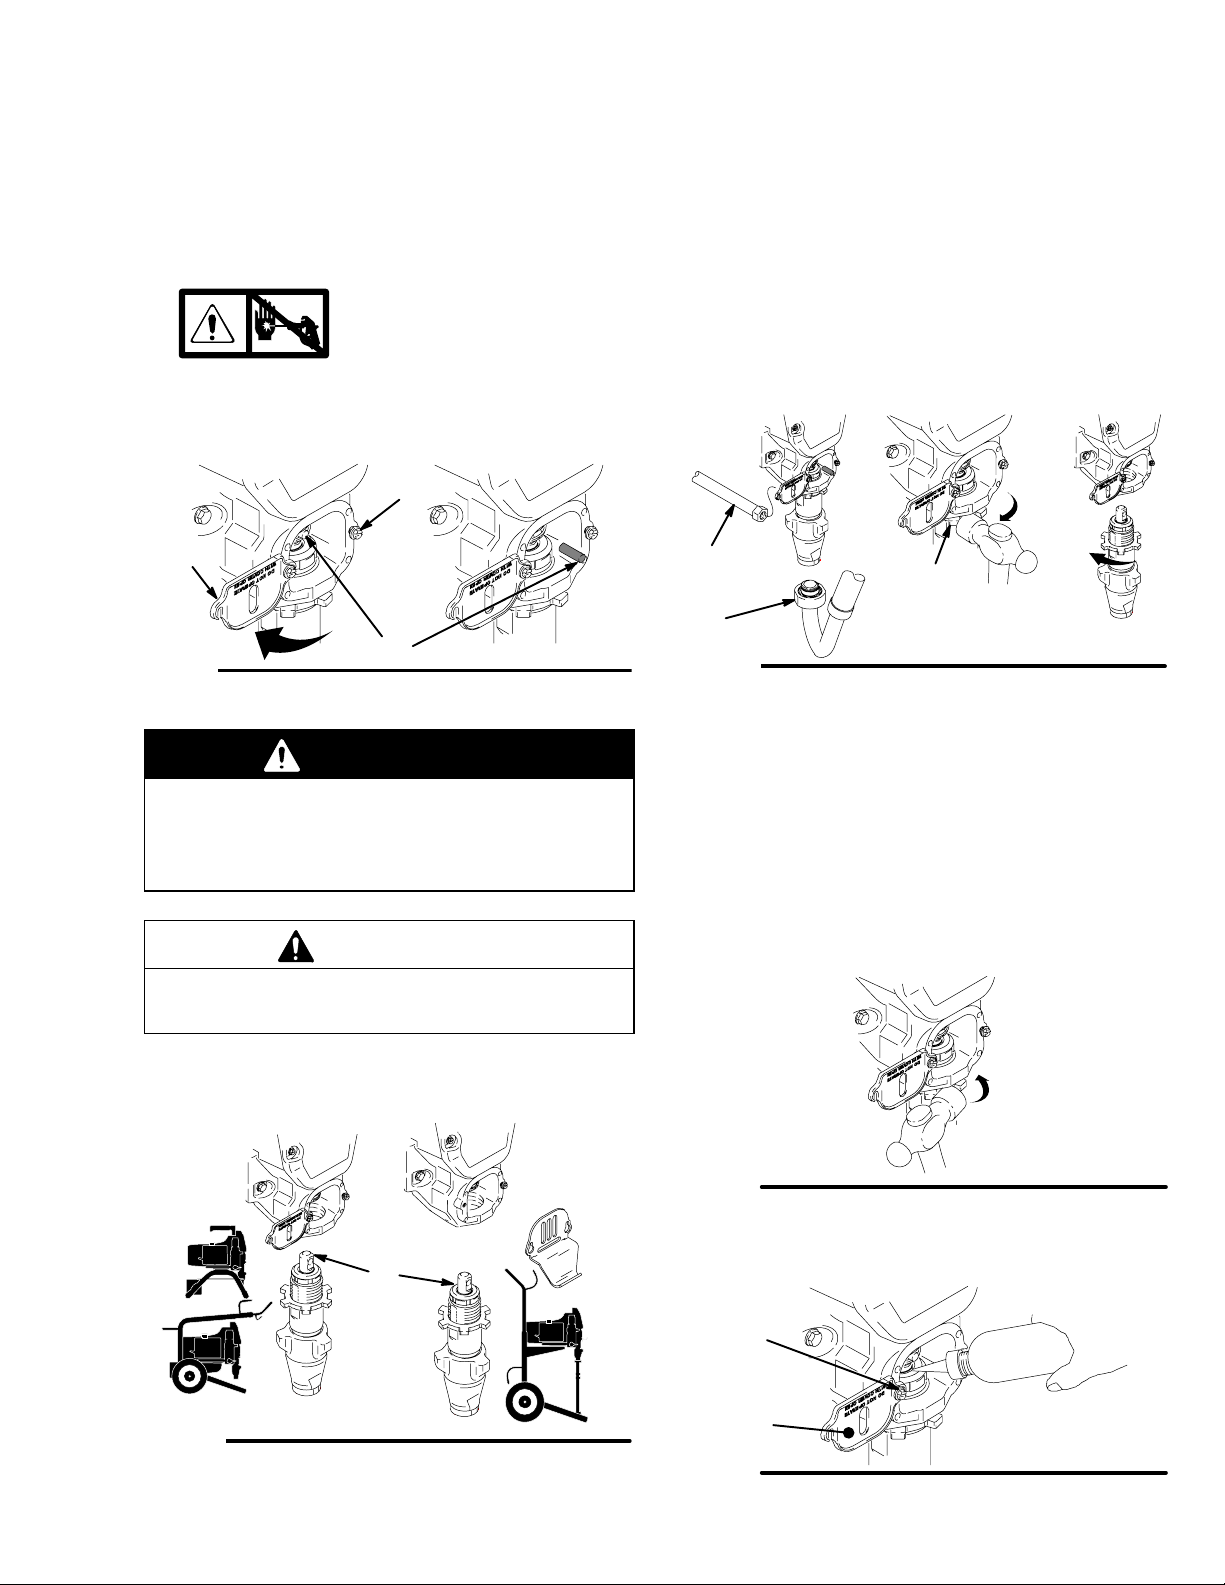
Displacement Pump Replacement
See manual 309053 for pump repair instructions.
See manual 309057 or 309058 for sprayer part number references.
Removal
1. Flush pump (13).
2.
3. Fig. 11. Loosen two screws (10b) and rotate
cover (10a).
10a
Fig. 11
Relieve pressure; page 5.
10b
9a
WARNING
If pump pin works loose, parts could break off due
to force of pumping action. Parts could project
through the air and result in serious injury or property damage.
CAUTION
4. Cycle pump until pump pin (9a) is in position to be
5. Fig. 12. Remove suction tube (78) and hose (19).
6. Loosen pump jam nut (12). Unscrew pump.
19
ti2568a
Fig. 12
Installation
3. Push pump up until pump threads engage.
4. Screw in pump until threads are flush with drive
5. Fig. 12. Install suction tube (78) and hose (19).
6. Fig. 14. Screw jam nut (12) up onto pump until nut
removed. Remove pump pin (9a).
12
78
ti2568a
housing opening. Align pump outlet to back.
stops. Tighten jam nut by hand, then tap 1/8 to 1/4
turn with a 20 oz (maximum) hammer to approximately 75" 5 ft–lb (102 Nm).
If the pump jam nut loosens during operation, the
threads of the drive housing will be damaged.
1. Fig. 13. Extend pump piston rod fully. Apply grease
to top of pump rod at (A) or inside connecting rod.
A
Fig. 13
ti2615a
2. Fig. 11. Install pump pin (9a). Verify retainer spring
(9b) is in groove of pump pin.
ti2568a
Fig. 14
7. Fig. 15. Fill packing nut with Graco TSL until fluid
flows onto top of seal.
10b
10a
Fig. 15
8. Fig. 11. rotate cover (10a); tighten screws (10b).
ti2568a
ti2568a
21309714
Page 22

Technical Data
Model 100–120V,
∅, A, Hz
395 1, 15, 60 3000 5/8 (466) 680 (180) 0.45 (1.7) 0.021 1/4 in.
495 1, 15, 60 3750 3/4 (560) 680 (180) 0.54 (2.0) 0.023 1/4 in
595 1, 15, 60 4000 9/10 (671) 585 (155) 0.60 (2.3) 0.026 1/4 in
Basic Sprayer Wetted Parts: . . . . . . . . . . . . . . . . . . . . . . . . . . . .
NOTE: Delrin and Teflon are registered trademarks of the
zinc-plated carbon steel, nylon, stainless steel, Teflon
, Delrin, chrome plating, leather, UHMWPE,
aluminum, tungsten carbide
DuPont Co.
Generator
Minimum W
Motor HP
(W)
Cycles per gallon
(liter)
Noise Level
Sound power 100 dBa*. . . . . . . . . . . . . . . . . . . . . . . .
Sound pressure 90 dBa*. . . . . . . . . . . . . . . . . . . . . . .
* per ISO 3744; measured at 3.1 feet (1 m)
Maximum
Delivery gpm
(lpm)
Maximum
Tip size
Fluid Outlet
npsm
Dimensions
Weight lb (kg)
Model
Stand 43 (20) 43 (20) N/A 21 (53.3) 15 (38.1) 14 (35.6)
Lo–Boy N/A N/A 69 (31) 21 (53.3) 26 (66.0) 20.5 (52.1)
Hi–Boy N/A 66 (30) 72 (33) 29.5 (74.9) Handle
395 495 595
Height in. (cm) Length in. (cm) Width in. (cm)
21 (53.3) 20.5 (52.1)
down, 39.5 (100.3)
Handle up
TO PLACE AN ORDER OR FOR SERVICE, contact your Graco distributor, or call 1–800–690–2894 to identify the
nearest distributor.
All written and visual data contained in this document reflects the latest product information available at the time of publication.
Graco reserves the right to make changes at any time without notice.
International Offices: Belgium, Korea, China, Japan
Graco Headquarters: Minneapolis
GRACO INC. P.O. BOX 1441 MINNEAPOLIS, MN 55440–1441
www.graco.com
PRINTED IN USA 309714 1/2003, Revised 5/2005
22 309714
 Loading...