

Page 1

CarSeat.se
English Installation Manual
Page 2
CarSeat.se
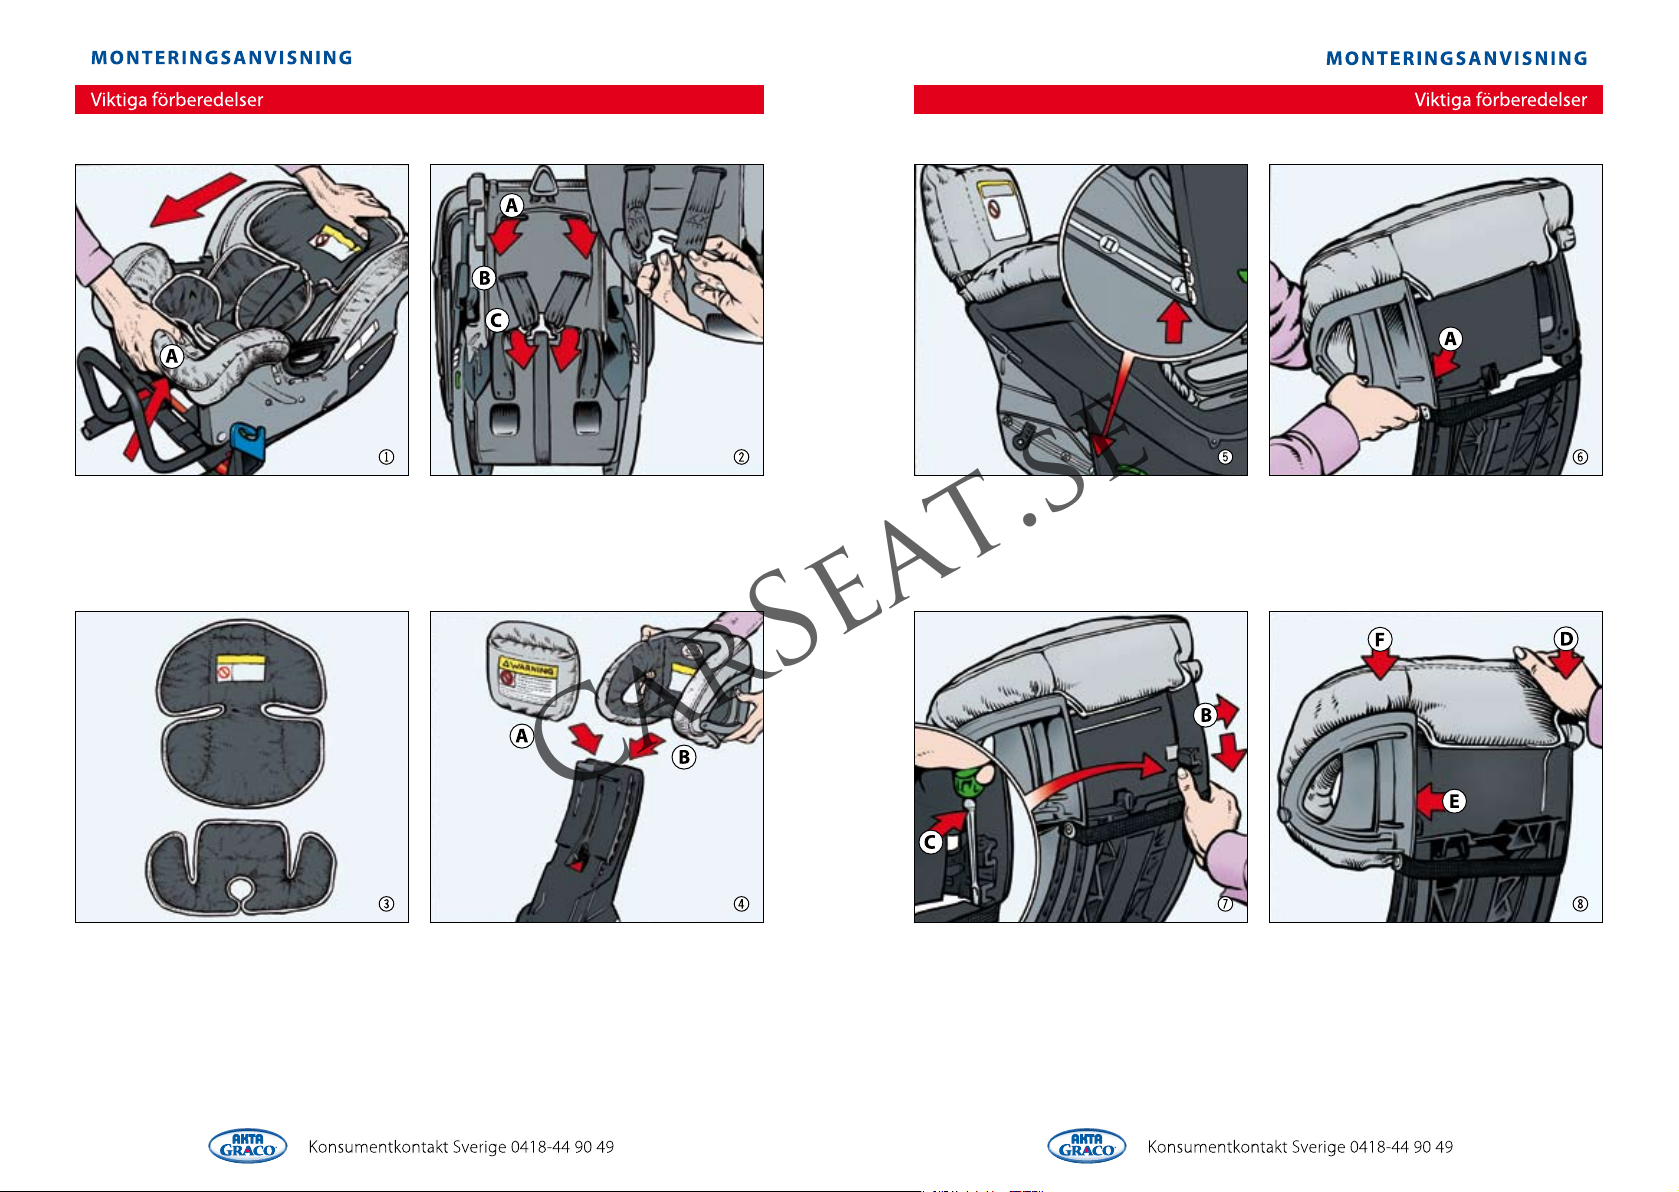
1. Split the car seat by pulling handle (A)
and remove seat from its base.
2. Height adjustment of harness: Pull belt
and remove from buckle (small upper photo).
Thread belt through opening at proper level
(A, B or C). Fasten buckle securely.
Note!!!! Make sure belt is not twisted!
3. A complete comfort cushion for newborns
is included. It consists of a bottom and a top
part. When the baby is around 3 months
bottom must be removed. Upper part is
removed around 9 months of age or earlier
if necessary.
4. Children under 9 kg. (20 lbs) use the soft
neck cushion (A) which is pulled over the
base. If child weighs more than 9 kg. (20 lbs),
head protector (B) is used.
5. Children under 9 kg. (20 lbs) should travel
with car seat in position "I".
6. Head protector for children from 9 kg.
(20 lbs) and up is installed by first pressing
down the heel on the left side (A)......
7. ..... Now pull the right side (B) and press
down heels in track provided. A gentle nudge
with a screwdriver might be help (C)......
8. ......Push down right side (D) to push heels
further down. Finish by pulling left side (E)
and pushing (F) to put heels firmly in
place. (To remove head protector, nudge heels
carefully with a screwdriver and pull up)
INSTALLATION MANUAL
INSTALLATION MANUAL
Important preparations
Important preparations
Page 3
12
CarSeat.se
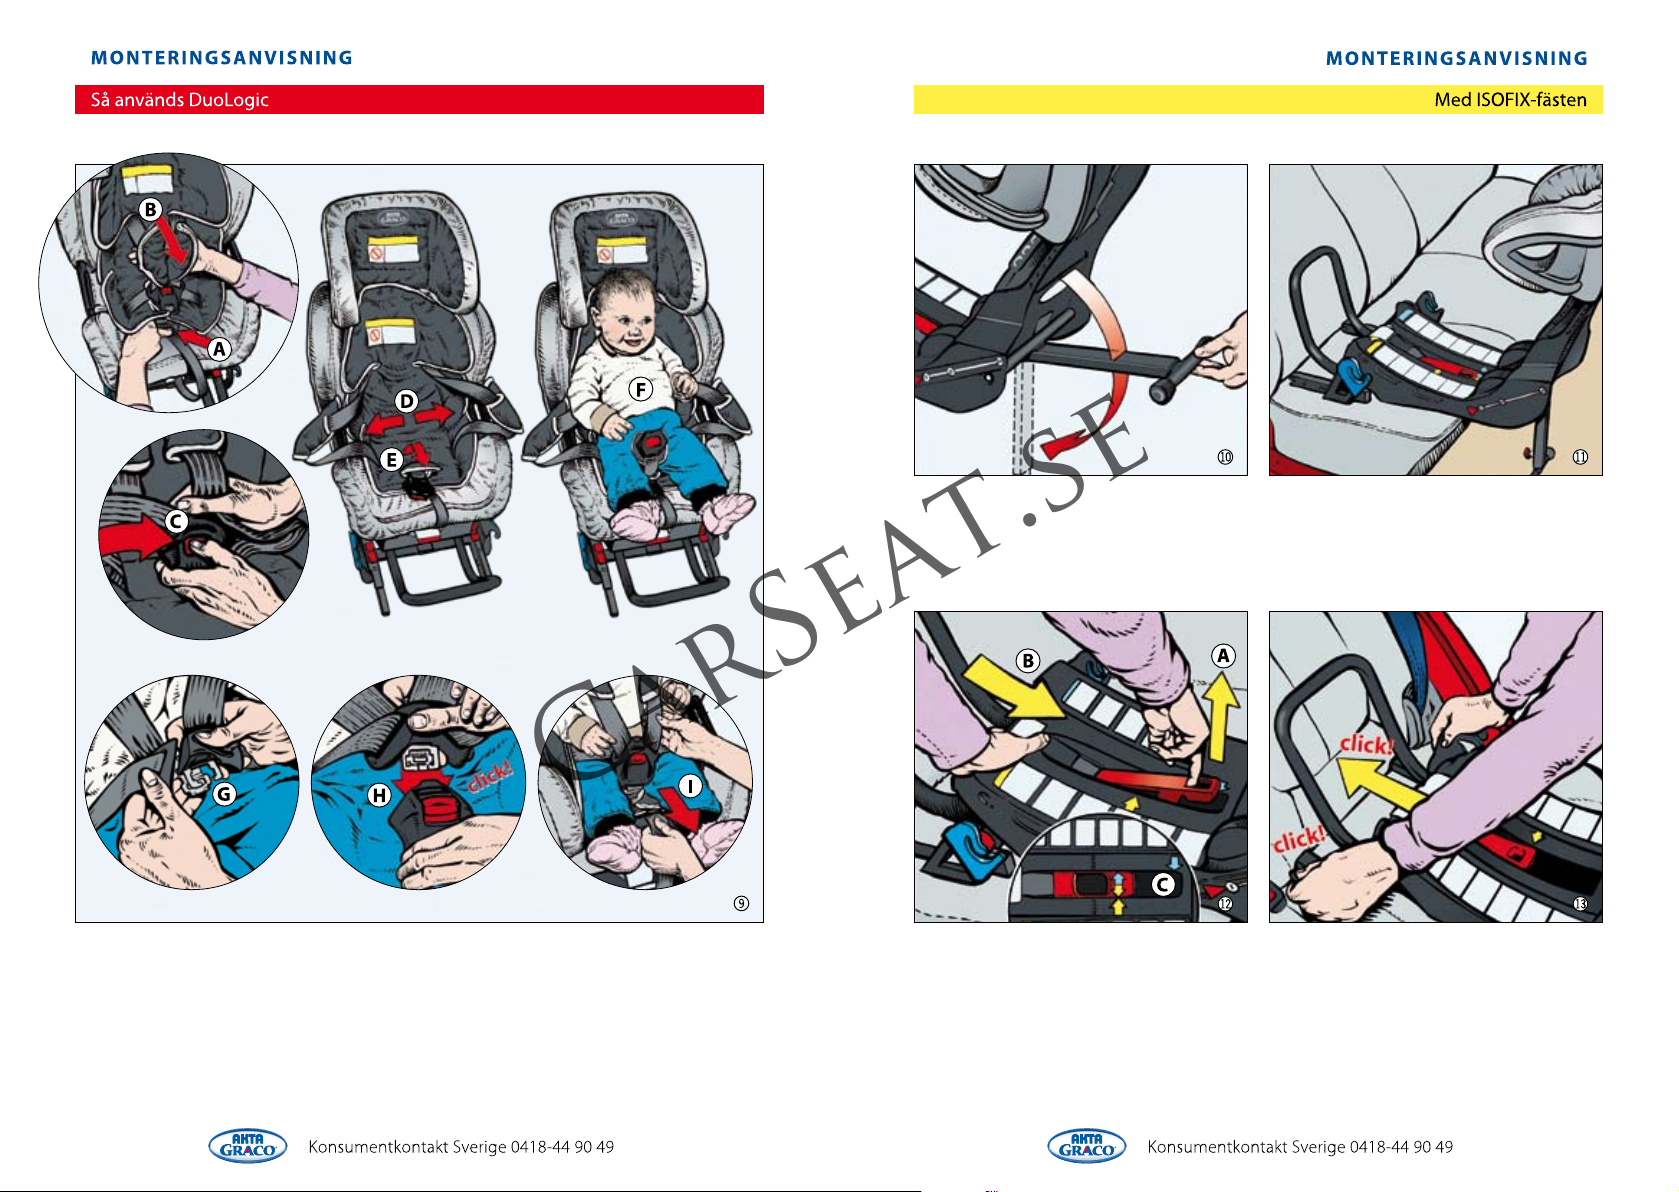
9. Placement of child: Push button (A) to extend car seat harness. Pull harness as far back as
possible (B). Push red button on the lock (C) to open harness and pull to respective side (D).
Pull crotch strap with lock and protective pad forward (E). Place child in car seat (F) with
crotch strap between legs. Pull together both harness straps (G) and push them into the
lock (H) with a "click". Adjust harness height as needed (see picture 2). Tighten belt by
pulling strap (I) in front . Appropriate tension has been reached when two adult fingers
can fit between belt and child. To release, push button (A).
10. To reach the right angle, support leg
should be extended completely before base
is placed in car. If DuoLogic is installed in
front seat, vehicle seat back should be
completely upright.
11. Place base in desired location. To make
installation easier, temporarily slide front
seat(s) all the way forward.
12. Your vehicle manual should show where
ISOFIX mountings are located. Lift the red
lock(A) and slide base forward (B) so yellow
arrows point against each other (C).
13. Push the base towards the ISOFIX
mountings. Connection should be made
with an audible "click". Included ISOFIX
guides (small plastic details around ISOFIX
mountings) make connection easier.
INSTALLATION MANUAL
How to use DuoLogic
INSTALLATION MANUAL
With ISOFIX
Page 4
14
CarSeat.se
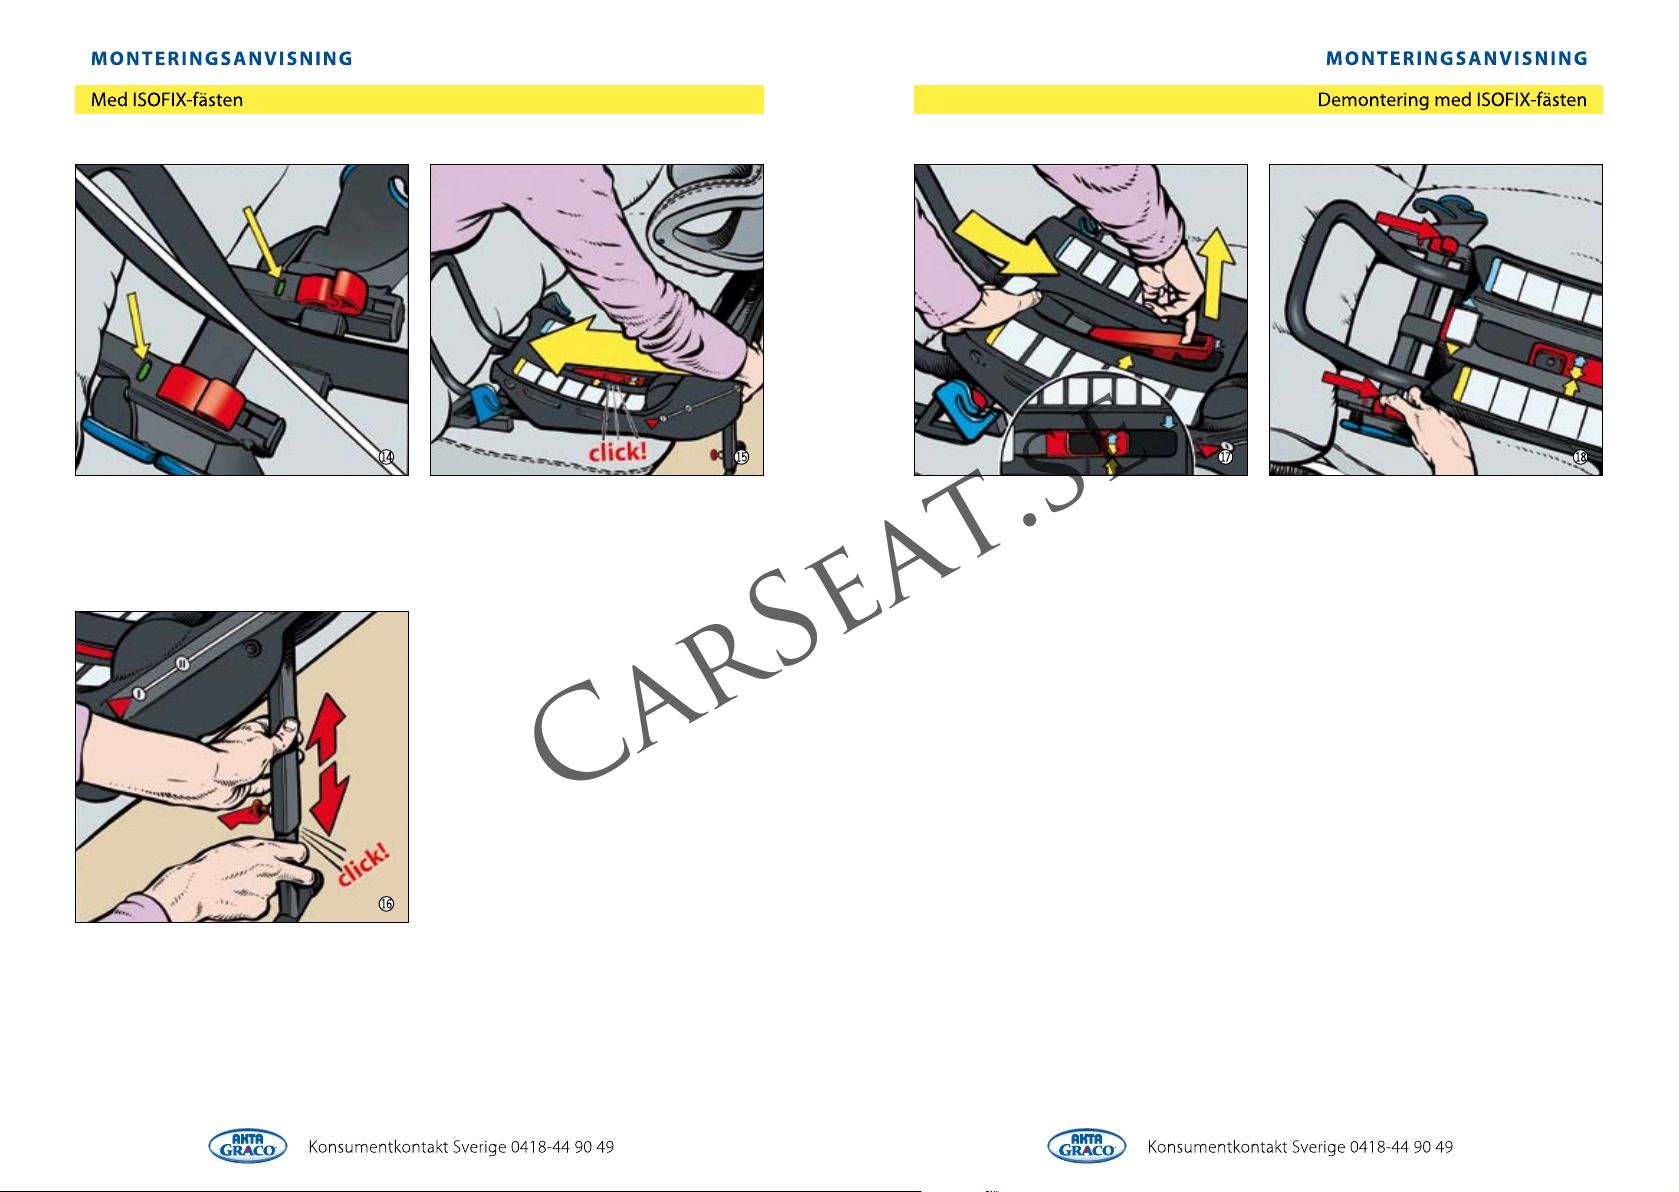
14. Make sure indicator is showing "green"
on both sides. This will confirm base is
securely locked with ISOFIX mountings.
15. Push base hard against seat back until it
locks with an audible "click". The black
frame should remain tight against seat back.
16. Adjust height of support leg by pulling
red knob. Make sure support leg is solid
against vehicle floor. Support leg should
be adjusted so base is resting on vehicle seat.
Now, continue installing seat on page 19.
17. NOTE!! DISASSEMBLY! Lift red lock so
tension in base is released. Make sure the
yellow arrows point against each other.
18. NOTE!! DISASSEMBLY! Lift ISOFIX buttons
on both sides and pull in direction of red
arrows until indicator show red.
INSTALLATION MANUAL
INSTALLATION MANUAL
With ISOFIX
Disassembly with ISOFIX
Page 5
16
CarSeat.se
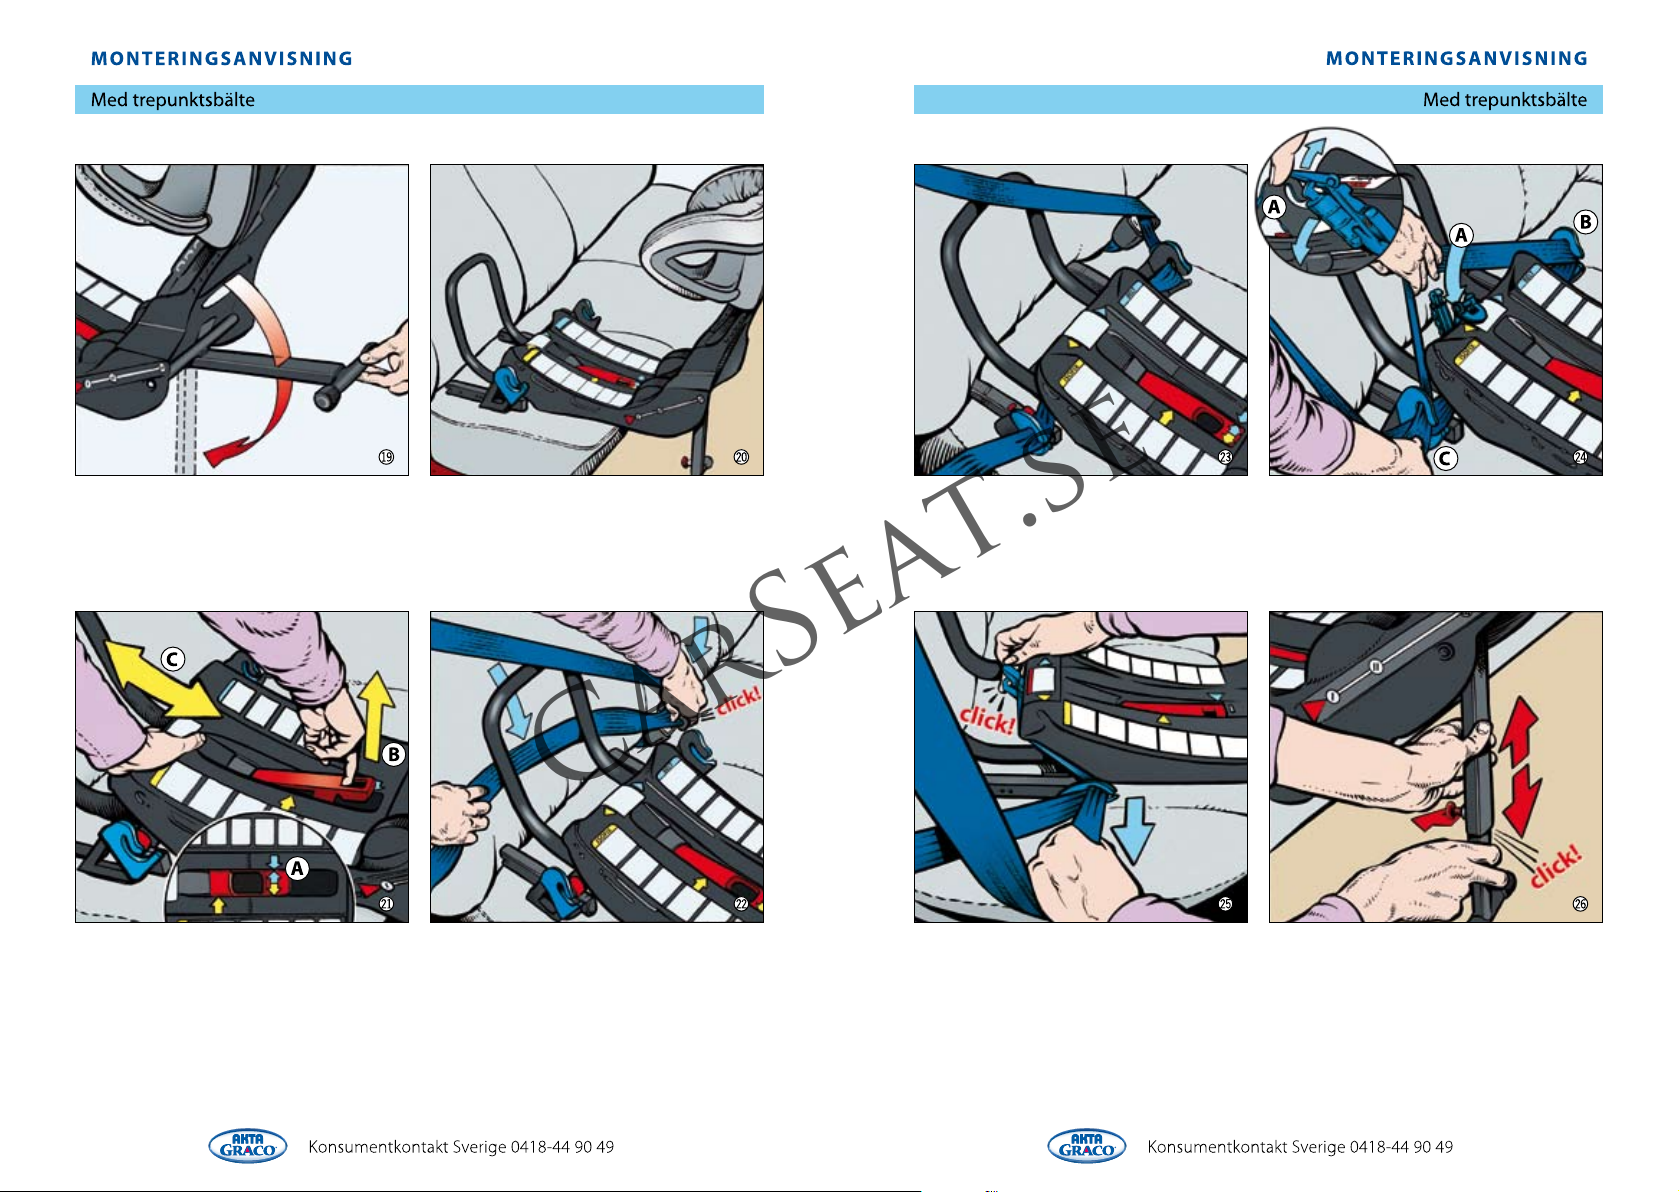
19. Extend support leg before placing base
on seat. If DuoLogic is installed in front seat,
make sure vehicle seat back is completely
upright.
20. Place base in desired location. To make
installation easier, temporarily slide front
seat(s) all the way forward.
23. Thread lap portion of seat belt through
blue clips on both sides.
24. Open clip (A) and thread chest portion
of seat belt through blue clip (B), through
clip underneath front of base (A), and through
blue clip (C).
21. Make sure blue arrows at bottom of base
are pointing against each other (A). Lift red
lock (B) to adjust forward or backwards (C).
22. Fasten seat belt in its regular buckle. Pull
lap portion of seat belt behind black frame.
25. Push down on base and tighten at same
time chest portion of seat belt thoroughly.
Make sure seat belt is holding base firmly
in place. Lock clip and carefully check it's
securely locked.
26. Adjust height of support leg by pulling
red knob. Make sure support leg is solid
against vehicle floor. Support leg should
be adjusted so base is resting on vehicle seat.
Now, continue installing seat on page 19.
INSTALLATION MANUAL
INSTALLATION MANUAL
Lap and diagonal belt
Lap and diagonal belt
Page 6
18
CarSeat.se
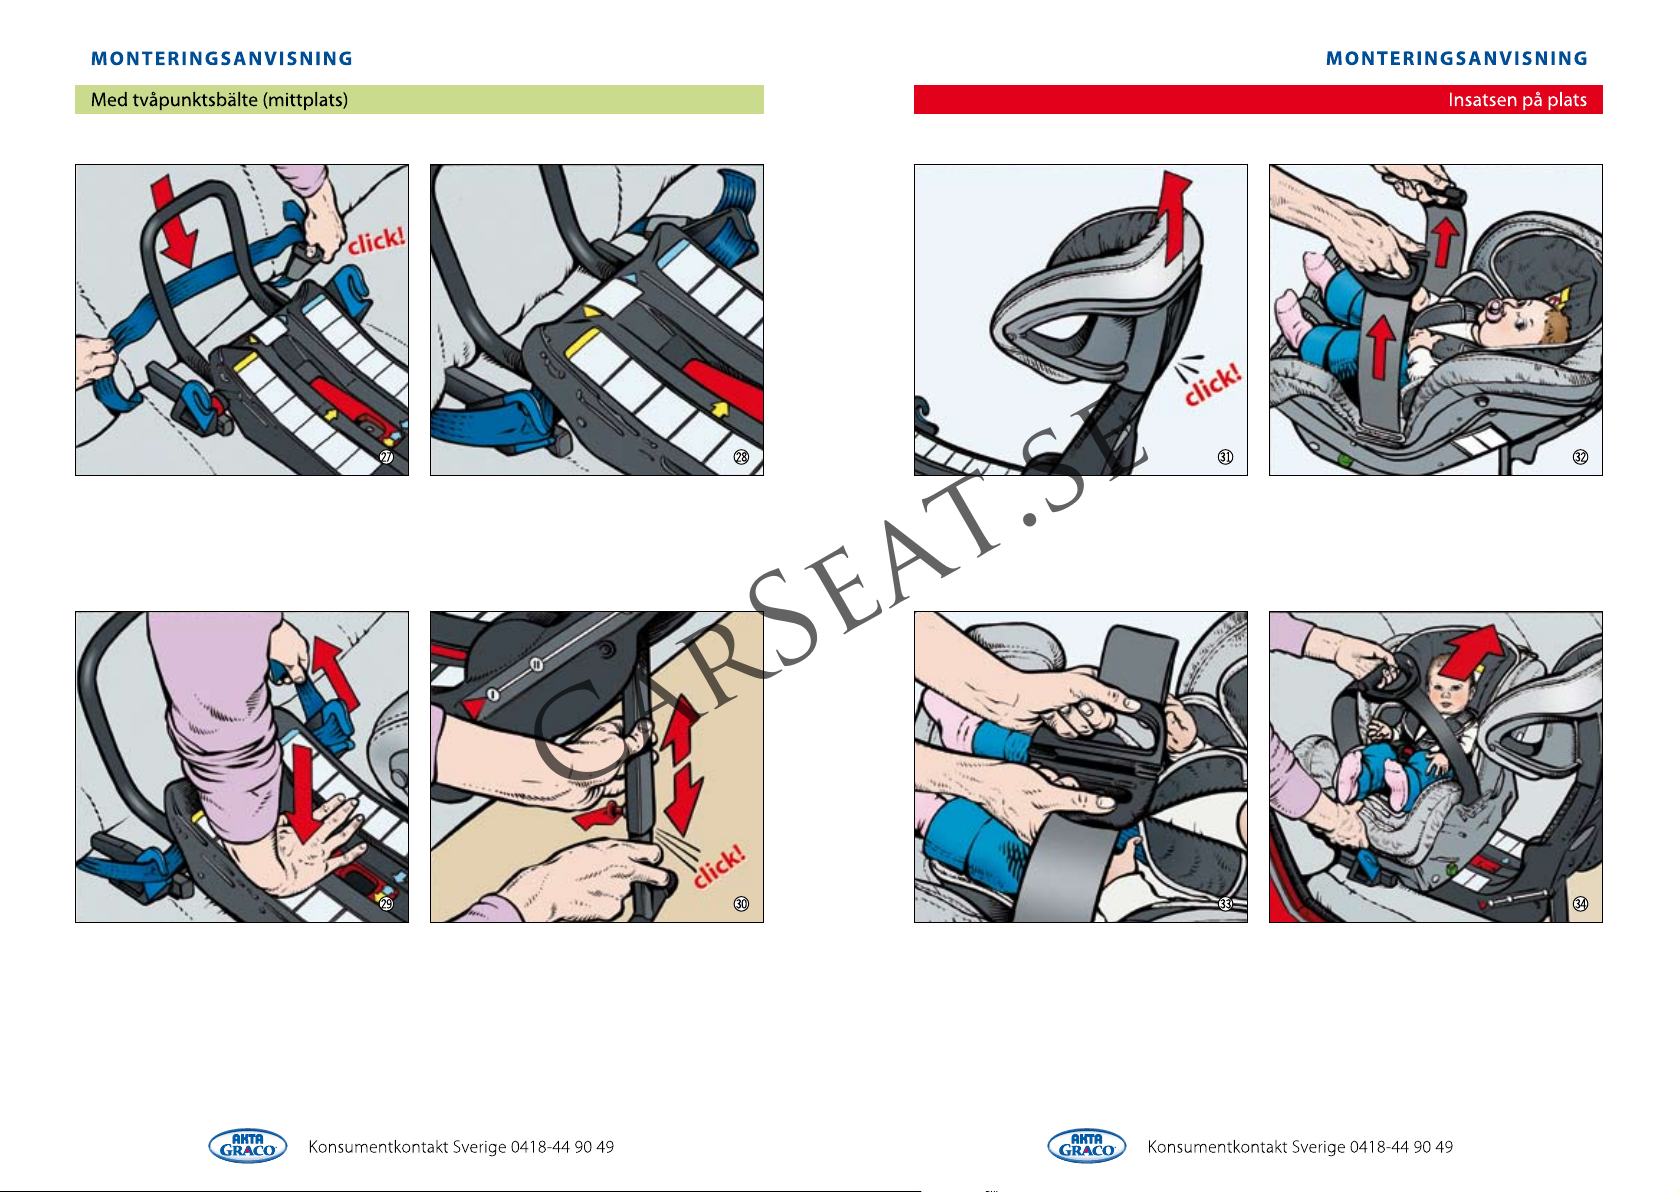
27. Secure base according to picture 19-21.
Pull seat belt as far as possible and secure in
its regular buckle. Pull seat belt under the
black frame.
28. Thread seat belt through blue clips on
both sides.
29. Push down on base and simultaneously
tighten seat belt. Make sure seat belt is tight
and holding base firmly in place.
30. Adjust height of support leg by pulling
red knob. Make sure support leg is solid
against vehicle floor. Support leg should
be adjusted so base is resting on vehicle seat.
Now, continue installing seat on next page.
31. If head protection is installed, pull up to
top position.(See page 11 for information
about head protector.
32. Pull handles up on both sides.
33. Put handles together by pulling towards
middle and fasten handles to each other.
NOTE!! BE CAREFUL WITH HEAD OF CHILD!
34. Insert seat according to picture then
rotate 90 degrees.
With lap belt (middle rear)
Seat in place
INSTALLATION MANUAL
INSTALLATION MANUAL
Page 7
20
CarSeat.se
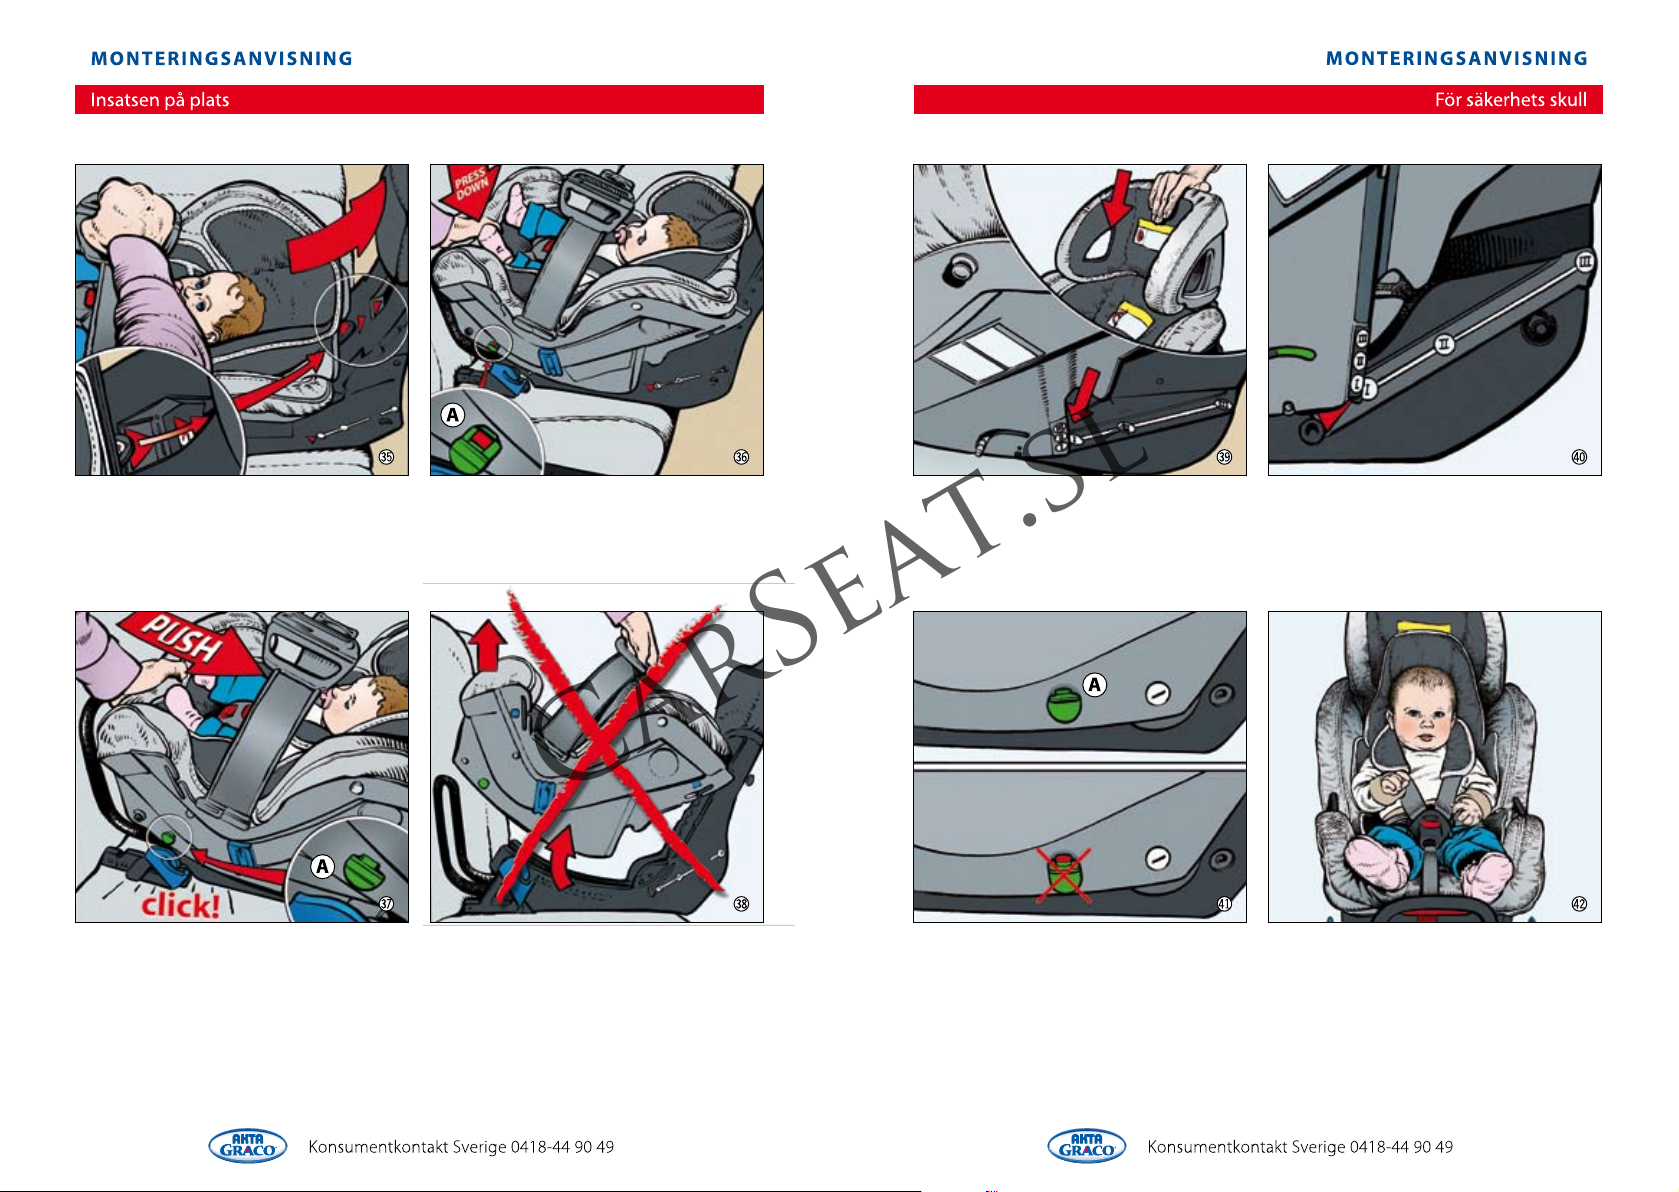
35. Put seat on top of base. Thread red
triangle marked "G" towards track of base.
36. Please note indicator (A) is currently red.
Now, push down seat into base......
37. ..... Put seat in position "I". Listen for an
an audible "click". Indicator should now
show green (A).
38. NOTE!! CHECK THOROUGHLY THAT SEAT
HAS LOCKED INTO BASE. IT SHOULD NOT BE
POSSIBLE TO LIFT SEAT FROM THE BASE!
41. Check carefully that safety indicator is
showing green (A). Make sure seat can't be
lifted from base. Don't use your car seat if
you're unsure of installation, instead contact
nearest reseller.
42. Make sure child is securely fastened in car
seat. Harness should be tight around child.
Two adult fingers should fit between harness
and child. An incorrectly installed car seat
could mean danger of life in a collision.
39. Adjust angle with handle in front of seat
(see A, picture 1). Push down head protector
against seat.
40. Position "I" is used from newborn. Position
"II" and "III" are for children weighing more
than 9 kg. (20 lbs)
INSTALLATION MANUAL
INSTALLATION MANUAL
Seat in place
Safety
 Loading...