

Page 1
Instructions - Parts
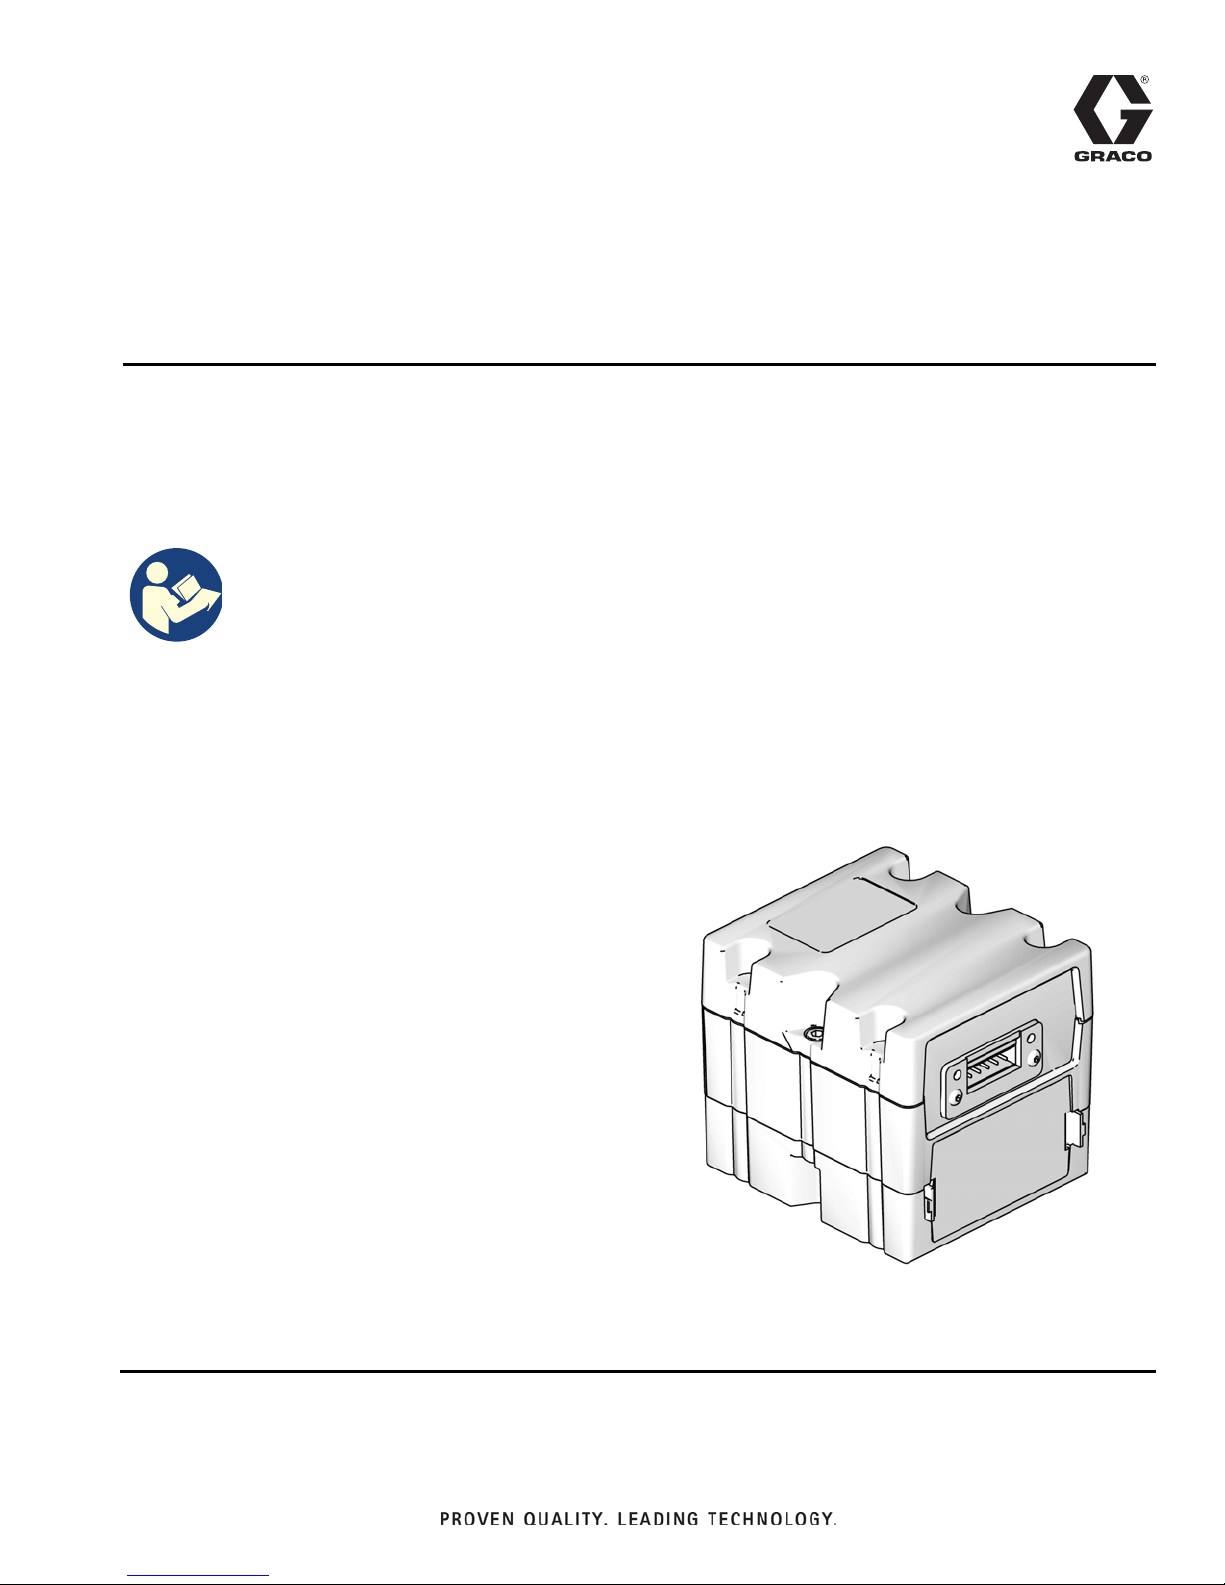
ti11985a
CGM with DeviceNet connector shown
Communications
Gateway Module
3A6338B
Installation Kit
For use with Electric Fixed Ratio (EFR) systems to provide fieldbus communications
abilities. For professional use only.
Important Safety Instructions
Read all warnings and instructions in this
manual and in your system manual
before using the equipment. Save these
instructions.
EN
Page 2
B
C
AA
AB
Contents
Related Manuals . . . . . . . . . . . . . . . . . . . . . . . . . . . 2
Models . . . . . . . . . . . . . . . . . . . . . . . . . . . . . . . . . . . 2
Overview . . . . . . . . . . . . . . . . . . . . . . . . . . . . . . . . . . 2
CGM Software . . . . . . . . . . . . . . . . . . . . . . . . . . 2
Installation . . . . . . . . . . . . . . . . . . . . . . . . . . . . . . . . 3
Setup . . . . . . . . . . . . . . . . . . . . . . . . . . . . . . . . . . . . . 5
EFR and PLC Connection . . . . . . . . . . . . . . . . . . 5
Gateway Screens . . . . . . . . . . . . . . . . . . . . . . . . 5
Available Internal Data . . . . . . . . . . . . . . . . . . . . . . 8
Automation Inputs (signals from EFR system to
PLC) . . . . . . . . . . . . . . . . . . . . . . . . . . . . . . . 9
Automation Outputs (signals from PLC to EFR
system) . . . . . . . . . . . . . . . . . . . . . . . . . . . . 11
CGM General Timing Diagrams . . . . . . . . . . . . 12
Appendix A - I/O Signal Descriptions . . . . . . . . . 19
Automation Inputs (signals from EFR system to
PLC) . . . . . . . . . . . . . . . . . . . . . . . . . . . . . . 19
Automation Outputs (signals from PLC to EFR
System) . . . . . . . . . . . . . . . . . . . . . . . . . . . 22
Appendix B - Data Exchanged . . . . . . . . . . . . . . . 24
EFR Data Exchange Elements . . . . . . . . . . . . . 25
Appendix C - Sequence Step Data Exchange . . . 30
EFR Sequence Step Data Exchange Elements 31
Appendix D - Error Number Requiring
Acknowledgment . . . . . . . . . . . . . . . . . . . . . . 32
Graco Standard Warranty . . . . . . . . . . . . . . . . . . . 34
Graco Information . . . . . . . . . . . . . . . . . . . . . . . . . 34
Overview
The Communications Gateway Module (CGM) provides
a control link between the Electric Fixed Ratio (EFR)
system and a selected fieldbus. This provides the
means for report monitoring and control by external
automation systems.
NOTE: The following system network configuration files
are available at help.graco.com.
• EDS file: DeviceNet or Ethernet/IP fieldbus
networks
• GSD file: PROFIBUS fieldbus networks
• GSDML: PROFINET fieldbus networks
• ACD file: DeviceNet or Ethernet/IP fieldbus
networks
The following components are included in the CGM
Installation Kit.
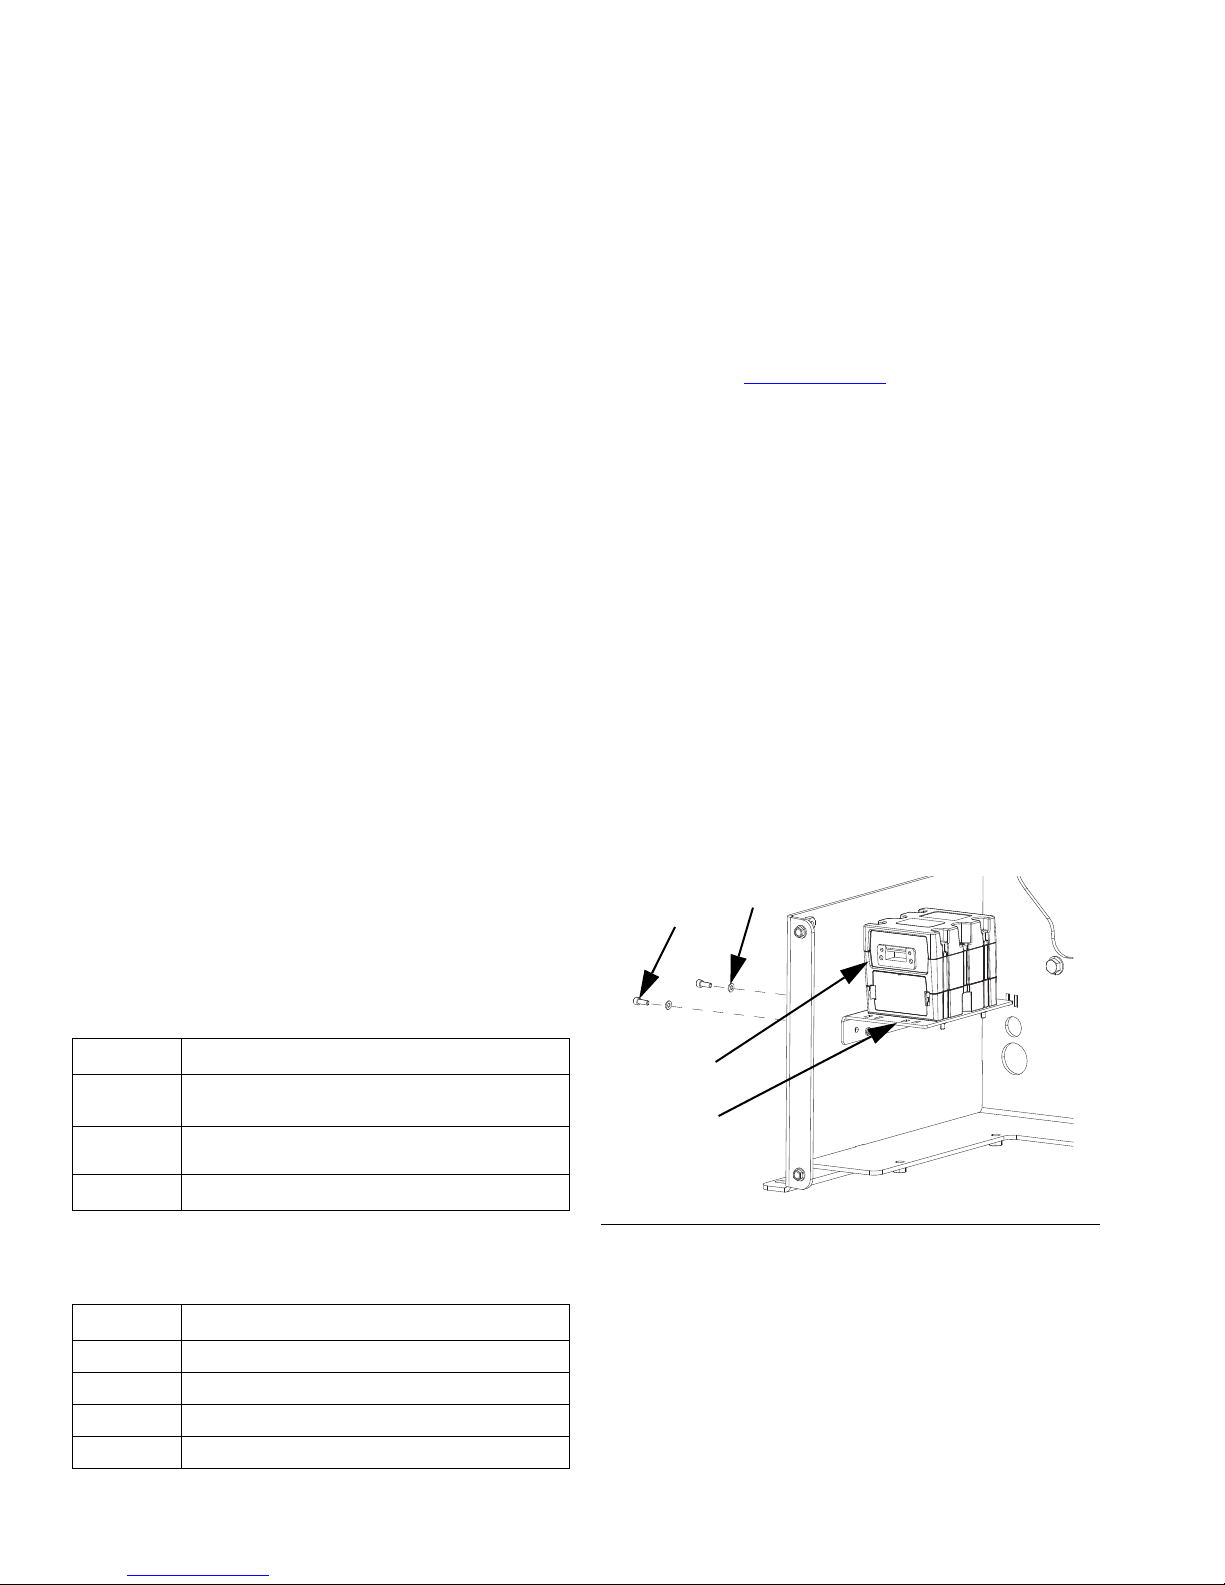
Ref. Description Qty.
ACGM Kit
AA Gateway Module
AB Mounting Bracket
B Screw, #10-32 x .50
C Washer, #10, Nylon
D Communication Cable (not shown)
1
1
1
2
2
1
Related Manuals
Manual Description
312864
3A6165
406987 GCA CAN Cables, Reference
Models
Part Description
25B127 DeviceNet CGM Kit
26A700 EtherNet/IP CGM Kit
26A701 PROFIBUS CGM Kit
26A702 PROFINET CGM Kit
2 3A6338B
Communications Gateway Module,
Instructions - Parts
Electric Fixed Ratio Proportioner, Setup Operation
FIG. 1
CGM Software
The following software is must be installed on the CGM
module to work properly with the EFR CGM map
19A796.
• 17P796, version 3.01.004
Page 3
Installation
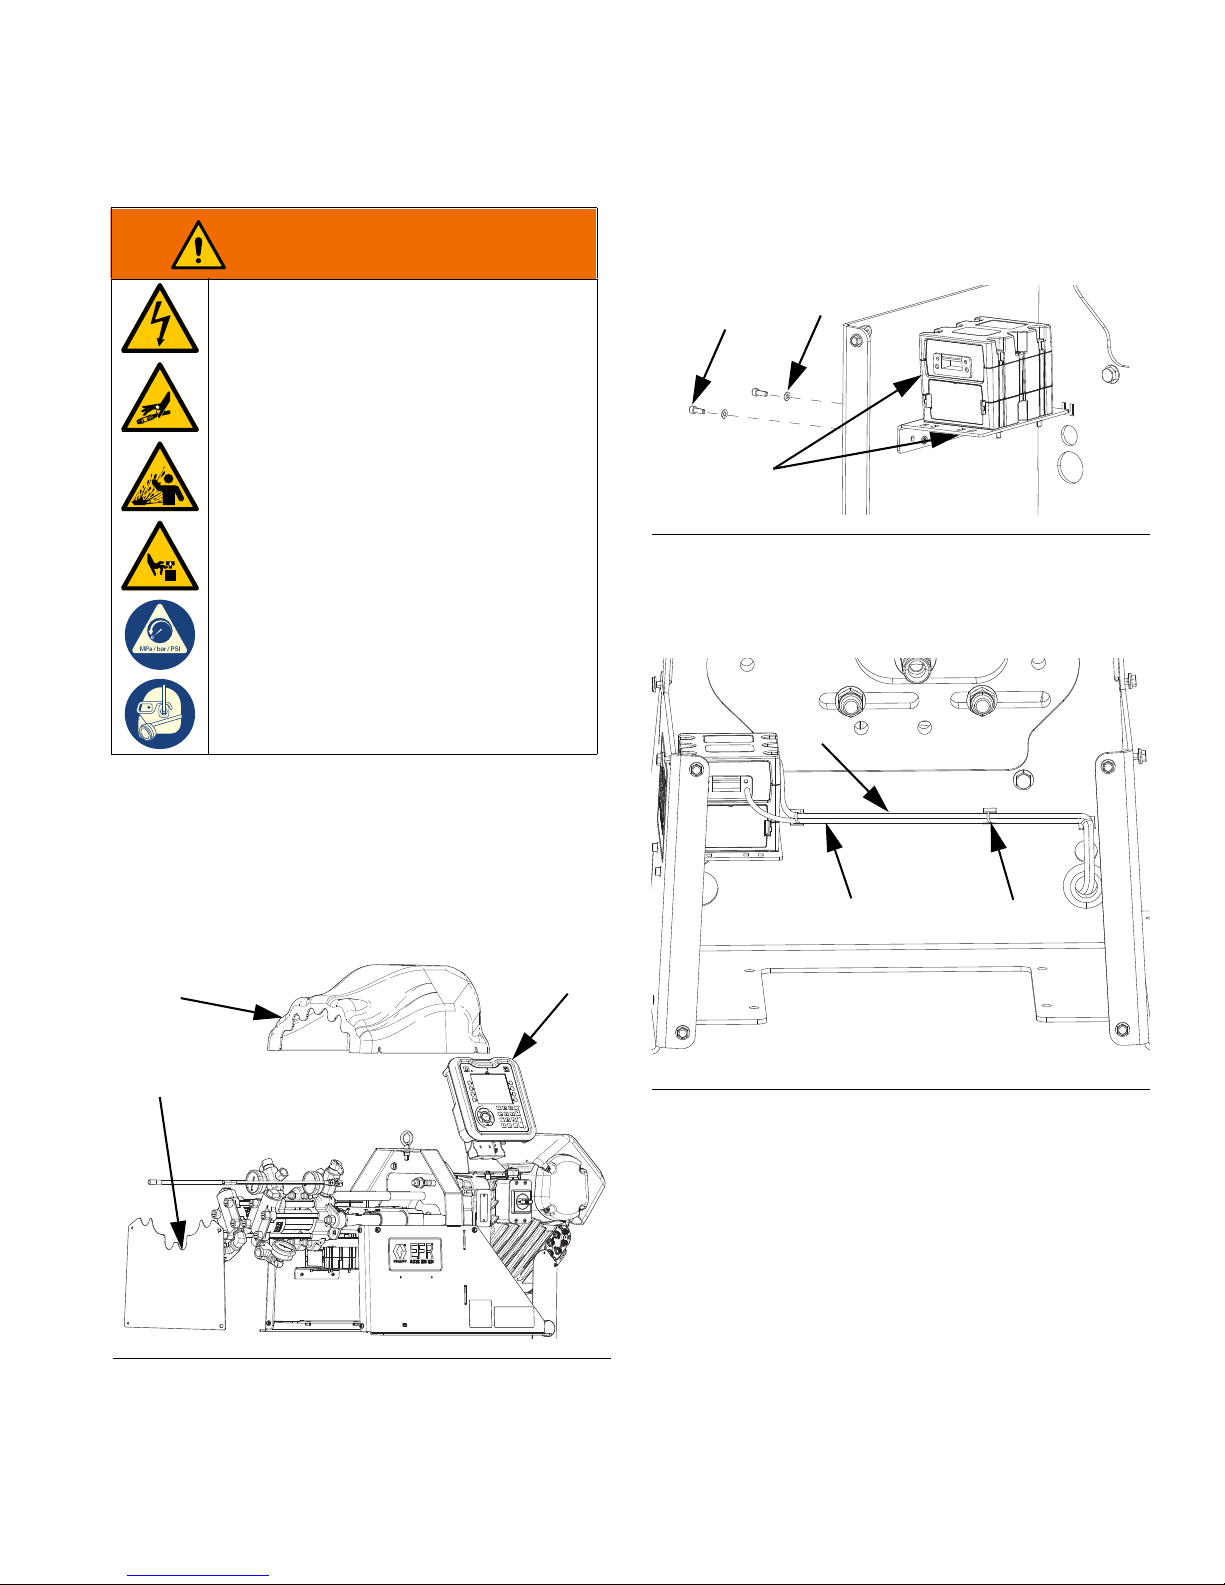
WARNING
F
E
G
A
B
C
CAN H
J
ELECTRIC SHOCK HAZARD
To avoid electric shock, make sure the
system power is OFF before connecting or
disconnecting CAN cables.
PRESSURIZED FLUID HAZARD
This equipment stays pressurized until
pressure is manually relieved. To help
prevent serious injury from pressurized
fluid, such as skin injection, splashing fluid
and moving parts, follow Pressure Relief
Procedure when you stop spraying and
before cleaning, checking or servicing the
equipment.
PERSONAL PROTECTIVE EQUIPMENT
Wear appropriate protective equipment
when in the work area to help prevent
serious injury, including eye injury, hearing
loss, inhalation of toxic fumes, and burns.
Installation
3. Mount the CGM Kit (A) inside the system frame with
two screws (B) and washers (C).
FIG. 3
4. Secure cables (CAN, J) to the frame using the cable
ties (H) provided, and route them through the
protected opening as shown in F
IG. 4.
1. Ensure the system power is OFF and pressure has
been relieved. Follow the Pressure Relief Procedure
in the Electric Fixed Ratio Proportioner, Setup Operation manual.
2. Remove the pump yoke shroud (F) and frame cover
(G) from the EFR system.
FIG. 4
FIG. 2
3A6338B 3
Page 4
Installation
CAN
Connector 1
ti11972a
CAN
Connector 2
ti11985a
5. Connect the CAN cable from either CAN connection
on the CGM to port 2 on the EFR.
NOTICE
Ensure the CAN cable is connected to the appropriate
CAN connection. Failure to connect the CAN cable to
the correct CAN connection can result in damage to
the CGM module.
FIG. 5: Cable Connections
6. If used, connect the Ethernet, DeviceNet, or
PROFIBUS cable (J) to the CGM as applicable.
Connect the other end of the cable to the FieldBus
device.
7. Reinstall the pump yoke shroud (F) and the frame
cover (G) onto the EFR system.
8. Perform the Install or Update Data Map procedure
in the Communications Gateway Module,
Instructions – Parts manual.
9. See Available Internal Data on page 8 for details
regarding the FieldBus pinout setup.
10. Perform the Setup procedure on page 5 to
configure the fieldbus.
NOTE: To produce an accurate dispense, the dispense
valve must be controlled directly by the EFR. See the
Electric Fixed Ratio Proportioner, Setup - Operation
manual for I/O integration of the dispense valve with the
EFR.
NOTE: See Automation Outputs (signals from PLC
to EFR System) on page 22 for information on
triggering a dispense through the EFR using the CGM.
FIG. 6: Cable Connections
4 3A6338B
Page 5
Setup
Setup
EFR and PLC Connection
Verify the PLC connection parameters are setup
correctly.
NOTE: The connection between the EFR and PLC will
not be made if the PLC connection parameters are not
set up correctly.
Standard Gateway Map: 19A796
Comm. Format Data-SINT
Input Assembly Instance 100
Input Byte Size 42
Output Assembly Instance 150
Output Byte Size 22
Gateway Screens
The Gateway screens are used to configure the
fieldbus. These screens are shown only if a CGM is
correctly installed in your system. See Installation on
page 3.
PROFIBUS Fieldbus Screens
These screens are shown only if a PROFIBUS Fieldbus
CGM is installed.
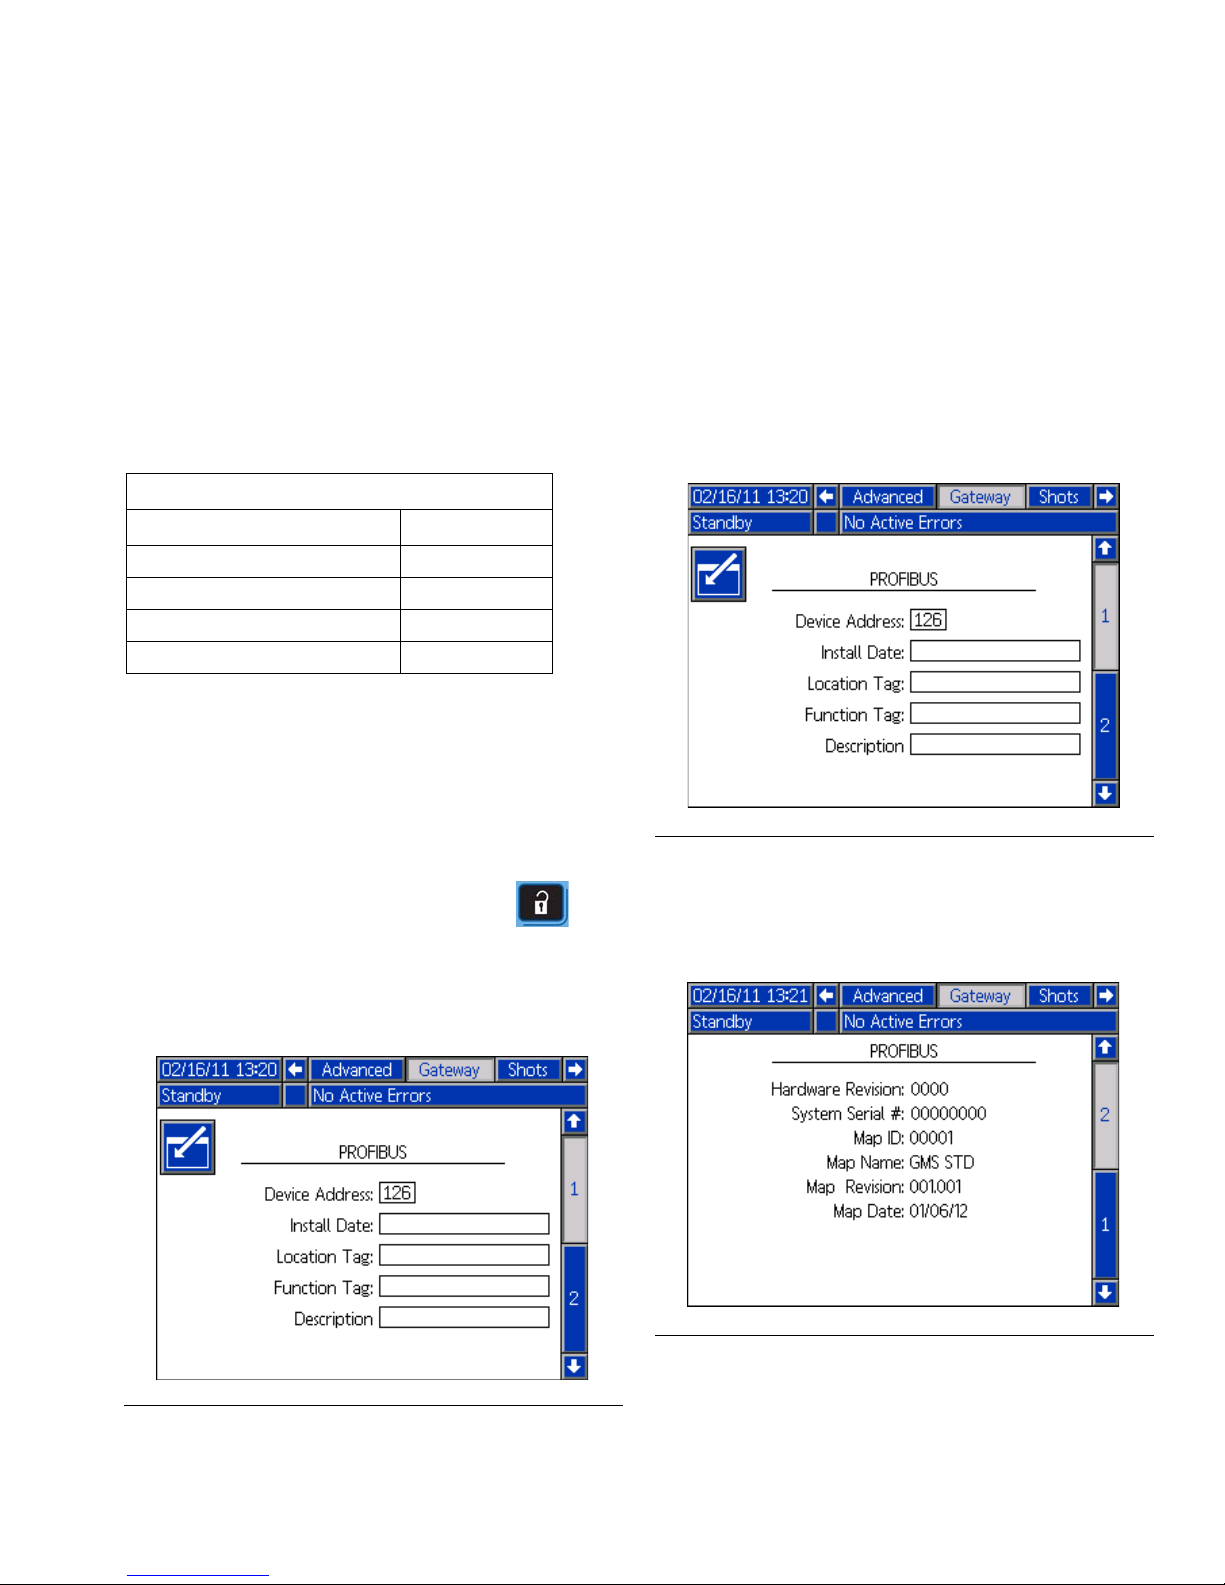
Screen 1
This screen enables the user to set the device address,
install date, location tag, function tag, and description.
FIG. 8: PROFIBUS Fieldbus Screen 1
Screen 2
1. With the system on and enabled, press to
access the Setup screens.
2. Press the left arrow key once to navigate to the
main Gateway screen. See F
FIG. 7: Example Fieldbus Screen
IG. 7.
This screen displays the hardware revision, system
serial number, and data map identification information.
FIG. 9: PROFIBUS Fieldbus Screen 2
3A6338B 5
Page 6
Setup
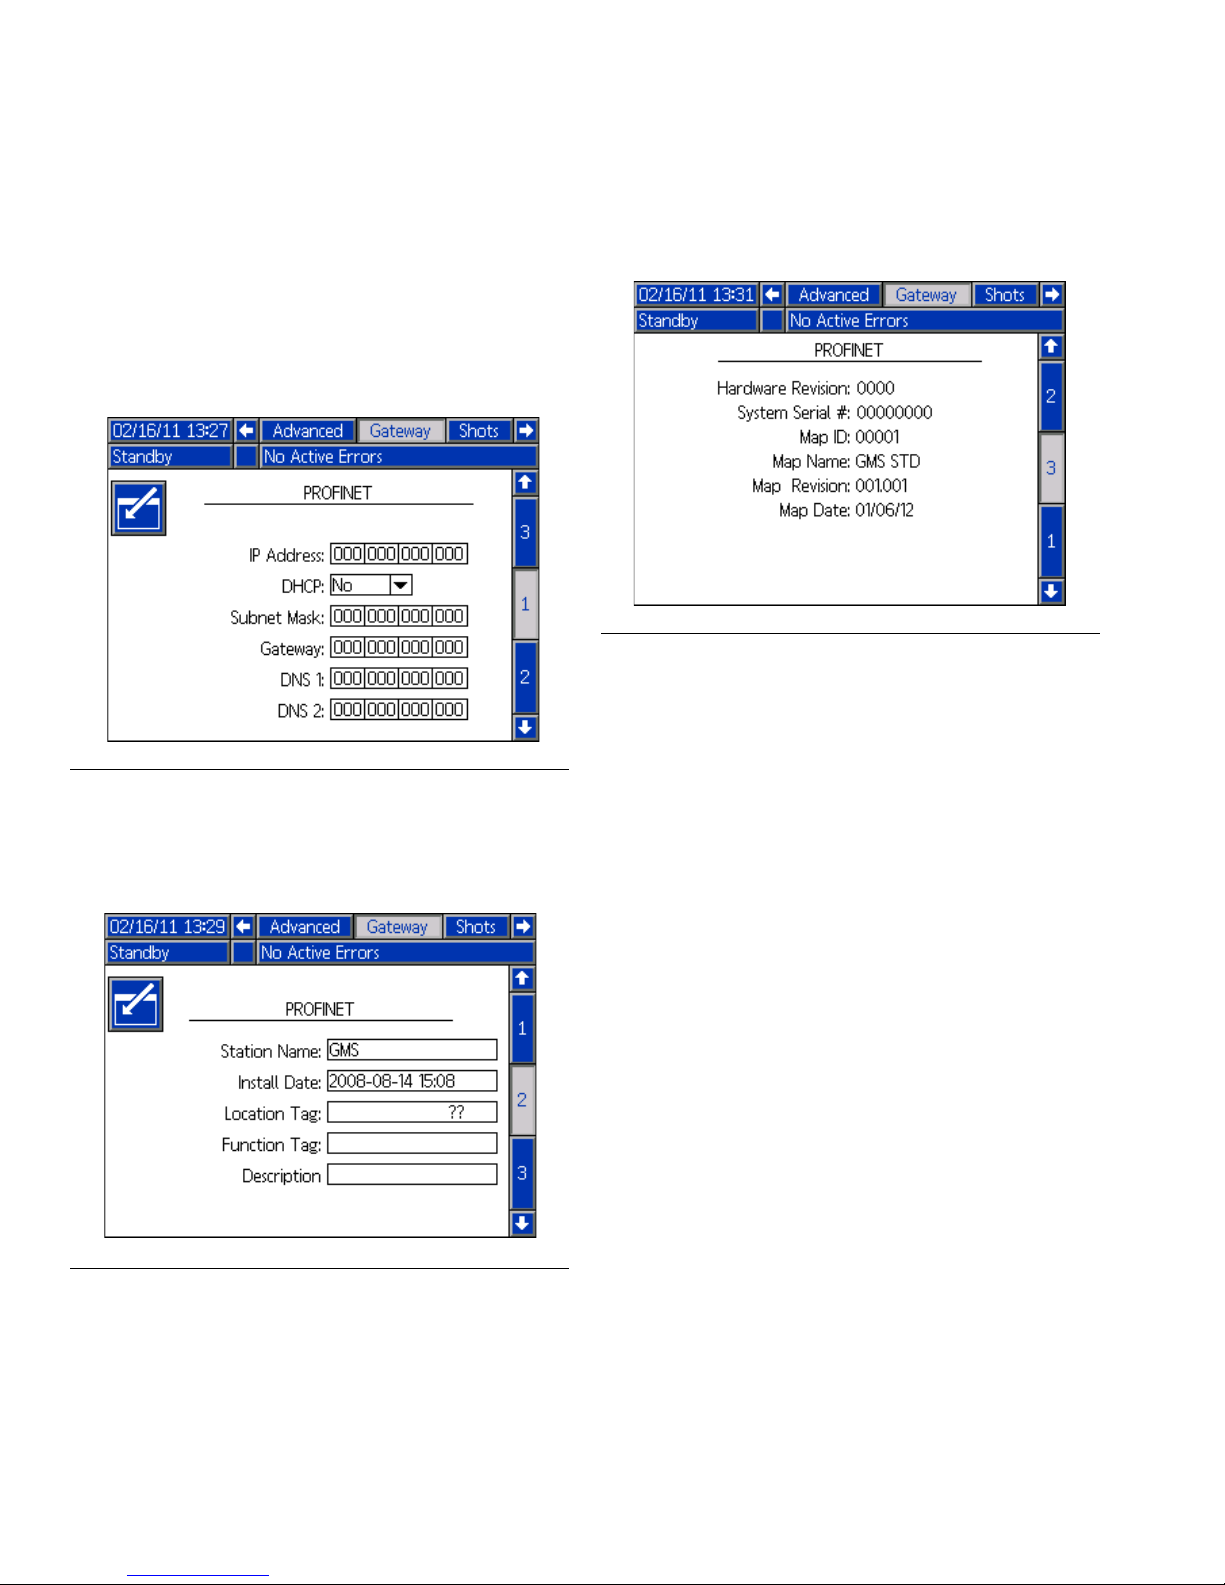
PROFINET Fieldbus Screens
These screens are shown only if a PROFINET Fieldbus
CGM is installed.
Screen 1
This screen enables the user to set the IP Address,
DHCP settings, subnet mask, gateway, and DNS
information.
Screen 3
This screen displays the hardware revision, system
serial number, and data map identification information.
FIG. 12: PROFINET Fieldbus Screen 3
FIG. 10: PROFINET Fieldbus Screen 1
Screen 2
This screen enables the user to set the station name,
install date, location tag, function tag, and description.
FIG. 11: PROFINET Fieldbus Screen 2
6 3A6338B
Page 7
Setup
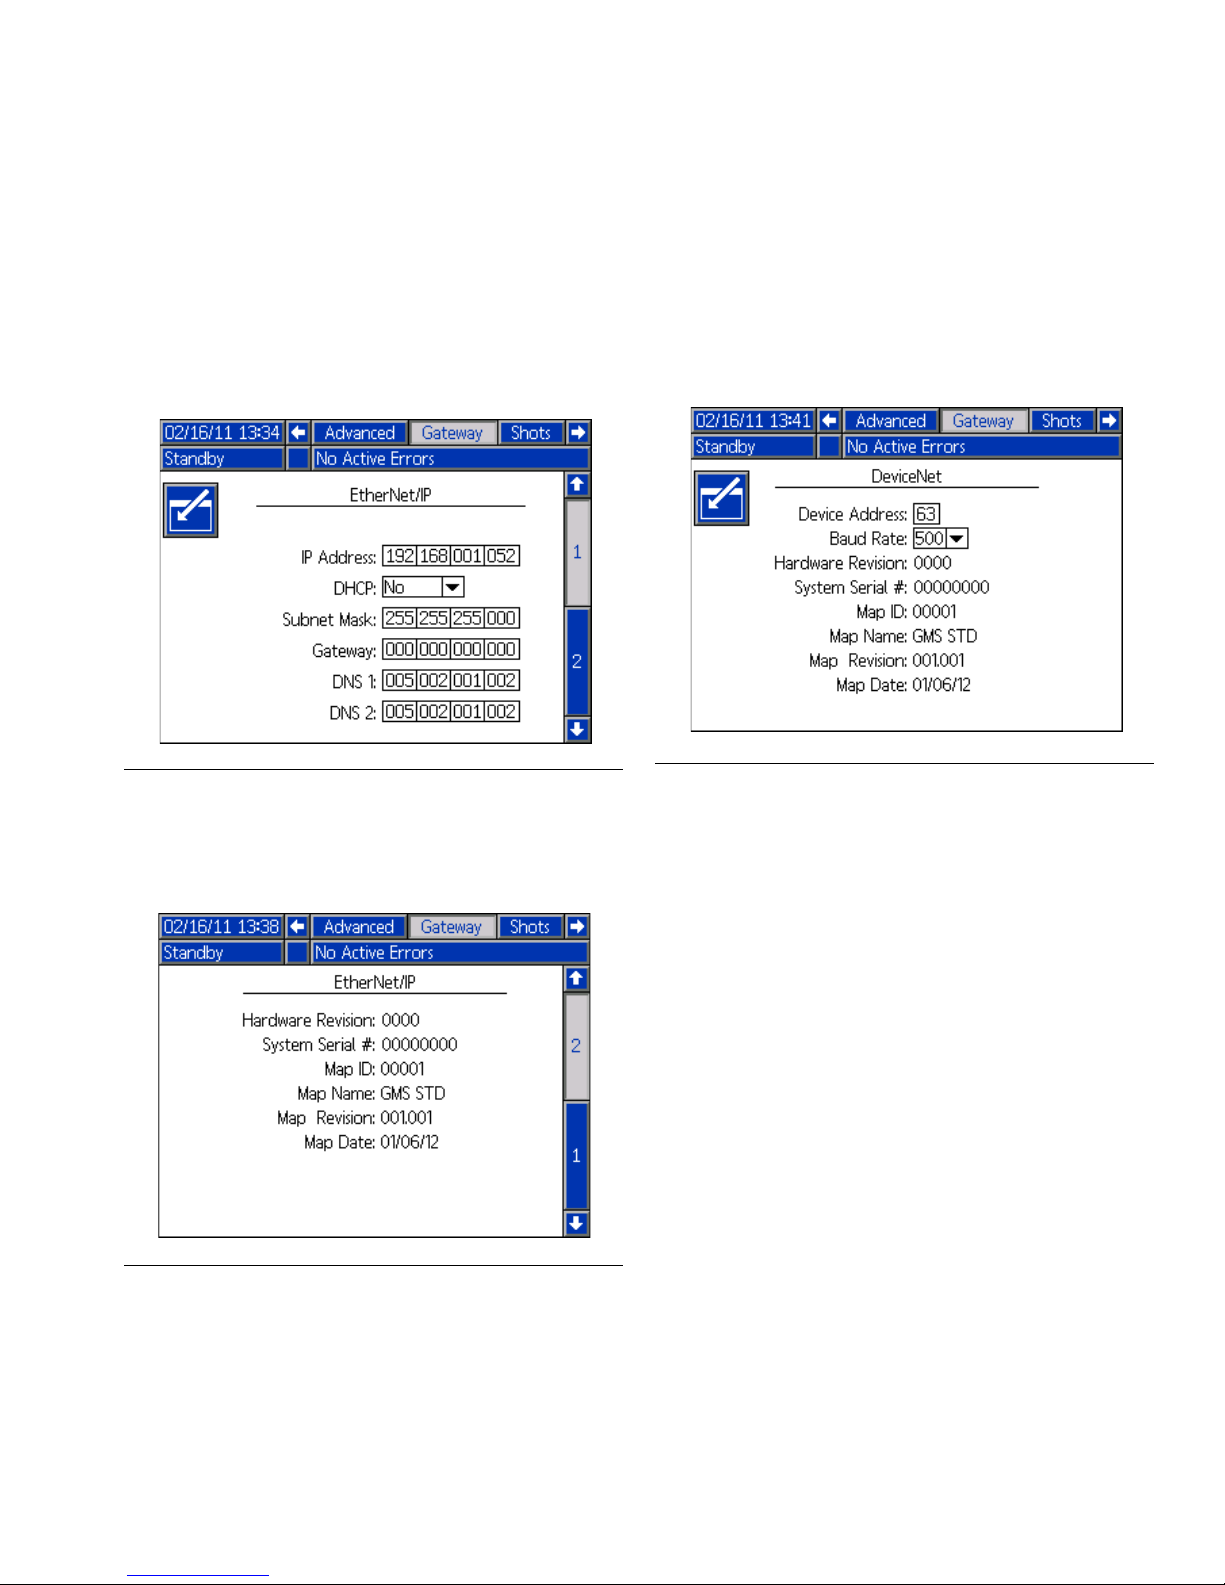
EtherNet/IP Fieldbus Screens
These screens are shown only if an EtherNet/IP
Fieldbus CGM is installed.
Screen 1
This screen enables the user to set the IP address,
DHCP settings, subnet mask, gateway, and DNS
information.
FIG. 13: EitherNet/IP Fieldbus Screen 1
DeviceNet Fieldbus Screen
This screen is shown only if a DeviceNet Fieldbus CGM
is installed.
This screen enables the user to set the device address
and baud rate, as well as view the hardware revision,
system serial number, and data map identification
information.
FIG. 15: DeviceNet Fieldbus Screen
Screen 2
This screen displays the hardware revision, system
serial number, and data map identification information.
FIG. 14: EtherNet/IP Fieldbus Screen 2
3A6338B 7
Page 8

Available Internal Data
Available Internal Data
See Appendix A - I/O Signal Descriptions on page 19
for additional details regarding each input/output.
Unless stated otherwise:
• In each instance, bytes are stored in little endian
order (most significant to least significant).
• PROFIBUS and PROFINET data must be mirrored
by the PLC to get the correct data out on the PLC
side. When the data is mirrored, the least significant
byte is inserted into the most significant spot, and
the most significant byte is inserted into the least
significant spot.
- Example: If the data is a binary number with
0011100110110111, mirroring it to get the
correct data out of the PROFIBUS or
PROFINET will result in 0111101110010011.
• Values are subject to the same maximum and
minimum restrictions as the ADM.
NOTE: Automation Outputs can be monitored by the
corresponding Automation Inputs to verify the EFR
received the data correctly.
8 3A6338B
Page 9

Automation Inputs (signals from EFR system to PLC)
Available Internal Data
Instance ID Description Data Type BIT
1 Heartbeat To PLC Boolean 0
2 System On Boolean 1
3 System Ready Boolean 2
4 Active Alarms Boolean 3
5 Active Deviations Boolean 4
6 Active Advisories Boolean 5
7 Current Sequence is Playing Boolean 6
8 Current Sequence is Paused Boolean 7
9 Current Sequence is Stopped Boolean 8
10 Dispense Valve Open Boolean 9
11 System is Priming Boolean 10
12 System is Purging Boolean 11
13 System is Parking Boolean 12
14 System is Depressurizing Boolean 13
15 Gel Shot is Running Boolean 14
16 EFR is Dispensing Boolean 15
17 {Reserved Bits} Boolean 16-23 2
18 {Reserved Bits} Boolean 24-31 3
19 Current Active Sequence uint8 0-7 4
20 Current Step of the Active Sequence uint8 0-7 5
21 Time Remaining to Complete Step (XX.X s) uint16
22 Red Pump Outlet Pressure (XXXX.X bar) uint16
23 Blue Pump Outlet Pressure (XXXX.X bar) uint16
24 Red Pump Inlet Pressure (XXXX.X bar) uint16
25 Blue Pump Inlet Pressure (XXXX.X bar) uint16
26 Pump Flow Rate (XXXX cc/min) uint16
27 Active Error Number Requiring Acknowledgment uint8 0-7 18
28
29 Data Exchanged Element Selected uint8 0-7 21
30 Data Exchanged Element Value uint16
31 Selected Step of the Active Sequence uint8 0-7 24
32 Selected Step Amount (XXXX.XX) uint32
Active Operator Mode Dispense Flow Rate
(XXXX cc/min)
uint16
0-7 6
8-15 7
0-7 8
8-15 9
0-7 10
8-15 11
0-7 12
8-15 13
0-7 14
8-15 15
0-7 16
8-15 17
0-7 19
8-15 20
0-7 22
8-15 23
0-7 25
8-15 26
16-23 27
24-31 28
Input Byte
Index’s
0
1
3A6338B 9
Page 10

Available Internal Data
Instance ID Description Data Type BIT
33 Selected Step Shot Type uint8 0-7 29
34 Selected Step Flow Rate (XXXX cc/min) uint16
35 Selected Step Calibration (XX.XX) uint16
0-7 30
8-15 31
0-7 32
8-15 33
0-7 34
36 Total Sequence Amount Requested (XXXX.XX cc) uint32
8-15 35
16-23 36
24-31 37
0-7 38
37 Total Sequence Amount Dispensed (XXXX.XX cc) uint32
8-15 39
16-23 40
24-31 41
Input Byte
Index’s
10 3A6338B
Page 11

Automation Outputs (signals from PLC to EFR system)
Available Internal Data
Instance ID Description Data Type BIT
1 System Enable Request Boolean 0
2 System Shutdown Request Boolean 1
3 Start Current Sequence/Step, Trigger Operator Mode Boolean 2
4 Pause Current Sequence Boolean 3
5 Stop Current Sequence Boolean 4
6 Priming Request Boolean 5
7 Purge Request Boolean 6
8 Parking Request Boolean 7
9 Depressurizing Request Boolean 8
10 {Reserved Bits} Boolean 9-15
11 {Reserved Bits} uint8 0-7 2
12 Desired Active Sequence uint8 0-7 3
13 Acknowledging of the Active Error Number uint8 0-7 4
14
15 Data Exchanged Element Desired uint8 0-7 7
16
17 Desired Step of the Active Sequence uint8 0-7 10
19
19 Desired Step Shot Type uint8 0-7 15
20
21
22
Desired Operator Mode Dispense Flow Rate (XXXX
cc/min)
Data Exchanged Element Desired Value
Desired Step Amount (XXXX.XX)
Desired Step Flow Rate (XXXX cc/min)
Desired Step Calibration (XX.XX)
{Reserved Word}
uint16
uint16
uint32
uint16
uint16
uint16
0-7 5
8-15 6
0-7 8
8-15 9
0-7 11
8-15 12
16-23 13
24-31 14
0-7 16
8-15 17
0-7 18
8-15 19
0-7 20
8-15 21
Output Byte
Index’s
0
1
3A6338B 11
Page 12

Available Internal Data
CGM General Timing Diagrams
NOTE: A 50ms delay is suggested between each CGM signal.
NOTE: In the diagrams shown below, the ID# corresponds to the Instance ID in the Automation Inputs and Outputs
table.
When the Priming Request bit is ON, the EFR will start priming as long as the System On bit is also ON. If the
System On bit or the Priming Request bit is OFF, the EFR will stop priming.
12 3A6338B
Page 13

Available Internal Data
When the Parking Request bit is ON, the EFR will start parking as long as the System On bit is also ON. If the
System On bit or the Parking Request bit is OFF, the EFR will stop parking.
3A6338B 13
Page 14

Available Internal Data
When the Purge Request bit is ON, the EFR will start purging as long as the System On bit is also ON. If the System
On bit or the Purge Request bit is OFF, the EFR will stop purging.
The purge flow rate can be modified quickly through the data exchange.
When the Depressurizing Request bit is ON, the EFR will start depressurizing. The EFR will only stop depressurizing
if the Depressurizing Request bit if OFF.
14 3A6338B
Page 15

Available Internal Data
If the sequence is not in operator mode, a pulse on the Start Current Sequence/Step, Trigger Operator Mode bit will
play the active sequence.
Sending the Desired Active Sequence byte is optional. If the The Desired Active Sequence byte is not sent, the
current active sequence stored in the EFR will be used.
3A6338B 15
Page 16

Available Internal Data
If there is a step in operator mode throughout the active sequence, the EFR will only dispense that step if the Start
Current Sequence/Step, Trigger Operator Mode bit remains ON. Once the Start Current Sequence/Step, Trigger
Operator Mode bit is OFF, the EFR will continue with the active sequence.
Sending the Desired Active Sequence byte is optional. If the The Desired Active Sequence byte is not sent, the
current active sequence stored in the EFR will be used.
16 3A6338B
Page 17

Available Internal Data
An ON pulse across the Stop Current Sequence bit will stop the active sequence.
Sending the Desired Active Sequence byte is optional. If the The Desired Active Sequence byte is not sent, the
current active sequence stored in the EFR will be used.
3A6338B 17
Page 18

Available Internal Data
An ON pulse across the System Shutdown Request bit will stop the sequence and turn the System On bit OFF,
making the system inactive.
A toggle OFF followed by a toggle ON of the System Enabled Request bit will put the system back into the active
state after the EFR has shut down.
The Sequence Data must be read before the EFR
finishes running another sequence. If the Sequence
Data is not read before finishing the sequence, the data
will be overwritten with new Sequence Data.
The Sequence Data consists of:
• Total Sequence Amount Requested
• Total Sequence Amount Dispensed
• Sequence Start Outlet Pressure for Red Pump
• Sequence Start Outlet Pressure for Blue Pump
• Sequence End Outlet Pressure for Red Pump
• Sequence End Outlet Pressure for Blue Pump
• Sequence Inlet Pressure for Red Pump
• Sequence Inlet Pressure for Blue Pump
18 3A6338B
Page 19

Appendix A - I/O Signal Descriptions
Appendix A - I/O Signal Descriptions
This section provides details about the CGM Automation Input and Output Signals.
Automation Inputs (signals from EFR system to PLC)
Heartbeat to PLC
Heartbeat to PLC is a Boolean signal that toggles at a
frequency of 1 Hz. This signal toggles so the PLC can
confirm the EFR is connected.
NOTE: The EFR is monitoring the fieldbus connection
as well. If the fieldbus connection stops transferring
data, the EFR will automatically shut down.
System On
System On is a Boolean signal that represents the
active state of the machine.
NOTE: The system must be ON or active for the
machine to dispense.
System Ready
System Ready State is a Boolean signal that represents
when the machine is ready to receive the next
command.
NOTE: the system will not be ready to receive the next
command if the EFR is dispensing, loading a sequence,
or if an active alarm is present.
Active Advisories
Active Advisories is a Boolean signal that represents the
active advisories on the EFR.
NOTE: When an advisory is present, the EFR is warning
the operator of potential problem(s) that may need
attention in the future to avoid shutdown time.
Current Sequence is Playing
Current Sequence is Playing is a Boolean signal that
represents when the sequence is dispensing/running.
Current Sequence is Paused
Current Sequence is Paused is a Boolean signal that
represents when the sequence is paused.
Current Sequence is Stopped
Current Sequence is Stopped is a Boolean signal that
represents when the sequence is stopped.
Dispense Valve Open
Dispense Valve Open is a Boolean signal that
represents when the valve is open.
Active Alarms
Active Alarms is a Boolean signal that represents the
active alarms on the EFR.
NOTE: When an alarm is present, the EFR requires the
operator’s attention and will shut down immediately.
Active Deviations
Active Deviations is a Boolean signal that represents the
active deviations on the EFR.
NOTE: When a deviation is present, the EFR is warning
the operator of potential problem(s) that may need
immediate attention to avoid shutdown time.
3A6338B 19
System is Priming
System is Priming is a Boolean signal that represents
when the system is priming.
System is Purging
System is Purging is a Boolean signal that represents
when the system is purging.
System is Parking
System is Parking is a Boolean signal that represents
when the system is parking.
System is Depressurizing
System is Depressurizing is a Boolean signal that
represents when the system is depressurizing.
Page 20

Appendix A - I/O Signal Descriptions
Gel Shot is Running
Gel Shot is Running is a Boolean signal that represents
when the system is dispensing as a result of the gel
timer.
EFR is Dispensing
EFR is Dispensing is a Boolean signal that represents
when the system is dispensing.
Current Active Sequence
Current Active Sequence is an integer that represents
the active sequence selected on the EFR.
Example: If the byte has a value of 33, sequence 33 is
the active sequence selected.
Current Step of the Active Sequence
Current Step of the Active Sequence is an integer that
represents the active step the EFR is currently running
on the Current Active Sequence.
Example: If the byte has a value of 4, step 4 is the active
step currently running.
Pump Flow Rate
Pump Flow Rate is a 16bit integer that represents the
current flow rate of the pump.
Active Error Number Requiring
Acknowledgment
See Appendix D - Error Number Requiring
Acknowledgment on page 32.
Active Operator Mode Dispense Flow Rate
Active Operator Mode Dispense Flow Rate is a 16bit
integer that represent the PCL desired flow rate for the
EFR, which is used to override the flow rate of the
operator mode step.
Data Exchange Element Selected
See Appendix B - Data Exchanged on page 24.
Data Exchange Element Value
See Appendix B - Data Exchanged on page 24.
Selected Step of the Active Sequence
Time Remaining to Complete Step
Time Remaining to Complete Step is a 16bit integer that
represents the remaining time required to complete the
Current Step of the Active Sequence.
Red Pump Outlet Pressure
Red Pump Outlet Pressure is a 16bit integer that
represents the outlet pressure on the red pump.
Blue Pump Outlet Pressure
Blue Pump Outlet Pressure is a 16bit integer that
represents the outlet pressure on the blue pump.
Red Pump Inlet Pressure
Red Pump Inlet Pressure is a 16bit integer that
represents the inlet pressure on the red pump.
Blue Pump Inlet Pressure
Blue Pump Inlet Pressure is a 16bit integer that
represents the inlet pressure on the blue pump.
See Appendix C - Sequence Step Data Exchange on
page 30.
Selected Step Amount
See Appendix C - Sequence Step Data Exchange on
page 30.
Selected Step Shot Type
See Appendix C - Sequence Step Data Exchange on
page 30.
Selected Step Flow Rate
See Appendix C - Sequence Step Data Exchange on
page 30.
Selected Step Calibration
See Appendix C - Sequence Step Data Exchange on
page 30.
20 3A6338B
Page 21

Total Sequence Amount Requested
Total Sequence Amount Requested is a 32bit integer
that represent the amount requested by the EFR during
the active sequence. This integer will only be populated
after the active sequence finishes dispensing.
Total Sequence Amount Requested
Total Sequence Amount Dispensed is a 32bit integer
that represent the amount dispensed by the EFR during
the active sequence. This integer will only be populated
after the active sequence finishes dispensing.
Appendix A - I/O Signal Descriptions
3A6338B 21
Page 22

Appendix A - I/O Signal Descriptions
Automation Outputs (signals from PLC to EFR System)
System Enable Request
System Enable Request is a bit used to turn on/activate
the system. It has the same function as the
button. Set this bit to 1 to turn on/activate the system,
and set it to 0 to turn off/deactivate the system.
System Shutdown Request
System Shutdown Request is a bit used to immediately
shut down the system. It has the same function as the
button. Set this bit to 1 to immediately shut down
the EFR. Once the EFR has shut down, set this bit to 0
to clear the shutdown request.
Start Current Sequence/Step, Trigger
Operator Mode
Start Current Sequence/Step, Trigger Operator mode is
a bit used to play and trigger a sequence. Set this bit to
1 to start the sequence. Once the sequence is
dispensing, set this bit to 0 to clear the request.
NOTE: When running in operator mode, this bit must
remain high (1) for operator mode to be triggered. Once
this bit is low (0), operator mode will be stopped and the
EFR will continue with the active sequence.
Pause Current Sequence
Pause Current Sequence is a bit used to pause the
active sequence. Set this bit to 1 to pause the current
active sequence. Once the sequence is paused, set this
bit to 0 to clear the request.
Stop Current Sequence
Stop Current Sequence is a bit used to stop the active
sequence. Set this bit to 1 to stop the current active
sequence. Once the sequence is stopped, set this bit to
0 to clear the request.
Priming Request
Priming Request is a bit used to turn the priming feature
ON and OFF. Set this bit to 1 to start the smart priming
feature. This bit can be set to 0 at any time during smart
priming to stop the smart priming feature.
NOTE: Once the smart priming request is completed,
set this bit to 0.
Purging Request
Purging Request is a bit used to turn the purging feature
ON and OFF. Set this bit to 1 to turn the purging feature
ON. When the PLC is ready to stop purging, set this bit
to 0 to turn the purging feature OFF.
Parking Request
Parking Request is a bit used to turn the parking feature
ON and OFF. Set this bit to 1 to start the parking
feature. This bit can be set to 0 at any time while the
pump is parking to stop the parking feature.
NOTE: Once the parking request is completed, set this
bit to 0.
Depressurizing Request
Depressurizing Request is a bit used to turn the
depressurizing feature on and off. Set this bit to 1 to turn
the depressurize feature ON. When the PLC is ready to
stop depressurizing, set this bit to 0 to turn the
depressurizing feature OFF.
Desired Active Sequence
Desired Active Sequence is a byte used to request a
new active sequence. If the value supplied is within the
operable range, the value will be accepted by the EFR
and reflected back to the Current Active Sequence of
the Automation Inputs. The operable range of this byte
corresponds to the number of sequences the EFR can
hold, which is 1 to 50.
22 3A6338B
Acknowledging the Active Error Number
See Appendix D - Error Number Requiring
Acknowledgment on page 32.
Page 23

Desired Operator Mode Dispense Flow
Rate
Desired Operator Mode Dispense Flow Rate is a byte
used to request a new operator mode dispense flow rate
to the EFR. If the value supplied is within the operable
range and the EFR is running in operator mode, the
value will be accepted by the EFR and reflected back to
the Active Operator Mode Dispense Flow Rate of the
Automation Inputs.
Data Exchange Element Desired
See Appendix B - Data Exchanged on page 24.
Data Exchange Element Desired Value
See Appendix B - Data Exchanged on page 24.
Desired Step of the Active Sequence
Appendix A - I/O Signal Descriptions
See Appendix C - Sequence Step Data Exchange on
page 30.
Desired Step Amount
See Appendix C - Sequence Step Data Exchange on
page 30.
Desired Step Shot Type
See Appendix C - Sequence Step Data Exchange on
page 30.
Desired Step Flow Rate
See Appendix C - Sequence Step Data Exchange on
page 30.
Desired Step Calibration
See Appendix C - Sequence Step Data Exchange on
page 30.
3A6338B 23
Page 24

Appendix B - Data Exchanged
Appendix B - Data Exchanged
The Data Exchange is a condensed structure used to read and edit a number of different variables in one data
location. If multiple data exchanges are needed, they must be cycled through.
Below is a timing diagram showing the Data Exchange portion of EFR CGM Map.
NOTE: A 50ms delay is suggested between each CGM signal.
When the PLC needs to use the Data Exchange, the Data Exchange Element Desired must first be sent to the EFR.
Initially, the Data Exchange Element Selected and the Data Exchange Element Value are set to zero to signal the
data in the Data Exchange is invalid. Once the EFR returns the Data Exchange Element Value, followed by the Data
Exchange Element Selected, the PLC can compare the Data Exchange Element Selected to the Data Exchange
Element Desired and confirm the data is correct for the Data Exchange Element Desired. Once the Data Exchange
Automation Inputs are confirmed, the Data Exchanged Element Desired Value can be used to request a new value.
If the value supplied is within the operable range of the element, the EFR will accept the new value and will return
that value to the Data Exchange Element Value.
24 3A6338B
Page 25

EFR Data Exchange Elements
Appendix B - Data Exchanged
Data Exchange Element
(base 10 integer)
1 Dispense Mode uint8
2 ADM Rate Units uint8
3 ADM Pressure Units uint8
4 Pressure Imbalance Alarm Enabled bool
5 Pressure Imbalance Alarm Level (XXXX.X bar) uint16
6 Red Pump Size (XXX.XX cc) uint16
7 Blue Pump Size (XXX.XX cc) uint16
8 Red Pump Specific Gravity (X.XXX g/cc) uint16
9 Blue Pump Specific Gravity (X.XXX g/cc) uint16
10 Gel Timer Enabled bool
11 Gel Timer Idle Period (XX s) uint16
12 Gel Timer Alarm Period (XX s) uint16
13 Gel Timer Repeat Sequence Until (XX cc) uint16
14 Gel Timer Sequence Selected uint8
15 Smart Prime Repeat Until (XX cc) uint16
16 Smart Prime Sequence Selected uint8
17 Purge Flow Rate (XXXX cc/min) uint16
18 Over Pressure Alarm(XXXX.X bar) uint16
20 Integration External Trigger Enabled bool
21 Integration External Trigger Status bool
22 Integration Smart Prime Enabled bool
23 Integration Smart Prime Status bool
24 Integration System Enabled bool
25 Integration System Status bool
26 Integration Analog Flow Rate Enabled bool
27 Integration Analog Flow Rate Status (XXXX mV) bool
28 Integration Sequence Selected Enabled bool
29 Integration Sequence Selected Status uint8
30 Red Pump Cycles (XXXX cycles) uint16
31 Red Pump Lifetime Cycles (XXXX cycles) uint16
32 Blue Pump Cycles (XXXX cycles) uint16
33 Blue Pump Lifetime Cycles (XXXX cycles) uint16
34 Dispense Valve Open Cycles (XXXX cycles) uint16
35 Dispense Valve Open Lifetime Cycles (XXXX cycles) uint16
36 Desired Number of Times to Run the Sequence uint16
37 Actual Number of Times the Sequence has Ran uint16
38 Mixed Material Specific Gravity (X.XXX g/cc) uint16
39 Sequence Start Outlet Pressure for Red Pump (XXXX.X bar) uint16
40 Sequence Start Outlet Pressure for Blue Pump (XXXX.X bar) uint16
41 Sequence End Outlet Pressure for Red Pump (XXXX.X bar) uint16
42 Sequence End Outlet Pressure for Blue Pump (XXXX.X bar) uint16
43 Sequence Inlet Pressure for Red Pump (XXXX.X bar) uint16
44 Sequence Inlet Pressure for Blue Pump (XXXX.X bar) uint16
Description Data Type
3A6338B 25
Page 26

Appendix B - Data Exchanged
Below is a list of explanations of each individual Data
Exchange Element.
Dispense Mode
Dispense Mode tells the EFR system whether the
system is in weight or volume mode. The following
values correspond to the various dispense modes
offered by the EFR.
Value Dispense Mode State
0 Weight Mode
1 Volume Mode
ADM Rate Units
ADM Rate Units tells the EFR system what units the
rate will be displayed in on the ADM. The following
values correspond to the various rate units the EFR
ADM offers.
Value Rate Units State
0 Per Minute
1Per Second
2Per Hour
ADM Pressure Units
ADM Pressure Units tells the EFR system what units the
pressure will be displayed in on the ADM. The following
values correspond to the various pressure units the EFR
ADM offers.
Value Pressure Units State
0PSI
1Bar
Pressure Imbalance Alarm Enabled
Pressure Imbalance Alarm Level
Pressure Imbalance Alarm Level is an integer used to
trigger the pressure imbalance alarm.
Red Pump Size
Red Pump Size is an integer used to define the size of
the red z pump.
Blue Pump Size
Blue Pump Size is an integer used to define the size of
the blue z pump.
Red Specific Gravity
Red Specific Gravity is an integer used to define the
specific gravity of the material in the red z pump.
Blue Specific Gravity
Blue Specific Gravity is an integer used to define the
specific gravity of the material in the blue z pump.
Gel Timer Enabled
Gel Timer Enabled is a boolean that can enable or
disable the Gel Timer feature. The following values
correspond to the different states the Gel Timer boolean
can be set to.
Value Gel Timer Enabled State
0 Not Enabled
1 Enabled
Gel Timer Idle Period
Gel Timer Idle Period is an integer used to define the
idle state of the gel timer before the gel timer causes a
dispense.
Pressure Imbalance Alarm Enabled is a boolean that
can enable or disable the ability to view pressure
imbalances between the red pump and the blue pump.
The following values correspond to the different states
the Pressure Imbalance Alarm boolean can be set to.
Pressure Imbalance
Value
0 Not Enabled
1 Enabled
26 3A6338B
Alarm State
Gel Timer Alarm
Gel Timer Alarm is an integer used to define the alarm
state of the gel timer.
Gel Timer Repeat Unit
Gel Timer Repeat Unit is an integer used to define the
amount of material dispensed for the gel timer shot.
Page 27

Appendix B - Data Exchanged
Gel Timer Sequence Selected
Gel Timer Sequence Selected is an integer used to
define the sequence that will run when the gel timer
expires.
NOTE: To use the active sequence as the selected
sequence for the gel timer, a new value of zero must be
sent across the data exchange. If a new value of zero is
not sent, the number sent across the data exchange will
correspond to the sequence selected for the gel timer.
Smart Prime Repeat Unit
Smart Prime Repeat Unit is an integer used to define
the amount of material dispensed for the smart prime.
Smart Prime Sequence Selected
Smart Prime Sequence Selected is an integer used to
define the sequence that will run when smart prime is
enabled.
NOTE: To use the active sequence as the selected
sequence for smart prime, a new value of zero must be
sent across the data exchange. If a new value of zero is
not sent, the number sent across the data exchange will
correspond to the sequence selected for the gel timer.
Purge Flow Rate
Purge Flow Rate is an integer used to define the flow
rate at which the Purge Request will dispense.
Integration External Trigger Status
Integration External Trigger Status is a boolean that
shows the status of the Integration Trigger I/O pin. The
following values correspond to the different states of the
Integration External Trigger Status boolean.
Integration Trigger
Value
0Not Active
1 Active
Status State
Integration Smart Prime Enabled
Integration Smart Prime Enabled is a boolean that can
enable usage of the Integration Smart Prime I/O pin.
The following values correspond to the different states
of the Smart Prime Enabled boolean.
Integration Smart Prime
Value
0 Not Enabled
1 Enabled
Enabled State
Integration Smart Prime Status
Integration Smart Prime Status is a boolean that shows
the status of the Integration Smart Prime I/O pin. The
following values correspond to the different states of the
Smart Prime Status boolean.
Over Pressure Alarm
Over Pressure Alarm is an integer used to define the
maximum pressure that can be reached before the EFR
shuts down and returns the error.
Value
0Not Active
1 Active
Integration Smart Prime
Status State
Integration System Enabled
Integration External Trigger Enabled
Integration External Trigger Enabled is a boolean that
can enable usage of the Integration Trigger I/O pin. The
following values correspond to the different states of the
Integration External Trigger Enabled boolean.
Integration Trigger
Value
0 Not Enabled
1 Enabled
3A6338B 27
Enabled State
Integration System Enabled is a boolean that can
enable usage of the Integration System I/O pin. The
following values correspond to the different states of the
Integration System Enabled boolean.
Integration System
Value
0 Not Enabled
1 Enabled
Enabled State
Page 28

Appendix B - Data Exchanged
Integration System Status
Integration System Status is a boolean that shows the
status of the Integration System I/O pin. The following
values correspond to the different states of the
Integration System Status boolean.
Integration System
Value
0Not Active
1 Active
Status State
Integration Analog Flow Rate Enabled
Integration Analog Flow Rate Enabled is a boolean that
can enable usage of the Integration Analog Flow Rate
I/O pin. The following values correspond to the different
states of the Integration Analog Flow Rate Enabled
boolean.
Integration Analog Flow
Value
0 Not Enabled
1 Enabled
Rate Enabled State
Integration Sequence Selected Status
Integration Sequence Selected Status is an integer
used to define the active sequence on the EFR by using
I/O pins on the ADM as bits. When read, the integer
results in the Active Sequence in the EFR system.
Example: If the integer has a value of 2, the Active
Sequence is 2.
NOTE: This integer can only be read by the PLC.
Red Pump Cycles
Red Pump Cycles is an integer used to define the
number of times the red pump has cycled. This can be
reset by sending a value zero from the PLC over the
Data Exchange.
Red Pump Lifetime Cycles
Red Pump Lifetime Cycles is an integer used to define
the number of times the pump has cycled during its
lifetime.
NOTE: This integer can only be read by the PLC.
Integration Analog Flow Rate Status
Integration Analog Flow Rate Status is an integer used
to define the voltage on the Analog Flow Rate I/O pin.
NOTE: This integer can only be read by the PLC.
Integration Sequence Selected Enabled
Integration Sequence Selected Enabled is a boolean
that can enable usage of the Integration Sequence
Selected I/O pins on the ADM. The following values
correspond to the different states of the Sequence
Selected Enabled boolean.
Integration Sequence
Value
0 Not Enabled
1 Enabled
Selected Enabled State
Blue Pump Cycles
Blue Pump Cycles is an integer used to define the
number of times the blue pump has cycled. This can be
reset by sending a value zero from the PLC over the
Data Exchange.
Blue Pump Lifetime Cycles
Blue Pump Lifetime Cycles is an integer used to define
the number of times the pump has cycled during its
lifetime.
NOTE: This integer can only be read by the PLC.
Dispense Valve Cycles
Dispense Valve Cycles is an integer used to define the
number of times the dispense valve has opened. This
can be reset by sending a value zero from the PLC over
the Data Exchange.
Dispense Valve Lifetime Cycles
Dispense Valve Lifetime Cycles is an integer used to
define the number of times the dispense valve has
opened during its lifetime.
28 3A6338B
NOTE: This integer can only be read by the PLC.
Page 29

Appendix B - Data Exchanged
Desired Number of Times to Run the
Sequence
Desired Number of Times to Run the Sequence is an
integer used to define the number of times the
sequence will run.
Example: If the integer is 5, the sequence will run 5
times before the dispense is finished.
Actual Number of Times the Sequence has
Ran
Actual Number of Times the Sequence has Ran is an
integer used to define the number of times the
sequence has run out of the desired number.
Example: If the integer is 10, the sequence has run 10
of X times. X represents the Desired Number of Times
to Run the Sequence.
NOTE: This integer can only be read by the PLC.
Mixed Material Specific Gravity
Mixed Material Specific Gravity is an integer used to
define the specific gravity of the mixed material.
NOTE: This integer can only be read by the PLC.
Sequence End Outlet Pressure for Red
Pump
Sequence End Outlet Pressure for Red Pump is an
integer that represents the outlet pressure of the red
pump once the active sequence is done dispensing.
NOTE: This integer will only be populated after the
active sequence is done dispensing.
NOTE: This integer can only be read by the PLC.
Sequence End Outlet Pressure for Blue
Pump
Sequence End Outlet Pressure for Blue Pump is an
integer that represents the outlet pressure of the blue
pump once the active sequence is done dispensing.
NOTE: This integer will only be populated after the
active sequence is done dispensing.
NOTE: This integer can only be read by the PLC.
Sequence Inlet Pressure for Red Pump
Sequence Inlet Pressure for Red Pump is an integer
that represents the inlet pressure of the red pump for the
current sequence being dispensed.
Sequence Start Outlet Pressure for Red
Pump
Sequence Start Outlet Pressure for Red Pump is an
integer that represents the outlet pressure of the red
pump once the active sequence begins dispensing.
NOTE: This integer will only be populated after the
active sequence is done dispensing.
NOTE: This integer can only be read by the PLC.
Sequence Start Outlet Pressure for Blue
Pump
Sequence Start Outlet Pressure for Blue Pump is an
integer that represents the outlet pressure of the blue
pump once the active sequence begins dispensing.
NOTE: This integer will only be populated after the
active sequence is done dispensing.
NOTE: This integer can only be read by the PLC.
NOTE: This integer will only be populated after the
active sequence is done dispensing.
NOTE: This integer can only be read by the PLC.
Sequence Inlet Pressure for Blue Pump
Sequence Inlet Pressure for Blue Pump is an integer
that represents the inlet pressure of the blue pump for
the current sequence being dispensed.
NOTE: This integer will only be populated after the
active sequence is done dispensing.
NOTE: This integer can only be read by the PLC.
3A6338B 29
Page 30

Appendix C - Sequence Step Data Exchange
Appendix C - Sequence Step Data Exchange
The Sequence Data Exchange is a condensed structure used to read and edit a number of steps in a sequence
across a set of bytes. If multiple steps of sequences are needed, they must be cycled through.
Below is a timing diagram showing the Sequence Step Data Exchange portion of EFR CGM Map.
NOTE: A 50ms delay is suggested between each CGM signal.
When utilizing the Sequence Step Data Exchange, the first element that must be passed to the EFR is the Desired
Step of the Active Sequence. Once the EFR receives that element, the EFR will update the Sequence Step Data
Exchange Automation Inputs Elements for the desired step. After the Sequence Step Data Exchange Automation
Inputs Elements have been updated, the Selected Step of the Active Sequence can be used to confirm the desired
step data has populated the Sequence Step Data Exchange Automation Inputs Elements. Once the data has been
confirmed for the desired step, the Sequence Step Data Exchange Automation Outputs Elements can be used to
request new values to the EFR. If the values supplied are within the operable range of the elements, the EFR will
accept the values and reflect the new values to the corresponding elements of the Sequence Step Data Exchange
Automation Inputs Elements.
30 3A6338B
Page 31

Appendix C - Sequence Step Data Exchange
Sequence Step Data Exchange Automation Inputs
Elements consist of:
• Selected Step of the Active Sequence
• Selected Step Amount
• Selected Step Shot Type
• Selected Step Flow Rate
• Selected Step Calibration
Sequence Step Data Exchange Automation Outputs
Elements consist of:
• Desired Step of the Active Sequence
• Desired Step Amount
• Desired Step Shot Type
• Desired Step Flow Rate
• Desired Calibration
See the EFR Sequence Step Data Exchange
Elements for further explanations of the Sequence Step
Data Exchange Automation Outputs Elements and
Sequence Step Data Exchange Automation Inputs
Elements.
NOTE: If the Desired Step of the Active Sequence
changes, the process of the Sequence Step Data
Exchange will start over again, as shown in the timing
diagram.
Desired/Selected Step Shot Size
Desired/Selected Step Shot Size is a byte used to
define the step type for the Desired Selected Step of the
Active Sequence. The table below shows the
corresponding values and units that can be written or
read from the EFR.
Sequence Step Type
Value
0 Step CC Continue* cc
1 Step Grams Continue* grams
2 Step Seconds Continue* seconds
3 Step CC Break** cc
4 Step Grams Break** grams
5 Step Seconds Break** seconds
6 Operator Mode N/A
* Continue means the EFR will not wait on an external
trigger from the Trigger I/O pin or the Start Current
Sequence/Step, Trigger Operator Mode bit. The EFR
will immediately continue into that step.
** Break means the EFR will wait on an external trigger
from the Trigger I/O pin or the Start Current
Sequence/Step, Trigger Operator mode bit before
moving into that step.
State Units
EFR Sequence Step Data
Exchange Elements
Desired/Selected Step of the Active
Sequence
Desired/Selected Step of the Active Sequence is a byte
used to define the sequence step information that can
be edited or read through the other elements of the
sequence step data exchanged. When reading or
writing to this element, the value will correspond with the
step that can be read or edited.
Example: If 3 is shown, step 3 can be edited or read.
Desired/Selected Step Amount
Desired/Selected Step Amount is a 32bit integer used to
define the step amount for the Desired Selected Step of
the Active Sequence. When reading or writing to this
element, the sequence step amount has two decimal
places, and the units are always reflected by the integer
in Selected Sequence Step Shot Type.
Desired/Selected Step Flow Rate
Desired/Selected Step Flow Rate is a 16bit integer used
to define the step flow rate for the Desired Selected
Step of the Active Sequence.
Desired/Selected Step Calibration
Desired/Selected Step Calibration is a 16bit signed
integer used to define the step calibration for the
Desired Selected Step of the Active Sequence. The
units for this are always reflected by the integer in the
Selected Sequence Step Shot Type.
3A6338B 31
Page 32

Appendix D - Error Number Requiring Acknowledgment
Appendix D - Error Number Requiring
Acknowledgment
The Error Number Requiring Acknowledgment is a structure that allows the PLC to monitor, acknowledge and clear
errors on the EFR system.
Below is a list of errors the EFR can return through the CGM. If active, each error will return a value to the Active
Error Number Requiring Acknowledgment location of the map. See the Error Value column for the corresponding
value of each error. When an error is returned through the Active Error Number Requiring Acknowledgment location
of the map, the error must be acknowledged. To acknowledge an error, the value of the error that was returned must
be copied to the Acknowledging of the Active Error Number location of the map. Once the error value has been
copied and sent, the EFR will clear the error and will not update the Active Error Number Requiring Acknowledgment
location until the error has been cleared inside the EFR.
NOTE: See the timing diagrams below for information regarding the timing of signals. A 50ms delay is suggested
between each CGM signal.
NOTE: See help.graco.com for further explanation of each error code.
Error Code Error Description Error Type Error Value
P4DA High Pressure Red Side Alarm 1
P4DB High Pressure Blue Side Alarm 2
P6DA Red Pressure Disconnected Alarm 3
P6DB Blue Pressure Disconnected Alarm 4
P7DA Pressure Imbalance Red Side Alarm 5
P7DB Pressure Imbalance Blue Side Alarm 6
V1NX Motor Under Voltage Alarm 8
V4NX Motor Over Voltage Alarm 9
T4NX Motor Temperature Alarm 10
T4NX Motor Board Temperature Alarm 11
WBNX Motor Encoder Alarm 12
WMNX Motor IPC Communication Alarm 13
WMNX Motor Board Hardware Alarm 14
WMNX Motor Board Exception Alarm 15
A4NX Motor Switch Current Alarm 16
P3DA High Pressure Red Side Warning Deviation 17
P3DB High Pressure Blue Side Warning Deviation 18
S1NX Invalided Sequence Step Warning Deviation 19
W5NX Motor Encoder Calibration Warning Deviation 20
CACA ADM Disconnected Advisory 21
CACF FCM Disconnected Advisory 22
CACM Motor Disconnected Advisory 23
CACC CGM Disconnected Advisory 24
CCCC CGM Fieldbus Disconnected Advisory 26
P6FA Inlet Pressure Red Side Disconnected Advisory 27
P6FB Inlet Pressure Blue Side Disconnected Advisory 28
DHDA Leak Detected Red Side Advisory 30
32 3A6338B
Page 33

Appendix D - Error Number Requiring Acknowledgment
DHDB Leak Detected Blue Side Advisory 31
F3NX High Flow Rate Advisory 32
P4FA High Inlet Pressure Red Pump Advisory 33
P4FB High Inlet Pressure Blue Pump Advisory 34
DDDA Red Pump Cavitation Advisory 35
DDDB Blue Pump Cavitation Advisory 36
DBDX Bubble Detected Advisory 37
P4FX High Inlet Pressure Advisory 38
3A6338B 33
Page 34

Graco Standard Warranty
Graco warrants all equipment referenced in this document which is manufactured by Graco and bearing its name to be free from defects in
material and workmanship on the date of sale to the original purchaser for use. With the exception of any special, extended, or limited warranty
published by Graco, Graco will, for a period of twelve months from the date of sale, repair or replace any part of the equipment determined by
Graco to be defective. This warranty applies only when the equipment is installed, operated and maintained in accordance with Graco’s written
recommendations.
This warranty does not cover, and Graco shall not be liable for general wear and tear, or any malfunction, damage or wear caused by faulty
installation, misapplication, abrasion, corrosion, inadequate or improper maintenance, negligence, accident, tampering, or substitution of
non-Graco component parts. Nor shall Graco be liable for malfunction, damage or wear caused by the incompatibility of Graco equipment with
structures, accessories, equipment or materials not supplied by Graco, or the improper design, manufacture, installation, operation or
maintenance of structures, accessories, equipment or materials not supplied by Graco.
This warranty is conditioned upon the prepaid return of the equipment claimed to be defective to an authorized Graco distributor for verification of
the claimed defect. If the claimed defect is verified, Graco will repair or replace free of charge any defective parts. The equipment will be returned
to the original purchaser transportation prepaid. If inspection of the equipment does not disclose any defect in material or workmanship, repairs
will be made at a reasonable charge, which charges may include the costs of parts, labor, and transportation.
THIS WARRANTY IS EXCLUSIVE, AND IS IN LIEU OF ANY OTHER WARRANTIES, EXPRESS OR IMPLIED, INCLUDING BUT NOT
LIMITED TO WARRANTY OF MERCHANTABILITY OR WARRANTY OF FITNESS FOR A PARTICULAR PURPOSE.
Graco’s sole obligation and buyer’s sole remedy for any breach of warranty shall be as set forth above. The buyer agrees that no other remedy
(including, but not limited to, incidental or consequential damages for lost profits, lost sales, injury to person or property, or any other incidental or
consequential loss) shall be available. Any action for breach of warranty must be brought within two (2) years of the date of sale.
GRACO MAKES NO WARRANTY, AND DISCLAIMS ALL IMPLIED WARRANTIES OF MERCHANTABILITY AND FITNESS FOR A
PARTICULAR PURPOSE, IN CONNECTION WITH ACCESSORIES, EQUIPMENT, MATERIALS OR COMPONENTS SOLD BUT NOT
MANUFACTURED BY GRACO. These items sold, but not manufactured by Graco (such as electric motors, switches, hose, etc.), are subject to
the warranty, if any, of their manufacturer. Graco will provide purchaser with reasonable assistance in making any claim for breach of these
warranties.
In no event will Graco be liable for indirect, incidental, special or consequential damages resulting from Graco supplying equipment hereunder, or
the furnishing, performance, or use of any products or other goods sold hereto, whether due to a breach of contract, breach of warranty, the
negligence of Graco, or otherwise.
FOR GRACO CANADA CUSTOMERS
The Parties acknowledge that they have required that the present document, as well as all documents, notices and legal proceedings entered into,
given or instituted pursuant hereto or relating directly or indirectly hereto, be drawn up in English. Les parties reconnaissent avoir convenu que la
rédaction du présente document sera en Anglais, ainsi que tous documents, avis et procédures judiciaires exécutés, donnés ou intentés, à la suite
de ou en rapport, directement ou indirectement, avec les procédures concernées.
Graco Information
Sealant and Adhesive Dispensing Equipment
For the latest information about Graco products, visit www.graco.com.
For patent information, see www.graco.com/patents.
TO PLACE AN ORDER, contact your Graco distributor, go to www.graco.com, or call to identify the nearest
distributor.
If calling from the USA: 1-800-746-1334
If calling from outside the USA: 0-1-330-966-3000
All written and visual data contained in this document reflects the latest product information available at the time of publication.
GRACO INC. AND SUBSIDIARIES • P.O. BOX 1441 • MINNEAPOLIS MN 55440-1441 • USA
Copyright 2018, Graco Inc. All Graco manufacturing locations are registered to ISO 9001.
Graco reserves the right to make changes at any time without notice.
Original instructions. This manual contains English. MM 3A6338
International Offices: Belgium, China, Japan, Korea
Graco Headquarters: Minneapolis
www.graco.com
Revision
B, February 2019
 Loading...