

Graco Baby & Toddler Car Seats, B427-1-02 Owner's Manual

© 2001 Graco B7005-10-01
2
2
2
2
1
1
3
3
To secure your child (on certain models)
WARNING: Avoid serious injury. Always use harness.
Step 1.
To secure your child in the harness, place crotch
strap between child's legs and insert the harness
buckles (1) into the centre buckle housing, making
sure child's fingers are clear. Adjust strap adjusters
(2) to get a snug fit around your child.
Step 2.
To release, squeeze buckle prongs at top and bottom
sides of centre housing as shown.
Rings (3) are fitted should you wish to attach a
separate harness complying with BS 6684.
Pour installer l'enfant en sécurité
(sur certains modèles)
AVERTISSEMENT : Eviter les blessures. Toujours
utiliser le harnais.
Etape 1.
Pour installer l'enfant en sécurité dans le harnais,
passer la sangle d'entrejambe entre les jambes de
l'enfant puis introduire les boucles de bretelle (1)
dans l'encoche centrale; vérifier que les doigts de
l'enfant sont loins de la boucle. Ajuster le harnais en
réglant les boucles (2) pour que l'enfant soit confortablement installé.
Etape 2.
Pour ouvrir le harnais, serrer les boucles de bretelle
du harnais sur les cotés de la boucle centrale
comme illustré.
Les anneaux (3) permettent d'installer un "harnais
libre" (ce harnais doit être conforme à la norme BS
6684 du Royaume Uni).
Um Ihr Kind anzuschnallen
(bei bestimmten Modellen)
WARNUNG: Um ernsthafte Verletzungen zu vermeiden,
schnallen Sie Ihr Kind immer an.
Schritt 1.
Um Ihr Kind anzuschnallen, plazieren Sie den
Zwischenbeingurt zwischen die Beine des Kindes und
schieben Sie die Gurtschnallen (1) in das mittlere Gurtschloß.
Achten Sie dabei darauf, daß die Finger des Kindes nicht
im Weg sind. Stellen Sie den Gurt mit den Gurtreglern (2)
so ein, daß er fest anliegt.
Schritt 2.
Zum Öffnen des Gurtsystems drücken Sie die Gurtzungen
an den oberen und unteren Seiten des Gurtschlosses wie
abgebildet zusammen.
Der Sitz ist mit Ringen (3) ausgestattet, an denen Sie ein
anderes Gurtsystem, das der Norm BS 6684 entspricht,
befestigen können.
Para sujetar a su niño (en ciertos modelos)
ADVERTENCIA: Evite lesiones graves. Siempre use el arnés.
Paso 1.
Para sujetar a su niño en el arnés, coloque la correa de la
entrepierna entre las piernas del niño e inserte las hebillas
del arnés (1) en la caja central de la hebilla, asegurándose de
que los dedos del niño no estén en medio. Ajuste los
ajustadores de las correas (2) para que ciñan bien a su niño.
Paso 2.
Para soltar, apriete las lengüetas de la hebilla en los lados
superior e inferior de la hebilla central como se indica.
Los anillos (3) están equipados por si desea conectar otro
arnés que cumple con BS 6684.
© 2001 Graco B7005-10-01
Para prender a criança
(somente em alguns modelos)
ATENÇÃO: Evite ferimentos graves usando sempre
o arnês.
Passo 1.
Para prender a criança no arnês, coloque a correia
de entrepernas entre as pernas da criança e insira
as fivelas do arnês (1) no alojamento da fivela
central, certificando-se de que os dedos da criança
estejam livres. Regule os ajustadores de correia (2)
para obter um ajuste preciso ao redor da criança.
Passo 2.
Para liberar, aperte as pontas da fivela no lado
superior e inferior do alojamento central, conforme
se mostra.
Há anéis (3) para o caso de se desejar instalar um
arnês separado em cumprimento à norma BS 6684.
T
urvavyön käyttö
(V
ain tietyissä malleissa)
VAROITUS: Vältä vakavat vammat. Käytä aina
turvavyötä.
Kohta 1.
Laita haaravyönauha lapsen jalkojen välistä. Paina
turvavyön soljet (1) haaravyönauhassa olevaan
lukkoon kiinni. Varmista, ettei lapsen sormet jää
väliin painaessasi lukkoa kiinni. Säädä turvavyö (2)
niin, että lapsesi on siinä hyvin kiinni.
Kohta 2.
Paina soljen kummaltakin puolelta avataksesi
turvavyön lukon (katso kuvaa).
Rattaassa on valmiina valjaslenkit (3), jos haluat
käyttää erillisiä valjaita.
Beveiligen van uw kind
(op bepaalde modellen)
WAARSCHUWING: Vermijd ernstig letsel. Gebruik altijd
de gordel.
Stap 1.
Om uw kind te beveiligen met de gordel, plaatst u het
kruisriempje tussen de benen en duwt u de insteekdelen (1)
in het gespdeel. Houd de vingers van het kind weg. Stel
met de gordelschuifjes (2) de juiste lengte in.
Stap 2.
Om los te maken drukt u op de insteekdelen aan de boven
en onderkant van het gespdeel, zoals afgebeeld.
Ringen (3) zijn aangebracht voor een eventuele aparate
gordel volgens BS 6684.
Per legare il bambino (su certi modelli)
AVVERTENZA: evitare feriti gravi. Usare sempre
le briglie.
Fase 1.
Per legare il bambino nelle briglie, porre la cinghia dell'inforcatura al centro delle gambe del bambino ed inserire le fibbie di briglie (1) nella fibbia centrale accertandosi di tenere
lontano le mani del bambino. Regolare i dispositivi di regolazione per le cinghie (2) per far che siano aderenti attorno
al bambino.
Fase 2.
Per rilasciarle, premere le linguette della fibbia in alto ed in
basso della fibbia centrale come indicato.
Gli anelli (3) sono inclusi, nel caso si desidera
fissare delle briglie in più in conformità con BS 6684.

©2002 Graco B427-1-02

2
OWNER’S MANUAL ............................ 18-33
PARTS LIST .................................................. 3-5
FITTING GUIDE ......................................... 88-89
MANUEL D’UTILISATION ................... 34-50
LISTE DES PIÉCES ...................................... 3-5
GUIDE D’INSTALLATION ......................... 88-89
GEBRAUCHSANLEITUNG ................. 51-69
TEILE LISTE .................................................. 3-5
ANPASSUNGSTABELLE .......................... 88-89
HANDLEIDING ..................................... 70-85
STUKLIJST .................................................... 3-5
MONTAGEVOORSCHRIFTEN .................. 88-89

3
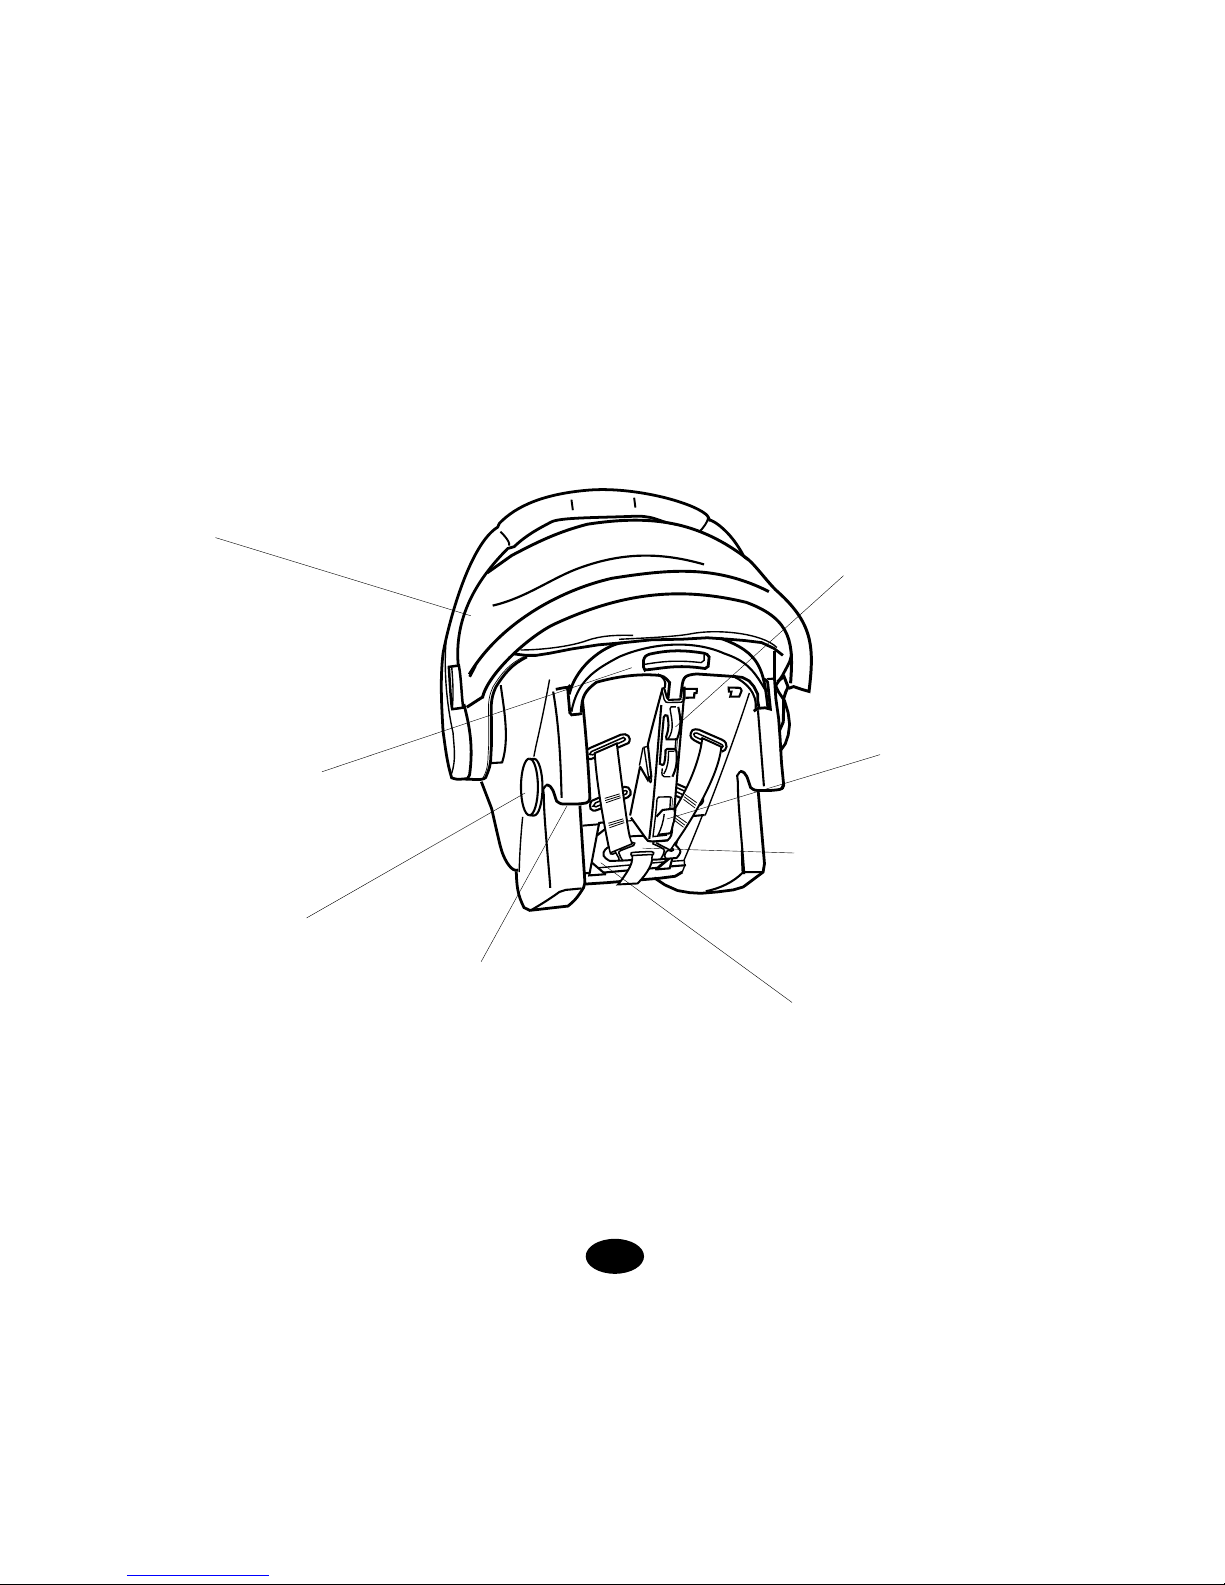
Handle
Poignée
Tragebügel
Handgreep
Hood
Capote
Sonnendach
Kap
Harness strap
Sangle du harnais
Gurtband
Harnasgordel
Harness button
Bouton du harnais
Schnellversteller
Verstelknop
Harness slot
Fente du harnais
Gurtschlitz
Gordel gleufje
Harness buckle
Boucle du harnais
Gurtschloß
Harnas gesp
Crotch strap
Sangle d'entrejambe
Zwischenbeingurt
Beengordeltje
Lap belt hook
Crochet de la sangle ventrale
Gurtführungshaken
Heupgordelhaak
Slack adjustment strap
Sangle de réglage
Justiergurt
Verstelriem
Seat cover
Housse de siège
Sitzbezug
Bekleding
Handle latch
Bouton de réglage de la poignée
Drücktasten
Handgreep grendel
4
Release handle
Manette de déverrouillage
Lösung der Bügelarretierung
Ontgrendelgreep
Level indicator
Indicateur d'inclinaison
Neigungsanzeige
Positie indicator
Metal junction plate
Boucle de jonction métallique
Gurtverteilerbeschlag
Metalen gordelplaatje
Centre belt guides
Guides de la sangle
diagonale zentrale
Gurtführung
Schoudergordeldoorvoer
Attachment latch
Crochet de verrouillage
Haken
Bevestigingshaak
Hood
Capote
Sonnendach
Kap
Mounting notch
Encoche de positionnement
Einbuchtung in Schaukelkufen
Inkeping voor bevestiging
Owner’s manual compartment
Rangement du
manuel de l'utilisateur
Aufbewahrungsort für
Handbuch
Plaats voor gebruiksaanwijzing

5
Base (sold separately)
Base (vendue séparément)
Basis (getrennt erhältlich)
Basisplaat (verkocht)
Load leg adjustment button
Bouton du réglage en hauteur du pied
Einstellungsknopf des tragenden Teils
Pootverstelling
Shoulder belt clip
Pince de blocage de la sangle
diagonale du siège du véhicule
SchulterGurthalterung
Schoudergordel klip
Load leg
Pied
Tragender Teil
Poot

6
1
2
3
4
7
5 6
7
8
8
9 10
11
12

9
13
14
15
16
17
18
10
B
C
A
19
11
20 21
22 23
12
24 25
26 27
13
28
F
E
D
14
29

15
30
32
31

16
34
33
36
35
37
38
17
39
40
42
41

18
Read this Owner’s Manual completely BEFORE first use of your car seat!
Keep this Owner’s Manual always with the car seat. Provisions are made on
the rear of the seat shell. Plan to spend some time getting to know your car
seat—time well spent when you consider that your baby’s safety depends on
it. Pay special attention to the warnings, printed in red.
Before continuing, please locate your vehicle owners manual. You may need to refer
to it as part of these instructions.
Car safety seats are designed to give protection to your child in the event of a sudden stop or
crash. No safety seat can guarantee absolute protection from injury in the event of a crash, but
their use reduces the risks.
Countries differ in their laws and recommendations for safe child restraint seat use. For further
advice contact your local law enforcement officers or your vehicle supplier.
Graco Children’s Products
PO BOX 5991
Basildon, Essex SS14 3GJ

19
Safety Requirements
European Safety Standards specify the
construction and performance of your car
seat as well as its components, requirements
for fitting and use, instructions and markings.
Your car seat has been approved to
European Standard
ECE R44.03
Semi-Universal/Universal group 0+, less than
13 kg. An approval number is attached to the
rear of the seat and must not be removed.
NOTICE
(Seat Only)
The seat is a “Universal” child restraint. It is
approved to Regulation No. 44.03 series of
amendments, for general use in vehicles
and it will fit all car seats.
Only suitable if the approved vehicles
are fitted with 3 point static/with retractor
safety belts, approved to UN/ECE
Regulation No. 16 or other equivalent
standards.
(Seat with Base)
The Base “Semi-Universal” child restraint. It
is approved to Regulation No. 44.03 series
of amendments, for general use in vehicles
and it will fit most, but not all, car seats.
See the fitting guide on page 88-89.
Only suitable if the approved vehicles
are fitted with 2 point static lap safety belt
or 3 point static/with retractor safety belts,
approved to UN/ECE Regulation No. 16 or
other equivalent standards.

20
Important safety points
DO read these instructions before
fitting the car seat in your car so that
you may be familiar with it and avoid
any dangerous misuse.
Premature babies of less than 37 weeks
gestation may be at special risk in a car.
Such a baby may experience breathing
difficulties while reclined in a car seat.
We advise that you have your doctor or
hospital staff examine your baby and
recommend the proper car seat or car bed
before you and your baby leave the hospital.
DO NOT USE YOUR CAR SEAT ON ANY
P ASSENGER SEA T WHERE AN AIRBAG IS
FITTED.
DO take care to locate and install the car
seat so that it is not liable to become trapped
by a moveable seat or in a door of the
vehicle.
DO make sure that the harness is
properly adjusted at all times and that
the straps are not twisted.
AVOID seating a passenger directly behind
the car seat. If a passenger must sit directly
behind the car seat, put the lightest person
there. In the event of an accident, a heavy
passenger is more likely to injure your child
than a light one.
DO make it a firm family rule that
everyone in the car always buckles up
for every trip. This sets a good example
for young children and ensures better
cooperation over the years. Also, an
unrestrained child or adult can be thrown into
other passengers and cause serious injury or
death in a crash.
DO NOT ever take a baby out of the
car seat for any reason while vehicle is
in motion. If your baby needs attention, find a
safe place and pull off the road.
DO store your car seat in a safe place when
not being used. Avoid putting heavy things on
top of it.
DO always check the security of your car
seat before each journey.
DO regularly check all child restraints for
wear and tear.

21
DO make sure that all folding seats are
securely latched.
DO NOT leave children unattended in your
car, even for the shortest time. Children
should not play with the car seat.
DO NOT leave luggage and other objects
unsecured in the car or the boot. If the car
has to stop suddenly, these objects will
continue moving and can cause serious
injuries. The larger the object, the greater
the risk.
DO NOT make unauthorized alterations or
additions to any part of the seat, base, or
car seat belt. Do not use accessories or parts
supplied by other manufacturers. The
function of the car seat could be altered,
resulting in serious injury or death.
DO NOT use another manufacturer’s seat
cover or base with this car seat. See your
retailer for Graco replacements ONLY.
DO NOT put anything underneath your car
seat. In a crash it could fly out,
making the webbing slack and creating
a hazard for other passengers.
DO NOT carry children in the luggage area
behind the rear seat in a hatchback or an
estate car unless specially designed for the
purpose.
DO NOT leave your car seat or base
unsecured in a car. Your car seat or base
must always be secured in the car.
After an accident, the car seat (and base, if
applicable) MUST BE replaced. Also replace
the seat belt that anchored the car seat and
the seat belts worn by any other vehicle
passengers. You may not see any damage,
but after a serious crash a car seat, base or
seat belt can be too weak to protect again.
In an emergency, the buckle has been
designed to be released quickly. It is not child
proof. More inquisitive children might learn to
undo the buckle. Children should be told
never to play with it or any other part of the
seat.
Your car seat must only be used with an
approved three-point lap and diagonal belt.

22
Car seat may be used as an infant carrier. Be
sure handle is locked in carrying position
before carrying your child. Put handle into
one of the back positions to use as a stand
for reclining or sitting up.
DO NOT place car seat or infant carrier near
edge of a table or counter or onto soft
surfaces like mattresses or cushions. Infant
rocking or movement may cause it to move
and fall off, causing injury or death.
Important procedures
To give your baby the best possible
protection, you must know several things
outlined in this Owner’s Manual:
!
Fitting the harness for your baby.
!
Choosing the safest seat location for the
car seat.
!
Verifying the seat belt system used in your
vehicle.
!
Properly installing the car seat (and
base—sold separately) in your vehicle.
!
Securing your baby in the seat.
!
Graco
®
Travel System and other uses
of car seat.
!
Care and maintenance of your car seat.
In the following pages, the red
texts mark very important safety
information!
Please READ and UNDERSTAND all red
warnings.
23
Adjusting the handle
Squeeze latches on both sides
at bottom of handle to release it.
Rotate handle into one of three
locking positions—carrying (up),
reclining (middle) or sitting (fully
down). Be sure it locks into desired
position and latches pop out.
Always place handle in the up
position when using the car seat in
a vehicle.
Always place handle in the down
position when removing your baby
from the seat.
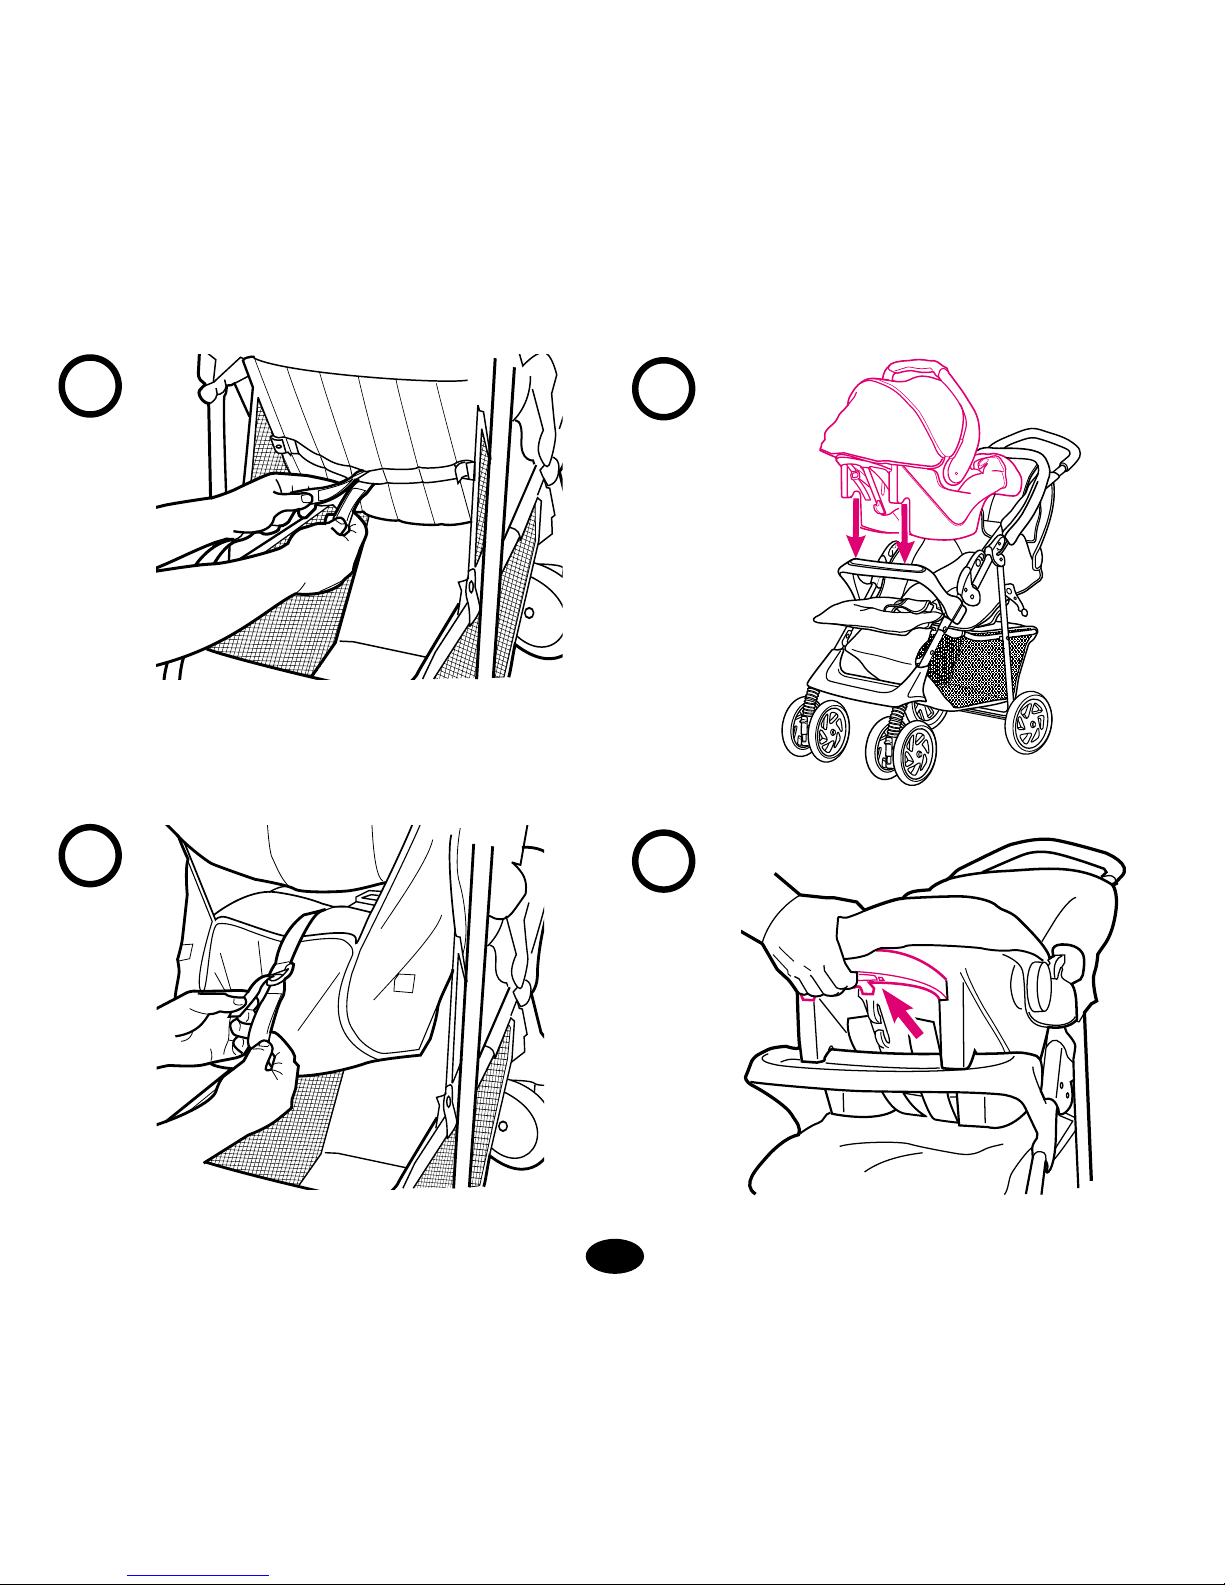
Attaching the
car seat to the base
(on certain models)
NOTE: A base for your seat (which
stays buckled in the car, so you can
avoid fastening the vehicle belt each
time you go out) is sold separately
through certain retailers.
To attach seat to base, position front
of seat in base then push down on
the back until it locks into place.
(See Illustration).
Pull up on car seat to be sure it is
securely latched into base.
To remove, squeeze release handle
at back of the car seat to release the
attachment latch. Lift car seat from
base as shown.
1
2
3
4
Correct
Incorrect
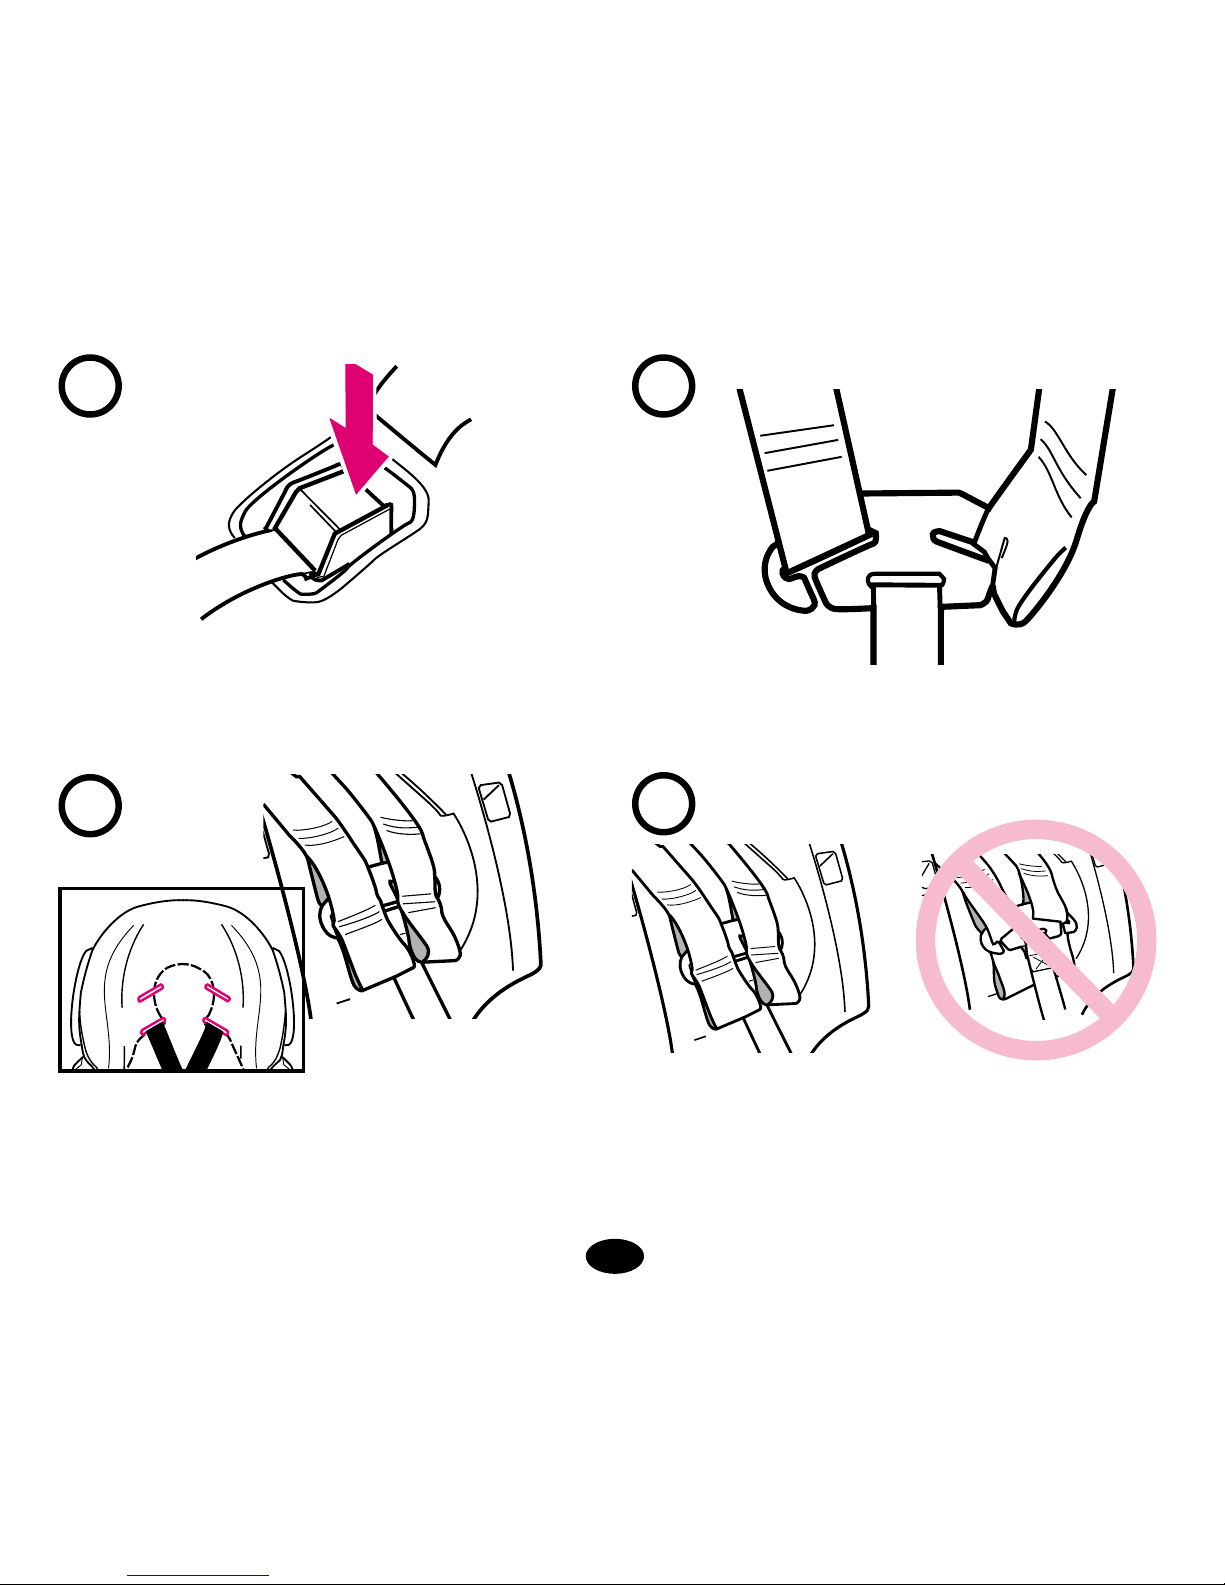
DO NOT use upper harness slots
with a small infant. The harness
may not securely hold a small
baby in a crash.
Step 4.
To change harness slots, first remove
your baby. Depress the harness
adjustment button at the front of the
seat and pull on the harness to
slacken it.
Step 5.
Behind the seat, take the shoulder
strap ends off the metal junction plate
and pull the straps through the slots
in the seat. Insert them into the
appropriate set of slots. Reassemble
the strap ends onto the junction plate.
The ends of the harness straps have
two loops.
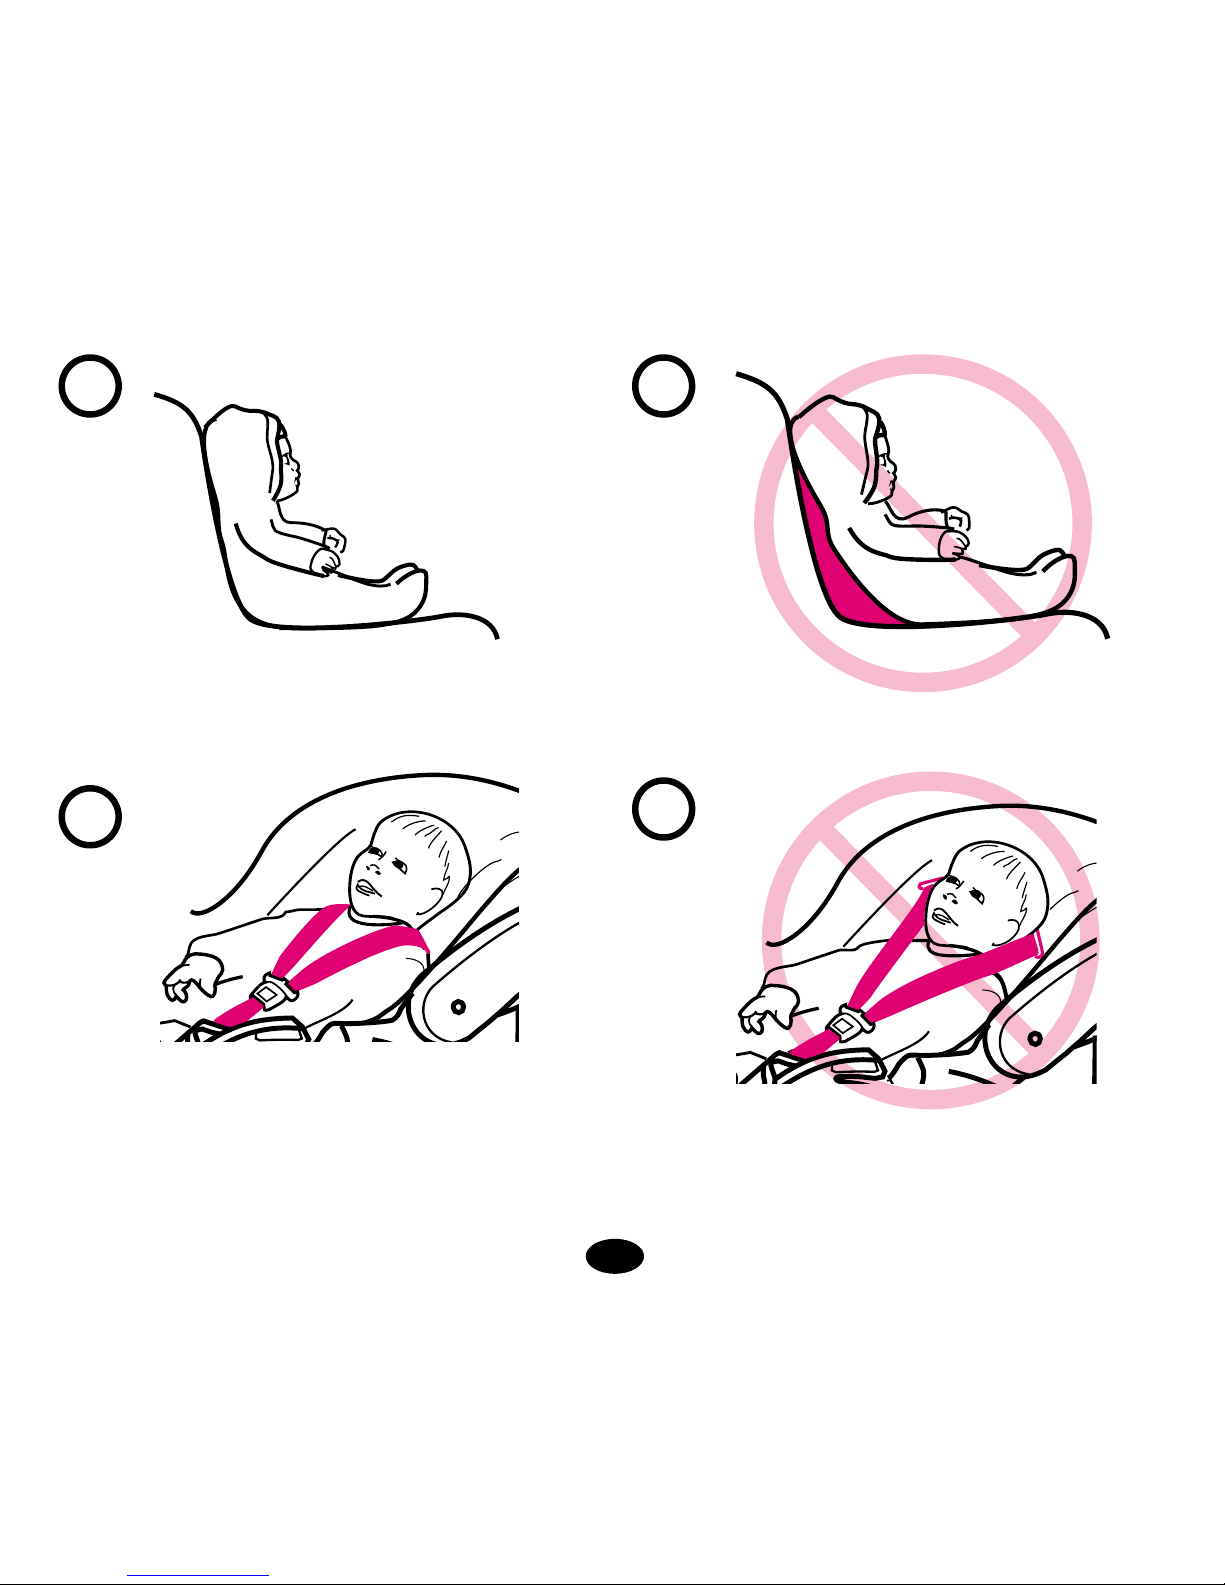
Fitting the harness
Before using the car seat, check that
the harness is properly adjusted for
your baby’s size.
Step 1.
Properly dress your baby. Use
clothing with legs so crotch strap can
be securely latched.
Step 2.
Put your baby in the seat. Make sure
that baby is sitting with back and
bottom flat against the seat as shown.
Correct
Incorrect—space behind back and
bottom
Step 3.
Check that harness straps are set at
the proper height. Straps must go into
the harness slots nearest to your
baby’s shoulders but not above the
shoulder line.
24
5
6
10
9
7
8
25
!
For a smaller baby, use the lower
shoulder slots and the upper strap
loops.
The ends of the straps must hang in
front of the junction plate.
Lift up the strap ends to check that
the loops are completely within the
junction plate slots and pull on the
straps to be sure they are secure.
!
For a larger baby, use the upper
shoulder slots and the end strap
loops.
Check that the straps are
completely within the junction plate
slots and pull on the straps to be sure
they are secure.
WARNING: Use extreme
care in threading the straps
according to the diagram. If the
straps are not secure, they will not
protect your baby.
Choosing the
seat location
See fitting chart on page 88-89 for
specific vehicle seating position.
DO place car seat in a forward-facing
vehicle seat. The seat can be placed
on the rear or front seat of the car
(except cars fitted with a passenger
air bag).
DO NOT place car seat in a vehicle
seat that uses an air bag.
DO NOT place car seat in a
rear-facing vehicle seat.
DO NOT place car seat in a
side-facing vehicle seat.
The car seat alone must be fastened
in the car with a three point belt with
or without a retractor, which has been
approved to ECE regulation No. 16 or
equivalent standard. Base could be
used with both 2 or 3 point belts.
13
14
11
12
15
16
17
18

26
Only use this car seat on vehicle
seats with seat backs that lock in
place. Seats without latches, that fold
forward or pivot freely should not be
used.
Only use this car seat on vehicle
seats that are fully padded and are
free of sharp objects.
Installing the car seat
After fitting the harness to your baby
and determining which vehicle seat
location is best, you are ready to
install your car seat. The installation
instructions vary depending on
whether or not you are using the
base. Refer to the proper section
below:
Step 1.
Place your car seat (or base without
the seat) into a forward-facing vehicle
seat with no air bag and with an
approved type of seat belt. Face your
car seat or base toward the rear of
the vehicle. Check that the car seat
handle is up.
DO NOT use car seat in a vehicle
with the handle in the sitting
(down) position.
NEVER face this car seat forward.
Serious injury or death can result
if this car seat is used facing
forward.
27
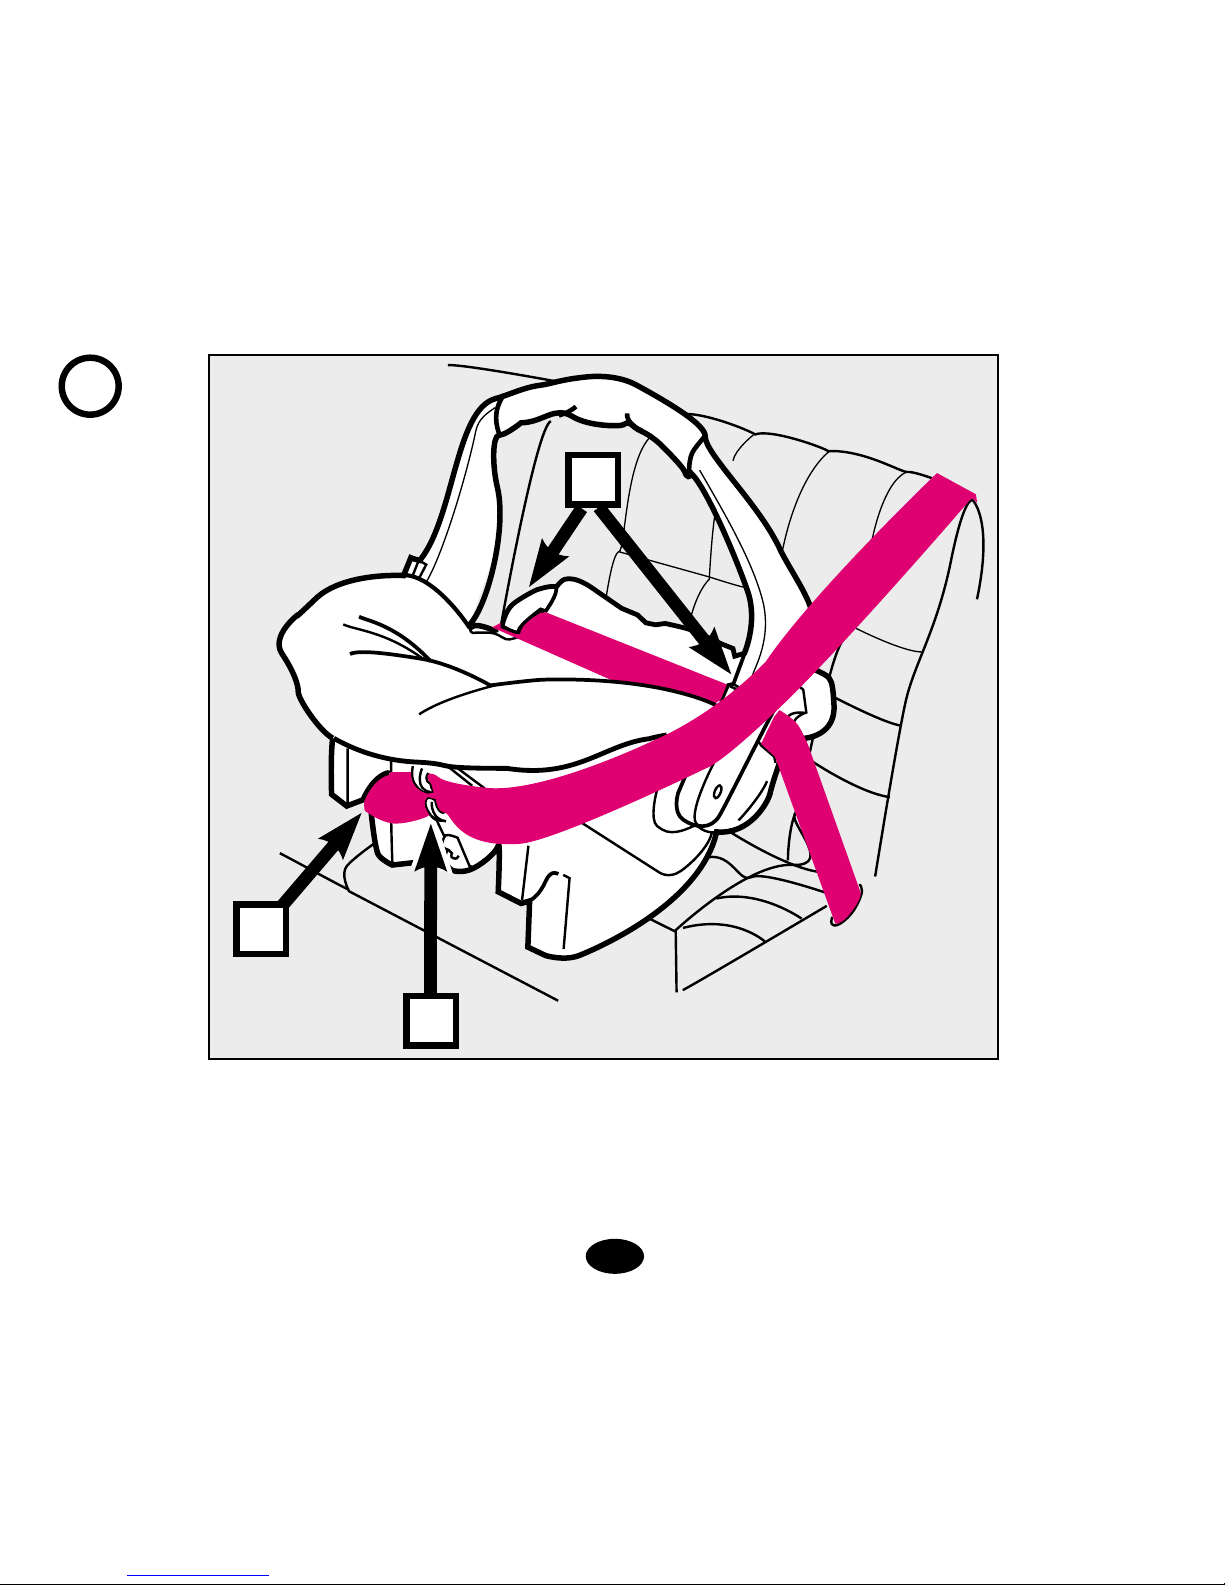
WITHOUT BASE:
Step 2.
Place shoulder belt around the back
of the car seat exactly as shown,
making sure to run it through the
center guides on the back of the
seat and below the notch opposite
the shoulder belt origin.
Put lap section of belt over car seat
and under the two belt hooks.
Buckle the vehicle belt.
Belt hooks
Centre guides
Notch opposite shoulder belt origin
Step 3.
Push car seat down into vehicle seat.
Help the retractor to take up all the
vehicle belt slack.
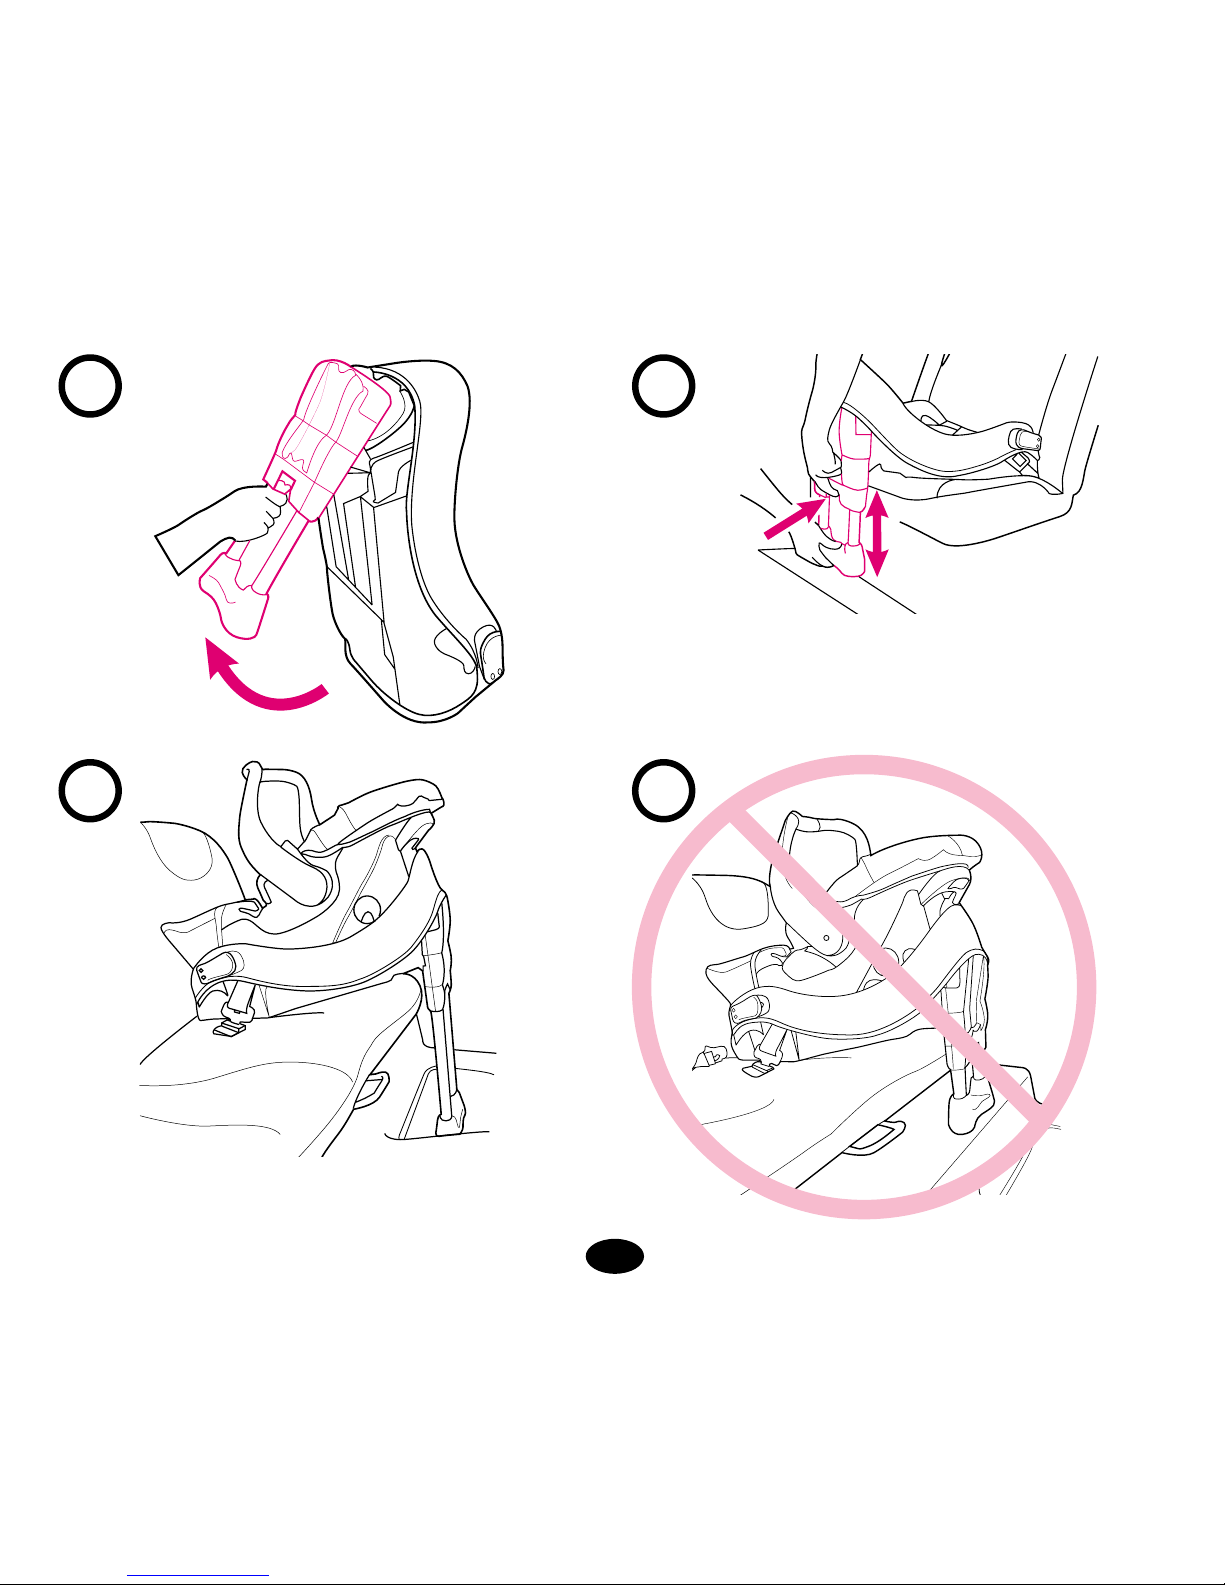
WITH BASE:
Step 1.
Lift the bottom of the load leg up untill
it clicks into place.
Caution: Keep fingers clear of
moving parts.
Step 2.
Place base on vehicle seat. Squeeze
load leg adjustment button, raise or
lower the load leg to proper height.
Make sure the load leg is secure by
pressing down on the front of the
base.
Do not place base with loadleg on a
ledge. If this occurs and the vehicle
seat is adjustable, move it forward so
that the foot is on the vehicle floor.
Correct
Incorrect
A
B
C
19
21
20
22
23
28
Step 3.
Pull lap section of belt through
openings on each side of base.
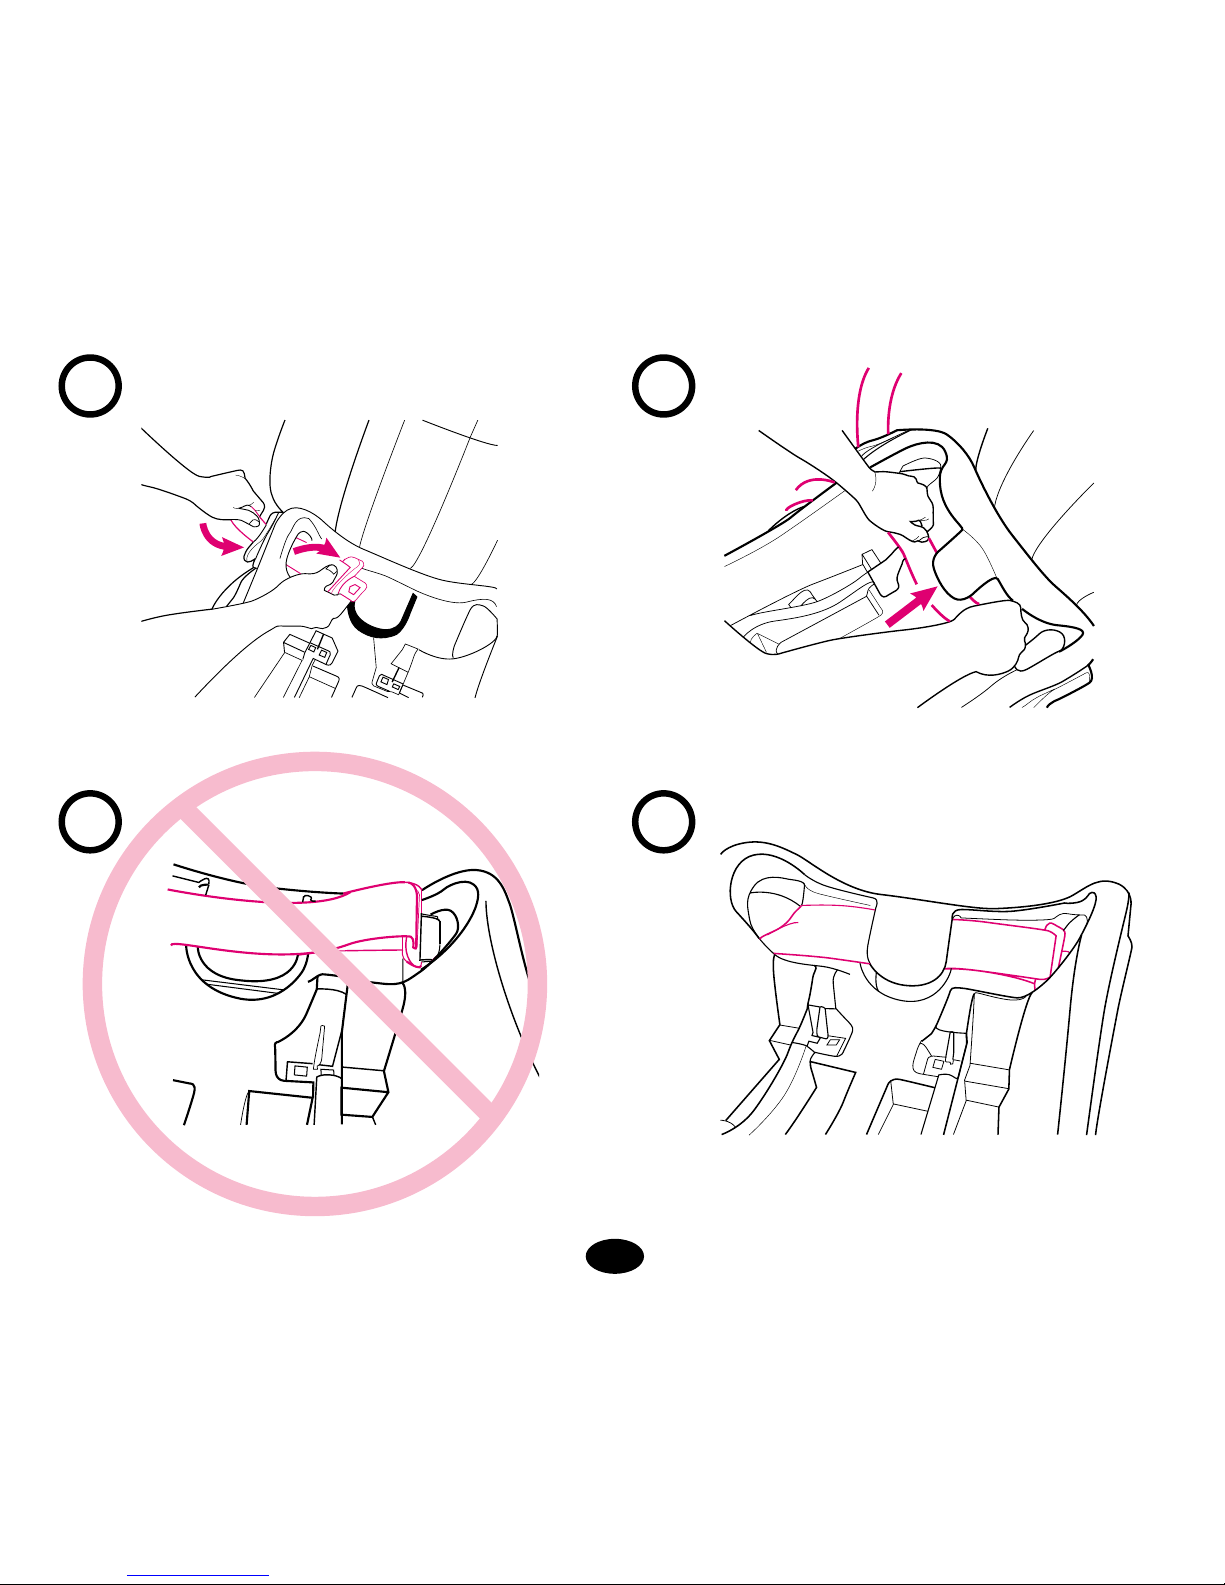
Step 4.
Slide strap under the centre lap belt
guide as shown.
Step 5.
Buckle the vehicle belt, press down
on base with your knee and pull
vehicle belt tight to secure base.
DO NOT allow vehicle belt
straps or car seat straps to
become twisted. Keep them flat.
CHECK the buckle contact point and
height.
Incorrect
Correct
If in doubt, contact either the car seat
manufacturer or the retailer.
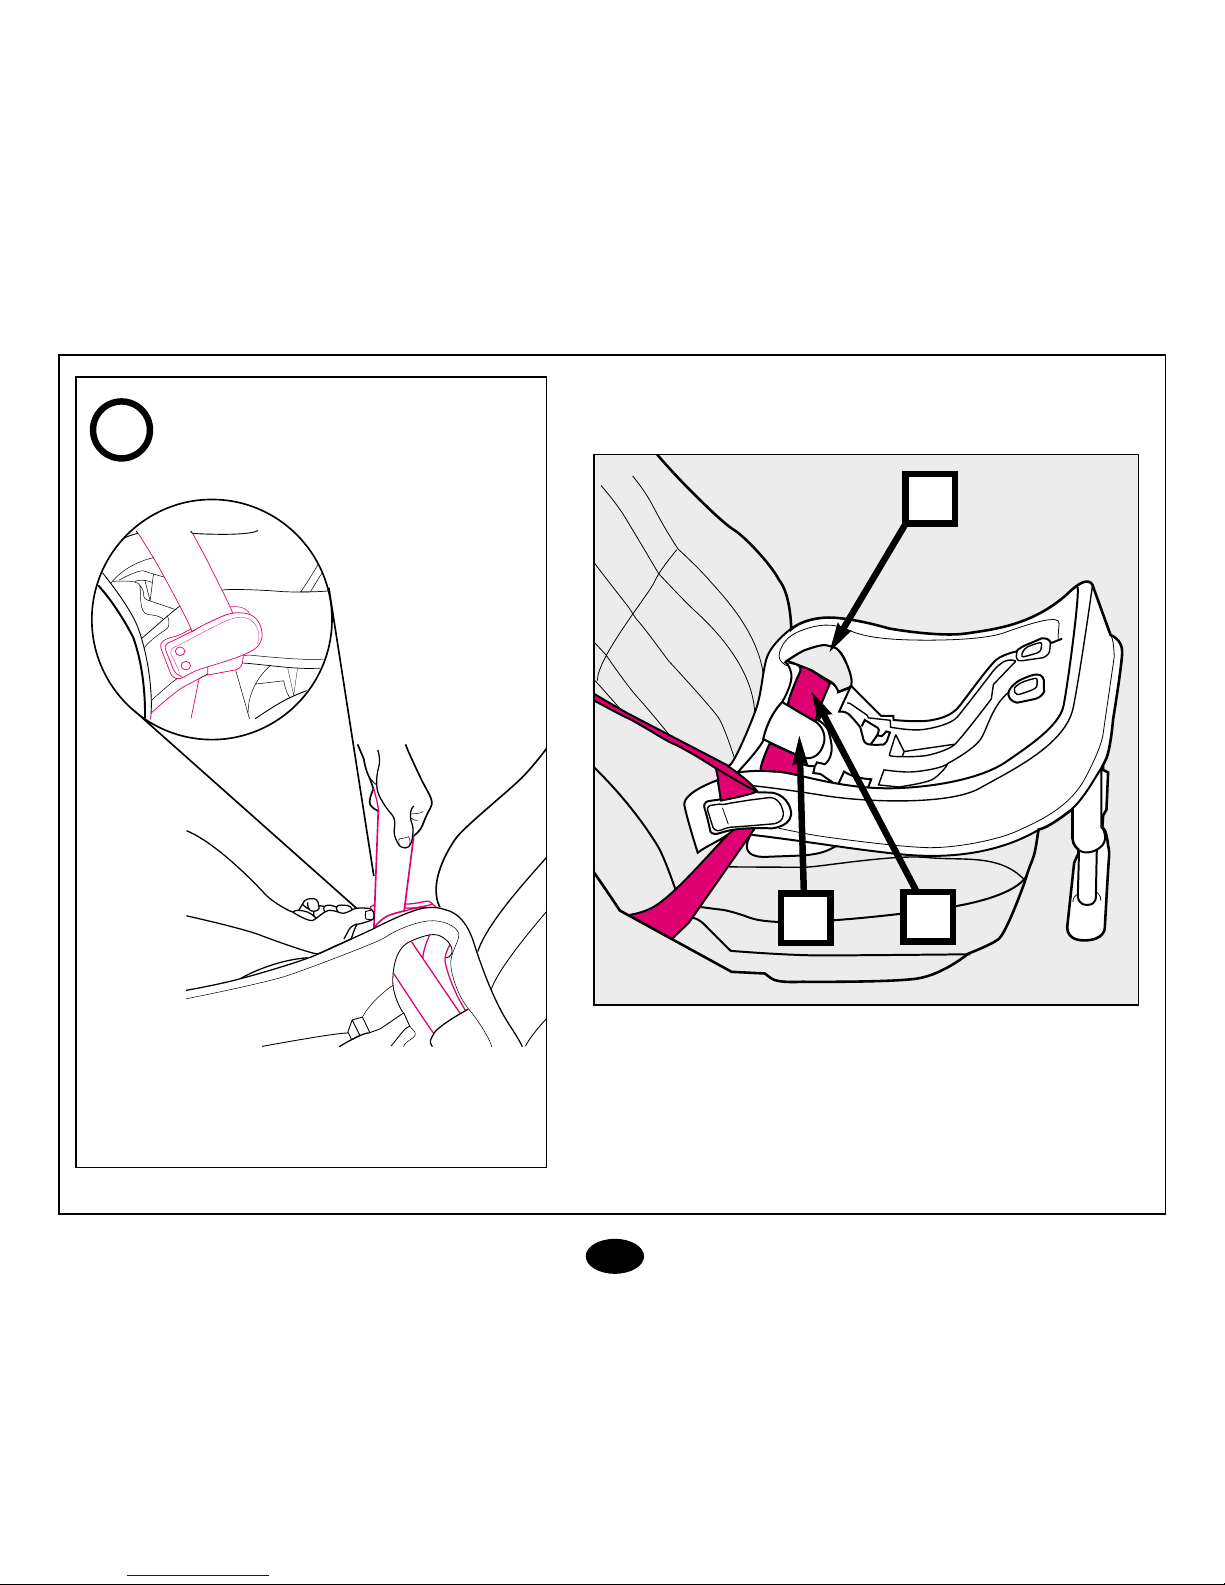
Step 6.
Clip shoulder belt into the shoulder
belt clip to prevent vehicle belt from
loosening.
WARNING: DO NOT catch shoulder
belt between car seat and base.
You must make sure shoulder belt
is out of the way.
Belt opening
Shoulder belt clip
Centre belt guide
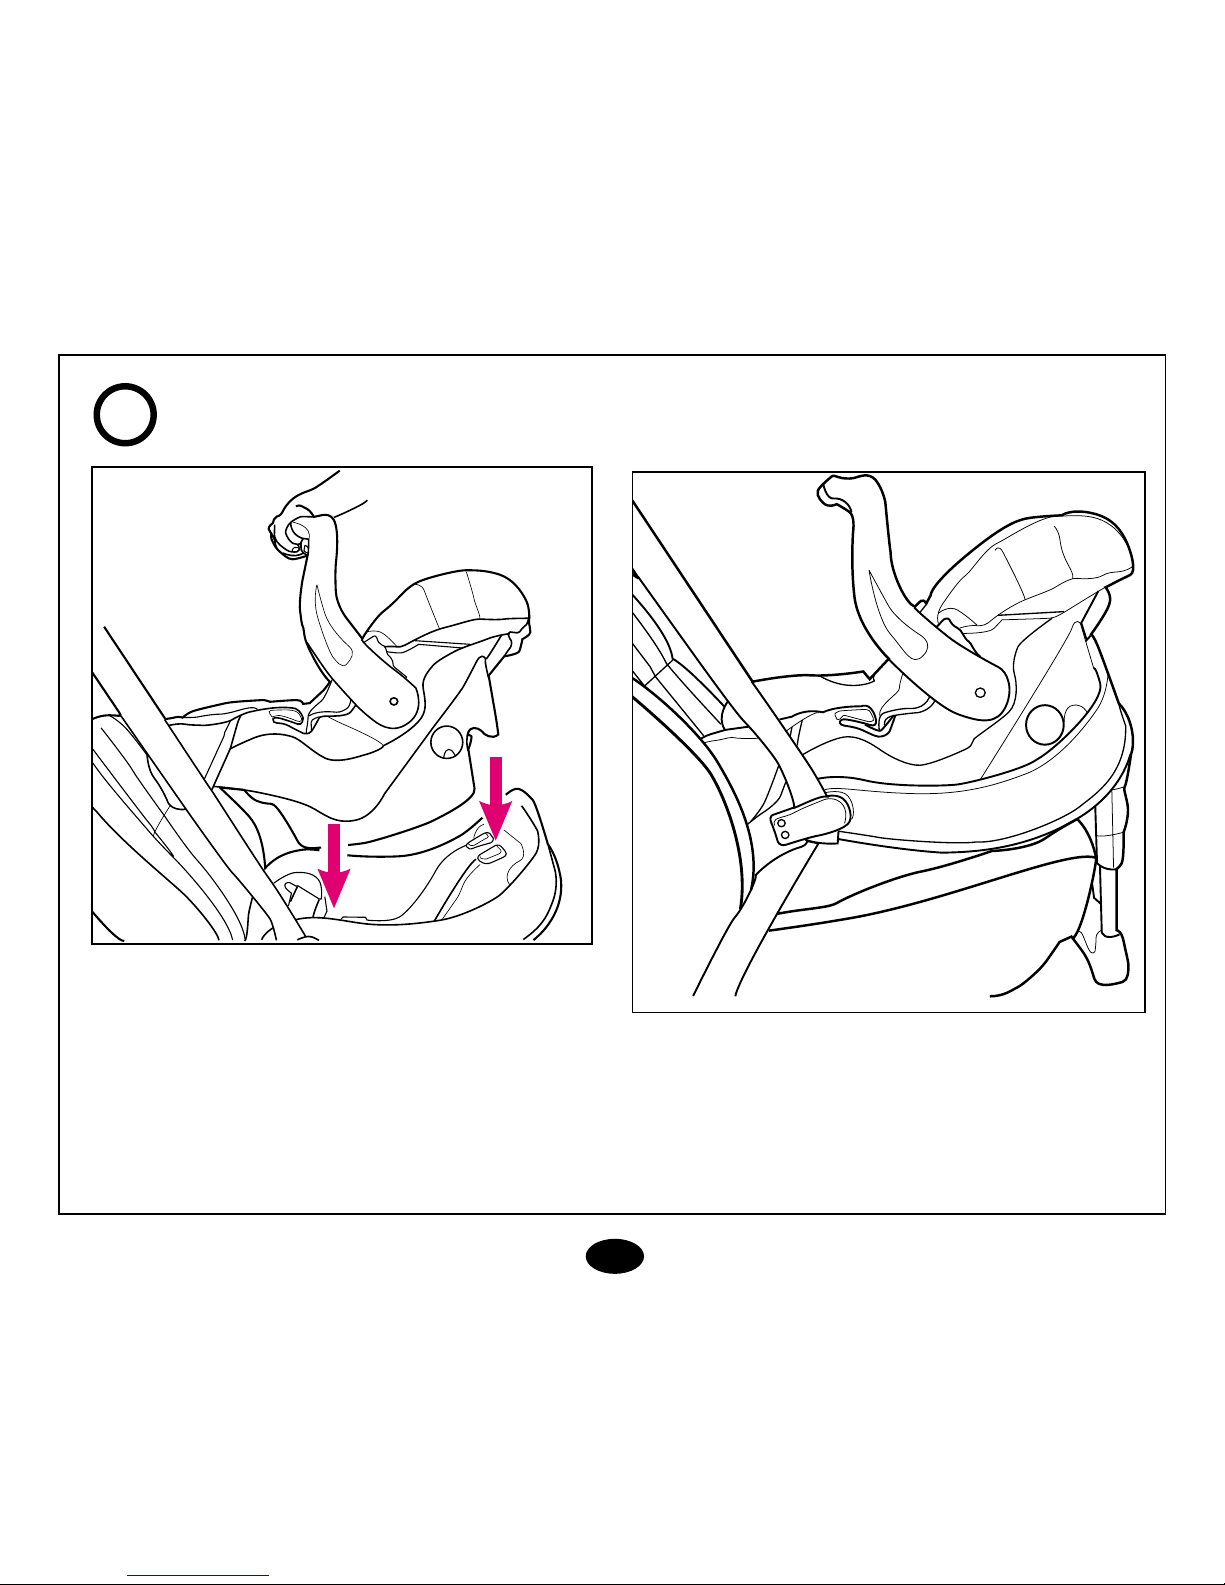
Step 7.
Push the car seat down until you hear
a “click”. Pull up on the car seat to be
sure it is securely latched into the
base.
DO NOT use the base if the car
seat does not latch securely.
24
25
26
28
D
E
F
27
29

29
Step 8.
To fold the load leg for storage,
remove the car seat from the base
and press the two knobs down to
release.
WITH OR WITHOUT BASE:
Tighten belt as snugly as possible.
Twist and pull on car seat to be sure
the vehicle belt holds it tightly.
WARNING: DO NOT use car seat in
any vehicle seat position where
vehicle belt does not hold car seat
tightly.
NEVER leave a car seat or base
unsecured in your vehicle. A loose
car seat or base could be thrown
into a passenger in a sudden stop
or crash and cause serious injury
or death.
Using the
level indicator
Attached to the side of your car seat
is a level indicator to help properly
recline the car seat on the vehicle
seat. It is very important for your
child’s safety that your car seat be
properly reclined. Proper use of the
level indicator requires that your
vehicle be parked on level ground
during installation of the car seat.
DO NOT use car seat in a very
upright position. The child’s head
may drop forward and cause
breathing problems.
DO NOT use car seat in a very
reclined position. A crash could
put too much force on a child’s
neck and shoulders.
32
31
30
 Loading...