

Page 1
Do not install or use
this child restraint until
you read and understand
the instructions in this
manual.
FAILURE TO PROPERLY
USE THIS CHILD
RESTRAINT INCREASES
THE RISK OF SERIOUS
INJURY OR DEATH IN A
SUDDEN STOP OR CRASH.
ATLAS
CHILD RESTRAINT/BOOSTER SEAT
www.gracobaby.com
PD319294C 6/15
Page 2

2
1-A Quick Guide to Your Manual
1-B Welcome to the Graco Family
1-C Correct Mode of Use
1-D Before You Begin
Register This Car Seat
If You Need Help
Certification
Car Seat’s Useful Life
Vehicle Seat Protection
Warm Weather Use
1-E Safety Warnings
1 Important Pages 6-21
2 Features Pages 22-27
2-A Car Seat Features
Page 3
3
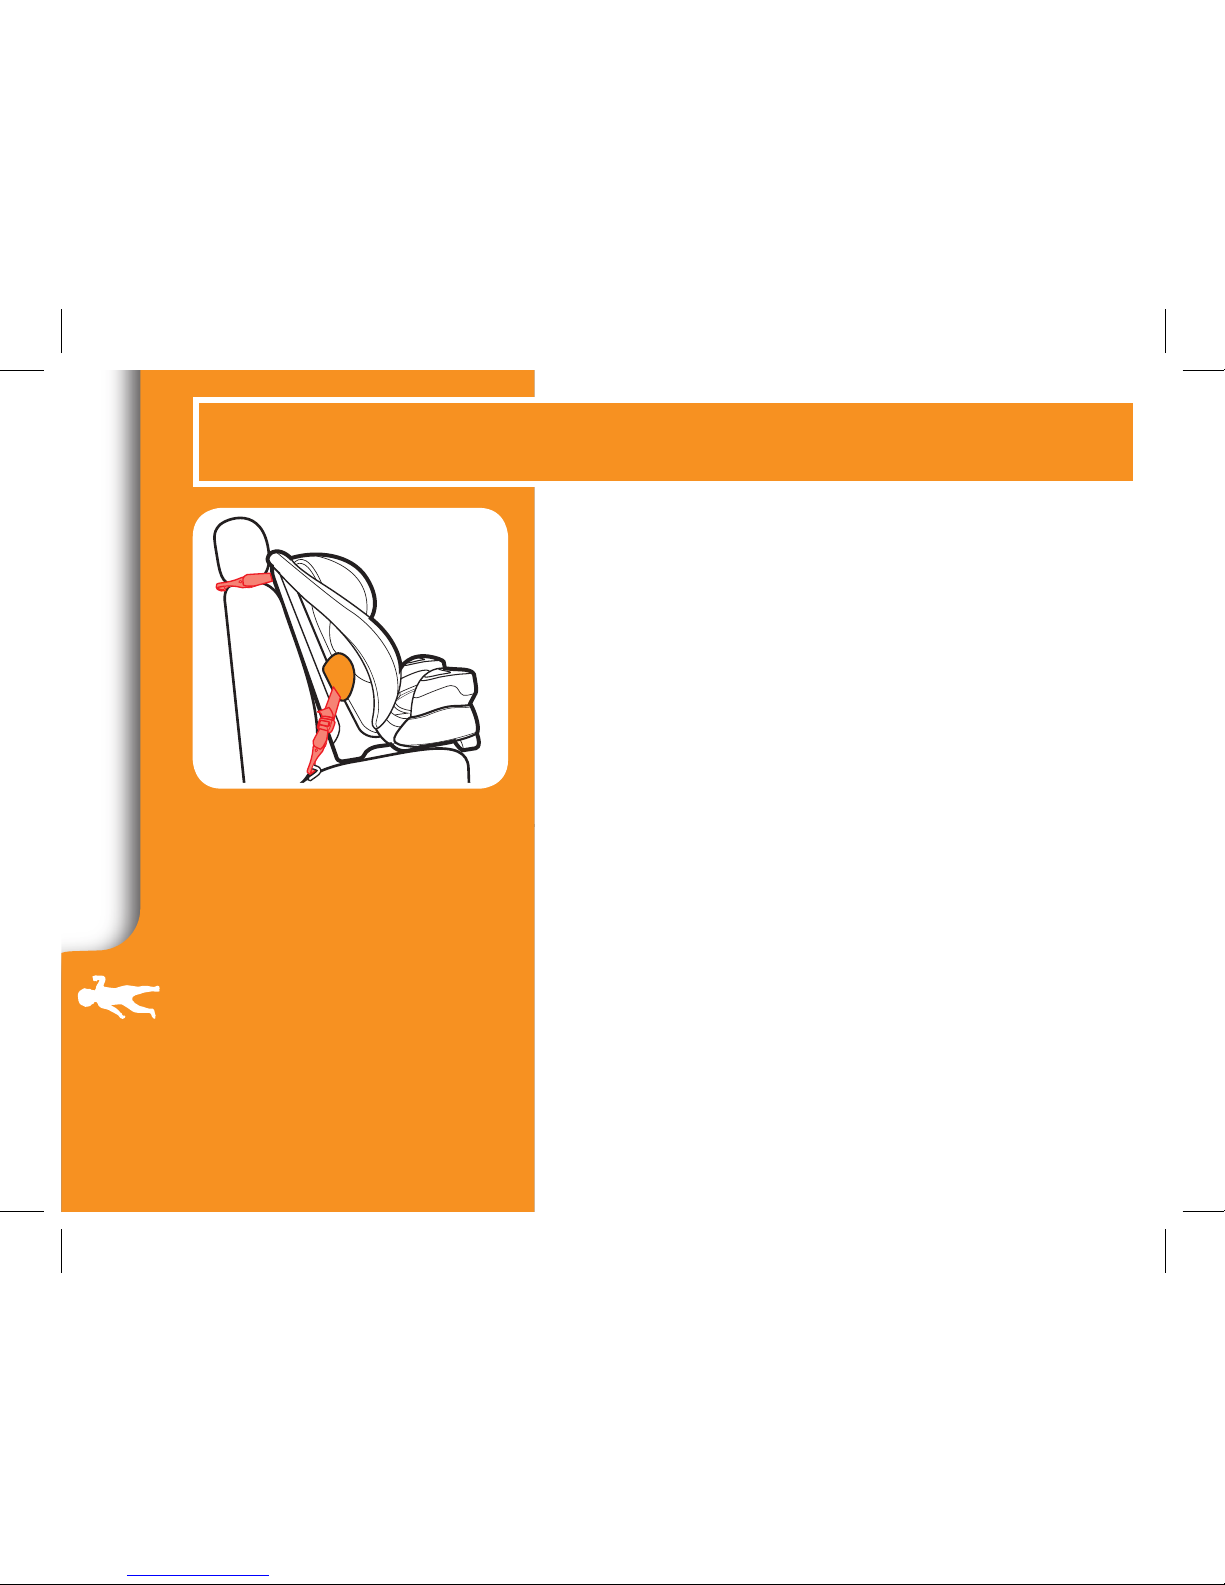
3-A Forward-Facing Use
3-B Install Forward-Facing with LATCH Straps
3-C Install Forward-Facing with the Vehicle Seat Belt
3 Forward-Facing Pages 28-39
4-A Booster Use
4-B Install Booster
4 Booster Pages 40-49
5-A Securing Child 5-Point Harness
5-B Securing Child Backed Booster
5-C Securing Child Backless Booster
5 Securing Child Pages 50-60
Page 4

4
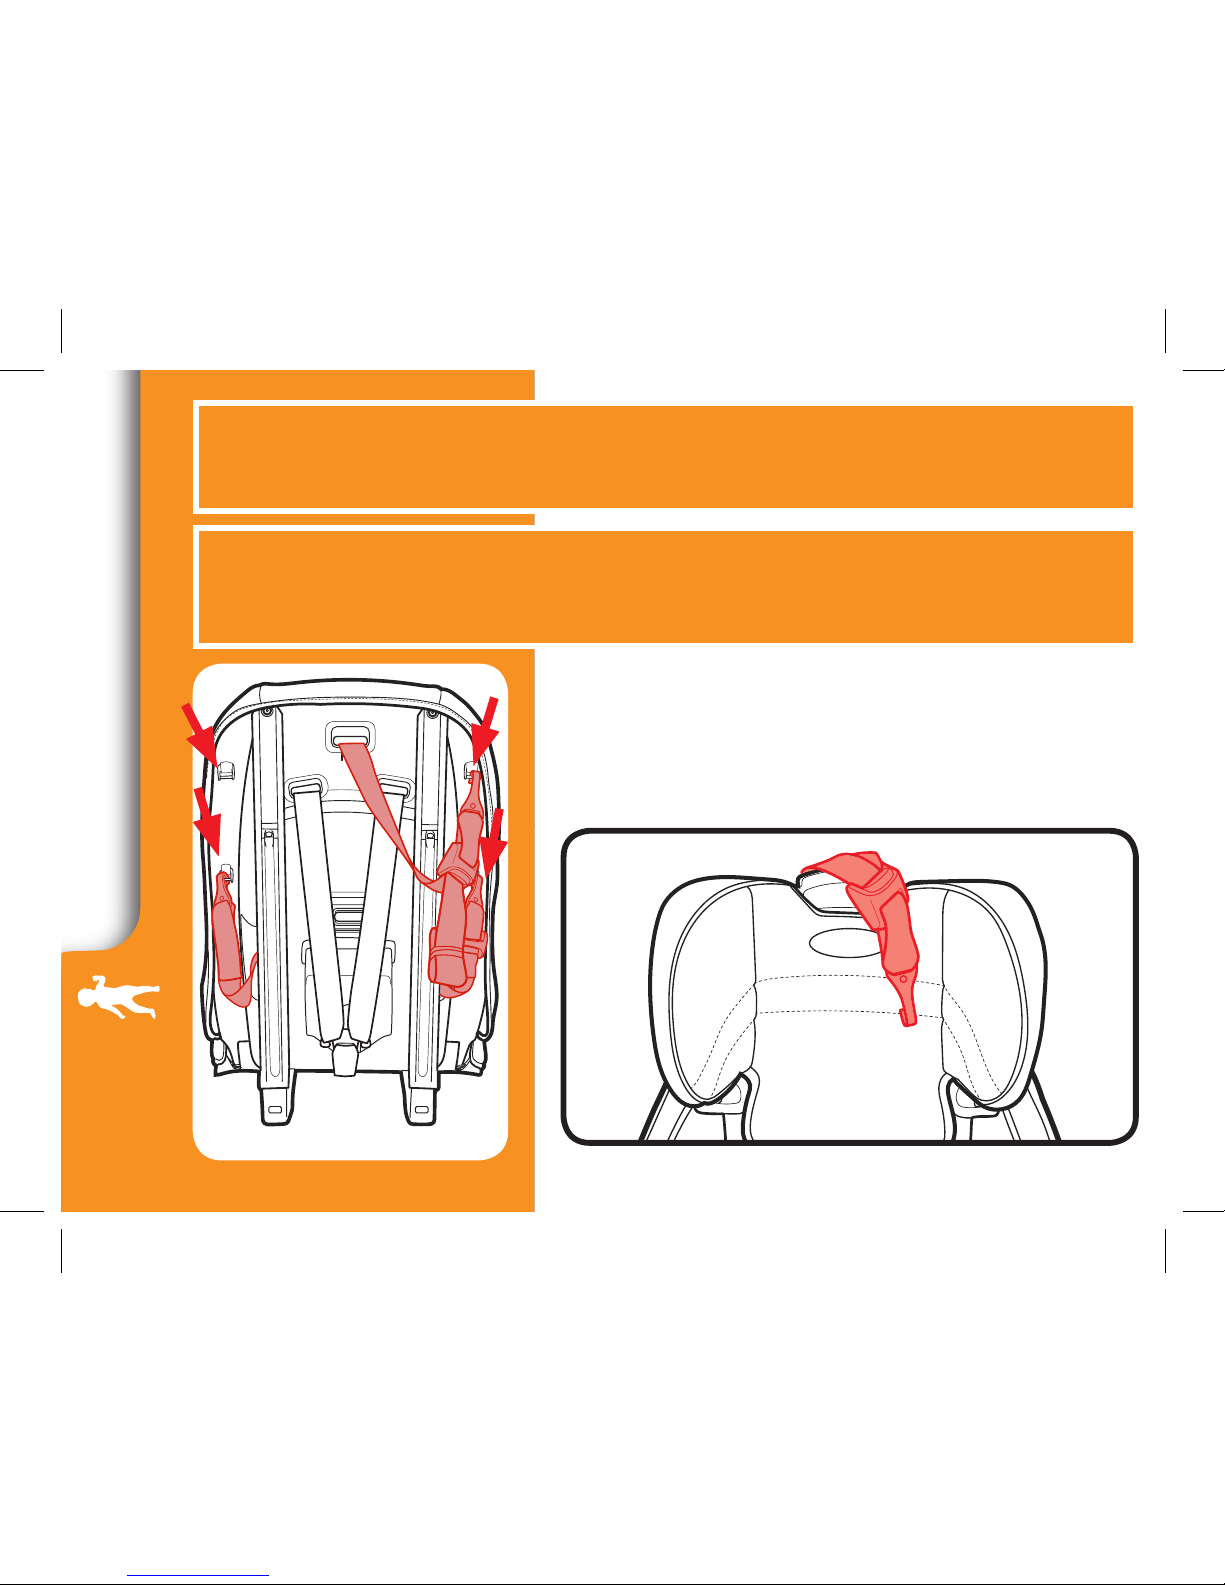
7-A How to Remove LATCH and Top Tether
7-B Choosing Vehicle Seat Location
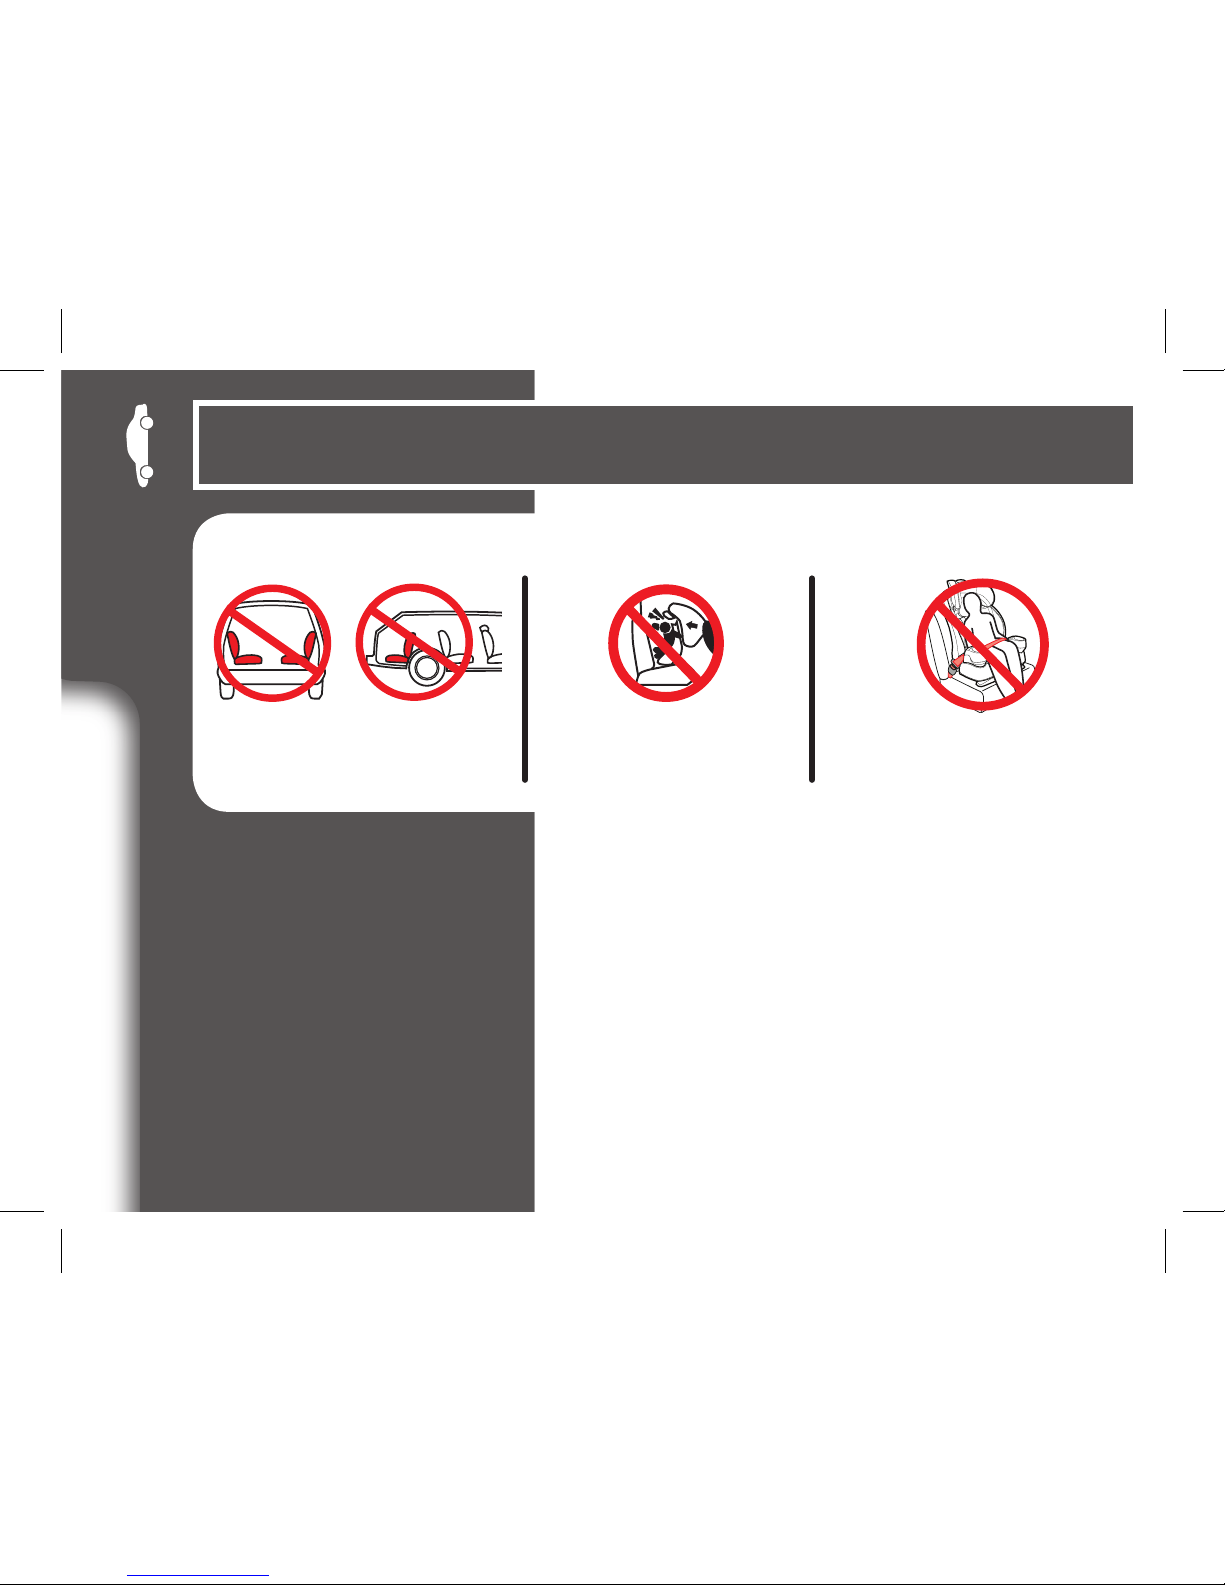
7-C Unsafe Vehicle Seat Location
7-D Vehicle Seat Belts
8-A Cleaning Seat Pad
8-B Cleaning Buckle Strap
8-C Cleaning Harness and LATCH Straps
7 Vehicle Information Pages 62-72
6 Accessories Page 61
8 Care & Cleaning Pages 73-77
Page 5
5
1-A Quick Guide to Your Manual
This car seat is for children: Forward-Facing: 22-65 lb (10-30 kg)
Booster: 30-100 lb (14-45 kg)
Car Seat Assembly (On Select Models)
Adult Assembly Required
Cup Holders
To attach cup holders, hook the front of the
cup holder to the shell and rotate it back until it
snaps into place.
Page 6
6
Get to Know Your Car Seat
What Seating Location Should I Use?
Review section 2-A to see all of the features of this car seat.
The best seating location for this car seat is one that:
• Is recommended by your vehicle owner’s manual, and
• Results in a secure installation of this car seat.
Some vehicles have specific requirements for where the car seat can be
installed, so be sure to check your vehicle owner’s manual for available
seating positions, if any. For example, sometimes the center rear seat has a
lap belt only vehicle seat belt, which cannot be used when this car seat is in
Booster mode.
Review section 7-B, 7-C of this manual AND your vehicle owner’s manual.
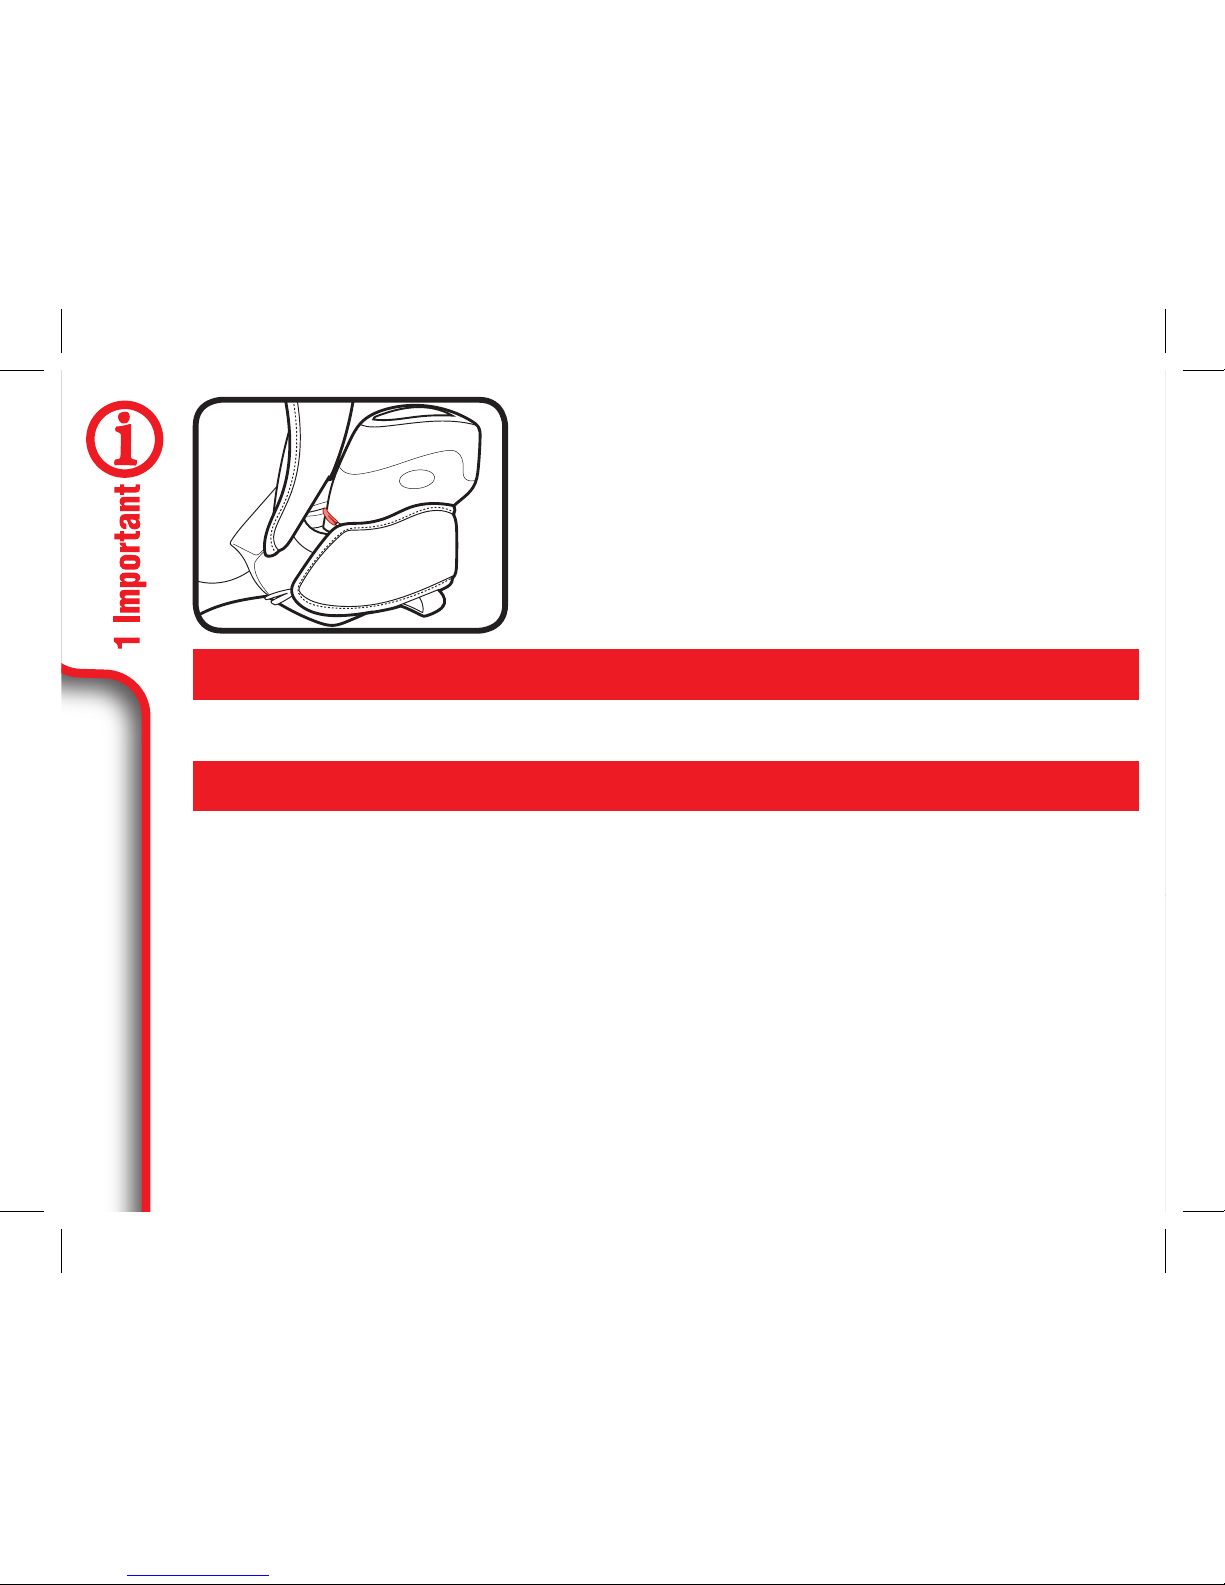
6. Attach Seat Pad Side Loops
Pull elastic loop on the seat pad through the
vehicle belt guide on side of seat and attach
to hook as shown. Repeat on other side.
Page 7
7
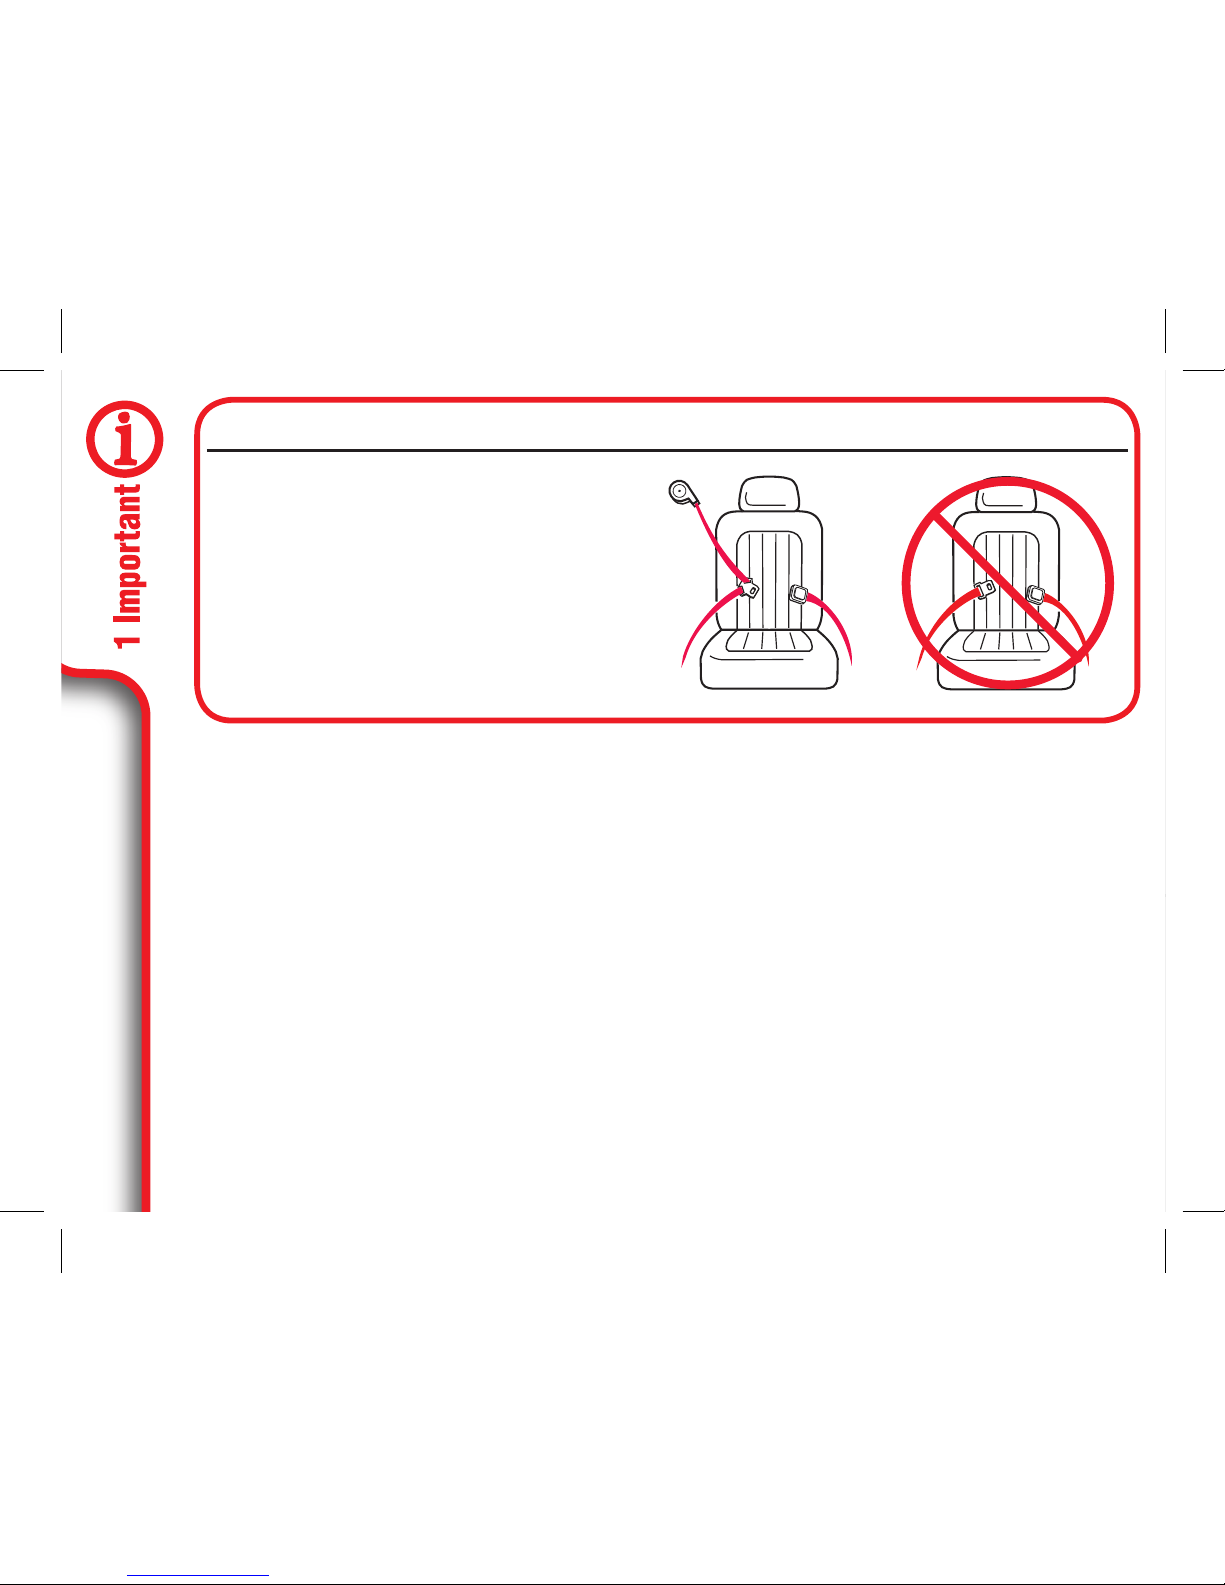
Which Installation Method Should I Use?
This car seat can be installed in your vehicle using either the vehicle seat belt
OR the lower anchor attachment. Both are equally safe to use. DO NOT USE
BOTH AT THE SAME TIME.
Vehicle Seat Belt: Review section 7 and your vehicle owner’s manual to
learn how to install your car seat with the vehicle seat belts.
LATCH: The LATCH system allows you to securely attach your car seat
in your car without using the vehicle seat belt. All 2003 and newer model
year vehicles are required to have lower anchor bars, although some
manufacturers began including them earlier. Some vehicle owner manuals
use the term ISOFIX to identify them.
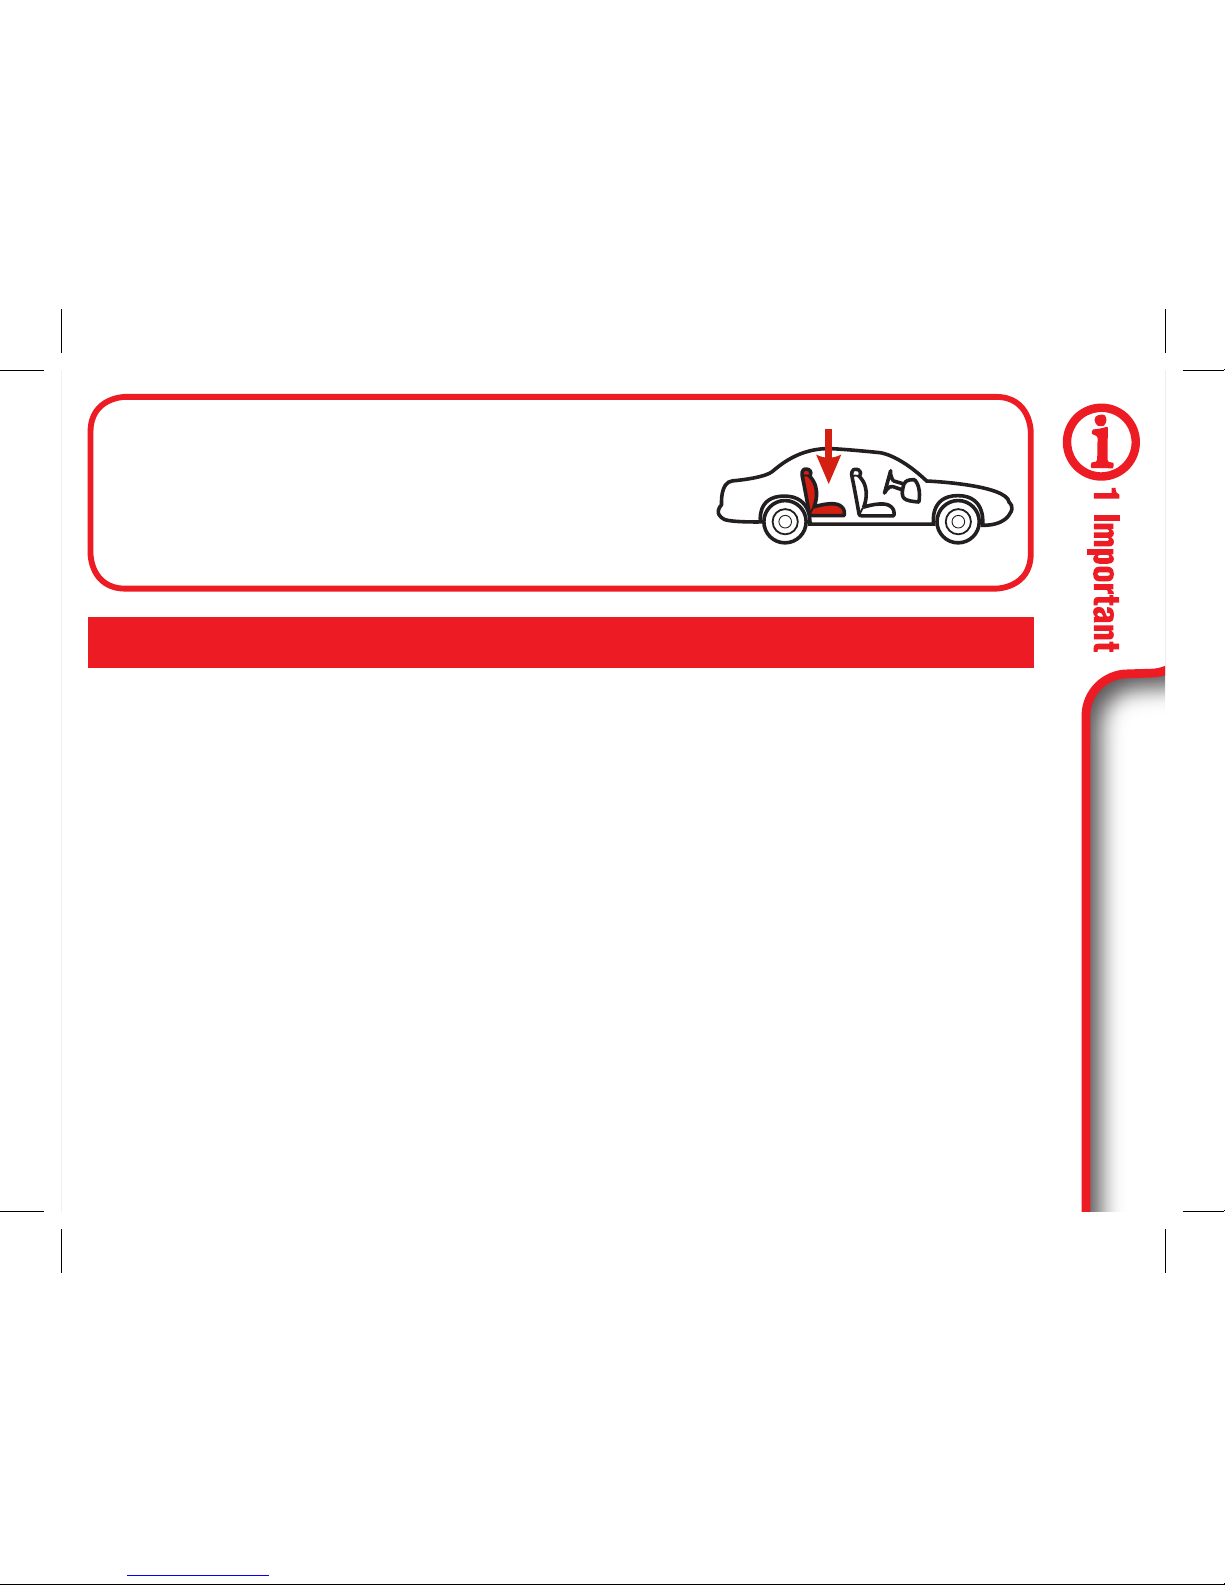
According to accident statistics, the safest
place for your child in any vehicle is the
back seat. The center of the back seat can
be the safest during a possible side impact.
Page 8
8
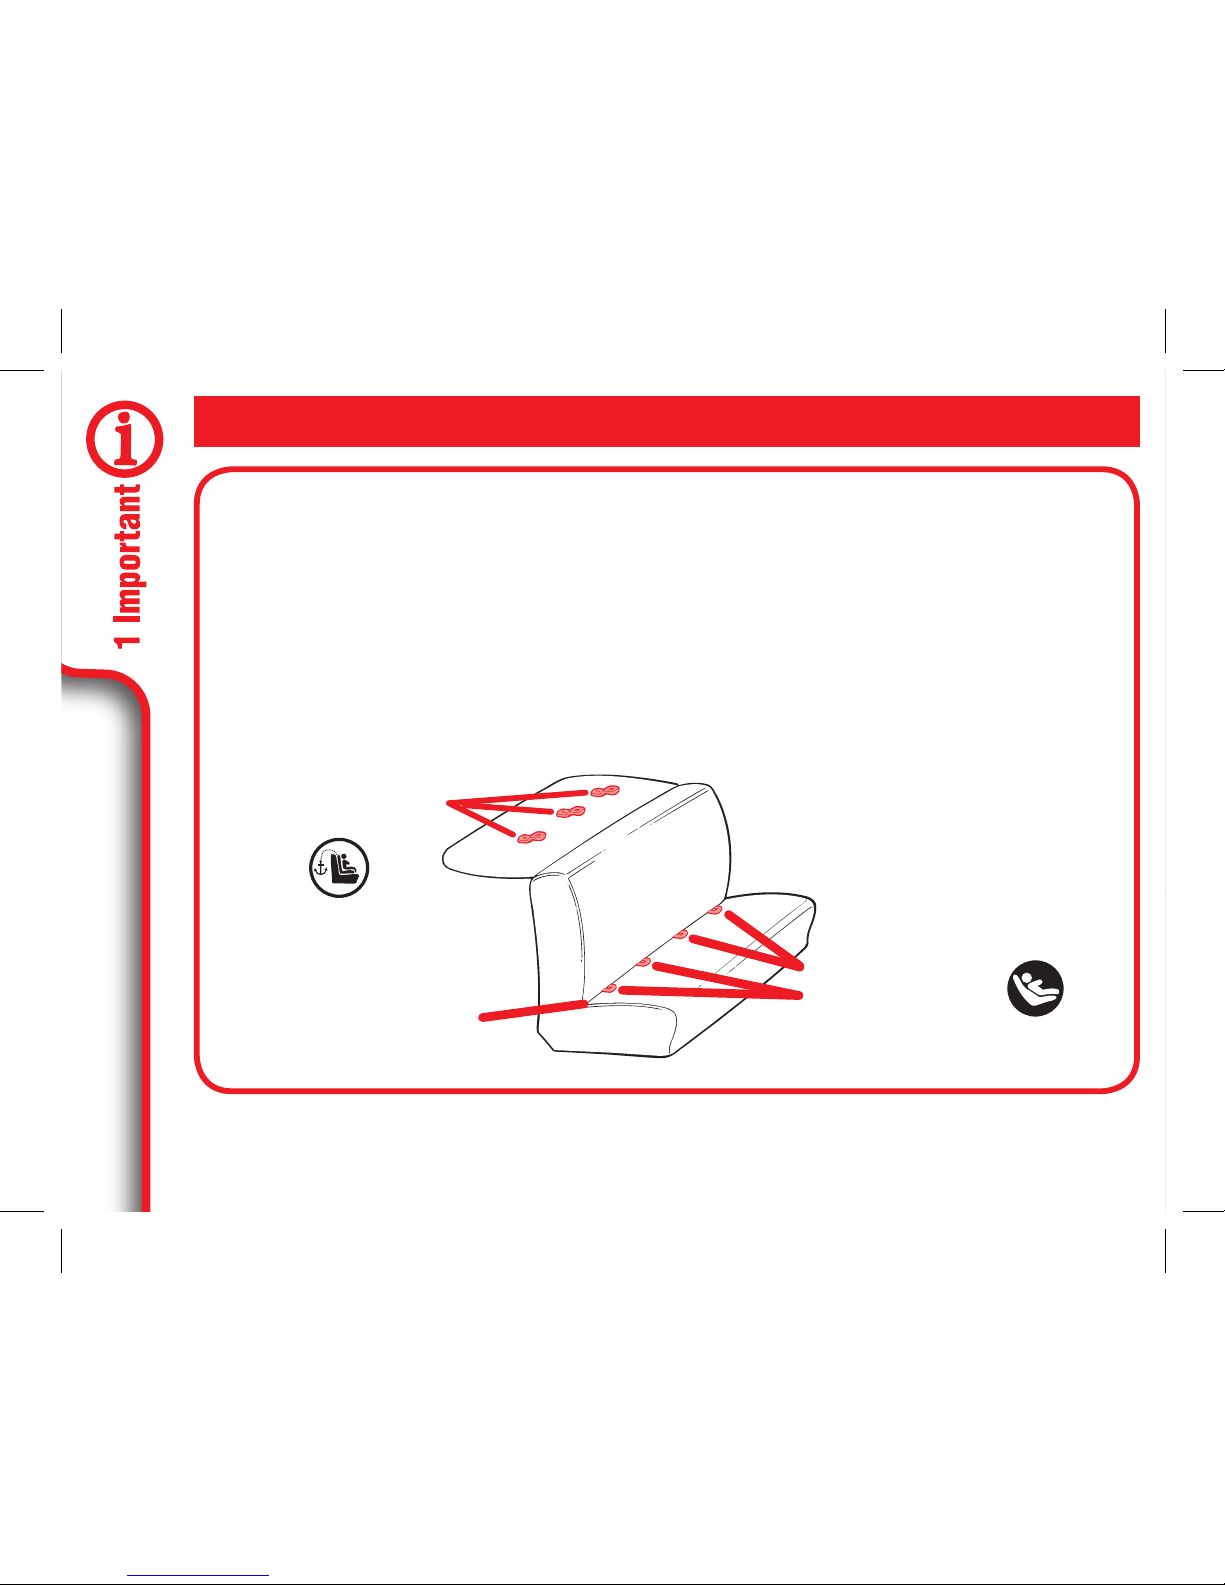
LATCH consists of lower anchor bars and a tether anchorage bar, which
are built-in to your vehicle, and connecting hooks that are built-in to your
car seat. Lower anchors are used INSTEAD of the vehicle’s seat belt to
secure the child seat to the vehicle. The tether is used IN ADDITION to the
lower anchors OR the vehicle’s seat belt to secure a forward-facing car
seat to the vehicle.
Review your vehicle’s owner manual for exact location and use.
What is LATCH?
Vehicle Tether
Anchorage Bars
Vehicle Lower
Anchor Bars
Typical seat in a passenger
vehicle. Other vehicle types
may have different lower
anchor bar locations.
Vehicle Seat Bight
Page 9

9
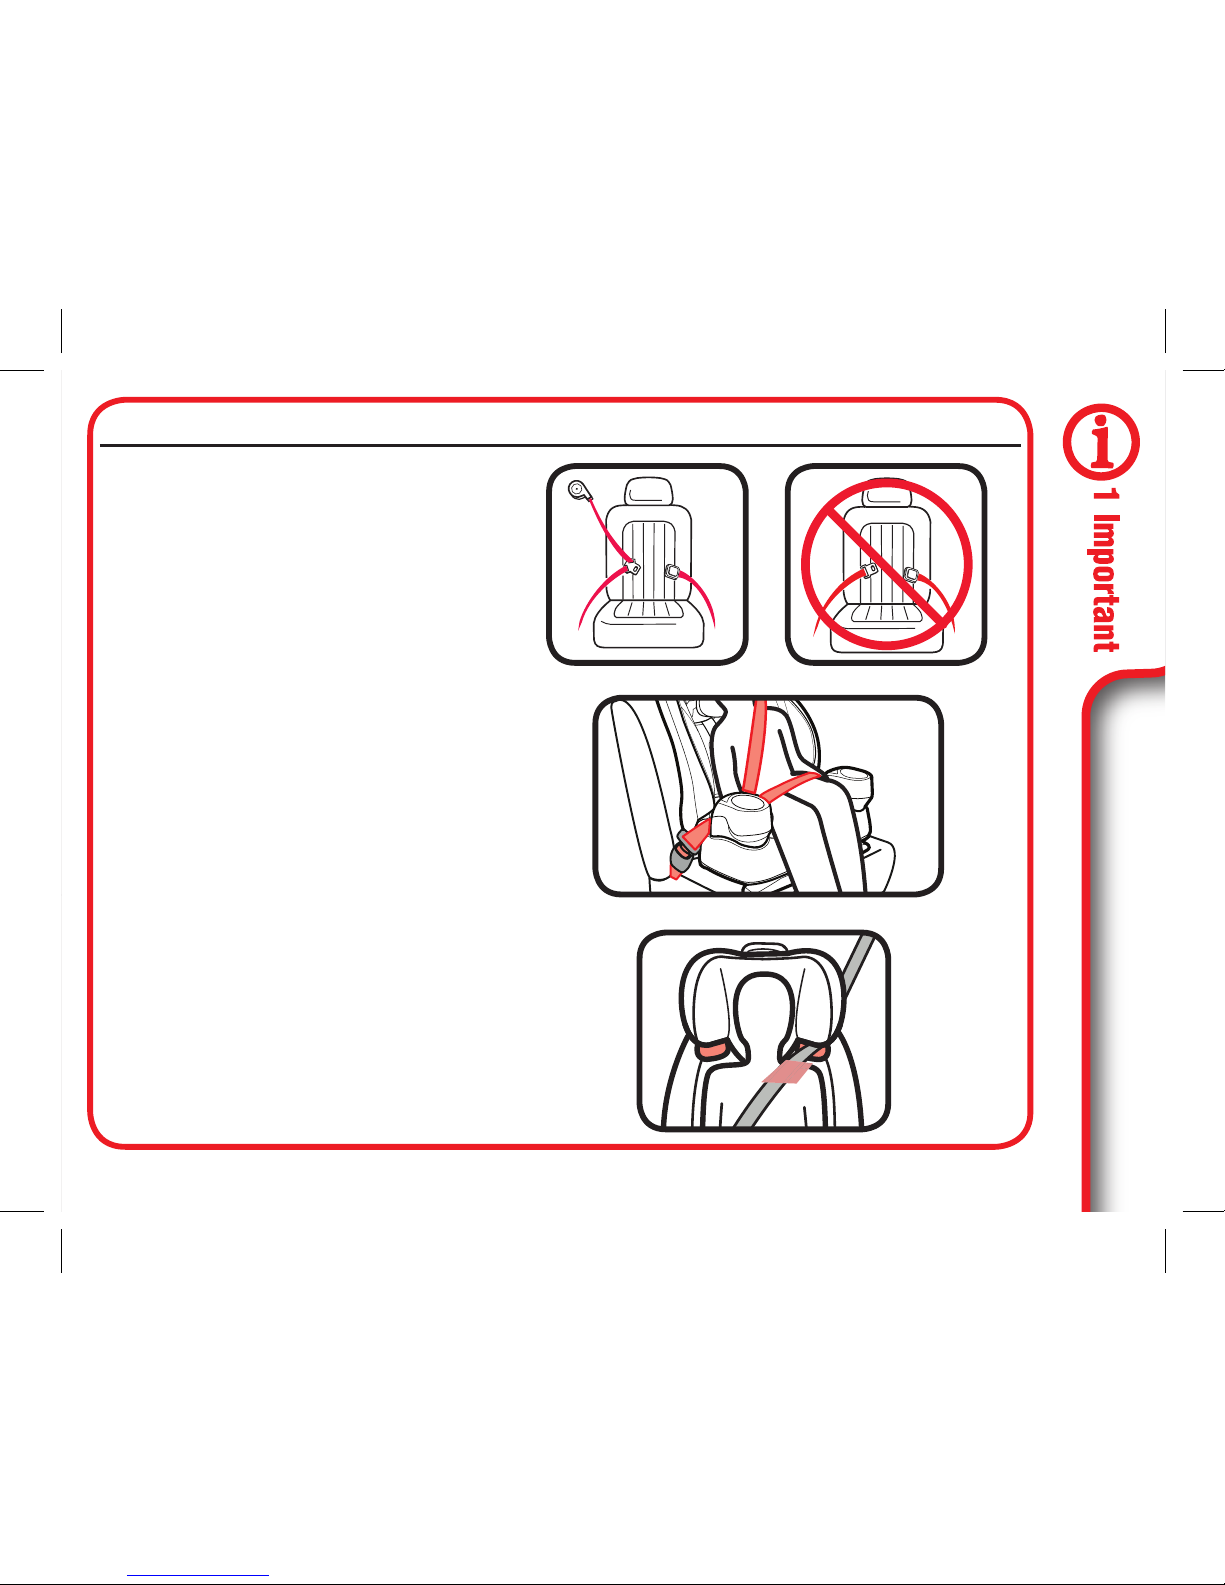
When Installing Forward-Facing
Vehicle Seat Belt
There are two types of vehicle seat belts
that can be used. Lap/Shoulder Seat Belt
or Lap Only Seat Belt.
Review section 3-C of this manual AND
your vehicle owner’s manual.
LATCH System
LATCH consists of lower anchor bars,
which are built-in to your vehicle, and
connecting hooks that are built-in your car
seat.
Review section 3-B of this manual AND
your vehicle owner’s manual.
Using The Car Seat Correctly
To make sure your child is secured properly, review section 3 and 4 to fit
your child.
Page 10
10
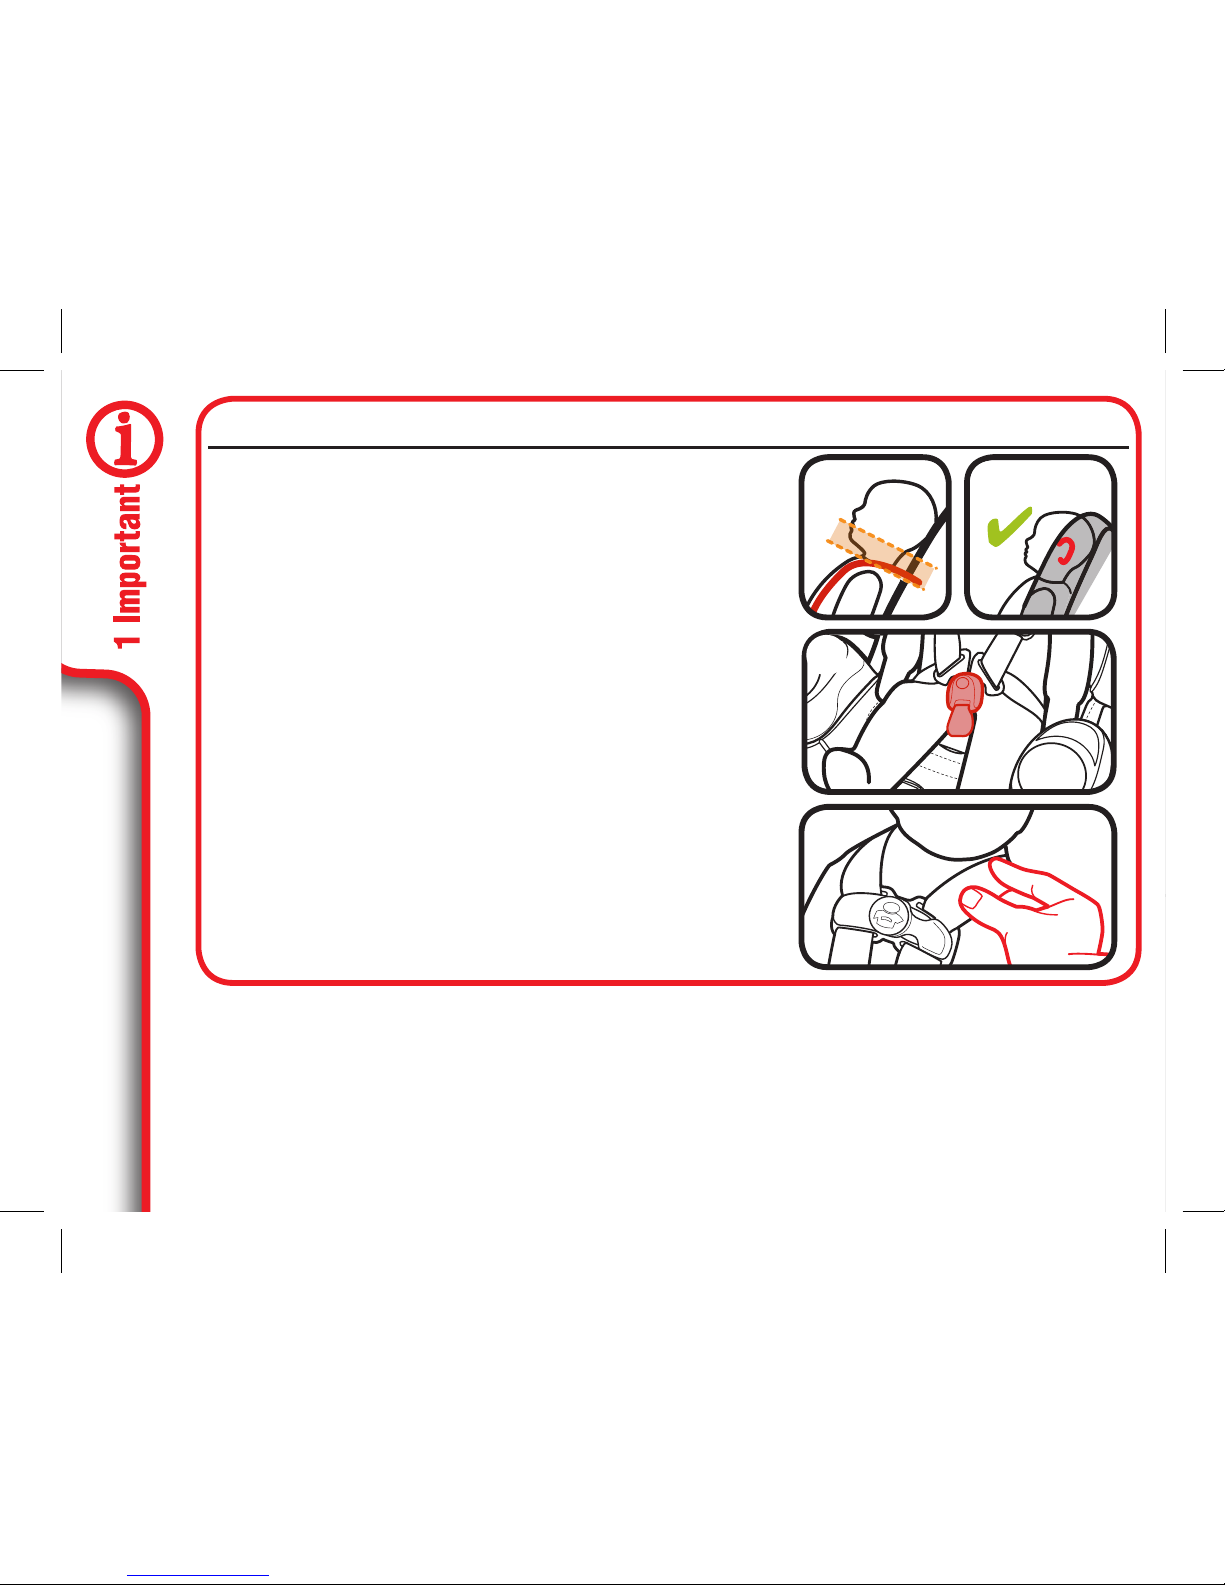
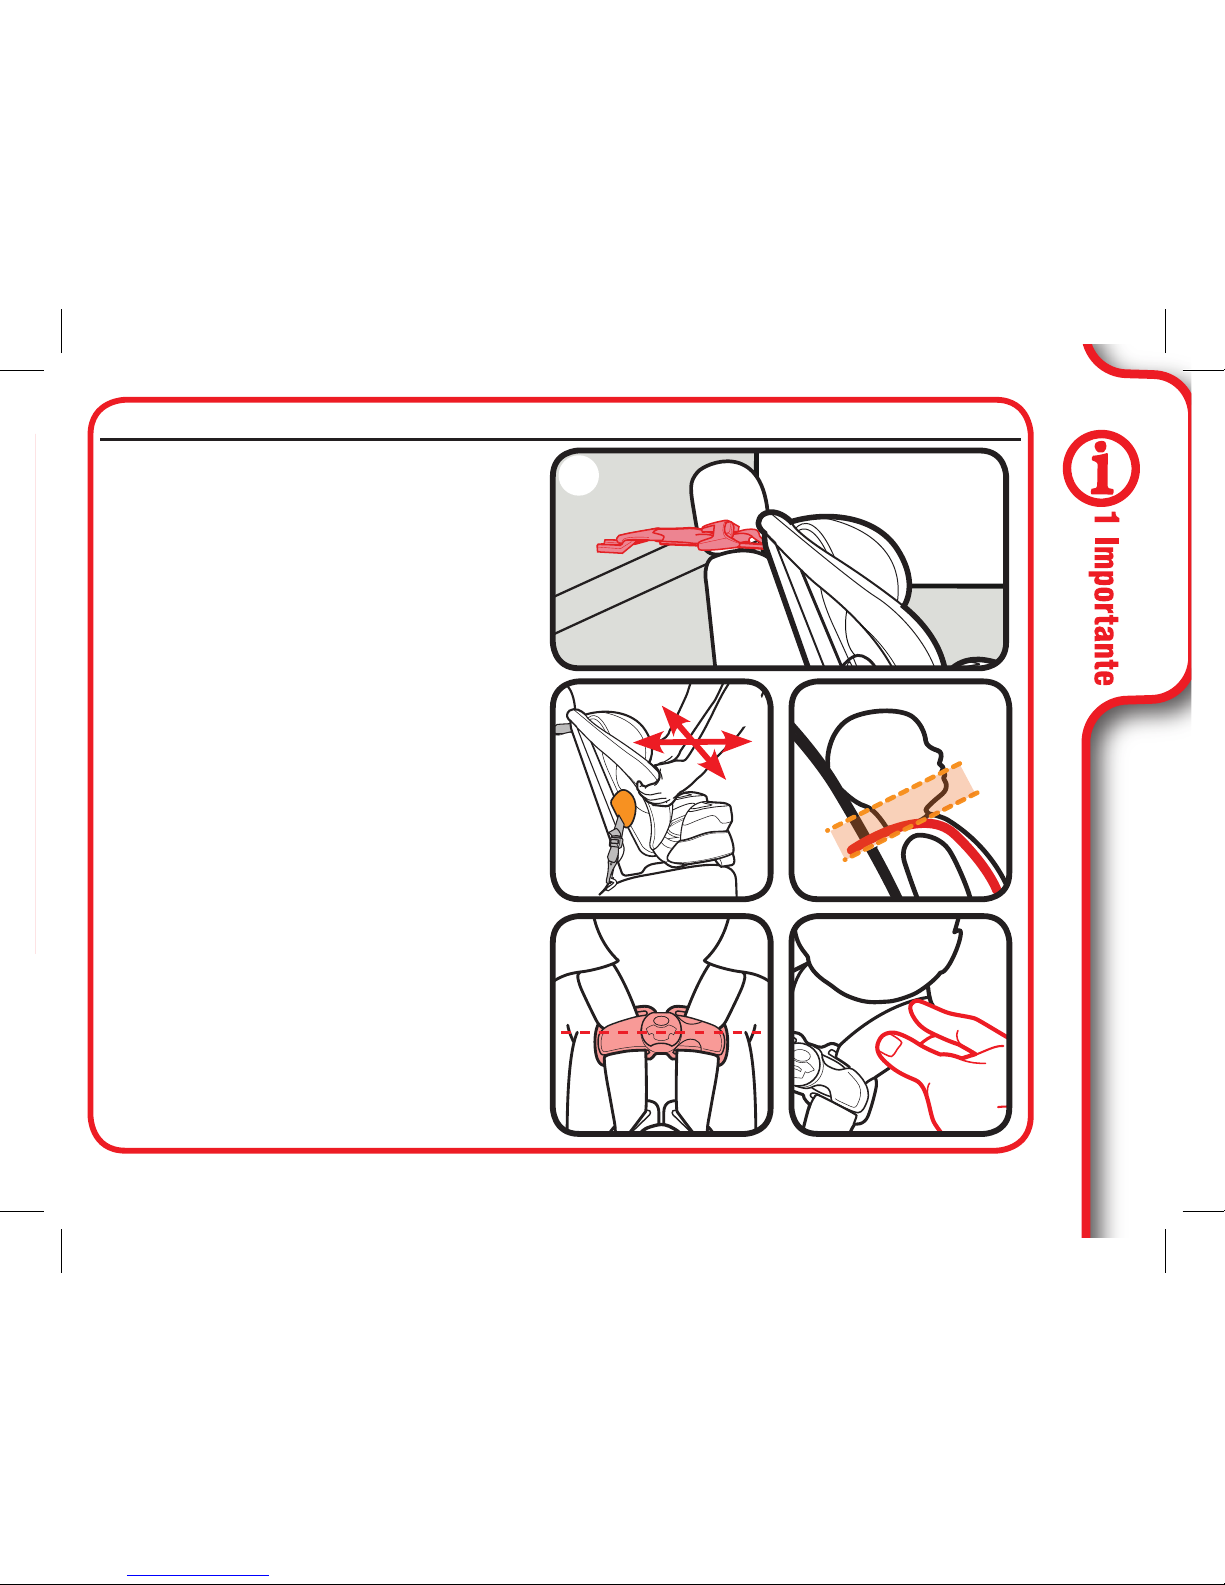
Harness Height, Forward-Facing (A)
Harness straps at or just above the child’s
shoulders and top of child’s ears below top of
headrest (B). Review section 3.
Buckle Position (C)
The correct slot is the one that is closest to
your child without being underneath them.
Review section 3.
Harness Tightness (D)
If your fingers slide off the harness straps
without pinching the straps, it is tight enough.
Review section 3.
For Forward-Facing, You Need to Adjust:
A
C
B
D
Page 11
11
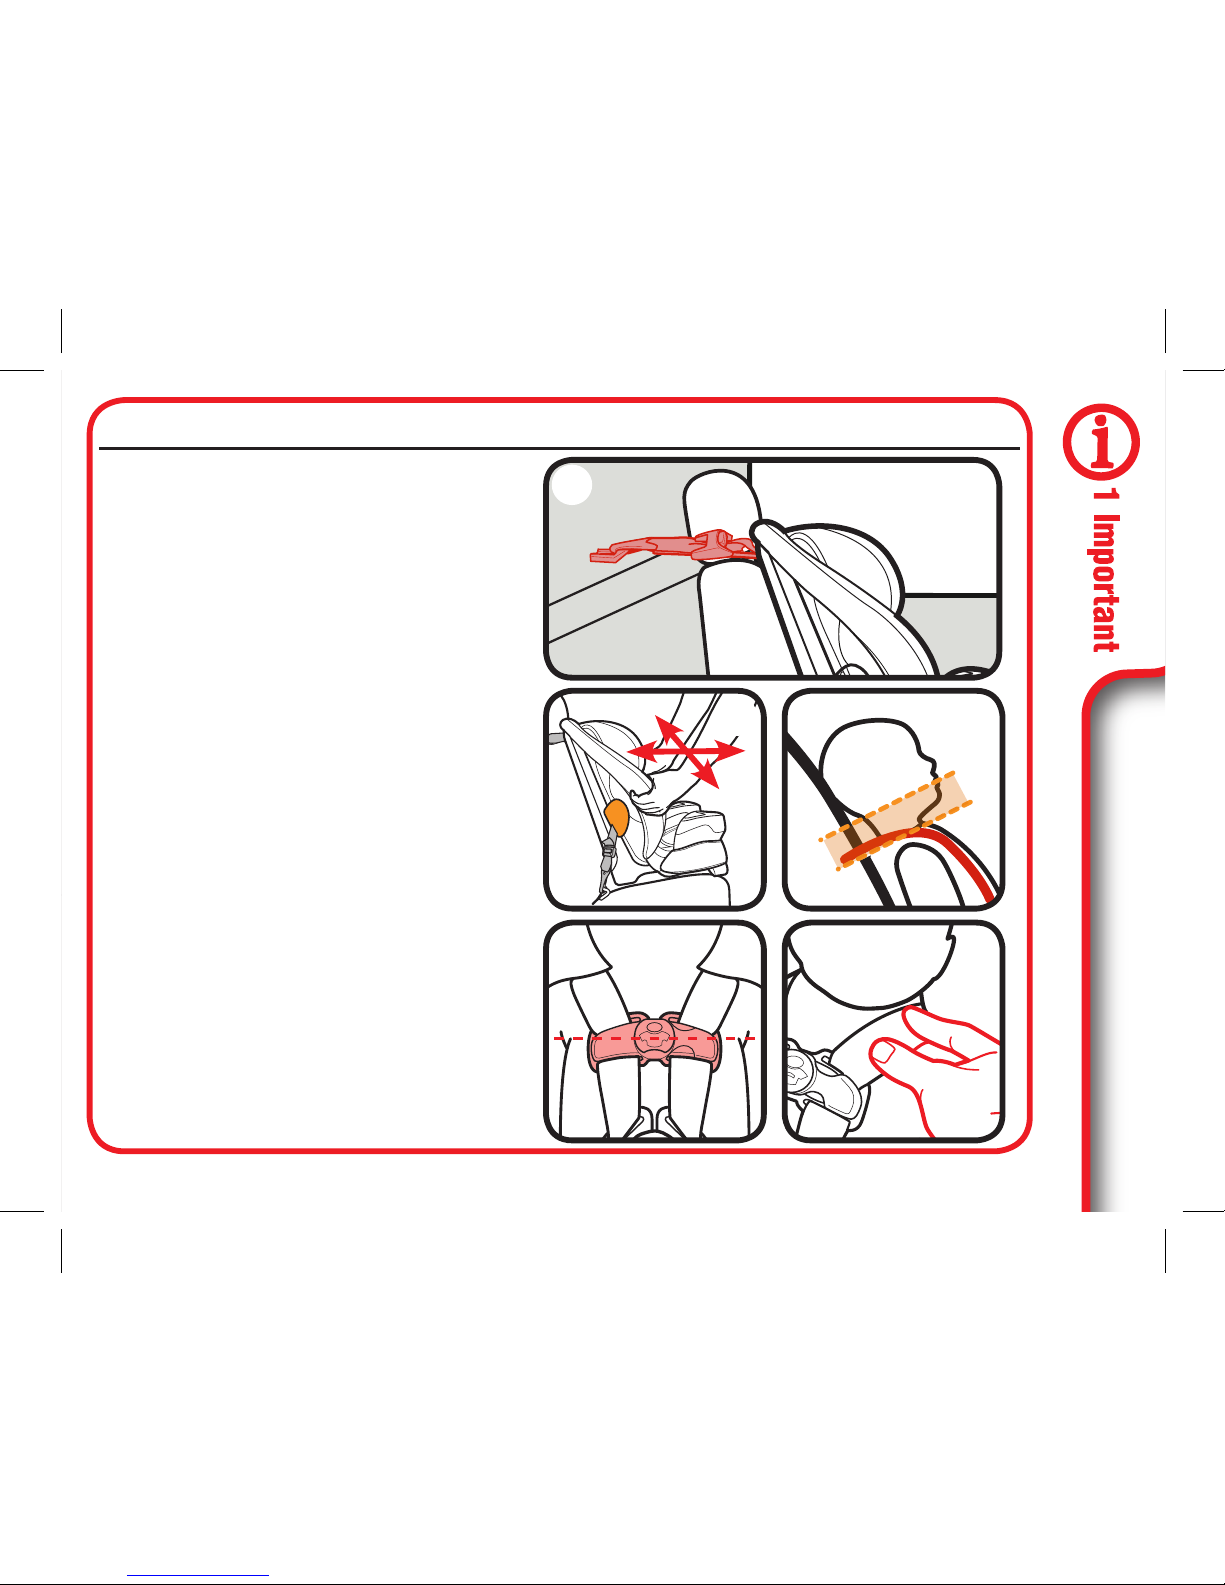
Use the top tether strap when
using forward-facing (A)
When used properly, the top tether
helps reduce injury in a sudden
stop or crash.
Review section 3
Car Seat Does Not Move More
than 1” (2.5 cm) at the Belt
Path (B)
Review section 3
Harness Straps at or Just
Above Child’s Shoulders (C)
Review section 3
Chest Clip Even With Armpits (D)
Review section 3
Cannot Pinch Harness Straps
at the Shoulder (E)
Review section 3
Forward-Facing Installation
B
A
D E
C
Page 12
12
Vehicle Seat Belt
Only use the Lap/Shoulder seat
belt configuration.
Review section 4-B, 4-C of this
manual AND your vehicle owner’s
manual.
When Installing As a Booster
Page 13
13
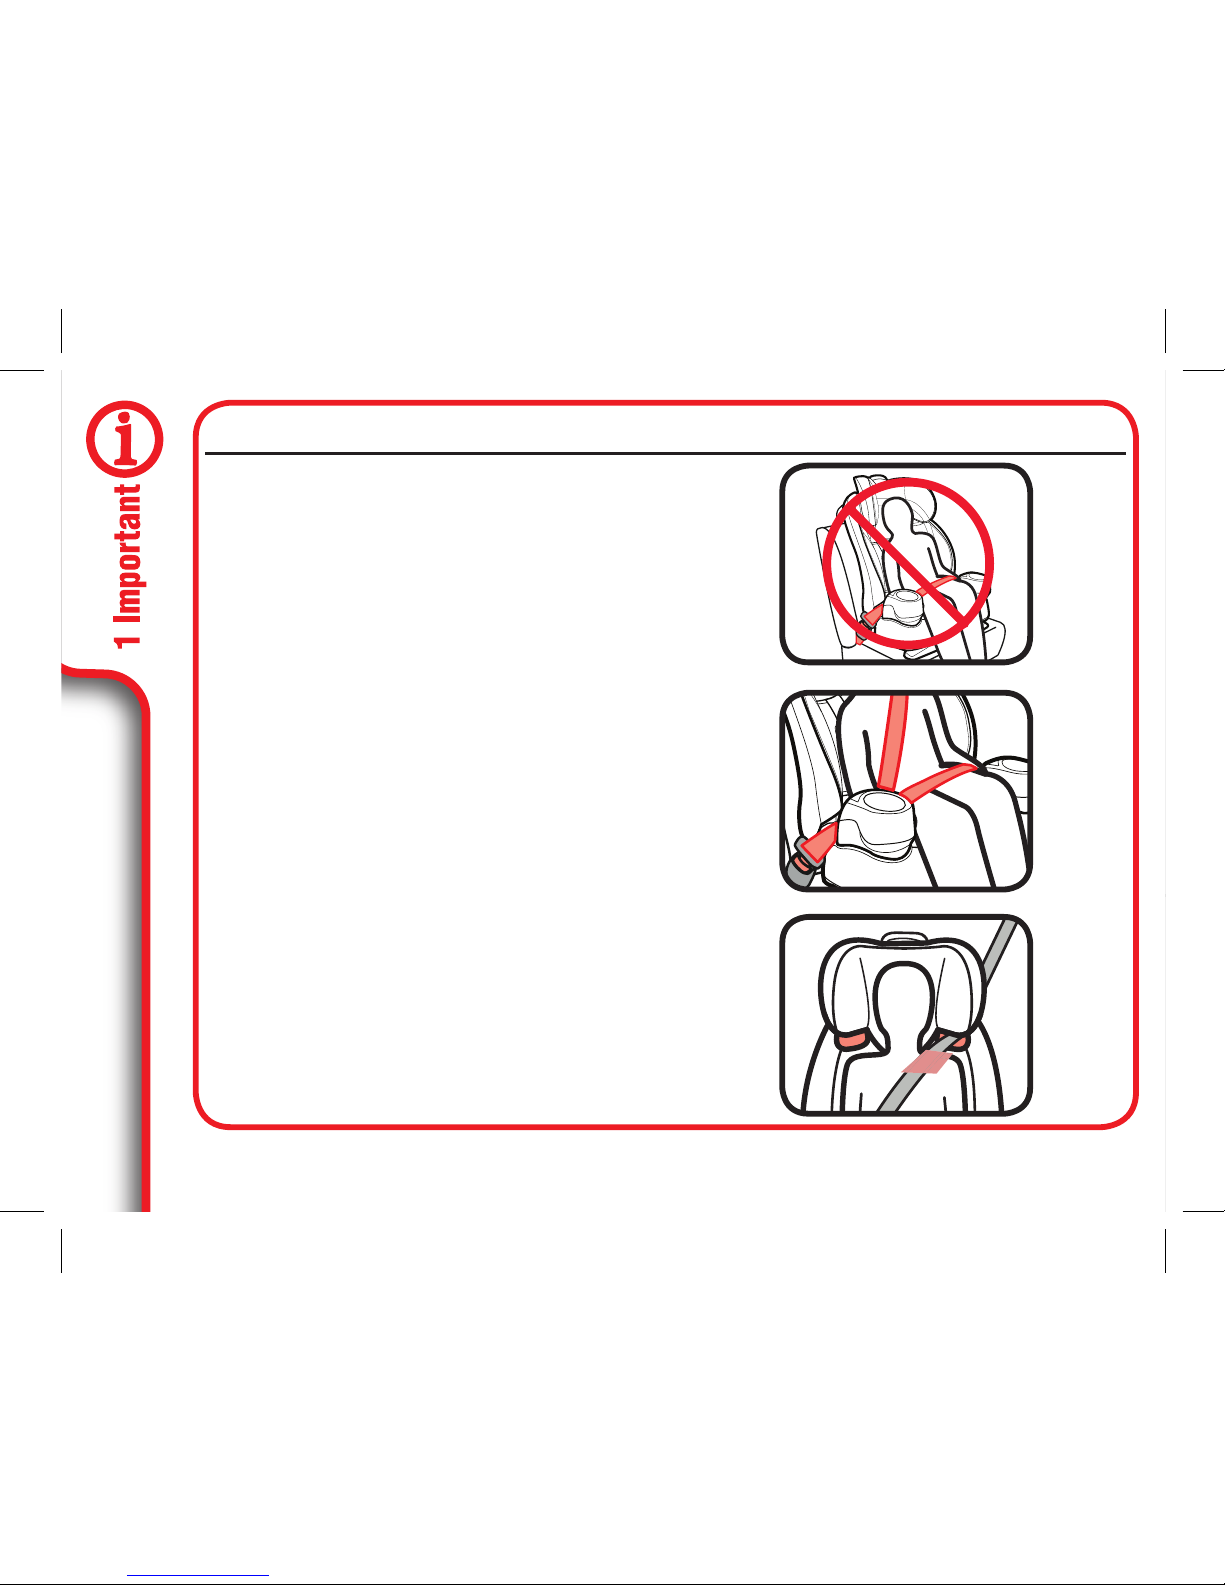
Use Lap/Shoulder Belt Only
Position Lap Belt
Lap belt must go in front of
armrest and lie low across your
child’s hips and thighs.
Position Shoulder Belt
Shoulder best lies across shoulder
between neck and edge of
shoulder.
For Booster, You Need to Adjust:
Page 14
14
Never Use Lap Belt Only
Review section 4
Lap Belt In Front of Armrest and
Lies Low Across Hips and Thighs
Review section 4
Shoulder Belt Lies On the
Shoulder, Between the Neck and
Edge of Shoulders
Review section 4
Booster Installation
Page 15
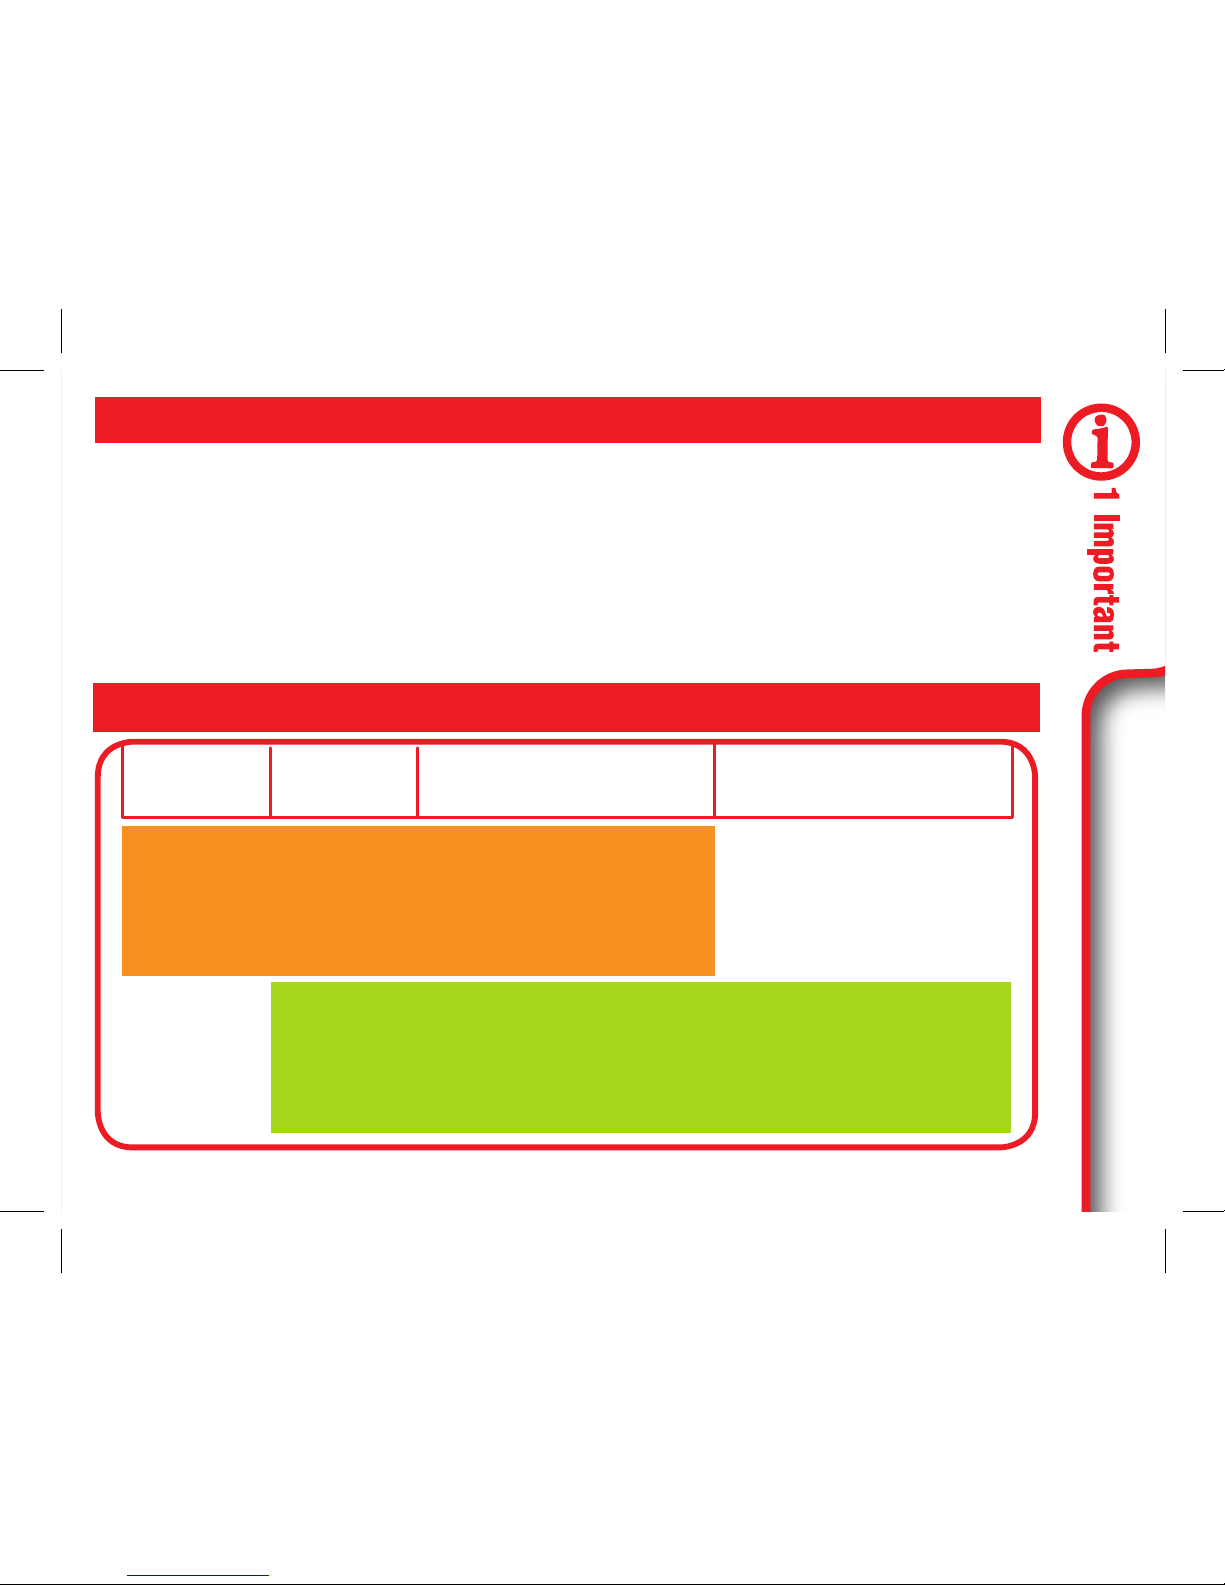
15
22 lb
(10 kg)
30 lb
(14 kg)
40 lb
(18.1 kg)
65 lb
(30 kg)
100 lb
(45 kg)
Forward-Facing with 5-Point Harness 22-30 lb
(10-14 kg) and can sit upright unassisted MUST
be forward facing. 30-65 lb (14-30 kg) SHOULD be
forward-facing.
Booster Mode with Vehicle Lap/Shoulder Seat Belt 30-65
lb (14-30 kg) CAN be in high back booster mode. Over 65
lb (30 kg) MUST be in booster mode.
1-C Correct Mode of Use
1-B Welcome to the Graco Family!
Your child’s safety depends on you. No car seat can guarantee protection
from injury in every situation, but proper use helps reduce the risk of serious
injury or death.
Even if this car seat seems easy to figure out on your own, you must follow
the detailed instructions in this instruction manual to ensure the steps below
are performed correctly.
Page 16

16
1-D Before You Begin
Please fill out the prepaid registration postcard attached to the harness
and mail it in today or register online at www.gracobaby.com/
carseatregistration.
Child restraints could be recalled for safety reasons. You must register
this restraint to be reached in a recall. Send your name, address, and the
restraint’s model number and manufacturing date to:
Graco Children’s Products, Inc.
Attn: Customer Service
3 Glenlake Parkway Atlanta, GA 30328
or register online at www.gracobaby.com/carseatregistration
or call 1-800-345-4109
For recall information, call the U.S. Government’s Vehicle Safety Hotline at
1-888-327-4236
(TTY: 1–800–424–9153), or go to http://www.NHTSA.gov.
Register This Child Restraint
Page 17
17
Model Name _________________________
Model Number _______________________
Date of Manufacture __________________
Date of Purchase _____________________
For future reference or if you change addresses, record the model name,
model number, date of manufacture and purchase date of this car seat on the
below. You can find this information either on the registration card if you still
have it or on the date label located on the back of the car seat.
In the U.S.A, please contact our Customer Service Department with any
questions you may have concerning parts, use, or maintenance. When
you contact us, please have your product’s model number and date of
manufacture ready so that we may help you efficiently. These numbers can
be found on a sticker on the back side of your car seat.
For additional resources or to get your car seat checked by a child
passenger safety technician, please visit the following web sites:
www.nhtsa.gov • www.seatcheck.org • www.safekids.org
If You Need Help
Page 18
18
STOP using this car seat and throw it away 7 years after the date of
manufacture. Look for date of manufacture label on back of the car seat.
Graco Children’s Products Inc. advises against loaning or passing along a car
seat unless you know the complete history of the product. We also advise
against purchasing a car seat second hand.
This child restraint meets or exceeds all applicable requirements of Federal
Motor Vehicle Safety Standard 213 for use in motor vehicles.
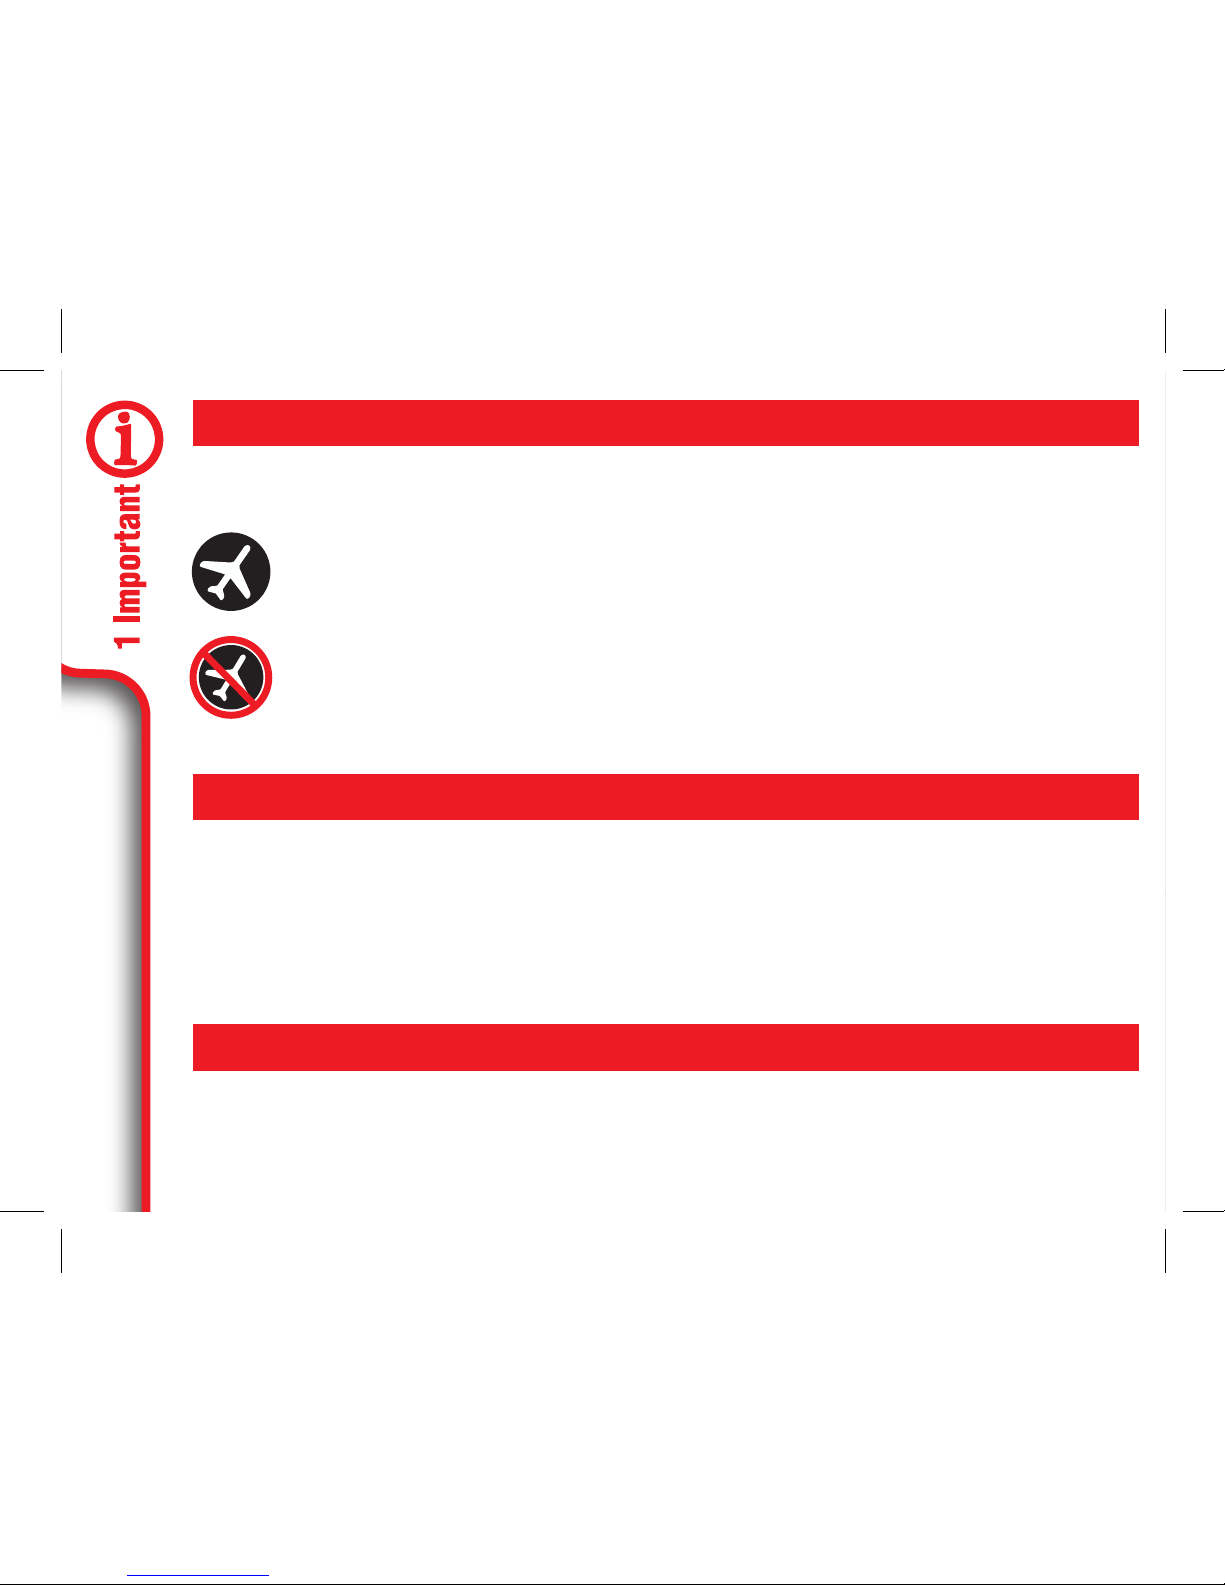
This child restraint is certified for use in aircraft only when used with
the internal harness system. Use only on forward-facing aircraft
seats. Follow the instructions for vehicle installation. See section 3-C.
This child restraint is NOT certified for use in aircraft when used as a
booster seat because aircrafts do not have shoulder belts.
Contact the airline for their specific polices.
Certification
Car Seat’s Useful Life
Protect vehicle seat. Use a car seat mat, towel, or thin blanket under and
behind car seat.
Vehicle Seat Protection
Page 19
19
Car seat parts can get very hot in the sun or warm weather. To avoid burns,
always check before putting child in car seat.
Warm Weather Use
Failure to follow these instructions and child restraint’s
labels can result in child striking the vehicle’s interior
during a sudden stop or crash.
1-E Safety Warnings
No car seat can guarantee protection from injury
in every situation, but proper use helps reduce the
risk of serious injury or death. READ THIS MANUAL
CAREFULLY.
Page 20
20
! Review your vehicle owner’s manual for more
information about air bags and car seat use.
! If your vehicle does not have a back seat, review your
vehicle owner’s manual.
! Select a suitable location for the car seat in your vehicle.
! Secure car seat with a vehicle seat belt or LATCH that
is properly routed as shown in this manual.
! Vehicle seat belt system MUST hold car seat securely.
Not all vehicle seat belts can be used with a car seat.
! If vehicle seat belt does not hold car seat securely,
read “Vehicle Seat Belts” section 7-D and your vehicle
owner’s manual.
! Always secure car seat with LATCH or a vehicle seat
belt, even when unoccupied. In a crash, an unsecured
car seat can injure passengers.
! If car seat is in a crash, it must be replaced. DO NOT
use it again! A crash can cause unseen damage and
using it again could result in serious injury or death.
Page 21
21
! DO NOT use car seat if it is damaged or missing parts.
! DO NOT use accessories or parts other than those
provided by Graco. Their use could alter the
performance of the car seat.
! DO NOT remove LATCH system from car seat. If using
vehicle seat belt to secure car seat, LATCH hooks must
be stored.
! Never leave child unattended, even when sleeping.
Child may become tangled in harness straps and
suffocate or strangle.
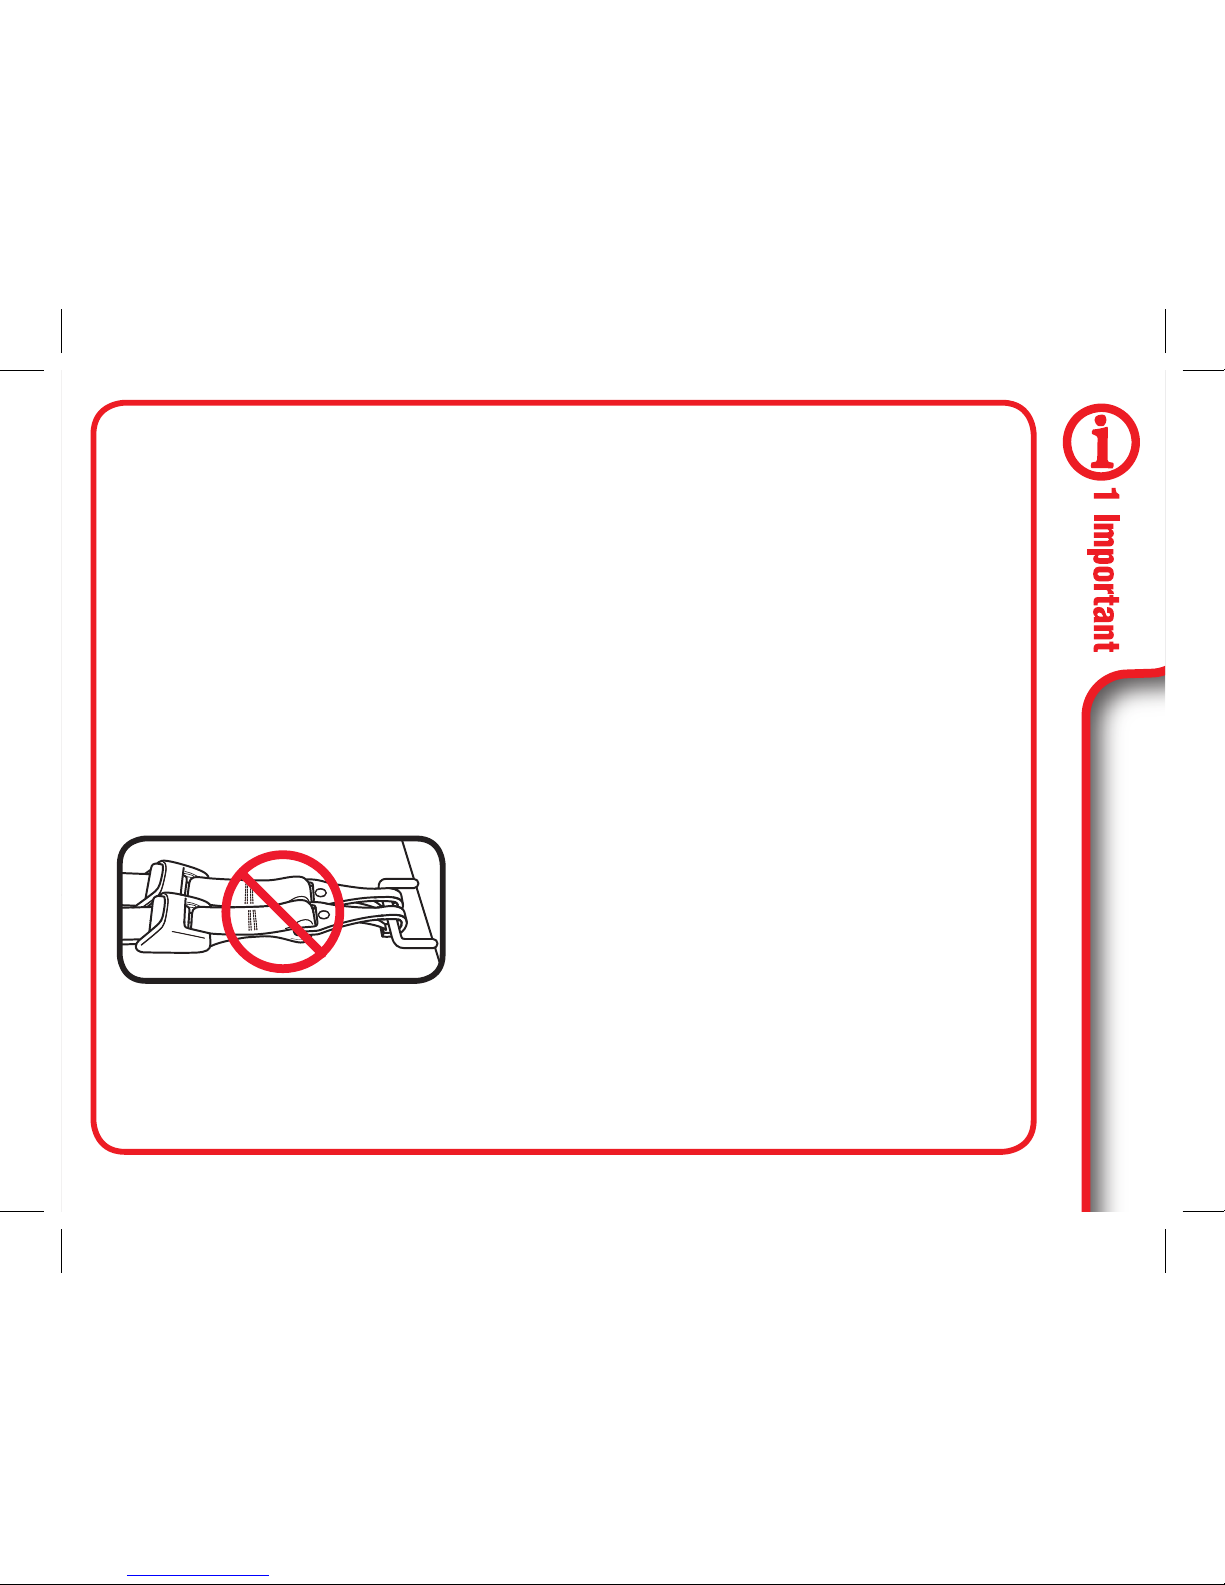
! Never attach two LATCH
connectors to one vehicle lower
anchor bar unless specifically
allowed by the vehicle
manufacturer.
! Do not use both the vehicle seat belt and LATCH strap
at the same time when using the car seat forwardfacing.
Page 22
2 Features
22
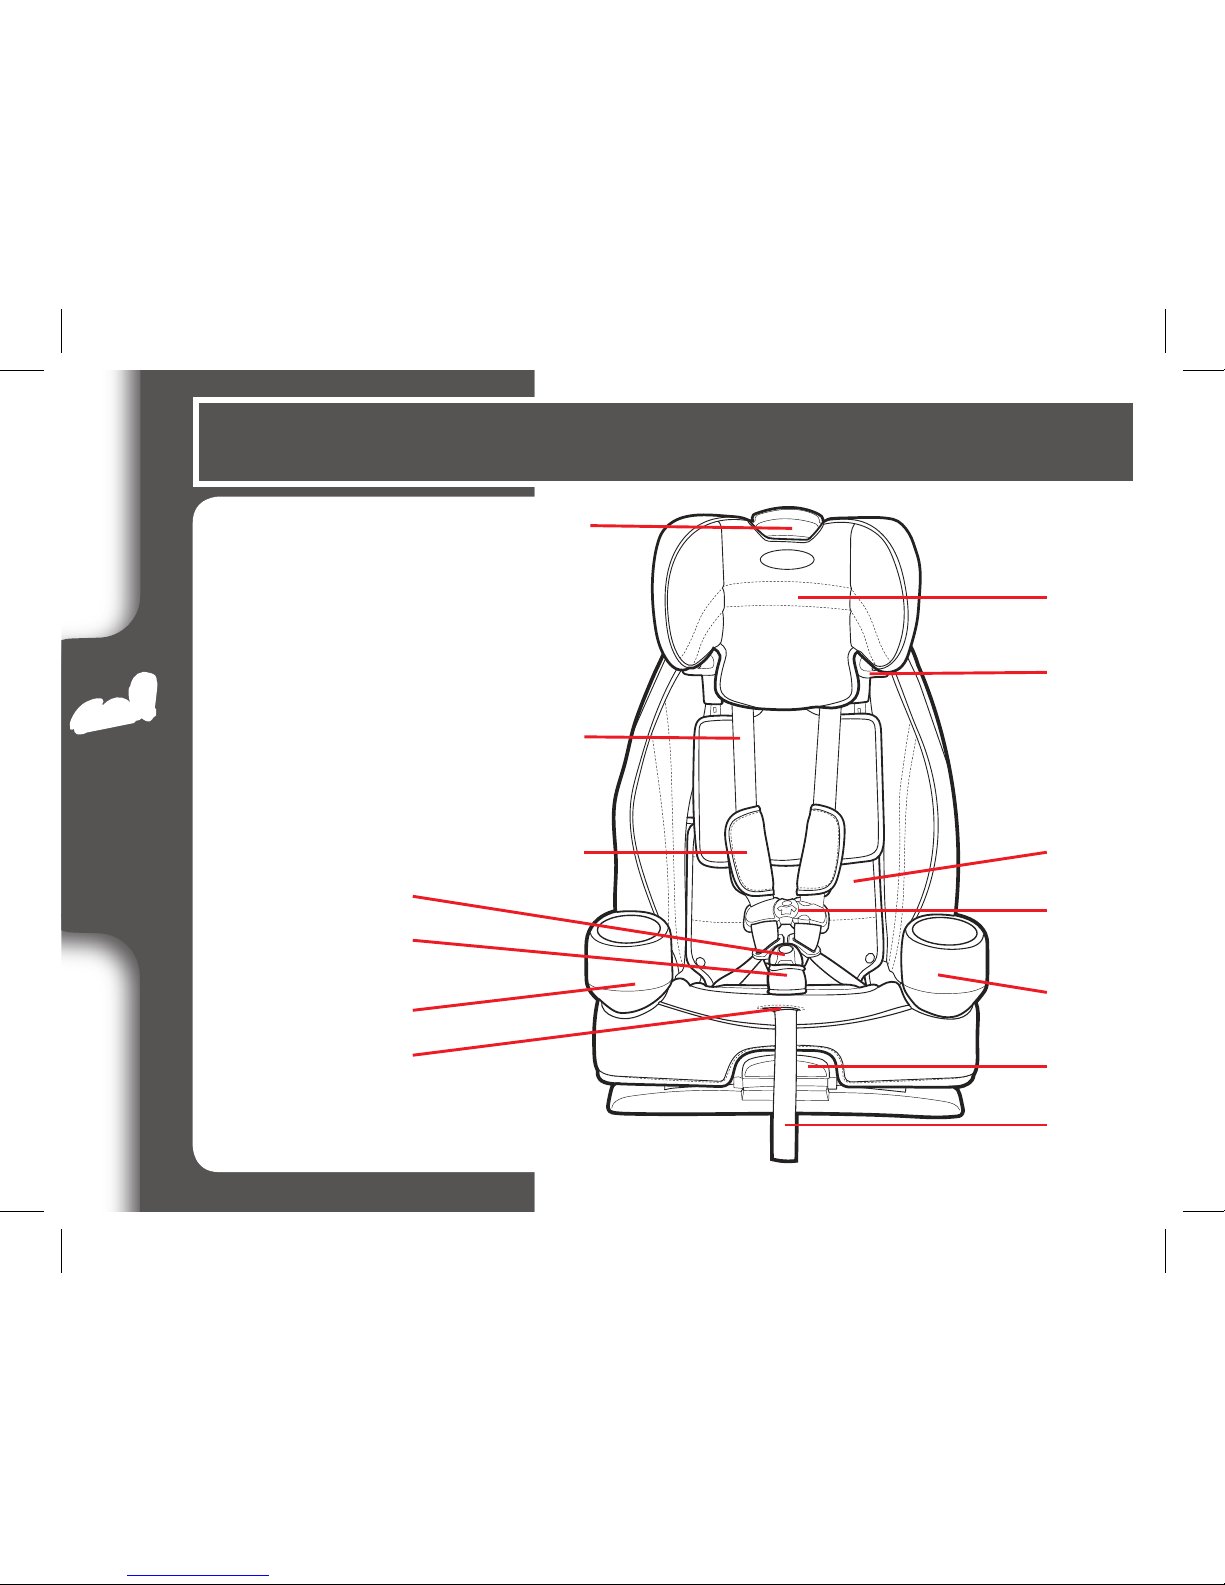
2-A Car Seat Features
A
E
H
I
K
D
B
C
G
L
I
J
F
M
Page 23

2 Features
23
A Height Adjust Lever
B Head Support
C Shoulder Belt Guide
D Harness Strap
E Harness Covers
F Harness Storage Compartment
(Behind Seat Pad)
G Chest Clip
H Buckle
I Buckle Cover
J Cup Holder
K Harness Adjuster Lever
(Under Seat Pad)
L Recline Lip
M Harness Adjustment Strap
Page 24
2 Features
24
F
A
C
D
E
G
B
A
C
D
E
F
B
Page 25

2 Features
25
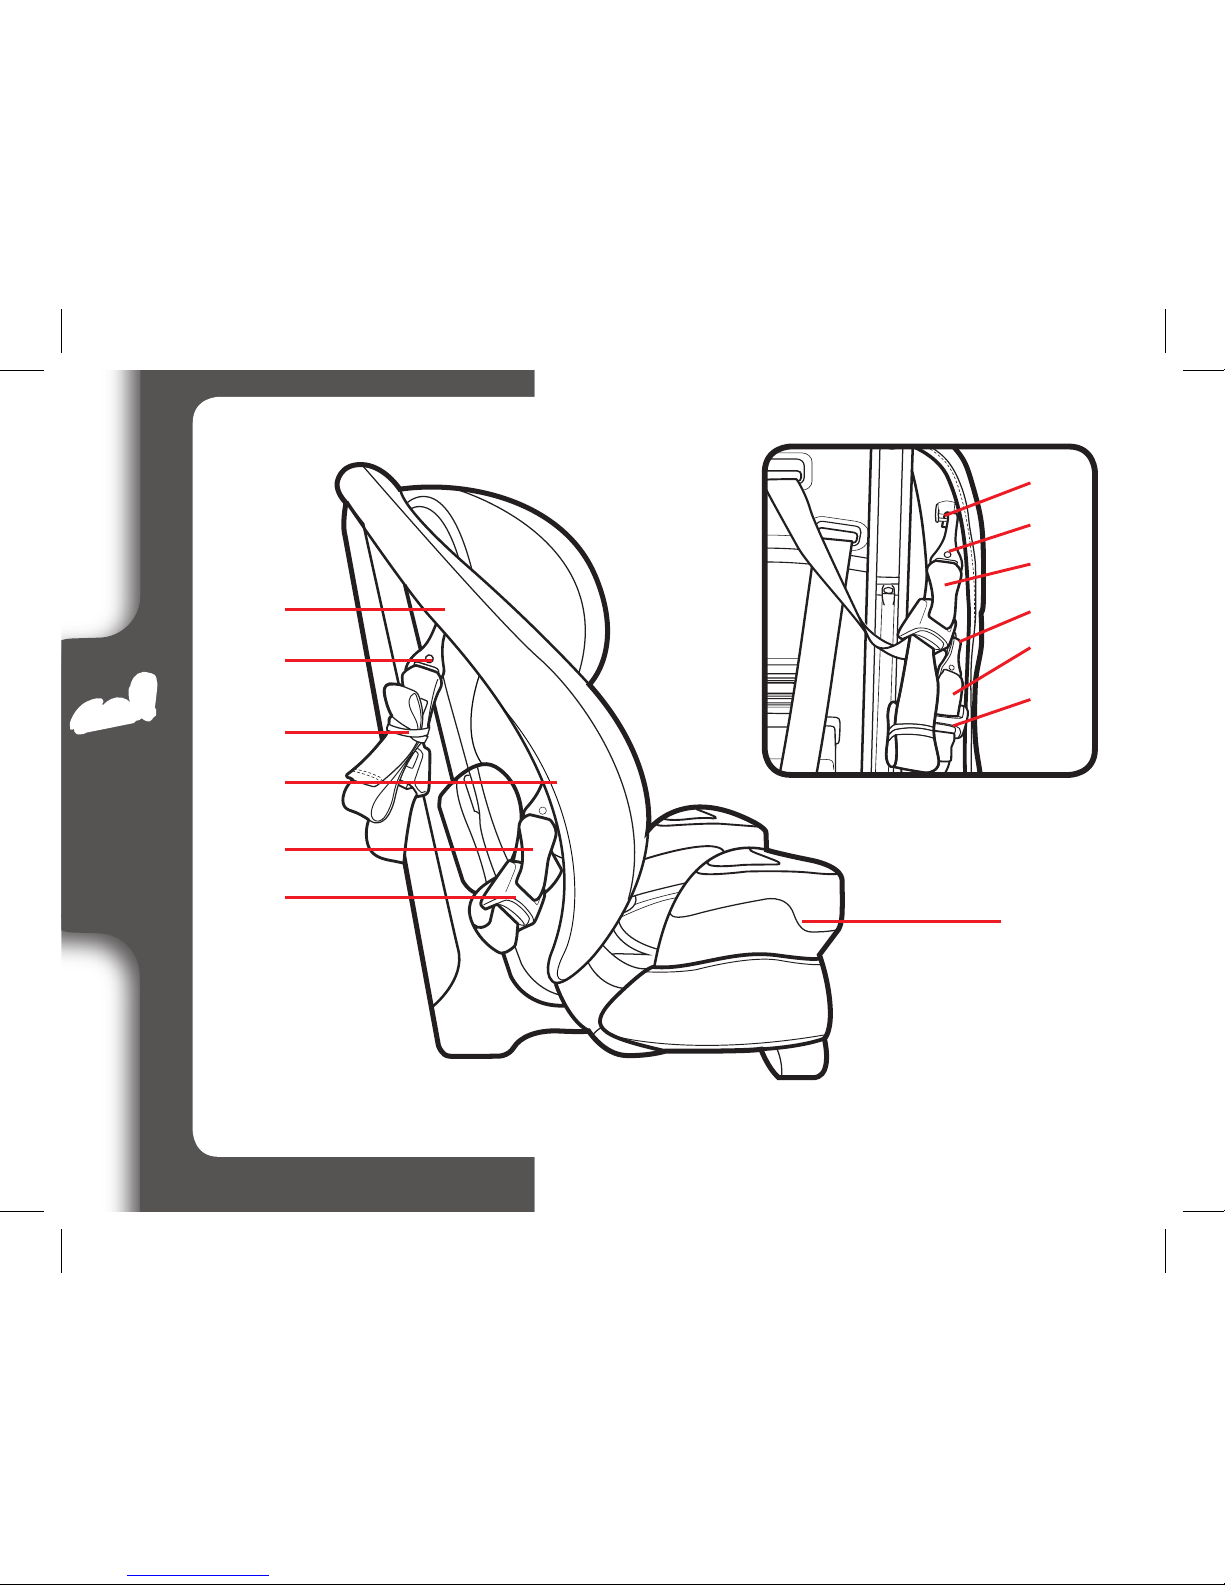
A Tether Storage Bar
B Tether Hook
C Tether Strap
D LATCH Storage Bar
E LATCH
F LATCH Adjuster
G Cup Holder
Page 26
2 Features
26
A
B
Page 27

2 Features
27
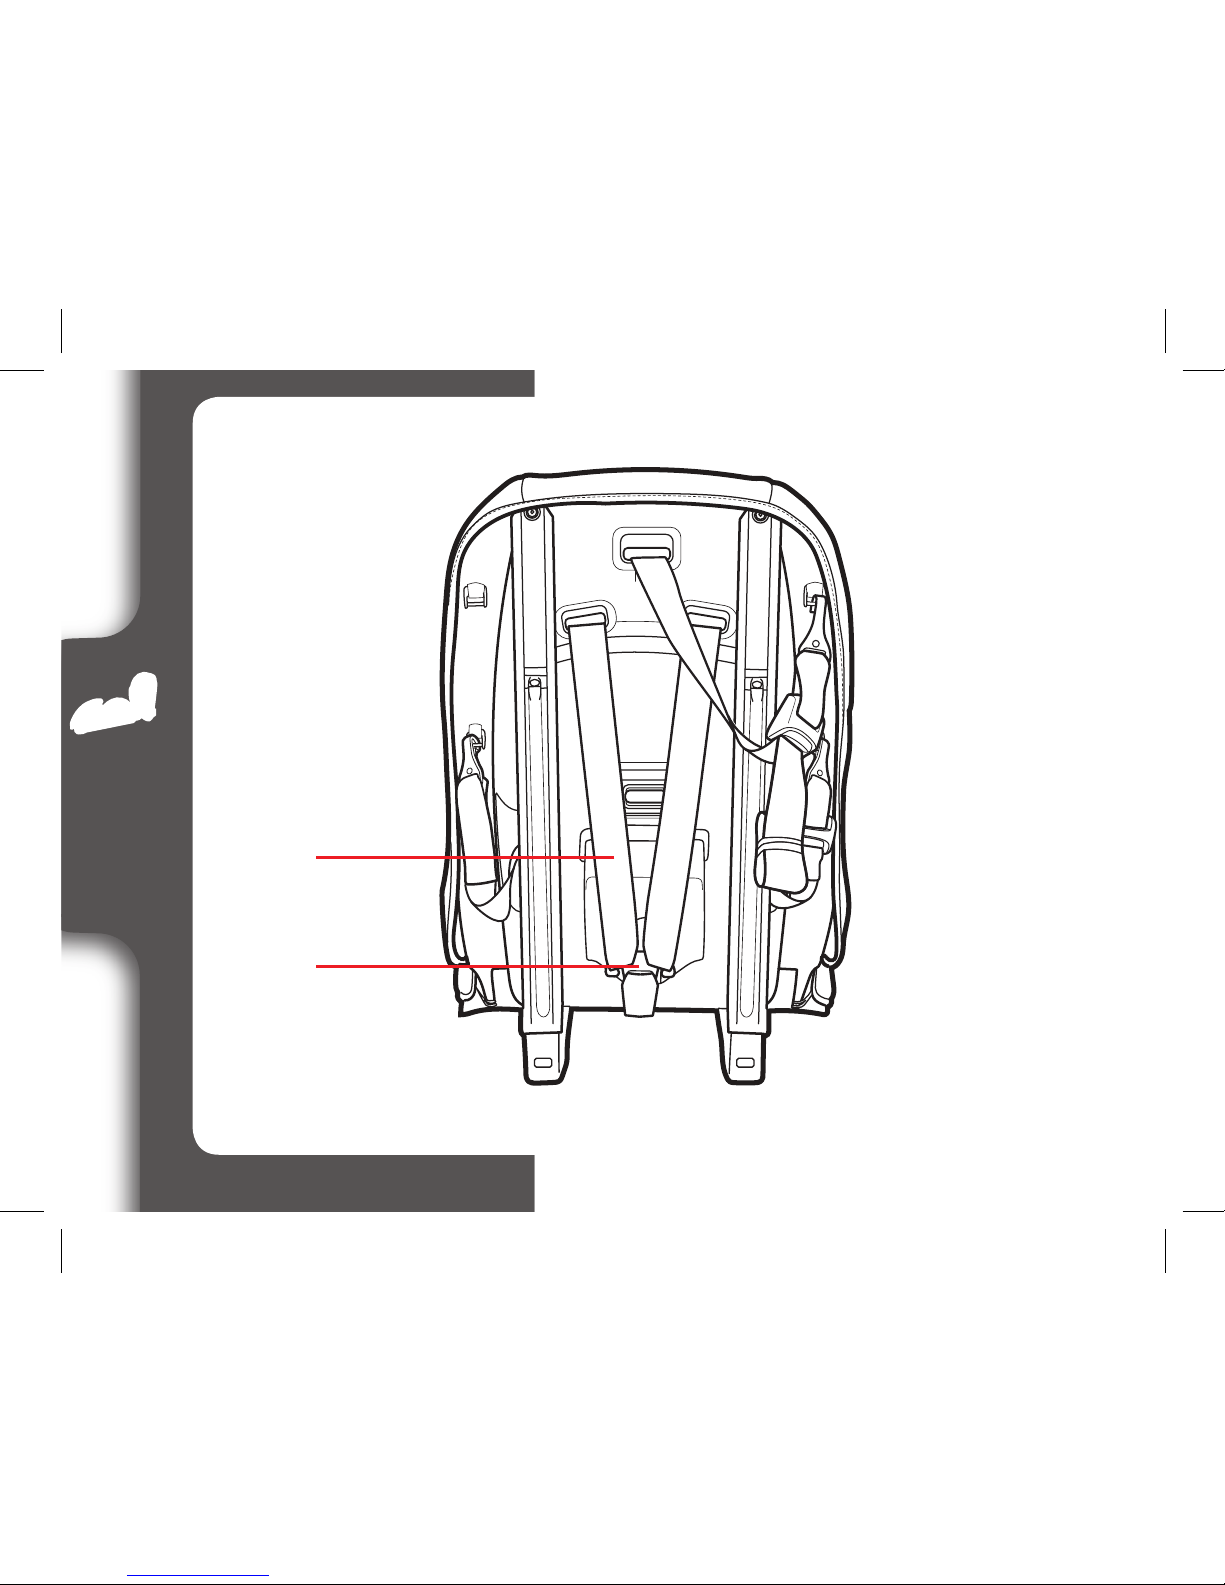
A Harness Straps
B Splitter Plate
Page 28
28
3 Forward
Facing
3-A Forward-Facing Use
Forward-Facing:
22-65 lb (10-30 kg) and 27-49” (69125 cm)
• Place car seat forward-facing in the vehicle
back seat.
• Make sure LATCH strap or vehicle seat belt
is routed through the forward-facing belt path
marked with a orange label.
• Attach and tighten the tether. When used
properly, the tether helps reduce injury in a
sudden stop or crash.
• Install this car seat tightly in your vehicle. Car
seat should not move at the forward-facing
belt path more than 1” (2.5 cm) from side to
side, front to back.
LATCH strap with
Tether
Do not install by this
method for a child
weighing more than
45 lb (20 kg)
Page 29

29
3 Forward
Facing
• Harness straps need to be even with or
just above the top of child’s shoulders and
chest clip is at armpit level.
The American Academy of Pediatrics (AAP)
and NHTSA recommend that children should
use the built-in harness system for as long
as possible until they reach the maximum
forward-facing weight and height for their car
seat. This car seat can remain forward-facing
using the built-in harness system for children
up to 65 lb (30 kg) and 49” (125 cm).
Vehicle Lap/Shoulder
Belt with Tether
Strap
Vehicle Seat Lap Belt
with Tether Strap
Page 30
30
3 Forward
Facing
3-B Install Forward-Facing
with LATCH Straps
Review your vehicle’s owner manual for LATCH location and
use. Do not install by this method for a child weighing more
than 45 lb (20 kg)
1. Remove LATCH hooks and Tether
Strap from Storage Locations
Unhook tether and lay it in the seat.
Page 31

31
3 Forward
Facing
2. Place Car Seat Forward-Facing in
Back Seat of the Vehicle
Place forward-facing in vehicle seat. The
bottom of the seat should sit as flat as
possible on the vehicle seat.
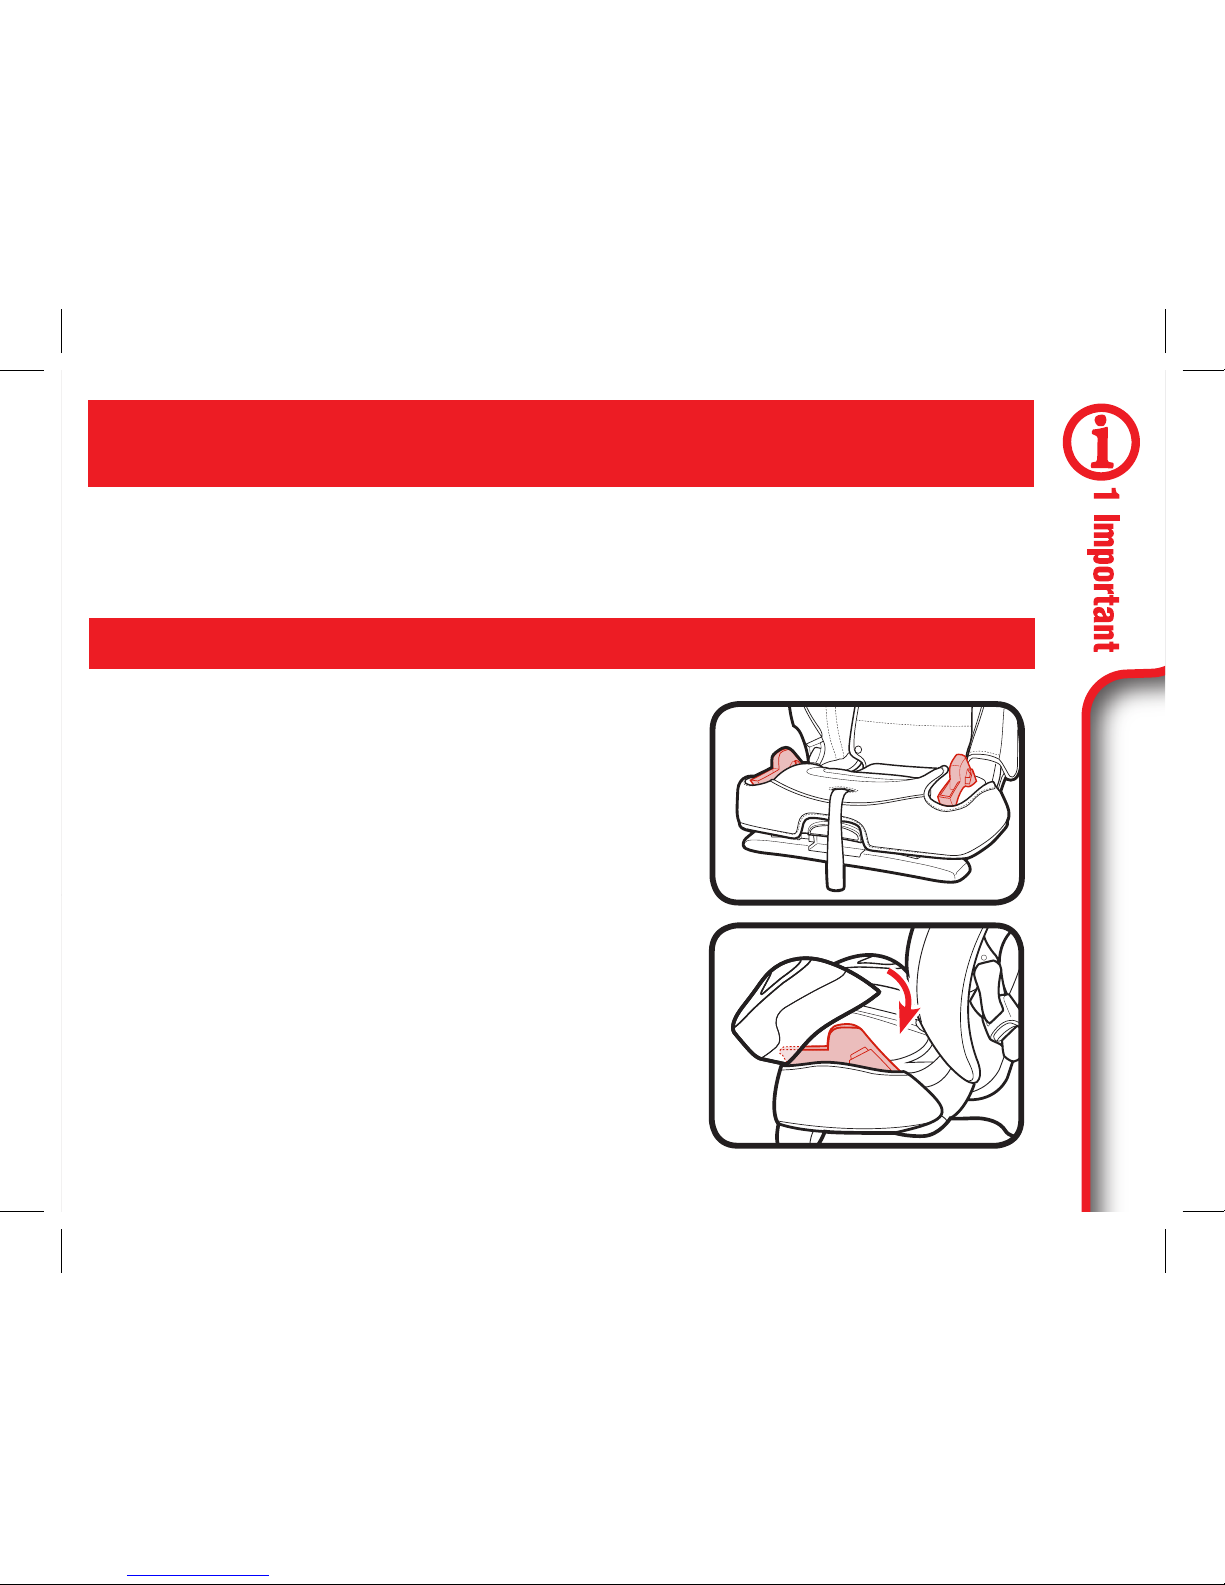
3. Choose One of the Two Recline
Positions
To recline, flex the recline lip out and lift
up on the seat. For upright position, flex the
recline lip out and push down on the seat.
4. Extend the LACTH Strap.
For easier installation, extend the LATCH
strap to its maximum length by pressing the
grey button and pull out on the strap.
Page 32

32
3 Forward
Facing
5. Attach LATCH Hooks to Vehicle’s
Lower LATCH Bars.
LATCH strap should not be twisted.
6. Tighten the LATCH Strap
Press down firmly in the center of the car
seat while tightening the LATCH strap.
Page 33

33
3 Forward
Facing
7. Attach Tether Strap
Extend the tether by
pressing the grey button
and pulling out on the strap
and attach.
Consult vehicle’s owner manual for specific
location.
8. Tighten Tether Strap
Remove all the slack.
9. Test For Tightness
Grab the sides of the seat where the lower
anchor strap is and slide the car seat sideto-side and front-to-back.
If the seat moves less than 1” (2.5 cm), it is
tight enough.
See section 5-A to secure your child.
Page 34

34
3 Forward
Facing
Is Everything Correct?
Car Seat Does Not Move More than
1” (2.5 cm) at the Belt Path
Harness Straps at or Just Above the
Child’s Shoulders.
Review section 5
Chest Clip Even With Armpits
Review section 5
Cannot Pinch Harness Straps at the
Shoulder
Review section 5
Page 35

35
3 Forward
Facing
3-C Install Forward-Facing
with Vehicle Seat Belt
1. Store LATCH Strap
Attach LATCH hooks to the plastic rings as
shown.
2. Unhook Tether
Strap From
Storage Location
and Lay it in the
Seat
3. Place Car Seat Forward-Facing in
Back Seat of the Vehicle
Place forward-facing in vehicle seat. The
bottom of the seat should sit as flat as
possible on the vehicle seat.
Page 36

36
3 Forward
Facing
4. Choose One of the Two Recline
Positions
To recline, flex the recline lip out and lift
up on the seat. For upright position, flex the
recline lip out and push down on the seat.
5. Route the Vehicle Seat Belt
Thread vehicle seat belt through the
forward-facing belt path (marked with a
orange label) and out the other side. Buckle
it. The seat belt should lie as flat as possible
and not be twisted.
Review your vehicle’s owner manual for vehicle seat belt use
Page 37

37
3 Forward
Facing
6. Lock the Vehicle Seat Belt
In most vehicles today, slowly pull the
shoulder belt all the way out and then let it
go back in. You will hear a clicking sound.
Slowly pull out on the belt and it should
be locked. If not, review your car’s owner
manual and section 7-D.
7. Tighten the Vehicle Seat Belt
Press down firmly in the center of the car
seat. Pull on the shoulder belt to tighten while
feeding the slack back in the retractor.
Page 38

38
3 Forward
Facing
8. Attach Tether Hook
Extend the top tether by
pressing the grey button
and pulling out on the strap
and attach.
Consult vehicle’s owner manual for specific
location.
9. Tighten Tether
Remove all the slack.
10. Test For Tightness
Grab the sides of the seat where the
vehicle seat belt is and slide the car seat
side-to-side and front-to-back.
If the seat moves less than 1” (2.5 cm), it
is tight enough.
See section 5-A to secure your child.
Page 39

39
3 Forward
Facing
Is Everything Correct?
Car Seat Does Not Move More than
1” (2.5 cm) at the Belt Path
Harness Straps at or Just Above the
Child’s Shoulders.
Review section 5
Chest Clip Even With Armpits
Review section 5
Cannot Pinch Harness Straps at the
Shoulder
Review section 5
Page 40

4 Booster
40
4-A Booster Use
Booster Use:
30-100 lb (14-45 kg) 38-57 in.
(96-145 cm) at least 3 years old
• Place car seat forward-facing in the vehicle
back seat.
• Make sure vehicle seat’s lap belt is adjusted
snugly and lays low on the child’s hip and is
routed in front of the armrest in the booster’s
belt path.
• Vehicle belts MUST lie flat against child and
MUST NOT be twisted.
• Vehicle seat’s shoulder belt is adjusted
snugly and should lie between child’s neck
and edge of shoulder.
Vehicle Lap/Shoulder
Seat Belt
Page 41

4 Booster
41
• Never use a vehicle lap-only belt across
front of child.
• DO NOT position vehicle shoulder belt under
the child’s arm or back.
• DO NOT allow child to slouch or slide down
in the booster seat.
• DO NOT position vehicle belt over top of
armrests.
• Vehicle’s seat headrest SHOULD NOT create
a gap between vehicle seat and booster seat.
• The front of booster seat MUST NOT hang
over front of vehicle seat.
• If child will not keep vehicle belt properly
positioned, DO NOT use this booster seat.
Use a different car seat.
The American Academy of Pediatrics (AAP)
and NHTSA recommend that children should
use the built-in harness system for as long
as possible until they reach the maximum
forward-facing weight and height for their car
seat. This car seat can remain forward-facing
using the built-in harness system for children
up to 65 lb (30 kg) and 49” (125 cm).
Never Use a Vehicle
Lap-Only Belt Across
Front of Child
Page 42

4 Booster
42
4-B Install Booster
1. Store The Harness System
A. Remove Harness Covers
To remove, undo the fastening strips and
remove.
B. Loosen the shoulder straps as much
as possible.
C. Raise the headrest to the highest
position.
C
B
A
Page 43

4 Booster
43
D
E
D. Unbuckle the chest clip and the
buckle strap E.
F. Remove the Buckle Strap
From bottom of car seat, rotate metal
retainer to side in order to push it through
slot easier.
F
Page 44

4 Booster
44
I
G. Lift the headrest pad flap up out of
the way.
H. Unsnap Seat Pad
Undo the 4 snaps.
I. Pull Bottom Seat Pad Back To Expose
the Plastic Shell
H
G
Page 45

4 Booster
45
K
K
J
J. Open the Harness Storage Door
K. Place Harness, Chest Clip, Buckle
Tongues and Buckle Inside Storage
Compartment and Close the Door
L. Replace Seat Pad
Move the headrest back to its proper
position for your child.
L
Page 46

4 Booster
46
2. Unhook Tether
From Storage
location and
Lay it in the
Seat
3. Place Car Seat Forward-Facing in
Back Seat of the Vehicle
Place forward-facing in vehicle seat. The
bottom of the seat should sit as flat as
possible on the vehicle seat.
Page 47

4 Booster
47
Graco allows the securing of the car seat with
LATCH system in the booster mode. The child still
MUST BE SECURED with the vehicle lap/shoulder
seat belt. LATCH can be used in the booster mode
regardless of the weight of the child up to 100 lb
(45 kg).
Verify the following before using LATCH in the
booster mode:
• The LATCH hook DOES NOT interfere with any
vehicle seat belts or buckles.
If the LATCH interferes with the vehicle seat belts or if the chosen seating position
does not have LATCH bars, you MUST store the LATCH strap. Always secure car
seat with LATCH or a vehicle seat belt, even when unoccupied. In a crash, an
unsecured car seat can injure passengers.
4. Choose One of the Two Recline
Positions
To recline, flex the recline lip out and lift up on
the seat. For upright position, flex the recline
lip out and push down on the seat.
Page 48

4 Booster
48
6. Attach LATCH Hooks to Vehicle’s
Lower Anchor Bars.
Lower Anchor strap should not be twisted.
7. Tighten the LATCH Strap
Remove all the slack from the LATCH strap
5. Extend the LATCH Strap.
For easier installation, extend the LATCH
strap to its maximum length by pressing the
grey button and pull out on the strap.
Skip to Step 10 if Not Using LATCH
Page 49

4 Booster
49
8. Attach The Tether
Extend the tether by pressing the grey
button and pulling out on the strap and
attach.
Consult vehicle’s owner
manual for specific
location.
9. Tighten Tether
Remove all the slack.
10. Thread the Vehicle Seat Shoulder
Belt Through Seat Belt Guide on the
Headrest
See section 5-A to secure your child.
Page 50

50
5 Securing
Child
5-A Securing Child 5-Point Harness
1. Loosen Harness Straps
(A) Push down on the harness release lever
while pulling out on the harness straps at
the chest clip.
(B) Unbuckle the
chest clip and the
buckle strap. (C)
Place harness straps
off to the sides.
A
B
WARNING! Do not put snowsuits or bulky garments
on your child when placing them in the car seat.
Bulky clothing can prevent the harness straps from being
tightened properly. To keep child warm, buckle your child in
the car seat and place a blanket around the child or place the
child’s coat on backwards after buckling in.
Page 51

51
5 Securing
Child
2. Place Your Child in the Seat
Make sure their back is flat against the car
seat back.
3. Place Harness Straps Over Child’s
Shoulders and Buckle
You will hear a “click” when buckle tongues
are securely attached. Pull up on each
buckle tongue to make sure it is securely
attached.
Click!
Page 52

52
5 Securing
Child
4. Be Sure the Harness Straps Are at
the Proper Height
Forward-Facing: Harness straps must be
at or just above the child’s shoulders and
top of child’s ears must be below top of
headrest.
5. To Raise or Lower Headrest/Harness
Lift adjustment lever and lift or lower
headrest for the proper harness height.
Forward-Facing
Page 53

53
5 Securing
Child
6. Check the Buckle Position
The correct slot the one that is closest to
your child without being underneath your
child.
7. Remove the Buckle Strap
From bottom of car seat, rotate metal
retainer to side in order to push it through
slot easier.
8. Pull buckle strap from car seat as
shown.
Page 54

54
5 Securing
Child
9. Insert Metal Retainer in the
New Buckle Strap Slot
Reach underneath the car seat and pull the
metal retainer through.
10. Buckle Strap Flap
Fold the buckle strap flap up and push it
back into the slot.
11. Pull Up on Buckle Strap to Make
Sure it is Secured
Page 55

55
5 Securing
Child
12. Buckle the Chest Clip
You will hear a “click” when the chest clip
is securely buckled.
13. Pull All the Slack Out From Around
the Waist
Pull up on the harness strap while pushing
the chest clip down. Do this to both sides.
Click!
Page 56

56
5 Securing
Child
14. Tighten the Harness by Pulling the
Harness Adjustment Strap
A snug harness should not allow any
slack. It lies in a relatively straight line
without sagging. It does not press on the
child’s flesh or push the child’s body into
an unnatural position.
When you are not able to pinch any of the
harness webbing at your child’s shoulder,
the harness is tight enough.
Page 57

57
5 Securing
Child
15. Raise the Chest Clip to Child’s
Armpit Level
16. Check Tightness Again, Tighten
More if Needed
Page 58

58
5 Securing
Child
1. Place Child In Seat
Have your child sit in the booster seat, with
his/her back flat against the back of the
booster seat.
2. Thread Vehicle’s Shoulder Belt Into
Seat Belt Guide in the Headrest
5-B Securing Child Backed Booster
Use only the vehicle lap and shoulder
belt system when restraining the child
in the booster seat.
Page 59

59
5 Securing
Child
3. Buckle the Vehicle Lap/Shoulder
Seat Belt
Be sure the lap portion of the vehicle seat
belt goes in front of the armrests.
Be sure the lap portion of the vehicle seat
belt lies low across your child’s hips.
Be sure the shoulder belt lies across your
child’s shoulders, between the neck and
edge of shoulder. The belt guides should be
even with or just above the shoulders.
Page 60

60
5 Securing
Child
Is Everything Correct?
Never Use Lap Belt Only
Lap Belt in Front of Armrest and Lies
Low Across Hips and Thighs
Shoulder Belt Lies On the Shoulder,
Between the Neck and Edge of
Shoulders
Page 61

61
6
Accessories
Harness Covers
Make sure that harness covers do not
interfere with placement of the chest clip at
armpit level.
To remove, undo the fastening strips and
remove.
Buckle Cover
To remove, undo the fastening strips and
remove.
6-A Accessories (on select models)
Page 62

7 Vehicle
Information
62
Lower Anchor Connector
Press in on the hook’s spring. Push hook
in, lift hook up, twist and pull out away from
anchor point.
Top Tether
To remove, press the grey button and pull
out on the strap to release the tension.
Press in on the hook’s spring. Push tether
hook in, then lift up and pull away from
tether anchor.
7-A How to Remove LATCH and Top
Tether
Page 63

7 Vehicle
Information
63
Review your vehicle’s owner manual for Seating Locations
7-B Choosing Vehicle Seat Location
The best seating location for this car seat is one that:
• Is recommended by your vehicle owner’s manual, and
• Results in a secure installation of this car seat
In the event there is no available back seat and / or you have no other
option, the National Highway Traffic Safety Administration (NHTSA)
recommends that you take the following steps:
• Ensure the child is properly restrained according to their age and size
• Move the seat as far back as possible
• Make sure the child is not leaning out of position, such as leaning
forward into the deployment path of the air bag
• Set the air bag ON-OFF switch, if available, to the OFF position
Page 64
7 Vehicle
Information
64
7-C Unsafe Vehicle Seat Location
Never install this car seat in any of the following vehicle seating locations:
rear-facing or side-
facing vehicle seats
rear-facing with an
active front air bag
booster mode with vehicle
lap belt only seat belt
Page 65

7 Vehicle
Information
65
Review your vehicle’s owner manual for vehicle seat belt use
Vehicle Seat Belt Terms
7-D Vehicle Seat Belts
This car seat can be installed using a vehicle seat belt. To do this, you will
need to change the seat belt to a locked mode for use with car seats. With
some vehicle seat belts, this is done with the latchplate; with other vehicle
seat belts, this is done with the retractor.
Retractor
A device that winds up the unused vehicle seat
belt. It is often hidden inside the panels on the
walls of the vehicle or in the vehicle seatback.
Latch Plate
The male end of the seat belt with
the silver tongue.
Seat Bight
The crease where the vehicle seat back
and seat bottom meet.
Page 66

7 Vehicle
Information
66
There are two different types of vehicle seat belts that can be used with this car seat:
Lap Belt Only
2 connection points. Can ONLY be
used in harness mode.
The following types of vehicle seat belts CANNOT be used safely with this car seat:
Lap Belt with Motorized
Shoulder Belt
Lap Belt or Shoulder
Belt Mounted on Door
Belts Forward of the
Seat Bight
Lap/Shoulder Belt
3 connections points. Can be used in
all car seats modes of use.
Identify Your Seat Belt Type
Page 67

7 Vehicle
Information
67
Always review your vehicle owner’s manual for specific information about
your vehicle seat belts.
There are three types of retractors: ELR (Emergency Locking Retractor),
ALR (Automatic Locking Retractor) , and Switchable (ELR switch to
ALR). To determine your type of retractor, follow these steps:
1. Slowly pull the belt out about halfway and stop.
2. Let the belt retract back several inches.
3. Try to slowly pull the belt out more. If the belt cannot
be pulled any further, it is ALR. If it can be pulled
further, go to the next step.
4. Slowly pull the belt all the way out, and then allow it
to retract several inches.
5. Try to pull the belt all the way out again. If it cannot be pulled out, it is
Switchable. If it can still be pulled out freely, it is ELR.
Note: Most vehicles manufactured after 1996 will have Switchable
retractors in the back seat. If you have any questions about your retractor
type, consult your vehicle owner’s manual or call Graco for assistance.
Lap/Shoulder Belt Installation - Rear-Facing/Forward Facing Modes
Page 68

7 Vehicle
Information
68
How to Lock Your Lap and Shoulder Vehicle Seat Belt
Sliding Latch Plate and Switchable
Retractor
A latchplate that slides freely on the belt
webbing and cannot, by itself, hold the belt
snug around a car seat.
When installing the car seat, route the vehicle
seat belt through the proper belt path and
buckle it in. Slowly pull the shoulder belt all
the way out to switch it to locking mode.
Then, as you pull the vehicle seat belt tight,
feed all the slack back into the retractor.
Grab the sides of the seat at the belt path and
slide the seat side-to-side and front-to-back. The
seat should not move more than 1” (2.5 cm).
Page 69

7 Vehicle
Information
69
Locking Latchplate and ELR Retractor
A latchplate that holds the lap belt snug
after it has been adjusted; contains a metal
bar on the underside of the hardware that
“locks” the belt in position.
When installing the car seat, route the
vehicle seat belt through the proper belt path
and buckle it in. Then, pull upwards on the
shoulder belt so that the lap belt gets tight
around the car seat.
Grab the sides of the seat at the belt path
and slide the seat side-to-side and front-toback. The seat should not move more than
1” (2.5 cm).
Page 70

7 Vehicle
Information
70
Sliding Latch Plate and ALR Retractor
A latchplate that slides freely on the belt
webbing and cannot, by itself, hold the belt
snug around a car seat.
Slowly pull the shoulder belt all the way
out. Route the vehicle seat belt through the
proper belt path and buckle it in. Then, as
you pull the vehicle seat belt tight, feed all
the slack back into the retractor.
Grab the sides of the seat at the belt path
and slide the seat side-to-side and front-toback. The seat should not move more than
1” (2.5 cm).
Page 71

7 Vehicle
Information
71
Sliding Latch Plate and ELR Retractor
A latchplate that slides freely on the belt
webbing and cannot, by itself, hold the belt
snug around a car seat.
With this retractor, you will need to use the
locking clip to lock the vehicle seat belt.
Call us at 1-800-345-4109 to order a
locking clip.
Route the vehicle seat belt through the
proper belt path and buckle it in. Pull the
vehicle seat belt tight. While pushing down
on seat, pinch the two straps together
behind the buckle tongue. Unbuckle the belt
without allowing it to slip.
Attach locking clip to lap and shoulder belts
as shown.
Rebuckle belt. Check that lap belt does not
move by pulling hard. If belt loosens or
lengthens, repeat procedure.
1” (2.5 cm)
Page 72

7 Vehicle
Information
72
Always review your vehicle owner’s manual for specific information about
your vehicle seat belts.
Grab the sides of the
seat at the belt path
and slide the seat
side-to-side and frontto-back. The seat
should not move more
than 1 “ (2.5 cm).
Lap Belt Installation - DO NOT use in Booster Mode
Locking Latch Plate and No Retractor
When installing the car seat, route the lap
seat belt through the proper path and buckle
it in. Then, pull upwards on the tail of the
belt so that the lap belt gets tight around the
car seat.
Sewn On Latch Plate and ALR
Slowly pull the lap belt all the way out.
Route the vehicle seat lap belt through the
proper belt path and buckle it in. Then, pull
the lap belt tight while feeding all the slack
back into the retractor.
Page 73

73
8 Care &
Cleaning
Refer to seat pad care tag for washing
instructions.
Head Support Cover
Clean with a damp sponge using mild soap
and cool water. If needed, head support
cover may be removed for cleaning.
Remove harness and buckle strap. See
section 4-B.
To remove, raise the head support and undo
the 4 elastic loops.
Pull off head support cover as shown
Machine wash cover in cold water on
delicate cycle and drip-dry. DO NOT USE
BLEACH.
Reverse the steps to reattach the Head
Support Cover.
8-A Cleaning Seat Pad
Page 74

74
8 Care &
Cleaning
Seat Cover
Clean with a damp sponge using mild soap
and cool water. If needed, seat cover may
be removed for cleaning.
Remove harness and buckle strap. See
scetion 4-B.
Machine wash cover in cold water on
delicate cycle and drip-dry. DO NOT USE
BLEACH.
To remove, undo the 4 seat pad snaps.
Undo the elastic loops on the side of the
seat.
Pull front tabs out of the bottom of the seat.
Page 75

75
8 Care &
Cleaning
Remove seat cover bottom as shown.
Slide seat back cover pocket off of shell
corner.
Pull up on seat back cover as shown.
Reverse the steps to reattach the seat cover.
Page 76

76
8 Care &
Cleaning
WARNING! Inspect and clean buckle from
time to time to remove any objects or
debris that could prevent latching.
From bottom of car seat, rotate metal retainer
to side in order to push it through slot easier.
Pull buckle strap from car seat as shown.
To clean buckle, place in a cup of warm water
and gently agitate the buckle. Press the red
button several times while in the water.
DO NOT SUBMERGE THE BUCKLE STRAP. DO
NOT USE SOAPS, HOUSEHOLD DETERGENTS
or LUBRICANTS.
Shake out excess water and allow to air dry.
Repeat steps as needed until it fastens with a
click. Re-insert the buckle into the same slot it
was removed. Pull up on buckle strap to make
sure it is secured.
8-B Cleaning Buckle Strap
Page 77

77
8 Care &
Cleaning
Surface wash only with mild soap and damp cloth. DO NOT IMMERSE
THE HARNESS STRAPS or LOWER ANCHOR STRAP IN WATER Doing so
may weaken the straps.
If harness straps or lower anchor strap are frayed or heavily soiled, contact
Customer Service at www.gracobaby.com or 1-800-345-4109.
8-C Cleaning Harness and LATCH
Straps
Page 78

78
Notes
Page 79

79
Notes
Page 80

Store instruction manual in the
harness storage compartment
with the instruction book icon
as shown.
To purchase parts or accessories in the United States,
please contact us at the following:
www.gracobaby.com
or
1-800-345-4109
Replacement Parts
Page 81

ATLAS
SISTEMA DE SEGURIDAD PARA NIÑOS
www.gracobaby.com
PD319295D 9/16
No instale ni use este sistema
de seguridad para niños hasta
que haya leído y entendido las
instrucciones en este manual.
NO USAR DEBIDAMENTE ESTE
SISTEMA DE SEGURIDAD PARA
NIÑOS AUMENTA EL RIESGO
DE LESIONES GRAVES O LA
MUERTE EN UN ACCIDENTE O AL
DETENERSE REPENTINAMENTE.
Page 82

2
1-A Guía rápida a su manual
1-B ¡Bienvenido a la familia Graco!
1-C Modo correcto de uso
1-D Antes de Empezar
Registre este asiento de automóvil
Si necesita ayuda
Certificación
Vida útil del asiento de automóvil
Protección del asiento del vehículo
Durante el uso en clima cálido
1-E Advertencias de seguridad
1 Importante Páginas 6-21
2 Características Páginas 22-27
2-A Características del asiento de automóvil
Page 83

3
3-A Orientado hacia adelante
3-B Instalación orientado hacia delante con la correa del LATCH
3-C Instalación usando los cinturones de seguridad del vehículo
3 Orientado hacia adelante Páginas 28-39
4-A Uso como asiento elevado
4-B Instalación del asiento elevado
4 Asiento elevado Páginas 40-49
5-A Asegurar al niño con el arnés de 5 puntos
5-B gurar al niño en el asiento con respaldo
5-C Asegurar al niño en el asiento sin respaldo
5 Cómo asegurar al niño Páginas 50-60
Page 84

4
7-A Cómo sacar el LATCH y anclaje superior
7-B Elegir la ubicación del asiento en el vehículo
7-C Lugares peligrosos para el asiento en el vehículo
7-D Cinturones de seguridad del vehículo
8-A Limpieza de la almohadilla del asiento
8-B Limpieza de la correa de la hebilla
8-C Limpieza del arnés y de las correas del LATCH
7 Información del vehículo Páginas 62-72
6 Accesorios Página 61
8 Cuidado y limpieza Páginas 73-77
Requiere que lo arme un adulto
1. Soporte para vasos
Para sujetar los apoyavasos, enganche el
frente del apoyavaso al armazón y gírelo hacia
atrás hasta que se trabe en su lugar.
Page 85

5
1-A Guía rápida a su manual
Este asiento de automóvil es para niños:
Orientado hacia adelante:
22 a 65 libras (10 a 30 kg)
Asiento: 30 a 100 libras (14 a 45 kg)
Ensamblaje del Asiento de Automóvil (en modelos selectos)
Requiere que lo arme un adulto
1. Soporte para vasos
Para sujetar los apoyavasos, enganche el
frente del apoyavaso al armazón y gírelo hacia
atrás hasta que se trabe en su lugar.
Page 86

6
Conozca su asiento de automóvil
¿Qué lugar del asiento debo usar?
Consulte la sección 2-A para ver todas las características de este sistema del asiento
de automóvil.
El mejor lugar para colocar este asiento de automóvil es:
• El que recomienda el manual del dueño de su vehículo, y
• Resulta en una instalación segura de este asiento de automóvil
Algunos vehículos tienen requerimientos específicos sobre dónde se puede instalar
el asiento de automóvil, por lo tanto, consulte el manual del dueño de su vehículo
para obtener las posiciones disponibles para el asiento, si las hay. Por ejemplo,
algunas veces el centro del asiento trasero tiene un cinturón de seguridad del
vehículo que es solamente un cinturón de seguridad del vehículo para la falda, que
no se puede usar cuando el asiento de automóvil está en el modo asiento.
Consulte la sección 7-B, 7-C de este manual Y el manual del dueño de su vehículo.
6. Sujete los nudos laterales de la
almohadilla del asiento
Pase el nudo elástico de la almohadilla del asiento
a través de la guía del cinturón del vehículo en el
costado del asiento y conéctela al gancho como
se indica. Repita el procedimiento del otro lado.
Page 87

7
¿Qué método de instalación debo usar?
Este asiento de automóvil se puede instalar en su vehículo usando el
cinturón de seguridad del vehículo O el inferior de unión de anclaje. Ambos
sistemas son igualmente seguros. NO USE LOS DOS AL MISMO TIEMPO.
Cinturón de seguridad del vehículo: Consulte la sección 7 y el manual
del dueño de su vehículo para aprender cómo instalar su asiento de
automóvil con los cinturones de seguridad del vehículo.
LATCH: El sistema LATCH le permite sujetar apretadamente su asiento de
seguridad en el automóvil sin usar el cinturón de seguridad del vehículo.
Todos los vehículos modelo 2003 y más nuevos deben tener las barras de
los anclajes inferiores a pesar de que algunos fabricantes comenzaron a
incluir las barras de los anclajes inferiores antes. Los manuales del dueño de
algunos vehículos emplean el término ISOFIX para identificar las barras de
los anclajes inferiores.
Según las estadísticas de accidentes, el lugar
más seguro para su niño en cualquier vehículo
es el asiento trasero. El centro del asiento
trasero puede ser el lugar más seguro durante
un posible impacto lateral.
Page 88

8
Para tener la seguridad de que su niño esté debidamente asegurado, consulte la
sección 3 y 4 para que quepa su niño.
LATCH consiste en las barras de los anclajes inferiores y las barras de los
anclajes de sujeción superiores, que están incorporados a su vehículo y
ganchos que están incorporados al asiento de automóvil. Los anclajes de
sujeción superiores se usan EN LUGAR DEL cinturón de seguridad del vehículo
para asegurar el asiento de automóvil al vehículo. Los anclajes de sujeción
superiores se usan ADEMÁS de los anclajes inferiores O el cinturón de
seguridad del vehículo para asegurar un asiento de automóvil orientado hacia
adelante al vehículo.
Consulte el manual del dueño de su vehículo para obtener el lugar y
uso exacto.
¿Qué es LATCH?
Las Barras de
anclaje de sujeción
superiores del
vehículo
Las Barras de
anclaje inferiores
del vehículo
Un asiento típico de un
vehículo de pasajeros. Otros
tipos de vehículos podrían
tener las barras de los anclaje
inferiores en otros lugares.
Recodo del asiento
del vehículo
Page 89

9
Cuando lo instala orientado hacia adelante
Cinturón de seguridad del vehículo
Hay dos tipos de cinturones de seguridad del
vehículo que se puede usar. El cinturón para
la falda y el hombro o cinturón de seguridad
solamente para la falda.
Consulte la sección 3-C de este manual Y el
manual del dueño de su vehículo antes de
instalar
Sistema LATCH
LATCH consiste en anclajes inferiores, que están
incorporados a su vehículo y ganchos que están
incorporados en su asiento de automóvil.
Consulte la sección 3-B de este manual Y el
manual del dueño de su vehículo antes de instalar
El uso del asiento de automóvil correctamente
Para tener la seguridad de que su niño esté debidamente asegurado, consulte la
sección 3 y 4 para que quepa su niño.
Page 90

10
A
C
B
D
Altura del arnés orientado hacia adelante (A)
Las correas del arnés al nivel de o apenas por
arriba de los hombros del niño. Parte superior
de las orejas del niño por
debajo de la parte superior de la
apoyacabeza (B). Revise la sección 3
Posición de la hebilla (C)
La ranura correcta es la que está más cerca de su
niño sin estar debajo de él. Consulte la sección 3.
Tensión del arnés (D)
Si sus dedos pueden deslizarse de las correas del
arnés sin apretar las correas, está tensionado lo
suficiente. Consulte la sección 3 .
Para la orientado hacia adelante, usted necesita ajustar:
Page 91
11
B
A
D E
C
Use la correa de sujeción superior
cuando está orientado hacia
adelante (A) Cuando se utiliza
correcta, el anclaje de sujeción
superior ayuda a reducir el riesgo
de lesiones en un accidente o al
detenerse repentinamente.
Consulte la sección 3.
El asiento de automóvil no se
mueve más de 1 pulgada (2.5 cm)
en la vía del cinturón (B)
Consulte la sección 3.
Las correas del arnés están a o
apenas por arriba de los hombros
del niño (C)
Consulte la sección 3.
La presilla del pecho está a la
altura de las axilas (D) Consulte la
sección 3.
No se puede apretar las correas
del arnés en el hombro (E)
Consulte la sección 3.
Orientado hacia adelante
Page 92

12
Cinturón de seguridad del vehículo
Use solamente la configuración del
cinturón de seguridad para la falda y el
hombro.
Consulte la sección 4-B, 4-C de este
manual Y el manual del dueño de su
vehículo.
Cuando lo instala como asiento para niños
Page 93

13
Use el cinturón para la falda y
el hombro solamente
Posición del cinturón para
la falda
El cinturón para la falda debe estar
en frente del apoyabrazos y pasar
a través de las caderas y los
muslos de su niño.
Posición del cinturón para
el hombro
El cinturón para el hombro debe
cruzar el hombro entre el cuello y
el borde del hombro.
Para el asiento para niños, necesita ajustar:
Page 94

14
Nunca use solamente el cinturón
para la falda
Consulte la sección 4.
Cinturón para la falda en frente
del apoyabrazos y que cruza
bajo en las caderas y los muslos
Consulte la sección 4.
El cinturón para el hombro cruza
el hombro, entre el cuello y el
borde del hombro
Consulte la sección 4.
Asiento para niños
Page 95

15
1-B ¡Bienvenido a la familia Graco!
La seguridad de su niño depende de usted. Ningún asiento de automóvil
garantiza la protección contra lesiones en toda situación, pero su utilización
correcta ayuda a reducir el riesgo de lesiones graves o la muerte.
Aunque parezca fácil determinar cómo usar este asiento de automóvil
por su cuenta, debe seguir las instrucciones detalladas en este manual
de instrucciones para asegurar que los pasos que siguen se cumplen
correctamente.
22 libras
(10 kg)
30 libras
(14 kg)
40 libras
(18.1 kg)
65 libras
(30 kg)
100 libras
(45 kg)
Orientado hacia adelante con el arnés de 5
puntos 22 a 30 libras (10 a 14 kg) y puede
sentirse verticalmente sin ayuda DEBE estar
orientado hacia adelante. 30 a 65 lb (14 a 30 kg)
DEBERÍAN ser orientados hacia adelante.
Asiento elevado con cinturón de seguridad del vehículo
para el hombro y la falda 30 a 65 libras (14 a 30 kg)
PUEDE estar en modo Asiento elevado. Más de 65 libras
(30 kg) DEBE estar en modo de Asiento elevado.
1-C Modo correcto de uso
Page 96

16
1-D Preliminar
Por favor, llene la tarjeta de registro con franqueo prepagado sujetada al arnés y
envíela hoy mismo por correo o regístrese en línea en www.gracobaby.com/
carseatregistration.
Los sistemas de seguridad para niños pueden ser retirados del mercado por
problemas de seguridad. Debe registrar este sistema para que lo podamos contactar
en dicho caso. Envíe su nombre, dirección y el número del modelo del sistema y la
fecha de fabricación a:
Graco Children’s Products, Inc.
Attn: Customer Service
3 Glenlake Parkway Atlanta, GA 30328
o llame al 1-800-345-4109
o inscríbase en línea en www.gracobaby.com/carseatregistration
Para obtener información sobre el retiro del mercado, llame a la línea gratuita de
información de seguridad del vehículo automotor del Gobierno de EE.UU. al
1-888-327-4236 (TTY: 1-800-424-9153) o visite http://www.NHTSA.gov.
Registre este sistema de seguridad para niños
Page 97

17
Nombre del modelo ___________________
Número de modelo ____________________
Fecha de fabricación __________________
Fecha de compra _____________________
Como referencia futura o si cambia de dirección, registro el nombre del modelo,
número del modelo, fecha de fabricación y fecha de compra de este asiento de
automóvil en el lugar que sigue. Puede encontrar esta información en la tarjeta de
registro si todavía la tiene o en la etiqueta con la fecha que está en el respaldo del
asiento de automóvil.
En los EE.UU., por favor, comuníquese con nuestro Departamento de Servicio al
Cliente con cualquier pregunta que pudiera tener sobre piezas, uso o mantenimiento.
Cuando se comunica con nosotros, por favor tenga listo el número de modelo y
la fecha de fabricación para que lo podamos ayudar más eficientemente. Estos
números pueden encontrarse en una etiqueta ubicada en el respaldo de su asiento
de automóvil.
Para recursos adicionales o para que un técnico en seguridad de pasajeros infantiles
inspeccione su asiento, por favor visite los siguientes sitios Web:
www.nhtsa.gov • www.seatcheck.org • www.safekids.org • www.cpsc.gov
Si necesita ayuda
Page 98

18
DEJE de usar este asiento de automóvil y tírelo a la basura 7 años después de la
fecha de fabricación. Busque la etiqueta en el respaldo del asiento de automóvil.
Graco Children’s Products Inc. aconseja no prestar ni transferir un asiento de
automóvil a menos que usted conozca la historia completa del producto. Tampoco
aconsejamos la compra de un asiento de automóvil de segunda mano.
Certificación
Vida útil del asiento de automóvil
Proteja el asiento del vehículo. Use una alfombrilla, una toalla o una manta fina
debajo y detrás del asiento de automóvil.
Protección del asiento del vehículo
¡ADVERTENCIA!
Este sistema de seguridad para niños cumple con o excede todos los requisitos requeridos
por la Norma Federal 213 de Seguridad de Automóviles para uso en automóviles.
Este sistema de seguridad para niños está certificado para su uso en aeronaves
solamente cuando se usa con el sistema de arnés interno. Usar solamente en
asientos de aeronave orientados hacia adelante. Seguir las instrucciones para
instalación en el vehículo. Consulte la sección 3-C.
Este sistema de seguridad para niños NO está certificado para su uso en
aeronaves cuando se usa como asiento porque las aeronaves no tienen
cinturones para los hombros.
Consulte a la aerolínea sobre sus políticas específicas.
Page 99

19
¡ADVERTENCIA!
Las piezas del asiento de automóvil se pueden calentar mucho cuando están bajo
el sol o cuando hace calor. Para evitar quemaduras, compruebe siempre la
temperatura del asiento antes de sentar al niño.
1-E Advertencias de seguridad
Ningún asiento de automóvil garantiza la protección
contra lesiones en toda situación, pero su utilización
correcta ayuda a reducir el riesgo de lesiones graves o la
muerte. LEA ESTE MANUAL CON ATENCION.
Uso durante clima cálido
No cumplir estas instrucciones y las de las etiquetas del sistema
de seguridad para niños podría causar el choque del niño contra el
interior del vehículo durante una parada repentina o un accidente.
Page 100

20
! Consulte el manual del dueño de su vehículo para obtener más
información sobre las bolsas de aire y el uso de un asiento de automóvil.
! Si su vehículo no tiene un asiento trasero, consulte el manual del dueño
de su vehículo.
! Elija el lugar adecuado para el asiento de automóvil en su vehículo.
! Sujete el asiento de automóvil con el cinturón de seguridad del
vehículo o el sistema LATCH que se ha colocado correctamente según las
indicaciones en este manual.
! El sistema de cinturones de seguridad del vehículo DEBE sujetar
firmemente el asiento de automóvil. No todos los cinturones de seguridad
de todos los vehículos se pueden utilizar con un asiento de automóvil.
! Si el cinturón de seguridad del vehículo no sujeta firmemente el asiento
de automóvil, lea la sección 7-D “cinturones de seguridad del vehículo” y
el manual del dueño de su vehículo.
! Sujete siempre el asiento de automóvil con el sistema LATCH o el
cinturón de seguridad del vehículo, incluso cuando esté desocupado. En
un accidente, un asiento de automóvil sin sujetar puede lastimar a los
pasajeros.
! Se debe reemplazar el asiento de automóvil tras haber sido sometido
a un accidente. ¡NO lo use de nuevo! Un accidente podría causar daños
ocultos y su utilización repetida podría causar lesiones graves o la
muerte.
 Loading...