

Page 1
Quick Start Guide for Protective Coating Handheld Sprayers
ATTENTION -
Maximum setting may not give the best or suitable fan pattern. Please read Quick Start Guide for details.
The pressure setting for this handheld sprayer is adjusted in a different manner than larger sprayers.
WARNING
This guide is intended as a quick reference. See Operation manual provided with your sprayer for full instructions on proper use and all safety warnings.
To help prevent fire and explosion: Always connect the ground wire provided when spraying flammable materials or static-producing oil-based materials.
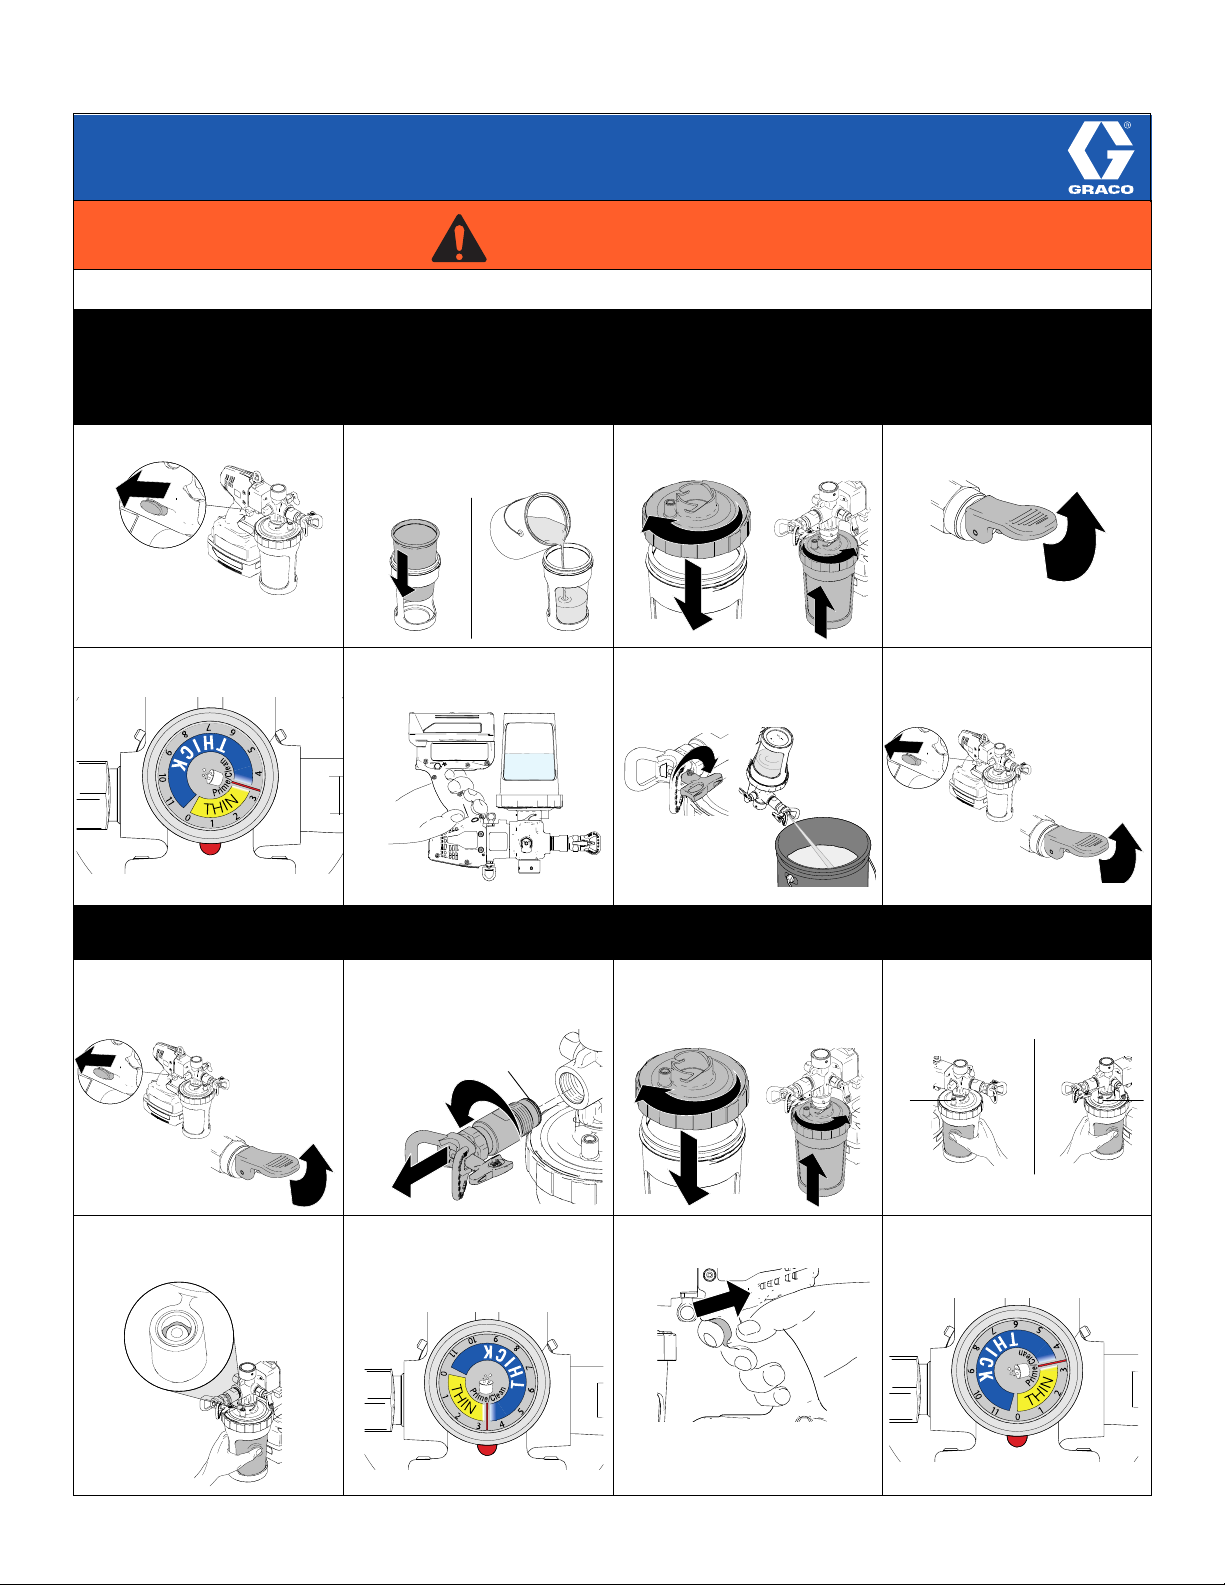
EVERY STARTUP -
FLUSHING OUT STORAGE MATERIAL
NOTE: Spraying water, solvents, and thin materials (low viscosity materials) at high pressure (setting “2” or higher with
yellow light flashing) can result in temporary pump leaking. To avoid, read and follow instructions (Quick Guide or Manual) on
how to properly adjust pressure.
1. Engage trigger lock. 2. Install and fill liner 1/2 full with
MUST
5. You
to setting “1”.
set pressure control
appropriate cleaning fluid for
material about to be sprayed.
6. Disengage trigger lock, turn
sprayer upside-down and
trigger for 10 seconds.
3. Thread lid onto cup and
connect cup to sprayer.
7. Reverse tip to UNCLOG
position. Put prime/pressure
relief valve to spray position
and trigger for 5 seconds.
4. Put prime/pressure relief valve
in UP position.
8. Engage trigger lock and put
prime/pressure relief valve UP
to release pressure. Remove
and dispose material cup.
LOADING SPRAY MATERIAL
1. Engage trigger lock and put
prime/pressure relief valve UP
to release pressure. Remove
and dispose material cup.
5. Squeeze liner to purge air
through check valve until
material reaches check valve.
3A2961C Copyright 2012, Graco Inc.
2. Unthread front valve housing
from sprayer, install filter if
needed, then reassemble.
6. You
MUST
relief valve UP to priming position. Turn pressure control
knob to prime/clean position in
line with red indicator dot.
Filter
put prime/pressure
3. Install liner into material cup
and fill with material. Thread lid
onto material cup and connect
cup to sprayer.
7. Disengage trigger lock and
trigger sprayer for 3 seconds.
4. To purge the maximum amount
of air out of the liner, slightly tilt
the sprayer so the check valve
is the highest point.
8. Turn pressure control knob
counter-clockwise to lowest
position. Put prime/relief valve
to DOWN position to spray.
Page 2
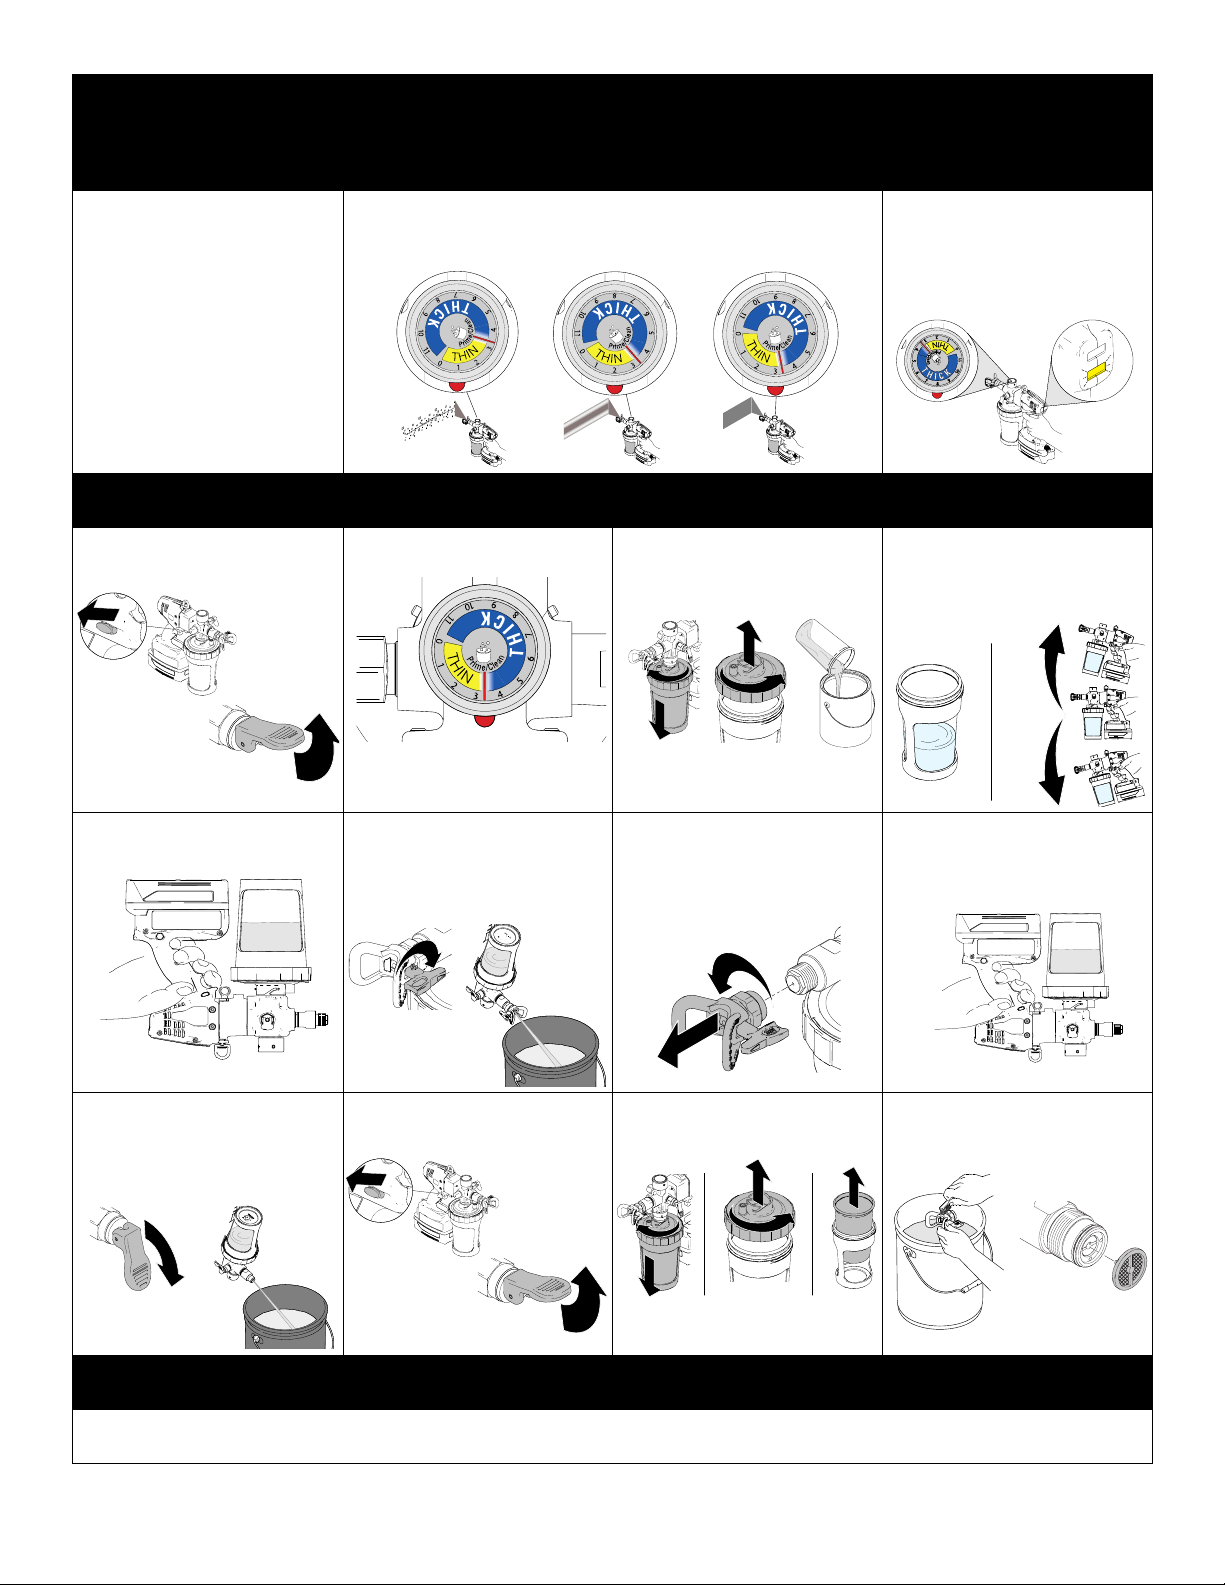
ADJUSTING PRESSURE
(Maximum pressure is NOT proper for all materials)
NOTE: Spraying water, solvents, and thin materials (low viscosity materials) at high pressure (setting “2” or higher with
yellow light flashing) can result in temporary pump leaking. To avoid, read and follow instructions (Quick Guide or Manual) on
how to properly adjust pressure.
1. To reduce overspray and
extend battery life, always
spray at lowest pressure that
produces desired spray
pattern.
CLEAN UP
1. Engage trigger lock and put
prime/pressure relief valve UP
to release pressure.
MUST
2. You
of “1” or less until desired spray pattern is achieved. Put pressure
relief handle in UP position to turn pressure control knob, then return
handle to DOWN position to spray.
2. Turn pressure control knob to
prime/clean position.
start with dial at “1” and gradually increase by increments
3.
Remove cup from sprayer and
lid from cup. Remove material
liner and lid. Properly dispose
lid and any excess material.
3. If yellow light is flashing while
triggering, pressure is set too
high. You
pressure until yellow light no
longer flashes, increase tip
size, or do not thin material as
much.
4. Insert a new liner into cup and
fill 1/3 full with appropriate
flushing fluid. Screw on lid and
attach cup to sprayer. Shake
sprayer to clean.
MUST
turn down
5. Disengage trigger lock, turn
sprayer upside-down and
trigger for 15 seconds.
9. Put prime/pressure relief valve
DOWN to spray position. Spray
remaining amount of fluid
through front of sprayer. If
sprayer is not completely clean,
repeat steps 8 and 9.
STORAGE
6. Reverse tip to UNCLOG position. Put prime/pressure relief
valve DOWN to spray position,
turn sprayer upside down, and
trigger sprayer for 2 seconds
only.
10. Engage trigger lock and put
prime/pressure relief valve UP
to release pressure.
7. Engage trigger lock. Put
prime/pressure relief valve in
UP position. Unthread
tip/guard from sprayer and
soak in flushing fluid. Remove
cup and properly dispose fluid.
11. Remove material liner and lid
and properly dispose. Properly
dispose used fluid.
8. Refill liner 1/3 full. Disengage
trigger lock, turn sprayer
upside-down and trigger
sprayer for approximately 15
seconds to recirculate material.
12. Clean Spray Tip/Guard
assembly with clean flushing
fluid. Use a soft brush if
needed. Remove material filter.
For storage, fill material cup 1/3 full with mineral spirits or dilute a 4 oz. bottle of Pump Armor concentrate with 4 oz. of water in material cup and
run through pump. Properly dispose storage fluid.
3A2961C Copyright 2012, Graco Inc.
 Loading...