

Page 1
Instructions
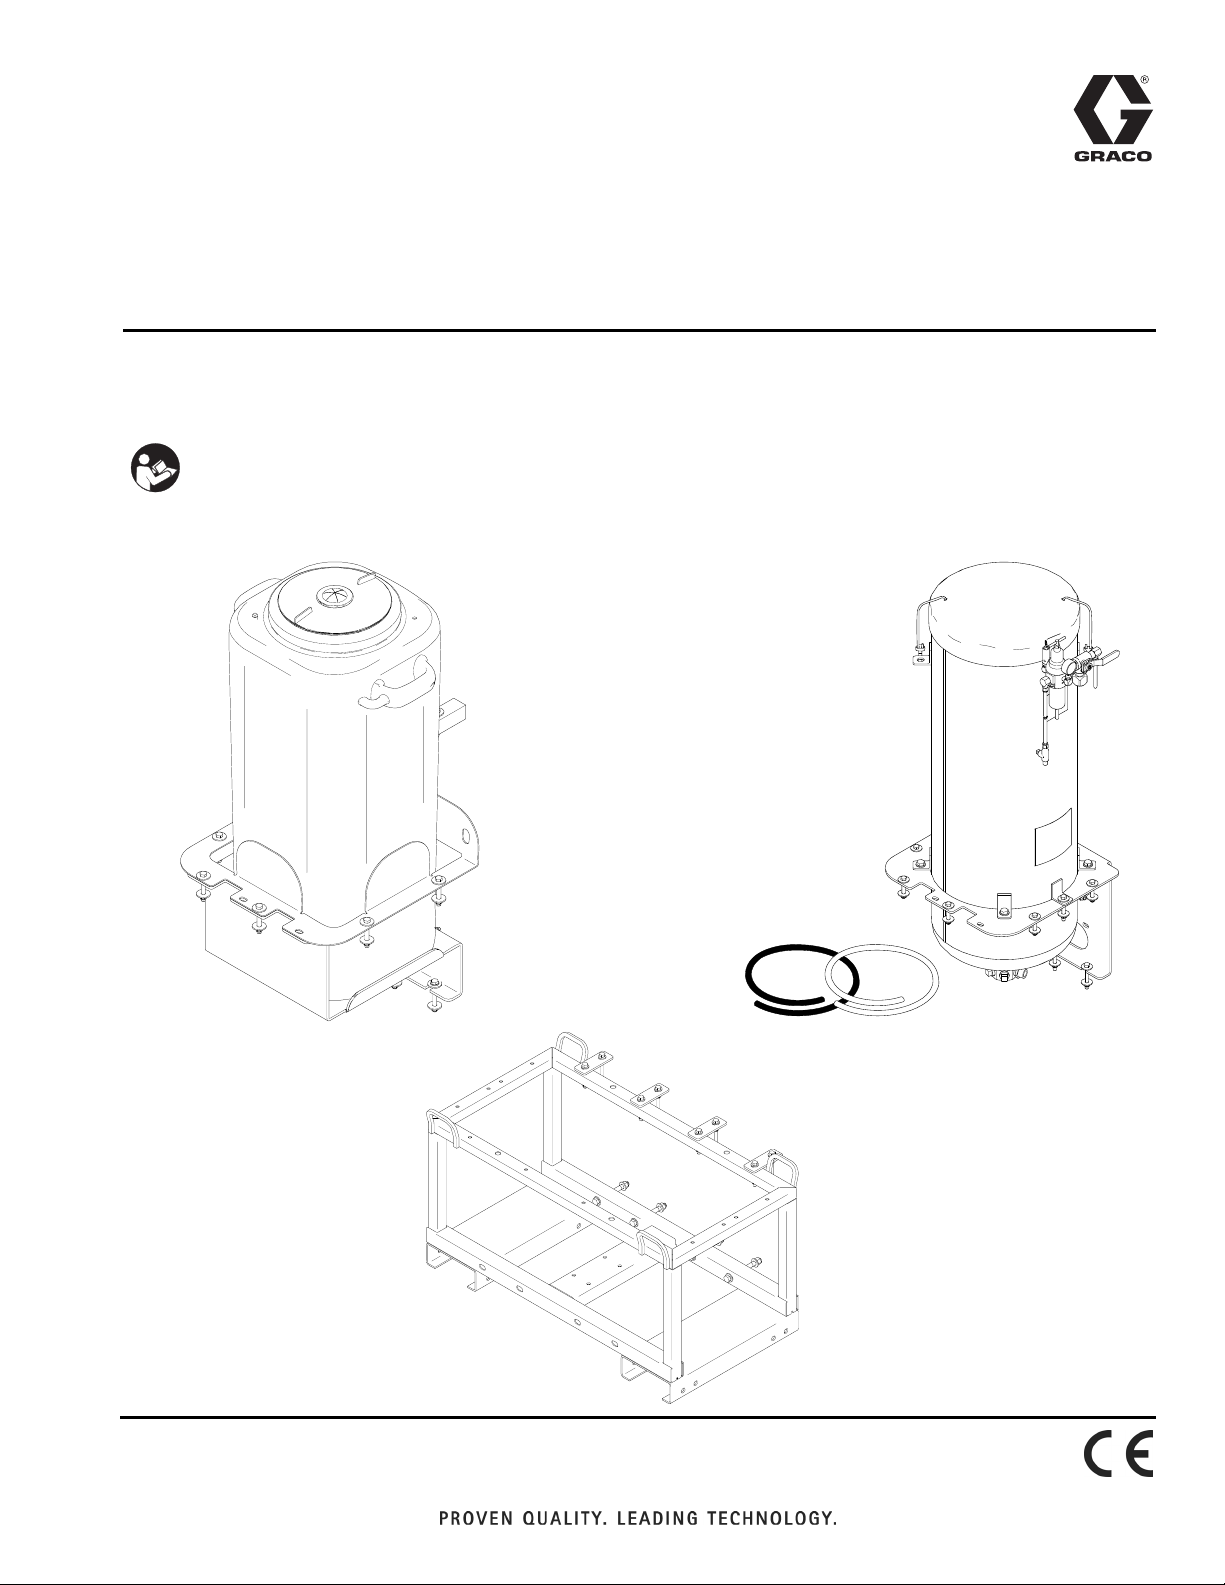
Bead Tank Kit, Paint Tank Kit, and Accessory Frame Kit
™
For RoadLazer
Model 24G769 - Paint Tank Kit
Model 24G765 - Bead Tank Kit
Model 24H585 - Accessory Frame Kit
Important Safety Instructions
For complete warnings and safety instructions see RoadLazer™
RoadPak
™
Line Striper System manual. Save these instructions.
Paint Tank Kit
RoadPak™ Line Striping System
Bead Tank Kit
3A1302D
EN
ti17165a
ti16794a
Accessory Frame Kit
ti17163a
Page 2
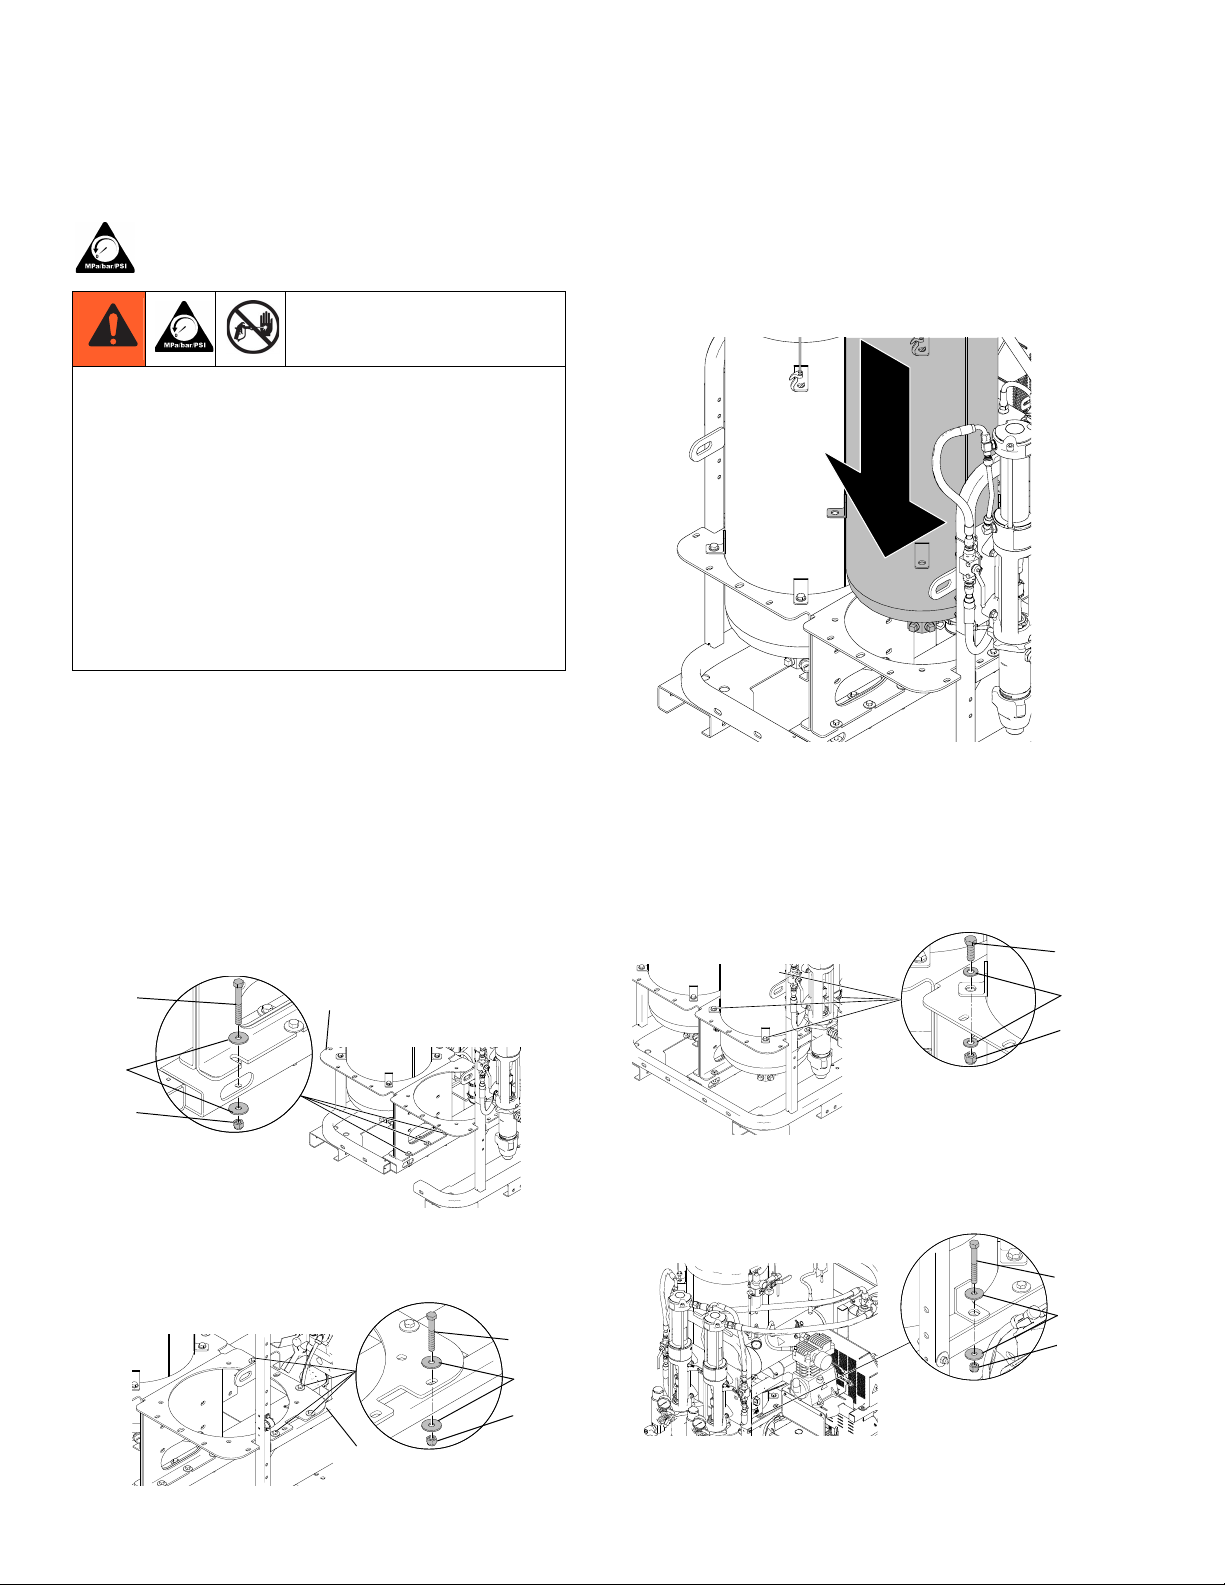
Pressure Relief Procedure
Follow the Pressure Relief Procedure whenever
you see this symbol.
The system pressure must be manually relieved to prevent the system from starting or spraying accidentally.
Fluid under high pressure can be injected through the
skin and cause serious injury. To reduce the risk of an
injury from injection, splashing fluid, or moving parts,
follow the Pressure Relief Procedure in manual
3A1214 whenever you:
• are instructed to relieve the pressure
• stop spraying
• check or service any of the system equipment
• install or clean the spray tip
1. Relieve pressure. See Pressure Relief Procedure
in manual 3A1214.
NOTE: If installing to accessory frame kit (24H585)
install four bolts (18) and washers (17) to top of
bracket (2). Thread nuts (15) onto bolts and torque
to 15 ft-lb (20.3 N•m).
4. Use hoist (or other lifting equipment) to lift bead tank
(1) and lower it into tank mounting bracket (2).
ti16798a
Second Bead Tank Installation
1. Place bead tank mounting bracket (2) into position
on RoadPak frame.
2. Install three bolts (16) and washers (17) on bottom
of bracket (2). Thread nuts (15) onto bolts and
torque to 15 ft-lb (20.3 N•m).
16
17
15
3. Install four bolts (18) and washers (17) to top of
bracket (2). Thread nuts (15) onto bolts and torque
to 15 ft-lb (20.3 N•m).
2
ti16797a
18
17
15
NOTE: Make sure bead tank is positioned with air
regulator inlet facing toward inside of RoadPak.
5. Install four bolts (18) and washers (17) at each corner bead tank mount. Thread nut (15) onto bolts and
torque to 27 ft-lb (36.6 N•m).
18
17
15
ti16799a
6. Install bolt (12) and washers (13) into center bead
tank mount. Thread nut (14) onto bolt and torque to
15 ft-lb (20.3 N•m).
12
13
14
ti16800a
2
2 3A1302D
ti16796a
Page 3
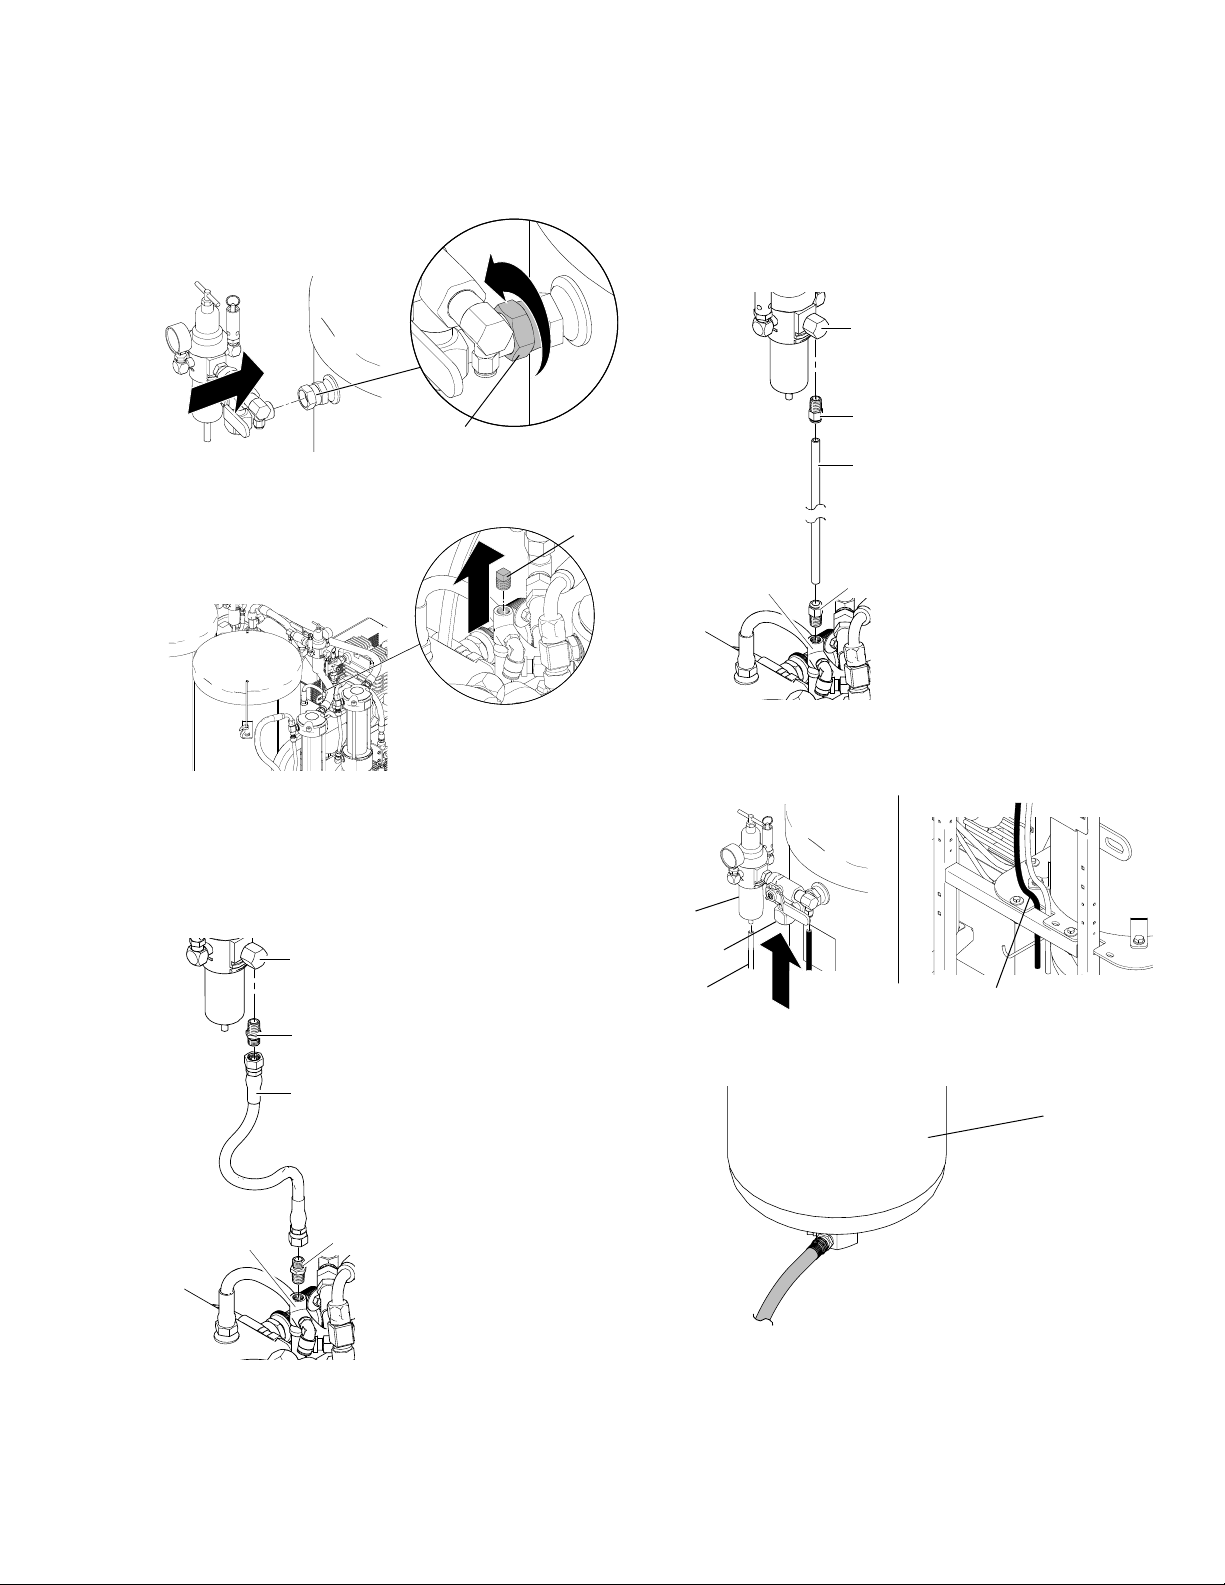
7. Connect air regulator assembly to bead tank air inlet
and tighten swivel (22).
If assembling second bead tank to remote location:
10. Tighten air fitting (29) to T-fitting (39). Tighten air fitting (29) to elbow fitting (24). Cut air hose (31) to
desired length and connect to air fittings (29).
24
22
ti16805a
8. Remove plug (40) from T-fitting (39) assembled to
air tank on RoadPak unit.
40
ti16808a
If assembling second bead tank to RoadPak frame:
9. Apply thread sealant to fitting (41) and tighten to
T-fitting (39). Apply thread sealant to fitting (41) and
tighten to elbow fitting (24). Connect coupled hose
(42) to fittings (41).
24
29
31
39
29
ti17168a
11. Connect dark hose (20) into air fitting (29) and clear
hose (32) to bottom of air regulator (11). Route
hoses through slot on tank bracket.
11
29
32
20
ti16806a
41
12. Connect bead hose (not included) to bottom of bead
tank (1).
42
1
39
41
ti17167a
ti16598a
NOTE: Bead tank kit comes with two hose fittings
(10) and three plugs (9) shipped with hose kit.
3A1302D 3
Page 4

Parts
Parts
37
12
13
13
14
3
4
43
22
21
11
19
28
1
8
9
2
6
24
32
10
343534
36
25
26
5
6
7
29
31
30
40
39
41
29
42
20
29
41
18
17
17
15
Ref. Part Description Qty.
1 24F496 TANK, bead, 36 gal., painted 1
2 16G777 PLATE, mount, bead tank, painted 1
3 16G166 COVER, bead tank 1
4 119771 STRAP, cover 2
5 100030 BUSHING 1
6 100840 FITTING, elbow, street 2
7 113292 VALVE, ball, 3 way 1
8 191222 FITTING 1
9 104663 PLUG, pipe 3
10 111834 NIPPLE, pipe, hex 1
11 113291 REGULATOR, air 1
12 100017 SCREW, cap, hex hd 4
13 109570 WASHER, plain 8
14 801020 NUT, lock, hex 4
15 101566 NUT, lock 10
16 116935 SCREW, cap hex hd 4
17 108851 WASHER, plain 17
18 BOLT, hex hd, 3/8 X 2.5 6
19 104655 GAUGE, press air 1
20 191267 HOSE, air 1
ti16801b
16
1717
15
Ref. Part Description Qty.
21 157191 FITTING, adapter (1/2 npt x 3/4 npt) 1
22 157785 FITTING, swivel 1
24 164259 FITTING, elbow, street 1
25 166999 FITTING, elbow, street 1
26 159239 FITTING, nipple, pipe, rdcg 1
28 108124 VALVE, safety, 75 psi 1
29 113319 FITTING, air 3
30 158683 FITTING, elbow, 90 deg 1
31 191643 HOSE, air, 3/8 1
32 16H355 TUBE, drain 1
34 100527 WASHER, plain 4
35 100521 SCREW, cap hex hd 2
36 111040 NUT, lock, insert, nylock, 5/16 2
37 16H060 LABEL, pressure on/off 1
39 106228 FITTING, tee, street 1
40 100509 PLUG, pipe 1
41 162453 FITTING, 1/4 npsm x 1/4 npt 1
42 512616 HOSE, coupled, 061120 1
43 15A552 SEAL, replacement 1
‡ Used if mounting more than 2 bead tanks to system.
4 3A1302D
Page 5
33 Gallon Paint Tank Kit (24G769)
33 Gallon Paint Tank Kit (24G769)
If Installing to RoadPak Frame:
1. Place paint tank bracket (1) into position on frame.
2. Install three bolts (9) and washers (7) on bottom of
support bracket (1). Thread nuts (8) onto bolts and
torque to 15 ft-lb (20.3 N•m).
9
7
8
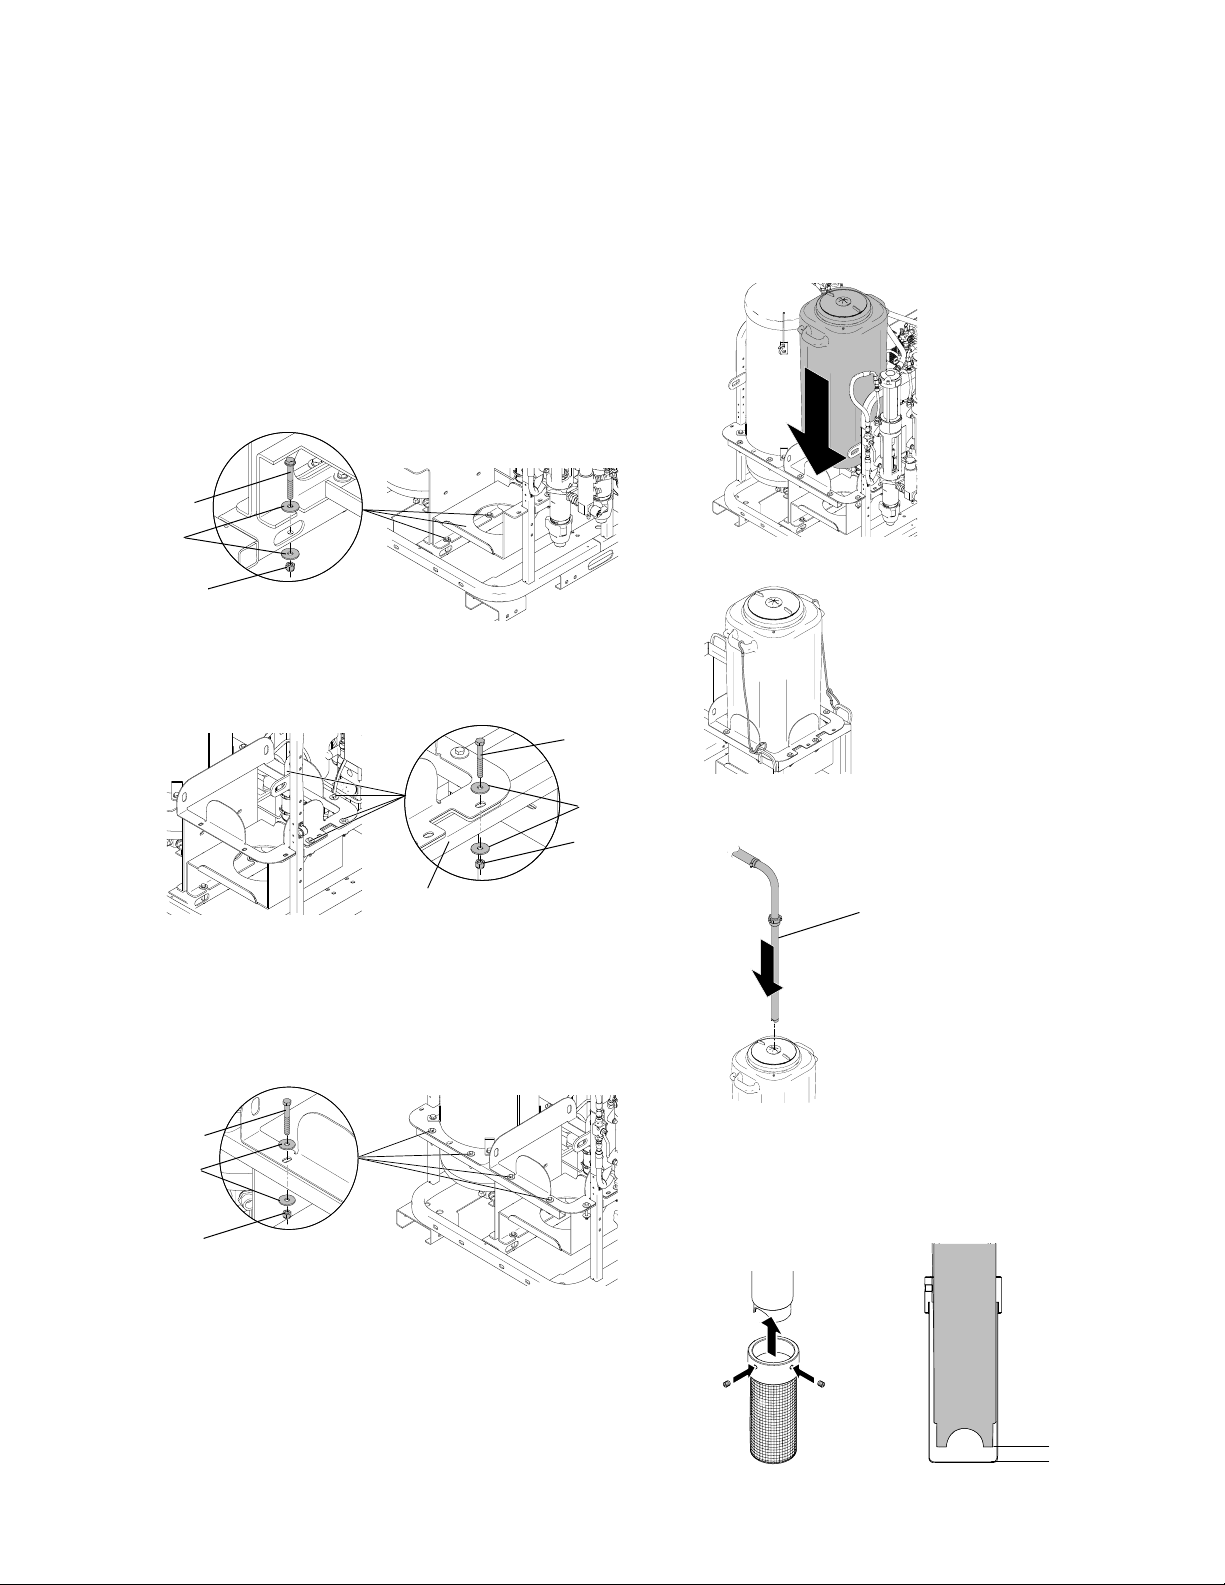
3. Install four bolts (6) and washer (7) to secure sleeve
bracket (2) and support bracket (1) to the frame.
Thread nuts (8) onto bolts and torque to 15 ft-lb.
ti17195a
6
7
8
5. Insert paint tank (3) into sleeve bracket.
ti17189a
6. Secure paint tank with tie-down straps.
ti17197a
7. Insert suction tube (with strainer removed) through
top grommet (5).
1
ti17299a
4. Install two bolts (6) and washer (7) to support bar
(14) and paint tank bracket (2). Thread nuts (8) onto
bolts and torque to 15 ft-lb (20.3 N•m). Install two
bolts (6) and washer (7) to support bar (14) and to
bead tank bracket. Thread nuts (8) onto bolts and
torque to 15 ft-lb (20.3 N•m).
6
7
8
ti17192a
5
ti17191a
NOTE: Optional Bottom Feed Fittings Kit 24J149 is
available for paint tank.
8. Connect strainer onto suction set. Strainer should
be about 1/2 in. from bottom of suction set.
ti16553a
1/2 in.
3A1302D 5
Page 6

33 Gallon Paint Tank Kit (24G769)
If Installing to RoadPak Accessory Frame:
1. Place paint tank bracket (1) into position on frame.
2. Install three bolts (9) and washers (7) on bottom of
support bracket (1). Thread nuts (8) onto bolts and
torque to 15 ft-lb (20.3 N•m).
1
7
8
ti17193a
3. Install six bolts (6) and washer (7) to secure sleeve
bracket (2) and support bracket (1) to the accessory
frame. Thread nuts (8) onto bolts and torque to 15
ft-lb (20.3 N•m).
6
5. Secure paint tank with tie-down straps.
ti17197a
6. Insert suction tube (with strainer removed) through
top grommet (5).
4. Insert paint tank (3) into sleeve bracket.
ti17190a
7
8
ti17194a
ti17191a
NOTE: Optional Bottom Feed Fittings Kit 24J149 is
available for paint tank.
7. Connect strainer onto suction set. Strainer should
be about 1/2 in. from bottom of suction set.
1/2 in.
ti16553a
6 3A1302D
Page 7

Parts
33 Gallon Paint Tank Kit (24G769)
5
16
15
17
13
3
Parts List
Ref. Part Description Qty.
1 24H831 BRACKET, Roadpak paint tank,
painted
2 24H832 SLEEVE, Roadpak, painted 1
3 24J353 TANK, paint, with 8 in. man-way
(includes 15)
5 194420 GROMMET, hopper 1
6 106212 SCREW, cap, hex HD 8
7 108851 WASHER, plain 22
8 101566 NUT, lock 11
9 116935 SCREW, cap, flnghd 3
10 100527 WASHER, plain 4
11 111040 NUT, lock, insert, Nylock, 5/16 2
12 100521 SCREW, cap hex HD 2
13 107570 PLUG, pipe, square HD 1
14 24J370 SUPPORT, paint tank sleeve,
painted
15 16J474 COVER, with opening and bulk-
head rim
16 16J473 COVER, with opening 1
17 125240 COVER, without opening 1
66
777
7
8
12
8
1
1010
14
2
11
9
77
8
ti17166b
1
1
1
1
3A1302D 7
Page 8

Accessory Frame Kit 24H585
Accessory Frame Kit 24H585
Installation
1. Load assembled accessory frame to desired location on vehicle.
2. Secure the accessory frame by strapping all four
corners down to the vehicle or by bolting the accessory frame to the RoadPak frame.
ti17196a
3. If bolting to RoadPak frame: Assemble four frame
straps (2) to accessory frame (1) and to RoadPak
frame by installing eight bolts (6) and washers (8).
Thread nuts (9) onto bolts and torque to 15 ft-lb
(20.3 N•m).
4. Install four bolts (3) and washers (4) to connect
accessory frame (1) and RoadPak frame. Thread
nuts (5) to bolts and torque to 27 ft-lb (36.6 N•m).
ti17187a
3
5
4
6
2
8
9
8 3A1302D
1
ti17188a
Page 9

Parts
Accessory Frame Kit 24H585
6
8
2
1
8
9
Parts List
Ref. Part Description Qty.
1 24H826 FRAME, Roadpak accessory 1
2 24J016 STRAP, frame, painted 4
3 115211 SCREW, cap, hex HD 4
4 109570 WASHER, plain 8
5 801020 NUT, lock, hex 4
6 100454 SCREW, cap hex HD 8
8 100023 WASHER, flat 16
9 101566 NUT, lock 8
ti17164a
5
4
4
3
3A1302D 9
Page 10

Graco Standard Warranty
Graco warrants all equipment referenced in this document which is manufactured by Graco and bearing its name to be free from defects in
material and workmanship on the date of sale to the original purchaser for use. With the exception of any special, extended, or limited warranty
published by Graco, Graco will, for a period of twelve months from the date of sale, repair or replace any part of the equipment determined by
Graco to be defective. This warranty applies only when the equipment is installed, operated and maintained in accordance with Graco’s written
recommendations.
This warranty does not cover, and Graco shall not be liable for general wear and tear, or any malfunction, damage or wear caused by faulty
installation, misapplication, abrasion, corrosion, inadequate or improper maintenance, negligence, accident, tampering, or substitution of
non-Graco component parts. Nor shall Graco be liable for malfunction, damage or wear caused by the incompatibility of Graco equipment with
structures, accessories, equipment or materials not supplied by Graco, or the improper design, manufacture, installation, operation or
maintenance of structures, accessories, equipment or materials not supplied by Graco.
This warranty is conditioned upon the prepaid return of the equipment claimed to be defective to an authorized Graco distributor for verification of
the claimed defect. If the claimed defect is verified, Graco will repair or replace free of charge any defective parts. The equipment will be returned
to the original purchaser transportation prepaid. If inspection of the equipment does not disclose any defect in material or workmanship, repairs
will be made at a reasonable charge, which charges may include the costs of parts, labor, and transportation.
THIS WARRANTY IS EXCLUSIVE, AND IS IN LIEU OF ANY OTHER WARRANTIES, EXPRESS OR IMPLIED, INCLUDING BUT NOT
LIMITED TO WARRANTY OF MERCHANTABILITY OR WARRANTY OF FITNESS FOR A PARTICULAR PURPOSE.
Graco’s sole obligation and buyer’s sole remedy for any breach of warranty shall be as set forth above. The buyer agrees that no other remedy
(including, but not limited to, incidental or consequential damages for lost profits, lost sales, injury to person or property, or any other incidental or
consequential loss) shall be available. Any action for breach of warranty must be brought within two (2) years of the date of sale.
GRACO MAKES NO WARRANTY, AND DISCLAIMS ALL IMPLIED WARRANTIES OF MERCHANTABILITY AND FITNESS FOR A
PARTICULAR PURPOSE, IN CONNECTION WITH ACCESSORIES, EQUIPMENT, MATERIALS OR COMPONENTS SOLD BUT NOT
MANUFACTURED BY GRACO. These items sold, but not manufactured by Graco (such as electric motors, switches, hose, etc.), are subject to
the warranty, if any, of their manufacturer. Graco will provide purchaser with reasonable assistance in making any claim for breach of these
warranties.
In no event will Graco be liable for indirect, incidental, special or consequential damages resulting from Graco supplying equipment hereunder, or
the furnishing, performance, or use of any products or other goods sold hereto, whether due to a breach of contract, breach of warranty, the
negligence of Graco, or otherwise.
FOR GRACO CANADA CUSTOMERS
The Parties acknowledge that they have required that the present document, as well as all documents, notices and legal proceedings entered into,
given or instituted pursuant hereto or relating directly or indirectly hereto, be drawn up in English. Les parties reconnaissent avoir convenu que la
rédaction du présente document sera en Anglais, ainsi que tous documents, avis et procédures judiciaires exécutés, donnés ou intentés, à la suite
de ou en rapport, directement ou indirectement, avec les procédures concernées.
Graco Information
For the latest information about Graco products, visit www.graco.com.
TO PLACE AN ORDER, contact your Graco distributor or call 1-800-690-2894 to identify the nearest distributor.
All written and visual data contained in this document reflects the latest product information available at the time of publication.
Graco reserves the right to make changes at any time without notice.
For patent information, see www.graco.com/patents.
Original instructions. This manual contains English. MM 3A1302
Graco Headquarters: Minneapolis
International Offices: Belgium, China, Japan, Korea
GRACO INC. P.O. BOX 1441 MINNEAPOLIS, MN 55440-1441
Copyright 2010, Graco Inc. is registered to ISO 9001
www.graco.com
Revised December 2013
 Loading...