

Page 1
Repair-Parts
Horizontal
3A0020A
Hydraulic Driver
For use with two horizontally mounted proportioning pumps. For professional use only.
Not for use in explosive atmospheres.
258771 - Horizontal Hydraulic Driver
1200 psi (8.2 MPa, 82.7 bar) Maximum Working Pressure
Important Safety Instructions
Read all warnings and instructions in this manual
and all supplied manuals. Save all instructions.
ENG
r_258640_3A0020A_1h
Page 2
Warnings
Contents
Warnings . . . . . . . . . . . . . . . . . . . . . . . . . . . . . . . . . 2
Repair . . . . . . . . . . . . . . . . . . . . . . . . . . . . . . . . . . . . 3
Disassembly . . . . . . . . . . . . . . . . . . . . . . . . . . . . 3
Assembly . . . . . . . . . . . . . . . . . . . . . . . . . . . . . . . 4
Parts . . . . . . . . . . . . . . . . . . . . . . . . . . . . . . . . . . . . . 6
Dimensions . . . . . . . . . . . . . . . . . . . . . . . . . . . . . . . . 8
Mounting Hole Layout . . . . . . . . . . . . . . . . . . . . . . . 8
Technical Data . . . . . . . . . . . . . . . . . . . . . . . . . . . . . 9
Graco Standard Warranty . . . . . . . . . . . . . . . . . . . 10
Graco Information . . . . . . . . . . . . . . . . . . . . . . . . . 10
Warnings
The following warnings are for the setup, use, grounding, maintenance, and repair of this equipment. The exclamation point symbol alerts you to a general warning and the hazard symbol refers to procedure-specific risk. Refer back
to these warnings. Additional, product-specific warnings may be found throughout the body of this manual where
applicable.
WARNING
EQUIPMENT MISUSE HAZARD
Misuse can cause death or serious injury.
• Do not operate the unit when fatigued or under the influence of drugs or alcohol.
• Do not exceed the maximum working pressure or temperature rating of the lowest rated system
component. See Technical Data in all equipment manuals.
• Do not leave the work area while equipment is energized or under pressure. Turn off all equipment
and follow the Pressure Relief Procedure when equipment is not in use.
• Check equipment daily. Repair or replace worn or damaged parts immediately with genuine manufacturer’s replacement parts only.
• Do not alter or modify equipment.
• Use equipment only for its intended purpose. Call your distributor for information.
• Route hoses and cables away from traffic areas, sharp edges, moving parts, and hot surfaces.
• Do not kink or over bend hoses or use hoses to pull equipment.
• Keep children and animals away from work area.
• Comply with all applicable safety regulations.
BURN HAZARD
Equipment surfaces and fluid that’s heated can become very hot during operation. To avoid severe
burns:
• Do not touch hot fluid or equipment.
• Wait until equipment/fluid has cooled completely.
PERSONAL PROTECTIVE EQUIPMENT
You must wear appropriate protective equipment when operating, servicing, or when in the operating
area of the equipment to help protect you from serious injury, including eye injury, inhalation of toxic
fumes, burns, and hearing loss. This equipment includes but is not limited to:
• Protective eyewear
• Clothing and respirator as recommended by the fluid and solvent manufacturer
•Gloves
• Hearing protection
2 3A0020A
Page 3
Repair
Repair
Disassembly
1. Relieve pressure. See system manual for pressure
relief instructions.
NOTICE
Recommended Hydraulic Oil
Use Graco-approved Hydraulic Oil, Part No. 169236
(5 gal) or 207428 (1 gal)) or a premium, ISO grade
46 petroleum-based hydraulic oil containing rust and
oxidation inhibitors and anti-wear agents.
Before using any other type of oil in this motor, contact your Graco distributor. Unauthorized use of
lesser grade oil or substitutes may void the warranty.
Hydraulic Oil Working Temperature
The maximum hydraulic oil operating temperature is
160 °F (71 °C). The motor seals will wear faster and
leakage may occur if the pump is operated at higher
oil temperatures.
If the hydraulic oil temperature approaches 160 °F
(71 °C), check the hydraulic fluid supply cooling system, filters, etc. and clean or repair as needed.
Keep the hydraulic system clean
To reduce the risk of damaging the hydraulic driver,
verify that the hydraulic power supply fluid lines and
reservoir are clean and free from contaminants.
Carefully follow the manufacturer’s recommendations on reservoir and filter cleaning, flushing, and
periodic changes of hydraulic fluid.
Always plug the hydraulic inlets, outlets and lines
when disconnecting them to avoid introducing dirt
and other contaminants into the system.
2. Use two people to lift and clamp the cylinder (1) in a
vise.
NOTICE
To prevent damage to sealing surfaces, do not clamp
any sealing surfaces in the vise.
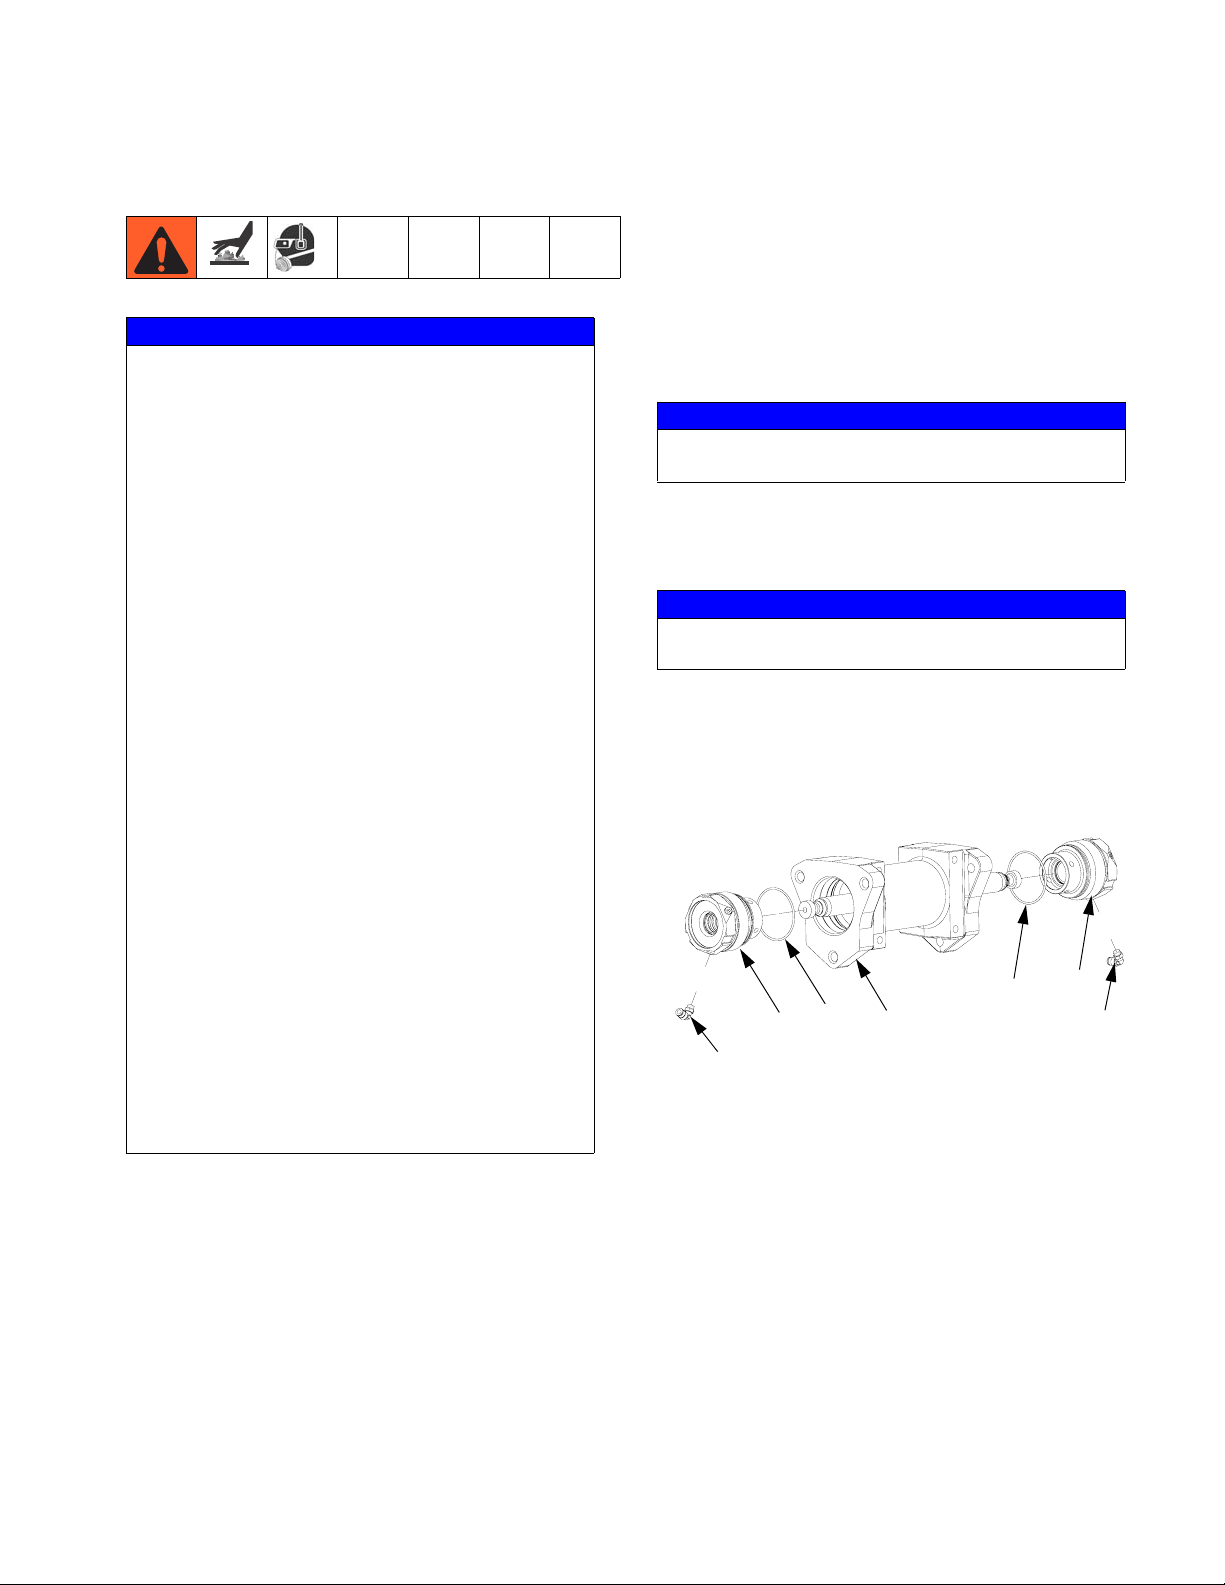
3. Remove elbow fittings (4) from outside of seal housings (2).
NOTICE
To prevent damage to the driver, avoid getting dust
or dirt in the driver during service.
4. Use a 3 1/4 in. socket or wrench to remove one seal
housing (2). Place a waste container below the seal
housing and cylinder (1) to drain any residual
hydraulic oil.
2a
2
4
5. Remove second seal housing (2).
6. Remove o-rings (2a) from seal housings (2).
1
2a
r_258640_3A0020A_2h
2
4
Required Tools
• Vise with soft jaws
• Set of adjustable wrenches
• O-ring pick
• 3/16 in. hex key
• Rubber mallet
• 3 1/4 in. socket
• Torque wrench capable of 150 ft-lbs (203 N•m).
• Anti-seize lubricant
• Pipe sealant
3A0020A 3
Page 4

Repair
Residual hydraulic oil in the cylinder can spray out of
ports during removal of the piston assembly.
NOTE: Be careful not to damage piston rod assembly (9).
7. Place a cloth over the hydraulic ports (P). Use a rubber mallet to tap piston rod assembly (9) out of cylinder (1).
Do not clamp vise on this surface.
91
Assembly
NOTE: Be careful not to damage piston rod assembly (9).
1. Clamp piston rod (9) flats or hex in a vise to prevent
damage to the piston rod.
2. Lubricate piston lead-in (L) with hydraulic oil to
ensure rubber energizing ring of bidirectional seal
(9b) seats properly. Install one edge of rubber energizing ring in deep piston groove and press the rest
of the o-ring down while preventing the o-ring from
twisting.
NOTICE
Prevent rubber energizing ring from twisting during
installation. The bidirectional seal (9b) will not function properly if the rubber energizing ring is twisted.
P
r_258640_3A0020A_3h
NOTICE
To avoid damaging piston rod, do not clamp on piston rod surface.
8. Clamp piston rod flats (9) in a vise to prevent damage to piston rod.
9. Use o-ring pick to remove sealing ring and rubber
energizing ring of bidirectional seal (9b). Remove
bearing (9c).
hex
flats
9b
L
9c
9
r_258640_3A0020A_4h
3. Install sealing ring of bidirectional seal (9b) over rubber energizing ring and install bearing (9c) in shallow piston groove.
NOTICE
Only expand the sealing ring of bidirectional seal
(9b) and bearing (9c) as much as needed to fit over
the piston. Damage will occur when the sealing ring
or bearing are opened wider than necessary.
4. Remove piston assembly (9) from vise and lubricate
bidirectional seal (9b) and bearing (9c) with hydraulic oil.
9b
9c
9
r_258640_3A0020A_4h
10. Thoroughly clean all metal parts in a compatible solvent and inspect for wear or damage. Replace as
necessary.
4 3A0020A
Page 5

Repair
5. Lubricate inside of cylinder (1) with hydraulic oil to
allow easy installation of piston assembly. Continue
to next step if the cylinder hasn’t been flushed and
there is residual hydraulic oil.
1
lubricate with
hydraulic oil
r_258640_3A0020A_6h
6. Install o-rings (2a) on seal housings (2). Lubricate
o-rings (2a) with hydraulic oil. Lubricate seals and
bearing inside seal housing with hydraulic oil.
2
2a
lubricate with
r_258640_3A0020A_7h
hydraulic oil
9. Install second seal housing (2) on cylinder (1).
Torque to 150-160 ft-lbs (203-216 N•m).
NOTE: Use a rubber mallet to gently tap seal housing while turning by hand to start threading the seal
housing into cylinder.
1
2
r_258640_3A0020A_10h
10. Apply pipe sealant on two elbow fittings (4) and pipe
plugs (5) and install in each seal housing (2).
NOTE: Elbow fitting should be placed in lowest port.
5
7. Install one assembled seal housing (2) on cylinder
(1). Torque to 150-160 ft-lbs (203-216 N•m).
1
2
r_258640_3A0020A_8h
8. Install piston rod assembly (9) in cylinder (1) with
bidirectional seal (9b) facing away from the cylinder
(1). Apply hydraulic oil to bidirectional seal and
bearing (9c). Use rubber mallet to tap piston rod
assembly until the piston is approximately at the
middle of the cylinder.
9
1
5
4
5
r_258640_3A0020A_11h
4
9c
r_258640_3A0020A_9h
3A0020A 5
9b
Page 6

Parts
Parts
5
3
2a
2
5
3
1
1
9
1
2
1
2x
2
4
3
1
Lubricate seals and surfaces with hydraulic oil.
2
Torque to 150-160 ft-lbs (203-216 N•m).
3
Apply pipe sealant.
2a
2
1
1
Ref. Part Description Qty.
1 258835 KIT, cylinder, hydraulic 1
2 258768 HOUSING, rod seals, assembly;
includes item 2a
2a 113570 O-RING 1
4 112698 FITTING, elbow, street 2
5 100139 PLUG, pipe 4
9 258769 ROD, piston, hydraulic, assembly;
includes 9a-9c
9a ROD, piston, hydraulic 1
9b◆ SEAL, piston, bidirectional;
includes rubber energizing ring and
sealing ring
9c◆ BEARING, wear, piston 1
r_258640_3A0020A_12h
9c
4
3
1
9a
r_258640_3A0020A_13h
9b
1
2
1
1
◆ Parts included in Kit 258770 (purchase separately).
6 3A0020A
Page 7

Parts
3A0020A 7
Page 8

Dimensions
Dimensions
17.375 in.
(441.3 mm)
Mounting Hole Layout
C
B
A
E
r_258640_3A0020A_15h
r_258640_3A0020A_14h
F
D
G
r_258640_3A0020A_17h
6.165 in. (156.6 mm)
A
5.114 in. (129.9 mm)
B
6.5 in. (165.1 mm)
C
4.43 in. (112.5 mm)
D
5.906 in. (150 mm) 120° bolt circle
E
6.26 in. (159.0 mm)
F
4 in. (101.6 mm)
G
8 3A0020A
Page 9

Technical Data
Maximum hydraulic working pressure . . . . . . . . . . . . . . . 1200 psi (8.3 MPa, 83 bar)
Maximum fluid temperature . . . . . . . . . . . . . . . . . . . . . . . 160°F (71°C)
Maximum hydraulic fluid flow . . . . . . . . . . . . . . . . . . . . . . 10.3 gpm (38.9 liter/min)
Maximum cycle rate . . . . . . . . . . . . . . . . . . . . . . . . . . . . . 65 cycles per minute
Hydraulic fluid consumption . . . . . . . . . . . . . . . . . . . . . . . 1 gal. (3.8 liters) per 6.3 cycles
Effective piston area . . . . . . . . . . . . . . . . . . . . . . . . . . . . .
Piston rod diameter . . . . . . . . . . . . . . . . . . . . . . . . . . . . . 1.125 in (28.6 mm)
Stroke length . . . . . . . . . . . . . . . . . . . . . . . . . . . . . . . . . . 3 in. (76.2 mm)
Thrust at 1200 psi (8.3 MPa, 83 bar) . . . . . . . . . . . . . . . . 7300 lbf (32,472 N)
Weight . . . . . . . . . . . . . . . . . . . . . . . . . . . . . . . . . . . . . . . approx. 40 lb. (18.1 kg)
6.1 sq. in. (39.2 cm
2
)
Technical Data
3A0020A 9
Page 10

Graco Standard Warranty
Graco warrants all equipment referenced in this document which is manufactured by Graco and bearing its name to be free from defects in
material and workmanship on the date of sale to the original purchaser for use. With the exception of any special, extended, or limited warranty
published by Graco, Graco will, for a period of twelve months from the date of sale, repair or replace any part of the equipment determined by
Graco to be defective. This warranty applies only when the equipment is installed, operated and maintained in accordance with Graco’s written
recommendations.
This warranty does not cover, and Graco shall not be liable for general wear and tear, or any malfunction, damage or wear caused by faulty
installation, misapplication, abrasion, corrosion, inadequate or improper maintenance, negligence, accident, tampering, or substitution of
non-Graco component parts. Nor shall Graco be liable for malfunction, damage or wear caused by the incompatibility of Graco equipment with
structures, accessories, equipment or materials not supplied by Graco, or the improper design, manufacture, installation, operation or
maintenance of structures, accessories, equipment or materials not supplied by Graco.
This warranty is conditioned upon the prepaid return of the equipment claimed to be defective to an authorized Graco distributor for verification of
the claimed defect. If the claimed defect is verified, Graco will repair or replace free of charge any defective parts. The equipment will be returned
to the original purchaser transportation prepaid. If inspection of the equipment does not disclose any defect in material or workmanship, repairs will
be made at a reasonable charge, which charges may include the costs of parts, labor, and transportation.
THIS WARRANTY IS EXCLUSIVE, AND IS IN LIEU OF ANY OTHER WARRANTIES, EXPRESS OR IMPLIED, INCLUDING BUT NOT LIMITED
TO WARRANTY OF MERCHANTABILITY OR WARRANTY OF FITNESS FOR A PARTICULAR PURPOSE.
Graco’s sole obligation and buyer’s sole remedy for any breach of warranty shall be as set forth above. The buyer agrees that no other remedy
(including, but not limited to, incidental or consequential damages for lost profits, lost sales, injury to person or property, or any other incidental or
consequential loss) shall be available. Any action for breach of warranty must be brought within two (2) years of the date of sale.
GRACO MAKES NO WARRANTY, AND DISCLAIMS ALL IMPLIED WARRANTIES OF MERCHANTABILITY AND FITNESS FOR A
PARTICULAR PURPOSE, IN CONNECTION WITH ACCESSORIES, EQUIPMENT, MATERIALS OR COMPONENTS SOLD BUT NOT
MANUFACTURED BY GRACO. These items sold, but not manufactured by Graco (such as electric motors, switches, hose, etc.), are subject to
the warranty, if any, of their manufacturer. Graco will provide purchaser with reasonable assistance in making any claim for breach of these
warranties.
In no event will Graco be liable for indirect, incidental, special or consequential damages resulting from Graco supplying equipment hereunder, or
the furnishing, performance, or use of any products or other goods sold hereto, whether due to a breach of contract, breach of warranty, the
negligence of Graco, or otherwise.
FOR GRACO CANADA CUSTOMERS
The Parties acknowledge that they have required that the present document, as well as all documents, notices and legal proceedings entered into,
given or instituted pursuant hereto or relating directly or indirectly hereto, be drawn up in English. Les parties reconnaissent avoir convenu que la
rédaction du présente document sera en Anglais, ainsi que tous documents, avis et procédures judiciaires exécutés, donnés ou intentés, à la suite
de ou en rapport, directement ou indirectement, avec les procédures concernées.
Graco Information
For the latest information about Graco products, visit www.graco.com.
TO PLACE AN ORDER, contact your Graco distributor or call to identify the nearest distributor.
Toll Free: 1-800-746-1334 Fax: 330-966-3006
All written and visual data contained in this document reflects the latest product information available at the time of publication.
GRACO OHIO INC. 8400 PORT JACKSON AVE NW, NORTH CANTON, OH 44720
Graco reserves the right to make changes at any time without notice.
This manual contains English. MM 3A0020
Graco Headquarters: Minneapolis
International Offices: Belgium, China, Japan, Korea
Copyright 2009, Graco Inc. is registered to ISO 9001
www.graco.com
 Loading...