

Page 1
Instructions - Parts
EP
™
Gun
313872N
Plural Component, Impingement Mix, Mechanical Purge Pour Gun
For use with non-flammable foam in open pour applications. Not approved for use in
European explosive atmosphere locations.
Model 257999, 24C932
3000 psi (20.7 MPa, 207 bar) Maximum Fluid Working Pressure
80-100 psi (0.55-0.69 MPa, 5.5-6.9 bar) Air Inlet Pressure Range
180°F (82°C) Maximum Fluid Temperature
Important Safety Instructions
Read all warnings and instructions in this
manual. Save these instructions.
EN
ti19547a
Page 2

Contents
Related Manuals . . . . . . . . . . . . . . . . . . . . . . . . . . . 3
Models . . . . . . . . . . . . . . . . . . . . . . . . . . . . . . . . . . . 4
Orifice Flow Area Ratio Chart . . . . . . . . . . . . . . . 4
Fixed Orifice Flowrate Data . . . . . . . . . . . . . . . . . 5
Variable Orifice Flowrate Data . . . . . . . . . . . . . . 6
Warnings . . . . . . . . . . . . . . . . . . . . . . . . . . . . . . . . . 9
Important Two-Component Material Information 11
Isocyanate Conditions . . . . . . . . . . . . . . . . . . . . 11
Material Self-ignition . . . . . . . . . . . . . . . . . . . . . 11
Keep Components A and B Separate . . . . . . . . 11
Moisture Sensitivity of Isocyanates . . . . . . . . . . 11
Foam Resins with 245 fa Blowing Agents . . . . . 11
Changing Materials . . . . . . . . . . . . . . . . . . . . . . 12
A (Red) and B (Blue) Components . . . . . . . . . . 12
Throat Seal Liquid . . . . . . . . . . . . . . . . . . . . . . . . . 13
Grounding . . . . . . . . . . . . . . . . . . . . . . . . . . . . . . . 13
Piston Safety Lock . . . . . . . . . . . . . . . . . . . . . . . . 13
Trigger Lock . . . . . . . . . . . . . . . . . . . . . . . . . . . . . . 13
Loss of Air Pressure . . . . . . . . . . . . . . . . . . . . . . . 14
Hook Support . . . . . . . . . . . . . . . . . . . . . . . . . . . . . 14
Component Identification . . . . . . . . . . . . . . . . . . . 16
Cutaway View . . . . . . . . . . . . . . . . . . . . . . . . . . 17
Theory of Operation . . . . . . . . . . . . . . . . . . . . . . . 18
Gun Triggered (Fluid Pouring) . . . . . . . . . . . . . . 18
Gun Detriggered . . . . . . . . . . . . . . . . . . . . . . . . 18
Setup . . . . . . . . . . . . . . . . . . . . . . . . . . . . . . . . . . . . 19
Adjust Orifices . . . . . . . . . . . . . . . . . . . . . . . . . . 20
Optional Hose Position . . . . . . . . . . . . . . . . . . . 21
Pressure Relief Procedure . . . . . . . . . . . . . . . . . . 22
Shutdown . . . . . . . . . . . . . . . . . . . . . . . . . . . . . . . . 23
Short Term Shutdown . . . . . . . . . . . . . . . . . . . . 23
Long Term Shutdown . . . . . . . . . . . . . . . . . . . . 23
Maintenance . . . . . . . . . . . . . . . . . . . . . . . . . . . . . . 24
Supplied Tool Kit . . . . . . . . . . . . . . . . . . . . . . . . 24
Lubrication . . . . . . . . . . . . . . . . . . . . . . . . . . . . 24
Grease the Gun . . . . . . . . . . . . . . . . . . . . . . . . 24
Flush Gun . . . . . . . . . . . . . . . . . . . . . . . . . . . . . 25
Clean Outside of Gun . . . . . . . . . . . . . . . . . . . . 26
Clean Breather Plug . . . . . . . . . . . . . . . . . . . . . 26
Clean Fluid Manifold . . . . . . . . . . . . . . . . . . . . . 26
Clean Check Valves . . . . . . . . . . . . . . . . . . . . . 27
Clean Fluid Housing Passages . . . . . . . . . . . . . 28
Clean Orifice . . . . . . . . . . . . . . . . . . . . . . . . . . . 29
Replace Mix Chamber and Front Seal . . . . . . . 29
Repair . . . . . . . . . . . . . . . . . . . . . . . . . . . . . . . . . . . 30
Tools Required . . . . . . . . . . . . . . . . . . . . . . . . . . 30
Lubrication . . . . . . . . . . . . . . . . . . . . . . . . . . . . . 30
Replace Cartridge . . . . . . . . . . . . . . . . . . . . . . 30
Remove Front End . . . . . . . . . . . . . . . . . . . . . . . 31
Disassemble Front End . . . . . . . . . . . . . . . . . . . 32
Assemble Front End . . . . . . . . . . . . . . . . . . . . . 32
Attach Front End . . . . . . . . . . . . . . . . . . . . . . . . 33
Pistons and Bulkhead . . . . . . . . . . . . . . . . . . . . 34
Purge Rod . . . . . . . . . . . . . . . . . . . . . . . . . . . . . 35
Solenoid Valve . . . . . . . . . . . . . . . . . . . . . . . . . . 36
Troubleshooting . . . . . . . . . . . . . . . . . . . . . . . . . . . 37
Electrical Diagram . . . . . . . . . . . . . . . . . . . . . . . 39
Parts . . . . . . . . . . . . . . . . . . . . . . . . . . . . . . . . . . . . 40
Kits . . . . . . . . . . . . . . . . . . . . . . . . . . . . . . . . . . . . . 43
Series A and B Kits . . . . . . . . . . . . . . . . . . . . . . 43
All Series Kits . . . . . . . . . . . . . . . . . . . . . . . . . . 45
Series C Kits . . . . . . . . . . . . . . . . . . . . . . . . . . . 49
Orifice Kits . . . . . . . . . . . . . . . . . . . . . . . . . . . . . 50
Drill Bit Kits . . . . . . . . . . . . . . . . . . . . . . . . . . . . 51
Complete O-ring Placement Guide . . . . . . . . . . 52
Accessories . . . . . . . . . . . . . . . . . . . . . . . . . . . . . . 53
Lubricant for Gun Rebuild . . . . . . . . . . . . . . . . . 53
Fluid Inlet Cover . . . . . . . . . . . . . . . . . . . . . . . . 53
Gun Cleaning Kit . . . . . . . . . . . . . . . . . . . . . . . . 53
Flushing Manifold . . . . . . . . . . . . . . . . . . . . . . . 53
15B817 Manifold Block . . . . . . . . . . . . . . . . . . . 53
Circulation Manifold . . . . . . . . . . . . . . . . . . . . . . 53
Reactor
Signal Cable Extensions . . . . . . . . . . . . . . . . . . 53
Solvent Flush Canister Kit . . . . . . . . . . . . . . . . . 54
Solvent Flush Pail Kit . . . . . . . . . . . . . . . . . . . . . 54
Grease Cartridge for Gun Shutdown . . . . . . . . . 54
Technical Data . . . . . . . . . . . . . . . . . . . . . . . . . . . . 55
Dimensions . . . . . . . . . . . . . . . . . . . . . . . . . . . . 56
Graco Standard Warranty . . . . . . . . . . . . . . . . . . . 58
®
IP Harness . . . . . . . . . . . . . . . . . . . . . 53
2 313872N
Page 3

Related Manuals
Manuals are available at www.graco.com.
Component manuals in U.S. English:
Power-LockTM Heated Hose
Part Description
309572 Instructions - Parts
Solvent Flush Kits
Part Description
309963 Instructions - Parts
Circulation Manifold Kit
Part Description
309818 Instructions - Parts
Heated Hoses and Applicator Kits
Related Manuals
Part Description
3A0237 Instructions - Parts
313872N 3
Page 4

Models
Models
Purge Rod
Diameter
Part
257999 0.250 (6.35) 0.031 (0.79) Handheld
24C932 0.250 (6.35) 0.031 (0.79) Auto
in. (mm)
Orifice Flow Area Ratio Chart
In general, flow area ratio should be equal to material ratio but will be influenced by material viscosity. The ideal flow
area ratio is dependent on flow rates, material viscosity, and material ratio. Choose the correct size orifices to equalize fluid pressures at the proportioner.
Dia-
meter 0.016 0.020 0.024 0.028 0.031 0.035 0.039 0.042 0.047 0.052 0.055 0.060 0.063 0.067 0.073 0.086
0.016 1.0 1.6 2.3 3.1 3.8 4.8 5.9 6.9 8.6 10.6 11.8 14.1 15.5 17.5 20.8 28.9
0.020 1.6
0.024 2.3 1.4
0.028 3.1
0.031 3.8 2.4 1.7 1.2
0.035 4.8 3.1 2.1 1.6 1.3
0.039 5.9 3.8 2.6 1.9 1.6 1.2
0.042 6.9 4.4 3.1 2.3 1.8 1.4 1.2
0.047 8.6 5.5 3.8 2.8 2.3 1.8 1.5 1.3
0.052 10.6 6.8 4.7 3.4 2.8 2.2 1.8 1.5 1.2
0.055 11.8 7.6 5.3 3.9 3.1 2.5
0.060 14.1 9.0 6.3 4.6 3.7 2.9 2.4
0.063 15.5 9.9 6.9 5.1 4.1 3.2 2.6 2.3 1.8 1.5 1.3 1.1
0.067 17.5 11.2 7.8 5.7 4.7 3.7
0.073 20.8 13.3 9.3 6.8 5.5 4.4 3.5
0.086 28.9 18.5 12.8 9.4 7.7 6.0 4.9 4.2 3.3 2.7 2.4 2.1 1.9 1.6 1.4
1.0 1.4 2.0 2.4 3.1 3.8 4.4 5.5 6.8 7.6 9.0 9.9 11.2 13.3 18.5
1.0 1.4 1.7 2.1 2.6 3.1 3.8 4.7 5.3 6.3 6.9 7.8 9.3 12.8
2.0 1.4 1.0 1.2 1.6 1.9 2.3 2.8 3.4 3.9 4.6 5.1 5.7 6.8 9.4
Orifice Size
in. (mm) Handle Type
Available Orifice Flow Area Ratios
1.0 1.3 1.6 1.8 2.3 2.8 3.1 3.7 4.1 4.7 5.5 7.7
1.0 1.2 1.4 1.8 2.2 2.5 2.9 3.2 3.7 4.4 6.0
1.01.21.51.82.0 2.4 2.6 3.0 3.5 4.9
1.0 1.3 1.5 1.7 2.0 2.3 2.5 3.0 4.2
1.0 1.2 1.4 1.6 1.8 2.0 2.4 3.3
1.0 1.1 1.3 1.5 1.7 2.0 2.7
2.01.71.41.11.0 1.2 1.3 1.5 1.8 2.4
2.0 1.6 1.3 1.2 1.01.11.21.52.1
1.0 1.1 1.3 1.9
3.0 2.5 2.0 1.7 1.5 1.2 1.1 1.0 1.2 1.6
3.0 2.4 2.0 1.8 1.5 1.3 1.2 1.0 1.4
1.0
Flowrate Increases as Diameter Increases =>
Flowrate Increases as Diameter Increases=>
4 313872N
Page 5
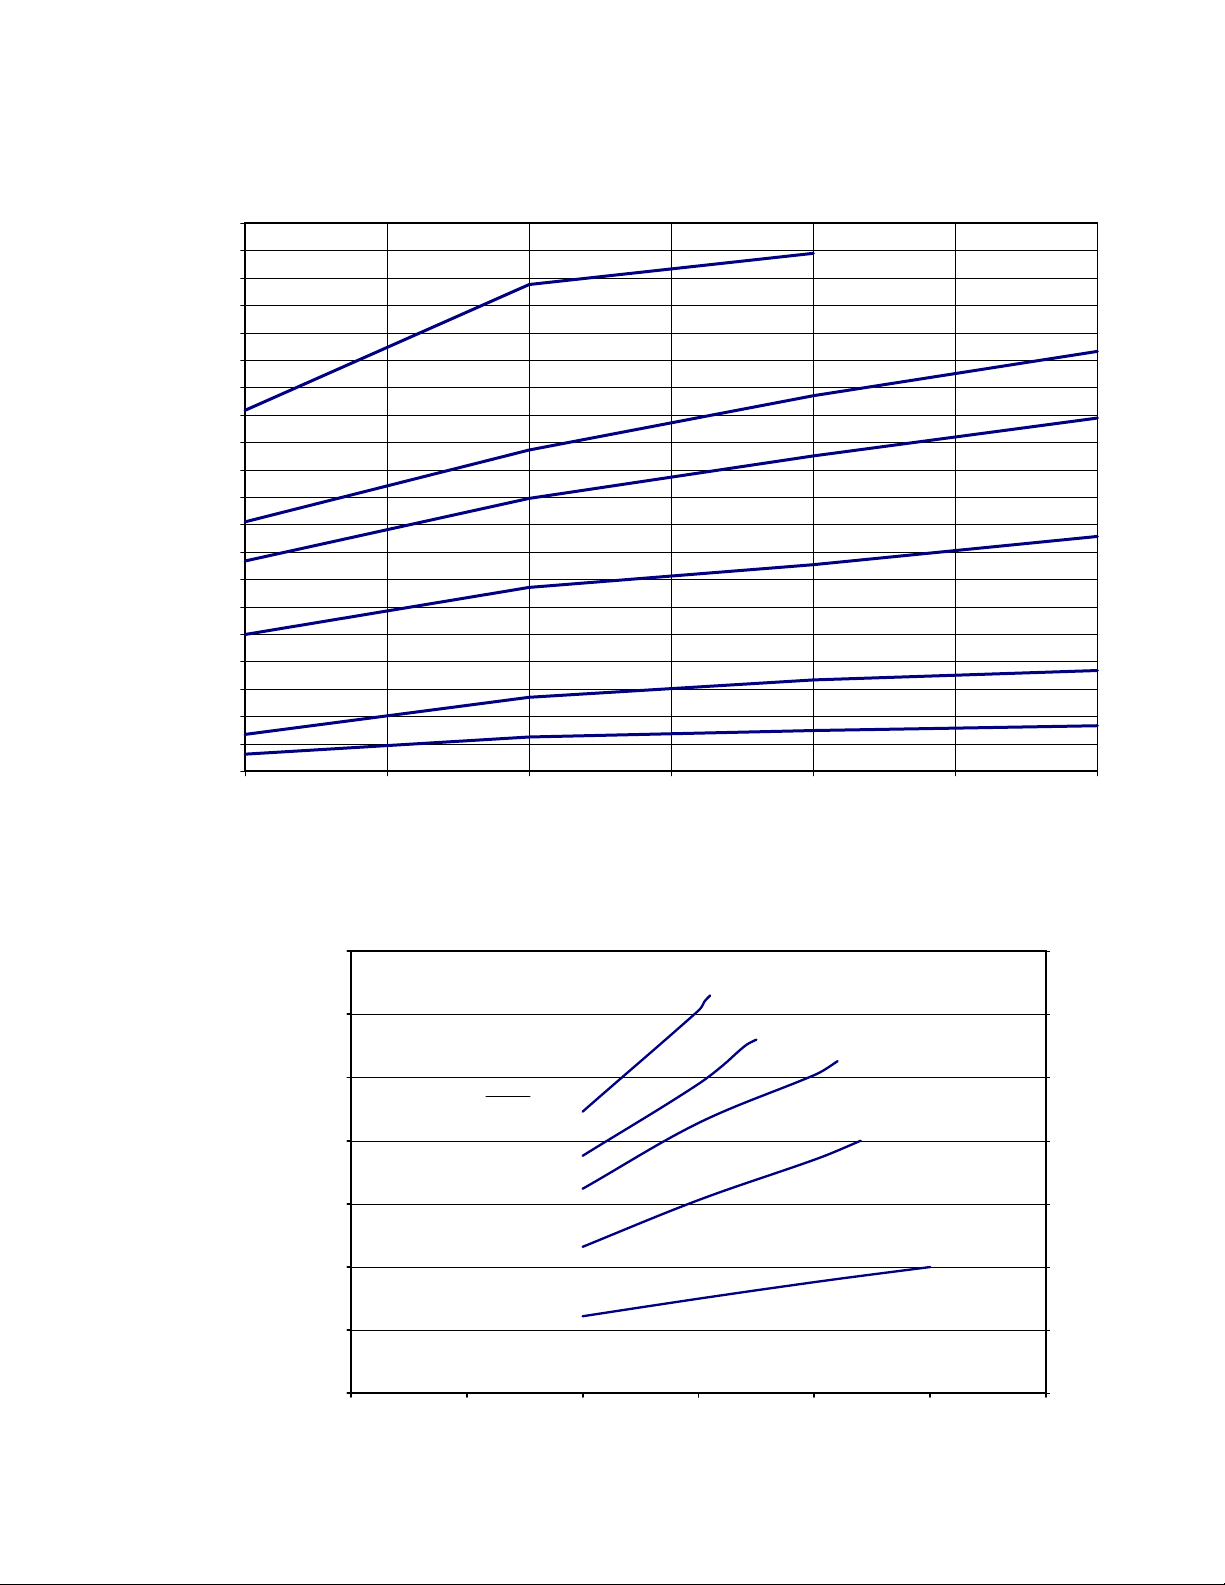
Fixed Orifice Flowrate Data
Models
5.00
4.75
4.50
4.25
4.00
3.75
3.50
3.25
3.00
2.75
2.50
2.25
Flow (gpm)
2.00
1.75
1.50
1.25
1.00
0.75
0.50
0.25
0.00
500 750 1000 1250 1500 1750 2000
EP Fixed Orifice Flow Data
0.086 in. Diameter Orifice
0.067 in. Diameter Orifice
0.060 in. Diameter Orifice
0.047 in. Diameter Orifice
0.031 in. Diameter Orifice
0.020 in. Diameter Orifice
Pressure (psi)
EP Gun Flowrate Data, Tested with 2 lb Foam
350 (5.53)
300 (4.74)
250 (3.95)
200 (3.16)
150 (2.37)
Flow
cc / sec, (gpm)
100 (1.58)
50 (0.79)
Orifice
0.086 in. diameter
0.067 in. diameter
0.060 in. diameter
0.047 in. diameter
0.031 in. diameter
0
500 15000
HFR with 160/160 and EP250
1000 2000 2500 3000
Pressure (psig)
313872N 5
Page 6

Models
Variable Orifice Flowrate Data
VARIABLE ORIFICE FLOWRATE DATA (1000 PSI)
0.086
0.073
0.067
0.063
0.060
0.055
0.052
0.047
0.041
0.039
0.033
0.031
ORIFICE DIAMETER (in.)
0.028
0.024
0.020
0.00 0.25 0.50 0.75 1.00 1.25 1.50 1.75 2.00 2.25 2.50 2.75 3.00 3.25 3.50 3.75 4.00 4.25 4.50 4.75
* To calculate flow in lb/min, multiply gpm rate by 10.
Example: 2 gpm x 10 = 20 lb/min.
FLOWRATE (gpm)
6 313872N
Page 7

Models
VARIABLE ORIFICE FLOWRATE DATA (1500 PSI)
0.086
0.073
0.067
0.063
0.060
0.055
0.052
0.047
0.041
0.039
0.033
0.031
ORIFICE DIAMETER (in.)
0.028
0.024
0.020
0.00 0.25 0.50 0.75 1.00 1.25 1.50 1.75 2.00 2.25 2.50 2.75 3.00 3.25 3.50 3.75 4.00 4.25 4.50 4.75
FLOWRATE (gpm)
* To calculate flow in lb/min, multiply gpm rate by 10.
Example: 2 gpm x 10 = 20 lb/min.
313872N 7
Page 8

Models
ORIFICE DIAMETER (in.)
VARIABLE ORIFICE FLOWRATE DATA (2000 PSI)
0.086
0.073
0.067
0.063
0.060
0.055
0.052
0.047
0.041
0.039
0.033
0.031
0.028
0.024
0.020
0.00 0.25 0.50 0.75 1.00 1.25 1.50 1.75 2.00 2.25 2.50 2.75 3.00 3.25 3.50 3.75 4.00 4.25 4.50 4.75
FLOWRATE (gpm)
* To calculate flow in lb/min, multiply gpm rate by 10.
Example: 2 gpm x 10 = 20 lb/min.
8 313872N
Page 9
Warnings
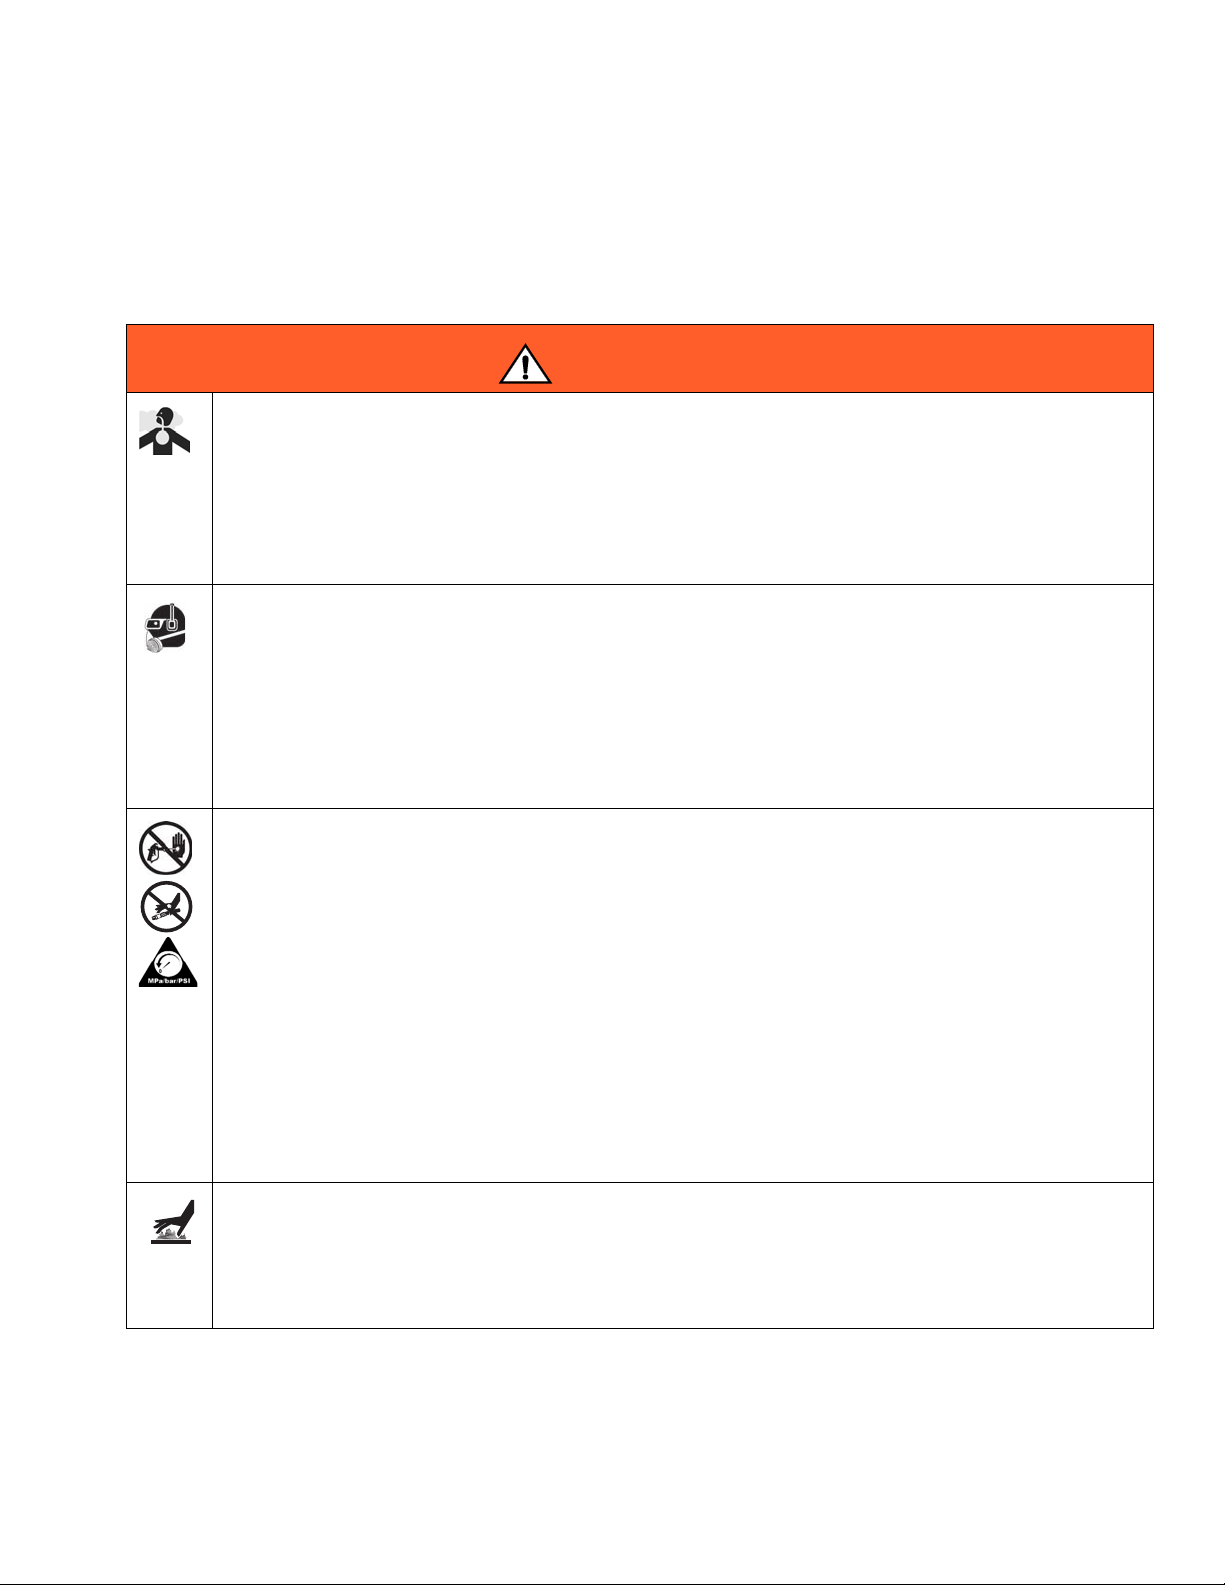
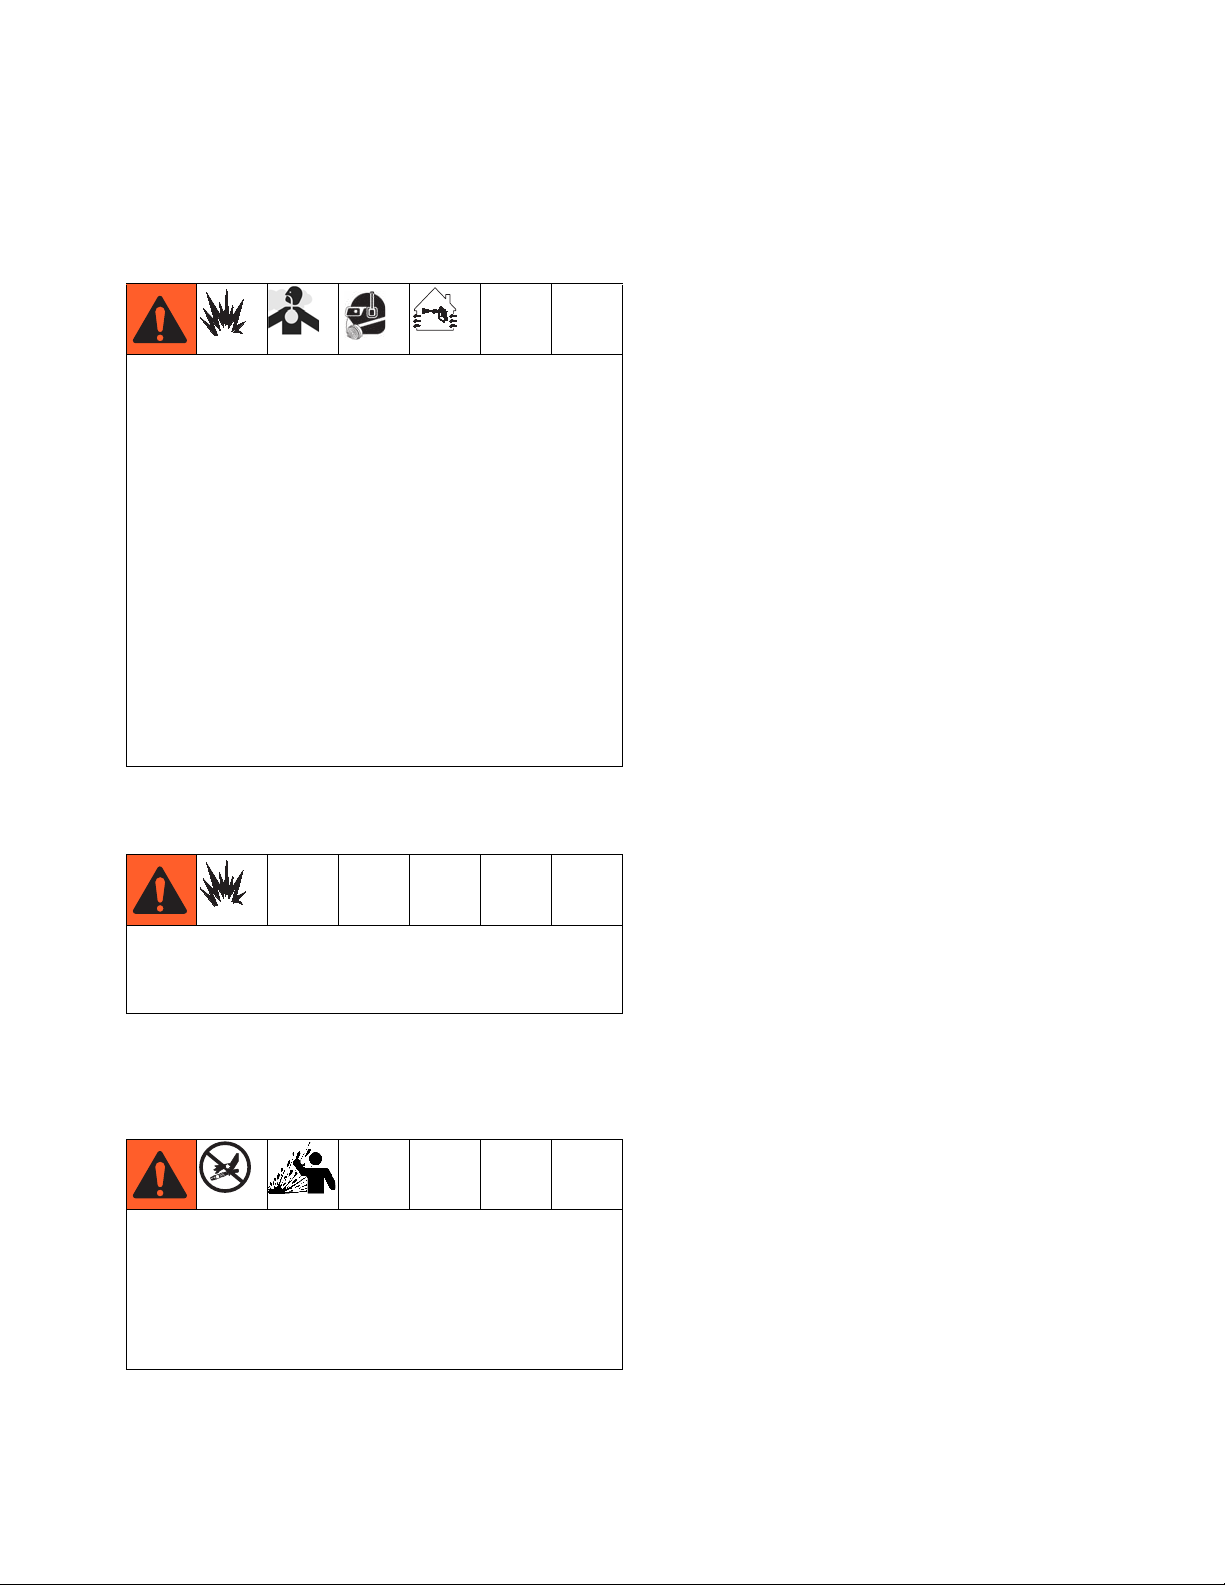
Warnings
The following warnings are for the setup, use, grounding, maintenance, and repair of this equipment. The exclamation point symbol alerts you to a general warning and the hazard symbol refers to procedure-specific risk. Refer back
to these warnings. Additional, product-specific warnings may be found throughout the body of this manual where
applicable.
WARNING
TOXIC FLUID OR FUMES HAZARD
Toxic fluids or fumes can cause serious injury or death if splashed in the eyes or on skin, inhaled, or
swallowed.
• Read MSDSs to know the specific hazards of the fluids you are using.
• Store hazardous fluid in approved containers, and dispose of it according to applicable guidelines.
• Always wear chemically impermeable gloves when spraying, dispensing, or cleaning equipment.
PERSONAL PROTECTIVE EQUIPMENT
You must wear appropriate protective equipment when operating, servicing, or when in the operating
area of the equipment to help protect you from serious injury, including eye injury, hearing loss, inhalation of toxic fumes, and burns. This equipment includes but is not limited to:
• Protective eyewear, and hearing protection.
• Respirators, protective clothing, and gloves as recommended by the fluid and solvent manufac-
turer.
SKIN INJECTION HAZARD
High-pressure fluid from dispensing device, hose leaks, or ruptured components will pierce skin. This
may look like just a cut, but it is a serious injury that can result in amputation. Get immediate surgical
treatment.
• Engage trigger lock when not dispensing.
• Do not point dispensing device at anyone or at any part of the body.
• Do not put your hand over the fluid outlet.
• Do not stop or deflect leaks with your hand, body, glove, or rag.
• Follow the Pressure Relief Procedure when you stop dispensing and before cleaning, checking,
or servicing equipment.
• Tighten all fluid connections before operating the equipment.
• Check hoses and couplings daily. Replace worn or damaged parts immediately
BURN HAZARD
Equipment surfaces and fluid that’s heated can become very hot during operation. To avoid severe
burns:
• Do not touch hot fluid or equipment.
313872N 9
Page 10
Warnings
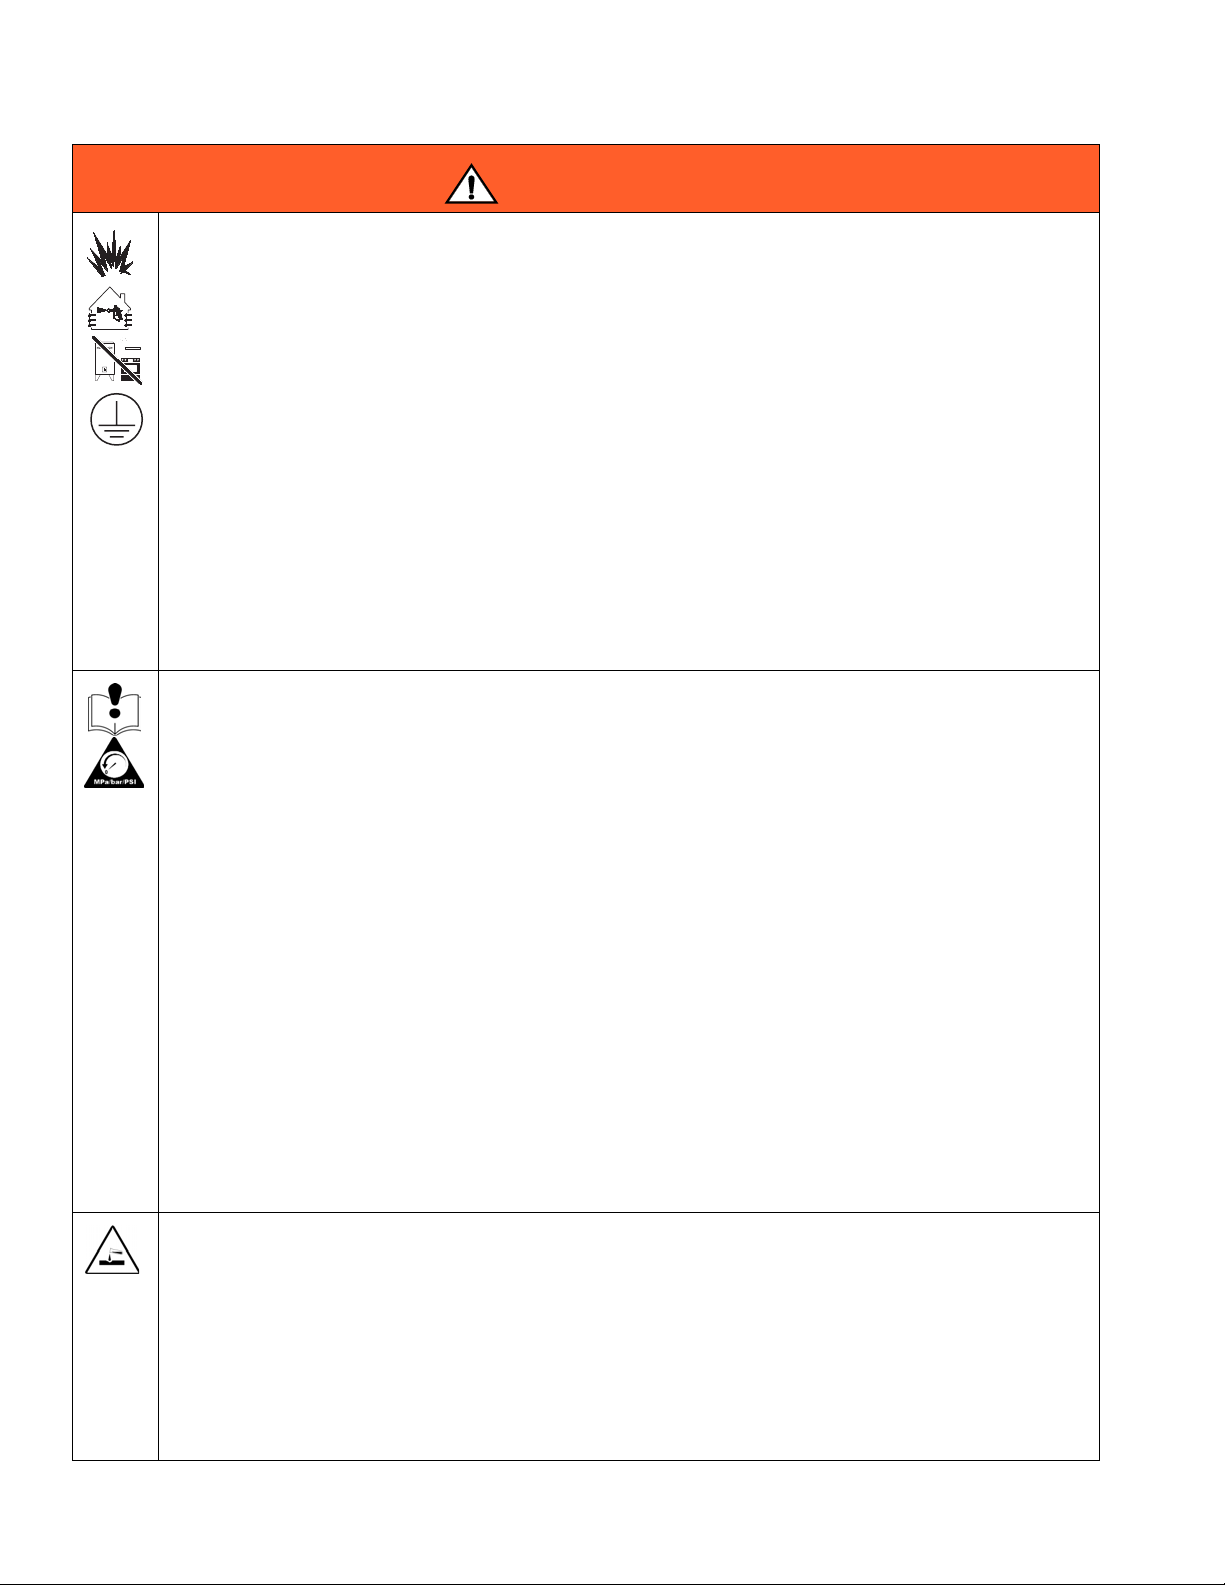
WARNING
FIRE AND EXPLOSION HAZARD
Flammable fumes, such as solvent and paint fumes, in work area can ignite or explode. To help prevent fire and explosion:
• Use equipment only in well ventilated area.
• Eliminate all ignition sources; such as pilot lights, cigarettes, portable electric lamps, and plastic
drop cloths (potential static arc).
• Keep work area free of debris, including solvent, rags and gasoline.
• Do not plug or unplug power cords, or turn power or light switches on or off when flammable fumes
are present.
• Ground all equipment in the work area. See Grounding instructions.
• Use only grounded hoses.
• Hold gun firmly to side of grounded pail when triggering into pail.
• If there is static sparking or you feel a shock, stop operation immediately. Do not use equipment
until you identify and correct the problem.
• Keep a working fire extinguisher in the work area.
EQUIPMENT MISUSE HAZARD
Misuse can cause death or serious injury.
• Do not operate the unit when fatigued or under the influence of drugs or alcohol.
• Do not exceed the maximum working pressure or temperature rating of the lowest rated system
component. See Technical Data in all equipment manuals.
• Use fluids and solvents that are compatible with equipment wetted parts. See Technical Data in all
equipment manuals. Read fluid and solvent manufacturer’s warnings. For complete information
about your material, request MSDS from distributor or retailer.
• Do not leave the work area while equipment is energized or under pressure. Turn off all equipment
and follow the Pressure Relief Procedure when equipment is not in use.
• Check equipment daily. Repair or replace worn or damaged parts immediately with genuine manufacturer’s replacement parts only.
• Do not alter or modify equipment.
• Use equipment only for its intended purpose. Call your distributor for information.
• Route hoses and cables away from traffic areas, sharp edges, moving parts, and hot surfaces.
• Do not kink or over bend hoses or use hoses to pull equipment.
• Keep children and animals away from work area.
• Comply with all applicable safety regulations.
PRESSURIZED ALUMINUM PARTS HAZARD
Use of fluids that are incompatible with aluminum in pressurized equipment can cause serious chemical reaction and equipment rupture. Failure to follow this warning can result in death, serious injury, or
property damage.
• Do not use 1,1,1-trichloroethane, methylene chloride, other halogenated hydrocarbon solvents or
fluids containing such solvents.
• Many other fluids may contain chemicals that can react with aluminum. Contact your material supplier for compatibility.
10 313872N
Page 11
Important Two-Component Material Information
Important Two-Component Material Information
Isocyanate Conditions
Spraying or dispensing materials containing isocyanates creates potentially harmful mists, vapors, and
atomized particulates.
Read material manufacturer’s warnings and material
MSDS to know specific hazards and precautions
related to isocyanates.
Prevent inhalation of isocyanate mists, vapors, and
atomized particulates by providing sufficient ventilation in the work area. If sufficient ventilation is not
available, a supplied-air respirator is required for
everyone in the work area.
To prevent contact with isocyanates, appropriate personal protective equipment, including chemically
impermeable gloves, boots, aprons, and goggles, is
also required for everyone in the work area.
Material Self-ignition
Some materials may become self-igniting if applied
too thickly. Read material manufacturer’s warnings
and material MSDS.
Keep Components A and B
Moisture Sensitivity of Isocyanates
Isocyanates (ISO) are catalysts used in two component
foam and polyurea coatings. ISO will react with moisture
(such as humidity) to form small, hard, abrasive crystals,
which become suspended in the fluid. Eventually a film
will form on the surface and the ISO will begin to gel,
increasing in viscosity. If used, this partially cured ISO
will reduce performance and the life of all wetted parts.
NOTE: The amount of film formation and rate of crystallization varies depending on the blend of ISO, the
humidity, and the temperature.
To prevent exposing ISO to moisture:
• Always use a sealed container with a desiccant
dryer in the vent, or a nitrogen atmosphere. Never
store ISO in an open container.
• Keep the ISO lube pump reservoir (if installed) filled
with Graco Throat Seal Liquid
206995. The lubricant creates a barrier between the
ISO and the atmosphere.
• Use moisture-proof hoses specifically designed for
ISO, such as those supplied with your system.
• Never use reclaimed solvents, which may contain
moisture. Always keep solvent containers closed
when not in use.
• Never use solvent on one side if it has been contaminated from the other side.
• Always lubricate threaded parts with ISO pump oil
or grease when reassembling.
™
(TSL™), Part
Separate
Cross-contamination can result in cured material in
fluid lines which could cause serious injury or damage equipment. To prevent cross-contamination of
the equipment’s wetted parts, never interchange
component A (isocyanate) and component B (resin)
parts.
313872N 11
Foam Resins with 245 fa Blowing Agents
Some foam blowing agents will froth at temperatures
above 90°F (33°C) when not under pressure, especially
if agitated. To reduce frothing, minimize preheating in a
circulation system.
Page 12

Important Two-Component Material Information
Changing Materials
• When changing materials, flush the equipment multiple times to ensure it is thoroughly clean.
• Always clean the fluid inlet strainers after flushing.
• Check with your material manufacturer for chemical
compatibility.
• Most materials use ISO on the A side, but some use
ISO on the B side.
• Epoxies often have amines on the B (hardener)
side. Polyureas often have amines on the B (resin)
side.
A (Red) and B (Blue) Components
IMPORTANT!
Material suppliers can vary in how they refer to plural
component materials.
Be aware that when standing in front of the manifold on
proportioner:
• Component A (Red) is on the left side. The A (Red)
side is intended for ISO, hardeners, and catalysts.
• Component B (Blue) is on the right side.The B
(Blue) side is intended for polyols, resins, and
bases.
For ratios higher than 1:1, the higher volume is typically
the B (Blue) side.
• Most polyurethanes use ISO on the A (Red) side
and polyol on the B (blue side, but some use ISO on
the B (Blue) side.
• Epoxies often have amines on the B (hardener) side
• Polyureas often have amines on the B (resin) side.
• Silicones often have the catalyst on the B side.
12 313872N
Page 13
Throat Seal Liquid
Throat Seal Liquid
Read material MSDS to know specific hazards and
precautions related to Throat Seal Liquid.
Grounding
Check your local electrical code and proportioner manual for detailed grounding instructions.
Ground the pour gun through connection to a
Graco-approved grounded fluid supply hose. Always
ground the gun when flushing.
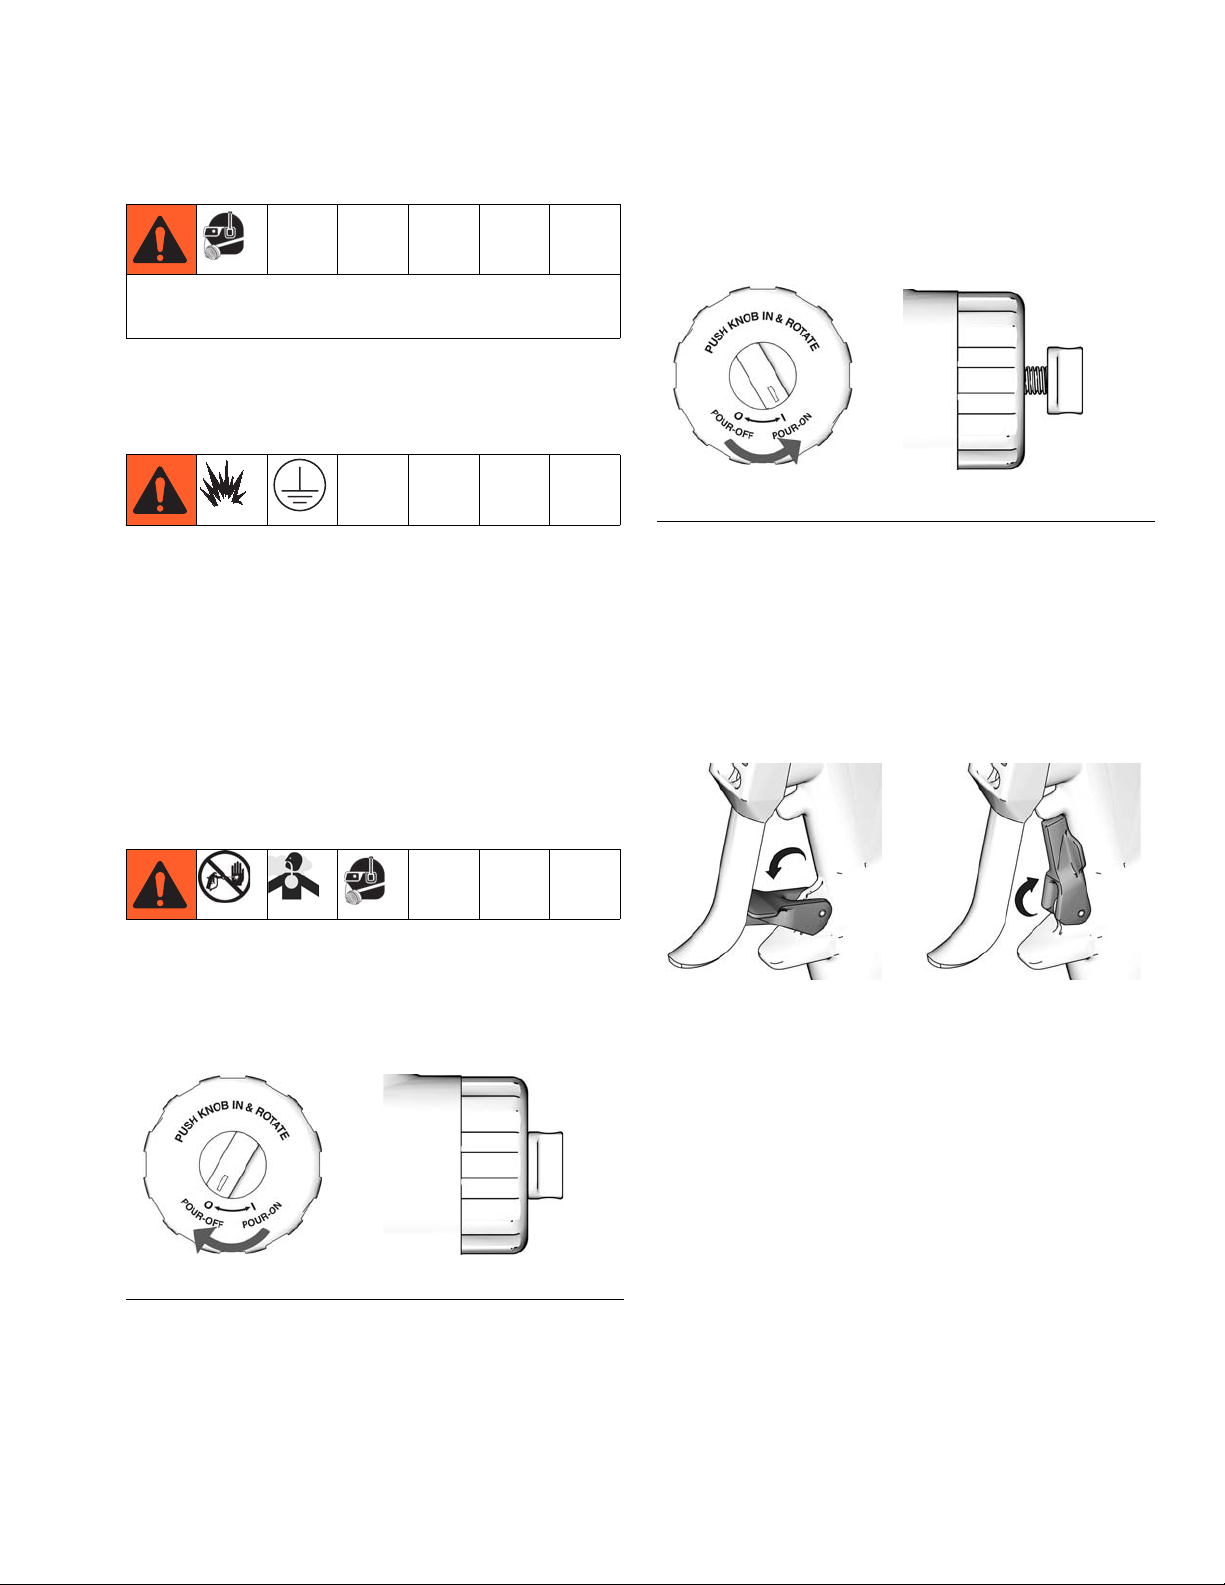
Disengage
To disengage piston safety lock, push knob in and turn
counterclockwise until it pops out. There will be a gap
between knob and gun body.
TI14473b TI14474a
FIG. 2: Piston Safety Lock Disengaged
Trigg er Lock
Engage trigger lock whenever you stop pouring to avoid
accidental triggering. Must be used with piston safety
lock.
Piston Safety Lock
Engage piston safety lock whenever you stop pouring to
avoid accidental triggering and serious injury.
Engage
To engage piston safety lock, push knob in and turn
clockwise. If engaged, gun will not dispense.
TI14454b TI14475a
FIG. 1: Piston Safety Lock Engaged
Engage
TI10442a
Disengage
TI10441a
313872N 13
Page 14

Loss of Air Pressure
Loss of Air Pressure
Purge rod actuation is controlled by air pressure. In
event of loss of air pressure, the purge rod will remain
retracted, the impingement ports will remain open, and
the gun will continue to pour. To stop pouring, do one of
the following:
• Engage piston safety lock, see Piston Safety Lock
section
• Close fluid valves A and B, see F
IG. 3
Hook Support
If necessary, use the hook support located on the top of
the gun to support the weight of the gun. Connect a
strong rope or chain able to support the weight of the
gun to the hook, then connect the other end to a support. This will enable the user to use the gun without
having to support the weight of the gun.
TI14450a1
FIG. 3
ti19549a
14 313872N
Page 15

Hook Support
313872N 15
Page 16
Component Identification
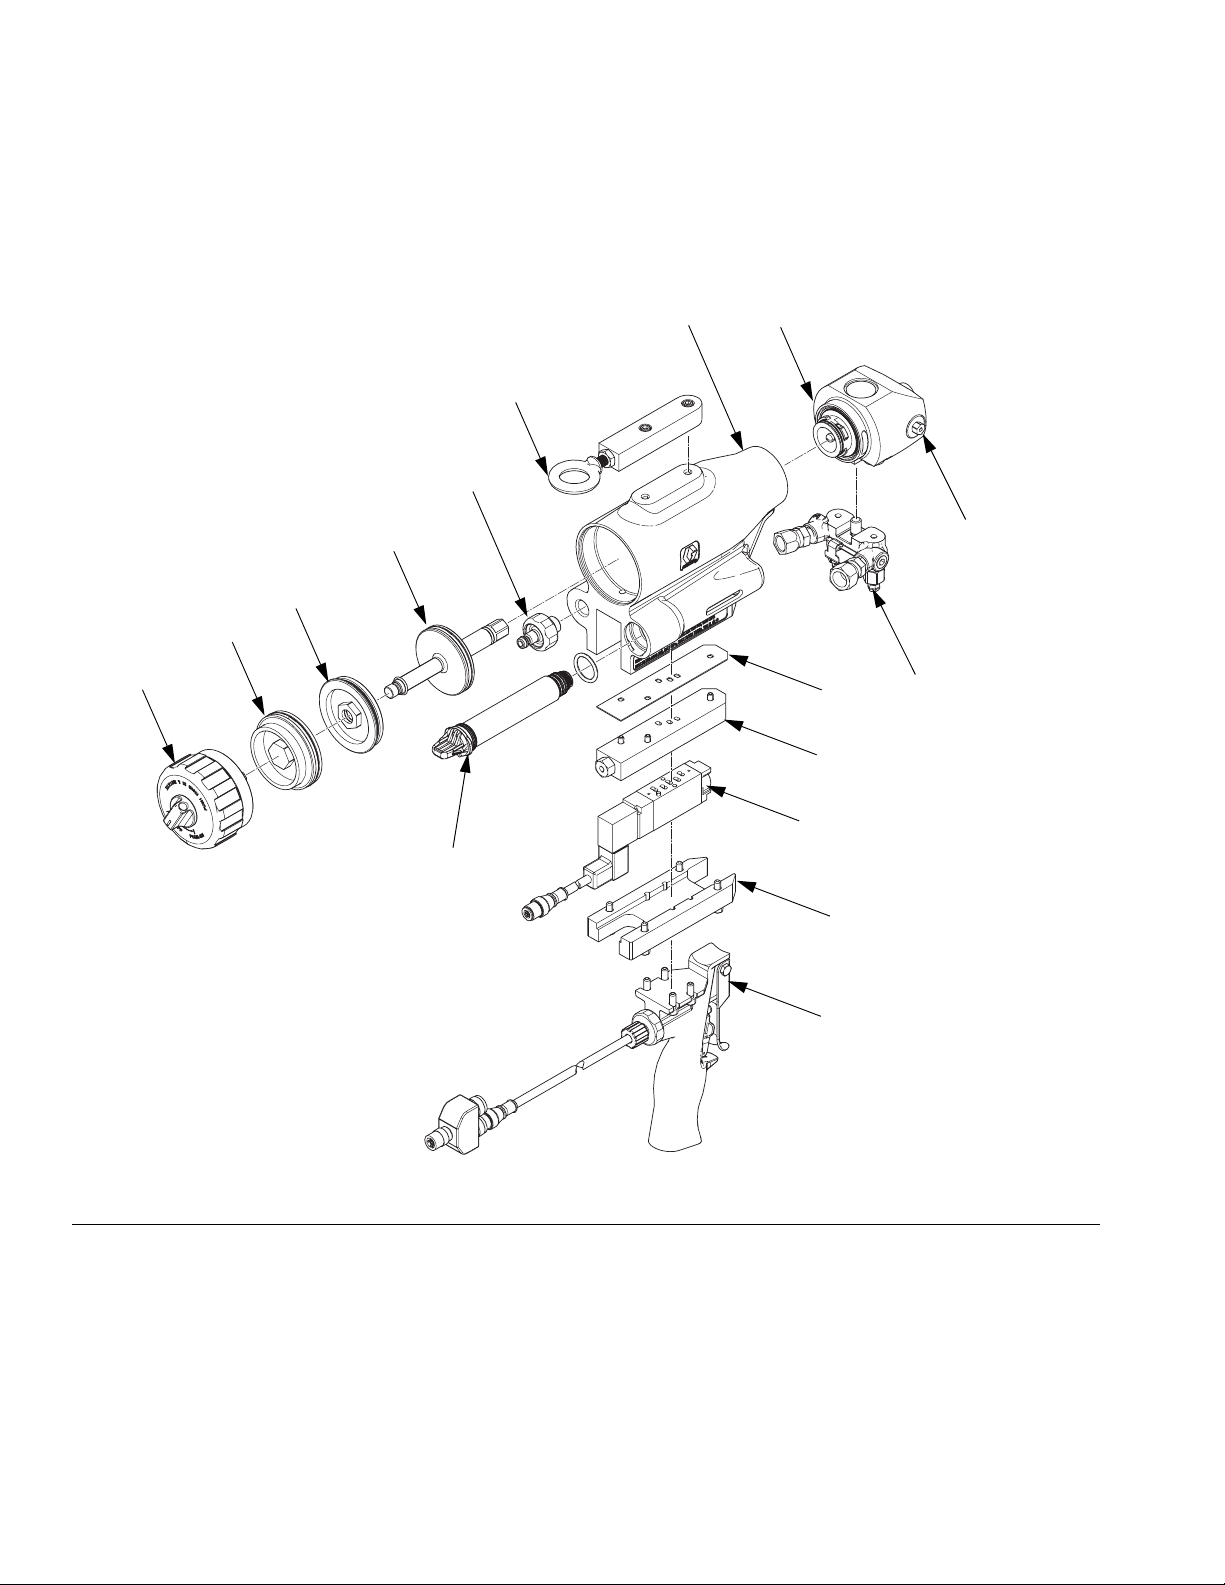
Component Identification
See Parts on page 40 for part numbers and further
component identification.
K
H
E
B
A
M
H
C
J
N
D
P
R
L
FIG. 4
Key:
A Hook Support
B Fluid Housing
COrifice
D Fluid Manifold
E Air Cylinder, Gun Body
F Mounting Plate
G Electric Trigger Handle (optional)
F
G
ti19550a
H Dual Pistons
J Bulkhead
K Piston Safety Lock
L Cartridge
M Airline Fitting
N Solenoid Valve Gasket
P Solenoid Valve Mounting Plate
R Solenoid Valve
16 313872N
Page 17
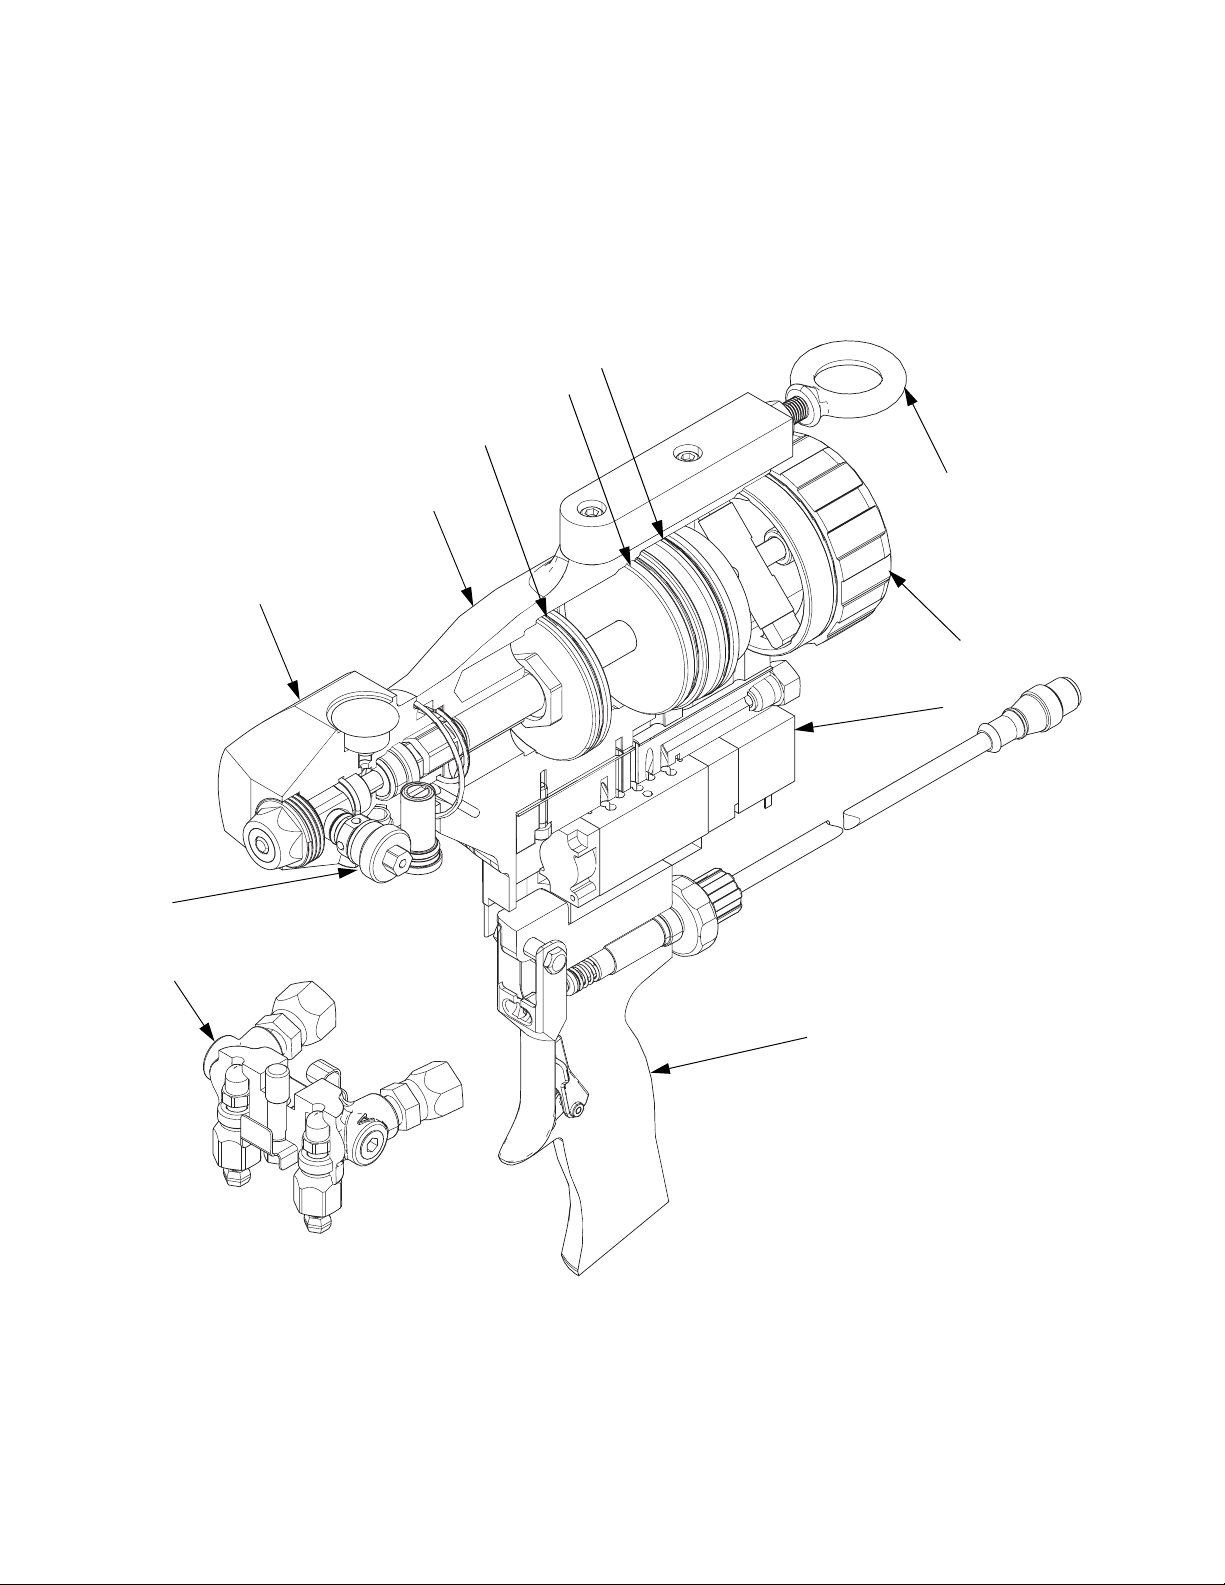
Cutaway View
Component Identification
H
J
H
C
D
B
E
A
K
R
G
ti19551a
313872N 17
Page 18
Theory of Operation
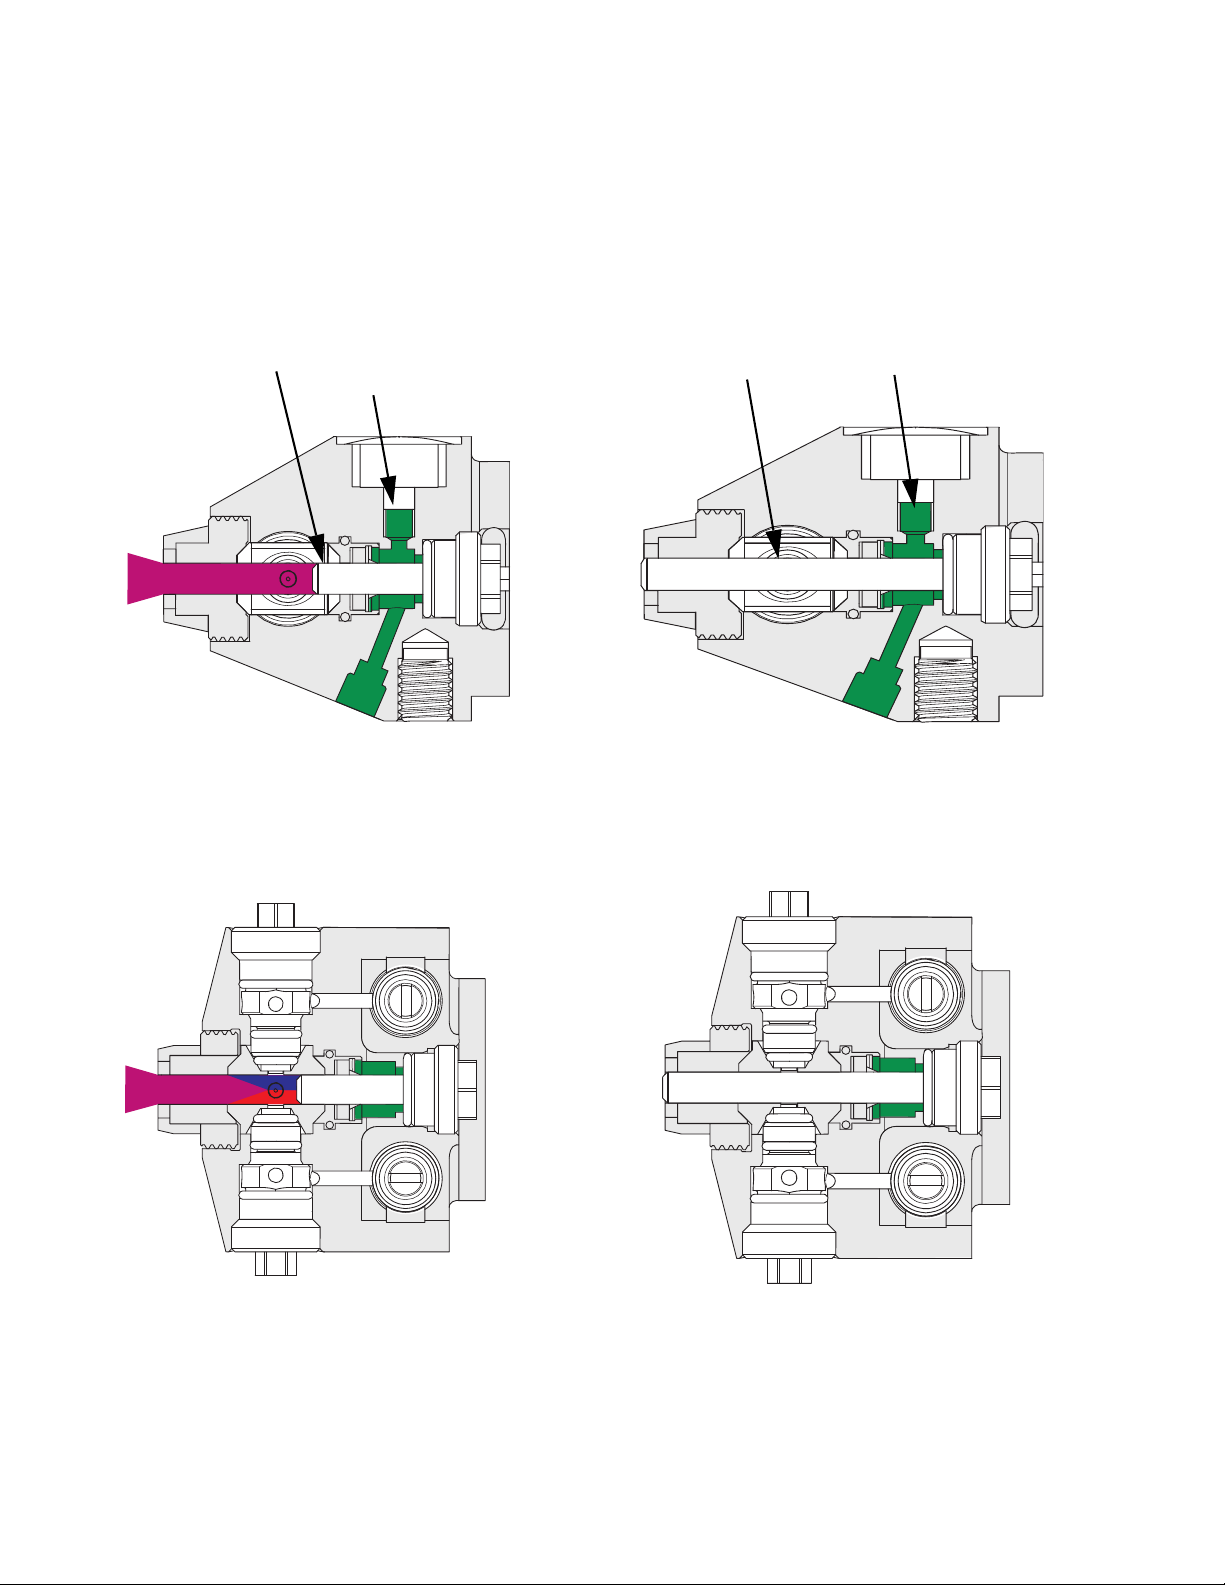
Theory of Operation
Gun Triggered (Fluid Pouring)
Purge rod retracts, opening the impingement ports and
allowing fluid to mix and flow through the nozzle.
Purge Rod
Grease
Side View
ti19552a
Gun Detriggered
Purge rod extends, closing the impingement ports and
stopping fluid flow.
Purge Rod
Side View
Grease
ti19553a
Top View
18 313872N
ti19554a
Top View
ti19555a
Page 19

Setup
Setup
Perform this setup procedure to get the pour gun ready
for operation.
1. Close fluid valves A and B.
B
A
TI2411a
F
IG. 5
2. Connect A and B fluid hoses to fluid manifold.
6. Connect gun air whip hose (AA) to air quick
coupler (AC). Turn on air. Open air valve (AB).
See F
IG. 6.
AA
AB
AD
AC
ti19556a
FIG. 6
7. Connect signal cable to solenoid valve.
8. Models with a handle, connect signal cable to handle.
9. Disengage piston safety lock. See page 13.
TI2417a
3. Engage piston safety lock. See page 13.
4. Connect gun air whip hose (AA) and air valve (AB)
to main air hose. See F
IG. 6. Verify air valve is
closed.
5. Assemble fluid manifold (AD) to gun by hand then
use 5/16 in. nut driver to torque bolt to 20-30 in-lb
(2.26-3.39 N•m). See F
IG. 6.
In the following step, do not point gun at yourself. If
necessary, use a mirror to verify purge rod travel.
Pointing gun at yourself or someone else can lead to
accidentally spraying yourself or someone else with
fluid. If the purge rod was not correctly installed,
purge rod can shoot out of the barrel when gun is
actuated and can cause severe injury.
10. Verify fluid valves are closed, see F
IG. 5, then trigger
gun to check for full purge rod travel.
Purge Rod
ti19557a
F
IG. 7
313872N 19
Page 20

Setup
11. Engage piston safety lock. See page 13.
12. Turn on proportioner. See proportioner manual.
13. Open fluid valves A and B.
ti19558a
F
IG. 8
14. Disengage piston safety lock. See page 13.
Adjust Orifices
In order to balance pressures between the A component
and B component the needle in each orifice may need to
be adjusted. Be sure that all necessary adjustments to
the proportioner are made prior to adjusting the orifices,
see proportioner manual.
If after adjusting pressures neither orifice can achieve
the desired pressure both orifices should be replaced
with a larger or smaller size. Note that a smaller orifice
will provide higher pressure and a larger orifice will provide lower pressure.
If after attempting to balance pressures the pressure difference is over 500 psi one orifice should be replaced
with a different size. If that is the case, adjust the needle
in each orifice all the way open (counter-clockwise) and
observe the pressures. The orifice whose pressure is
farthest from the desired pressure should be replaced.
Note that a smaller orifice will provide higher pressure
and a larger orifice will provide lower pressure.
1. Insert a 5/64 in. hex key (supplied) into the opening
in the hex on the orifice.
15. Perform a test pour into a waste container. Adjust
pressure and temperature to get desired results,
see proportioner manual. Also, see Adjust Ori-
fices.
ti19559a
FIG. 9
2. In order to increase the pressure, turn the needle
clockwise.
ti19561a
In order to decrease the pressure, turn the needle
counter-clockwise.
ti19560a
20 313872N
Page 21

Setup
Optional Hose Position
As shipped, fluid inlet swivel fittings point to rear of the
gun. If desired, use the following procedure to make the
fluid inlet swivel fittings point downward.
NOTICE
To prevent cross-contamination of gun’s wetted parts,
do not interchange A component (isocyanate) and B
component (resin) parts.
1. Follow Pressure Relief Procedure, page 22.
2. Disconnect air quick coupler. Use hex nut driver to
remove fluid manifold (AD).
5. Apply thread sealant to plugs (AH), elbows (AJ),
and male threads of swivels (AE). Install
elbows (AJ) in optional inlets, facing down. See F
IG.
11. Install swivels in elbows. Be sure to install the A
swivel in the A side. Install plugs (AH) where swivels
had been. Torque all parts to 235-245 in-lb
(26.6-27.7 N•m).
AH
AJ
AE
TI2646
F
IG. 11
6. Connect the A hose to the A swivel and the B hose
to the B swivel.
AD
ti19562a
3. Disconnect signal cable.
4. Place a cap over the end of each hose. Disconnect
fluid hoses from inlet swivels (AE). Remove plugs
from optional inlets (AG).
AE
7. Attach fluid manifold (AD) to gun. Torque fluid manifold bolt to 20-30 in-lb (2.26-3.39 N•m).
8. Connect air quick coupler (AC).
TI2417a
AE
AG
F
IG. 10
313872N 21
Page 22

Pressure Relief Procedure
Pressure Relief Procedure
1. Engage piston safety lock. See page 13.
NOTE: Air supply is required for purge rod actuation. Do
not disconnect gun air supply until fluid pressure is
relieved.
2. Close fluid valves A and B. Leave air valve (AB)
open.
7. Relieve system pressure. See Pressure Relief Procedure in proportioner manual.
8. Ensure fluid valves are closed then remove fluid
manifold.
9. Place the fluid manifold over waste containers, facing away from you.
10. Very slowly open the fluid valves. Under high pressure, fluid will spray sideways from the fluid ports.
AB
AC
ti19549a
FIG. 12
3. Disengage piston safety lock. See page 13.
4. Trigger gun onto cardboard or into waste container
to relieve pressure.
ti19563a
TI2484a
IG. 13
F
5. Disconnect air quick coupler (AC). See F
IG. 12.
6. Engage piston safety lock. See page 13.
22 313872N
Page 23

Shutdown
Shutdown
Short Term Shutdown
Perform Short Term Shutdown procedure if gun will not
be used for more than one hour.
1. Perform Pressure Relief Procedure on page 22.
2. Engage piston safety lock.
3. Trigger gun to retract purge rod.
4. While purge rod is retracted, remove any material
build-up on front poor tip and front packing.
ti19564a
Long Term Shutdown
Perform Long Term Shutdown procedure if gun will not
be used for more than 48 hours.
1. Perform Short Term Shutdown.
2. Flush Gun, see page 25.
5. While purge rod is retracted, spray Throat Seal
Lubricant (TSL) into the front nose.
6. Trigger gun five times in order to ensure material
does not build up on purge rod.
7. Detrigger gun and leave the air on.
8. Perform Grease the Gun on page 24.
313872N 23
Page 24

Maintenance
Maintenance
Procedure Schedule
Grease the Gun, page 24 Daily
Replace Mix Chamber and Front
Seal, see page 29
Clean Check Valves, page 27 Monthly
Clean Outside of Gun, page 26 As Needed
Clean Breather Plug, page 26 As Needed
Clean Fluid Manifold, page 26 As Needed
Clean Fluid Housing Passages,
page 28
Clean Orifice, page 29 As Needed
Every 2-4
Weeks
As Needed
Supplied Tool Kit
See Parts on page 40 for tool illustrations.
• Hex Nut Driver; 5/16
• Screwdriver; 1/8 blade
• Impingement Port Drill Bit; various sizes depending
on port size
Lubrication
See Accessories on page 53 to order lubricant. Liberally lubricate all o-rings, seals, and threads.
NOTICE
Use only Throat Seal Liquid on the o-rings, seals,
and threads of the cartridge. Fusion grease or
other petroleum-based or vegetable-based lubricants will cause cartridge o-rings and seals to swell
and stick.
Grease the Gun
1. Perform pressure relief procedure. See Pressure
Relief Procedure on page 22.
2. Perform short term shutdown procedure. See Short
Term Shutdown on page 23.
• 117661 Pin Vise; dual reversible chucks,
see F
IG. 14
• 117773 Fusion
• 117792 Grease Gun
• 100633 Allen Wrench; 5/32
Reversible
F
IG. 14: Pin Vise
®
grease
Reversible
3. Use a 5/32 in. allen key to remove the weep plug.
ti19565a
TI3684a
24 313872N
Page 25

Maintenance
4. Use a grease gun with the required synthetic
grease, part 117773, to purge the gun body until
grease exits the weep hole without evidence of foreign material.
ti19566a
5. Use a 5/32 in. allen key to install the weep plug.
Flush Gun
4. Install flush hoses to flush manifold 15B817. See
IG. 16. Install flush manifold onto gun. Torque flush
F
manifold bolt to 20-30 in-lb (2.26-3.39 N•m).
TI2647a
F
IG. 16: Flush Manifold
5. Holding a metal part of flush manifold firmly to side
of grounded pail and flush with compatible solvent
into a grounded metal pail. See wetted parts info in
Technical Data, page 55. Use lowest possible fluid
pressure when flushing.
6. Follow Pressure Relief Procedure, page 22.
NOTE: For a more thorough flush, solvent flush kits are
available as an accessory. See Accessories on
page 53.
1. Follow Pressure Relief Procedure, page 22.
2. Remove fluid manifold (AD).
AD
ti19549a
FIG. 15
3. Disconnect signal cable.
ti19567a
F
IG. 17: 248139, 1 qt (0.95 liter) Solvent Cup
7. Remove flush hoses from flush manifold. Remove
flush manifold from gun.
8. Remove Recirculation Block 15C850 from fluid
manifold.
9. Connect fluid manifold to gun. Torque fluid manifold
bolt to 20-30 in-lb (2.26-3.39 N•m).
10. Connect signal cable.
313872N 25
Page 26

Maintenance
Clean Outside of Gun
The solvents listed in this section may ignite if used in
flushing. Use them only for external cleaning.
Wipe the outside of the gun with a compatible solvent.
See materials of construction info in Technical Data,
page 55. Use N-Methylpyrrolidone (NMP), Dynasolve
CU-6, Dzolv, or an equivalent solvent to soften cured
material. Applying a light coat of lubricant will make
future cleaning easier.
Clean Breather Plug
The solvents listed in this section may ignite if used in
flushing. Use them only for external cleaning.
Clean Fluid Manifold
Fluid Manifold Fluid Ports
TI2411a
FIG. 19
1. Follow Pressure Relief Procedure.
2. Use 5/16 in. hex nut driver to remove fluid
manifold (AD).
Remove and clean breather plug with compatible solvent. See materials of construction info in Technical
Data, page 55. The breather plug is part of the solenoid
manifold assembly (30). See F
rolidone (NMP), Dynasolve CU-6, Dzolv, or an equivalent to soften cured material. Applying a light coat of
lubricant will make future cleaning easier. Torque
breather plug to 30-40 in-lb (3.89-4.82 N•m).
Breather
Plug
F
IG. 18: Breather Plug
IG. 18. Use N-Methylpyr-
30
ti14469a1
AD
ti19562a
3. Disconnect signal cable.
4. Clean fluid manifold fluid ports with compatible solvent and brush whenever removed from gun. See
materials of construction info in Technical Da ta,
page 55. To prevent damaging the internal sealing
surfaces, do not use brush to clean inside diameter
of fluid ports. Fill fluid ports with grease if left
exposed, to seal out moisture. See F
5. Install fluid manifold. Torque fluid manifold bolt to
20-30 in-lb (2.26-3.39 N•m).
IG. 19.
6. Connect signal cable.
26 313872N
Page 27

Maintenance
Clean Check Valves
1. Follow Pressure Relief Procedure, page 22.
2. Flush Gun, page 25.
3. Disconnect air quick coupler (AC). Use hex nut
driver to remove fluid manifold (AD).
AD
AC
ti19568a
6. Use flat tip screwdriver to pry out check valves at
notch.
ti19569a
Damaged check valve o-rings may result in external
leakage. Replace o-rings if worn or damaged.
7. Press on ball (BC) to test check valve for proper
movement and spring action. Replace check valve
assembly if necessary.
4. Disconnect signal cable.
5. Clean and inspect check valve mating surfaces and
fluid ports. See Clean Fluid Manifold on page 26.
NOTICE
To prevent cross-contamination of the check valves,
do not interchange A component and B component
parts. The A component check valve is marked with
an A.
8. Slide filter (BD) off. Clean and inspect parts. Thoroughly inspect o-rings (BE, BG). If necessary,
remove screw (BA) and disassemble check valve.
B
A
BA
AK
IG. 20
F
9. Liberally lubricate o-rings (BE, BG). Reassemble
check valves. Screw (BA) should be flush with
check valve housing surface (within 1/16 in. or
1.5 mm).
BB
BC
BD
BE
BF
BG
ti19570a
10. Install check valves into fluid housing (AK).
313872N 27
Page 28

Maintenance
11. Use hex nut driver to install fluid manifold (AD).
Torque fluid manifold bolt to 20-30 in-lb
(2.26-3.39 N•m). Connect air quick coupler (AC).
AK
AD
AC
ti19571a
12. Connect signal cable.
Clean Fluid Housing Passages
2. Use 5/16 in. nut driver (supplied) to remove
orifices (C). See F
IG. 4 on page 16.
NOTICE
To prevent cross-contamination of the orifices do
not interchange A component and B component
parts. The A component orifice is marked with an
A.
3. Remove Front End, see page 31.
4. Remove all items from front end to enable cleaning
of passages. See Disassemble Front End on
page 32.
5. Use appropriate drill bits to clean fluid housing passages. See F
IG. 22. See Drill Bit Kits, page 51.
CB
CB
If necessary, use drill bits to clean the passages in the
fluid housing and gun body. See Drill Bit Kits, page 51.
1. Follow Pressure Relief Procedure on page 22.
TI19547a
FIG. 21
CA
CC
Key:
CA Orifice Passage
CB Fluid Inlets
(on bottom of fluid housing)
CC Nozzle
F
IG. 22: Fluid Housing Passages
CA
Cleanout Tool:
27/64” drill bit
1/8” drill bit
1/4” drill bit
6. See Assemble Front End on page 32.
7. Attach Front End, see page 33.
8. Install orifices. Torque to 20-30 in-lb
(2.26-3.39 N•m).
CC
ti19572a
28 313872N
Page 29

Maintenance
Clean Orifice
1. Follow Pressure Relief Procedure on page 22.
2. Use 5/16 in. nut driver (supplied) to remove
orifices (C). See F
To prevent cross-contamination of the orifices do
not interchange A component and B component
parts. The A component orifice is marked with an
A.
NOTE: The cap is held in place with reverse threads.
3. Remove cap (25f) from orifice (25g).
IG. 4 on page 16.
NOTICE
Replace Mix Chamber and Front Seal
17
18
19
ti19574a
1. Follow Pressure Relief Procedure on page 22.
2. Use 5/16 in. nut driver (supplied) to remove
orifices (25, 26, 27).
25g
25d
25e
25a
25b
4. Remove needle (25h) from orifice. Thoroughly
inspect all o-rings and replace if necessary.
5. If necessary, use drill bit that is the same size as the
orifice to drill out the orifice. Orifice size is marked
on the orifice.
6. Use Fusion grease to liberally lubricate all o-rings.
7. Reassemble in reverse order. Torque orifice body
into orifice cap to 60-70 in-lb (6.78-7.91 N•m).
Torque orifices into fluid housing to 20-30 in-lb
(2.26-3.39 N•m).
NOTE: Back-up ring (25e) is placed behind the o-ring
(25d) on the needle.
25c
25h
25f
ti19573a
3. Use a 3/4 in. wrench to remove front pour tip (19).
4. Connect air quick coupler (AC).
5. Press and release trigger to push out the mix
chamber (17) and front seal (18) and discard.
6. Disconnect air quick coupler (AC).
7. Install new mix chamber and front seal.
8. Replace front pour tip and torque to 60-70 in-lb
(6.78-7.91 N•m).
NOTICE
To prevent cross-contamination of the orifices do
not interchange A component and B component
parts. The A component orifice is marked with an
A.
9. Replace orifices. Torque to 20-30 in-lb
(2.26-3.39 N•m).
313872N 29
Page 30

Repair
Repair
Tools Required
Tools required to complete some gun repair procedures:
• 15/16 in. wrench
• flat head screwdriver (supplied)
• 5/16 hex nut driver (supplied)
• 1/2 in. deep well socket
• 3/4 in. deep well socket
• 5/64 in. allen wrench (supplied)
• 9/64 in. allen wrench
• 5/32 in. allen wrench
• Phillips screwdriver
Lubrication
See Accessories on page 53 to order lubricant. Liberally lubricate all o-rings, seals, and threads.
NOTICE
Use only Throat Seal Liquid on the o-rings, seals,
and threads of the cartridge. Fusion grease or
other petroleum-based or vegetable-based lubricants will cause cartridge o-rings and seals to swell
and stick.
Replace Cartridge
The cartridge is necessary for proper operation of the
gun. Replacement of the cartridge is unnecessary for
the lubrication of the purge rod.
30 313872N
Page 31

Repair
Remove Front End
NOTICE
Proper attachment of front end is critical. Do not
operate gun if front end is loose or not snug against
body. Improper attachment can cause slow leaks.
1. Perform Pressure Relief Procedure, page 22.
2. Flush Gun, see page 25.
3. Disconnect air quick coupler (AC). Use hex nut
driver to remove fluid manifold (AD).
6. Pull fluid housing away from gun body to remove. If
fluid housing cannot be removed perform the following steps.
a. Attach air quick coupler.
b. Pull and release the trigger or press and release
the red button on the solenoid valve.
c. Remove fluid housing.
d. Disconnect air quick coupler.
7. Disengage purge rod from ball socket in piston shaft
then remove purge rod.
AD
AC
ti19568a
4. Disconnect signal cable.
5. Rotate fluid housing (AK) 45 degrees counterclockwise to disengage fluid housing slots.
AK
ti19575a
ti19576a
8. Inspect fluid housing o-rings for wear or damage.
Replace if necessary.
313872N 31
Page 32

Repair
Disassemble Front End
NOTICE
To prevent cross-contamination of the equipment’s wetted parts, never interchange component A (isocyanate)
and component B (resin) parts. The gun is shipped with
the A side on the left. The fluid manifold, fluid housing,
side seal assembly, check valve cartridge, and mix
chamber are marked on the A side.
19
55
17
18
23
22
21
20
26
56
Assemble Front End
NOTICE
To prevent cross-contamination of the equipment’s wetted parts, never interchange component A (isocyanate)
and component B (resin) parts. The gun is shipped with
the A side on the left. The fluid manifold, fluid housing,
side seal assembly, check valve cartridge, and mix
chamber are marked on the A side.
16b
3
26a
7
7
20
21
22
23
3
26
16c
56
55
17
18
19
25a
6
3
25
16e
ti19577a
1. Remove Front End, see page 31.
2. Remove check valve assembly (16e).
3. Remove orifice (25). Repeat for opposite side.
4. Remove pour tip (19).
5. Remove front packing (18), mix module (17),
scraper assembly (55), and o-ring (56).
6. Remove rear packing nut (23), seal (22), rear packing housing (21), and o-ring (20).
16t
25
16e
28
3
ti19578a
3
Torque to 20-30 in-lb (2.26-3.39 N•m)
6
Torque to 60-70 in-lb (6.78-7.91 N•m)
1. Install o-ring (20), rear packing housing (21),
seal (22), and rear packing nut (23). Torque rear
packing nut to 20-30 in-lb (2.26-3.39 N•m).
2. Install o-ring (56), scraper assembly (55), mix
module (17), and then front packing (18).
3. Install pour tip (19) hand-tight.
4. Install purge rod into front of fluid housing. Press
purge rod through housing until 3/4 in. of ball socket
end of purge rod extends out of housing as shown in
F
IG. 23.
32 313872N
Page 33

Repair
5. Install check valve assembly. See Clean Check
Val ves on page 27 for detailed assembly instruc-
tions.
6. Install orifice components (25). Install orifice
cap (25a) and torque to 20-30 in-lb (2.26-3.39 N•m).
Repeat for opposite side.
7. See Attach Front End procedure.
Attach Front End
NOTICE
Proper attachment of front end is critical. Do not
operate gun if front end is loose or not snug against
body. Improper attachment can cause slow leaks.
1. Engage piston safety lock.
2. Liberally lubricate o-rings and install on fluid
housing (AK).
3. Apply thin coat of TSL to purge rod.
6. Push fluid housing flush to the gun body. Rotate
fluid housing 45 degrees clockwise to engage fluid
housing slots.
AK
ti19580a
7. Torque pour tip (19) to 60-70 in-lb (6.7-9.1 N•m).
8. Use hex nut driver to install fluid manifold (AD).
Torque fluid manifold bolt to 20-30 in-lb
(2.26-3.39 N•m). Connect air quick coupler (AC).
4. Install fluid housing onto purge rod.
5. Insert end of purge rod into ball socket in piston
shaft.
ti19579a
F
IG. 23
AD
AC
ti19571a
9. Connect signal cable.
313872N 33
Page 34

Repair
Pistons and Bulkhead
User should have piston seals kit 24D312 available
before performing this procedure.
1. Follow Pressure Relief Procedure, page 22.
2. Use hex nut driver to remove fluid manifold (AD).
AD
6. Unscrew piston safety lock assembly and remove.
Inspect o-ring and replace if necessary.
TI14465a
7. Place 1/2 in. socket on the piston shaft through the
front of the gun body. Entering through the rear of
the gun body, place a 3/4 in. socket with extension
on the rear piston. Hold piston shaft in place and
remove the rear piston. Inspect rear piston o-ring
and replace if necessary.
Access the
Pistons and
Bulkhead
3. Disconnect signal cable.
4. Remove Front End, see page 31.
5. Disconnect air quick coupler (AC).
TI14463a1
ti19562a
AC
Piston
Shaft
TI14465a
8. Entering through the rear of the gun body, place a
3/4 in. socket with extension on the bulkhead.
Remove the bulkhead. Inspect bulkhead o-rings and
replace as necessary.
9. Push piston shaft towards rear of gun to remove
front piston and piston shaft from the gun body.
10. Use a 1/2 in. socket on the piston shaft and
15/16 in. wrench on the front piston to remove front
piston from piston shaft.
11. Inspect o-rings. Replace if worn or damaged. Liberally lubricate o-rings then reinstall.
12. Apply medium strength thread locker to threads
then install front piston onto piston shaft. Torque to
100-110 in-lb (11.3-12.4 N•m). See Component
Identification on page 16.
13. Install piston shaft and piston assembly into gun
body. See Component Identification on page 16.
34 313872N
Page 35

Repair
14. Install bulkhead onto piston shaft. Torque to
100-110 in-lb (11.3-12.4 N•m). See Component
Identification on page 16.
15. Apply medium strength threadlocker to threads then
install rear piston onto piston shaft. Torque to
100-110 in-lb (11.3-12.4 N•m). See Component
Identification on page 16.
16. Install piston safety lock. See Component Identifi-
cation on page 16.
17. Attach Front End, see page 33.
18. Use hex nut driver to install fluid manifold (AD).
Torque fluid manifold bolt to 20-30 in-lb
(2.26-3.39 N•m). Connect air quick coupler (AC).
Purge Rod
1. Flush Gun, page 25.
2. Follow Pressure Relief Procedure, page 22.
3. Disconnect air quick coupler (AC). Use hex nut
driver to remove fluid manifold (AD).
AD
AC
AD
19. Connect signal cable.
AC
ti19568a
4. Disconnect signal cable.
ti19571a
5. Remove Front End, see page 31. Inspect purge
rod for wear or damage. Replace if necessary.
6. Use 3/4 in. wrench to loosen front tip. Coat purge
rod with TSL then replace purge rod.
7. Attach Front End, see page 33.
8. Attach air quick coupler to fully extend purge rod.
Tighten front tip to 60-70 in-lb (6.78-7.91 N•m)
9. Install fluid manifold. Torque fluid manifold bolt to
20-30 in-lb (2.26-3.39 N•m).
10. Connect signal cable.
313872N 35
Page 36

Repair
Solenoid Valve
1. Follow Pressure Relief Procedure on page 22.
2. Disconnect air quick coupler (AC). Use hex nut
driver to remove fluid manifold (AD).
AD
AC
ti19568a
3. Disconnect electronic cables from solenoid valve
and handle (if installed).
4. Use 5/32 in. allen wrench to remove handle mounting plate screws. Remove handle mounting plate
and handle. See Component Identification on
page 16.
5. Use Phillips screwdriver to remove solenoid valve.
Inspect and replace if necessary. Inspect gasket on
bottom of solenoid valve and replace if necessary.
See Component Identification on page 16.
6. Use a 9/64 in. allen wrench to remove the solenoid
valve mounting plate and gasket. Inspect gasket
and replace if necessary. See Component Identifi-
cation on page 16.
7. Assemble in reverse order. Torque fluid manifold
bolt to 20-30 in-lb (2.26-3.39 N•m). Torque screws
connecting handle to body to 20-30 in-lb
(2.26-3.39 N•m). See Component Identification
on page 16.
36 313872N
Page 37

Troubleshooting
Follow Pressure Relief Procedure, page 22, before
checking or repairing gun.
NOTICE
To prevent cross-contamination of the equipment’s wetted parts, never interchange component A (isocyanate)
and component B (resin) parts. The gun is shipped with
the A side on the left. The fluid manifold, fluid housing,
side seal assembly, check valve cartridge, and mix
chamber are marked on the A side.
Use the following table to check all possible problems
and causes before disassembling gun. See Mainte-
nance on page 24 and Repair on page 30 for referenced procedures.
Troubleshooting
Problem Cause Solution
Gun does not fully actuate when triggered
Fluid does not pour when gun is fully
actuated
Gun actuates slowly Plugged breather plug Clean breather plug
Gun delays, then actuates abruptly Cured material around the purge rod Inspect purge rod, mix module, and
Gun does not actuate when triggered Air supply to gun is shut off Open air supply
Pressure imbalance Plugged orifice ports Clean orifice ports
Fluid does not shut off when fluid
valves are closed
Safety lock engaged Disengage piston safety lock
Plugged breather plug Clean breather plug
Damaged air valve Replace if necessary
Closed fluid valves Open valves.
Plugged orifice ports Clean orifice ports
Plugged check valves Clean check valves
Safety lock engaged Disengage piston safety lock
Damaged piston o-rings Replace air piston o-rings
Damaged air gasket Replace
Dirty or damaged air valve Clean or replace valve
orifices. Replace if necessary
Foam build-up around front tip 1) Clean off front tip.
2) Use 3/4 in. wrench to loosen front
tip 1/8 turn and re-tighten.
Signal cable is disconnected Connect signal cable
Plugged check valves Clean check valves
Viscosities not equal Adjust temperature or orifice needle
to compensate
Plugged fluid screens Clean screens
Damaged fluid valves Replace
313872N 37
Page 38

Troubleshooting
Problem Cause Solution
Burst of air from muffler when gun is
Normal No action required
triggered
Steady air leakage from muffler Damaged air valve Replace
Damaged air gasket Replace
Damaged piston o-rings Replace
Leak between air cylinder and fluid
Damaged o-ring Replace
housing
Material leaking out weep ports in
fluid housing near air cylinder
Mix module and rear seal worn Inspect and replace mix module and
rear seal, clean fluid housing
Material is spraying out of nozzle Flow rate is too high Change one or more of the following
variables to obtain a flow rate of
10 to 15 pounds per minute
• Orifice size
• Material Temperature
38 313872N
Page 39

Electrical Diagram
Troubleshooting
24
315
AIR
1 2
2
YE
1
4
BROWN
BLUE
5
3
2
1
2
3
4
5
1
2
3
4
5
4
5
3
2
1 1
MALE FEMALE
BLACK #2
BLACK #1
1 1
MALE FEMALE
SWITCH SIGNAL
1
2
24VDC COMMON
3
SOLENOID ACTIVATION
4
5
4
1
MALE
5
3
2
313872N 39
Page 40

Parts
Parts
2
Torque to 125-135 in-lb (14.1-15.3 N•m)
3
Torque to 20-30 in-lb (2.26-3.39 N•m)
4
Torque to 100-110 in-lb (11.3-12.4 N•m)
5
Torque to 10-12 in-lb (1.13-1.36 N•m)
6
Torque to 60-70 in-lb (6.78-7.91 N•m)
8
Apply medium thread locker to threads
8
9
11
5
12a
12b
6
3
26
16b
1
16c
55
17
19
18
16a
25d
25f
24
25e
3
3
3
22
2
13
2
7
4
6
5
5
3
23
7
21
16h
1
7
20
16g
16t
16e
25b
25g
25c
56
25a
25h
29
28
3
14
30
31
3
ti19585a
12
52
48
10
4
8
4
8
3
32
5
34
4
33
54
35
37
3
3
Model 257999 Shown
36
4-Hose Fluid Manifold
28
249523
43
47
49
40 313872N
ti14472a
28
43
ti7134a
Page 41

Quantity
257999,
Ref Part Description
EP Gun, 250,
0.031 in.
orifice,
Handheld
24C932,
EP Gun, 250,
0.031 in.
orifice, Auto
1 24D682 CYLINDER, machined 1 1
2 24F033 HOOK, vertical mount assembly 1 1
3 113003 SCREW, socket head cap 2 2
4 24E864 SHAFT, piston, dual 1 1
5 ◆ PACKING, o-ring 3 3
6 24E972 PISTON, front 1 1
7 ◆ PACKING, o-ring 1 1
8 24E973 BULKHEAD, applicator 1 1
9 ◆ PACKING, o-ring 1 1
10 24E974 PISTON, rear 1 1
11 ◆ O-RING 1 1
12 24D295 STOP, assy, safety 1 1
13 15T897 PLUG, air valve 1 1
14 188554 PACKING, o-ring 1 1
15 PIN, roll 1 1
16a ✠ HOUSING, fluid, assy, 250 1 1
16b 295229✠ FITTING, grease, 1/4-28 1 1
16c 1704-2✠ PLUG, hole DP-750 1 1
16e ✿❄✠ VALVE, check 1 1
16g 248132❖✠ O-RING, outer housing 1 1
16h 256773❖✠ PACKING, o-ring 022 1 1
16t ✠ PLUG, pipe 1 1
17 *‡✠ MODULE, mix, 250 rod 1 1
18 16P943*‡✠ PACKING, front, 250 rod 1 1
19 16T794✠ TIP, pour, 250 rod 1 1
20 ***✠ PACKING, o-ring 6 6
21 15Y980✠ HOUSING, packing, rear, 250 rod 1 1
22 ***‡✠ SEAL 6 6
23 24D678✠ NUT, packing, rear, 250 1 1
24 24D317✠ ROD, purge, 250 1 1
25 † RESTRICTOR, adjustable, 250, 031 2 2
26 † RESTRICTOR, adjustable, iso, 250, 031 2 2
28 246012 MANIFOLD, fluid 1 1
29 24D315 GASKET, solenoid, manifold 1 1
30 24E975 ★ MANIFOLD, solenoid, assy 1 1
31 106245 SCREW, socket head cap 3 3
32 24M121 ★ VALVE, solenoid, 4 way 1 1
33 24M122 ★ CORD SET, euro/male, din/female 1 1
34 24E865 ★ PLATE, adapter, handle 1 1
35 101888 ★ SCREW, socket head cap 4 4
Parts
313872N 41
Page 42

Parts
Quantity
257999,
Ref Part Description
EP Gun, 250,
0.031 in.
orifice,
Handheld
24C932,
EP Gun, 250,
0.031 in.
orifice, Auto
36 24D073 HANDLE, 2k dispense 1
37 C19980 SCREW, cap, socket hd 4
41 172479 ▲ TA G, wa rn i n g 1 1
43 112307 ELBOW, street 2 2
44 117510 COUPLER, line, air, 1/4 npt 1 1
45 15B772 HOSE, air, 18 inch 1 1
46 15B565 VALVE, ball 1 1
47 117661 PIN, vise 1 1
48 117642 TOOL, nut driver 1 1
49 118575 TOOL, screw driver, 1/8 blade 1 1
51 222385 ▲ TA G, wa rn i n g 1 1
52 295598 TOOL, wrench, hex 1 1
54 24D320 CONNECTOR, splitter 1
55 **✠ SCRAPER, assembly 1 1
56 115719**✠ PACKING, o-ring, 015 1 1
▲ Replacement Danger and Warning labels, tags and
cards are available at no cost.
* Parts included in Kit 16T549.
** Parts included in Kit 16T531.
*** Parts included in Kit 24E252.
◆ Parts included in Kit 24D312.
❖ Parts included in Kit 24D313.
✿ Parts included in Kit 246352.
❄ Parts included in Kit 246731.
✠ Parts included in Kit 16T553.
†See Orifice Kits section starting on page 49.
‡ Suggested spares. These parts should be kept
on-hand to prevent down time. Kits 24D321, 246731,
246352 should also be kept on-hand. See Kits start-
ing on page 43 for contents of each kit.
★ If installed gun components are prior to October
2011, kit 24M123 is necessary when replacing components.
42 313872N
Page 43

Kits
See Maintenance on page 24 and Repair on page 30 for appropriate kit installation procedures. See Complete
O-ring Placement Guide on page 52 for o-ring identification help.
Series A and B Kits
The following kits are for series A and B guns only.
Series A and B guns utilize the TSL cartridge for lubrication of the purge rod and the front head assembly does
not contain a scraper.
Kits
Kit
Description
250 Mix
Chamber
375 Mix
Chamber
Throat Seal
Liquid Bleed
Por t O-Ring
Kit
375 Iso Orifice
Parts included in Kit
Kit Number
24D314 Mix Chamber 1
24D322 Mix Chamber 1
246354 O-Ring 6
24D239 24D254;
see Orifice
Kits on
page 50
Description
Front Bearing 1
Front Bearing 1
O-Ring Installation
To ol
Orifice Housing 1
O-Ring 1
O-Ring 1
O-Ring 1
Needle 1
Backup Ring 1
O-Ring 1
Iso Orifice Cap 1
Orifice Spacer 1
Cleanout Drill 1
Qty
1
Illustration
17 18
313872N 43
Page 44

Kits
Kit
Description
Kit Number
375 Orifice 24C761 -
24C766,
24C794 24C804;
see Orifice
Kits on
page 50
Fluid Hous-
24D313 Housing Outer
ing Seals
Outer Fluid
24E611 O-Ring 6
Housing
O-Ring Kit
Parts included in Kit
Description
Orifice Housing 1
O-Ring 1
O-Ring 1
O-Ring 1
Needle 1
Backup Ring 1
O-Ring 1
Orifice Cap 1
Orifice Spacer 1
Cleanout Drill 1
O-Ring
Housing Inner
O-Ring
Qty
1
1
Illustration
16g
16h
16g
375 Lip Seal 24D325 375 Lip Seal 6
TSL Check
Val ve Kit
24B843 Check Valve Seat 1
Ball 1
Spring 1
O-Ring 1
20
22
44 313872N
Page 45

All Series Kits
The following kits are for all series EP guns.
Kits
Kit
Description
250 Iso Orifice
250 Orifice 24C751 -
Orifice
O-Ring Kit
Kit Number
24D223 24D238;
see Orifice
Kits on
page 50
24C756,
24C805 24C815;
see Orifice
Kits on
page 50
24D321 O-Ring 1
Parts included in Kit
Description
Orifice Housing 1
O-Ring 1
O-Ring 1
O-Ring 1
Needle 1
Backup Ring 1
O-Ring 1
Iso Orifice Cap 1
Cleanout Drill 1
Orifice Housing 1
O-Ring 1
O-Ring 1
O-Ring 1
Needle 1
Backup Ring 1
O-Ring 1
Orifice Cap 1
Cleanout Drill 1
O-Ring 1
O-Ring 1
O-Ring 1
Backup Ring
Qty
25e
25d
Illustration
25c
25b
25a
Orifice
O-Ring Kit
313872N 45
248130 O-Ring 6
25c
25c
Page 46

Kits
Kit
Description
Orifice
Kit Number
248128 O-Ring 6
Parts included in Kit
Description
O-Ring Kit
Iso Check
Val ve
246731 Check Valve Hous-
ing
Spring Retaining
Screw
Carbide Ball 1
Filter 1
Check Valve Spring 1
O-Ring 1
O-Ring 1
Check Valve 246352 Check Valve Hous-
ing
Spring Retaining
Screw
Carbide Ball 1
Filter 1
Check Valve Spring 1
O-Ring 1
O-Ring 1
40 Mesh Fil-
246357 40 Mesh Screen 10
ter Kit (40
mesh,
0.015 in.,
375 micron)
60 Mesh Fil-
246358 60 Mesh Screen 10
ter Kit (60
mesh,
0.010 in.,
238 micron)
80 Mesh Fil-
246359 80 Mesh Screen 10
ter Kit (80
mesh,
0.007 in.,
175 micron)
Qty
1
1
1
1
Illustration
25a
25a
46 313872N
Page 47

Kits
Kit
Description
Check Valve
O-Ring Kit
Check Valve
Face O-Ring
Kit
Parts included in Kit
Kit Number
Description
248129 O-Ring 6
248133 O-Ring 6
Qty
Illustration
Inner Fluid
256773 O-Ring 6
Housing
O-Ring Kit
250 Lip Seal 24E252 250 Lip Seal 6
O-Ring 6
Piston Seals 24D312 Rod O-Ring 3
Front Piston O-Ring 1
Bulkhead O-Ring 1
Rear Piston O-Ring 1
11
22
20
16h
5
5
7
9
5
313872N 47
Page 48

Kits
Kit
Description
Piston Safety
Stop
Kit Number
24D295 Back Cap 1
Parts included in Kit
Description
O-Ring 1
Piston Stop 1
Safety Stop Shaft 1
O-Ring 1
Spring 1
Stop Shaft
257425 O-Ring 6
O-Ring Kit
Handle 24D073 2K Electric Handle 1
Handle Mounting
Screw
Qty
4
Illustration
Located inside back cap
Trigger
Switch Harness
EP Solenoid
Conversion
(Required for
components
prior to October 2011)
24D049 Trigger Switch 1
Switch Spacer 1
Air Valve Plug 1
Strain Relief 1
Signal Cable 1
24M123 Solenoid Valve 1
Cord Set 1
Screw 4
Adapter Plate 1
Solenoid Mount 1
48 313872N
Page 49

Series C Kits
The following kits are for series C guns only. Series C
guns do not utilize the TSL cartridge for lubrication of
the purge rod and the front head assembly does contain
a scraper.
Kits
Kit
Description
250 Mix
Chamber
(Requires
16T794 if
using
series A fluid
housing)
Pour Tip 16T794 Pour Tip 1
Scraper Cartridge
Kit Number
16T549 Mix Chamber 1
16T531 Scraper Cartridge 1
Parts included in Kit
Description
Front Bearing 1
O-ring 1
Qty
Illustration
Fluid Housing Kit
(Orifices sold
separately)
313872N 49
16T553 Fluid Housing with
centerline components
Grease Gun 1
Grease 1
TSL 1
1
Page 50

Kits
Orifice Kits
In the following table, shaded rows indicate “Super Standard” items that are typically stocked and provide the
best delivery dates.
Impingement
Port Size
0.016 0.41 24C805 24D229
0.020 0.51 24C751 24D223
0.024 0.61 24C806 24D230
0.028 0.71 24C807 24D231
0.031 0.79 24C752 24D224
0.035 0.89 24C808 24D232
0.039 0.99 24C809 24D233
0.042 1.07 24C810 24D234
0.047 1.19 24C753 24D225
0.052 1.32 24C811 24D235
0.055 1.40 24C812 24D236
0.060 1.52 24C754 24D226
0.063 1.60 24C813 24D237
0.067 1.70 24C755 24D227
0.073 1.85 24C815 24D238
0.086 2.18 24C756 24D228
All 250 Super
Standard Orifices
Kit Type and Kit Number
250 Model Polyol
Orifice Kit
24E250
250 Model Iso
Orifice Kitin. mm
50 313872N
Page 51

Kits
Drill Bit Kits
For cleaning fluid housing passages and orifices. Drill bit illustrations are actual size for comparison. See Clean Fluid
Housing Passages on page 28. Not all sizes are used with every gun model.
Orifice Size
Kit
Number
Drill Bit
Size
Qty in
Kit
Illustrationin. mm
24D289
246631
246815
248892
24D293
24D294
248640
246629
249764
246628
246809
246627
249113
#78
#76
#73
#70
#68
#65
#61
#58
#56
#55
#54
#53
1/16 in.
6 0.016
60.020
60.024
60.028
60.031
60.035
60.039
60.042
60.047
60.052
60.055
60.060
60.063
0.41
0.51
0.61
0.71
0.79
0.89
0.99
1.07
1.20
1.32
1.40
1.52
1.60
24D290
24D291
246625
246624 3/32 in. 3 0.094 2.39
249115
24D327 #15 1 0.180 4.57
313872N 51
#51
#49
#44
1/8 in.
60.067
60.073
3
6
0.086
0.125
1.70
1.85
2.18
3.18
Page 52

Kits
Complete O-ring Placement Guide
The following illustration shows all gun o-rings at actual size. See Kits on page 43 for o-ring kit details including
quantities of each o-ring in each kit.
See Parts on page 40 for part references and locations.
11
7
25c
16b
14
16c
12a
16a
9
25d
12b
56
25a
5
25b
52 313872N
Page 53

Accessories
Accessories
Lubricant for Gun Rebuild
NOTICE
Use only Throat Seal Liquid on the o-rings, seals,
and threads of the cartridge. Fusion grease or
other petroleum-based or vegetable-based lubricants will cause cartridge o-rings and seals to swell
and stick.
248279, 4 oz (113 gram) [10]
High adhesion, water resistant, lithium-based lubricant.
MSDS sheet available at www.graco.com.
Fluid Inlet Cover
15C850 Recirculation Block
T3877a1
Gun Cleaning Kit
15D546
Kit includes gun pick, tip cleaning tool, o-ring tool, utility
knife and blades, and seven different brushes.
Circulation Manifold
246362
Attaches to gun fluid manifold to enable preheating of
hose. See manual 309818.
T3877a
Reactor® IP Harness
24D679
Attaches to gun signal cable to enable connection to
Reactor IP proportioners. 10 ft cable, male 9-pin to
female 5-pin.
Flushing Manifold
15B817 Manifold Block
Attaches to gun fluid manifold to enable flushing.
TI15103a
Signal Cable Extensions
24E898
ti2647a
313872N 53
25 ft extension cable, male 5-pin to female 5-pin.
24E897
50 ft extension cable, male 5-pin to female 5-pin.
Page 54

Accessories
Solvent Flush Canister Kit
248139, 1 qt (0.95 liter) Solvent Cup
Includes flushing manifold to flush gun with solvent. Portable for remote flushing. See manual 309963.
ti19567a
Grease Cartridge for Gun Shutdown
248280 Cartridge, 3 oz [10]
Specially formulated low viscosity grease flows easily
through gun passages, to prevent two-component curing and keep fluid passages clean.
Solvent Flush Pail Kit
248229, 5.0 gal. (19 liter) Pail
Includes flush manifold with individual A and B shutoff
valves, and air regulator. See manual 309963.
ti19586a
54 313872N
Page 55

Technical Data
Technical Data
Maximum Fluid Working Pressure . . . . . . . . . . . . . . . . 3000 psi (20.7 MPa, 207 bar)
Minimum Air Inlet Pressure. . . . . . . . . . . . . . . . . . . . . . 80 psi (0.55 MPa, 5.5 bar)
Maximum Air Inlet Pressure . . . . . . . . . . . . . . . . . . . . . 100 psi (0.69 MPa, 6.9 bar)
Maximum Fluid Temperature . . . . . . . . . . . . . . . . . . . . 180°F (82°C)
Air Inlet Size . . . . . . . . . . . . . . . . . . . . . . . . . . . . . . . . . 1/4 npt Quick Disconnect Nipple
A Component Inlet Size . . . . . . . . . . . . . . . . . . . . . . . . -5 JIC, 1/2 - 20 UNF
B Component Inlet Size . . . . . . . . . . . . . . . . . . . . . . . . -6 JIC, 9/16 - 18 UNF
Weight. . . . . . . . . . . . . . . . . . . . . . . . . . . . . . . . . . . . . . Models with Handle: 7.4 lb (3.4 kg)
Models without Handle: 6.4 lb (2.9 kg)
Sound pressure . . . . . . . . . . . . . . . . . . . . . . . . . . . . . . 80.22 dB(A) at 100 psi (0.7 MPa, 7 bar)
Sound power, measured per ISO 9416-2 . . . . . . . . . . . 80.64 dB(A) at 100 psi (0.7 MPa, 7 bar)
Materials of Construction . . . . . . . . . . . . . . . . . . . . . . . Aluminum, stainless steel, acetal, chemically resistant
o-rings, carbon steel, fluoroelastomer o-rings
Wetted Parts . . . . . . . . . . . . . . . . . . . . . . . . . . . . . . . . . Aluminum, stainless steel, acetal, chemically resistant
o-rings
313872N 55
Page 56

Technical Data
Dimensions
$
&
Side View
(
'
Bottom View
%
ti19587a
Ref Dimension, in. (mm)
A 10.8 (274)
B 11.7 (297)
C6.1 (155)
D3.1 (79)
E 0.73 (19)
F 1.06 (27); Mounting: 4x 10-24
56 313872N
Page 57

Technical Data
313872N 57
Page 58

Graco Standard Warranty
Graco warrants all equipment referenced in this document which is manufactured by Graco and bearing its name to be free from defects in
material and workmanship on the date of sale to the original purchaser for use. With the exception of any special, extended, or limited warranty
published by Graco, Graco will, for a period of twelve months from the date of sale, repair or replace any part of the equipment determined by
Graco to be defective. This warranty applies only when the equipment is installed, operated and maintained in accordance with Graco’s written
recommendations.
This warranty does not cover, and Graco shall not be liable for general wear and tear, or any malfunction, damage or wear caused by faulty
installation, misapplication, abrasion, corrosion, inadequate or improper maintenance, negligence, accident, tampering, or substitution of
non-Graco component parts. Nor shall Graco be liable for malfunction, damage or wear caused by the incompatibility of Graco equipment with
structures, accessories, equipment or materials not supplied by Graco, or the improper design, manufacture, installation, operation or
maintenance of structures, accessories, equipment or materials not supplied by Graco.
This warranty is conditioned upon the prepaid return of the equipment claimed to be defective to an authorized Graco distributor for verification of
the claimed defect. If the claimed defect is verified, Graco will repair or replace free of charge any defective parts. The equipment will be returned
to the original purchaser transportation prepaid. If inspection of the equipment does not disclose any defect in material or workmanship, repairs will
be made at a reasonable charge, which charges may include the costs of parts, labor, and transportation.
THIS WARRANTY IS EXCLUSIVE, AND IS IN LIEU OF ANY OTHER WARRANTIES, EXPRESS OR IMPLIED, INCLUDING BUT NOT LIMITED
TO WARRANTY OF MERCHANTABILITY OR WARRANTY OF FITNESS FOR A PARTICULAR PURPOSE.
Graco’s sole obligation and buyer’s sole remedy for any breach of warranty shall be as set forth above. The buyer agrees that no other remedy
(including, but not limited to, incidental or consequential damages for lost profits, lost sales, injury to person or property, or any other incidental or
consequential loss) shall be available. Any action for breach of warranty must be brought within two (2) years of the date of sale.
GRACO MAKES NO WARRANTY, AND DISCLAIMS ALL IMPLIED WARRANTIES OF MERCHANTABILITY AND FITNESS FOR A
PARTICULAR PURPOSE, IN CONNECTION WITH ACCESSORIES, EQUIPMENT, MATERIALS OR COMPONENTS SOLD BUT NOT
MANUFACTURED BY GRACO. These items sold, but not manufactured by Graco (such as electric motors, switches, hose, etc.), are subject to
the warranty, if any, of their manufacturer. Graco will provide purchaser with reasonable assistance in making any claim for breach of these
warranties.
In no event will Graco be liable for indirect, incidental, special or consequential damages resulting from Graco supplying equipment hereunder, or
the furnishing, performance, or use of any products or other goods sold hereto, whether due to a breach of contract, breach of warranty, the
negligence of Graco, or otherwise.
FOR GRACO CANADA CUSTOMERS
The Parties acknowledge that they have required that the present document, as well as all documents, notices and legal proceedings entered into,
given or instituted pursuant hereto or relating directly or indirectly hereto, be drawn up in English. Les parties reconnaissent avoir convenu que la
rédaction du présente document sera en Anglais, ainsi que tous documents, avis et procédures judiciaires exécutés, donnés ou intentés, à la suite
de ou en rapport, directement ou indirectement, avec les procédures concernées.
Graco Information
For the latest information about Graco products, visit www.graco.com.
TO PLACE AN ORDER, contact your Graco distributor or call to identify the nearest distributor.
Phone: 612-623-6921 or Toll Free: 1-800-746-1334 Fax: 330-966-3006
All written and visual data contained in this document reflects the latest product information available at the time of publication.
GRACO INC. AND SUBSIDIARIES • P.O. BOX 1441 • MINNEAPOLIS MN 55440-1441 • USA
Copyright 2010, Graco Inc. All Graco manufacturing locations are registered to ISO 9001.
Graco reserves the right to make changes at any time without notice.
For patent information, see www.graco.com/patents.
Original instructions. This manual contains English. MM 313872
Graco Headquarters: Minneapolis
International Offices: Belgium, China, Japan, Korea
www.graco.com
Revised September 2014
 Loading...