

Page 1
Operation / 操作 / 작동
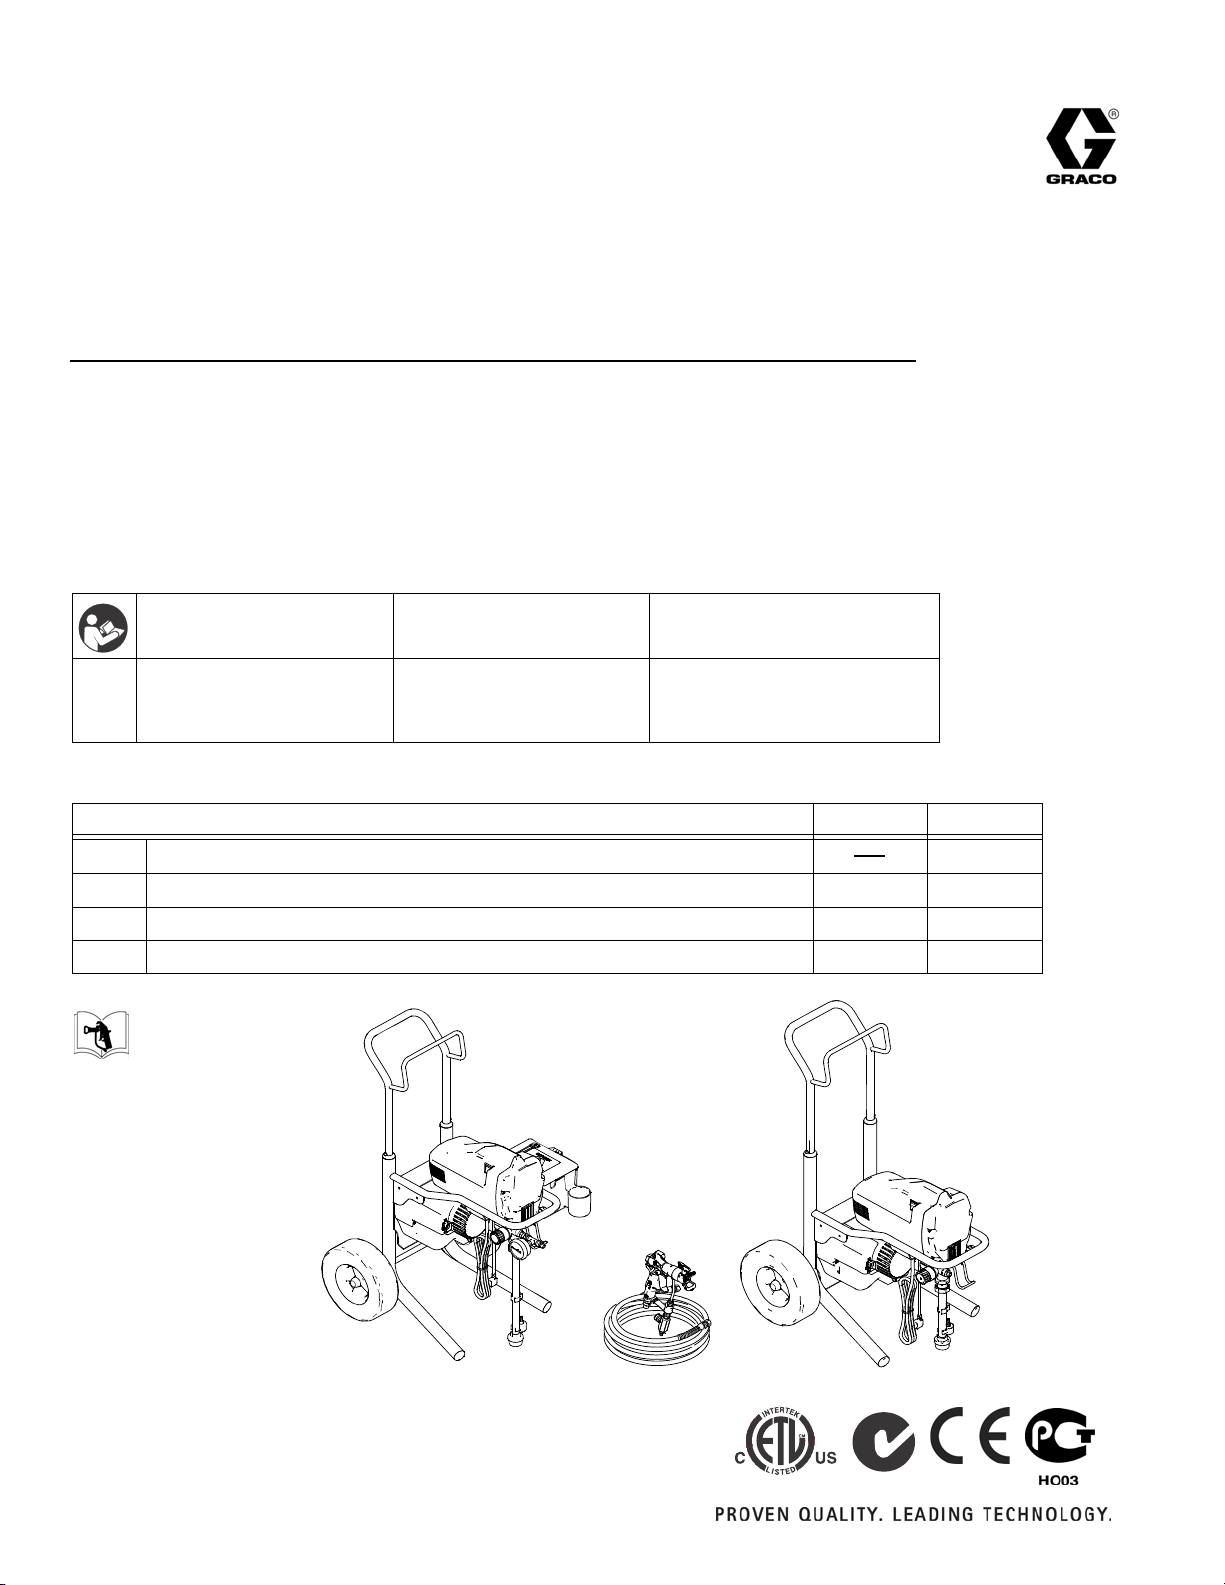
FinishPro™ 290
Airless/Air-Assisted Sprayer
无气/空气辅助式喷涂机
에어리스 / 공기 보조식 도장기
-
For the application of architectural paint and coatings - / - 适用于建筑涂料和涂层的应用 - / - 구조적 도장 및 코팅 분야 -
2800 psi (193 bar, 19.3 MPa) Maximum Working Pressure Airless Spraying /
2800 psi (193 bar, 19.3 MPa) 最大工作压力无气喷涂 /
2800 psi (193 bar, 19.3 MPa) 최대 허용 압력 에어리스 도장기
313797C
ENG ZHO KOR
Important Safety
Instructions
Read all warnings and instructions
in this manual and on the sprayer
cord. Save these instructions.
Models / 型号 / 모델 :
120V
240V
240V
110V
US / 美国 / 미국
Europe CE 7/7 / 欧洲,CE 7/7 / 유럽 CE 7/7
Europe Multi / 欧洲,多国 / 유럽 멀티
UK / 英国 / 영국
313347
重要安全说明 중요 안전 지침
请阅读本手册及喷涂机电源线
上的所有警告和说明。 妥善保
存这些说明。
Region / 地区 / 지역
이 설명서와 도장기 코드의 모든
경고와 지침을 읽고 , 이러한 지침을
잘 보관해 두십시오 .
Hi-Boy Lo-Boy
256842
256843 257411
256844 257412
256845 257413
Graco Inc. P.O. Box 1441 Minneapolis, MN 55440-1441
Copyright 2009, Graco Inc. is registered to I.S. EN ISO 9001
ti13369a
Page 2
Warning
Warning
The following warnings are for the setup, use, grounding, maintenance and repair of this equipment. The exclamation
point symbol alerts you to a general warning and the hazard symbol refers to procedure-specific risks. Refer back
to these warnings. Additional, product-specific warnings may be found throughout the body of this manual where
applicable.
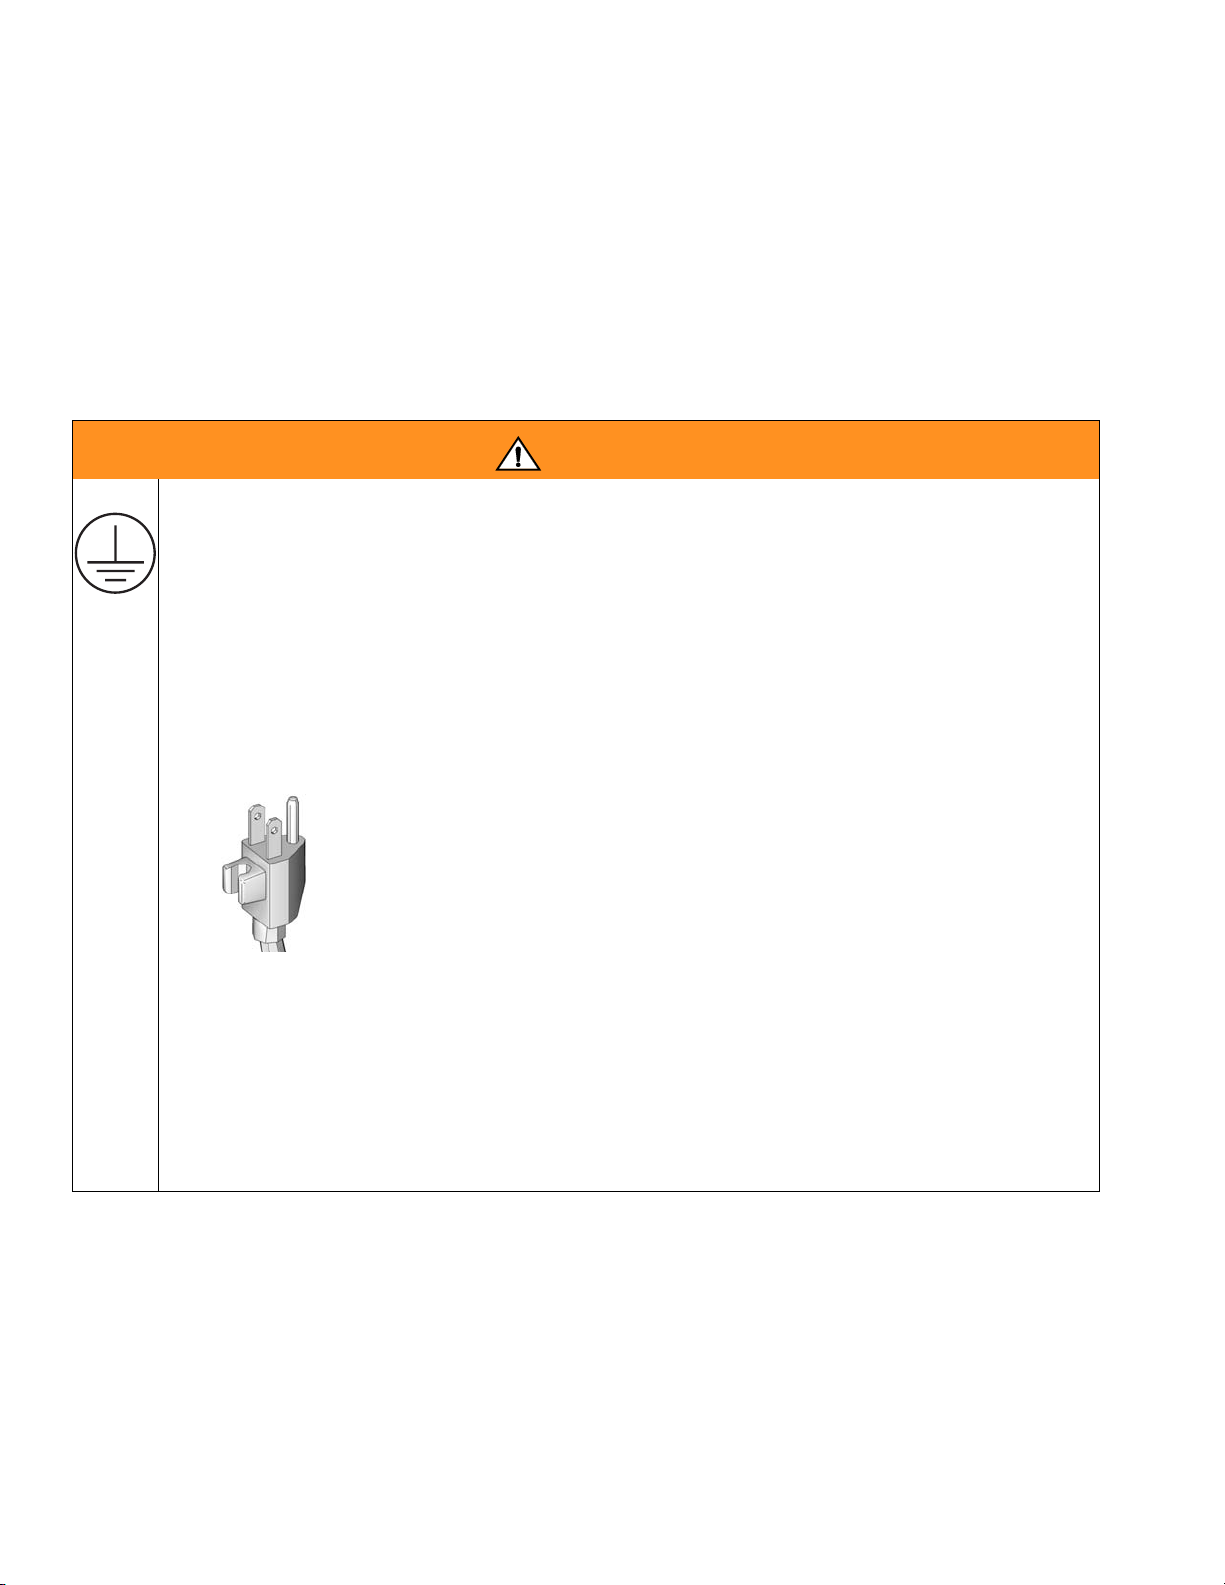
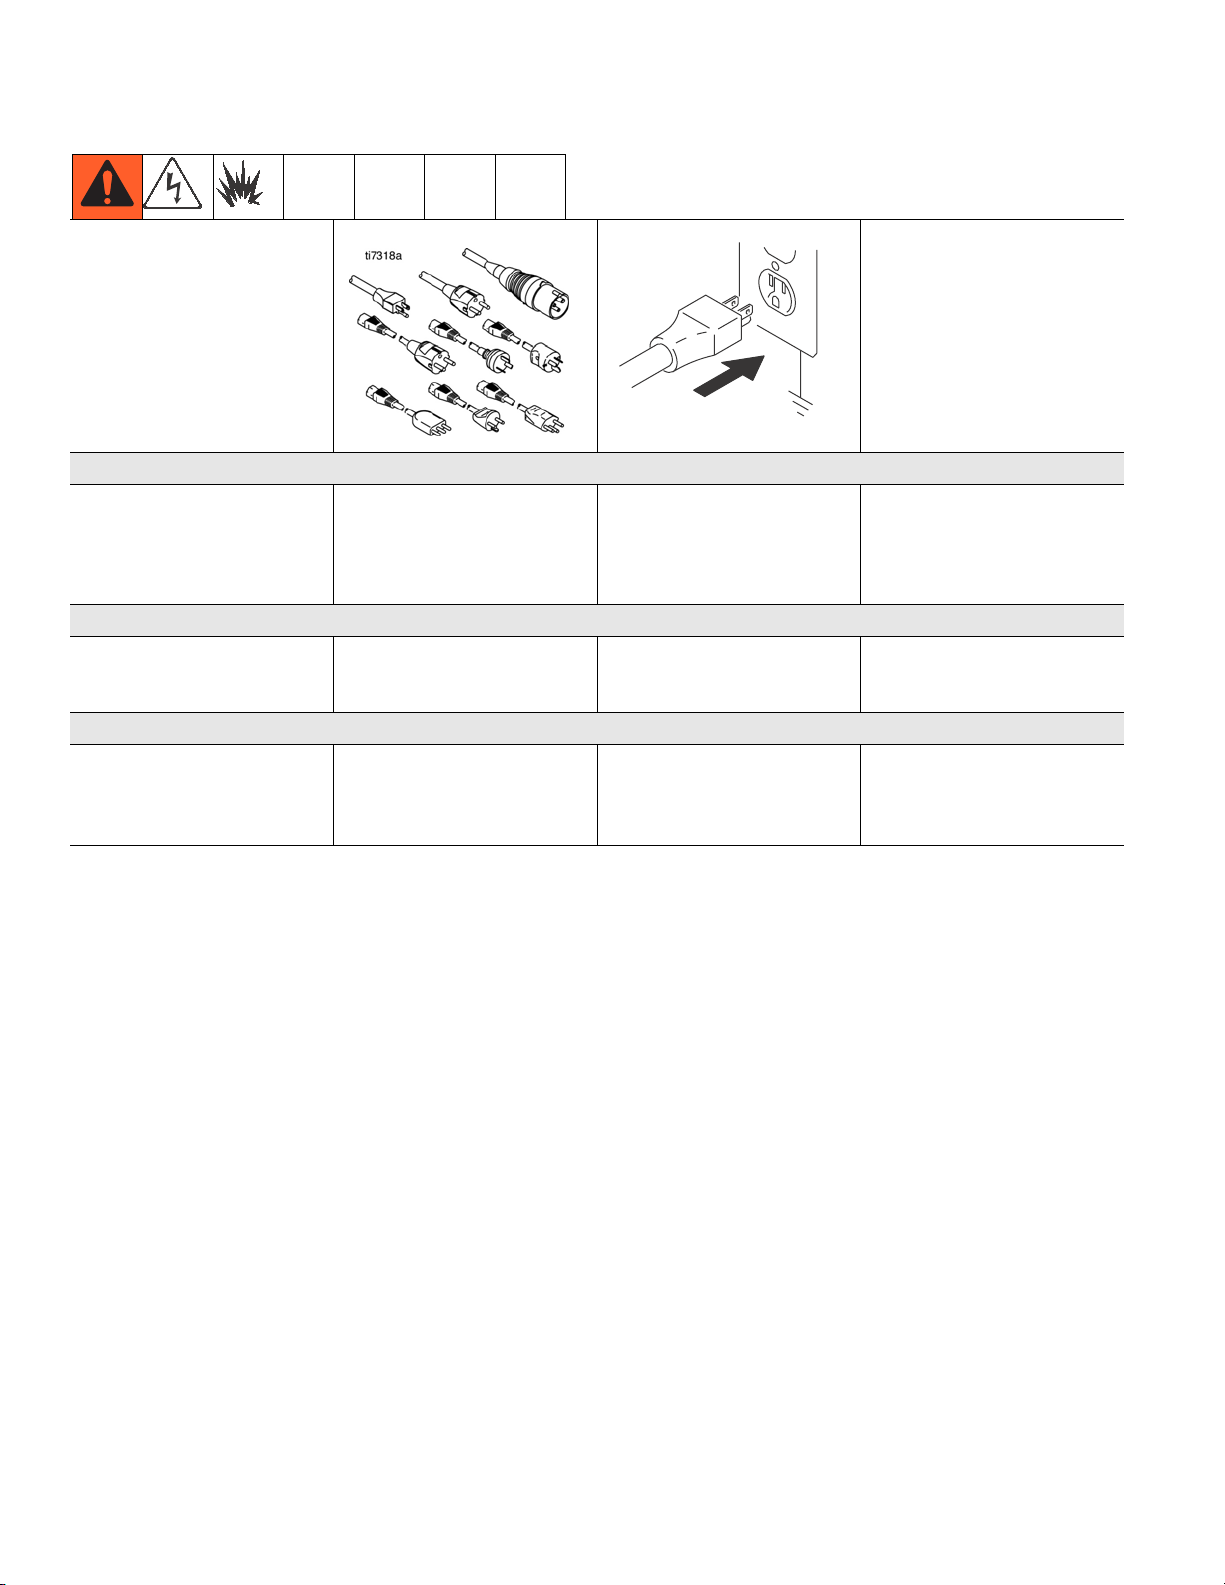
Grounding Instructions
This product must be grounded. In the event of an electrical short circuit, grounding reduces the risk of electric shock
by providing an escape wire for the electric current. This product is equipped with a cord having a grounding wire
with an appropriate grounding plug. The plug must be plugged into an outlet that is properly installed and grounded
in accordance with all local codes and ordinances.
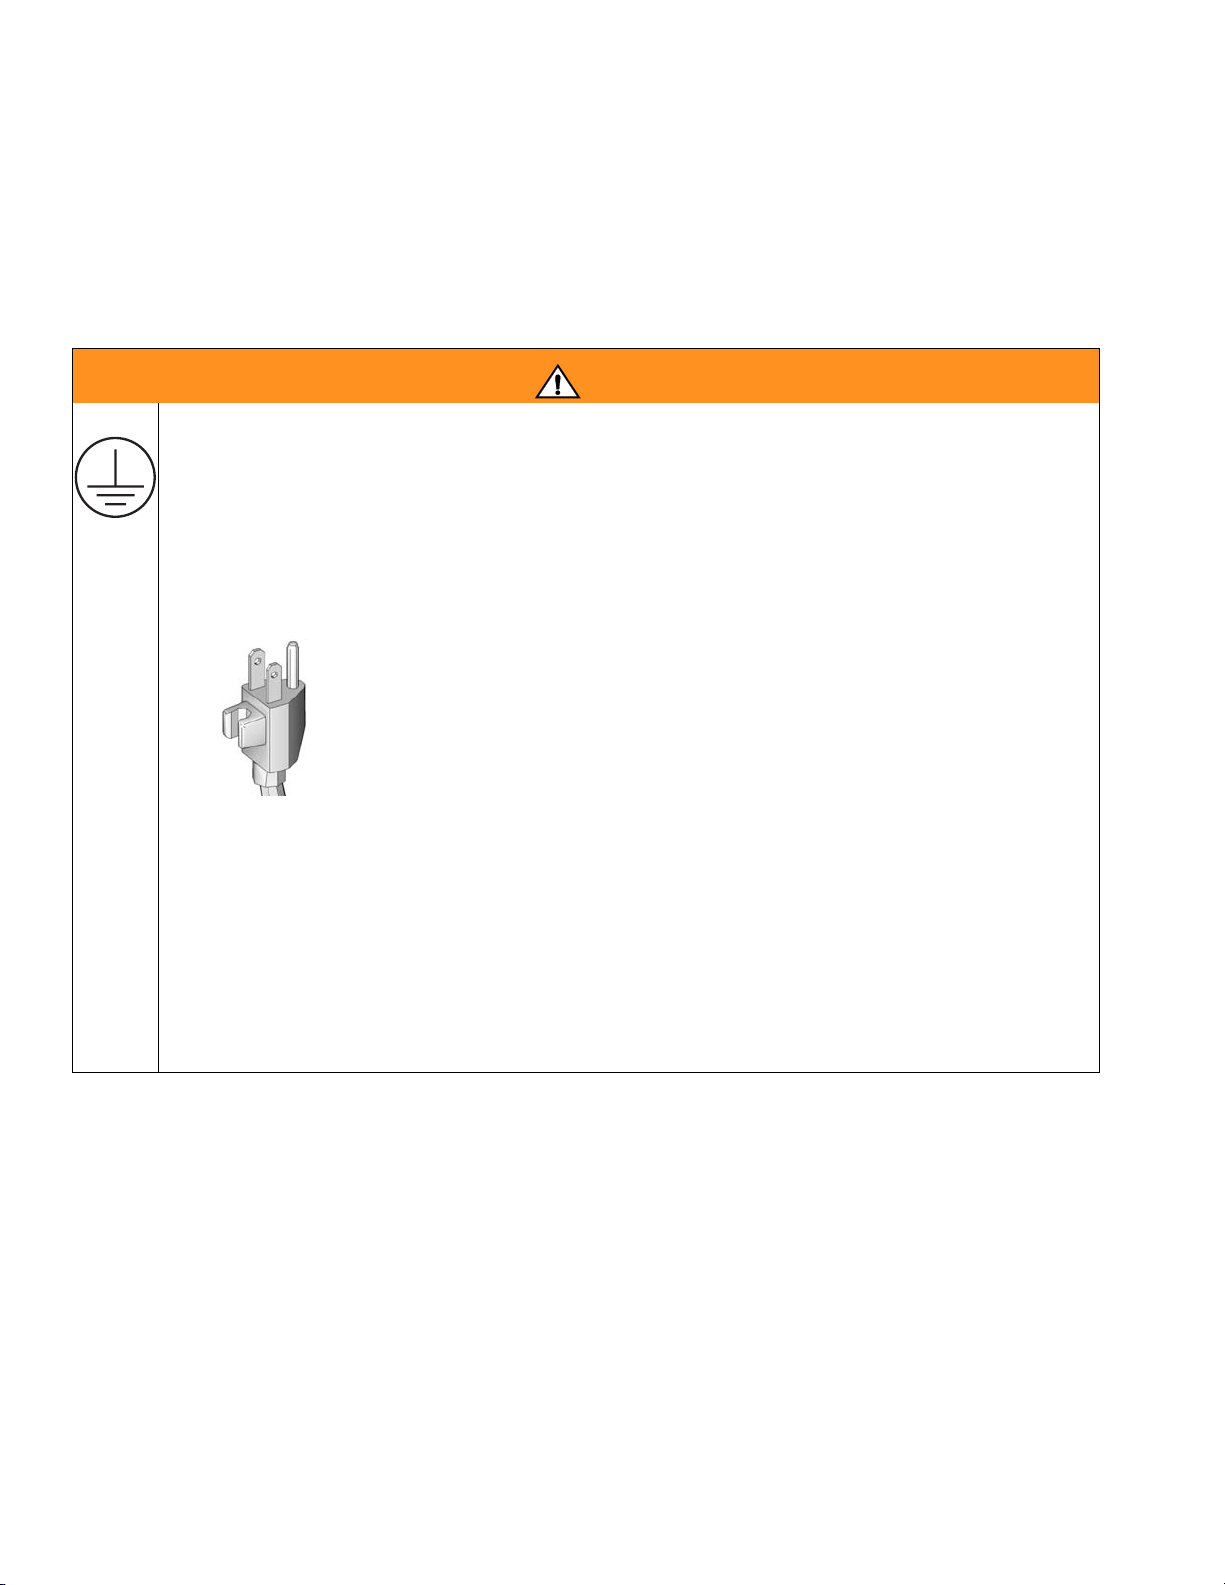
WARNING
GROUNDING
• Improper installation of the grounding plug is able to result in a risk of electric shock.
• When repair or replacement of the cord or plug is required, do not connect the grounding wire
to either flat blade terminal.
• The wire with insulation having an outer surface that is green with or without yellow stripes is
the grounding wire.
• Check with a qualified electrician or serviceman when the grounding instructions are not completely
understood, or when in doubt as to whether the product is properly grounded.
• Do not modify the plug provided; if it does not fit the outlet, have the proper outlet installed by
a qualified electrician.
• This product is for use on a nominal 120V circuit and has a grounding plug similar to the plug
illustrated in the figure below.
• Only connect the product to an outlet having the same configuration as the plug.
• Do not use an adapter with this product.
Extension Cords:
• Use only a 3-wire extension cord that has a 3-blade grounding plug and a 3-slot receptacle that
accepts the plug on the product.
• Make sure your extension cord is not damaged. If an extension cord is necessary, use 12 AWG
(2.5 mm
• An undersized cord results in a drop in line voltage and loss of power and overheating.
2 313797C
2
) minimum to carry the current that the product draws.
Page 3
Warning
WARNING
FIRE AND EXPLOSION HAZARD
Flammable fumes, such as solvent and paint fumes, in work area can ignite or explode. To help prevent
fire and explosion:
• Do not spray flammable or combustible materials near an open flame or sources of ignition such as
cigarettes, motors, and electrical equipment.
• Paint or solvent flowing through the equipment is able to result in static electricity. Static electricity
creates a risk of fire or explosion in the presence of paint or solvent fumes. All parts of the spray
system, including the pump, hose assembly, spray gun, and objects in and around the spray area
shall be properly grounded to protect against static discharge and sparks. Use Graco conductive
or grounded high-pressure airless paint sprayer hoses.
• Verify that all containers and collection systems are grounded to prevent static discharge.
• Connect to a grounded outlet and use grounded extensions cords. Do not use a 3-to-2 adapter.
• Do not use a paint or a solvent containing halogenated hydrocarbons.
• Keep spray area well-ventilated. Keep a good supply of fresh air moving through the area. Keep
pump assembly in a well ventilated area. Do not spray pump assembly.
• Do not smoke in the spray area.
• Do not operate light switches, engines, or similar spark producing products in the spray area.
• Keep area clean and free of paint or solvent containers, rags, and other flammable materials.
• Know the contents of the paints and solvents being sprayed. Read all Material Safety Data Sheets
(MSDS) and container labels provided with the paints and solvents. Follow the paint and solvents
manufacturer’s safety instructions.
• Fire extinguisher equipment shall be present and working.
• Sprayer generates sparks. When flammable liquid is used in or near the sprayer or for flushing or
cleaning, keep sprayer at least 20 feet (6 m) away from explosive vapors.
SKIN INJECTION HAZARD
• Do not aim the gun at, or spray any person or animal.
• Keep hands and other body parts away from the discharge. For example, do not try to stop leaks
with any part of the body.
• Always use the nozzle tip guard. Do not spray without nozzle tip guard in place.
• Use Graco nozzle tips.
• Use caution when cleaning and changing nozzle tips. in the case where the nozzle tip clogs while
spraying, follow the Pressure Relief Procedure for turning off the unit and relieving the pressure
before removing the nozzle tip to clean.
• Do not leave the unit energized or under pressure while unattended. When the unit is not in use, turn
off the unit and follow the Pressure Relief Procedure for turning off the unit.
• High-pressure spray is able to inject toxins into the body and cause serious bodily injury. In the event
that injection occurs, get immediate surgical treatment.
• Check hoses and parts for signs of damage. Replace any damaged hoses or parts.
• This system is capable of producing 3300 psi. Use Graco replacement parts or accessories that are
rated a minimum of 3300 psi.
• Always engage the trigger lock when not spraying. Verify the trigger lock is functioning properly.
• Verify that all connections are secure before operating the unit.
• Know how to stop the unit and bleed pressure quickly. Be thoroughly familiar with the controls.
EQUIPMENT MISUSE HAZARD
Misuse can cause death or serious injury.
• Always wear appropriate gloves, eye protection, and a respirator or mask when painting.
• Do not operate or spray near children. Keep children away from equipment at all times.
• Do not overreach or stand on an unstable support. Keep effective footing and balance at all times.
• Stay alert and watch what you are doing.
• Do not operate the unit when fatigued or under the influence of drugs or alcohol.
• Do not kink or over-bend the hose.
• Do not expose the hose to temperatures or to pressures in excess of those specified by Graco.
• Do not use the hose as a strength member to pull or lift the equipment.
313797C 3
Page 4
Warning
WARNING
ELECTRIC SHOCK HAZARD
Improper grounding, setup, or usage of the system can cause electric shock.
• Turn off and disconnect power cord before servicing equipment.
• Use only grounded electrical outlets.
• Use only 3-wire extension cords.
• Ensure ground prongs are intact on sprayer and extension cords.
• Do not expose to rain. Store indoors.
PRESSURIZED ALUMINUM PARTS HAZARD
Do not use 1, 1, 1-trichloroethane, methylene chloride, other halogenated hydrocarbon solvents or fluids
containing such solvents in pressurized aluminum equipment. Such use can cause serious chemical
reaction and equipment rupture, and result in death, serious injury, and property damage.
TOXIC FLUID OR FUMES HAZARD
Toxic fluids or fumes can cause serious injury or death if splashed in the eyes or on skin, inhaled,
or swallowed.
• Read MSDS’s to know the specific hazards of the fluids you are using.
• Store hazardous fluid in approved containers, and dispose of it according to applicable guidelines.
PERSONAL PROTECTIVE EQUIPMENT
You must wear appropriate protective equipment when operating, servicing, or when in the operating
area of the equipment to help protect you from serious injury, including eye injury, inhalation of toxic
fumes, burns, and hearing loss. This equipment includes but is not limited to:
• Protective eye wear
• Clothing and respirator as recommended by the fluid and solvent manufacturer
•Gloves
• Hearing protection
4 313797C
Page 5
警告
以下为针对本设备的设置、使用、接地、维护及修理的警告。惊叹号标志表示一般性警告,而各种危险标志则表示
与特定的操作过程有关的危险。请返回此处查阅相关的警告。在本手册的其它适当地方还会有另外的与特定产品有
关的警告。
接地说明
本产品必须接地。万一发生电气短路时,通过为电流提供逃逸的通路,接地可减少出现电击的危险。本产品配备
了一条带接地线和适当接地插头的电源线。必须将该插头插入按照当地规定和要求正确安装并接地的电源插座上。
警告
接地
• 接地插头安装不当会导致遭受电击的危险。
• 需要修理或更换电线或插头时,不要将接地线连接至任一扁平插脚上。
• 接地线的标志是其绝缘层的外表面为绿色 (带或不带黄色条纹)。
• 如果您对接地说明不十分理解,或不知道该产品是否已正确接地,请与一位合格的电工或维修人
员联系。
• 不要改造所提供的插头,如果无法将其插入电源插座内,让一位合格的电工安装一个好的电源插座。
• 此产品适合在标称电压为 120V 的电路上使用,其接地插头与下图所示的插头类似。
警告
• 只能将本产品连接至与该插头具有相同构型的电源插座中。
• 此产品不得配用转接器。
加长电线:
• 只能使用 3 芯加长电线,而且其一端要有一个 3 脚接地插头,另一端要有一个可接受该产品所带插
头的 3 槽插座。
2
• 确保加长电线未受损坏。如果需要加长电线,至少要使用 12 号 AWG (2.5 mm
品所需的电流通过。
• 电线规格太低会导致线路电压下降、掉电及过热。
)电线,以承受本产
313797C 5
Page 6
警告
火灾和爆炸危险
工作区内的溶剂及涂料烟雾等易燃烟雾会点燃或爆炸。为避免火灾及爆炸:
• 不要在明火或诸如烟头、电机及电气设备等火源附近喷涂易燃或可燃材料。
• 流过本设备的涂料或溶剂可产生静电。在有涂料或溶剂烟雾的环境中,静电会有引起火灾或爆炸的
危险。喷涂系统的所有部件,包括泵、软管组件、喷枪,以及喷涂区内及附近的物体都应适当接地,
以防止出现静电放电和火化。使用 Graco 导电软管或接地的高压无气涂料喷涂软管。
• 检查确认所有容器及收集系统均已接地,以防止出现静电放电。
• 连接至接地的电源插座并使用接地的加长电线。不得使用 3 脚转 2 脚的转接器。
• 不要使用含有卤代烃的涂料或溶剂。
• 保持喷涂区域的通风良好。该区域要不断有足够的新鲜空气供给。泵组件应置于通风良好的地方。
不要喷涂泵组件。
• 不要在喷涂区域吸烟。
• 不要在喷涂区域操作电灯开关、发动机或其它可产生电火花的产品。
• 保持该区域清洁,无涂料或溶剂容器、碎片及其它可燃材料。
• 了解所喷涂料及溶剂的成分。认真阅读随涂料和溶剂一起提供的所有材料安全数据表 (MSDS)
及容器标签。按照涂料和溶剂生产厂家的安全说明进行。
• 应配有工作性能良好的灭火设备。
• 喷涂机会产生电火花。当喷涂机使用易燃液体或在其附近使用易燃液体或用易燃液体进行冲洗或
清洗时,要让喷涂机离开爆炸性蒸气至少 20 英尺 (6 m)。
警告
皮肤注射危险
• 不要将喷枪瞄准任何人或动物,也不要朝他们喷涂。
• 双手及其他身体部位要远离出口。例如,不要试图用身体的任何部位去堵泄漏。
• 始终使用喷头护罩。不要在没有安装喷头护罩时进行喷涂。
• 使用 Graco 喷头。
• 清洁和更换喷头时要小心。如果喷涂时出现喷头堵塞,在卸下喷头进行清洁之前要按照泄压步骤
关机并释放压力。
• 不要让通着电或有压力的设备无人看管。设备不用时要切断电源并按照泄压步骤进行关机。
• 高压喷射会将毒素注入体内并造成身体严重受伤。万一发生注射,应即刻进行手术治疗。
• 检查软管和部件是否有损坏的迹象。更换任何损坏的软管或部件。
• 该系统可产生高达 3300 psi 的压力。使用额定压力至少为 3300 psi 的 Graco 更换件或附件。
• 不喷涂时要始终锁上扳机锁。检查确认扳机锁工作正常。
• 在操作设备之前,要确认所有连接都牢固。
• 要知晓如何让设备停机和快速泄压。十分熟悉各控制件。
设备误用危险
误用设备会导致严重的人员伤亡。
• 喷涂时要始终穿戴适当的手套、护目镜及呼吸器或面罩。
• 不要在儿童附近进行操作或喷涂。要始终让儿童远离设备。
• 不要让身体过度探出或站在不稳定的支撑物上。要始终做到双脚站稳、身体平衡。
• 要保持警觉并看着自己正在做的事。
• 疲劳时或在吸毒或酗酒之后不得使用此设备。
• 不要扭绞或过度弯曲软管。
• 不要将软管暴露在超过 Graco 所规定的温度或压力下。
• 不要借助软管来拽拉或提升设备。
6 313797C
Page 7
警告
电击危险
系统接地不当、设置不正确或使用不当都可导致电击。
• 进行设备维修之前,要关闭电源并切断电源线的连接。
• 只能使用已接地的电源插座。
• 只能使用三芯加长电线。
• 确保喷涂机及加长电线上的接地插脚完好无损。
• 不要暴露在雨水中。要存放在室内。
高压铝质部件危险
不要在加压的铝质装置中使用 1, 1, 1- 三氯乙烷、二氯甲烷、其它卤代烃溶剂或含有这些溶剂的流体。
否则会导致剧烈的化学反应和设备破裂,并可造成严重的人员伤亡及财产损失。
流体或烟雾中毒危险
如果吸入有毒的烟雾、食入有毒的流体或让它们溅到眼睛里或皮肤上,都会导致严重伤害或死亡。
• 应阅读材料安全数据表 (MSDS),熟悉所用流体的特殊危险性。
• 危险性流体要存放在规定的容器内,并按照有关规定的要求进行处置。
个体防护用品
在操作或维修设备时,或在进入设备的工作区时,必须穿戴适当的防护用品,以免受到严重损伤
(包括眼睛损伤)、吸入有毒烟雾、烧伤以及听力损失。这些用品包括但不限于:
• 护目镜
• 流体和溶剂生产厂家所推荐的防护衣及呼吸器
• 手套
• 听力保护装置
警告
313797C 7
Page 8
경고
경고
다음은 이 장비의 설치 , 사용 , 접지 , 유지보수 및 수리에 관한 주의 사항입니다 . 느낌표 기호는 일반적인 주의
사항을 나타내며 위험 기호는 각 절차에 대한 위험을 의미합니다 . 필요할 때 다시 이러한 경고문을 확인하십시오 .
이 설명서의 해당 부분에서 제품별 경고문 또한 제공하고 있습니다 .
접지 지침
이 제품은 접지해야 합니다 . 회로가 단락된 경우 , 접지는 전기 전류에 대한 와이어 이스케이프를 제공함으로써
감전 위험을 줄입니다 . 이 제품에는 적절한 접지 플러그와 함께 접지선이 있는 코드가 장착되어 있습니다 .
플러그는 접지 올바르게 모든 지역 규정에 따라 설치되어 접지된 콘센트에 꽂아야 합니다 .
경고
접지
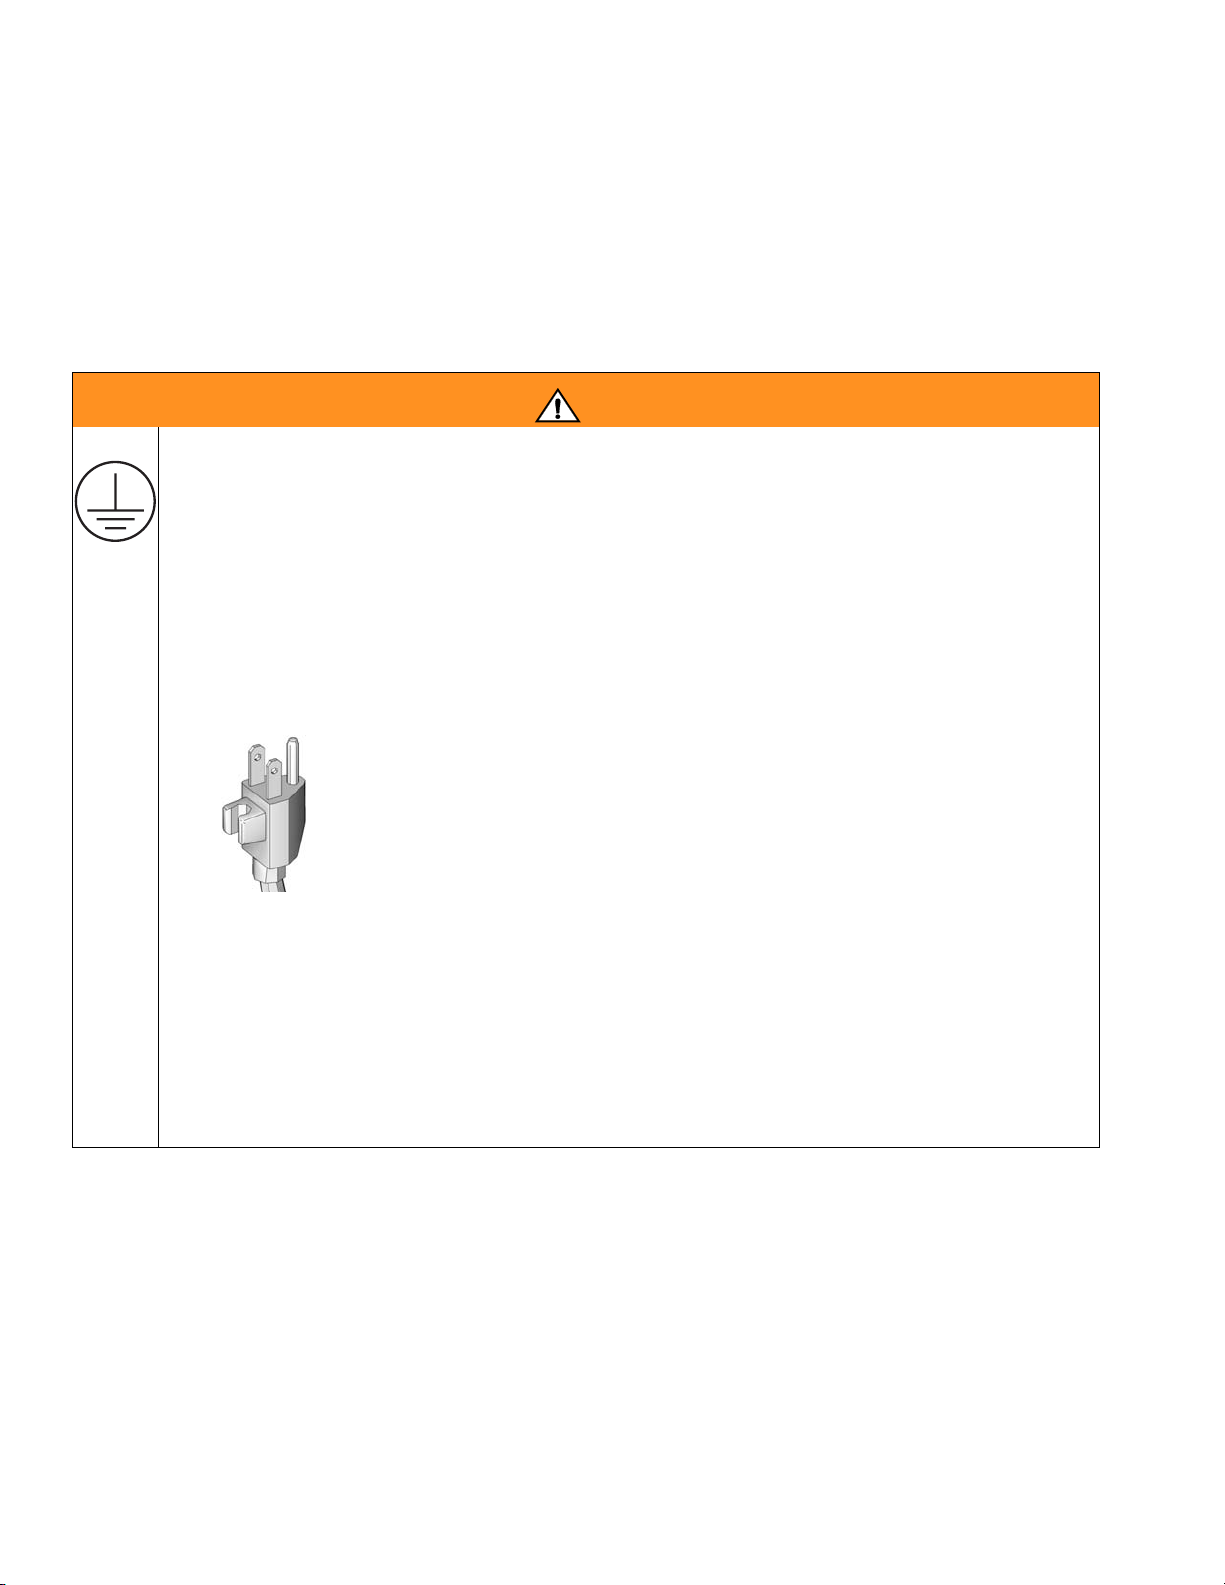
• 접지 플러그를 잘못 설치하면 감전의 위험이 있습니다 .
• 코드나 플러그의 수리 또는 교체가 필요한 경우 접지선을 플랫 블레이드 단자에 연결하지
마십시오 .
• 녹색 ( 노란색 줄이 있을 수도 있음 ) 겉 표면의 절연물이 있는 와이어가 접지선입니다 .
• 접지 방법을 잘 모르거나 제품이 올바르게 접지되었는지에 관해 의문이 있는 경우 자격 있는
전기 기술자나 서비스 요원에게 문의하십시오 .
• 제공된 플러그는 개조하지 마십시오 . 플러그가 콘센트에 맞지 않으면 자격 있는 전기 기술자가
올바른 콘센트를 설치하게 해야 합니다 .
• 이 제품은 공칭 전압이 120V 인 회로용이며 아래 그림에 나온 플러그와 비슷한 접지 플러그가
있습니다 .
• 제품은 플러그와 동일한 구성을 갖는 콘센트에 연결해야 합니다 .
• 어댑터는 사용하지 마십시오 .
확장 코드 :
• 제품에 플러그를 꽂을 수 있는 3-선 확장 코드와 3-슬롯 소켓이 있는 3-블레이드 접지 플러그만
사용하십시오 .
• 확장 코드가 손상되지 않았는지 확인하십시오 . 확장 코드가 필요하면 제품에 필요한 전류를
공급할 수 있도록 최소 12 AWG (2.5 mm
• 코드 크기가 기준보다 작으면 라인 전압이 강하하고 전력 손실과 과열이 발생하게 됩니다 .
2
) 를 사용해야 합니다 .
8 313797C
Page 9
경고
화재 및 폭발 위험
작업장의 솔벤트 및 페인트 연기와 같은 인화성 연기는 발화하거나 폭발할 위험이 있습니다 .
화재와 폭발을 방지하기 위해 다음을 준수하십시오 .
• 담배, 모터, 전기 장비 등의 화기나 점화원 근처에서 화염성 또는 폭발성 재료를 스프레이하지
마십시오 .
• 장비를 통과해서 흐르는 페인트나 솔벤트는 정전기를 일으킬 수 있습니다 . 정전기는 페인트
또는 솔벤트 연기 존재 시 화재나 폭발을 일으킬 위험이 있습니다 . 펌프 , 호스 어셈블리 ,
스프레이 건 등을 포함한 도장기의 모든 부품과 도장 영역과 그 주변의 물체는 적절히 접지하여
정전기 방전과 스파크가 생기지 않도록 하십시오 . Graco 전도성 또는 접지된 고압 에어리스
도장기 호스를 사용하십시오 .
• 정전기 방전을 방지하기 위해 모든 통과 수집 시스템은 접지해야 합니다 .
• 접지된 콘센트에 연결하고 접지된 확장 코드를 사용하십시오 . 3-to-2 어댑터는 사용하면 안
됩니다 .
• 할로겐화 탄화수소가 포함된 페인트 또는 솔벤트는 사용하지 마십시오 .
• 스프레이 영역은 환기가 잘 되게 하십시오 . 해당 영역에서 신선한 공기가 잘 공급되게 해야
합니다 . 펌프 어셈블리는 환기 상태가 좋은 영역에 유지하고 , 펌프 어셈블리를 스프레이하지
마십시오 .
• 스프레이 영역에서 담배를 피지 마십시오 .
• 스프레이 영역에서 라이트 스위치 , 엔진 또는 기타 유사한 스파크를 생성하는 제품을 조작하지
마십시오 .
• 작업 영역은 깨끗하게 페인트 또는 솔벤트 통, 헝겁조각 및 기타 화염성 재료가 없게 하십시오 .
• 스프레이할 페인트와 솔벤트 내용물을 알아 두십시오 . 모든 재료 안전 데이터 시트 (MSDS) 와
페인트 및 솔벤트와 함께 제공된 컨테이너 라벨을 읽고 , 페인트 및 솔벤트 제조업체의 안전
지침을 따르십시오 .
• 정상 동작하는 소화기를 비치해 두십시오 .
• 도장기가 스파크를 생성합니다 . 세척 또는 청소에 또는 그 부근에서 화염성 액체를 사용하는
경우에는 폭발성 증기로부터 20 피트 (6 m) 이상 떨어져서 작업하십시오 .
경고
피부 손상 위험
• 사람이나 동물에게 건을 향하거나 스프레이하지 마십시오 .
• 손이나 다른 신체 부위에 방출되지 않게 하십시오 . 예를 들어 , 신체 일부에 누출되지 않도록
하십시오 .
• 항상 노즐 팁 가드를 사용하십시오 . 노즐 팁 가드가 제 자리에 있지 않은 상태로 스프레이하면
안 됩니다 .
• Graco 노즐 팁을 사용하십시오 .
• 노즐 팁을 청소 및 변경할 때는 주의하십시오 . 스프레이 도중 노즐 팁이 막힐 경우에는 압력
해제 절차 를 따라 장치를 끄고 압력을 떨어뜨린 후에 노즐 팁을 제거하고 나서 깨끗이 청소합
니다 .
• 사용 중이지 않을 때 장치에 전원이 공급되거나 장치가 압력을 받는 상태로 방치해 두지
마십시오 . 장치를 사용하지 않을 때는 압력 해제 절차 를 따라 장치 전원을 끄십시오 .
• 고압 스프레이 시 독소가 인체에 주입되어 심각한 부상을 입을 수 있습니다 . 이러한 경우 즉시
병원을 찾아 치료를 받아야 합니다 .
• 호스와 부품에 손상 징후가 있는지 확인하고 , 손상된 호스 또는 부품을 교체하십시오 .
• 이 시스템은 3300 psi 를 생성할 수 있습니다 . 최소 정격이 3300 psi 인 Graco 교체 부품 또는
액세서리를 사용하십시오 .
• 스프레이하지 않을 때는 항상 방아쇠 잠금장치를 잠궈 두십시오 . 방아쇠 잠금장치가 제대로
작동하는지도 점검합니다 .
• 장치 사용 전에 모든 연결 부위가 안전하게 고정되어 있는지 확인하십시오 .
• 장치 중지 방법과 압력을 신속하게 줄이는 방법을 알아 두십시오 . 컨트롤에 대해서도 숙지하고
있어야 합니다 .
313797C 9
Page 10
경고
장비 오용 위험
장비를 잘못 사용하면 중상을 입거나 사망에 이를 수 있습니다 .
• 도장 시에는 항상 적절한 장갑 , 눈 보호 장치 , 마스크를 착용하십시오 .
• 어린이 근처에서는 조작 또는 스프레이하지 마십시오 . 장비 주변에는 절대 어린이가 없어야
합니다 .
• 불안정한 지지대에 세워두지 마십시오 . 또한 효과적으로 지탱되도록 하고 항상 균형을 유지해
주십시오 .
• 작업 중 반드시 주의를 기울여야 합니다 .
• 피곤한 상태 또는 약물이나 술을 마신 상태로 장치를 조작하지 마십시오 .
• 호스가 꼬이거나 너무 구부러지면 안 됩니다 .
• Graco 가 지정한 사양을 벗어난 온도나 압력에 호스를 노출하지 마십시오 .
• 호스를 사용해서 장비를 끌어당기거나 들어올리지 마십시오 .
감전 위험
시스템의 접지 , 설정 또는 사용이 올바르지 않으면 감전 사고가 발생할 수 있습니다 .
• 장비를 수리하기 전에 전원을 끄고 전원 코드를 뽑으십시오 .
• 접지된 전기 콘센트만 사용하십시오 .
• 3 선 확장 코드만 사용하십시오 .
• 도장기와 확장 코드의 접지된 단자가 손상되지 않았어야 합니다 .
• 빗물에 노출시키지 말고 실내에 보관하십시오 .
경고
가압 알루미늄 부품 위험
가압 알루니늄 장비에서는 1, 1, 1- 트리클로로에탄과 염화 메틸렌을 비롯해 솔벤트 등을 포함하는
기타 할로겐화 하이드로카본 솔벤트나 유체는 사용하지 마십시오 . 그러한 물질을 사용하면 심각한
화학적 반응이 일어나고 장비가 파손되어 사망이나 중상 또는 재산상의 피해를 입을 수 있습니다 .
유해성 유체 또는 가스 위험
유독성 유체 또는 연기가 눈이나 피부에 닿거나 이를 흡입하거나 삼키면 중상을 입거나 사망에
이를 수 있습니다 .
• 재료 안전 자료 시트 (MSDS) 를 참조하여 사용 중인 유체에 어떠한 위험 요소가 있는지
확인하십시오 .
• 위험한 유체는 승인된 용기에 보관하고 관련 규정에 따라 폐기하십시오 .
개인 보호 장비
장비를 작동하거나 수리할 때 또는 장비가 작동하는 지역에 있을 때에는 눈 부상 , 유독성 연기
흡입 , 화상 및 청력 손상을 포함한 중상을 예방하기 위해 반드시 적절한 보호 장비를 착용해야
합니다 . 다음은 이러한 장비의 예입니다 .
• 보호 안경
• 유체 및 솔벤트 제조업체에서 권장하는 보호복 및 마스크
• 장갑
• 청력 보호
10 313797C
Page 11
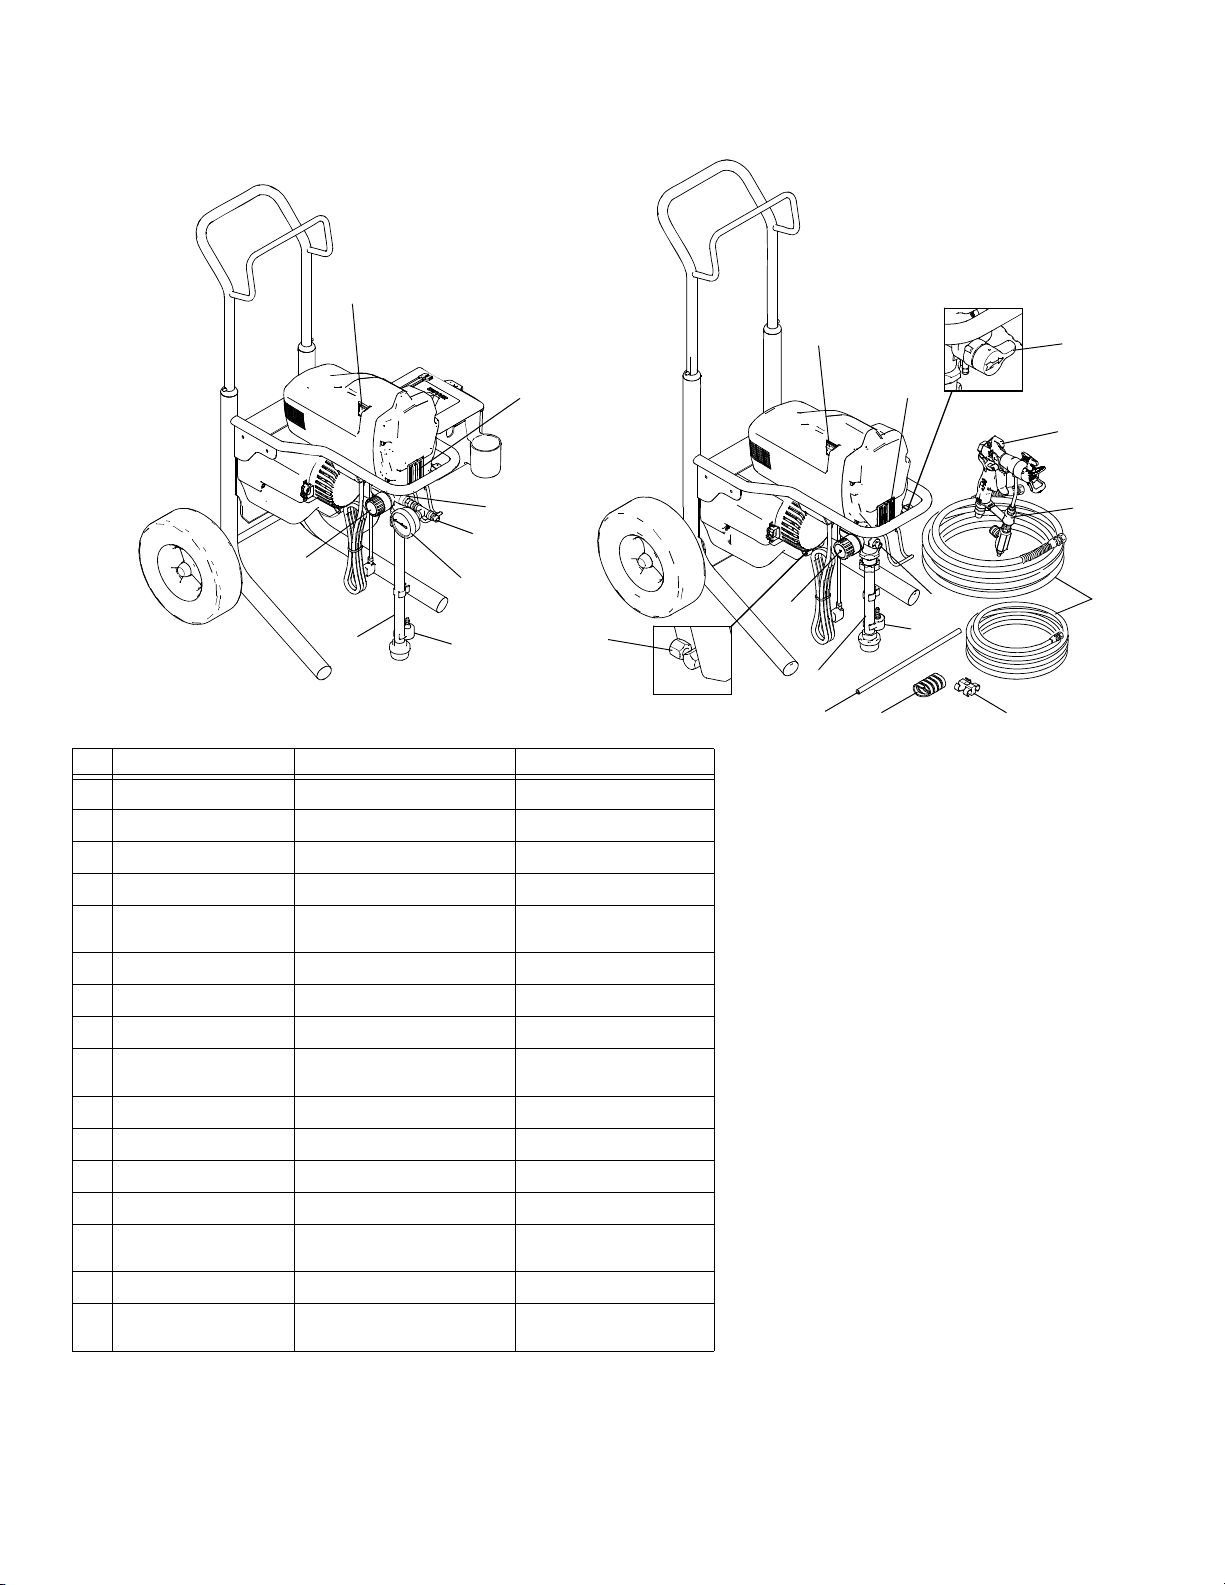
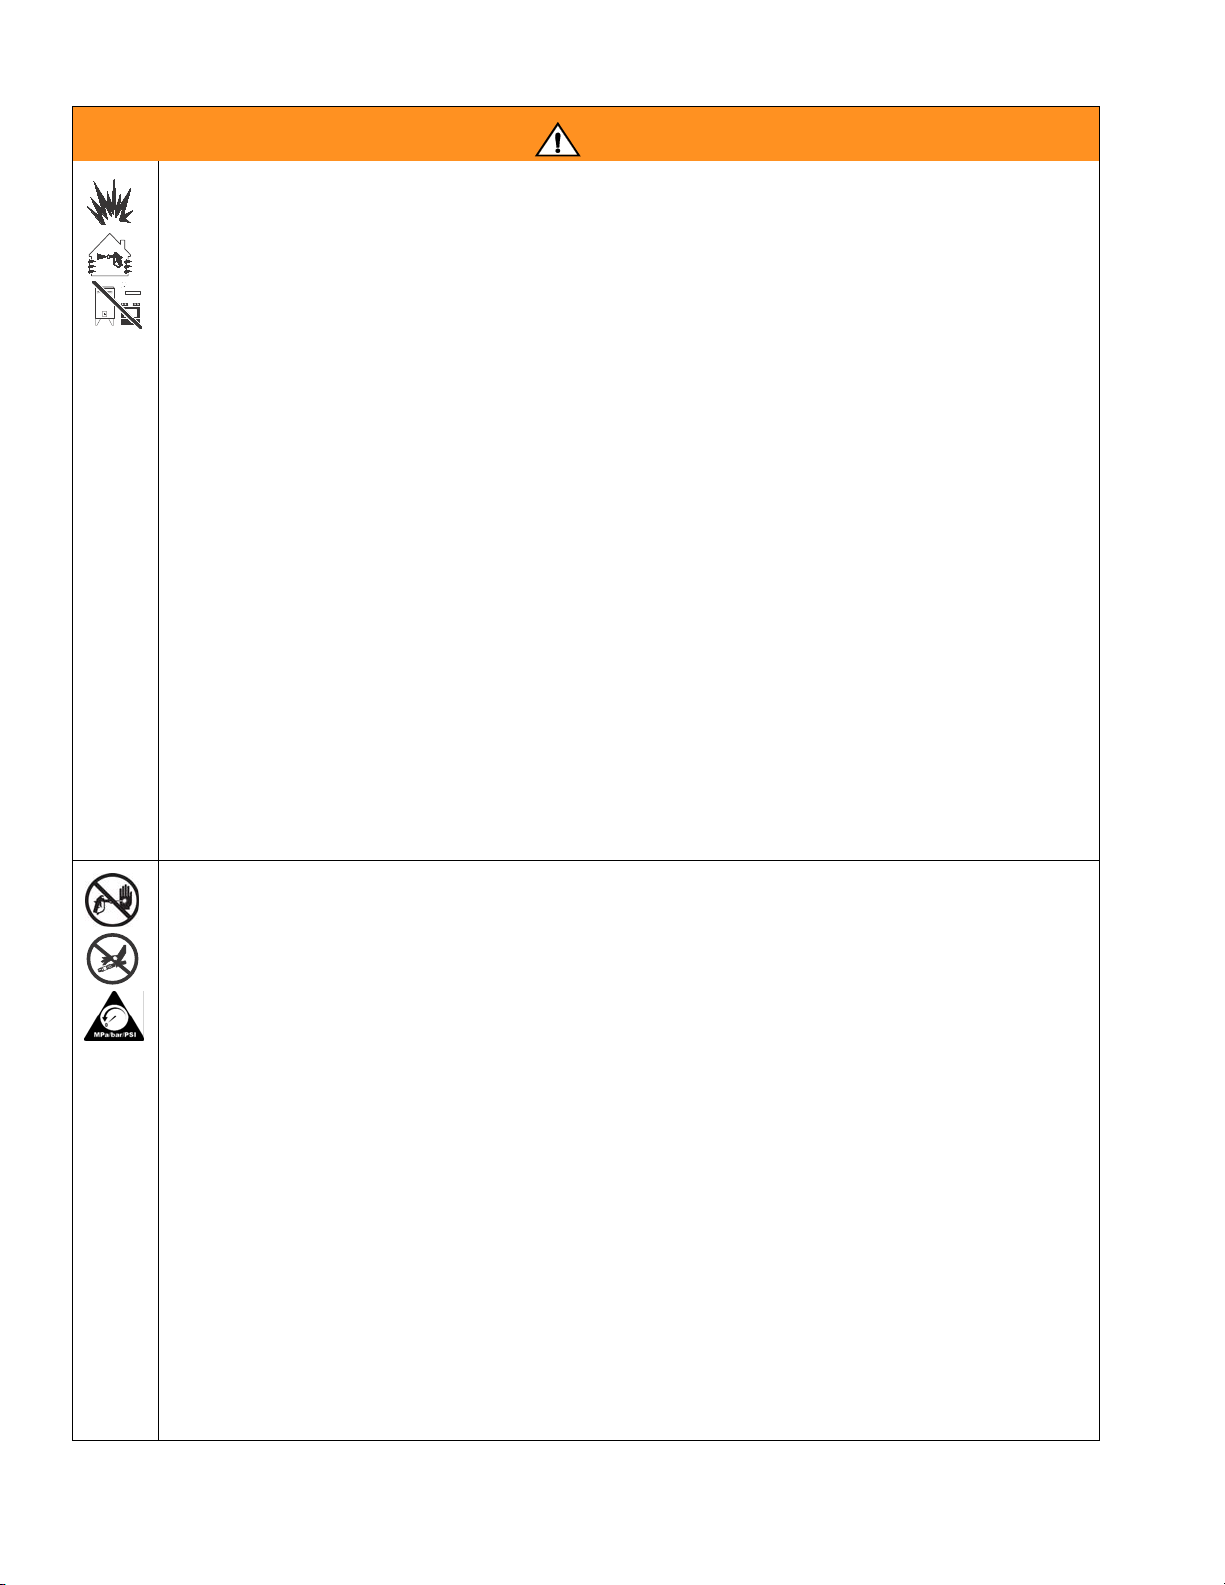
Component Identification /
Component Identification / 部件辨认 / : 부품 명칭
J
部件辨认
/
: 부품 명칭
ti13371a
English
A
B
C
D
E
F
G
H
J
K
M
N
P
R
S
T
Drain Tube/Hose
Air Hose Connection
Prime/Spray Valve
Fluid Outlet
Air and Fluid
Supply Hoses
Displacement Pump
Gun (see manual)
Fluid Pressure Control
Power/Function
Selector
Gun ON/OFF Valve
Direct Immersion Tube
Hose Wrap
Hose T-Clip
Fluid Pressure Gage
(240V)
Black Air Whip Hose
Easy Access Door
Outlet Valve
T
F
D
H
R
M
中文 한국어
回流管/软管 배수 튜브 / 호스
空气软管连接 공기 호스 연결
填料 / 喷涂阀 프라임 / 스프레이 밸브
流体出口 유체 배출구
供气和供料软管 공기 및 유체 공급 호스
活塞泵 변위 펌프
喷枪 (参见手册) 건 ( 매뉴얼 참조 )
流体压力控制器 유체 압력 조절기
电源/功能选择器 전원 / 기능 선택기
喷枪的开关阀 건 온 / 오프 밸브
直接浸入式管 다이렉트 침지관
软管扎带 호스 랩
软管 T 型夹 호스 T- 클립
流体压力表 (240V) 다이렉트 침지관 (240V)
黑色的空气快接软管 검정색 공기 휩 호스
出口阀检修门 이지 액세스 도어
A
B
배출구 밸브
J
C
T
G
K
H
D
E
A
M
S
N
P
313797C 11
Page 12
Grounding / 接地 / 접지
English
The sprayer must be
grounded. Grounding reduces
the risk of electrical shock by
providing an escape wire for
the electrical current.
中文
必须将喷涂机接地。通过
接地,可给电流提供逃逸的
通路,减少出现电击的危险。
한국어
도장기는 반드시 접지해야
합니다. 접지를 하면 전류가
빠져나갈 길이 생기므로 감전
의 위험이 줄어듭니다 .
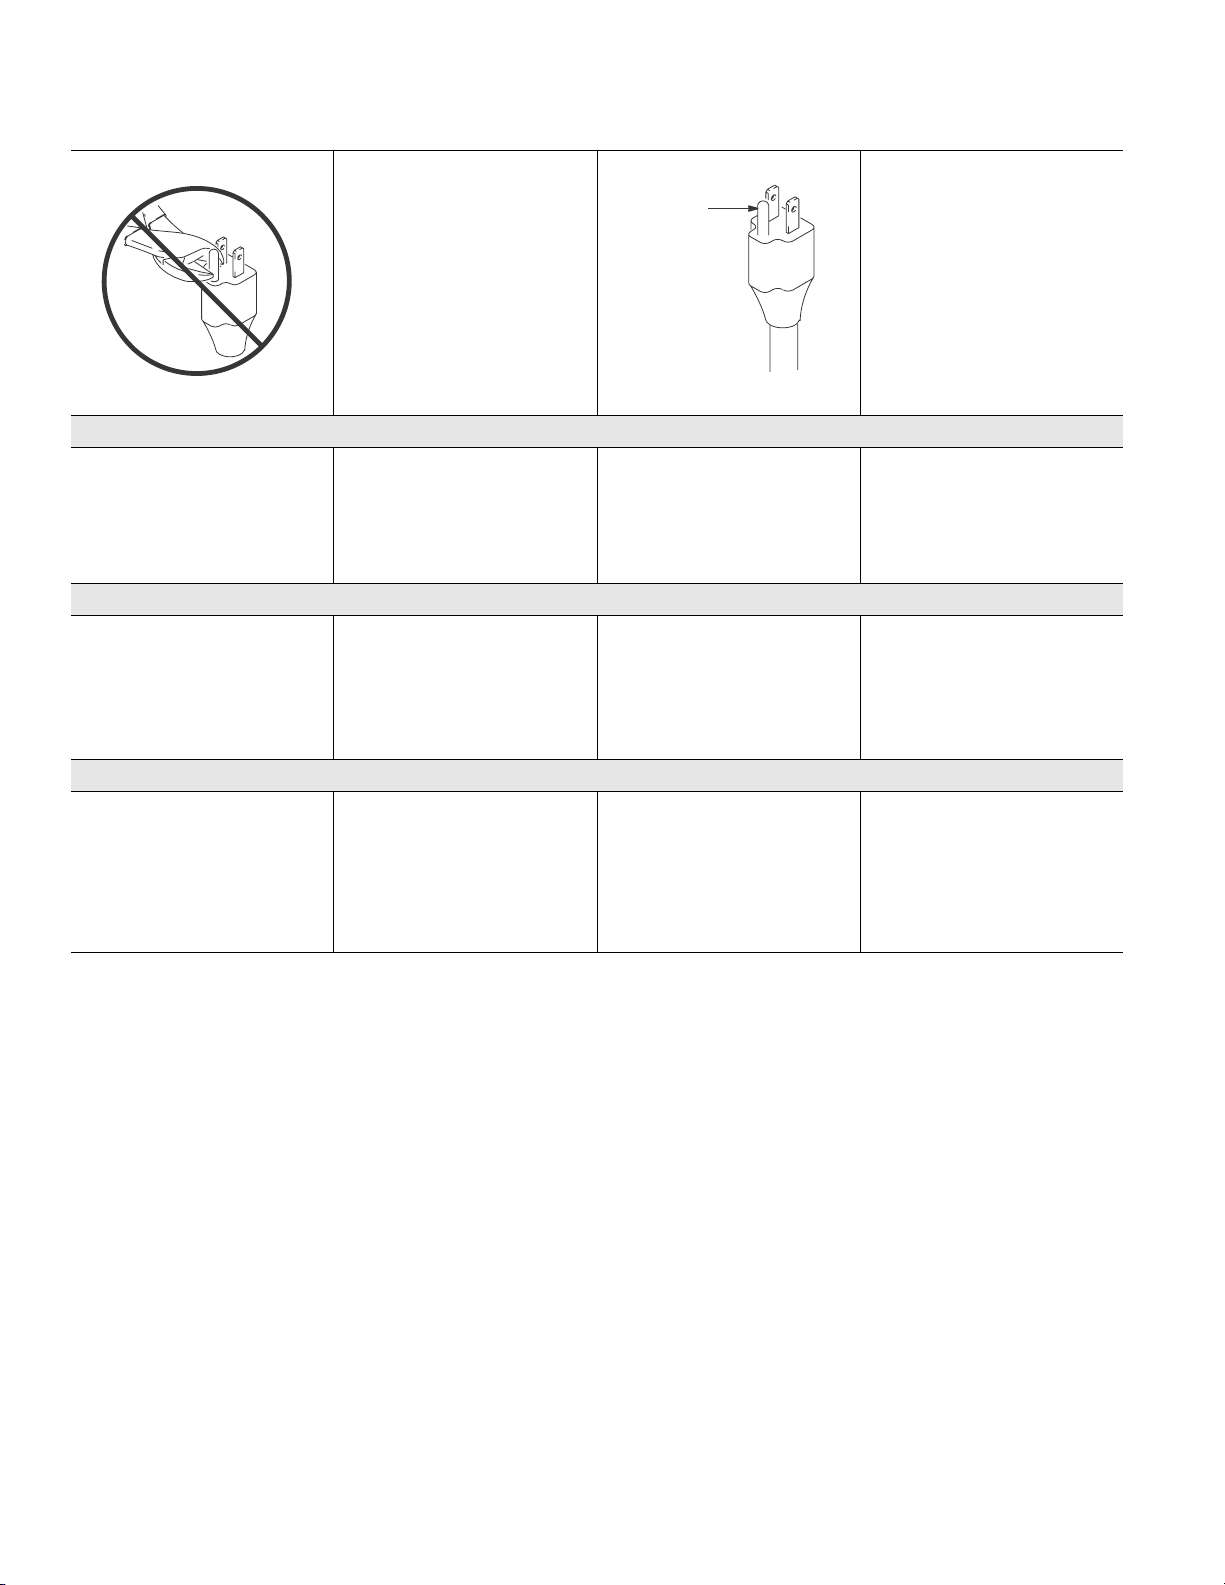
The sprayer cord includes
a grounding wire with
an appropriate grounding
contact.
喷涂机的电源线带有接地导线
和适当的接地触脚。
도장기 코드에는 적절한 접지
접촉부와 함께 접지선이
포함되어 있습니다 .
ti2810a
The plug must be plugged
into an outlet that is properly
installed and grounded
in accordance with all local
codes and ordinances.
必须将该插头插入按照当地规
定和 要求正确安装并接地的
电源插座上。
플러그는 관련 지역
규정에 따라 올바르게
설치 및 접지된 콘센트에
꽂아야 합니다 .
Grounding / 接地 /
접지
12 313797C
Page 13
Grounding / 接地 /
접지
ti4297a
English
• Do not modify plug! If it will
not fit in outlet, have grounded
outlet installed by a qualified
electrician.
• Do not use an adapter.
中文
• 不要对插头进行修改!如果
无法将其插入电源插座内,
让一位合格的电工重新安装接
地的电源插座。
• 不要使用转接器。
한국어
•
플러그를 개조하지 마십시오!
콘센트에 맞지 않으면
자격을
갖춘 기술자에게 접지된
콘센트 설치를 맡기십시오 .
•
어댑터는 사용하지 마십시오 .
Power Requirements
• 100-120V units require
100-120 VAC, 50/60 Hz, 15A,
1 phase.
• 230V units require 230 VAC,
50/60 Hz, 10A, 1 phase.
电源要求
• 100-120V 设备需要交流
100-120 V,50/60 Hz,15A,
单相电源。
• 230V 设备需要交流 230 V,
50/60 Hz,10A, 单相电源。
전원 요구 사항
• 100-120V 장치에는 100-120
VAC, 50/60 Hz, 15A, 단상이
필요합니다 .
• 230V 장치에는 230 VAC,
50/60 Hz, 10A, 1 개의 단상
이 필요합니다 .
ti4295a
Extension Cords
Use an extension cord with an
undamaged ground contact.
加长电线
使用接地触脚未损坏的加长电线。
확장 코드
접지 접촉부가 손상되지 않은
확장 코드를 사용하십시오 .
If an extension cord is
necessary, use a 3-wire,
12 AWG (2.5 mm
2
) minimum.
Longer cords reduce sprayer
performance.
如果需要加长电线,至少要使用
3 芯的 12 号 AWG (2.5 mm
2
)
电线。过长的电线会降低喷涂机
的性能。
확장 코드가 필요한 경우에는
3 선 , 12 AWG (2.5 mm
2
) 이하를
사용하십시오 . 코드가 더 길면
도장기 성능이 저하됩니다 .
313797C 13
Page 14
Grounding / 接地 /
접지
English
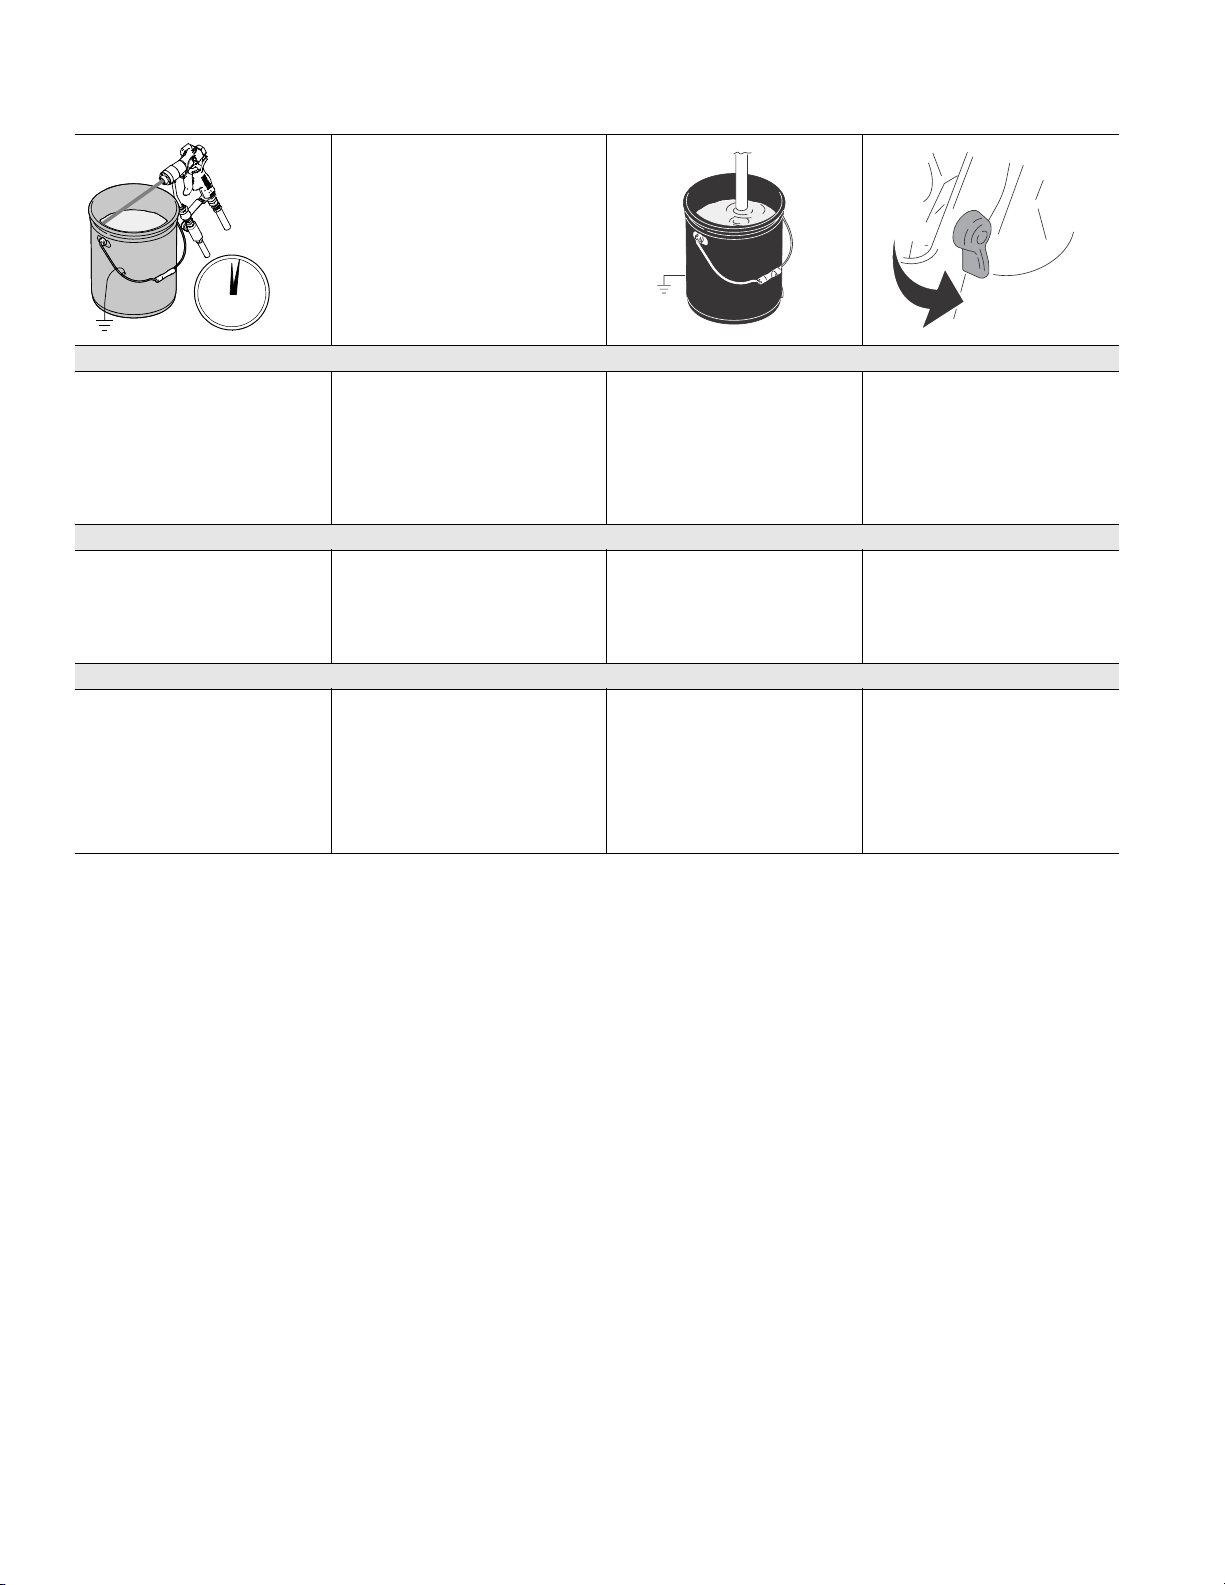
Pails
• Solvent and oil/based
fluids: follow local code. Use
only conductive metal pails,
placed on a grounded
surface such as concrete.
中文
桶
• 溶剂及油性流体:按照当地
的规范。只使用放置在已接
地表面 (如混凝土)上的导
电金属桶
한국어
세척 통
?
솔벤트 및 오일 기반 유체 :
지역 규정을 따르십시오 .
전도성이 있는 금속 통은
반드시 콘트리트와 같은
접지된 바닥 위에 놓습니다 .
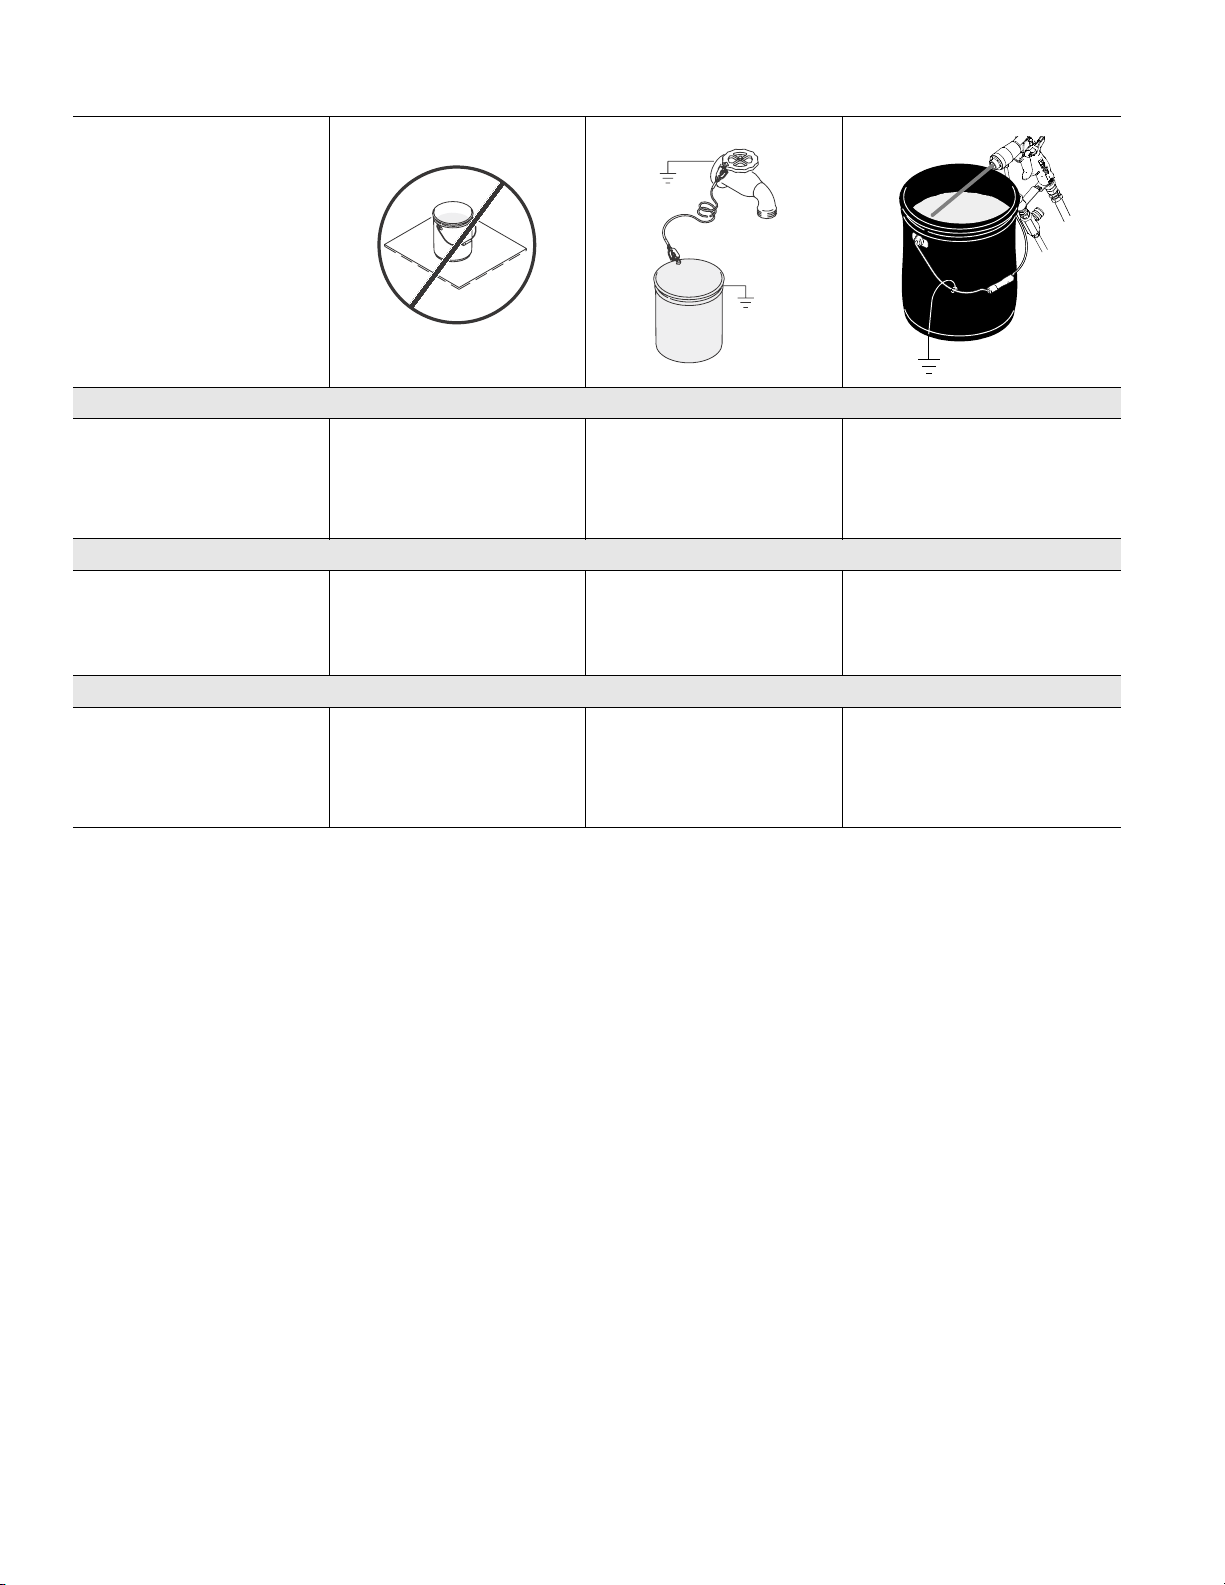
ti5850a
• Do not place pail on
a nonconductive surface such
as paper or cardboard which
interrupts grounding continuity.
• 不要将桶放在诸如纸或 纸板等
非导电的表面上, 这样的表面
会影响接地的连续性。
? 종이 또는 마분지 같이 접지
를 방해하는 비전도성 표면
위에 통을 놓으면 안됩니다 .
ti5851a
• Grounding a metal pail:
connect a ground wire to pail
by clamping one end to pail
and other end to a true earth
ground such as a water pipe.
• 金属桶的接地:将一根接地导
线连接到桶上, 导线的一端夹
在桶上另一端夹在诸如水管等
真正的大地接地点上。
? 금속 통 접지 : 한쪽 끝은
세척 통에 , 다른쪽 끝은 수도
관과 같은 어스 접지에 연결
하는 방식으로 접지선을 연결
하십시오 .
ti13323a
• To maintain grounding
continuity when flushing
or relieving pressure: hold
metal part of spray gun firmly
to side of a grounded metal pail.
Then trigger gun.
• 为了在冲洗或 释放压力时维持
接地的连续性:将喷枪的金属部
分紧紧靠在接地金属桶的边上。
然后扣动喷枪扳机。
?
세척하거나 압력을 해제할
때 접지 상태를 유지하려면 :
스프레이 건의 금속 부분을
접지된 금속 통의 측면에 단단히
고정시킨 후 건을 발사합니다 .
14 313797C
Page 15
Pressure Relief Procedure /
泄压步骤
/
압력 해제 절차
Pressure Relief Procedure /
ti13272a
English: To reduce risk of injury
from injection, always follow this
procedure when instructed to
relieve pressure, stop spraying,
service equipment or install
or clean spray tip.
中文:为减少由于注射造成人员受
伤的危险,当要求您释放压力、
停止喷涂、维修设备、安装或清洗
喷嘴时,应始终按照泄压步骤进行。
영어 : 부상의 위험을 줄이기
위해 압력 해제 , 스프레이 중지 ,
장비 정비 또는 스프레이 팁
설치 또는 청소 등이 필요한
경우에는 반드시 이 절차를
따르십시오 .
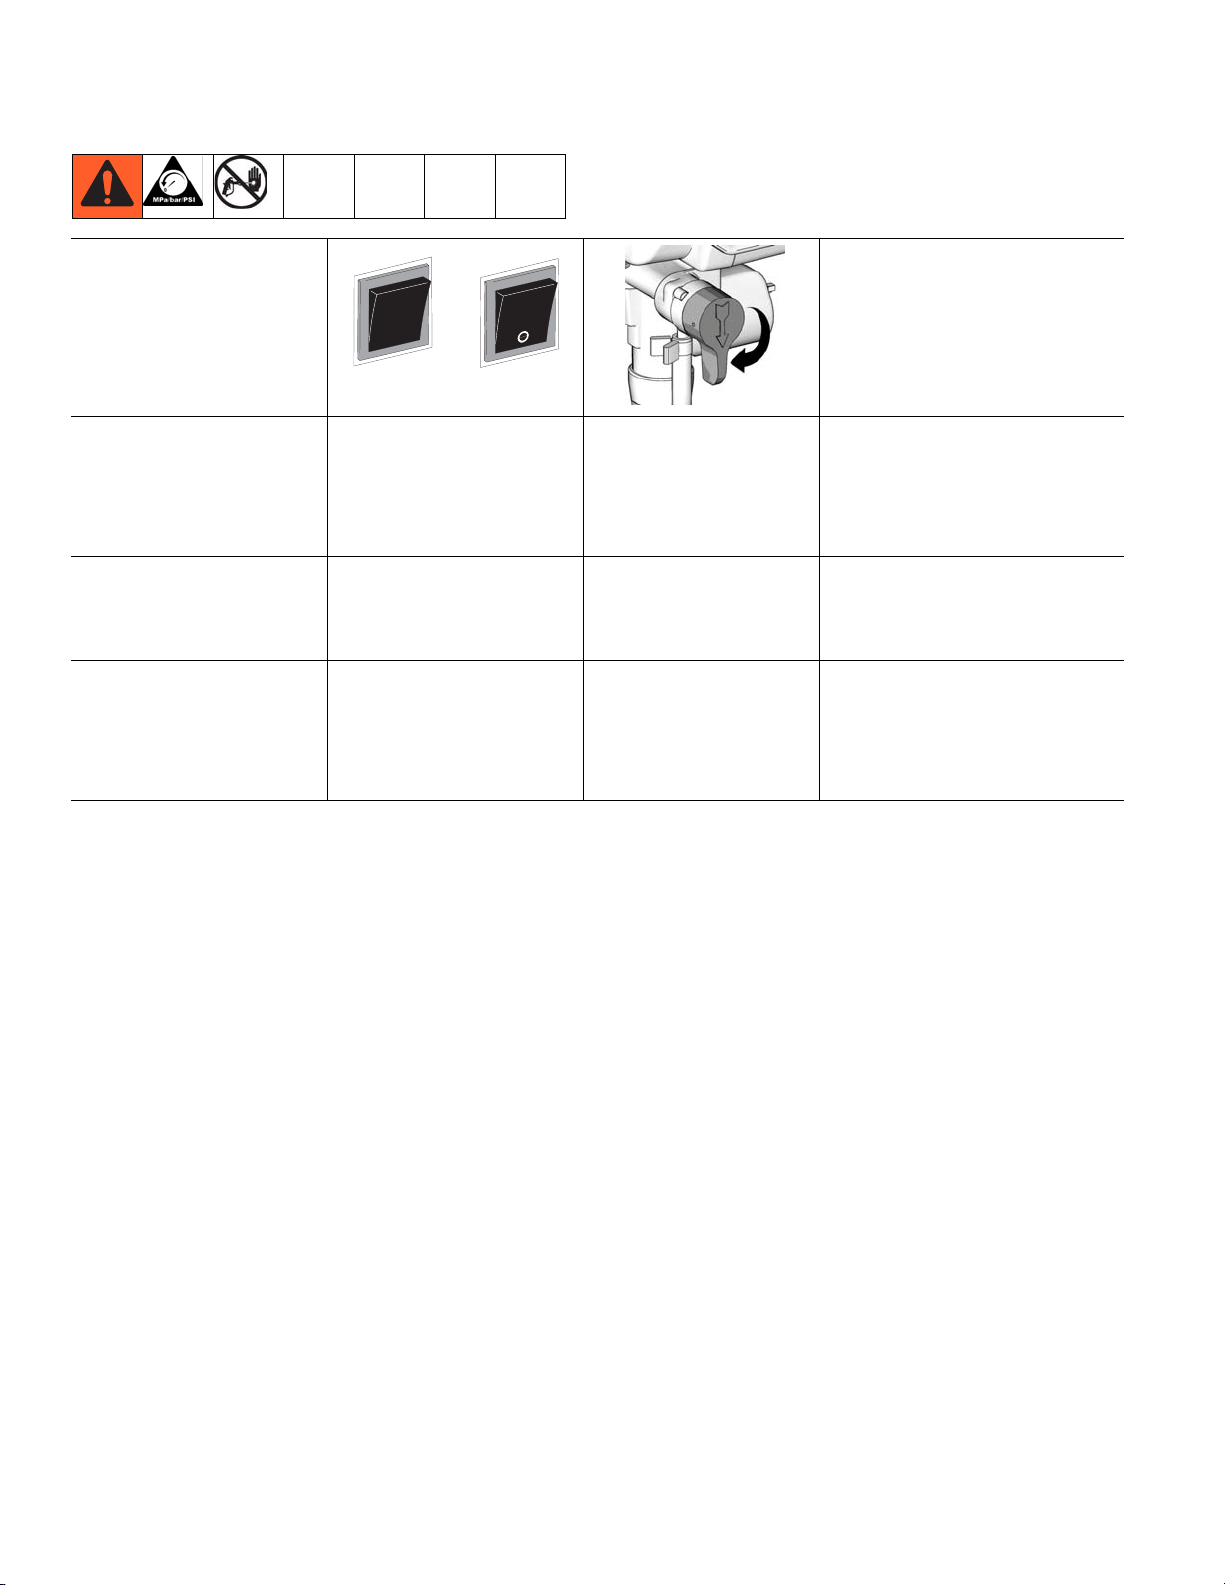
1 Set power/function selection
switch to OFF and unplug
sprayer.
2 Turn pressure control knob
to lowest setting.
1 将电源/功能选择开关置于
关断 (OFF)位置并拔下喷涂
机的电源插头。
2
将压力控制旋钮调到最低值。
1 전원 / 기능 : 선택 스위치를
OFF 에 맞추고 도장기 플러
그를 뽑습니다 .
2 압력 제어 노브를 최저 설정
으로 돌린다 .
泄压步骤
ti13275a
/
압력 해제 절차
ti9346a
3 Hold gun to side of
grounded, metal pail.
Trigger the gun to relieve
pressure.
4 Turn prime valve
to PRIME.
3 握住喷枪靠在接地金属桶
的边上。扣动喷枪扳机,
使压力释放掉。
4
将填料阀旋转至填料位置。
3 건을 접지된 금속 세척통
측면에 고정시킨 후 ,
건의 방아쇠를 당겨 압력
을 해제합니다 .
4 프라임 밸브를 PRIME으로
돌립니다 .
If you suspect spray tip or hose
is completely clogged, or that pressure
has not been fully relieved after following
these steps, VERY SLOWLY loosen tip
guard retaining nut or hose end coupling
to relieve pressure gradually, then loosen
completely. Clear tip or hose obstruction.
如果怀疑喷嘴或软管完全堵塞或完成这些
步骤后怀疑压力未完全释放掉, 应
缓慢地
松开喷嘴护罩的固定螺母或软管端
部的接头,使压力逐渐释放掉,然后再完
全松开。清理喷嘴或软管的堵塞物。
스프레이 팁이나 호스가 완전히 막혔거
나 위의 단계를 따른 후에도 압력이
충분히 떨어지지 않으면 팁 가드 고정
너트 또는 호스 끝 커플링을
히
풀어서 점차적으로 압력을 완화한
다음 완전히 풀어 주십시오 . 팁 또는
호스의 장애물을 청소하십시오 .
极为
아주 천천
313797C 15
Page 16
Operation / 操作 / 작동
Startup / 起动 / 시작
Operation /
操作/ 작동
ti13406a
English
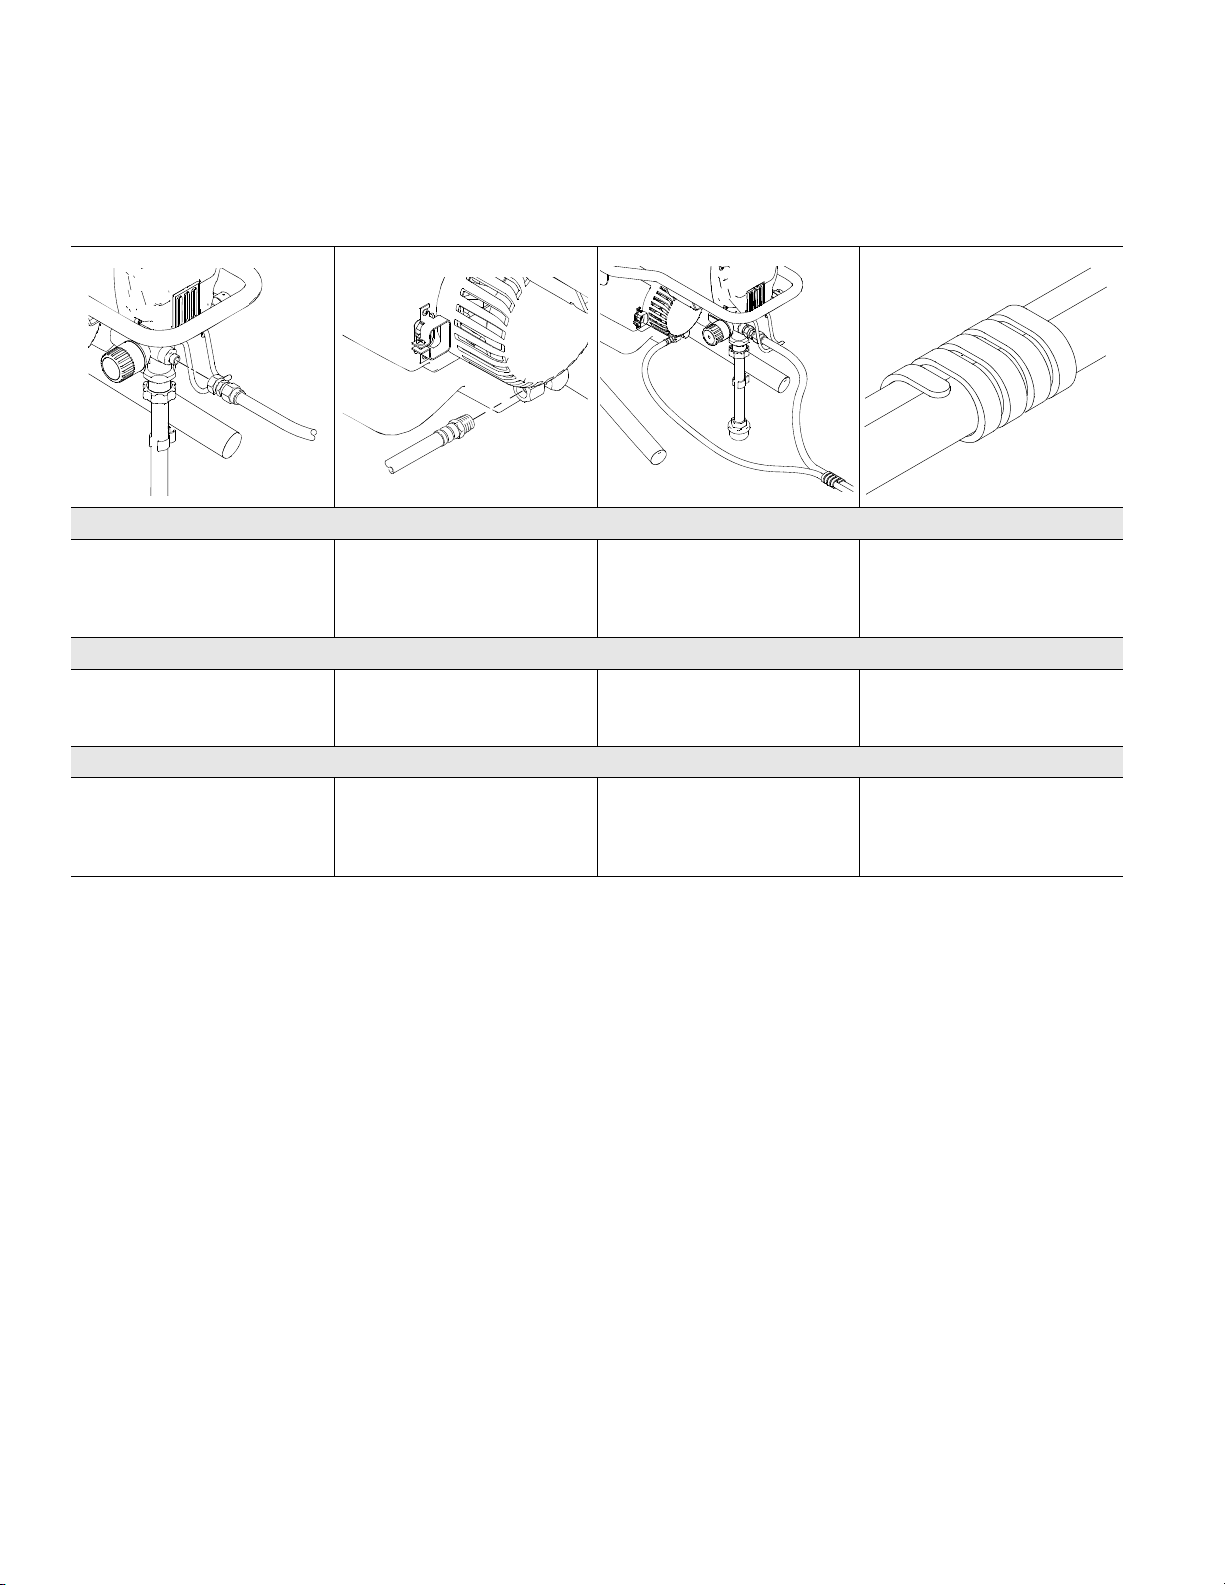
Connect hoses to sprayer
1 Attach fluid supply hose to
fluid fitting. Tighten
securely.
中文
将软管连接到喷涂机上
1 将供料软管连接至流体管
接头。牢牢拧紧。
한국어
도장기에 호스 연결
1 유체 공급 호스를 유체
피팅에 연결하고 , 확실하
게 조입니다 .
ti13405a
2 Attach air supply hose to
sprayer air fitting.
2 将供气软管连接至喷涂机
空气管接头。
2 공기 공급 호스를 도장기
공기 피팅에 연결합니다 .
ti13370a
Connect Gun to hoses
1 Lay connected hoses flat
and next to each other.
将喷枪与软管连接
1 将接好的软管靠在一起并
平放在地上。
호스에 건 연결
1 연결된 호스를 편평하게
나란히 놓습니다 .
ti13325a
2 Assemble first hose wrap
two to three feet from front
of sprayer.
2 在距离喷涂机前端约两到
三英尺的位置绑上第一条
软管扎带。
2 첫 번째 호스 랩을 도장기
전면에서 2 - 3 피트 떨어
진 위치에서 조립합니다 .
16 313797C
Page 17
ti13361a
Operation /
操作/ 작동
English
3 Attach additional wraps
at 2 to 3-ft intervals.
中文
3 每隔 2 至 3 英尺再绑上一
条扎带。
한국어
3 추가 랩을 2 - 3 피트 간격
으로 연결합니다 .
ti13319a
ti13318a
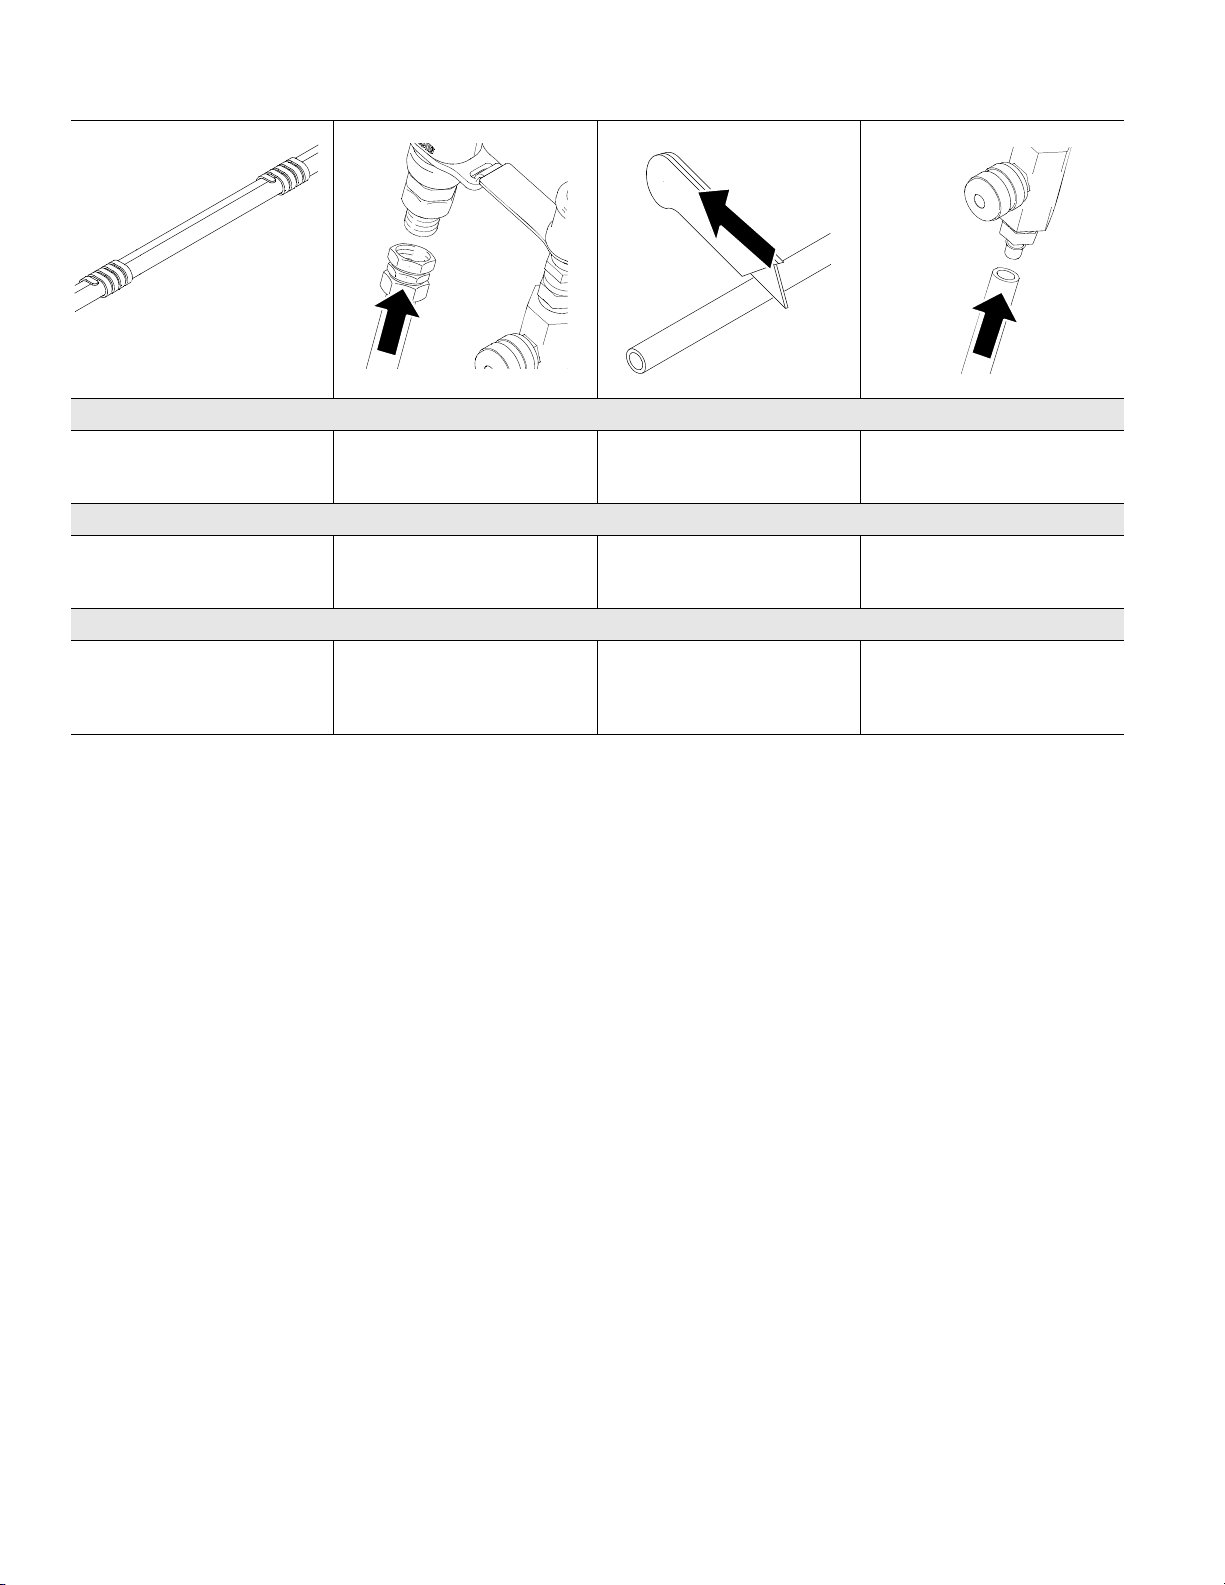
4 Attach fluid supply hose. 5 Couple black air whip hose
to air supply hose barb and
cut to length.
4 连接供料软管。 5 将黑色的空气快接软管连接
至供气软管的倒刺接头上,
然后将其切至适当长度。
4 공기 / 유체 공급 호스를
연결합니다 .
5 검정색 공기 휩 호스를
공기 공급 호스 미늘에
연결하고 적당한 길이로
잘라냅니다 .
ti13317a
6 Connect air hose to barb on
air adjustment valve.
6 将空气软管连接至空气调节
阀的倒刺接头上。
6 공기 호스를 공기 조정
밸브의 미늘에 연결합니다 .
313797C 17
Page 18
ti9446a
English
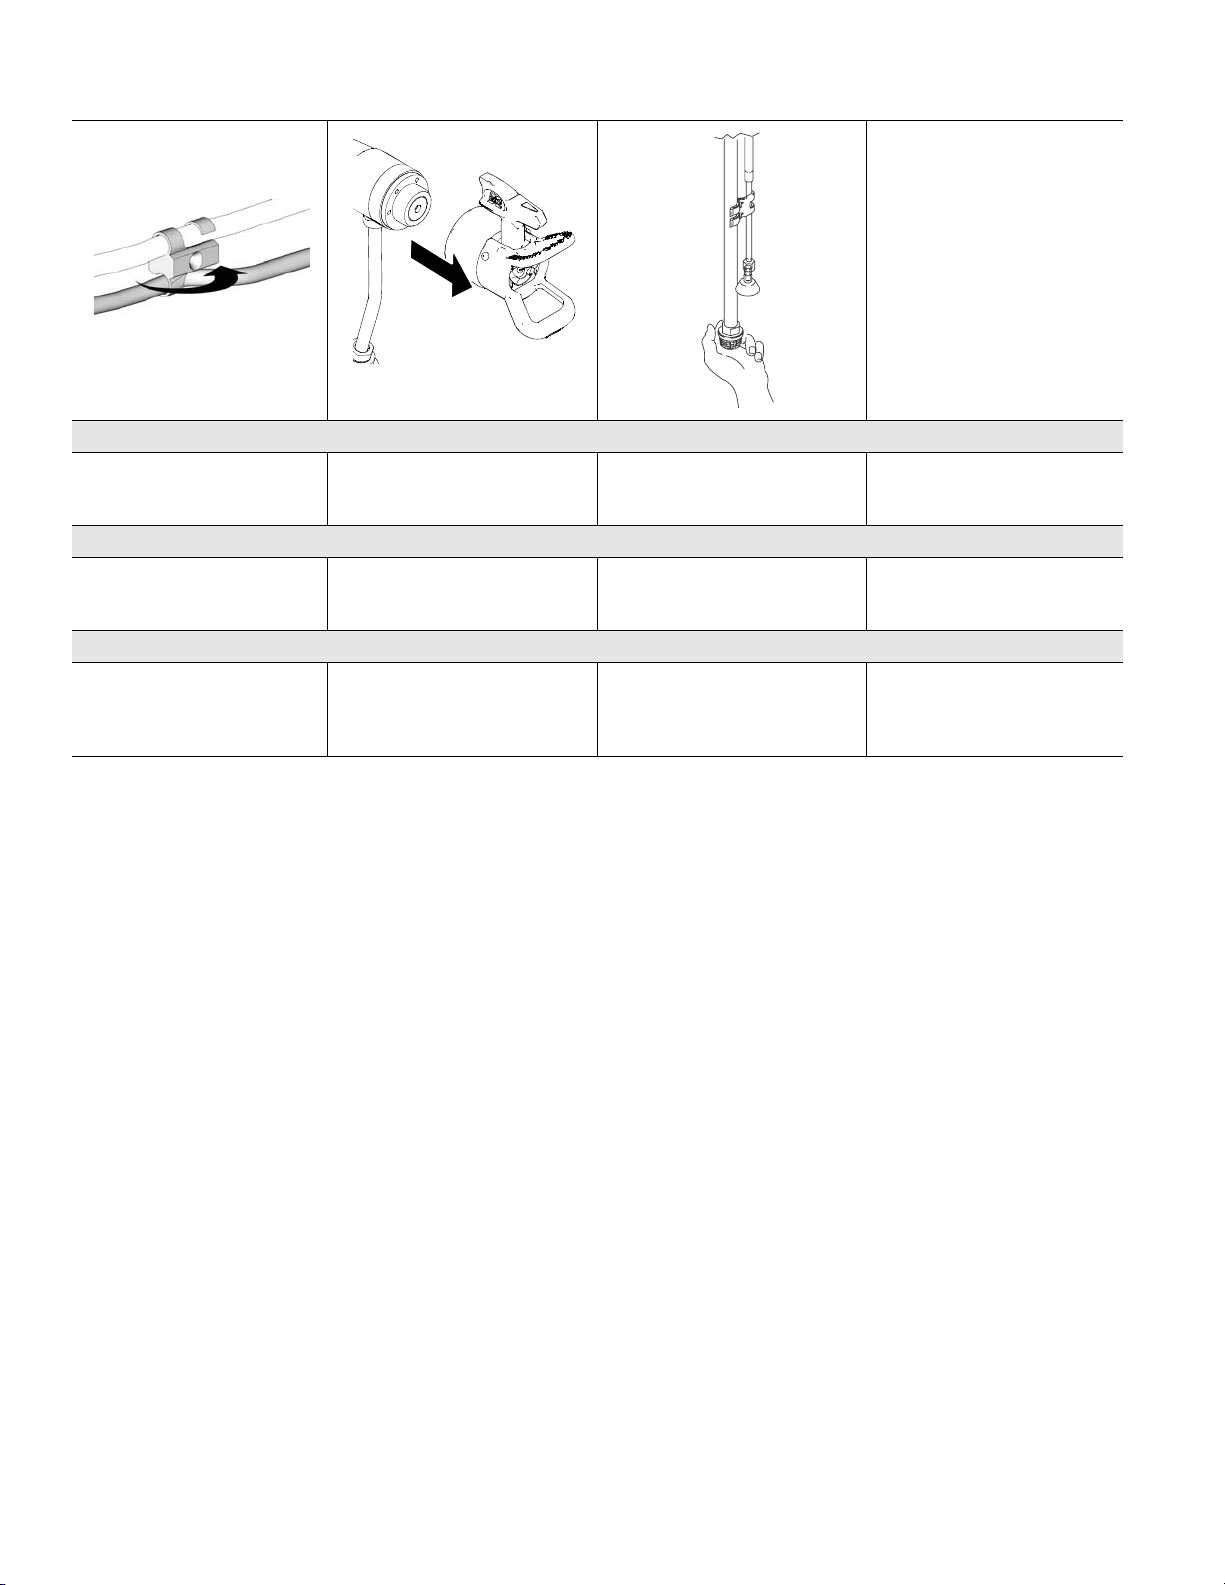
7 Install hose T-clips on black
air whip hose and paint
hose.
中文
7 将软管 T 型夹装在黑色
的空气快接软管和涂料软
管上。
한국어
7 검정 공기 휩 호스 및 페
인트 호스에 호스 T- 클립
을 설치합니다 .
ti13320a
8 If air cap is installed on gun,
remove it.
8 如果喷枪安装了空气帽,
卸下它。
8 건에 공기 캡이 설치되어
있으면 제거합니다 .
9 Remove and check inlet
strainer for clogs and debris.
9 卸下并检查入口过滤器是否
有堵塞物及污物。
9 흡입구 여과기에 찌거기가
끼어 있는지 확인한 후
찌꺼기가 있으면 제거하십
시오 .
Operation /
操作/ 작동
18 313797C
Page 19
Startup / 起动 / 작동 시작
Priming and Flushing / 填料和冲洗 / 주입과 세척
Startup / 起动 /
작동 시작
ti13272a
ti13275a
English
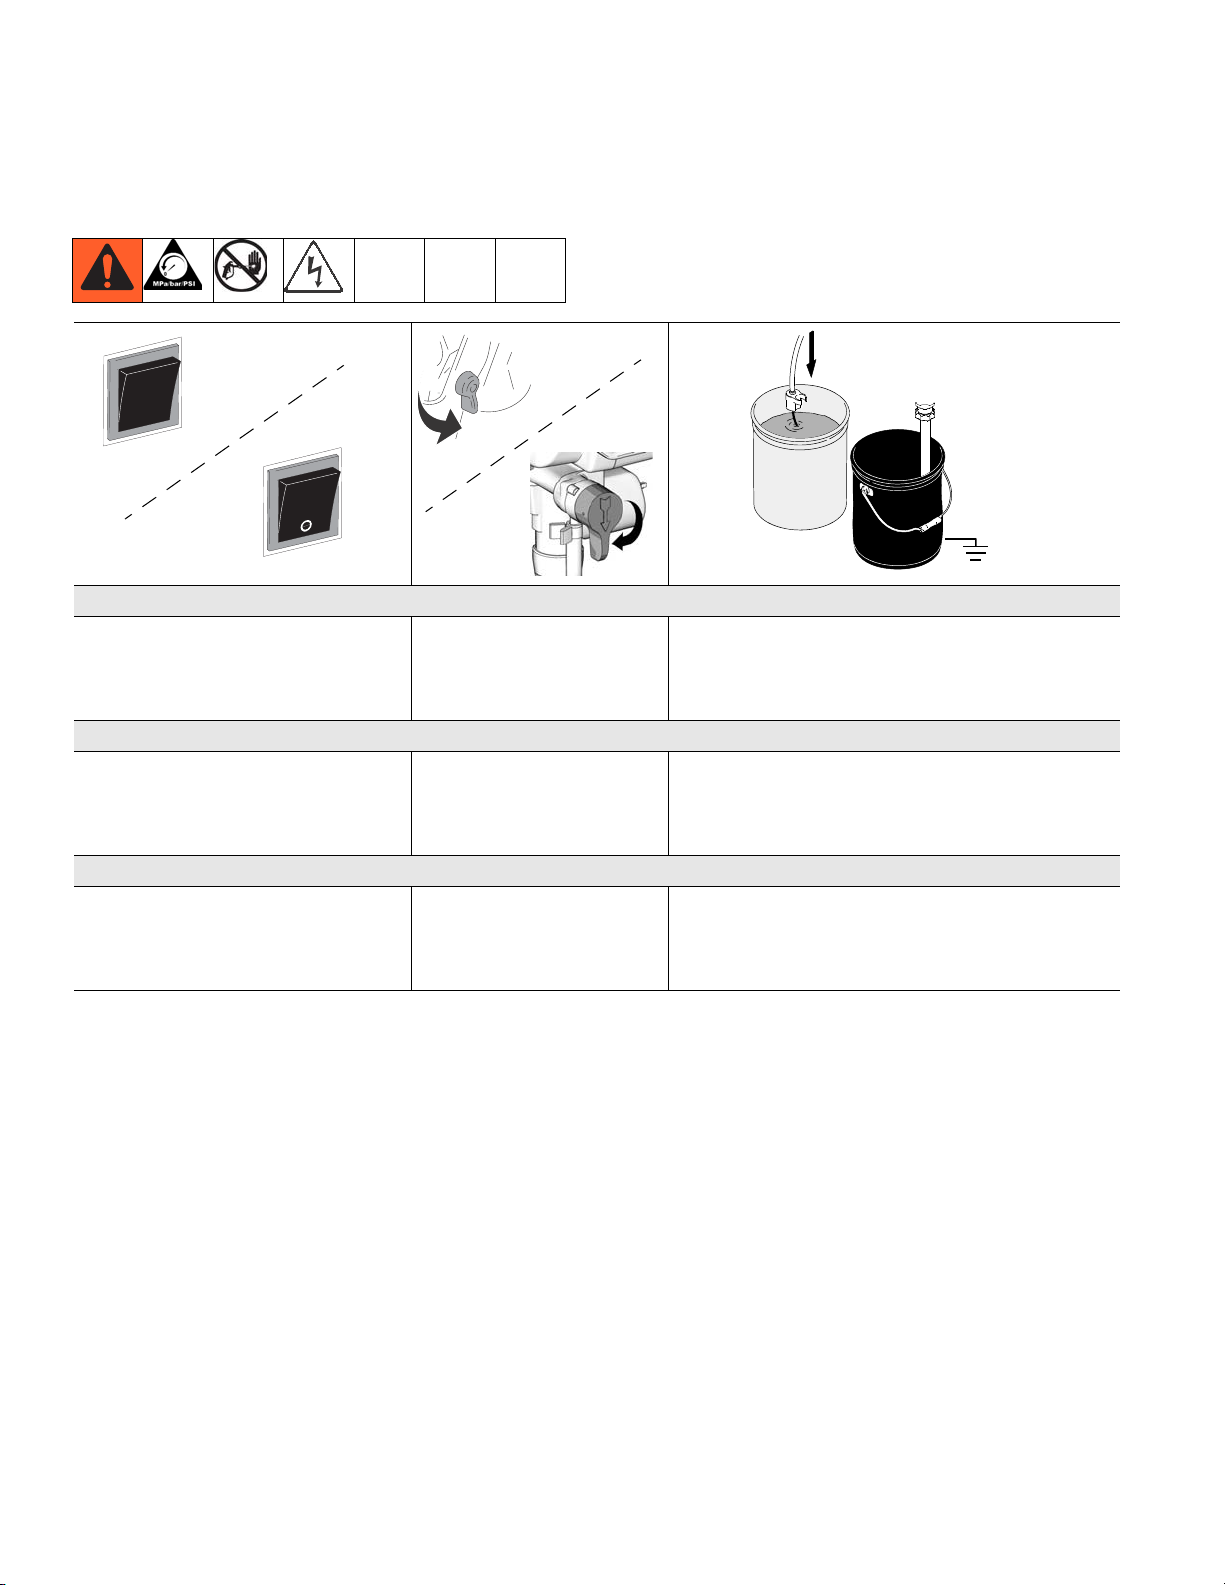
1 Verify power/function selection switch
is OFF.
2 Plug power supply cord into properly
grounded electrical outlet.
中文
1 确认电源/功能选择开关处于关断
(OFF)位置。
2 将电源线插头插入正确接地的电源插
座上。
한국어
1 전원 / 기능 선택 스위치가 OFF 에
맞춰져 있는지 확인합니다 .
2 전원 공급 코드를 접지된 전기
콘센트를 꽂습니다 .
ti10353a
ti9346a
3 Lock gun trigger safety.
4 Turn prime valve to
PRIME.
3 锁上喷枪扳机的安全销。
4 将填料阀旋转至填料位置。
3 건 방아쇠 안전 장치를
잠급니다 .
4 프라임 밸브를 PRIME으로
돌립니다 .
ti13441a
5 Place suction tube in grounded metal pail partially
filled with flushing fluid and drain tube in waste pail.
Attach ground wire to pail and to true earth ground.
5 将吸料管放入盛有冲洗液的接地金属桶内,将回流管
放入废液桶中。用接地导线将桶连接到真正的大地接
地点上。
5 세척액 일부를 채운 접지된 금속 통에 흡입
튜브를 놓고 쓰레기통에 배기 튜브를 놓은 후 ,
접지선을 금속통과 실제 지면에 연결합니다 .
313797C 19
Page 20
Startup / 起动 /
작동 시작
ti13273a
ti12879a
ti13276a
English
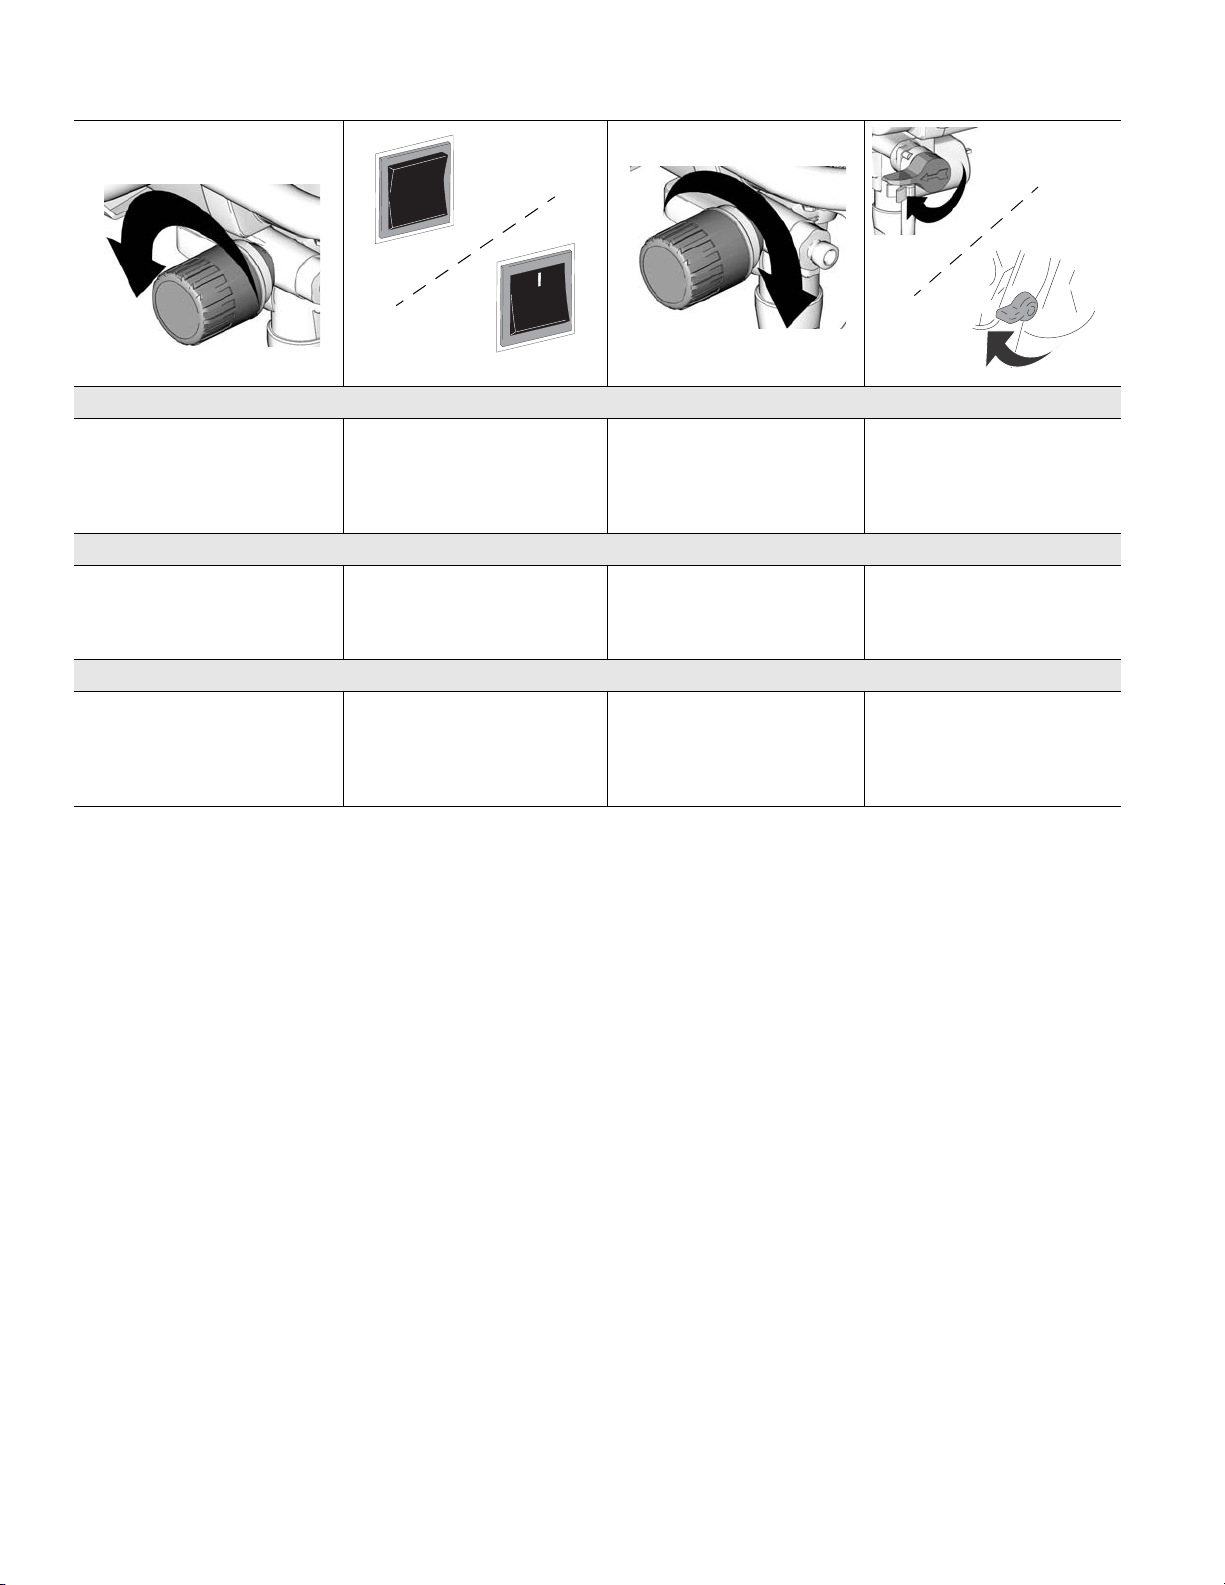
6 Turn fluid pressure
all the way down.
7 Set power/function selection
switch to AIRLESS or ON.
中文
6 将流体压力调到最低处。 7 将电源/功能选择开关置于
无气 (AIRLESS)或接通
(ON)位置。
한국어
6 유체 압력을 최대로 낮춥
니다 .
7 전원 / 기능 선택 스위치를
AIRLESS 또는 ON 에
맞춥니다 .
ti12878a
8 Increase pressure to start
motor and allow fluid to
circulate through drain tube
for 15 seconds; then turn
pressure down.
8 将压力增大以使电动机起
动,并让流体通过回流管
循环 15 秒钟;然后将压力
降低。
8 압력을 늘려 모터를 가동
하면 유체가 15 초 동안
배수 튜브를 통해 순환합
니다 . 그런 다음 압력을
낮춥니다 .
ti9345a
ti10352a
9 Turn prime valve to SPRAY.
10 Unlock gun trigger safety.
9 将填料阀旋转至喷涂位置。
10 开启喷枪扳机的安全销。
9 프라임 밸브를 돌려서
스프레이합니다 .
10 건 방아쇠 안전 장치의
잠금을 풉니다 .
20 313797C
Page 21
Startup / 起动 /
작동 시작
ti13324a
English
11 Hold gun against grounded
metal flushing pail. Trigger
gun and increase fluid
pressure to 1/2.
Flush 1 minute.
中文
11 握住喷枪靠在接地的金属冲
洗桶上。扣动喷枪扳机并增
大流体压力至 1/2 刻度。
冲洗 1 分钟。
한국어
14 접지된 금속 세척통을
향해 건을 잡습니다 .
방아쇠를 당겨 유체 압력
을 1/2 만큼 늘린 상태에
서 1 분 동안 세척합니다 .
Inspect for leaks. Do not stop leaks
with hand or a rag! If leaks occur,
perform Pressure Relief
procedure. Tighten fittings. Repeat
steps 1 - 9 of Startup, page 19.
If no leaks, proceed to step 10.
检查是否有泄漏。不要用手或抹布
去堵泄漏!如果出现泄漏,请执行
泄压步骤。拧紧接头。重复第
19 页起动的第 1 - 9 步。如果没
有泄漏,则进行第 10 步。
누출 부위가 있는지 검사합니다 .
손이나 헝겊으로 누출 부위를
막지 마십시오 ! 누출이 발생하면
압력 해제 절차를 따릅니다 .
피팅을 조입니다 . 시작하기 (19 페
이지 ) 에 있는 단계 1 - 9 를 반복
합니다 . 누출이 없으면 단계
10 을 계속하십시오 .
ti2714a
12 Place siphon tube in paint
pail.
13 Trigger gun again into
flushing pail until paint
appears. Move gun to
paint pail and trigger
for 20 seconds.
12 将吸料管放入涂料桶中。
13 再次朝冲洗桶内扣动喷枪
扳机,直到有涂料流出。
将喷枪移向涂料桶并扣动扳
机 20 秒钟。
15 페인트 통에 흡입 튜브를
놓습니다 .
16 페인트가 나타날 때까지
세척 통을 향해 건을 쏩니
다 . 페인트 통으로 건을
옮겨 20 초 동안 트리거합
니다 .
ti10353a
14 Lock gun trigger safety.
Assemble RAC tip or flat tip
and air cap, page 22.
14 锁上喷枪扳机的安全销。
按第 22 页所示,组装 RAC
喷嘴或扁平喷嘴及空气帽。
17 건 방아쇠를 안전하게
잠그고 , RAC 팁 또는 플랫
팁과 공기 캡을 조립합니
다 (22 페이지 ).
313797C 21
Page 22

RAC Tip and Flat Tip Air Cap Assembly /
RAC 喷嘴和扁平喷嘴空气 帽的组装
RAC Tip and Flat Tip Air Cap Assembly /
RAC 喷嘴和扁平喷嘴空气 帽的组装 /
RAC 팁과 플랫 팁 공기 캡 조립
/
RAC 팁과 플랫 팁 공기 캡 조립
ti10353a
English
1 If equipment has been
operating, Relieve
Pressure. Lock trigger
safety.
中文
1 如果已操作过设备,请泄压。
锁上扳机的安全销。
한국어
1 최근 장비를 조작한 적이
있으며 압력을 해제하고
방아쇠 안전장치를 안전하
게 잠급니다 .
RAC Tip / RAC 喷嘴 / RAC 팁
6
(a)
2 Insert seat (33a) into seat housing (35).
3 Insert seat housing (35) into air cap (6).
4 Insert seal (33b) over seat (33a). Use black seal
for water-based materials and orange for solvent
and oil-based materials.
2 将阀座 (33a)插入阀座室 (35)。
3 将阀座室 (35)插入空气帽 (6)。
4 将密封件 (33b)套在阀座 (33a)上。水性涂料使用
黑色密封,而溶剂和油性涂料用橙色。
2 시트 (33a) 를 시트 하우징 (35) 에 끼웁니다 .
3 시트 하우징 (35) 을 공기 캡 (6) 에 끼웁니다 .
4 시트 (33a) 에 씰 (33b) 을 끼웁니다 . 수성 재료에는
검정색 씰을 , 솔벤트 및 유성 재료에는 주황색
씰을 사용하십시오 .
35
33
33b
33a
ti8249a
Flat Tip / 扁平喷嘴 /
플랫 팁
A
6
33
ti13263a
5 Insert tip (33) into slot (A) in air cap (6).
Notice: If air cap is not fully installed on gun,
fluid pressure can force paint into air line
and damage sprayer.
6 Install air cap (6) over end of gun.
Hand tighten firmly.
5 将喷嘴 (33)插入空气帽 (6)的槽道
(A)内。
注意:如果空气帽未完全安装到喷枪上,流体压
力可能会使涂料进入气路,导致喷涂机损坏。
6 将空气帽 (6)装到喷枪的末端上。 用手
牢固拧紧。
5 팁(33)을 슬롯 (A)에 넣고 공기 캡(6)에
끼웁니다 .
알림 : 공기 캡이 건에 완전히 설치되어 있지
않으면 유압으로 페인트가 공기 라인으로
들어가 도장기가 손상될 수 있습니다 .
6 공기 캡 (6) 을 건 끝에 설치하고 손으로
확실히 조입니다 .
22 313797C
Page 23

Spraying / 喷涂 /
Spraying / 喷涂 / 스프레이 작업
Air-Assisted Spraying / 空气辅助式喷涂 / 공기 보조식 스프레이
ti12878a
스프레이 작업
ti12879a
ti12854a
English
1 Prime pump (page 19,
steps 1-13).
2 Slide air on/off valve to OFF
position (down).
中文
1 给泵填料 (见第 19 页,
第 1-13 步)。
2 将空气开关阀推到关闭位置
(下位)。
한국어
1 펌프를 프라임합니다
(19 페이지의 단계 1-13).
2 공기 온 / 오프 밸브를 OFF
위치 ( 아래쪽 ) 로 밉니다 .
ti13321a
3 Turn air adjustment valve off
at gun.
3 关闭喷枪上的空气调节阀。 4 增大流体压力以消除分叉。 5 降低流体压力直到喷型出现
3 건에서 공기 조정 밸브를
끕니다 .
4 Increase fluid pressure to
eliminate tails.
4 유압을 높여 꼬리를 제거합
니다 .
ti13279a
5 Decrease fluid pressure until
tails begin to appear
in spray pattern.
分叉为止。
5 꼬리가 스프레이 패턴에
나타나기 시작할 때까지
유압을 낮춥니다 .
ti13280a
313797C 23
Page 24

Spraying / 喷涂 /
스프레이 작업
ti13274a
English
6 Set function selection switch
to AA (Air-Assisted) or ON.
中文
6 将功能选择开关置于 AA
(空气辅助式)或接通
(ON)位置。
한국어
6 기능 선택 스위치를
AA(Air-Assisted) 또는 ON
에 맞춥니다 .
ti13281a
7 Slide air on/off valve ON and
increase air pressure to
eliminate tails.
7 将空气开关阀推到打开位
置,并增大空气压力以消除
分叉。
7 공기 온 / 오프 밸브를 ON 위
치로 밀고 공기 압력을 높
여 꼬리를 제거합니다 .
ti13316a
8 Trigger gun and turn gun air
adjustment valve until tails
disappear and good spray
pattern is achieved.
8 扣动喷枪扳机并旋转喷枪空
气调节阀,直到分叉消失而
且获得好的喷型。
8 건을 트리거한 후 , 꼬리가
사라지고 양호한 스프레이
패턴이 나타날 때까지 건
공기 조정 밸브를 돌립니다 .
ti12854a
9 Slide air on/off valve to OFF
to save setting of air
adjustment valve.
9 将空气开关阀推到关闭位置,
以保存空气调节阀的设定值。
9 공기 온 / 오프 밸브를 OFF
위치로 밀어 공기 조정
밸브의 설정을 저장합니다 .
24 313797C
Page 25

Spraying / 喷涂 /
스프레이 작업
Airless Spraying (240V only) /
ti13273a
English
1 Set power/function
selection switch
to AIRLESS (240V only).
2 Prime Pump (page 19,
steps 1-13).
中文
1 将电源/功能选择开关置
于无气 (AIRLESS)位置
(仅限 240V)。
2 给泵填料 (见第 19 页,
第 1-13 步)。
한국어
1 전원 / 기능 선택 스위치
를 AIRLESS(240V 전용 )
에 맞춥니다 .
2 펌프를 프라임합니다
(19 페이지의 단계 1-13).
3 Start with pressure turned to its lowest setting.
Spray test pattern. Gradually increase fluid
pressure until you achieve a consistent spray
pattern without heavy edges. Use a smaller tip
size if pressure adjustment alone does not
eliminate heavy edges.
3 开始时,先将压力调到最低值。喷涂试验喷型。
然后逐渐增大流体压力,直到获得一致的喷型,
而且没有厚边。如果单纯调整压力无法消除厚边,
可采用尺寸较小的喷嘴。
3 압력을 최저 설정에 맞춘 상태로 시작하고 ,
두꺼운 가장자리 없이 일정한 스프레이 패턴을
얻을 때까지 서서히 압력을 높입니다 . 압력
조정만으로 두꺼운 가장자리가 사라지지 않으면
더 작은 팁을 사용하십시오 .
无气喷涂(仅限 240V) /에어리스 스프레이 (240V 전용 )
ti12879a
• Hold gun perpendicular and 10-12
inches from surface. Overlap
strokes by 50%.
• Move gun before triggering and
release trigger before stopping.
• 握住喷枪,使其垂直于被喷表面并
距离 10-12 英寸。让喷道有 50%
的搭接。
• 要在扣动扳机之前移动喷枪,而在
扳机释放之后才停止喷枪的移动。
• 표면에서 10-12 인치 정도 떨어지
게 건을 수직으로 세우고 50% 씩
중첩해서 분무합니다 .
• 건을 발사하기 전에 건 이동을
시작하고 건 이동을 중지하기
전에 방아쇠를 해제하십시오 .
313797C 25
Page 26

Clearing a Clogged Tip / 清除喷嘴的堵塞物 / 막힌 팁 청소
ti13033a
Spraying / 喷涂 /
스프레이 작업
ti10353a
ti10353a
English
1 Relieve pressure, page 15.
2 Lock trigger safety.
Flat Tip: Remove and clean
guard and tip.
RAC Tip: proceed to step 3.
中文
1 释放压力,见第 15 页。
2 锁上扳机的安全销。
扁平喷嘴:取下并清理护罩
和喷嘴。
RAC 喷嘴:转到步骤 3。
한국어
1 압력을 해제합니다
(15 페이지 ).
2 방아쇠 안전 장치를
잠급니다 .
플랫 팁 : 가드와 팁을 제거
해서 청소합니다 .
RAC 팁 : 3 단계로
진행합니다 .
ti10352a
3 Rotate tip 180°.
4 Unlock trigger safety.
3 旋转喷嘴 180°。
4 开启扳机的安全销。
3 팁을 180° 회전시킵니다 .
4
방아쇠 잠금 장치를 풉니다 .
ti13323a
5 Trigger gun into pail or onto
ground to remove clog.
5 朝桶内或地上扣动喷枪
扳机,以清除堵塞物。
5 막힘 현상을 없애기 위해
통 안으로 또는 바닥으로
건을 작동합니다 .
ti13034a
6 Lock trigger safety.
7 Rotate tip back 180°
to spray position.
6 锁上扳机的安全销。
7 将喷嘴旋回 180° 至喷涂位
置。
6 방아쇠 안전 장치를
잠급니다 .
7 스프레이 위치로 팁을 180°
회전시킵니다 .
26 313797C
Page 27

Cleanup / 清洗 / 청소
ti13272a
ti10353a
Cleanup / 清洗 /
청소
ti13275a
English
1 Set power/function
selection switch to OFF.
Unplug sprayer.
中文
1 将电源/功能选择开关置
于关断 (OFF)位置。拔下
喷涂机电源插头。
한국어
1 전원/기능 선택 스위치를
OFF 에 맞추고 도장기
플러그를 뽑습니다 .
ti12879a
2 Turn pressure to lowest
setting. Trigger gun to
relieve pressure.
2 将压力调到最低值。扣动
喷枪扳机,使压力释放掉。
2 최저 압력으로
설정합니다 . 건의
방아쇠를 당겨 압력을
해제합니다 .
ti9346a
3 Lock trigger safety.
4 Put drain tube in pail.
5 Turn prime valve to
PRIME.
3 锁上扳机的安全销。
4 将回流管放入桶中。
5 将填料阀旋转至填料位置。
3 방아쇠 안전 장치를
잠급니다 .
4 통에 배수 튜브를
놓습니다 .
5 프라임 밸브를 PRIME으로
돌립니다 .
ti13320a
6 Remove tip and air cap
from gun. Refer to your
gun manual for complete
cleaning instructions.
6 从喷枪上卸下喷嘴及空
气帽。完整的清洗说明请
参阅喷枪手册。
6 팁과 공기 캡을 건에서
제거합니다. 자세한 청소
방법은 건 설명서를 참조
하십시오 .
313797C 27
Page 28

Cleanup / 清洗 /
청소
ti13441a
English
7 Remove siphon tube set
from paint and place in
flushing fluid. Use water for
water base paint and
mineral spirits for oil base
paint.
中文
7 将吸料管套件从涂料中取
出,然后放入冲洗液中。
水性涂料用水,油性涂料用
矿物油精。
한국어
7 페인트에서 흡입 튜브를
빼서 세척 유체에 가져다
놓습니다 . 수성 페인트에
는 물을 사용하고 유성 페
인트에는 미네랄 분리기를
사용합니다 .
ti13273a
ti9345a
8Plug in sprayer.
9 Set function selection
switch to AIRLESS or ON.
10 Turn prime valve to SPRAY.
8 插上喷涂机电源插头。
9 将功能选择开关置于无气
(AIRLESS)或接通 (ON)
位置。
10 将填料阀旋转至喷涂位置。
8 도장기 플러그를
꽂습니다 .
9 기능 선택 스위치를
AIRLESS 또는 ON 에
맞춥니다 .
10 프라임 밸브를 돌려서
스프레이합니다 .
ti10352a
ti12878a
11 Hold gun against paint pail.
12 Unlock trigger safety.
13 Trigger gun and increase
pressure until flushing fluid
appears.
11 握住喷枪靠在涂料桶上。
12 开启扳机的安全销。
13 扣动喷枪扳机并增大压力,
直到有冲洗液流出。
11 페인트 통에 건을 고정시킵
니다 .
12 방아쇠 잠금 장치를
풉니다 .
13 세척 유체가 나타날
때까지 건을 쏘아 압력을
높입니다 .
ti13322a
ti10353a
14 Move gun to flushing pail,
hold gun against pail, trigger
gun to thoroughly flush
system. Release trigger and
lock trigger safety.
14 将喷枪移向冲洗桶,握住喷
枪靠在桶上,扣动喷枪扳机
使系统彻底冲洗。释放扳机
并锁上扳机的安全销。
14 건을 세척 통으로 옮기고
통에 건을 댄 후 , 건의
방아쇠를 완전히 당겨 시스
템을 세척합니다 . 끝나면
방아쇠를 놓고 안전장치를
잠그십시오 .
28 313797C
Page 29

Cleanup / 清洗 /
청소
ti9346a
English
14 While continuing to trigger
gun, turn prime valve to
PRIME and allow flushing
fluid to circulate for 1 to
2 minutes to clean drain
tube.
中文
14 在继续扣动喷枪扳机的同
时将填料阀旋转至填料位
置,然后让冲洗液循环
1 至 2 分钟以清洗
回流管。
한국어
14 건을 계속 트리거하는 동
안 , 프라임 밸브를 PRIME
으로 돌리고 , 배출 튜브
가 깨끗할 때까지 1-2 분
정도 세척 유체를 순환시
키십시오 .
ti2820a
15 Raise siphon tube
above flushing fluid
and run sprayer for 15 to
30 seconds to drain fluid.
15 将吸料管提升到冲洗液的
液面之上并运行喷涂机
15 至 30 秒钟, 以将流体
排出。
15 흡입 튜브를 세척 유체
위로 올리고 15 - 30 초
동안 스프레이하여 유체를
배출합니다 .
ti9345a
ti10353a
16 Turn prime valve to
SPRAY.
17 Unlock trigger safety and
trigger gun into flushing
pail to purge fluid from
hose.
16 将填料阀旋转至喷涂位置。
17 开启扳机的安全销,
朝冲洗桶内扣动喷枪扳机,
以排出软管内的流体。
16 프라임 밸브를 돌려서
스프레이합니다 .
17 건의 방아쇠 잠금을 풀고
세척 통에 건을 트리거하
여 호스에서 유체를 제거
합니다 .
ti13274a
ti12878a
18 Set function selection
switch to AA (Air-Assisted)
or ON.
19 Trigger gun and slowly
increase air pressure to
blow material out of gun air
passages.
18 将功能选择开关置于 AA
(空气辅助式)或接通
(ON)位置。
19 扣动喷枪扳机并缓慢增大
空气压力,以吹掉喷枪空
气通道外的涂料。
18 기능 선택 스위치를
AA(Air-Assisted)
또는 ON 에 맞춥니다 .
19 건을 트리거하고, 서서히
공기 압력을 높여서 건
공기 통로로부터 재료를
제거합니다 .
313797C 29
Page 30

Cleanup / 清洗 /
청소
ti13272a
ti13275a
ti10353a
English
20 Set power/function
selection switch to OFF.
21 Lock trigger safety.
中文
20 将电源/功能选择开关置
于关断 (OFF)位置。
21 锁上扳机的安全销。
한국어
20 전원/기능 선택 스위치를
OFF 로 돌립니다 .
21 방아쇠 안전 장치를
잠급니다 .
ti9346a
ti13372a
22 Turn prime valve to
PRIME.
23 Remove filter from gun.
Clean and inspect.
Install filter.
24 Wipe sprayer, hose and
gun with a rag soaked in
water or mineral spirits.
22 将填料阀旋转至填料位置。 23 从喷枪上取下过滤器。
进行清洗并检查。
装上过滤器。
24 用一块在水或矿物油精中
浸泡过的抹布擦洗喷涂机、
软管及喷枪。
22 프라임 밸브를 PRIME 으로
돌립니다 .
23 건에서 필터를 제거하고
청소 및 검사한 후 필터를
설치합니다 .
24 물이나 미네랄 분리기를
적신 헝겊으로 스프레이 ,
호스 및 건을 닦습니다 .
ti2895a
25 If flushing with water, flush
again with mineral spirits
or Pump Armor to leave
a protective coating to
prevent freezing or
corrosion.
25 如果是用水冲洗的,
请重新用矿物油精或
Pump Armor 冲洗一遍,
以留下一层保护性涂层,
避免结冰或腐蚀。
25 물로 세척한 경우 미네랄
분리기 또는 펌프 아로마
로 다시 세척하면 보호막
이 형성되어 결빙이나 부
식을 막을 수 있습니다 .
30 313797C
Page 31

Repair / 修理 /
수리
Repair / 修理 / 수리
Compressor / Motor Replacement / 压缩机/电动机的更换 / 콤프레서 / 모터 교체
ti13413a
English
Compressor Belt Removal
1 Remove three screws
and belt cover.
中文
压缩机皮带的拆除
1 卸下三个螺钉和皮带罩。
한국어
콤프레서 벨트 제거
1 나사 세 개와 벨트 커버
를 제거합니다 .
ti13407a
2 Remove three screws
and belt guide plate.
2 卸下三个螺钉和皮带
导板。
2 세 개의 나사와 벨트
가이드 플레이트를 제거
합니다 .
ti13408a
3 Loosen top and bottom
idler pulley bracket
screws.
3 松开顶部和底部的惰轮托
架螺钉。
3 상단과 하단의 아이들러
풀리 브래킷 나사를
풉니다 .
ti13412a
4 Pull idler back and
remove belt from pulleys.
4 回拉惰轮并从皮带轮上卸
下皮带。
4 아이들러를 뒤로 당기고
풀리에서 벨트를 제거합
니다 .
313797C 31
Page 32

ti13418a
Repair / 修理 /
수리
ti13443a ti13417a
English
Compressor Belt
Installation
1 Install belt and guide
plate with three screws.
中文
压缩机皮带的安装
1 装上皮带并用三个螺钉安
装导板。
한국어
콤프레서 벨트 설치
1 세 개의 나사로 벨트와
가이드 플레이트를 설치
합니다 .
2 Place torque wrench in
square hole and torque
to 60 in-lb to properly
tension belt. Tighten top
and bottom idler screws.
2 将扭力扳手置于方形
孔中,并用 60 磅英寸
的扭力将皮带适度张紧。
拧紧顶部和底部的惰轮
螺钉。
2 사각형 구멍에 토크 렌
치를 놓고 60 in-lb까지
토크를 적용해 벨트에
적절한 장력이 가해지게
한 후 상단 및 하단 아이
들러 나사를 조입니다 .
ti13419a
3 Torque top and bottom
idler screws to 120 in-lb.
3 用 120 磅英寸的扭力
将顶部和底部的惰轮螺钉
拧紧。
3 상단 및 하단 아이들러
나사에 120 in-lb 까지
토크를 적용합니다 .
ti13413a
4 Install belt cover with
three screws.
4 用三个螺钉装上皮带罩。
4 세 개의 나사를 사용해
서 벨트 커버를 설치합
니다 .
32 313797C
Page 33

ti13414a
Repair / 修理 /
ti13663a
수리
ti13409a
English
Compressor/Motor
Removal
1 Loosen IEC cord
clamp screw and
remove IEC plug
from compressor.
中文
压缩机/电动机的拆除
1 松开 IEC 电线夹
螺钉,并从压缩机
上卸下 IEC 插头。
한국어
콤프레서 / 모터 제거
1 IEC 코드 클램프 나
사를 풀고 콤프레서
에서 IEC 플러그를
제거합니다 .
ti13411a
2 Remove air hose
from compressor and
remove outlet fitting
from compressor.
2 从压缩机上卸下空气
软管,然后从压缩机
上卸下出口接头。
2 콤프레서에서 공기
호스를 제거한 후
배출구 피팅을 제거
합니다 .
ti13416a
3 Remove four screws.
Tip compressor
assembly down and
forward to remove
from sprayer. Place
compressor on
workbench.
4 Perform belt removal
procedure, page 31.
3 卸下四个螺钉。将压
缩机组件向前向下翻
倒,以将其从喷涂机
上卸下。将压缩机放
到工作台上。
4 按照第 31 页的皮带
拆除步骤操作。
3 네 개의 나사를 빼고
, 콤프레서 어셈블리
를 앞방향 아래로
기울여 도장기에서
제거합니다 . 콤프레
서를 작업대 위에
놓으십시오 .
4 벨트 제거 절차를
수행합니다 (31 페
이지 ).
ti13664a
5 Remove two screws
and IEC cord clamp.
Remove two screws
and compressor
shroud.
5 卸下两个螺钉和 IEC
电线夹。卸下两个螺
钉和压缩机护罩。
5 두 개의 나사와 IEC
코드 클램프를 제거
하고 두 개의 나사와
콤프레서 슈라우드를
제거합니다 .
ti13662a
6 Disconnect harness
from motor to control
board. Remove
control board and
screw.
7 Remove three
screws and motor
from compressor.
6 断开电动机与控制板
之间的线束连接。
卸下控制板和螺钉。
7 卸下三个螺钉,
然后从压缩机上卸
下电动机。
6 모터와 제어 보드 사
이의 하니스를 분리
하고 제어 보드와
나사를 제거합니다 .
7 콤프레서에서 세
개의 나사와 모터를
제거합니다 .
313797C 33
Page 34

Repair / 修理 /
수리
ti13414a
ti13421a
English
Compressor/Motor
Installation
1 Install motor to
compressor housing with
three screws. Torque
screws to 120 in-lb.
2 Connect harness from
motor to control board.
中文
压缩机/电动机的安装
1 用三个螺钉将电动机安装
到压缩机上。用 120 磅
英寸的扭力拧紧螺钉。
2 连接电动机与控制板之间
的线束。
한국어
콤프레서 / 모터 설치
1 세 개의 나사로 모터를
콤프레서 하우징에 설치
하고 나사에 120 in-lb
까지 토크를 적용합니다 .
2 모터에서 제어 보드까지
하니스를 연결합니다 .
ti13414a
ti13411a
3 Install compressor
shroud with two screws.
Install IEC cord clamp
with two screws.
4 Install air inlet fitting and
perform Belt
Installation, page 32.
3 用两个螺钉装上压缩机护
罩。用两个螺钉装上 IEC
电线夹。
4 装上空气入口管接头,
并执行第 32 页的皮带
安装。
3 두 개의 나사로 콤프레
서 슈라우드를 설치하고
두 개의 나사로 IEC 코드
클램프를 설치합니다 .
4 공기 흡입구 피팅을 설
치하고 벨트 설치를 수
행합니다 (32 페이지 ).
ti13442a
5 Tip compressor
assembly up and back
into frame. Install four
screws.
5 将压缩机组件向上翻起并
装回到机架内。装上四个
螺钉。
5 콤프레서 어셈블리를 뒤
쪽 윗방향의 프레임쪽으
로 기울이고 네 개의
나사를 끼웁니다 .
ti13420a
6 Install IEC connector and
tighten cord clamp. Install
air hose to outlet fitting.
6 装上 IEC 连接器并拧紧
电线夹。将空气软管连接
至出口接头上。
6 IEC 커넥터를 설치하고
코드 클램프를 조입니다.
공기 호스를 배출구
피팅에 설치합니다 .
34 313797C
Page 35

Basic Troubleshooting /
基本故障排除
/
기본적인 문제 해결
Basic Troubleshooting / 基本故障排除 / 기본적인 문제 해결
Check everything in this Basic Troubleshooting Table before you bring the sprayer to a Graco authorized service center.
Problem
Sprayer Will Not Operate
Basic Fluid Pressure
Basic Mechanical
Basic Air Pressure
1. Pressure control knob setting.
2. Spray tip or fluid filter may be
1. Pump frozen or hardened paint
2. Motor. Remove drive housing
1. Power/function selector.
2. Air ON/OFF valve at gun may be
What To Check
(If check is OK, go to next check)
Motor will not run if set at min
imum (fully counter-clockwise).
clogged.
assembly. See page 60. Try to
rotate fan by hand.
closed
What To Do
(When check is not OK, refer to this column)
Slowly increase pressure setting to see if motor starts.
-
Relieve Pressure, page 15. Then clear clog or clean
gun filter. Refer to gun instruction manual, 313347.
Thaw sprayer if water or water-based paint has frozen
in sprayer. Place sprayer in warm area to thaw. Do not
start sprayer until thawed completely. If paint hardened
(dried) in sprayer, replace pump packings. See page
60.
Replace motor if fan won’t turn. See page 33, Motor
Replacement.
Ensure selection is ON.
Turn air adjustment valve counter-clockwise to open.
Slide air ON/OFF up to open.
313797C 35
Page 36

Basic Troubleshooting /
基本故障排除
/
기본적인 문제 해결
Problem
Basic Electrical
See wiring diagram, page 63
What To Check
(If check is OK, go to next check)
1. Electric supply. Meter must read
105-130 Vac for 110-120 Vac mod
els and 210-255 Vac for 230 Vac
models.
2. Extension cord. Check extension
cord continuity with volt meter.
3. Sprayer power supply cord.
Inspect for damage such as broken
insulation or wires.
4. Fuse. Check replaceable fuse on
control board (next to ON/OFF
switch).
5. Motor leads are securely fastened
and properly connected to control
board.
6. Motor thermal switch. Yellow
motor leads must have continuity
through thermal switch.
-
What To Do
(When check is not OK, refer to this column)
Reset building circuit breaker, replace building fuses.
Try another outlet.
Replace extension cord. Use shorter extension cord.
Replace power supply cord. See page 60.
Replace fuse after completing motor inspection.
See page 62.
Replace loose terminals; crimp to leads.
Be sure terminals are firmly connected.
Clean circuit board terminals. Securely reconnect
leads.
Replace Motor, page 60.
7. Brush cap missing or loose brush
lead connections. Brush length
must be 1/4 in. (6mm).
8. Motor armature commutator for
burn spots, gouges and extreme
roughness.
9. Motor armature for shorts using
armature tester (growler) or per
form spin test, page 54.
10. Pressure control not plugged in
to control board.
Replace Motor, page 60.
Replace Motor, page 60.
Replace Motor, page 60.
-
Insert pressure control connector into control board.
36 313797C
Page 37

Basic Troubleshooting /
基本故障排除
/
기본적인 문제 해결
Problem
Low Fluid Output
What To Check
(If check is OK, go to next check)
1. Worn or clogged spray tip.
2. Verify pump does not continue
to stroke when gun trigger
is released.
3. Prime valve leaking.
4. Suction hose connections.
5. Electric supply with volt meter.
Meter must read 105-130 Vac for
110-120 Vac models and 210-255
for 240 Vac models. Low voltages
reduce sprayer performance.
6. Extension cord size and length.
7. Leads from motor to circuit
board for damaged or loose
wire connectors. Inspect wiring
insulation and terminals for
signs of overheating.
What To Do
(When check is not OK, refer to this column)
Relieve pressure, page 15. Replace or clean tip.
Refer to gun instruction manual, 313347.
Service Pump, page 58.
Relieve pressure, page 15. Then repair Prime Valve,
page 60.
Tighten any loose connections. Check o-rings
on suction hose tube.
Reset building circuit breaker; replace building fuse.
Repair electrical outlet or try another outlet.
Replace with a correct, grounded extension cord,
page 12.
Be sure male terminal pins are centered and firmly
connected to female terminals. Replace any loose
terminals or damaged wiring. Securely reconnect
terminals.
8. Worn motor brushes which must
be 1/4 in. (6 mm) minimum.
9. Motor brushes binding in brush
holders.
10. Low stall pressure. Turn pressure
control knob fully clockwise.
11. Motor armature for shorts
by using an armature tester
(growler) or perform spin test,
page 54.
12. Pump is primed.
13. Inlet and outlet balls are not
stuck.
Replace Motor, page 33.
Clean brush holders. Remove carbon dust by using
compressed air to blow out brush dust.
Replace Pressure Control Assembly, page 60.
Replace Motor, page 33.
Prime pump, page 19.
Inlet: Remove suction tube and place pencil into inlet
housing to dislodge ball and allow proper priming.
Outlet: Insert screwdriver in slot and remove
Easy-Access door, page 11. Unscrew outlet valve
with a 3/4 in. socket. Remove and clean assembly.
313797C 37
Page 38

Basic Troubleshooting /
基本故障排除
/
기본적인 문제 해결
Problem
Motor runs and pump strokes
Motor runs but pump does not
stroke
Motor is hot and runs
intermittently
What To Check
(If check is OK, go to next check)
1. Prime Valve is open or leaking.
2. Paint supply.
3. Intake strainer clogged.
4. Suction tube leaking air.
5. Intake valve ball and outlet
ball are seating properly not worn.
6. Leaking around throat packing
nut which may indicate worn
or damaged packings.
7. Pump rod damaged.
8. Gears or drive housing.
1. Be sure ambient temperature where
sprayer is located is not more
than 115°F (46°C) and sprayer
is not located in direct sun.
What To Do
(When check is not OK, refer to this column)
Close or replace Prime Valve, page 60.
Refill and reprime pump.
Remove and clean, then reinstall.
Tighten nut. Check o-rings on swivel tube.
Clean and repair pump, page 58. Strain paint before
using to remove particles that could clog pump.
Replace Pump and Packing module, page 60.
Replace Pump and Packing module, page 60.
Inspect Drive Housing Assembly and gears
for damage and replace if necessary, page 60.
Move sprayer to shaded, cooler area if possible.
Low air output at gun
Low air output at gun
2. Motor has burned windings
indicated by removing positive
(red) brush and seeing burned
adjacent commutator bars.
1. Air valves at gun may be closed.
2. Air connections may be loose.
3. Damaged (leaking) air supply
hose.
4. Air intake filter clogged.
Replace Motor, page 33.
Turn air adjustment valve counter-clockwise to open.
Slide air ON/OFF up to open.
Check all connections for leaking air.
Replace air supply hose.
Clean or replace air intake filter.
38 313797C
Page 39

Basic Troubleshooting /
基本故障排除
/
기본적인 문제 해결
Problem
Air compressor does not run
What To Check
(If check is OK, go to next check)
1. Power/function selector switch
2. Voltage to compressor below 105
Vac for 110 - 120 Vac models or
below 210 Vac for 240 Vac models
3. Loose power connections
4. Excessive head pressure
(compressor hums)
5. Excessive head pressure
(compressor hums)
6. Fuse. Check replaceable fuse
on compressor control board.
7. Compressor thermal switch is
open. Ensure ambient temperature
is below 115 °F (46 °C).
8. Low compressor performance.
What To Do
(When check is not OK, refer to this column)
Set function selector switch to ON; replace switch.
Try another outlet. Reduce extension cord length
or increase extension cord gauge.
Verify all connections are firm.
Moisture frozen in air supply line.
Wait for air pressure to bleed to zero.
Replace fuse after completing motor inspection,
page 62.
Move sprayer to shaded, cooler area.
Worn compressor; repair compressor with
Compressor Service Kit, page 62.
Poor air spray pattern
Water in pattern
1. Air cap or air manifold air ports
clogged.
2. Air cap worn.
3. Worn spray tip.
1. Water in air line.
Soak in solvent to clean.
Replace air cap.
Relieve pressure, page 15. Replace tip. Refer to gun
instruction manual, 313347.
Add Water Separator Kit 257824 to air line.
313797C 39
Page 40

Basic Troubleshooting /
基本故障排除
将喷涂机送往 Graco 公司授权的维修中心之前,请全面检查本基本故障排除表所列的各项内容。
要检查的内容
应采取的措施
故障
(如果检查没有问题,请转到下一项
检查内容)
(如果检查有问题,请参见本栏内容)
喷涂机无法工作
/
기본적인 문제 해결
基本流体压力问题 1. 压力控制旋钮设置。如果设为最小
值 (逆时针旋转到底),电动机将
不工作。
2. 喷嘴或流体过滤器可能被堵塞。 释放压力,见第 15 页。然后清除堵塞物或清洗喷枪过
基本机械问题 1. 泵冻结或涂料硬化。 如果水或水性涂料在喷涂机内冻结,要解冻喷涂机。
2. 电动机。卸下驱动室组件。
见第 60 页。尝试用手转动风扇。
基本空气压力问题 1. 电源/功能选择器。 确保选择为接通 (ON)。
2. 喷枪的空气开关阀可能关着。 逆时针转动空气调节阀将其打开。将空气开关向上推至
缓慢增加压力设置,查看电动机是否启动。
滤器。参见喷枪使用手册,313347。
把喷涂机放在暖和的地方进行解冻。在完全解冻之前,
不要起动喷涂机。如果喷涂机内的涂料已经硬化
(变干),应当更换泵密封垫。见第 60 页。
如果风扇不转,更换电动机。参见第 33 页中的更换电
动机。
打开位置。
40 313797C
Page 41

故障
Basic Troubleshooting /
要检查的内容
(如果检查没有问题,请转到下一项
检查内容)
基本故障排除
/
기본적인 문제 해결
应采取的措施
(如果检查有问题,请参见本栏内容)
基本电气问题
参见第 63 页的接线图
1. 供电。对于 110-120 Vac 型号,
电压表的读数应为 105-130 Vac,
对于 230 Vac 型号,电压表的读数应
为 210-255 Vac。
2. 加长电线。用电压表检查加长电线的
连续性。
3. 喷涂机的电源线。检查有无损坏,
如绝缘破损或断线。
4. 保险丝。检查控制板上的可更换保险
丝 (在靠近 ON/OFF 开关处)。
5. 电动机引线牢牢地固定并正确地连接
到控制板上。
6. 电动机过热保护开关。黄色的电动机
引线必须经由过热保护开关连通。
7. 电刷帽丢失或电刷引线连接松动。
电刷的长度必须有 1/4 英寸 (6mm)。
8. 检查电动机电枢换向器上是否有烧焦
的斑点、刮槽和极其粗糙的地方。
复位楼内的断路器,更换保险丝。试试另外的插座。
更换加长电线。使用较短的加长电线。
更换电源线。见第 60 页。
检查完电动机后,更换保险丝。见第 62 页。
更换松动的接线端子,卷曲的引线。确保接线端子牢固
连接。
清理电路板接线端子。牢固地重新连接引线。
更换电动机,第 60 页。
更换电动机,第 60 页。
更换电动机,第 60 页。
9. 用电枢测试仪 (短路线圈测试仪)或
者进行第 54 页的旋转测试,检查电
动机电枢是否短路。
10. 压力控制器未插入控制板内。 把压力控制器的连接器插入控制板。
更换电动机,第 60 页。
313797C 41
Page 42

Basic Troubleshooting /
基本故障排除
/
기본적인 문제 해결
要检查的内容
(如果检查没有问题,请转到下一项
故障
流体输出低 1. 喷嘴磨损或堵塞。 释放压力,见第 15 页。更换或清理喷嘴。参见喷枪使
检查内容)
(如果检查有问题,请参见本栏内容)
用手册,313347。
应采取的措施
2. 检查当喷枪扳机释放后泵是否不再继
续运转。
3. 填料阀泄漏。 释放压力,见第 15 页。然后修理填料阀,见第 60 页。
4. 吸料管的连接。 拧紧任何松动的连接处。检查吸料管接管上的 O 形圈。
5. 用电压表检查供电。对于 110-120
Vac 型号,电压表的读数应为
105-130 Vac,对于 240 Vac 型号,
电压表的读数应为 210-255 Vac。
低电压会降低喷涂机的性能。
6. 加长电线的尺寸和长度。 换用尺寸正确、接地的加长电线,见第 12 页。
7. 从电动机到电路板的引线损坏或接线
连接器松动。检查接线绝缘和接线端
子是否有过热的迹象。
8. 电动机电刷磨损,最短必须有
1/4 英寸 (6mm)。
9. 电动机电刷粘在电刷座内。 清理电刷座。用压缩空气吹掉刷粉的方法除去碳灰。
10. 停转压力低。将压力控制旋钮顺时针
旋转到底。
维修泵,见第 58 页。
复位楼内的断路器,更换保险丝。修理电源插座或试试
另外的插座。
要确保接线端子插头对正并牢固地插入接线端子插座
中。更换所有松动的接线端子或破损电线。牢固地重新
连接接线端子。
更换电动机,第 33 页。
更换压力控制组件,第 60 页。
11. 用电枢测试仪 (短路线圈测试仪)
或者进行第 54 页的旋转测试,
检查电动机电枢是否短路。
12. 泵已填料。 给泵填料,见第 19 页。
13. 入口和出口止回球未卡住。 入口: 卸下吸料管,然后将一支铅笔插入入口腔内,
更换电动机,第 33 页。
使止回球移开以便进行填料。
出口: 将螺丝刀插入槽内,然后卸下检修门,
第 11 页。用一把 3/4 英寸套筒扳手将出口阀拧下。
卸下组件并予以清理。
42 313797C
Page 43

Basic Troubleshooting /
基本故障排除
要检查的内容
(如果检查没有问题,请转到下一项
故障
电动机运转,而且泵运行 1. 填料阀开着或泄漏。 关闭或更换填料阀,见第 60 页。
2. 涂料供应。 重新装满并重新给泵填料。
3. 吸料过滤器堵塞。 卸下并清洗,然后再装上。
4. 吸料管漏气。 拧紧螺母。检查活动管上的 O 形圈。
检查内容)
(如果检查有问题,请参见本栏内容)
应采取的措施
/
기본적인 문제 해결
5. 吸料阀的止回球和出口止回球正确就
位而且没有磨损。
6. 喉部密封螺母周围泄漏可能表示密封
有磨损或损坏。
7. 活塞柱损坏。 更换泵和密封垫组件,第 60 页。
电动机运转,但泵不运行 8. 齿轮或驱动室。 检查驱动室组件和齿轮是否损坏,必要时予以更换,
电动机发热并间歇运行 1. 要确保喷涂机所在的环境温度不超过
115°F (46°C),而且喷涂机不应放
在阳光直接照射到的地方。
2. 卸下正极 (红色)电刷,如果看见换
向片附近有烧毁,说明电动机有绕组
被烧坏。
喷枪的空气输出低 1. 喷枪的空气阀可能关着。 逆时针转动空气调节阀将其打开。将空气开关向上推至
2. 空气连接可能松脱。 检查所有连接有无漏气。
喷枪的空气输出低 3. 供气软管损坏 (漏气)。 更换供气软管。
清洁并修理泵,见第 58 页。在使用之前要过滤涂料以
除掉可能堵塞泵的颗粒物。
更换泵和密封垫组件,第 60 页。
第 60 页。
如果可能的话,将喷涂机移到阴凉的地方。
更换电动机,第 33 页。
打开位置。
4. 进气口过滤器被堵塞。 清洁或更换进气口过滤器。
313797C 43
Page 44

Basic Troubleshooting /
基本故障排除
/
기본적인 문제 해결
要检查的内容
(如果检查没有问题,请转到下一项
故障
空气压缩机不运转 1. 电源/功能选择器开关 将功能选择开关设定在接通 (ON)位置;更换开关。
检查内容)
(如果检查有问题,请参见本栏内容)
应采取的措施
2. 110-120 Vac 型号压缩机的电压是否
低于 105 Vac,或 240 Vac 型号是否
低于 210 Vac。
3. 电源接线处松动。 确认所有连接都牢固。
4. 压头压力过大 (压缩机发出
嗡嗡声)。
5. 压头压力过大 (压缩机发出
嗡嗡声)。
6. 保险丝。检查压缩机控制板上的可更
换保险丝。
7. 压缩机的过热保护开关断开着。要确
保环境温度低于 115 °F (46 °C)。
8. 压缩机的性能低。 压缩机磨损,用压缩机维修配件包修理压缩机,
空气喷型不好 1. 空气帽或空气歧管的气口堵塞。 浸泡在溶剂中进行清洗。
2. 空气帽磨损。 重新装上空气帽。
3. 喷嘴磨损。 释放压力,见第 15 页。更换喷嘴。参见喷枪使用手册,
试试另外的插座。缩短加长电线的长度或增大加长电线
的规格。
供气管路中有湿气冻结。
等待空气压力释放至零。
检查完电动机后更换保险丝,第 62 页。
将喷涂机移到阴凉的地方。
第 62 页。
313347。
喷型中有水 1. 气路中有水。 给气路添加水分离器套件 (257824)。
44 313797C
Page 45

Basic Troubleshooting /
基本故障排除
/
기본적인 문제 해결
Graco 공인 서비스 센터에 도장기를 반환하기 전에 이 문제 해결표에 있는 모든 항목을 확인하십시오 .
필요한 작업
( 점검 결과가 나쁘면 이
부분을
참조하십시오 .)
문제점
점검 사항
( 점검 결과가 정상이면
다음 단계로 이동한다 .)
도장기가 시동되지 않음
기본 유체 압력 1. 압력 제어 손잡이 설정 . 최소
( 완전히 시계 반대 방향 ) 로 설정
된 상태에서는 모터가 가동되지
않습니다 .
2. 스프레이 팁 또는 유체 필터가
막혔을 수 있습니다 .
기본 정보 ( 기계 ) 1. 펌프에서 페인트가 얼거나 경화됨 . 도장기에서 물이나 수성 페인트가 언 경우에는 도장
2. 모터. 드라이브 하우징 어셈블리를
제거합니다 . 60 페이지를 참조하십
시오 . 손으로 팬을 돌려 보십시오 .
압력 설정을 서서히 늘려 모터가 시동되는지 확인하
십시오 .
압력을 해제한 후 (15 페이지 )
막힌 부분을 청소하거나 건 필터를 청소합니다 .
건 사용 설명서 , 313347 을 참조하십시오 .
기를 해동하십시오 . 도장기를 따뜻한 장소에 놓고
해동합니다 . 완전히 해동될 때까지 도장기를 사용하
지 마십시오 . 도장기에서 페인트가 굳은 ( 마른 )
경우에는 펌프 패킹을 교체하십시오 . 60 페이지를
참조하십시오 .
돌아가지 않으면 모터를 교체합니다 . 33 페이지의
모터 교체를 참조하십시오 .
기본 공기 압력 1. 전원 / 기능 선택기 . ON 이 선택되었는지 확인하십시오 .
2. 건의 ON/OFF 밸브가 닫혔을
수 있습니다 .
공기 조정 밸브를 시계 반대 방향으로 돌려서 연
후에 공기 온 / 오프 스위치를 위로 밀어서 여십시오 .
313797C 45
Page 46

Basic Troubleshooting /
基本故障排除
/
기본적인 문제 해결
문제점
기본 정보 ( 전기 )
63 페이지의 배선도를 참조하
십시오 .
점검 사항
( 점검 결과가 정상이면
다음 단계로 이동한다 .)
1. 전기 공급 . 계기에는 110-120 VAC
모델의 경우 105-130 VAC, 230 VAC
모델의 경우 210-255 VAC 가 표시되
어야 합니다 .
2. 확장 코드 . 전압계와의 확장 코드
연속성을 확인하십시오 .
3. 도장기 전원 공급장치 코드 .
절연체나 와이어 파손 등과 같은
손상이 있는지 검사하십시오 .
4. 퓨즈 . 제어 보드의 교체형
퓨즈 (ON/OFF 스위치 옆 )
를 점검하십시오 .
5. 모터 리드가 안전하게 조여져 있고
제어 보드에 올바르게 연결되어
있습니다 .
필요한 작업
( 점검 결과가 나쁘면 이
부분을
건물 회로 차단기를 리셋하거나 건물 퓨즈를 교체하
십시오 . 다른 소켓을 사용해 보십시오 .
확장 코드를 교체하십시오 . 짧은 확장 코드를
사용합니다 .
전원 공급장치 코드를 교체하십시오 . 60 페이지를
참조하십시오 .
모터 검사가 끝나면 퓨즈를 교체하십시오 . 62 페이지
를 참조하십시오 .
느슨한 단자를 교체하십시오 . 단자가 확실히 연결되
었는지 확인하십시오 .
회로 보드 단자를 청소하고 리드를 안전하게 다시
연결하십시오 .
참조하십시오 .)
6. 모터 열 스위치 . 노란색 모터
리드는 열 스위치를 통과해 연속성
이 있어야 합니다 .
7. 브러쉬 캡이 없거나 브러쉬 리드
연결이 느슨합니다. 브러쉬 길이는
1/4 인치 (6mm) 여야 합니다 .
8. 모터 전기자 정류자에 탄 자국과
홈이 있고 매우 거칩니다 .
9. 전기자 테스터 ( 그라울러 ) 를
사용하여 모터 전기자 단락을 확인
하고 회전 테스트를 수행하십시오
(54 페이지 ).
10. 압력 컨트롤이 제어 보드에 꽂혀
있지 않습니다 .
모터 r 를 교체하십시오 (60 페이지 ).
모터 r 를 교체하십시오 (60 페이지 ).
모터 r 를 교체하십시오 (60 페이지 ).
모터 r 를 교체하십시오 (60 페이지 ).
압력 제어 커넥터를 제어 보드에 끼웁니다 .
46 313797C
Page 47

Basic Troubleshooting /
基本故障排除
/
기본적인 문제 해결
점검 사항
( 점검 결과가 정상이면
문제점
유체 출력이 낮음 1. 낡은 또는 막힌 스프레이 팁 . 압력을 해제 (15 페이지 ) 하고 팁을 교체하거나
다음 단계로 이동한다 .)
팁을 청소합니다 ( 건 설명서 313347 참조 ).
2. 건 방아쇠를 놓을 때 펌프가 연속적
으로 스토로크하지 않는지 확인하십
시오 .
3. 프라임 밸브에서 누출이 있습니다 . 압력을 해제 (15 페이지 ) 한 다음 프라임 밸브를
4. 석션 호스 연결부 . 느슨해진 연결 부위를 조이십시오. 석션 호스 튜브의
5. 전압계가 있는 전기 공급장치 .
계기에는 110-120 VAC 모델의 경우
105-130 VAC, 240 VAC 모델의 경우
210-255 가 표시되어야 합니다 .
전압이 낮으면 도장기 성능이 저하
됩니다 .
6. 확장 코드 크기 및 길이 . 올바르게 접지된 확장 코드로 교체하십시오
펌프를 정비하십시오 (58 페이지 ).
수리하십시오 (60 페이지 ).
O- 링을 점검하십시오 .
건물 회로 차단기를 리셋하거나 건물 퓨즈를 교체하
십시오. 전기 소켓을 수리하거나 다른 소켓을 사용해
보십시오 .
(12 페이지 ).
필요한 작업
( 점검 결과가 나쁘면 이
부분을
참조하십시오 .)
7. 모터에서 회로 보드까지 연결된 리
드가 손상되었거나 와이어 커넥터가
느슨합니다 . 배선 절연과 단자에
과열 흔적이 있는지 검사하십시오 .
8. 마모된 모터 브러쉬 길이는 최소
1/4 인치 (6 mm) 여야 합니다 .
9. 브러쉬 홀더에 모터 브러쉬가
연결되어 있습니다 .
10. 스톨 압력을 낮추십시오 . 압력 제
어 손잡이를 시계 방향으로 완전히
돌리십시오 .
11. 전기자 테스터 ( 그라울러 ) 를 사용
하여 모터 전기자 단락을 확인하고
회전 테스트를 수행하십시오
(54 페이지 ).
12. 펌프가 프라임됩니다 . 펌프를 프라임하십시오 (19 페이지 ).
13. 흡입 및 배출 볼이 달라붙지
않습니다 .
수 단자 핀이 중앙에 있고 암 단자에 단단히 연결되
어 있는지 확인하십시오 . 느슨한 단자나 손상된 배선
이 있으면 교체하십시오 . 단자를 안전하게 다시 연결
하십시오 .
모터 r 를 교체하십시오 (33 페이지 ).
브러쉬 홀더를 청소하십시오 . 압축 공기를 사용해서
브러쉬에 묻은 먼지를 불어내서 탄소를 제거하십시오 .
압력 제어 어셈블리를 교체하십시오 (60 페이지 ).
모터 r 를 교체하십시오 (33 페이지 ).
흡입구 : 석션 튜브를 제거한 후 연필을 흡입구
하우징에 놓아 볼을 제거하고 올바르게 프라이밍되게
하십시오 .
배출구 : 스크류드라이버를 홈에 끼우고 이지 액세스
도어를 제거하십시오 (11 페이지 ). 3/4 인치 소켓으
로 배출구 밸브의 나사를 풀고 어셈블리를 제거해서
청소합니다 .
313797C 47
Page 48

Basic Troubleshooting /
基本故障排除
/
기본적인 문제 해결
문제점
모터가 가동되고 펌프가 스트
로크합니다
모터가 가동되지만 펌프가
스트로크하지 않습니다 .
점검 사항
( 점검 결과가 정상이면
다음 단계로 이동한다 .)
1. 프라임 밸브가 열려 있거나 누출됩
니다 .
2. 페인트 공급기 . 펌프를 채우고 다시 프라임하십시오 .
3. 흡입 스트레이너가 막혔습니다 . 빼서 청소한 후 다시 끼우십시오 .
4. 석션 튜브에서 공기가 샙니다 . 너트를 조이고 , 스위블 튜브의 O- 링을 점검하십시오 .
5. 흡입 밸브 볼과 배출 볼이 제대로
마모되지 않게 장착되어 있습니다 .
6. 쓰로트 패킹 너트 주변에 누출이 발
생했습니다 . 패킹이 마모되었거나
손상된 것일 수 있습니다 .
7. 펌프 로드가 손상되었습니다 . 펌프와 패킹 모듈을 교체하십시오 (60 페이지 ).
8. 기어 또는 드라이브 하우징 . 드라이브 하우징 어셈블리와 기어가 손상되었는지
프라임 밸브를 닫거나 교체하십시오 (60 페이지 ).
펌프를 청소하고 교체하십시오 (58 페이지 ).
사용 전에 페인트를 여과하여 , 펌프 막힘 현상을
일으킬 수 있는 입자를 제거하십시오 .
펌프와 패킹 모듈을 교체하십시오 (60 페이지 ).
검사하고 , 필요하면 교체하십시오 (60 페이지 ).
필요한 작업
( 점검 결과가 나쁘면 이
부분을
참조하십시오 .)
모터가 뜨겁고 간헐적으로
중단되면서 작동합니다 .
건에서의 공기 출력이 낮음 1. 건의 공기 밸브가 닫혔을 수
건에서의 공기 출력이 낮음 3. 공기 공급 호스가 손상되었습니다 (
1. 도장기가 있는 장소의 외부 온도가
115°F(46°C) 를 넘지 않고 도장기
가 직사광선 아래에 놓이지 않도록
하십시오 .
2. 모터의 권선이 탔습니다 . 포지티브
( 빨간색 ) 브러쉬를 제거하고 타버
린 주변의 정류자 바를 보면 알
수 있습니다 .
있습니다 .
2. 공기 연결부가 느슨할 수 있습니다 . 모든 연결부에 공기 누출이 있는지 점검하십시오 .
누출 발생 ).
4. 공기 흡입 필터가 막혔습니다 . 공기 흡입 필터를 청소 또는 교체하십시오 .
가능하면 도장기를 그늘이 지고 서늘한 곳으로
옮기십시오 .
모터 r 를 교체하십시오 (33 페이지 ).
공기 조정 밸브를 시계 반대 방향으로 돌려서 연 후
에 공기 온 / 오프 스위치를 위로 밀어서 여십시오 .
공기 공급 호스를 교체하십시오 .
48 313797C
Page 49

Basic Troubleshooting /
基本故障排除
/
기본적인 문제 해결
점검 사항
( 점검 결과가 정상이면
문제점
공기 콤프레서가 가동되지 않음1. 전원 / 기능 선택기 스위치 . 기능 선택기 스위치를 ON 에 맞추고 스위치를 교체하
다음 단계로 이동한다 .)
십시오 .
2. 콤프레서 전압을 110 - 120 Vac 모
델의 경우 105 Vac 아래로 맞추고
240 Vac 모델의 경우 210 Vac 아래
로 맞추십시오 .
3. 전원 연결부가 느슨합니다 . 모든 연결부가 확실히 연결되어 있는지 확인하십시오 .
4. 헤드 압력이 너무 큽니다
( 콤프레서 소음 ).
5. 헤드 압력이 너무 큽니다
( 콤프레서 소음 ).
6. 퓨즈 . 콤프레서 제어 보드의 교체
가능 퓨즈를 점검하십시오 .
7. 콤프레서 열 스위치가 열려 있습니
다 . 외부 온도가 115°F(46°C)
미만인지 확인하십시오 .
다른 소켓을 사용해 보십시오 . 확장 코드 길이를
줄이거나 확장 코드 게이지를 늘립니다 .
공기 공급 라인에서 습기가 얼었습니다 .
공기 압력이 0 으로 떨어질 때까지 기다리십시오 .
모터 검사를 완료한 후 퓨즈를 교체하십시오
(62 페이지 ).
도장기를 그늘이 지고 서늘한 곳으로 옮기십시오 .
필요한 작업
( 점검 결과가 나쁘면 이
부분을
참조하십시오 .)
8. 콤프레서 성능이 불량합니다 . 콤프레서가 마모되었습니다 . 콤프레서 서비스 키트
로 콤프레서를 교체하십시오 (62 페이지 ).
공기 스프레이 패턴이 나쁨 1. 공기 캡 또는 공기 매니폴드
공기 포트가 막혔습니다 .
2. 에어 캡이 막혔습니다 . 에어 캡을 다시 끼우십시오 .
3. 스프레이 팁이 마모되었습니다 . 압력을 해제 (15 페이지 ) 하고 팁을 교체합니다
일정한 형태의 물 1. 공기 라인에 물이 있습니다 . 물 분리기 키트 257824 를 공기 라인에 추가하십시오 .
솔벤트에 담궈서 청소하십시오 .
( 건 설명서 313347 참조 ).
313797C 49
Page 50

Basic Troubleshooting /
基本故障排除
/
기본적인 문제 해결
General Problem: No Output / 一般故障:没有输出 / 일반적인 문제 : 출력 없음
Problem Cause Solution
Power switch is on and sprayer is plugged
in but pump does not cycle.
Motor runs but pump does not cycle. Gear and/or yoke are damaged. Replace gear and yoke using Gear/Yoke
Motor does not run. Water or paint entered pressure control
故障 原因 解决的办法
电源开关已接通,喷涂机已插入电源插
座,但泵不运行。
电动机运转,但泵不运行。 齿轮及/或轭已损坏。 用齿轮/轭修理配件包更换齿轮和轭,
电动机不运转。 水或涂料进入压力控制开关或控制
See Basic Troubleshooting, page 35.
switch or shorted control board.
参见第 35 页的基本故障排除。
板短路。
Repair Kit, page 60.
Clean out and/or dry out and retry. Replace if
necessary using Pressure Control Switch
Kit, page 60.
第 60 页。
清洗并/或干燥,然后再试。如果有必要,
用压力控制开关配件包进行更换,第 60 页。
문제점 원인 해결 방안
전원을 켜고 도장기의 플러그를 꽂았으
나 펌프가 회전하지 않습니다 .
모터가 가동하지만 펌프가 회전하지
않습니다 .
모터가 가동하지 않습니다 . 물 또는 페인트가 압력 제어 스위치에
기본적인 문제 해결을 참조하십시오
(35 페이지 ).
기어 및 / 또는 요크가 손상되었습니다 . 기어 / 요크 수리 키트를 사용하여 기어와
들어갔거나 제어 보드가 단락되었습니다 .
요크를 교체하십시오 (60 페이지 ).
청소하거나 말린 후 다시 시도하십시오 .
필요하면 압력 제어 스위치 키트를 사용하
여 교체하십시오 (60 페이지 ).
50 313797C
Page 51

Basic Troubleshooting /
General Problem: Excessive Pressure Build Up /
一般故障:压力过度积聚 /
일반적인 문제 : 압력이 과도하게 높음
Problem Cause Solution
Prime/Spray valve actuates automatically,
relieving pressure through drain tube.
故障 原因 解决的办法
填料 / 喷涂阀自动开启,通过回流管释
放压力。
Pressure control switch is worn. Replace pressure control switch using
Water or paint entered pressure control
switch or shorted control board.
Control board failed. See Control Board Diagnostics, page 55.
压力控制开关已磨损。 用压力控制开关配件包更换压力控制开关,
水或涂料进入压力控制开关或控制板短路。 清洗并/或干燥,然后再试。如果有必要,
控制板故障。 见第 55 页的控制板的诊断。用控制板配件
基本故障排除
Pressure Control Switch Kit, page 60.
Clean out and/or dry out and retry. Replace if
necessary using Pressure Control Switch
Kit, page 60.
Replace damaged control board using
Control Board Kit, page 60.
第 60 页。
用压力控制开关配件包进行更换,第 60 页。
更换已损坏的控制板,第 60 页。
/
기본적인 문제 해결
문제점 원인 해결 방안
프라임 / 스프레이 밸브가 자동으로 가동
되면서 배수관을 통해 압력을 낮춥니다 .
압력 제어 스위치가 마모되었습니다 . 압력 제어 스위치 키트를 사용하여 압력
제어 스위치를 교체하십시오 (60 페이지 ).
물 또는 페인트가 압력 제어 스위치에
들어갔거나 제어 보드가 단락되었습니다 .
결함이 있는 제어 보드 . 제어 보드 진단
청소하거나 말린 후 다시 시도하십시오 .
필요하면 압력 제어 스위치 키트를 사용하
여 교체하십시오 (60 페이지 ).
을 참조하십시오(55페이지 ).
제어 보드 키트를 사용하여 손상된 제어
보드를 교체하십시오 (60 페이지 ).
313797C 51
Page 52

Motor Diagnostics / 电动机的诊断 / 모터 진단
English
Check for electrical continuity
in motor armature, windings
and brush as follows:
中文
按如下说明对电动机电枢、
绕组和电刷的电路连续性进行
检查:
한국어
모터 전기자 , 코일의 전기
연결을 점검하고 다음과
같이 솔질하십시오 .
If Motor Diagnostics reveal
a damaged motor or if motor
brushes are shorter than 1/4
in. (6.4 mm) or if the motor
shaft cannot turn, replace
the motor using Motor Kit,
page 60.
如果电动机诊断表明电动机已
损坏,或者如果电动机电刷短
于 1/4 英寸 (6.4 mm),或
者如果电动机轴杆不能旋转,
则用电动机配件包更换电动
机,第 60 页。
모터 진단 결과 모터가 손상
된 것으로 나타나거나 모터
브러쉬가 1/4 인치 (6.4 mm)
미만이거나 모터 샤프트가
회전하지 않으면 모터 키트
를 이용하여 모터를 교체합
니다 (60 페이지 ).
Setup
1 Relieve pressure,
设置
1 释放压力,见第 15 页。
설치
1 압력을 해제합니다
Basic Troubleshooting /
page 15.
(15 페이지 ).
基本故障排除
2 Unplug electrical cord.
2 拔下电源线。
2 전기 코드를 뽑습니다 .
/
기본적인 문제 해결
52 313797C
Page 53

English
3 Remove enclosure
and disconnect
motor leads from
control card.
中文
3 卸下外壳并断开
控制板上的电动机
引线。
한국어
3 인클로저를 제거
하고 제어 카드에
서 모터 리드를 분
리합니다 .
4 Remove fan brace
(if equipped).
4 卸下风扇支架
(若有)。
4 ( 필요한 경우 )
팬 잠금쇠를 제거
합니다 .
Basic Troubleshooting /
5 Remove four
screws and front
cover.
5 卸下四个螺钉和
前盖。
5 네 개의 나사와
전면 커버를 제거
합니다 .
基本故障排除
6 Remove yoke and
/
기본적인 문제 해결
7 Remove gear.
guide rods.
6 卸下轭和导杆。 7 卸下齿轮。
6 요크와 가이드 로
드를 제거합니다 .
7 기어를 제거합
니다 .
313797C 53
Page 54

English
Armature Short Circuit Spin
Test
Quickly turn motor fan by
hand. There should not be
electrical shorts and fan
should coast two or three
revolutions before stopping.
If fan does not spin freely,
armature is shorted. Replace
motor using Motor Kit,
page 60.
中文
电枢短路旋转测试
用手快速转动电动机风扇。
应没有电气短路,而且风扇在
停止以前应能靠惯性转动两或
三圈。如果风扇不能自由地旋
转,说明电枢短路。用电动机
配件包
更换电动机,第 60 页。
한국어
전기자 단락 회로 회전
테스트
손으로 모터 팬을 빠르게
돌립니다. 전기 단락이 없는
것이며 , 팬이 멈추기 전에
2 - 3 회 회전해야 합니다 .
만일 팬이 자유롭게 회전하
지 않으면 전기자가 단락된
것입니다 . 이 경우 모터 키
트를 이용하여 모터를 교체
하십시오 (60 페이지 ).
Armature, Brushes and
Motor Wiring Open Circuit
1 Connect red and black
motor leads together with
test lead.
电枢、电刷和电动机接线开路
1 将电动机的红色和黑色引
线与测试引线连在一起。
전기자, 브러쉬와 모터 배선
개방 회로
1 테스트 리드로 빨간색
및 검정색 모터 리드를
연결합니다 .
Basic Troubleshooting /
2 Turn motor by hand
(approximately two
revolutions per second).
2 用手转动电动机
(速度约为每秒两圈)。
2 손으로 모터 팬을
돌립니다 ( 초당 약
2 바퀴씩 ).
基本故障排除
/
기본적인 문제 해결
3 If there is an uneven
resistance or no
resistance, replace motor
using Motor Kit, page 60.
3 如果阻力不均匀或没有
阻力,则用电动机配件
包更换电动机,见第
60 页。
3 고르지 않은 저항이
있거나 저항이 없을때
모터 키트를 사용하여
모터를 교체합니다
(60 페이지 ).
54 313797C
Page 55

Basic Troubleshooting /
Control Board Diagnostics / 控制板的诊断 / 제어 보드 진단
English
NOTE: Check for motor
problems before replacing
control board. A damaged
motor may burn out a good
control card.
中文
注释: 在更换控制板之前应检
查电动机是否有故障。已损坏
的电动机可能会烧坏一块正常
的控制板。
한국어
주: 제어 보드 교체 전에
모터에 문제가 있는지 점검
하십시오 . 손상된 모터가
문제 없는 제어 카드를
태웠을 수 있습니다 .
Check for a damaged control
board or pressure control
switch as follows:
如下所述检查控制板或压力控
制开关是否已损坏:
다음과 같이 손상된 제어
보드 또는 압력 제어 스위치
를 점검하십시오 .
1 Relieve pressure,
page 15.
1 释放压力,见第 15 页。 2 拔下电源线。
1 압력을 해제합니다
(15 페이지 ).
基本故障排除
2 Unplug electrical cord.
2 전기 코드를 뽑습니다 .
/
기본적인 문제 해결
313797C 55
Page 56

Basic Troubleshooting /
基本故障排除
/
기본적인 문제 해결
English
3 Remove cover screws
and front cover.
4 Remove yoke and guide
rods.
5 Remove gear. 6 Remove pressure control
harness from control
board. Use tip of small
flat-blade screwdriver to
press tab on right side
connector to release.
中文
3 卸下盖子螺钉和前盖。 4 卸下轭和导杆。 5 卸下齿轮。 6 卸下控制板上的压力控制
器线束。可用一把小型
扁平螺丝刀的头端按压
连接器右侧的突耳来将
其释放。
한국어
3 커버 나사와 앞 커버를
제거합니다 .
4 요크와 가이드 로드를
제거합니다 .
5 기어를 제거합니다 . 6 제어 보드에서 압력 제
어 하니스를 제거합니다.
작은 일자 드라이버 끝
부분을 사용하여 오른쪽
커넥터의 탭을 눌러서
해체합니다 .
56 313797C
Page 57

English
7 Attach harness from a
pressure control switch
you know is functioning
correctly to control board.
NOTE: Pressure control
switch does not have to
be installed in pump.
中文
7 将一个已知工作正常的压
力控制开关的线束连接至
控制板。
注释:无需将压力控制开
关安装到泵上。
한국어
11 문제가 없는 것이 확실
한 압력 제어 스위치에
서 제어 보드로 하니스
를 연결합니다 .
주: 압력 제어 스위치를
펌프에 설치할 필요는
없습니다 .
8 Turn pressure control
adjustment knob
clockwise to maximum
pressure setting.
8 顺时针将压力控制调整
旋钮旋转至最大压力设
定值。
12 압력 제어 손잡이를
시계 방향으로 돌려서
압력을 최대로
높이십시오 .
Basic Troubleshooting /
基本故障排除
9 Plug electrical cord into
120Vac receptacle.
9 将电线插入交流120V电源
插座上。
13 전기 코드를 120Vac 소
켓에 꽂습니다 .
/
기본적인 문제 해결
10 Turn power switch ON.
• If motor runs, replace
pressure switch
(Pressure Control
Switch Kit, page 60).
• If motor does not run,
replace control board and
repeat test (Control
Board Kit, page 60).
10 接通电源开关。
• 如果电动机运转,则更换
压力开关 (压力控制开关
配件包,第 60 页)。
• 如果电动机不运转,
则更换控制板然后再次
进行测试 (控制板配件,
第 60 页)。
14 전원을 켭니다 .
• 모터가 작동하면 압력
스위치 ( 압력 제어 스위
치 키트 , 60 페이지 )
를 교체하십시오 .
• 모터가 작동하지 않으면
제어 보드를 교체하고
테스트를 반복하십시오 (
제어 보드 키트 , 60 페
이지 ).
313797C 57
Page 58

Pump Diagnostics
NOTICE
Never submerge pump in water or allow fluid to enter
pressure control when repairing or cleaning the
pump.
泵的诊断
注意
在修理或清洁泵时,切勿将泵浸泡在水中,也不得让
流体进入压力控制器内。
펌프 진단
알림
펌프를 수리하거나 청소할 때 펌프를 물에 담그거
나 유체가 압력 컨트롤에 들어가게 하면 안됩니다 .
Basic Troubleshooting /
When pump packings wear, paint begins to leak down
outside of pump. Replace pump packings at the first sign
of leaking or additional damage to drive train could occur.
Use Pump Repair Kit, page 60.
泵密封垫一旦磨损,涂料会从泵中漏出。刚发现有涂料从
泵中漏出时就要立刻更换泵密封垫,否则可能会对传动机
构造成更多的损坏。使用泵修理配件包,第 60 页。
펌프 패킹이 마모되면 페인트가 펌프 밖으로 누출되기
시작합니다 . 처음 누출 징후가 보이면 바로 펌프 패킹
을 교체하십시오 . 그렇지 않으면 구동 트레인에 추가
손상이 발생할 수 있습니다 . 펌프 수리 키트를 사용하
십시오 (60 페이지 ).
基本故障排除
/
기본적인 문제 해결
Pump Service
NOTICE
Never submerge pump in water or allow fluid to enter
pressure control when repairing or cleaning the
pump.
泵的维修
注意
在修理或清洁泵时,切勿将泵浸泡在水中,也不得让
流体进入压力控制器内。
펌프 서비스
알림
펌프를 수리하거나 청소할 때 펌프를 물에 담그거
나 유체가 압력 컨트롤에 들어가게 하면 안됩니다 .
If sprayer continues to cycle (motor and pump run) when
the spray gun trigger is released, or if performance is
poor even with new spray tips and clean filters, the pump
inlet or outlet valve may be obstructed or worn. If a pump
is worn, replace it.
如果在喷枪扳机释放之后喷涂机仍持续运行 (电动机和泵
运转),或者如果即使使用新的喷嘴和清洁的过滤器喷涂
性能仍然很差,则泵的入口或出口阀可能堵塞或已磨损。
如果泵已磨损,则更换。
스프레이 건 방아쇠가 풀릴 때 도장기가 계속 작동
( 모터와 펌프 작동 ) 할 경우 또는 새 스프레이 팁과 깨
끗한 필터를 사용해도 성능이 나쁠 경우 , 펌프 흡입구
또는 배출구 밸브가 막혔거 나 마 모된 것일 수 있습니다 .
펌프가 마모되었으면 교체하십시오 .
58 313797C
Page 59

Parts (Lo-Boy Shown) /
零部件 (所示为 Lo-Boy)
/
부품 ( 그림은 Lo-Boy 임 )
Parts (Lo-Boy Shown) / 零部件(所示为 Lo-Boy) / 부품(그림은 Lo-Boy임)
214h
214j
214g
214f
214e
214d
214c
214b
215
209d
209c
209e
209a
206
205
32
209b
209
201a
201
207a
207
215
214k
214
214a
214b1
214b2
215
211
214
212
ti13422a
4
203
5
1
7
213
222
231
202
202a
14
7
8
10
11
12
9
13
30
38
31
19
25
215
221
219
219a
219c
219b
220
26
26c
20a
7
18
2
3
202
ti10677a
313797C 59
20
32
23
147
148
149
135d
135c
146
26a
26b
26d
26e
ti13665a
Page 60

Parts List / 部件清单 / 부품 목록
Ref. Part Description Qty.
1 257371 FRAME, cart, Lo-Boy, 290 AA
(Models 256842, 256846, 257411, 257412,
257413)
257372 FRAME, cart, Hi-Boy, 290 AA
(Models 256843, 256844, 256845, 257414)
2 119451 WHEEL, semi-pneumatic 2
3 119452 CAP, hub 2
4 287489 HANDLE, assy, hi cart 1
5 109032 SCREW, mach, pnh 4
7 260212 SCREW, hex washer hd, thd form 9
8 115099 WASHER, garden hose 1
9 15J356 TUBE, suction, intake, Lo-Boy 1
15B506 TUBE, suction, intake, Hi-Boy
10 103413 PACKING, o-ring 1
11 15B652 WASHER, suction 1
12 15E813 NUT, jam 1
13 246385 STRAINER, 7/8-14 UNF 1
14 15X615 BRACKET, retainer, cord 1
18 COMPRESSOR, air 1
19 244035 DEFLECTOR, barbed 1
20 257821 KIT, compressor shroud (includes 20a) 1
20a▲ 15K616 LABEL 1
23 155541 FITTING, swivel, 90 degree 1
25 257096 GUN, spray, air assist, AA30,
RAC Tip (Models 256842, 256846)
257380 GUN, spray, air assist, AA30,
Flat Tip (Models 256843, 256844, 256845,
257411, 257412, 257413, 257414)
26 256976 KIT, repair, hose 25 ft, 290 AA (includes 26a,
26b, 26c, 26d, 26e)
26a 214698 HOSE, cpld, 3/16 in. x 25 ft 1
26b 15X841 HOSE, whip 1
26c 15X842 HOSE, air 1
26d 15X843 SLEEVE, wrap, spiral 7
26e 120706 TUBE, t-clip 3
27 257520 KIT, accessory, hose extension, 25 ft (not
shown)
30 195400 CLIP, spring 1
31 115489 CLAMP, drain tube 2
32 118444 SCREW, mach, slot hex wash hd 4
38 15Y115 TUBE, drain, Lo-Boy 290 AA
(Models 256842, 256846, 257411, 257412,
257413)
15Y114 TUBE, drain, Hi-Boy 290 AA
(Models 256843, 256844, 256845)
135c 122274 SCREW, thrd forming, flat head 2
135d 115632 RETAINER, power cord 1
146 257811 KIT, toolbox (Models 256843, 256844,
256845, 257411, 257412, 257413)
147 245856 GAUGE, fluid (Models 256843, 256844,
256845, 257411, 257412, 257413)
148 111733 WRENCH (Models 256843, 256844, 256845,
257411, 257412, 257413)
149 197193 PLAMMER (Models 256843, 256844,
256845, 257411, 257412, 257413)
201 257839 KIT, repair, motor, fluid pump, 120V (Models
256842, 256845, 257413) (includes 201a)
256938 KIT, repair, motor, fluid pump, 240V
(Models 256843, 256844, 256846, 257411,
257412) (includes 201a)
201a 257809 KIT, repair, fan 1
202 KIT, repair, Power Cord (includes 202a)
257803 120V Model 256842 1
253369 CE Models 256843, 257411 1
257805 Euro Multicord 256844, 257412 1
257806 ANZ/China 256846 1
253368 UK 256845, 257413 1
202a▲ 15H085 LABEL, warning 1
203 115498 SCREW, mach, slot hex wash hd 1
205 118899 SWITCH, rocker, spst (Model 256842) 1
122528 SWITCH, three position, rocker (Models
256843, 256844, 256845, 257411, 257412,
257413)
117223 SWITCH, dpst, rocker (Model 256846)
206 15X737 BRACKET, switch 1
Parts List /
部件清单
Ref. Part Description Qty.
207 KIT, repair, board, control (includes 207a,
1
257802 120V (Model 256842) 1
1
1
1
1
1
1
1
1
1
1
1
1
257837 240V (Models 256843, 256844, 256846,
257975 110V, UK (Models 256845, 257413)
207a 121939 SCREW, plastite, #8 hex wash hd 1
207b 122893 FUSE, 8 Amp (240V Models 256843,
209 KIT, repair, shield, motor
257800 Model 256842 (includes 209a, 209b, 209c,
257801 Models 256843, 256844, 256845, 257411,
258672 Model 256846 (includes 209a, 209b, 209c,
209a 15X095 LABEL, brand 1
209b 15X096 LABEL, brand 1
209c 15Y118 LABEL 1
209d LABEL 1
209d1▲ 195833 Model 256842 1
195792 Model 256846
209d2 15X131 LABEL, switch (Models 256843, 256844,
209e▲ 195793 LABEL, warning (Models 256843, 256844,
211 196001 WASHER 2
212 194507 PIN, dowel, 5/16 2
213 119275 CLIP, wire 1
214 256972 PUMP, complete (includes 214a, 214a1,
256974 KIT, repair, pump repack 1
214a KIT, repair, pressure
257528 2600 psi (Models 256842, 256846) 1
257529 2800 psi (Models 256843, 256844, 256845,
214a1 15R604 LABEL 1
214a2 15B464 LABEL 1
214b 256973 KIT, repair, inlet valve, 290 AA
214b1 15K105 BALL, stop 1
214b2 105445 BALL, (.5000) 1
214c 120776 PACKING, o-ring 1
214d 195947 ADAPTER, filter 1
214e 243094 KIT, housing, valve, outlet 1
214f 224807 BASE, valve 1
214g 111600 PIN, grooved 1
214h 187625 HANDLE, valve, drain 1
214j 235014 VALVE, drain 1
214k 256974 KIT, rod 1
215 257808 KIT, repair, gear/yoke 1
219 257799 KIT, repair, housing, cover (includes 219a,
219a 115478 SCREW, mach, torx/slt pan hd 4
219b 15J809 COVER, pump outlet 1
219c 15X094 LABEL, brand 1
220 15J790 HOOK, pail (Models 256843, 256844,
15Y453 HOOK, pail, long
221 115477 SCREW, mach, torx pan hd 2
222 15J802 COVER 1
231 15X905 CORD, power, 290 compressor 1
232 15Y951 WIRE, jumper, UK (Models 256845, 257413) 2
233 15X730 WIRE, jumper
Additional Warning labels and tags are avialable at no cost.
▲
▲
可免费提供额外的警告标牌和标签。
▲
추가 경고 라벨과 태그는 무료로 제공하고 있습니다
207b)
257411, 257412)
256844, 256846, 257411, 257412)
209d1)
257412, 257413 (includes 209a, 209b, 209c,
209d2, 209e)
209d1)
256845, 257411, 257412, 257413)
256845, 257411, 257412, 257413)
214a2, 214b, 214b1, 214b2, 214c, 214d,
214e, 214f, 214g, 214h, 214j, 214k)
257411, 257412, 257413)
(includes 214b1, 214b2)
219b, 219c)
256845, 257411, 257412, 257413)
(Models 256842, 256846)
Models 256843, 257411 2
Models 256844, 257412 2
Models 256845, 257413 1
Model 256846 2
Model 257414 2
/
부품 목록
.
1
2
1
1
1
1
1
1
1
1
1
1
1
60 313797C
Page 61

Parts (Compressor) / 零部件 (压缩机) / 부품 ( 콤프레서 )
118
Parts List /
部件清单
/
부품 목록
138
114
144
122c
131b
145
122a
131
122b
131a
122
129
135a
120a
135b
112
106
117
110
120
136
133
128
120a
142
106
121
ti13423a
ti13423a
135
* Torque to 70 ± 5 in-lb / * 用 70 ± 5 磅英寸的扭力拧紧 / * 70 ± 5 in-lb 까지 조입니다
313797C 61
Page 62

Parts List /
部件清单
Parts List (Compressor) / 零部件清单 (压缩机) / 부품 목록 ( 콤프레서 )
Ref. Part Description Qty.
18 KIT, repair, compressor, complete
257813 110V/120V Models 256842, 256845,
257413
257814 240V Models 256843, 256844,
256846, 257411, 257412, 257414
106 257815 KIT, repair, piston/cylinder 1
110 120204 SCREW, mach, hex flat head 1
112 257836 KIT, repair, valve plate 1
114 120593 SCREW, mach, torx pan hd 3
117 257812 KIT, repair, head/valve plate 1
118 120229 SCREW, hex flange 3
120a 568157 FITTING, 90, brass,
.38 cmcf x 1/4 mp
120 257816 KIT, repair, tube, cooling 1
121 KIT, repair, motor, compressor
256940 110V/120V 1
256942 240V 1
122 257817 KIT, repair, idler 1
122a 260212 SCREW, hex washer hd, thd form 2
122b 110755 WASHER, plain 1
122c 257818 KIT, repair, belt 1
128 257342 BASE, assemble, air filter 1
129 115495 SCREW, mach, hex washer hd 3
131 257819 KIT, repair, board, control 110V/120V 1
257820 KIT, repair, board, control 240V 1
131a 121939 SCREW, plastite, #8 hex wash hd 1
131b 15Y078 WIRE, jumper, pressure control 1
131c 119276 FUSE,12.5 Amp (120V Models
256842, 256845, 257413)
133 15W961 FILTER, air, compressor 1
135 257823 KIT, jumper IEC 1
135a 15Y079 WIRE, ground 1
135b 115498 SCREW, mach, slot hex wash hd 1
136 278044 COVER, air filter/silencer 1
138 118444 SCREW, mach, slot hex wash hd 3
142 122703 VALVE, pressure relief 1
144 15Y461 RING, pulley, lower 1
145 278086 COVER, belt 1
1
1
2
1
/
부품 목록
* Torque to 70 ± 5 in-lb
* 用 70 ± 5 磅英寸的扭力拧紧
* 70 ± 5 in-lb 까지 조입니다
62 313797C
Page 63

Wiring Diagram - 120 Vac /
接线图 - 120 Vac
/
배선도 - 120 Vac
Wiring Diagram - 120 Vac / 接线图 - 120 Vac / 배선도 - 120 Vac
A
D
E
Fluid Pump / 流体泵 / 유체 펌프
Compressor / 压缩机 / 콤프레서
B
B
G
C
G
C
C
F
E
ti13424a
B
C
A
B
C
D
E
Green/Yellow Wire
F
G
English
Red Wire
Black Wire
White Wire
Blue Wire
Striped Wire
Fuse
中文 한국어
红色线 빨간색 와이어
黑色线 검정색 와이어
白色线 흰색 와이어
蓝色线 파란색 와이어
条纹线 줄무늬 와이어
绿 / 黄色线 녹색 / 노란색 와이어
保险丝 퓨즈
313797C 63
Page 64

Wiring Diagram - 240 Vac /
接线图 - 240 Vac
/
배선도 - 240 Vac
Wiring Diagram - 240 Vac / 接线图 - 240 Vac / 배선도 - 240 Vac
A
B
D
A
B
A
G
D
A
F
E
Fluid Pump / 流体泵 / 유체 펌프
Compressor / 压缩机 / 콤프레서
A
E
D
English
A
B
D
E
F
G
Brown Wire
Black Wire
Blue Wire
Grren/Yellow Wire
Compressor Fuse
Fluid Pump Fuse
ti13425a
中文 한국어
棕色线 갈색 와이어
黑色线 검정색 와이어
蓝色线 파란색 와이어
绿 / 黄色线 녹색 / 노란색 와이어
压缩机的保险丝 콤프레서 퓨즈
流体泵的保险丝 유체 펌프 퓨즈
64 313797C
Page 65

Technical Data
Power requirements
Max tip size
US★
UK★
Europe◆
Asia/Australia◆
Max material output gpm (lpm)
US ★
UK★
Europe◆
Asia/Australia◆
Maximum material pressure - Airless
US ★
UK★
Europe◆
Asia/Australia◆
Maximum material pressure - AA
US ★
UK★
Europe◆
Asia/Australia◆
Atomizing air output @ 30 psi
US★
UK★
Europe
Asia/Australia
Air pressure
US★
UK★
Europe◆
Asia/Australia◆
Technical Data
FinishPro 290 Models
★ 100/120V AC, 50/60 hz, 15A, 1 phase
◆ 230 V AC, 50/60 hz, 10A, 1 phase
0.017
0.017
0.017
0.017
0.34 gpm (1.28 lpm)
0.34 gpm (1.28 lpm)
0.34 gpm (1.28 lpm)
0.34 gpm (1.28 lpm)
2600 psi (180 bar)
2600 psi (180 bar)
2800 psi (193 bar)
2800 psi (193 bar)
2600 psi (180 bar)
2600 psi (180 bar)
2800 psi (193 bar)
2800 psi (193 bar)
3.2 cfm
3.2 cfm
3.2 cfm
3.2 cfm
35 psi (2.4 bar)
35 psi (2.4 bar)
35 psi (2.4 bar)
35 psi (2.4 bar)
Frame
Lo-boy / Hi-Boy
Dimensions
Length
Width
Height
Weight - bare
Pump motor
Material hose
Air hose
Gun
Wetted parts
313797C 65
27 in. (68.5 cm)
21 in. (53.3 cm)
28 in. (71.1 cm)
68 lbs (31 kg)
1/2 HP DC
3/16 in. x 25-ft (blue)
3/8 in. x 25-ft (clear)
AA30 w RAC X tip or Flat Tip
zinc-plated carbon steel, nylon, stainless steel, PTFE, Acetal,
chrome plating, leather, UHMWPE, aluminum, tungsten carbide
Page 66

技术数据
电源要求
最大喷嘴尺寸
美国 ★
英国 ★
欧洲 ◆
亚洲/澳洲 ◆
最大涂料输出量 gpm (lpm)
美国 ★
英国 ★
欧洲 ◆
亚洲/澳洲 ◆
最大涂料压力 - 无气
美国 ★
英国 ★
欧洲 ◆
亚洲/澳洲 ◆
最大涂料压力 - AA
美国 ★
英国 ★
欧洲 ◆
亚洲/澳洲 ◆
雾化空气输出 (30 psi)
美国 ★
英国 ★
欧洲
亚洲/澳洲
空气压力
美国 ★
英国 ★
欧洲 ◆
亚洲/澳洲 ◆
技术数据
FinishPro 290 型
★ 交流 100/120V,50/60 Hz, 15A, 单相
◆ 交流 230V,50/60 Hz, 10A, 单相
0.017
0.017
0.017
0.017
0.34 gpm (1.28 lpm)
0.34 gpm (1.28 lpm)
0.34 gpm (1.28 lpm)
0.34 gpm (1.28 lpm)
2600 psi (180 bar)
2600 psi (180 bar)
2800 psi (193 bar)
2800 psi (193 bar)
2600 psi (180 bar)
2600 psi (180 bar)
2800 psi (193 bar)
2800 psi (193 bar)
3.2 cfm
3.2 cfm
3.2 cfm
3.2 cfm
35 psi (2.4 bar)
35 psi (2.4 bar)
35 psi (2.4 bar)
35 psi (2.4 bar)
机架
Lo-boy / Hi-Boy
尺寸
长度
宽度
高度
重量 - 裸机
泵电动机
涂料软管
空气软管
喷枪
流体部件
66 313797C
27 英寸 (68.5 cm)
21 英寸 (53.3 cm)
28 英寸 (71.1 cm)
68 磅 (31 kg)
1/2 HP 直流
3/16 英寸 x 25 英尺 (蓝色)
3/8 英寸 x 25 英尺 (透明)
AA30,带 RAC X 喷嘴或扁平喷嘴
镀锌碳钢、尼龙、不锈钢、PTFE、乙缩醛、镀铬、皮质、超高分
子量聚乙烯、铝质、碳化钨
Page 67

기술 자료
전기 사양
최대 팁 크기
US★
영국 ★
유럽 ◆
아시아/호주◆
최대 재료 출력 gpm(lpm)
US ★
영국 ★
유럽 ◆
아시아/호주◆
최대 재료 압력 - 에어리스
US ★
영국 ★
유럽 ◆
아시아/호주◆
최대 재료 압력 - AA
US ★
영국 ★
유럽 ◆
아시아/호주◆
공기 출력 @ 30 psi 원자화
US★
영국 ★
유럽
아시아/호주
공기 압력
US★
영국 ★
유럽 ◆
아시아/호주◆
기술 자료
FinishPro 290 모델
★ 100/120V AC, 50/60 hz, 15A, 단상
◆ 230 V AC, 50/60 hz, 10A, 단상
0.017
0.017
0.017
0.017
0.34 gpm (1.28 lpm)
0.34 gpm (1.28 lpm)
0.34 gpm (1.28 lpm)
0.34 gpm (1.28 lpm)
2600 psi (180 bar)
2600 psi (180 bar)
2800 psi (193 bar)
2800 psi (193 bar)
2600 psi (180 bar)
2600 psi (180 bar)
2800 psi (193 bar)
2800 psi (193 bar)
3.2 cfm
3.2 cfm
3.2 cfm
3.2 cfm
35 psi (2.4 bar)
35 psi (2.4 bar)
35 psi (2.4 bar)
35 psi (2.4 bar)
프레임
Lo-boy / Hi-Boy
치수
길이
너비
높이
무게 - 기본
펌프 모터
재료 보관함
공기 호스
건
유체가 접촉되는 부품
313797C 67
27 인치 (68.5 cm)
21 인치 (53.3 cm)
28 인치 (71.1 cm)
68 파운드 (31 kg)
1/2 HP DC
3/16 인치 . x 25 피트 - ( 파란색 )
3/8 인치 . x 25- 피트 ( 투명 )
AA30 w RAC X 팁 또는 플랫 팁
아연 도금 탄소강 , 나일론 , 스테인레스 강철 , PTFE, 아세텔 ,
크롬 도금 , 가죽 , UHMWPE, 알루미늄 , 텅스텐 카바이드
Page 68

Notes / 注释 / 참고
Notes / 注释 /
참고
68 313797C
Page 69

Graco Standard Warranty /
Graco 公司的标准担保书
/
Graco 표준 보증
Graco Standard Warranty / Graco 公司的标准担保书 / Graco 표준 보증
Graco warrants all equipment referenced in this document which is manufactured by Graco and bearing its name to be free from defects in material
and workmanship on the date of sale to the original purchaser for use. With the exception of any special, extended, or limited warranty published by
Graco, Graco will, for a period of twelve months from the date of sale, repair or replace any part of the equipment determined by Graco to be defective.
This warranty applies only when the equipment is installed, operated and maintained in accordance with Graco’s written recommendations.
This warranty does not cover, and Graco shall not be liable for general wear and tear, or any malfunction, damage or wear caused by faulty
installation, misapplication, abrasion, corrosion, inadequate or improper maintenance, negligence, accident, tampering, or substitution of non-Graco
component parts. Nor shall Graco be liable for malfunction, damage or wear caused by the incompatibility of Graco equipment with structures,
accessories, equipment or materials not supplied by Graco, or the improper design, manufacture, installation, operation or maintenance of structures,
accessories, equipment or materials not supplied by Graco.
This warranty is conditioned upon the prepaid return of the equipment claimed to be defective to an authorized Graco distributor for verification of the
claimed defect. If the claimed defect is verified, Graco will repair or replace free of charge any defective parts. The equipment will be returned to the
original purchaser transportation prepaid. If inspection of the equipment does not disclose any defect in material or workmanship, repairs will be made
at a reasonable charge, which charges may include the costs of parts, labor, and transportation.
THIS WARRANTY IS EXCLUSIVE, AND IS IN LIEU OF ANY OTHER WARRANTIES, EXPRESS OR IMPLIED, INCLUDING BUT NOT LIMITED
TO WARRANTY OF MERCHANTABILITY OR WARRANTY OF FITNESS FOR A PARTICULAR PURPOSE.
Graco’s sole obligation and buyer’s sole remedy for any breach of warranty shall be as set forth above. The buyer agrees that no other remedy
(including, but not limited to, incidental or consequential damages for lost profits, lost sales, injury to person or property, or any other incidental
or consequential loss) shall be available. Any action for breach of warranty must be brought within two (2) years of the date of sale.
GRACO MAKES NO WARRANTY, AND DISCLAIMS ALL IMPLIED WARRANTIES OF MERCHANTABILITY AND FITNESS FOR A PARTICULAR
PURPOSE, IN CONNECTION WITH ACCESSORIES, EQUIPMENT, MATERIALS OR COMPONENTS SOLD BUT NOT MANUFACTURED
BY GRACO. These items sold, but not manufactured by Graco (such as electric motors, switches, hose, etc.), are subject to the warranty, if any,
of their manufacturer. Graco will provide purchaser with reasonable assistance in making any claim for breach of these warranties.
In no event will Graco be liable for indirect, incidental, special or consequential damages resulting from Graco supplying equipment hereunder, or the
furnishing, performance, or use of any products or other goods sold hereto, whether due to a breach of contract, breach of warranty, the negligence
of Graco, or otherwise.
FOR GRACO CANADA CUSTOMERS
The Parties acknowledge that they have required that the present document, as well as all documents, notices and legal proceedings entered into,
given or instituted pursuant hereto or relating directly or indirectly hereto, be drawn up in English. Les parties reconnaissent avoir convenu que la
rédaction du présente document sera en Anglais, ainsi que tous documents, avis et procédures judiciaires exécutés, donnés ou intentés, à la suite
de ou en rapport, directement ou indirectement, avec les procédures concernées.
对于 GRACO 公司的加拿大用户
The Parties acknowledge that they have required that the present document, as well as all documents, notices and legal proceedings entered into, given or
instituted pursuant hereto or relating directly or indirectly hereto, be drawn up in English. 各当事人承认他们已要求用英语制订本文及所订立、提出或制定的依此
或直接或间接与此有关的所有文件、通知及诉讼。
중국 / 한국 GRACO 고객 정보
The Parties acknowledge that they have required that the present document, as well as all documents, notices and legal proceedings entered into,
given or instituted pursuant hereto or relating directly or indirectly hereto, be drawn up in English. 양 당사자는 현재 문서를 비롯하여 이와 관련되어
제공되는 또는 이와 직 , 간접적으로 관련되는 모든 문서 , 경고 및 법적 소송 절차는 영문으로 작성된다는 사실을 인정합니다 .
313797C 69
Page 70

Graco Standard Warranty /
Graco 公司的标准担保书
/
Graco 표준 보증
TO PLACE AN ORDER, contact your Graco distributor, or call 1-800-690-2894 to identify the nearest distributor.
All written and visual data contained in this document reflects the latest product information available at the time of publication.
Graco reserves the right to make changes at any time without notice.
MM/313316
This manual contains: English, Chinese, Korean
Graco Headquarters: Minneapolis
International Offices: Belgium, Korea, China, Japan
GRACO INC. P.O. BOX 1441 MINNEAPOLIS, MN 55440-1441
http://www.graco.com
08/2009
70 313797C
 Loading...