

Page 1
Instructions-Parts
Part No. 15V826
312784D
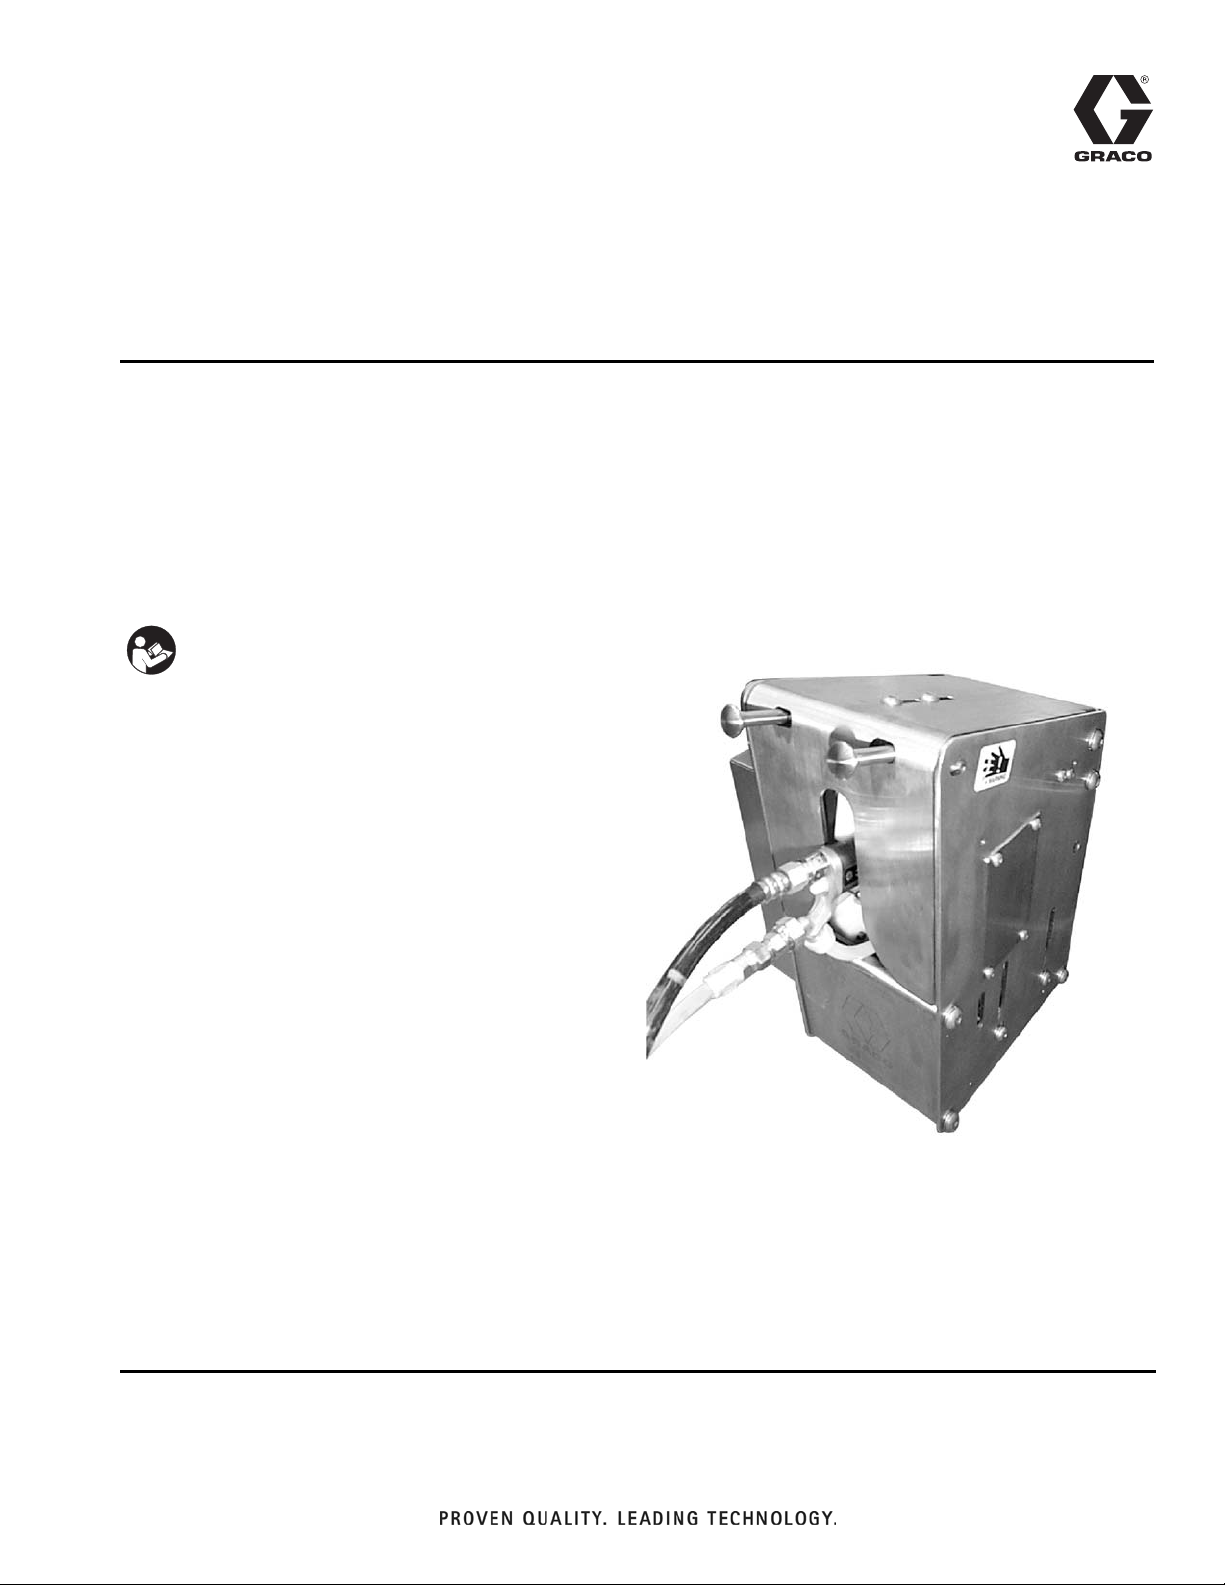
Gun Flush Box Kit
Kit includes parts to install a Graco Gun Flush Box in a ProMix® 2KS or ProMix® 2KE
Proportioning System. For professional use only.
Bare Gun Flush Box is approved for use in explosive atmospheres. See manual 309227.
100 psi (0.7 MPa, 7 bar) Maximum Air Inlet Pressure
Important Safety Instructions
Read all warnings and instructions in this manual.
Save these instructions.
ENG
Page 2

Related Manuals
Contents
Related Manuals . . . . . . . . . . . . . . . . . . . . . . . . . . . 2
Warnings . . . . . . . . . . . . . . . . . . . . . . . . . . . . . . . . . 3
Installation . . . . . . . . . . . . . . . . . . . . . . . . . . . . . . . . 5
Location . . . . . . . . . . . . . . . . . . . . . . . . . . . . . . . 5
Intrinsically Safe Installation . . . . . . . . . . . . . . . . 5
Ventilation . . . . . . . . . . . . . . . . . . . . . . . . . . . . . . 5
Grounding . . . . . . . . . . . . . . . . . . . . . . . . . . . . . . 5
Before Installing . . . . . . . . . . . . . . . . . . . . . . . . . 5
Install the Air Flow Switch . . . . . . . . . . . . . . . . . . 6
Install the Pressure Switch . . . . . . . . . . . . . . . . . 9
Gun Flush Box Solenoid . . . . . . . . . . . . . . . . . . 10
Atomizing Air Safety Shutoff Valve . . . . . . . . . . 14
Connect the Air Tubes to the Gun Flush Box . . 14
Trigger Height Adjustment . . . . . . . . . . . . . . . . . 14
Operation . . . . . . . . . . . . . . . . . . . . . . . . . . . . . . . . 14
Maintenance . . . . . . . . . . . . . . . . . . . . . . . . . . . . . . 17
Troubleshooting . . . . . . . . . . . . . . . . . . . . . . . . . . . 17
Parts . . . . . . . . . . . . . . . . . . . . . . . . . . . . . . . . . . . . 18
Accessories . . . . . . . . . . . . . . . . . . . . . . . . . . . . . . 19
Technical Data . . . . . . . . . . . . . . . . . . . . . . . . . . . . 21
Graco Standard Warranty . . . . . . . . . . . . . . . . . . . 22
Graco Information . . . . . . . . . . . . . . . . . . . . . . . . 22
Related Manuals
See the following manuals for additional information on
the ProMix 2KS, ProMix 2KE, and Gun Flush Box Kits.
Manual Description
309227 Bare Gun Flush Box
312775 ProMix 2KS Manual System Installation
312776 ProMix 2KS Manual System Operation
312777 ProMix 2KS Manual System
Repair-Parts
312778 ProMix 2KS Automatic System Installa-
tion
312779 ProMix 2KS Automatic System Opera-
tion
312780 ProMix 2KS Automatic System
Repair-Parts
3A0868 ProMix 2KE Pump-Based Operation
3A0869 ProMix 2KE Meter-Based Operation
3A0870 ProMix 2KE Repair-Parts
2 312784D
Page 3
Warnings
Warnings
The following warnings are for the setup, use, grounding, maintenance, and repair of this equipment. The exclamation point symbol alerts you to a general warning and the hazard symbols refer to procedure-specific risks. When
these symbols appear in the body of this manual, refer back to these Warnings. Product-specific hazard symbols and
warnings not covered in this section may appear throughout the body of this manual where applicable.
WARNING
FIRE AND EXPLOSION HAZARD
Flammable fumes, such as solvent and paint fumes, in work area can ignite or explode. To help prevent fire and explosion:
• Use equipment only in well ventilated area.
• Eliminate all ignition sources; such as pilot lights, cigarettes, portable electric lamps, and plastic
drop cloths (potential static arc).
• Keep work area free of debris, including solvent, rags and gasoline.
• Do not plug or unplug power cords, or turn power or light switches on or off when flammable fumes
are present.
• Ground all equipment in the work area. See Grounding instructions.
• Use only grounded hoses.
• Hold gun firmly to side of grounded pail when triggering into pail.
• If there is static sparking or you feel a shock, stop operation immediately. Do not use equipment
until you identify and correct the problem.
• Keep a working fire extinguisher in the work area.
SKIN INJECTION HAZARD
High-pressure fluid from gun, hose leaks, or ruptured components will pierce skin. This may look like
just a cut, but it is a serious injury that can result in amputation. Get immediate surgical treatment.
• Do not point gun at anyone or at any part of the body.
• Do not put your hand over the spray tip.
• Do not stop or deflect leaks with your hand, body, glove, or rag.
• Do not spray without tip guard and trigger guard installed.
• Engage trigger lock when not spraying.
• Follow Pressure Relief Procedure in this manual, when you stop spraying and before cleaning,
checking, or servicing equipment.
PRESSURIZED EQUIPMENT HAZARD
Fluid from the gun/dispense valve, leaks, or ruptured components can splash in the eyes or on skin
and cause serious injury.
• Follow Pressure Relief Procedure in this manual, when you stop spraying and before cleaning,
checking, or servicing equipment.
• Tighten all fluid connections before operating the equipment.
• Check hoses, tubes, and couplings daily. Replace worn or damaged parts immediately.
312784D 3
Page 4
Warnings
WARNING
EQUIPMENT MISUSE HAZARD
Misuse can cause death or serious injury.
• Do not operate the unit when fatigued or under the influence of drugs or alcohol.
• Do not exceed the maximum working pressure or temperature rating of the lowest rated system
component. See Technical Data in all equipment manuals.
• Use fluids and solvents that are compatible with equipment wetted parts. See Technical Data in all
equipment manuals. Read fluid and solvent manufacturer’s warnings. For complete information
about your material, request MSDS forms from distributor or retailer.
• Check equipment daily. Repair or replace worn or damaged parts immediately with genuine manufacturer’s replacement parts only.
• Do not alter or modify equipment.
• Use equipment only for its intended purpose. Call your distributor for information.
• Route hoses and cables away from traffic areas, sharp edges, moving parts, and hot surfaces.
• Do not kink or over bend hoses or use hoses to pull equipment.
• Keep children and animals away from work area.
• Comply with all applicable safety regulations.
TOXIC FLUID OR FUMES HAZARD
Toxic fluids or fumes can cause serious injury or death if splashed in the eyes or on skin, inhaled, or
swallowed.
• Read MSDS’s to know the specific hazards of the fluids you are using.
• Store hazardous fluid in approved containers, and dispose of it according to applicable guidelines.
• Always wear impervious gloves when spraying or cleaning equipment.
PERSONAL PROTECTIVE EQUIPMENT
You must wear appropriate protective equipment when operating, servicing, or when in the operating
area of the equipment to help protect you from serious injury, including eye injury, inhalation of toxic
fumes, burns, and hearing loss. This equipment includes but is not limited to:
• Protective eyewear
• Clothing and respirator as recommended by the fluid and solvent manufacturer
•Gloves
• Hearing protection
4 312784D
Page 5

Installation
Installation
See FIG. 2 for a typical installation of the gun flush box
kit. F
IG. 2 is only a guide. Contact your Graco distributor
for assistance in designing a system to meet your application needs.
Do not bypass the gun flush box interlock sensors.
They prevent the gun flush box from operating unless
the gun is in position and the gun flush box door is
locked.
If using an electrostatic gun, shut off electrostatics
before flushing. Follow the warnings in your electrostatic gun manual.
Location
Grounding
Ground the gun flush box as explained in the Gun Flush
Box manual 309227.
Before Installing
• To avoid electric shock, turn off EasyKey power
before installing.
• All electrical wiring must be done by a qualified
electrician and comply with all local codes and regulations.
• Do not substitute system components as this may
impair intrinsic safety.
• Read Warnings, page 3.
Locate and mount the gun flush box as explained in the
Gun Flush Box manual 309227.
Intrinsically Safe Installation
Follow instructions in your proportioner manual.
Ventilation
Electrically interlock the spray booth air supply (J) with
ventilators, using a ventilation interlock valve (K), to prevent the gun flush box from operating when ventilating
fans are not operating. See F
follow all applicable air exhaust velocity codes for your
area and type of installation.
IG. 2, page 6. Check and
NOTICE
To avoid damaging circuit board when servicing, wear
Part No. 112190 grounding strap on wrist and ground
appropriately.
1. Close main air shutoff valve on air supply line and
on proportioner.
2. Shut off proportioner power. F
3. Loosen the 4 screws and remove the Fluid Station
cover.
F
IG. 1: Power Off (ProMix 2KS Shown)
IG. 1.
0 = OFF
TI12657a
312784D 5
Page 6

Installation
F
E
D
B
Key:
GFB Gun Flush Box (see FIG. 11 for detail of air line connec-
tion fittings A, C, P, S)
A Air Line from GFB to Pressure Switch Input
B Fluid Supply to Gun
C Air Line from GFB to GFB Solenoid Output
D Atomizing Air Supply
E Gun Air Safety Shutoff Valve (see page 14)
GFBHD
G
C
S
F Fluid Station
GSpray Gun
H Main Air Supply Line
P Air Line from GFB to Fluid Station Main Air Manifold
S Air Line from GFB to Gun Air Safety Shutoff Valve Pilot
Por t
P
A
TI15100a
F
IG. 2: Typical Installation (ProMix 2KS System Shown)
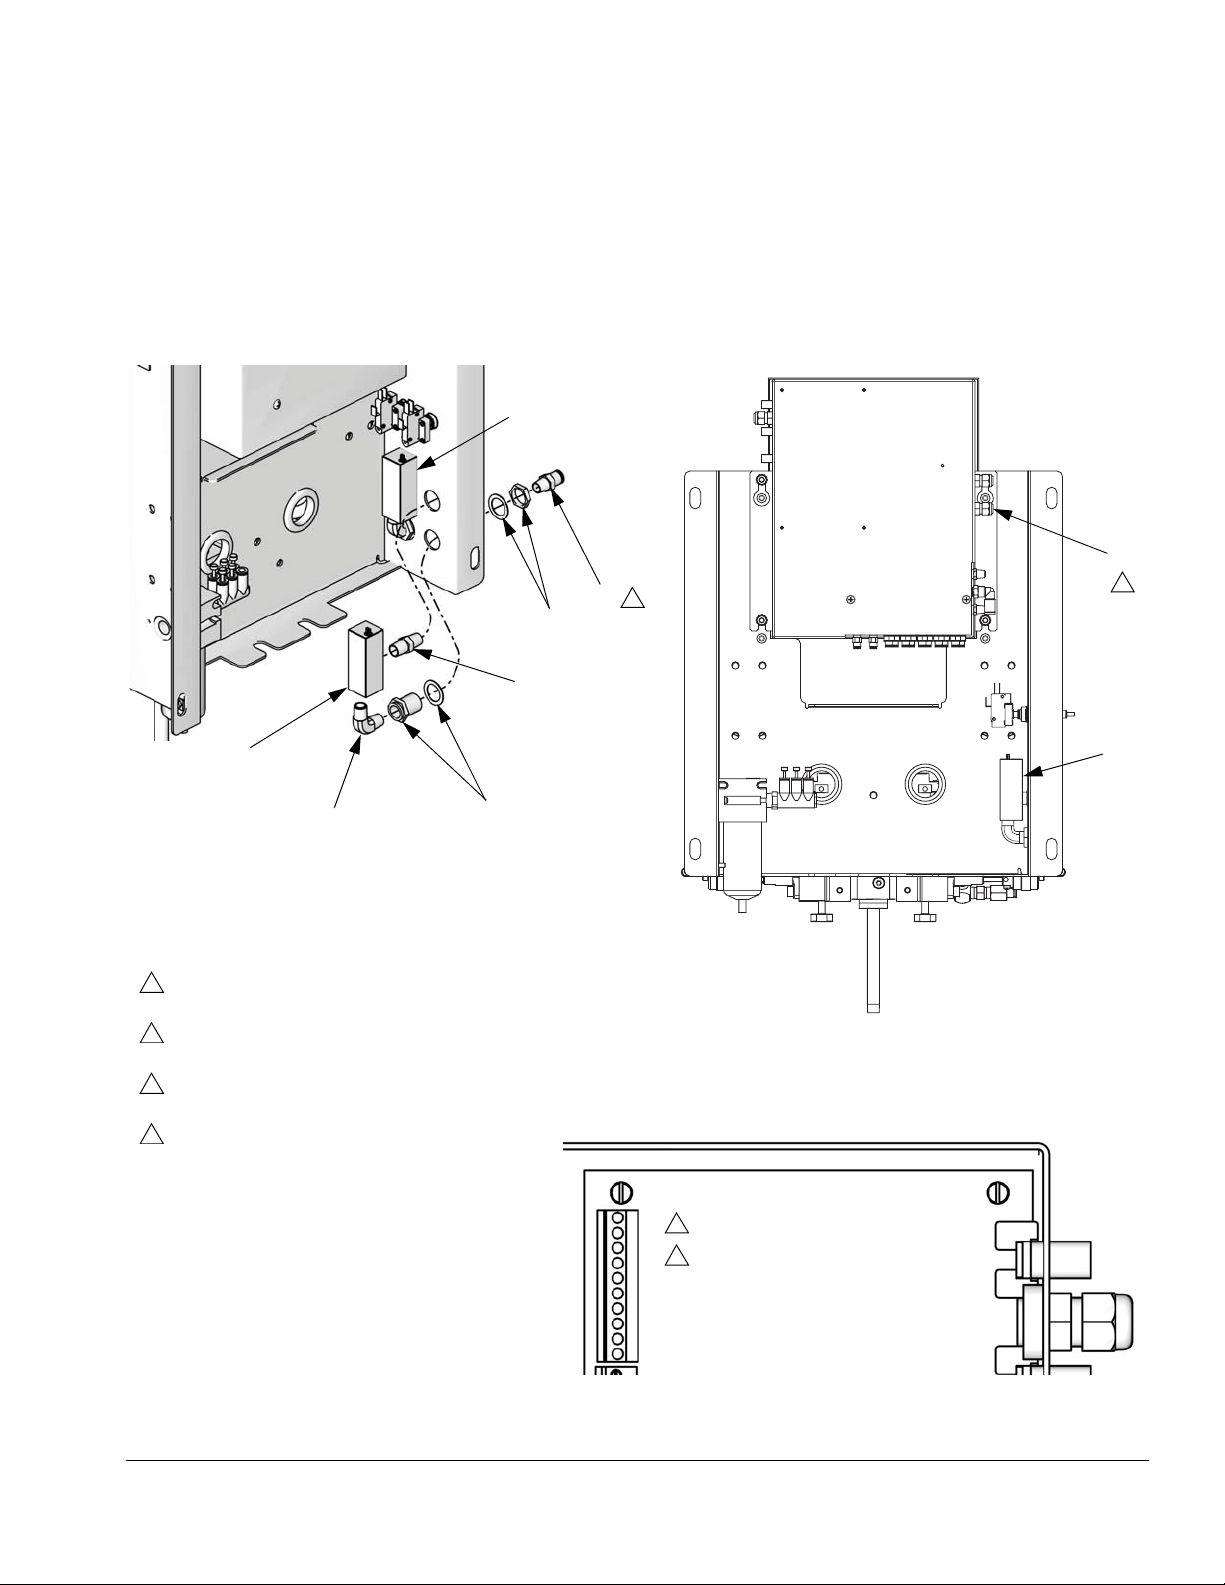
Install the Air Flow Switch
2. See F
IG. 3 for the ProMix 2KS or FIG. 4 for the Pro-
Mix 2KE. Position the air flow switch (102) as
shown. Install the nipple (103) and elbow (104).
Assemble the bulkhead fitting (105) as shown, to
secure the switch to the side of the panel.
3. Route the air flow switch wires through the desig-
NOTE: Each gun flush box includes one air flow switch
(AFS). Install the air flow switch as shown in F
IG. 3. If
you are using a second gun flush box, install its air flow
nated strain relief (K). Connect AFS#1 wires to pins
1 and 2. ProMix 2KS only: Connect AFS#2 wires (if
used) to pins 3 and 4.
switch next to the first switch, as shown.
1. Follow Before Installing, page 5.
6 312784D
Page 7
Installation
4. See FIG. 2. Connect a 1/4 npt atomizing air line (D)
from the AFS outlet nipple (103) to the air inlet port
of the air safety shutoff valve (E, also see F
IG. 10).
Connect another length of atomizing air line (D)
from the safety valve outlet port to the gun (G) air
inlet.
Install AFS#2 here
(if used).
L
105
103
TI13350a
102
5. See F
1
IG. 3 for the ProMix 2KS or FIG. 4 for the Pro-
Mix 2KE. Install an appropriate air inlet fitting (L) into
the bulkhead fitting (105). The air inlet fitting must
be 1/4 npt(m) on the bulkhead end. The other end
must be sized to mate with your main air supply line.
K
2
102
104
105
Install Air Flow Switch on Back of Fluid Station Panel
1
User supplied air inlet fitting (L) must be 1/4
npt(m) to mate with bulkhead fitting (105).
2
Route AFS wires through this strain relief (K)
to Fluid Station Control Board.
3
Connect AFS#1 wires to J1 pins 1 and 2 on
Fluid Station Control Board.
4
Connect AFS#2 wires to J1 pins 3 and 4 on
Fluid Station Control Board.
Back View of Fluid Station Panel
J1
1
3
2
3
4
4
AFS Wire Connections at
Fluid Station Control Board
TI15099a
TI13347a
F
IG. 3: Installing the Air Flow Switch on a ProMix 2KS
312784D 7
Page 8

Installation
1
User supplied air inlet fitting (L) must be 1/4
npt(m) to mate with bulkhead fitting (105).
2
Connect AFS#1 wires to pins 1 and 2.
3
Connect AFS#2 wires to pins 7 and 8.
Install GFB Pressure
Switch (107) here
102
103
L
1
105
104
TI16428a
Install Air Flow Switch in Control Box
AFS/PS Wires Schematic
1 142
SIG
COMMON
AFS #1
ti15730a
FIG. 4: Installing the Air Flow Switch and Pressure Switch on a ProMix 2KE
78
SIG
GFB PS/
AFS #2
COMMON
8 312784D
Page 9

Installation
Install the Pressure Switch
NOTE: Each gun flush box includes one pressure switch
(PS). Install the pressure switch as shown in F
the ProMix 2KS or F
IG. 4 for the ProMix 2KE. If you are
using a second gun flush box, install its pressure switch
next to the first switch, as shown.
1. Follow Before Installing, page 5.
IG. 5 for
2. Position the pressure switch (107) as shown. Install
the bulkhead fitting (108) to secure the switch to the
side of the panel. Install the tubing adapter (118) in
the bulkhead fitting.
3. Route the pressure switch wires through the designated strain relief (K). Connect PS#1 wires to pins 7
and 8. Connect PS#2 wires (if used) to pins 9 and
10.
4. Connect a 5/32 in. (4 mm) OD air tube from the tube
adapter (118) to the A port on the bottom of the gun
flush box. See F
IG. 2 and FIG. 11.
118
108
K
TI14162a
Install PS#2 here (if used).
107
Install Pressure Switch on Back of Fluid Station Panel
J1
7
3
8
9
4
10
PS Wire Connections at
Fluid Station Control Board
TI13347a
Back View of Fluid Station Panel
2
Route PS wires through this strain relief (K) to
Fluid Station Control Board.
3
Connect PS#1 wires to J1 pins 7 and 8 on
Fluid Station Control Board.
4
Connect PS#2 wires to J1 pins 9 and 10 on
Fluid Station Control Board.
2
107
TI15099a
FIG. 5: Installing the Pressure Switch on a ProMix 2KS
312784D 9
Page 10

Installation
Gun Flush Box Solenoid
NOTE: Each gun flush box includes one solenoid (109).
Install the solenoid in the fluid station panel, as shown in
F
IG. 6. If you are using a second gun flush box, install its
solenoid next to the first solenoid, as shown.
1. Follow Before Installing, page 5.
2. Install the solenoid valve (109) in the correct position as shown in F
IG. 6 for the ProMix 2KS or FIG. 7
for the ProMix 2KE. Secure with the two screws
supplied.
3. Connect the GFB#1 solenoid wires as shown in F
6 for the ProMix 2KS or F
Also see the Electrical Schematic (F
IG. 7 for the ProMix 2KE.
IG. 8 or FIG. 9).
4. Remove the plug from the solenoid manifold and
install the tube fitting connector (110).
IG.
Bottom View of
Solenoid Manifold
110 (GFB#1)
TI13862a
110 (GFB#2)
34
1
J8
Gun Flush Box
Solenoid Locations
109 (GFB#1)
109 (GFB#2)
3
Connect GFB#1 solenoid wires
to J8 pins 3 (red) and 4 (black) on
Fluid Station Control Board.
4
Connect GFB#2 solenoid wires
to J8 pins 1 (red) and 2 (black) on
Fluid Station Control Board.
TI12652a
FIG. 6: Installing Gun Flush Box Solenoid Valve on a ProMix 2KS
10 312784D
Page 11

GFB Wires Schematic
Installation
Install solenoid here.
ti15730a
FIG. 7: Installing the Gun Flush Box Solenoid Valve on a ProMix 2KE
1 14
910
BLACK
RED
GFB
SOLENOID
312784D 11
Page 12

Installation
FLUID PANEL CONTROL BOX
FLUID
PANEL
CONTROL
BOARD
J10
1
2
3
+12VDC I/S
COM
SHIELD
Gun Flush Box
Solenoid Connections
Air Flow Switch
Connections
FO OUT
(BLU)
Pressure Switch
FO IN
Connections
(BLK)
J4
J6
J15
J14
J13
MH2
HAZARDOUS AREA
1
2
3
J3
4
5
6
1
2
3
J12
4
5
6
UNUSED
1
UNUSED
2
UNUSED
3
UNUSED
4
UNUSED
5
UNUSED
6
1
2
3
J5
4
5
6
3
2
J11
5
4
1
3
2
J7
5
4
1
6
5
4
J8
3
2
1
6
5
4
3
2
1
6
5
4
3
2
1
6
5
4
J9
3
2
1
1
2
3
4
5
6
J1
7
8
9
10
6' STD.
(3'-100' OPTIONS)
50' STD.
GRD (BLK)
+12VDC (RED)
SHIELD (BARE)
CAN H (WHT)
CAN L (BLU)
BLACK
RED
BLACK
RED
BLACK
RED
BLACK
RED
BLACK
RED
BLACK
RED
BLACK
RED
BLACK
RED
BLACK
RED
BLACK
RED
BLACK
RED
BLACK
RED
SIG
COM
SIG
COM
SIG
COM
SIG
COM
SIG
COM
PWR (RED)
COM (BLACK)
SIG (WHITE)
SHIELD/GRN
PWR (RED)
COM (BLACK)
SIG (WHITE)
SHIELD/GRN
PWR (RED)
COM (BLACK)
SIG (WHITE)
SHIELD/GRN
GROUND
TERMINAL
MANIFOLD
MANIFOLD
3X CABLE
(10')/
(40')
GRD (BLK)
+12VDC (RED)
SHIELD (BARE)
CAN H (WHT)
CAN L (BLU)
BOOTH
3
CONTROL
2
BOARD
5
4
1
DUMP B
GFB #1
GFB #2
DUMP A
NOT USED
PURGE C
PURGE B
PURGE A
NOT USED
NOT USED
DOSE B
DOSE A
AIR FLOW SWITCH 1
AIR FLOW SWITCH 2
SOLVENT FLOW SWITCH
GFB 1 PRESSURE SWITCH
GFB 2 PRESSURE SWITCH
FLOW METER A
FLOW METER B
FLOW METER SOLVENT
12 VDC
3-WAY SOLENOID
12 VDC
4-WAY SOLENOID
V/P ANALOG OUT (WHT)
PRESS. (GRN)
+12 V (RED)
GND (BLK)
CHASSIS (BARE)
MANIFOLD
CLR 8
CLR 7
CLR 6
CLR 5
CLR 4
CLR 3
CLR 2
CLR 1
SOL CLR
MANIFOLD
CLR 21
CLR 20
CLR 19
CLR 18
CLR 17
CLR 16
CLR 15
CLR 14
CLR 13
I.S. METERS
+12VDC
+12VDC
+12VDC
+12VDC
+12VDC
+12VDC
+12VDC
+12VDC
+12VDC
+12VDC
+12VDC
+12VDC
+12VDC
+12VDC
+12VDC
+12VDC
+12VDC
+12VDC
COM
COM
COM
COM
COM
COM
COM
COM
COM
COM
COM
COM
COM
COM
COM
COM
COM
COM
J1
1
2
3
4
5
J7/J11
J7/J11
J7/J11
FLOW
CONTROL
BOARD
1 4 5 2 3
COLOR
BOARD 1
(COLORS
1 THRU 12,
CATALYST
1 THRU 4)
1
2
3
4
J8
5
6
1
2
3
J15
4
5
6
1
2
3
J14
4
5
6
1 4 5 2 3
1 4 5 2 3
COLOR
BOARD 2
(COLORS
13 THRU 30)
1
2
3
J8
4
5
6
1
2
3
J15
4
5
6
1
2
3
J14
4
5
6
J2
1
2
J4
1
2
3
4
5
J9
J16
J10
J9
J16
J10
SIG (RED)
COM (BLK)
+ PRESSURE (GRN)
COM (RED)
EX+ (WHT)
- PRESSURE (BLK)
SHIELD (BARE)
6
COM
5
+12VDC
4
COM
3
+12VDC
2
COM
1
+12VDC
COM
6
+12VDC
5
COM
4
+12VDC
3
COM
2
+12VDC
1
COM
6
+12VDC
5
COM
4
+12VDC
3
COM
2
+12VDC
1
6' STD.
6
COM
5
+12VDC
4
COM
3
+12VDC
2
COM
1
+12VDC
COM
6
+12VDC
5
COM
4
+12VDC
3
COM
2
+12VDC
1
COM
6
+12VDC
5
COM
4
+12VDC
3
COM
2
+12VDC
1
MANIFOLD
MANIFOLD
TECNO
V/P
FLUID
PRESS.
SENS.
CLR 9
CLR 10
CLR 11
CLR 12
CAT 4
CAT 3
CAT 2
CAT 1
SOL CAT
CLR 22
CLR 23
CLR 24
CLR 25
CLR 26
CLR 27
CLR 28
CLR 29
CLR 30
FIG. 8: System Electrical Schematic (ProMix 2KS)
12 312784D
Page 13

Installation
2
3
4
5
J1
1
CAN_L
+V_CAN
V_CAN_RTN
CAN_H
SHIELD
J2
CAN_L
+V_CAN
V_CAN_RTN
CAN_H
SHIELD
J3
CAN_L
+V_CAN
V_CAN_RTN
CAN_H
SHIELD
J6
1
2
3
4
5
USER INTERFACE
J1
MODULE
1
2
3
4
5
6
7
8
9
10
11
12
13
14
J4
1
2
3
4
5
6
7
8
9
J2
1
2
Solenoid Connections
3
4
Gun Flush Box
Air Flow Switch
Connections
J7
1
2
3
4
5
CAN_L
+V_CAN
V_CAN_RTN
CAN_H
SHIELD
UNUSED
UNUSED
UNUSED
UNUSED
UNUSED
SOLENOID
4-WAY
12 VDC
SOLENOID
3-WAY
12 VDC
FLOW METER A
AIR FLOW SWITCH 1
P3
1
2
3
4
5
PURGE A
DOSE A1
PURGE B
DOSE B
DOSE A2
DOSE A3
GFB #1
MANIFOLD
3X CABLE
USB BASE
MODULE
ALARM
PWR (RED)
COM (BLACK)
SIG (WHITE)
SHIELD/GRN
SIG
COM
+
-
BLACK
RED
BLACK
RED
BLACK
RED
BLACK
RED
BLACK
RED
BLACK
RED
BLACK
RED
P4
1
2
3
4
5
1
2
3
4
5
6
7
8
9
10
11
12
13
14
15
16
17
18
19
20
21
22
23
24
25
26
27
28
29
30
UNUSED
UNUSED
UNUSED
UNUSED
UNUSED
P1
V CAN
V CAN
V CAN
V CAN RTN
V CAN RTN
CHASSIS GND
CHASSIS GND
V CAN RTN
V CAN RTN
BIT 3
BIT 2
GND
SCK
SO
SI
V CAN
V CAN
V CAN
V CAN RTN
V CAN RTN
CAN L
CAN H
V CAN RTN
V CAN RTN
BIT 0
BIT 1
VTOKEN
LOFO
/HOLD
/CS
J2
1
USB COMPONENT
2
3
MODULE
4
5
6
7
8
9
10
11
12
13
14
15
16
17
18
19
20
1
2
22
23
24
25
26
27
28
29
30
1
2
3
4
5
6
7
8
9
10
11
12
13
14
1
2
3
4
5
6
7
8
9
10
11
12
13
14
Pressure Switch
Connections
GFB 1 PRESSURE SWITCH/
AIR FLOW SWITCH 2
FLOW METER B
3X CABLE
SIG
COM
PWR (RED)
COM (BLACK)
SIG (WHITE)
SHIELD/GRN
FIG. 9: System Electrical Schematic (ProMix 2KE)
312784D 13
Page 14

Operation
Atomizing Air Safety Shutoff Valve
1. Mount the safety shutoff valve securely.
2. Connect the gun atomizing air from the ProMix 2KS
air flow switch to the safety shutoff valve IN port.
See F
IG. 2 and FIG. 10.
3. Connect an air line from the safety shutoff valve
OUT port to the gun air inlet.
Air Pilot Port (S)
0.375 in.
(9.525 mm)
Air Outlet
[normally closed]
Exhaust
to Gun
(normally
open)
Air Inlet
TI13110b
F
IG. 10: Air Safety Shutoff Valve
Connect the Air Tubes to the Gun Flush Box
P
A
C
S
F
IG. 11: Gun Flush Box Air Fittings (Bottom View)
NOTE: Use 5/32 in. (4 mm) OD tubing. Connect tubing
as follows:
1. From the P fitting to the air supply manifold (M, F
IG.
12). Use a clean, dry air supply (filtered to 10
microns).
2. From the A fitting to the pressure switch air input
(PS, F
IG. 12).
3. From the C fitting to the gun flush box solenoid
(GFB, F
IG. 12) output.
4. From the S fitting to the atomizing air safety shutoff
valve pilot port (F
IG. 10).
You must connect safety interlock air to prevent atomizing air from turning on during flushing.
The four gun flush box air fittings are labeled as follows.
IG. 11.
See F
Label Function
P Gun flush box supply air input
A Return air/pressure switch signal
C Gun trigger cylinders air (activates gun trigger)
S Safety interlock (locks out atomizing air)
Trigger Height Adjustment
Adjust the trigger height to ensure the gun triggers during purging. See the Gun Flush Box manual 309227.
Operation
Follow the operating instructions in the proportioner
Operation manual. See the following chart for a sum-
mary of GFB functions.
GFB
Lid
Open Yes Locked out by safety shutoff valve
Open No Locked out by safety shutoff valve
Closed Yes Locked out by safety shutoff valve
Closed No Supplied to gun
Gun in
GFB? Atomizing Air Status
14 312784D
Page 15

GFB to Solenoid
Connections
Operation
Pressure Switch and
Air Flow Switch
Connections
GFB to Air
Manifold
Connections
GFB#1 (C)GFB#2 (C)
GFB#1 (P)
GFB#2 (P)
TI13862a
PS#1 (A) PS#2 (A)
AFS#2 (OUT)
AFS#1 (OUT)
AFS#1
(IN)
AFS#2
(IN)
TI13860a
M
TI15099a
FIG. 12: GFB Solenoid, Air Manifold, Pressure Switch, and Air Flow Switch Connections (ProMix 2KS shown)
312784D 15
Page 16

Operation
16 312784D
Page 17

Maintenance
Maintenance
Daily Weekly Every 2 weeks, minimum
Gun Flush Box
Enclosure
Door Clean hinge holes. Grease hinges.
Cylinders Pull the cylinder rod forward
Switches Clean and lubricate.
Fluid Outlet tube
Clean the inside with a
compatible solvent.
Clean the inside and outside with a compatible solvent.
and coat with grease or
petroleum jelly.
Check for buildup of mix
material and replace if
restricted.
Troubleshooting
Problem Cause Solution
Gun is in gun flush box, but system will not purge or mix.
Gun flush box fails to purge after
pot life time ends.
Air is shut off. Turn on system air.
Gun switch is not activating. Test switch. Replace if damaged.
Pressure switch is not working prop-
erly.
Tubing is not installed correctly. Check tubing connections, page 14.
Gun is not in gun flush box. Place gun in gun flush box when it is
Check that correct fluid station circuit
board input is activating (LED should
be lit).
not in use.
Gun switch is not activating. Test switch. Replace if damaged.
Gun trigger is not open when gun
flush box controller activates it.
Gun is out of gun flush box with
door closed but atomizing air is off.
312784D 17
Tubing is not installed correctly. Check tubing connections, page 14.
Cylinder is dirty or damaged. Clean cylinder rod or replace.
Gun is not properly set in gun holder. Check to make sure gun holder is not
obstructed by buildup.
Lower cylinder is out of adjustment. Adjust cylinder block. See Trigger
Height Adjustment, page 14.
Lid switch or gun switch failure. Check switches and replace if neces-
sary.
No air flow to gun flush box. Check air supply and tubing.
Page 18

Parts
Parts
Part No. 15V826 Gun Flush Box Kit
101
115
113
112
114
TI13110b
TI12652a
109
TI14547a
107
108
118
102
TI13862a
103
110
105
104
TI15099a
18 312784D
Page 19

Accessories
Part No. 15V826 Gun Flush Box Kit
Ref.
No. Part No. Description Qty.
101 244105 MODULE, gun flush box, see man-
ual 309227
102◆ 119159 SWITCH, air flow
103◆ 113029 NIPPLE; 1/4 npt
104◆ 111763 ELBOW; 1/4 npt (mbe)
105◆ 104641 FITTING, bulkhead; 3/4-20 unef x
1/4 npt(f)
107 121323 SWITCH, pressure
108 104176 BULKHEAD; 1/4 in. (6 mm) OD
tube x 1/4 in. (6 mm) OD tube
109 121324 VALVE, solenoid
110 111328 CONNECTOR; 10-32 x 5/32 in. (4
mm) OD tube
111 598095 TUBE, air, nylon; 5/32 in. (4 mm)
OD; for making air connections;
must be ordered in 500 ft (152.5 m)
lengths; not shown
112‡ 100081 BUSHING; 1/2 npt(m) x 3/8 npt(f)
113‡ 104632 VALVE, piloted
114‡ 111881 MUFFLER
115‡ 598140 ELBOW, tube; 1/8 npt(m) x 5/32 in.
(4 mm) OD tube
118 517312 ADAPTER, tube; 1/4 in. (6 mm) OD
tube x 5/32 in. (4 mm) OD tube
* Order length needed.
◆ Part of Air Flow Switch Kit 15T632.
Accessories
Gun Holder
1
Part No. For Gun
1
1
1
1
1
1
1
1
1
1
1
1
1
2
198405
198787
196768
196769
196770 Graco Alpha Gun
196771 Graco Alpha Plus, Alpha Plus with
196767 Devilbiss JGA/MSA*
15T646
15G093 Graco G15
15G346 Graco G40 and G40 with RAC Tip
* Brand names or marks are used for identification pur-
poses and are trademarks of their respective owners.
Graco PRO
Graco PRO
Graco PRO
Graco Delta Spray
RAC Tip
Graco AirPro
570123 Wall Mount Kit
For mounting the gun flush box to the spray booth wall.
Kit mounts only to the right side of the gun flush box.
™
Xs3, PRO™ Xs4
™
Xs2
™
3500, 3500hc, 4500
™
Gun
™
Gun
‡ Part of Atomizing Air Safety Shutoff Kit 15V823.
312784D 19
Page 20

Accessories
20 312784D
Page 21

Technical Data
Technical Data
Maximum Air Inlet Pressure . . . . . . . . . . . . . . . . . . . . . 100 psi (0.7 MPa, 7 bar)
Minimum Air Flow required to activate Air Flow Switch
Weight. . . . . . . . . . . . . . . . . . . . . . . . . . . . . . . . . . . . . . 22 lbs. (9.6 kg)
Height . . . . . . . . . . . . . . . . . . . . . . . . . . . . . . . . . . . . . .
With door open . . . . . . . . . . . . . . . . . . . . . . . . . . . . . .
Width. . . . . . . . . . . . . . . . . . . . . . . . . . . . . . . . . . . . . . . 7 in. (178 mm)
Length. . . . . . . . . . . . . . . . . . . . . . . . . . . . . . . . . . . . . . 11 in. (279 mm)
Outlet . . . . . . . . . . . . . . . . . . . . . . . . . . . . . . . . . . . . . . 2 in. npt(f)
Wetted Parts . . . . . . . . . . . . . . . . . . . . . . . . . . . . . . . . . Stainless steel, nylon, ultra high molecular weight polyeth-
1 cfm (28.3 lpm, 0.028 m
14 in. (356 mm)
21 in. (533 mm)
ylene
3
/min)
312784D 21
Page 22

Graco Standard Warranty
Graco warrants all equipment referenced in this document which is manufactured by Graco and bearing its name to be free from defects in
material and workmanship on the date of sale to the original purchaser for use. With the exception of any special, extended, or limited warranty
published by Graco, Graco will, for a period of twelve months from the date of sale, repair or replace any part of the equipment determined by
Graco to be defective. This warranty applies only when the equipment is installed, operated and maintained in accordance with Graco’s written
recommendations.
This warranty does not cover, and Graco shall not be liable for general wear and tear, or any malfunction, damage or wear caused by faulty
installation, misapplication, abrasion, corrosion, inadequate or improper maintenance, negligence, accident, tampering, or substitution of
non-Graco component parts. Nor shall Graco be liable for malfunction, damage or wear caused by the incompatibility of Graco equipment with
structures, accessories, equipment or materials not supplied by Graco, or the improper design, manufacture, installation, operation or
maintenance of structures, accessories, equipment or materials not supplied by Graco.
This warranty is conditioned upon the prepaid return of the equipment claimed to be defective to an authorized Graco distributor for verification of
the claimed defect. If the claimed defect is verified, Graco will repair or replace free of charge any defective parts. The equipment will be returned
to the original purchaser transportation prepaid. If inspection of the equipment does not disclose any defect in material or workmanship, repairs will
be made at a reasonable charge, which charges may include the costs of parts, labor, and transportation.
THIS WARRANTY IS EXCLUSIVE, AND IS IN LIEU OF ANY OTHER WARRANTIES, EXPRESS OR IMPLIED, INCLUDING BUT NOT LIMITED
TO WARRANTY OF MERCHANTABILITY OR WARRANTY OF FITNESS FOR A PARTICULAR PURPOSE.
Graco’s sole obligation and buyer’s sole remedy for any breach of warranty shall be as set forth above. The buyer agrees that no other remedy
(including, but not limited to, incidental or consequential damages for lost profits, lost sales, injury to person or property, or any other incidental or
consequential loss) shall be available. Any action for breach of warranty must be brought within two (2) years of the date of sale.
GRACO MAKES NO WARRANTY, AND DISCLAIMS ALL IMPLIED WARRANTIES OF MERCHANTABILITY AND FITNESS FOR A
PARTICULAR PURPOSE, IN CONNECTION WITH ACCESSORIES, EQUIPMENT, MATERIALS OR COMPONENTS SOLD BUT NOT
MANUFACTURED BY GRACO. These items sold, but not manufactured by Graco (such as electric motors, switches, hose, etc.), are subject to
the warranty, if any, of their manufacturer. Graco will provide purchaser with reasonable assistance in making any claim for breach of these
warranties.
In no event will Graco be liable for indirect, incidental, special or consequential damages resulting from Graco supplying equipment hereunder, or
the furnishing, performance, or use of any products or other goods sold hereto, whether due to a breach of contract, breach of warranty, the
negligence of Graco, or otherwise.
FOR GRACO CANADA CUSTOMERS
The Parties acknowledge that they have required that the present document, as well as all documents, notices and legal proceedings entered into,
given or instituted pursuant hereto or relating directly or indirectly hereto, be drawn up in English. Les parties reconnaissent avoir convenu que la
rédaction du présente document sera en Anglais, ainsi que tous documents, avis et procédures judiciaires exécutés, donnés ou intentés, à la suite
de ou en rapport, directement ou indirectement, avec les procédures concernées.
Graco Information
For the latest information about Graco products, visit www.graco.com.
TO PLACE AN ORDER, contact your Graco distributor or call to identify the nearest distributor.
Phone: 612-623-6921 or Toll Free: 1-800-328-0211 Fax: 612-378-3505
All written and visual data contained in this document reflects the latest product information available at the time of publication.
Graco reserves the right to make changes at any time without notice.
Original instructions. This manual contains English. MM 312784
Graco Headquarters: Minneapolis
International Offices: Belgium, China, Japan, Korea
GRACO INC. P.O. BOX 1441 MINNEAPOLIS, MN 55440-1441
Copyright 2008, Graco Inc. is registered to ISO 9001
www.graco.com
Revised 11/2010
 Loading...