

Page 1
INSTRUCTIONS-PARTS LIST
306436L
Important Safety Instructions
Read all warnings and instructions in this manual.
Save these instructions.
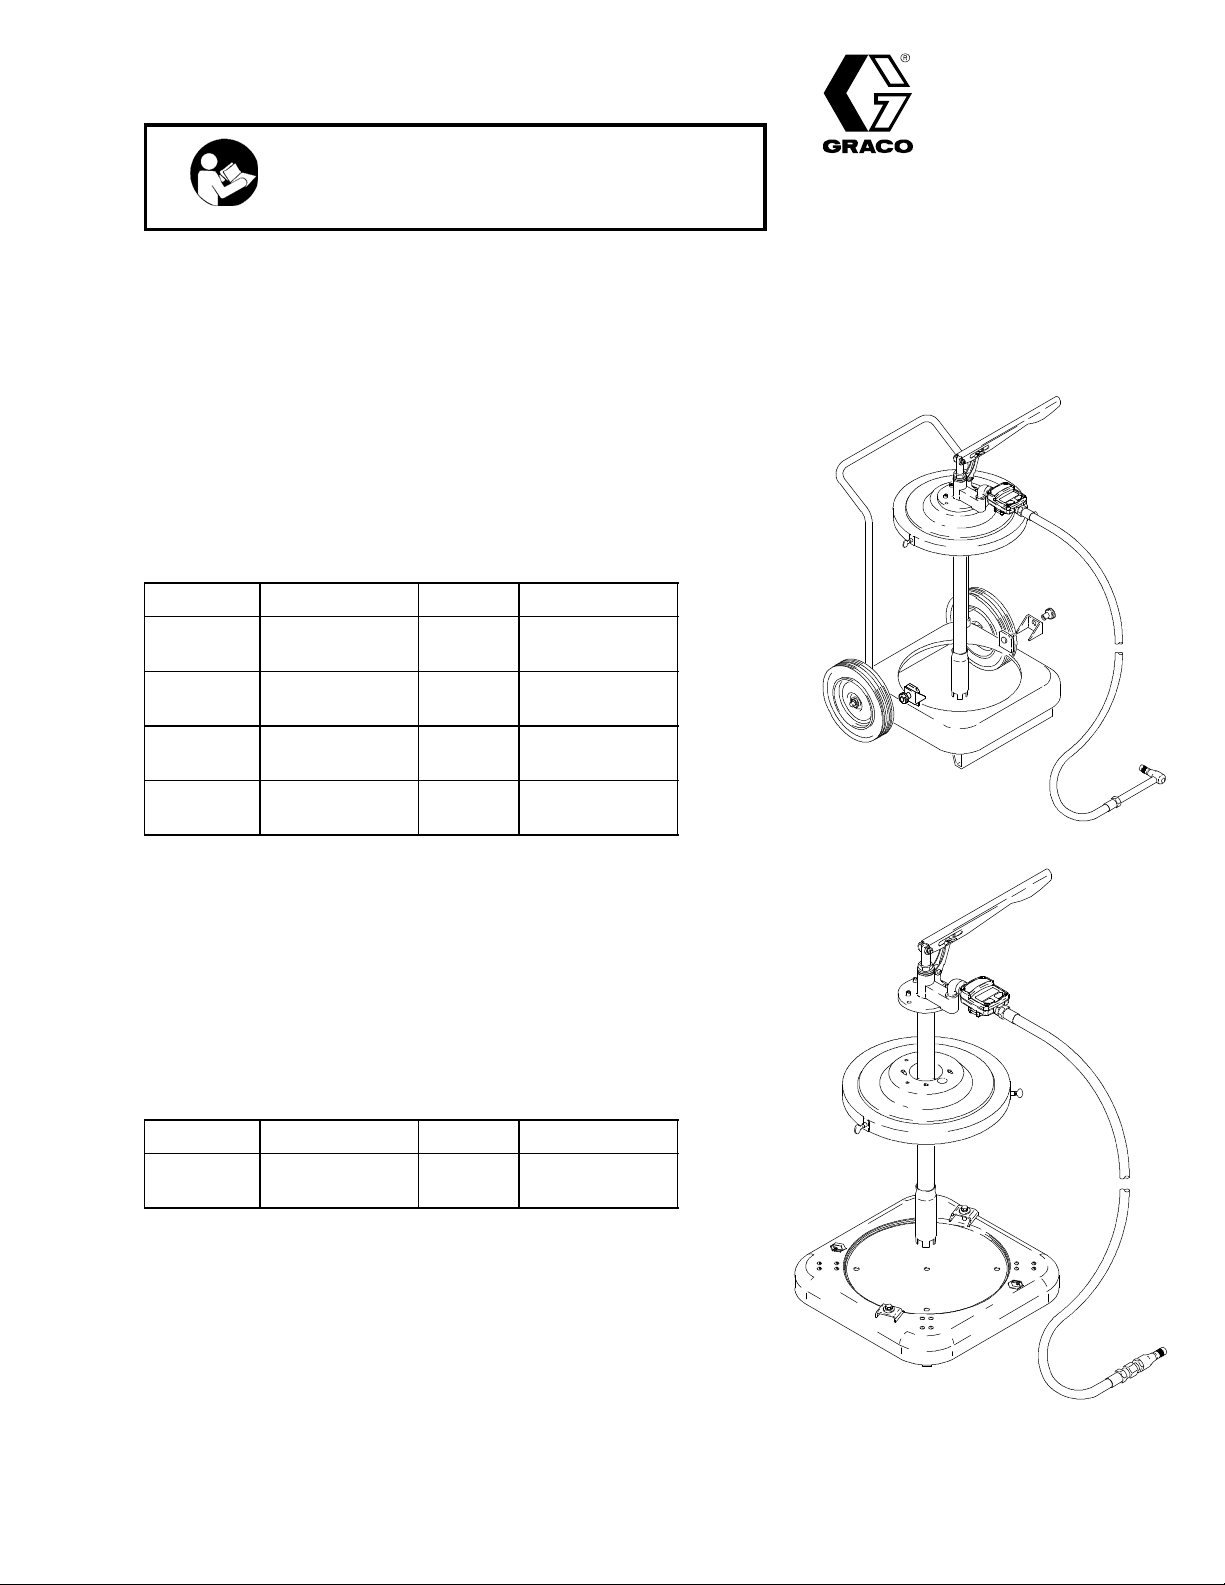
MODEL 204867
Hand Pump Assembly
HAND-OPERATED, 120-LB SIZE
Gear Lube Dispensers
175 psi (1.2 MPa, 1 2 bar) Maximum Working Pressure
Model Mounting Cover Meter
225376,
Series B
225378,
Series A
225380,
Series A
225384,
Series B
Portable Base Cover inline,
electronic
Portable Base Cover None
None Cover None
Portable Truck Cover inline,
electronic
First choice when
quality counts.t
Model 225384
06789A
HAND-OPERATED, 16-GALLON SIZE
Automatic Transmission
Fluid Dispenser
175 psi (1.2 MPa, 1 2 bar) Maximum Working Pressure
Model Mounting Cover Meter
225880,
Series B
Portable Base Cover inline,
electronic
GRACO INC. P.O. BOX 1441 MINNEAPOLIS, MN 55440--1441
http://www.graco.com
ECOPYRIGHT 1993, GRACO INC.
Graco Inc. is registered to I.S. EN ISO 9001
Model 225880
06790A
Page 2

Table of Contents
Installation 3..........................................................................................
Operation 4..........................................................................................
Dimensions Chart 4...................................................................................
Service 6............................................................................................
Parts
Hand Pump Assembly, Model 204867 7................................................................
Gear Lube Dispensers, Models 225378, 225376, 225380 8...............................................
Gear Lube Dispenser, Model 225384 9................................................................
Automatic Transmission Fluid Dispenser, Model 225880 10...............................................
Truck Assembly, Model 203650 10....................................................................
Portable Base Assembly, Model 203622 1 1.............................................................
Hose and Meter Assemblies, Models 239707, 239705 1 1.................................................
Warranty 12.........................................................................................
Graco Phone Number 12...............................................................................
2 306436
Page 3
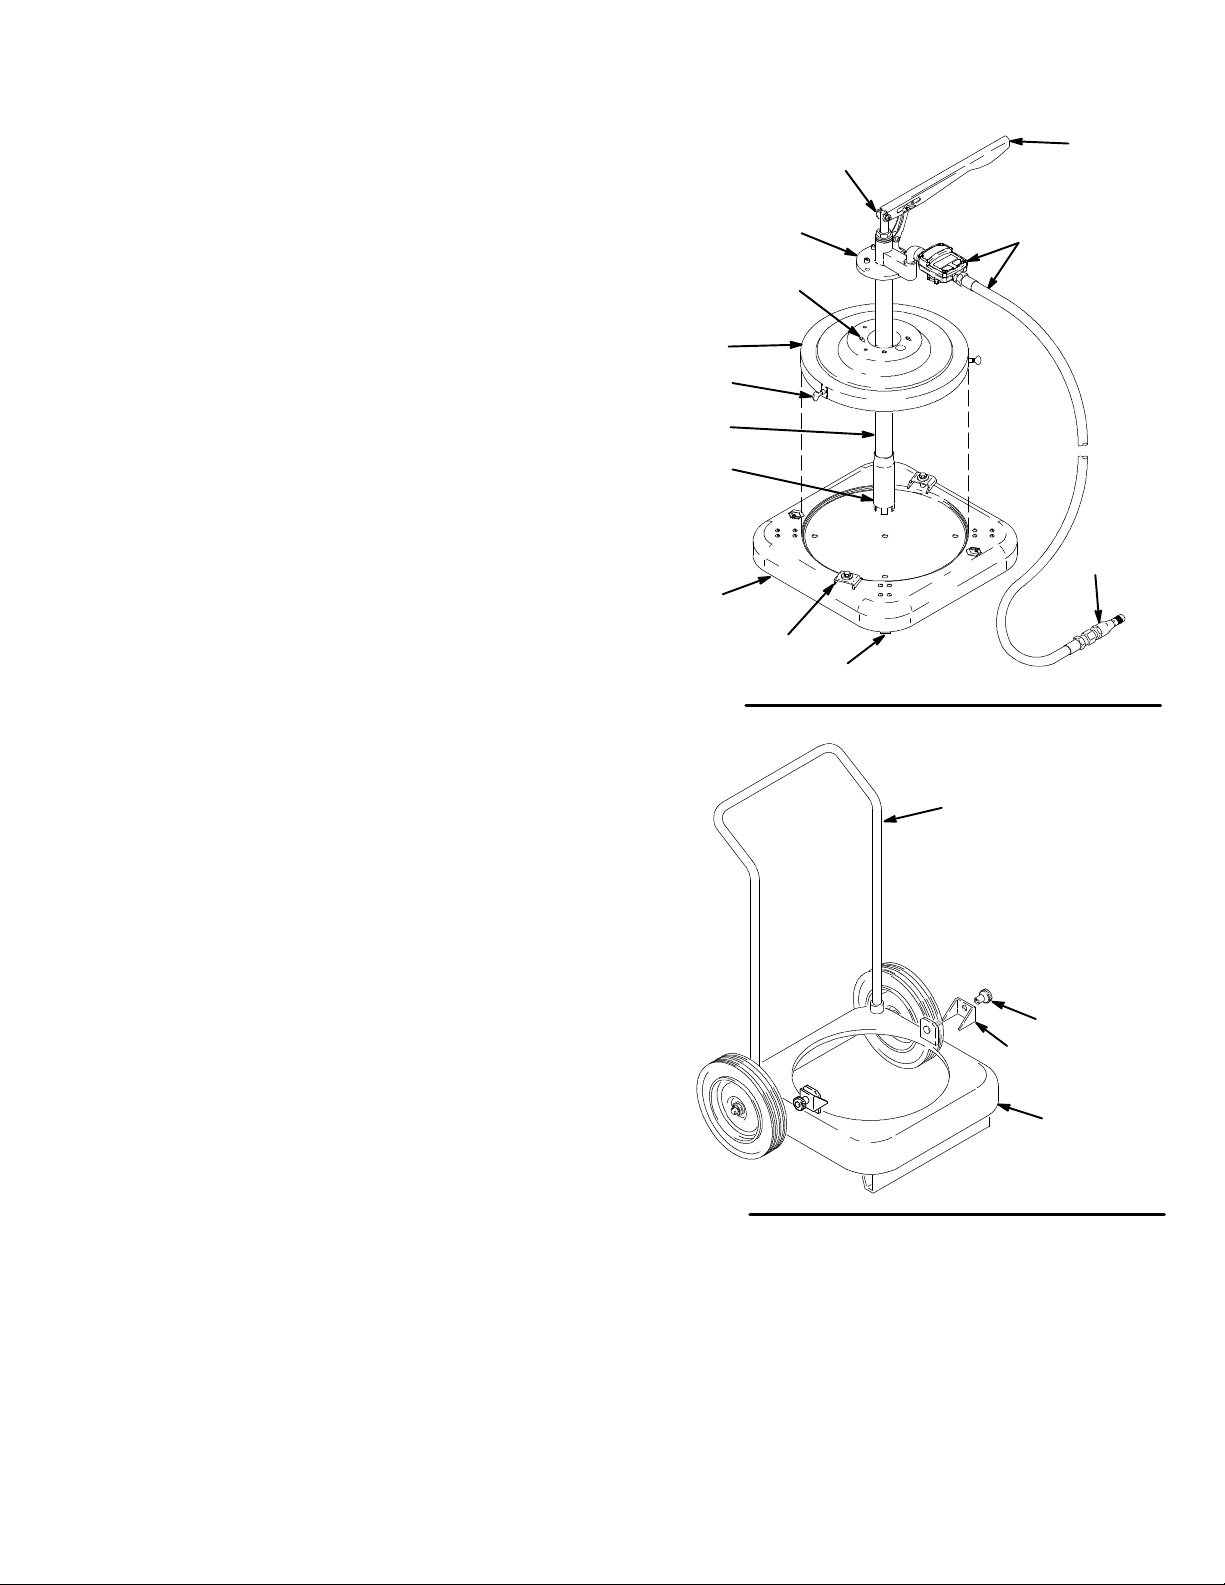
Installation
See Fig.1 or Fig. 2, depending on your model.
Models with a Portable Truck
Insert the truck handle (708) into the sockets in the
truck base (701).
All Models
Place a full container of fluid on the base. Carefully
clean the container top before opening it to avoid fluid
contamination. Secure the drum or shield (401) with
the hardware provided.
Models with a Drum Cover
Install the drum cover (601) on the opened drum and
secure it with the thumbscrews (603).
All Models
Slide the pump extension tube (318) all the way down
on the riser tube (314). Insert the riser tube into the
opening in the top of the shield (401) or cover (601).
Lower the pump until the outlet housing (319) rests on
the shield or cover and secure it with the four screws
(309). Install the pump lever (316), clevis (311), and
hose and meter assembly (2 or 5).
601
603
314
318
101
Fig. 1
319
309
104
31 1
102
316
5
502
06782A
To prime the pump, open the nozzle (502) and operate
the pump until fluid flows from the nozzle. Close the
nozzle and place it in the opening in the outlet housing
(319).
708
707
706
701
06783
Fig. 2
3306436
Page 4

CAUTION
Operation
Reset the meter to zero by pressing the RESET
button.
To avoid contamination when changing drums, do
not let the pump’s intake valve touch the floor or any
dirty surface.
Dimension Chart
Model No. Height
in. (mm)
225376 37 (940) 19 (483) 36 (16)
225378 37 (940) 19 (483) 34 (15)
225380 35 (889) 16 (406) 18 (8)
225384 39 (991) 24 (610) 49 (22)
225880 37 (940) 19 (483) 35 (16)
Insert the nozzle in the fill hole. Open the nozzle and
operate the pump. When finished, close the nozzle
and wipe off any excess fluid. Place the nozzle in the
opening in the outlet housing.
If the meter fails to register, it may be due to a low
battery. See the Service section in instruction manual
308687.
Models with Non-Drip Nozzle 200--348
The non-drip nozzle can be set in the automatic position by turning it two or more turns counterclockwise.
Width
inch (mm)
Weight
lb (kg)
4 306436
Page 5

Notes
5306436
Page 6

Service
Pump Service
NOTE: Clean all parts in non-flammable solvent. Dry
all parts thoroughly before reassembly.
1. Remove the pump from the cover or shield.
2. Slide the extension (318) up the riser tube (314) to
expose the intake valve (302).
3. Unscrew the intake valve (302) from the riser tube
(314). Disassemble the intake valve and clean and
inspect the parts. Replace worn or damaged parts.
4. Unscrew the riser tube (314) from the outlet
housing (319).
5. Pull the riser tube down off the connecting rod
(320) and piston (301).
6. Unscrew the piston (301) from the connecting rod
(320). Disassemble the piston and clean and
inspect the parts. Replace worn or damaged parts.
7. Loosen the packing nut (312).
8. Disconnect the rod (320) from the pump lever
(316). Pull the connecting rod down out of the
outlet housing (319).
9. Unscrew the packing nut (312) and remove the
packings (313). Clean and inspect the parts.
Replace worn or damaged parts.
10. Reassemble the pump in the reverse order,
following the lubrication and sealant notes in Fig.
3. Tighten the packing nut (312) just enough to
stop leakage.
Hand Pump Assembly, Model 204--867,
Series A
316
321
1
312
303
308
313
305
307
309
319
1
Lubricate threads
1
2
Lubricate I.D.
3
Lubricate O.D.
Apply pipe sealant
4
to threads
320
301f
301c
301d
301b
301a
301e
2
4
314
1
322
310
31 1
306
304
4
301
6 306436
Fig. 3
315
3
318
317
302b
302d
302c
4
302
302a
06784A
Page 7

Ref No. 3, Model 204867, Series A
Hand Pump Assembly
See Parts Drawing in Fig. 3.
Parts
Ref
No. Part No. Description Qty.
301 200753 PISTON ASSEMBLY
Includes items 301a to 301f 1
301a 100114 .BALL, steel, 7/16 in. dia. 1
301b 150134 .SPRING, compression 1
301c 150463 .GLAND, male 1
301d* 150464 .V--PACKING, leather 3
301e 150465 .SEAT, piston 1
301f 152559 .HOUSING, piston 1
302 202162 INTAKE VALVE HOUSING
Includes items 302a to 302d 1
302a 101021 .RING, retaining 1
302b 156738 .VALVE, poppet 1
302c 156739 .BODY, valve 1
302d 156750 .GUIDE, poppet 1
303 100133 LOCKWASHER, spring, 3/8 in. 1
304 100184 CAPSCREW, hex, 5/16--24 x 1 in. 1
305 100187 NUT, hex, 5/16 --24 1
306 100191 NUT, wing, 5/16-- 18 1
307 100214 LOCKWASHER, spring, 5/16 in. 1
Ref
No. Part No. Description Qty.
308 100340 NUT, hex, 3/8 --16 1
309 101120 SCREW, rd hd, 1/4--20 x 1--1/4 in. 4
310 150662 SCREW, pivot 1
311 150726 CLEVIS 1
312 154513 PACKING NUT 1
313* 154514 PACKING, duck and neoprene 2
314 156511 RISER TUBE 1
315 156593 O-RING, nitrile rubber 1
316 158769 LEVER, pump handle 1
317 159487 SPACER 1
318 159488 TUBE, extension 1
319 159923 HOUSING, outlet 1
320 159930 CONNECTING ROD 1
321 159931 SCREW, pivot 1
322 100119 ELBOW, 1/2 npt 1
* Keep spare on hand to reduce down time.
7306436
Page 8

Parts
Gear Lube Dispenser
Model 225378, Series A
without meter
Includes items 1, 3, 6, 201
Model 225376, Series B
with meter
Includes items 1, 2, 3, 6
Ref
No. Part No. Description Qty
1 203622 PORTABLE BASE ASSEMBLY
See separate Parts List, page 11 1
2 239705 HOSE & METER ASSEMBLY
See separate Parts List, page 11 1
3 204867 HAND PUMP ASSEMBLY
See separate Parts List, page 7 1
6 204574 COVER ASSEMBLY
See manual 306--345 1
201 214658 HOSE ASSEMBLY
Model 225378 only
Includes items 201a to 201c; See
separate Parts List on page 11, under
Ref No. 2, Hose & Meter Assembly 1
3
201
6
1
06787
Gear Lube Dispenser
Model 225380, Series A
Includes items 3, 6, 201
Ref
No. Part No. Description Qty
3 204867 HAND PUMP ASSEMBLY
See separate Parts List, page 7 1
6 204574 COVER ASSEMBLY
See manual 306345 1
201 214658 HOSE ASSEMBLY
Model 225378 only
Includes items 201a to 201c; See
separate parts list on page 11, under
Ref No. 2, Hose & Meter Assembly 1
3
201
6
06788
8 306436
Page 9

Parts
Gear Lube Dispenser
Model 225384, Series B
Ref
No. Part No. Description Qty
2 239705 HOSE & METER ASSEMBLY
See separate Parts List, page 11 1
3 204867 HAND PUMP ASSEMBLY
See separate Parts List, page 7 1
6 204574 COVER ASSEMBLY
See manual 306345 1
7 203650 TRUCK ASSEMBLY
See separate Parts List, page 10 1
3
2
7
6
06789A
9306436
Page 10

Parts
Automatic Transmission Fluid Dispenser
Model 225880, Series B
3
Ref
No. Part No. Description Qty
1 203622 PORTABLE BASE ASSEMBLY
See separate Parts List, page 11 1
3 204867 HAND PUMP ASSEMBLY
See separate Parts List, page 7 1
5 239707 DISPENSE KIT, metered
See separate Parts List, page 11 1
6 204574 COVER ASSEMBLY
See manual 306345 1
Ref No. 7, Part No. 203650, Series A
Truck Assembly,
Ref
No. Part No. Description Qty
701 203651 TRUCK BASE 1
702 100609 SCREW, rd hd, 1/4 --20 x 3/8 in. 2
703 101242 RETAINING RING 2
704 101251 WHEEL 2
705 154636 WASHER 4
706 159912 THUMBNUT 2
707 159913 HOLD DOWN CLAMP,
steel drums only 2
159952* HOLD DOWN CLAMP,
5 gallon pail 2
708 159924 TRUCK HANDLE 1
* Must be ordered separately.
5
6
1
06790A
708
706
702
705
707
705
10 306436
703
704
707
706
701
06797
Page 11

Parts
Ref No. 1, Part No. 203622, Series B
Portable Base Assembly
Ref
No. Part No. Description Qty.
101 191750 BASE, drum 1
102 113646 CASTER; polyurethane 4
103 102547 BOLT, hex hd; 5/16 in.--18 x 1.5 in. 2
104 191747 BRACKET 2
105 100214 WASHER, lock 2
106 100132 WASHER, flat 2
107 113660 RIVET 16
Ref No. 5, Part No. 239707, Series A
Metered Dispense Kit
Ref
No. Part No. Description Qty
501* 214657 HOSE, fluid, cpld 1/2 npt(m) x
1/4 npt(f); 1/2 in. ID, 5 ft long 1
502 203469 NON-DRIP NOZZLE 1
503 158491 NIPPLE, 1/2 npt 1
508 239824 METER, inline electronic 1
503
*501
508
103
105
106
104
101
107
102
06472A
502
06795A
*Keep spare on hand to reduce down time.
Ref No. 2, Part No. 239705, Series A
Hose and Meter Assembly
Includes items 201, 202, 203
Ref
No. Part No. Description Qty
201 214658 HOSE ASSEMBLY
Includes items 201a to 201c 1
201a 200348 .NON-DRIP NOZZLE 1
201b* 214657 .HOSE, fluid, cpld 1/2 npt(m) x
1/4 npt(f), 1/2 in. ID, 5 ft long 1
201c 100200 .NIPPLE, 1/4 npt, 6 in. long 1
202 158491 NIPPLE, 1/2 npt 1
203 239824 METER, inline electronic 1
*Keep spare on hand to reduce down time.
202
203
*201b
201a
201c
06793A
11306436
Page 12

Graco Standard Warranty
Graco warrants all equipmentmanufacturedby Gracoand bearingits nameto befree from defects in material and workmanshipon the
date of sale to the original purchaser for use. With the exception of any special, extended, or limited warranty published by Graco,
Graco will, for a period of twelve months from the date of sale, repair or replace any part of the equipment determined by Graco to be
defective. This warranty applies only when the equipment is installed, operated and maintained in accordance with Graco’s written
recommendations.
This warranty does not cover, and Gracoshall not be liable for general wear and tear, or any malfunction, damage or wear caused by
faultyinstallation, misapplication,abrasion,corrosion,inadequate orimproper maintenance, negligence, accident, tampering, or substitution of non-Graco component parts. Nor shall Graco be liable for malfunction, damage or wear caused by the incompatibility of
Graco equipment with structures, accessories, equipment or materials not supplied by Graco, or the improper design, manufacture,
installation, operation or maintenance of structures, accessories, equipment or materials not supplied by Graco.
This warranty is conditioned upon the prepaid return of the equipment claimed to be defective to an authorized Graco distributor for
verification of the claimed defect. If the claimed defect is verified, Graco will repair or replace free of charge any defective parts. The
equipmentwill be returnedto theoriginalpurchaser transportationprepaid. If inspection of the equipmentdoes notdisclose anydefect
in material or workmanship, repairs will be made at a reasonable charge, which charges may include the costs of parts, labor, and
transportation.
THIS WARRANTY IS EXCLUSIVE, AND IS IN LIEU OF ANY OTHER WARRANTIES, EXPRESS OR IMPLIED, INCLUDING BUT
NOT LIMITED TO WARRANTY OF MERCHANTABILITY OR WARRANTY OF FITNESS FOR A PARTICULAR PURPOSE.
Graco’ssole obligation andbuyer’s sole remedy for anybreach ofwarrantyshall be as set forth above. The buyer agrees that no other
remedy (including, but not limitedto, incidental or consequentialdamages for lost profits, lost sales,injury to person orproperty, or any
other incidental or consequential loss)shall be available. Any action forbreach of warranty must be brought withintwo (2)years ofthe
date of s ale.
Graco makes no warranty, and disclaims all implied warranties of merchantability and fitness for a particular purpose in connection
with accessories, equipment,materials or components sold but not manufactured by Graco. These items sold, but not manufactured
by Graco (such as electric motors, switches, hose, etc.), are subject to the warranty, if any, of their manufacturer. Graco will provide
purchaser with reasonable assistance in making any claim for breach of these warranties.
In no event will Graco be liable for indirect, incidental, special or consequential damages resulting from Graco supplying equipment
hereunder, or the furnishing, performance, or use of any products or other goods sold hereto, whether due to a breach of contract,
breach of warranty, the negligence of Graco, or otherwise.
FOR GRACO CANADA CUST
The parties acknowledge that they have required that the present document, as wellas all documents, notices and legalproceedings
entered into, given or institutedpursuant heretoor relating directly orindirectly hereto, be drawn up in English. Les parties reconnaissent avoirconvenu que la rédaction du présente document sera en Anglais, ainsique tous documents, avis et procédures judiciaires
exécutés, donnés ou intentés à la suite de ou en rapport, directement ou indirectement, avec les procedures concernées.
OMERS
Graco Phone Number
TO PLACE AN ORDER, contact your Graco distributor, or call this number to identify the distributor closest to you:
1--800--533--9655 Toll Free
All written and visual data contained in this document reflects the latest product information available at the time of publication.
Graco reserves the right to make changes at any time without notice.
MM 306436
International Offices: Belgium, China, Japan, Korea
Graco Headquarters: Minneapolis
GRACO INC. P.O. BOX 1441 MINNEAPOLIS, MN 55440--1441
http://www.graco.com
Revised to L, November 2020
12 306436
 Loading...