

Page 1
©2013 Graco PD254465B 07/13
Endure Group 123 (9-36kg)
9-18kg 15-36kg
Owner’s Manual
Parts list
Fitting Guide
Page 2
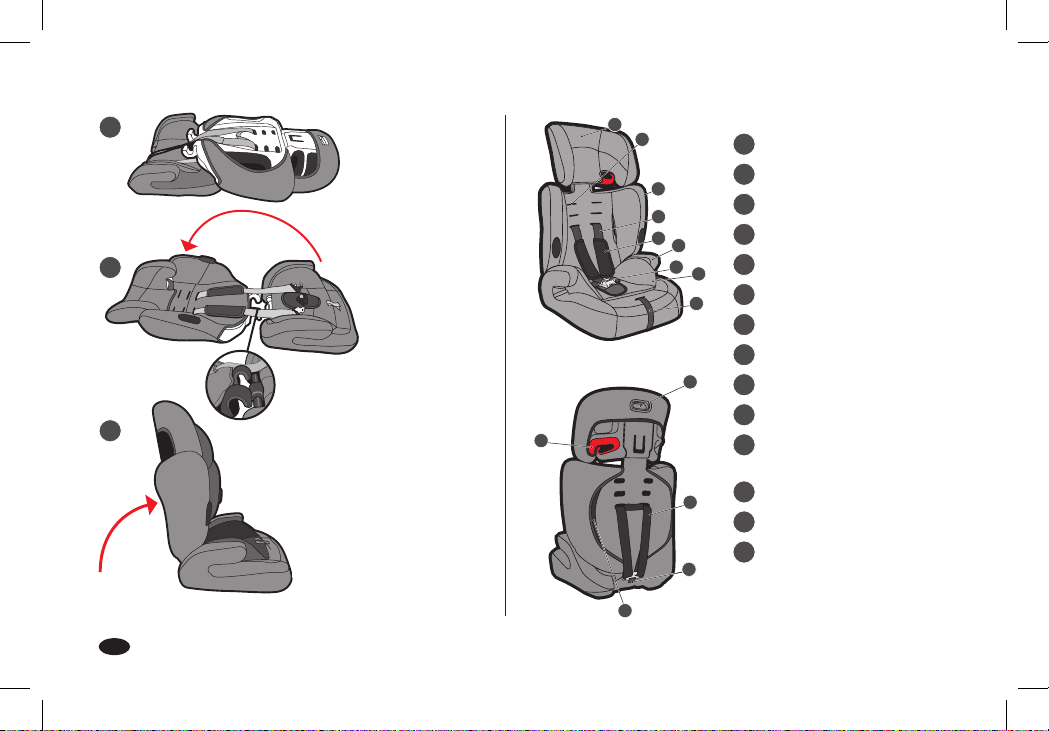
1
Assembling your
Endure 123 Child
Restraint.
Once removed
from the box,
place your new
Endure123 on the
2
floor as shown in
Diagram 1, left.
Open the two parts
out so that the
backrest and seat
lie flat, as shown in
Diagram 2.
Locate the two
3
hooks at the base
of the backrest
10
over the bars on
the back of the seat
base (inset).
Raise the backrest
to the vertical
postion until it
1
2
3
4
5
1
Headrest
2
Slot
3
Backrest
4
6
7
8
9
Harness
5
Chest pad
6
Armrest
7
Buckle & crotch pad
8 Newborn liner
11
9
Harness adjuster strap
10
Belt guide
11
Button
(headrest height adjustment)
12
12
13
12
Harness strap
13
Harness connector
14
Pocket for instruction manual
snaps into place.
Diagram 3
2
14
Page 3
Care and maintenance
THESE INSTRUCTIONS ARE
IMPORTANT. PLEASE READ
CAREFULLY AND RETAIN FOR
FUTURE REFERENCE.
It is dangerous to NOT follow the
instructions for this product.
Backrest cover removal
First release the elastic strap at the
bottom of the backrest cover. Slide
the cover off. The cover can now be
cleaned.
Headrest and Seat cushion cover
removal
Slide the cover off. The cover can
now be cleaned.
Washing the covers
Machine wash cover in cold water
on delicate cycle and drip-dry.
DO NOT USE BLEACH.
IMPORTANT NOTE
Children should not be left in their child restraint system
unattended.
Any luggage or other objects liable to cause injuries in
the event of a collision must be properly secured.
This child restraint must not be used without the cover.
The seat cover should not be replaced with any other
than the one recommended by the manufacturer,
because the cover constitutes an integral part of the
restraint performance.
The child restraint should be changed when it has been
subject to violent stresses in an accident.
It is dangerous to make any alterations or additions to
the child restraint without the approval of the competent
authority.
Please always fasten the child restraint when it is inside the
vehicle.
It is dangerous to not follow closely the installation
instructions provided by the child restraint manufacturer.
Any straps holding the child restraint to the vehicle should
be tight.
Only use contact points and connections described in
the instructions and marked on the child restraint.
1 This is a “Universal” child restraint. It is
approved to ECE Regulation 44.04 for
general use in vehicles and will fit most,
but not all vehicle seats.
2 Only suitable for use with 3 point
retractor vehicle safety belts approved
to ECE regulation 16 or equivalent
standards.
3 A correct fit is likely if the vehicle
manufacturer has declared in the
vehicle handbook that the vehicle is
capable of accepting a “Universal” child
restraint of this group.
4 This child restraint has been declared
“Universal: under more stringent
conditions than those applied to earlier
designs which do not carry this notice.
5 If in any doubt, consult either the child
restraint manufacturer or the retailer.
3
Page 4
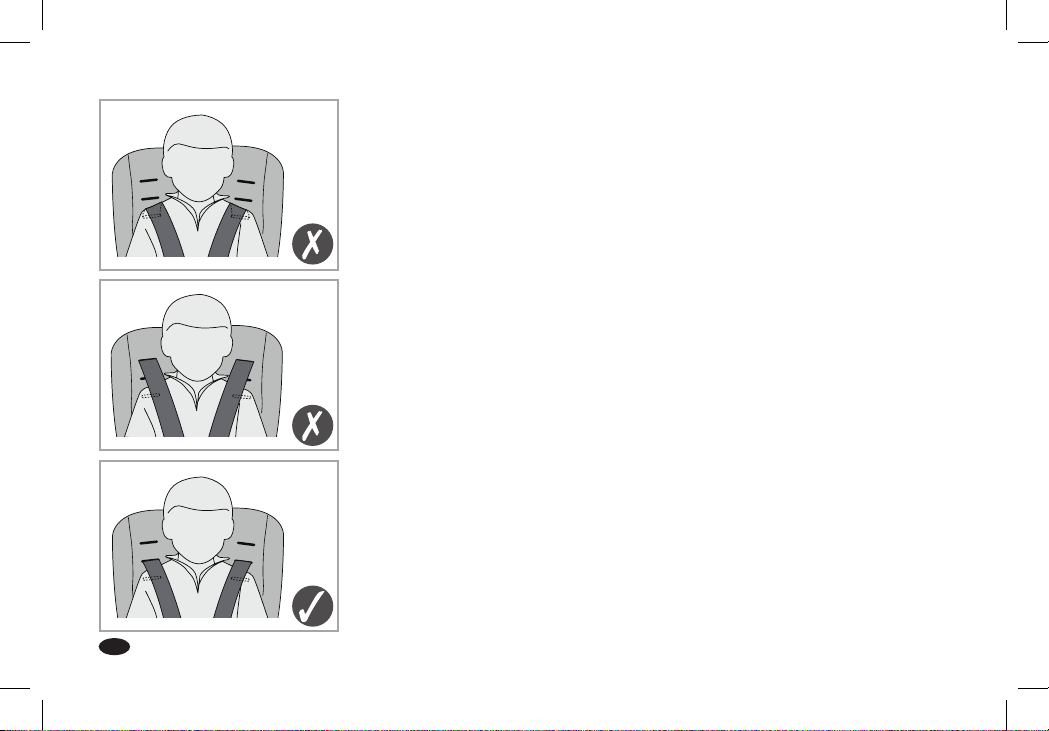
Use the Correct Shoulder
Strap Height
Please always read the manual
before using it. The manual is
located in the pocket at the side
of the seat.
TOO LOW
TOO HIGH
4
CORRECT
Page 5
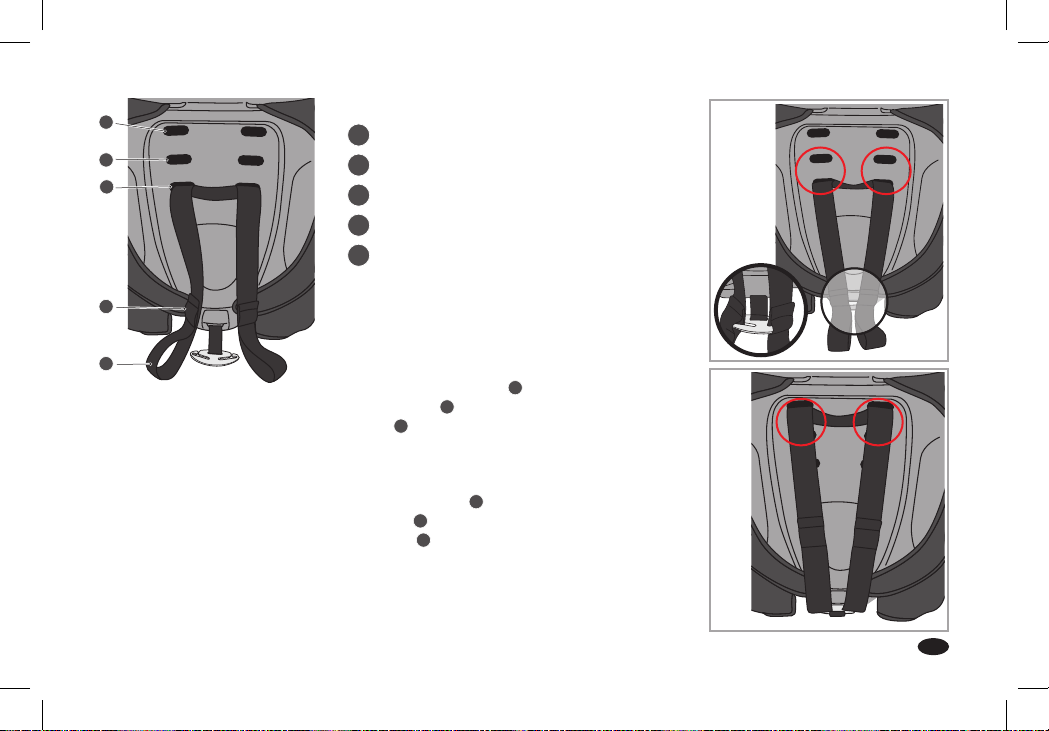
1
2
3
1
Top slot
2
Middle slot
3
Bottom slot
4
Top loop
5
Bottom loop
1
4
Using the Correct Strap
Positioning
5
1 For infants and toddlers
(9kg to 18kg) use middle
2
2
and bottom 3 slots and the
top 4 loops on the harness
strap.
2 For older children (up to
18kg) use the top 1 and
middle 2 slots and the
bottom 5 loops on the
harness strap.
5
Page 6
For 9 – 18kg
1
3
4
6
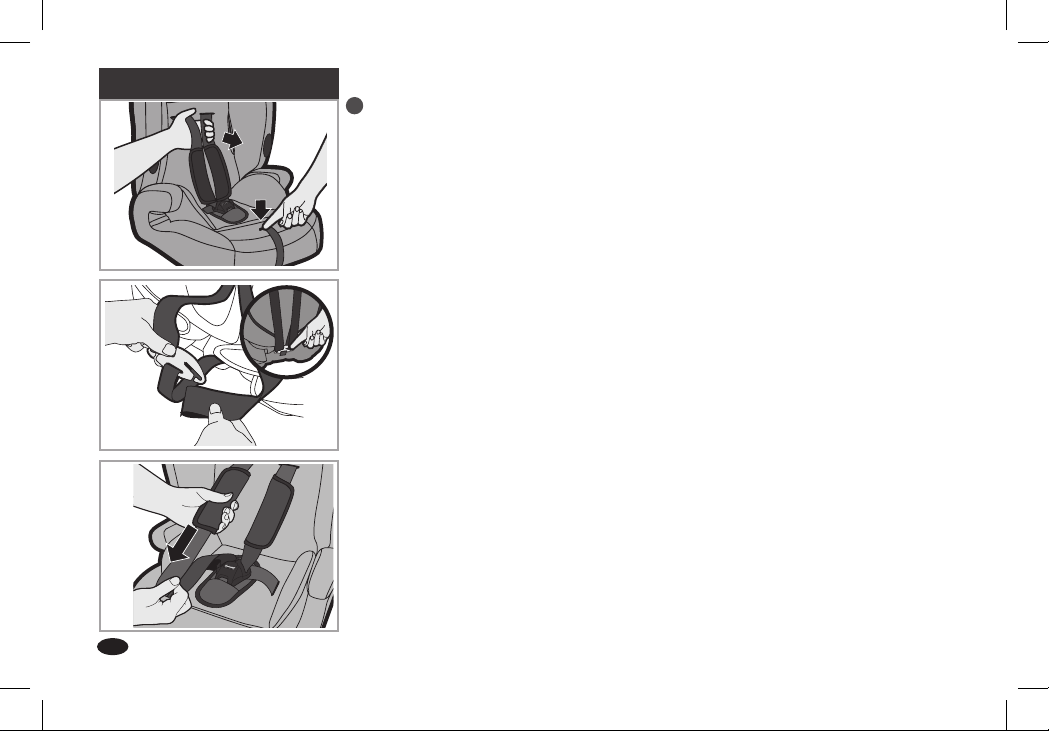
1 Changing the Shoulder
Strap Height
1 Firstly, loosen the harness.
2 From the rear of the seat
find the harness connector.
3 Release the strap from the
2
harness connector.
4 From the front of the seat,
pull the strap through the
slot in the seat’s backrest
and chest pad.
Page 7

5
Changing the Shoulder
Strap Height (continued)
5 Thread the chest pad
through to the back.
6
6 Thread the chest pad back
through the next slot up
or down on the cover and
backrest, depending on the
size of your child.
7
7 Pull the chest pad
through to the front of
the seat.
7
Page 8

8
Changing the Shoulder
Strap Height (continued)
8 Make sure that the rubber
side of the chest pads faces
the child’s chest. Thread the
harness strap through the
chest pad. Make sure NOT to
twist the straps.
9
9 Re-thread the harness strap
back onto the harness
connector at the back of the
seat.
Repeat for the other harness
strap.
Ensure both straps are at the
same height.
Recommended to keep your
child harnessed as long as
possible.
8
Page 9

For 9 – 18kg
1
3
2 Fitting the Child Restraint
with the 3-Point Lap &
Diagonal Seat Belt
Position the child restraint
on the vehicle’s seat.
1 Thread the diagonal of the
vehicle seat belt underneath
the head rest as indicated
with the red tag, and the lap
strap between the base of
the child restraint and the
2
4
armrest of the child restraint
as indicated with the red
tag. Pull the vehicle seat belt
out as much as it will go
so there is lots of slack and
feed in through the seat belt
route slot in the seat’s plastic
backrest furthest from the
vehicle’s seat belt buckle as
indicated with the red tag.
2 Feed the belt buckle
around the back of the child
restraint over the harness
straps and back through
the opposite seat belt route
slot, to the front of the child
restraint.
3 Pull the buckle through
the slot and push the child
restraint firmly against the
backrest of the vehicle’s seat.
4 Feed the buckle and both
the diagonal and lap straps
between the armrest
and the base of the child
restraint as indicated with
the red tag.
9
Page 10

5
Fitting the Child Restraint
with the 3-Point Lap
& Diagonal Seat Belt
(continued)
CLICK
CORRECT
5 Fasten the vehicle seat belt
into the seat belt buckle
making sure the vehicle seat
belt and the buckle are in
line with each other. Please
contact the child restraint
manufacturer if in doubt
about this point.
Finish tightening the vehicle
seat belt until there is no slack
and the seat is held firmly
in place.
Now you can strap your child
into the seat. Make sure
the seat belt has not become
twisted. Also check that the
cover is not impeding the
movement or fit of the seat
belt webbing in any way.
Ensure rigid and plastic parts
of child restraint are not
liable to become trapped by
a movable vehicle seat or
vehicle doors.
To release your child restraint
follow the above instructions
in reverse order.
WRONG
10
Page 11

1
2
3 Fastening the Harness
1 Slot the two metal sections
of the buckle connectors
together.
2 Slot the two buckle
connectors into the slot in
the top of the buckle until
they “click” into place.
Always check the harness is
correctly locked by pulling
the shoulder straps upwards.
To release the harness, press
the red button on the buckle
downwards.
CLICK
11
Page 12

4
1
2
3
5
12
4 Tightening the Harness
1 Pull the shoulder straps
upwards to remove the slack
from the lap sections of the
harness.
2 Pull chest pads down as far
as they can go.
3 Now pull the adjuster strap
until the harness is fully
tightened.
The harness should be
adjusted as tightly as possible
without causing discomfort to
your child.
Ensure that the lap strap
portion of the harness
2
is located as low as possible
towards the thighs-not round
the tummy.
A loose harness can be
1
dangerous. Check the harness
adjustment and tighten each
time the child is placed in
the seat.
5 Slackening the Harness
1 The harness is slackened by
pressing the lever (under the
seat cover) on the front of
the seat.
2 Grip the two shoulder
straps with one hand. Then
press down on the lever
underneath the softgoods as
you pull the shoulder straps
towards you to loosen the
harness.
Take care when adjusting the
shoulder straps that you do
not trap the harness adjuster
straps as you press the lever
down.
TAKE CARE - Check
harness straps are
not twisted
Page 13

For 15 – 36kg
1
2
3b
6 Removing the Safety
Harness Shoulder Straps
1 Firstly, loosen the harness.
2 From the rear of the seat find
the harness connector.
3a
3 Slide both the harness straps
off the harness connector at
the back of the backrest.
From the front of the seat,
pull the straps through
the slots in the seat backrest
and fabric cover.
13
Page 14

7 Removing the Safety
Harness Lap Straps and
Crotch Strap
1 From underneath the seat,
locate the three webbing
retainer buckles. Turn the
buckles on their narrowest
end and feed them,
complete with webbing
straps, through the slots in
the base of the seat, then
through the slots in the
1
fabric cover. The lap straps
and crotch strap can then be
removed completely from
the seat.
Store the newborn liner,
chest pads, buckle/crotch
pads and harness straps in a
safe place.
14
Page 15

For 15 – 36kg
1
8 Adjusting the Headrest
According to the child’s height,
2
the headrest can be adjusted
up or down.
1 Put one hand on the
backrest. Pull the button in
the headrest with your other
hand.
2 Move the headrest up or
down as required ensuring
your child’s head is centred
on the headrest.
Check to make sure it is
clicked into one of the six
height positions by pulling
up on head support.
The red seat belt guides
must be level with, or just
above, the shoulders, as
shown by the dotted line.
15
Page 16

For 15 – 36kg
1
9 Fitting the Child Restraint
using the Adult Seat Belt
IMPORTANT: Before fitting
the seat remove the shoulder
straps, crotch strap and lap
strap. (See pages 13 and 14)
1 Place the child restraint onto
the vehicle’s seat. Ensure
that the backrest of the seat
is pushed firmly against the
backrest of the vehicle’s seat.
Place the child in the child
2
3
4
16
restraint.
2 Place the vehicle seat belt
across the child and child
restraint making sure that
the diagonal vehicle seat
belt goes through the
vehicle seat guide in the
headrest as indicated with
the red tag.
3 Ensure that the lap strap
portion of the harness is
located as low as possible
towards the thighs - not
around the tummy.
4 Place the vehicle seat belt
under the armrest closest to
the buckle as indicated with
the red tag.
Page 17

5
Fitting the Child Restraint using the
Adult Seat Belt (continued)
5 Fasten the vehicle seat belt into the
seat belt buckle making sure the
vehicle seat belt and the buckle are
in line with each other as indicated
with the red tag.
6 Finish by tightening the vehicle seat
belt until there is no slack and the
child and child restraint are held
firmly in place.
6
Make sure the seat belt has not
become twisted.
Also check that the cover is not
impeding the movement or fit of the
vehicle seat belt in any way.
17
Page 18

UK GRACO CONSUMER SERVICES
Newell Rubbermaid
Halifax Avenue
Fradley Park
Lichfield WS13 8SS
United Kingdom
Consumer Service Desk (UK enquiries only)
Dialling from UK: 0844 412 1212
Dialling from ROI: 0818 221 422
www.graco.co.uk
Newell Rubbermaid Europe Sarl
Chemin de Blandonnet 10
CH-1214 Vernier / Geneva
 Loading...