

Page 1

Quickstart Guide
DIGISKY 15448
Exposure Meter for Flash and Ambient Light 1.18/10.19
Essentials
Preparations required for use of the exposure meter
and its basic functions are described in these instructions.
Please check that the exposure meter and accessories
as detailed below are included in the box. If the contents
are incomplete, please contact your local dealer.
▪ DIGISKY exposure meter
▪ V070A rechargeable battery
▪ Power supply and USB connector cable
▪ Carrying strap
▪ Quickstart guide
The latest version of the detailed operating instructions
can be found and downloaded from the product page at
www.gossen-photo.de . Please download these and read
them carefully.
The DIGISKY is always delivered with the latest firmware.
Should a newer version be available, you can download
it together with the SkyRefresh update program and a
detailed update instructions from the product page.
Afterwards you can do the update of the meter yourself.
Contents
Page
Preparation
2
Meter Overview
3
Navigation
4
Turn On,
Measuring Modes,
Function Selection
5
Ambient Light
6
Flash Light
7
Movie
8
FCC & IC (USA)
9
Safety Precautions
10
Disposal Note
11
Page 2
2 GOSSEN Foto- und Lichtmesstechnik GmbH
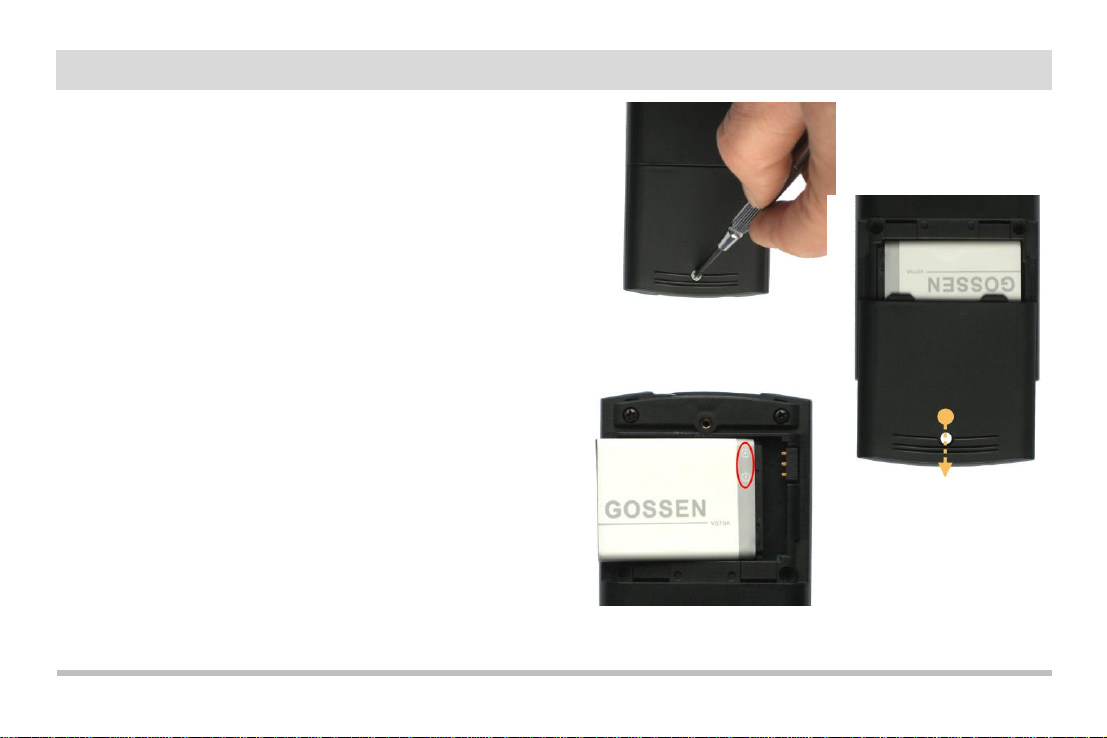
3. Insert Battery
How to insert and charge the battery
The DIGISKY works with a device-specific, rechargeable lithiumion battery. Use the V070A rechargeable battery and the USB
battery charger included with the exposure meter.
Switch your DIGISKY off or wait until the exposure meter is
switched off automatically. Unscrew the battery cover at the back
of the meter with a (Philips) recessed head screwdriver, and then
pull it down and out of the housing.
Insert the battery into the compartment as shown in the figure.
Make sure that the battery is inserted with correct polarity
(+ and –)! Then place the battery cover over the battery
compartment and secure it with the screw.
Connect the cable to the USB port at the exposure meter first,
and then insert the mains plug into an electrical outlet.
The battery can also be charged using a USB port at a PC.
Remove the mains plug to this end, and connect the USB plug to
your PC.
The charging indicator lights up red while the battery is charging.
After the battery has been fully charged, the indicator will light up
green.
To protect the battery pack and prolong its life, do not charge it
for longer than 24 hours without break.
1. Unscrew
2. Remove Cover
Preparation
Page 3
GOSSEN Foto- und Lichtmesstechnik GmbH 3
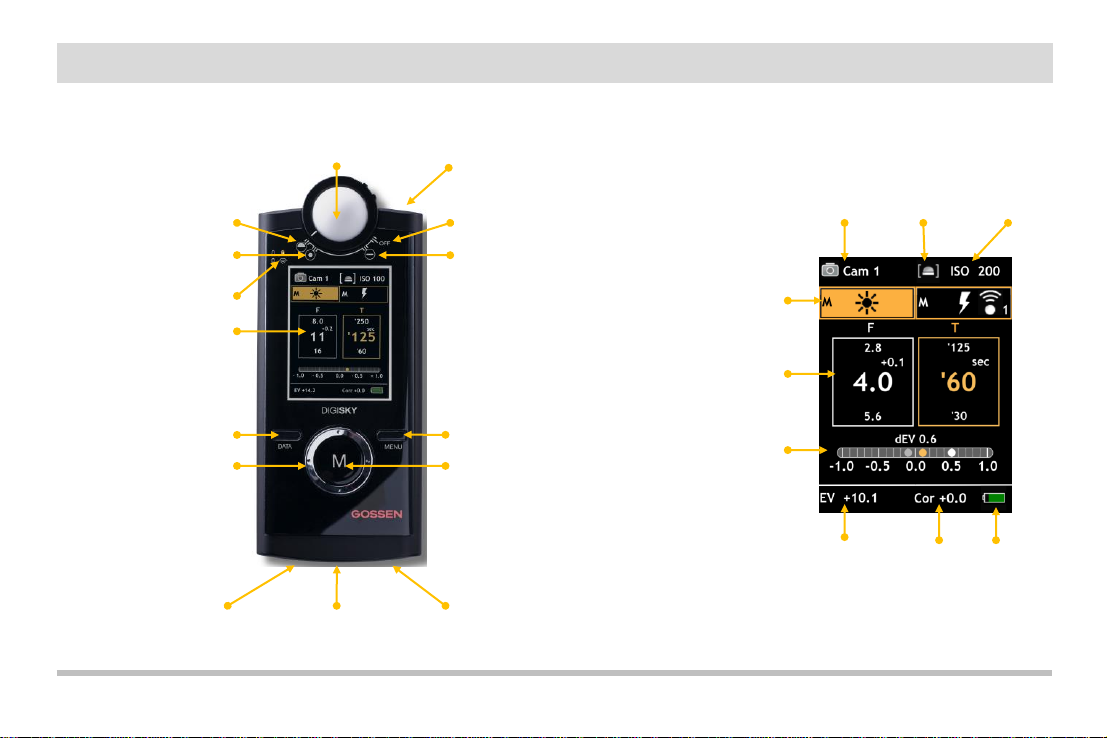
Switch device off
Incident light,
flat diffuser
Diffuser ring for incident light /
reflected light measurement,
off
LED`s for meter status
Display panel
Data key
Ring controller
Socket for connecting
flash synchronizing cable
Carrying strap
holder
USB port for charging battery
or data transmission
Meter cell for
reflected light
measurement
Menu key
Measurement key
User
Cam 1
Cam 2
Cam 3
Movie
Retractable
diffuser head
for spherical/
flat /reflected
measurement
ISO
speed
Measuring
function
Measured
values
Analog scale
Exposure
value EV
Cor.
Battery
Incident light
Spherical diffuser
Reflected light
Meter Overview
Page 4
4 GOSSEN Foto- und Lichtmesstechnik GmbH
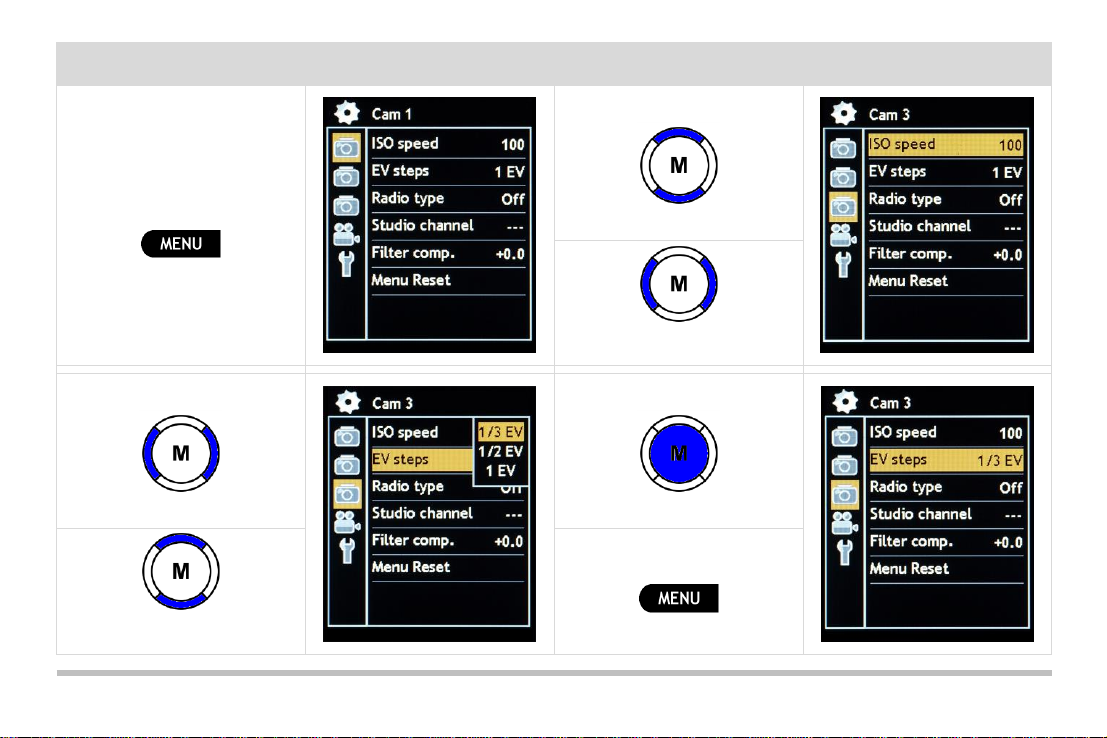
Navigation
Main Menu
Press and hold menu key
to select a menu
Use the ring controller
to select a user
to select a setting
Use the ring controller
to select a submenu
Press the measurement key
to confirm
to select a value
Use the measurement key
to exit the menu
Page 5

GOSSEN Foto- und Lichtmesstechnik GmbH 5
Function Selection: Ambient Light / Flash Light
Use the menu key
to select a function
Measuring Modes
Spherical incident light
measurement
. Reflected light
measurement
Flat incident light
measurement
Off
DIGISKY off
RF Function Selection: All / Group
Radio
Use DATA key and ring
controller
to select all
or groups
Turn On
after Standby (display OFF)
Activate by pressing any key or turning the instrument head
Automatic switching OFF
Activate with menu key only
Manual switching OFF
Turn instrument head to measurement modes
Page 6

6 GOSSEN Foto- und Lichtmesstechnik GmbH
Ambient Light
Use the ring controller
to set time / f-stop
Use the ring
controller
to select the desired
value
Press the measurement key to make a measurement.
Contrast measurement: press and hold the measurement key.
Contrast measurement: use the data key to display the average, minimum and maximum value.
Page 7

GOSSEN Foto- und Lichtmesstechnik GmbH 7
Flash Light
Use the ring
controller
to select the desired
synchronization
speed.
Radio
Use DATA key and
ring controller
to select flash
groups
All / ST
G1 to G4
(Elinchrom)
A to D (Phottix)
LP 1 to LP40
(Broncolor)
Press the measurement key
to perform a measurement.
NonCord
Approx. 45 seconds measurement standby duty trigger flash manually
Cord
Synchronizing cable – flash is triggered
RF RF module – flash is triggered
A compilation of compatible radio systems can be downloaded
from the product page at www.gossen-photo.de .
Page 8

8 GOSSEN Foto- und Lichtmesstechnik GmbH
Movie
Settings f-stop, sector angle, sensitivity etc. are set in the main menu.
EV analog display
Illuminance,
luminance
Measured value
with correction
Shutter
angle
CINE
speed
Press the measurement key to perform a measurement.
For continuous measurement: press and hold the measurement key;
use data key to display the average, minimum and maximum value.
Use the menu key
to switch the
display from
f-stop value to
photometric
value.
Movie
Page 9

GOSSEN Foto- und Lichtmesstechnik GmbH 9
The following data, required for the fulfillment of FCC and IC regulations, are referred to the meter mentioned in this document.
Product name: DIGISKY
Model number: H260A
FCC ID number: YXF-DIGISKY
IC number: 9333A-DIGISKY
Company name: GOSSEN Foto- und Lichtmesstechnik GmbH
FCC & IC - USA
Modifications
Any changes or modifications not expressly approved by the manufacturer could void the user's authority to
operate the equipment.
Conditions of
Operations
This device complies with Part 15 of the FCC Rules. Operation is subject to the following two conditions: (1) this
device may not cause harmful interference, and (2) this device must accept any interference received, including
interference that may cause undesired operation.
15.105
Class B digital device
or peripheral
This equipment has been tested and found to comply with the limits for a Class B digital device, pursuant to Part
15 of the FCC Rules. These limits are designed to provide reasonable protection against harmful interference in
a residential installation. This equipment generates, uses and can radiate radio frequency energy and, if not
installed and used in accordance with the instructions, may cause harmful interference to radio communications.
However, there is no guarantee that interference will not occur in a particular installation. If this equipment does
cause harmful interference to radio or television reception, which can be determined by turning the equipment
off and on, the user is encouraged to try to correct the interference by one or more of the following measures:
-- Reorient or relocate the receiving antenna.
-- Increase the separation between the equipment and receiver.
-- Connect the equipment into an outlet on a circuit different from that to
which the receiver is connected.
-- Consult the dealer or an experienced radio/TV technician for help.
15.105
Class A digital device
or peripheral
This equipment has been tested and found to comply with the limits for a Class A digital device, pursuant to part
15 of the FCC Rules. These limits are designed to provide reasonable protection against harmful interference
when the equipment is operated in a commercial environment. This equipment generates, uses, and can radiate
radio frequency energy and, if not installed and used in accordance with the instruction manual, may cause
harmful interference to radio communications. Operation of this equipment in a residential area is likely to cause
harmful interference in which case the user will be required to correct the interference at his own expense.
Page 10

10 GOSSEN Foto- und Lichtmesstechnik GmbH
Safety Precautions
In the event of malfunctioning, switch the light meter off immediately.
If the event that smoke develops or unusual odors become apparent, which are caused by either the measuring instrument or the power
supply, disconnect from mains power immediately and remove the rechargeable battery from the instrument in order to prevent possible
fire. Continuing to operate the measuring instrument or the power supply after such malfunctions have occurred may result in severe
injury. Please contact your local dealer or GOSSEN Service in order to eliminate malfunctioning. If you bring or send the instrument in for
repairs, make sure that the rechargeable battery has been removed first.
Never use the measuring instrument in proximity to flammable gases.
Electronic devices must not be used near flammable gases. Otherwise there would be danger of explosion and fire.
Never hang the meter and/or the carrying strap around the head or neck of a child.
Danger of strangulation exists if the carrying strap is hung around the head or neck of a child.
Store the measuring instrument at a location which cannot be accessed by children.
The measuring instrument and its accessories include parts which can be swallowed. Make sure that these parts (e.g. housing covers,
rechargeable batteries etc.) do not fall into the hands of children who might swallow them. Otherwise, danger of suffocation prevails.
Use suitable cables only.
Use only the included, original GOSSEN cables for connection to external devices. GOSSEN assumes no liability if other cables are
used.
Do not dismantle the exposure meter.
Never touch any parts located inside of the housing – injury may result. Never attempt to repair the meter yourself or try to open the
meter. Repairs may only be made by qualified personnel. If the meter’s housing is damaged due to dropping or other external influences,
remove the rechargeable battery or power supply and contact your local dealer or GOSSEN Service for repair.
Avoid any and all contact with the liquid crystals.
If the display is damaged (e.g. broken), danger of injury due to contact with glass shards or discharge of liquid crystals exists. Make sure
that skin, eyes and mouth do not come into contact with the liquid crystals.
Page 11

GOSSEN Foto- und Lichtmesstechnik GmbH 11
Disposal Note
This icon indicates that this product must be disposed of separately.
The following must be observed by users in European countries:
▪ This product may only be disposed of separately at a designated collection point. It may not be disposed of with
household trash.
▪ For further information contact your local dealer or waste disposal authorities.
Page 12

12 GOSSEN Foto- und Lichtmesstechnik GmbH
Printed in Germany – Subject to change without notice
GOSSEN Foto- und Lichtmesstechnik GmbH I Lina-Ammon-Str.22 I D-90471 Nürnberg I Germany
Telefon: +49 911 800621-0 I Fax: +49 911 800621-29 I E-Mail: info@gossen-photo.de
www.gossen-photo.de
 Loading...