

Page 1

EN Instruction manual .......................... 2
RU Инструкция по эксплуатации ...... 7
UA Інструкція з експлуатації ............ 13
Page 2

2
INSTRUCTION MANUAL EN
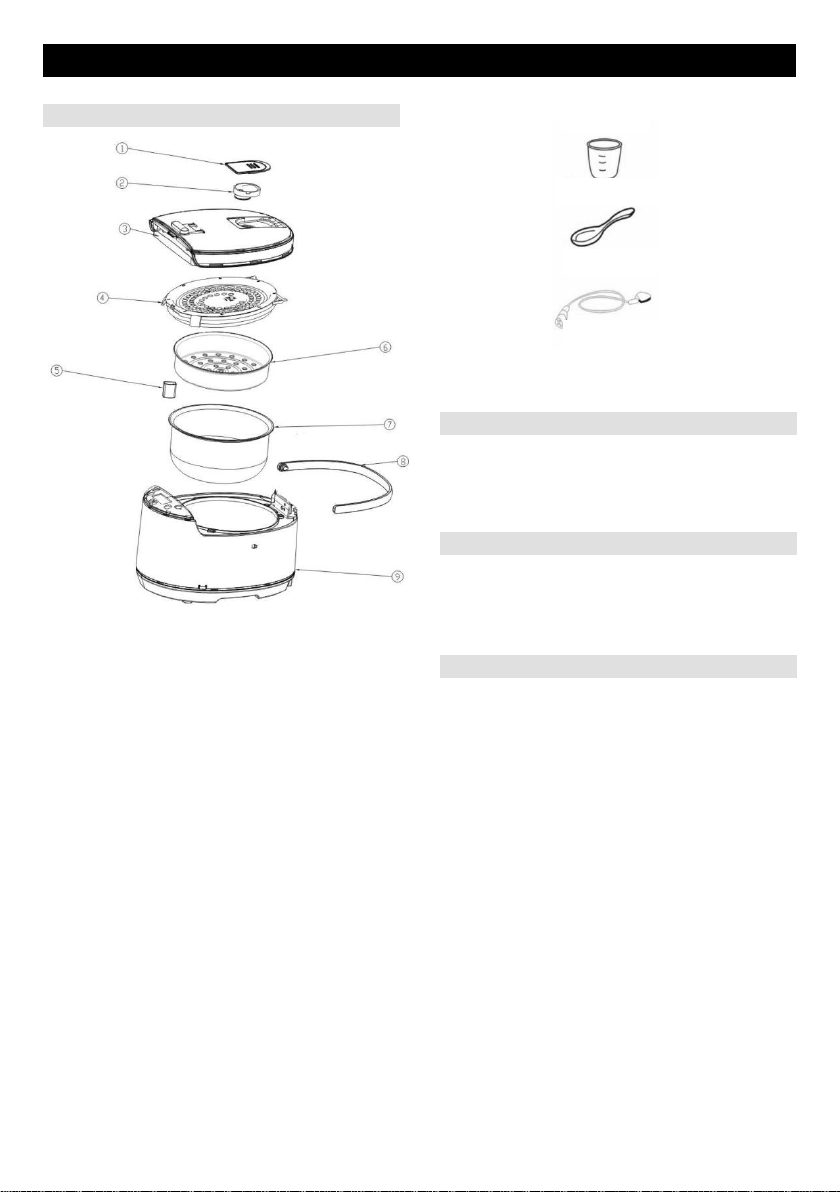
General description
1. Exhaust hood cover
2. Exhaust hood
3. Top lid
4. Pressure plate
5. Rice spoon holder
6. Steamer rack
7. Inner pot
8. Handle
9. Housing
Accessories:
Important
Before using the appliance for the first time,
carefully read this instruction manual and save it
for future reference.
Danger
Do not immerse the unit with electrical
components in water and do not wash it under
running water.
Warning
Before connecting the appliance to the power
mains, make sure the voltage specified on the
bottom of the appliance matches the voltage of the
power mains in your home. If the power cord is
damaged, it may only be replaced by Gorenje,
Gorenje's authorized service and repair center, or
an adequately trained professional.
Do not use the appliances, of the plug, power
cord, or any other component is damaged.
The appliance should not be used by children or
persons with impaired physical or psychological
skills, or persons with lacking experience and
knowledge, unless such persons are supervised or
advised by a person responsible for their safety.
Do not let the children play with the appliance.
Do not touch the appliance housing during use, as
it will get hot. To move the appliance, hold it by the
handle.
Be careful when opening the cooker; there is a
danger of scalding. Do not use force to open the
lid.
To avoid hazard, do not connect the appliance to
an external timer or a remote control system.
This equipment is labelled in compliance with the
European Directive 2002/96/EC on waste electric
and electronic equipment. The Directive specifies
the requirements for collection and management
of waste electric and electronic equipment
effective in the entire European Union.
Page 3

3
Program
Default
time
Time range
P04“Porridge”
1:00
0:30--4:00
P05“Soup”
1:10
0:30--4:00
P06“Stew”
2:00
0:40--6:00
P07“Yoghurt
6:00
1:00—10:00
P08“Slow cook”
4:00
2:00—8:00
P09“Fry”
0:30
0:10--1:00
P10“Reheat”
0:20
0:10--2:00
Caution!
Place the appliance on a level and stable surface.
The appliance is intended solely for household
use.
Do not use attachments, accessories, or other
parts provided by other manufacturers not
expressly recommended by Gorenje In case of
use of such attachments or accessories, the
warranty shall be void.
Preparing for use
1. Remove the packaging
2. Clean the appliance as instructed in the chapter
"Cleaning".
3. When inserting the inner pot, make sure the
bottom is clean. When the inner pot is inserted
into the pressure cooker, rotate it slightly in
both directions to make sure it sits correctly in
place.
4. Make sure the sealing ring is correctly installed.
5. Wait until the appliance cools down and clean it.
Using the appliance
Control panel
Button explanation
Setting time
Press together and for 3 sec and
then set minutes by pressing and hours by
pressing . When done wait for 3 sec and
time will be set.
Starting cooking programs P01 to P03
Those programs are fully automatic.
Cooking time is determent by the amount of
ingredients you put into the appliance.
Multi cooker has build in scale that weights and
adjust cooking time in accordance with the amount
of ingredients you put in.
Press button to select the program P01,
P02 or P03.
Press to start the program.
Display will show local time!
When cooking is finished, buzzer will ring and
keep warm function will start. Display will
show . Keep warm function will keep your
food warm for maximum 11 hours.
Button: to start preset program.
Button: to select preset program.
mode, keep warm function will start when this
button is pressed.
set delayed start.
hours are added rapidly.
minutes are added rapidly.
Button: to cancel working. In standby
Button: to change cooking time or/and
Button: to set hours. By holding this button
Button: to set minutes. By holding this button
Press to cancel keep warm function and
put the cooker in stand-by mode.
Cooking programs default time table:
Page 4

4
P11“Boil”
1:00
0:40--3:00
P12“Steam”
0:20
0:10--1:30
P13“Cake”
1:20
1:10—2:10
P14“Pasta”
0:10
0:05--0:40
P15“Fish”
0:40
0:30--2:00
P16“Chicken”
0:55
0:45--3:00
P17“Beef”
1:20
0:40--5:00
P18“Pork”
1:00
0:40--4:00
Starting cooking programs P04 to P18
Press button to select the program you
want (like P04 – P18).
Press to start the program.
Display will show and the remaining
cooking time!
When cooking is finished, buzzer will ring and
keep warm function will start. Display will
show . Keep warm function will keep your
food warm for maximum 11 hours.
Press to cancel keep warm function and
put the cooker in stand-by mode.
Starting cooking program with delayed start
First select the program you want by
pressing . Then press so that
display will show . With and
set time to 5:00 (4 hours default cooking
time + 5 hours delay) and press and hold
for 3 sec . Display will show and local
time.
Press to start the program with delayed
time!
To cancel press button.
When cooking is finished, buzzer will ring and
keep warm function will start. Display will
show . Keep warm function will keep your
food warm for maximum 11 hours.
Press to cancel keep warm function and
put the cooker in stand-by mode.
Starting cooking program with changed cooking
time
Press button to select the program you
want (like P01 – P18).
Press button to select the program you
want (like P01 – P18).
Pressing you can set when you want your
cooking to start!
Press to start the program.
Example: if now its 7:00 and you want to slow
cook your dish and that your lunch will be finished
at 16:00
Pressing you can set how long your meal
will be cooked.
Press to start the program.
Example: First select the program you want by
pressing . Then press so that
display will show . With and
set cooking time.
Page 5

5
Press to start the program.
Display will show and the remaining
cooking time.
To cancel press button.
When cooking is finished, buzzer will ring and
keep warm function will start. Display will
show . Keep warm function will keep your
food warm for maximum 11 hours.
Press to cancel keep warm function and
put the cooker in stand-by mode.
Starting cooking program with changed cooking
time and delayed start.
Press button to select the program you
want (like P01 – P18).
Press to set how long your meal will be
cooked.
Press again to set when you want your
cooking to start!
Press to start the program.
Example: if now its 7:00 and you want to slow
cook your dish for 6h and that your lunch will be
finished at 16:00.
Press button to select the P8 program.
Press , the display will show and
by pressing and set you cooking
time to 6h.
Press again and the display will
show . With and set time
to 3:00 (6 hours cooking time + 3 hours delay),
press and hold for 3 sec.
Display will show and local time.
Press to start the program with delayed
time!
To cancel press button.
When cooking is finished, buzzer will ring and
keep warm function will start. Display will
show . Keep warm function will keep your
food warm for maximum 11 hours.
Press to cancel keep warm function and
put the cooker in stand-by mode.
Special feature for programs Pasta, Steam and
Fry.
For these cooking programs it’s important that
water or oil have the correct temperature before
you start cooking.
When selecting these programs cooking time will
not start to count down until the right temperature
is reached. When right temperature is reached the
cooker will beeped three times and then cooking
time will start to count down. When beeps are
heard you can insert food in water or oil.
Tip: Clean the appliance immediately after use
(see chapter "Cleaning").
Cleaning
The appliance and parts of the appliance are not
dishwasher safe.
Thoroughly clean the appliance after each use, as
well as before use if it hasn't been used for a
while.
1. Before cleaning, disconnect the appliance from
the power mains and wait for it to cool down.
Page 6

6
2. Rinse the cooking pot with hot water and some
liquid detergent, and dry thoroughly.
3. Remove pressure plate as shown on the pic,
rinse with hot water and some liquid detergent
and dry thoroughly.
4. Wipe the housing with a damp cloth. Do not
wash the housing under running water and do
not immerse it in water.
5. To make sure the appliance works properly,
make sure the heating plate is clean. Clean
the heating plate with a damp cloth and dry it
thoroughly.
6. Do not use aggressive cleaners and metal
accessories for cleaning as these may
damage the appliance.
Storage
Store the appliance in a safe and dry place.
Environment
After the expiry of its useful life, do not discard the
appliance with common household waste. Take is
to an authorized recycling center. This will help
preserve the environment.
Warranty and repair
If you need information or if you have a problem,
please contact the Gorenje Customer Care Centre
in your country (you find its phone number in the
worldwide guarantee leaflet). If there is no
Customer Care Centre in your country, go to your
local Gorenje dealer or contact the Service
department of Gorenje domestic appliances.
For personal use only!
GORENJE
WISHES YOU A LOT OF PLEASURE
IN USING YOUR APPLIANCE.
We reserve the right to any modifications.
Page 7

7
ИНСТРУКЦИЯ ПО ЭКСПЛУАТАЦИИ RU
Общее описание
1. Крышка вытяжного колпака
2. Вытяжной колпак
3. Верхняя крышка
4. Прижимная пластина
5. Подставка для ложки
6. Паровая решетка
7. Кастрюля для варки
8. Ручка
9. Корпус
В комплекте:
Measuring cup - мерная чашка
Meal spoon - ложка
Power cord - шнур питания
Важное замечание
Перед первым использованием прибора
внимательно прочитайте эту инструкцию по
эксплуатации и сохраните ее для дальнейшего
использования в качестве справочного
материала.
Опасно!
Не погружайте блок с электрическими
компонентами в воду и не промывайте его
струей воды.
Предупреждение
Перед подключением прибора к сети
убедитесь, что напряжение, указанное на
днище прибора, соответствует напряжению
сети. Если шнур питания поврежден, его может
заменить компания Gorenje, авторизованный
сервисный и ремонтный центр Gorenje или
подготовленный специалист.
Не используйте прибор, если разъемы, шнур
питания или любые другие компоненты
повреждены.
Прибором не должны пользоваться дети или
лица с нарушениями физического или
психологического здоровья, либо лица с
недостаточным опытом и знаниями, за
исключением случая, когда эти лица работают
под наблюдением или пользуются советами
лица, ответственного за их безопасность. Не
позволяйте детям играть с прибором.
Не прикасайтесь к корпусу прибора при
эксплуатации, поскольку он сильно
нагревается. Перемещайте прибор за ручку.
Page 8

8
Будьте осторожны в момент, когда варка
открывается, т.к. можно получить ожог. Не
используйте силу для открывания крышки.
Для избегания опасных ситуаций не
подключайте прибор к внешнему таймеру или
системе дистанционного управления.
Данный прибор маркирован в соответствии с
Европейской Директивой 2002/96/EC по
утилизации электрического и электронного
оборудования. Директива определяет
требования к сбору и утилизации
отслужившего электрического и электронного
оборудования, действующие на всей
территории Европейского Союза.
Внимание!
Установите прибор на ровную и устойчивую
поверхность.
Прибор предназначен исключительно для
домашнего использования.
Не используйте приспособления,
принадлежности или иные детали других
производителей, которые непосредственно не
рекомендованы Gorenje. В случае
использования таких приспособлений и
принадлежностей гарантия будет
аннулирована.
Подготовка к использованию
6. Снимите упаковку
7. Очистите прибор, как описано в главе
"Чистка".
8. При установке кастрюли убедитесь, что
днище чистое. При установке кастрюли в
скороварку поверните кастрюлю немного в
обоих направлениях, чтобы убедиться, что
она расположена правильно.
9. Убедитесь, что уплотнительное кольцо
установлено правильно.
10. Подождите, пока прибор остынет, затем
очистите его.
Применение прибора
Панель управления
Описание кнопок
Кнопка: запуск заданной программы.
Кнопка: выбор программы.
Кнопка: остановка работы. В режиме
ожидания включается функция поддержки
нужной температуры при нажатии этой кнопки.
Кнопка: изменение времени
приготовления пищи или/и установка задержки
запуска.
Кнопка: установка часов. Удержание
этой кнопки используется для быстрой смены
часов.
Кнопка: установка минут. Удержание этой
кнопки используется для быстрой смены минут.
Установка времени
Нажмите одновременно и на 3 с,
затем установите минуты нажатием и
часы нажатием . После этого подождать
3 с и время будет установлено.
Запуск программ приготовления от P01 до P03
Эти программы являются полностью
автоматическими.
Время приготовления определяется
количеством ингредиентов, помещенных в
прибор.
Мультиварка оснащена встроенными весами,
которые взвешивают и регулируют время
Page 9

9
приготовления в соответствии с количеством
Программа
Время по
умолчани
ю
Временной
диапазон
P04 "Каша"
1:00
0:30--4:00
P05 "Суп"
1:10
0:30--4:00
P06 "Тушение
(мяса/рыбы)"
2:00
0:40--6:00
P07 "Йогурт"
6:00
1:00—10:00
P08 Режим
"Медленоварки
"
4:00
2:00—8:00
P09 "Жарка"
0:30
0:10--1:00
P10 "Подогрев"
0:20
0:10--2:00
P11
"Кипячение"
1:00
0:40--3:00
P12 "Обработка
паром"
0:20
0:10--1:30
P13 "Пирог"
1:20
1:10—2:10
P14 "Спагетти"
0:10
0:05--0:40
P15 "Рыба"
0:40
0:30--2:00
P16 "Курица"
0:55
0:45--3:00
P17 "Говядина"
1:20
0:40--5:00
P18 "Свинина"
1:00
0:40--4:00
заложенных ингредиентов.
Нажмите кнопку для выбора программы
P01, P02 или P03.
Нажмите кнопку для запуска
программы.
На дисплее будет отображаться местное
время!
По завершении приготовления подается
звуковой сигнал и включается функция
сохранения температуры. На дисплее будет
отображаться . Функция поддержания
температуры сохраняет пищу теплой максимум
11 часов.
Нажать для отмены функции
поддержания температуры и перевести варку в
режим ожидания.
Таблица заданного по умолчанию времени
для программ приготовления:
Запуск программ приготовления от P04 до P18
Нажмите кнопку , чтобы выбрать
программу (из P04 - P18).
Нажмите кнопку для запуска
программы.
На дисплее отобразится и
оставшееся время приготовления!
По завершении приготовления подается
звуковой сигнал и включается функция
сохранения температуры. На дисплее будет
отображаться . Функция поддержания
Page 10

10
температуры сохраняет блюдо теплым
максимум 11 часов.
Нажать для отмены функции
поддержания температуры и перевести варку в
режим ожидания.
Запуск программы приготовления с задержкой
старта
Нажмите кнопку , чтобы выбрать
нужную программу (из P01 - P18).
Нажав , установите отсрочку времени
приготовления!
Нажмите для запуска программы.
Пример: пусть сейчас 7:00 и вы хотите
готовить блюдо в режиме «Томление» и чтобы
к 16.00 ваш обед был готов.
Сначала выберите нужную программу, нажав
Нажать для отмены функции
поддержания температуры и перевести варку в
режим ожидания.
Запуск программы приготовления пищи с
измененным временем приготовления
Нажмите кнопку , чтобы выбрать
нужную программу (из P01 - P18).
Нажатием кнопки установите время
приготовления вашего блюда.
Нажмите для запуска программы.
Пример: Сначала выберите нужную программу,
нажав клавишу . Затем нажмите
с тем, чтобы на дисплее отобразилось
клавишу . Затем нажмите с
тем, чтобы на дисплее отобразилось
. С помощью и
установите время на 5:00 ( 4 часа заданное
время в режиме томление + 5 часов отсрочка
старта) и нажмите и удерживайте в
течение 3 с. На дисплее будет отображаться
и местное время.
Нажмите кнопку для запуска
программы с задержкой времени!
Для отмены нажмите кнопку .
По завершении приготовления подается
звуковой сигнал и включается функция
сохранения температуры. На дисплее будет
отображаться . Функция поддержания
температуры сохраняет блюдо теплым
максимум 11 часов.
. С помощью и установите
время приготовления.
Нажмите для запуска программы.
На дисплее отобразится и
оставшееся время приготовления.
Для отмены нажмите кнопку .
По завершении приготовления подается
звуковой сигнал и включается функция
сохранения температуры. На дисплее будет
отображаться . Функция поддержания
температуры сохраняет блюдо теплым
максимум 11 часов.
Нажать для отмены функции
поддержания температуры и перевести варку в
режим ожидания.
Page 11

11
Запуск программы приготовления с
измененным временем приготовления пищи и
отложенным запуском.
Нажмите кнопку для запуска
программы с задержкой времени!
Нажмите кнопку , чтобы выбрать
нужную программу (из P01 - P18).
Нажатием кнопки установите время
приготовления вашего блюда.
Нажмите снова , чтобы установить
отсрочку времени приготовления!
Нажмите для запуска программы.
Пример: пусть сейчас 7:00 и вы хотите
приготовить ваше блюда в режиме
медленоварки в течение 6 часов, чтобы ваш
обед был готов к 16:00.
Нажмите кнопку для выбора
программы P8.
Нажмите кнопку , на дисплее
отобразится , нажатием и
установите период приготовления,
равный 6 часам.
Нажмите еще раз, и на дисплее
отобразится . С помощью и
установите время на 3:00 (6 часов время
приготовления+3 часа отсрочка старта),
нажмите и удерживайте в течение 3
с.
На дисплее будет отображаться и
местное время.
Для отмены нажмите кнопку .
По завершении приготовления подается
звуковой сигнал и включается функция
сохранения температуры. На дисплее
отобразится . Функция поддержания
температуры сохраняет блюдо теплым
максимум 11 часов.
Нажать для отмены функции
поддержания температуры и перевести варку в
режиме ожидания.
Примечание:
для программ Спагетти, Приготовление на пару
и Обжаривание важно чтобы вода или масло
достигли необходимой температуры
приготовления. При выборе
вышеперечисленных программ обратный
отсчет времени не начнется, пока жидкость в
чаше не нагреется до необходимой
температуры. Звуковой сигнал сообщит о
достижении нужной температуры и начнется
обратный отсчет времени приготовления.
Совет: Очищайте прибор сразу же после
использования (см. главу "Чистка").
Чистка
Прибор и его детали не следует мыть в
посудомоечной машине.
Тщательно очищайте прибор после каждого
использования, а также перед использованием,
если он длительное время не работал.
10. Перед чисткой отсоедините прибор от
электросети и дайте ему остыть.
11. Промойте кастрюлю горячей водой и
небольшим количеством жидкого моющего
средства, затем тщательно высушите.
12. Снимите прижимную пластину, как
показано на рисунке, промойте горячей
водой и небольшим количеством жидкого
моющего средства, затем тщательно
высушите.
Page 12

12
PUSH - НАЖАТЬ
PULL - ОТТЯНУТЬ
13. Протрите корпус влажной тканью. Не мойте
корпус струей воды и не погружайте его в
воду.
14. Чтобы удостовериться, что прибор
работает нормально, убедитесь, что
нагревательная плита чистая. Очистить
нагревательную плиту с помощью влажной
ткани и тщательно протереть.
15. Не используйте агрессивные чистящие
средства и металлические приспособления
для чистки, так как они могут повредить
прибор.
Хранение
Храните прибор в надежном и сухом месте.
Вопросы, связанные с охраной
окружающей среды
После истечения срока службы не
выбрасывайте прибор вместе с бытовыми
отходами. Доставьте его на авторизованный
центр утилизации. Это будет способствовать
сохранению окружающей среды.
Гарантия и ремонт
Если вы хотите получить информацию или у
вас возникли проблемы, пожалуйста,
свяжитесь с Центром поддержки покупателей
Gorenje в вашей стране (номер телефона
центра указан в гарантийном талоне). Если
такого центра в вашей стране нет, обратитесь к
вашему местному дилеру Gorenje или
свяжитесь с отделом обслуживания бытовой
техники Gorenje.
Только для личного использования!
GORENJE
ЖЕЛАЕТ ВАМ ПОЛУЧАТЬ
УДОВОЛЬСТВИЕ ОТ
ИСПОЛЬЗОВАНИЯ ВАШЕГО
ПРИБОРА.
Мы оставляем за собой право на любые
изменения прибора.
Page 13
13
ІНСТРУКЦІЯ З ЕКСПЛУАТАЦІЇ UA
Мірний стакан
Ложка
Шнур живлення
Опис елементів
1. Кришка робочого клапана
2. Робочий клапан
3. Верхня кришка
4. Верхня нагрівальна ущільнювальна
пластина
5. Тримач ложки для рису
6. Парова решітка
7. Чаша для приготування
8. Ручка
9. Корпус
Аксесуари:
Важливо!
Перед початком експлуатації приладу уважно
прочитайте цю інструкцію й збережіть її для
використання в майбутньому.
Небезпечно
Не занурюйте електричні елементи приладу у
воду та в жодному разі не мийте його під
проточною водою.
Попередження
Перед підключенням приладу до мережі
живлення переконайтеся, що напруга в ній
відповідає напрузі, зазначеній на дні приладу.
Якщо шнур живлення пошкоджено, його
можна замінити звернувшись до
авторизованого сервісного центру Gorenje або
особи належної кваліфікації.
Не використовуйте прилад, якщо штепсельну
вилку, шнур живлення або інший компонент
пошкоджено.
Діти та особи з фізичними чи розумовими
вадами або особи без належного досвіду та
знань можуть користуватися приладом лише зі
сторонньою допомогою й під суворим
наглядом людей, що несуть відповідальність
за їх безпеку. Не дозволяйте дітям грати з
приладом.
Коли прилад увімкнено, НЕ торкайтеся його
корпусу, оскільки він нагрівається. Під час
переміщення тримайте прилад за ручки.
Будьте обережні відкриваючи прилад, щоб не
ошпаритися. Не відкривайте кришку силою.
Page 14

14
Не підключайте прилад до зовнішнього
таймера або системи дистанційного
керування, це може призвести до виникнення
загрози.
Це обладнання позначено відповідно до
Директиви ЄС 2002/96/EC щодо відходів
електричного та електронного обладнання.
Директива визначає вимоги до збирання та
переробки відходів електричного й
електронного обладнання, які
застосовуються у всьому Європейському
союзі.
Обережно!
Установіть прилад на рівну стійку поверхню.
Цей прилад призначено виключно для
побутового використання.
Використовуйте лише рекомендовані
компанією Gorenje приладдя, аксесуари або
інші деталі сторонніх виробників. У разі
використання нерекомендованого приладдя
або аксесуарів гарантія на прилад не
розповсюджується.
Перед використанням
11. Зніміть пакування
12. Очистіть прилад, як це зазначено в розділі
«Чищення».
13. Вставляючи внутрішню каструлю,
переконайтеся, що дно чисте. Вставивши
внутрішню каструлю у мультиварку, злегка
поверніть каструлю в обох напрямках, щоб
впевнитися, що вставили її правильно.
14. Переконайтеся, що ущільнювальна
пластина вставлена належним чином.
15. Дайте приладу охолонути й почистіть його.
Використання
Панель управління
Опис кнопок
Кнопка: для початку обраної
програми.
Кнопка: для вибору програми.
Кнопка: для припинення роботи.
Якщо натиснути кнопку в режимі очікування,
увімкнеться режим підігріву і підтримання
температури.
Кнопка: для зміни часу приготування
та/або налаштування відкладеного старту.
Кнопка: для налаштування годинника.
При утримування цієї кнопки, швидко
змінюється значення годин.
Кнопка: для налаштування годинника.
При утримування цієї кнопки, швидко
змінюється значення хвилин.
Налаштування годинника
Натисніть разом та та
утримайте протягом 3 сек , після чого
встановіть хвилини, натискаючи , та
години, натискаючи . Після вибору годин
і хвилин, зачекайте 3 сек – і годинник буде
налаштовано.
Page 15

15
Початок роботи програм з P01 по P03
Програма
Тривалість за
замовчуванн
ям
Можливий
інтервал
P04“Каша”
1:00
0:30--4:00
P05“Суп”
1:10
0:30--4:00
P06
“Тушкування”
2:00
0:40--6:00
P07“Йогурт
6:00
1:00—10:00
P08 “Повільне
приготування”
4:00
2:00—8:00
P09“Смаження”
0:30
0:10--1:00
P10“Розігрів”
0:20
0:10--2:00
P11“Варка”
1:00
0:40--3:00
P12
“Приготування
на пару”
0:20
0:10--1:30
P13“Пиріг”
1:20
1:10—2:10
P14“Паста”
0:10
0:05--0:40
P15“Риба”
0:40
0:30--2:00
P16“Курка”
0:55
0:45--3:00
P17
“Яловичина”
1:20
0:40--5:00
P18“Свинина”
1:00
0:40--4:00
Це повністю автоматичні програми.
Час приготування визначається за кількістю
інгредієнтів, яку Ви поклали до каструлі.
Мультиварка має вбудовані ваги, які зважують
інгредієнти, які Ви кладете всередину, і
відповідно регулює час приготування.
Натисніть кнопку щоб обрати програму
P01, P02 чи P03.
Натисніть щоб почати програму.
Дисплей показуватиме поточний час!
Коли приготування закінчиться, пролунає
звуковий сигнал, і активується режим
підтримання тепла. На дисплеї
відображатиметься . Режим підтримки
тепла підігріває страву протягом 11 годин.
Натисніть , щоб вимкнути режим
підтримки тепла і перевести мультиварку у
режим очікування.
Тривалість програм приготування:
Початок роботи програм з P04 по P18
Натисніть кнопку щоб обрати
відповідну програму (P04 – P18).
Натисніть для початку програми.
На дисплеї з’явиться напис та час
до закінчення приготування!
Коли приготування закінчиться, пролунає
звуковий сигнал, і активується режим
підтримання тепла. На дисплеї
відображатиметься . Режим підтримки
тепла підтримуватиме температуру страви
максимум 11 годин.
Page 16

16
Натисніть щоб вимкнути режим
підтримки тепла і перевести мультиварку у
режим очікування.
Початок роботи програми із відкладеним
стартом
Натисніть кнопку щоб обрати
програму (P04 – P18).
Натисніть щоб вимкнути режим
підтримки тепла і перевести мультиварку у
режим очікування.
Початок програми зі зміненою тривалістю
приготування
Натисніть кнопку щоб обрати
програму (P04 – P18).
Натиснувши Ви можете встановити
час відкладеного старту.
Натисніть для початку програми.
Приклад: якщо зараз 7:00 і Ви хочете готувати
у режимі «Томління», щоб обід був готовий
о16:00. Спочатку оберіть програму,
натискаючи . Потім натисніть
на дисплеї відобразиться .
Кнопками та встановіть час 5:00 (
4 години встановлений час приготування для
режиму “Томління” + 5 годин відкладений
старт) та натисніть і утримайте кнопку
протягом 3 сек. На дисплеї
відобразиться і місцевий час.
Натисніть для початку програми із
відкладеним стартом!
щоб відмінити натисніть кнопку .
Коли приготування закінчиться, пролунає
звуковий сигнал, і активується режим
підтримання тепла. На дисплеї
відображатиметься . Режим підтримки
тепла підтримуватиме температуру страви
максимум 11 годин.
Натискаючи Ви можете встановити
бажану тривалість приготування.
Натисніть щоб почати програму.
Приклад: Спочатку оберіть програму,
натискаючи . Потім натисніть ,
на дисплеї з’явиться напис . Кнопками
та встановіть тривалість
приготування.
Натисніть щоб почати програму.
На дисплеї буде відображено та час
до закінчення приготування.
Для відмінити натисніть кнопку .
Коли приготування закінчиться, пролунає
звуковий сигнал, і активується режим
підтримання тепла. На дисплей
відображатиметься . Режим підтримки
тепла підтримуватиме температуру страви
максимум 11 годин.
Натисніть щоб вимкнути режим
підтримки тепла і перевести мультиварку у
режим очікування.
Початок програми зі зміненою тривалістю
приготування та відкладеним стартом.
Page 17

17
Натисніть кнопку щоб обрати
програму (P04 – P18).
Натискаючи Ви можете встановити
бажану тривалість приготування.
Для відмінити натисніть кнопку .
Коли приготування закінчиться, пролунає
звуковий сигнал, і активується режим
підтримання тепла. На дисплей
відображатиметься . Режим підтримки
тепла підтримуватиме температуру страви
максимум 11 годин.
Натисніть іще раз і встановіть
відкладений час приготування!
Натисніть щоб почати програму.
Приклад: якщо зараз 7:00 і Ви бажаєте
повільно готувати страву протягом 6 годин, і
щоб обід був готовий о 16:00.
Натисніть кнопку щоб обрати
програму P8.
Натисніть , на дисплеї
відобразиться , натискаючи та
встановіть тривалість приготування
6годин.
Натисніть на дисплеї знову
відобразиться . Кнопками та
встановіть відкладений час
приготування на 3.00 ( 6 годин обраний час
приготування + 3 години відкладений старт)
натисніть і утримайте протягом 3
сек.
На дисплеї відобразиться і
місцевий час.
Натисніть щоб почати програму із
відкладеним початком!
Натисніть щоб вимкнути режим
підтримки тепла і перевести мультиварку у
режим очікування.
Примітка:
для програм Спагетті, Приготування на пару
та Смаження важливо щоб вода чи рослинне
масло досягли необхідної температури
приготування. При виборі даних програм
зворотній відлік часу не розпочнеться до тих
пір, поки рідина всередині чаші не нагріється
до необхідної температури. Звуковой сигнал
сповістить про досягнення належної
температури і розпочнеться зворотній відлік
часу приготування.
Підказка: Чистіть прилад одразу після
кожного використання (див. розділ
«Чищення»).
Чищення
Пристрій і його деталі не можна мити в
посудомийній машині.
Ретельно очищайте прилад після кожного
використання. Також вимийте прилад перед
приготуванням їжі, якщо не використовували
його певний час.
16. Перш ніж почати чистити прилад,
від’єднайте його від мережі живлення й
дайте йому охолонути.
17. Вимийте каструлю в гарячій воді з
додаванням рідкого мийного засобу. Після
цього повністю висушіть її.
18. Зніміть ущільнювальну пластину як
показано на рисунку, промийте у гарячій
воді із рідким мийним засобом та ретельно
висушіть.
Page 18

18
19. Протріть корпус вологою тканиною. Не
2. Потягніть
1.Натисніть
мийте корпус під водою та не занурюйте
його у воду.
20. Щоб прилад працював належним чином,
нагрівальна пластина повинна бути
чистою. Почистіть нагрівальну пластину
вологою тканиною та повністю висушіть.
21. Не використовуйте агресивні мийні засоби
та металеві пристосування для очищення,
оскільки вони можуть пошкодити прилад.
Зберігання
Зберігайте прилад у безпечному й сухому
місці.
Довкілля
Після закінчення строку експлуатації не
викидайте прилад разом із побутовими
відходами. Віднесіть його в авторизований
центр утилізації. Таким чином ви збережете
довкілля.
Гарантія та ремонт
Додаткову інформацію або допомогу в разі
проблеми можна отримати звернувшись на
місцеву інформаційну лінію Gorenje (див.
номер телефону в міжнародному гарантійному
талоні). Якщо у вашій країні немає такої лінії,
зверніться до регіонального дилера компанії
Gorenje або сервісного центру, де
обслуговуються побутові прилади Gorenje.
Лише для особистого використання!
КОМПАНІЯ GORENJE
БАЖАЄ ВАМ ОТРИМАТИ
МАКСИМАЛЬНЕ ЗАДОВОЛЕННЯ
ВІД КОРИСТУВАННЯ ЦИМ
ПРИСТРОЄМ.
Ми залишаємо за собою право вносити будьякі зміни.
 Loading...