

Page 1

MCB6BA
EN Instruction manual .......................... 2
UA Інструкція з експлуатації .............. 9
RU Инструкция по эксплуатации .... 22
Page 2

INSTRUCTION MANUAL EN
General description
1. Operating valve
2. Handle
3. Safety valve
4. Lid hinge
5. Lid
6. Seal ring
7. Seal ring support
8. Cooking pot
9. Inner ring
10. Handle
11. Handle
12. Display
13. Housing
14. Control panel
15. Heating panel
16. Lower panel
Accessories:
Important
Before using the appliance for the first time,
carefully read this instruction manual and save it
for future reference.
Danger
Do not immerse the unit with electrical
components in water and do not wash it under
running water.
Warning
Before connecting the appliance to the power
mains, make sure the voltage specified on the
bottom of the appliance matches the voltage of the
power mains in your home. If the power cord is
damaged, it may only be replaced by Gorenje,
Gorenje's authorized service and repair center, or
an adequately trained professional.
Do not use the appliances, of the plug, power
cord, or any other component is damaged.
The appliance should not be used by children or
persons with impaired physical or psychological
skills, or persons with lacking experience and
knowledge, unless such persons are supervised or
advised by a person responsible for their safety.
Do not let the children play with the appliance.
DO not touch the appliance housing during use, as
it will get hot. To move the appliance, hold it by the
handles.
2
Page 3

Be careful when releasing the pressure and
opening the pressure cooker; there is a danger of
scalding. Do not use force to open the lid.
To avoid hazard, do not connect the appliance to
an external timer or a remote control system.
This equipment is labelled in compliance with the
European Directive 2002/96/EC on waste electric
and electronic equipment. The Directive specifies
the requirements for collection and management
of waste electric and electronic equipment
effective in the entire European Union.
Caution!
Place the appliance on a level and stable surface.
The appliance is intended solely for household
use.
Do not use attachments, accessories, or other
parts provided by other manufacturers not
expressly recommended by Gorenje In case of
use of such attachments or accessories, the
warranty shall be void.
Preparing for use
1. Remove the packaging
2. Clean the appliance as instructed in the
chapter "Cleaning".
3. When inserting the inner potl, make sure the
bottom is clean. When the inner pot is inserted
into the pressure cooker, rotate it slightly in
both directions to make sure it sits correctly in
place.
4. Make sure the sealing ring is correctly
installed. To check whether the sealing ring is
correctly installed, fill one third of the cooking
pot with water and set the pressure holding
time to 15 minutes.
5. When the time runs out, release the steam by
setting the safety steam release valve into
Exhaust position, and wait for the floating
valve to drop.
6. Wait until the appliance cools down and clean
it.
Using the appliance
Open the appliance slid as shown in the figure.
If required, the lid can be completely removed as
shown in the figure.
Place the ingredients into the pressure cooker.
The ingredients should not fill more than 4/5 of the
cooker. Ingredients that tend to expand of swell
during cooking (such as beans) should not fill
more than 1/5 of the cooker.
Close the appliance lid as shown in the figure.
Before closing the lid, make sure the sealing ring
is correctly installed.
Move the steam release valve to the "sealed"
position and make sure the floating valve is not
lifted.
3
Page 4

Select the desired program.
Selected program, symbol "F:", and a number will
flash on the display. The number represents
cooking time. In 30 seconds, the display will stop
flashing and the cooking process will start.
Cooking time will start counting down when the
pressure in the cooker reaches the desired value.
"Pressure" will appear on the display.
When the cooking process is over, the appliance
will switch to "warming" mode. To end the cooking
process, press the "Cancel" key.
Move the pressure release valve to "Exhaust"
position and wait for the floating valve to drop.
Tip: When cooking meat which requires a longer
cooking time (such as beef), leave the valve in the
"sealed" position and wait for the appliance to cool
and for the floating valve to drop.
Programs, Cake, Slow cook, Fry and
Suatee/Brown are selected directly through the
buttons on front panel.
Programs, Stew, Braise, Steam, Rice and Soup
are selected with Multifunction button on the front
panel!
Setting the delayed start
Press "Time setting". "00:00" and "preset" will
appear on the display. Use the + and – keys to set
the number of hours before the cooking process is
to start. Press the "time setting" again and use the
+ and – keys to set the minutes of delay. Select
the cooking program, either directly or with the
"Multifunction" key. Selected program, symbol
"F:", and a number will flash on the display. The
number indicates the cooking time. After thirty
seconds, time will start counting down. The display
will show the time remaining to the start of the
cooking program, the selected program, and the
"Preset" sign. When the delay time expires, the
cooking program will start.
To cancel the delayed start setting, press
"Cancel".
When the cooking starts, the heating symbols will
flash on the display. In addition, letter F and the
remaining cooking time in minutes will be shown.
Cooking time starts counting down when the
pressure in the cooker reaches the required level
and the floating valve is lifted into its upper
position. "Pressure" will appear on the display.
Manual cooking
Use manual cooking for large amounts of food or
larger chunks of meat, if the desired cooking
program does not allow changing the cooking
time.
When using manual cooking the temperature
inside the pot is 100 °C with open lid and 115-120
°C if the lid is closed and under pressure.
Press »Pressure holding time« and use the + and
– keys to set the cooking time. A flashing P: and a
number will appear on the display. The number
represents cooking time. At the same time, the
heaters will be activated. After 30 seconds, the P:
sign and the number will stop flashing.
Cooking time starts counting down when the
pressure in the cooker reaches the required level
and the floating valve is lifted into its upper
position. "Pressure" will appear on the display.
Fry program
This program is used for frying.
Cooking time is preset to 25 minutes.
When using this program, remove the lid or
keep it open.
During this cooking program, oil can reach a very
high temperature between 160°C and 170°C.
Press the "Fry" key.
Start frying when the oil heats up.
To end the cooking process prematurely, press
the "Cancel" key. When you are done frying, it is
recommended to wait for 30 minutes for the
appliance to cool down before using it again.
Sauté/Brown program
4
Page 5

This program is used for frying meat and
vegetables. The temperature is lower than with the
"Fry" program (120°C – 130°C).
Cooking time is preset to 30 minutes.
When using this program, remove the lid or
keep it open.
Press the "Sauté/Brown" key.
"F:30" will flash on the display. After 30 seconds,
F:30 will stop flashing. When the "Pressure"
symbol lights up, the oil has reached a
temperature that is suitable for sautéing or
browning.
To end the cooking process prematurely, press
the "Cancel" key.
Slow cook program
This program is used to slowly cook meat and
vegetables.
A temperature between 85°C and 100°C is
maintained.
Press the "Slow cook" key. Cooking time will flash
on the display. The cooking time can be adjusted if
necessary using the + and – keys. After 30
seconds, cooking time will stop flashing and the
program will start. The cooker will operate
regardless of the pressure!
When cooking time expires, the appliance will
switch to "Warming" mode.
Cake program
This program is used for baking bread or pastry.
Cooking temperature inside the pot is set to 115120°C.
Press the "Cake" key. "F:" and a number will flash
on the display. The number indicates the cooking
time which is preset to 30 minutes. The cooking
time can be adjusted if necessary using the + and
– keys. After 30 seconds, cooking time will stop
flashing and the program will start.
Cooking time starts counting down when the
pressure in the cooker reaches the required level
and the floating valve is lifted into its upper
position. "Pressure" will appear on the display.
When cooking time expires, the appliance will
switch to "Warming" mode.
Steam program
This program is intended for steam cooking.
Cooking temperature inside the pot is set to 115120°C.
Fill 1/5 or 2/5 of the cooking vessel with water.
Amount of water depends on the cooking time.
Insert the steam cooking grid and place the
ingredients to be cooked onto the grid.
Use the "Multifunction" key to select the "Steam"
program.
"F:" and a number will flash on the display. The
number indicates the cooking time which is preset
to 15 minutes. The cooking time can be adjusted if
necessary using the + and – keys. After 30
seconds, cooking time will stop flashing and the
program will start.
Cooking time starts counting down when the
pressure in the cooker reaches the required level
and the floating valve is lifted into its upper
position. "Pressure" will appear on the display.
When cooking time expires, the appliance will
switch to "Warming" mode.
Stew program
This program is used for cooking stews.
Cooking time is preset to 20 minutes.
Cooking temperature inside the pot is set to 115120°C.
Use the "Multifunction" key to select the "Stew"
program.
"F:", a number, and "Stew" will flash on the
display. The number indicates the cooking time
which is preset to 20 minutes. The cooking time
can be adjusted if necessary using the + and –
keys.
After 30 seconds, the display will stop flashing.
Cooking time starts counting down when the
pressure in the cooker reaches the required level
and the floating valve is lifted into its upper
position. "Pressure" will appear on the display.
When cooking time expires, the appliance will
switch to "Warming" mode.
Rice program
This program is used for cooking rice.
Cooking temperature inside the pot is set to 115120°C.
Use the "Multifunction" key to select the "Rice"
program.
"F:" and a number will flash on the display. The
number indicates the cooking time which is preset
to 10 minutes. The cooking time can be adjusted if
necessary using the + and – keys. After 30
seconds, cooking time will stop flashing and the
program will start.
Cooking time starts counting down when the
pressure in the cooker reaches the required level
and the floating valve is lifted into its upper
position. "Pressure" will appear on the display.
When cooking time expires, the appliance will
switch to "Warming" mode.
5
Page 6

Soup program
Programs
Original
pressure
cooking time
(min)
Time
settings
(min)
Pressure (kPa)
Fry
00:25
/
Lid open
Cake
00:30
1 - 90
50 - 60
Soup
00:30
1 - 90
50 - 60
Rice
00:10
1 - 90
50 - 60
Stew
00:20
1 - 90
50 - 60
Slow cook
02:00
1h - 9h 0 Steam
00:15
1 - 90
50 - 60
Sauté Brown
00:30
1 - 90
Lid open
Braise
00:30
1 - 90
50 - 60
Warming / /
0
This program is used for cooking soups and
porridges.
Cooking temperature inside the pot is set to 115120°C.
Use the "Multifunction" key to select the "Soup"
program.
"F:" and a number will flash on the display. The
number indicates the cooking time which is preset
to 30 minutes. The cooking time can be adjusted if
necessary using the + and – keys. After 30
seconds, cooking time will stop flashing and the
program will start.
Cooking time starts counting down when the
pressure in the cooker reaches the required level
and the floating valve is lifted into its upper
position. "Pressure" will appear on the display.
When cooking time expires, the appliance will
switch to "Warming" mode.
Braise program
This program is used for cooking braising.
Cooking temperature inside the pot is set to 115120°C.
Use the "Multifunction" key to select the
"Braise/Tendon" program.
"F:" and a number will flash on the display. The
number indicates the cooking time which is preset
to 30 minutes. The cooking time can be adjusted if
necessary using the + and – keys. After 30
seconds, cooking time will stop flashing and the
program will start.
Cooking time starts counting down when the
pressure in the cooker reaches the required level
and the floating valve is lifted into its upper
position. "Pressure" will appear on the display.
When cooking time expires, the appliance will
switch to "Warming" mode.
Warming program
This program is used to warm up the food or to
keep it warm.
Press the Cancel/Warming key.
The appliance will heat up the food or maintain a
temperature between 60°C and 80°C.
To cancel the program, press the
"Cancel/Warming" key.
Program table
Tip: Clean the appliance immediately after use
(see chapter "Cleaning").
Power button
Power button tells you how much power the
machine used, since the machine plug it. Display
shows power consumption in kWh.
The readings are only approximate.
6
Page 7
Cleaning
The appliance and parts of the appliance are not
dishwasher safe.
Thoroughly clean the appliance after each use, as
well as before use if it hasn't been used for a
while.
1. Before cleaning, disconnect the appliance
from the power mains and wait for it to cool
down.
2. Rinse the cooking pot with hot water and
some liquid detergent, and dry thoroughly.
3. Wipe the housing with a damp cloth. Do not
wash the housing under running water and do
not immerse it in water.
4. After use, remove the condensate tank and
rinse it.
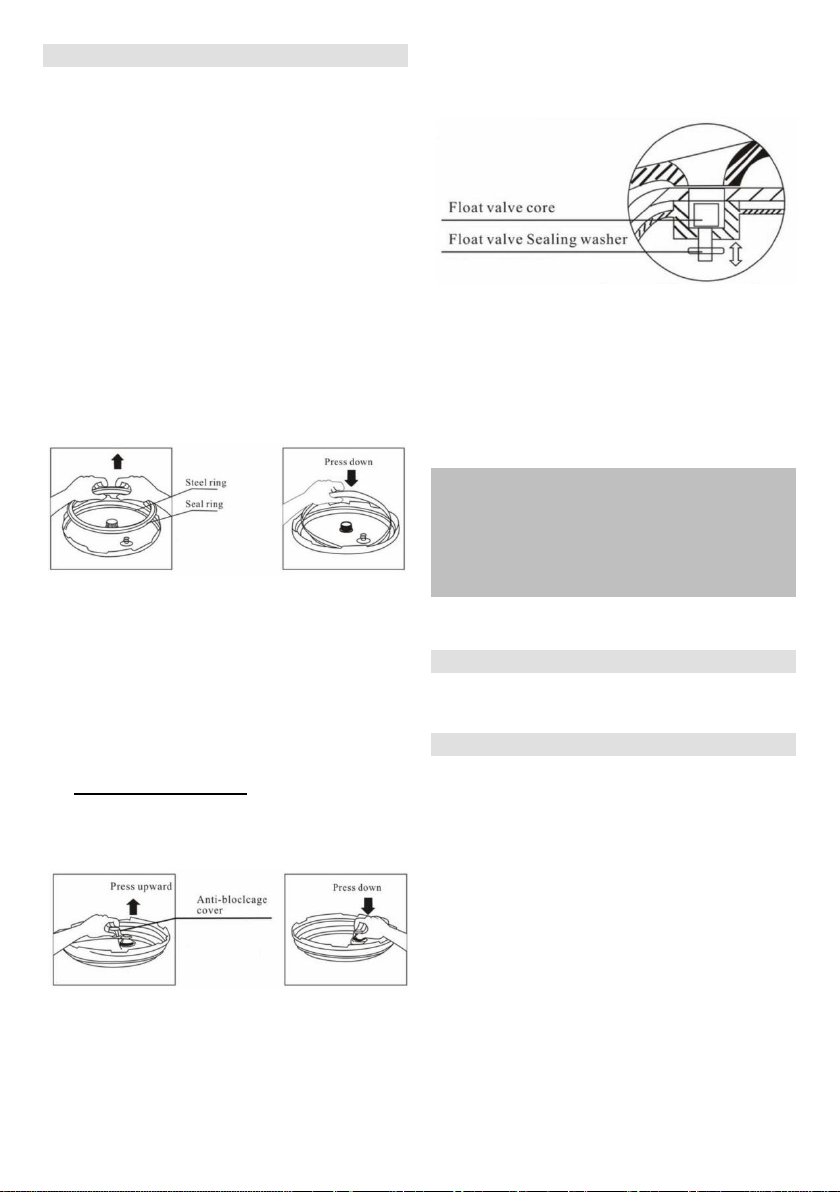
5. Remove the lid and clean it. Remove the
sealing ring by gently pulling it upwards.
Clean the sealing ring under running hot water
with some detergent. Dry the sealing ring
thoroughly. When putting sealing ring back on,
make sure it is correctly fitted under the
sealing ring holder. Make sure there are no
wrinkles on the gasket. If the sealing ring is
not fitted correctly, the appliance will not work
and it may be damaged. If you notice during
cleaning that the sealing ring is damaged or
cracked, do not use the appliance and call a
Gorenje service center to replace it.
6. Remove the metal filter, clean it, and replace it
onto the lid.
7. Clean the safety valve.
8. To make sure the appliance works properly,
make sure the heating plate is clean. Clean
the heating plate with a damp cloth and dry it
thoroughly.
9. Do not use aggressive cleaners and metal
accessories for cleaning as these may
damage the appliance.
Tip: Sometimes it’s hard to fit sealing ring into the
sealing ring holder after cleaning. We suggest that
you put the sealing ring back into the sealing ring
holder just before you start to use the machine
and before putting it back, you apply a bit of
cooking oil onto the sealing ring. Oiling the ring
makes the ring slips in its position much easier.
Storage
Store the appliance in a safe and dry place.
Environment
After the expiry of its useful life, do not discard the
appliance with common household waste. Take is
to an authorized recycling center. This will help
preserve the environment.
7
Page 8

Warranty and repair
Shown
code
Fault
E1
sensor cut circuit
E2
sensor short
circuit
E3
over
temperature
E4
signal swich
failure
If multi cooker stops to work please check the
display for an error code. Write down this code
and inform Gorenje Call Center.
For more information or in case of problems,
please contact Gorenje Call Center in your country
(phone number listed in the International Warranty
Sheet). If there is no such center in your country,
please contact the local Gorenje dealer or
Gorenje's small domestic appliance department.
For personal use only!
GORENJE
WISHES YOU A LOT OF PLEASURE
IN USING YOUR APPLIANCE.
We reserve the right to any modifications.
8
Page 9

Інструкція з експлуатації UA
Кошик для приготування у фритюрі
Мірний стакан
Ложка
Шнур живлення
Загальний опис
1. Робочий клапан
2. Ручка
3. Запобіжний клапан
4. Кріплення кришки
5. Кришка
6. Герметичне кільце
7. Тримач герметичного кільця
8. Чаша для приготування
9. Внутрішня ємність
10. Ручка
11. Ручка
12. Дисплей
13. Корпус
14. Панель управління
15. Нагрівальна пластина
16. Нижня панель
Аксесуари:
Важливо
Перед початком експлуатації приладу
уважно прочитайте цю інструкцію й
збережіть її для використання в
майбутньому.
Небезпечно
Не занурюйте електричні елементи приладу
у воду та в жодному разі не мийте прилад
під проточною водою.
Застереження
Перед підключенням приладу до мережі
живлення переконайтеся, що напруга в ній
відповідає напрузі, зазначеній на нижній
поверхні приладу. Якщо шнур живлення
пошкоджено, його можна замінити
звернувшись до авторизованого сервісного
центру Gorenje або особи з належною
кваліфікацією.
Не використовуйте прилад, якщо
штепсельну вилку, шнур живлення або
інший компонент пошкоджено.
Діти та особи з фізичними чи розумовими
вадами або особи без належного досвіду та
знань можуть користуватися приладом лише
зі сторонньою допомогою й під суворим
наглядом людей, що несуть відповідальність
за їх безпеку. Не дозволяйте дітям грати з
приладом.
9
Page 10

Коли прилад увімкнено, НЕ торкайтеся його
корпусу, оскільки він нагрівається. Під час
переміщення тримайте прилад за ручки.
Будьте обережні випускаючи тиск і
відкриваючи прилад під тиском, щоб не
ошпаритися. Не відкривайте кришку силою.
Не підключайте прилад до зовнішнього
таймера або системи дистанційного
керування, це може призвести до
небезпечних наслідків.
Це обладнання позначено відповідно до
Директиви ЄС 2002/96/EC щодо відходів
електричного та електронного обладнання.
Директива визначає вимоги до збирання та
переробки відходів електричного й
електронного обладнання, які
застосовуються у всьому Європейському
союзі.
Увага!
Установіть прилад на рівну стійку поверхню.
Цей прилад призначено виключно для
побутового використання.
Використовуйте лише рекомендовані
компанією Gorenje приладдя, аксесуари або
інші деталі сторонніх виробників. У разі
використання нерекомендованого приладдя
або аксесуарів гарантія на прилад не
розповсюджується.
пари в положення «Відкрито».
Зачекайте, доки опуститься поплавковий
клапан.
11. Дайте приладу охолонути й почистіть
його.
Використання
Відкрийте кришку приладу, як показано на
рисунку
За потреби кришку можна зняти повністю
(див. рис).
Перед використанням
7. Зніміть пакування.
8. Очистіть прилад, як це зазначено в
розділі «Чищення».
Вставляючи внутрішню каструлю,
переконайтеся, що дно чисте. Вставивши
внутрішню каструлю у скороварку, злегка
поверніть каструлю в обох напрямках, щоб
впевнитися, що вставили її правильно.
9. Переконайтеся, що ущільнювальне
кільце вставлено належним чином. Для
цього заповніть каструлю для
приготування водою на третину й
встановіть час утримання тиску
15 хвилин.
10. Коли час мине, випустіть пару,
встановивши запобіжний клапан випуску
Помістіть інгредієнти у мультиварку.
Чаша мультиварки повинна бути заповнена
не більше ніж на 4/5. Якщо інгредієнти
збільшуються у розмірі під час приготування
(наприклад, квасоля), заповніть ними не
більше 1/5 чаші.
Закрийте кришку приладу, як показано на
малюнку. Перед закриттям кришки
переконайтеся, що ущільнювальне кільце
вставлено належним чином.
.
10
Page 11

Встановіть клапан випуску пари в положення
«Закрито» та перевірте, щоб поплавковий
клапан не був піднятий.
Виберіть потрібну програму.
На дисплеї блиматиме вибрана програма,
символ «F:» та число. Число вказує на час
приготування. За 30 секунд дисплей
перестане блимати, і почнеться процес
приготування. Відлік часу приготування
почнеться, коли тиск у мультиварці сягне
потрібного значення.
Закінчивши приготування, прилад
автоматично перейде в режим «Підігрів».
Щоб закінчити приготування, натисніть
клавішу «Відміна».
Встановіть клапан випуску пари в положення
«Відкрито» та зачекайте, доки поплавковий
клапан не опуститься.
Панель управління
Передню панель обладнано кнопками для
безпосереднього вибору програм: випічка,
повільне приготування, смаження та соте.
Програми тушкування, томління,
приготування на пару, рис та суп
вибираються за допомогою кнопки «Вибір
функції» на передній панелі.
Функція відкладеного запуску
Натисніть «Налаштування часу». На дисплеї
відобразиться «00:00» та «preset». За
допомогою клавіш «+» і «–» задайте години
до початку приготування. Натисніть кнопку
«Налаштування часу» для встановлення
хвилин. За допомогою клавіш «+» і «–»
задайте хвилини до початку приготування.
Виберіть програму приготування
безпосередньо або кнопкою «Вибір функції».
На дисплеї відобразиться обрана програма,
символ “F:” та час приготування. За
тридцять секунд почнеться зворотний відлік
часу. Дисплей відображатиме час до запуску
програми приготування, обрану програму та
індикацію відкладеного старту «Preset».
Коли час мине, запуститься програма
приготування.
Щоб скасувати відкладений запуск,
натисніть клавішу «Відміна».
Коли почнеться приготування, на дисплеї
відображатимуться пламені нагріву,
індикація «F:» та час приготування, що
залишився (у хвилинах).
Відлік часу приготування почнеться, коли
тиск у мультиварці сягне потрібного рівня, а
поплавковий клапан підніметься в найвище
положення. Символ “Pressure”
відображатиметься на дисплеї.
Порада: У разі приготування м’яса, яке
потрібно готувати тривалий час (наприклад,
яловичини), залиште клапан у положенні
«Закрито» й зачекайте, доки прилад охолоне
і поплавковий клапан опуститься.
Налаштування власного режиму
приготування
Використовуйте ручний режим приготування,
якщо необхідно приготувати велику страву
або великий шматок м’яса, а стандартна
програма не дозволяє змінювати час
приготування.
У цьому режимі температура всередині
каструлі сягатиме 100 °C (з відкритою
кришкою) та 115–120 °C (із закритою
кришкою та під тиском).
Натисніть кнопку «Час роботи під тиском»
та вкажіть тривалість готування за
допомогою клавіш «+» і «-». На дисплеї
блиматиме «P:» та число. Число вказує на
11
Page 12

час приготування. У той самий час
увімкнуться нагрівальні елементи. За
30 секунд символ «P:» та число перестануть
блимати.
Відлік часу приготування почнеться, коли
тиск у мальтиварці сягне потрібного рівня, а
поплавковий клапан підніметься в найвище
положення.
Символ“Pressure”відображатиметься на
дисплеї.
Програма «Смаження»
Ця програма використовується для
смаження м’яса та приготування у фритюрі.
Попередньо встановлено час приготування
25 хвилин. Зменшення або збільшення часу
приготування даною програмою не
передбачені.
Готуйте тільки з відкритою кришкою!
Під час використання цієї програми олія
може суттєво розігрітися, до 160–170 °C.
Як тільки олія розігріється, почніть смажити
продукти.
Щоб раніше закінчити приготування,
натисніть кнопку «Відміна». Після смаження
рекомендується зачекати близько 30 хвилин,
щоб прилад охолонув. Після цього можна
використовувати його знову.
Програма «Соте»
Ця програма використовується для
обсмаження м’яса та овочів. На відміну від
програми «Смаження», температура
всередині чаші досягає 120°C – 130°C.
Попередньо встановлено час приготування
30 хвилин.
Готуйте тільки з відкритою кришкою!
Натисніть кнопку «Соте». На дисплеї
відображатиметься «F:30». За 30 секунд
символи на дисплеї перестануть блимати і
розпочнеться процесс приготування. Поява
символу «Pressure» означає досягнення
встановленої температури придатної для
готування. Щоб раніше закінчити
приготування, натисніть клавішу «Відміна».
Програма «Повільне
приготування»
Ця програма використовується для
повільного приготування м’яса й овочів.
Підтримується температура 85–100°C.
Натисніть кнопку «Повільне приготування».
На дисплеї почне блимати час приготування.
За потреби його можна змінити клавішами
«+» і «-». За 30 секунд час приготування
перестане блимати, і почнеться процес
приготування. Мультиварка працюватиме,
незалежно від тиску!
Після закінчення приготування прилад
перейде в режим «Підігрів».
Програма «Випічка»
Ця програма використовується для випічки.
Підтримується температура 115-120°C.
Натисніть кнопку "Випічка". Символ "F:" та
час приготування відображатимуться на
дисплеї. Попередньо встановлено час
приготування 30 хвилин. За потреби його
можна змінити клавішами «+» і «-». За
30 секунд символи перестануть блимати, і
почнеться процес приготування.
Відлік часу приготування почнеться, коли
тиск у мальтиварці сягне потрібного рівня, а
поплавковий клапан підніметься в найвище
положення.
Символ “Pressure”відображатиметься на
дисплеї.
Після закінчення приготування прилад
перейде в режим «Підігрів».
Програма «Приготування на
пару»
Ця програма використовується для
приготування страв на пару.
Температура приготування — 115–120 °C.
Заповніть каструлю для приготування водою
на 1/5 або 2/5. Об’єм води залежить від часу
приготування. Вставте решітку для
приготування на пару та покладіть на неї
необхідні інгредієнти.
Натисніть клавішу «Вибір функції», щоб
вибрати програму «На пару».
Символ «F:» і число блиматимуть на
дисплеї. Число вказує на час приготування
(попередньо встановлено час 15 хвилин). За
потреби його можна змінити клавішами «+» і
«-». За 30 секунд індикація перестане
блимати, і почнеться процес приготування.
Відлік часу приготування почнеться, коли
тиск у мультиварці сягне потрібного рівня, а
поплавковий клапан підніметься в найвище
положення.
Символ “Pressure”відображатиметься на
дисплеї.
Після закінчення приготування прилад
перейде в режим «Підігрів».
12
Page 13

Програма «Тушкування»
Ця програма використовується для
приготування тушкованих страв.
Попередньо встановлено час приготування
20 хвилин. Температура приготування —
115–120 °C.
Виберіть програму «Тушкування» за
допомогою кнопки «Вибір функції».
Символ «F:» і число блиматимуть на
дисплеї. Число вказує на час приготування.
За потреби час можна змінити клавішами
«+» і «-».
За 30 секунд дисплей перестане блимати.
Відлік часу приготування почнеться, коли
тиск у мультиварці сягне потрібного рівня, а
поплавковий клапан підніметься в найвище
положення.
Символ“Pressure”відображатиметься на
дисплеї.
Після закінчення приготування прилад
перейде в режим «Підігрів».
Програма «Рис»
Ця програма використовується для
приготування рису та інших злаків.
Попередньо встановлено час приготування
10 хвилин. Температура приготування —
115–120 °C.
Оберіть програму «Рис» за допомогою
кнопки «Вибір функції».
Символ «F:» і число блиматимуть на
дисплеї. Число вказує на час приготування.
За потреби час приготування можна змінити
клавішами «+» і «-».
За 30 секунд дисплей перестане блимати.
Відлік часу приготування почнеться, коли
тиск у мультиварці сягне потрібного рівня, а
поплавковий клапан підніметься в найвище
положення.
Символ“Pressure”відображатиметься на
дисплеї.
Після закінчення приготування прилад
перейде в режим «Підігрів».
Програма «Суп»
Ця програма використовується для
приготування супу та молочних каш.
Попередньо встановлено час приготування
30 хвилин. Температура приготування —
115–120°C.
Виберіть програму «Суп» за допомогою
кнопки «Вибір функції».
Символ «F:» і число блиматимуть на
дисплеї. Число вказує на час приготування.
За потреби час приготування можна змінити
клавішами «+» і «-».
За 30 секунд дисплей перестане блимати.
Відлік часу приготування почнеться, коли
тиск у мультиварці сягне потрібного рівня, а
поплавковий клапан підніметься в найвище
положення. Символ
“Pressure”відображатиметься на дисплеї.
Після закінчення приготування прилад
перейде в режим «Підігрів».
Програма «Томління»
Попередньо встановлено час приготування
30 хвилин.
Температура приготування — 115–120 °C.
Оберіть програму «Томління» за допомогою
кнопки «Вибір функції».
Символ «F:» і число блиматимуть на
дисплеї. Число вказує на час приготування.
За потреби час приготування можна змінити
клавішами «+» і «-».
За 30 секунд дисплей перестане блимати.
Відлік часу приготування почнеться, коли
тиск у мультиварці сягне потрібного рівня, а
поплавковий клапан підніметься в найвище
положення.
Символ “Pressure” відображатиметься на
дисплеї.
Після закінчення приготування прилад
перейде в режим «Підігрів».
Функція підтримання тепла
Ця програма використовується для підігріву
страв або підтримання їх теплими.
Натисніть клавішу «Відміна/Підігрів».
Пристрій розігріватиме страву або
підтримуватиме її температуру між 60 та
80 °C.
Щоб скасувати програму, натисніть клавішу
«Відміна/Підігрів».
13
Page 14

Таблиця програм
Програми
Автоматичне
готування(хв.)
Налаштування
часу (хв.)
Тиск
(кПа)
Смаження
00:25
/
Відкрита
кришка
Випічка
00:30
1 - 90
50 - 60
Суп
00:30
1 - 90
50 - 60
Рис
00:10
1 - 90
50 - 60
Тушкування
00:20
1 - 90
50 - 60
Повільне
приготування
02:00
1 – 9годин
0
На пару
00:15
1 - 90
50 - 60
Соте
00:30
1 - 90
Відкрита
кришка
Томління
00:30
1 - 90
50 - 60
Підігрів / /
0
Сталеве кільце
Гереметичне
кільце
Натисніть вниз
Потягніть вверх
Фільтр
Натисніть вниз
Ущільнювальна прокладка поплавкового клапана
14. Зніміть і помийте кришку. Зніміть
ущільнювальне кільце, обережно
потягнувши його догори.
Порада: Відразу після використання
очистіть прилад (див. розділ «Чищення»).
Кнопка споживчої потужності
За допомогою даної функції Ви зможете
приблизно побачити енергоспоживчі затрати
приладу, відображені у кВт. Дані значення
не є абсолютно вірними і можуть мати
похибку.
Чищення
Пристрій і його деталі не можна мити в
посудомийній машині.
Ретельно очищайте прилад після кожного
використання. Також вимийте прилад перед
приготуванням їжі, якщо не використовували
його певний час.
10. Перш ніж почати чистити прилад,
від’єднайте його від мережі живлення й
дайте йому охолонути.
11. Вимийте каструлю в гарячій воді з
додаванням рідкого миючого засобу.
Після цього повністю висушіть її.
12. Протріть корпус вологою тканиною. Не
мийте корпус під водою та не занурюйте
його у воду.
13. Після використання вийміть резервуар
для конденсату та сполосніть його.
Помийте його гарячою водою з миючим
засобом. Повністю висушіть. Вставляючи
ущільнювальне кільце на місце,
переконайтеся, що правильно вставили
його у тримач. На ньому не повинно бути
зморшок. Якщо вставити ущільнювальне
кільце неправильно, прилад не
працюватиме та може бути пошкоджено.
Якщо під час чищення ви помітили, що
кільцевий ущільнювач пошкоджений або
тріснув, не користуйтеся приладом і
зверніться до авторизованого
сервісного центру Gorenje для заміни.
15. Зніміть і почистіть металевий фільтр,
після чого знову встановіть його на
кришку.
16. Очистіть запобіжний клапан.
17. Щоб прилад працював належним чином,
нагрівальна пластина повинна бути
чистою. Почистіть нагрівальну пластину
вологою тканиною та повністю висушіть.
18. Не використовуйте агресивні миючі
засоби та металеві спонжі для
очищення, оскільки вони можуть
пошкодити прилад.
14
Page 15

Порада: Інколи після чищення складно
Код
Несправність
E1
коротке
замикання
ланцюга датчика
E2
коротке
замикання
датчика
E3
перегрівання
E4
несправність
сигнального
перемикача
вставити ущільнювальне кільце в тримач.
Радимо вставляти ущільнювальне кільце в
тримач безпосередньо перед використанням
приладу, злегка змастивши його рослинною
олією.
Зберігання
Зберігайте прилад у безпечному й сухому
місці.
Довкілля
Після закінчення строку експлуатації не
викидайте прилад разом із побутовими
відходами. Віднесіть його в авторизований
центр утилізації. Таким чином ви збережете
довкілля.
Гарантія та ремонт
Якщо мультиварка не працює, погляньте на
код помилки на дисплеї. Запишіть його та
повідомте авторизований сервісний центр
Gorenje.
Додаткову інформацію або допомогу в разі
проблеми можна отримати звернувшись на
місцеву інформаційну лінію Gorenje (див.
номер телефону в міжнародному
гарантійному талоні). Якщо у вашій країні
немає такої лінії, зверніться до
регіонального дилера компанії Gorenje або
сервісного центру, де обслуговуються
побутові прилади Gorenje.
Лише для особистого використання!
КОМПАНІЯ GORENJE
БАЖАЄ ВАМ ОТРИМАТИ
МАКСИМАЛЬНЕ ЗАДОВОЛЕННЯ
ВІД КОРИСТУВАННЯ ЦИМ
ПРИСТРОЄМ.
Ми залишаємо за собою право вносити
будь-які зміни.
15
Page 16

Рецепти та поради щодо приготування страв
Інгредієнти
Кількість
Спосіб приготування
Довгозернистий рис
400 г
Покладіть усі інгредієнти в каструлю.
Додайте воду, сіль і вершкове масло.
Закрийте кришку. Виберіть програму
«Рис».
Заморожений горох
100 г
Морква, нарізана невеликими
кубиками
100 г
Вода або бульйон
550 мл
Сіль за смаком
Вершкове масло
30 г
Інгредієнти
Кількість
Спосіб приготування
Довгозернистий рис
400 г
1. Налийте в каструлю оливкову олію.
Виберіть програму «Смаження».
2. Додайте креветки, мідії, нарізані
помідори, роздавлений часник, базилік
і сіль. Смажте протягом 7–10 хвилин.
Не закривайте кришку!
3. Додайте рис і нарізаний перець.
Налийте воду. Закрийте кришку.
4. Виберіть програму «Рис», встановіть
час приготування 15 хвилин.
Вода або бульйон
500 мл
Креветки
12
Мідії
12-14
Помідори (середнього розміру)
2
Солодкий перець
1
Базилік, сіль за смаком
Оливкова олія
2 столові ложки
Часник
2 зубчики
Готування страв у мультиварці-скороварці надає низку переваг.
- Страви, приготовані у скороварці, не втрачають мінеральні речовини, вітаміни та колір.
- Висока температура в каструлі та пара зменшують час приготування на третину. До того
ж, завдяки приготуванню під високим тиском волокна їжі стають м’якшими та ніжнішими.
Навіть найжорсткіше м’ясо смакуватиме ніжно.
- Не потрібно наглядати за процесом приготування. Мультиварка регулює потрібну
температуру й сповіщає, коли страву можна подати на стіл. Проведіть вільний час із
Ця програма ідеально підходить для приготування страв зі злаків (овес, гречка, рис).
Рис з овочами (4 порції)
Рис із морепродуктами (4 порції)
друзями й рідними.
Рецепти для програми «Рис»
16
Page 17

Рецепти для програми «Суп»
Інгредієнти
Кількість
Спосіб приготування
Колотий горох
250 г
1. Промийте горох холодною водою.
2. Покладіть горох у каструлю та налийте
700 мл. води. Закрийте кришку.
3. Виберіть програму «Суп», встановіть
час 25 хвилин.
4. Відварений горох перекладіть у миску
та збийте блендером. Додайте
роздавлений часник, нарізаний бекон і
кріп.
5. Покладіть у каструлю та готуйте,
використовуючи програму «Суп»,
протягом 10 хвилин. Добре смакує з
грінками.
Бекон
100 г
Часник
3–4 зубчики
Сіль, перець за смаком
Кріп
6 гілочок
Вода
700 мл
Інгредієнти
Кількість
Спосіб приготування
Манна крупа
60 г
1. Покладіть у каструлю курячі крильця й
налийте 1000 мл холодної води.
2. Виберіть програму «Суп», закрийте
кришку та встановіть час 25 хвилин.
3. Процідіть готовий бульйон через сито.
4. Додайте манну крупу, збиті яйця й
пармезан у каструлю з курячим
бульйоном.
5. Приправте сіллю, перцем і нарізаною
петрушкою. Готуйте у програмі «Суп»
протягом 10 хвилин, не закриваючи
кришку та помішуючи інгредієнти.
Курячий бульйон
1000 мл
Яйця
3
Сіль, перець за смаком
Петрушка
6 гілочок
Тертий пармезан
100 г
Курячі крильця
4 шт.
Гороховий суп із беконом (4 порції)
Суп із манної крупи (4 порції)
17
Page 18

Рецепти для програми «Тушкування»
Інгредієнти
Кількість
Спосіб приготування
Нарізана яловичина
800 г
1. Виберіть програму «Смаження» або
«Соте».
2. Покладіть у каструлю інгредієнти у
наступному порядку: вершкове масло,
дрібно нарізана цибуля, солодкий перець
паприка, роздавлений часник, сік і цедра
лимона. Добре все перемішайте та
обсмажте протягом 5-7 хвилин.
3. Додайте 250 мл гарячої води й томатну
пасту. Сіль за смаком. Покладіть у
каструлю м’ясо.
4. Вимкніть програму «Смаження». Встановіть
решітку для приготування на пару та
викладіть картоплю, нарізану половинками.
5. Закрийте кришку, виберіть програму
«Тушкування» та встановіть час 30–
35 хвилин.
6. Коли м’ясо буде готове, додайте в
каструлю сметану, змішану з борошном і
перцем чилі. Прикрасьте петрушкою.
Подавайте з картопляним пюре.
Цибуля
1
Вершкове масло
50 г
Часник
2 зубчика
Солодкий перець паприка
1 столова ложка
Петрушка
6 гілочок
Лимон (сік і цедра)
1
Перець чилі (без зерняток)
½
Томатна паста
1 столова ложка
Сметана
2 столові ложки
Борошно
1 столова ложка
Сіль за смаком
Очищена картопля
8-10
Інгредієнти
Кількість
Спосіб приготування
М’ясо кролика (нарізане
шматками)
1,5 кг
1. Виберіть програму «Смаження» та
розігрійте 2 столові ложки оливкової олії.
2. Обваляйте м’ясо кролика в борошні й
обсмажте в каструлі до золотистого
кольору (2–3 хвилини з кожної сторони).
Перекладіть обсмажене м’ясо на тарілку.
3. Виберіть програму «Соте» або
«Смаження». Розігрійте оливкову олію, яка
залишилася.
4. Покладіть у каструлю інгредієнти в такому
порядку: дрібно нарізана цибуля,
нарізаний бекон і роздавлений часник.
5. Обжарте всі інгредієнти протягом 3–
4 хвилин, доки вони не стануть м’якими й
не набудуть золотистого кольору. Додайте
вино й половину об’єму оцту.
6. Покладіть у каструлю м’ясо. Додайте
розмарин і помідори, приправте за смаком.
Закрийте кришку. Виберіть програму
«Тушкування», встановіть час 35 хвилин.
7. Перед подаванням прикрасьте дрібно
нарізаною петрушкою.
Бекон
6 шматків
Консервовані помідори у
власному соку
800 мл
Дрібно нарізана цибуля
2
Часник
4 зубчики
Оливкова олія
60 мл
Біле вино
250 мл
Бальзамічний оцет
30 мл
Розмарин
2 гілочки
Петрушка
6 гілочок
Борошно
2 столові ложки
Гуляш із картопляним пюре (4 порції)
Кролик із розмарином (4 порції)
18
Page 19

Яловичина по-бургундськи (4 порції)
Інгредієнти
Кількість
Спосіб приготування
Оливкова олія
3 столові ложки
1. Виберіть програму «Соте»
(«Смаження») і розігрійте оливкову олію.
2. Додайте яловичину й обсмажте, доки
вона не набуде коричневого кольору.
Відкладіть.
3. Тушкуйте цибулю, доки вона не стане
прозорою.
4. Знову покладіть м’ясо й інші інгредієнти
(крім води й борошна) і залиште кипіти
протягом 3–4 хвилин.
5. Закрийте кришку, виберіть програму
«Тушкування» та встановіть час 30–
35 хвилин.
6. Після закінчення програми приготування
зачекайте, щоб тиск знизився (не
знижуйте його навмисно), потім
відкрийте кришку.
7. Змішайте борошно й воду в чашці та
влийте в каструлю.
8. Встановіть ручний режим приготування
та тушкуйте до загустіння. Потім готуйте
ще одну хвилину.
9. Страву можна подавати.
Яловичина (лопаткова
частина), нарізана шматками
1 кг
Морква (нарізана)
5
Червона цибуля (велика)
1
Часник (подрібнений)
2 зубчики
Лаврове листя
1
Сіль
3 столові ложки
Чебрець
2 столові ложки
Чорний перець
½ столової ложки
Яловичий бульйон
150 мл
Червоне вино
150 мл
Томатна паста
2 столові ложки
Вода
50 мл
Борошно
2 столові ложки
Інгредієнти
Кількість
Спосіб приготування
Яйця
3 (близько 150 г)
Найцікавіше в цьому рецепті те, що всі
інгредієнти треба взяти в однаковій кількості:
борошно, цукор, вершкове масло та яйця.
Настійно рекомендуємо використовувати
вершкове масло та яйця кімнатної
температури.
1. Збийте яйця з цукровою пудрою та
процідіть через сито, щоб уникнути
грудочок.
2. Додайте борошно та ретельно
перемішайте.
3. Додайте вершкове масло й сіль.
Перемішайте всі інгредієнти до однорідної
маси.
4. Вилийте в тісто розтоплений шоколад і
злегка розподіліть до утворення розводів.
5. Змажте каструлю для приготування
вершковим маслом і вилийте в неї готове
тісто.
6. Закрийте кришку. Виберіть програму
«Випічка», встановіть час 30 хвилин.
Борошно
150 г
Цукрова пудра
150 г
Вершкове масло
150 г
Пучка солі
Чорний шоколад
50 г
Рецепти для програми «Випічка»*
*Доступна не на всіх моделях мультиварок
Мармуровий торт із шоколадом (4 порції)
19
Page 20

Рецепти для програми «Повільне приготування»
Інгредієнти
Кількість
Спосіб приготування
Оливкова олія
3 столові ложки
1. Виберіть програму «Соте» («Смаження») і
розігрійте оливкову олію.
2. Додайте яловичину й тушкуйте, доки вона
не набуде коричневого кольору.
3. Обсмажте цибулю до прозорості.
4. Знову покладіть м’ясо та інші інгредієнти
5. Закрийте кришку. Встановіть програму
«Повільне приготуванння», встановіть час
4–5 годин. Встановіть клапан випуску пари
в положення «Відкрито».
6. Коли приготування закінчиться, вийміть
м’ясо й наріжте невеликими шматочками.
7. Подавайте на великій тарілці, поливши
соусом.
Яловичина (лопаткова
частина) без кісток
1,5 кг
Цибуля (велика)
1
Морква
4
Часник (подрібнений)
3 зубчики
Лаврове листя
2
Сіль
3 столові ложки
Чорний перець
½ столової ложки
Яловичий бульйон
300 мл
Біле вино
100 мл
Інгредієнти
Кількість
Спосіб приготування
Оливкова олія
3 столові ложки
1. Виберіть програму «Соте» («Смаження») і
розігрійте оливкову олію.
2. Додайте яловичину й тушкуйте, доки вона
не набуде коричневого кольору.
3. Додайте часник і тушкуйте ще протягом
хвилини. Приправте сіллю й перцем.
Відкладіть.
4. Розплавте вершкове масло й додайте
картоплю, селеру, цибулю та моркву.
Обсмажте до золотистого кольору.
5. Додайте всі інгредієнти й ретельно
перемішайте.
6. Закрийте кришку. Встановіть програму
«Повільне приготування», встановіть час
5–6 годин. Встановіть клапан випуску
пари в положення «Відкрито».
7. Страву можна подавати.
Вершкове масло
50 г
Яловичина (нарізана шматками
товщиною по 2 см)
0,6 кг
Картопля сорту Рассет
(невелика, неочищена,
нарізана шматками товщиною
по 1,5 см)
0,5 кг
Червона картопля (невелика,
неочищена, нарізана шматками
товщиною по 1,5 см)
0,5 кг
Часник (роздавлений)
5
Червоне вино
1 чашка
Пиво «Guinness»
1 чашка
Цибуля (велика, крупно
нарізана)
1
Яловичий бульйон
6 чашок
Томатна паста
3 столові ложки
Білий цукор
1 столова ложка
Чебрець (сушений)
1 столова ложка
Лаврове листя
3
Селера (нарізана)
4 стеблини
Вустерський соус
2 столові ложки
Морква (нарізана шматками
товщиною по 2 см)
3
Тушковане м’ясо (4 порції)
Яловичина, тушкована у вині по-ірландськи (4 порції)
20
Page 21

Рецепти для програми «Приготування на парі»
Інгредієнти
Кількість
Спосіб приготування
Оливкова олія
1 столова ложка
1. Намажте кожен стейк 1 столовою ложкою
гірчиці.
2. Покладіть на кожен стейк по одній гілочці
чебрецю.
3. Виберіть програму «Соте», («Смаження») і
тушкуйте цибулю та часник в оливковій
олії до золотистого кольору. Додайте вино
й лаврове листя.
4. Покладіть лосось у пароварку й поставте в
каструлю.
5. Закрийте кришку, виберіть програму
«Пара» та встановіть час 3 хвилини.
6. Після закінчення приготування встановіть
клапан випуску пари в положення
«Відкрито», щоб швидко знизити тиск.
7. Вийміть стейки та каструлю з водою.
8. Змішайте 2 столові ложки гірчиці й
кукурудзяний крохмаль.
9. Вийміть лаврове листя та розмішайте
приготовану суміш у рідині. Готуйте в
режимі ручного приготування до
загустіння, підтримуючи кипіння й постійно
помішуючи
10.Подавайте соус зі стейком лосося.
Стейки лосося (невеликі)
4
Цибуля (невелика, нарізана)
1
Часник (подрібнений)
1
Біле вино
1 чашка
Свіжий чебрець
3–4 гілочки
Гірчиця (діжонська)
6 столових ложок
Кукурудзяний крохмаль
1 столова ложка
Лаврове листя
1
Стейк лосося з гірчицею (2 порції)
21
Page 22

ИНСТРУКЦИЯ ПО ЭКСПЛУАТАЦИИ RU
Фритюрная корзинка
Мерная чашка
Ложка для еды
Шнур питания
Общее описание
1. Клапан управления
2. Ручка
3. Предохранительный клапан
4. Петля крышки
5. Крышка
6. Уплотнительное кольцо
7. Опора уплотнительного кольца
8. Кастрюля для варки
9. Внутреннее кольцо
10. Ручка
11. Ручка
12. Индикатор
13. Корпус
14. Панель управления
15. Нагревательная панель
16. Нижняя панель
В комплекте:
Важное замечание
Перед первым использованием прибора
внимательно прочитайте эту инструкцию по
эксплуатации и сохраните ее для
дальнейшего использования в качестве
справочного материала.
Опасно
Не погружайте блок с электрическими
компонентами в воду и не промывайте его
струей воды.
Предупреждение
Перед подключением прибора к сети
убедитесь, что напряжение, указанное на
днище прибора, соответствует напряжению
сети. Если шнур питания поврежден, его
может заменить компания Gorenje,
авторизованный сервисный и ремонтный
центр Gorenje или подготовленный
специалист.
Не используйте прибор, если разъемы, шнур
питания или любые другие компоненты
повреждены.
Прибором не должны пользоваться дети или
лица с нарушениями физического или
психологического здоровья, либо лица с
недостаточным опытом и знаниями, за
исключением случая, когда эти лица
работают под наблюдением или пользуются
советами лица, ответственного за их
22
Page 23

безопасность. Не позволяйте детям играть с
прибором.
Не прикасайтесь к корпусу прибора при
эксплуатации, поскольку он сильно
нагревается. Перемещайте прибор за ручку.
Будьте осторожны, отпуская давление и
открывая скороварку; существует опасность
ошпаривания. Не прилагайте силу для
открытия крышки.
Для избегания опасных ситуаций не
подключайте прибор к внешнему таймеру
или системе дистанционного управления.
Данный прибор маркирован в
соответствии с Европейской Директивой
2002/96/EC по утилизации электрического и
электронного оборудования. Директива
определяет требования к сбору и
утилизации отслужившего электрического
и электронного оборудования,
действующие на всей территории
Европейского Союза.
Внимание!
Установите прибор на ровную и устойчивую
поверхность.
Прибор предназначен исключительно для
домашнего использования.
Не используйте приспособления,
принадлежности или иные детали других
производителей, которые непосредственно
не рекомендованы Gorenje. В случае
использования таких приспособлений и
принадлежностей гарантия будет
аннулирована.
.
5. По истечении времени, выпустите пар,
переведя предохранительный клапан
выпуска пара в положение Exhaust
(Выпуск), и дождитесь, пока упадет
плавающий клапан.
6. Дождитесь, пока прибор остынет, и
почистите его.
Применение прибора
Откройте крышку прибора так, как это
показано на рисунке.
При необходимости, можно полностью снять
крышку так, как это показано на рисунке.
Подготовка к использованию
1. Снимите упаковку
2. Почистите прибор так, как это указано в
главе "Чистка".
3. Вставляя внутреннюю кастрюлю,
убедитесь в том, что дно чистое. При
вставке внутренней кастрюли в
скороварку слегка поверните ее в обоих
направлениях для того, чтобы убедиться
в том, что она правильно стала на
место.
4. Убедитесь в том, что надлежащим
образом вставлено уплотнительное
кольцо. Для проверки того, что
уплотнительное кольцо вставлено
надлежащим образом, наполните
кастрюлю для варки на треть водой и
установите время варки под давлением
на 15 мин.
Положите в скороварку ингредиенты.
Ингредиенты не должны занимать более 4/5
скороварки. Ингредиенты, расширяющиеся
23
Page 24

или разбухающие в процессе приготовления
(например, бобы), должны занимать не
более 1/5 скороварки.
Закройте крышку скороварки так, как это
показано на рисунке. Перед тем, как закрыть
крышку, убедитесь в том, что
уплотнительное кольцо вставлено
надлежащим образом.
Переведите клапан выпуска пара в
положение "sealed" (закупорено) и
убедитесь в том, что плавающий клапан не
поднят.
Выберите желаемую программу.
На индикаторе начнут мигать выбранная
программа, символ "F:" и число. Число
означает время приготовления. Через 30
секунд, индикатор перестанет мигать и
начнется процесс приготовления. По
достижении нужной величины давления в
скороварке время приготовления начнет
отсчет назад. На индикаторе появится
надпись "Pressure" (давление).
По окончании процесса приготовления,
прибор переключится в режим "нагревания".
Для завершения процесса приготовления
нажмите на кнопку "Cancel" (Отменить).
Переведите клапан выпуска пара в
положение "Exhaust" и подождите, пока не
упадет плавающий клапан.
Совет: При приготовлении мяса,
требующего большего времени
приготовления (например, говядины),
оставляйте клапан в положении "sealed" и
ждите, пока прибор не остынет, а
плавающий клапан не опустится.
Программы, Выпечка, Медленное
Приготовление, Жарка и
Соте/Поджаривание выбираются прямо с
помощью кнопок на передней панели!
Установка задержки запуска
Нажмите на "Time setting" (Установка
Времени). На индикаторе появятся "00:00" и
"preset" (предварительная установка).
Пользуясь кнопками + и –, выставьте число
часов до начала процесса приготовления.
Вновь нажмите на "time setting" и, пользуясь
кнопками + и –, выставьте число минут
задержки. Выберите программу
приготовления, напрямую или с помощью
кнопки "Multifunction"
(Многофункциональная). На индикаторе
начнут мигать выбранная программа,
символ "F:" и число. Время показывает
время приготовления. Через тридцать
секунд, начнется отсчет времени назад. На
индикаторе будет показываться время,
остающееся до запуска программы
приготовления, выбранная программа и знак
"Preset". По истечении времени задержки
запустится программа приготовления. Для
отмены установки задержки запуска
нажмите на кнопку "Cancel".
Когда начнется приготовление, на
индикаторе начнут мигать символы
нагревания. Кроме того, будут отображаться
буква F и оставшееся время приготовления
в минутах.
Время приготовления начнет отсчет назад
после того, как давление в скороварке
достигнет необходимого уровня и
плавающий клапан поднимется в верхнее
положение. На индикаторе отобразится
"Pressure".
24
Page 25

Ручное приготовление
Пользуйтесь ручным приготовлением в
случае приготовления большого количества
еды или больших кусков мяса, если
желаемая программа приготовления не
позволяет менять время приготовления.
При применении ручного приготовления,
температура внутри кастрюли будет 100 °C
при открытой крышке и 115-120 °C при
закрытой крышке и под давлением.
Нажмите на "Pressure holding time" (Время
поддержания давления) и, пользуясь
кнопками + и –, выставьте время
приготовления. На индикаторе начнут
мигать P: и число. Число означает время
приготовления. Вместе с тем активируются
нагреватели. Через 30 секунд знак P: и
число перестанут мигать.
Время приготовления начнет отсчет назад
после того, как давление в скороварке
достигнет необходимого уровня и
плавающий клапан поднимется в верхнее
положение. На индикаторе отобразится
"Pressure".
Программа жарки
Данная программа используется для жарки.
Время приготовления предварительно
устанавливается на 25 минут.
При использовании этой программы,
снимите крышку или держите ее
открытой.
При выполнении этой программы
приготовления, масло может достичь очень
высокой температуры от 160°C до 170°C.
Нажмите на кнопку "Fry" (Жарка).
Начните жарку после того, как нагреется
масло.
Для прерывания процесса приготовления до
его завершения, нажмите на кнопку "Cancel".
По окончании жарки, рекомендуется
подождать 30 минут, пока прибор не
остынет, перед тем, как вновь им
пользоваться.
Программа соте/поджаривания
Данная программа используется для
поджаривания мяса и овощей. Температура
ниже, чем в случае программы "Жарки"
(120°C – 130°C).
Время приготовления предварительно
устанавливается на 30 минут.
При использовании этой программы,
снимите крышку или держите ее
открытой.
Нажмите на кнопку "Sauté/Brown"
(соте/поджаривание).
На индикаторе начнет мигать "F:30". Через
30 секунд, F:30 перестанет мигать. Когда
высвечивается надпись "Pressure", это
означает, что масло достигло температуры,
подходящей для приготовления соте или
поджаривания.
Для прерывания процесса приготовления до
его завершения, нажмите на кнопку "Cancel".
Программа медленного приготовления
Данная программа используется для
медленного приготовления мяса и овощей.
Поддерживается температура между 85°C и
100°C.
Нажмите на кнопку "Slow cook" (Медленное
приготовление). На индикаторе высветится
время приготовления. При необходимости
время приготовления может настраиваться
с помощью кнопок + и –. Через 30 секунд
время приготовления перестанет мигать и
программа запустится. Скороварка будет
работать независимо от давления!
По окончании времени приготовления,
прибор переключится в режим "Нагревания".
Программа приготовления выпечки
Данная программа используется для того,
чтобы печь хлеб или выпечку.
Температура приготовления внутри
кастрюли устанавливается на 115-120°C.
Нажмите на кнопку "Cake" (Выпечка).
На индикаторе начнут мигать "F:" и число.
Число показывает время приготовления,
которое предварительно устанавливается
на 30 минут. Время приготовления может
при необходимости регулироваться с
помощью кнопок + и –. Через 30 секунд
время приготовления перестанет мигать и
программа запустится.
Время приготовления начнет отсчет назад
после того, как давление в скороварке
достигнет необходимого уровня и
плавающий клапан поднимется в верхнее
положение. На индикаторе отобразится
"Pressure".
По окончании времени приготовления,
прибор переключится в режим "Нагревания".
25
Page 26

Программа приготовления на пару
Данная программа предназначена для
приготовления на пару.
Температура приготовления внутри
кастрюли устанавливается на 115-120°C.
Наполните 1/5 или 2/5 посуды для
приготовления водой. Количество воды
зависит от времени приготовления.
Вставьте сетку для приготовления на пару и
положите ингредиенты, которые нужно
приготовить на сетке.
С помощью кнопки "Multifunction" выберите
программу "Steam" (Пар).
На индикаторе начнут мигать "F:" и число.
Число показывает время приготовления,
которое предварительно устанавливается
на 15 минут. Время приготовления может
при необходимости регулироваться с
помощью кнопок + и –. Через 30 секунд
время приготовления перестанет мигать и
программа запустится.
Время приготовления начнет отсчет назад
после того, как давление в скороварке
достигнет необходимого уровня и
плавающий клапан поднимется в верхнее
положение. На индикаторе отобразится
"Pressure".
По окончании времени приготовления,
прибор переключится в режим "Нагревания".
Программа приготовления рагу
Данная программа предназначена для
приготовления рагу.
В данном режиме время приготовления
предварительно устанавливается на 20
минут.
Температура приготовления внутри
кастрюли устанавливается на 115-120°C.
С помощью кнопки "Multifunction" выберите
программу "Stew" (Рагу).
На индикаторе начнут мигать "F:", число и
надпись "Stew". Число показывает время
приготовления, которое предварительно
устанавливается на 20 минут. Время
приготовления может при необходимости
регулироваться с помощью кнопок + и –.
Через 30 секунд индикатор перестанет
мигать. Время приготовления начнет отсчет
назад после того, как давление в скороварке
достигнет необходимого уровня и
плавающий клапан поднимется в верхнее
положение. На индикаторе отобразится
"Pressure".
По окончании времени приготовления,
прибор переключится в режим "Нагревания".
Программа приготовления риса
Данная программа используется для
приготовления риса.
Температура приготовления внутри
кастрюли устанавливается на 115-120°C.
С помощью кнопки "Multifunction" выберите
программу "Rice" (Рис).
На индикаторе начнут мигать "F:" и число.
Число показывает время приготовления,
которое предварительно устанавливается
на 10 минут. Время приготовления может
при необходимости регулироваться с
помощью кнопок + и –. Через 30 секунд
время приготовления перестанет мигать и
программа запустится.
Время приготовления начнет отсчет назад
после того, как давление в скороварке
достигнет необходимого уровня и
плавающий клапан поднимется в верхнее
положение. На индикаторе отобразится
"Pressure".
По окончании времени приготовления,
прибор переключится в режим "Нагревания".
Программа приготовления супа
Данная программа используется для
приготовления супов и каш.
Температура приготовления внутри
кастрюли устанавливается на 115-120°C.
С помощью кнопки "Multifunction" выберите
программу "Soup" (Суп).
На индикаторе начнут мигать "F:" и число.
Число показывает время приготовления,
которое предварительно устанавливается
на 30 минут. Время приготовления может
при необходимости регулироваться с
помощью кнопок + и –. Через 30 секунд
время приготовления перестанет мигать и
программа запустится.
Время приготовления начнет отсчет назад
после того, как давление в скороварке
достигнет необходимого уровня и
плавающий клапан поднимется в верхнее
положение. На индикаторе отобразится
"Pressure".
По окончании времени приготовления,
прибор переключится в режим "Нагревания".
26
Page 27

Программа тушения мяса
Программы
Исходное
время
приготовле
ния под
давлением
(мин)
Установ
ки
времен
и (мин)
Давлени
е (кПа)
Жарка
00:25
/
Крышка
открыта
Выпечка
00:30
1 - 90
50 - 60
Суп
00:30
1 - 90
50 - 60
Рис
00:10
1 - 90
50 - 60
Рагу
00:20
1 - 90
50 - 60
Медленное
приготовление
02:00
1h - 9h
0
На пару
00:15
1 - 90
50 - 60
Соте/Поджарива
ние
00:30
1 - 90
Крышка
открыта
Тушеное мясо
00:30
1 - 90
50 - 60
Нагревание
/ / 0
Данная программа используется для
приготовления тушеного мяса.
Температура приготовления внутри
кастрюли устанавливается на 115-120°C.
С помощью кнопки "Multifunction" выберите
программу "Braise/Tendon" (Тушение
мяса/Сухожилия).
На индикаторе начнут мигать "F:" и число.
Число показывает время приготовления,
которое предварительно устанавливается
на 30 минут. Время приготовления может
при необходимости регулироваться с
помощью кнопок + и –. Через 30 секунд
время приготовления перестанет мигать и
программа запустится.
Время приготовления начнет отсчет назад
после того, как давление в скороварке
достигнет необходимого уровня и
плавающий клапан поднимется в верхнее
положение. На индикаторе отобразится
"Pressure".
По окончании времени приготовления,
прибор переключится в режим "Нагревания".
Программа нагревания
Данная программа используется для
нагревания еды или поддержания ее в
теплом состоянии.
Нажмите на кнопку Cancel/Warming
(Отмена/Нагревание).
Прибор нагреет еду и будет поддерживать
температуру в пределах 60°C - 80°C.
Для отмены программы, нажмите на кнопку
"Cancel/Warming".
Таблица программ
Совет: Сразу де после применения
почистите прибор (см. главу "Чистка").
Кнопка питания
Кнопка питания показывает Вам, сколько
энергии использовало устройство после
подключения к сети. На индикаторе
показывается потребление мощности в кВт.
Показание лишь приблизительное.
27
Page 28

Чистка
Нажать вверх
Противозакупорочная
крышка
Нажать вниз
Сердечник плавающего клапана
Уплотнительная шайба плавающего клапана
Нажать вниз
Стальное кольцо
Уплотнитель
ное кольцо
Прибор и компоненты прибора не
рассчитаны на мойку в посудомоечной
машине.
Тщательно чистите прибор после каждого
использования, а также перед
использованием, если он не использовался
в течение какого-то времени.
1. Перед чисткой, отсоедините прибор от
сети и дождитесь, пока он остынет.
2. Промывайте кастрюлю для варки
горячей водой с жидким моющим
средством и тщательно высушите.
3. Вытрите корпус влажной тряпкой. Не
мойте корпус под проточной водой и не
погружайте его в воду.
4. После применения, снимите бачок для
конденсата и промойте его.
5. Снимите крышку и почистите ее.
Снимите уплотнительное кольцо,
осторожно потянув его вверх.
Помойте уплотнительное кольцо под
проточной горячей водой с моющим
средством. Тщательно высушите
уплотнительное кольцо. При установке
уплотнительного кольца обратно на
место, убедитесь в том, что оно
правильно стало под фиксатором
уплотнительного кольца. Убедитесь, что
на прокладке нет морщин. Если
уплотнительное кольцо не установлено
надлежащим образом, прибор не будет
работать, и может повредиться. Если
при чистке Вы заметите, что
уплотнительное кольцо повреждено или
потрескалось, не пользуйтесь
устройством и обратитесь в Сервисный
центр Gorenje для его замены.
6. Снимите металлический фильтр,
помойте его и поставьте на место на
крышку.
Уплотнительное кольцо
7. Почистите предохранительный клапан.
8. Для того чтобы обеспечить надлежащую
работу прибора, убедитесь в том, что
нагревательная плита чистая. Чистите
нагревательную плиту влажной тряпкой
и тщательно ее высушите.
9. Не пользуйтесь агрессивными
чистящими средствами и
металлическими приспособлениями для
чистки, так как они могут повредить
прибор.
Совет: Иногда бывает трудно вставить
уплотнительное кольцо в фиксатор
уплотнительного кольца после чистки. Мы
предлагаем вставлять уплотнительное
кольцо в фиксатор уплотнительного кольца
непосредственно перед тем, как Вы будете
пользоваться прибором, и перед его
установкой на место нанесите немного
масла для жарки на уплотнительное кольцо.
За счет смазки кольца оно намного легче
станет на место.
28
Page 29

Хранение
Отобразившийся
код
Сбой
E1
разрыв цепи
датчика
E2
короткое
замыкание
датчика
E3
перегрев
E4
сбой
сигнального
переключателя
Храните прибор в надежном и сухом месте.
Вопросы, связанные с охраной
окружающей среды
После истечения срока службы не
выбрасывайте прибор вместе с бытовыми
отходами. Доставьте его на авторизованный
центр утилизации. Это будет
способствовать сохранению окружающей
среды.
Гарантия и ремонт
Если скороварка перестанет работать,
посмотрите код ошибки на индикаторе.
Запишите этот код и сообщите в кол-центр
компании Gorenje Call.
Если вы хотите получить информацию или у
вас возникли проблемы, пожалуйста,
свяжитесь с Центром поддержки
покупателей Gorenje в вашей стране (номер
телефона центра указан в гарантийном
талоне). Если такого центра в вашей стране
нет, обратитесь к вашему местному дилеру
Gorenje или свяжитесь с отделом
обслуживания бытовой техники Gorenje.
Только для личного использования!
GORENJE
ЖЕЛАЕТ ВАМ ПОЛУЧАТЬ
УДОВОЛЬСТВИЕ ОТ
ИСПОЛЬЗОВАНИЯ ВАШЕГО
ПРИБОРА.
Мы оставляем за собой право на любые
изменения прибора.
29
 Loading...