

Page 1

Elektronische Programmuhr DE AT
Die Restzeit können Sie nach Wunsch mit dem Knebel 2
korrigieren, wobei sich der Knebel 1 auf Position
„Betriebsdauer“ befinden muss.
Nach Ablaufen der eingestellten Zeit ertönt ein akustisches
Signal, welches sich nach 7 Minuten selbsttätig ausschaltet,
wenn es nicht durch Drehen des Knebels 1 auf eine andere
Position unterbrochen wird. Das Symbol S1 erlischt, das
Symbol S3 blinkt. In diesem Moment schaltet der Backofen
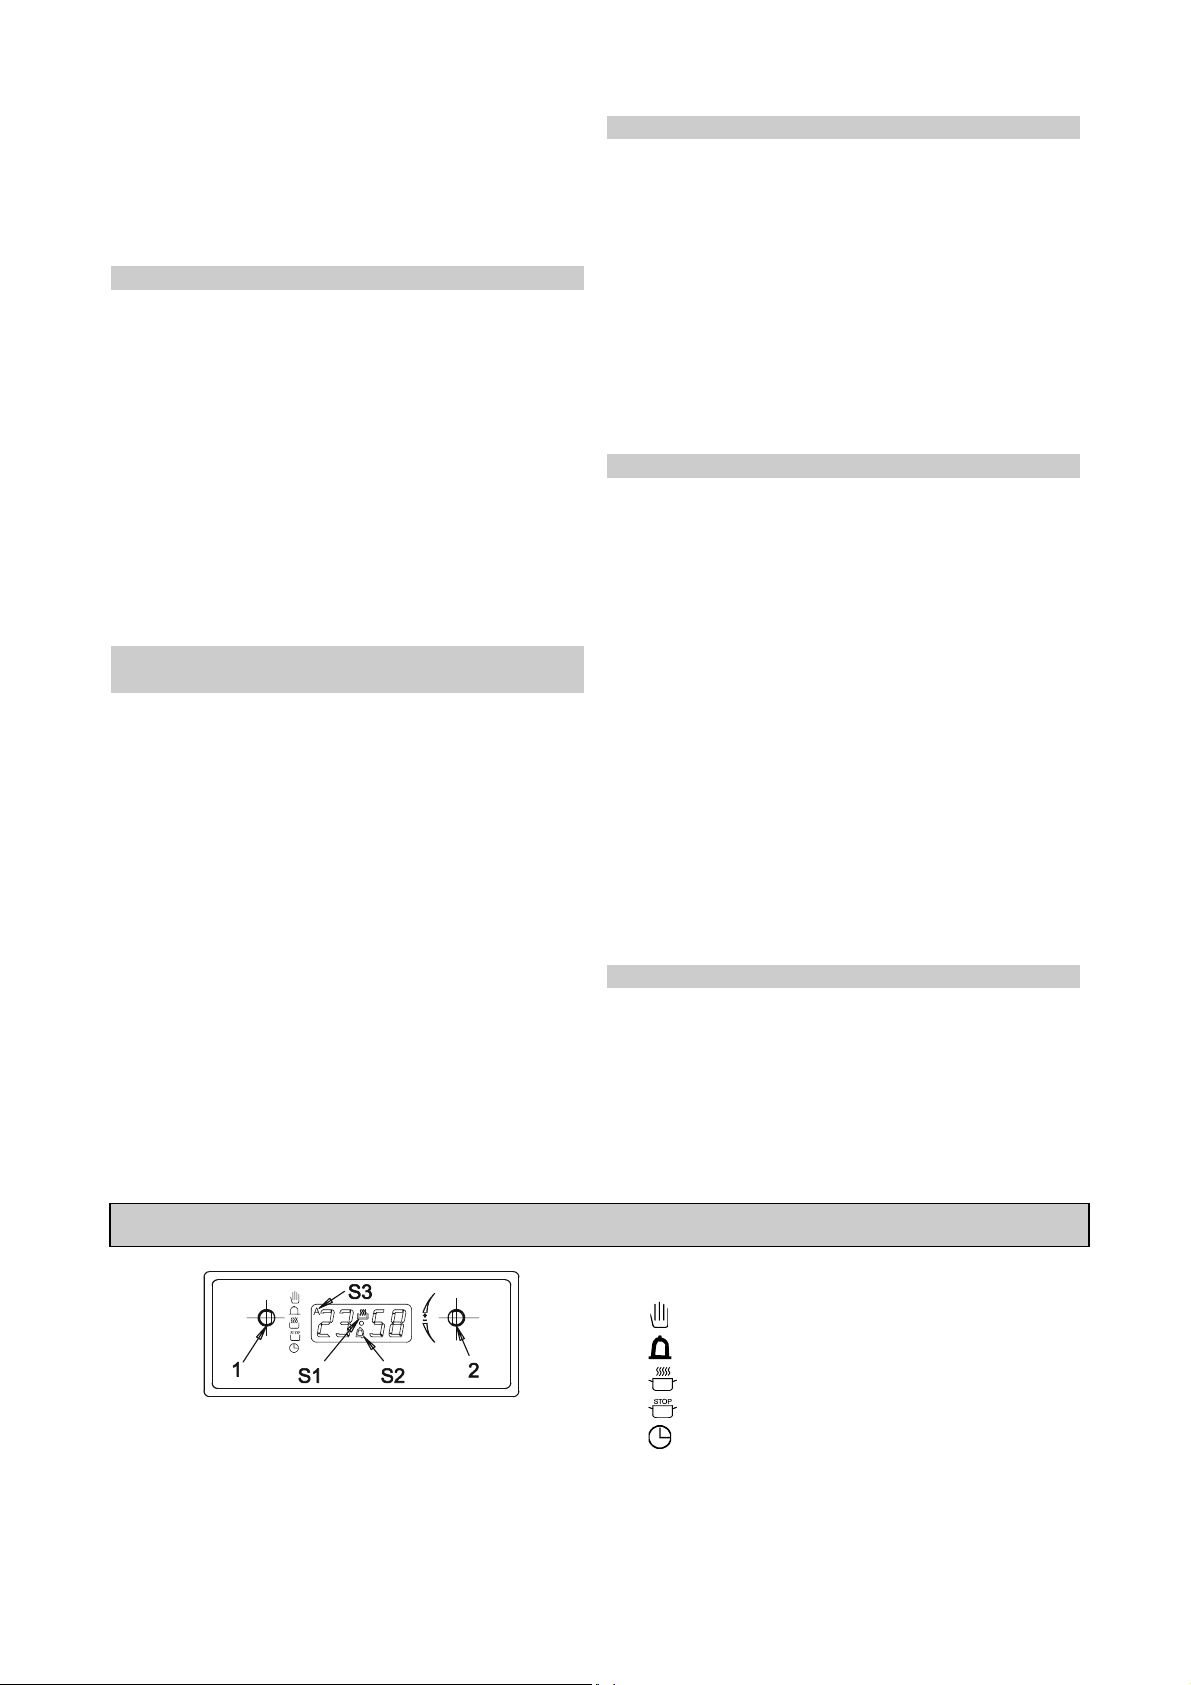
1 Wahlknebel für einzelne Funktionen
2 Knebel für (+) und (-) Einstellungen
Beschreibung der Symbole:
aus.
Nach Verdrehen des Knebels 1 auf Position „Handbetrieb“,
erlischt das Symbol S3 und das Symbol S1 leuchtet auf, die
Uhr ist nun auf unprogrammierten (Hand-) Betrieb eingestellt.
Position ‘Manuell’
Position ‘Kurzzeitwecker’
Position ‘Dauer’
Postion ‘Ende’
Position ‘Tageszeit’
Einstellung der Uhr
Nach dem Anschluß der Geräts an das Stromnetz, erscheint
an der Anzeige 0 00 und das Symbol S3 blinkt. Drehen Sie
den Knebel 1 in die Position ‘Manuell' und stellen Sie durch
Drehen des Knebels 2 in Richtung ”+” oder ”- ” die genaue
Tageszeit ein. Das Symbol S3 erlischt. Sieben (7) Sekunden
nach dem Aktivieren eines beliebigen Knebels beginnt die
Uhr zu laufen. Das Symbol S1 leuchtet auf und zeigt an, dass
die Uhr auf unprogrammierten (manuellen) Betrieb eingestellt
ist.
Anmerkung: Wenn Sie den Knebel 2 längere Zeit auf
Position (+) oder (-) halten, ändert sich die Anzeige schneller.
Hinweis: Wenn Sie die Tageszeit 7 Sekunden nach dem
Anschluß des Geräts an das elektrische Versorgungsnetz
nicht einstellen, beginnt diese selbst zu laufen. Wenn Sie
dann den Knebel 2 in Richtung ‘+’ drehen, hört die Tageszeit
auf zu blinken, das Symbol S3 blinkt noch immer. Stellen Sie
die Tageszeit nachträglich auf folgende Art und Weise ein:
− Drehen Sie den Knebel 1 in die Position ‘Tageszeit’ und
danach zurück in die Position ‘Manuell.
− Stellen Sie mit dem Knebel 2 die genaue Tageszeit ein
(das Symbol S3 erlischt, das Symbol S1 leuchtet auf).
Verfahren Sie auf die selbe Art und Weise auch bei
Stromausfall oder Korrektur der Tageszeit.
Der Knebel 1 in der Position ‘Tageszeit’ dient zur Anzeige
der Tageszeit und nicht zur Änderung derselben!
Einstellung des unprogrammierten (manuellen)
Betriebs
Drehen Sie den Knebel 1 auf Stellung „Handbetrieb“. Jedes
bis dann eingestellte Programm wird widerrufen (das
Symbol S3 erlischt, wenn es aktiv war). Das Symbol S1 wird
aktiv (wenn es nicht bereits vorher war), damit ist der
unprogrammierte (Hand-) Betrieb eingestellt.
Halbautomatischer Betrieb mit Betriebsdauer
Drehen Sie den Knebel 1 auf Position „Betriebsdauer“. Auf
der Anzeige erscheint 0 00 und das Symbol S1. Stellen Sie
durch Drehen des Knebels 2 in Richtung (+) oder (-) die
gewünschte Zeit. Es erscheint das Symbol S3. Die Zeit kann
in Intervallen von je 1 Minute eingestellt werden. Die
maximale mögliche Einstellzeit beträgt 10 Stunden.
Nachdem Sie die gewünschte Zeit eingestellt haben, beginnt
diese nach 7 Sekunden mit dem Abzählen. Wenn der Knebel
1 auf Position ‘Dauer’ geblieben ist, wird auf der Anzeige das
Abzählen der eingestellten Zeit gezeigt.
Wenn Sie den Backvorgang beenden möchten, müssen
Sie auch den Backofen ausschalten!
Halbautomatischer Betrieb mit Betriebsende
Drehen Sie den Knebel 1 auf Position „Ende“. Auf der
Anzeige erscheint die Tageszeit. Stellen Sie durch Drehen
des Knebels 2 in Richtung (+) oder (-) die gewünschte Zeit
für das Betriebsende ein (diese muss länger sein, als die
Tageszeit). Das Symbol S3 leuchtet auf. Sieben (7)
Sekunden nach der Einstellung der gewünschten Zeit
erscheint auf der Anzeige die Tageszeit.
Wenn die Tageszeit die eingestellte Endzeit des Back- bzw.
Bratvorgangs erreicht hat, ertönt ein akustisches Signal, das
nach 7 Minuten selbsttätig ausschaltet, falls es nicht durch
Drehen des Knebels 1 auf eine Position bereits unterbrochen
wurde. Das Symbol S1 erlischt, das Symbol S3 blinkt. In
diesem Moment schaltet sich der Backofen ab.
Nach dem Drehen des Knebels 1 auf Position „Handbetrieb“,
erlischt das Symbol S3 und das Symbol S1 leuchtet auf, die
Uhr ist nun auf unprogrammierten (Hand-) Betrieb eingestellt.
Wenn Sie den Backvorgang beenden möchten, müssen
Sie auch den Backofen abschalten!
Automatischer Betrieb mit Einstellung der
Betriebsdauer- und des Betriebsendes
Drehen Sie Knebel 1 auf Position „Dauer“ und stellen Sie
durch Drehen des Knebels 2 in Richtung (+) oder (-) die
Betriebsdauer ein.
Danach drehen Sie den Knebel 1 auf Position “Ende” und auf
der Anzeige erscheint die naheliegendste mögliche
Betriebsende-Zeit. Stellen Sie durch Drehen des Knebels 2 in
Richtung (+) oder (-) das Betriebsende ein. Das Symbol S1
erlischt, wenn die Betriebsende-Zeit länger ist, als die
Tageszeit + Betriebsdauer.
Der Backofenbetrieb beginnt automatischt mit Bezug auf die
eingestellten Zeiten.
Beispiel:
Tageszeit = 12:00, die Betriebsdauer ist auf 1:30 eingestellt,
das Betriebsende auf 14:00. Das bedeutet, dass der
Backofenbetrieb um 12:30 starten wird.
Fehler bei der Einstellung
Wenn z.B. die Betriebsende-Zeit so eingestellt ist, dass sie
kürzer ist, als die Tageszeit + Betriebszeit ist, ertönt ein
akustisches Signal und das Symbol S3 blinkt. Um einen
richtigen Betrieb zu gewährleisten, müssen die eingestellten
Zeiten korrigiert werden ( empfehlenswert ist es, den Knebel
1 auf Position „Manuell“ zu drehen und danach den ganzen
Vorgang zu wiederholen).
Kurzzeitwecker
Durch Drehen des Knebels 1 auf Position „Kurzzeitwecker“,
können Sie den Kurzzeitwecker aktivieren, welcher nur eine
Warnfunktion hat und der den Backofen nicht abschaltet.
3
Page 2

Stellen Sie die gewünschte Zeit durch Drehen des Knebels 2
in Richtung (+) oder (-) ein. Das Symbol S2 leuchtet auf.
Nachdem Sie die gewünschte Zeit eingestellt haben, beginnt
diese nach 7 Sekunden abzuzählen. Wenn der Knebel 1 auf
Position „Kurzzeitwecker“ geblieben ist, erscheint auf der
Anzeige das Abzählen der eingestellten Zeit. Die Restzeit
können Sie nach Bedarf mit dem Knebel 2 korrigieren, wobei
sich der Knebel 1 auf Position „Dauer“ befinden muss.
Wenn die eingestellte Zeit abgelaufen ist, ertönt ein
akustisches Signal. Nach 7 Minuten schaltet dieser
selbsttätig ab, falls nicht durch Drehen des Knebels 1 auf
eine beliebige Position, außer der bestehenden, bereits
unterbrochen wurde. Das Symbol S2 erlischt.
Knebel (1) auf Position „Tageszeit“
Diese Position ist neutral und zeigt die Tageszeit an. Sie wird
dann angewendet, wenn Sie möchten, dass an der Anzeige
immer die Tageszeit dargestellt wird. Sie haben z.B. die Uhr
auf automatischen Betrieb eingestellt. Wenn sich der Knebel
1 auf Position „Ende“ befindet, wird auf der Anzeige die
Endzeit angezeigt, wenn Sie jedoch den Knebel 1 auf
Position „Tageszeit“ drehen, wird auf der Anzeige die
Tageszeit dargestellt.
Lautstärke des akustischen Signals
Wenn keine Zeitfunktion aktiv ist (es wird nur die Tageszeit
angezeigt), drehen Sie den Knebel 1 auf Position „Manuell“
und warten 7 Sekunden. Wenn Sie vor Ablauf dieser Zeit
den Knebel 2 drehen, können Sie die Tageszeit ändern.
Drehen Sie danach den Knebl 2 in Richtung (-) und halten
Sie ihn auf dieser Position. Es erscheint der erste Wert der
Lautstärke des akustischen Signals. Lassen Sie den Knebel
2 los und drehen Sie diesen dann erneut in Richtung (-) und
halten ihn auf dieser Position, erscheint der nächste Wert der
Lautstärke.
Die zuletzt eingestellte Lautstärke des akustischen Signals
bleibt bestehen. Sie können die Lautstärke des akustischen
Signals jederzeit neu einstellen.
Widerruf von Zeitprogrammen
Sie können alle Zeiteinstellungen, außer den Einstellungen
des Kurzzeitweckers, jederzeit widerrufen, indem Sie den
Knebel 1 auf Position „Manuell“ drehen. Die eingestellten
Programme werden automatisch unterbrochen und die Uhr
stellt sich auf die Position des unprogrammierten (Hand-)
Betriebs ein.
Anwendung der Uhr in Kombination mit dem
Backofen
Bei Verwendung der Uhr in Kombination mit dem
Backofen, zuerst den Backofen einschalten und den
gewünschte Brat- bzw. Backvorgang, sowie die
Temperatur einstellen. Erst dann die Funktionen an der
Uhr einstellen. Nach Beendigung des Brat- bzw.
Backvorgangs, den Backofen abschalten.
ÄNDERUNGEN, WELCHE DIE FUNKTION DES GERÄTES NICHT BEEINFLUSSEN, BLEIBEN
VORBEHALTEN.
Electronic timer GB IE MT
symbol S3 is still flashing. You can now set the current time
as follows:
− Turn button 1 to the position "current time" and then back
to "manual".
− Set current time with button 2 (symbol S3 is off, symbol S1
is on).
Repeat the same procedure in case of power failure, or in
1 function button
2 minus (-) and plus (+) button
Description of symbols:
position "manual"
position "timer"
position "period of operation"
position "end"’
position "current time"
Setting the current time
After connecting the appliance to the mains the display
indicates flashing 0 00 and the flashing symbol S3. Turn
button 1 to the position "manual", and by turning the button 2
towards "+" or "-" set the current time of day. Symbol S3
goes off. The clock starts running 7 seconds after the last
touch of any button. The symbol S1 is on, indicating that the
clock has been set to manual (conventional) mode.
Note: keeping button 2 turned towards the position "+" or "-"
speeds up the setting process on the display.
Caution: In case you fail to set the current time within 7
seconds following the plugging of the appliance to mains
power, it will start running automatically. If you now turn
button 2 in the ‘+’ direction, current time stops flashing, but
case of changing the time of day.!
Button 1 in position ‘current time’ serves exclusively for
displaying current time, and not for changing it!
Setting the conventional (manual) operation
Turn the button 1 to the position "manual". All actual
running programs are hereby cancelled (the symbol S3 is
deleted if it was active). Symbol S1 becomes active (if it was
not already on), which means that the clock is set to the
conventional (manual) mode of operation.
Semi-automatic operation with the defined period
Turn button 1 to the position "period of operation". The display
indicates 0 00 and the symbol S1 is on. Set the desired period by
turning button 2 to the position "+" or "-". The symbol S3
appears. The period of operation may be selected in steps of 1
minute. Maximum possible period to be set is 10 hours.
Once the desired period of operation is selected, the time
countdown starts after the 7 second lapse. If button 1 remained in
the position "period of operation" the display indicates the
countdown time.
The remaining time may be checked by turning button 2, while
button 1 must remain in the position "period of operation".
The expiry of the set period is signaled by the alarm, which is
switched off automatically after 7 minutes, if it was not switched
off before by turning button 1 into any position other than the
4
Page 3
present one. The symbol S1 is off and the symbol S3 flashes. In
this moment the oven is switched off.
After turning the button 1 into the position "manual" the symbol S3
turns off and the symbol S1 reappears. The clock is set to
conventional (manual) mode.
If you wish to terminate roasting the oven must be switched
off!
Semi-automatic operation with the end of operation
Turn button 1 to the position "end". The display indicates the
current time. Set the desired end of operation time by turning
button 2 towards the position "+" or "-" (naturally, the end
time must be greater than the current time). The symbol S3
appears. The display returns to read current time 7 seconds
after the setting process is completed.
Once the current time reaches the preset end of operation
time, this is signaled by the sound alarm, which is switched
off automatically after 7 minutes, if it was not switched off
before by turning button 1 to any direction. The symbol S1 is
off and symbol S3 flashes. In this moment the oven is
switched off.
After turning button 1 into the position "manual" the symbol
S3 turns off and the symbol S1 reappears. The clock is set to
conventional (manual) mode.
If you wish to terminate roasting the oven must be
switched off!
Automatic operation with the preset period and the
end of operation
Turn button 1 to the position "period of operation" and by
turning button 2 towards "+" or "-" set the period of cooking.
Then turn button 1 into the position "end" and the display
indicates the nearest possible end of operation time. Set the
desired end of operation time by turning button 1 towards "+"
or "-". The symbol S1 is off if the end time is greater than the
current time + the preset period of operation.
The oven starts operating automatically according to the
preset times.
Example
Current time = 12:00, operation interval was set at 1:30 and
the end of operation at 14:00. This means that the oven will
start operating at 12:30.
Errors in setting the time
If the selected end time falls shorter than the current time +
period of operation, this is signaled by the sound alarm and
the flashing symbol S3. Preset times have to be corrected
and adjusted (the best procedure is to turn button 1 into the
position "manual" and repeat the complete procedure).
Alarm timer
To activate the timer, turn button 1 to the position "timer".
This timer functions only as a warning signal and does not
switch off the oven.
Set the desired time by turning button 2 towards "+" or "-".
Symbol S2 is on.
Once the desired alarm time is selected, the time countdown
starts after the 7 second lapse. If button 1 remained in the
position "timer" the display indicates the countdown of preset
time.
The remaining time may be corrected with button 2, while
button 1 must remain in the position "period of operation".
The expiry of the set period is signaled by the alarm, which is
switched off automatically after 7 minutes, if it was not
switched off before by turning button 1 in any position other
than the actual one. The symbol S2 is off.
Button (1) in the position of current time
This position is neutral and indicates current time. It is used
in case you wish the current time to be indicated on the
display. The clock is for example set to automatic operation.
If button 1 is set to the position "end" the display reads the
end of operation time, and if button 1 is turned to the position
"current time" the display will read current time.
Sound alarm volume
When all functions are off (only the current time is displayed)
it is possible to select 3 different volume settings of the sound
signal. Turn button 1 to the position "manual" and wait for 7
seconds. If button 2 is turned prior the expiry of this period,
the current time will be altered! Next, turn button 2 towards "" and keep it in this position. The first volume level is
sounded. Release button 2 and turn again towards "-" for the
next volume level, etc.
The last selected level is stored as default. Volume level may
be reset anytime.
Deleting all timer adjustments
All the time settings except the alarm timer may be deleted at
any time by turning button 1 to the position "manual".
Preset programs are automatically cancelled and the clock
returns to the conventional (manual) mode.
Using the clock in combination with oven
To use the clock in combination with oven, the first step
is to switch the oven on and set the desired baking mode
and the temperature. Only after that you may proceed
setting the clock functions. After the completion of
baking switch the oven off.
WE RESERVE THE RIGHT TO ALTER THE SPECIFICATIONS WITH NO INFLUENCE ON THE
OPERATION OF THE APPLIANCE..
Timer per la programmazione IT
Descrizione dei simboli:
posizione ‘manuale’
posizione ‘contaminuti’
posizione ‘durata’
1 manopola per scelta funzioni
2 manopola per impostazioni (+) e (-)
5
posizione ‘fine’
posizione ‘ora esatta’
Page 4

Impostazione ora
Quando inserite la spina dell’apparecchio nella presa di
corrente, sul display appare la scritta lampeggiante 0 00 e il
simbolo S3. Premete la manopola 1 ie giratela nella
posizione “manuale” e girando la manopola 2 nel senso ”+” o
”- ” impostate l’ora esatta. Il simbolo S3 si spegne. 7 secondi
dopo la regolazione dell’ora attuale, l’orologio comincia a
funzionare. Contemporaneamente si illumina il simbolo S1
che indica la regolazione dell’orologio per il funzionamento
manuale.
Nota: tenendo girata la manopola 2 nel senso ‘+’ o ‘-‘ per
più tempo, le cifre avanzano più rapidamente.
Avvertenza: Se in tempo di 7 secondi dal collegamento
dell’apparecchio alla rete elettrica non impostate l’ora esatta,
il tempo comincia a scorrere da solo. Se dopo girate la
manopola 2 nel senso ‘+’ , l’ora esatta smette di
lampeggiare, mentre il simbolo S3 lampeggia ancora. L’ora
esatta può essere impostata anche in un secondo tempo
come segue:
Girare la manopola 1 nella posizione ‘ora esatta’
premendola; dopodichè giratela nella posizione
‘manuale’.:
− Con la manopola 2 impostate l’ora esatta (il simbolo S3 si
spegne e si accende il simbolo S1).
Procedere nello stesso modo dopo la mancata energia
elettrica o per correggere l’ora esatta!
La manopola 1 nella posizione ‘ora esatta’ serve solo per
fare vedere l’ora esatta e non per i cambiamenti!
Impostazione del funzionamento manuale
in qualsiasi altra posizione. Il simbolo S1 si spegne, mentre il
simbolo S3 lampeggia. In quel momento il forno si spegne.
Girando la manopola 1 nella posizione ‘manuale’, il simbolo S3 si
spegne e si accende il simbolo S1 – così l’orologio è impostato
sul funzionamento manuale.
Se volete finire la cottura, dovete spegnere anche il forno!
Funzionamento automatico con impostazione di
durata e di fine funzionamento
Girando la manopola 1 nella posizione ‘durata’ e girando
anche la manopola 2 in senso ‘+’ o ‘-‘ potete impostare la
durata del funzionamento. Dopo di che, girate la manopola 1
nella posizione ‘fine’, sul display appare il tempo di fine
funzionamento minimo programmabile. Girando la manopola
2 in senso ‘+’ o ‘-‘ impostate l’ora di fine funzionamento. Il
simbolo S1 si spegne , se l’ora di fine funzionamento è
maggiore dell’ora attuale + la durata di funzionamento. Il
forno si accende automaticamente secondo la
programmazione.
Esempio
Ora attuale = 12.00, durata di funzionamento è impostata per
1.30, la fine di funzionamento invece per le 14.00. Questo
significa, che il forno si accenderà per le 12.30.
Errori nell’impostazione
Se l’ora di fine funzionamento impostata è minore dell’ora
attuale + la durata di funzionamento, si attiverà il segnale
acustico e lampeggerà il simbolo S3. Per il funzionamento
corretto bisognerà correggere i tempi programmati (girando la
manopola 1 nella posizione ‘manuale’ e poi ripetere tutta la
programmazione).
Girate la manopola 1 nella posizione ‘manuale’ – cosi si
annulla qualsiasi programma impostato in precedenza (il
simbolo S3 si spegne se era attivo). Si attiva il simbolo S1
(se non lo era già) che indica l’impostazione del
funzionamento manuale.
Funzionamento semiautomatico con impostazione
della durata
Girate la manopola 1 nella posizione ‘durata’. Sul display
appare 0 00 e il simbolo S1. Girando la manopola 2 nel
senso ‘+’ o ‘-‘ impostate il tempo desiderato. Appare il
simbolo S3. Potete impostare il tempo a intervalli di 1 minuto.
Il tempo massimo dell’impostazione è di 10 ore.
7 secondi dopo l’impostazione scatta il conto alla rovescia.
Se la manopola 1 è rimasta nella posizione ‘manuale’, sul
display appare il conto alla rovescia. Il tempo rimasto può
essere corretto con la manopola 2 , mentre la manopola 1
deve essere nella posizione ‘durata’.
Passato il tempo impostato interviene un segnale acustico,
che si spegne automaticamente dopo 7 minuti se non è già
stato disattivato prima girando la manopola 1 in qualsiasi
altra posizione. Il simbolo S1 si spegne mentre il simbolo S3
lampeggia. In quel momento il forno si spegne.
Girando la manopola 1 nella posizione ‘manuale’ si spegne il
simbolo S3 e si attiva il simbolo S1 – così l’orologio è
impostato sul funzionamento manuale.
Se volete finire la cottura, dovete spegnere anche il
forno!
Funzionamento semiautomatico con impostazione di
fine funzionamento
Girate la manopola 1 nella posizione ‘fine’. Sul display appare
l’ora attuale. Girando la manopola 2 nel senso ‘+’ o ‘-‘, impostate
il tempo desiderato di fine funzionamento (il quale deve essere
maggiore dell’ora attuale). Appare il simbolo S3 e dopo 7 secondi
dall’impostazione appare l’ora attuale.
Quando l’ora attuale raggiunge il tempo impostato di fine cottura,
si attiva un segnale acustico che si disattiva da solo dopo 7
minuti, se non è già stato disattivato prima girando la manopola 1
Contaminuti
Se girate la manopola 1 nella posizione di ‘contaminuti’
potete attivare il contaminuti, che ha la funzione di segnalare
il tempo trascorso, ma non interrompe il funzionamento del
forno.
Il tempo desiderato va impostate girando la manopola 2 nel
senso ‘+’ o ‘-‘; così si accende il simbolo S2.
Una volta impostato il tempo desiderato, il conto alla rovescia
inizia dopo 7 secondi. Se la manopola 1 si trova nella
posizione di ‘contaminuti’, sul display appare il conto alla
rovescia.
Girando la manopola 2 potete correggere il tempo rimasto
sempre se la manopola 1 si trova nella posizione ‘durata’.
Trascorso il tempo prestabilito interviene un segnale
acustico, che cessa automaticamente dopo 7 minuti, se non
lo interrompete prima girando la manopola 1 in qualsiasi altra
posizione. Il simbolo S2 si spegne.
Manopola (1)n posizione ‘ora attuale’
Questa posizione è neutrale e mostra l’ora attuale. Usatela
se volete vedere sempre l’ora attuale.
Per esempio: avete impostato l’orologio sul funzionamento
manuale. Se la manopola 1 si trova nella posizione ‘fine’, il
display mostrerà l’ora di fine funzionamento. Se invece girate
la manopola 1 nella posizione di ‘ora attuale’, sul display
apparirà l’ora attuale.
Volume del segnale acustico
Quando non è attiva nessuna funzione (si legge solo l’ora
attuale) potete scegliere tra 3 livelli di volume del segnale
acustico, girando la manopola 1 nella posizione ‘manuale’ e
aspettare 7 secondi. Se prima del tempo trascorso girate la
manopola 2, cambierete l’ora attuale! Per il primo livello di
volume tenete girata la manopola 2 nel senso ‘-‘ . Per il
secondo livello lasciate la manopola e giratela di nuovo nel
senso ‘-‘.
Il livello di volume del segnale acustico impostato, è quello
che avete scelto per ultimo. Naturalmente lo si può cambiare
quando volete.
6
Page 5

Annullamento di qualsiasi programma a tempo
Tutte le impostazioni a tempo, escluso il contaminuti,
possono essere annullate in
qalsiasi momento girando la manopola 1 nella posizione
‘manuale’. I programmi impostati si interrompono
automaticamente e l’orologio si mette nella posizione di
funzionamento manuale.
Funzionamento combinato orologio - forno
Se volete usare l’orologio contemporaneamente con il
forno, dovete prima accendere il forno scegliendo il
sistema di cottura e la temperatura desiderata, e poi
impostare le funzioni dell’orologio. Finita la cottura,
spegnete il forno.
CASA PRODUTTRICE SI RESERVA IL DIRITTO DELLE MODIFICHE NON ALTERANDO IL
FUNZIONAMENTO DELL'APPARECCHIO
Programmateur électronique FR BE LU
Fonctionnement semi-automatique avec réglage de
l'heure de fin de cuisson
Tournez le bouton 1 sur la position "fin". Tournez ensuite le
bouton 2 vers "+" ou "-" pour régler l’heure de fin de cuisson
1 Sélecteur de fonctions individuelles
2 Bouton de réglages (+) et (-)
Mise à l'heure
Quand vous branchez l'appareil au réseau électrique, les
chiffres 0 00 apparaissent sur l’afficheur et le symbole S3
commence à clignoter. Tournez le bouton 1 sur la position
"heure du jour" ou "manuel" et mettez l’horloge à l’heure
exacte en tournant le bouton 2 vers "+" ou "-". L’horloge se
met en marche 7 secondes après la dernière activation d'un
bouton. Le symbole S1 s’allume pour indiquer que le
programmateur est réglé en mode non-programmé (manuel).
Remarque : si vous maintenez sans interruption le bouton 2
sur la position "+" ou "- ", les chiffres défilent plus vite sur
l’afficheur.
Fonctionnement non programmé (manuel)
Tournez le bouton 1 sur la position "manuel". Vous annulez
ainsi tous les programmes réglés auparavant (si le
symbole S3 était allumé, il s'éteint). Le symbole S1 s'allume
(s'il ne l’était pas déjà), ce qui signifie que l’appareil est prêt à
fonctionner en mode non-programmé (manuel).
Fonctionnement semi-automatique avec réglage de la
durée de cuisson
Tournez le bouton 1 sur la position "durée" . Les chiffres 0 00
et le symbole S1 apparaissent sur l’afficheur. Tournez
ensuite le bouton 2 vers "+" ou "-" pour régler la durée de
cuisson. Le symbole S3 s'affiche. Vous pouvez régler la
durée par incréments de 1 minute. La durée maximale est de
10 heures.
Une fois la durée réglée, le décompte commence au bout de
7 secondes. Si le bouton 1 est resté sur la position "manuel",
le temps décompté défile sur l’afficheur. Vous pouvez
corriger le temps restant à l'aide du bouton 2, tandis que le
bouton 1 doit être sur la position "durée".
Lorsque la durée de cuisson s’est écoulée, le signal retentit
et s'arrête automatiquement au bout de 7 minutes si vous ne
l’avez pas interrompu auparavant en tournant le bouton 1 sur
une autre position. Le symbole S1 disparaît, le symbole S3
clignote et le four s’éteint.
Si vous tournez le bouton 1 sur la position "manuel", le
symbole S3 disparaît et le symbole S1 s'affiche pour indiquer
que l’appareil fonctionne en mode non-programmé (manuel).
Si vous voulez arrêter la cuisson, vous devez mettre le
four à l’arrêt afin de ne pas déclencher par mégarde une
deuxième cuisson.
(qui doit être postérieure à l’heure actuelle). Le symbole S3
s'affiche et 7 secondes après, l'heure du jour réapparaît sur
l’afficheur.
Quand l'heure de fin de cuisson est atteinte, le signal sonore
retentit et s'arrête automatiquement au bout de 7 minutes si
vous ne l’avez pas interrompu auparavant en tournant le
bouton 1 sur une autre position. Le symbole S1 disparaît, le
symbole S3 clignote et le four s’éteint.
Si vous tournez le bouton 1 sur la position "manuel", le
symbole S3 disparaît et le symbole S1 s'affiche pour indiquer
que l’appareil fonctionne en mode non programmé (manuel).
Si vous voulez arrêter la cuisson, vous devez mettre le
four à l’arrêt afin de ne pas déclencher par mégarde une
deuxième cuisson
Fonctionnement automatique avec réglage de la durée
et réglage de l'heure de fin de cuisson
Tournez le bouton 1 sur la position "durée" puis tournez le
bouton 2 vers "+" ou "-" pour régler la durée de cuisson.
Tournez ensuite le bouton 1 sur la position "fin" pour afficher
l'heure de fin de cuisson la plus proche possible. En tournant
le bouton 2 vers "+" ou "-", réglez l’heure de fin de cuisson
désirée. Le symbole S1 s'éteint si l'heure de fin de cuisson
est postérieure à l'heure actuelle + la durée de cuisson.
Le four est prêt et se met en marche automatiquement en
fonction de la durée et de l'heure de fin de cuisson réglées.
Exemple
L’heure du jour est 12:00, la durée de cuisson est réglée sur
1:30, et l'heure de fin de cuisson est programmée pour 14:00.
Cela signifie que le four se mettra en marche à 12:30.
Erreurs de réglage
Si par exemple l'heure de fin de cuisson réglée est antérieure
à l’heure actuelle + la durée de cuisson, le signal sonore
retentit et le symbole S3 clignote. Pour que le four fonctionne
convenablement, il est nécessaire de corriger la durée et
l’heure de fin de cuisson réglées (Le mieux est de tourner le
bouton 1 sur la position "manuel" et ensuite de recommencer
toute la procédure).
Minuteur
En tournant le bouton 1 sur la position "minuteur", vous
pouvez activer le minuteur qui a seulement une fonction
d'avertisseur et n’arrête pas le four.
Tournez le bouton 2 vers "+" ou "-" pour régler la durée
désirée. Le symbole S2 s'affiche et au bout de 7 secondes, le
temps commence à être décompté. Si le bouton 1 est resté
sur la position "minuteur", le temps décompté défile sur
l’afficheur.
En tournant le bouton 2, vous pouvez corriger le temps
restant, mais le bouton 1 doit être sur la position "durée".
7
Page 6

Après l'écoulement de la durée réglée, le signal sonore
retentit et s'arrête automatiquement au bout de 7 minutes si
vous ne l’avez pas interrompu auparavant en tournant le
bouton 1 sur une autre position. Le symbole S2 s'éteint.
nouveau vers "-" et le maintenez dans cette position,
l'intensité suivante apparaît.
L'intensité du signal sonore choisie en dernier lieu est
retenue. Vous pouvez de nouveau régler l'intensité du signal
sonore quand vous le désirez.
Bouton (1) sur la position "heure du jour"
Annulation d'un programme temporel
Cette position est neutre et permet d’afficher l’heure du jour.
Tournez le bouton sur cette position si vous voulez que
l'heure du jour soit affichée en permanence. Vous avez, par
exemple, réglé le programmateur en fonctionnement
automatique. Si le bouton 1 se trouve sur la position "fin",
l’heure de fin de cuisson est affichée, mais si vous tournez le
bouton 1 sur la position "heure du jour", c’est celle-ci qui sera
affichée.
Intensité du signal sonore
Quand aucune fonction temporelle n'est active (seule l’heure
du jour est affichée), vous pouvez choisir 3 niveaux
d'intensité différents pour le signal sonore : tournez le bouton
1 sur la position "manuel" puis attendez 7 secondes. Mais
attention : si vous tournez le bouton 2 avant 7 secondes,
vous modifiez l’heure du jour. Tournez ensuite le bouton 2
vers "-" et maintenez-le dans cette position. L’intensité de
niveau 1 apparaît. Si vous relâchez le bouton 2, le tournez de
Tous les réglages de temps, sauf la fonction minuteur,
peuvent être annulés à n'importe quel moment en tournant le
bouton 1 sur la position "manuel". Les programmes réglés
sont automatiquement interrompus et l’appareil passe en
mode de fonctionnement non programmé (manuel).
Utilisation du programmateur en combinaison avec le
four
Pour utiliser le programmateur en combinaison avec le
four, vous devez d'abord mettre le four en marche et
régler le mode de cuisson désiré ainsi que la
température. C'est seulement ensuite que vous réglez le
programmateur. Si vous voulez arrêter la cuisson, vous
devez mettre le four à l’arrêt afin de ne pas déclencher
par mégarde une deuxième cuisson.
NOUS NOUS RESERVONS LE DROIT DE PROCEDER A DES MODIFICATIONS QUI N’ONT PAS
D’INCIDENCE SUR LE FONCTIONNEMENT DE L’APPAREIL.
Reloj apagador desenchufador electrónico ES
− Girad el botón 1 hasta la posición ´hora actual´ y
presionádlo, luego giradlo de nuevo hasta la posición
´manual´.
Por medio del botón 2 se ajusta la hora actual (el símbolo S3 se
apaga, se enciende el símbolo S1).
Hay que proceder del mismo modo en caso de una
interrupción de la corriente eléctrica o al corregir la hora
1 botón para seleccionar las funciónes individuales
2 botón para (+) más y (-) menos
Descripción de símbolos:
posición ‘manual’
posición ‘minutero’
posición ‘duración’
posición ‘fin’
posición ‘hora actual’
Puesta en hora del reloj
Cuando conectáis el aparato en la electricidad, en la esfera
se visualice 0 00 cual esta parpadeando, el simbolo S3 esta
tambien parpadeando. Presionad el botón 1 y giradlo hasta la
posición ´manual´ y girando el botón 2 en la dirección '+' o '-'
ajustad la hora actual. El símbolo S3 se apaga.
Después de 7 segundos del cualquier ultimo activado botón
el reloj empieza a marchar. Tambien se enciende el simbolo
S1, cúal indica que el reloj esta ajustado en el
funcionamiento no programado (manual).
Nota: si mantenéis el botón 2 en la position '+' o la '-' más
tiempo, los numeros en el
rapido.
Advertencia: Si 7 segundos después de la conexión del
aparato a la corriente eléctrica no ajustáis la hora actual, el
tiempo empieza a transcurrir por símismo. Si luego giráis el
botón 2 en la dirección ´+´, la hora actual deja de parpadear,
pero el símbolo S3 sigue parpadeándo. Se debe ajustar la
hora actual posteriormente del siguiente modo:
visualizador se diversifican más
actual.
Ajuste del funcionamiento no programado (manual)
Presionad el botón 1 y giradlo hasta la posición ´manual´.
Todos los programas ajustados hasta ahora se anulan (el
simbolo S3 se apaga si el estava activo). El simbolo S1 se
activará (si aún no estava), lo que avisa, que esta ajustado
funcionamiento no programado (manual).
Funcionamiento medio-automatico con la duración de
funcionamiento
Presionad el botón 1 y giradlo hasta la posición ´manual´.
Si giráis el botón 1 en la position 'duración'. En la esfera se
aparece 0 00 y el simbolo S1. Con el botón 2, girandole en la
dirección '+' o la '-', ajustáis el tiempo deseado. El simbolo
S3 se aparece. El tiempo podéis ajustar en pasos de 1
minuto. El tiempo de funcionamiento podéis ajusrar máximo
hasta 10 horas.
Después de 7 segundos, el tiempo deseado empieza a
descontarse y el en visualizador aparece la hora actual. El
tiempo restante puede ser corregido según sus deseos con
el botón 2, si presionáis el botón 1 en la posición ´duración´.
Cuando pasa el tiempo ajustado suena la alarma. La alarma
se apagará automaticamente despúes de 7 minutos, si aún
no estava apagada con el botón 1 girado en cualquiera otra
position de la position actual. El simbolo S1 se apaga y el
simbolo S3 parpadea. En este momento el horno se apaga
solamente.
Después de girarlo el botón 1 en la position 'manual', el
simbolo S3 se apaga y el simbolo S1 se enciende, y el reloj
esta ajustado en el funcionamiento no programado (manual).
8
Page 7

Si queréis terminar de asar, debéis apagar también el
horno!
Funcionamiento medio-automatico con el fin de
funcionamiento
Presionad el botón 1 y giradlo hasta la posición ´fin´. En la
esfera se aparece la hora principal.
Con el botón 2, girandolo en la dirección '+' o la '-', ajustáis el
tiempo del fin de funcionamiento (el este tiempo debe ser
más largo de la hora principal). El simbolo S3 se
Después de 7 segundos del ajustar el tiempo deseado en la
esfera se aparecela hora principal.
Cuando la hora principal llega a igualizarse con el tiempo
ajustado del fin de asar, suena la alarma, cúal se apagará
automatiæamente despúes de 7 minutos, si aún no estava
apagada con el botón 1 girado en cualquieraotra position de
la position actual. El simbolo S1 se apaga y el simbolo S3
parpadea. En este momento el horno se apaga solamente.
Después de haber presionado el botón 1 y girarlo hasta la
posición ´manual´, el símbolo S3 se apaga y se enciende el
símbolo S1 .y el reloj está ajustado al funcionamiento no
programado (manual). Si queréis terminar de asar, debéis
que apagar también el horno!
aparece.
Funcionamiento automatico con el ajustamiento de la
duración y del fin de funcionamiento
Girad el botón 1 en la posición 'duración'. Girando el botón 2
en la dirección '+' o '-' ajustad la duración de funcionamiento.
Después girad el botón 1 en la posición 'fin' y en la esfera
aparece la hora másla hora más cercana posible del fin de
funcionamiento. Con el botón 2, girandolo en la dirección '+'
o '-', ajustáis el fin de funcionamiento. El simbolo S1 se
apagará, si la hora del fin de funcionamiento está más
alejada que la hora principal + la duración de funcionamiento.
El horno empieza a funcionar automatico según de los
tiempos ajustados.
Ejemplo
Hora principal = 12:00, duración de funcionamiento esta
designada en la 1:30, y el fin en la 14:00. Esto se segnifica,
que la hora empiezará funcionar a las 12:30.
Faltas en ajustamiento
Si por ejemplo el tiempo del fin de funcionamiento esta
ajustado asi que esta más corto de la hora principal + la
duración de funcionamiento, suenará la alarma y el simbolo
S3 parpadeará.
Para funcionamiento correcto tienens que corregir el tiempo
ajustado (mejor es que el botón 1 giráis en la position
'manual' y luego repite el procedimiento entero).
Minutero
Si giráis el botón 1 en la position 'minutero', se activa el
minutero, cúal tiene solamente al función de avisar y no
apaga el horno. Con el botón 2 girandolo en la dirección '+' o
la '-', ajuste el tiempo deseado. El simbolo S2 se encende.
Después de 7 segundos, el tiempo deseado cúal esta a
designado empieza descontarse.
Si el botón 1 se a quedado en la position 'minutero', en la
esfera se aparece el tiempo ajustado cúal esta
descontandose. Resto del tiempo podéis a corregirlo como
queréis con el botón 2, pero el botón 1 debe que estar en la
position 'duración'.
Cuando pasa el tiempo designado suena la alarma, cúal se e
apagará automatiæamente despúes de 7 minutos, si aún no
estava apagada con el botón 1 giradole en cualquiera otra
position de la position actual. El simbolo S2 se apaga.
Botón (1) en la position 'hora principal'
Esta position es neutra y ineica la hora principal. Utilizalo, si
queréis que todo el tiempo en la esfera esta indicada la hora
principal. El reloj esta ajustado por ejemplo en el
funcionamiento automatiæo. Si el botón 1 esta en la position
'fin', en la esfera esta indicado el tiempo de fin, y si el botón 1
giráis en la position 'hora principal', en la esfera se aparece
hora principal.
Potencia del sonido de alarma
Cuando no esta acitivada nigúna función (indicada esta
solamente la hora principal), podéis seleccionar 3 potencias
diferentes del sonido asi, que giráis el botón 1 en la position
'manual' y esperas 7 segundos. Si giráis el botón 2, antes de
que pasa este tiempo, la hora principal se cambiará!
Después giráis el botón 2 en la dirección '-' y lo mantengas
en esta posición y aparecese el primer modo del sonido. Si el
botón 2 soltáis y luego otra vez giráis en la dirección '-' y lo
mantienes en esta posición se aparece el próximo modo del
sonido.
La potencia del sonido que fuera a seleccionada la ultima se
mantiene. Las potencias del sonido podéis a seleccionar
siempre cuando queréis.
Anulacion de cualquier programa
Todas las funciónes designadas, menos función del
minutero, podéis anular siempre con el botón 1, asi que lo
giráis en la position 'manual'. Los programas ajustados se
anularan automaticamente y el reloj se pone en el estado de
funcionamiento no programado (manual).
Utilización de reloj en combinación con el horno
Con la utilizción del reloj en combinación con el horno
debéis que encender primero el horno y ajustar el
sistema deseado de asar y designar la temperatura.
Después ajustáis los funciónes del reloj. Cuando
termines de asar, apaga el horno.
NOS RESERVAMOS EL DERECHO A MODIFICACIONES QUE NO TIENEN EFECTO SOBRE LAS
FUNCIONES DEL APARATO
9
Page 8

Programador electrónico PT
corrigir o tempo que resta com o auxílio do botão 2, enquanto
que o botão 1 deve permanecer na posição "duração".
Quando a duração regulada acabou, o sinal sonoro toca e
pára automaticamente passado 7 minutos se não o
interromper girando o botão 1 para outra posição. O símbolo
S1 desaparece e o símbolo S3 pisca. Nesta altura, o forno
está desligado.
1 botão selector das funções individuais
2 botão de regulação (+) e (-)
Descrição dos símbolos:
posição ‘manual’
posição ‘minutaria’
posição ‘duração’
posição ‘fim’
posição ‘hora actual’
Regulação da hora
Quando ligar o aparelho à rede eléctrica, os dígitos 0 00
aparecem no visualizador e o símbolo S3 começa a piscar.
Rode o botão 1 para a posição "manual", e a seguir rode o
botão 2 para "+" ou "-" para acertar o relógio. O símbolo
S3 desaparece e o relógio põe-se em funcionamento
passados 7 segundos. Acende-se o símbolo S1 para indicar
que o aparelho está regulado em modo não-programado
(manual)
Observação: se mantiver durante mais tempo o botão 2 na
posição "+" ou "-", o relógio põe-se à hora mais
rapidamente.
Advertência: Se não acertar o relógio nos 7 secondes a
seguir a ligação do aparelho à rede eléctrica, este coloca-se
automaticamente em funcionamento. Neste caso, rode o
botão 2 para ‘+’ : a hora actual pára de piscar, enquanto que
o símbolo S3 continua a piscar. Para acertar o relógio,
proceda da seguinte forma:
− Rode primeiro o botão 1 para a posição ‘hora actual’ e a
seguir para a posição ‘manual’.
− Acerte o relógio com o botão 2 (o símbolo S3 apaga-se e
o símbolo S1 fica visualizado).
Proceda da mesma forma após uma falha de electricidade
ou para corrigir o acerto do relógio.
O botão 1 na posição ‘hora actual’ serve apenas para a
visualização da hora. Não pode ser utilizado para regular
o programador.
Funcionamento não programado (manual)
Rodar o botão 1 para a posição "manual" para anular os
programas regulados anteriormente (se o símbolo S3
estiver afixado, apaga-se). O símbolo S1 afixa-se (se já não
estava), o que significa que o forno vai funcionar em modo
não programado (manual).
Funcionamento semi-automático com duração da
cozedura
Rodar o botão 1 para a posição "duração". Os algarismos 0
00 e o símbolo S1 aparecem no visualizador. Regular a
duração da cozedura girando o botão 2 para "+" ou "-". O
símbolo S3 afixa-se. Pode regular a duração por intervalos
de 1 minuto. A duração máxima é de 10 horas.
Quando a duração da cozedura é regulada, o tempo começa
a ser descontado passado 7 segundos. Se o botão 1
permaneceu na posição "manual", a contagem decrescente
da duração pré-regulada aparece no visualizador. Pode
Se rodar o botão 1 para a posição "manual", o símbolo S3
desaparece e o símbolo S1 afixa-se para indicar que o
relógio está pronto para o funcionamento não programado
(manual).
Se quiser parar a cozedura, tem de desligar o forno para não
desactivar uma segunda cozedura pressionando por
inadvertência o botão 1.
Funcionamento semi-automático com regulação da
hora do fim da cozedura
Rodar o botão 1 para a posição "fim". A hora actual aparece
no visualizador. Rode o botão 2 para "+" ou "-" regular a
hora de fim de cozedura (a mesma deve ser posterior à hora
actual). O símbolo S3 afixa-se. Passado 7 segundos, a hora
actual aparece novamente no visualizador.
Quando a hora actual atinge a hora de fim de cozedura, o
sinal sonoro toca e pára automaticamente passado 7
minutos se não o interrompeu rodando o botão 1 para outra
posição. O símbolo S1 desaparece e o símbolo S3 pisca.
Nessa altura, o forno está desligado.
Se rodar o botão 1 para a posição "manual", o símbolo S3
desaparece e o símbolo S1 afixa-se para indicar que o
relógio está pronto para o funcionamento não programado
(manual).
Se quiser parar a cozedura, tem de desligar o forno para
não desactivar uma segunda cozedura pressionando por
inadvertência o botão 1.
Funcionamento automático com regulação da duração
da cozedura e paragem do forno
Rodar o botão 1 para a posição "duração e regular a duração
de cozedura rodando o botão 2 para "+" ou "–".
Rodar de seguida o botão 1 para a posição "fim" para poder
regular a hora do fim da cozedura mais próxima. Regular a
hora de fim de cozedura rodando o botão 2 para "+" ou "-".
O símbolo S1 apaga-se se a hora do fim da cozedura for
posterior à hora actual + a duração da cozedura.
O forno começa a funcionar automaticamente mediante os
tempos regulados.
Exemplo
A hora actual é 12:00, a duração da cozedura está regulada
para 1:30 e o fim para 14:00. Isto significa que o forno
colocar-se-á em funcionamento às 12:30.
Erros de regulação
Se por exemplo a hora do fim da cozedura estiver regulada
de forma a ser anterior à hora actual + a duração da
cozedura, o sinal sonoro toca e o símbolo S3 pisca. Para que
o forno funciona normalmente, é necessário corrigir os
tempos regulados (O melhor é rodar o botão 1 para a
posição "manual" e de seguida recomeçar a totalidade do
procedimento).
Temporizador
Ao rodar o botão 1 para a posição "minutaria", poderá activar
a minutaria que apenas tem uma função de aviso e não pára
o forno.
Ao rodar o botão 2 para "+" ou "-" poderá regular a duração
da cozedura desejada. O símbolo S2 afixa-se. Quando a
duração da cozedura é regulada, o tempo começa a ser
descontado passado 7 segundos. Se o botão 1 ficou na
10
Page 9

posição "minutaria", a contagem decrescente da duração
pré-regulada aparece no visualizador.
Poderá corrigir a duração que resta rodando o botão 2, mas
o botão 1 deve estar na posição "duração".
Quando a duração regulada acabe, o sinal sonoro toca e
pára automaticamente passado 7 minutos se não o
interromper rodando o botão 1 para outra posição. O símbolo
S2 apaga-se.
Botão (1) na posição "hora actual"
Esta posição é neutra e afixa a hora actual. Pode utilizá-lo se
quiser que a hora actual seja visível
permanentemente no visualizador. Regulou, por exemplo, o
relógio para a cozedura automática.
Se o botão 1 se encontre na posição "fim", a hora de fim de
cozedura é afixada, mas se rodar o botão 1 para a posição
"hora actual ", é a hora actual que será visualizada.
Intensidade do sinal sonoro
Quando nenhuma função que mede o tempo de cozedura é
activa (apenas hora actual é visualizada), pode escolher 3
níveis de intensidade diferentes do sinal sonoro : rodar o
botão 1 para a posição "manual" e aguardar 7 segundos mas
cuidado se rodar o botão 2 antes dos 7 segundos, mudará a
hora actual. Rodar de seguida o botão 2 para "-" e mantê-lo
nesta posição. A intensidade mais fraca do sinal sonoro
afixa-se. Se libertar o botão 2 e o rodar novamente para "-",
a intensidade seguinte aparece.
A intensidade do sinal sonoro escolhida, aquando da última
regulação, é memorizada. Poderá modificá-la novamente
quando quiser.
Anulação de um programa de tempo
Todas as regulações de tempo, excepto a minutaria, podem
ser anuladas a qualquer altura rodando o botão 1 para a
posição "manual". Os programas regulados são
automaticamente interrompidos e o relógio está em modo de
funcionamento não programado (manual).
Utilização do relógio em combinação com o forno
Se utilizar o relógio em combinação com o forno, terá de
colocar primeiro o forno em funcionamento, de seguida
terá de regular o modo da cozedura desejado e a
temperatura. Só depois poderá regular a duração da
cozedura no relógio. Para parar a cozedura, terá de
desligar o forno para não desactivar uma segunda
cozedura pressionando por inadvertência o botão 1.
RESERVAMOS O DIREITO DE INTROUER ALTERAGÕES QUE NÃO MODIFIQUEM A
FUNCIONALIDADE DO APARELHO
Electronische programmeerklok NL BE LU
− Met knop 2 stelt u de juiste dagtijd in (het symbool S3 verdwijnt,
het symbool S1 gaat branden)
Op de zelfde wijze handelt u bij stroomonderbrekingen of bij
een correctie van de dagtijd!
De knop 1 in de stand “dagtijd” dient alleen om de
dagtijd te laten zien en niet om hem te veranderen!
1 knop voor de keuze van de individuele functies
2 knop voor de (+) en (-) instellingen
Beschrijving van de symbolen:
stand “handbediening”
stand “kookwekker”
stand “werkingsduur”
stand “einde”
stand “dagtijd”
Het instellen van de klok op de dagtijd
Als u het apparaat op het electriciteitsnet aansluit, worden op de
display de cijfers 0 00 zichtbaar en knippert het symbool S3.
Draai knop 1 op de stand "handbediening" en stel de juiste dagtijd
in door knop 2 in de richting "+" of "-" te draaien. Het symbook S3
verdwijnt. 7 seconden na het activeren van een knop begint de
klok te lopen. Het symbool S1 licht op en toont aan dat de klok op
de niet-geprogrammeerde werking (handbediening) is ingesteld.
Opmerking: wanneer u knop 2 langere tijd op stand "+" of "-"
houdt, veranderen de getallen op de display sneller.
Waarschuwing: Als u 7 seconden na het aansluiten van het
apparaat op het elektriciteitsnet geen dagtijd instelt, begint deze
zelf te lopen. Als u dan knop 2 in de “+” richting draait, houdt de
dagtijd op te knipperen, terwijl het symbool S3 nogsteeds
knippert. U stelt dan de dagtijd achteraf in op de volgende wijze:
− Draai knop 1 in de stand “dagtijd” en dan terug in de stand
“handbediening”
Het instellen van de niet-geprogrammeerdewerking
(handbediening)
Draai knop 1 op de stand "handbediening". Elk eerder
ingesteld programma wordt hierdoor herroepen (het symbool
S3 verdwijnt, als het actief was(. Het symbool S1 wordt actief
(als het dit al niet was). Dit betekent, dat de nietgeprogrammeerde werking (handbediening) is ingesteld.
Halfautomatische werking met werkingsduur
Draai knop 1 op de stand "werkingsduur". Op de display
verschijnen de getallen 0 00 en het symbool S1. Door knop 2
in de richting "+" of "-" te draaien, stelt u de gewenste tijd in.
Symbool S3 verschijnt op de display. U kunt de tijd in
intervallen van 1 minuut instellen. De maximale instelbare tijd
is 10 uur.
Wanneer u de gewenste tijd heeft ingesteld, begint deze na 7
seconden af te tellen. Wanneer knop 1 op de stand
"handbediening" staat, ziet u op de display het aftellen van
de ingestelde tijd.
U kunt de resterende tijd desgewenst met knop 2 corrigeren,
waarbij knop 1 op de stand "werkingsduur" moet staan.
Na afloop van de ingestelde tijd klinkt een geluidssignaal, dat
na 7 minuten vanzelf ophoudt, als u het niet onderbreekt door
knop 1 in een andere stand te draaien. Symbool 1 verdwijnt
en symbool S3 knippert. Op dit moment schakelt de oven uit.
Nadat u knop 1 in de stand "handbediening" heeft gedraaid,
verdwijnt symbool S3 en wordt symbool S zichtbaar. De klok
is nu ingesteld op de niet-geprogrammeerde werking
(handbediening". Wanneer u het bakken of braden wilt
beëindigen, moet u ook de oven uitschakelen!
11
Page 10

Halfautomatische werking met einde van de werking
Draai knop 1 in de stand "einde". Op de display verschijnt de
dagtijd. Door knop 2 in de richting "+" of "-" te draaien, stelt
u de gewenste tijd van de beëindiging van de werking in
(deze moet langer als de dagtijd zijn). Symbool S3 verschijnt
op de display 7 seconden na de instelling van de gewenste
tijd.
Wanneer de dagtijd de ingestelde bak-/braadtijd bereikt,
klinkt een geluidssignaal, dat na 7 minuten vanzelf ophoudt
als u het niet onderbreekt door knop 1 in een andere stand te
draaien. Symbool S1 verdwijnt en symbool S3 knippert. Op
dit moment schakelt de oven uit.
Nadat u knop 1 in de stand "handbediening" heeft gedraaid,
verdwijnt symbool S3 en verschijnt symbool S1. De klok is nu
ingesteld op de niet-geprogrammeerde werking
(handbediening). Wanneer u het bakken of braden wilt
beëindigen, moet u ook de oven uitschakelen!
Automatische werking met instelling van de
werkingsduur en einde van de werking
Draai knop 1 in de stand "werkingsduur" en stel door het
draaien van knop 2 in de richting "+" of "-" de werkingsduur
in.
Draai daarna knop 1 in de stand "einde" en op de display
verschijnt de eerstmogelijke beëindigingstijd van de werking.
Stel het einde van de werking in door knop 2 in de
richting "+" of "-" te draaien. Het symbool S1 verdwijnt
wanneer de beëindigingstijd langer is dan de dagtijd + de
werkingsduur.
De oven begint automatisch te werken op de ingestelde
tijden.
Voorbeeld
Dagtijd = 12:00, de werkingsduur is als volgt ingesteld: begin
1:30, einde 14:00. Dit betekent, dat de oven om 12:30 begint
de werken.
Fouten bij het instellen
Als bijvoorbeeld de tijd van het einde van de werking zo is
ingesteld, dat hij korter dan de dagtijd + de werkingsduur is,
klinkt een geluidssignaal en knippert het symbool S3. Voor
een juiste werking moeten de ingestelde tijden worden
gecorrigeerd (u kunt het beste overschakelen op de nietgeprogrammeerde werking (handbediening) door tegelijkertijd
knop 2 in de stand "handbediening" te draaien en dan de hele
procedure te herhalen).
De kookwekker
Door knop 1 in de stand "kookwekker" te draaien kunt u de
kookwekker activeren, die alleen een waarschuwingsfunctie
heeft en de oven niet uitschakelt.
Door knop 2 in de richting van "+" of "-" te draaien stelt u de
gewenste tijd in. Het symbool S2 verschijnt op de display.
Wanneer u de gewenste tijd heeft ingesteld, begint deze na 7
seconden af te tellen. Wanneer knop 1 nogsteeds op de
stand "kookwekker" staat, verschijnt het aftellen van de
ingestelde tijd op de display.
Door knop 1 te draaien kunt u de resterende tijd corrigeren.
Hierbij moet knop 1 op de stand "werkingsduur" staan.
Na afloop van de ingestelde tijd klinkt een geluidssignaal, dat
na 7 minuten vanzelf ophoudt, als u het niet eerder
uitschakelt door knop 1 in een andere stand te draaien. Het
symbool S2 verdwijnt.
Knop (1) op de stand "dagtijd"
Deze stand is neutraal en laat de dagtijd zien. Gebruik hem
alleen wanneer u wilt dat de dagtijd voortdurend op de display
zichtbaar is. U heeft de klok bijvoorbeeld op automatische
werking ingesteld. Wanneer knop (1) op de stand "einde"
staat, wordt op de display de eindtijd weergegeven. Als u
knop (1) in de stand "dagtijd" draait, zal op de display de
dagtijd te zien zijn.
De geluidssterkte van het signaal
Wanneer geen enkele functie geactiveerd is (alleen de
dagtijd verschijnt op de display) kunt u 3 verschillende
geluiddsterkten kiezen door knop 1 in de stand
"handbediening" te draaien en 7 seconden te wachten.
Wanneer u voor de afloop van deze tijd knop 2 draait, zult u
de dagtijd veranderen! Draai daarna knop 2 in de richting "-"
en houdt hem in deze stand. De eerste instelling van het
geluidssignaal verschijnt op de display. Wanneer u de knop
loslaat , hem weer in de richting "-" draait en in deze stand
houdt, verschijnt de tweede geluiddsterkte.
De laatst ingestelde geluidssterkte blijft in het geheugen. U
kunt desgewenst de geluidssterkte nogmaals instellen.
Het herroepen van een tijdprogramma
U kunt alle tijdinstellingen, behalve de kookwekker, op elk
moment herroepen door knop 1 in de stand "handbediening"
te draaien. De ingestelde programma's worden automatisch
onderbroken en de klok springt op de stand van de nietgeprogrammeerde werking (handbediening).
Het gebruik van de klok in combinatie met de oven
Bij het gebruik van de klok in combinatie met de oven
moet u eerst de oven aanzetten, het gewenste bakbraadsysteem en de gewenste temperatuur instellen.
Schakel de oven uit wanneer u het bakken of braden
beëindigt.
WIJ BEHOUDEN HET RECHT VOOR OP VERANDERINGEN DIE DE FUNCTIE VAN HET
APPARAAT NIET BEIVLOEDEN
Ηλεκτρονικός χρονοδιακόπτης GR CY
Περιγραφή στις ενδείξεις:
θέση "χειροκίνητης λειτουργίας"
θέση "χρονοδιακόπτης"
1 πλήκτρο λειτουργιών
2 πλην (-) και συν (+)
12
θέση "χρόνος λειτουργίας"
θέση "τέλος λειτουργίας"
θέση "ένδειξη ώρας"
Page 11

Ρύθμιση της ώρας
Μόλις συνδεθεί η συσκευή εμφανίζεται η ένδειξη 0 00 και το
σύμβολο S3. Περιστρέψτε το πλήκτρο 1στη θέση της " χειροκίνητης
λειτουργίας ", και περιστρέφοντας το πλήκτρο 2 προς "+" ή "-"
ρυθμίστε την ώρα της ημέρας. Το σύμβολο S3 σβήνει.
Tο ρολόι ξεκινά μετά από 7 δευτερόλεπτα. Tο σύμβολο S1 είναι
ενεργοποιημένο, δείχνει ότι το ρολόι έχει
(συμβατική) λειτουργία
Σημείωση: έχετε στρέψει το διακόπτη 2 προς τη θέση "+" ή "-"
ανατρέχετε γρήγορα στις ρυθμίσεις σας.
Προσοχή: σε περίπτωση που δεν ρυθμίσετε την ώρα της ημέρας
μέσα στα 7 δευτερόλεπτα μετά την σύνδεση με το δίκτυο, θα
αρχίσει να λειτουργεί αυτόματα. Εάν περιστρέψετε το πλήκτρο 2
προς την
αναβοσβήνει , αλλά το σύμβολο S3 εξακολουθεί να αναβοσβήνει.
Τώρα μπορείτε να ρυθμίσετε την τρέχουσα ώρα:
− Περιστρέψτε το πλήκτρο 1 στη θέση "ένδειξη της ώρας" και
− Ρυθμίστε την ώρα της ημέρας με το πλήκτρο 2 (το σύμβολο S3
Επαναλάβετε την ίδια διαδικασία σε περίπτωση διακοπής ρεύματος
ή να αλλάξετε την ώρα της ημέρας!
Πλήκτρο 1 στη θέση ‘ένδειξη ώρας’ είναι μόνο για την
ένδειξη της ώρας και όχι για την ρύθμιση της ώρας!
κετευθυνσηn ‘+’ , η τρέχουσα ώρα σταματά να
πίσω πάλι στην " χειροκίνητης λειτουργίας ".
είναι σβηστό , το
σύμβολο S1 είναι ενεργοποιημένο).
ρυθμιστή στη χειροκίνητη
Ρύθμιση στη συμβατική (χειροκίνητη) λειτουργία
Στρέψτε το πλήκτρο 1 στη θέση "manual". Όλα τα
προγράμματα διαγράφονται(το σύμβολο S3 διαγράφεται
εάν ήταν ενεργοποιημένο). Ενεργοποιείται το σύμβολο S1
(αν δεν ήδη ήταν ενεργοποιημένο), και το ρολόι έχει ρυθμιστεί
στη συμβατική λειτουργία ( χειροκίνητη ) λειτουργία.
Ημι-Αυτόματη λειτουργία με προκαθορισμένο χρόνο
Στρέψτε το πλήκτρο 1 στη θέση "period of operation". Η
ένδειξη δείχνει 0 00 και το σύμβολο S1 είναι
ενεργοποιημένο. Ρυθμίστε τον επιθυμητό χρόνοtστρέφοντας
το πλήκτρο 2 στη θέση "+" ή "-". Εμφανίζεται το σύμβολοl
S3. Ο χρόνος λειτουργίας επιλέγεται σε βήματα του λεπτού.
Mέγιστος χρόνος ρύθμισης είναι 10 ώρες.
Αφού έχετε επιλέξει το χρόνο λειτουργίας
χρονομετρητής μετά από 7 δευτερόλεπτα. Εάν το πλήκτρο 1
παραμείνει στη θέση "manual" η ένδειξη δείχνει το χρόνο στο
χρονομετρητή.
Μπορείτε να ελέγχετε τον υπόλοιπο χρόνο στρέφοντας το
πλήκτρο 2, και εφόσον το πλήκτρο 1 παραμένει στη θέση
"period of operation".
Με τη λήξει του χρόνου ηχεί ο βομβητής, ο οποίος αυτομάτως
απενεργοποιείτε μετά από 7
κλείσει στρέφοντας το διακόπτη 1 σε οποιαδήποτε
κατεύθυνση εκτός από την παρούσα. Το σύμβολο S1 είναι
σβηστό και το σύμβολο S3 αναβοσβήνει. Τώρα ο φούρνος
είναι σβηστός.
Aφού στρέψετε το διακόπτη 1 στη θέση "manual" το σύμβολο
S3 απενεργοποιείται και επανεμφανίζεται το σύμβολο S1. Tο
ρολόι ρυθμίζεται στη
Αν θέλετε να διακόψετε το ψήσιμο θα πρέπει να σβήσετε
το φούρνο!
λεπτά αν ήδη δεν τον έχετε
συμβατική (χειροκίνητη) λειτουργία.
ξεκινά ο
Ημι-αυτόματη λειτουργία με λήξη χρόνου
Στρέψτε το πλήκτρο 1 στη θέση "end". Η ένδειξη εμφανίζει την
ώρα της ημέρας. Ρυθμίστε το χρόνο λήξης του ψησίματος
στρέφοντας το πλήκτρο 2 προς τη θέση "+" ή "-" (λογικό είναι
ότι ο χρόνος λήξης θα είναι μεγαλύτερος από την τρέχουσα ώρα).
Εμφανίζεται το σύμβολο S3. Αφού ολοκληρώσετε τις ρυθμίσεις
μετά από 7 λεπτά εμφανίζεται
Oταν η ώρα της ημέρας φτάσει στον προκαθορισμένο χρόνο
λήξης ηχεί ο βομβητής και μετά από 7 λεπτά αυτομάτως
απενεργοποιείται, εάν δεν ήδη τον έχετε απενεργοποιήσει
στρέφοντας το πλήκτρο 1 σε οποιαδήποτε κατεύθυνση. Tο
σύμβολο S1 είναι σβηστό και το σύμβολο S3 αναβοσβήνει. Τώρα
ο φούρνος είναι σβηστός.
η ώρα της ημέρας.
Aφού στρέψετε το
σβήνει και επανεμφανίζεται το σύμβολο S1 Tο ρολόι ρυθμίζεται
στην συμβατική (χειροκίνητη) λειτουργία.
Αν θέλετε να διακόψετε το ψήσιμο θα πρέπει να σβήσετε το
φούρνο!
πλήκτρο 1 στη θέση "manual" το σύμβολο S3
Aυτόματη λειτουργία με προκαθορισμένο χρόνο και
λήξη
Στρέψτε το πλήκτρο 1 στη θέση "period of operation" και
στρέψτε επίσης το πλήκτρο 2 προς το "+" ή "-" και
ρυθμίστε το χρόνο ψησίματος. Στη συνέχεια στρίψτε το
πλήκτρο 1 στη θέση "end" και η ένδειξη δείχνει τον
πλησιέστερο χρόνο λήξης. Ρυθμίστε τον επιθυμητό χρόνο
λήξης στρέφοντας το πλήκτρο 1 προς το "+" ή "-". Tο
σύμβολο S1 είναι
μεγαλύτερος από την ώρα της ημέρας + και από τον
προκαθορισμένο χρόνο λειτουργίας.
Tώρα ο φούρνος ξεκινά αυτόματα τη λειτουργία του σύμφωνα
με τις ρυθμίσεις.
ΠΑΡΑΔΕΙΓΜΑ
Η ώρα της ημέρας = 12:00, η λειτουργία με διάστημα
ρυθμίστηκε στις 1:30 και με λήξη στις 14:00. Αποτέλεσμα η
έναρξη λειτουργίας του φούρνου θα ξεκινήσει στις 12:30.
σβηστό εάν ο χρόνος λήξης είναι
Λάθος ρυθμίσεις στο χρόνο λειτουργίας
Εάν ο επιλεγόμενος χρόνος λειτουργίας είναι μικρότερος από
την ώρα +χρόνο λειτουργίας, ηχεί ο βομβητής και
αναβοσβήνει το σύμβολο S3. Θα πρέπει να διορθώσετε τους
προκαθορισμένους χρόνους (η πλέον κατάλληλη διαδικασία
είναι να στρέψετε το διακόπτη 1 στη θέση “ manual “ και
επαναλάβετε ολόκληρη την διαδικασία).
Υπενθύμιση Χρόνου
Για να ενεργοποιήσετε το χρονοδιακόπτη στρέψτε το
διακόπτη 1 στη θέση "timer Αυτός ο χρονοδιακόπτης
λειτουργεί ως υπενθύμιση χρόνου και δεν απενεργοποιεί το
φούρνο.
Ρυθμίστε το χρόνο που θέλετε στρέφοντας το πλήκτρο 2
προς το "+" ή "-". Το σύμβολο S2 είναι ενεργοποιημένο.
Αφού δώσετε τον επιθυμητό χρόνο ξεκινά η χρονομέτρηση
μετά από 7 δευτερόλεπτα.
θέση "timer"η ένδειξη δείχνει τον προκαθορισμένο χρόνο του
χρονομετρητή.
Ο υπόλοιπος χρόνος διορθώνεται με το πλήκτρο 2, και
εφόσον το πλήκτρο 1 παραμείνει στη θέση "period of
operation".
Με τη λήξει του χρόνου ηχεί ο βομβητής, ο οποίος αυτομάτως
απενεργοποιείτε μετά από 7 λεπτά αν ήδη δεν τον έχετε
στρέφοντας το διακόπτη 1 σε οποιαδήποτε
κλείσει
κατεύθυνση εκτός από την παρούσα. Το σύμβολο S2 είναι
σβηστό.
Εάν το πλήκτρο 1 παραμείνει στη
Πλήκτρο(1) στη θέση current time
Αυτή είναι η ουδέτερη θέση και δείχνει την ώρα της ημέρας.
Χρησιμοποιείται που θέλετε να εμφανίζεται η ώρα της
ημέρας. Για παράδειγμα το ρολόι είναι ρυθμισμένο στην
αυτόματη λειτουργία. Εάν το πλήκτρο 1 είναι ρυθμισμένο στη
θέση "end" η ένδειξη δείχνει το χρόνο λήξης, και εάν το
πλήκτρο 1 βρίσκεται στη θέση "current time" εμφανίζεται η
ώρα της ημέρας.
Ένταση ήχου βομβητή
Όταν όλες οι λειτουργίες είναι σβηστές (μόνο η ώρα της
ημέρας φαίνεται ) έχετε τη δυνατότητα να επιλέξετε 3
διαφορετικές εντάσεις του ήχου του βομβητή. Στρέψτε το
διακόπτη 1 στη θέση "manual" και περιμένετε 7
δευτερόλεπτα. Εάν στρέψετε το πλήκτρο 2 πριν τη λήξη του
χρόνου τροποποιείται την ώρα της ημέρας! Στη συνέχεια
στρέψτε το πλήκτρο
Ηχεί η πρώτη ένταση. Αφήστε το και ξανά στρίψτε το προς
το "-" για το επόμενο επίπεδο.
2 προς το "-" και κρατήστε το σε αυτή.
13
Page 12

Το τελευταίο επιλεγόμενο αποθηκεύεται στη μνήμη. Ανά
πάσα στιγμή μπορείτε να ρυθμίσετε την ένταση ήχου του
βομβητή.
Διαγραφή στις ρυθμίσεις
Όλες οι ρυθμίσεις διαγράφονται ανά πάσα στιγμή εκτός
από την υπενθύμιση χρόνου, στέφοντας το πλήκτρο 1 στη
θέση "manual".
Τα προκαθορισμένα προγράμματα αυτομάτως διαγράφονται
και το ρολόι επιστρέφει στην συμβατική λειτουργία (
χειροκίνητη) λειτουργία.
Συνδυασμός λειτουργίας φούρνου και ρολογιού
Για το τον συνδυασμό λειτουργίας φούρνου και
ρολογιού το πρώτο βήμα είναι να βάλετε το φούρνο σε
λειτουργία και ρυθμίστε τις επιθυμητές λειτουργίες
ψησίματος καθώς και την θερμοκρασία. Κατόπιν τούτου
μπορείτε να ρυθμίσετε τις λειτουργίες του ρολογιού.
Μετά το τέλος του ψησίματος σβήστε το φούρνο.
ΜΕ ΕΠΙΦΥΛΑΞΗ ΤΟΥ ΔΙΚΑΙΩΜΑΤΟΣ ΓΙΑ ΜΕΤΑΒΟΛΕΣ ΤΩΝ ΧΑΡΑΚΤΗΡΙΣΤΙΚΩΝ ΧΩΡΙΣ
ΚΑΜΙΑ ΕΠΙΔΡΑΣΗ ΣΤΗ ΛΕΙΤΟΥΡΓΙΑ ΤΗΣ ΣΥΣΚΕΥΗΣ.
Elektronska programska ura SI
Elektronska programska ura
1 gumb za izbiro posameznih funkcij
2 gumb za nastavitve (+) in (-)
Opis simbolov:
položaj ‘ročno’
položaj ‘minutnik’
položaj ‘trajanje’
položaj ‘konec’
položaj ‘dnevni čas’
Naravnava ure na dnevni čas
Ko aparat priključite na električno omrežje, se na številčnici
prikaže utripajoči 0 00, prav tako utripa tudi simbol S3. Gumb
1 zavrtite v položaj 'ročno' in z vrtenjem gumba 2 v smeri ”+”
ali ”- ” nastavite točen dnevni čas. Simbol S3 ugasne. 7
sekund po zadnjem aktiviranju kateregakoli gumba začne ura
teči. Zasveti tudi simbol S1, ki ponazarja, da je ura
nastavljena na neprogramirano (ročno) delovanje.
Opomba: če držite gumb 2 v poziciji ’+’ ali ’-’ dalj časa, se
številčnica hitreje spreminja.
Opozorilo: Če 7 sekund po priključitvi aparata na omrežje ne
nastavite dnevnega časa, začne le-ta teči sam. Če potem
zavrtite gumb 2 v ‘+’ smeri, dnevni čas preneha utripati, še
vedno pa utripa simbol S3. Dnevni čas nato naknadno
nastavite na naslednji način:
− Gumb 1 zavrtite v položaj ‘dnevni čas’ in nato nazaj v
položaj ‘ročno’.
− Z gumbom 2 nastavite točen dnevni čas (simbol S3
ugasne, prižge se simbol S1).
Na enak način postopajte tudi ob prekinitvi električne energije
ali pri korekciji dnevnega časa!
Gumb 1 v položaju ‘dnevni čas’ služi le za prikaz
dnevnega časa in ne za spreminjanje!
Nastavitev neprogramiranega (ročnega) delovanja
Zavrtite gumb 1 v položaj 'ročno'. Preklican je vsak do
takrat nastavljeni program (simbol S3 se zbriše, če je bil
aktiven). Aktiven postane simbol S1 (če že ni bil), kar
pomeni, da je nastavljeno neprogramirano (ročno) delovanje.
Polavtomatsko delovanje s trajanjem delovanja
Zavrtite gumb 1 v položaj 'trajanje'. Na številčnici se prikaže 0 00
in simbol S1. Z vrtenjem gumba 2 v smeri ”+” ali ”-” nastavite
željeni čas. Pojavi se simbol S3.
Čas lahko nastavljate v intervalu po 1 minuto. Maksimalni možni
nastavljeni čas je 10 ur.
Ko ste nastavili željeni čas, se le-ta začne po 7 sekundah
odštevati. Če je ostal gumb 1 v položaju ‘trajanje’, se na številčnici
prikazuje odštevanje nastavljenega časa.
Preostali čas lahko po želji korigirate z gumbom 2, pri čemer
mora biti gumb 1 v položaju 'trajanje'.
Po poteku nastavljenega časa se oglasi zvočni signal, ki se po 7
minutah izključi sam, če ni prekinjen z zasukom gumba 1 v
katerikoli drugi položaj, kot je obstoječi. Simbol S1 ugasne, simbol
S3 pa utripa. V tem trenutku se pečica izklopi.
Po zasuku gumba 1 v položaj 'ročno' simbol S3 ugasne in prižge
se simbol S1, ura pa je nastavljena na neprogramirano (ročno)
delovanje. Če želite zaključiti pečenje, morate izklopiti tudi
pečico!
Polavtomatsko delovanje s koncem delovanja
Zavrtite gumb 1 v pozicijo 'konec'. Na številčnici se prikaže dnevni
čas. Z vrtenjem gumba 2 v smeri ”+” ali ”-” nastavite čas konca
delovanja (le-ta mora biti daljši od dnevnega časa). Pojavi se
simbol S3. 7 sekund po nastavitvi željenega časa se na številčnici
prikaže dnevni čas.
Ko doseže dnevni čas nastavljeni končni čas pečenja, se oglasi
zvočni signal, ki se po 7 minutah izključi sam, če ni prekinjen z
zasukom gumba 1 v katerikoli drugi položaj, kot je obstoječi.
Simbol S1 ugasne, simbol S3 pa utripa. V tem trenutku se pečica
izklopi.
Po zasuku gumba 1 v položaj 'ročno' simbol S3 ugasne in prižge
se simbol S1, ura pa je nastavljena na neprogramirano (ročno)
delovanje. Če želite zaključiti pečenje, morate izklopiti tudi
pečico!
Avtomatsko delovanje z nastavitvijo trajanja in konca
delovanja
Zavrtite gumb 1 v položaj 'trajanje' in z vrtenjem gumba 2 v
smeri '+' ali '-' nastavite trajanje delovanja.
Zatem zavrtite gumb 1 v pozicijo 'konec' in na številčnici se
prikaže najbližji možen končni čas delovanja. Z vrtenjem
gumba 2 v smeri '+' ali '-' nastavite konec delovanja. Simbol
S1 ugasne, če je končni čas daljši od dnevnega časa +
trajanja delovanja.
Pečica začne avtomatsko delovati glede na nastavljene čase.
Primer
Dnevni čas = 12:00, trajanje delovanja je nastavljeno na 1:30,
konec pa na 14:00. To pomeni, da bo pečica začela delovati
ob 12:30.
14
Page 13

Napake pri nastavitvi
Če je na primer končni čas delovanja nastavljen tako, da je
krajši od dnevnega časa + trajanja delovanja, se oglasi
zvočni signal in simbol S3 utripa. Za pravilno delovanje je
potrebno korigirati nastavljene čase (najbolje je, da gumb 1
zavrtite v položaj 'ročno' in nato ponovite ves postopek).
Minutnik
Če zavrtite gumb 1 v položaj 'minutnik', lahko aktivirate
minutnik, ki ima samo opozorilno funkcijo in ne izklopi pečice.
Z vrtenjem gumba 2 v smeri '+' ali '-' nastavite željeni čas.
Prižge se simbol S2.
Ko ste nastavili željeni čas, se le-ta začne odštevati po 7
sekundah. Če je ostal gumb 1 v položaju 'minutnik', se na
številčnici prikazuje odštevanje nastavljenega časa.
Preostali čas lahko po želji korigirate z gumbom 2, pri čemer
mora biti gumb 1 v položaju 'trajanje'.
Ko se izteče nastavljeni čas, se oglasi zvočni signal. Po 7
minutah se izključi sam, če ni prekinjen z zasukom gumba 1
v katerikoli drugi položaj, kot je obstoječi.
Simbol S2 ugasne.
Gumb (1) v položaju 'dnevni čas'
Ta položaj je nevtralen in prikazuje dnevni čas. Uporabite ga, če
želite, da je na številčnici ves čas prikazan dnevni čas. Uro ste na
primer nastavili na avtomatsko delovanje. Če je gumb 1 v
položaju 'konec', je na številčnici prikazan končni čas, če pa gumb
1 zavrtite v položaj 'dnevni čas', bo na številčnici prikazan dnevni
čas.
Jakost zvočnega signala
Ko ni aktivna nobena časovna funkcija (prikazan je samo
dnevni čas), lahko izbirate 3 različne jakosti zvočnega signala
tako, da zavrtite gumb 1 v položaj 'ročno' in počakate 7
sekund. Če pred pretekom tega časa zasučete gumb 2,
boste spremenili dnevni čas! Nato gumb 2 zavrtite v smeri '-'
in ga držite v tem položaju. Pojavi se prva nastavitev
zvočnega signala. Če gumb 2 spustite in ponovno zasučete v
smeri
'-' in ga držite v tem položaju, se pojavi naslednja jakost.
Ohrani se tista jakost zvočnega signala, ki jo nazadnje
določite. Jakost lahko ponovno nastavite, kadarkoli želite.
Preklic kateregakoli časovnega programa
Vse časovne nastavitve, razen minutnika, lahko prekličete
kadarkoli tako, da gumb 1 zavrtite v položaj 'ročno'.
Nastavljeni programi se avtomatsko prekinejo in ura se
postavi v stanje neprogramiranega (ročnega) delovanja.
Uporaba ure v kombinaciji s pečico
Pri uporabi ure v kombinaciji s pečico morate najprej
vklopiti pečico in nastaviti željeni sistem pečenja ter
temperaturo. Šele nato nastavljajte funkcije na uri. Ko
zaključite s pečenjem, izklopite pečico.
PRIDRUŽUJEMO SI PRAVICO DO SPREMEMB, KI NE VPLIVAJO NA FUNKCIONALNOST
APARATA
Elektronski programski sat HR BA
treperiti, ali još uvijek treperi simbol S3. Točno vrijeme zatim
naknadno podesite na slijedeći način:
− Gumb 1 okrenite u položaj ‘točno vrijeme’ i natrag u položaj
‘ručno’.
− Gumbom 2 izaberite točno vrijeme dana (simbol S3 se
1 gumb za izbor pojedinih funkcija
2 gumb za (+) i (-) podešavanja
Opis simbola:
položaj ‘ručno’
položaj ‘odbrojavanje’
položaj ‘trajanje’
položaj ‘završetak’
položaj ‘točno vrijeme’
Podešavanje točnog vremena
Kada aparat priključite na električnu mrežu, na brojčaniku se
pokaže trepereći natpis 0 00, isto tako treperi simbol S3.
Gumb 1 zavrtite u položaj "ručno", dok okretanjem gumba 2 u
smjeru "+" ili "-" podesite točno tekuće vrijeme. Simbol S3 se
ugasi. Nakon 7 sekundi od aktiviranja bilo kojeg gumba, sat
počinje raditi. Zasvijetli i simbol S1, koji pokazuje da je sat
podešen na neprogramirano (ručno) djelovanje.
Napomena: ako gumb 2 držite u položaju "+" ili "-" duže
vrijeme, brojčanik se brže mijenja.
Upozorenje: Ako 7 sekundi nakon priključenja aparata na el.
mrežu ne izaberete točno vrijeme, sat započne teći sam. Ako
zatim okrenete gumb 2 u ‘+’ smjer, točno vrijeme prestane
ugasi, a upali se simbol S1).
Na isti način postupite i u sluč
ili kod korekcije točnog vremena!
Gumb 1 u položaju ‘točno vrijeme" služi samo za prikaz
točnog vremena, a ne za mijenjanje!
Podešavanje neprogramiranog (ručnog) djelovanja
Okrenite gumb 1 u položaj "ručno". Poništili ste sve dotad
postavljene programe (simbol S3 se izbriše, ako je bio
aktivan). Aktivan postane simbol S1 (ako dosad nije bio), što
znači da je podešeno neprogramirano (ručno) djelovanje.
Poluautomatsko djelovanje s trajanjem djelovanja
Okrenite gumb 1 u položaj "trajanje". Na brojčaniku se pojavi
0 00 i simbol S1. Okretanjem gumba 2 u smjeru "+" ili "-"
podesite izabrano razdoblje. Pojavi se simbol S3. Razdoblje
možete podešavati u intervalima po 1 minutu. Maksimalno
moguće podešeno razdoblje je 10 sati.
Nakon što ste podesili izabrano razdoblje, vrijeme se
započne odbrojavati nakon 7 sekundi. Ako je gumb 1 ostao u
položaju "trajanje", na brojčaniku se prikazuje odbrojavanje
podešenog vremena. Gumbom 2 možete po volji popravljati
preostalo vrijeme, ali pritom mora gumb 1 biti u položaju
"trajanje". Nakon isteka podešenog vremena, začuje se
zvučni signal, koji se nakon 7 minuta isključi sam, ako nije
prekinut okretanjem gumba 1 u bilo koji drugi položaj, osim
postojećeg. Simbol S1 se ugasi, a simbol S3 treperi. U tom
se trenutku pećnica isključi.
aju prekida električne energije,
15
Page 14

Nakon okretanja gumba 1 u položaj "ručno", simbol S3 se
ugasi i upali se simbol S1, a sat je podešen na
neprogramirano (ručno) djelovanje.
Ako želite zaključiti s pečenjem, morate isključiti i
pećnicu!
Poluautomatsko djelovanje sa završetkom djelovanja
Okrenite gumb 1 u položaj "završetak". Na brojčaniku se
pojavi vrijeme dana. Okretanjem gumba 2 u smjeru "+" ili "-"
podesite vrijeme završetka djelovanja (ovo mora biti duže od
trenutnog vremena). Pojavi se simbol S3. Nakon 7 sekundi
na brojčaniku se prikaže vrijeme dana.
Kad tekuće vrijeme sustigne podešeno vrijeme završetka
pečenja, začuje se zvučni signal, koji se nakon 7 minuta
isključi sam, ako nije prekinut okretanjem gumba 1 u bilo koji
drugi položaj osim postojećega. Simbol S1 se ugasi, a simbol
S3 treperi. U tom se trenutku pećnica isključi.
Nakon okretanja gumba 1 u položaj "ručno", simbol S3 se
ugasi, i upali se simbol S1, a sat je podešen na
neprogramirano (ručno) djelovanje.
Ako želite zaključiti s pečenjem, morate isključiti i
pećnicu!
Automatsko djelovanje s podešenim trajanjem i
završetkom
Okrenite gumb 1 u položaj "trajanje", i okretanjem gumba 2 u
smjeru "+" ili "-" podesite trajanje djelovanja.
Zatim okrenite gumb 1 u položaj "završetak", i na brojčaniku
se prikaže najbliže moguće vrijeme završetka djelovanja.
Okretanjem gumba 2 u smjeru "+" ili "-" podesite završetak
djelovanja. Simbol S1 se ugasi ako je vrijeme završetka duže
od trenutnog vremena + trajanja djelovanja.
Pećnica započne automatski djelovati sukladno podešenim
vremenima.
Primjer
Vrijeme dana = 12:00, trajanje djelovanja podešeno je na
1:30, a završetak na 14:00. Ovo znači, da će pećnica
započeti raditi u 12:30.
Greške kod podešavanja
Ako je na primjer vrijeme završetka rada podešeno tako da je
kraće od tekućeg vremena + trajanja djelovanja, začuje se
zvučni signal i treperi simbol S3. Za pravilno djelovanje
potrebno je korigirati podešena vremena (najbolje je da gumb
1 zavrtite u položaj "ručno" i čitav postupak na to ponovite).
Tipka za odbrojavanje
Ako gumb 1 okrenete u položaj "odbrojavanje" možete
aktivirati odbrojavanje, čija je funkcija upravo upozoravanje, i
ne isključuje pećnicu.
Okretanjem gumba 2 u smjeru "+" ili "-" podesite izabrano
vrijeme. Upali se simbol S2.
Kad ste podesili izabrano vrijeme, ovo se nakon 7 sekundi
započne odbrojavati. Ako je gumb 1 ostao u položaju
"odbrojavanje", na brojčaniku se prikazuje odbrojavanje
podešenog vremena.
Okretanjem gumba 2 možete provjeriti preostatak vremena,
time da gumb 1 mora biti u položaju "trajanje".
Kad je podešeno razdoblje isteklo, začuje se zvučni signal,
koji se nakon 7 minuta isključi sam, ako ga ne prekinemo
okretanjem gumba 1 u bilo kojem smjeru, osim postojećeg.
Simbol S2 se ugasi.
Gumb (1) u položaju tekućeg vremena dana
Ovaj položaj je neutralan i prikazuje vrijeme dana.
Upotrijebite ga alko želite da na brojčaniku uvijek bude
prikazano tekuće vrijeme. Sat ste, na primjer, podesili na
automatsko djelovanje. Ako je gumb 1 u položaju "završetak",
na brojčaniku je prikazano konačno vrijeme, a ako gumb 1
okrenete u položaj "vrijeme dana", na brojčaniku će biti
prikazano tekuće vrijeme dana.
Glasnoća zvučnog signala
Kad nije aktivna nijedna funkcija (prikazano je samo vrijeme
dana), možete birati 3 različite glasnoće zvučnog signala,
tako da gumb 1 okrenete u položaj "ručno" i pričekate 7
sekundi. Ako prije isteka tog vremena okrenete gumb 2,
promijeniti ćete vrijeme dana! Zato gumb 2 okrenite u smjeru
"-" i držite ga u tom položaju. Pojavi se prva regulacija
zvučnog signala. Ako gumb 2 ispustite i ponovno zavrtite u
smjeru "-" i držite u tom položaju, pojavi se slijedeća
regulacija, itd.
Podešena ostane ona glasnoća zvučnog signala, koja je
zadnja određena. Glasnoću možete mijenjati kad god želite.
Poništavanje bilo kojeg vremenskog programa
Sve vremenske podešenosti, osim tipke odbrojavanja,
možete poništiti bilo kada time, da gumb 1 okrenete u
položaj "ručno". Podešeni programi automatski se prekidaju,
a sat se postavi u stanje neprogramiranog (ručnog)
djelovanja.
Upotreba sata u kombinaciji s pećnicom
Prilikom upotrebe sata u kombinaciji s pećnicom, morate
najprije uključiti pećnicu i podesiti izabrani sistem
pečenja te temperaturu. Tek zatim podešavajte funkcije
sata. Kad završite s pečenjem, isključite pećnicu.
PRIDRŽAVAMO PRAVO NA PROMJENE KOJE NE UTJEČU NA FUNKCIONALNOST APARATA.
Електронски програмски часовник MK
Опис на симболите:
положба ‘рачно’
положба 'минутарник'
положба ’траење’
1 копче за избирање поединечни функции
2 копче за (+) и (-) дотерувања
16
положба ’крај’
положба ’дневно време’
Page 15

Дотерување на часовнокот на дневно време
Штом апаратот го приклучите на електрична мрежа, на
скалата ќе се појави 0 00 кое трепка, исто така трепка и
симболот Ѕ3. Завртите го копчето 1 во положба 'рачно' и
со вртење на копчето 2 во насока ”+” или ”- ” дотерајте
точно дневно време. Симболот S3 ќе угасне. 7 секунди по
задното активирање
работи часовникот. Ќе засвети и симболот Ѕ1, кој
покажува дека е часовникот дотеран на непрограмирано
(рачно) работење.
Забелешка: ако го држите копчето 2 во положба ’+’ или ’-
’ подолго време, скалата ќе се менува побрзо.
Предупредување: Ако 7 секунди по приклучување на
апаратот на електрична мрежа
време, времето ќе почне да оди само. Ако потоа го
завртите копчето 2 во насока ‘+’, дневното време ќе
престане да трепка, сеґ уште па трепка симболот S3.
Дневно време потоа дополнително ќе дотерате на
следниов начин:
− Завртите го копчето 1 во положба ’дневно време’ и
потоа назад во положба ‘
− Со копчето 2 дотерајте точно дневно време (симболот
S3 ќе угасне, ќе се запали симболот S1).
На ист начин постапувате и при прекин на електричната
енергија, или при корекција на дневното време!
Копчето 1 во положба ’дневно време’ служи само за
прикажување на дневното време, а не за менување!
на било кое копче ќе почне да
не дотерате дневно
рачно’
Дотерување непрограмирано (рачно) работење
Завртите го копчето 1 во положба ’рачно’. Поништен е
секој до тогаш дотеран програм (симболот Ѕ3 ќе се
избрише , ако бил активен). Активен ќе стане симболот
Ѕ1 (ако веќе не бил), што значи дека е дотерано
непрограмирано (рачно) работење.
Полуавтопматско работење со траење на
работењето
Завртите го копчето 1 во положба ’рачно’. На скалата ќе
се појави 0 00 и симболот Ѕ1. Со вртење на копчето 2 во
насока ’+’ или ’–’ ќе дотерате сакано време. Ќе се појави
симболот Ѕ3. Време можете да дотерувате во интервали
од 1 минута. Максимално можно време за дотерување е
10 часа.
Кога сте дотерале
времето да се одбројува. Ако останало копчето 1 во
положба ’траење’, на скалата ќе се појави одбројување на
дотераното време. Останатото време по желба можете
да го коригирате со копчето 2, при што копчето 1 мора да
биде во положба ’траење’.
По поминување на дотераното време ќе
сигнал, кој по 7 минути ќе се исклучи сам, ако не се
прекини со завртување на копчето 1 во било која друга
положба од постојната. Симболот Ѕ1 ќе угасне, симболот
Ѕ3 па трепка. Во тој момент рерната се исклучила.
По завртување на копчето 1 во положба ’рачно’,
симболот Ѕ3
часовникот па е дотеран на непрограмирано (рачно)
работење.
Ако сакате да го завршите печењето, морате да ја
исклучите и рерната!
сакано време , по 7 секунди ќе почне
се појави звучен
ќе угасне и ќе се запали симболот Ѕ1,
Полуавтоматско работење со крај на работењето
Завртите го копчето 1 во позиција ’крај’. На скалата ќе се
појави дневно време. Со вртење на копчето 2 во насока
’+’ или ’-’ ќе дотерате време за крај на работењето
(времето мора да биде подолго од дневното време). Ќе
се попјави симболот Ѕ3 . 7 секунди по дотерување сакано
време, на скалата ќе се појави
Кога дневното време го достигне дотераниот крај на
печење, ќе се појави звучен сигнал, кој по 7 минути ќе се
дневно време.
исклучи сам, ако не се прекини со завртување на копчето
1 во било која друга положба од постојната. Симболот Ѕ1
ќе угасне, симболот Ѕ3 па трепка. Во тој момент рерната
исклучила.
се
По завртување на копчето 1 во положба ’рачно’,
симболот Ѕ3 ќе угасне и ќе се запали симболот Ѕ1,
часовникот па е дотеран на непрограмирано (рачно)
работење.
Ако сакате да го завршите печењето, морате да ја
исклучите и рерната!
Автоматско работење со дотерување траење и крај
на работењето
Завртите го копчето 1 во положба ’траење’ и со вртење
на копчето 2 во насока ’+’ или ’-’ ќе дотерате траење на
работењето.
Потоа завртите го копчето 1 во позиција ’крај’ и на
скалата ќе се појави најблиското можно крајно време на
рабоење. Со вртење на копчето 2 во насока ’+’ или ’-’
дотерајте крај на
е крајното време подолго од дневното време + траење на
работењето.
Рерната автоматски ќе почне да работи со обѕир на
дотераните времиња.
Пример
Дневно време = 12:00 , траење на работењето е дотерано
на 1:30, а крај на 14:00. Тоа значи дека рерната ќе почне
да работи во 12:30.
работењето. Симболот Ѕ1 ќе угасне, ако
Грешки при дотерувањето
Ако е на пример крајното време на работење дотерано
така да е пократко од дневното време + траење на
работењето, ќе се појави звучен сигнал и трепка
симболот Ѕ3. За правилно работење треба да се
коригираат дотераните времиња (најдобро е да го
завртите копчето 1 во положба ’рачно’ и потоа да ја
повторите целата
постапка).
Минутарник
Ако го завртите копчето 1 во положба ’минутарник’,
можете да го активирате минутарникот, кој има само
предупредувачка функција и не ја исклучува рерната. Со
вртење на копчето 2 во насока ’+’ или ’-’ дотерајте
сакано време. Ќе се запали симболот Ѕ2.
Кога сте дотерале сакано време, времето ќе почне да се
одбројува по 7
положба ’минутарник’ , на скалата ќе се појави
одбројување на дотераното време. Преостанатото време
можете по желба да го коригирате со копчето 2, при тоа
копчето 1 мора да биде во положба ’траење’.
Кога ќе помине дотераното време, ќе се појави звучен
сигнал. По 7 минути ќе се исклучи
со вртење на копчето 1 во било која друга положба од
постојната. Симболот Ѕ2 ќе угасне.
секунди. Ако останало копчето 1 во
сам, ако не е прекинат
Копчето (1) во положба ’дневно време’
Оваа положба е неутрална и покажува дневно време. Ја
користите кога сакате да е на скалата сето време
прикажано дневно време. На пример часовникот сте го
дотерале на автоматско работење. Ако е копчето 1 во
положба ’крај’, на скалата е прикажано крајното време,
ако па
го завртите копчето 1 во положба ’дневно време’,
скалата ќе биде прикажано дневно време.
на
Јачина на звучниот сигнал
Кога не е активна ниедна временска функција (се
покажува само дневно време), можете да избирате 3
различни јачини на звучниот сигнал, со вртење на
копчето 1 во положба ’рачно’ и почекате 7 секунди. Ако
пред да помине ова време го завртите копчето 2, ќе го
17
Page 16

промените дневното време! Потоа завртите го копчето 2
во насока ’-’ и држете го во таа положба. Ќе се појави
првото дотерување на звучниот сигнал. Ако го пуштите и
повторно го завртите копчето 2 во насока ’-’ и го држите
во таа положба, ќе се појави следната јачина.
Се зачувува јачината на звучниот сигнал
ја одредиле. Јачина можете повторно да дотерате било
кога.
што задна сте
Поништување на било која временска
програма
Сите временски дотерувања, освен минутарникот,
можете да ги поништите било кога, со завртување на
копчето 1 во положба ’рачно’. Дотераните програми
автоматски прекинуваат и часовникот се наместува во
состојба на непрограмирано (рачно) работење.
Употреба на часовникот во комбинација со рерна
При употреба на часовникот во комбинација со рерна,
морате најпрвин да ја вклучите рерната и да дотерате
сакан систем на печење и температура. Дури потоа ги
дотерувате функциите на часовникот. Кога ќе
завршите со печење, исклучите ја рерната.
СИ ПРИДРЖУВАМЕ ПРАВО ДП ИЗМЕНИ КОИ НЕ ВЛИJААТ ВРЗ ФУНКЦИОНАЛНОСТА НА
АПАРАТОТ.
Elektronski programski časovnik RS BA
znači da je regulisano neprogramisano (ručno)
funkcionisanje.
Poluautomatizovano funkcionisanje s trajanjem
delovanja
Obrnite dugme 1 u položaj "trajanje". Na brojčaniku se pojavi
1 dugme za izbor pojedinih funkcija
2 dugme za (+) i (-) regulisanja
Opis simbola:
položaj ‘ručno’
položaj ‘odbrojavanje
položaj ‘trajanje’
položaj ‘završetak
položaj ‘tačno vreme
Regulisanje tačnog vremena
Kada aparat priključite na električnu mrežu, na brojčaniku se
pokaže trepereći natpis 0 00, isto tako treperi simbol S3.
Dugme 1 obrnite u položaj "ručno", dok okretanjem dugmeta
2 u smeru "+" ili "-" regulišete tačno vreme. Simbol S3 se
ugasi. Nakon 7 sekundi od aktivisanja bilo kojeg dugmeta,
časovnik počinje da radi. Zasvetli i simbol S1, koji pokazuje
da je časovnik regulisan na neprogramisano (ručno)
funkcionisanje.
Napomena: ako dugme 2 držite u položaju "+" ili "-" duže
vreme, brojčanik se brže menja.
Upozorenje: Ako 7 sekundi nakon priključenja aparata na
mrežu ne regulišete tačno vreme, ovo će da započne teći
samo. Ako nakon toga okrenete dugme 2 u ‘+’ smer, tačno
vreme prestane treperiti, ali još uvek treperi simbol S3. Tačno
vreme zatim naknadno regulišite na sledeći način:
− Dugme 1 okrenite u položaj ‘tačno vreme’ i pritisnite ga:
zatim ga obrnite natrag u položaj ‘ručno’.
− Dugmetom 2 regulišite tačno vreme (simbol S3 se ugasi, a
upali se simbol S1).
Na isti način postupite i prilikom prekida električ
kod korekcije tačnog vremena.
Dugme 1 u položaju tačnog vremena služi samo za
prikaz tekućeg vremena, i ne za njegovo menjanje!
ne energije, ili
Regulisanje neprogramisanog (ručnog) delovanja
0 00 i simbol S1. Okretanjem dugmeta 2 u smeru "+" ili "-"
regulišite izabran period. Pojavi se simbol S3. Period rada
možete da regulišete u intervalima po 1 minutu. Maksimalno
moguće regulisano razdoblje je 10 časova.
Nakon što ste regulisali izabran period, čas započne da se
odbrojava nakon 7 sekundi. Ako je dugme 1 ostalo u položaju
‘trajanje’, na brojčaniku se prikazuje odbrojavanje regulisanog
vremena. Dugmetom 2 možete po volji da popravljate
preostali čas, ali pritom mora dugme 1 da bude u položaju
"trajanje".
Nakon isteka regulisanog vremena, začuje se zvučni signal,
koji se nakon 7 minuta isključi sam, ako nije prekinut
okretanjem dugmeta 1 u bilo koji drugi položaj, osim
postojećeg. Simbol S1 se ugasi, a simbol S3 treperi. U tom
se trenutku rerna isključi.
Nakon okretanja dugmeta 1 u položaj "ručno", simbol S3 se
ugasi i upali se simbol S1, a časovnik je regulisan na
neprogramisano (ručno) funkcionisanje.
Ako želite da zaključite s pečenjem, morate da isključite i
rernu !
Poluautomatizovano funkcionisanje sa završetkom
delovanja
Obrnite dugme 1 u položaj "završetak". Na brojčaniku se
pojavi čas dana. Okretanjem dugmeta 2 u smeru "+" ili "-"
regulišite čas završetka rada (ovo mora da bude duže od
trenutnog vremena). Pojavi se simbol S3. Nakon 7 sekundi
na brojčaniku se prikaže čas dana.
Kad tekući čas sustigne regulisani čas završetka pečenja,
začuje se zvučni signal, koji se nakon 7 minuta isključi sam,
ako nije prekinut okretanjem dugmeta 1 u bilo koji drugi
položaj osim postojećega. Simbol S1 se ugasi, a simbol S3
treperi. U tom se trenutku rerna isključi.
Nakon okretanja dugmeta 1 u položaj "ručno", simbol S3 se
ugasi, i upali se simbol S1, a časovnik je regulisan na
neprogramisano (ručno) funkcionisanje.
Ako želite da zaključite s pečenjem, morate da isključite i
rernu !
Automatizovano funkcionisanje s regulisanim
trajanjem i završetkom
Obrnite dugme 1 u položaj "ručno". Poništili ste sve dotad
postavljene programe (simbol S3 se izbriše, ako je bio
aktivan). Aktivan postane simbol S1 (ako dosad nije bio), što
Obrnite dugme 1 u položaj "trajanje", i okretanjem dugmeta 2
u smeru "+" ili "-" regulišite dužinu delovanja.
18
Page 17

Zatim obrnite dugme 1 u položaj "završetak", i na brojčaniku
se prikaže najbliži mogući čas završetka funkcionisanja.
Okretanjem dugmeta 2 u smeru "+" ili "-" regulišite
završetak funkcionisanja. Simbol S1 se ugasi ako je čas
završetka duži od trenutnog vremena + trajanja
funkcionisanja.
Rerna započne automatski da funkcioniše sukladno
regulisanim vremenima.
Primer
Tačno vreme = 12:00, trajanje funkcionisanja regulisano je na
1:30, a završetak na 14:00. Ovo znači, da će rerna započeti
da radi u 12:30.
Greške kod regulisanja
Ako je na primer čas završetka rada regulisan tako da je kraći
od tekućeg vremena + trajanja funkcionisanja, začuje se
zvučni signal i treperi simbol S3. Za pravilno funkcionisanje
potrebno je korigovati regulisana vremena (najbolje je da
dugme 1 obrnete u položaj "ručno" i čitav postupak na to
ponovite).
Tipka za odbrojavanje
Ako dugme 1 okrenete u položaj "odbrojavanje" možete da
aktivišete odbrojavanje, čija je funkcija upravo upozoravanje, i
ne isključuje rernu.
Okretanjem dugmeta 2 u smeru "+" ili "-" regulišite izabran
čas. Upali se simbol S2.
Kad ste regulisali izabran čas, ovaj se nakon 7 sekundi
započne odbrojavati. Ako je dugme 1 ostalo u položaju
"odbrojavanje", na brojčaniku se prikazuje odbrojavanje
regulisanog vremena.
Okretanjem dugmeta 2 možete da proverite preostatak
vremena, time da dugme 1 mora da bude u položaju
"trajanje".
Kad je regulisano razdoblje isteklo, začuje se zvučni signal,
koji se nakon 7 minuta isključi sam, ako ga ne prekinemo
okretanjem dugmeta 1 u bilo kojem smeru, osim postojećeg.
Simbol S2 se ugasi.
Dugme (1) u položaju tekućeg časa dana
Ovaj položaj je neutralan i prikazuje čas dana. Koristite ga
ako želite da na brojčaniku uvek bude prikazan tekući čas.
Časovnik ste, na primer, regulisali na automatizovano
funkcionisanje. Ako je dugme
1 u položaju "završetak", na brojčaniku je prikazan konačni
čas, a ako dugme 1 okrenete u
položaj "čas dana", na brojčaniku će biti prikazan tekući čas
dana.
Glasnoća zvučnog signala
Kad nije aktivna nijedna funkcija (prikazan S2 je samo čas
dana), možete da birate 3 različite glasnoće zvučnog signala,
tako da dugme 1 okrenete u položaj "ručno" i pričekate 7
sekundi. Ako prije isteka tog vremena okrenete dugme 2,
promeniti ćete čas dana! Zato dugme 2 obrnite u smeru "-" i
držite ga u tom položaju. Pojavi se prva regulacija zvučnog
signala. Ako dugme 2 ispustite i ponovno obrnete u smeru "" i držite u tom položaju, pojavi se sledeća regulacija, itd.
Regulisana ostane ona glasnoća zvučnog signala, koja je
zadnja određena. Glasnoću možete da menjate kad god
želite.
Brisanje bilo kog vremenskog programa
Sve vremenske regulisanosti, osim tipke odbrojavanja,
možete da poništite bilo kada time, da dugme 1 okrenete u
položaj "ručno". Regulisani programi automatski se prekidaju,
a časovnik se postavi u stanje neprogramisanog (ručnog)
funkcionisanja.
Korištenje časovnika u kombinaciji s rernom
Prilikom korištenja časovnika u kombinaciji s rernom,
morate najpre da uštekate rernu i da regulišete izabrani
sistem pečenja te temperaturu. Tek zatim regulišite
funkcije časovnika. Kad avršite s pečenjem, isključite
rernu.
ZADRŽAVAMO PRAVO NA PROMENE, KOJE NE UTIČU NA FUNKCIONALNOST APARATA
Ora programore elektronike AL
në drejtim ”+” ose ”- ” rregulloni kohën e saktë ditore. Simboli
S3 shuhet.
Pullën 1 rrotullojeni në pozicion “koha e ditës” ose “me dorë”,
me rrotullimin e pullës 2 në kahje të '+' ose '-' dhe rregullojeni
kohën e saktë ditore. 7 sekonda pas aktivizimit në secilëndo
pullë, ora fillon të punojë. shëndrit edhe simboli S1, i cili
tregon, se ora është e rregulluar në punim jo të programuar
(me dorë).
1 Pulla për zgjedhjen e funksioneve të veçanta
2 Pulla për rregullime (+) dhe (-)
Përshkrimi i simboleve:
pozicioni ‘me dorë’
pozicioni ‘minutniku’
pozicioni ‘zgjatje’
pozicioni ‘fund’
pozicioni ‘koha ditore’
Rregullimi i orës në kohën e ditës
Kur e aderoni aparatin në rrjetën elektrike, në numratore
tregohet 0 00 rrahës, gjithashtu rreh simboli S3. Pullën 1
rrotullojeni në pozicion 'me dorë' dhe me rrotullimin e pullës 2
Vërrejtje: nëqoftëse mbani pullën 2 në pozicion ‘+’ ose ‘-‘ më
gjat kohë, numratorja ndryshon më shpejtë.
Vërrejtje: nëqoftëse 7 sekonda pas aderimit të aparatit në
rrjetë nuk e rregulloni kohën ditore, ai fillon të rrjedh vetë.
Nëqoftëse pastaj e rrotulloni pullën 2 në drejtim ‘+’, koha
ditore ndërpren rrehjen, por ende rreh simboli S3. Pastaj,
kohën ditore përsëri e rregulloni në mënyrë siç vijon:
− Pullën 1 e rrotulloni në pozicion ‘koha ditore’ dhe pastaj
përsëri në pozicion ‘me dorë’.
− Me pullën 2 e rregulloni kohën e saktë të ditës (simboli S3
shuhet, dhizet simboli S1).
Në mënyrë të njejtë veproni edhe në rast të ndërprerjes së
energjisë elektrike ose te korigjimi i kohës ditore!
Pulla 1 në pozicion ‘koha ditore’ shërben vetëm për
tregimin e kohës ditore dhe jo për ndryshimin e saj!
19
Page 18

Rregullimi i punimit jo të programuar (me dorë)
Rrotullojeni pullën 1 në pozicion “me dorë”. Do të shnoset
çdo program i rregulluar deri atëherë (simboli S3 do të
fshihet, nëqoftëse ka qenë aktiv). Simboli S1 aktivizohet
(nëqoftëse nuk ka qenë), domethënë që është i rregulluar
punimi jo i programuar (me dorë).
Gabimet te rregullimi
Nëqoftëse, koha përfundimtare e punimit është e rregulluar
ashtu, që ashtë më e shkurtër se koha e ditës + zgjatja e
punimit, paraqitet sinjali akustik dhe simboli S3 rreh. Për
punim të rregullt, duhet korigjuar kohët e rregulluara (është
më mirë që pullën 1 të rrotulloni në pozicion “me dorë” dhe
pastaj të përsëritni tanë proçesin).
Punimi gjysëmautomatik me zgjatjen e punimit
Rrotullojeni pullën 1 në pozicion “zgjatje”. Në numratore
paraqitet 0 00 dhe simboli S1. Me rrotullimin e pullës 2 në
kahje '+' ose '-' rregulloni kohën e dëshiruar. Paraqitet
simboli S3. Kohën mundeni ta rregulloni në interval nga 1
minutë. Koha maksimale e rregullimit është 10 orë.
Pasi që e keni rregulluar kohën e dëshiruar, ajo fillon të
numrohet me zbritje pas 7 sekondash. Nëqoftëse ka mbetur
pulla 1 në pozicion “‘zgjatje’ ”, në numratore tregohet zbritja e
kohës së rregulluar. Me pullën 2 mund të korigjoni sipas
dëshirës kohën e mbetur, ku duhet pulla 1 të jetë në pozicion
“zgjatje”.
Pas kalimit të kohës së rregulluar, paraqitet sinjali akustik, i
cili pas 7 minutash ndërprehet vetë, nëqoftëse nuk është i
ndërprerë me rrotullimin e pullës 1 në çfarëdo pozicioni tjetër,
vetëm jo në ate që ashtë egzistues. Simboli S1 shuhet, kurse
simboli S3 rreh. Në atë moment furra shkyçet.
Pas rrotullimit të pullës 1 në pozicion “me dorë”, simboli S3
shuhet dhe shëndrit simboli S1, ora është e rregulluar në
punim jo të programuar (me dorë).
Nëqoftëse dëshironi të përfundoni me pjekjen, duhet
shkyçur edhe furrën!
Punimi gjysëmautomatik me përfundimin e punimit.
Rrotullojeni pullën 1 në pozicion “fund”. Në numratore
paraqitet koha e ditës. Me rrotullimin e pullës 2 në drejtim '+'
ose '-' rregulloni kohën e dëshiruar të përfundimit të punimit
(ai duhet të jetë më i gjatë se koha e ditës). Paraqitet simboli
S3. 7 sekonda pas rregullimit të kohës së dëshiruar, në
numratore paraqitet koha e ditës.
Kur e arrin koha e ditës kohën e rregulluar përfundimtare të
pjekjes, paraqitet sinjali akustik, i cili pas 7 minutash shkyçet
vetë, nëqoftëse nuk është i ndërprerë me rrotullimin e pullës
1 në çfarëdo pozicioni tjetër vetëm jo në ate që ashtë
egzistues. Simboli S1 shuhet, Simboli S3 rreh. Në këte
moment furra shkyçet. Pas rrotullimit të pullës 1 në pozicion
“me dorë” simboli S3 shuhet dhe shëndrit simboli S1, Ora
është e rregulluar në punim jo të programuar (me dorë).
Nëqoftëse dëshironi të përfundoni me pjekjen, atëherë
patjetër duhet shkyçur furrën!
Punimi automatik me rregullimin e zgjatjes dhe
përfundimin e punimit
Rrotullojeni pullën 1 në pozicion “zgjatje” dhe me rrotullimin e
pullës 2 në drejtim '+' ose'-' rregulloni zgjatjen e punimit.
Pastaj, rrotullojeni pullën 1 në pozicion “fund” dhe në
numratore paraqitet koha më e afërme dhe e mundëshme e
kohës përfundimtare të punimit. Me rrotullimin e pullës në
kahje '+' ose '-' rregulloni përfundimin e punimit. Simboli 1
shuhet, nëqoftëse është koha përfundimtare më e gjatë se
koha e ditës + zgjatja e punimit.
Furra fillon automatikisht të punojë sipas kohëve të
rregulluara.
Shembull
Koha e ditës = 12:00, zgjatja e punimit është e rregulluar në
1:30, përfundimi në 14:00. Kjo domethënë, që furra do të
fillojë të punojë në 12:30.
Minutniku
Me rrotullimin e pullës 1 në pozicionin “minutniku” mundeni të
aktivizoni minutnikun, icili ka vëtëm funksion vërrejtës dhe
nuk e shkyç furrën.
Me rotullimin e pullës 2 në drejtim '+' ose '-' rregulloni kohën e
dëshiruar. Shëndrit simboli S2.
Kur e keni rregulluar kohën e dëshiruar, ai fillon të zbrit pas 7
sekondash. Nëqoftëse ka mbetur pulla 1 në pozicion
“minutniku” në numratore tregohet zbritja e kohës së
rregulluar.
Sipas dëshirës, me pullën 2 mundeni të korigjoni kohën e
mbetur, e këtu duhet, që pulla 1 të jetë në pozicion “zgjatje”.
Kur kalon koha e rregulluar, paraqitet sinjali akustik, i cili pas
7 minutash shkyçet vetë, nëqoftëse nuk është i ndërprerë me
rrotullimin e pullës 1 në cilindo pozicion tjetër se është
egzistuesi. Simboli S2 shuhet.
Pulla (1) në pozicion “koha e ditës”
Ky pozicion është neutral dhe tregon kohën e ditës. Këte e
përdorni, nëqoftëse dëshironi që në numratore të jetë terë
kohën koha e ditës. Orën e keni rregulluar për shembull në
punim automatik. Nëqoftëse është pulla 1 në pozicion “fund”
në numratore tregohet koha përfundimtare, nëqoftëse pullën
1 e rrotulloni në pozicion “koha e ditës” në numratore do të
tregohet koha e ditës.
Fuqia e sinjalit akustik
Kur nuk është aktiv asnjë funksion kohor (tregohet vetëm
koha ditore) mund të zgjidhni 3 fuqi të ndryshme të sinjalit
akustik ashtu, që të rrotulloni pullën 1 në pozicion “me dorë”
dhe të pritni 7 sekonda. Nëqoftëse para kalimit të kësaj kohe
do të rrotulloni pullën 2, do të ndryshoni kohën e ditës.
Pastaj, rrotullojeni pullën 2 në drejtim ‘-‘ dhe e mbani në këte
pozicion. Paraqitet rregullimi i parë i fuqisë së sinjalit akustik.
Nëqoftëse e lëshoni pullën 2 dhe përsëri e rrotulloni në
drejtim ‘-‘ dhe mbani në këte pozicion, paraqitet forca e
pastajme.
Mbetet ajo fuqi e sinjalit akustik, të cilën e përcaktoni më në
fund. Fuqinë mundeni të rregulloni kurdo që të dëshironi.
Shnosja e çdo programi kohor
Tanë rregullimet kohore, përveç minutnikut, mundeni të
shnosni kurdo, ashtu, që me trusjen e pullës 1 rrotulloni në
pozicion “me dorë”. Programet e rregulluara automatikisht
ndërprehen dhe ora arrin në situatë të punimit jo të
programuar (me dorë).
Përdorimi i orës në kombinacion me furrën
Te përdorimi i orës në kombinacion me furrën, më së
pari duhet kyçur furrën dhe të rregullohet sistemi i
dëshiruar i pjekjes dhe temperatura. Tek pastaj rregulloni
funksionet në orë. Kur përfundoni me pjekjen, shkyçni
furrën.
MARRIM TË DREJTË NË NDRYSHIME, TË CILAT NUK NDIKOJNË NË FUNKSIONIMIN E
APARATI
20
Page 19

Elektromos programozó óra HU
A beállított időtartam lejárta után hangjelzés hallható, mely 7
másodperc múlva magától kikapcsolódik, ha eközben nincs
megszakítva az 1-es gomb elcsavarásával bármely már
meglévőn kívüli helyzetbe. Az S1 szimbólum kialszik, az S3
pedig villog. A sütő ebben a pillanatban kikapcsolódik
Az 1-es gomb “kézi” szimbólum jelzésű helyzetbe való
elcsavarásával az S3 szimbólum kialszik és kigyullad az S1
1 funkció kiválasztó gomb
2 helyzetbeállító gomb (+ ) és (-) állás
Jelmagyarázat:
szimbólum, az óra nem programozott (kézi) üzemmódba van
állítva.
Ha a sütést be akarjuk fejezni, a sütőt is ki kell
kapcsolni!
‘kézi’ pozíció
‘percmutató’ pozíció
‘időtartam’ pozíció
‘vége’ pozíció
‘napi időjelzés’ pozíció
Az óra napi időjelzésre való beállítása
A készülék elektromos hálózatra történő csatlakozatása után
a számlapon megjelenik a
0 00 és villog az S3 szimbólum is. Az 1-es gombot állítsuk
‘kézi’ pozícióba, majd a 2-es gomb“+” vagy “-“ irányba való
forgatásával állítsuk be a pontos napi időt. Ekkor az S3 jel
kialszik. Az óra beindul 7 másodperccel bármely gomb
lenyomása után. Kigyullad az S1 szimbólum is, mely jelzi,
hogy az óra nem programozott (kézi) üzemmódba van állítva.
Megjegyzés: Ha a 2-es jelzésű gombot hosszabb ideig “+”
vagy “ –“ állásban tartjuk, a számlap gyorsabban változik.
Figyelmeztetés: Ha a készüléknek a hálózatra való
kapcsolása után 7 másodpercig nem állítjuk be a napi időt,
az magától kezd el működni. Ha ezután elforgatjuk a 2-es
gombot ‘+’ irányba, a napi idő nem villog tovább, viszont
továbbra is villogni fog az S3 jel. A napi időt utólagosan a
következő módon állíthatjuk be:
− Az 1-es gombot tekerjük ‘napi idő’ pozícióba, majd vissza
‘kézi’ pozícióba.
− A 2-es gomb segítségével állítsuk be a pontos napi időt,
(ekkor az S3 jel kialszik és kigyullad az S1 jel).
Ugyanilyen módon járjunk el áramszünet, vagy az
időbeállítás korrigálása esetén.
Az 1-es gomb ‘napi idő’ pozícióban csak a napi idő
kijelzésére szolgál és nem annak megváltoztatására!
(Kézi) nem programozott üzemmód beállítása
Az 1-es gombot “kézi” állásba csavarjuk el. Ezzel
érvénytelenítjük az eddig beállított összes programot (az
S3 szimbólum törlődik, ha aktív volt). Aktívvá válik az S1
szimbólum is (ha eddig nem volt az), ami annyit jelent, hogy
be van állítva a (kézi) nem programozott üzemmód.
Félautomata üzemmód üzemidő tartammal
Az 1-es gombot “időtartam” állásba csavarjuk el. A
számlapon megjelenik a 0 00 kijelzés és az S1 szimbólum. A
2-es gomb “+” vagy “ –“ állásba való elcsavarásával
beállítjuk a kiválasztott időtartamot. Megjelenik az S3
szimbólum.
Az időtartamot 1 perces időközönként lehet beállítani. A
lehetséges maximális időbeállítás 10 óra.
Miután beállítottuk a kiválasztott üzemidőt, 7 másodperccel
később beindul a visszaszámlálás.
Ha az 1-es gomb “időtartam” jelzésű helyzetben maradt, a
számlapon látható a beállított idő visszaszámlálása.
A fennmaradó időt a 2-es gombbal korrigálhatjuk, míg az 1-
es gombnak ”időtartam” állásban kell lennie.
Félautomata üzemmód üzemmód befejezéssel
Az 1-es gombot “vége” pozícióba csavarjuk el. A számlapon
megjelenik a napi pontos idő. A 2-es gomb “+” vagy “ –“
irányba való elcsavarásával beállítjuk az üzemmód végét (ez
hossszabb kell hogy legyen a napi pontos időnél). Megjelenik
az S3 szimbólum. A számlapon a kiválasztott idő beállítását
követő 7 másodperc múlva megjelenik a napi pontos idő.
Miután a napi pontos idő eléri a sütésre beállított idő végét,
hangjelzés hallható, mely 7 perc múlva automatikusan
kikapcsolódik, ha az 1-es gomb bármely irányba való
elcsavarásával nem kerül megszakításra. Az S1 szimbólum
kialszik, az S3 szimbólum pedig villog. A sütő ebben a
pillanatban kikapcsolódik. Az 1-es gomb “kézi” szimbólum
jelzésű helyzetbe való elcsavarásával az S3 szimbólum
kialszik és kigyullad az S1 szimbólum, az óra (kézi) nem
programozott üzemmódba van.
Ha a sütést be akarjuk fejezni, a sütőt is ki kell kapcsolni!
Automata üzemmód üzemidő kezdet és befejezés
beállításával
Az 1-es gombot “időtartam” állásba csavarjuk el és a 2-es
gomb (+) vagy (-) irányba való elcsavarásával beállítjuk az
üzemmód időtartamát.
Az 1-es gombot “vége” pozícióba csavarjuk el, a számlapon
megjelenik az üzemmód végéhez legközelebb álló idő. A 2-
es gomb (+ ) vagy (-) irányba való elcsavarásával beállítjuk
az üzemmód végét. Az S1 szimbólum kialszik, ha a
befejezést jelző idő hosszabb a napi pontos idő + üzemmód
tartamnál.
A sütő a beállított időre való tekintettel automatikusan
működésbe lép.
Például
Napi pontos idő = 12:00, az üzemmód időtartama 1:30-ra van
beállítva, vége pedig 14.00-ra. Ez annyit jelent, hogy a sütő
12:30-kor kezd el üzemelni.
Beállításnál felmerülő hibák
Ha az üzemmód vége úgy van beállítva, hogy rövidebb a napi
pontos idő + üzemmód tartamnál, hangjelzés hallható és
villog az S3 szimbólum. A szabályos üzemelés érdekében
korrigálni kell a beállított időt (legjobb, ha az 1-es gombot
‘kézi’ jelzésű helyzetbe állítjuk és az eljárást megismételjük).
Percmutató
Ha az 1-es gomb elcsavarásával “percmutató” helyzetet
választunk, ez működésbe lép, de supán figyelmeztető
funkciója van, a sütőt pedig nem kapcsolja ki. A 2-es gomb
“+” vagy “ –“irányba való elcsavarásával beállítjuk a
kiválasztott időt. Kigyullad az S2 szimbólum.
A kiválasztott idő beállítását követő 7 másodperc múlva
megkezdődik a visszaszámlálás.
Ha az 1-es gomb “percmutató” állásban maradt, a számlapon
megfigyelhető a beállított idő viszaszámlásása.
A 2-es gombbal változtatható a többi időbeálítás is is, míg az
1-es gombnak ”időtartam” állásban kell lennie.
21
Page 20

A beállított idő lejárta után hangjelzés hallható, mely 7
másodperc múlva saját magától kikapcsolódik, ha az 1-es
gomb bármely irányba történő elcsavarásával nem szakítjuk
meg. Az S2 szimbólum kialszik.
Az (1) gomb “napi időjelzés” állásban
beállított hangjelzés hallható. Ha elengedjük a 2-es gombot
és ismét “-“ irányba csavarjuk, majd ebben a helyzetben
tartjuk, a következő hangerősség hallható.
Az utoljára beállított hangjelzés hangerősségi foka marad
meg. A hangerősség tetszés szerint bármikor ismételten
beállítható.
Ez semleges helyzet és a napi pontos időt mutatja. Akkor
használjuk, ha azt szeretnénk, hogy a számlapon állandóan
jelen legyen a napi pontos idő. Az órát például automata
üzemmódba állítjuk. Ha az 1-es gomb “vége” állásban van, a
számlapon a befejezést jelző idő jelenik meg, ha pedig az 1-
es gombot “napi időjelzésre” állítjuk, a számlapon a napi
pontos idő jelenik meg.
Bármely időjelző program törlése
Az összes időbeállítást, kivéve a percmutatót, bármikor meg
lehet szüntetni az 1-es gomb “kézi” helyzetbe történő
eltekeréssel. A beállított programok automatikusan
törlődnek, az óra a nem programozott (kézi) üzemmód
állásba kerül.
Az óra használata sütővel kombinálva
Hangjelzés erőssége
Ha egyik időfunkció sincs aktiválva (csak a pontos napi
időjelzés látható) 3 különböző hangerősség közül lehet
választani úgy, hogy az 1-es gombot ”kézi” üzemmódba
állítjuk, és 7 másodpercet várunk. Ha ez idő lejárta előtt a 2-
es gombot elcsavarjuk, megváltoztatjuk a napi pontos időt! A
gombot erre “-“ irányba csavarjuk és ebben a helyzetben
tartjuk. Az elsődlegesen
Ha az órát sütővel kombinálva használjuk, először a
sütőt kell bekapcsolni és be kell állítani a kiválasztott
sütési módot, valamint hőmérsékletet. Csak ezután
állítjuk be az órán lévő funkciókat. A sütés befejezése
után kikapcsoljuk a sütőt is.
GYÁRTÓ A VÁLTOZTATÁS JOGÁT FENNTARTJA
Электронные программные часы RU
Аналогичные действия следует произвести также в случае
отключения электроэнергии, или с целью корректировки
установленного времени суток!
Ручка 1 в положении «текущее время» служит только для
индикации текущего времени суток, а не для изменений!
Установка ручного режима работы
1 кнопка выбора отдельных функций
2 кнопка установки (+) и (-)
Описание символов:
«ручной режим»
«будильник»
«продолжительность приготовления»
«завершение приготовления»
«текущее время».
Установка индикации текущего времени суток
После подключения аппарата к электрической сети на дисплее
высветится мигающее значение 0 00, а также начнет мигать
символ S3. Поверните ручку 1 в положение «ручной режим», и,
вращая ручку 2 в направлении «+» или « –», установите точное
время суток. Символ S3 погаснет. Через 7 секунд после
последней активации любой из ручек начнется отсчет текущего
времени суток. Загорится
показывает, что программатор установлен в «ручной режим».
Примечание: Если Вы будете удерживать кнопку 2 в
положении «+» или «-»в течение более длительного времени,
то цифры на дисплее будут изменяться быстрее.
Внимание: если через 7 секунд после подключения аппарата к
электросети Вы не установите текущее время суток, отсчет
времени суток
затем повернете ручку 2 в направлении «+», значение времени
суток прекратит мигать, а символ S3 продолжит мигать.
Установку текущего времени можно произвести затем
дополнительно следующим образом:
− поверните ручку 1 в режим «текущее время», а затем в
«ручной режим».
− С помощью ручки 2 установите точное текущее время суток
символ S3 погаснет, и загорится символ S1).
(
начнет производиться самостоятельно. Если Вы
также символ S1, который
Поверните кнопку 1 в положение «ручной режим».
Каждая из прежде установленных программ
отменяется (в том случае, если символ S3 был
активирован, он стирается). Активируется символ S1
(если он не был активирован прежде) - это значит, что
установлен непрограммируемый (ручной) режим работы.
Полуавтоматический режим работы с установкой
продолжительности работы
Поверните ручку 1 в положение «продолжительность
приготовления».
На дисплее высветится 0 00 и символ S1. Вращая ручку
2 в направлении «+» или «- » установите желаемое
время. Появится символ S3.
Время можно устанавливать с интервалом в 1 минуту.
Максимально возможное время составляет 10 часов.
После установки желаемого времени, через 7 секунд
начнется отсчет. Если ручка 1 осталась в положении
«продолжительность
будет высвечиваться отсчет установленного времени.
С помощью ручки 2 можно корректировать остальное
время по желанию, при этом ручка 1 должна быть в
положении «продолжительность приготовления».
По истечении установленного времени раздается
звуковой сигнал, который через 7 минут самостоятельно
отключится, если не прервать его, повернув ручку 1 в
любое другое положение. Символ S1
S3 начнет мигать. В этот момент духовка выключится.
После того, как Вы повернете ручку 1 в положение
«ручной режим», символ S3 погаснет, и загорится символ
S1. Программатор установлен в ручной режим работы.
Если Вы хотите завершить приготовление,
выключите также духовку!
приготовления», то на дисплее
погаснет, а символ
22
Page 21

Полуавтоматический режим работы с установкой
завершения приготовления
Поверните ручку 1 в положение «завершение
приготовления». На дисплее высветится текущее время.
Повернув ручку 2 в направлении «+» или «-», установите
желаемое время завершения работы (оно должно
превышать текущее время суток). Появляется символ S3.
Через 7 секунд после установки желаемого времени на
дисплее высветится текущее время суток.
Когда текущее время совпадет с установленным
временем завершения приготовления, раздастся
звуковой сигнал, который через 7 минут выключится
самостоятельно, если не прервать его, повернув ручку 1
в любое другое положение. Символ S1 погаснет, а
символ S3 продолжит мигать. В этот момент духовка
выключится.
После того, как Вы повернете ручку 1 в положение
«ручной режим», символ S3 погаснет. Начнет светиться
символ S1; программатор установлен в ручной режим
работы. Если Вы хотите завершить приготовление,
выключите также духовку!
Автоматический режим работы с установкой
продолжительности приготовления и завершения
приготовления
Поверните ручку 1 в положение «продолжительность
приготовления», и вращая ручку 2 в направлении «+» или
«-», установите продолжительность приготовления.
Потом поверните ручку 1 в положение «завершение
приготовления», и на дисплее высветится ближайшее
возможное время завершения работы. Вращая ручку 2 в
направлении «+» или «-», установите время завершения
приготовления. Символ S1 погаснет тогда, когда время
завершения приготовления превысит
времени суток и продолжительности приготовления.
Духовка начнет автоматически работать в зависимости с
установленными значениями.
сумму текущего
Пример:
Текущее время суток = 12:00, продолжительность
приготовления - 1:30, а завершение приготовления
установлено на 14:00. Это означает, что духовка начнет
работать в 12:30.
Ошибки при установке времени
В случае, если время завершения приготовления
установлено таким образом, что оно меньше суммы
текущего времени и продолжительности приготовления,
раздастся звуковой сигнал и символ S3 будет мигать.
Для правильной работы необходимо исправить
установленное время (повернуть ручку 1 в «ручной
режим» и затем повторить всю процедуру установки).
«Будильник»
Повернув ручку 1 в положение «будильник», можно
активировать функцию «будильник», которая служит
только в качестве предупредительной функции, и не
выключает духовку.
Вращая ручку 2 в направлении «+» или «-», установите
желаемое время. Начнет светиться символ S2.
После установки желаемого времени, отсчет времени
начнется через 7 секунд. Если ручка 1 осталась в
положении «будильник», на дисплее будет
высвечиваться
С помощью кнопки 2 можете по желанию корректировать
оставшееся время, при этом ручка 1 должна быть в
положении «продолжительность приготовления».
По истечении установленного времени раздастся
звуковой сигнал, который через 7 минут выключится
самостоятельно, если не прервать его, повернув ручку 1
в любое другое положение. Символ S2 погаснет.
отсчет установленного времени.
Ручка (1) в положении «текущее время»
Это положение нейтральное и показывает текущее время
суток.
Оно используется в том случае, когда Вы хотите, чтобы
на дисплее постоянно было показано текущее время
суток.
Например:
Программатор установлен в автоматический режим
работы. Если ручка 1 в положении «завершение
приготовления», то на дисплее высветится время
завершения приготовления. Если Вы повернете ручку 1 в
положение «текущее время
текущее время суток.
», то на дисплее высветится
Громкость звукового сигнала
Если ни одна функция не активирована (на дисплее
появляется только текущее время суток), то Вы можете
выбрать какой-либо из 3 различных уровней громкости
звукового сигнала следующим образом: поверните ручку
1 в положение «ручной режим», и подождите 7 секунд.
Если до истечения этого времени Вы повернете кнопку 2,
то Вы измените установленное текущее время суток!
После того, как Вы повернете ручку 2 в направлении «-»,
и будете удерживать ее в этом положении, установится
первый уровень громкости звукового сигнала. Если Вы
отпустите ручку 2, а затем снова повернете ее в
направлении «–», и будете удерживать в этом
положении, установится следующий уровень громкости
звукового сигнала.
Сохранится в качестве установленного тот уровень
громкости
самым последним. Громкость звукового сигнала можно
установить заново, по желанию в любое время.
звукового сигнала, который был определен
Отмена любого установленного временного
значения
Все установки времени, кроме «будильника», в любое
время можно отменить, повернув ручку 1 в положение
«ручной режим». Установленные программы
автоматически прервутся, и программатор перейдет в
«ручной режим».
Использование программатора в комбинации с
духовкой
При использовании программатора в комбинации с
духовкой, Вы должны прежде всего включить
духовку и установить желаемый режим нагрева и
температуру приготовления. Только затем можно
устанавливать различные функции на
программаторе. После завершения приготовления
следует отключить духовку.
ОСТАВЛЯЕМ ЗА СОБОЙ ПРАВО НА ИЗМЕНЕНИЯ, КОТОРЫЕ НЕ ВЛИЯЮТ НА
ФУНКЦИОНАЛЬНОСТЬ АППАРАТА
23
Page 22

Електронний таймер UA
Про закінчення часу Вас сповістить звуковий сигнал, який
автоматично виключиться через 7 хвилин, якщо Ви його не
дезактивували перед тим за допомогою повертання кнопки 1
до
будь-якої позначки. Символ S1 дезактивується, а символ
S3 мигатиме. В цей момент прилад дезактивується .
Після повертання кнопки 1 в позицію "вручну", символ S3
дезактивується, а символ S1 з’являється. Годинник
1 функціональна кнопка
2 кнопки мінус (-) і плюс (+)
Символи:
позиція "вручну"
позиція "таймер"
позиція "час роботи"
позиція "кінець"
позиція "поточний час"
Установка поточного часу
Після підключення приладу до електромережі на дисплеї
починає мигати 0 00 та символ S3. Поверніть кнопку 1 до
позиції "вручну", та за допомогою обертання кнопки 2 до
"+" або до "-" встановіть поточний час дня. Символ S3
дезактивується. Годинник почне працювати через 7
секунд після останнього торкання до будь-якої кнопки.
Активується символ S1, який означає, що годинник
встановлено вручну.
Примітка: утримуючи кнопку 2 на позиції "+" або "-", Ви
прискорите процес установки на дисплеї.
Застереження: Якщо Ви не встановили таймер протягом
7 секунд після підключення приладу до електроенергії, він
почне працювати автоматично. Якщо Ви тепер повернете
кнопку 2 у напрямку ‘+’, поточний час припинить мигати,
але символ S3 все ще
встановити поточний час наступним чином:
− Поверніть ручку 1 до позначки "поточний час", а потім
назад до позначки "вручну".
− Встановіть поточний час за допомогою кнопки 2
(символ S3 дезактивований, символ S1 активований).
Повторіть цю ж процедуру у випадку збою в
електромережі або ж у випадку переведення часу дня!
1 в позиції ‘поточний час’ слугує виключно
Кнопка
для демонстрації поточного часу, а не для його
змінення!
мигатиме. Тепер можна
Установка класичного управління (вручну)
Поверніть кнопку 1 до позиції "вручну". Всі поточні
програми дезактивуються (зникає символ S3, якщо він
був присутній до цього). Символ S1 активується (якщо
ще не був активований), що означає, що годинник було
встановлено вручну.
Напівавтоматичне функціонування протягом
визначеного періоду
було
встановлено в звичайний модуль.
Якщо Ви хочете завершити смаження, прилад слід
виключити!!
Напівавтоматичне функціонування із визначеним
кінцем готування
Поверніть кнопку 1 до позиції "кінець". На дисплеї –
поточний час. Встановіть бажаний час закінчення
готування за допомогою повертання кнопки 2 до позиції
"+" або "-" (час закінчення готування має бути пізніший за
поточний час). Активується символ S3. Через 7 секунд по
завершенню встановлення кінцевого часу на дисплеї
з’являється поточний час.
Як тільки поточний час
встановленого часу закінчення готування, лунає звуковий
сигнал, який автоматично відключається через 7 хвилин,
якщо Ви не виключите його вручну повертанням кнопки 1
в будь-якому напрямку. Символ S1 виключається, а
символ S3 мигає. Прилад виключається.
Після повертання кнопки 1 в положення "вручну", символ
S3 дезактивується, а символ S1 з’являється. Годинник
працює в
Якщо Ви хочете завершити смаження, прилад слід
виключити!
звичайному режимі.
досягає попередньо
Автоматичне функціонування протягом
визначеного часу і встановленого кінця
приготування
Поверніть кнопку 1 в позицію "робочий час" і
повертанням кнопки 2 у напрямку "+" або "-" встановіть
час готування.
Потім поверніть кнопку 1 до позиції "кінець" і на дисплеї
з’являється найближчий можливий час закінчення
готування. Встановіть необхідний час закінчення
готування, повертаючи кнопку 1 у напрямку "+" або "-".
Символ S1 зникає, якщо час закінчення готування
ближчий за поточний час + попередньо встановлений час
готування.
Прилад починає готування відповідно до заданих
установок.
Приклад
Поточний час = 12:00, час готування - 1:30, а закінчення
готування о 14:00. Це означає, що готування почнеться о
12:30.
Помилки у встановленні часу
Якщо обраний час закінчення готування є коротшим за
поточний час + час готування, лунає звуковий сигнал і
мигає символ S3. Установки слід змінити (поверніть
кнопку 1 в позицію "вручну" і повторіть процедуру ще раз).
Поверніть кнопку 1 до позначки "час роботи". На дисплеї
0 00 і активується символ S1.Встановіть необхідний час,
повертаючи кнопку 2 до позиції "+" або "-". Символ S3
активується. Робочий час можна встановлювати з інтервалом
1 хвилина. Максимальний час функціонування 10 годин.
Як тільки встановлено час роботи, через 7 секунд
починається відлік часу. Якщо кнопка 1 залишилась
"робочий час", на дисплеї починається відлік часу.
Залишковий час можна перевірити повертанням кнопки 2, в
той час як кнопка 1 має залишатись в позиції "робочий час".
в позиції
Сигналізація таймеру
Щоб активувати таймер, поверніть кнопку 1 в позицію
"таймер". Таймер функціонує тільки як попереджувальний
сигнал і не виключає прилад.
Встановіть бажаний час повертанням кнопки 2 у напрямку
"+" або "-". Включається символ S2.
Як тільки встановлено час сигналу, через 7 секунд
починається відлік часу. Якщо кнопка 1 залишається в
позиції "таймер", на дисплеї – відлік попередньо
встановленого часу.
24
Page 23

Залишковий час можна змінити за допомогою кнопки 2, в
той час як кнопка 1 має залишатись в позиції "робочий
час".
По закінченні часу лунає звуковий сигнал, який
автоматично відключається через 7 хвилин, якщо Ви не
виключите його вручну повертанням кнопки 1 в будьякому напрямку. символ S2 зникає.
час буде змінено! Наступне: поверніть кнопку 2 у
напрямку "-" і утримуйте її в цій позиції
перший рівень гучності. Відпустіть кнопку 2 і знову
поверніть її до "-" для наступного рівня гучності, і. т. д.
Останній обраний рівень зберігається. Рівень гучності
можна змінити будь-коли.
Знищення всіх установок таймеру
Кнопка (1) в позиції поточного часу
Ця позиція є нейтральною і означає поточний час. Вона
використовується, якщо Ви бажаєте мати індикацію
поточного часу на дипслеї. Годинник встановлено на
автоматичне функціонування. Якщо кнопка 1 встановлена
на позицію "кінець", на дисплеї – індикація часу
закінчення готування, а якщо кнопка 1 знаходиться в
позиції "поточний час", на дисплеї – поточний час.
Гучність звукового сигналу
Коли всі функції дезактивовані (на дисплеї тільки
поточний час), є можливість обрати поміж 3 різних
установок гучності звукового сигналу. Поверніть кнопку 1
до позиції "вручну" і почекайте 7 секунд. Якщо Ви
повернете кнопку 2 до закінчення цього періоду, поточний
Всі установки таймеру, окрім сигналізації таймеру, можна
знищити будь-коли повертанням кнопки 1 до позиції
"вручну".
Попередньо встановлені програми відміняються
автоматично і годинник переходить у звичайний режим.
Функціонування годинника і приладу одночасно
Щоб використовувати годинник у комбінації із
приладом, перший крок – включити прилад і
встановити бажаний режим готування і температуру.
Тільки після цього Ви можете програмувати таймер.
Після завершення готування виключіть прилад.
ВИРОБНИК ЗАЛИШАЄ ЗА СОБОЮ ПРАВО ВНОСИТИ ЗМІНИ, ЯКІ НЕ ВПЛИВАЮТЬ НА
ФУНКЦІОНУВАННЯ ПРИЛАДУ
. Пролунає
Zegar elektroniczny do programowania PL
się sam. Jeżeli potem pokrętło 2 zostanie przekręcone w kierunku
‘+’, wartości czasu dziennego przestaną pulsować, ale wciąż
jeszcze pulsować będzie symbol S3. Czas dzienny można potem
dodatkowo ustawić w następujący sposób:
1 pokrętło służące do wybierania poszczególnych
funkcji
2 pokrętło służące do wybierania (+) plus in (-)
minus
Opis symboli:
pozycja ‘ręcznie’
pozycja ‘minutnik’
pozycja ‘czas trwania’
pozycja ‘koniec’
pozycja ‘czas dzienny’
Nastawienie zegara na czas aktualny
Po podłączeniu aparatu do sieci elektrycznej na tarczy cyfrowej
pojawi się mrugający
znak 0 00, mruga również i symbol S3.
Pokrętło 1 należy przestawić na pozycję 'ręcznie' i przekręcając
pokrętło 2 w kierunku ”+” lub ”- ” ustawić dokładny czas dzienny.
Symbol S3 zgaśnie.
Pokrętło 1 należy przekręcić w pozycję „aktualny czas” lub
„nastawienie ręczne”.
Czas aktualny można nastawić przekręcając pokrętło 2 w
kierunku „+” plus lub „-” minus.
Po upływie 7 sekund od ostatniego włączenia jednego z pokręteł
zegar zaczyna działać.
Symbol S1 zaświeci się, co oznacza, że zegar został nastawiony
na działanie niezaprogramowane (ręczne).
Uwaga: naciskając przez dłuższy czas na pokrętło 2 w pozycji
„+” lub „-” liczby na tarczy cyfrowej szybciej zmieniają się.
Ostrzeżenie: Jeżeli w ciągu 7 sekund po podłączeniu urządzenia
do sieci nie zostanie ustawiony czas dzienny, zacznie on odliczać
− Pokrętło
− Za pomocą pokrętła 2 należy ustawić dokładny czas dzienny
W ten sam sposób należy postępować również w przypadku
przerwy w dostawie prądu lub korygując ustawienia czasu
dziennego!
Pokrętło 1 w pozycji ‘czas dzienny’ służy jedynie do
wskazywania czasu dziennego, a nie do zmiany jego
ustawień!
Nastawienie niezaprogramowanego (ręcznego)
działania
Należy przekręcić pokrętło 1 na pozycję „nastawienie ręczne”.
Każdy do tej pory nastawiony program zostaje
skasowany ( jeśli symbol S3 był włączony zostaje on
skasowany). Włącza się symbol S1 (jeśli nie był włączony ),
co oznacza, że zostało nastawione niezaprogramowane
(ręczne) działanie.
Półautomatyczne nastawienie czasu działania
Pokrętło 1 należy przekręcić na pozycję „działanie”. Na tarczy
cyfrowej pojawi się 0 00 oraz symbol S1.
Przekręcając pokrętło 2 w kierunku „+” lub „-” nastawiamy
żądany czas.
Wtedy pojawi się symbol S3. Czas można nastawiać w
interwałach 1 minutowych. Najdłuższy możliwy czas
nastawienia wynosi 10 godzin.
,
Po nastawieniu żądanego czasu działania, po upływie 7
sekund rozpocznie się odliczanie czasu. Jeśli pokrętło 1
pozostanie na pozycji ‘czas trwania’, „nastawienie ręczne”, na
tarczy cyfrowej rozpocznie się odliczanie nastawionego
czasu.
Czas można skorygować za pomocą pokrętła 2, pokrę
musi znaleźć się w pozycji
1 należy przekręcić na pozycję ‘czas dzienny’, a
następnie z powrotem na pozycję ‘ręcznie’.
(symbol S3 zgaśnie, zapali się symbol S1).
tło 1
25
Page 24

„ działanie". Po upływie nastawionego czasu działania,
włączy się sygnał dźwiękowy,
który automatycznie wyłączy się po 7 minutach, jeśli nie
został on wyłączony wcześniej przez przekręcenie pokrętła 1
na pozycję inną niż pozycja w jakiej znajduje się aktualnie.
Symbol S1 wyłączy się, natomiast symbol S3 mruga. W tym
czasie piekarnik wyłączy się.
Po przekręceniu pokrętła 1 na pozycję „nastawienie ręczne”,
symbol S3 wyłączy się, natomiast symbol S1 włączy się.
Zegar zostaje nastawiony na niezaprogramowane (ręczne)
działanie.
Chcąc zakończy
piekarnik!
ć pieczenie, musimy wyłączyć również
Półautomatyczne nastawienie zakończenia działania
Pokrętło 1 należy przekręcić na pozycję „zakończenie
działania”.
Na tarczy cyfrowej pojawi się aktualny czas. Przekręcając
pokrętło 2 w kierunku „+”
lub „-” nastawiamy czas końca działania. /Musi być on
dłuższy od czasu aktualnego/.
Pojawi się symbol S3. Po upływie 7 sekund od nastawienia
żądanego czasu na tarczy cyfrowej pojawi się aktualny czas.
Gdy aktualny czas osiągnie nastawiony czas zakończenia
pieczenia, włącza się sygnał dźwiękowy, który automatycznie
wyłączy się po 7 minutach, jeśli nie został wcześniej
wyłączony przez przez przekręcenie pokrętła 1 na pozycję
niż pozycja w jakiej znajduje się obecnie. Symbol S1
inną
wyłączy się, natomiast symbol S3 mruga. W tym czasie
piekarnik wyłączy się.
Symbol S3 wyłączy się po przekręceniu pokrętła 1 na pozycję
„nastawienie ręczne”.
Symbol S1 zaświeci się, a zegar zostaje nastawiony na
niezaprogramowane (ręczne) działanie.
Chcąc zakończyć pieczenie, musimy wyłączyć również
piekarnik!
Automatyczne nastawienie czasu i zakończenia
działania
Pokrętło 1 należy przekręcić na pozycję„działanie"
Przekręcając pokrętło 2 w kierunku „+” lub „-” można
nastawić czas trwania działania.
Następnie należy przekręcić pokrętło 1 na pozycję
„zakończenie działania”, na tabliczce cyfrowej pojawi się
najbliższy możliwy czas zakończenia działania. Przez
przekręcenie pokrętła 2 w kierunku „+” lub „-” można
nastawić czas zakończenia działania piekarnika.
Symbol S1 zgaśnie, jeśli czas końcowy jest dłuższy od czasu
aktualnego + czasu działania.
Piekarnik zaczyna działać automatycznie według
nastawionych czasów działania.
Na przykład
Aktualny czas – 12:00, czas trwania działania jest nastawiony
na 1:30, czas zakończenia działania jest nastawiony na
14:00.
Oznacza to, że piekarnik zacznie działać o godzinie 12:30
Błędy nastawienia
Jeśli czas zakończenia działania jest krótszy od czasu
aktualnego + czasu działania, włącza się sygnał
dźwiękowy, a symbol S3 zacznie mrugać. Aby zegar działał
prawidłowo, należy skorygować nastawione czasy działania
(najlepiej w ten sposób, że pokrętło 1 przekręcimy na pozycję
(ręczne) działanie, po czym cały proces należy powtórzyć.
Minutnik
Przekręcając pokrętło1 na pozycję „minutnik” włącza się
minutnik, który spełnia rolę sygnalizacyjną nie wyłączając
piekarnika. Przekręcając pokrętło 2 w kierunku „+” lub „-”
można nastawić żądany czas działania. Symbol S2 zapali
się. Po upływie 7 sekund od chwili nastawienia, nastawiony
żądany czas zaczyna się odliczać.
Jeśli pokrętło 1 znajdzie się w pozycji „minutnik”na tarczy
cyfrowej rozpocznie się odliczanie nastawionego czasu. Za
pomocą pokrętła 2 można czas skorygować, przy czym
pokrętło 1 musi się znaleźć w pozycji „działanie”.
Po upływie nastawionego czasu działania włączy się sygnał
dźwiękowy, który automatycznie wyłączy się po 7 minutach,
jeśli nie został on wcześniej wyłączony przez przekręcenie
pokrętła 1 na pozycję inną niż ta w jakiej znajduje się
obecnie. Symbol S2 wyłączy się.
Pokrętło (1) w pozycji “czas aktualny”
Pozycja ta jest pozycją neutralną przedstawiającą aktualny
czas. Stosuje się ją, gdy chcemy aby na tarczy cyfrowej był
przedstawiony czas aktualny.
Na przykład: jeśli zegar został nastawiony na automatyczne
działanie, a pokrętło 1 znajduje się w pozycji “koniec
działania”, na tarczy cyfrowej pojawi się czas końca
działania. Jeśli pokrętło 1 przekręcimy na pozycję “aktualny
czas” na tarczy cyfrowej pojawi się czas aktualny.
Moc sygnału dźwiękowego
Gdy nie jest włączona żadna z funkcji (pojawia się tylko
aktualny czas) przez przekręcenie pokrętła 1 na pozycję
„nastawienie ręczne” i po upływie 7 sekund spośród 3
różnych mocy sygnału dźwiękowego można wybrać taki,
który nam najbardziej odpowiada.
Przekręcajac pokrętło 2 przed upływem tego czasu, aktualny
czas ulegnie zmianie!
Po przekręceniu pokrętła 2 w kierunku „-”, usłyszymy
pierwszy stopień nastawienia sygnału dźwiękowego. Po
zwolnieniu przycisku i powtórnym naciśnięciu nastawiamy
następny stopień nastawienia sygnału dźwiękowego.
Zachowana zostanie ta moc sygnału dźwiękowego, którą
nastawiliśmy na końcu.
Moc sygnału dźwiękowego można nastawiać kiedykolwiek.
Skasowanie programów czasowych
Wszelkiego rodzaju zaprogramowanie, oprócz minutnika, można
skasować kiedykolwiek, przekręcając pokrętło 1 na pozycję
„nastawienie ręczne”. Nastawione programy automatycznie
zostaną przerwane, a zegar znajdzie się w pozycji
niezaprogramowanego (ręcznego) działania.
Zastosowanie zegara w połączeniu z piekarnikiem
Aby zastosować zegar w połączeniu z piekarnikiem,
należy najpierw włączyć piekarnik, po czym nastawić
żądany system pieczenia oraz temperaturę. Dopiero po
tym można nastawiać funkcje na zegarze. Po
zakończeniu pieczenia, piekarnik należy wyłączyć.
PRODUCENT ZACHOWUJE PRAWO DO WPROWADZANIA ZMIAN NIE WPŁYWAJĄCYCH NA
FUNKCJONALNOŚĆ URZĄDZENIA
26
Page 25

Elektronické programovací hodiny CZ
Otočením knoflíku 1 do polohy “ ručně ” symbol S3 zhasne a
rozsvítí se symbol S1. Hodiny jsou nastaveny na
neprogramovanou (ruční ) činnost. Jestliže chcete ukončit
pečení, musíte vypnout také troubu!
Poloautomatická činnost s ukončenou činností
1 knoflík pro nastavení jednotlivých funkcí
2 knoflík pro (+) a (-) nastavení
Popis symbolů:
poloha ‘ručně’
poloha ‘minutka’
poloha ‘trvání’
poloha ‘konec’
poloha ‘denní čas’
Nastavení hodin na denní čas
Jakmile připojíte přístroj na elektrickou síť, ukáže se na
číselníku blikající 0 00 a současně bliká symbol S3. Knoflík 1
otočte do polohy “ ručně ” a otáčením knoflíku 2 ve směru
“+” nebo “-” nastavíte přesný denní čas . Symbol S3
zhasne.
Hodiny začnou jít po uplynutí 7 vteřin od posledního
aktivování jakéhokoliv knoflíku. Zasvítí také symbol S1, který
znázorňuje, že jsou hodiny nastaveny na neprogramovanou
(ruční) činnost.
Poznámka: jestliže držíte knoflík 2 v poloze “+” nebo “-”
déle, potom se číselník rychleji mění.
Upozornění: Jestliže v 7 vteřinách od zapojení přístroje na
el. síť nenastavíte denní čas, potom začne sám ubíhat.
Jestliže potom otočíte knoflík 2 ve směru ‘+’ , denní čas
přestane blikat a ještě pořád bliká symbol S3. Denní č
potom nastavíte dodatečně následujícím způsobem:
− Knoflík 1 otočte do polohy ‘denní čas’ a potom opět do
polohy ‘ručně’.
− Knoflíkem 2 nastavíte přesný denní čas (symbol S3
zhasne, rozsvítí se symbol S1).
Stejným způsobem postupujete také při přerušení el. proudu
nebo při korekci denního času!
Knoflík 1 v poloze ‘denní čas ’ slouží jen pro příkaz
denního času a ne pro jeho změnu!
as
Otočte knoflíkem 1 do polohy “ konec ”. Na číselníku se ukáže denní
čas. Otočením knoflíku 2 ve směru “ + ” nebo “ - ” nastavíte
požadovaný čas ukončení činnosti (který však musí být delší než
denní čas). Ukáže se symbol S3. Po uplynutí 7 vteřin od nastavení
požadovaného času se na číselníku ukáže denní čas.
Jakmile dosáhne denní čas nastavený konečný čas pečení, ohlásí
se zvukový signál, který po uplynutí 7 minut sám vypne, jestliže není
přerušen otočením knoflíku 1 do jakékoliv jiné polohy než je
nastavena. Symbol S1 zhasne, symbol S3 bliká. Tehdy se trouba
vypne.
Po otočení knoflíku 1 do polohy “ ručně ” symbol S3 zhasne a
rozsvítí se symbol S1. Hodiny jsou nastaveny na neprogramovanou
(ruční) činnost. Jestliže chcete ukončit pečení, musíte vypnout
také troubu!
Automatická činnost s nastavením trvání a konce
činnosti
Otočíte knoflíkem 1 do polohy “ trvání ” a otáčením knoflíku 2 ve
směru
“ + ” nebo “ - ” nastavte trvání činnosti.
Potom otočte knoflíkem 1 do polohy “ konec ” a na číselníku se
ukáže nejbližší možný konečný čas činnosti. Otočením knoflíku 2 ve
směru “ + ” nebo “ - ” nastavte ukončení činnosti. Symbol S1
zhasne, jestliže je konečný čas delší než denní čas + trvání činnosti.
Trouba se s ohledem na nastavený čas automaticky zapne.
Příklad
Denní čas = 12:00, délka výkonu je nastavena na 1:30,
ukončení na 14:00. To znamená, že se trouba zapne ve
12:30.
Chyby při nastavení
Například jestliže je konečný čas činnosti nastaven tak, že je
kratší než denní čas + trvání činnosti, ohlásí se zvukový
signál a symbol S3 bliká. Pro správnou činnost je potřeba
korigovat nastavený čas, ( nejlépe tak, že knoflík 1 otočíte do
polohy “ ručně ” a celý postup potom zopakujete).
Minutka
Nastavení neprogramované (ruční) činnosti
Otočte knoflíkem 1 do polohy “ ručně ”. Tím je přerušen každý
nastavený program (symbol S3 se vymaže, jestiže byl
aktivován). Aktivuje se symbol S1 (jestiže nebyl aktivován), což
znamená, že je nastavena neprogramovaná (ruční) činnost.
Poloautomatická činnost s trváním činnosti
Otočte knoflíkem 1 do polohy “ trvání ”. Na číselníku se ukáže
0 00 a symbol S1. Otáčením knoflíku 2 ve směru “ + ” nebo
“ - ” nastavíte požadovaný čas. Ukáže se symbol S3. Čas
můžete nastavovat v 1 minutových intervalech. Maximální
možný čas nastavení je 10 hodin.
Nastavený čas se začne odpočítávat po 7 vteřinách. Jestliže
zůstal knoflík 1 v poloze “ trvání ”, potom se na číselníku
ukazuje odpočítávání nastaveného času.
Zbytek času můžete podle potřeby měnit knoflíkem 2,
přičemž musí být knoflík 1 v poloze “ trvání ”.
Po vypršení nastaveného času se ozve zvukový signál, který
se po 7 minutách sám vypne, jestliže není přerušen otočením
knoflíku 1 do jakékoliv jiné polohy než je nastavená poloha.
Symbol S1 zhasne, symbol S3 bliká. Tehdy se trouba vypne.
Otočením knoflíku 1 do polohy “ minutka ” můžete aktivovat
minutku, která má jenom upozorňovací funkci a nevypíná
troubu.
Otočením knoflíku 2 ve směru “ + ” nebo “ - ” nastavíte
požadovaný čas. Rozsvítí se symbol S2.
Jakmile jste nastavili požadovaný čas, začne se odpočítávat
po 7 sekundách. Jestliže zůstal knoflík 1 v poloze “ minutka ”
, potom se na číselníku ukáže odpočítávání nastaveného
času. Zbytek času můžete podle potřeby měnit knoflíkem 2,
přičemž musí být knoflík 1 v poloze “ trvání ” činnosti.
Jakmile vyprší nastavený čas, ohlásí se zvukový signál, který
se po 7 minutách sám vypne, jestliže není přerušen otočením
knoflíku 1 do jakékoliv jiné polohy než je nastavena. Symbol
S2 zhasne.
Knoflík (1) v poloze “ denní čas ”
Tato poloha je neutrální a ukazuje denní čas. Používáte ji,
jestliže chcete aby byl na číselníku po celou dobu nastaven
denní čas. Hodiny jste například nastavili na automatickou
činnost. Jestliže je knoflík 1 v poloze “ konec ”, potom
číselník ukazuje konečný čas, jestliže otočíte knoflíkem 1 do
polohy “ denní čas ”, potom se na číselníku ukáže denní čas.
27
Page 26

Jakost zvukového signálu
Jestliže není aktivována žádná z časových funkcí (ukazuje se
jen denní čas), můžete vybírat mezi 3 různými druhy
zvukového signálu tak, že otočíte knoflíkem 1 do polohy “
ručně ” a vyčkáte 7 vteřin. Jestliže před vypršením této doby
otočíte knoflíkem 2, změníte denní čas! Potom otočte
knoflíkem 2 ve směru “ - ” a držte jej v této poloze. Ukáže se
první nastavení zvukového signálu. Jestliže knoflík 2 pustíte a
opět otočíte ve směru “ - ” a držíte jej v této poloze, ukáže se
druhý zvukový signál.
Zůstane ten zvukový signál, terý jste vybrali jako poslední.
Jakost můžete kdykoliv znovu nastavit.
Změna jakéhokoliv časového programu
Všechna časová nastavení, kromě minutky , můžete
kdykoliv změnit tak, že knoflíkem 1 otočíte do polohy “ ručně
”. Nastavené programy se automaticky přeruší a hodiny se
nastaví na stav neprogramované (ruční) činnosti.
Použití hodin v kombinaci s troubou
Při použití hodin v kombinaci s troubou,
musíte nejdříve zapnout troubu a nastavit vybraný
systém pečení a teplotu. Teprve potom nastavíte funkce
na hodinách. Jakmile ukončíte pečení, vypněte troubu.
VYHRAZUJEME SI PRÁVO NA ZMĚNY, KTERÉ NEMAJÍ VLIV NA FUNKČNOST SPOTŘEBIČE
Elektronické programovateľné hodiny SK
Poloautomatická kontinuitná prevádzka
Gombík 1 otočte do polohy 'trvanie'. Na číselníku sa zjavia 0
00 a symbol S1. Otočením gombíka 2 smerom '+' alebo '-'
nastavíte želaný čas. Zjaví sa symbol S3. Čas môžete
nastavovať v jednominútových intervaloch. Maximálne možné
nastavenie času je 10 hodín.
1 gombík výberu jednotlivých funkcií
2 nastavovací gombík
Popis symbolov:
poloha ‘ručne’
poloha ‘minútový ukazovateľ’
poloha ‘trvanie’
poloha ‘koniec’
poloha ‘denný čas’
Nastavenie hodín na denný čas
Po nastavení želaného času sa po 7 sekundách začne
odčítanie nastaveného času. Ak gombík 1 zostal v polohe
‘trvanie’, na číselníku sa zobrazí odčítanie nastaveného času.
Gombíkom 2 môžete podľa priania korigovať ostatný čas,
pričom musí byť gombík 1 v polohe 'trvanie'.
Po uplynutí nastaveného času sa ozve zvukový signál, ktorý
sa po 7 minútach automaticky vypne, ak ho neprerušíte
otočením gombíka 1 do inej polohy. Symbol S1 zhasne,
symbol S3 bliká. V tej chvíli sa rúra vypne.
Otočením gombíka 1 do polohy 'ručne' symbol S3 zhasne a
zapne sa symbol S1. Hodiny sú nastavené na
neprogramovanú (ruč
Ak chcete pečenie ukončiť, musíte vypnúť aj rúru!
nú) prevádzku.
Po zapojení spotrebiča na elektrickú sieť sa na číselníku
zjavia blikajúce 0 00 a blikajúci symbol S3. Gombík 1 otočte
do polohy 'denný čas' alebo 'ručne'. Otočením gombíka 2
smerom '+' alebo '-' nastavíte presný denný čas. Gombík 1
otočte do polohy 'ručne' a otočením gombíka 2 smerom ”+”
alebo ”- ” nastavíte presný denný čas. Symbol S3 zhasne. 7
sekúnd po poslednom aktivovaní ktoréhokoľvek gombíka sa
hodiny uvedú do prevádzky. Rozsvieti sa symbol S1, ktorý
znázorňuje, že sú hodiny nastavené na neprogramovanú
(ručnú) prevádzku.
Poznámka: ak držíte gombík 2 v polohe '+' alebo '-' dlhší
čas, číselník sa rýchlejšie mení.
Upozornenie: Ak v priebehu 7 sekúnd po pripojení
spotrebiča na sieť nenastavíte denný čas, začne čas plynúť
sám. Ak potom gombík 2 otočíte smerom ‘+’, denný čas
prestane blikať, ale ešte vždy bliká symbol
dodatočne nastavíte týmto spôsobom:
− Gombík 1 otočte do polohy ‘denný čas’ a potom naspäť do
polohy ‘ručne’.
− Gombíkom 2 nastavíte presný denný čas (symbol S3
zhasne a rozsvieti sa symbol S1).
Rovnakým spôsobom postupujte aj pri prerušení dodávky
elektrického prúdu alebo pri korigovaní denného času!
Gombík 1 v polohe ‘denný čas’ slúži len na znázornenie
denného času a nie na menenie!
S3. Denný čas
Nastavenie neprogramovanej (ručnej) prevádzky
Gombík 1 otočte do polohy 'ručne' Tým je zrušený každý,
do tej doby nastavený program (symbol S3 sa vymaže, ak
bol aktívny). Aktivuje sa symbol S1 (ak ešte nebol), čo
znamená, že je nastavená neprogramovaná (ručná)
prevádzka.
Poloautomatická ukončená prevádzka
Gombík 1 otočte do polohy 'koniec'. Na číselníku sa zobrazí
denný čas. Otočením gombíka 2 smerom '+' alebo '-'
nastavíte čas konca prevádzky (tento môže byť dlhší ako
denný čas). Zobrazí sa symbol S3. 7 sekúnd po nastavení
želaného času sa na číselníku zobrazí denný čas.
Keď denný čas dosiahne nastavený konečný čas pečenia,
ozve sa zvukový signál, ktorý sa po 7 minútach automaticky
vypne, ak ho neprerušíte otočením gombíka 1 do inej polohy.
Symbol S1 zhasne, bliká symbol S3. V tej chvíli sa rúra
vypne.
Otočením gombíka 1 do polohy 'ručne' symbol S3 zhasne.
Zapne sa symbol S1 a hodiny sú nastavené na
neprogramovanú (ručnú) prevádzku.
Ak chcete pečenie ukončiť, musíte vypnúť aj rúru!
Automatická prevádzka s nastavením dĺžky trvania a
konca
Gombík 1 otočte do polohy 'trvanie' a otočením gombíka 2
smerom '+' alebo '-' nastavte dĺžku trvania prevádzky.
Potom gombík 1 otočte do polohy 'koniec' a číselníku sa
zobrazí najbližší možný konečný čas prevádzky. Otočením
gombíka 2 smerom '+' alebo '-' nastavíte čas konca
prevádzky. Symbol S1 zhasne, ak je konečný čas prevádzky
dlhší ako suma denného času a trvania prevádzky.
Rúra začne automaticky fungovať v súlade s nastavenými
časmi.
Príklad
Denný čas = 12:00, dĺžka prevádzky je nastavená na 1:30,
koniec na 14:00. To znamená, že rúra sa do chodu uvedie o
12:30.
28
Page 27

Chyby pri nastavení
Ak je napríklad konečný čas prevádzky nastavený tak, že je
kratší ako suma denného času a dĺžky prevádzky, sa ozve
zvukový signál a bliká symbol S3. Pre správnu prevádzku je
treba nastavené časy korigovať (najlepšie, keď gombík 1
otočíte do polohy 'ručne' a potom celý postup zopakujete).
Minútový ukazovateľ
Otočením gombíka 1 do polohy 'minútový ukazovateľ'
môžete aktivovať minútový ukazovateľ, ktorý má len
upozorňovaciu funkciu a rúru nevypína. Otočením gombíka 2
smerom '+' alebo '-' nastavíte želaný čas. Zobrazí sa symbol
S2.
Nastavený želaný čas sa začne odpočítavať po 7 sekundách.
Ak zostal gombík 1 v polohe 'minútový ukazovateľ', na
číselníku sa zobrazí odpočítavanie nastaveného času.
Gombíkom 2 môžete podľa priania korigovať ostatný čas,
pričom musí gombík 1 zostať v polohe 'trvanie'.
Po uplynutí nastaveného času sa ozve zvukový signál, ktorý
sa po 7 minútach automaticky vypne, ak ho neprerušíte
otočením gombíka 1 do inej polohy. Symbol S2 zhasne.
Intenzita zvukového signálu
Ak nie je aktívna ani jedna časová funkcia (zobrazený je len
denný čas), môžete zvoliť jednu z 3 rôznych intenzít
zvukového signálu. Postupujete tak, že gombík 1 otočíte do
polohy 'ručne' a počkáte 7 sekúnd. Ak pred uplynutím tejto
doby otočíte gombík 2, zmeníte denný čas! Potom gombík 2
otočte smerom '-' a v tej polohe ho držte. Zobrazí sa prvé
nastavenie zvukového signálu. Uvoľnením, opätovným
otočením
gombíka 2 smerom '-' a držaním v tejto polohe nastavíte
ďalšiu intenzitu zvukového signálu.
Zachovaná je vždy tá intenzita, ktorú ste nastavili ako
poslednú. Intenzitu môžete ľubovoľne nastaviť podľa priania.
Zrušenie ktoréhokoľvek časového programu
Všetky časové nastavenia, okrem minútovej ručičky, možno
kedykoľvek zrušiť otočením gombíka 1 do polohy 'ručne'.
Nastavený program
sa automaticky preruší a hodiny sa zapnú na
neprogramovanú (ručnú) prevádzku.
Použitie hodín v kombinácii s rúrou
Gombík (1) v polohe 'denný čas'
Táto poloha je neutrálna a predstavuje denný čas. Použite ju
v prípade, ak chcete, aby bol na číselníku po celú dobu
znázornený denný čas. Hodiny ste napríklad nastavili na
automatickú prevádzku. Ak je gombík 1 v polohe 'koniec', sa
na číselníku zobrazí konečný čas, ak však gombík 1 otočíte
do polohy 'denný čas', sa na číselníku ukáže denný čas.
Pri kombinovanom použití hodín s rúrou musíte najskôr
zapnúť rúru a nastaviť želaný režim pečenia a teplotu. Až
potom nastavíte funkcie na hodinách. Po ukončenom pečení
rúru vypnite.
VYHRADZUJEME SI PRÁVO NA ZMENY, KTORÉ NEMAJÚ VPLYV NA FUNKČNOSŤ SPOTREBIČA
Електронен часовник BG
Внимание: Ако не сте успели да нагласите текущия час
за 7 секунди след включване на уреда към
1 бутон за управление
2 минус (-) бутон и - плюс (+) бутон
Описание на символите:
Позиция " ръчен режим "
Позиция " часовник "
Позиция " период на работа "
Позиция " край на работа "
Позиция " текущо време "
захранването, часовникът се включва автоматично. Ако
завъртите
но символ S3 все още мига. Можете да настроите
текущото време както следва:
− Завъртете бутон 1 на позиция " текущо време" и после
− Нагласете текущото време с бутон 2 (символ S3
Повторете същата процедура при спиране на тока или
при промяна на времето!
Настройка за конвенционална (ръчна) работа
Завъртете бутон 1 в позиция "ръчна работа". Всички
направени до този момент настройки се прекъсват
(символът S3 се изтрива ако е бил на дисплея). Появява
се символаl S1 (ако не е вече активен на дисплея),което
означава че часовникът е настроен за конвенционална
(ръчна ) работа.
бутон 2 в посока ‘+’ , часът спира да мига,
на "ръчен режим".
изчезва от дисплея, символ S1 е все още на
дисплея).
Настройка на текущия час
След включване на уреда към електрическата мрежа на
дисплея се появява 0 00 и символът S3. Завъртете
бутон 1 наляво до позиция "текущо време" или "ръчен
режим", след което настройката на текущия час се
извършва с въртене на бутон 2 в посоки "+" или "-".
Часовникът започва работа 7 секунди след последното
натискане на който и да е
дисплея, което показва че часовникът е превключен на
ръчен режим на работа.
Забележка: ако сте задържали бутон 2 в позиции "+" или
"-" настройката се ускорява.
бутон. Символът S1 е на
Полуавтоматична работа с дефиниран период от
време
Завъртете бутон 1 в положение "период на работа", на
дисплея се появява 0 00 и символа S1. Настройте
желания от Вас период с въртене на бутон 2 в посока "+"
и "-". Появява се символа S3. Периодът на работа се
избира на стъпки от 1 минута. Максималният период за
настройка е до 10 часа.
След като желаното
започва да отчита след 7 секунди пауза. На дисплея е
изобразен текущия час.
29
време е настроено, часовникът
Page 28

Времето което остава може да бъде проверено със
завъртане на бутон 2, докато бутон 1 е в положение
"период на работа".
Изтичането на зададения интервал от време става чрез
звукова аларма, която изключва автоматично след 7
минути, ако не е прекъсната със завъртане на бутон 1 в
позиция различна от настроената. Символът S1
появява на дисплея, а символът S3 мига. В този момент
фурната изключва.
Със завъртане на бутон 1 в положение "ръчна работа"
символа S3. Символът S1 се появява отново и
часовникът се включва в конвенционален (ръчен) режим.
Ако искате да прекъснете печенето по рано фурната
може да бъде изключена ръчно.!
Полуавтоматичен режим на работа, който
завършва с край на работата.
Завъртете бутон 1 в положение "край". На дисплея е
изобразен текущия час. Настройте желания час за край
на работата с въртене на бутони 2 в позиция "+" или "-".
(естествено е часът който настройвате да е по-голям от
текущия). Появява се символът S3. На дисплея се
изобразява текущия час след около 7 секунди.
Достигането
аларма, която изключва автоматично след 7 минути, ако
не е прекъсната със завъртане на бутон 1 в която и да е
посока. Символът S1 е на дисплея и символът S3 мига. В
този момент фурната изключва.
Завъртането на бутон 1 в положение "ръчен режим"
изключва символа S3
часовникът се включва в конвенционален (ръчен) режим.
Ако искате да прекъснете печенето по рано фурната
може да бъде изключена ръчно.!
на зададения час се индикира със звукова
. Символът S1 се появява отново и
Автоматична работа със зададен интервал от
време и край на работа
Завъртете бутон 1 в положение "период на работа" и с
бутон 2 като въртите в посока "+" или "-" настройте
периода за работа.
След това завъртете бутон 1 в положение "край" и на
дисплея се изобразява най-близкия възможен час за
работа. Настройте желания час за край на работа с
бутони 2 като въртите в
е изключен ако посочения час за край на работата е поголям от текущия.
Фурната се включва автоматично в съответствие с
настройката.
посока "+" или "-". Символът S1
се
Звуков сигнал
За да активирате часовника завъртете бутон 1 в позиция
"таймер". В този случай часовникът не изключва фурната
и само ви предупреждава за изтичане на определено
време. Настройте желаното време с завъртане на бутон
2 в посока "+" или "-". Символът S2 е на дисплея.
След като желаното време е настроено, часовникът
започва да отчита след
остане в положение "таймер" на дисплея се отчита
изтичането на зададеното време. Оставящото време
може да бъде корегирано с бутон 2, като бутон 1 трябва
да остане в положение " период на работа".
Изтичането на зададения интервал от време става чрез
звукова аларма, която изключва автоматично след 7
минути, ако
различна от настроената първоначално. Символът S2
изчезва от дисплея.
не е прекъсната със завъртане на 1 в посока
7 секунди пауза. Ако бутон 1
Бутон (1) в положение текущо време
Това положение е неутрално и показва текущия час.
Използва се когато искате текущия час да бъде
изобразен на екрана. Например часовникът е настроен за
автоматична работа ако бутон 1 е в позиция "край" на
дисплея се чете времето за край на работата, ако бутон 1
е в положение "текущо време" на дисплея се
текущия час.
изобразява
Звуков сигнал
Когато всички функции са изключени (на дисплея е
изобразен текущия час) е възможно да бъдат настроени
3 различни степени на звуковия сигнал. Завъртете бутон
1 в положение "ръчна работа"и изчакайте около 7
секунди. Ако бутон 2 е завъртян преди изтичане на това
време ще бъде променен текущия час. След това
завъртете бутон 2 в
първото ниво на звуковия сигнал, след това завъртете
отново в посока "-" и задръжте и т.н..Последното избрано
положение се запомня, то може да бъде променено по
всяко време.
посока "-" и задръжте. Ще чуете
Изтриване на всички настройки
Всички настройки освен звуковата аларма могат да бъдат
изтрити чрез завъртане на бутон 1 в позиция "ръчен".
Зададените програми се канцелират и часовникът
преминава към конвенционална ( ръчна ) работа.
Използване на часовника в комбинация с фурната
Пример
Tекущ час = 12:00, интервалът за работа е настроен на
1:30часа и краят на работата е в 14:00. Това означава че
фурната ще се включи в 12:30.
Грешки при настройка на времето
Ако избраният край за работа е преди текущия час +
периода за работа грешката се индикира със звукова
аларма и мигане на символа S3. Настроените часове
трябва да бъдат пренастроени ( най-добре е да
завъртите бутон 1 в позиция "ръчен " и да повторите
процедурата за настройка отново).
При използване на фурната в комбинация с
часовника първата стъпка е да включите фурната и
да изберете желания режим и температура. Едва след
това може да пристъпите към настройката на
часовника. След като приключите печенето
изключете фурната.
ЗАПАЗВАМЕ СИ ПРАВОТО ДА ПРОМЕНЯМЕ СПЕЦИФИКАЦИЯТА БЕЗ ТОВА ДА ВЛИЯЕ НА
РАБОТАТА НА УРЕДА
30
Page 29

Elektronisk timer DK
den aktuelle. Symbolet S1 er slukket, og symbolet S3 blinker.
På dette tidspunkt slukkes ovnen.
Når knap 1 er drejet til positionen "manuel", slukkes symbolet
S3, og symbolet S1 vises igen. Uret stilles til normal (manuel)
tilstand.
Hvis du vil afslutte stegning, skal ovnen slukkes!
1 funktionsvælger
2 knapperne minus (-) og plus (+)
Symbolbeskrivelser:
positionen "manuel"
positionen "timer"
positionen "driftsperiode"
positionen "slut"
positionen "aktuelt klokkeslæt"
Indstilling af aktuelt klokkeslæt
Efter tilslutning af apparatet til strømforsyningen blinker displayet
skiftevis med 0 00 og symbolet S3. Drej knap 1 til positionen
"manuel", og indstil det aktuelle klokkeslæt ved at dreje knap 2
mod "+" eller "-". Symbol S3 slukkes. Uret starter syv sekunder
efter sidste berøring af en knap. Symbolet S1 er tændt og
angiver, at uret er indstillet til manuel (normal) tilstand. Bemærk:
Når knappen 2 holdes i positionen "+" eller "-", forøges
hastigheden af indstillingsprocessen på displayet.
Advarsel: Hvis du ikke indstiller det aktuelle klokkeslæt,
inden for syv sekunder efter apparatet kobles til
strømforsyningen, starter det automatisk. Hvis du nu drejer
knap 2 i retningen "+", holder det aktuelle klokkeslæt op med
at blinke, men symbolet S3 blinker stadig. Du kan nu indstille
det aktuelle klokkeslæt på følgende måde:
− Drej knap 1 til positionen "aktuelt klokkeslæt" og derefter
tilbage til "manuel".
− Indstil det aktuelle klokkeslæt med knap 2 (symbol S3 er
slukket, og symbol S1 lyser).
− Gentag proceduren i tilfælde af strømafbrydelse, eller hvis
du vil ændre tidspunktet.
Knap 1 i positionen "aktuelt klokkeslæt" bruges
udelukkende til at vise aktuelt klokkeslæt og til at ændre
det!
Indstilling af normal (manuel) drift
Drej knap 1 til positionen "manuel". Alle aktive programmer
afsluttes hermed (symbolet S3 slettes, hvis det var aktivt).
Symbolet S1 tændes (hvis det ikke allerede var tændt),
hvilket betyder, at uret er indstillet til normal (manuel)
funktionstilstand.
Halvautomatisk drift med foruddefineret periode
Drej knap 1 til positionen "driftsperiode". Displayet viser 0 00,
og symbolet S1 er tændt. Indstil den ønskede periode ved at
dreje knap 2 til positionen "+" eller "-". Symbolet S3 vises
igen. Driftsperioden kan vælges i trin på 1 minut. Den længst
mulige periode er 10 timer.
Når den ønskede driftsperiode er valgt, starter nedtællingen
efter den korte pause på syv sekunder. Hvis knap 1 blev i
stillingen " driftsperiode ", vises nedtællingstiden i displayet.
Den resterende tid kan ses ved at dreje knap 2, mens knap 1
stadig er i positionen "driftsperiode".
Udløbet af den indstillede periode signaleres af alarmen, som
automatisk slukkes efter syv minutter, hvis den ikke blev
slukket forinden ved at dreje knap 1 til en anden position end
Halvautomatisk drift med slut på ovndrift
Drej knap 1 til positionen "slut". Displayet angiver det aktuelle
klokkeslæt. Indstil det ønskede tidspunkt for slut på drift ved
at dreje knap 2 mod positionen "+" eller "-" (sluttiden skal
selvfølgelig forekomme senere end den aktuelle tid).
Symbolet S3 vises igen. I displayet vises igen det aktuelle
klokkeslæt syv sekunder efter indstillingen er udført.
Når den aktuelle tid når udløbet af den indstillede periode,
signaleres det af lydalarmen, som automatisk slukkes efter
syv minutter, hvis den ikke blev slukket forinden ved at dreje
knap 1 i en af retningerne. Symbolet S1 er slukket, og
symbolet S3 blinker. På dette tidspunkt slukkes ovnen.
Når knap 1 er drejet til positionen "manuel", slukkes symbolet
S3, og symbolet S1 vises igen. Uret stilles til normal (manuel)
tilstand.
Hvis du vil afslutte stegning, skal ovnen slukkes!
Automatisk drift med forudindstillet periode og slut på
drift
Drej knap 1 til positionen "driftsperiode", og indstil
stegeperioden ved at dreje knap 2 mod "+" eller "-".
Drej derefter knap 1 til positionen "slut", og det tidligst mulige
tidspunkt for slut på drift vises på displayet. Indstil det
ønskede tidspunkt for slut på drift ved at dreje knap 1 mod
"+" eller "-". Symbolet S1 er slukket, hvis sluttidspunktet
forekommer senere end den aktuelle tid + den
forudindstillede driftsperiode.
Ovnen starter automatisk driften i henhold til de
forudindstillede tidspunkter.
Eksempel:
Aktuel tid = 12:00, driftsintervallet blev indstillet til 1:30 og slut
på drift til 14:00. Det betyder, at ovnen starter driften kl.
12:30.
Fejl i indstilling af tid
Hvis den valgte sluttid forekommer før den aktuelle tid +
driftsperiode, signaleres dette af lydalarmen og det blinkende
symbol S3. Forudindstillede tider skal rettes (den bedste
måde er at dreje knap 1 til positionen "manuel", og gentage
hele proceduren).
Alarmtimer
Drej knap 1 til positionen "timer" for at aktivere timeren.
Denne timer fungerer kun som et advarselssignal, og slukker
ikke ovnen.
Indstil det ønskede tidspunkt ved at dreje knap 2 mod "+"
eller "-". Symbolet S2 er tændt.
Når den ønskede alarmtid er valgt, starter nedtællingen efter
den korte pause på syv sekunder. Hvis knap 1 blev i stillingen
"timer", vises nedtælling til det forudindstilte tidspunkt i
displayet.
Den resterende tid kan korrigeres ved at dreje knap 2, mens
knap 1 stadig er i positionen "driftsperiode".
Udløbet af den indstillede periode signaleres af alarmen, som
automatisk slukkes efter syv minutter, hvis den ikke blev
slukket forinden ved at dreje knap 1 til en anden position end
den faktiske. Symbolet S2 er slukket.
31
Page 30

Knap (1) i positionen aktuelt klokkeslæt
Denne position er neutral og angiver det aktuelle klokkeslæt.
Den anvendes, hvis du ønsker at se det aktuelle klokkeslæt
på displayet. Uret er f.eks. indstillet til automatisk funktion.
Hvis knap 1 er stillet i positionen "slut", vises tidspunktet for
slut på drift på displayet, og hvis knap 1 er drejet til positionen
"aktuelt klokkeslæt", vises det aktuelle klokkeslæt på
displayet.
Slip knap 2, og drej igen mod "-" for at høre næste lydstyrke
etc.
Det sidst valgte niveau gemmes som standard. Lydstyrken
kan altid indstilles igen.
Sletning af alle timerindstillinger
Alle tidsindstillinger bortset fra alarmtimeren kan når som
helst slettes ved at dreje knap 1 til positionen "manuel".
Forudindstillede programmer annulleres automatisk, og uret
vender tilbage til normal (manuel) tilstand.
Styrke af lydalarm
Når alle funktioner er slukket (kun det aktuelle klokkeslæt
vises), er det muligt at vælge 3 forskellige lydstyrker for
lydsignalet. Drej knap 1 til positionen "manuel", og vent syv
sekunder. Hvis knap 2 drejes, før udløb af denne periode,
ændres det aktuelle klokkeslæt! Drej derefter knap 2 mod "", og hold den i denne position. Den første lydstyrke høres.
Brug af uret sammen med ovnen
Hvis uret skal bruges sammen med ovnen, er første trin at
tænde for ovnen og indstille den ønskede bagetilstand samt
temperaturen. Først derefter kan du fortsætte indstillingen af
urfunktionerne. Når bagningen er færdig, skal du slukke
ovnen.
RET TIL ÆSNDRINGER FORBEHOLDES.
Elektronisk timer NO
S1 tänds (om den inte redan var tänd), vilket innebär att
klockan är i normalläge (manuellt).
Halvautomatiskt läge med inställd tillagningstid
1 funktionsknapp
2 minus (-) och plus (+)
Beskrivning av symboler:
läge “manuell”
läge “timer”
läge “tillagningstid”
läge “färdigtid”
läge “aktuell tid”
Ställa in aktuell tid
När apparaten har anslutits till elnätet blinkar siffrorna 0 00
och symbolen S3 i displayen. Vrid knapp 1 till läge "manuell",
och ställ in aktuell tid genom att vrida knapp 2 mot "+" eller
"-". Klockan börjar gå 7 sekunder efter det att du har släppt
knapparna. Symbolen S1 lyser. Den anger att klockan har
ställts i manuellt (normalt) läge. Obs! Om du håller kvar
knapp 2 mot "+" eller "-" bläddras tiden fram snabbare i
displayen.
Varning: Om du inte ställer in aktuell tid inom 7 sekunder
efter att apparaten har anslutits till elnätet, börjar klockan gå
automatiskt. Genom att vrida knapp 2 mot ’+’ slutar aktuell
tid att blinka. Symbolen S3 fortsätter dock att blinka. Du kan
nu ställa in aktuell tid genom att göra på följande sätt:
− Vrid knappen 1 först till läge “aktuell tid” och därefter
tillbaka till “manuell”.
− Ställ in aktuell tid med hjälp av knapp 2 (symbolen S3 lyser
inte, symbolen S1 lyser).
Gör på samma sätt efter ett strömavbrott eller om du behöver
ställa in rätt tid!
Om knapp 1 står i läge ”aktuell tid” kan inte aktuell tid
ställas in, denna visas endast!
Ställa in normalläge (manuellt)
Vrid knapp 1 mot läge "manuell". Då avbryts alla aktuella
program (symbolen S3 slocknar om den var tänd). Symbol
Vrid knapp 1 mot läge "tillagningstid". I displayen visas 0 00
och symbolen S1 börjar blinka. Ställ in önskad tillagningstid
genom att vrida knapp 2 mot "+" eller "-". Symbolen S3
tänds. Tillagningstiden kan ställas in i steg om 1 minut.
Längsta möjliga tid som kan ställas in är 10 timmar.
När du är klar med inställningen av tillagningstiden startar
nedräkningen efter 7 sekunder. Om du håller kvar knapp 1 i
läge "tillagningstid" visas nedräkningstiden i displayen.
Du kan kontrollera hur lång tid som återstår genom att vrida
på knapp 2, samtidigt som knapp 1 är kvar i läge
"tillagningstid".
När den inställda tiden har gått hörs en ljudsignal. Signalen
stängs automatiskt av efter 7 minuter. Du kan själv stänga av
den innan dess genom att vrida knapp 1 till något läge.
Symbol S1 slocknar och symbol S3 blinkar. Nu stängs ugnen
av.
När du har vridit knapp 1 till läge "manuell" slocknar symbol
S3 och symbol S1 tänds igen. Klockan är nu i normalläge
(manuellt).
Om du vill avsluta stekningen måste ugnen stängas av!
Halvautomatiskt läge med angiven färdigtid
Tryck på knappen 1 och vrid den till läge "färdigtid". I
displayen visas aktuell tid. Ställ in önskad färdigtid genom att
vrida knapp 2 mot "+" eller "-" (färdigtiden måste förstås
infalla senare än aktuell tid). Symbolen S3 tänds. När du har
gjort inställningen återgår displayen till aktuell tid efter 7
sekunder.
När den inställda färdigtiden nås, hörs en ljussignal. Signalen
stängs av automatiskt av efter 7 minuter. Du kan själv stänga
av den innan dess genom att vrida knapp 1 i någon riktning.
Symbol S1 slocknar och symbol S3 blinkar. Nu stängs ugnen
av.
När du har vridit knapp 1 till läge "manuell" slocknar symbol
S3 och symbol S1 tänds igen. Klockan är nu i normalläge
(manuellt).
Om du vill avsluta stekningen måste ugnen stängas av!
Automatiskt läge med förinställd tillagningstid och
färdigtid
Vrid knapp 1 mot "tillagningstid". Ställ sedan in
tillagningstiden genom att vrida knapp 2 mot "+" eller "-".
32
Page 31

Vrid knapp 1 till läge ”färdigtid”. Då visas tidigaste möjliga
färdigtid i displayen. Ställ in önskad färdigtid genom att vrida
knapp 1 mot "+" eller "-". Om sluttiden infaller senare än
aktuell tid + tillagningstiden, slocknar symbolen S1.
Ugnen kopplas automatiskt på enligt den förinställda
tillagningstiden.
Exempel
Aktuell tid = 12:00, tillagningstiden har ställts in till 1:30 och
färdigtiden till 14:00. Det innebär att ugnen kopplas på kl.
12:30.
Fel vid tidsinställningen
Om den valda färdigtiden infaller före aktuell
tid + tillagningstid, anges detta med en ljudsignal och symbol
S3 blinkar. De förinställda tiderna måste då korrigeras. Detta
gör du bäst genom att först vrida knapp 1 mot läge "manuell"
och sedan upprepa inställningarna.
Signalur
När du vill aktivera timern vrider du knapp 1 mot läge ”timer”.
Timern fungerar endast som äggur och den stänger inte av
ugnen.
Ställ in önskad tid genom att vrida knapp 2 mot "+" eller "-".
Symbol S2 tänds.
När inställningen är klar startar nedräkningen efter 7
sekunder. Om du håller kvar knapp 1 i läge "timer" visas
nedräkningstiden i displayen.
Du kan kontrollera hur lång tid som återstår genom att vrida
på knapp 2, samtidigt som knapp 1 är kvar i läge
"tillagningstid".
När den inställda tiden har gått hörs en ljudsignal. Signalen
stängs automatiskt av efter 7 minuter. Du kan själv stänga av
den innan dess genom att vrida knapp 1 till något läge.
Symbol S2 slocknar.
Knapp (1) i läge aktuell tid
Detta är neutralläget och här visas aktuell tid. Detta läge
använder du när du vill att aktuell tid ska visas i displayen.
Exempel: Du har ställt in klockan på automatiskt läge. Om
knapp 1 ställs i läge "färdigtid", visas färdigtiden i displayen,
och om knapp 1 vrids till "aktuell tid" visas aktuell tid i
displayen.
Volym för ljudsignalen
När alla funktioner är avstängda (endast aktuell tid visas) kan
du välja mellan 3 olika volyminställningar för ljudsignalen.
Vrid knapp 1 till läge "manuell" och vänta i 7 sekunder. Om
du vrider på knapp 2 innan 7 sekunder har gått ändras den
aktuella tiden! Vrid sedan knapp 2 mot "-" och håll kvar den
där . Då hörs den första volymnivån. Släpp knapp 2 och vrid
den mot ”-” igen. Då hörs nästa volymnivå, osv.
Den nivå som har valts senast lagras som standardnivå.
Volymnivån kan när som helst ändras.
Ta bort alla inställningar för timern
Du kan när som helst ta bort alla tidsinställningar utom
signaluret. Du gör det genom att vrida knapp 1 till läge
"manuell".
Inställda program avbryts automatiskt och klockan återgår till
normalläge (manuellt).
Använda klockan tillsammans med ugnen
Om du vill använda klockan tillsammans med ugnen är
första steget att koppla på ugnen och ställa in önskat
ugnsläge och önskad temperatur. Först därefter kan du
gå vidare och ställa in klockans funktioner. När
tillagningen är färdig stänger du av ugnen.
RETT TIL ENDRINGER FORBEHOLDES.
Elektronisk programur SE
NB: Dersom du ikke innstiller klokkeslettet innen 7 sekunder
etter at du har tilkoblet strømmen til apparatet, vil uret
begynne å gå automatisk. Dersom du nå skrur knappen 2
mot '+', stopper klokkeslettet med å blinke, mens symbolet
S3 fortsetter å blinke. Du kan da stille inn klokkeslettet på
følgende måte:
− Sett knappen 1 på "klokkeslett" og deretter tilbake på
1 funksjonsknapp
2 minus (-) og pluss (+) knapp
Beskrivelse av symbolene i displayet:
"manuell"
"alarmklokke"
"steketid"
"sluttid"
"aktuelt klokkeslett"
Stille inn klokkeslettet
Når enheten tilkobles strømnettet, blinker tallene 0 00 på
displayet, og symbolet S3 blinker. Sett knappen 1 på
"manuell" og still inn klokkeslettet ved å skru knappen 2 mot
"+" eller "-". Symbolet S3 forsvinner.
Klokken begynner å gå 7 sekunder etter siste trykk på én av
knappene. Symbolet S1 lyser og viser at programuret er
innstilt på vanlig (manuell) betjening. Merk: når knappen 2
holdes dreid mot "+" eller "-", endres tallene på displayet
raskere.
"manuell".
− Still inn klokkeslettet med knappen 2 (symbolet S3 er av,
symbolet S1 er på).
Gjenta denne fremgangsmåten i tilfelle av strømbrudd eller
hvis du vil rette klokkeslettet!
Knappen 1 på "klokkeslett" er utelukkende beregnet for å
vise klokkeslettet og ikke for å endre det!
Stille inn på vanlig (manuell) betjening
Sett knappen 1 på "manuell". Alle eventuelle igangværende
programmer blir dermed slettet (symbolet S3 slokner hvis
det var aktivert). Symbolet S1 begynner å lyse (hvis det ikke
allerede lyste i forveien). Det betyr at programuret er innstilt
på vanlig (manuell) betjening.
Halvautomatisk, tidsstyrt steking
Sett knappen 1 på "steketid". Displayet viser 0 00, og
symbolet S1 lyser. Innstill ønsket steketid ved å skru
knappen 2 mot "+" eller "-". Symbolet S3 lyser. Steketiden
kan innstilles i trinn på ett minutt. Maksimum steketid er 10
timer.
33
Page 32

Når ønsket steketid er innstilt, begynner programuret å telle
ned etter 7 sekunder. Hvis knappen 1 blir stående i stillingen
"steketid", viser displayet gjenværende tid.
Du kan kontrollere resterende tid ved å skru på knappen 2,
mens knappen 1 skal bli stående i stillingen "steketid".
Utløpet av nedtellingstiden signaleres av en alarm, som slås
av automatisk etter 7 minutter hvis ikke du slår den av før ved
å sette knappen 1 på en annen posisjon enn den aktuelle.
Symbolet S1 slokner, og symbolet S3 blinker. Varmen i
ovnen er da slått av.
Når knappen 1 settes på "manuell", slokner symbolet S3, og
symbolet S1 lyser igjen. Programuret er da innstilt på vanlig
(manuell) betjening.
Slå av ovnen når du er ferdig med å steke!
Halvautomatisk steking med sluttid
Sett knappen 1 på "sluttid". Displayet viser aktuelt klokkeslett.
Innstill ønsket sluttidspunkt ved å skru knappen 2 mot "+"
eller "-" (sluttidspunktet må naturligvis komme etter aktuelt
klokkeslett). Symbolet S3 lyser. Displayet går tilbake til å vise
aktuelt klokkeslett 7 sekunder etter at innstillingen er utført.
Når forhåndsinnstilt sluttidspunkt nås, vil du høre et lydsignal,
som slås av automatisk etter 7 minutter hvis ikke du slår det
av før ved å skru på knappen 1. Symbolet S1 slokner, og
symbolet S3 blinker. Varmen i ovnen er da slått av.
Når knappen 1 settes på "manuell", slokner symbolet S3, og
symbolet S1 lyser igjen. Programuret er da innstilt på vanlig
(manuell) betjening.
Slå av ovnen når du er ferdig med å steke!
Automatisk steking med forhåndsinnstilt steketid og
sluttid
Sett knappen 1 på "steketid" og innstill steketiden ved å skru
knappen 2 mot "+" eller "-".
Sett deretter knappen 1 på "sluttid". Displayet viser nærmeste
mulige sluttidspunkt. Innstill ønsket sluttid ved å skru
knappen 1 mot "+" eller "-". Symbolet S1 lyser ikke hvis
sluttiden er større enn summen av aktuelt klokkeslett +
innstilt sluttid.
Ovnen slås på automatisk i samsvar med de forhåndsinnstilte
tidene.
Eksempel
Aktuelt klokkeslett = 12:00, steketiden er innstilt til 1:30 og
sluttiden til 14:00. Det betyr at ovnen automatisk vil slå seg
på klokken 12:30.
Feil ved innstilling av tiden
Dersom innstilt sluttid kommer før aktuelt klokkeslett +
steketiden, advares det om dette med et lydsignal og ved at
symbolet S3 blinker. De forhåndsinnstilte tidene må da rettes
og justeres (det beste er å sette knappen 1 på "manuell" og
gjenta innstillingen).
Alarmklokke
Alarmklokken aktiveres ved å sette knappen 1 på
"alarmklokke". Denne klokken fungerer bare som et
varselsignal og slår ikke av ovnen.
Innstill ønsket tid ved å skru knappen 2 mot "+" eller "-".
Symbolet S2 lyser.
Når ønsket alarmtid er innstilt, begynner klokken å telle ned
etter 7 sekunder. Hvis knappen 1 blir stående i stillingen
"alarmklokke", viser displayet nedtellingen av forhåndsinnstilt
tid.
Du kan justere resterende tid ved å skru på knappen 2, mens
knappen 1 skal bli stående i stillingen "steketid".
Utløpet av innstilt tid signaleres av en alarm, som slås av
automatisk etter 7 minutter hvis ikke du slår den av før ved å
sette knappen 1 på en annen posisjon enn den aktuelle.
Symbolet S2 forsvinner.
Knapp (1) på aktuelt klokkeslett
Denne stillingen er nøytral og viser aktuelt klokkeslett. Den
brukes hvis du ønsker å få vist aktuelt klokkeslett på
displayet. Programuret er for eksempel innstilt på automatisk
steking. Dersom knappen 1 innstilles på "sluttid", viser
displayet sluttidspunktet, og hvis knappen 1 er innstilt på
"klokkeslett", viser displayet aktuelt klokkeslett.
Volum på lydalarm
Når alle funksjoner er av (bare aktuelt klokkeslett vises), er
det mulig å velge 3 forskjellige voluminnstillinger for
lydalarmen. Sett knappen 1 på "manuell" og vent i 7
sekunder. Dersom det skrus på knappen 2 før denne tiden
har gått, vil klokkeslettet bli endret! Skru deretter knappen 2
mot "-" og hold den der. Første lydnivå høres. Slipp knappen
2 og skru den mot "-" igjen for å høre neste lydnivå etc.
Siste lydnivå lagres som standard. Lydnivået kan alltid
justeres igjen.
Slette alle programurinnstillinger
Alle innstilte tider med unntak av alarmklokken kan slettes på
ethvert tidspunkt ved å sette knappen 1 på "manuell".
Forhåndsinnstilte programmer blir da automatisk slettet, og
programuret går tilbake til vanlig (manuell) betjening.
Bruk av programuret sammen med ovnen
For å bruke programuret sammen med ovnen må du først
slå på ovnen og stille inn ønsket stekefunksjon og
temperatur. Først deretter kan du fortsette med å stille
inn urfunksjonene. Slå av ovnen når du er ferdig med å
steke.
VI FÖRBEHĹLLER OSS RÄTTEN ATT GÖRA ÄNDRINGAR I SPECIFIKATIONERNA. SĹDANA
ÄNDRINGAR PĹVERKAR INTE APPARATENS FUNKTION.
Elektroninen ajastin FI
Kuvakkeiden selitteet:
"käsikäytön"asento
ajastinasento
1 toimintopainike
2 miinuspainike (–) ja pluspainike (+)
34
"toiminta-aika"-asento
"loppu"-asento
kellonajan asento
Page 33

Oikean ajan asetus
Kun laite on liitetty sähköverkkoon, näytössä vilkkuvat aika 0
00 ja tunnus S3 vilkkuu. Aseta oikea kellonaika kiertämällä
nuppia 2 suuntaan "+" tai "-". Tunnus S3 sammuu. Kello
alkaa käydä 7 sekunnin kuluttua viimeisestä nupin
kosketuksesta. Tunnus S1 on näkyvissä ilmaisten, että kello
on asetettu (tavalliseen) käsikäyttötilaan.
Huomautus: kun painiketta 2 pidetään kierrettynä suuntaan
"+" tai "-", asettaminen vauhdittuu näytössä.
Varoitus: Jos et ehdi asettaa kellonaikaa 7 sekunnin kuluessa
siitä, kun laite liitetään sähköverkkoon, kello alkaa käydä
automaattisesti. Jos nyt kierrät nuppia 2 suuntaan '+', niin
kellonajan vilkkuminen loppuu, mutta tunnus S3 vilkkuu
edelleen. Nyt voit asettaa oikean kellonajan seuraavasti:
− Kierrä nuppi 1 kohtaan "kellonaika" ja sitten takaisin
kohtaan "käsikäyttö".
− Aseta kellonaika nupilla 2 (tunnus S3 ei pala, tunnus S1
palaa).
Toista samat toimet virtakaton jälkeen tai jos kellonajan
näyttötapaa on muutettava!
Nuppi 1 kellonajan asennossa ainoastaan näyttää
kellonajan, se ei ole tarkoitettu ajan muuttamiseen!
Automaattinen toiminta asettaen jakso ja toiminnon
päättyminen ennalta
Kierrä nuppia 1 suuntaan "toiminta-aika" ja aseta
valmistusjakson pituus kiertämällä nuppia 2 suuntaan "+" tai
"-".
Kierrä sitten nuppi 1 kohtaan "loppu", ja näyttöön tulee lähin
mahdollinen toiminnon päättymisaika. Aseta haluttu käytön
päättymisaika kiertämällä nuppia 1 suuntaan "+" tai "-".
Tunnus S1 on sammunut, jos päättymisaika on suurempi
kuin nykyhetki + esiasetettu toimintojakso.
Uuni aloittaa automaattisen toiminnan esiasetettujen aikojen
mukaisesti.
Esimerkki
Nykyhetki= 12:00, toiminta-ajaksi asetettiin 1:30, ja toiminnon
päättymisajaksi 14:00. Siten uuni käynnistyy kello 12:30.
Virheet ajan asetuksessa
Jos valittu päättymisaika jää lyhyemmäksi kuin nykyhetki +
toimintojakso, tästä ilmoitetaan äänimerkillä ja vilkkuvalla
tunnuksella S3. Esiasetetut ajat täytyy korjata ja säätää
(paras menettely on kiertää nuppi 1 asentoon "käsikäyttö"
sekä toistaa koko menetelmä).
Tavallisen (käsi-) toiminnon asetus
Kierrä nuppi 1 kohtaan "käsikäyttö". Silloin peruuntuvat
kaikki parhaillaan käynnissä olevat ohjelmat (jos tunnus
S3 oli näytössä, se poistuu). Tunnus S1 tulee esiin (jos se ei
jo ollut näytössä) ilmaisten, että kello on asetettu (tavalliseen)
käsikäyttötilaan.
Puoliautomaattinen toiminta ajanjakso määräten
Kierrä nuppi 1 kohtaan "toiminta-aika". Näyttöön tulee aika 0
00 ja tunnus S1 on esillä. Aseta haluttu jakso kiertämällä
nuppia 2 suuntaan "+" tai "-". Tunnus S3 tulee esiin.
Toiminta-ajan valintaväli on 1 minuutti. Pisin asetettava
ajanjakso on 10 tuntia.
Kun haluttu toiminta-aika on valittu, ajan alaslaskenta alkaa 7
sekunnin kuluttua. kun painiketta 1 pidetään painettuna
asennossa "toiminta-aika", näyttö osoittaa alaslaskennan
aikaa.
Jäljellä olevan ajan voi tarkistaa kiertämällä painiketta 2,
mutta painikkeen 1 täytyy pysyä asennossa "toiminta-aika".
Asetetun ajanjakson loppu ilmoitetaan äänimerkillä, joka
sammuu automaattisesti 7 minuutin kuluttua, ellei sitä
sammuteta aikaisemmin kiertämällä nuppi 1 johonkin
muuhun asentoon nykyisestä. Tunnus S1 on pois ja tunnus
S3 vilkkuu. Tällä hetkellä uunista katkaistaan virta.
Kun nuppi 1 on kierretty asentoon "käsikäyttö", tunnus S3
sammuu ja tunnus S1 tulee takaisin. Kello on asetettu
(tavalliseen) käsikäyttötilaan.
Jos haluat lopettaa paahtamisen, uunin virta täytyy
katkaista.
Puoliautomaattinen toiminta päättyminen määräten
Kierrä nuppi 1 kohtaan "loppu". Näytössä näkyy oikea aika.
Aseta haluttu käytön päättymishetki kiertämällä nuppia 2
suuntaan "+" tai "-". (päättymisajan täytyy tietysti olla
nykyhetkeä suurempi luku). Tunnus S3 tulee esiin. Näyttöön
palautuu oikea kellonaika 7 sekunnin kuluttua asetuksen
valmistumisesta.
Kun saavutetaan toiminnon loppumisen asetettu ajankohta,
siitä ilmoitetaan äänimerkillä, joka sammuu automaattisesti 7
minuutin kuluttua, ellei sitä sammuteta aikaisemmin
kiertämällä nuppia 1 johonkin suuntaan. Tunnus S1 on pois ja
tunnus S3 vilkkuu. Tällä hetkellä uunista katkaistaan virta.
Kun nuppi 1 on kierretty asentoon "käsikäyttö", tunnus S3
sammuu ja tunnus S1 tulee takaisin. Kello on asetettu
(tavalliseen) käsikäyttötilaan.
Jos haluat lopettaa paahtamisen, uunin virta täytyy
katkaista.
Hälytysajastin
Käynnistä ajastin kiertämällä nuppi 1 kohtaan "ajastin". Tämä
ajastin antaa ainoastaan hälytysmerkin, eikä kytke uunia
päälle.
Aseta haluttu aika kiertämällä nuppia 2 suuntaan "+" tai "-".
Tunnus S2 palaa.
Kun haluttu hälytys-aika on valittu, ajan alaslaskenta alkaa 7
sekunnin kuluttua. kun nuppi 1 jätetään asentoon "ajastin",
näytössä nähdään esiasetusajan alaslaskenta.
Jäljellä olevaa aikaa voi korjata nupilla 2, mutta painikkeen 1
täytyy pysyä asennossa "toiminta-aika".
Asetetun ajanjakson loppu ilmoitetaan äänimerkillä, joka
sammuu automaattisesti 7 minuutin kuluttua, ellei sitä
sammuteta aikaisemmin kiertämällä nuppi 1 johonkin
muuhun asentoon nykyisestä. Tunnus S2 on sammunut.
Nuppi 1 oikean kellonajan kohdassa
Tämä asento on vapaa, ja vain oikea kellonaika näytetään.
Sitä käytetään, jos halutaan oikean kellonajan näkyvän
näytössä. Kello on tässä esimerkissä asetettu
automaattitoimintoon. Jos nuppi 1 on asetettu osoittamaan
kohtaa "loppu", näytössä on käyttöajan päättymishetki, ja jos
nuppi 1 on kierretty osoittamaan "kellonaika" kohtaa,
näytössä on oikea kellonaika.
Hälytysäänen voimakkuus
Kun kaikki toiminnot ovat pois päältä (näytössä on vain oikea
kellonaika), voidaan äänimerkille valita 3 erilaista
äänenvoimakkuuden asetusta. Kierrä nuppi 1 kohtaan
"käsikäyttö" ja odota 7 sekuntia. Jos nuppia 2 kierretään
ennen tämän jakson päättymistä, oikea aika muuttuu!
Seuraavaksi kierrä nuppi 2 kohtaan "-", ja pidä se siinä
asennossa. Kuulet ensimmäisen äänenvoimakkuustason.
Vapauta nuppi 2 ja kierrä uudelleen kohti merkkiä "-"
seuraavaa voimakkuustasoa varten jne.
Viimeinen valittu taso tallennetaan oletukseksi.
Voimakkuustason voi asettaa uudelleen milloin tahansa.
Kaikkien ajastinsäätöjen poisto
Kaikki ajan asetukset hälytysajastinta lukuun ottamatta
voidaan poistaa milloin tahansa kiertämällä nuppi 1
asentoon "käsikäyttö".
Esiasetetut ohjelmat peruuntuvat automaattisesti ja kello
palautuu (tavalliseen) käsikäyttötilaan.
35
Page 34

Kellon käyttö yhdessä uunin kanssa
Käytettäessä kelloa uunin kanssa ensimmäinen vaihe on
kytkeä virta uuniin ja asettaa haluttu paistotapa sekä
lämpötila. Vasta sen jälkeen voit edetä kellotoimintojen
asetuksiin. Paistamisen päätyttyä katkaise uunin virta.
VARAAMME OIKEUDEN SELLAISIIN TEKNISTE9N TIETOJEN MUUTOKSIIN, JOILLA EI OLE
VAIKUTUSTA LAITTEEN KÄYTTÖÖN.
Elektroninis laikmatis LT
Pusiau automatinis režimas su nustatyta veikimo
trukme
Mygtuką 1 pasukite į padėtį “veikimo trukmė”. Displėjuje
pasirodys 0.00 ir simbolis S1. Sukdami mygtuką 2 į padėtį
“+” ar “-”, nustatykite pageidaujamą orkaitės veikimo
trukmę. Displėjuje pasirodo simbolis S3. Veikimo trukmę
1 funkcijų mygtukas
2 - minus (-) mygtukas ir plius (+) mygtukas
Simbolių aprašymas:
normalaus (rankinio) režimo simbolis
laikmačio simbolis
veikimo trukmės simbolis
veikimo pabaigos simbolis
paros laiko nustatymo simbolis
Tikslaus paros laiko nustatymas
Prijungus prietaisą prie elektros tinklo displėjuje pasirodo 0
00 ir mirksi simbolis S3. Mygtuką 1 pasukite iki rankinio
orkaitės reguliavimo simbolio ir, sukinėdami 2 mygtuką link
“+” arba “-“, nustatykite tikslų paros laiką (simbolis S3
užgęsta). Praėjus 7 sekundėms po bet kurio mygtuko
palietimo, laikmatis pradeda rodyti naują nustatytą laiką.
Displėjuje rodomas simbolis S1 parodo, kad laikmatis
nustatytas veikti normaliu (rankiniu) režimu.
Pastaba: laikant paspaustą mygtuką 2 padėtyje “-” arba “+”,
nustatymo procesas displėjuje vyksta greičiau.
Įspėjimas: Jei nenustatote paros laiko per 7 sekundes ir
išjungiate prietaisą iš elektros tinklo, laikmatis pradės veikti
automatiškai. Jeigu dabar pasukate mygtuką 2 kryptimi ‘+’,
paros laikas nustoja mirksėti, bet simbolis S3 vis dar mirksi.
Dabar galite nustatyti paros laiką tokiu būdu:
− Pasukite mygtuką 1
tada atgal į poziciją "normalus (rankinis) nustatymas".
− Nustatykite paros laiką mygtuku 2 (simbolis S3 užgźsta,
simbolis S1 šviečia).
Jei nutrūko elektros tiekimas ar norite pakeisti paros laiką,
pakartokite šiuos veiksmus!
Mygtukas 1 – tai paros laikas, ir jis naudojamas rodyti
laiką, o ne kaitalioti jį!
į poziciją "paros laiko nustatymas", o
galima nustatyti minutės tikslumu. Maksimali veikimo trukmė,
kurią galima nustatyti, yra 10 valandų.
Pasirinkus pageidaujamą orkaitės veikimo trukmę, laikas
pradedamas skaičiuoti atgal po 7 sekundžių. Mygtuką 1
palikus padėtyje “veikimo trukmė”, displėjuje rodomas atgal
skaičiuojamas laikas.
Likźs laikas patikrinamas sukant mygtuką 2, o mygtukas 1
turi išlikti pozicijoje “veikimo trukmė”.
Apie pasibaigusį nustatytą laiką praneša garso signalas, jis
išsijungia automatiškai po 7 minučių
išjungtas pasukus mygtuką 1 į bet kurią padėtį, išskyrus
esamą. Simbolis S1 išnyksta, ir mirksi simbolis S3. Šiuo
momentu orkaitė yra išjungta.
Pasukus mygtuką 1 į padėtį “normalus (rankinis)
nustatymas”, išnyksta simbolis S3 ir vėl pasirodo simbolis S1.
Laikmatis nustatytas veikti normaliu (rankiniu) režimu.
Jei norite nutraukti kepimą, orkaitź reikia išjungti!
, jei prieš tai nebuvo
Pusiau automatinis režimas su nustatyta veikimo
pabaiga
Pasukite mygtuką 1 į padėtį “veikimo pabaiga”. Displėjuje
rodomas tikslus paros laikas. Sukdami mygtuką 2 į padėtį
“+” ar “-” nustatykite pageidaujamą veikimo laiką (paprastai
veikimo pabaigos laikas turi būti vėlesnis nei tikslus paros
laikas). Pasirodo simbolis S3. Praėjus 7 sekundėms nuo
nustatymo displėjuje rodomas tikslus paros laikas. Tiksliam
paros laikui pasiekus nustatytą veikimo pabaigos laiką,
pasigirsta garso signalas, jis išsijungia automatiškai po 7
minučių, jei prieš tai neišjungiamas pasukus mygtuką 1 bet
kuria kryptimi. Simbolis S1 išnyksta ir mirksi simbolis S3.
Šiuo momentu orkaitė yra išjungta.
Pasukus mygtuką 1 į padėtį “normalus (rankinis) nustatymas”
išnyksta simbolis S3, ir vėl pasirodo simbolis S1. Laikmatis
nustatytas veikti normaliu (rankiniu) režimu.
Jei norite nutraukti kepimą, orkaitź reikia išjungti!
Automatinis režimas su nustatyta veikimo trukme ir
veikimo pabaiga
Normalaus (rankinio) režimo nustatymas
Mygtuką 1 pasukite į padėtį “normalus (rankinis) valdymas”.
Visos tuo metu veikiančios programos nutraukiamos (jei
simbolis S3 buvo aktyvus, jis ištrinamas). Simbolis S1
pasidaro aktyvus (jei jis dar nebuvo aktyvus), tai reiškia, kad
laikmatis nustatytas veikti normaliu (rankiniu) režimu.
Mygtuką 1 pasukite á padëtá “veikimo trukmë” ir sukdami
mygtukŕ 2 á padëtá “+” ar “-” nustatykite pageidaujam¹
gaminimo trukmê.
Po to pasukite mygtuk¹ 1 á padëtá “veikimo pabaiga”, ir
displëjuje pasirodys artimiausias galimas veikimo pabaigos
laikas. Sukdami mygtukŕ 1 á padëtá “+” ar “-”, nustatykite
pageidaujam¹ veikimo pabaigos laikŕ. Jei veikimo pabaigos
laikas yra vëlesnis nei tikslus paros laikas + nustatyta
orkaitës veikimo trukmë, simbolis S1 iđnyksta. Orkaitë
pradeda veikti automatiđkai pagal ávestas laiko reikđmes.
36
Page 35

Pavyzdys
Tikslus paros laikas yra 12:00, veikimo trukmė buvo nustatyta
1:30, veikimo pabaigos laikas yra 14:00. Vadinasi, orkaitė
pradės veikti 12:30.
Klaidos nustatant laiką
Jei pasirinktas veikimo trukmės laikas yra: ankstesnis nei
tikslus paros laikas + veikimo trukmė, tai praneša garso
signalas ir mirksintis simbolis S3. Įvestus laikus reikia
koreguoti (geriausia tai daryti taip: mygtuką 1 pasukti į padėtį
“normalus (rankinis) režimas” ir laikmatį nustatykite dirbti
normaliu režimu, po to pakartokite visus programavimo
veiksmus).
Signalinis laikmatis
Norėdami suaktyvinti laikmatį, pasukite mygtuką 1 į padėtį
“laikmatis”. Ši laikmačio funkcija naudojama tik kaip
įspėjamasis signalas ir orkaitės neišjungia.
Sukdami mygtuką 2 “-” ar “+” kryptimi, nustatykite
pageidaujamą laiką. Displėjuje pasirodo simbolis S2.
Pasirinkus pageidaujamą signalizavimo laiką, jis pradedamas
skaičiuoti atgal po 7 sekundžių. Mygtuką 1 palikus padėtyje
“laikmatis”, displėjuje rodomas atgal skaičiuojamas
nustatytas laikas.
Likusį veikimo laiką galima koreguoti mygtuku 2, jei mygtukas
1 nustatytas į padėtį “veikimo trukmė”.
Apie pasibaigusį nustatytą laiką praneša garso signalas, jis
išsijungia automatiškai po 7 minučių, jei prieš tai nebuvo
išjungtas pasukus mygtuką 1 į bet kurią padėtį, išskyrus
. Simbolis S2 išnyksta.
esamą
Mygtukas (1) nustatytas į tikslaus paros laiko padėtį
Pavyzdžiui, laikmatis suprogramuotas veikti automatiniu
režimu. Kai mygtukas 1 nustatytas į padėtį “veikimo pabaiga”,
displėjuje rodomas veikimo pabaigos laikas, o mygtuką 1
pasukus į padėtį “paros laikas”, displėjuje vėl bus rodomas
tikslus paros laikas.
Garso signalo stiprumas
Kai funkcijos išjungtos (displėjuje rodomas tik tikslus paros
laikas), galima pasirinkti trejopo stiprumo garso signalą.
Pasukite mygtuką 1 į padėtį “normalus (rankinis) režimas” ir
palaukite 7 sekundes. Jei mygtukas 2 pasukamas prieš
pasibaigiant šiam laikui, tikslus paros laikas bus pakeistas!
Tada mygtuką 2 pasukite į padėtį “-” ir laikykite jį šioje
padėtyje. Girdėsite pirmojo stiprumo garso signalą. Atleiskite
mygtuką 2 ir dar kartą pasukite jį į padėtį “-”, - girdėsite
antrojo stiprumo garso signalą ir t.t.
Paskutinis pasirinktas lygis yra išsaugomas. Garso signalo
stiprumą galima pakeisti bet kuriuo metu.
Visų laikmačio nustatytų verčių ištrynimas
Bet kuriuo metu galima ištrinti visas nustatytas laiko vertes,
išskyrus signalinio laikmačio. Tai atliekama pasukus mygtuką
1 į padėtį “normalus (rankinis) režimas”.
Nustatytos programos automatiškai nutraukiamos, o
laikmatis grįžta į normalaus (rankinio) veikimo režimą.
Laikmačio ir orkaitės naudojimas kartu
Kad laikmačiu galėtumėte naudotis kartu su orkaite,
pirmiausia įjunkite orkaitę ir nustatykite pageidaujamą kepimo
režimą bei temperatūrą. Tik po to galite nustatyti
pageidaujamas laikmačio funkcijas. Baigę kepti, išjunkite
orkaitę.
Ši padėtis yra neutrali ir rodo tikslų paros laiką. Ji reikalinga,
jei norite, kad displėjuje būtų rodomas tikslus paros laikas.
MES PASILIEKAME TEISĘ ATLIKTI PAKEITIMUS, KURIE NEDARO ĮTAKOS PRIETAISO
VEIKIMUI.
Elektroniskais taimeris LV
Piezīme: ja poga 2 tiek piespiesta uz ilgāku laiku, cipari uz
displeja mainās ātrāk.
Uzmanību: gadījumā, ja 7 sek. laikā pēc iekārtas
pieslēgšanas elektrotīklam tekošais laiks netiks iestādīts,
1 funkciju izvēles poga
2 (-) un (+) poga
Simbolu apraksts:
manuālā vadība
taimeris
darbības laiks
darbības pabeigšana
tekošais laiks
Tekošā laika iestādīšana
Pēc iekārtas pieslēgšanas elektrotīklam uz displeja mirgo
“0.00” un simbols “S3”.
Pagrieziet pogu 1 pozīcijā “manuālā darbība” un griežot pogu
2 “+” vai “-” virzienā uzstādiet pareizo laiku. Simbols “S3”
izslēgsies 7 sek. laikā pēc pēdējas pogas piespiešanas
pulkstenis sāks darboties. Tiks izgaismots simbols “S1”, kas
apliecina ka cepeškrāsns garava darboties manuālā režīmā.
pulkstenis s
virzienā : tekošais laiks vairs nemirgo, simbols “S3” joprojam
mirgo.
Tagad Jūs varat iestādīt laiku sekojoši:
− pagrieziet pogu 1 “tekošais laiks” un pēc tam atpakaļ
“manuālā darbība” pozīcijā
− ar pogu 2 iestādiet tekošo laiku (simbols “S3” ir izslēgts,
simbols “S1’ ieslēgts).
Atkārtojiet šo procedūru pēc elektroenerģijas padeves
pārtraukšanas vai arī mainot laika iestādījumus!
Uzstādot pogu 1 “tekošais laiks” pozīcijā ir iespējams
vienīgi izvadīt uz displeju tekošo laiku, bet nav iespējams
to koriģēt!
Cepeškrāsns darbība manuālā režīma
Pagrieziet pogu 1 pozīcijā “manuālā darbība”. Visi iepriekš
uzstādīti iestādījumi tiks atcelti (ja simbols “S3” bija
izgaismots, tas tiks izslēgts). Tiek ieslēgts simbols “ S1” (ja
tas nebija aktīvs) un cepeškrāsns ir gatava darbībai manuālā
režīmā.
Daļēji automātiskā darbība ar darbības laika
iestatīšanu
Pagrieziet pogu 1 pozīcijā “darbības laiks”. Uz displeja: “0 00”
un simbols “S1”. Griežot pogu 2 “+” vai “-” virzienā uzstādiet
āks funkcionēt automātiski. Pavirzot pogu 2 “+”
37
Page 36

vēlamo darbības laiku. Uz displeja tiek izgaismots simbols
“S3”. Darbības laiks tiek uzstādīt ar 1-minūtes soli. Maksimāli
iespējamais laiks ir 10 stundas.
7 sek. laikā pēc iestādīšanas pabeigšanas sāksies laika
atskaitīšana. Ja poga 1 paliek iestādīta “darbības laiks”
pozīcijā, tad laika atskaitīšana tiks atveidota uz displeja. Lai
apskatītu atlikušo laiku, ir nepieciešams pagriezt pogu 2
(poga 1 ir “darbības laiks” pozīcijā).
Pēc laika izbeigšanas tiks izdots skaņas signāls, kas
izslēgsies pēc 7 minūtēm (Jūs varat to izslēgt griežot pogu
1). Simbols “S1” ir nodzēsts, bet simbols “S3” mirgo – iekārta
tiek izslēgta. Pavirzot pogu 1 līdz pozī
izslēdziet simbolu “S3”. Tiks ieslēgts simbols “S1”, kas
apliecina, ka pulkstenis darbosies manuālā režīmā.
Ja Jūs vēlaties pabeigt cepšanu, izslēdziet cepeškrāsni!
cijai “manuālā vadība”
Daļēji automātiskā darbība ar darbības laika ilguma
iestatīšanu
Pagrieziet pogu 1 pozīcijā “darbības pabeigšana”. Uz
displeja: tekošais laiks. Griežot pogu 2 “+” vai “-” virzienā
uzstādiet vēlamo darbības pabeigšanas laiku (laika nozīmei ir
jābūt lielākai, kā tekošais laiks). Uz displeja tiek izgaismots
simbols “S3”. 7 sek. laikā pēc iestādīšanas pabeigšanas uz
displeja tiks atveidots tekošais laiks.
Pēc laika izbeigšanas tiks izdots skaņas signāls, kas
izslēgsies pēc 7 minūtēm (Jūs varat to
izslēgt griežot pogu 1). Apzīmējums “S1” ir nodzēsts, bet
simbols “S3” mirgo – iekārta tiek izslēgta. Pavirzot pogu 1 līdz
pozīcijai “manuālā vadība” izslēdziet apzīmējumu “S3
ieslēgts apzīmējums “S1”, kas apliecina, ka cepeškrāsns
darbosies manuālā režīmā.
Ja Jūs vēlaties pabeigt cepšanu, izslēdziet cepeškrāsni!
”. Tiks
Automātiskā darbība ar darbības un pabeigšanas
laika iestādīšanu
Pagrieziet pogu 1 pozīcijā “darbības laiks”. Griežot pogu 2 “+”
vai “-” virzienā uzstādiet darbības laika nozīmi.
Pagrieziet pogu 1 pozīcijā “pabeigšana” un uz displeja tiks
atveidota tuvāka iespējama darbības pabeigšanas nozīme.
Griežot pogu 1 “+” vai “-” virzienā uzstādiet vēlamo darbības
pabeigšanas laika nozīmi. Simbols “S1” tiks nodzēsts, ja
uzstādīta darbības pabeigšanas laika nozīme ir lielāka par
tekoša laika un uzstādīta darbības laika ilguma summas.
Cepeškrāsns uzsāks darbību automātiski.
Piemērs
Tekošais laiks = 12.00, darbības laika ilgums ir uzstādīts uz
1.30, bet darbības pabeigšanas laika nozīme ir 14.00. Tas
nozīmē, ka cepeškr
āsns uzsāks darbību plkst. 12.30
Kļūdas uzstādot laiku
Gadījumā, ja darbības pabeigšanas laiks ir uzstādīts
nepareizi (nozīme ir mazāka par tekoša laika un darbības
laika kopsummas), sistēma izdos skaņas signālu un
iemirgosies simbols“S3”. Koriģējiet laika nozīmi, griežot pogu
1 pozīcijā “manuālā vadība” un atkārtojiet visu procedūru.
Brīdinājuma taimeris
Pagriežot pogu 1 pozīcijā “taimeris” Jūs varat aktivizēt
brīdinājuma taimeri, kas tikai brīdina, bet neizslēdz iekārtu.
Griežot pogu 2 “+” vai “-” virzienā uzstādiet laiku – uz displeja
simbols “S2”.
7 sek. laikā pēc iestādīšanas pabeigšanas, sāksies laika
atskaitīšana. Uz displeja tekošais laiks. Ja poga 1 atstātā
pozīcijā “taimeris”, noteiktais laiks tiek atskaitīts uz displeja.
Ja nepieciešams, koriģējiet laiku griežot pogu 2 (pogai 1 ir
jābūt pozīcijā “darbības laiks”).
Pēc laika izbeigšanas tiks izdots skaņas signāls, kas
izslēgsies pēc 7 minūtēm (Jūs varat to izslēgt pagriežot pogu
1). Simbols “S2” ir nodzē
sts.
Poga (1) pozīcijā “tekošais laiks”
Neitrāls stāvoklis; uz displeju tiek izvadīts tekošais laiks.
Uzstādiet šo režīmu, lai redzētu tekošo laiku uz
displeja. Ja poga 1 ir pavirzīta līdz pozīcijai “pabeigšana” uz
displeja tiek atveidots pabeigšanas laiks. Ja pagriezīsiet pogu
1 līdz pozīcijai “tekošais laiks”, uz displeja tiks atveidots
tekošais laiks.
pulksteņa
Skaņas signāla skaļums
Ja neviena no funkcijām nav aktivizēta (tikai tekošais laiks),
griežot pogu 1 līdz pozīcijai “manuālā vadība”Jūs varat
iestādīt kādu no 3 skaņas signāla skaļuma līmeniem.
Uzgaidiet 7 sekundes. Ja šajā laikā Jūs pagriezīsiet pogu 2,
tiks mainīti tekoša laika iestatījumi! Pēc 7 sekundēm pavirziet
pogu 2 “-” virzienā un turiet pogu piespiestu: Jūs izdzirdēsiet
pirmo skaņas signālu. Pagriežot pogu atkārtoti, tiks aktivizēts
nākamais skaņas signāla līmenis. Sistēmas atmiņā tiks
saglabāts pēdējais skaļuma iestādījums. Jūs varat main
signāla skaļumu jebkurā brīdī.
Visu taimera iestādījuma atcelšana
Jūs varat atcelt jebkuru programmu (izņemot brīdinājuma
taimeri) pagriežot pogu 1 līdz pozīcijai “manuālā vadība”.
Iestādītas programmas tiks automātiski pārtrauktās un
pulkstenis pārslēgsies uz darbību manuālā režīmā.
Pulksteņa izmantošana kombinācijā ar cepeškrāsni
Izmantojot pulksteni kombinācijā ar cepeškrāsni vispirms ir
nepieciešams ieslēgt cepeškrāsni un uzstādīt cepšanas
programmu un temperatūru. Pēc tam, iestatiet pulksteņa
nozīmes. Pēc cepšanas pabeigšanas izslēdziet iekārtu.
īt
RAŽOTĀJS PATUR TIESĪBAS VEIKT MODEĻU MODIFICĒŠANU, KAS NEIETEKMĒ IEKĀRTAS
FUNKCIONĒŠANU
Elektrooniline taimer EE
Sümbolite kirjeldus:
asend "käsitsi"
asend "taimer"
asend "töö kestus"
1 funktsiooninupp
2 nupud miinus (-) ja pluss (+)
38
asend "lõpp"
asend "jooksev kellaaeg"
Page 37

Kellaaja seadistamine
Pärast seadme ühendamist vooluvõrku kuvatakse ekraanil
vilkuv 0 00 ja vilkuv sümbol S3. Keerake nupp 1 asendisse
"käsitsi" ja seadistage jooksev kellaaeg, keerates nuppu 2
"+" või "-" suunas. Sümbol S3 kustub. Kell käivitub 7
sekundi möödudes pärast viimast nupuvajutust. Sümbol S1
põleb, näidates, et kell on seatud käsitsi (tavapärase) töö
režiimi.
Märkus: nupu 2 hoidmine "+" või "-" suunas kiirendab
ekraanikuva seadistusprotsessi.
Ettevaatust: juhul, kui 7 sekundi jooksul pärast seadme
vooluvõrku ühendamist jooksvat kellaaega ei seadistata,
hakkab see automaatselt käima. Kui nüüd keerata nuppu 2
‘+’ suunas, lakkab jooksev kellaaeg vilkumast, kuid sümbol
S3 vilgub edasi. Nüüd saate jooksvat kellaaega seadistada
järgmisel viisil:
- Keerake nupp 1 asendisse "jooksev kellaaeg" ja seejärel
tagasi asendisse "käsitsi".
- Seadistage jooksev kellaaeg nupuga 2 (sümbol S3 on
kustunud, sümbol S1 põleb).
Voolukatkestuse korral või kellaaja muutmiseks korrake
sama protseduuri!
Nupp 1 asendis "jooksev kellaaeg" on ainult jooksva
kellaaja kuvamiseks, mitte selle muutmiseks!
Tavapärase (käsitsi) töö seadistamine
Keerake nupp 1 asendisse "käsitsi". Sellega tühistatakse
kõik käimasolevad programmid (sümbol S3 kustutatakse,
kui see oli aktiivne). Sümbol S1 aktiveerub (kui see enne ei
töötanud), mis tähendab, et kell on seatud tavapärase
(käsitsi) töö režiimi.
Kindlaksmääratud kestusega poolautomaatne töö
Keerake nupp 1 asendisse "töö kestus". Ekraanil kuvatakse 0 00
ja sümbol S1 põleb. Seadke soovitud kestus, keerates nupu 2
asendisse "+" või "-". Ilmub sümbol S3. Töö kestust saab valida
üheminutilise sammuga. Maksimaalne võimalik kestus, mida
saab seada, on 10 tundi.
Kui töö soovitud kestus on valitud, algab 7 sekundi pärast
järelejäänud aja arvestamine. Kui nupp 1 jäi asendisse "töö
kestus", kuvatakse ekraanil järelejäänud aega.
Järelejäänud aega saab kontrollida, keerates nuppu 2, samal ajal
peab nupp 1 jääma asendisse "töö kestus".
Seatud perioodi lõppemisest antakse teada märguandega, mis
lülitub 7 minuti pärast automaatselt välja, kui seda juba varem
nupu 1 keeramisega mõnesse teise asendisse välja ei lülitatud.
Sümbol S1 kustub ja sümbol S3 vilgub. Sel hetkel lülitub ahi välja.
Pärast nupu 1 keeramist asendisse "käsitsi" kustub sümbol S3 ja
ilmub taas sümbol S1. Kell seatakse tavapärasesse (käsitsi)
režiimi.
Kui soovite küpsetamist lõpetada, tuleb ahi välja lülitada!
Etteantud kestuse ja lõppemisajaga automaatne töö
Keerake nupp 1 asendisse "töö kestus" ja seadistage
toiduvalmistamise kestus, keerates nuppu 2 "+" või "-"
suunas.
Seejärel keerake nupp 1 asendisse "lõpp" ja ekraanil
kuvatakse töö lõppemise ligikaudne aeg. Seadke töö
lõppemise soovitud aeg, keerates nuppu 1 "+" või "-"
suunas. Sümbol S1 ei põle, kui lõppemisaeg on suurem kui
jooksev kellaaeg + töö etteantud kestus.
Ahi hakkab etteantud ajal automaatselt tööle.
Näide
Jooksev kellaaeg = 12:00, töö kestuseks on seatud 1:30 ja
töö lõppemisajaks 14:00. See tähendab, et ahi hakkab tööle
kell 12:30.
Vead aja seadistamisel
Kui valitud lõppemisaeg on väiksem kui jooksev kellaaeg +
töö kestus, siis antakse sellest teada helisignaali ja vilkuva
sümboliga S3. Etteantud aegu tuleb parandada ja reguleerida
(kõige otstarbekam on keerata nupp 1 asendisse "käsitsi" ja
korrata tervet protseduuri).
Märguande taimer
Taimeri aktiveerimiseks keerake nupp 1 asendisse "taimer".
See taimeri funktsioon annab vaid hoiatussignaali, kuid ahju
välja ei lülita.
Seadke soovitud aeg, keerates nuppu 2 "+" või "-" suunas.
Sümbol S2 põleb.
Kui märguande soovitud aeg on valitud, algab 7 sekundi
pärast järelejäänud aja arvestamine. Kui nupp 1 jäi asendisse
"taimer", kuvatakse ekraanil järelejäänud aega.
Järelejäänud aega saab korrigeerida nupuga 2, samal ajal
peab nupp 1 jääma asendisse "töö kestus".
Seatud perioodi lõppemisest antakse teada märguandega,
mis lülitub 7 minuti pärast automaatselt välja, kui seda juba
varem nupu 1 keeramisega mõnesse teise asendisse välja ei
lülitatud. Sümbol S2 lülitub välja.
Nupp (1) asendis "jooksev kellaaeg"
See on neutraalne asend ja näitab jooksvat kellaaega.
Kasutage seda juhul, kui soovite, et ekraanil kuvataks
jooksvat kellaaega. Kell on näiteks seatud automaatse töö
re˛iimi. Kui seada nupp 1 asendisse "lõpp", kuvatakse
ekraanil töö lõppemisaeg, ja kui keerata nupp 1 asendisse
"jooksev kellaaeg", kuvatakse ekraanil jooksev kellaaeg.
Helisignaali tugevus
Kui kõik funktsioonid on välja lülitatud (ekraanil on ainult
jooksev kellaaeg), on võimalik valida helisignaalile 3 erinevat
tugevusastet. Keerake nupp 1 asendisse "käsitsi" ja oodake 7
sekundit. Kui enne selle aja lõppu keerata nuppu 2,
muudetakse jooksvat kellaaega! Järgmiseks keerake nuppu
2 "-" suunas ja hoidke seda selles asendis. Kõlab esimene
helitugevus. Vabastage nupp 2 ja keerake uuesti "-" suunas,
et valida järgmine helitugevus jne.
Vaikimisi salvestatakse viimasena valitud helitugevus.
Helitugevust saab alati lähtestada.
Kõikide taimeri seadistuste kustutamine
Kõiki ajaseadistusi, välja arvatud märguande taimer, saab
kustutada igal ajal, keerates nupu 1 asendisse "käsitsi".
Eelseadistatud programmid tühistatakse automaatselt ja kell
naaseb tavapärase (käsitsi) töö režiimi.
Kella kasutamine koos ahjuga
Et kasutada kella koos ahjuga, tuleb esmalt ahi sisse
lülitada ja seada soovitud küpsetusrežiim ja temperatuur.
Alles seejärel võite alustada kellafunktsioonide
seadistamist. Peale küpsetamise lõppu lülitage ahi välja.
JÄTAME ENDALE ÕIGUSE MUUTA SPETSIFIKATSIOONE, ILMA ET SEE MÕJUTAKS SEADME TÖÖD.
39
Page 38

Elektronik Gösterge TR
1 özellik düğmesi
2 eksi (-) ve artı (+) düğmeleri
Simgelerin açıklaması:
“manuel” konumu
“çalar saat” konumu
“çalışma süresi” konumu
“pişirme süresi sonu” konumu
“saat” konumu
Doğru saatin ayarlanması
Cihazın elektrik bağlantısını yaptıktan sonra göstergede 0 00
karakterleri ve S3 simgesi yanıp söner. 1 numaralı düğmeyi
"manuel" konumuna getirip, ardından 2 numaralı düğmeyi
“+” veya “-” konumuna getirerek doğru saati ayarlayın. S3
simgesi söner. Herhangi bir düğmeye son dokunmanızdan 7
saniye sonra saat çalışmaya başlar. S1 simgesi yanar ve
göstergenin manuel (geleneksel) moda ayarlandığını gösterir.
Not: 2 numaralı düğmeyi “+” veya “-” konumunda
tutarsanız, göstergedeki ayarlama işlemi hızlanır.
Dikkat: Cihazın fişini çektikten sonraki 7 saniye içinde doğru
saati ayarlayamazsanız, otomatik olarak çalışmaya başlar. 2
numaralı düğmeyi “+” yönünde çevirirseniz, saatin yan
sönmesi durur ancak S3 simgesi yanıp sönmeye devam
eder. Şimdi saati aşağıdaki gibi ayarlayabilirsiniz:
− 1 numaralı düğmeyi “saat” konumuna, ardından tekrar
“manuel” konumuna çevirin.
− 2 numaralı düğmeyi kullanarak saati ayarlayın (S3 simgesi
söner, S1 simgesi yanar).
Elektrik kesintisi olması veya saatlerin ileri ya da geri
alınması halinde aynı prosedürü uygulayın!
1 numaralı düğme ‘saat’ konumunda olduğunda yalnızca
saat görüntülenir, ayarlama yapılmaz!
ıp
Geleneksel (manuel) çalışma modunun ayarlanması
1 numaralı düğmeyi “manuel” konumuna getirin. Tüm
çalışmakta olan programlar iptal edilir (yanıyorsa, S3
simgesi söner). S1 simgesi yanar (eğer yanmıyorsa) ve
göstergenin geleneksel (manuel) çalışma moduna
ayarlandığını gösterir.
olarak susar.
başlar. Bu sırada fırın kapatılır.
1 numaralı düğme “manuel” konumuna getirildikten sonra S3
simgesi söner ve S1 simgesi yeniden yanar. Gösterge geleneksel
(manuel) çalışma moduna geçer.
Pişirme işlemini sona erdirmek isterseniz, fırını kapatmanız
gerekir!
S1 simgesi söner, S3 simgesi ise yanıp sönmeye
Pişme süresinin sonunu belirleyerek yarı otomatik
çalışma
1 numaralı düğmeyi “pişirme süresi sonu” konumuna getirin.
Göstergede saat görüntülenir. 2 numaralı düğmeyi “+” veya
“-” konumuna getirerek çalışma süresinin sonunu ayarlayın
(normalde çalışma süresinin sonu içinde bulunulan saatten
daha ileri olmalıdır). S3 simgesi yanar. Ayarlama işlemi
tamamlandıktan 7 saniye sonra göstergede saat görüntülenir.
Saat çalışma süresinin sonuna geldiğinde, sesli alarm verilir;
bu alarmı 1 numaralı düğmeyi herhangi bir yöne çevirerek
susturabilirsiniz veya 7 dakika sonra kendiliğinden susar. S1
simgesi söner, S3 simgesi ise yanıp sönmeye başlar. Bu
sırada fırın kapatılır.
1 numaralı düğme “manuel” konumuna getirildikten sonra S3
simgesi söner ve S1 simgesi yeniden yanar. Gösterge
geleneksel (manuel) çalışma moduna geçer.
Pişirme işlemini sona erdirmek isterseniz, fırını
kapatman
ız gerekir!
Çalışma süresini ve çalışma süresi sonunu önceden
belirleyerek otomatik çalışma
1 numaralı düğmeyi “çalışma süresi” konumuna getirip,
ardından 2 numaralı düğmeyi “+” veya “-” konumuna
getirerek pişirme süresini ayarlayın.
Daha sonra 1 numaralı düğmeyi “çalışma süresi sonu”
konumuna getirin; göstergede çalışma sonunun olası en
yakın zamanı görüntülenir. 1 numaralı düğmeyi “+” veya “-”
yönüne çevirerek istediğiniz çalışma süresi sonunu ayarlayın.
Çalışma süresi sonu içinde bulunulan saat ile önceden
ayarlanmış çalışma süresi sonunun toplamından daha
büyükse, S1 simgesi söner.
Fırın önceden belirlenen sürelere göre otomatik olarak çalışır.
Örnek
İçinde bulunduğunuz saat = 12:00, çalışma süresi 1:30’a ve
çalışma süresi sonu ise 14:00’e ayarlanmış. Bu durum, f
12:30’da çalışacağı anlamına gelir.
Saat ayarında yapılan hatalar
Seçtiğiniz süre, içinde bulunduğunuz saatle çalıma süresinin
toplamından daha küçük olduğunda sesli alarm verilir ve S3
simgesi yanıp söner. Önceden ayarladığınız süreleri
düzeltmeniz ve gerektiği gibi ayarlamanız gerekir (en iyi
prosedür, 1 numaralı düğmeyi “manuel” konumuna getirmek
ve tüm ayarlama prosedürünü baştan tekrarlamaktır).
ırının
Tanımlı bir süre için yarı otomatik çalışma
1 numaralı düğmeyi “çalışma süresi” konumuna getirin.
Göstergede 0 00 karakterleri ve S1 simgesi görüntülenir. 2
numaralı düğmeyi “+” veya “-” konuma getirerek istediğiniz
süreyi ayarlayın. S3 simgesi yanar. Çalışma süresini 1 dakikalık
aralıklarla belirleyebilirsiniz. Belirleyebileceğiniz en uzun çalışma
süresi 10 saattir.
Çalışma süresini seçtikten 7 saniye sonra geri sayım işlemi
başlar. 1 numaralı düğme “çalışma süresi” konumunda kalırsa,
geri sayılan süre görüntülenir.
1 numaralı düğme “çalışma süresi” konumundayken 2 numaralı
düğmeyi çevirerek kalan süreyi kontrol edebilirsiniz.
Ayarlanan sürenin sonunda alarm verilir ve bu alarmı 1 numaralı
düğmeyi önceden belirlenen konum dışında herhangi bir konuma
çevirdiğinizde alarm susar; aksi halde 7 dakika sonra otomatik
Çalar saat
Çalar saati etkinleştirmek için 1 numaralı düğmeyi “çalar
saat” konumuna getirin. Bu çalar saat özelliği yalnızca uyarı
sinyali verilmesine neden olur, fırın kapatılmaz.
2 numaralı düğmeyi “+” veya “-” yönüne çevirerek istediğiniz
süreyi ayarlayın. S2 simgesi yanar.
Çalar saat süresini ayarladıktan 7 saniye sonra geri sayım
işlemi başlar. 1 numaralı düğme “çalar saat” konumunda
kalırsa, geri sayılan süre görüntülenir.
1 numaralı düğme “çalışma süresi” konumundayken 2
numaralı düğmeyi çevirerek kalan süreyi kontrol edebilirsiniz.
Ayarlanan sürenin sonunda alarm verilir ve bu alarmı 1
numaralı düğmeyi önceden belirlenen konum dışında
herhangi bir konuma çevirdiğinizde alarm susar; aksi halde 7
dakika sonra otomatik olarak susar. S2 simgesi söner.
40
Page 39

(1) numaralı düğme saat konumundayken
Bu konum nötr konumdur ve göstergede saat görüntülenir.
Göstergede saatin görüntülenmesini istiyorsanız, bu konumu
kullanın. Örneğin gösterge otomatik çalışmaya göre ayarlanır.
1 numaralı düğme “çalışma süresi sonu” konumuna
getirildiğinde, göstergede çalışma süresi sonu, “saat”
konumuna getirildiğinde ise o andaki saat görüntülenir.
Sesli alarmın ses seviyesi
Tüm özellikler kapalıyken (göstergede yalnızca saat
görüntüleniyorken) 3 farlı sinyal sesi seviyesi
belirleyebilirsiniz. 1 numaralı düğmeyi “manuel” konumuna
getirip 7 saniye bekleyin. 2 numaralı düğme bu süre
dolmadan önce çevrilirse, saat değişir! Sonra 2 numaralı
düğmeyi “-” konumuna getirip orada tutun. İlk ses seviyesi
duyulur. 2 numaralı düğmeyi bırakıp tekrar “-” konumuna
getirdiğinizde bir sonraki ses seviyesi duyulur ve son seviye
de bu şekilde ayarlanır.
Son seçtiğiniz seviye varsayılan olarak ayarlanır. Ses
seviyesini istediğiniz zaman sıfırlayabilirsiniz.
Tüm gösterge ayarlarının silinmesi
1 numaralı düğmeyi “manuel” konumuna getirerek çalar saat
dışındaki tüm süre ayarlarını silebilirsiniz.
Önceden ayarlanmış programlar otomatik olarak iptal edilir ve
gösterge geleneksel (manuel) moda geçer.
Göstergenin fırınla birlikte kullanılması
Göstergeyi fırınla birlikte kullanmak istiyorsanız, ilk
yapmanız gereken fırını açmak ve pişirme moduyla
sıcaklığı ayarlamaktır. Yalnızca bunları yaptıktan sonra
saat özelliklerini ayarlamaya devam edebilirsiniz. Pişirme
işlemi tamamlandıktan sonra fırını kapatın.
CİHAZIN ÇALIŞMASINI ETKİLEMEDEN TEKNİK ÖZELLİKLERDE DEĞİŞİKLİK YAPMA HAKKIMIZ
SAKLIDIR.
Ceas electronic RO
1. buton de funcţionare
2. buton minus (-) şi plus (+)
Descrierea simbolurilor:
poziţia "manual"
poziţia "ceas"
poziţia "perioada de funcţionare"
poziţia "sfârşit"’
poziţia "data curentă"
Setarea datei curente
După ce aparatul este conectat la sursa de energie, ecranul
indică intermitent 0.00 şi simbolul luminos S3. Întoarceţi
butonul 1 la poziţia <manual>, şi rotind butonul 2 spre + sau
– setaţi ora curentă. Simbolul S3 dispare. Ceasul începe să
meargă la 7 secunde după ultima setare din buton. Simbolul
S1 este aprins, arătând că ceasul a fost setat la modul de
funcţionare manuală.
NOTA: ţinând butonul 2 spre + sau – procesul de setare este
mai rapid.
ATENTIE: În cazul în care nu reuşiţi să setaţi ora în 7
secunde de la conectarea aparatului la sursa de energie,
acesta va începe să funcţioneze automat. Dacă acum rotiţi
butonul 2 spre + , ora curentă nu mai este intermitentă, dar
simbolul S3 rămâne totuşi intermitent. Acum puteţi seta ora
după cum urmează:
− Rotiţi butonul 1 spre “Current Time” ( ora curentă) şi apoi
îna poi spre “ manual”.
− Alegeţi ora cu butonul 2 ( simbolul S3 este oprit, simbolul
S1 este pornit).
Repetaţi procedura în caz de pană de curent, sau dacă se
schimbă ora!
Butonul 1 în poziţia ‘current time’ (ora curent
arată ora şi nu o schimbă!
ă) doar
Setarea modului de funcţionare manual
Rotiţi butonul 1 spre poziţia MANUAL. Toate programele care
funcţionează în acel moment, sunt anulate ( simbolul S3 este
şters dacă acesta era activ). Simbolul S1devine activ (dacă
nu era deja pornit), ceea ce înseamnă că ceasul este setat
să funcţioneze manual.
Funcţionarea semi-automată cu perioadă predefinită
Rotiţi butonul 1 spre poziţia “perioadă de funcţionare”.
Ecranul arată 0 00 şi simbolul S1 este pornit. Setaţi perioada
dorită rotindbutonul 2 spre + sau -. Simbolul S3 apare.
Perioada de funcţionare poate fi selectată gradat cu câte un
minut. Perioada maximă posibilă este de 10 ore. După ce aţi
ales ora dorită, la 7 secunde începe numărătoarea inversă.
Dacă butonul 1 rămâne în poziţia ‘perioadă de funcţionare’
ecranul arată numărătoarea inversă. Dacă rotiţi butonul 2
puteţi verifica timpul rămas, în timp ce butonul 1 rămâne în
poziţia ‘perioadă de funcţionare’. Expirarea timpului este
anunţată de un semnal sonor, care se opreşte după 7 minute,
dacă nu e oprită înainte cu ajutorul butonului 1 , schimbându-i
poziţia. Simbolul S1 este oprit şi simbolul S3 este
intermitent. În acest moment cuptorul este oprit.
ce butonul 1 este în poziţia “manual” , simbolul S3 se
După
opreşte şi reapare S1. Ceasul este setat la modul de
funcţionare manual.
Dacă vreţi să terminaţi programul de copt, cuptorul
trebuie să fie oprit!
Funcţionarea semi-automată cu oprirea funcţionării
Rotiţi butonul 1 spre poziţia “sfârşit”. Ecranul arată data
curentă. Setaţi data de terminare a funcţionării rotind butonul
2 spre poziţia + sau – ( în mod normal, ora de terminare
trebuie să fie mai mare decât ora curentă). Apare simbolul
S3. Ecranul revine după 7 secunde după ce procesul este
complet. Când timpul de oprire se apropie porneşte semnalul
sonor, care se opreşte după 7 minute, dacă nu este oprit
înainte prin rotirea butonului 1 în orice direcţie. Simbolul S1
este oprit iar S3 este intermitent. În acest moment cuptorul
este oprit. După ce butonul 1 este în poziţia “manual”
41
Page 40

simbolul S3 este oprit iar S1 reapare. Ceasul este setat la
modul de funcţionare manual.
Dacă vreţi să terminaţi programul de copt, cuptorul
trebuie să fie oprit!
Funcţionarea automată cu perioadă determinată şi
oprirea funcţionării
Rotiţi butonul 1 spre “perioadă de funcţionare” şi rotind
butonul 2 spre + sau – alegeţi timpul de coacere. Apoi rotiţi
butonul 1 spre poziţia “sfârşit” iar ecranul indică cea mai
apropiată perioadă de terminare a programului. Alegeţi
timpul rotind butonul 1 spre + sau - . Simbolul S1 este oprit
dacă timpul de terminare este mai mare decâat timpul curent
+ perioada setată de funcţionare. Cuptorul începe să
funcţioneze automat conform cu orele setate.
Exemplu:
Ora curentă = 12:00, intervalul de funcţionare a fost setat la
1:30 şi terminarea programului la 14:00. Aceasta înseamnă
că cuptorul va începe să funcţioneze la 12:30.
Erori de setare
Dacă ora de terminare a programului este mai mică decât ora
curentă + perioada de funcţionare, porneşte semnalul sonor
şi simbolul S3 se aprinde. Orele presetate trebuie să fie
ajustate ( cea mai bună metodă este să rotiţi butonul 1 spre
poziţia “manual” şi repetaţi procedura completă).
Alarmă
Folosirea ceasului şi cuptorul în acelaşi timp
Pentru a folosi ceasul împreună cu cuptorul primul pas
este să pornitţi cuptorul şi să setaţi modul de coacere
dorit şi temperatura. Numai după aceea puteţi seta
ceasul. După terminarea programului de coacere, opriţi
cuptorul.
Pentru a activa alarma, rotiţi butonul 1 spre poziţia “alarmă”.
Aceasta funcţionează doar ca semnal de avertizare şi nu
opreşte cuptorul. Setaţi ora dorită rotind butonul 2 spre + sau
- . Simbolul S2 este pornit.
Odată ce ora alarmei este setată, numărătoarea inversă
începe după 7 secunde. Dacă butonul 1 rămâne la poziţia
“alarmă”, ecranul arată numărătoarea inversă.
Timpul rămas poate fi corectat vu butonul 2, în timp ce
butonul 1 trebuie să rămână în poziţia “perioadă de
funcţionare”.
Expirarea timpului setat este semnalat de alarmă, care e
opreşte automat după 7 minute, dacă nu este oprit înainte
prin rotirea butonului 1 în orice direcţie. Simbolul S2 este
oprit.
Butonul 1 în poziţia datei curente
Această poziţie este neutră şi indică ora curentă. Ceasul
este, de exemplu, să setaţi funcţioanrea automată. Dacă
butonul 1 este poziţionat la “sfârşit”, ecranul arată terminarea
programului , şi dacă butonul 1 este rotit spre ‘data curentă’ ,
ecranul va arăta ora curentă.
Volumul alarmei
Când toate funcţiile sunt oprite ( doar data curentă apare) ,
puteţi selecta 3 niveluri de volum pentru alarmă. Rotiţi
butonul 1 spre “manual” şi aşteptaţi 7 secunde. Dacă butonul
2 este pornit înainte de expirarea timpului , data curentă se
va schimba! Apoi, rotiţi butonul 2 spre – şi lăsaţi-l în această
poziţie. O să auziţi primul nivel al volumului. Eliberaţi butonul
2 şi rotiţi-l din nou spre - pentru următorul nivel de volum,
etc. Ultimul nivel selectat este păstrat ca default. Volumul
poate fi resetat oricând.
Anularea setărilor
Toate setările de timp, cu excepţia celor de la alarmă, se pot
anula în orice moment rotind butonul 1 spre poziţia “manual”.
Programele presetate sunt anulate automat iar ceasul revine
la funcţia manuală.
NE REZERVĂM DREPTUL DE A MODIFICA ACESTE SPECIFICAŢII FĂRĂ NICI O INFLUENŢĂ ASUPRA
FUNCŢIONĂRII APARATULUI.
42
 Loading...