

Page 1
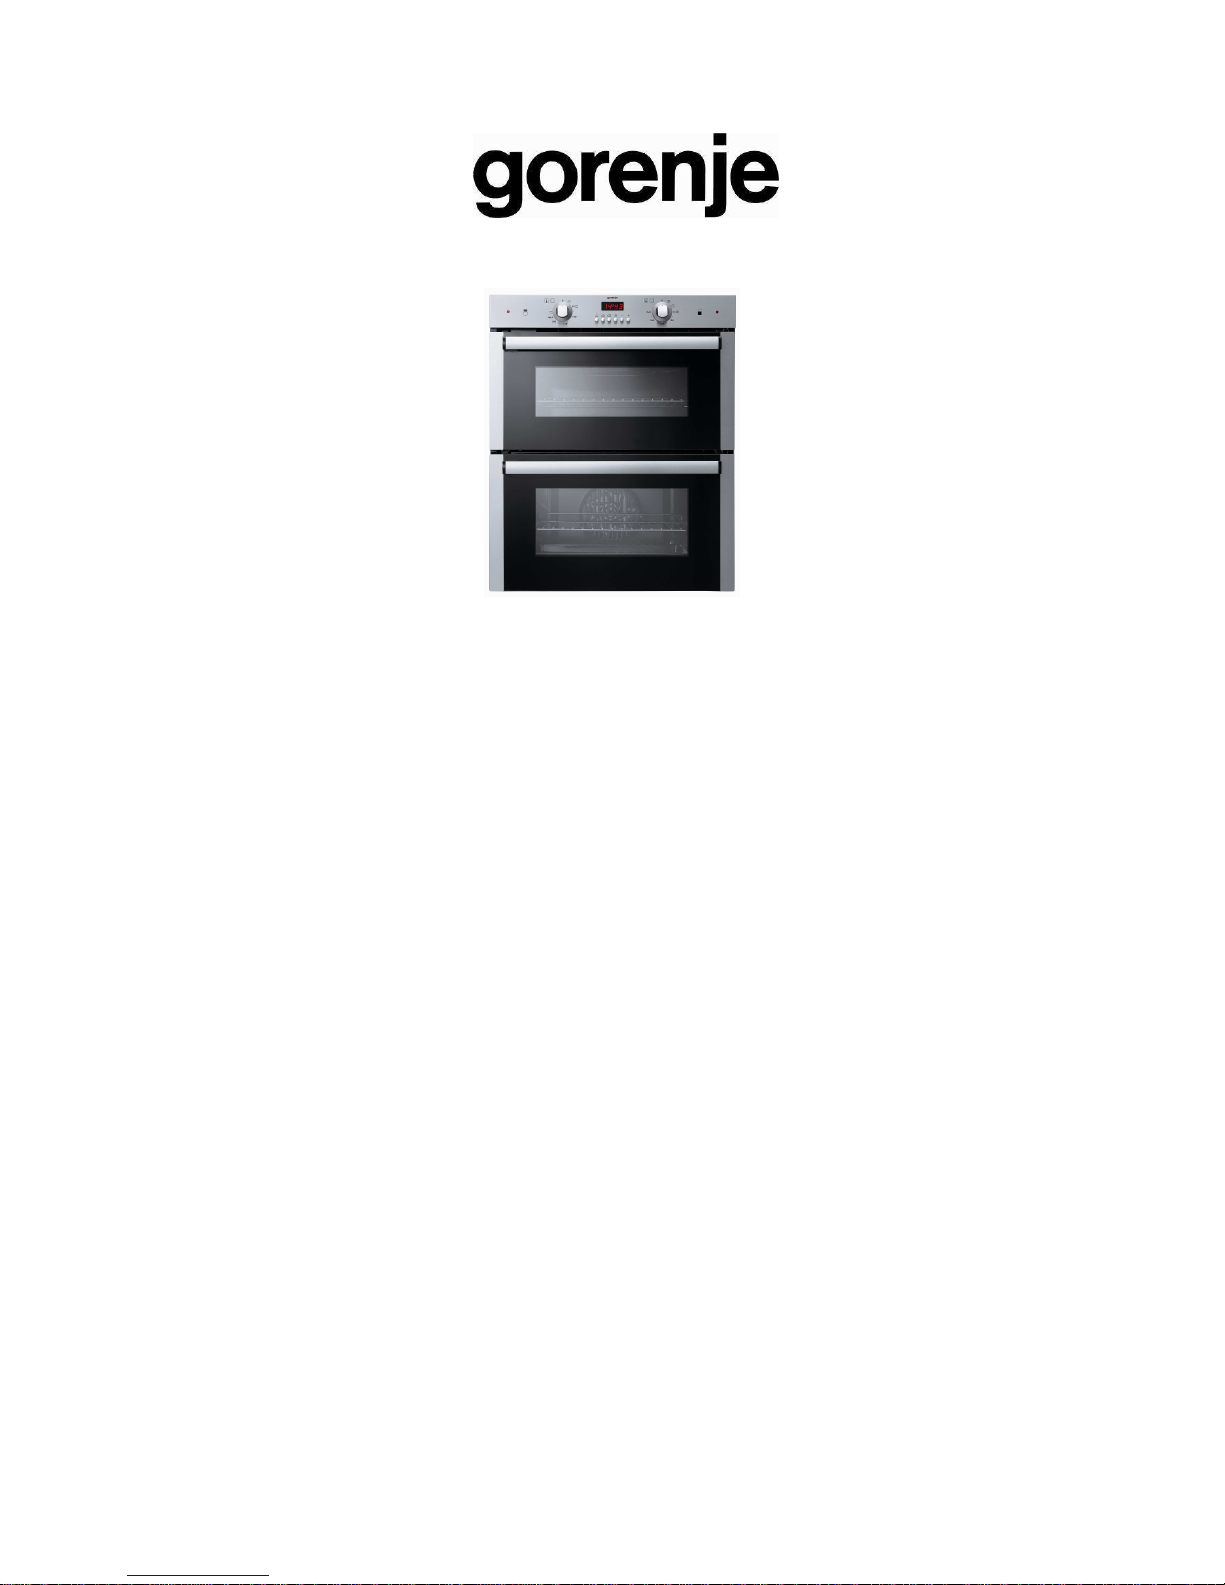
BDU 2116 AX
BUILT-IN MULTI-FUNCTION DOUBLE OVEN
INSTALLATION AND OPERATING INSTRUCTIONS
As part of our commitment to constantly improving our products, we reserve the right to make
changes to them based on advances to their technical, functional and/or aesthetic properties.
Page 2

Introduction
This quality oven has been designed to provide trouble-free service provided it is installed
and maintained correctly. This oven is for domestic use only.
Please read these instructions carefully before installing or using your appliance. It is
advisable to keep your purchase and installation receipts with these instructions in a safe
place for future reference.
Included is some important safety information, guidelines and recommendations to enable
you to safely use your oven.
This appliance has been tested and certified to meet all applicable UK electrical and safety
standards.
This appliance must only be installed and repaired by qualified electricians or authorised
service personnel.
If it is not repaired properly you could be putting yourself and others in danger. It will also
invalidate the guarantee.
When contacting the Helpline please have model number to hand. The model number is
shown on the data label which is visible by opening the oven door.
Unpacking
Carefully remove all the packaging and lift out the oven and accessories.
Open the oven and remove any tape or packing material used for transit.
Check the appliance for any damage. If the unit has been damaged do not use it and
contact the retailer from whom the appliance was bought.
Retain the packaging until the unit has been installed, removing it from the area of installation
and keeping it out of the reach of children.
Dispose of all the packaging in accordance with your local authority guidelines as well as any
old appliance that is being replaced – see safe oven disposal section.
Before installation
Before any installation work can be carried out a number of requirements must be met.
Make sure that you or your installer are familiar with all the relevant building and fire
regulation requirements before choosing the location of your appliance.
This appliance must be installed in accordance with the instructions to validate the
guarantee.
Refer to the “Location” section for minimum clearances and safe placement of your oven.
Page 3
Location
Avoid installing the oven too close to a fridge or boiler.
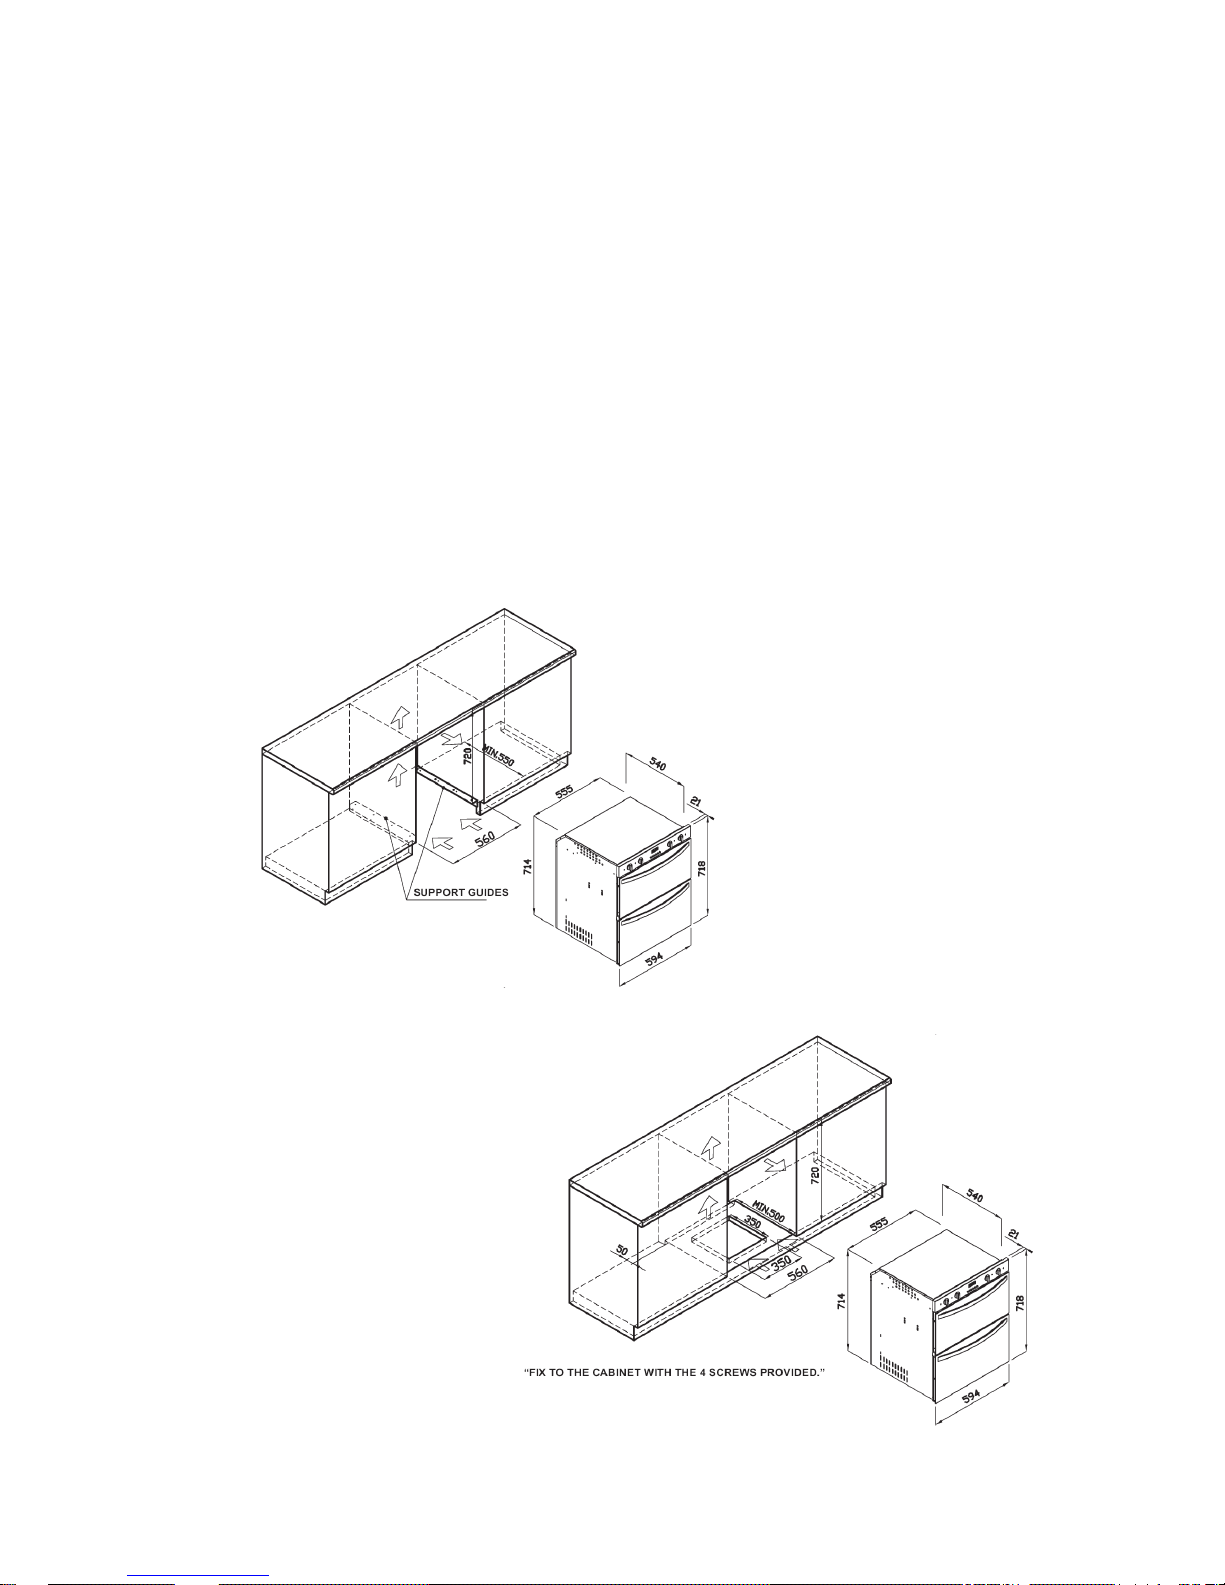
The oven should be installed into an oven housing unit as shown in Figure 1.
Ensure that the surrounding material is heat resistant and non-combustible.
Certain minimum clearances must be allowed for when planning the unit’s location.
Housing dimensions
The unit in which the oven is installed must be manufactured to a modular dimension
of 600mm.
Openings at least 50 mm deep must be cut both in the bottom and in the top of the
unit to ensure adequate ventilation (see figure1 for essential dimensions).
During assembly, particular care must be taken not to pick up the oven by the door.
As a general rule, the oven door should never be forced or subjected to undue
stresses.
Page 4
Electricity supply
Once a satisfactory location has been established, the electrical supply to the appliance must
be arranged.
The mains voltage must correspond to that which is specified on the data plate.
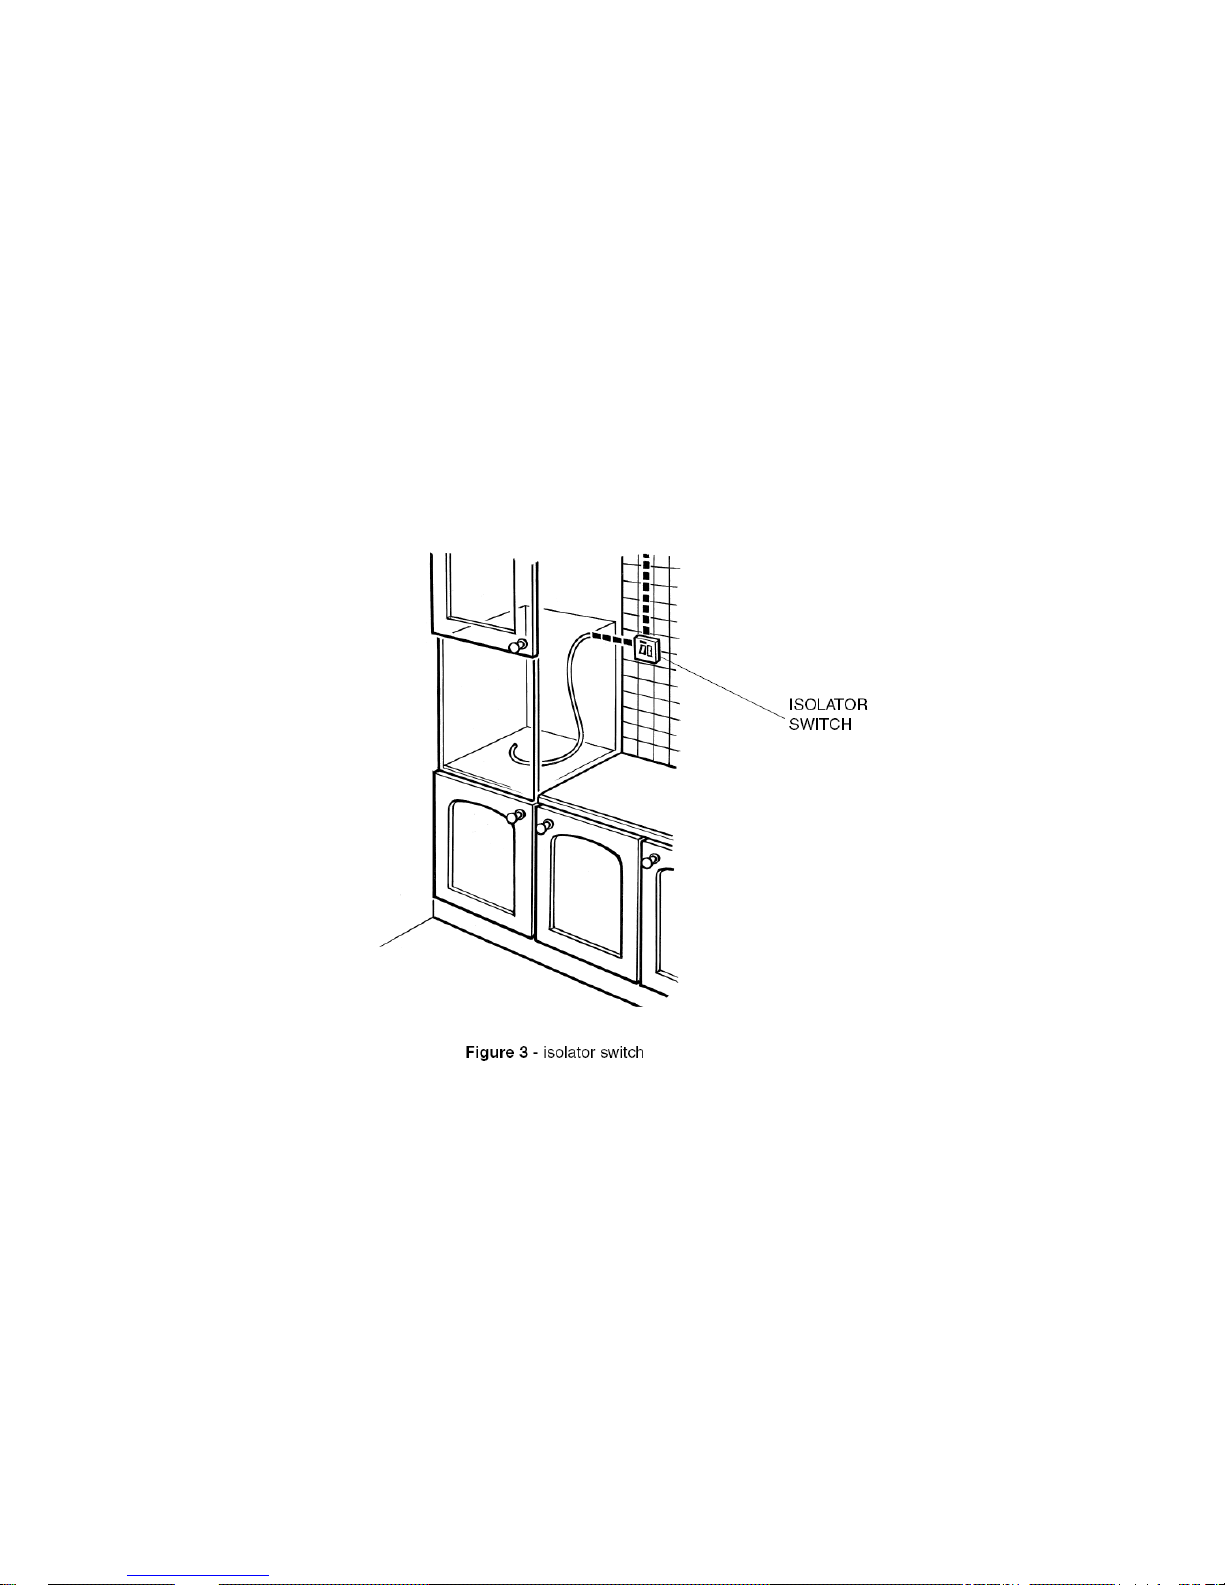
The supply should be from a 30 amp fused spur, with an isolator switch installed above the
work surface and to one side of the unit in case of emergency. The isolator switch must have
woking contacts separated by 3mm.
This installation must be carried out in accordance with current I.E.E. Wiring Regulations and
Building Regulations (Part P).
The mains supply cable from the isolator to the unit must be rated for the maximum power
consumed by the unit (also specified on the data plate).
The supply cable must be long enough to allow for servicing the appliance.
The supply cable must be routed away from hot surfaces
Page 5
Electrical connection
The appliance must be properly connected to the mains supply by a qualified
electrician according to current safety regulations.
This appliance must be earthed.
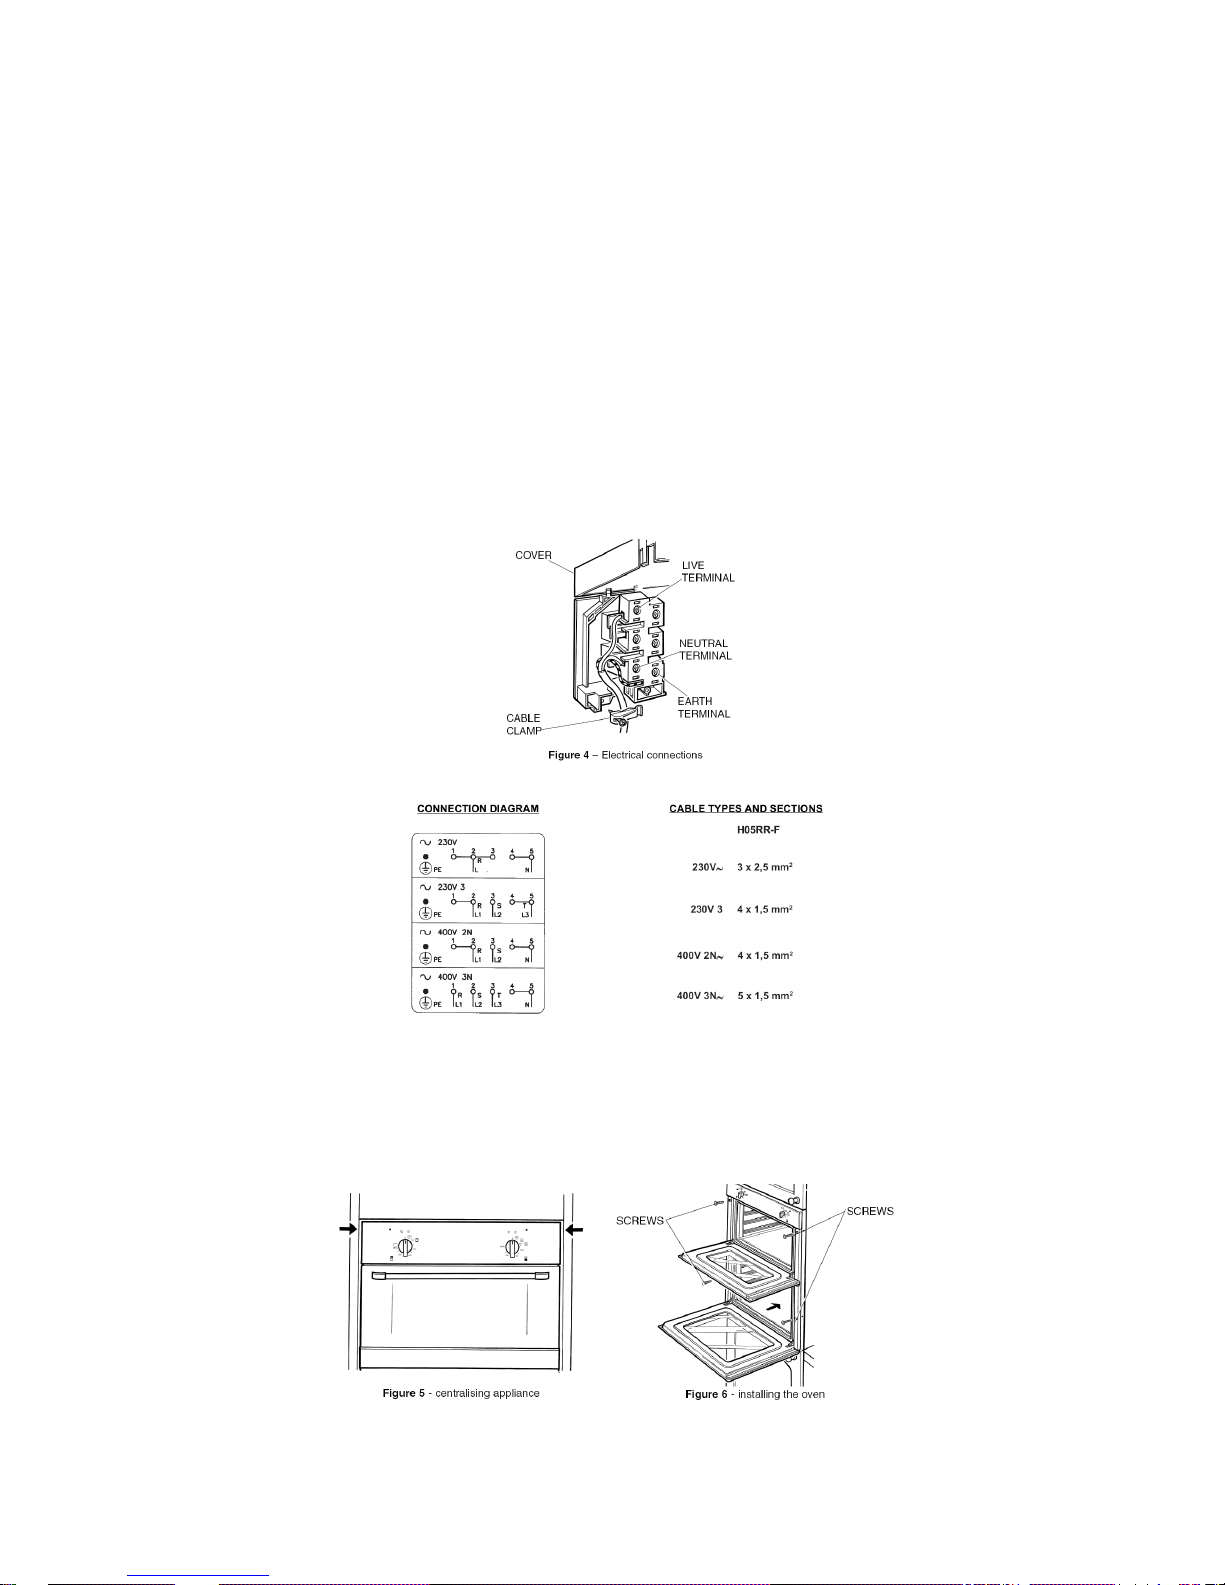
1. Lift up the cover (Figure 4).
2. Loosen the cable clamp (Figure 4).
3. Connect the mains supply cable to the terminal block on the cooker using the following
colour code (Figure 4):
• The yellow/green wire should be connected to the earth terminal.
• The blue or black wire should be connected to the neutral terminal.
• The brown or red wire should be connected to the live terminal.
Secure the cable clamp. Check the cable terminals for tightness and ensure that the terminal
links are in place, then close the cover over the terminal block.
Installing the oven
Place the oven into the housing unit and adjust its position until it is level, making sure it
aligns with any adjacent units, drawers, and cupboard doors (Figure 5).
When correctly positioned, drill the unit and secure the appliance in place with four fixing
screws (Figure 6).
Page 6

Please read these safety notes before using the
oven
• Make sure you understand what the oven
controls do before using the oven.
• Always turn the oven controls to the OFF
position when the oven is not in use.
• Before removing cooked food from the oven
open the door carefully to allow any heat to
disperse.
• Use dry oven gloves when removing items from
the oven.
• Be careful when operating the oven and take
care to avoid touching hot elements inside the
oven.
• Ensure that the cables of other household
appliances used near the working oven are
away from its hot elements. Ensure also that
the cables are not trapped by the oven door.
• Keep the oven door closed when the oven is
not in use.
• Keep the oven clean as a build up of grease or
fat from cooking can cause a fire.
• Allow the oven to cool before cleaning.
• Keep any ventilation holes clear of obstructions.
• Never leave children unsupervised where the
oven is installed as the appliance will get hot
during and after use.
• Never allow anyone to sit or stand on any part
of the oven.
• Never heat up unopened food containers as
pressure can build up causing them to burst.
• Never store chemicals, food stuffs or
pressurised containers in cabinets above or
next to the oven.
• Never use the oven as a room heater.
• Never dry clothes or place other items on the
oven door.
• Never line any part of the oven cavity with
aluminium foil.
Page 7

Using the oven
Please note: When using for the first time the oven may smell for a short time while
burning off dust and manufacturing residues from the heating elements. This is
normal and does not indicate a fault with the oven.
The oven is fan assisted and evenly distributes the heat throughout the oven. This may
reduce the cooking times compared with a conventional oven so always read the cooking
instructions on the packaging when cooking convenience food.
It is recommended to preheat the oven for a few minutes or wait until the temperature
indicator goes off before placing food in the oven for cooking.
Be careful when using aluminium foil. Do not cover the sides of the oven, the shelf or oven
interior. If wrapping food in foil the cooking time may increase.
Main oven controls
The thermostat determines the temperature inside the
oven during cooking. Turn the control knob clockwise
to align the cooking temperature with the marker on
the control panel. The temperature indicator will light
up when a temperature is set, and turn off when the
temperature has been reached. During cooking the
thermostat will maintain the set temperature.
The temperature can be set between 50°C and
250°C. To turn the oven off, the knob must be turned
to “0”. There are 4 function settings for the main oven.
Turn the control selector so that the symbol on the
selector aligns with the marker on the control panel:
Light ON
When the control knob is turned to
this
position, the interior light will switch
on.
Fan assisted cooking
Fan assisted cooking uses
the fan and circular heating
element to evenly distribute
the heat throughout the
oven. Select the required
temperature on the control
knob.
Defrost setting
This function operates the fan without
the oven heating up. This is suitable
for defrosting frozen food.
OFF position.
Page 8

Top oven controls
The thermostat determines the temperature
inside the oven during cooking. Turn the
control knob clockwise to align the cooking
temperature with the marker on the control
panel. The temperature indicator will light up
when a temperature is set, and turn off when
the temperature has been reached. During
cooking the thermostat will maintain the set
temperature.
The temperature can be set between 50°C
and 250°C. To turn the oven off, the knob
must be turned to “0”. There are 3 function
settings for the top oven.
Turn the control selector so that the symbol
on the selector aligns with the marker on the
control panel:
Light ON
When the control
knob is turned to this
position, the interior
light will switch on.
Top heating element (grill)
Use this function for grilling
or top oven heat which is
suitable for browning food.
Turn the control knob, as far
as it will go, to the grill
symbol.
Top and bottom
heating element
(oven)
Use this function for
conventional oven
cooking. Select the
required temperature
on the control knob.
The top oven is not
fan assisted.
OFF position.
Page 9

Electronic programmer
The electronic programmer incorporates the
following functions:
- 24 hour clock with luminous display
- 10 hour timer
- automatic oven cooking
- semiautomatic oven cooking
The electronic programmer operate only
on the “large” oven.
Programming buttons and their functions.
Luminous symbols
When “AUTO” blinks, this means that the timer is in “automatic” mode but no setting has yet
been made.
When “AUTO” remains permanently alight, this means that the timer is in “automatic” mode
and already programmed
If there is no symbol alight other than the digits of the clock, this means that the timer is in
“manual” mode.
The timer incorporates a digital electronic clock with luminous numbers indicating the hours
and minutes. When the appliance is first connected to the a.c. supply, or following a power
cut, three zeroes will blink in the timer window. To set the clock, press and hold the two
buttons and together, and use the or symbol to select the exact time. The longer the
increase or decrease button is held, the faster the numbers will scroll. If convenient, the clock
can be turned back to 00.00:
to scroll back further at this point, release all the buttons and repeat the sequence, pressing
and holding the decrease button until the time appears in the display.
Normal cooking without using the timer
To operate the oven in manual mode — in other words without using the timer — the blinking
“AUTO” indicator must be deactivated by pressing the button.
Page 10

Automatic cooking (programmed start and stop times)
To cook food in the oven using the automatic timer, proceed as follows:
- establish how long the food needs to cook
- enter the cooking stop time
- select the temperature and the cooking method.
Once these steps have been completed, the “AUTO” indicator will light up permanently in
the display, confirming that the oven has been programmed.
Practical example: we want to cook food for a period of 30 minutes, ending at 14.00.
- Pressing and holding , enter 0.30 in the display.
- Pressing and holding , enter 14.00 in the display.
This done, the display will revert to the current time and “AUTO” reappears, confirming that
the settings have been acknowledged and memorized. At 13.30 (14.00 minus 30 minutes)
the oven switches on automatically and the symbols and
AUTO” will appear for as long as cooking continues. The oven will then switch off
automatically at 14.00, triggering a beep that can be silenced by pressing .
Semiautomatic cooking
A. Programming the duration
B. Programming the stop time.
A) Select the duration for which the food is to cook by pressing . The oven will switch on
immediately, with the symbols “AUTO” and showing in the display.
Once the set duration has elapsed, cooking will stop and the beep sounds intermittently.
Silence the beep as indicated above.
B) Set the time for cooking to stop, by pressing . The oven will switch on immediately, with
the symbols “AUTO” and . showing in the display. When the set time comes around,
cooking will stop and the beep sounds intermittently. Silence the beep as indicated above.
Current programming status can be displayed at any given moment by pressing
the corresponding button.
It is also possible to cancel the current selection at any moment by pressing and resetting
the display to zero. Pressing at this point, the programmer will revert to manual mode.
CAUTION: if the oven is disconnected from the power supply, or in the event of a
power failure, the clock resets to zero and all programming will be lost. When power is
restored, three zeroes appear.
Page 11

Using the grill
KEEP THE DOOR OPEN WHILST GRILLING
Move the shelf to the first or second position from the top.
Select the symbol on the top oven control selector, and preheat the grill for 5 minutes.
Place the food in the middle of the grill pan and position the pan so the food is near but not
touching the top element.
Do not line the grill pan with aluminium foil or wrap food items with foil before placing under
the grill.
Aluminium foil has a high reflectivity which can damage grill elements.
When fitting the handle, hook the handle over the edge of the grill pan and through the wire
rack at a central point along the grill pan edge, (Figure 9). Lower the handle fully down to fit.
THE GRILL SHOULD ONLY BE USED FOR A MAXIMUM OF 30 MINUTES
Page 12

Cleaning the oven
Before cleaning the oven, wait for it to cool down.
It is best to clean the bottom of the oven after every use and not allow the food or spots of oil
to remain and become permanent stains.
Wash surfaces in warm soapy water. For stubborn marks on glass surfaces, a mild cream
cleaner can be used. Dry parts with a soft cloth.
For the interior surfaces in the oven use normal oven cleaners but always read the
manufacturer’s instructions on how to use them.
Do not use caustic paste, abrasive wire, powders or hard instruments to clean any part of
the appliance.
Cleaning the glass doors
Ensure the oven doors are cool before cleaning. Removal of a door makes it easier to clean
the door, the door surround and the seals.
To remove a door proceed as follows:
1. Open the door fully.
2. Raise one hinge clip and rotate it towards you as far as the stop (Figure 10). Repeat the
procedure with the second hinge clip on the other side of the door.
3. Raise the door gently until it comes to rest against the hinge clips.
4. Grip the edges of the door and lift the door clear of the catches in the hinge openings.
5. When cleaning the door, take care not to move the clips from their position.
6. Once cleaning is complete, lift the door and slide the hinges into the hinge openings.
7. Engage the slots on the hinges with the catches in the hinge openings.
8. Check that the weight of the door is fully supported on the hinges.
9. Lower the door and raise the hinge clips, then return them away from you and back to their
starting positions.
10. Check that the seal is in place then close the door. Make sure that the inner face of the
door meets and shuts against the seal all around.
Page 13

Changing the lamps
Wait for the oven to cool.
Unscrew and remove the diffuser. Unscrew the lamp from the lampholder. Replace lamp and
diffuser (Figure 11).
The replacement lamp must be of the same type, voltage and wattage (25W SES 300°C).
Mains lead replacement
Do not attempt to repair or replace the mains connecting cable yourself, consult a
qualified electrician.
For best cooking results
Grill
Even cooking:
• Ensure that the grill pan is positioned centrally below the grill element.
Fat splattering:
To avoid fat splattering onto the oven interior
• Ensure that the grill pan is not lined with foil
General Baking
Uneven rising of cakes:
• Oven shelf is not level.
Prevent sinking of cakes:
• Preheating of fan ovens – not always necessary
• Cooking at too high a temperature – reduce temperature by 25°C for fan cooking.
• When using soft margarine use an all in one method instead of the traditional creaming of
the margarine and sugar. when using a food mixer or processor do not over cream soft
margarine.
Over/undercooking:
• Reduce or increase cooking times or temperatures to suit personal taste.
Page 14

Troubleshooting guide
 Loading...