

Page 1
WWW.MANUALS.WS
WWW.MANUALS.WS
Page 2

WWW.MANUALS.WS
Section 1 Getting to Know Your Digital Camera....................1
Overview .....................................................................................1
Front View ...................................................................................1
Rear View....................................................................................2
Side View ....................................................................................2
Bottom View.................................................................................3
Section 2 Getting Up and Running...........................................4
Contents
Loading the Batteries....................................................................4
Inserting and Removing a SD Card (Not Supplied) ........................4
Protecting Data on an SD Card .............................................................5
Opening and Closing the Lens Cover.............................................5
Turning the Camera On and Getting Started...................................6
Turning the Camera Off................................................................6
Section 3 Camera Mode..............................................................7
Direction Button Functions ............................................................7
LCD Monitor Information...............................................................7
Taking Photos ..............................................................................8
Taking Close-Up Photos................................................................8
Taking Movies..............................................................................9
Shooting Spur of the Moment Movie Clips......................................9
Using the Self-timer....................................................................10
Using the Digital Zoom................................................................10
Camera Mode Settings ............................................................... 11
Taking Photos Continuously........................................................13
Changing Resolution..................................................................13
Using the Flash..........................................................................14
Setting the LCD Brightness.........................................................14
Advanced Settings .....................................................................15
Adjusting Exposure..............................................................................16
Adjusting White Balance......................................................................17
Sharpening Images ..............................................................................17
Quick Review Settings.........................................................................18
Movie Format Settings.........................................................................18
Sound Settings.....................................................................................19
Formatting a Memory Card..................................................................19
WWW.MANUALS.WS
Selecting Interface Language..............................................................20
2
Page 3

WWW.MANUALS.WS
Section 4 Playback Mode .........................................................21
Direction Button Functions ..........................................................21
LCD Monitor Information............................................................. 21
Displaying Single & Thumbnail Images ........................................ 22
Displaying Single Images ....................................................................22
Displaying Thumbnail Images..............................................................22
Making Slide Shows................................................................... 23
Playing Movie Clips .................................................................... 23
Deleting Photos & Movie Clips ....................................................23
Deleting Images and Movie Clips........................................................24
Magnifying Photos......................................................................24
Using DPOF Settings.................................................................. 25
Printing a Single Image or All Images .................................................25
Section 5 Viewing Photos and Movie Clips on a TV...........26
Connecting the Camera to a Television........................................26
Viewing Photos and Movie Clips on a Television........................... 26
Section 6 Transferring Data to a Computer..........................27
Installing the Digital Camera Driver..............................................27
Connecting Your Camera to a Computer...................................... 28
Mass Storage Mode.............................................................................28
PC Camera Mode................................................................................28
Installing Bundled Software......................................................... 29
Section 7 Troubleshooting.......................................................30
Can’t turn the camera on .....................................................................30
Camera turns on but the LCD monitor is blank...................................30
No photo is taken when the shutter button is pressed........................30
Photos are not in focus ........................................................................30
Photos are too dark..............................................................................30
Photos are too bright............................................................................30
Section 8 Specifications and System Requirements .........31
Specifications............................................................................. 31
System Requirements.................................................................32
WWW.MANUALS.WS
3
Page 4

Section 1
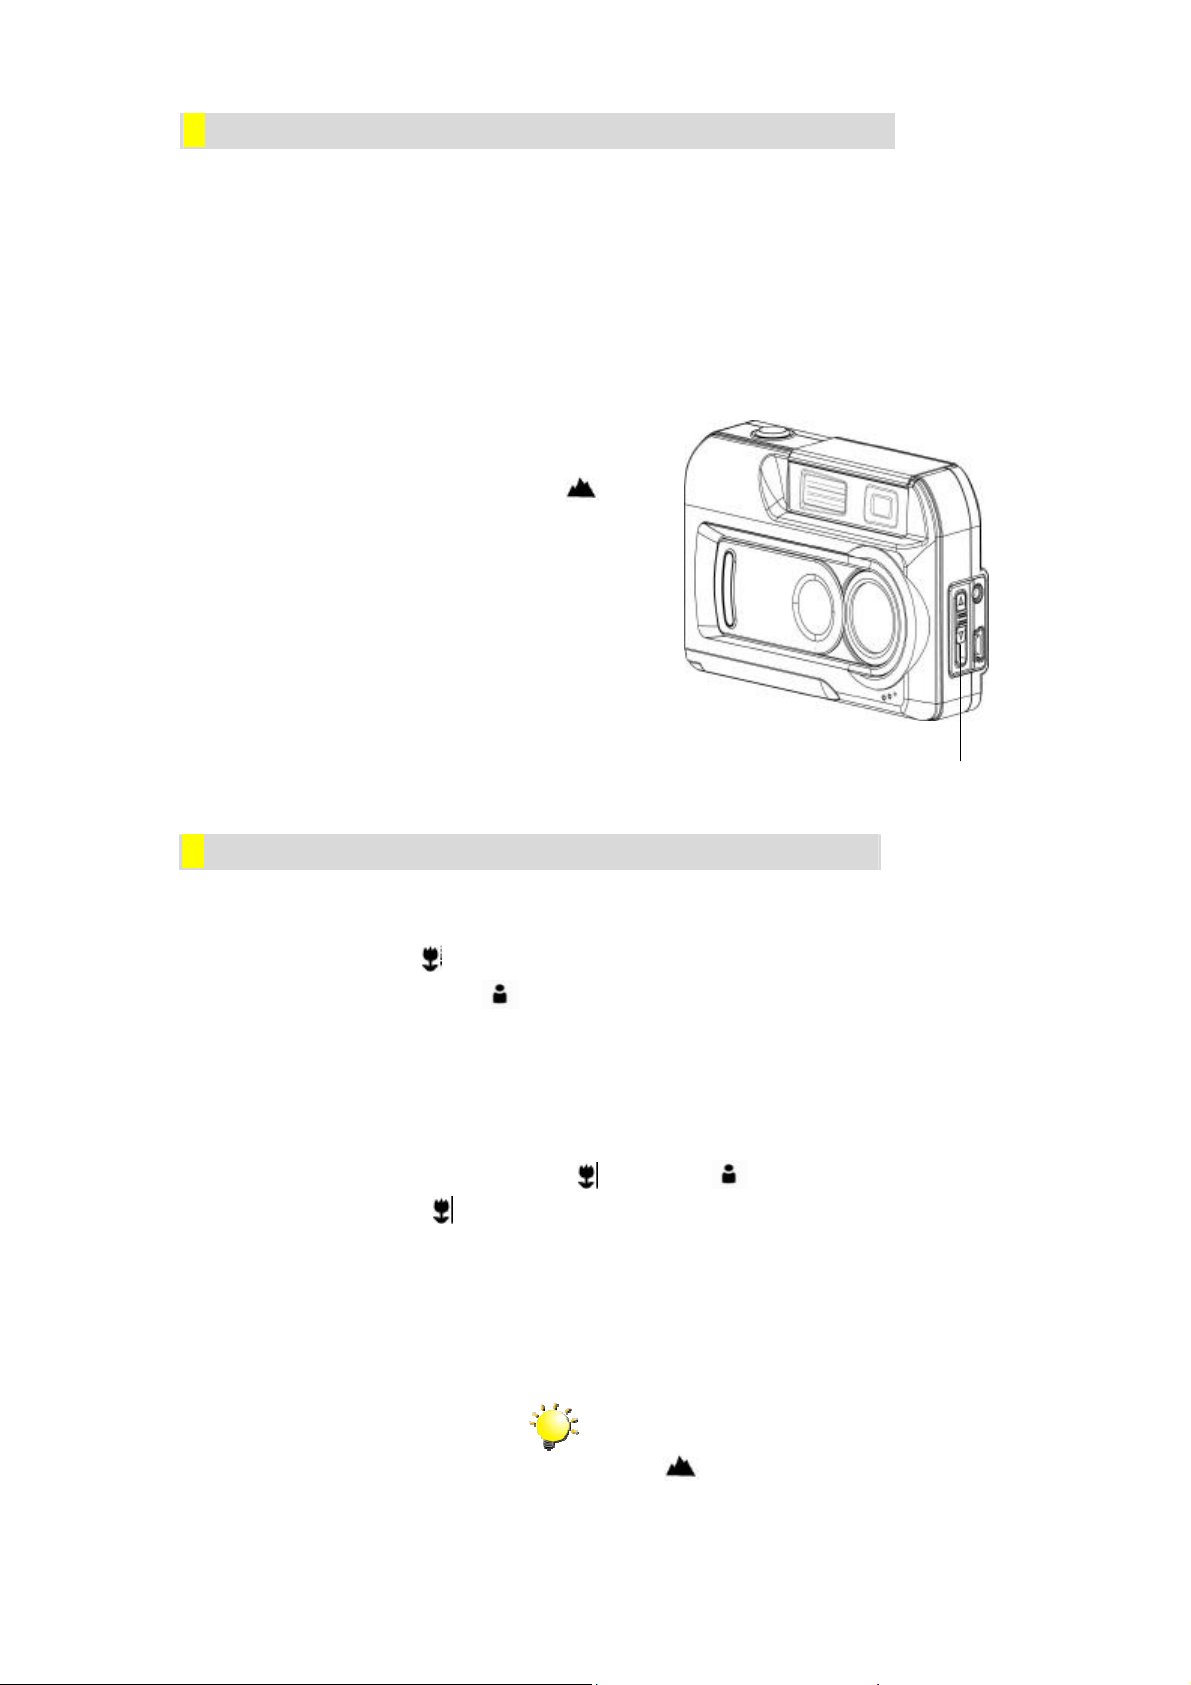
Flash
Viewfinder
Self-T
imer LED
WWW.MANUALS.WS
★Overview
Your new digital camera delivers high quality images at up to 2048x1536 resolution as well as
Getting to Know Your Digital Camera
short movie clips using a 3.2-Megapixel CMOS sensor. With the optical viewfinder and built-in
1.5" TFT color LCD monitor, you can compose images and then examine them in detail. The
camera adjusts exposure and colour balance automatically or lets you change these settings
manually and features a 4x digital zoom to increase your control over the pictures you take. A
Movie Hotkey lets you switch rapidly between taking movie clips and taking photographs. The
camera is also ideally suited for use as a PC camera hooked up to your home computer
16MB of memory is built in to your camera so you can take photos and movie clips without
installing a memory card. The memory card slot allows you to increase the storage capacity if
you wish. When you want to print out images, play movie clips to friends, post images on
websites or inside emails, images and movie clips can be downloaded from the camera to a
computer where you have the option of editing them using ArcSoft PhotoImpression and
ArcSoft VideoImpression software provided.
★Front View
Shutter Button
Lens Cover
WWW.MANUALS.WS
1
Page 5
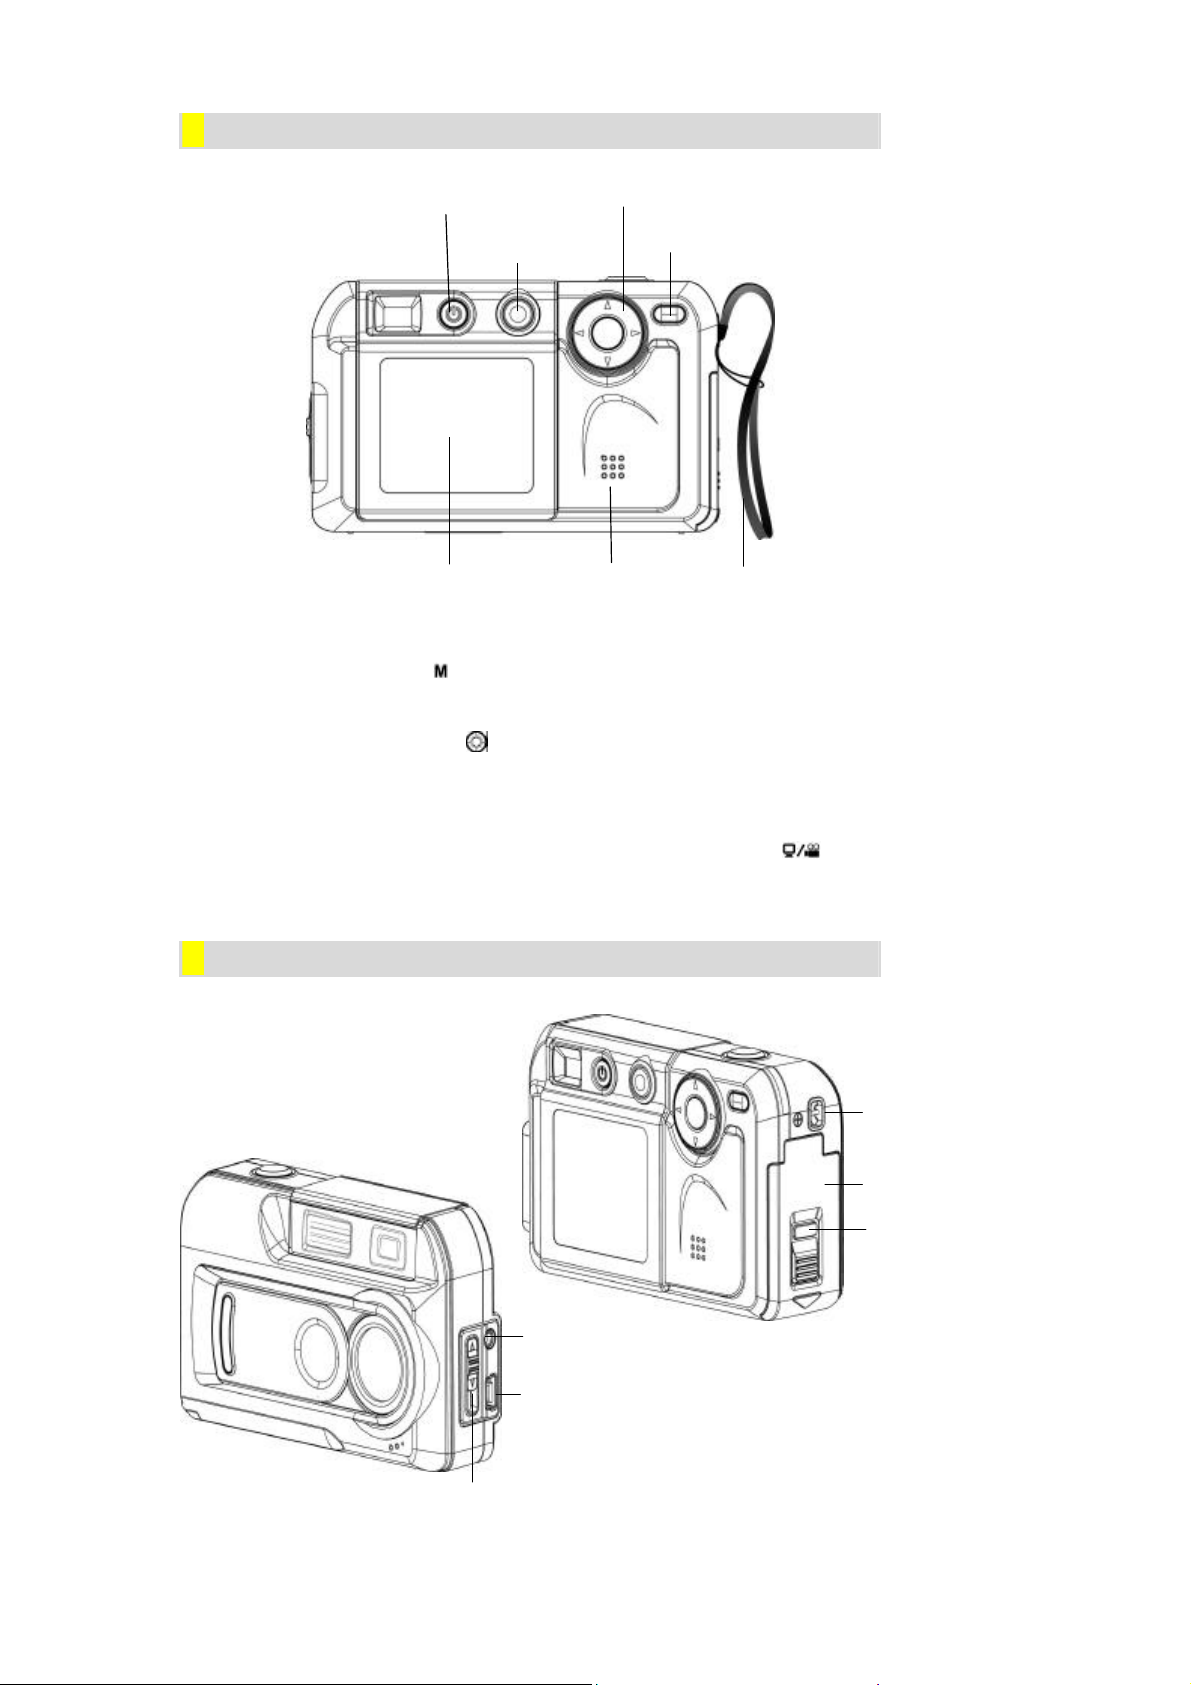
★Rear View
Battery / SD Card
Eyelet for Wrist Strap
Release Button
Mode Button
Wrist Strap
LCD Monitor
PC Mode / Movie Button
WWW.MANUALS.WS
ð The mode button ( ) is used to switch between the two main operation modes. Turn
to section 3, Camera Mode, and section 4, Playback Mode, for full details
ð The direction button ( ) is used in Camera Mode for general setting, and in the
Power Button
Direction Button
Speaker
Playback Mode to navigate through menus. Turn to section 3, Camera Mode, and
section 4, Playback Mode, for full details
ð For information on using the PC Mode/Movie button ( ), turn to Section 6,
Transferring Data to a Computer
★Side View
Cover
TV Out Port
WWW.MANUALS.WS
USB Port
Macro Switch
2
Page 6

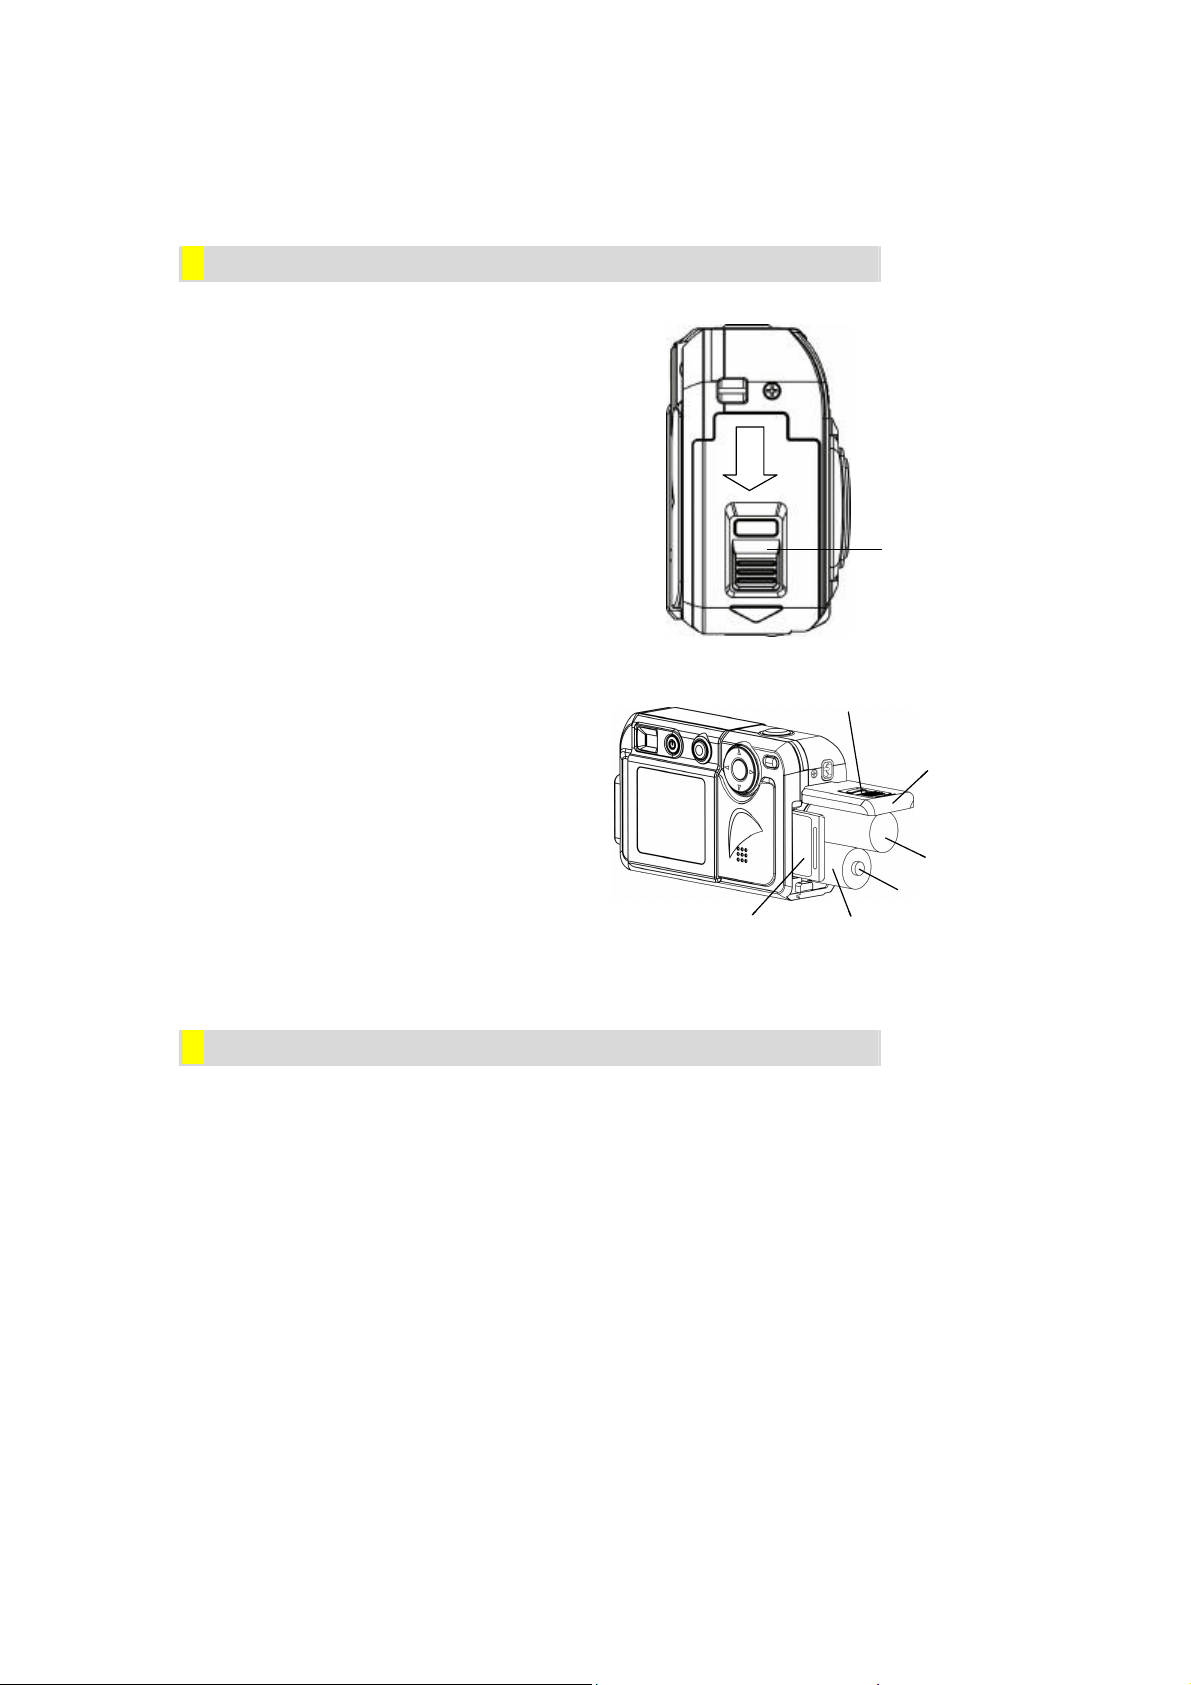
Tripod Mount
WWW.MANUALS.WS
ð For information on fitting batteries, turn to Loading the Battery in section 2.
ð To learn how to install a memory card, turn to Inserting an SD Card ( Not Supplied)
in section 2.
ð For information on transmitting imag es and movie clips to a computer using the TV
Out (
on a TV, and Section 6, Transferring Data to a Computer respectively.
ð The Macro Switch (
focus. Turn to Taking Close-Up Photos in section 3 for full details.
★Bottom View
) and USB ( ) ports, turn to Section 5, Viewing Photos and Movie Clips
/ / ) is used when taking photos with differ ent lengths of
WWW.MANUALS.WS
3
Page 7
Section 2
Press down and hold the release button,
and slide the battery/SD Card cover in the
surface facing the front of the
To remove an installed SD card, press the card inwards to release it. When the card pops out,
Release
WWW.MANUALS.WS
★Loading the Batteries
Getting Up and Running
You must load 2 AA size alkaline batteries
before the camera can be used:
1.
direction of the arrow to release the cover.
2. Insert the batteries according to the correct
polarity marks (+ or -).
3. Close the battery/SD card cover firmly.
button
Release Button
Release Button
Battery/SD
Battery/SD
Card Cover
Card Cover
-
-
+
+
SD Card
SD Card
★Inserting and Removing an SD Card (Not Supplied)
The camera comes with 16MB of built-in memory, allowi ng you to store images and movie
clips. You can expand the memory capacity by using a SD (Secure Digital) memory card ( Not
AA Size Battery
AA Size Battery
Supplied). To insert a memory card, refer to the figure above and:
1. Open the battery/SD card cover.
2. Insert the memory card with the metal
camera.
3. Press the card into the slot until it locks into position.
gently slide it from its slot.
WWW.MANUALS.WS
4
Page 8
protected tab on
card
To open the lens cover, simply use a finger
To close the lens cover, slide in the other
WWW.MANUALS.WS
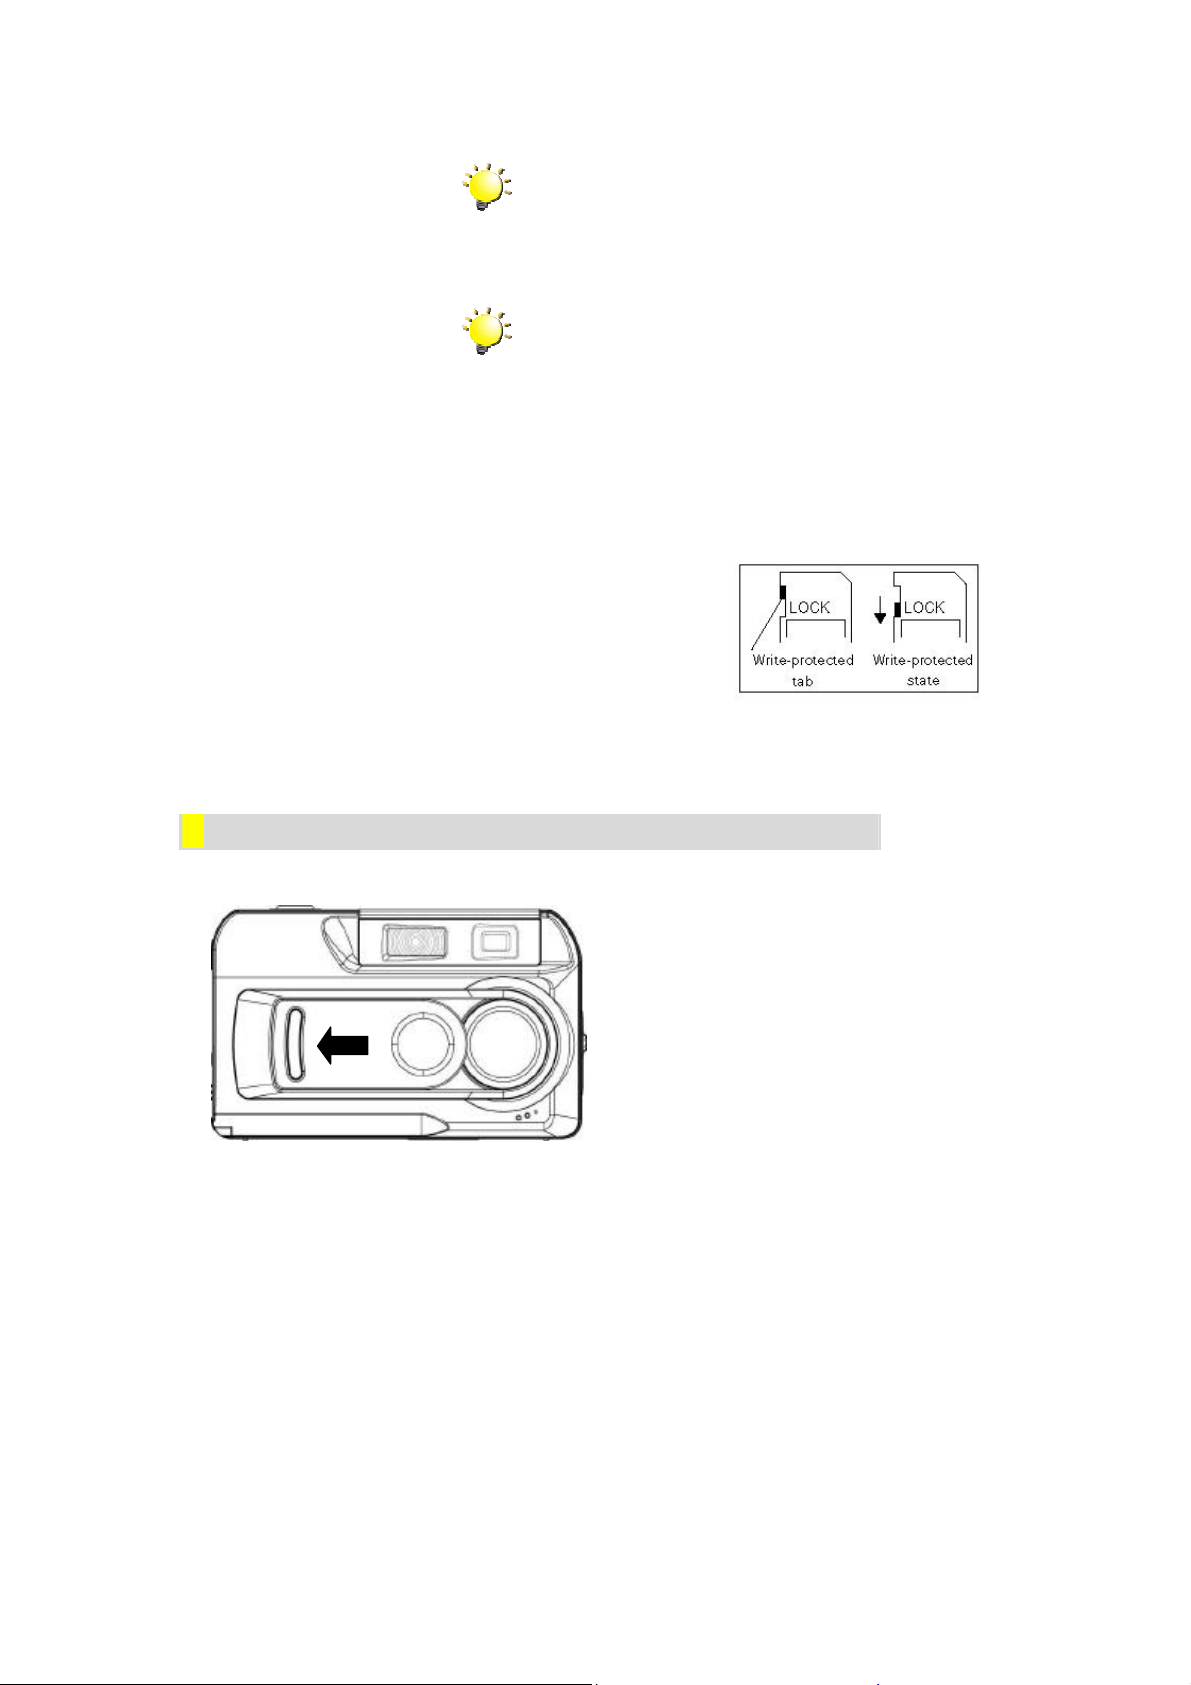
Protecting Data on an SD Card
Note
A memory card that has previously been used in
another device may have to be formatted before it can
be used. Turn to Formatting a Memory Card in
section 3 for details.
Note
When a memory card is fitted, images and movie clips
are saved on the card rather than on the built-in
memory..
Valuable data on an SD Card can be protected by preventing any new data being written onto
the same card. To do this:
Slide the writethe side of the SD memory
to LOCK.
★Opening and Closing the Lens Cover
to slide the cover across, as shown.
direction.
WWW.MANUALS.WS
5
Page 9

use the camera in Playback
t intend to take any photos)
you do not have to open the lens cover before
The camera will turn itself off automatically if it is
WWW.MANUALS.WS
★Turning the Camera On and Getting Started
To turn on once the batteries are loaded:
1. Open the lens cover first, and then press down and hold the power
button for ONE second.
2. When the camera is turned on, the GREEN LED underneath the
direction button will light up.
Note
If you only want to
Mode (i.e. you don’
turning on the camera.
Note
left unused for THREE minutes.
ð To take a picture, press the shutter button. For full details turn to
Taking Photos in Section 3.
ð To view stored photos press the mode button once to move to
Playback Mode. Press a second time to return to Camera Mode. For
full details turn to Section 4, Playback Mode.
ð To take a movie clip, press the PC mode/movie button to temporarily
switch to Movie Mode then the shutter button to start filming. For full
details of taking movie clips turn to Taking Movies in Section 3.
★Turning the Camera Off
To turn off the camera:
1. Press down and hold the power button for ONE second. The GREEN
LED will light out.
2. Close the lens cover.
WWW.MANUALS.WS
6
Page 10

Section 3
Press the mode button to switch between
on the LCD
are recorded to indicate
The number of images that can still be
WWW.MANUALS.WS
★Direction Button Functions
Camera Mode
The Camera Mode is for taking photos and short movies. In this mode, the direction button has
the following functions:
Right button: LCD monitor on but information off →
Enter Button
Enter Button
Up Button
Up Button
Left Button
Left Button
Down Button
Down Button
★LCD Monitor Information
Right Button
Right Button
Left button: Self-timer on/off
Up button: Digital zoom in
Down button: Digital zoom out
Enter button: Enter options menu
Monitor off → Monitor on with information
Note
Camera Mode and Playback Mode.
The indicators shown may display
monitor when images
the following:
78
taken at current resolution.
Single Image (photograph) Mode
Movie Mode
Multisnap (continuous shooting) Mode
SD card inserted
WWW.MANUALS.WS
Macro Mode
Self-timer Mode
Auto-flash
Flash off
Forced-flash
Battery indicator: full power /
medium power / low power /
power empty
7
Page 11
★Taking Photos
or
Remember to turn the macro switch back to
up
WWW.MANUALS.WS
Once your camera is turned on, you can compose pictures using the viewfinder or the LCD
monitor. Using the viewfinder will save battery power. You may find it easier to compose your
pictures with the LCD monitor however. Close-up shots in particular will be more accurate if
composed through the LCD monitor. The LCD monitor must be used when Digital Zoom is
used.
1. Turn the camera on.
2. Ensure the macro switch on the side of
the camera is turned to Normal ( )
3. If the LCD monitor is off, turn it on by
pressing the right direction button.
4. Compose your shot in the viewfinder
on the LCD screen..
5. Press the shutter button to take the
picture.
Macro Switch
★Taking Close-Up Photos
Your camera has two close-up photo modes to allow you to take high quality photos at close
range. The Macro Mode ( ) should be used for objects located at about 20cm from the
camera, while the Portrait Mode ( ) should be used for object located at 60cm to 130cm.
You may use the LCD monitor to compose close-up pictures more easily. To take close-up
photos:
1. Turn the camera on.
2. Turn the macro switch to Macro ( ) or Portrait ( ) positions. In Macro Mode,
the macro icon ( ) will appear on the LCD monitor.
3. If the LCD monitor is off, turn it on by pressing the right direction button.
4. Compose your shot on the LCD monitor.
5. Press the shutter button to take the picture.
WWW.MANUALS.WS
Note
Normal ( ) when you are not taking closephotos.
8
Page 12

★Taking Movies
Movie Mode
by pressing the PC mode/movie button. Press this hotkey
to start recording. To stop
recording, just press the shutter button again. When you
finish recording, your camera will revert to its previous
The PC Mode/Movie Button provides a rapid
way to enter Movie Mode, but Movie Mode must
be restored each time when it is used. If you
want to take several movie clips, set the camera
in
WWW.MANUALS.WS
Taking short movies is simple with your camera. Simply set your camera to Movie Mode, frame
your picture using the viewfinder or LCD monitor and press the shutter button to start recording.
When a movie is recording, the RED LED underneath the direction button will remain lit and a
time indicator will display on LCD monitor. To stop the recording, just press the shutter button
a second time.
To set your camera to Movie Mode:
1. When in Camera Mode, press the
Enter button. The first screen of the
Options Menu appears, with the
Shooting Mode submenu open.
Enter Button
Enter Button
Left Button
Left Button
Up Button
Up Button
Right Button
Right Button
2. Press the down direction button once
to highlight the Movie Mode icon
( ).
3. Press the Enter button again to exit the
Options Menu. The Movie Mode icon
( ) will display on the LCD monitor.
★Shooting Spur of the Moment Movie Clips
PC Mode/Movie Button
You can temporarily switch your camera into
first then press the shutter button
Down Button
Down Button
mode (e.g. Single Photo or Multisnap Mode)
WWW.MANUALS.WS
Note
to Movie Mode following the instructions
Taking Movies above.
9
Page 13

10
timer photo, ensure the
ly such as on a level
timer turns off automatically once a
timer photo is taken. To restore the
WWW.MANUALS.WS
★Using the Self-Timer
The self-timer allows you to take photos with a 10-second time delay so that you can join the
scene in the photo.
Note
Before taking a selfcamera is placed secure
surface or a tripod.
1. To activate the self-timer, press the left direction button while in Camera Mode. The
self-timer icon ( ) will appear on the center of the LCD Monitor screen.
2. Compose the picture in the normal way. When you are ready, press the shutter
button and move into position. When the self-timer is triggered, the self -timer icon
( ) on the LCD monitor will blink.
3. The RED self-timer LED on the front of the camera beneath the lens cover will also
blink. The speed of blinking will increase just before the picture is taken.
Note
Selfselfself-timer, press the left direction button again.
★Using the Digital Zoom
The digital zoom magnifies images up to FOUR times when taking photos.
1. To zoom in, press the up direction button while in Camera Mode. The digital zoom
can be set at any one of 16 increments from 1x to 4x. The magnification ratio will be
shown on the LCD monitor.
2. To zoom out, press the down direction button.
WWW.MANUALS.WS
Page 14

The Options menu will close
if no button is
WWW.MANUALS.WS
★Camera Mode Settings
Camera Mode Settings are used to change shooting mode, resolution, flash setting, LCD
brightness and advanced settings. These settings are changed from the Camera Mode
Options Menu. To open this menu:
1. When in Camera Mode, press the enter
button.
2. The first screen of the Options Menu
appears with the Shooting Mode
submenu open and Single Photo
Mode.
Left Button
Left Button
Enter Button
Enter Button
Up Button
Up Button
Down Button
Down Button
Right Button
Right Button
3. Use the left and right direction buttons
to move between submenus.
4. Use the up and down direction buttons
to change selections within a
submenu.
5. When you have completed changing
the settings, press the enter button to
close the Options Menu.
Note
automatically
pressed for 15 seconds..
WWW.MANUALS.WS
11
Page 15

12
The following table summarizes the choices available in the Camera Mode Options Menu:
WWW.MANUALS.WS
Submenu Display Options
Shooting Mode
Single Photo Mode (default setting)
Resolution
Flash Setting
Movie Mode
Continuous Shooting Mode
Low resolution
Standard resolution (default setting)
High resolution
Auto-flash
Flash Off (default setting)
Forced-flash
Advanced Settings
LCD Brightness
The Advanced Settings submenu allows you
to set the following:
ð Exposure
ð White Balance
ð Sharpness
ð Quick Review
ð Video Format
ð Sound
ð Format SD Card
ð Language
Low Brightness
Normal Brightness (default setting)
High Brightness
Changes made to Resolution, Flash , Quick Review, Video, Sound and Language settings are saved
when the camera is powered off. Other options return to their default settings each time the camera is
WWW.MANUALS.WS
powered on.
Page 16

13
★Taking Photos Continuously
WWW.MANUALS.WS
With the camera set to Multisnap Mode,
you can take up to FIVE photos. To enter
Multisnap Mode, use the direction button
to select the multisnap icon ( ) and
press the enter button.
★Changing Resolution
Your camera gives you the option of taking photos at different resolutions. Resolution
determines size and hence quality of images. High resolution images are the best choice if you
want to print your photos. Low resolution images may be sufficient for sending by email or
posting on a website. Higher resolution images require more storage space on the built-in
memory or optional memory card. Your decision of what resolution to use will be determined
therefore by the intended use of the image and the memory space remaining.
Three resolution settings are available:
Low ( ), Standard ( ) and High ( ).
These correspond to the following
resolutions:
Single Photo Mode
1024x768 pixels 320x240 pixels 1024x768 pixels
1600x1200 pixels 320x240 pixels 1600x1200 pixels
Movie Mode
Multisnap Mode
2048x1536 pixels 320x240 pixels 2048x1536 pixels
WWW.MANUALS.WS
Page 17

14
: the flash fires automatically
according to lighting conditions. Use this
t fire under any
this mode when
where flash
photography is prohibited, or when the
subject is distant (beyond the range of
the flash always fires.
Not able to use this mode when taking
images outdoors. Please use either
The flash cannot be used when battery power is
WWW.MANUALS.WS
★Using the Flash
Your camera has three flash settings:
ð
Auto-flash
mode for general photography
ð Flash Off: the flash won’
circumstances. Use
ð
taking images in a place
the flash).
Forced-flash:
auto-flash or flash-off instead.
★Setting the LCD Brightness
Three brightness settings are available:
ð Low LCD Brightness: Normally
sufficient in dim lighting conditions
ð
ð
Normal LCD Brightness: Use in
intermediate lighting conditions.
This is the default setting.
High LCD Brightness: Use in
bright conditions.
Note
low ( ).
WWW.MANUALS.WS
Page 18

WWW.MANUALS.WS
★Advanced Settings
The Advanced Settings submenu contains options for configuring your camera set up and
more advanced options to improve the quality of your photos. You can set the following options
by press the direction button and then enter button.
Submenu Display Options
Exposure
White Balance
Sharpness
● Nine incremental settings (default = 0)
● Automatic (default)
● Daylight
● Fluorescent
● Tungsten
● Hard
● Normal (default)
● Soft
Quick Review
Video
Sound
WWW.MANUALS.WS
● On
● Off (default)
● NTSC
● PAL
(Default setting depends on area)
● On (default)
● Off
15
Page 19

Format Card
● Yes
WWW.MANUALS.WS
● No (default)
Language
Exit
● English (default)
● Deutsch
● Francais
● Italienisch
● Espano
● Portugues
Select to exit Advanced Settings and
Camera Mode Options menus.
Adjusting Exposure
Your camera adjusts image exposure
automatically depending on lighting conditions.
In certain circumstances you may wish to adjust
the exposure compensation setting, for instance
to avoid making your subject too dark when it is
backlit or shot against a bright background or to
avoid making lights appear too bright in night
shots. The default setting is 0.
WWW.MANUALS.WS
16
Page 20

17
Adjusting White Balance
Your can soften and sharpen images to
settings
WWW.MANUALS.WS
Your camera adjusts the colour balance of images automatically depending on lighting
conditions. You can override the automatic setting if you wish. Four white balance settings are
available:
ð Automatic: The camera automatically
adjusts white balance.
ð Daylight: Use when outside on a
clear day
ð Fluorescent: Use when under
fluorescent tube lighting.
ð Tungsten: Use when under tungsten
filament light bulb
lighting.
Sharpening Images
achieves different effects. The following
are available:
ð Hard: Image processed to increase
sharpness, making edges
more distinct.
ð Normal: Standard level of sharpening
on all images, suited to most
applications.
ð Soft: Amount of sharpening
reduced below normal level.
WWW.MANUALS.WS
Page 21

18
Quick Review Settings
at
your photos after you have taken them. With
Quick Review on, images are displayed for
TWO seconds on the LCD monitor
Before outputting video that you have taken,
opriate TV
either
standard include
the USA, Canada, Japan, South Korea and
Countries and areas using the PAL standard
include the UK, Europe, China, Australia,
If the wrong standard is selected, video may
WWW.MANUALS.WS
Quick Review allows you to have a look
immediately after they are taken.
Video Settings
you should ensure that the appr
standard for your area is selected –
NTSC or PAL.
Countries using the NTSC
Taiwan.
Singapore and Hong Kong.
flicker when played back.
WWW.MANUALS.WS
Page 22

19
This camera only supports memory cards
with the FAT16 format. A new card or one
that has been used in another device will
probably need to be formatted before it can
in memory or
in memory
WWW.MANUALS.WS
Sound Settings
You can enable sound effects to signal
power on and off, and taking of photos and
movie clips.
ð ON: Enable audio effects
ð OFF: Disable audio effects
Formatting a Memory Card
be used,
ð YES: Format the built-
a SD card (Not Supplied).
ð NO: Do not format built-
or a SD card (Not Supplied).
Caution
Formatting destroys all data stored on the card
WWW.MANUALS.WS
Page 23

20
Selecting Interface Language
. The
WWW.MANUALS.WS
You can change the interface language
following languages are available:
ð English
ð Deutsch
ð Français
ð Italienisch
ð Español
ð Portugues
ð Duits
WWW.MANUALS.WS
Page 24

21
Section 4
View the previous stored image or movie
ip
Press the mode button to switch between Camera
Mode and Playback Mode. You can also enter
Playback Mode directly by powering on the camera
photo or movie clip in the memory, a
will display on the LCD
on the
are being
Number of images stored for
viewing and position of current
WWW.MANUALS.WS
★Direction Button Functions
Playback Mode
The Playback Mode is for viewing and managing photos and movie clips stored on the built-in
memory or on an optional memory card. In this mode, the direction button has the following
functions:
Enter Button
Enter Button
Left Button
Left Button
Up Button
Up Button
Down Button
Down Button
Right Button
Right Button
Right button: LCD monitor information on/off
Left button: No function
Up button:
Down button: View the next stored image or movie cl
Enter button: Enter options menu
clip in sequence
in sequence
Note
without opening the lens door.
Note
If there is no
message “NO PICTURE”
monitor when switching to Playback Mode.
★LCD Monitor Information
The indicators shown may display
LCD monitor when still images
viewed to indicate the following:
78/100
image in memory
Showing movie clip
WWW.MANUALS.WS
Page 25

22
Showing a image with DPOF
The default setting for viewing stored images is as
). Thus when you turn on your
to enter
be
displayed one at a time. Press the up or down
direction buttons to view the previous or next image
Press the direction button to enter the thumbnail
To take a closer look at a single image (and
return to single image view), use the direction
button to select the desired image, then press
WWW.MANUALS.WS
★Displaying Single & Thumbnail Images
In Playback Mode, stored photos can be viewed ONE at a time or as NINE thumbnail images.
setting
Showing image resolution
Displaying Single Images
single images (
camera and press the mode button
Playback Mode, images will automatically
in the memory.
Displaying Thumbnail Images
When you first enter Playback Mode, single images are displayed.
view ( ).
the enter button.
WWW.MANUALS.WS
Page 26

23
★Making Slide Shows
When in Playback Mode, press the Enter
button to open the Options Menu appears.
ection key to highlight
Press the Enter button again to launch the
slideshow. Stored images will be displayed in
If a memory card is fitted, you can delete only
those images and movie clips stored on the
y card
Images and movie clips that have been deleted
WWW.MANUALS.WS
You can set your camera to display images one after another in turn. To start a slide show:
1.
The Display Mode submenu is the first item.
2. Use the Up or Down dir
the Slideshow icon ( ).
3.
succession.
4. To halt the slideshow, press the Enter button.
★Playing Movie Clips
Playing movie clips is as simple as viewing stored images. Follow the instructions for
displaying single images above. Use the up and down direction buttons to cycle through stored
images until you locate the desired movie clip, the first frame of which will be displayed tagged
with a movie icon ( ). Press the shutter button to play the movie clip and a second time to
stop playing.
★Deleting Photos & Movie Clips
Deleting unwanted images and movie clips helps free up memory capacity. You can delete
images and movie clips individually or delete all images and movie clips together.
Note
card.
Note
Images on a write-protected memor
cannot be deleted.
WWW.MANUALS.WS
Caution
cannot be recovered.
Page 27

24
Deleting Images and Movie Clips
In Playback Mode, locate the image or
Press the enter button to select the
The selected image will be shown with
a square overlay. This is the area to
be magnified. Use the direction
buttons to move this over the area of
the
to
use the direction buttons to navigate
Press the enter button a second time
WWW.MANUALS.WS
To delete images and/or movie clips:
1.
movie clip you want to delete.
2. When the image (or first frame of
movie clip) is displayed, press Enter.
3. Open the Deletion Menu ( ).
4. Select either Single Image Deletion
( ) or All Image Deletion ( ).
5. Press the enter button to delete the
selected image or movie clip / all
images and movies clips.
★Magnifying Photos
Photos can be magnified up to four times their original size in Playback Mode. To magnify an
image:
1. In Playback Mode, locate the image you want to magnify.
2. When the image is being displayed, press the enter button.
3. Open the Zoom Menu ( ).
4. Select either 2x or 4x magnification.
5.
magnification.
6.
the image you want to magnify.
7. Press the enter button to perform
magnification. You can continue
across the enlarged image.
8.
to cancel the magnification.
WWW.MANUALS.WS
Page 28

25
DPOF only works with an optional memory card
WWW.MANUALS.WS
★Using DPOF Settings
DPOF (Digital Print Order Format) makes printing your photos extremely simple. You only
have to select which photos you want to have printed using the DPOF submenu and then
insert your card into a compatible printer (or give the card to a printing service) to print the
selected images out. You can select individual images or select all images to be printed.
Printing a Single Image or All Images
To select a single or all images for DPOF printing:
1. In Playback Mode, locate the image
Note
installed.
you want to print.
2. When the image is displayed, press
the enter button and select the DPOF
Menu ( ).
3. The first item selected in the DPOF
Menu is for Single Image Printing
( ).
4. To set all image printing, select All
Image Printing ( ).
5. Press the enter button to select the
image(s) for printing.
6. The DPOF icon will be shown on the
selected DPOF image.
WWW.MANUALS.WS
Page 29

26
Section 5
The LCD monitor does not work when the
WWW.MANUALS.WS
★Connecting the Camera to a Television
Viewing Photos and Movie Clips on a TV
You can view stored images and movie clips on a television. To connect to a television:
1. Connect one end of the movie
cable to your camera’s TV Out
port.
2. Connect the other end of the
cable to a television or
videocassette recorder.
★Viewing Photos and Movie Clips on a Television
The steps for viewing stored photos and movie clips are exactly the same as for viewing them
TV Out Port
on the LCD monitor. First connect the camera to a television and turn it on. Then, enter
Playback Mode and proceed as described in Section 4, Playback Mode.
Note
camera is connected to a television.
WWW.MANUALS.WS
Page 30

27
Section 6
The computer must have one of the following
s
ROM drive. The welcome screen
. Follow the
screen instructions to complete the
installation. Depending on your
system, you may have to
restart your computer after installing the
WWW.MANUALS.WS
You can transfer images and movie clips stored on your camera to a computer and send them
in emails to friends or post them on websites. To do this you should:
Transferring Data to a Computer
1. Install the digital camera driver on your computer
2. Connect your camera to the computer
3. Transfer images or movie clips
Note
operating systems installed:
ð Windows 98SE/2000/ME/XP
The computer should have at least 64MB RAM
★Installing the Digital Camera Driver
Before connecting your camera to a computer for the first time, you should install a driver on
the computer. The driver is on the CD-ROM disc provided in the camera package. To install
the driver:
1. Insert the CD-ROM into the computer’
CDappears.
2. Click “Install Device Driver”
on-
operating
driver.
WWW.MANUALS.WS
Page 31

28
camera with the supplied USB
WWW.MANUALS.WS
★Connecting Your Camera to a Computer
Your camera connects to a computer through a USB cable such as that provided in the
camera package.
1. Connect the computer and
cable.
2. Press the PC Mode/Movie
button to switch between
Mass Storage Mode and PC
Camera Mode.
3. Transfer the camera’s images
to the computer.
Mass Storage Mode
USB Port
The RED status LED will light when the camera is connected to the computer and in Mass
Storage Mode. Image and movie files can then be found on your computer at “My
Computer\Removable Disk\DCIM\”. Under this mode, you can read, delete, move, or copy
any image or movie files you want. Use the bundled application software ArcSoft
PhotoImpression 3.0 and VideoImpression 2.0 to edit the photos and movie clips, if
necessary.
PC Camera Mode
The GREEN status LED will light up when the camera is connected to the computer and in
PC Camera Mode. Under this mode, you can take movie clips, compose video e-mail, or
conduct live video conference meetings on the internet from your PC.
WWW.MANUALS.WS
Page 32

29
your
ROM drive. The
Select the piece(s) of software you
want to install from the list, then click
. Follow
screen instructions to complete
n. Depending on your
system, you may have to
restart your computer after installing the
WWW.MANUALS.WS
★Installing Bundled Software
The CD-ROM supplied with your camera contains three pieces of software.
ð ArcSoft PhotoImpression 3 is a user-friendly application that helps you retouch,
edit and organize images.
ð ArcSoft VideoImpression 2.0 allows you to edit movie clips and is equally easy
to use.
ð Acrobat Reader is a popular program that you need to have installed to read
the User’s Manual. Many computer users will find they already have this
software installed on their computer.
To install the bundled software:
1. Insert the CD-ROM into
computer’s CDwelcome screen appears.
2.
Install Application Software
the onthe installatio
operating
software.
WWW.MANUALS.WS
Page 33

30
Section 7
etting the LCD Brightness in Section 3 to adjust the
may be full: Delete some
WWW.MANUALS.WS
Can’t turn the camera on
Troubleshooting
Camera turns on but the LCD monitor is blank
The monitor may have been turned off: Press the right direction button
The LCD monitor will not work when the camera is linked to a
Images on the monitor may be faint when viewed in bright light: Follow
No photo is taken when the shutter button is pressed
Pictures cannot be taken when the camera is saving the previous
The batteries may not be installed or may be incorrectly installed:
Check the batteries, ensure they are oriented correctly.
The Battery / SD Card Cover may be open: Close the cover.
The batteries may be out of power: Replace the batteries.
to switch the monitor on.
television: ensure the movie cable is disconnected.
the instructions in S
monitor brightness.
photo: Wait for the previous photo to be saved.
The built-in memory or installed memory card
images or movie clips or insert a memory card with space.
Flash may be being charged: Wait for the flash to complete charging.
Photos are not in focus
Subjects must be at least 130 cm away for photos taken in Normal
Mode: If the subject is closer, use Portrait Mode.
Subjects must be located between 60 cm and 130 cm for photos taken
in Portrait Mode: If a close-up photo is taking, use Macro Mode.
Photos are too dark
In low light conditions the flash should be used: Ensure the flash
setting is set to Auto.
Subject may be beyond range of flash: Move closer to subject.
Photos are too bright
WWW.MANUALS.WS
The exposure setting may be wrong. Reset the exposure to setting.
Flash may be too close to the subject: Move farther to subject.
Page 34

31
Section 8
WWW.MANUALS.WS
Specifications and System Requirements
★Specifications
Image Sensor 3.2 Mega-pixel CMOS Sensor
Operating modes Digital Camera, PC Camera, Movie Clips
Lens f=9.6mm F3.0
Normal: 130cm ~ Infinity; Portrait: 60cm ~
Focus Range
130cm; Macro: center 20cm
Digital Zoom Recording Mode: 4x, Playback Mode: 4x
Viewfinder Optical
LCD Monitor 1.5” TFT Color LCD
Built-in 16M Memory;
Storage Media
SD/MMC Card Slot Support
Image Resolution 2048x1536; 1600x1200; 1024x768
Movie Clips 320x240 at 20 fps
Auto/Manual (Daylight, Fluorescent,
White Balance
Tungsten)
Exposure Auto/Manual
Self-timer 10 Seconds Delay
Flash Strobe Auto/Off/Forced
File Format
Image play Single Image/Thumbnails/Slideshow
Interface Mini USB/TV Out
TV out NTSC/PAL Selectable
Power Supply 2 x AA Alkaline Battery、USB Bus Power
Dimension 95.8x34.5x58.3mm
Weight 108 g (without battery & accessory)
Still Image: JPEG
Movie: AVI (Motion JPEG)
WWW.MANUALS.WS
Page 35

32
WWW.MANUALS.WS
★System Requirements
Windows 98SE/2000/ME/XP
Pentium MMX, Celeron or AMD Athlon®
CPU
64MB RAM
CD-ROM drive
500MB free HDD space
Available USB port
16-bit Color Display
WWW.MANUALS.WS
 Loading...