

Page 1

WWW.MANUALS.WS
WWW.MANUALS.WS
G-SHOT 3003CC
MPEG4
Digital Video Camera
(User Guide)
“Goodmans Helpline Phone Number 0870 873 0080”
Page 2

WWW.MANUALS.WS
WWW.MANUALS.WS
Specifications
● Image Sensor: 3.2 mega pixel CMOS sensor
● Digital Camera Resolution :
- 2432 x 1824 [4 Mega Pixel by interpolation]
- 2048x1536 [3 Mega Pixel ]
- 1600 x 1200 [2 Mega Pixel ]
- 640 x 480 [VGA - 0.3 Mega pixel]
Image Quality Option: Super Fine ; Fine ; Normal
● Digital Camcorder Resolution options:
- VGA : 640 x 480 at 27fps
- QVGA : 320 x 240 at 30fps
● LCD Display : 1.5" TFT LCD (High resolution LTPS type at 130K pixel )
● Internal Memory : 64MB Flash
● External Storage: SD Card (MMC compatible) up to 512MB
● Shutter: Electrical
● Movie File Format: AVI (MPEG 4), with sound
● Still Image File Format: JPEG
● Voice File Format: WAV
● White Balance: Auto / Manual (Sunny, cloudy, Fluorescent, Tungsten)
● Flash Modes: Anti-Red Eye, Automatic, On, Off
● Microphone: Built-in
● Digital Zoom: 8X Digital Zoom
● Range of focus: 1.2m to Infinity
● Self-timer: 10 second delay
● TV output : PAL/ NTSC
● USB connectivity: version 2.0
2
Page 3
WWW.MANUALS.WS
WWW.MANUALS.WS
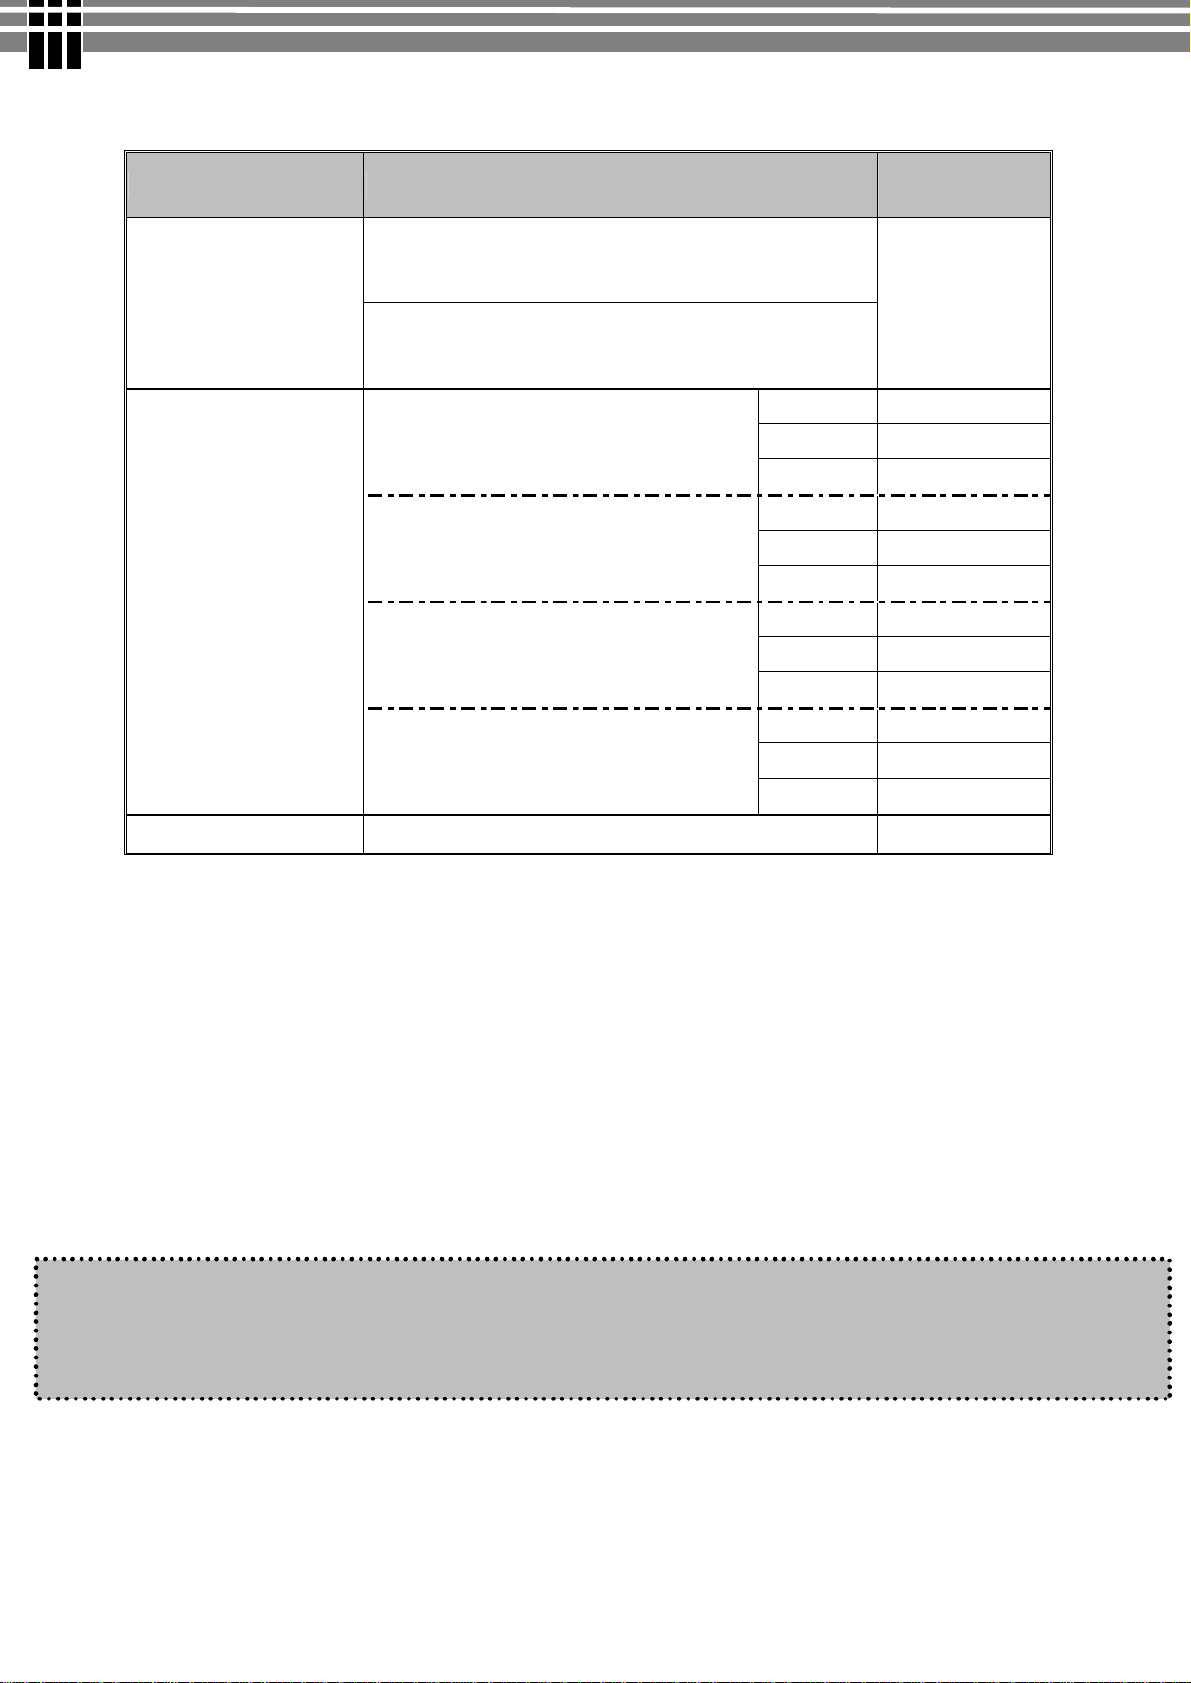
● Internal Storage: 64MB Internal Flash Memory
● Number of images stored in 64MB (typical):
Mode Condition Approx. capacity
VGA(640x480) ~ 5mins20sec
Digital Video (DV)
QVGA(320x240) ~14min
Camera
2Mega Pixel : 1600 x 1200
0.3Mega Pixel(VGA) : 640 x 480
Voice Recording (VR)
NOTE:
• The above figures are only estimates. The actual numbers will vary depending on scene (image)
complexity.
• Compatibility with all SD/MMC memory cards is NOT guaranteed.
● Power: NP6O Rechargeable Li-ion battery
● Power Source : Individual Charger (through USB or Power Adapter)
● Dimensions: 38 x 100 x 70 mm
● Weight: About 130g (without batteries)
- -
Super Fine
Fine 60 4Mega Pixel : 2432 x 1824
Normal 140
Super Fine
Fine 90 3Mega Pixel : 2048 x 1536
Normal 230
Super Fine
Fine 150
Normal 540
Super Fine
Fine 770
Normal 1230
~ 56min
30
40
70
360
Note
When playing an MPEG4 movie on PC for the first time, please install Mpeg4
Movie Driver (included in CD ROM) before connecting to PC
3
Page 4

WWW.MANUALS.WS
WWW.MANUALS.WS
System Requirements
The minimum system requirements for the digital camera are as the following:
System Requirement
OS Windows 98SE/Me/2000/XP
CPU Pentium MMX ‘ Celeron or AMD Athlon® or higher
RAM 64 MB
CD-ROM 4X or above
HDD Hard drive with 500MB free disk space
Color display: 16-bit
USB port
4
Page 5
WWW.MANUALS.WS
WWW.MANUALS.WS
TABLE OF CONTENTS
1. PACKAGE CONTENTS.....................................................................................................................6
2. INSTALLING SOFTWARE DRIVER..............................................................................................7
3. IDENTIFYING THE PARTS.............................................................................................................9
4. CONTROL BUTTON FUNCTIONS...............................................................................................10
5. PREPARATION..................................................................................................................................12
Loading the Battery into the Camera.......................................................................................................12
Inserting and Removing an SD Card (Optional).....................................................................................12
Protecting Data on an SD Card................................................................................................................13
Attaching the Strap...................................................................................................................................14
Using the bag.............................................................................................................................................14
Charging the battery.................................................................................................................................15
Loading the Battery into Battery cradle..................................................................................................15
(A) Charging it by USB cable..................................................................................................................15
(B) Charging it by power Adaptor...........................................................................................................16
6. GETTING STARTED.......................................................................................................................17
Turning the Camera On............................................................................................................................17
Turning the Camera Off...........................................................................................................................17
Checking Battery Power...........................................................................................................................17
7. MONITOR SCREEN CONTENTS................................................................................................18
DIGITAL VIDEO MODE...........................................................................................................18
DIGITAL CAMERA MODE..........................................................................................................19
8. SETTING THE DEFAULT(Setup Mode)......................................................................................20
MENU.......................................................................................................................................................20
SETUP MODE..........................................................................................................................................20
9. TAKING MOVIE (DV MODE)........................................................................................................23
Menu Settings (DV Mode ).....................................................................................................................23
Changing resolution (DV Mode).............................................................................................................23
Changing Zoom Level (DV Mode).........................................................................................................24
Changing “EV” Exposure Compensation (DV Mode).........................................................................24
Other Video Recording Settings..............................................................................................................24
10. TAKING PHOTO (CAMERA MODE).........................................................................................27
Menu Settings (Camera Mode )........................................................................................................27
Changing resolution (Camera Mode)......................................................................................................27
Photo Quality (Camera Mode).................................................................................................................28
Changing “EV” Exposure Compensation...............................................................................................28
Using the Flash (DV Mode).....................................................................................................................28
Changing Zoom Level..............................................................................................................................28
Other Camera Settings..............................................................................................................................29
11. PLAYBACK ( PLAYBACK MODE).............................................................................................32
Playing Movie ..................................................................................................................................32
Playing Photos ...................................................................................................................................33
Viewing Pictures and Movies on a TV....................................................................................................34
Other Settings (Play back mode).............................................................................................................35
12. DELETING FILES (PLAY BACK MODE).................................................................................36
13. VIEWING MPEG4 MOVIE ON PC.............................................................................................37
MPEG4 Movie..........................................................................................................................................37
Share MPEG4 Movie................................................................................................................................37
14. TRANSFERRING FILES...............................................................................................................38
Connecting to PC......................................................................................................................................38
Copying files to PC...................................................................................................................................39
15. REMOVING THE CAMERA........................................................................................................41
5
Page 6
WWW.MANUALS.WS
WWW.MANUALS.WS
USB Cable
AV Cable
Ear Phone
Pouch
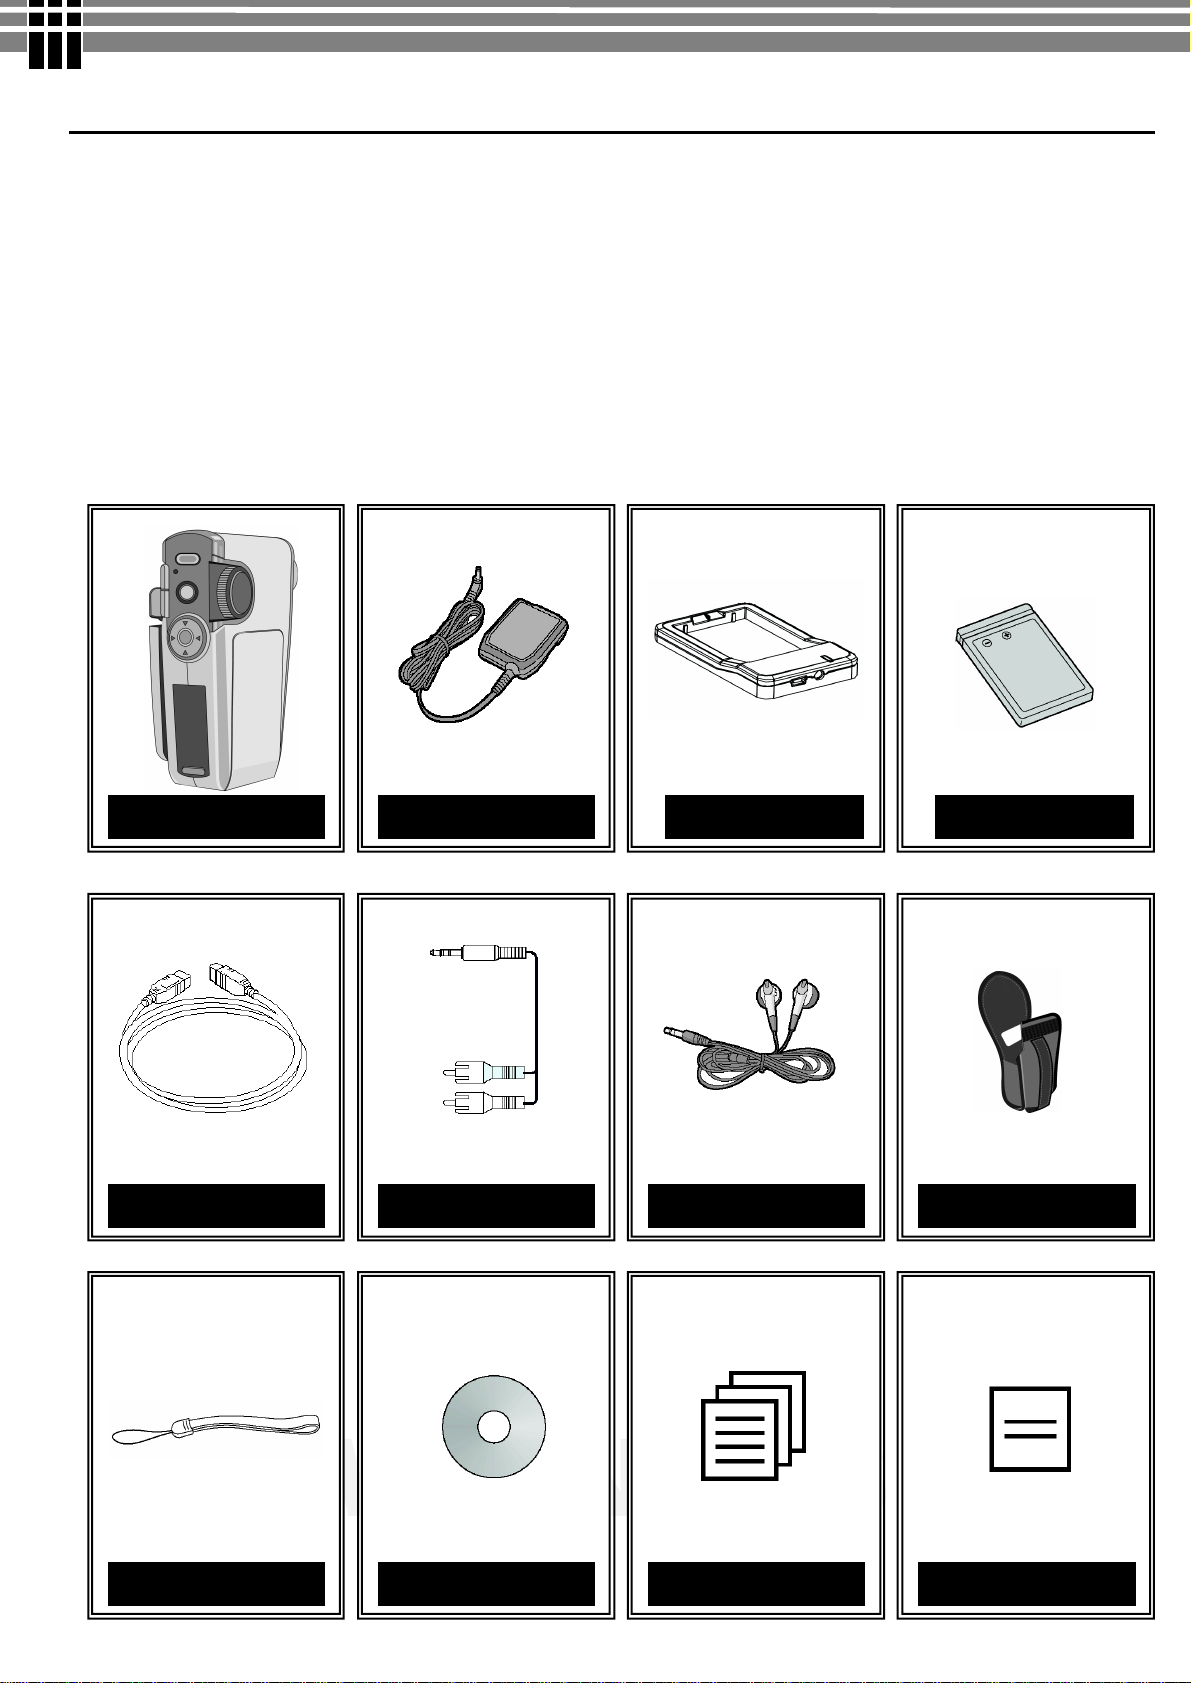
1. PACKAGE CONTENTS
• Digital Video Camera
• Power Adaptor (for battery charger)
• Charger
• NP6O Rechargeable Li-ion Battery
• USB cable
• AV cable
• Earphone
• Hand Strap
• Pouch
• Installation CD (User’s Manual, camera drivers)
• User’s Manual
• Quick Start Guide
G-Shot 3003cc Charger Power Adaptor
NP60 Battery
Hand Strap CD ROM User Manual Quick Guide
6
Page 7
WWW.MANUALS.WS
WWW.MANUALS.WS
After the driver installation is completed, the
w
x
u
+
v
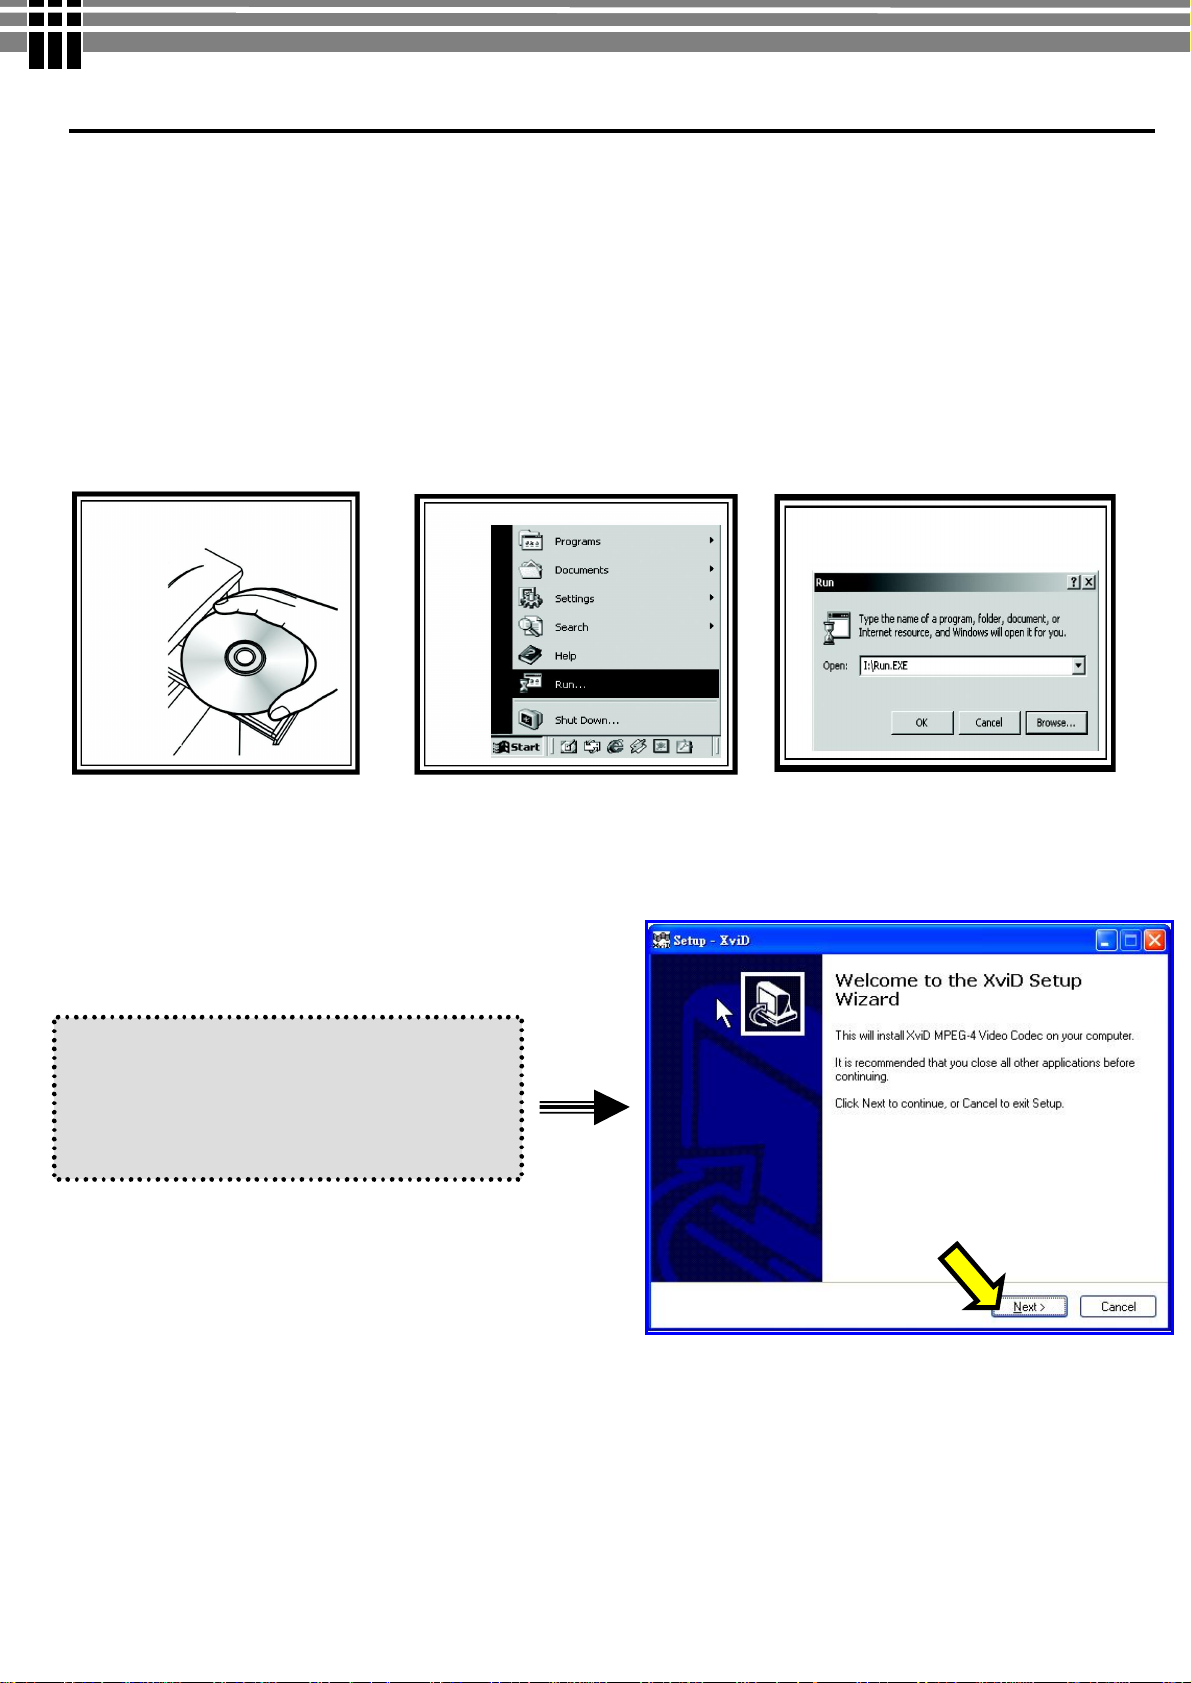
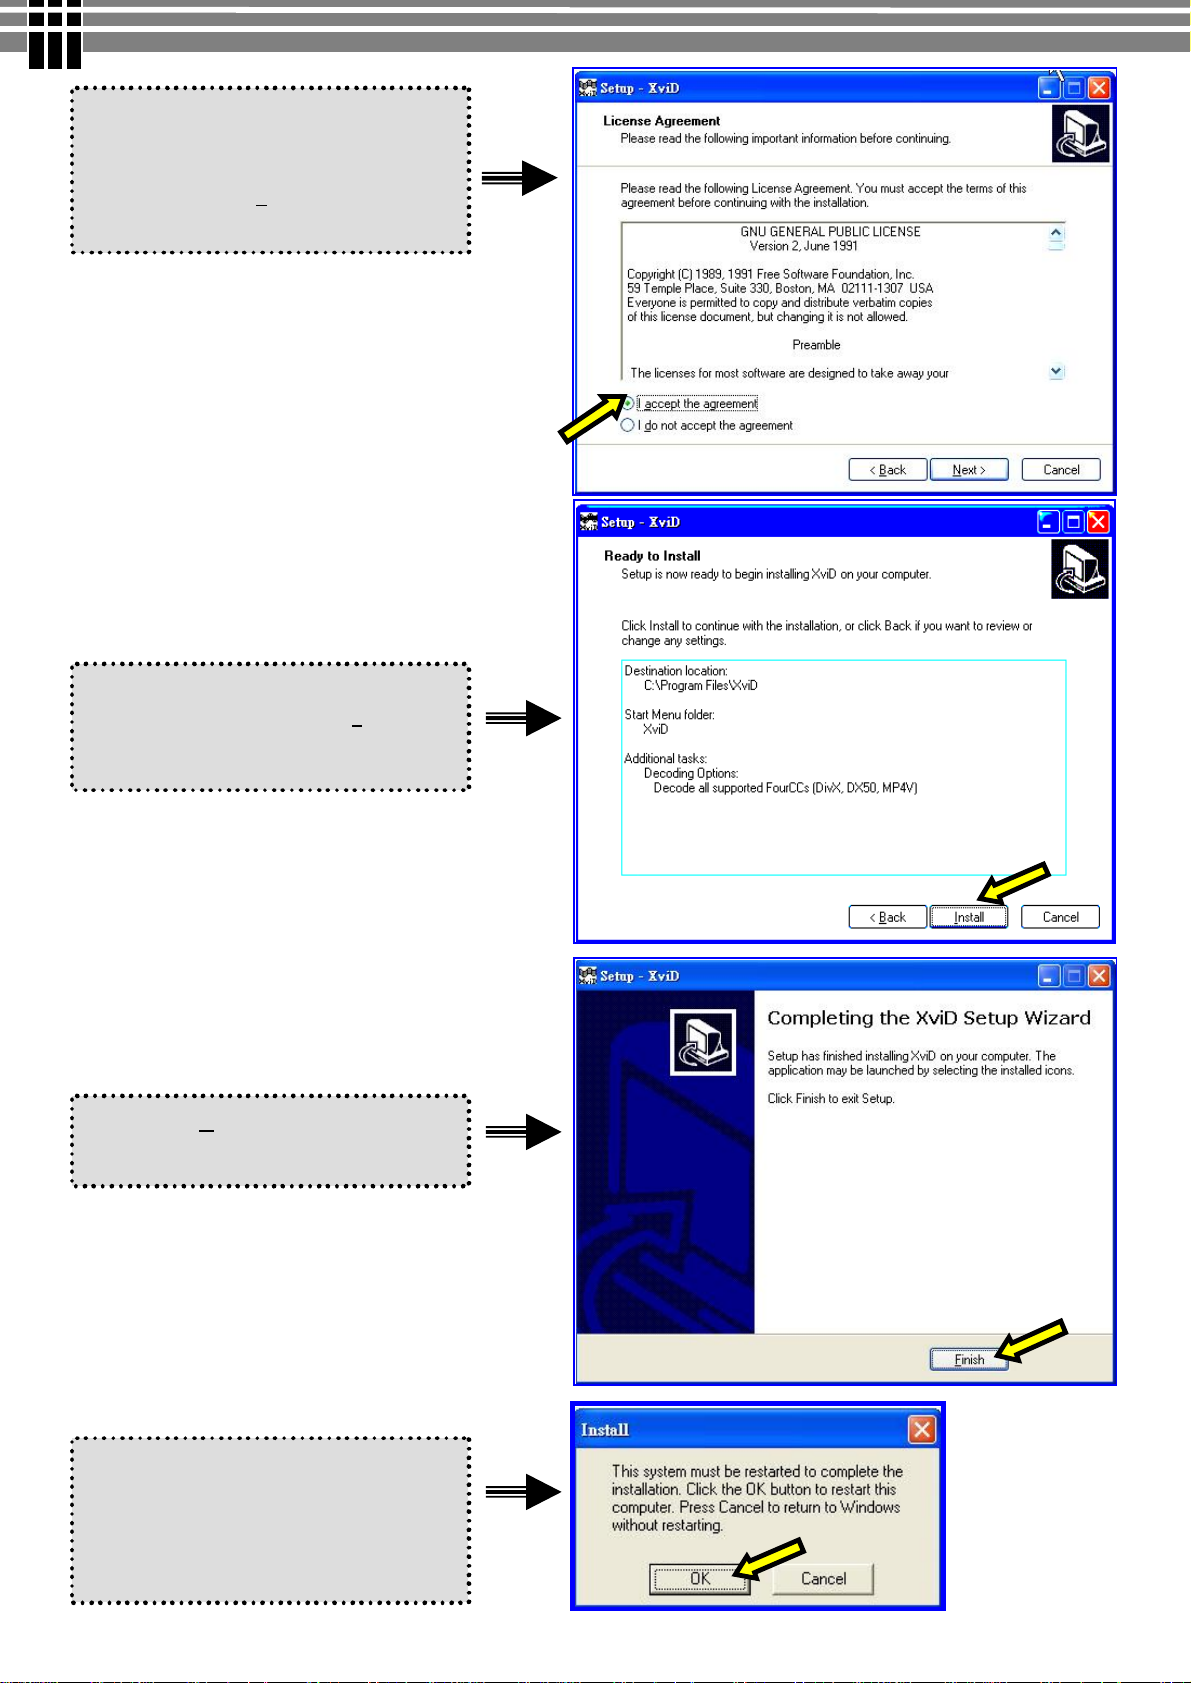
2. INSTALLING SOFTWARE DRIVER
Before connecting this camera to a computer for the first time, you should install a driver on the computer. The
driver is on the CD-ROM disc provided in the package. To install the driver:
1. Insert installer CD into the CD-ROM drive
2. Close the CD-ROM drive. An installer wizard will automatically launch.
If the installer wizard does not appear, then
3. You can click Start in the Windows Taskbar. Then, select Run to continue
4. Click Browse to search the file path, and select “autorun.exe” in your CD-ROM drive
5. Click Open, and then click OK.
u Follow the on-screen instructions to complete driver installation
Xvid (Mpeg4 Movie driver) Setup Wizard
will prompt you to install Mpeg4 Movie
driver for Movie playback.
7
Page 8
WWW.MANUALS.WS
WWW.MANUALS.WS
Click
“
I accept the agreement
”
to
Mpeg4 Movie driver for
C
lick on
F
inish
to
complete
the
The Install Shield Wizard will then
After the installa
tion is completed,
install
Movie playback.
And, click on Next to continue the
installation.
appear. Please click on Install to
continue the installation.
installation.
you may need to restart your
computer for the driver to take effect.
Press OK to re-boot the PC
8
Page 9
WWW.MANUALS.WS
WWW.MANUALS.WS
Mode
Dial
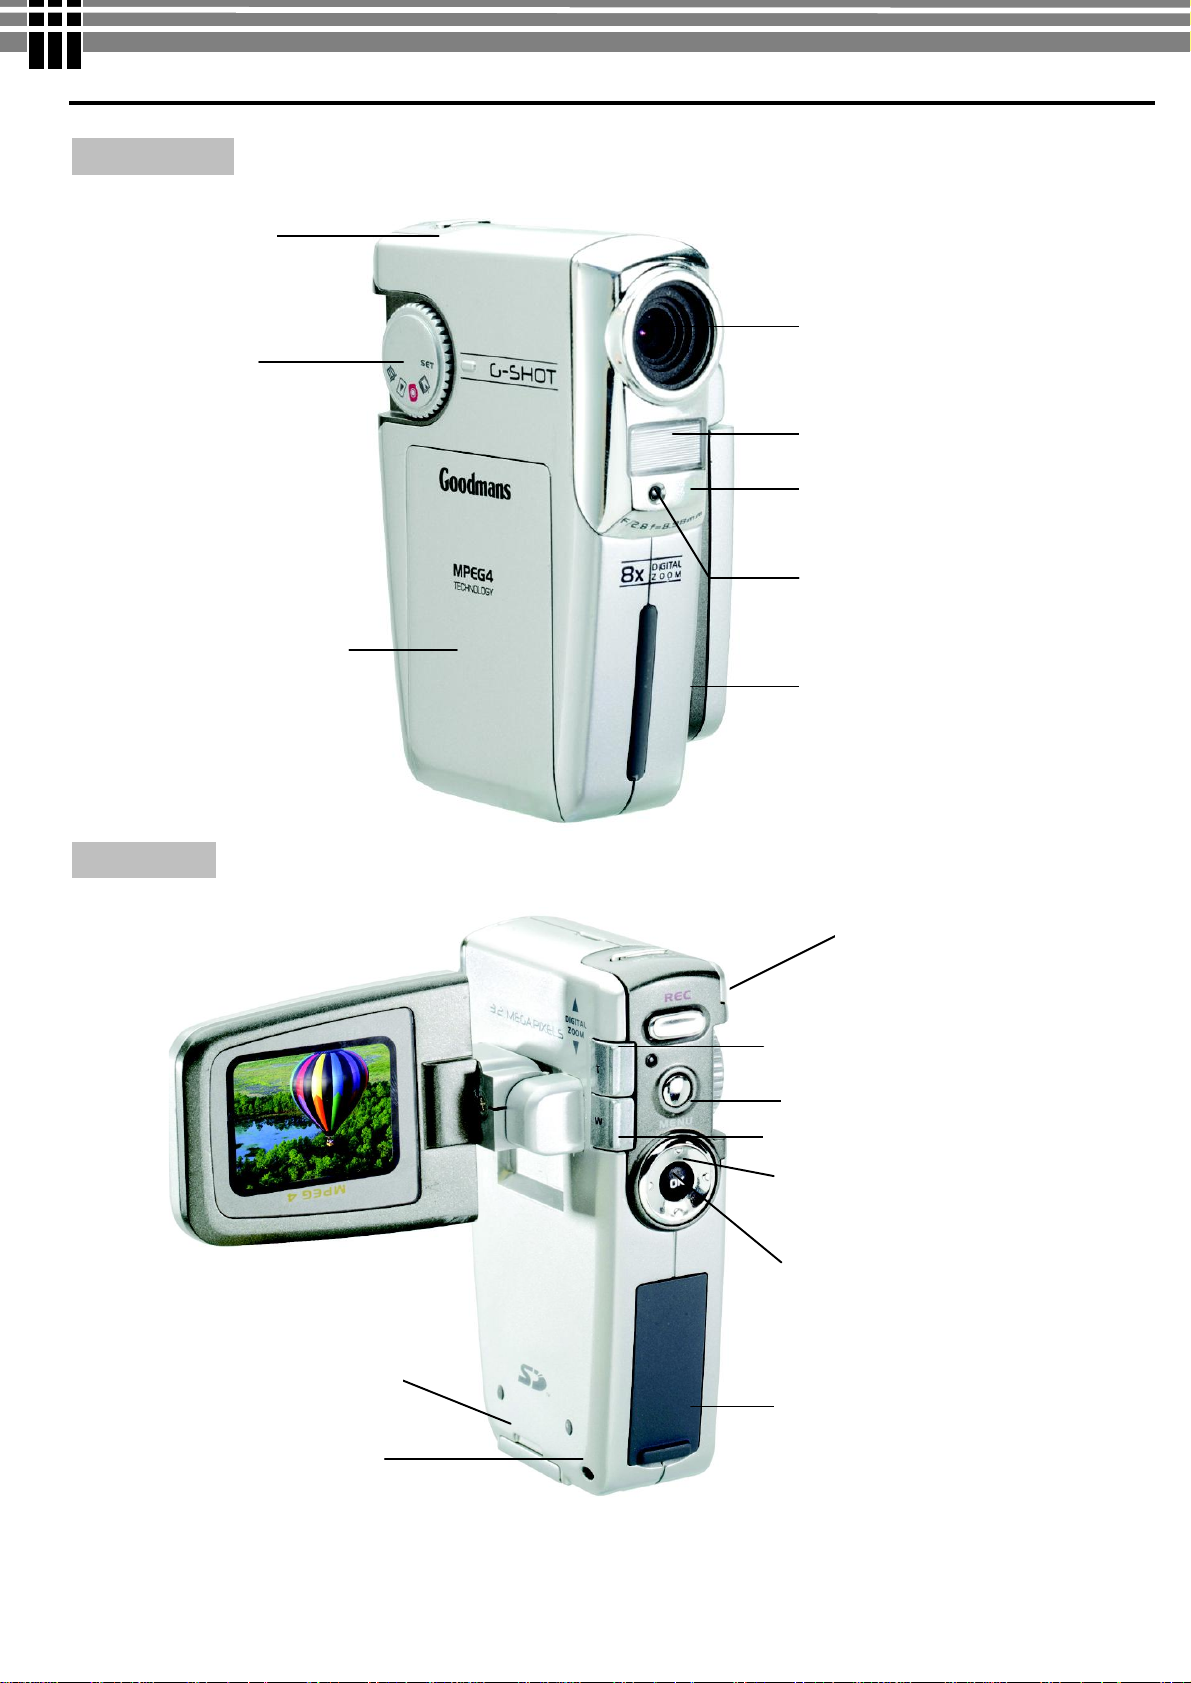
3. IDENTIFYING THE PARTS
Front View
Power Button
Battery Compartment
Rear View
Lens
Flash
Microphone
Self-timer LED
TFT LCD Panel
Record Button
(T) Zoom Out
Menu Button
(W) Zoom in
Direction Buttons
OK Button
SD / MMC
Card cover
Strap Eyelet
AV & USB connector
Cover
9
Page 10
WWW.MANUALS.WS
WWW.MANUALS.WS
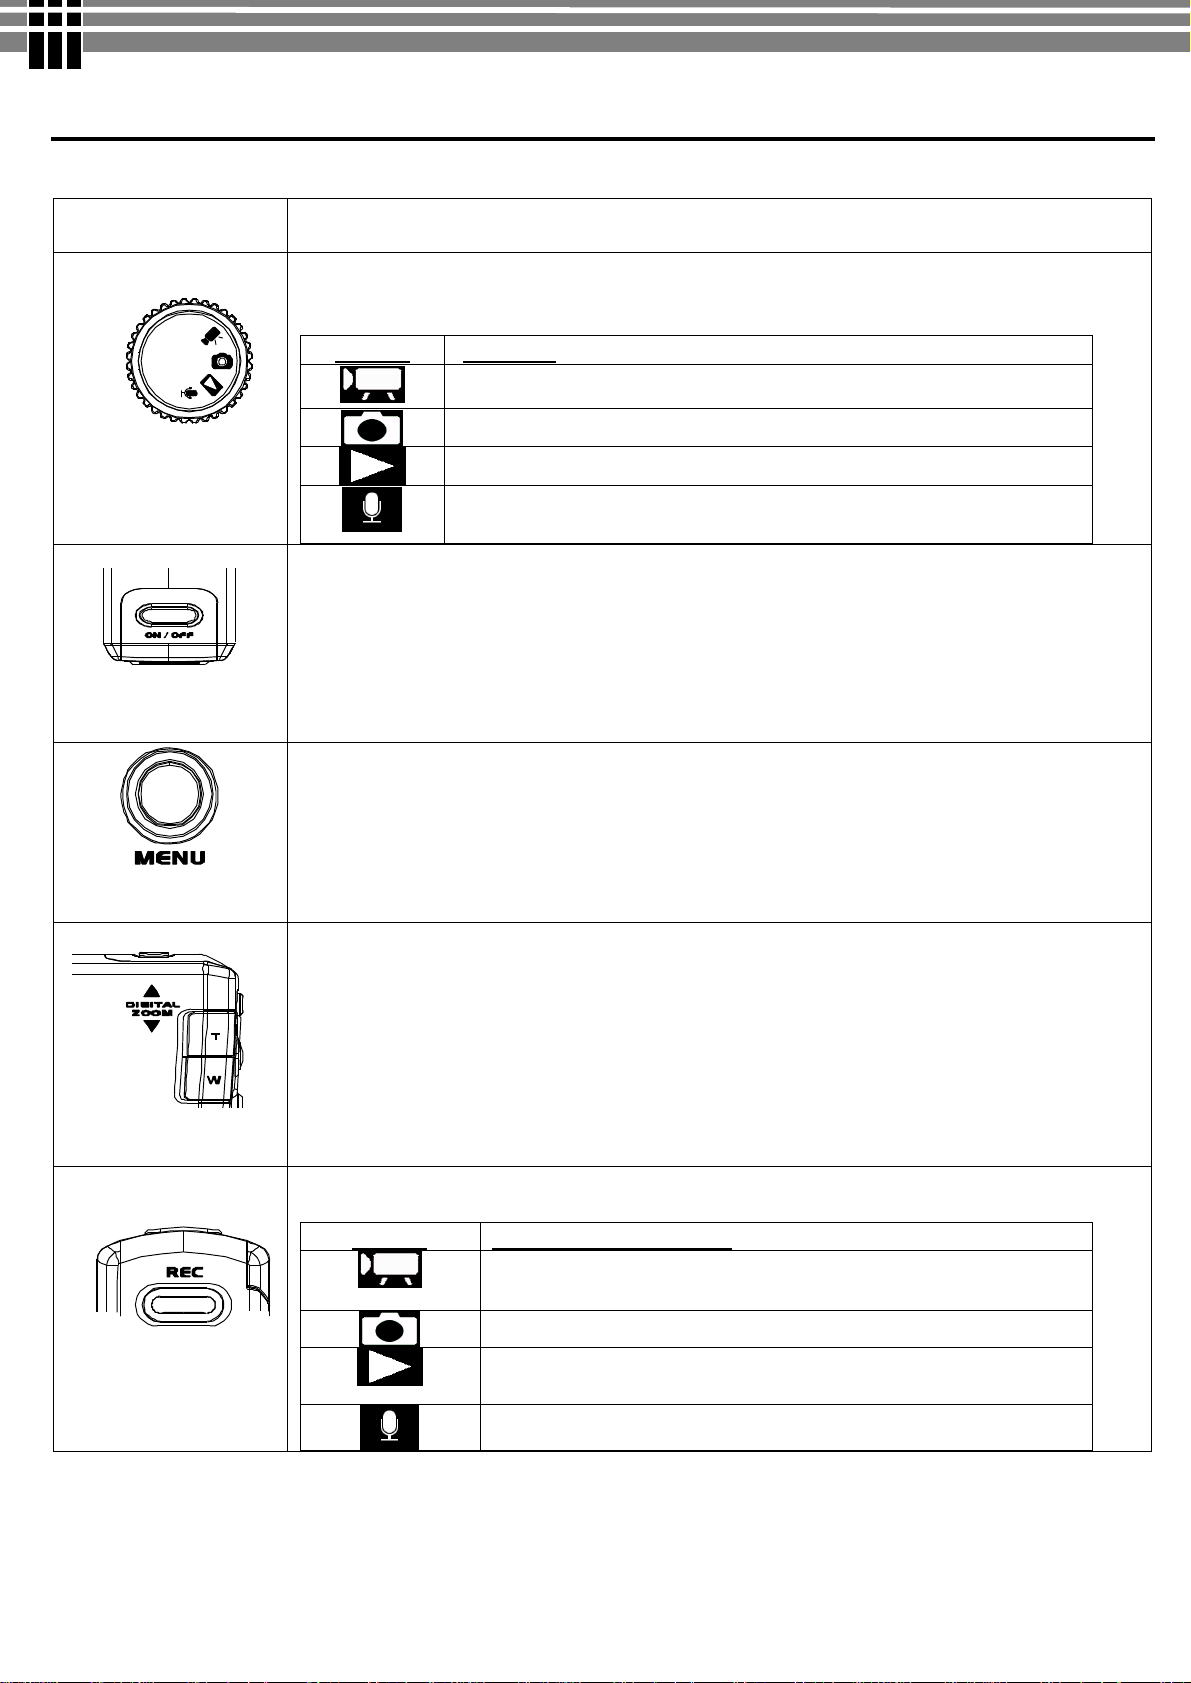
4. CONTROL BUTTON FUNCTIONS
Functional Buttons
ITEM
[ MODE ]
MODE DIAL: Rotate the MODE switch to change 4 different operation modes:
MODE STATUS
Movie Recording Mode
Photo Taking Mode
Playback Mode: [Movie/Photo/Voice]
Voice Recording Mode
.
▪Power button: Press down for one second to turn on or turn off the camera
STEPS
[ON / OFF]
[ T ] / [ W ]
▪Menu button: Press MENU to display a menu for selected mode.
.
▪Tele-Wide button: Digital Zoom in and out
The digital zoom can be set from 1x to 8x and the magnification ratio is shown on the
LCD monitor.
Function of [REC] in various modes:
MODE FUNCTION OF [REC]
Start taking movie /Stop taking move
[ REC ]
Start taking photo
Start playing movie/ voice file
Stop playing movie/ voice file
Start voice recording / Stop voice recording
10
Page 11
WWW.MANUALS.WS
WWW.MANUALS.WS
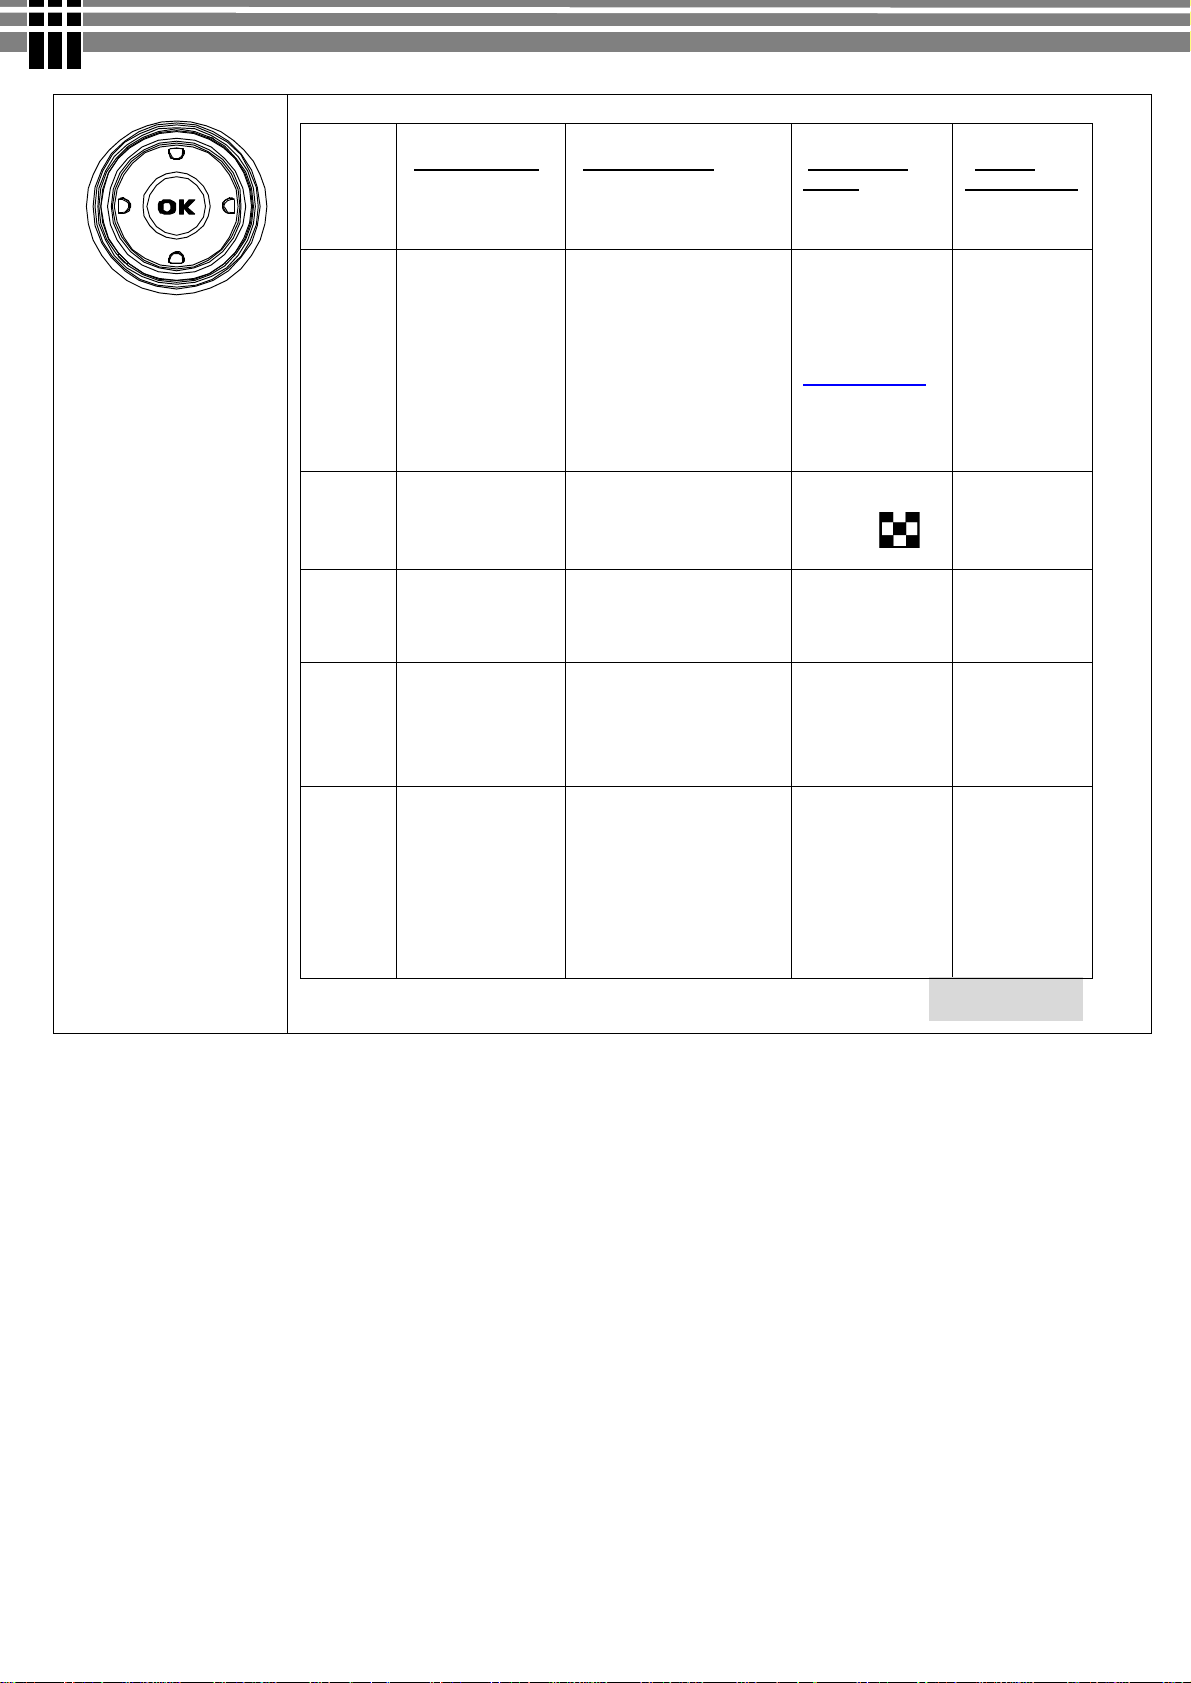
BUTTON
[MOVIE MODE] [PHOTO MODE]
[PLAYBACK
MODE]
[VOICE
RECORDING]
[ Direction / OK]
▲
▼
▶
◀
OK
▪ Movie
resolution
(VGA/QVGA )
- -
▪ Adjust EV
Exposure Value
(-2.0 to +2.0 )
- -
▪ Hide screen
icons/info
▪Show screen
icons/info
▪ Photo Resolution
(4M/3M/2M/VGA)
▪ Photo Quality
(Super Fine / Fine /
Normal)
▪Adjust EV
Exposure Value
(-2.0 to +2.0 )
Toggle between
Flash mode
▪ Off / Red-Eye
Reduction/ Auto/ On
▪ Hide screen
icons/info
▪Show screen
icons/info
Toggle
display
between AV
out / LCD
(see page34)
▪ TV preview?
▪ LCD preview?
▪Nine-image
display
▪ Next
▪ Previous
▪ Hide
screen
icons/info
▪Show
screen
icons/info
- -
- -
- -
- -
- -
- - Unavailbale
11
Page 12
WWW.MANUALS.WS
WWW.MANUALS.WS
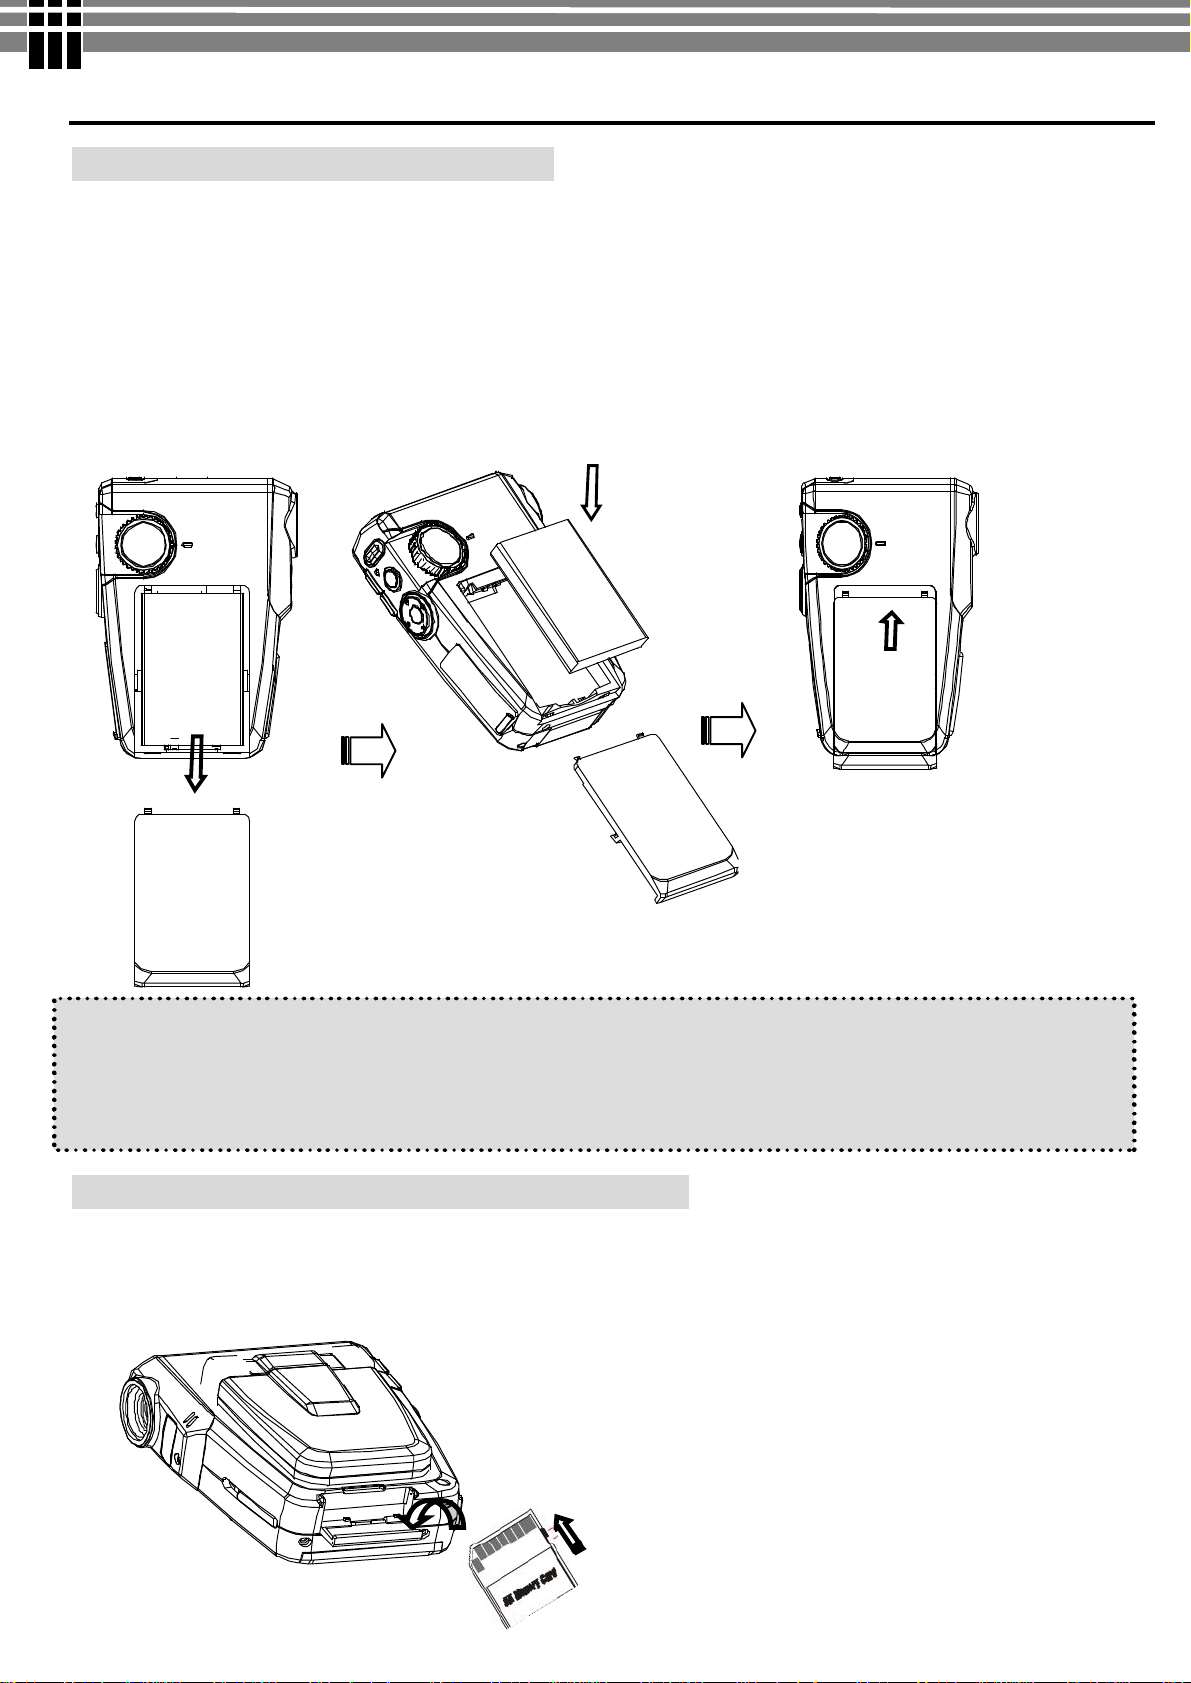
5. PREPARATION
Loading the Battery into the Camera
Please load the NP60 battery pack into the charger according to following steps:
1. Slide the battery compartment cover open in the direction as indicated
2. Face the battery up with letter side upward. Follow the battery injection direction according to the correct
polarity marks (+ or-) and plug the battery into camera
3. After the batteries are properly installed, close the battery compartment door firmly
Note:
u Please fully charge Li-ion battery pack for at least three hours before using camera.
u If you remove the battery from the camera, you will need to set the date and time again the next time you
reinsert the battery and use the camera.
Inserting and Removing an SD Card (Optional)
The video camera comes with 64 MB pre-build memory which allows you to store pictures, movies, recorded
voice. You can expand the memory capacity by using an optional SD or MMC memory card up to 512MB. To
insert a memory card, refer to the figure above and:
12
Page 13
WWW.MANUALS.WS
WWW.MANUALS.WS
1. Open the SD card cover
2. Insert the memory card until it locks into position
To remove an installed SD card, press the card inwards to release it. When the card pops out, gently remove it
from its slot.
Note:
l Do not remove the SD/MMC card while the camera is processing data (when the LED is flashing).
When a memory card is fitted, movies and pictures are saved on card rather than on the built-in
memory. And, the SD card icon will be shown on LDC display.
l It may be necessary to format the SD card the first time it is used; especially if the card has been
used in devices other than your camera. To format, see [Format] in SETUP MODE (see page 19).
l If the Built-in memory/ SD card is full, the LCD display will show "MEMORY FULL" flashing in
red color. If the SD card is write-protected, the SD card icon will change in red color.
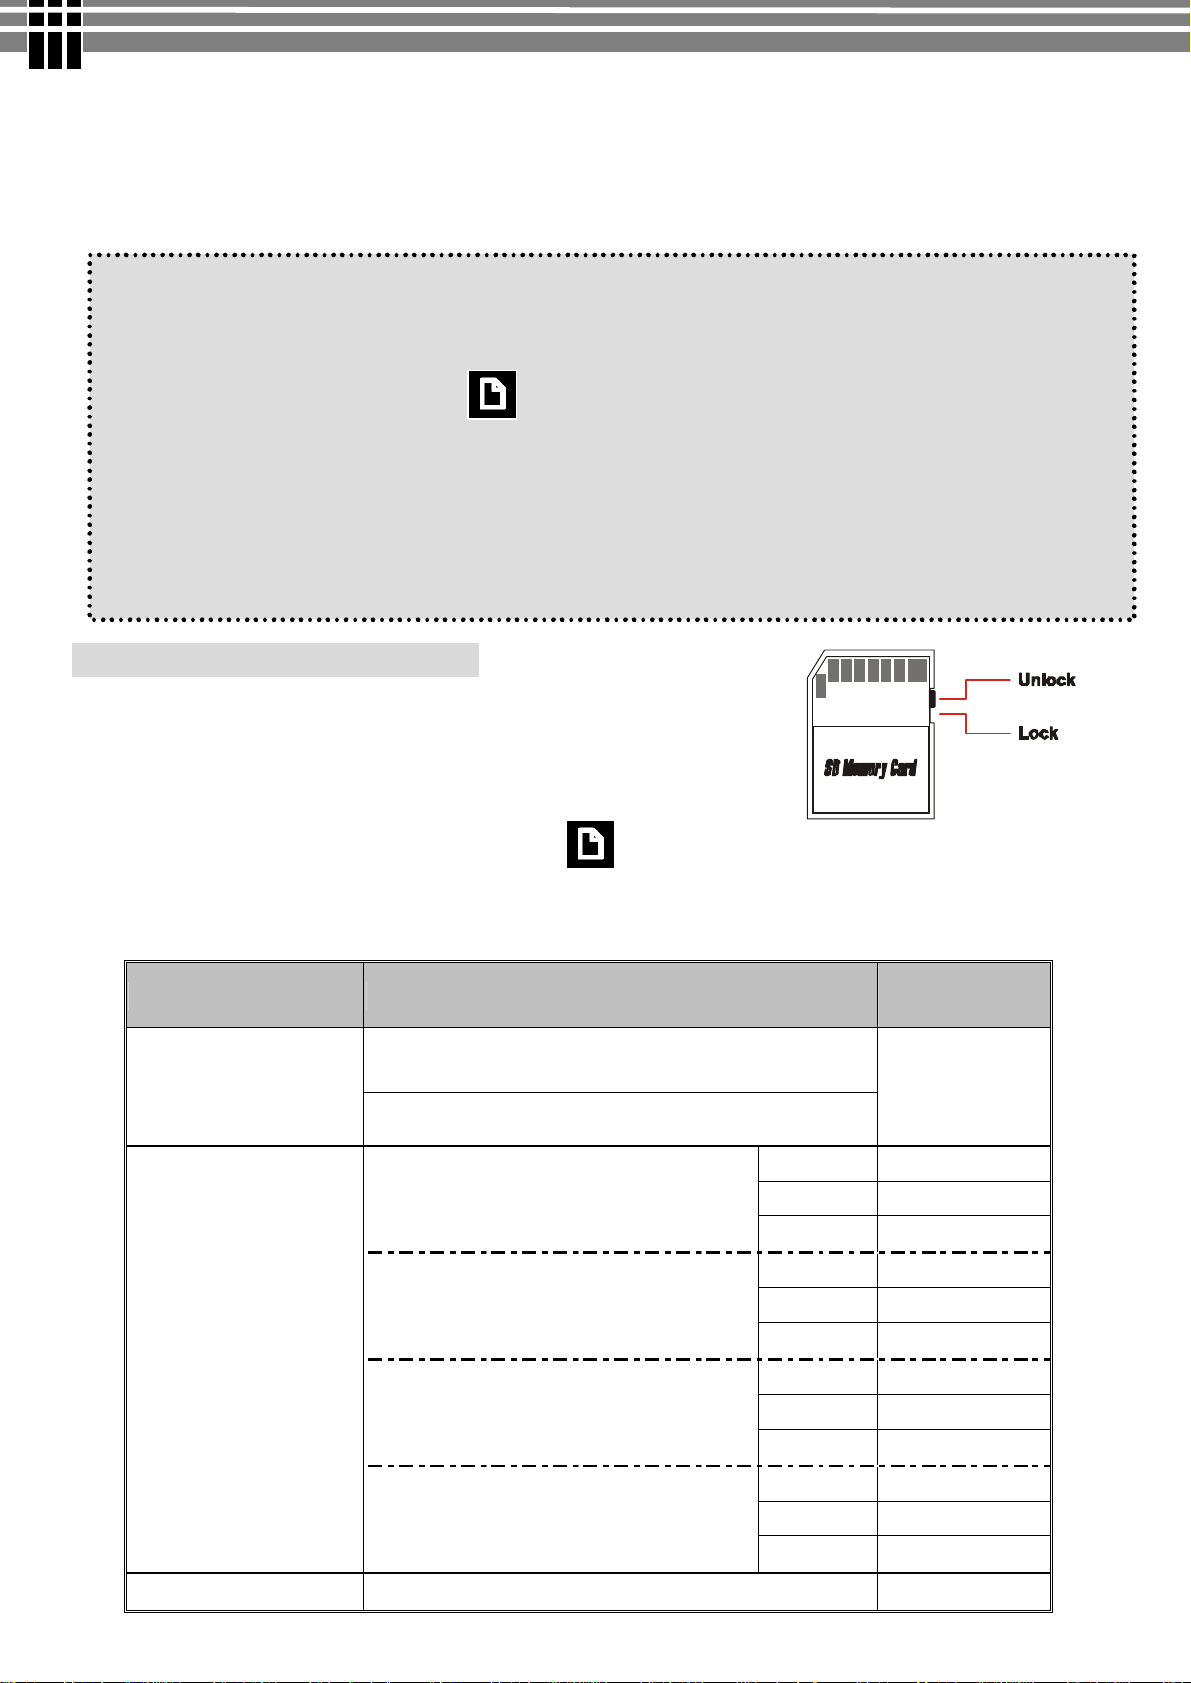
Protecting Data on an SD Card
The SD card comes with a write-protect switch. When the write-protect
switch is set to the Lock position, the card will become non-writable. To
ensure that the camera can operate normally, you should set the writeprotect switch to the Unlock position before inserting the SD card.
If you insert a write-protected card, the media icon on the LCD display will become red.
l Listed below is the approximate number of images that can be stored cards in 64MB built-in memory.
Actual capacity may vary (up to + 5%) depending on the environment and color condition.
Mode Condition Approx. capacity
Digital Video (DV)
Camera
0.3Mega Pixel(VGA) : 640 x 480
VGA(640x480) ~ 5mins20sec
QVGA(320x240) ~14min
Super Fine
Fine 60 4Mega Pixel : 2432 x 1824
Normal 140
Super Fine
Fine 90 3Mega Pixel : 2048 x 1536
Normal 230
Super Fine
Fine 150 2Mega Pixel : 1600 x 1200
Normal 540
Super Fine
Fine 770
30
40
70
360
Normal 1230
Voice Recording (VR)
- -
13
~ 56min
Page 14

WWW.MANUALS.WS
WWW.MANUALS.WS
u
v
u
v
w
Attaching the Strap
1. Thread the strap through the camera strap eyelet as shown
2. Thread the other end of strap through the loop
Using the bag
1. The accessory bag comes handy if you are planning to carry the camera with you while you are traveling
around. Simply put the camera into the bag as indicated, and you are ready to carry the camera with you.
2. Please put your hand through the wrist strap and firmly hold the camera as illustrated.
3. While taking photo with flash light, avoid blocking the strobe flash to retain the best result.
14
Page 15

WWW.MANUALS.WS
WWW.MANUALS.WS
Charge by
USB
Charge by Power
Battery Cradle
Charging the battery
Ø Before you use the video camera for the first time,
please fully charge the NP60 battery with battery cradle for
at least three hours.
(USB port)
Adaptor (DC In port)
Loading the Battery into Battery cradle
Load NP60 battery into the battery cradle by following step:
Ø Face the battery up (with the charger’s graphic) side
upward, then slide the battery into charge according to the
correct polarity marks. (+ or -). The caution LED (red)
lights during charging.
(A) Charging it by USB cable
1. Connect the battery cradle and the computer with USB cable
2. It takes about three hours to achieve a full charge. Actual charging time depends on current battery
capacity and charging conditions. The caution LED (red) lights during charging and goes off after roughly
3 hours.
15
Page 16

WWW.MANUALS.WS
WWW.MANUALS.WS
(B) Charging it by power Adaptor
1. Connect the Power Adapter (5V, 400mA) to the DC in jack and a house hold power outlet.
2. It takes about three hours to achieve a full charge. Actual charging time depends on current battery
capacity and charging conditions. The caution LED (red) lights during charging and goes blinking after
roughly 2 hours, at which point the battery pack is 90% charged. Leaving the AC adapter connected for
approximately one hour more charges the battery pack until the LED goes off.
Note:
l The power adapter provides an output voltage of 3.7 VDC at 400 milliamps and is intended for use only
with the battery charger. DO NOT ATTACH THE POWER ADAPTER DIRECTLY TO THE
G-SHOT3003CC CAMERA UNIT.
16
Page 17

WWW.MANUALS.WS
WWW.MANUALS.WS
6. GETTING STARTED
Turning the Camera On
(1) Flip out the LCD panel; the camera will turn on automatically.
(2) Or press power button for one second to turn on it.
Turning the Camera Off
To turn off the Camera, you can either press and hold the power button for one second, or you can place the
panel back to its original position.
Checking Battery Power
When the camera is on, you will see the battery power indicator on the bottom left corner of the LCD monitor
screen. It shows you the battery power level.
17
Page 18

WWW.MANUALS.WS
WWW.MANUALS.WS
7. MONITOR SCREEN CONTENTS
DIGITAL VIDEO MODE
The monitor screen uses various indicators and icons to keep you informed of the status of under video mode.
(1) (2)
(3)
(4)
(5)
(1) MODE Status Indicator
● Movie Recording Mode
(7)
(8)
(6)
● Photo Taking Mode
● Playback Mode à[Movie/Photo/Voice]
● Voice Recording Mode
(2) White Balance Indicator
Auto / Sunny / Cloudy/
Fluorescent/ Light bulb
(3) Movie Quality
● 640 x 480Pixels (30fps)
● 320 x 240Pixels (30fps)
(Hints: You can press [▲] key to toggle around above
quality setting for quick access!.)
(4) Recording Status Indicator
● Movie Recording in progress
● (No icon) : Movie Recording Standby
(5) Recording time
● Elapsed time (hh:mm:ss) : While movie recording
in progress
● Remaining recording time (hh:mm:ss) : While in
standby status
(6) Digital Zoom Level
● Digital zoom ratio meter: 1x to 8x
(8) Battery Level Indicator
(8) Storage Media Type
● : memory card (SD/MMC) is using
● (icon turns red): memory card is write
protected.
18
Page 19

WWW.MANUALS.WS
WWW.MANUALS.WS
DIGITAL CAMERA MODE
The monitor screen uses various indicators and icons to keep you informed of the status of under camera mode.
(1) (2)
(3)
(4)
(5)
(6)
(7)
(8)
(1) MODE Status Indicator
● Movie Recording Mode
● Photo Taking Mode
● Playback Mode à[Movie/Photo/Voice]
● Voice Recording Mode
(2) White Balance Indicator
Auto / Sunny / Cloudy/
Fluorescent/ Light bulb
(3) Photo Resolution
● : 2432 x 1824pixels (interpolated)
●
●
●
(Hints: You can press [▲] key to toggle around above
resolution-modes for quick access! )
(4) Photo Quality
● SF : SUPER FINE
● F : FINE
● N : NORMAL
(Hints: You can press [▼] key to toggle around above
quality setting for quick access!.)
(5) Flash Mode
(6) Self Timer
: 2048 x 1536pixels
: 1600 x 1200pixels
: 640 x 480pixels
Red-Eye/ Auto/ Fill-in/ Off
(Timer-OFF )/ (5sec ) / (10sec )
(7) Photo Counter
● No. of Pictures / Remaining Shots
(8) Digital Zoom Level
● Digital zoom ratio meter: 1x to 8x
19
Page 20

WWW.MANUALS.WS
WWW.MANUALS.WS
8. SETTING THE DEFAULT(Setup Mode)
MENU
Different menus are available for Movie, Photo, Playback, and Voice recording mode.
To access the menu:
1. Press the MENU button to open the main menu under different mode.
The selected mode menu is displayed on the LCD screen.
MENU in Movie Mode
MENU in Playback Mode
2. Use the 3/4button to navigate through function items.
3. Use the [OK] button to enter to specific function item.
(The selected function/option is highlighted with color.)
4. Press [OK] to confirm the selection,
Or, press the MENU button twice to exit the mode menu.
SETUP MODE
You can customize the camera settings for your own use, as well as for shooting-related functions. Press the
[MENU] button to display a menu for the selected mode. (The Setup menu is displayed in all modes.)
1. Power on the camera.
2. Press [MENU] button, and use the
MENU in Photo Mode
3/4button to navigate to Setup icon.
3. Use the [OK] button to enter to Setup Mode.
4. Use 4-way arrow button to navigate through the available function
(The selected function/option is highlighted with color.)
20
Page 21

WWW.MANUALS.WS
WWW.MANUALS.WS
In the below table, default setting is indication with an asterisk [Þ]
Þ 1min / 3min / Never Sleep
[ Auto Off ]
Functions:
- This item determines the auto-off time when the camera stay idle
[Beep]
[Brightness]
[ Display Setup]
[Format]
Þ 1min / 3min
Functions:
- This item allows you to toggle the beep sound on or off
Exposure Compensation Range : -2.0 (darker) to +2.0EV(brighter)
ÞDefault setting : 0
Functions:
- This item allows you to adjust the brightness level of LCD monitor
You can view stored movies and pictures on a LCD Display or Television
Þ LCD / TV (PAL) / TV (NTSC)
Note: Setting TV System
- TV(PAL) for PAL standard: UK, Europe, China, Australia, Singapore & Hong Kong etc.
- TV(NTSC) for NTSC standard : USA, Canada, Japan, South Korea and Taiwan etc.
This item allows you to format the store media that is currently in use.
Functions:
- You can use this function to prepare the SD card to record media, BUT all files stored in
media will be gone after executing this function!
This item is for date & time setting.
l Move between Date, Time and Exit by using Left/Right buttons.
l Adjust date and time by using Up/Down buttons, then select OK to validate each
[Date/Time
Setting]
[Default Setup ]
[Version ]
change.
l Select MENU to leave Time Setting without any change.
Note:
- If you remove the battery from the camera, you will need to set the date and time again the
next time you reinsert the battery and use the camera.
Use this function to return the camera settings to default values except for date & time
This function shows the camera’s software version (this info is used by service centre)
21
Page 22

WWW.MANUALS.WS
WWW.MANUALS.WS
22
Page 23

WWW.MANUALS.WS
WWW.MANUALS.WS
Start/Stop
VGA
/
QVGA
MENU
9. TAKING MOVIE (DV MODE)
This mode allows you to take motion video with sound in the Movie Mode. Video is stored in memory with
high quality MPEG4 compression with at low file sizes. The length of recorded movie clip is unlimited
(maximum length depends on memory size of SD/MMC card)
TO TAKE MOIVE:
1. Turn the Mode Dial to [ ] DV mode.
2. Press [▲] button repeatedly to select Movie’ s
resolution [VGA] / [QVGA].
3. To start recording, press [REC] button once. Movie
recording begins, with the elapsed recording time shown
on the LCD.
.
4. To stop recording, press [REC] button again. The movie
is recorded. The camera is ready to shoot another movie
Note:
l Before movie is taken, you can see the remaining time allowing you to take next movie on top right corner
of LCD. The remaining time is an approximation based on the unused memory
Menu Settings (DV Mode )
When in DV [ ] mode, you can use the default settings that have already been chosen for video recording.
If you want to change the recording settings to suit your needs, press the Menu button. Then use the 4-way
arrow keys to go through each setting and make adjustments.
The following sections describe about the video recording settings.
Changing resolution (DV Mode)
Your camera offers 2 choices in resolution: "VGA" or "QVGA".
u“VGA” (640 x 480 pixels) allows a movie to be taken as sharp as
possible, which is best suitable for TV viewing, but requires more
memory to store.
ØØ Select VGA if you want to produce the best result for viewing
u“QVGA” (320 x 240 pixels) allows for longer recording time to be
stored on the camera, but the quality of image will deteriorate.
ØØ Select QVGA if saving memory is top priority,
While in DV mode, pressing [▲] key allows you to switch the quality setting without entering the options
menu.
Note:
- If the moving picture is recorded again after stopping recording, it will be saved as another file.
- Exposure Value, White Balance, Strobe Flash…etc. adjustments cannot be selected during recording of
MPEG4 moving pictures.
Recording
Resolution
23
Page 24

WWW.MANUALS.WS
WWW.MANUALS.WS
Changing Zoom Level (DV Mode)
While recording, you can press the [ T ] or [ W ] button to zoom in/out the screen..
The digital zoom can be set from 1x to 8x and the magnification ratio is shown
on the LCD monitor.
Changing “EV” Exposure Compensation (DV Mode)
In movie mode, press [▶] button to activate EV setting. Then, rock the [◀ ] or [▶] to change the EV
value, and then press [O.K] to confirm the setting.
▶ : Increases the EV value:
A higher EV value is best used for lightcolored subjects and backlight subjects.
u Exposure Compensation Range: -2.0EV to +2.0EV Steps: 1 /3EV.
Exposure compensation lets you change the exposure setting (EV value) manually to adjust for the lighting of
your subject. This feature helps to achieve better results when recording a backlit subject, a strongly lit subject
indoors, and a subject that is against a dark background.
Other Video Recording Settings
In the below table, default setting is indication with an asterisk [Þ]
Þ 640 x 480Pixels / 320 x 240Pixels
Hints:
◀ : Decreases the EV value.:
A lower EV value is best for dark-color subjects
and for shooting outdoors on a clear day.
- You can press [▲] key to toggle around above quality setting.
[Movie Quality]
[White Balance]
Þ Auto / Sunny / Cloudy / Fluorescent / Light bulb
Hints:
- Adjust the WB according to the light conditions for the recording
24
Page 25

WWW.MANUALS.WS
WWW.MANUALS.WS
Exposure Compensation Range : -2.0EV(underexposure) to +2.0EV(overexposure)
ÞDefault setting : 0
[EV Adjust ]
Q
Hints:
- Compensates for extreme differences between foreground and background lighting
To adjust basic setting, eg.
[SETUP MODE ]
Sleep mode / Beep / LCD brightness /
Display Setup / Format / Date-Time setting …etc
Hints:
For details on how to use Setup mode, see “SETUP MODE” on page 19
25
Page 26

WWW.MANUALS.WS
WWW.MANUALS.WS
26
Page 27

WWW.MANUALS.WS
WWW.MANUALS.WS
MENU
Adjust EV
Adjust
Start/Stop
Adjust Photo
Toggle
10. TAKING PHOTO (CAMERA MODE)
G-Shot3003CC equips with 3.2-Mega Pixel sensor can take high quality images with up to 2432x1824 pixels
TO TAKE PHOTO:
1. Turn the Mode Dial to [ ] Camera mode.
2. Press [▲] button repeatedly to select photo
resolution setting [4MP] / [3MP] / [2MP] / [VGA],
Or, press [▼] button to select photo resolution
[SF] Super Fine/ [F] Fine / [N] Normal (See next
section “Photo Resolution Vs Photo Quality”)
3. To start shooting photo, press [REC] button once.
Note:
l Before photo is taken, you can see number of [total no. of photos have been taken] / [remaining shots] on
top right corner of LCD. The remaining shot is an approximation based on the unused memory
Menu Settings (Camera Mode )
When in Camera [ ] mode, you can use the default settings that have already been chosen for photo taking.
If you want to change the settings to suit your needs, press the Menu button. Then use the 4-way arrow keys to
go through each setting and make adjustments.
The following sections describe about the menu settings.
Changing resolution (Camera Mode)
Your camera offers 4 choices in resolution:
shooting
● : 2432 x 1824pixels (interpolated)
●
●
●
J TIPS - Choice of Resolution
- While in Camera mode, you can press [▲] key to toggle the resolution without entering the options menu.
u
u
u
Resolution
: 2048 x 1536pixels
: 1600 x 1200pixels
: 640 x 480pixels
Flash mode
Photo quality
[4M]
too large for email.
[2M]
[VGA]
[3M]
/
is suitable for 6”x4” Photo printout; acceptable for email.
allows a photo to be taken as sharp as possible, which is suitable for 7”x 5” Photo printout;
is good for sharing with email to small for photo printout
27
Page 28

WWW.MANUALS.WS
WWW.MANUALS.WS
Photo Quality (Camera Mode)
● SF: SUPER FINE
● F : FINE
● N : NORMAL
(You can press [▼] key to toggle around above quality setting for quick access!.
JTIPS – Photo Resolution Vs Photo Quality:
u In general, photos taken at higher resolution and quality contain more details and look sharper, but they
also take up more memory space as well as longer processing time for taking next photos. To maximize the
number of photos to be stored, you can choose a lower quality setting. To maximize the photo quality,
choose a higher setting
Changing “EV” Exposure Compensation
In Camera mode, press [▶] button to activate EV setting. Then, rock the [◀ ] or [▶] to change the EV
value, and then press [O.K] to confirm the setting. (See Changing “EV” Exposure Compensation (DV
Mode) page24 for details)
Using the Flash (DV Mode)
In movie mode, press [◀] button to toggle Flash mode.
: Red-Eye Reduction with Auto Flash
: Auto Flash
: Flash (Compulsory)
: No Flash
Changing Zoom Level
While recording, you can press the [ T ] or [ W ] button to zoom in/out the screen.
The digital zoom can be set from 1x to 8x and the magnification ratio is shown on
the LCD monitor.
28
Page 29

WWW.MANUALS.WS
WWW.MANUALS.WS
Other Camera Settings
In the below table, default setting is indication with an asterisk [Þ]
Þ No Flash / Red-Eye / Auto / Fill-in
Hints:
- You can press [◀] key to toggle around above quality setting.
[Flash Option]
SF - Super Fine / Þ F - FINE / N - Normal
Hints:
- You can press [▼] key to toggle around above quality setting.
[Photo Quality]
[Photo Quality]
[White Balance]
[EV Adjust ]
4M -
2M -
Hints:
- You can press [▲] key to toggle around above quality setting.
- Interpolation is a way to add pixels that are not really there to make an image print properly at
Þ Auto / Sunny / Cloudy / Fluorescent / Light bulb
Hints:
- Adjust the WB according to the light conditions for the recording
Exposure Compensation Range : -2.0EV(underexposure) to +2.0EV(overexposure)
ÞDefault setting : 0
Q
Hints:
- Compensates for extreme differences between foreground and background lighting
2432 x 1824pixels
1600 x 1200pixels
sizes larger than normal. Interpolation softens the image. Use this mode to print images larger
than 7”x 5”. For the best quality images and prints, always use 3M + SF.
(interpolation) / Þ 3M -
/ VGA -
640 x 480pixels
-
2048 x 1536pixels
/
Þ - Timer OFF / - Set the self-timer to be 5 Seconds
[Self Timer]
/ - Set the self-timer to be 10 Seconds
Note:
- Self-timer Mode is automatically off after a photo is captured or the camera is turned off.
29
Page 30

WWW.MANUALS.WS
WWW.MANUALS.WS
Þ - Date-Stamp Disabled / - Date-Stamp Enabled
[Date Stamp]
[SETUP MODE ]
Note:
- Use this function to mark the date stamp on the captured photos. Once this function is being
enabled, the date-time setting will be activated to ask for your confirmation on current date &
time.
To adjust basic setting, eg.
Sleep mode / Beep / LCD brightness /
Display Setup / Format / Date-Time Setting …etc
Hints:
For details on how to use Setup mode, see “SETUP MODE” on page 19
30
Page 31

WWW.MANUALS.WS
WWW.MANUALS.WS
31
Page 32

WWW.MANUALS.WS
WWW.MANUALS.WS
u
PlayBack
Mode
x
v
[Thumbnail Display]
w
y
11. PLAYBACK ( PLAYBACK MODE)
Playing Movie
1. Turn the Mode Dial to (Playback) Mode, then the last file,
e.g. Movie / Photo / Audio, taken will be displayed
2. Press [▼] key once to display 6-images [thumbnail display].
3. Use the 4-way keys select the movie you want to view. The selected recording is border by a red frame
4. Press the [OK] button once to view [single display] on the selected movie file.
5. Press the [REC] button once to play the movie, press the button again to pause the movie playback
JTIPS – Hide On-Screen Info:
- [O.K] button allows to hide / show on-screen info of the file.
[Single Display]
[PLAY / PAUSE]
32
Page 33

WWW.MANUALS.WS
WWW.MANUALS.WS
x
v
[Thumbnail Display]
w
Playing Photos
1. Turn the Mode Dial to (Playback) Mode, then the last file, e.g. Movie / Photo / Audio, taken will
be displayed
2. Press [▼] key once to display 6-images [thumbnail display].
3. Use the 4-way keys select the photo you want to view. The selected recording is border by a red frame
4. Press the [OK] button once to view [single display] on the selected photo file.
[Single Display]
33
Page 34

WWW.MANUALS.WS
WWW.MANUALS.WS
x
y
z
[
PLAY BACK MODE
] [
ENTERING TV M
ODE
] [
CONFIRM SETTING
]
Viewing Pictures and Movies on a TV
Connect your camera and TV via an AV cable for real- time display. You can export your video clips, still
pictures and audio recordings directly to your TV to share them with friends and family.
1. Turn on your TV and select the appropriate Video Input channel to which the camera is connected.
2. Connect the audio and video ends of the AV cable to your TV.
3. Connect the other end to your camera (AV Out port).
4. Turn on the camera, and turn Rotary Dial to Playback [ ►]mode
5. Entering to TV option mode by pressing the [▲]cursor
6. Select [YES], and press "OK" button to confirm entering into TV mode. The steps for viewing stored
pictures and movie on a TV are exactly the same as for viewing them on the LCD monitor.
JTIPS – Hide On-Screen Info:
Ø [O.K] button allows to hide / show on-screen info of the file.
34
Page 35

WWW.MANUALS.WS
WWW.MANUALS.WS
7. To return back from TV mode to LCD display mode, repeat step5 & step6. Following screen will
appear on TV to guide you return to LCD display mode.
Notes:
l The LCD monitor will be turn off when TV mode is being activated
l The default setting of TV system is in PAL mode for most European countries. If your TV is using
NTSC instead of PAL, you need to change TV system setting to NTSC; otherwise the output images
will not be displayed properly. (See “Setup Mode – Display Setup” page 19)
Other Settings (Play back mode)
Resizes:
- This function allows you to resize photo size
(note: resize photo from low resolution to higher resolution will degrade the photo quality)
[Resize]
DPOF: Direct Print Out Format
- This function allows you to print on a DPOF-compatible printer or at a professional print
service from the memory card in accordance with the file name recorded on the card
[DPOF]
Notes – DPOF :
l DPOF print settings can be configured for images only, not for video clips.
l DPOF print settings can be configured for images on memory card only (NOT for internal memory).
After DPOF settings have been configured, a folder titled “MISC”, which holds DPOF settings information,
will be created on the root level of the storage devices. In case you need to copy images between storage
devices, DO REMEMBER TO COPY THE “MISC” FOLDER AS WELL, should you want to keep the
DPOF settings information.
35
Page 36

WWW.MANUALS.WS
WWW.MANUALS.WS
x
y
[DELETE ONE / DELETE ALL
]
u
12. DELETING FILES (PLAY BACK MODE)
TO DELETE FILES:
1. Turn the Mode Dial to (Playback) Mode, then the last file,
e.g. Movie / Photo / Audio, taken will be displayed
2. Press [▼] key once to display 6-images [thumbnail display].
3. Use the 4-way keys select the file you want to delete. The selected file is border by a red frame
4. Press the [MENU] button to enter to delete mode.
5. Press the [OK] button once to select [Delete One] file , [Delete All] files in the memory, then
6. Select [ YES] to confirm deleting record, or select [NO] to cancel delete.
[ DELETE MODE ]
36
Page 37

WWW.MANUALS.WS
WWW.MANUALS.WS
13. VIEWING MPEG4 MOVIE ON PC
MPEG4 Movie
G-Shot3003CC allows you to take motion video with sound in the Movie Mode. Video is stored in memory
with high quality MPEG4 compression with at low file sizes. The length of recorded movie clip is unlimited
(maximum length depends on memory size of SD/MMC card)
When playing MPEG4 movie for the first time, MPEG4 Video Codec Xvid should be installed in PC.
To do this:
1. Insert the CD-ROM into the computer’s CD-ROM
drive. Click “Install Mpeg4 Video Driver ? ” (Install
MPEG4 Video Codec Xivd) and follow the on-screen
instructions to complete the installation. (See
chapter2 - installing software driver for details)
2. Start video player such as Widows Media Player to
view MPEG4 AVI Movies.
Note:
Application software for playing AVI, e.g. Windows Media Player, Quick Time…etc, is NOT included in
this camera package. You have to make sure that application program, exists on your computer system.
Share MPEG4 Movie
Ø You can share the recorded MPEG4 movies to your friends via internet or CD. Make sure MPEG4 Video
Codec Xvid is installed in your friends’ PC. MPEG4 Video Codec Xvid is available in the provided CD or
can be downloaded from Internet.
37
Page 38

WWW.MANUALS.WS
WWW.MANUALS.WS
w
v
PlayBack
Mode
u
14. TRANSFERRING FILES
Connecting to PC
1. Turn on your camera, and switch the Mode Dial to [ ]
Playback Mode.
2. Connect the computer and camera with the supplied USB cable.
3. Connect the other end of the USB cable to your camera.
38
Page 39

WWW.MANUALS.WS
WWW.MANUALS.WS
u
v
w
f
older.
u
Copying files to PC
By copying files from the camera to your computer, you can permanently save your creative works in the hard
disk.
To do this:
(This step varies according to your operation system)
.
l Double-click on My Computer.
l Then double-click on the icon of the
For Windows XP users:
After the camera is connected to your
computer, a dialogue window will appear
automatically. Please select the item Open
folder to view files using Windows
Explorer and click OK.
For Windows 2000/ME/98SE users:
removable disk that has just appeared
Double-click on DCIM folder.
Double-click on the 100COACH
39
Page 40

WWW.MANUALS.WS
WWW.MANUALS.WS
x
Drag the pictures to your desired target
folder.
Note:
Ø Please do not copy any files into the “DCIM” folder or “100COACH” folder of your
camera. Otherwise it may cause the camera unstable or crash.
40
Page 41

WWW.MANUALS.WS
WWW.MANUALS.WS
Windows
Me Users
15. REMOVING THE CAMERA
Use the procedure below when disconnecting the USB cable from a
Windows PC
u
41
Page 42

WWW.MANUALS.WS
WWW.MANUALS.WS
Windows
2000 or Window XP Users
Windows
98 or Windows 98SE Users
u
u
42
 Loading...