

Page 1
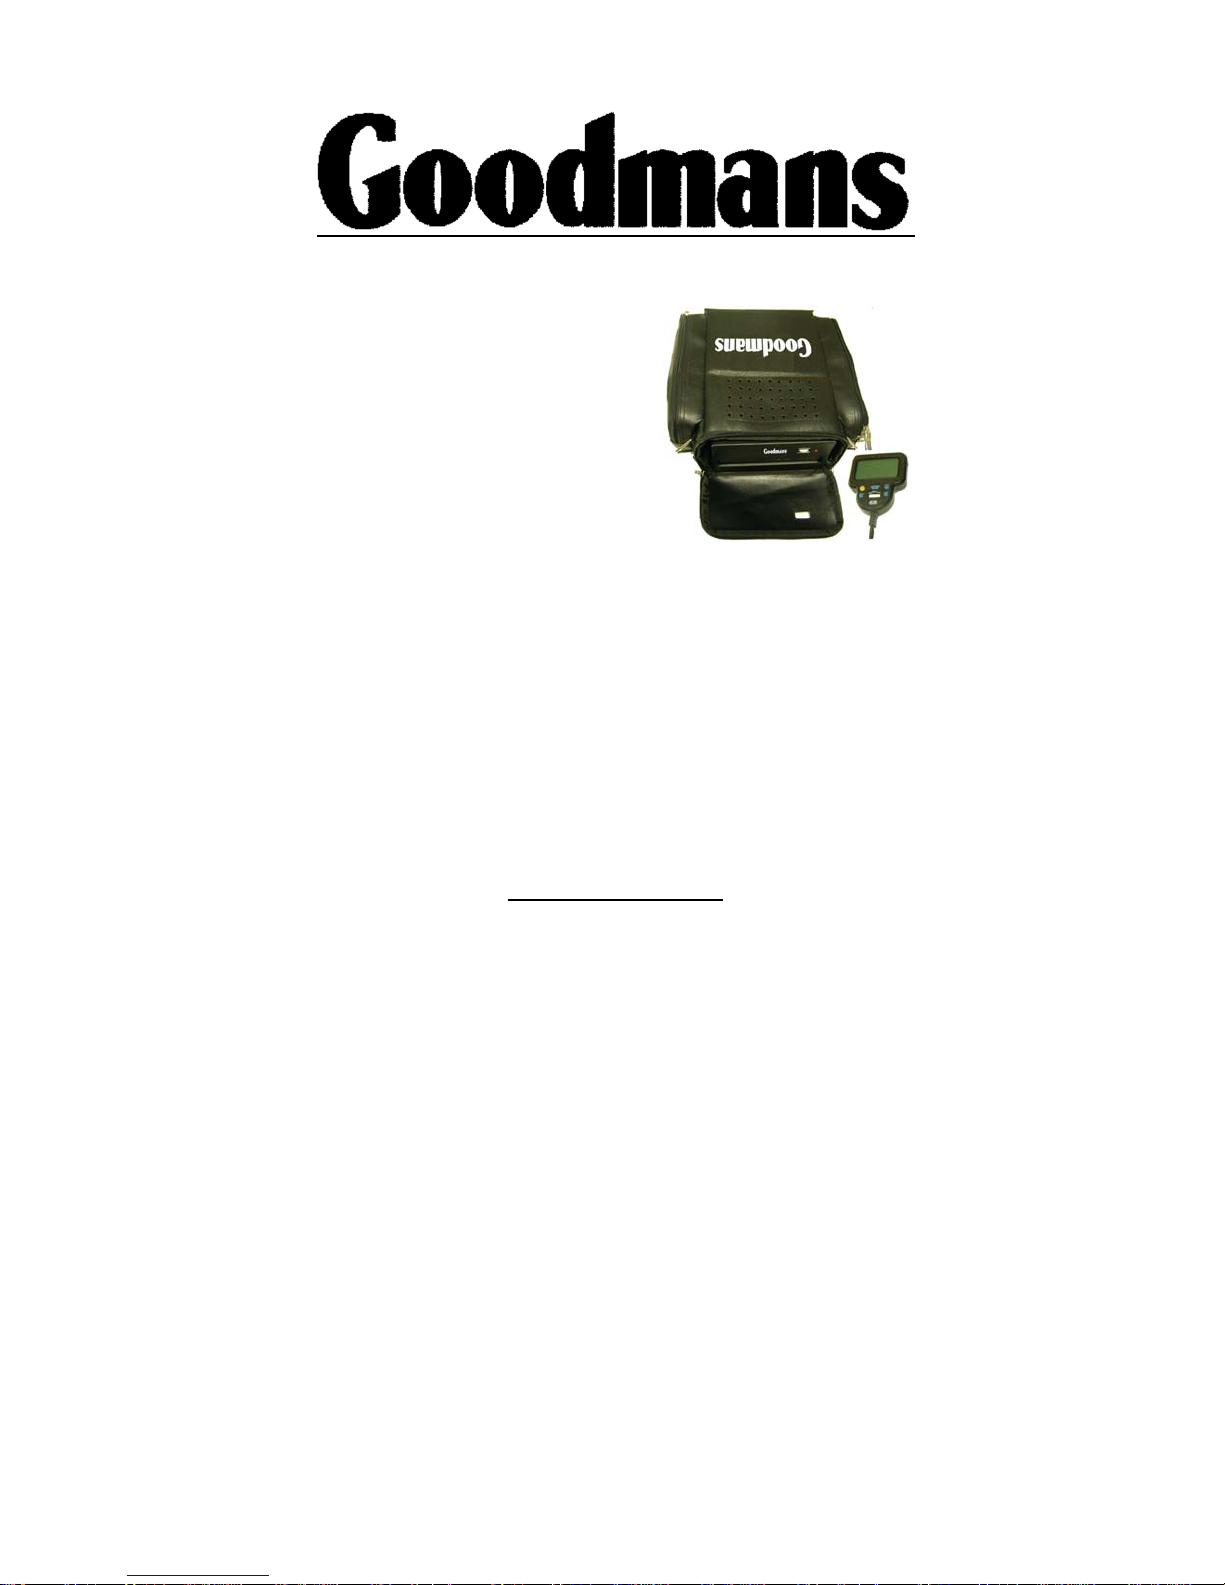
GNAV20
User’s Guide
1
TABLE OF CONTENTS
1. GNAV20 Overview
2. How GPS Works
3. Getting Started
4. Entering a Destination
5. Driving Directions
6. Off-Route Situations
7. Changing the Settings
8. Voice Mode and Speech Recognition
9. Entering a Destination by Voice
10. Driving Directions and Voice Commands
11. Changing the Settings by Voice
12. Advanced Voice Functions
13. Troubleshooting
14. Safety Information
15. Map Update Information
2
Page 2
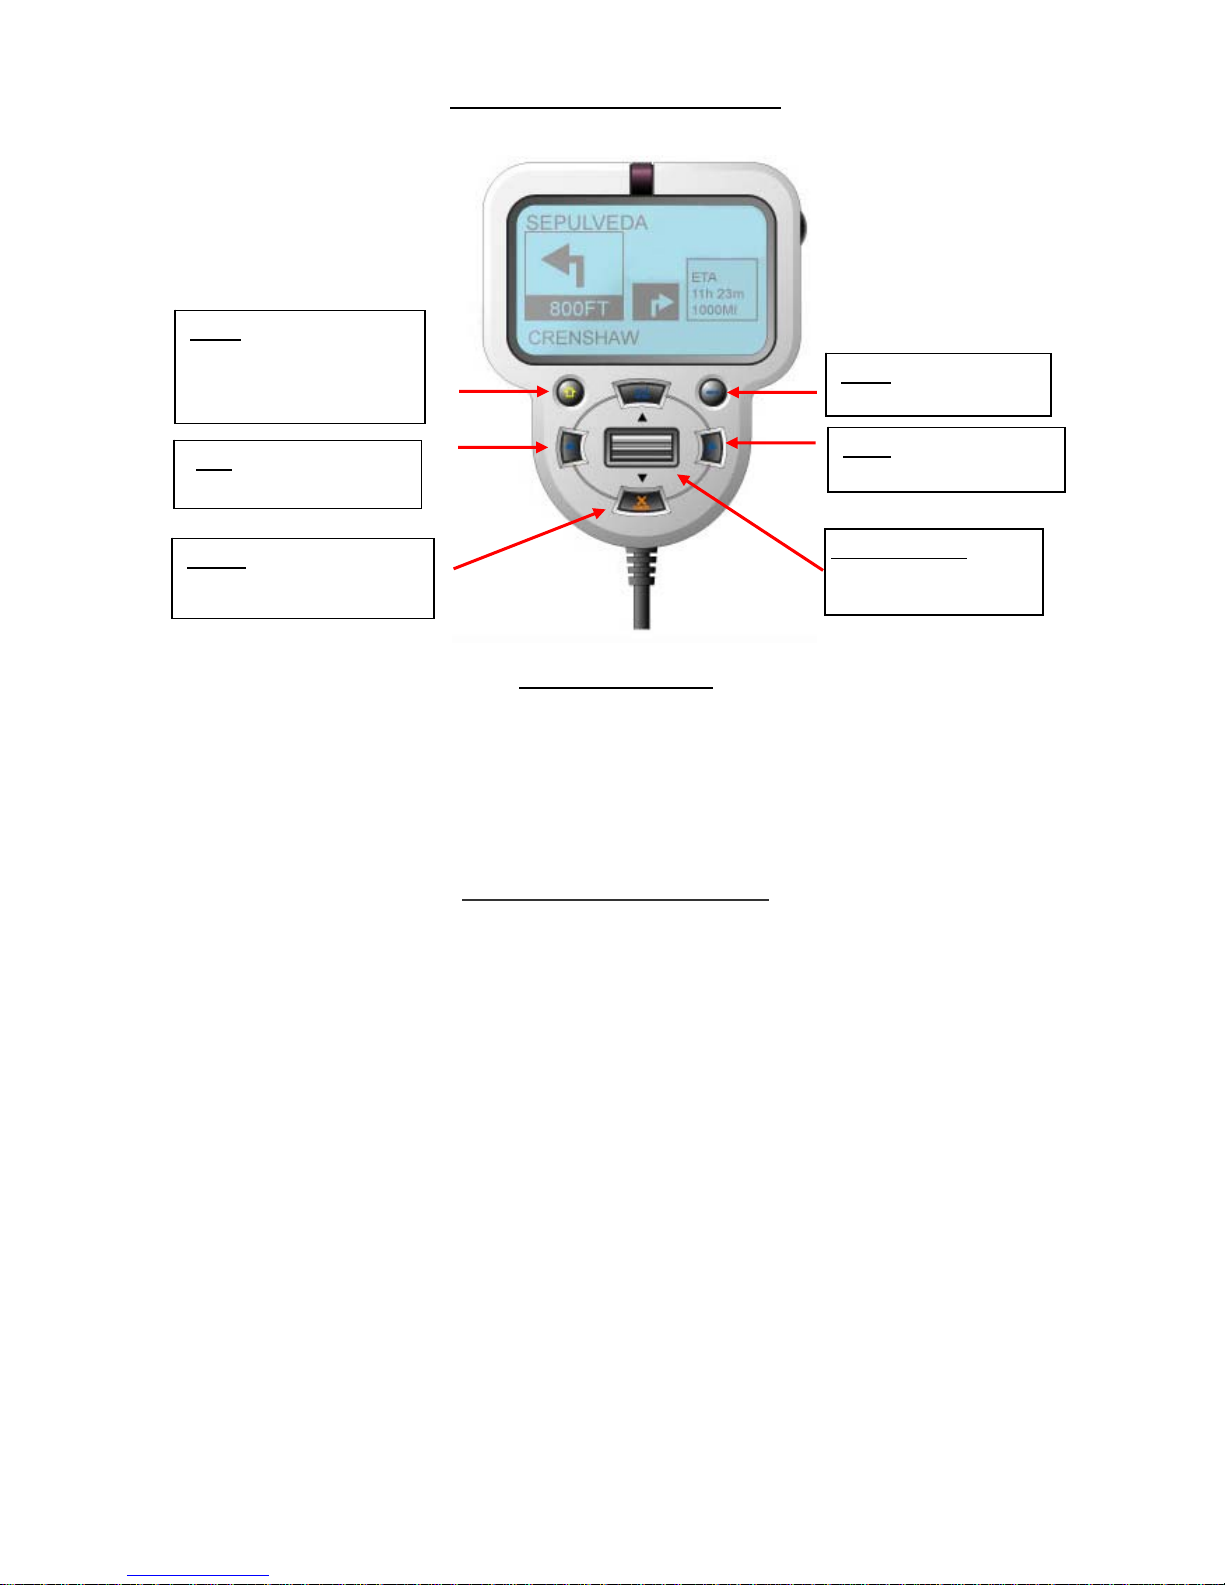
Home – Pushing the
HOME button routes you
to a predefined address in
memory.
CHAPTER 1 – GNAV20 OVERVIEW
Menu– Display Main
Menu
Left– Moves the cursor to
the left.
Cancel – To cancel the action
and move back one level.
Right– Moves the cursor
to the right.
Scroll Up/Down –
To scroll through
menu items quickly.
Figure 1. Display Unit
3
CHAPTER 2 - HOW GPS WORKS
The Global Positioning System (GPS) is a worldwide radio-navigation system formed from a
constellation of 24 satellites and their ground stations. GPS works in any weather conditions, anywhere in
the world, 24 hours a day. There are no subscription fees or setup charges to use GPS.
GPS satellites circle the earth twice a day in a very precise orbit and transmit signal information to earth.
GPS receivers take this information and use triangulation to calculate the user's exact location. Essentially,
the GPS receiver compares the time a signal was transmitted by a satellite with the time it was received.
The time difference tells the GPS receiver how far away the satellite is. Now, with distance measurements
from a few more satellites, the receiver can determine the user's position and display it on the unit's
electronic map.
A GPS receiver must be locked on to the signal of at least three satellites to calculate a 2D position
(latitude and longitude) and track movement. With four or more satellites in view, the receiver can
determine the user's 3D position (latitude, longitude and altitude). Once the user's position has been
determined, the GPS unit can calculate other information, such as speed, bearing, track, trip distance,
distance to destination, sunrise and sunset time and more.
GPS works in the following simplified way:
1. The basis of GPS is "triangulation" from satellites.
2. To "triangulate," a GPS receiver measures distance using the travel time of radio signals from 3
or more satellites.
3. To measure travel time, GPS Receiver needs very accurate timing in its circuitry.
4. A correction must also be made for any delays the signal experiences as it travels through the
atmosphere.
5. Along with distance, the exact locations of the satellites in space are required for the calculation.
6. The firmware that runs the GPS Receiver takes all these inputs and calculates the co-ordinates of
the user’s location.
4
Page 3
CHAPTER 3 - GETTING STARTED
The GNAV20 allows for quick and easy entry of destination information. Turn-by-turn driving
instructions are clearly displayed on the LCD screen and given by Voice.
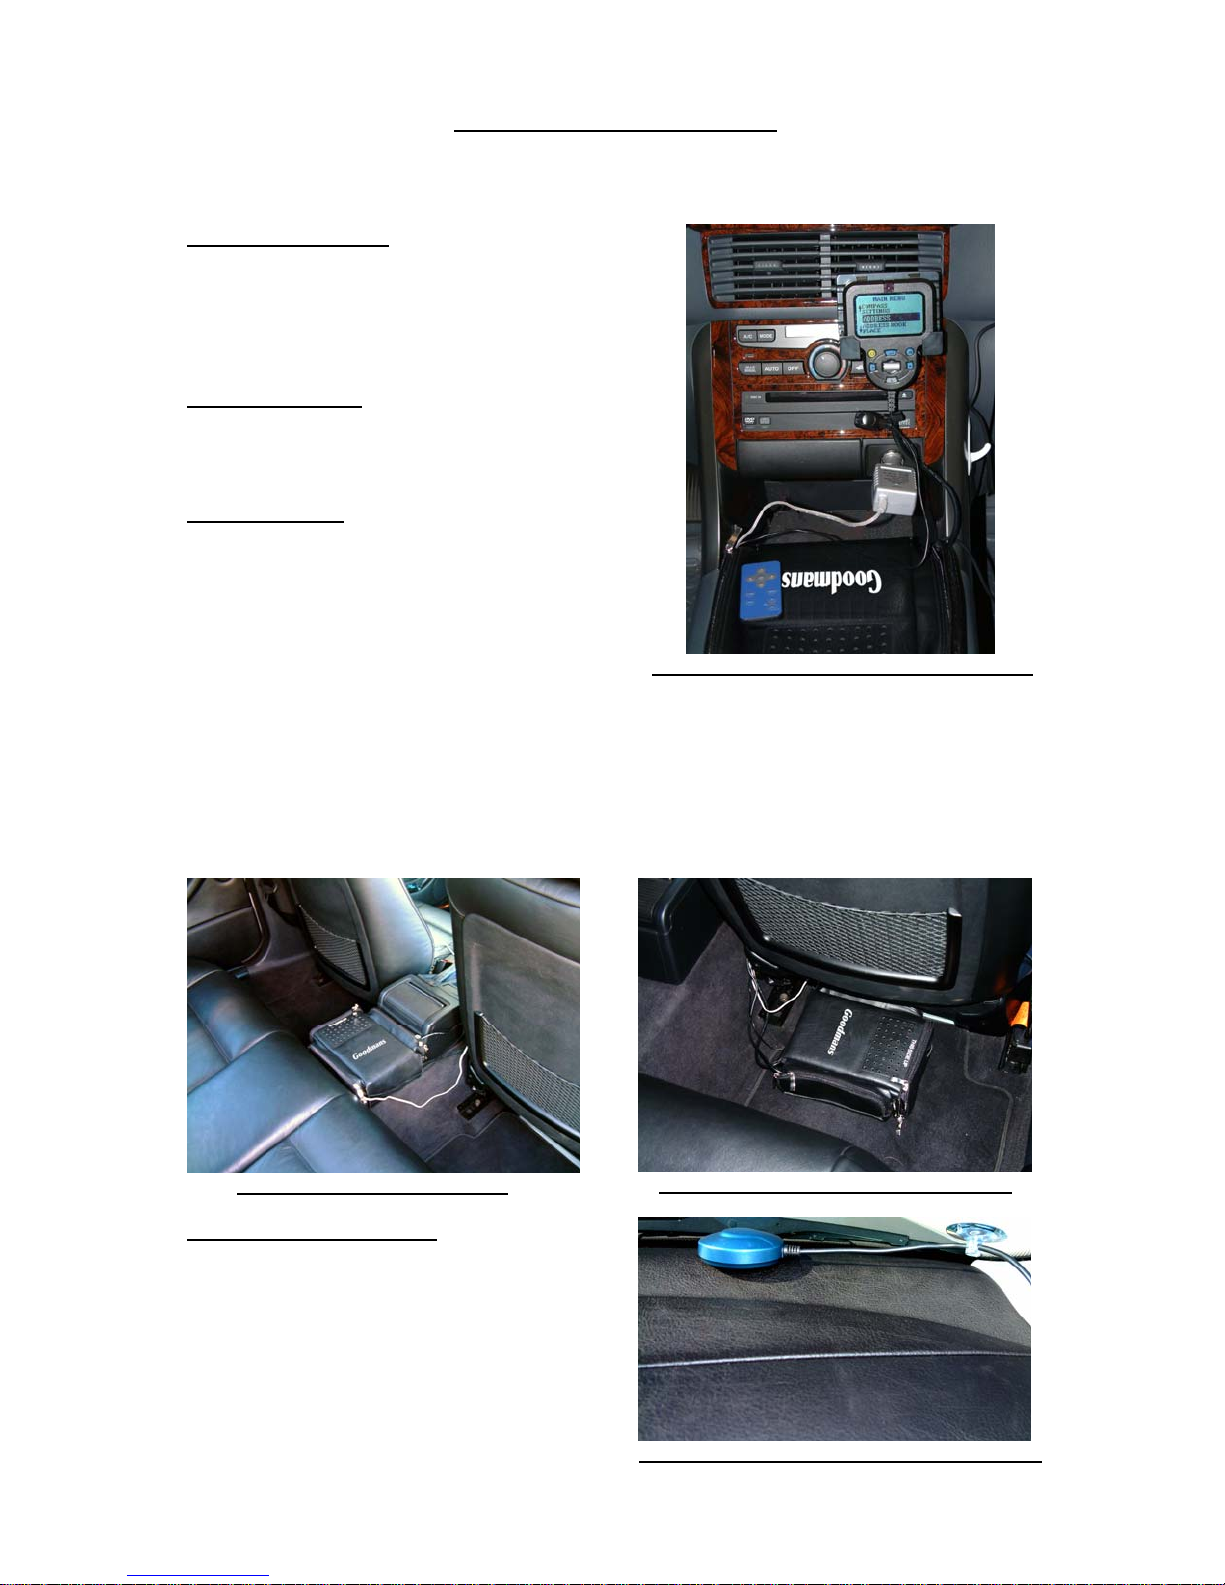
Positioning the Display
– The Display works
best when fastened to the dash board. Its ball
joint allows for adjustment to best viewing
angle. When positioning the unit please take
care to install it away from air bags and
important functional control s .
Positioning the Unit
– The GNAV20 is
designed to work on a flat surface. We
recommend that you place the unit on the floor
of the vehicle, with the speaker facing up.
Turning on Power
- Pull out the power cable
from the cable compartment and plug it into the
cigarette lighter receptacle. The LED on the
power cable and on the front of the unit should
both illuminate, indicating the unit is on.
Figure 2. Position Unit between Front Seats
Figure 3. Position Unit on Floor
Positioning the GPS Antenna
- Place the
GPS antenna on a location which does not
obscure the driver’s vision. Typical place is
either on the rear or lower part of the front
windscreen. The Antenna can be secured in
place by attaching the suction cup to the
windscreen. Make sure that the antenna has a
clear view of the sky and is not covered /
obscured by the vehicles roof or other parts of
the vehicle which will prevent reception and
cause mis-operation.
5
Figure 4. Position Unit behind Front Seat
Fig. 5 Position GPS Antenna under Windshield
6
Page 4
Adjusting Brightness
50
– The brightness control is located on the right side of the display near the top of
the unit. To increase the brightness level rotate the wheel up, to decrease the brightness rotate the wheel
down.
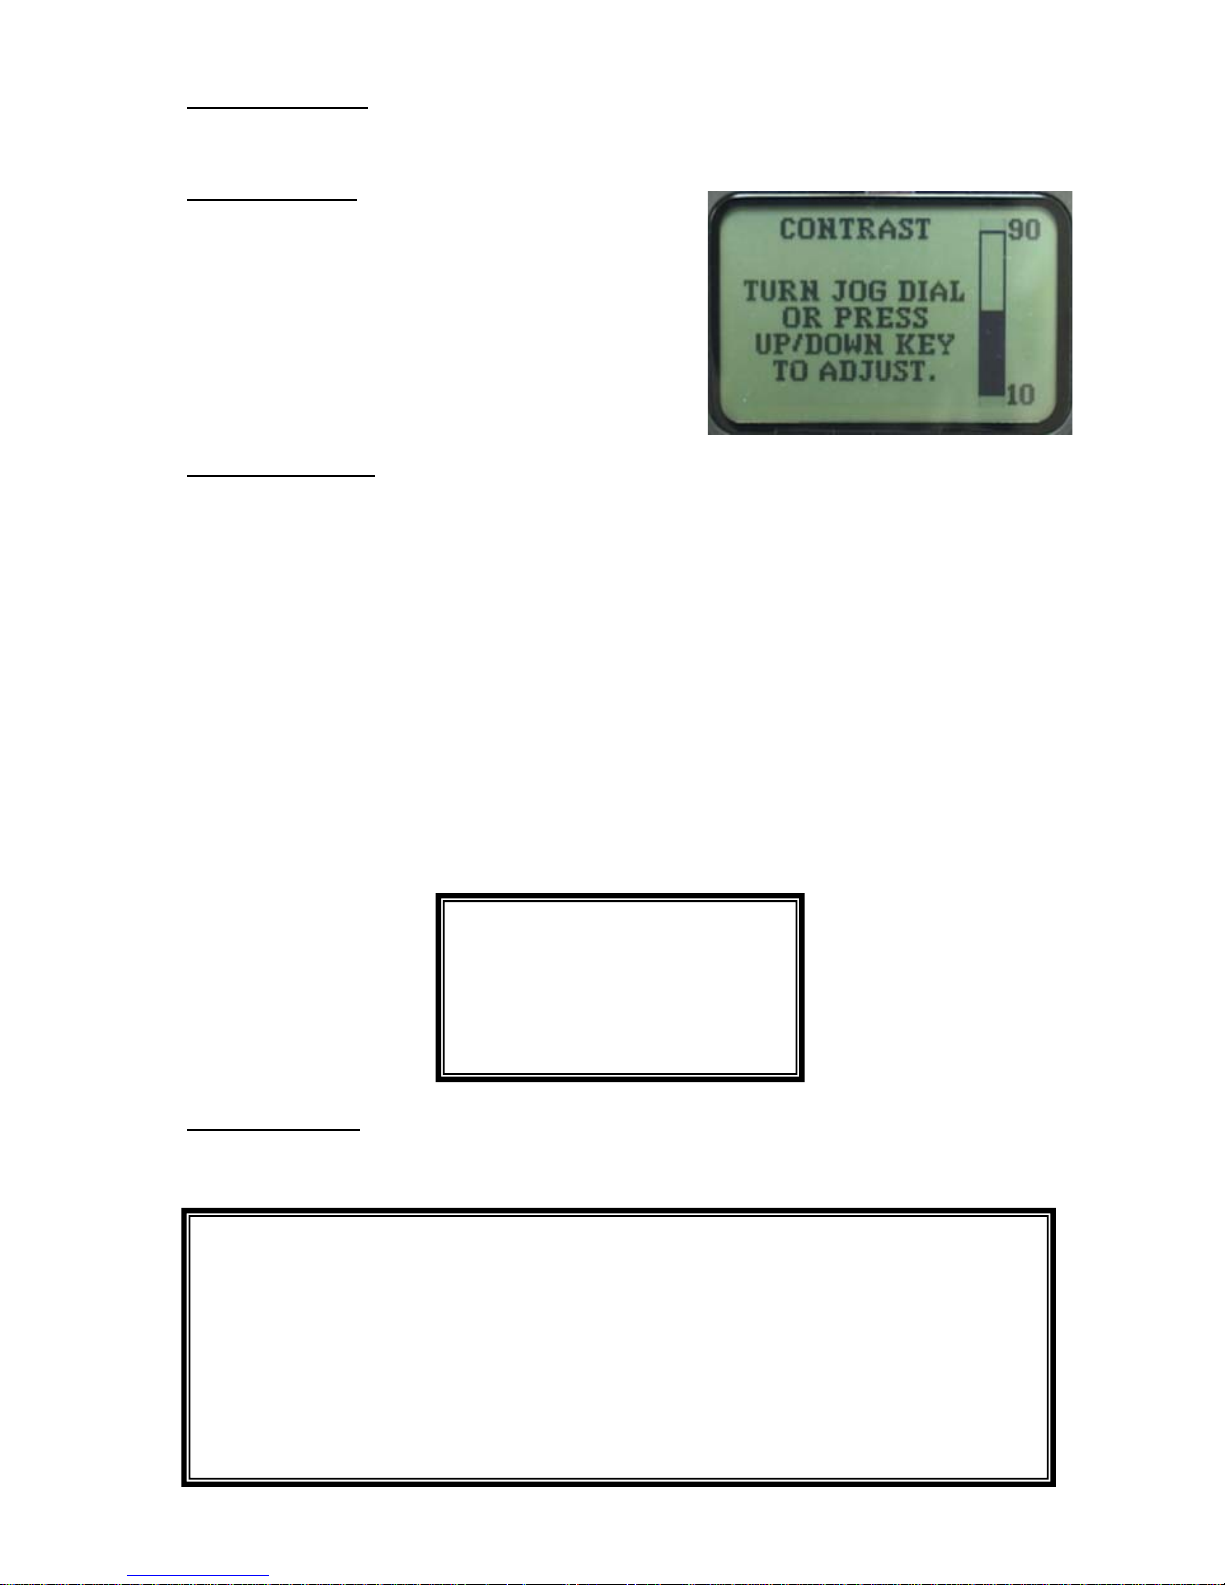
Adjusting Contrast
– The Contrast control is located in the
SETTINGS menu. Choose SETTINGS in the MAIN MENU
and scroll up to CONTRAST and press ENTER. To
increase the contrast level rotate the scroll wheel up, to
decrease the contrast rotate the scroll wheel down. A short
cut is to push LEFT and RIGHT Arrows together and it will
take you to the CONTRAST adjustment screen.
Adjusting the Volume
– A thumbwheel volume control is located on the front of the unit. Turn the wheel
to about the middle of its range to start, and adjust the volume from there. Volume can also be adjusted by
using the Volume UP/DOWN buttons on the Remote. The volume control is located in the SETTINGS
menu. After powering up the unit, choose SETTINGS and scroll to the VOLUME CONTROL and press
ENTER. You can adjust the volume up or down in this screen.
7
The system is equipped with Automatic
Volume Control. This feature
automatically increases the speaker
volume whenever the vehicle is
traveling at speeds greater than
TIP
MPH.
Loading a Map Disc
- To load a map disc into the unit, simply open the CD-ROM tray by pressing the
eject button which is located on the front of the unit. Place the disc in the tray, and push the tray shut.
IMPORTANT MAPPING INFORMATION – PLEASE READ
While the majority of turn instructions the GNAV20 gives you are correct, there are instances where a
city will post a “no U-turn” or “no right turn” sign after we release the map data. There are even
cases where a two-way street is turned into a one-way street, or a ramp or street entrance is
permanently closed.
While we strive to make the map data and turn instructions extremely accurate, we cannot guarantee
that all turn instructions will be legal, or even possible. Please exercise good judgment and caution,
and pay attention to all street signs and traffic regulations.
Do not follow the instructions of the GNAV20 if it suggests making an illegal turn or maneuver.
8
Page 5
CHAPTER 4 – ENTERING A DESTINATION
The GNAV20 goes through a test cycle when it is first powered up, or whenever power is cycled. During
this time the Goodmans logo is displayed. Data can be entered to the GNAV20 by pushing the buttons on
the display unit or the small Remote.
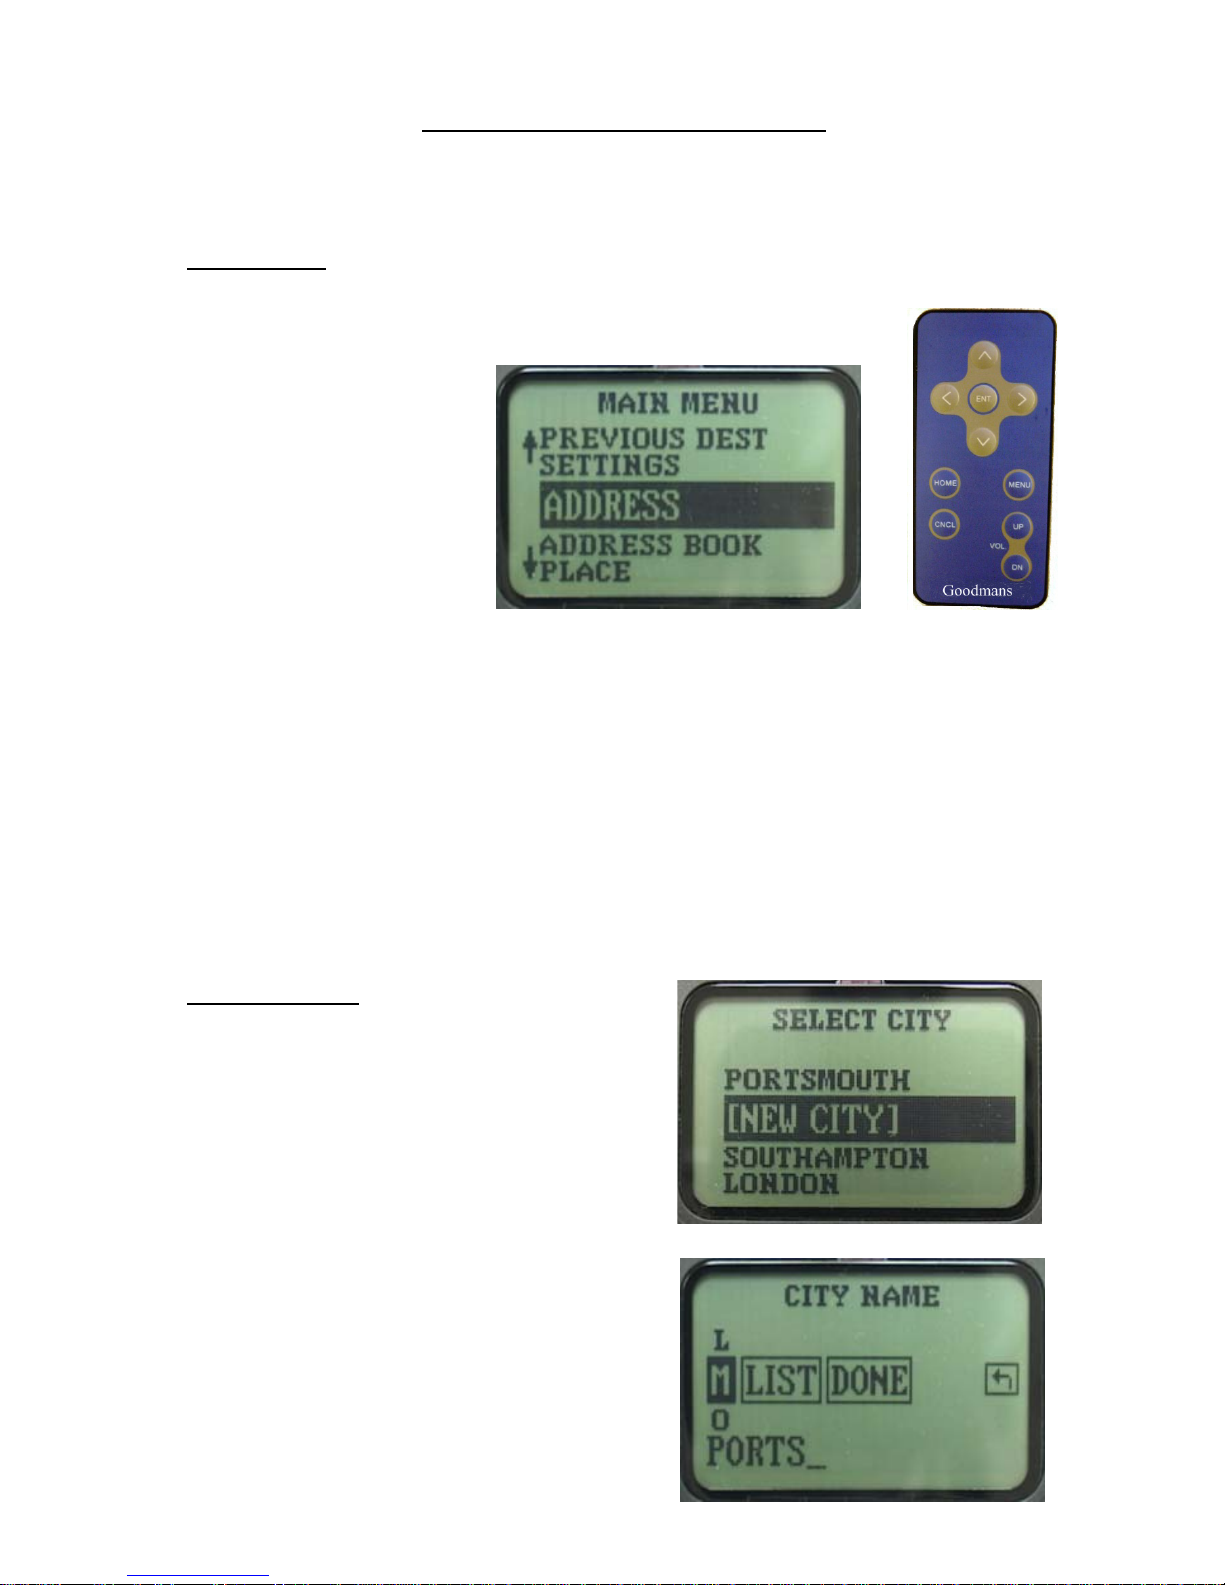
The Main Menu
– The main menu screen is displayed when the system is ready. From this screen all
system controls and functions can be accessed.
The Entries in the Main Menu
are:
o Previous Destinations
o Settings
o Address
o Address Book
o Place
o Where Am I?
9
ADDRESSES
To navigate to an address, use the SCROLL WHEEL to highlight the ADDRESS option and press the
ENTER key to select.
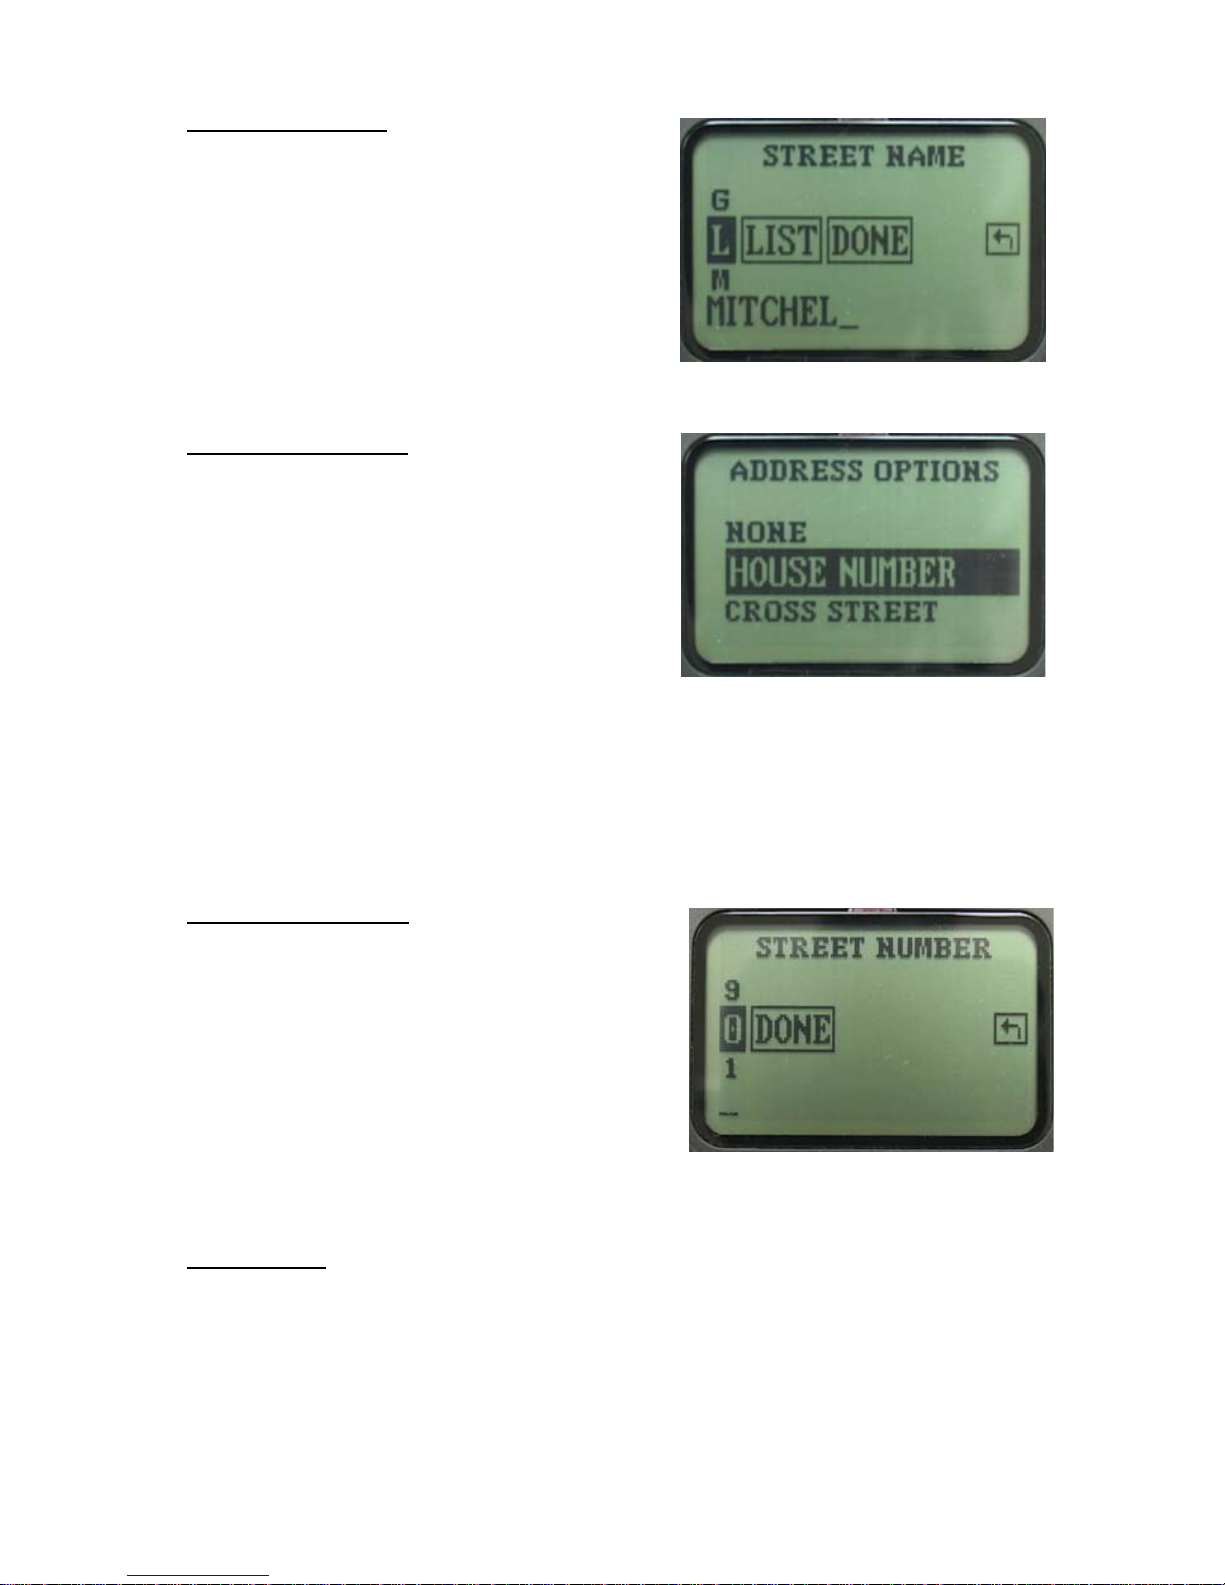
Entering City Name
– You need to first enter the City
Name. The GNAV20 keeps the names of the most recent
ten (10) cities visited in memory. You can use the
SCROLL WHEEL to move up and down through the list
to select the city or enter a new one.
To enter the name, use the SCROLL WHEEL or
UP/DOWN Buttons on the Remote to scroll through the
letters, when the desired letter is highlighted, push the
ENTER key and the letter will appear on the bottom of
the screen. If a letter is selected by mistake, use the
LEFT/RIGHT Arrow to highlight the BACK symbol
then push ENTER to move back one space. The
GNAV20 has a spell-ahead feature, which eliminates
letters as you enter the name. You can select the LIST
box and see the list of available names, or once enough
letters are entered to eliminate the list to ten or fewer
names, the system will jump to a list screen
automatically. Select the City Name and push ENTER.
10
Page 6
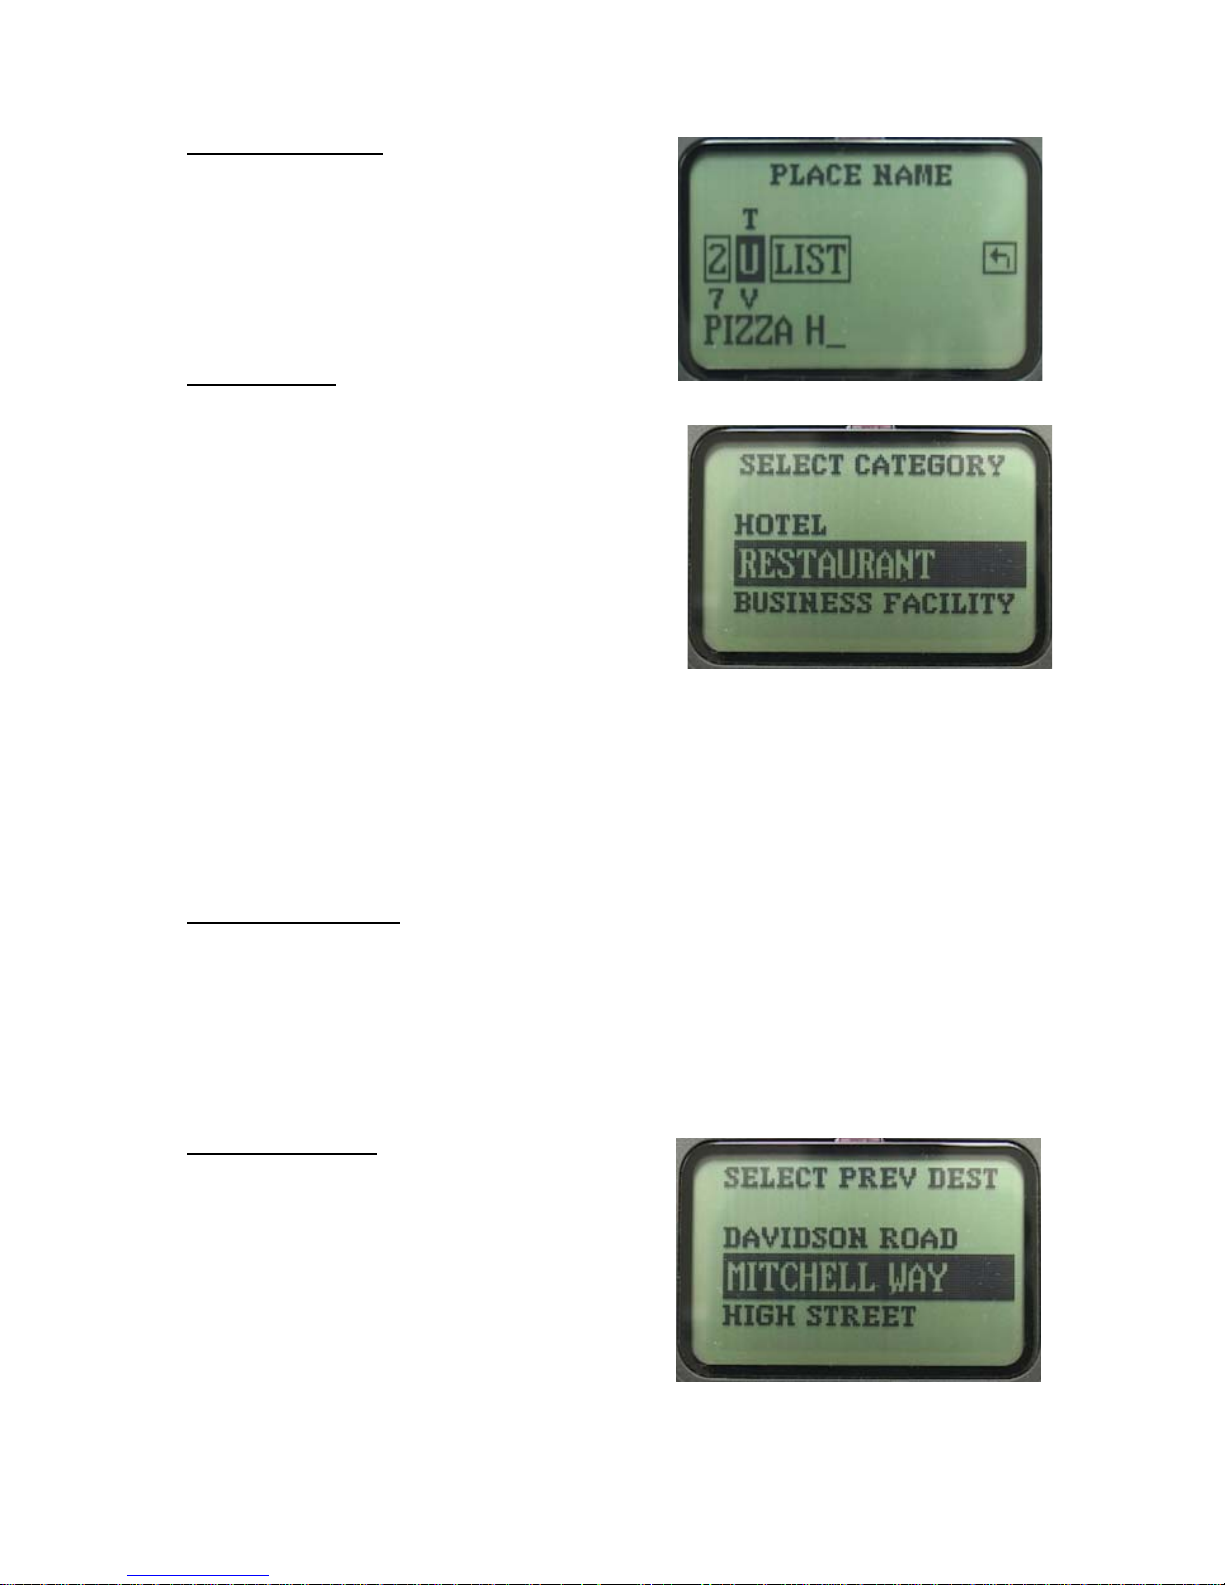
Enter the Street Name
– After entering the city name
you will be prompted to enter the street name. You
should not use prefixes such as North, South, East, West,
or suffixes like Street, Court, or Avenue, as the GNAV20
will ask you for this information later.
Use the SCROLL WHEEL to select the letters like in
City Name. Again, the spell-ahead feature will eliminate
letters as you enter the street name. Once enough letters
are entered, you will see a list of possible names to
choose from or you can continue to enter more letters to
minimize the list, select the Street Name and push
ENTER. If you entered the complete name, select DONE and it will take you to the next screen.
Enter the Address Option
– After the Street Name, the
GNAV20 will display the screen asking you to select one
of three address options. Select NONE if you don’t want
to enter the House Number, the GNAV20 will take you
to the nearest point of the street you have entered. Select
HOUSE NUMBER and it will show a screen to enter the
exact number. Select Cross Street and the GNAV20 will
display another Street Name screen for you to enter the
name of the cross street. You can also use this method to
navigate to an intersection of two streets.
11
Enter the House Number
– Use the SCROLL WHEEL
to move up and down through the list of numbers. When
the desired number is highlighted, push the ENTER
button and the number will appear on the bottom of the
screen. Continue this process until you have entered the
entire house number. When you are finished, use the
RIGHT ARROW on the keypad and highlight DONE,
then press the ENTER key. The GNAV20 will display a
confirmation screen with the Street and City Names,
Select YES and it will start calculating the route.
Route Guidance
–After the Address Option has been selected and if chosen, house number or cross street
name entered. The GNAV20 will display a confirmation screen showing the address, select YES and push
ENTER to confirm the address and the GNAV20 will begin calculating the route and then begin the Turnby-Turn route guidance with both gra p hi c sc reens and v oice inst r ucti o ns.
12
Page 7
PLACES
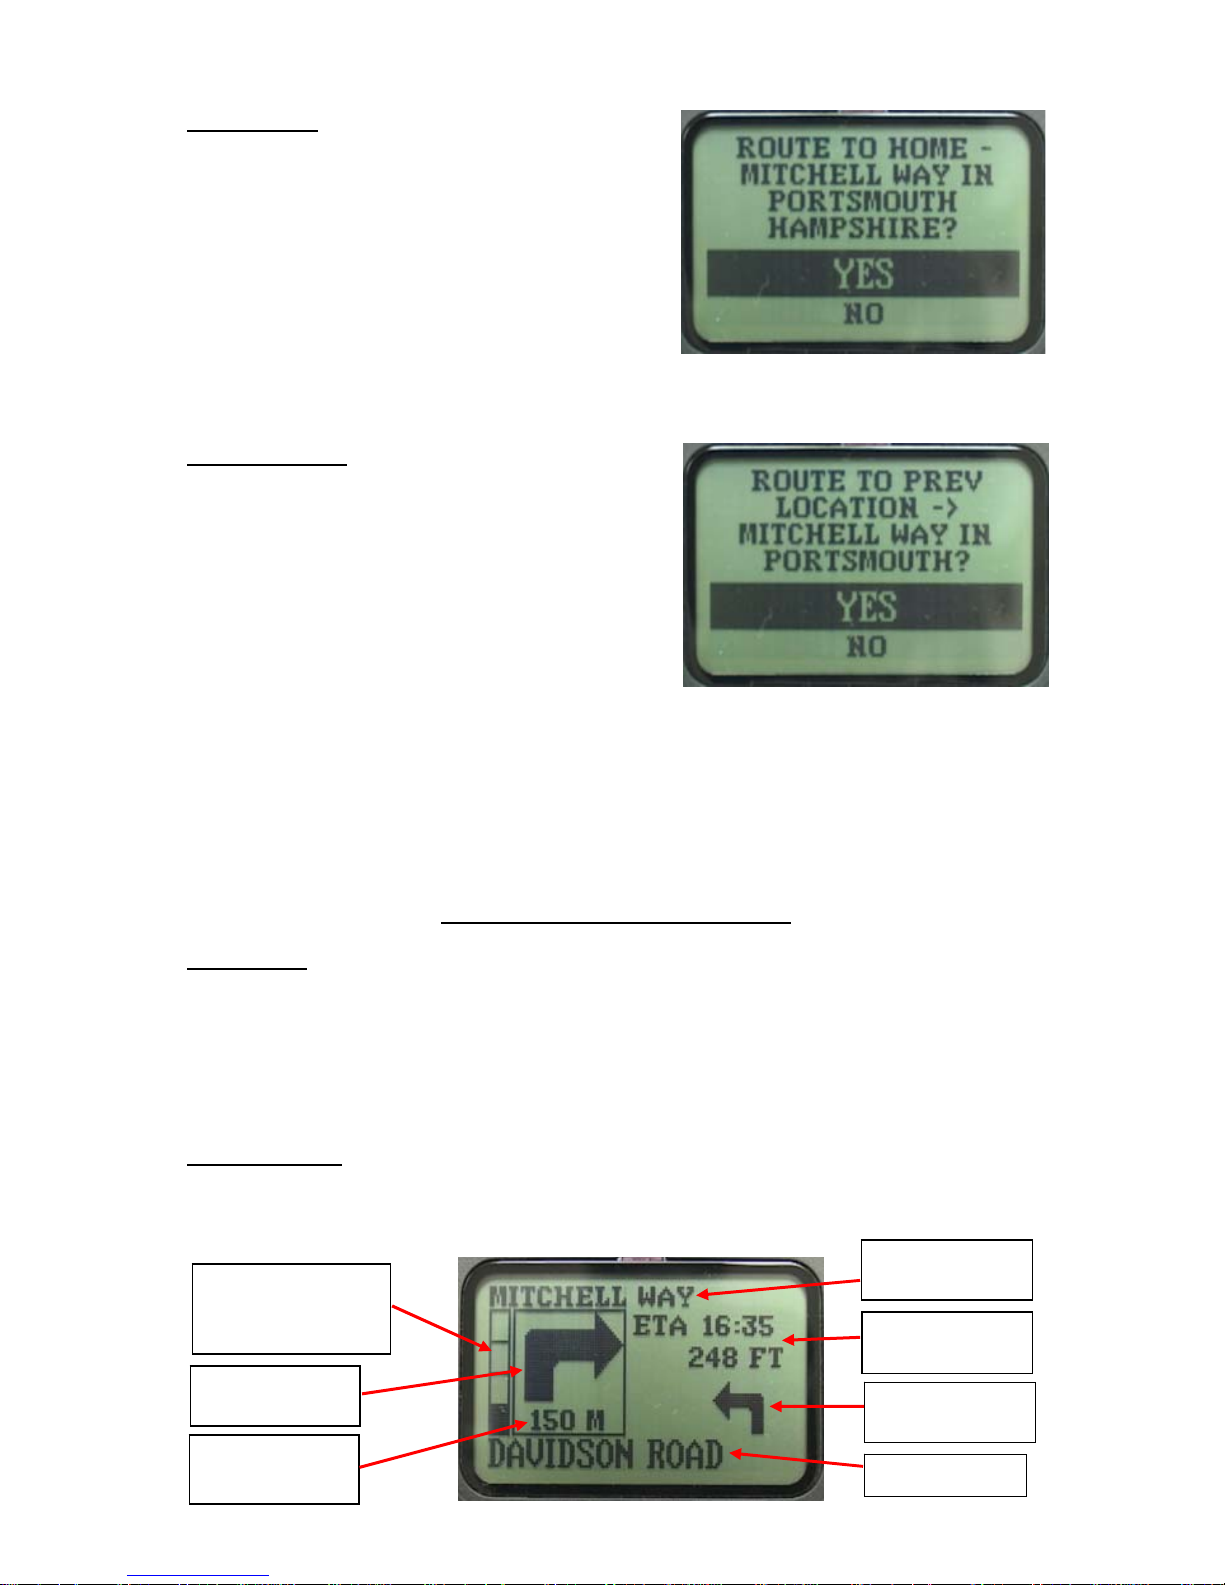
Entering a Place Name
- If you want to go to a specific
place, such as a restaurant or hotel, and you don't know
the address, you can enter the place name as a
destination. The GNAV20 recognizes many places,
including cities, airports, and tourist attractions (like
Stonehenge), as well as many other categories.
Enter the name by selecting numbers and letters on the
screen. Once enough letters are entered, the GNAV20
will go to the Select Category screen.
Select a Category
– The GNAV20 shows a screen of
possible categories for that name. Some names will show
up in multiple categories like Hotel and Restaurant. Use
the SCROLL WHEEL to select the correct category. The
GNAV20 will display a list of possible places in that
category. Select the one you want and push ENTER. The
GNAV20 will display a confirmation screen showing the
place name and city. Select NO if it is not the correct one
and the GNAV20 will go back to the previous screen so
you can select from the list again. If it is correct, select
YES and the GNAV20 will start calculating the route and
begin the Turn-by-Turn route guidance with both graphic
screens and voice instructions.
13
ADDRESS BOOK
Address Book Locations
– If you have stored an address (or addresses) in your address book, you can
route to one of these address. Select ADDRESS BOOK in the Main Menu, a SEL CUSTOM NAME
screen will be displayed with all the Custom Names from the Address Book, use the SCROLL WHEEL to
select the CUSTOM NAME that you want to go to. The GNAV20 will start calculating the route and
begin the Turn-by-Turn route guidance with both graphic screens and voice instructions. If there is no
entry in the Address Book, the GNAV20 will display a screen showing THE ADDRESS BOOK IS
EMPTY and then back to the Main Menu. Address book entries can be added in the SETTINGS menu.
PREVIOUS DESTINATIONS
Previous Destinations
– GNAV20 remembers the last
ten destinations in the memory so you can go back to
one of these locations without re-enter the address.
Select PREVIOUS DEST in the Main Menu, the
GNAV20 will display a SELECT PREV DEST screen,
use the SCROLL WHEEL to select the address that you
want to go to. The GNAV20 will start calculating the
route and begin the Turn-by-Turn route guidance with
both graphic screens and voice instructions. If there is
no entry in the Previous Destination list, the GNAV20
will display a screen showing NO PREVIOUS DEST
and then back to the Main Menu.
14
Page 8
HOME ADDRESS
p
p
Home Address
– The GNAV20 allows the user to store
a pre-defined address in memory. By pushing th e HOME
Button on the Display unit or the Remote, the GNAV20
display a confirmation screen of the address, select YES
and push ENTER to confirm and the GNAV20 will start
calculating the route and begin the Turn-by-Turn route
guidance with both graphic screens and voice
instructions. If there is no entry in the HOME location,
the GNAV20 will display a screen showing NO HOME
ADDRESS ENTERED PREVIOUSLY and then ask DO
YOU WANT TO STORE A HOME ADDRESS? Select
YES to enter an address, NO to go back to MAIN
MENU.
PREVIOUS LOCATION
Previous Location
– After you arrived at the destination
and turned off the GNAV20, it stores the starting location
in memory. When the power is turned on again, the
GNAV20 will display a screen asking whether you want
to go back to where you come from.
NOTE: This feature only works for a completed route. If
power was turned off before the completion of a route
and then turned on again, the GNAV20 will display a
screen asking whether you want to continue the
unfinished route.
15
CHAPTER 5 - DRIVING DIRECTIONS
GPS Location
- After you have entered your destination the GNAV20 uses GPS to locate your vehicle. If
the GNAV20 has been powered down for a few days it might take a minute or two for the GPS receiver to
lock onto the satellite positions. During this period the GNAV20 will display “Acquiring GPS” on the
screen. You can either wait for the GNAV20 to acquire GPS, or you can start driving and the GNAV20
will begin giving directions as soon as it has achieved GPS satellite lock.
If you are in a garage, or parked underneath an overhang or similar structure, the GNAV20 will not be
able to achieve GPS lock. You must move your vehicle to a place where you have a clear view of the sky.
Driving directions
- The GNAV20 uses the GPS to monitor the vehicles location throughout the trip.
During a typical trip the GNAV20 will give verbal guidance and display the following information on the
Route screen:
Turn Warning
(Counts down from
200 Feet)
Street Name for
U
coming Turn
ETA Time and
Distance
Direction of
coming Turn
U
Next Turn
Direction
Distance to
Upcoming Turn
Current Street
16
Page 9
Voice Guidance
- During a typical trip you will receive the following information and turn-by-turn
instructions:
“Leg” Information – This tells you how far you will have to drive on the current road, and the
direction of your next turn.
Example
GNAV20: “Drive 4.3 miles and turn left”
“Prepare To” Warning – This information is given about 1 mile before the upcoming turn on the
Motorway.
Example
GNAV20: “Prepare to turn left in 1 mile”
“Turn” Instruction – You will hear a chime followed by the turn instruction. The chime sounds
approximately 180 feet before the turn on city streets and ¼ mile on Motorways.
Example
GNAV20: (chime) “Turn left”
17
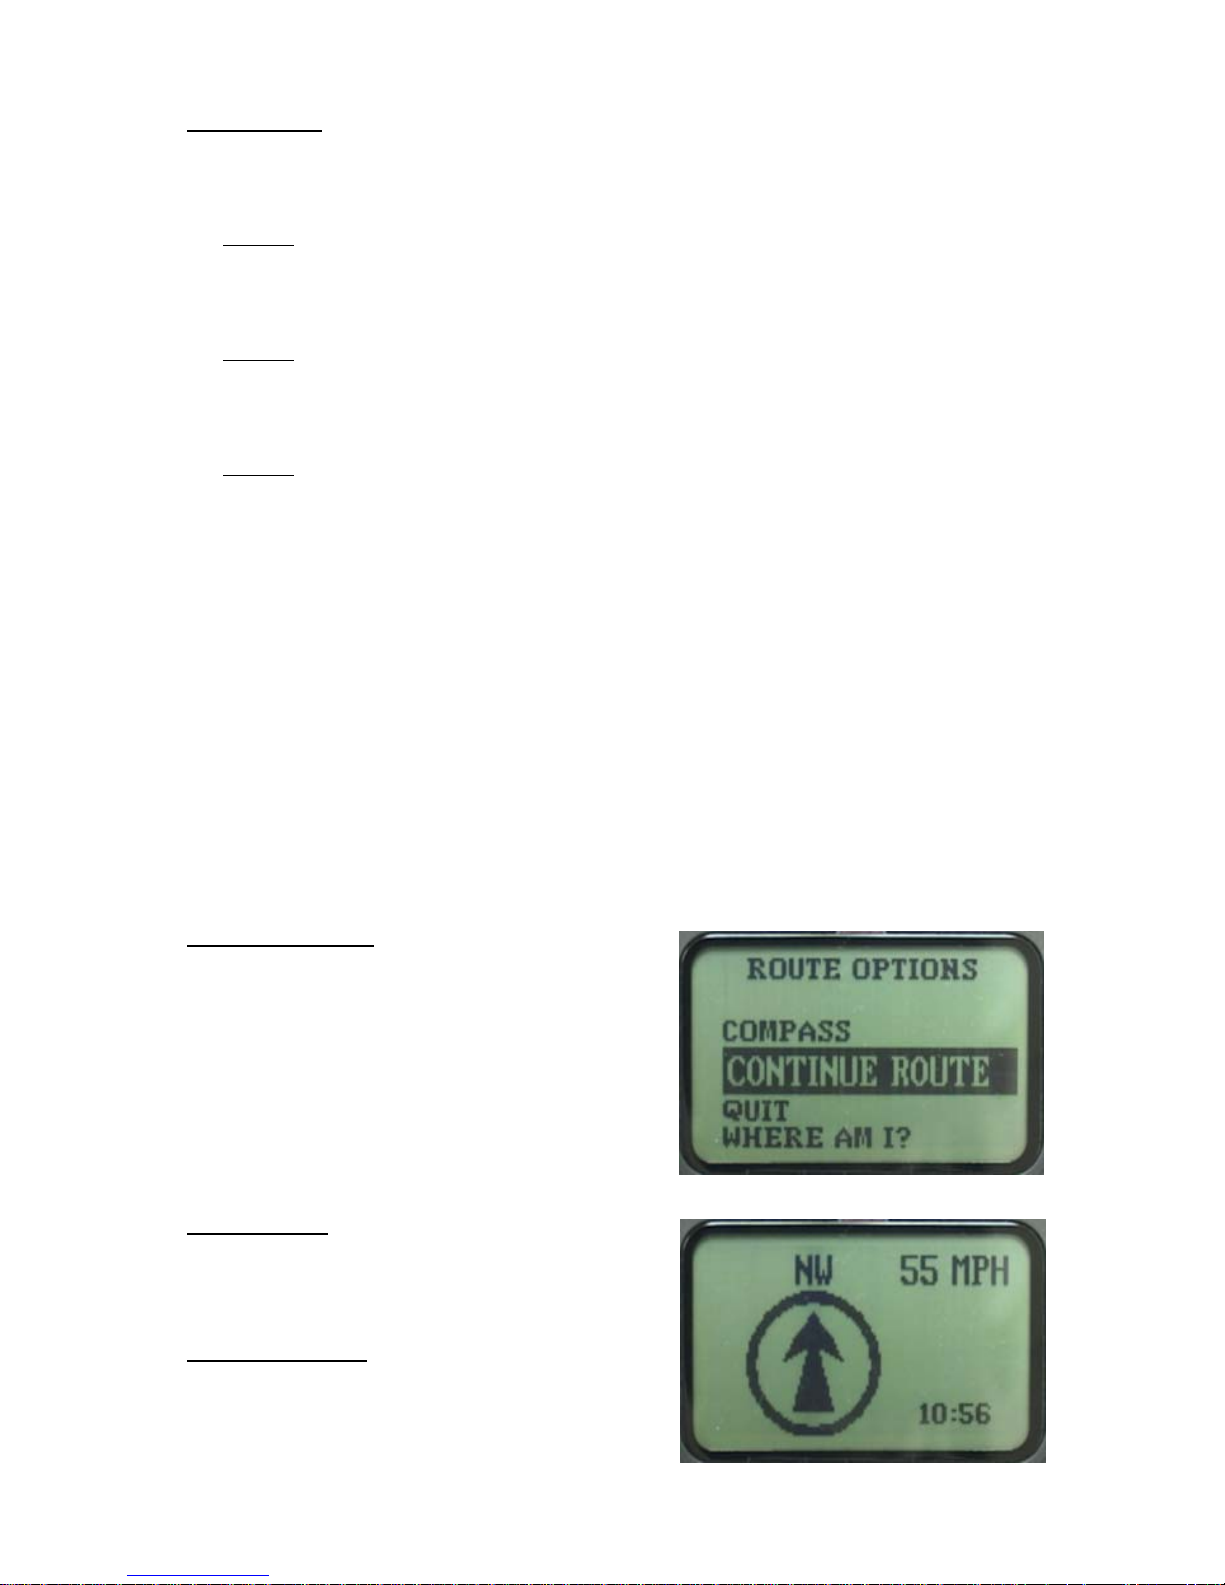
Route Options Screen
– When the ENTER button is
pushed during a route, the Route Option Screen appears.
You can select one of the options on the screen or if no
selection is chosen, the display will return to the Route
Screen after 5 seconds. The selections are:
o Continue the route – back to Route screen
o Quit the route – back to Main Menu after
confirmation
o Where Am I? – show your current location
o Compass – show Compass screen
Compass Screen
– The Compass screen displays the
direction of the car’s heading, the speed of the car and
the local time. Pushing the ENTER button will return to
the Route screen.
Where Am I? Screen
– The Where Am I? screen
displays the car’s current location and return to the Route
screen after 5 seconds.
18
Page 10
CHAPTER 6 –OFF ROUTE SITUATIONS
Automatic Rerouting
- The GNAV20 usually detects an off route occurrence within 500 feet of missing a
turn, or taking a wrong turn. After you have gone off route the GNAV20 will automatically calculate a
new route, and in most cases will get you back on the correct road immediately. If you go off route in a
rural area, or on a dead-end street, the NAV20 will ask you to find a safe place and turn around, as it is
either impossible or impractical to reroute the vehicle in the direction you are traveling.
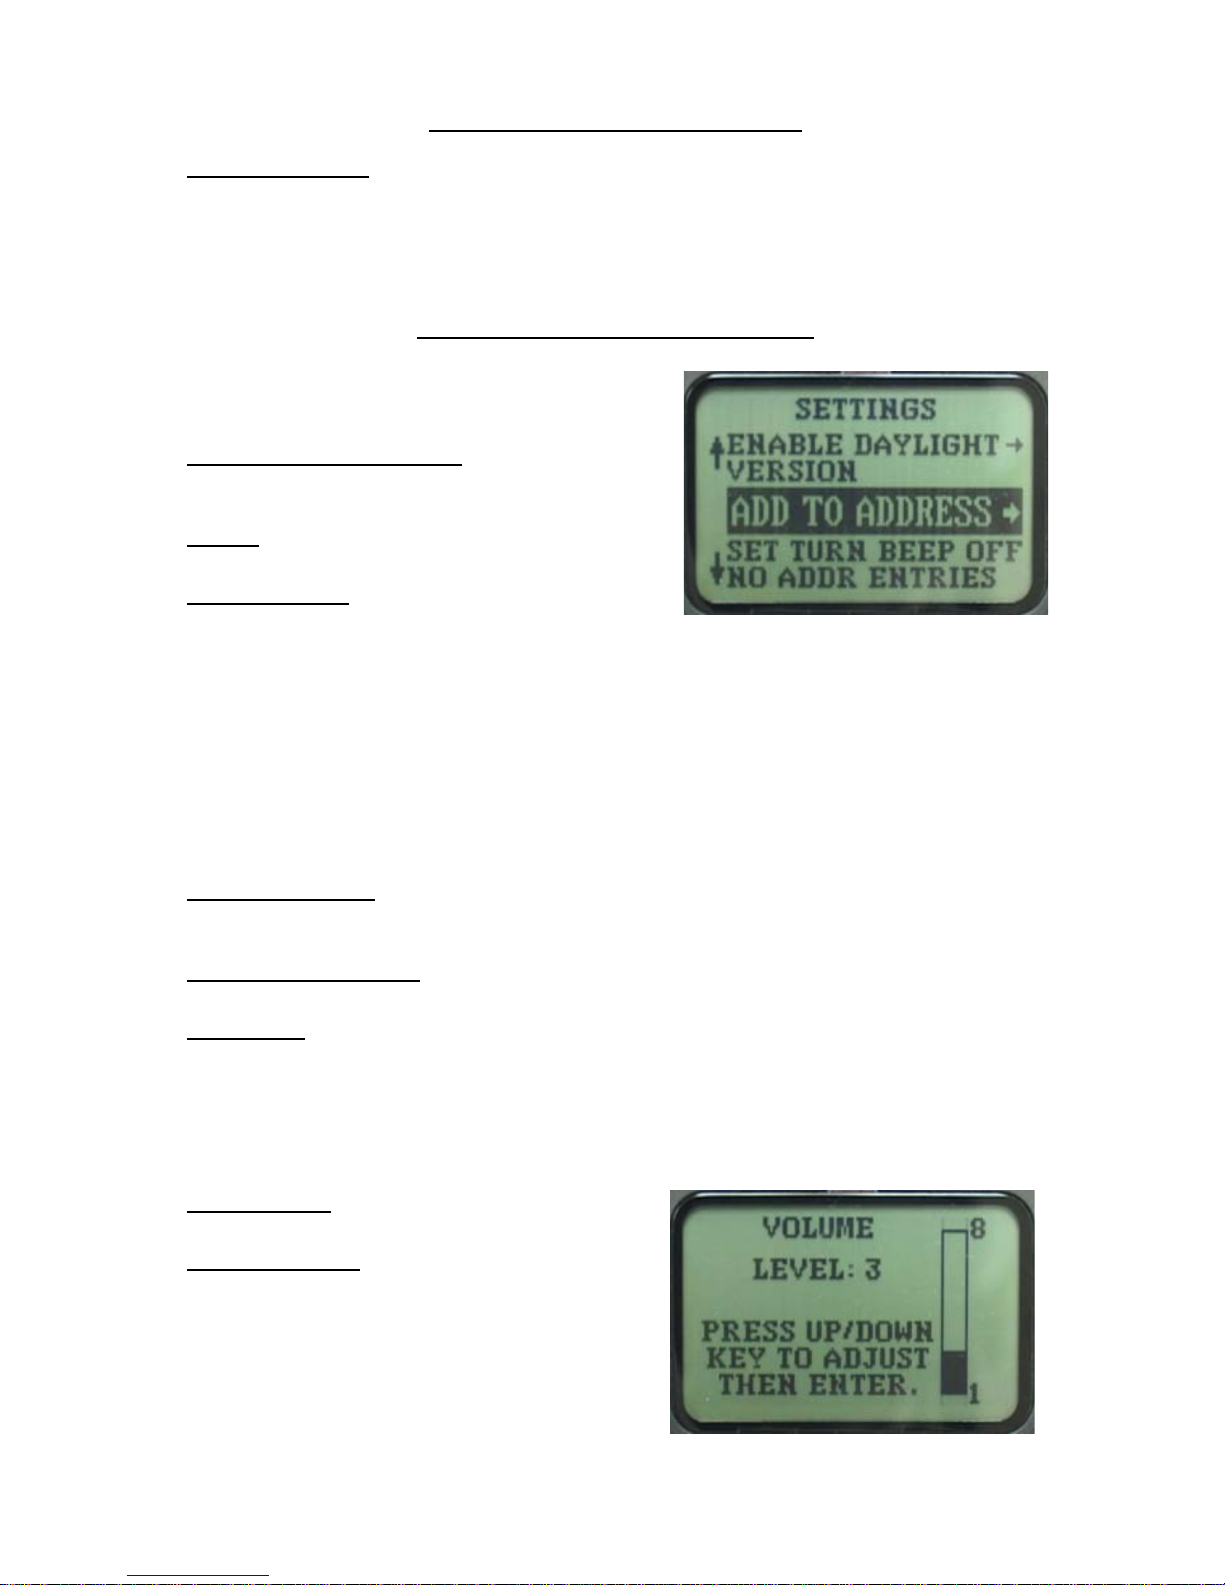
CHAPTER 7 – CHANGING THE SETTINGS
There are some settings that can be changed in the
SETTINGS menu. Here are a short description of these
items.
Enable/Disable Daylight Saving
– Select ENABLE will
add one hour to the time and select DISABLE will
subtract one hour.
Version
– Selecting this will display the version number
of the software.
Set Turn Beep Off
– The GNAV20 ships with the Turn
Beeps enabled. The turn beep is the chime that sounds
approximately 50 feet before the upcoming turn. If you
choose to disable the turn beeps, the chime will no longer sound.
Add to Address Book
– Select this if you want to add entries to your address book. It will bring up the
19
address entry screen. After the address has been entered, it will ask you for a CUSTOM NAME for this
location; for example: OFFICE.
Delete Address Book Entry
– Select this if you want to delete entries to your address book. It will bring
up the SEL CUSTOM NAME screen. Select the Custom Name you want to delete and push ENTER.
Enable Voice
– The GNAV20 uses Voice Recognition as a secondary input method. Most of the functions
of GNAV20 can be executed using Voice Commands. Please refer to Chapter 7, Voice Mode for details.
The Voice Mode can be activated by selecting Enable Voice in the SETTINGS menu. Once in Voice
mode, the buttons (except ENTER) on the Display unit or the Remote will not function any more. To
deactivate Voice Mode, you can either do it through the SETTINGS menu in Voice Mode or by pushing
ENTER. If you push ENTER, the screen will display “Enable Remote?”, select YES and Voice Mode will
be deactivated.
Volume Control
– the volume can be adjusted up or
down in this screen.
Edit Home Address
– Select this screen if you want to
change the HOME Address in memory.
20
Page 11

CHAPTER 8 – VOICE MODE AND SPEECH RECOGNITION
The GNAV20 supports Voice Command as a secondary input method using Voice Recognition software
and patented spell checking technology. The Voice Mode can be activated from the SETTINGS menu and
deactivated either by Voice Command or the ENTER button.
Positioning the Microphone
– The microphone is used to operate the Voice Control using Voice
Recognition. The microphone has a clip that allows you to attach it at various places. Remove the
microphone cable from the cable compartment and clip it to an object. A good place to position the
microphone is on the power cord about 2 inches behind the power plug. If your vehicle has a high level of
noise at highway speeds, then you should clip the microphone to the shoulder harness of your seatbelt,
about eight inches below your chin, and swivel it so the holes point toward you.
Speech Recognition
- The GNAV20's speech recognition software allows you to input your destination by
voice. You will be asked to spell street names, place names, and even food names.
Confirming “Beeps” and “Boops”
- The GNAV20 “beeps” after hearing each letter or number, and
“boops” (a lower pitched beep), after hearing command words, such as the word “stop”. If there is no
confirming beep or boop, you must say the letter, number, or command word again.
Menu Commands
– The following command words can be used when accessing menu items.
Command Word What it Does
Previous Allows you to move back though a list of choices, one at a time.
Yes / No Used to answer when the GNAV20 asks a YES/NO question.
Stop Used when you are finished entering info rmation, or when you
want to exit a menu.
21
The Stop Command
– The stop command can be used three different ways:
1. When you are finished entering information.
Example
You: Navigator (beep) Route (boop)
GNAV20: “Do you want to go to an address?”
You: Yes (boop)
GNAV20: “Say the City Name.”
You: L (beep) O (beep) N (beep) D (beep) O (beep) N (beep) stop (boop)
2. If you have entered a route and would like to stop the route before you reach your destination.
Example
You: Navigator (beep) Stop (boop)
GNAV20: “Do you want to quit?”
You: Yes (boop)
GNAV20: “Good-bye.”
3. To exit the system. You can say STOP anytime the GNAV20 asks you a question:
Example
You: Navigator (beep) Route (boop)
GNAV20: “Do you want to go to an address?”
You: Stop (boop)
GNAV20: “Do you want to quit?”
You: Yes (boop)
GNAV20: “Good-bye.”
22
Page 12

Common Speech Recognition Problems
– While the speech recognizer works for most people, you may
encounter a problem once and a while. Here are some of the common problems you might have:
• Holding the Microphone
– The microphone design requires it to be clipped to an object. If you hold
the microphone in your hand it will not pick up your voice.
• Speaking too soon
- The most common speech recognition problem is answering a question before the
GNAV20 has stopped speaking. To avoid this problem, wait until the GNAV20 has finished speaking
before answering.
• Talk radio or other people talking in the car
- If you are playing a talk radio station or if anyone in the
car is talking, even if they are talking quietly, you will have difficulty with speech recognition. You
must turn down the radio and ask others to remain quiet during speech input.
• Fan is too loud or is blowing air across the microphone
- This problem occurs very often in s um mer
when the air conditioning is turned up high. Lower the fan speed and/or reposition the microphone.
• Road noise is too loud
- In some vehicles, especially convertibles and trucks, the interior noise
increases dramatically at freeway speeds. If your vehicle is noisy at freeway speeds, you should enter
your destination while parked, or while on a surface street. Positioning the microphone on your
shoulder harness, about eight inches below your chin shou ld also resolve this problem.
• Shouting
- Shouting puts stress into the voice, and actually degrades speech recognition performance.
If the GNAV20 is not hearing you, try moving the microphone closer to your mouth and speak in a
normal voice.
CHAPTER 9 - ENTERING A DESTINATION BY VOICE
23
Selecting a Destination
- The GNAV20 will ask you if you want to go to an address, place or location in
your address book (if programmed).
ADDRESSES
Entering the City Name
– The GNAV20 will ask you for the city name, spell the city name one letter at a
time. Remember to wait for confirming BEEP before saying the next letter. Say STOP after the last letter
and the GNAV20 will ask you to confirm the name. Answer YES if it is correct or NO if it is incorrect.
Example (has previous entered City Name in memory)
You: Navigator (beep) Address
GNAV20: “Do you want to go to” and LONDON will be displayed on the screen
You: No [If you answer Yes, it will go to the Street Name screen]
GNAV20: “Spell the city name.”
You: P-O-R-T-S-M-O-U-T-H–stop
GNAV20: “Did you say” and PORTSMOUTH will be displayed on the screen.
You: Yes
Example (no previous entered City Name in memory)
You: Navigator (beep) Address
GNAV20: “Spell the city name.”
You: P-O-R-T-S-M-O-U-T-H–stop
GNAV20: “Did you say” and PORTSMOUTH will be displayed on the screen.
You: Yes
24
Page 13

Enter the Street Name
– After entering the city name, you
will be asked to spell the street name. You should not use
prefixes such as North, South, East, West, or suffixes like
Street, Court, Avenue, as the GNAV20 will ask you for this
information later.
Example
GNAV20:“Spell the street name.”
You: M-I-T-C-H-E-L-L –stop
GNAV20: “Did you say” and MITCHELL will be
displayed on the screen
You: Yes
Enter the House Number or Cross Street
– The GNAV20 will ask you for the 3 address options.
Example (use House Number)
GNAV20:“Do you want to say the building or house number?”
You: Yes
GNAV20:“Say the building or house number.”
You: 2-0 –stop
GNAV20:“Did you say 20?”
You: Yes
Display: MITCHELL WAY IN PORTSMOUTH
You: Yes
GNAV20 starts routing
EXCEPTION
A special case where you should enter a
prefix, such as North, is when the
address is on North Street. In this case
you would simply spell
“N-O-R-T-H-stop” for the street name.
TIPS
If there are suffix like East/West/
North/South, there will be more than
one street name, saying No to the first
one and the GNAV20 will display the
next one.
Example (No House Number)
25
GNAV20:“Do you want to say the building or house number?”
You: No
GNAV20:“To an Intersection?”
You: No
Display: MITCHELL WAY IN PORTSMOUTH
You: Yes
GNAV20 starts routing
Example (Intersection)
GNAV20:“Do you want to say the building or house number?”
You: No
GNAV20:“To an Intersection?”
You: Yes
GNAV20:“Spell the Cross Street Name”
You: J-A-M-E-S –stop
GNAV20: “Did you say” and JAMES will be displayed on the screen
You: Yes
GNAV20 starts routing
In some cities, the address may include a dash (-) separating the numbers, so you should say the word
"dash” between the numbers. Here are some examples of special building numbers and how to enter
them:
Building Number
What you should say
18-15 1–8–dash–1–5–stop
26
Page 14

PLACES
y
Entering a Place Name
- If you want to go to a specific place, and you don't know the address, you may
spell the place name as a destination. Some common places are cities, airports, hotels, restaurants and
tourist attractions (like Stonehenge), but other categories are available. If you want to go to Taco Bell, for
example, you would enter the information as follow:
Example
You: Navigator (beep) Route
GNAV20: “Do you want to go to an address?”
You: No
GNAV20: “To a place?”
You: Yes
GNAV20: “Spell some words in the place
name.”
You: T–A–C–O–space–B–E–L–L–stop
TIP
You can use the word blank in place of
space. You should do this if the
GNAV20 “beeps” instead of “boops”
after you say space. If you get a
“beep” after saying space, this means
the GNAV20 “heard” space as a letter,
which will confuse the spell checker. If
this is the case, then it is suggested that
GNAV20: “There are two categories,
restaurant?”
You: Yes
GNAV20: “Taco Bell?”
You: Yes
GNAV20: “Do you want the nearest about 1.2
miles away?”
You: Yes
GNAV20: “Do you want to go to Taco Bell on
Pacific Coast Highway in Torrance?”
You: Yes
GNAV20 starts routing
If you don’t like the first choice the
GNAV20 gives you, you can say “no”
to hear the next choice. In fact, you can
say “no” to as many choices as you
like, and the GNAV20 will give you the
next closest restaurant in the category.
You can also say “previous” to go back
and hear or select restaurants that have
alread
TIP
been listed.
27
ADDRESS BOOK
Address Book Locations
– If you have stored an address (or addresses) in your address book, you can
route to one of these address by spelling the custom name at the address book prompt. If you live at 120
West Olive Avenue, and you have stored this address as “H–O–M–E”, you can easily route to your home
in the following way:
Example
You: Navigator (beep) Route
GNAV20: “Do you want to go to an address?”
You: No
GNAV20: “To a place?”
You: No
GNAV20: “Do you want to go to a location in the address book?”
You: Yes
GNAV20: “Spell the custom name.”
You: H–O–M–E–stop
GNAV20: “West Olive Avenue in Monrovia” will be displayed on the screen
You: Yes
GNAV20 starts routing
28
Page 15

CHAPTER 10 - DRIVING DIRECTIONS AND VOICE COMMANDS
The driving instruction under Voice Mode works the same as in non-voice mode; the guidance is given by
both voice and graphic screens.
Requesting Information
– After you have entered your destination you can query the GNAV20 for
information anytime during your trip. Here is a list of command words, along with a brief explanation of
their function:
Command
Explanation
Navigator (beep) Turn Distance to your next turn, and the direction of the turn.
Navigator (beep) Distance Remaining distance to your destination.
Navigator (beep) Direction Announces your direction of travel.
Navigator (beep) Repeat Repeats a driving instruction.
Navigator (beep) Trip A summary of the remaining roads you will take.
Navigator (beep) Next To hear the next leg of the route. You can manually “scroll”
through your route by repeating this command.
Navigator (beep) Previous To hear the previous leg of the route.
Navigator (beep) Help Gives a list of command words, and allows you to turn on the
training mode.
Navigator (beep) Where am I Announces your current location.
Navigator (beep) Stop To end the route and put the GNAV20 in the standby mode.
CHAPTER 11 – CHANGING THE SETTINGS BY VOICE
29
Settings Menu
- After you have put the GNAV20 in the standby mode by saying "stop" or "navigator
(beep) stop", you may say "navigator (beep) settings" to change the default settings.
When you enter the settings menu the GNAV20 will start listing options, and you can respond by saying
“yes”, “no”, or “previous” to move through the list of menu options. The “previous” command is
helpful when you accidentally select a menu option and want to exit from that choice, as it moves you
back through the menu one step at a time. To move forward through the menu options you should say
“no” until you reach the desired menu item.
Here is a summary of all the options available in the settings menu:
Address Book
– If you chose to add locations to the address book, the GNAV20 will ask you to enter the
street number, street name, and a custom name. These addresses will reside in your address book for
quick recall at any time.
You can also remove locations from the address book, either one at a time or all the addresses at the same
time. When removing only one address, the GNAV20 will display the address on the screen for
verification after you spell the custom name.
When removing all the listings from the address book, the GNAV20 will ask “Are you sure you want to
remove all the listings?” If you answer “yes” the all the listing will be removed, and they will not be able
to be recovered. If you answer “no”, the GNAV20 will ask you to spell the custom name of the address
book entry that you would like to remove. At this point you can either spell the custom name or say
“stop” and the GNAV20 will allow you to quit and exit the settings menu.
30
Page 16

Normal Mode / Expert Mode
– When the normal mode ON, the GNAV20 will ask you if you want to go
to an address, place, intersection, freeway, or to a location in the address book every time the GNAV20 is
powered up. Please refer to Chapter 11 for Expert Mode instructions.
Route Preview
– When the route preview is enabled the GNAV20 will calculate the route after you have
entered your destination information, and will list the motorways on which you will travel. You will then
have the option of accepting the route, avoiding one motorway, or avoiding multiple motorways.
When the route preview is enabled, the GNAV20 will also tell you the distance to your destination before
giving the first turn instruction. This information is not given when the route preview is disabled, however
you can always ask the GNAV20 for the distance to your destination at any time by saying, “navigator
(beep) distance”.
Training Mode
– The GNAV20 ships with the training mode in the ON position. The training mode is
designed to walk you through the process of entering address and place information. Once you are
familiar with the system you will probably want to turn the training mode off, which will place the system
in the normal mode. If you want to see how the normal mode functions before turning the training mode
off, you can answer “yes” when the GNAV20 asks “Are you familiar with this navigation system?” at
startup.
If the training mode is OFF, and you say only the word “navigator”, the system will go back into the
training mode until the power is cycled.
Confirmation Beeps
– These are the confirmation beeps and boops that occur during destination entry,
31
and after giving commands. If you disable beeps, the GNAV20 will not give you any feedback, so you
will not know if the GNAV20 has missed a command or a letter during destination entry. With the beep s
turned off you will be able to enter information at a faster pace, but that could increase chance of error.
Turn Beeps
– When the GNAV20 ships with the Turn Beeps enabled. The turn beep is the chime that
sounds approximately 50 feet before the upcoming turn. If you choose to disable the turn beeps, the chime
will no longer sound.
32
Page 17

CHAPTER 12 – ADVANCED VOICE FUNCTIONS
EXPERT MODE
The Expert Mode
– The expert mode can be turned on and off in the settings menu (Chapter 10), and
should only be used if you have read the manual and are familiar with the system. The expert mode
allows you to bypass the startup menu and directly access your destination. The expert mode also gives
limited feedback. When placed in the expert mode the GNAV20 will only sound a chime when powered
up (unless you have an unfinished route in memory, in which case the GNAV20 will ask you if you would
like to continue to that POI or address), and will wait for you to give it a command.
Here is a list of expert mode commands along with an explanation of how they are used.
Command
Explanation
Navigator (beep) Address To enter a street address.
Navigator (beep) Place To enter a specific place, like Taco Bell.
Navigator (beep) Address Book If you have entered locations in your address book.
Navigator (beep) Intersection To go to an intersection.
Navigator (beep) Route To temporarily switch to the normal mode.
33
SHORTCUTS AND TIPS
Spelling part of the place name – If you are entering a place name that is extremely long, you only need
to spell part of each word, as long as you say the word “space” between words. For example, you can
enter “Redondo Beach Brewing Company” in the following way:
R–E–D–O–space–B–E–A–space–B–R–E–W–stop
You can also enter place names in any order, and even omit entire words. Of course your chance of
finding the correct place increases with precise information, but this is useful if you can only remember a
few words in the place name. Here is another way to enter “Redondo Beach Brewing Company”:
Example
B–R–E–W–I–N–G–space–B–E–A–C–H–stop
Search from Closest to Farthest
database, the GNAV20 will list the locations, starting with the one closest to your vehicle, and will
continue to the next closest location every time you say “no”.
If you enter a place that occurs many times throughout the database, the GNAV20 will ask you if you
would like to spell the city name. If you do not choose to spell the city name, and the GNAV20 has a
good GPS signal, it will list the locations starting with the one closest to you vehicle, and will go to the
next closest location with every “no” response.
Search Nearby Cities
– This GNAV20 has the unique ability to find a POI even if you enter the wrong
city. For example, Macaroni Grill has restaurants in many cities, so after entering this POI the GNAV20
will ask you if you want to spell the city name. If you answer “yes”, and spell a city where the Macaroni
Grill is not located, the GNAV20 will pick the Macaroni Grill location closest to the city you entered.
– If you enter a place that occurs less than 5 times throughout the entire
34
Page 18

CHAPTER 13 - TROUBLESHOOTING
No Sound from the Speaker
• If the GNAV20 is plugged into the cigarette lighter adaptor and the switch is in the ON position,
and you are still not getting power, you should unscrew the tip of the power plug and check the
fuse. If the fuse is blown, you should replace it with the same value fuse.
• If the fuse is not damaged, or if you have to replace the fuse repeatedly, please call our help line
0870 873 0080 for further assistance.
• Is the volume knob on the GNAV20 is turned to the halfway mark?
• Go to the Volume Control screen under the SETTINGS menu and adjust the volume to 5 or
higher
Unit Beeps at Startup then is Silent
• The expert mode has been activated. To turn the expert mode OFF:
1. Say, “navigator (beep) Settings”
2. Answer, “No” until the GNAV20 asks, “Do you want to turn OFF the expert mode?” then
answer “Yes”.
No Response to Commands
• If the navigation unit is not responding to your commands try relocating the microphone closer to
your mouth. Remember to clip the microphone to an object, like your seatbelt shoulder harness.
• Wind and fan noise, as well as talk radio stations can “confuse” the voice recognition software, so
turn the radio off, roll up your windows, and turn your fan to a lower setting when entering
information.
• If the GNAV20 still does not respond, please call our help line 0870 873 0080 for further
assistance.
GPS is Not Available
35
• Is the antenna positioned on a metal surface, preferably the roof of your vehicle? Some vehicles
have window film with metal properties that block the GPS signal. If you have placed the GPS
antenna on the inside of the vehicle you will have to reposition it to the outside.
• If the GNAV20 has been turned off for a while it takes a few minutes to “find” the GPS signal. It
can take up to 15 minutes in extreme cases.
• If the GNAV20 does not locate the GPS signal after 15 minutes, restart the system.
• If the GNAV20 still has not picked up the GPS signal, call our help line 0870 873 0080.
The GNAV20 is Slow Responding to Commands
• Was the GNAV20 left in an environment that was too hot or too cold? This navigation system is
designed to operate between +40 degrees and +112 degrees Fahrenheit. When starting the
GNAV20 in very cold or very hot weather, you may have to use the vehicles heater or airconditioner to bring the temperature into the proper range.
The GNAV20 Does Not Recognize an Address
• Sometimes a new street is constructed after the map database has been updated. Also, some rural
areas and small towns are not detailed, and only major intersections are listed. Try navigating to
a major intersection near the address.
The GNAV20 Does Not Recognize an Place Name
• This typically happens with restaurants, as every year many restaurants either go out of business
or change names. If the GNAV20 does not recognize the place name, try using the address
instead.
36
Page 19

CHAPTER 14 – SAFETY INFORMATION
Safety Information:
1. The Customer is solely responsible for: (a) compliance with all applicable (i) traffic regulations,
restrictions and road conditions and (ii) FCC regulations (including, without limitation Part 15
regulations), (b) evaluating the road conditions, hazards and suitability o f any route for travel, (c)
operating the vehicle in a safe manner, (d) eliminating distractions and maintaining safe driving
practices and (e) placing, securing and/or mounting the Product (i) to avoid interference with vehicle
controls and safety devices, (ii) eliminate obstructions to the driver’s surveillance of road conditions
and (iii) prevent personal injury and property damage in the event of an accident. Do not place,
secure and/or mount the Product on or near any vehicle airbag to avoid serious injury to the driver or
passenger in the event of airbag deployment.
2. FAMILIARIZE YOURSELF WITH THE USER MANUAL, INSTALLATION, OPERATION AND
CONTROLS OF THE PRODUCT BEFORE YOU START TO DRIVE THE VEHICLE. DO NOT
OPERATE THE CONTROLS OF THE PRODUCT WHILE YOU ARE DRIVING. PAY FULL
ATTENTION TO THE OPERATION OF THE VEHICLE AND ROAD CONDITIONS WHILE
THE VEHICLE IS IN MOTION TO AVOID ACCIDENT, COLLISION, PERSONAL INJURY OR
PROPERTY DAMAGE.
3. Goodmans does not warrant or represent that the use of the Product will be uninterrupted or error-free,
or that the Product will satisfy all of the Customer's needs or requirements or that errors in
programming related to the Product’s software (including, without limitation, the map data) will be
corrected.
37
4. Goodmans does not warrant or represent that any indicated route for travel complies with existing
traffic or other applicable restrictions or is suitable for travel by the Customer. The map information
provided to you by the Product is subject to change and may be inaccurate or incomplete. In no event
is the map information and the information provided to you by the Product intended to su percede
compliance with applicable traffic regulations, restrictions and road conditions.
5. The Product's performance is limited by, among other things, the accuracy and detail of the most
recent map data at the time of publication of the map, the noise level and other conditions under
which the Products are operated, and the Customer's correct use of the Products.
38
Page 20

CHAPTER 15 – MAP UPDATE INFORMATION
Map Update:
The Electronic Map is updated periodically but no less than once every twelve months. Updated maps can
be purchased from Pronounced Technologies (Map Supplier). Ordering information can be found at the
web site www.pronounced.com
or by calling +1-626-599-2205.
Maps for other European Countries:
Maps for other European Countries can also be purchased from the Pronounced Technologies web sit,
www.pronounced.com
, or by calling +1-626-599-2205. Please check the web site for available maps.
39
 Loading...