

Page 1

GDVD83W2LCD
Goodmans Product Information Helpline
0870-873-0080
Portable DVD Player
with Remote Control
Quick Guide
82-154-00820
Page 2

Quick Guide
Package Contents
1.DC Adapter 4.Battery
2.Car-cigarette-lighter Adapter 5.Remote Control
3.AV-SCART Cable
Getting to Know Your Portable DVD Player
SIDE PANEL
1234567
1. Volume Control
2. headphone socket
3. headphone socket
4. Coaxial output socket (DIGITAL AUDIO)
5. AV out/AV in switch
6. Audio output/input socket
7. Video output/input socket
2
Page 3

Getting to Know Your Portable DVD Player-continued
FRONT VIEW
1
2
3
4
5
6
7
8
9
10
11
12
12
13 14
1. LCD screen 2. LCD button
3. SETUP button 4. INFO. button
5. MENU button 6. PAUSE/UP button
7. F.FWD/RIGHT button 8. PLAY/SEL. button
9. STOP/DOWN button 10. NEXT button
11. PREVIOUS button 12. SPEAKERS
13. F.BWD/LEFT button 14. OPEN button
3
Page 4

BATTERY INSTALLATION FOR THE REMOTE
CONTROL
Insert the battery and match the (+) and (-) on battery to the marks inside
the battery compartment.
First-time use:
Remember to remove the insulating Mylon
strip from the battery compartment.
CR2025
+
+
OPEN
PUSH
Notes:
1. If the remote control unit fails to work even when it is operated near
the player, replace the battery.
2. Use a 3V lithium battery. (CR2025)
4
Page 5

Quick Operation Guide
STEP 1. Connect it to Power (A)
Connect the supplied adapter to the DC IN socket on the left side of the
portable DVD player.
(A)
STEP 2. Connect headphones.
(B)
STEP 3. Open the display panel. (C)
(C)
5
Page 6

STEP 4. Move POWER switch to the ON position to turn on the
portable DVD player. (D)
(D)
STEP 5. Press OPEN button to open the DVD Door. (E)
(E)
STEP 6. Gently hold the edge of the disc, then place it in the
centre and push gently until the disc is securely located
with the printed side up.
STEP 7. Close the DVD Door.
STEP 8. Press PLAY/SEL. to play the disc.
6
Page 7

Using the Battery Pack
Battery charge
Battery release
button
DC IN jack
Before using the battery pack, make sure to charge it. You can charge the
battery pack directly or charge it while the battery pack attached to this
Portable DVD player.
Note: Battery will NOT change while using the unit.
A. CHARGE THE BATTERY PACK DIRECTLY
STEP 1. Connect the AC adapter(12V, 1.25A) to the DC IN socket on the
left side of the battery pack and a mains power socket. (as
shown in figure (A))
indicator
Battery
connectors
STEP 2. The battery charge indicator will turn red and start charging.
STEP 3. When the battery pack is fully charged, the battery charge
indicator will turn green.
Note:
1. Because of the characteristics of the battery, when the battery charge
indicator turns green the battery pack is not necessarily fully charged. Please
continue charging the battery pack for another hour.
2. The total charge time for the battery pack is approximately 3.5 hours.
3. When the battery pack is fully charged, (depending on use) it will last for
approximately 2.5 hours.
(A)
DC IN jack
7
Page 8
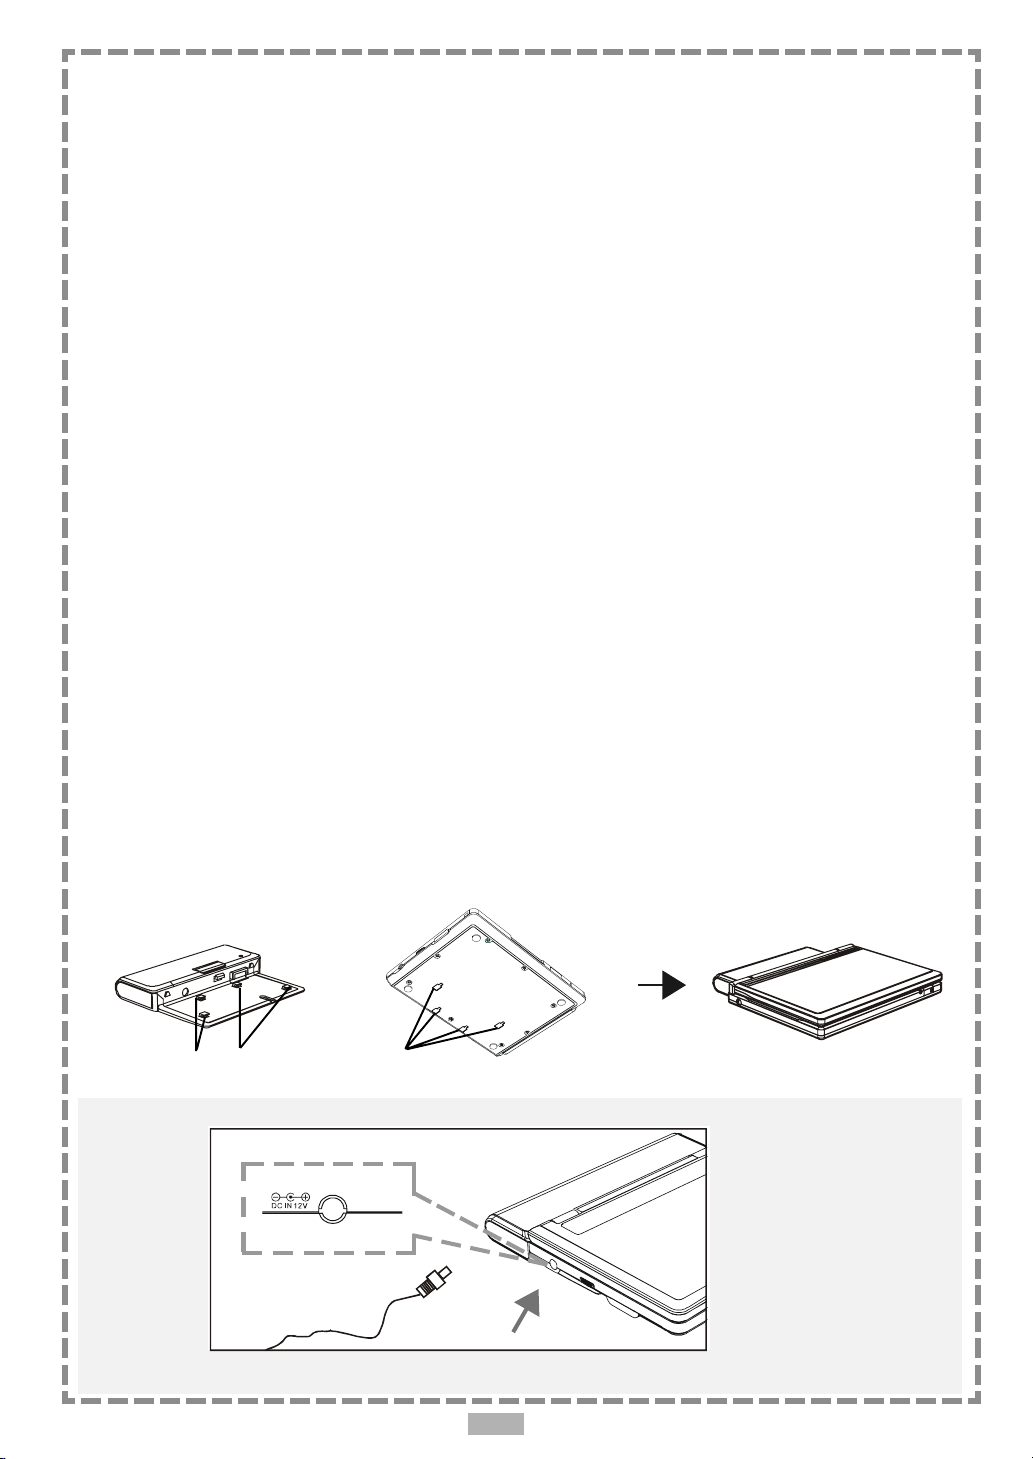
B. CHARGE THE BATTERY PACK WHILE THE
BATTERY PACK ATTACHED TO THE PORTABLE
DVD PLAYER
STEP 1. Please align this portable DVD player’s battery connectors with
the battery pack’s battery connectors. Then attach the battery
pack to this portable DVD player. (as shown in figure (B))
Note:
1. Please turn Power off when attaching or removing the battery pack.
2. If you want to remove the battery pack, press battery release button, then
slowly remove it from the portable DVD player by sliding it carefully away from
the player.
STEP 2. Connect the AC adapter(12V, 1.25A) to the DC IN socket on the
left side of this portable DVD player and a household power
outlet. (as shown in figure (C) shown)
STEP 3. Battery charge indicator will turn red and start charging.
STEP 4. When the battery is fully charged, the indicator will turn
green.
Note:
1. The battery pack is not charged while this portable DVD player is turned on.
2. Please use the specific power adapter (12V, 1.25A) to charge the battery pack.
(B)
(C)
Plastic guide
Guide holes
8
 Loading...